Hull and Deck Integrity - Antrim Design and Deck Integrity Pacific Offshore Academy by Jim Antrim,...
30
Hull and Deck Integrity Pacific Offshore Academy by Jim Antrim, N.A. Antrim Associates, Naval Architects www.AntrimDesign.com Abbreviations ISAF The International Sailing Federation http://www.sailing.org/ This is the source of the RRS, OSR, ERS, and many class rules. An extremely valuable resource. US Sailing http://home.ussailing.org/ U.S. Versions of the RRS and OSR add to and modify the ISAF original OSR “ISAF Offshore Special Regulations Governing Offshore Racing for Monohulls & Multihulls” Available through ISAF & US Sailing (includes US Sailing Prescriptions) OSR references in this article relate to the 2010-2011 edition RRS Racing Rules of Sailing Available through ISAF & US Sailing (includes US Sailing Prescriptions) ISO International Organization for Standardization http://www.iso.org/iso/home.html Source of the current standards for yacht structure and stability ANSI American National Standards Institute http://www.ansi.org/ Another source for the ISO standards. DNV Det Norske Veritas Norway based shipping standards organization. ABS American Bureau of Shipping U.S. based shipping standards organization. Page 1 of 30 Hull & Deck Integrity – Pacific Offshore Academy, Jim Antrim 2011
Transcript of Hull and Deck Integrity - Antrim Design and Deck Integrity Pacific Offshore Academy by Jim Antrim,...
Hull and Deck IntegrityPacific Offshore Academy
by Jim Antrim, N.A.Antrim Associates, Naval Architects
www.AntrimDesign.com
Abbreviations
ISAF The International Sailing Federation http://www.sailing.org/ This is the source of the RRS, OSR, ERS, and many class rules. An extremely valuable resource.
US Sailinghttp://home.ussailing.org/U.S. Versions of the RRS and OSR add to and modify the ISAF original
OSR “ISAF Offshore Special Regulations Governing Offshore Racing for Monohulls & Multihulls” Available through ISAF & US Sailing (includes US Sailing Prescriptions)OSR references in this article relate to the 2010-2011 edition
RRS Racing Rules of SailingAvailable through ISAF & US Sailing (includes US Sailing Prescriptions)
ISO International Organization for Standardizationhttp://www.iso.org/iso/home.htmlSource of the current standards for yacht structure and stability
ANSI American National Standards Institutehttp://www.ansi.org/Another source for the ISO standards.
DNV Det Norske VeritasNorway based shipping standards organization.
ABS American Bureau of ShippingU.S. based shipping standards organization.
Page 1 of 30 Hull & Deck Integrity – Pacific Offshore Academy, Jim Antrim 2011
Lloyd's Lloyd's Register of ShippingGreat Britain based shipping standards organization.
ORR Offshore Racing Rulehttp://www.offshorerace.org/ORR developed from Americap, which developed from IMS (InternationalMeasurement System), which developed from MHS (Measurement Handicap System). All of them are based on performance prediction from the same VPP (Velocity Prediction Program), which has gradually evolved since the mid seventies.
AVS Angle of Vanishing Stability. The heel angle where the righting arm goes to zero, typically in the 105 to 135 degree range. If the boat heels to a lower angle you can expect it to self-right. If a greater angle, it will turn turtle.
LPS Limit of Positive Stability. The same as AVS. LPS is the ORR term.
SI Stability Index. ORR modifies LPS based on length of boat and beam to length ratio to derive SI. The length and beam modifying factors were empirically developed following the 1979 Fastnet Race disaster.
SST A “Self Survey Tip” in this article
Definitions for some of the less well known terms used
scantlings: The dimensions of structural elements used in shipbuilding, the collective dimensions of the various parts, particularly the framing and structural supports.
sea cock: A valve in the hull that protects the plumbing pipes from water from outside the vessel.
downflooding point: An opening that allows the entry of seawater into the hull or superstructure of an undamaged vessel due to heel, trim, or submergence of the vessel. An opening capable of flooding the hullthat can't be made watertight, or might be left open by the crew.
hawse hole: An opening in the hull, through which anchor chains or mooring lines (“hawsers”) are run. Note hawse holes are not usually a downflood point, since they are not usually open to the hull interior.
Page 2 of 30 Hull & Deck Integrity – Pacific Offshore Academy, Jim Antrim 2011
Overview
Hull and structure is a broad subject. Many of the points touched upon in thisarticle deserve a class of their own, and may get one as the subject matter of thePacific Offshore Academy begins to expand.
The first question you may ask is what type of boat is best suited for an extendedoffshore voyage? The short answer is – the boat that you own, or can afford.Well, OK. People have crossed oceans in all manner of crazy craft; boats of allsizes and descriptions. Dugout canoes, boats made of leather, logs, or plasticbottles; and those were some of the smarter ones. Many of them even made it tothe other side. Perhaps a better question – what qualities should a boat have sothat the voyage will be one of enjoyment, rather than a fight for survival? In mostcases the answer lies in preparation.
First Premise
Here is a summation of this entire article: Keep the water outside the boat. Thiscomment may seem facetious; but it is not. Rather it deserves treatment as amantra, to be repeated over and over as you prepare your boat for the voyage.Keep the water out of the boat; keep the water out of the boat.
A professor of naval architecture once criticized me for referring to a boat as a“vessel”. The professor shall remain nameless. Let's call him 'Randy Paulling'.'Randy' told me, “a vessel is for holding the water in. A boat holds the water out.”In my defense, the US Coast Guard calls them vessels consistently; but nomatter your semantics, one thing we all can agree on – we want the ocean tostay outside the boat. Think about it. If you accomplish this simple goal, your boatwill remain afloat – you are safe; your clothes, bedding, and food will remain dry– you are comfortable. Safe and comfortable equals happy. Missionaccomplished. Keep the water outside the boat.
The Big PictureIn the big picture view there are three areas of concern to identify a seaworthyhull:1 Hull Structure. Is the boat strong enough?
2 Stability. Is the boat stable enough? Does it have enough righting momentto recover from a severe knockdown?
3 Attachments and penetrations. Are all the fittings, joints, through hulls and openings properly mounted and sealed?
Page 3 of 30 Hull & Deck Integrity – Pacific Offshore Academy, Jim Antrim 2011
For the most part, points 1 and 2 above are determined by the designer beforeyou get the boat. Once the boat is built you don't have much control over thoseaspects. Nevertheless, some information and knowledge will be helpful; so youcan at least begin to ask the right questions. Point 3 – attachments andpenetrations – that is the meat of this article and the focal point of your boatpreparation.
The bible for much of this is the “ISAF Offshore Special Regulations GoverningOffshore Racing for Monohulls & Multihulls” (OSR). This is a booklet that hasbeen around for decades and is re-issued every two years. If you are preparingfor a Pacific Cup, you will hear too much about this booklet and will grow to hateit. Rule of thumb - If you don't hate it yet, you haven't reviewed it thoroughlyenough. Even if you are not doing a race it is an excellent resource for anysailboat. If you are a cruiser, please ignore “regulations” and “racing” in the title.Read the book. In its sometimes clumsy way, it is full of good advice andwisdom.
Two final points that need emphasis here – maintenance and inspection. A dirtybilge, or a locker that hasn't been emptied in years may hide a developingstructural problem. A rudder that hasn't been pulled for inspection recently mayhave bad bearings or a corroded post. One corroded hose clamp can sink yourboat. Keep everything clean, accessible, and in good working order.
Hull structure
Yacht designers and naval architects are conscientious people. As I write this, Ipersonally have been in the yacht design profession for 40 years, and I can'tthink of a single designer who would not fit that description. We may come from awide variety of backgrounds and different levels and styles of education; but weall want our boats to survive their intended purpose. We want the sailors to get tothe other side of the pond safely. That being said, there is close to zeroregulation on yacht structures in the U.S., although that picture is graduallychanging. Until very recently, what regulation there was generally applied only toracing boats.
Structural Regulations and Guidelines -A brief history
(You may skip this history section. It will not be on the quiz.)In the Western world there are three big organizations involved in structuralregulations for merchant ships: Lloyd's, DNV, and ABS. (see the Abbreviationssection). Each of them has dabbled in the pleasure boat world from time to time. Ithink they view it as a happy diversion, kind of like a coal miner coming home to
Page 4 of 30 Hull & Deck Integrity – Pacific Offshore Academy, Jim Antrim 2011
play with his son's Tonka trunk in the sand box. In the seventies, when CarlSchumacher and I were both working for Gary Mull, references on how toengineer a sailboat were limited and scattered. Lloyd's had an early version outof their rules for fiberglass boats, but the early version was close to worthlessand essentially assumed everything was built out of chopped strand mat. Therewere ancient guidelines in the U.S. by Nevins and Herreschoff, basically seat ofthe pants guidelines for the structure of wooden boats; there were rules forbuilding 12 meters and the like. Gary got the idea of unifying the guidelines thatwere out there. 'Let's take the various guidelines, input the known materialproperties, and reverse engineer to find the loads that were implied. Mix in somecommon sense and logic. Derive a new book based on engineering formulas thatwould work for any construction material.' It was a brilliant and far-sighted idea;and Gary led the charge to implement it. This effort led to the ABS “Guide forBuilding and Classing Offshore Racing Yachts”, first published in 1981, anexcellent booklet. I have been engineering boats to it ever since. For a few years,race organizations were trying to force plan approval through ABS. It was anexpensive and rather annoying process for designers and owners, and it wasn'tlong before ABS shut the program down and got out of the yacht review process.The guide, however, was still widely used.
Recently, driven by European regulations, ISO has gotten deeply involved in theyacht structure and regulation game. The current edition of the OSR has droppedthe ABS guide entirely and now refers only to the new ISO regulations, asdiscussed below. The good news is that the ISO regulations are also very goodand the scantlings derived are generally very similar to those from ABS. The badnews is that plan approval has once again reared its ugly head; and so far is justas expensive and annoying as the ABS system.
Current Structural Requirements
OSR paragraph 3.03 “Hull Construction Standards (Scantlings)” points you to theapplicable standards that a designer should use to engineer your boat'sstructure. In 2010 this paragraph changed so that all monohulls built from 2010onward doing an ocean race (Category 0, 1, or 2) must be engineered and builtto ISO 12215 Category A. (Note: ISO 8666 - also referenced in this section - justdefines how critical dimensions referred to are measured. Essentially it defineshow things like length, beam, and displacement are to be measured so there isconsistency when the terms are used in ISO 12215.)
ISO 12215 is a rather rigorous and technical cookbook that defines the loads andformulas used to engineer a boat. The ISO standards were developed in Europeover the past few years; and boats built in Europe are required to meet thestandards. It is conceptually similar to its ABS predecessor. In my experience
Page 5 of 30 Hull & Deck Integrity – Pacific Offshore Academy, Jim Antrim 2011

scantlings determined using the ISO regulations are nearly identical to thosefrom ABS; but it is slightly more rigorous in some areas.
Evaluating Boat Structure – What Can You Do?
If your boat is new you will want to put it through its paces, sail it hard upwindand down in the biggest waves you can find. Don't make a trans-oceanic voyageyour first real test of the structure. San Francisco is a great testing ground. It'snot uncommon for a boat to sail a few years in Southern California withoutissues; and then start breaking things as soon as they sail in San Francisco.They may also discover deck hardware leaks that never revealed themselvesbefore.
If you have an older boat the teething problems are probably long gone – unlessthe boat has lived a comfortable life on the farm and never been to the racetrack.Older boat concerns will be decay, fatigue, and damage caused by accidentssuch as groundings.
Survey It Yourself
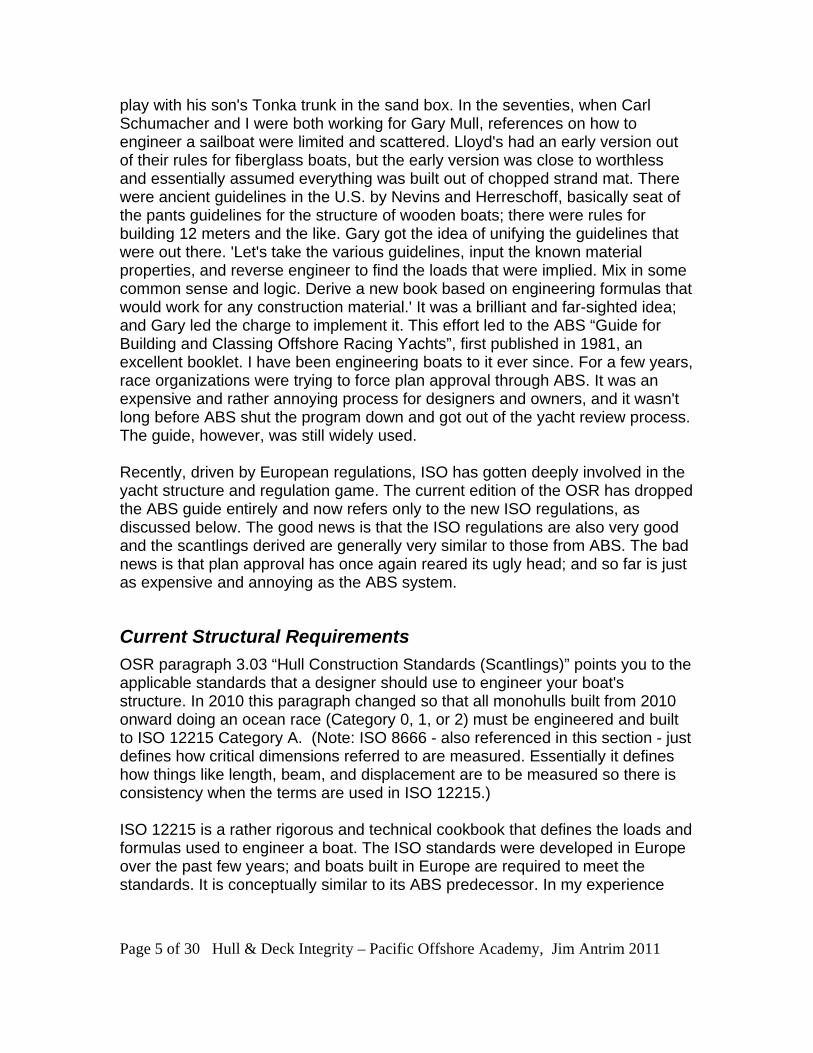
Conducting a self survey is a useful exercise for any boat owner. The first placeto look for problems are high load areas – chainplates, mast step, keel andrudder attachments, big deck hardware. Also common problem areas are corners– for example: hatch cutouts, or the corners where the house meets the deck.What are you looking for? Corrosion, discoloration, cracks, lifted paint. Fatigue infiberglass or metals is usually revealed by very fine cracks, often roughly parallelor radiating from a corner. Stress cracks caused by a collision or overload lookvery much like fatigue cracks. Lifted paint often conceals a structural problem.
Hairline fatigue and stress cracks -microcracks - generally start in the surfacelayers. Fairing compounds are resin mixed with filler, as is gelcoat. All of thesefilled resins are more brittle than the structural layers underneath, which typicallyare resin reinforced with fiberglass, carbon, or aramid. Fillers that are easy tosand are generally the most brittle, while structural fillers like West Systems 404High-Density are much stronger, less brittle, and much harder to fair. Sincegelcoat and fairing layers are always at or near the surface and are more brittle,they crack much more easily than the underlying laminate. For this reason, aboat may show fatigue or stress cracks in the surface for many years without aproblem. The good news and the bad news is that the resin layers are fusedtogether. Eventually over time, cracks in the outer brittle layers will start migratinginto the structural layers.
Page 6 of 30 Hull & Deck Integrity – Pacific Offshore Academy, Jim Antrim 2011
Fatigue cracks surrounding a crack through the laminate. Often found at the corner of a cutout.
Page 7 of 30 Hull & Deck Integrity – Pacific Offshore Academy, Jim Antrim 2011
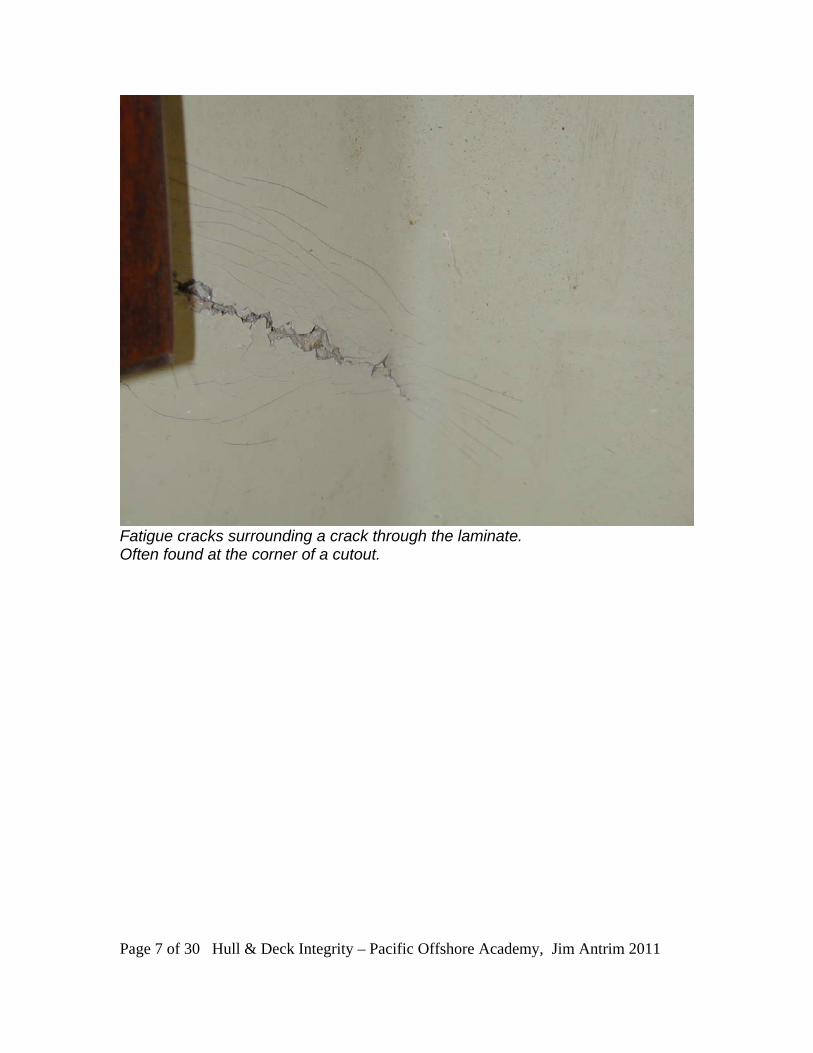
Severe fatigue cracking in a keel stub. This keel was close to falling off.
This article will be sprinkled with “Self Survey Tips”. Look for the SST symbol.When in doubt, consult a marine professional:
marine surveyor naval architect boat yard
Page 8 of 30 Hull & Deck Integrity – Pacific Offshore Academy, Jim Antrim 2011
Stability
Stability regulations for monohulls and multihulls are covered by OSRparagraphs 3.04 and 3.05 respectively. In addition, racers sailing under an ORRrating may be required to meet stability standards imposed by that rating rule.OSR 3.04 refers to ISO 12217, a relatively recent and comprehensive standard.
From a safety margin point of view, the key number relating to safety is the AVS,LPS, or SI (see abbreviations). If you are going to sea, you can expect to beknocked down. If a boat is knocked down until the masthead hits the water, thatwill be a heel angle of more than 90 degrees, about 95 degrees is typical. A boatwith an AVS of 100 has little margin left. If you have been measured under ORR,LPS and SI are printed on your rating certificate. Sometimes a sistership hasbeen measured, or was measured in the past under IMS, and that number canbe found. You naval architect is likely to have the number. Final option is to testit. This is pretty simple on a small boat, and very informative.
A major concern is whether your boat has any downflooding points (seedefinitions) that will be submerged when you are knocked down. If you havebeen laid over to 90 degrees, whether purposefully in the test noted above oraccidentally at sea, you may have noted where the waterline is with the boatlying on its side. How close is the companionway to the water? Are there anyhatches or opening ports that will be submerged? Do you have any cool below-deck control line openings that will be streaming water into the interior while youare laid on your side? If so, you better know before heading off to sea. Ideallywhen heeled to its AVS, your boat will have no downflooding points submerged.
Significantly, if your boat was not designed to race under the OSR and not sailingunder ORR, you may have no clue what margin of safety you have during aknockdown. Cruisers usually want shallow draft for better access to anchorages.Cruising boats always have more interior and deck gear, more stuff in the rigging– weight placed high in the boat. In contrast, modern race boats often have verydeep draft and bulb keels – a low center of gravity. Ironically, racing boats areoften much safer than cruising boats when it comes to high heel angle stability.They are certainly more likely to know where the limit is.
Page 9 of 30 Hull & Deck Integrity – Pacific Offshore Academy, Jim Antrim 2011
Attachments and Penetrations
Let me start by describing the boat building process. Yacht construction is athree step process that goes something like this:
Step 1 Build a strong, watertight, monocoque hull and deck shell.
Step 2 Drill hundreds of holes through the shell.
Step 3 On Friday afternoon, fasten a bunch of stuff in the holes.
Now, even if it is Friday afternoon when you read this and you've had a couple ofbeers, you may notice that steps 2 and 3 are somewhat at odds with our firstpremise, “Keep the water out of the boat”.
Let's look at the shell penetrations you are likely to have. We'll examine somekey areas of structural concern and methods to prevent leaks, and identifyrelated paragraphs in the OSR where applicable. (Depending on race categoryand whether you have a monohull or multihull, not all of the OSR references mayapply to you.)
Hull Penetrations Deck Penetrations
Rudder Mast partners & stepKeel ChainplatesThrough Hulls Hull/Deck jointEngine & generator exhaust CompanionwayStrut drive Hatches & PortsPropeller shaft VentsCockpit drains Tank fills and tank ventsBowsprit Deck hardwareKelp Cutters Control lines openings
Anchor lockers & hawse holes
That's a lot of holes!
Page 10 of 30 Hull & Deck Integrity – Pacific Offshore Academy, Jim Antrim 2011
The fitting or device will be attached to the hull in a manner fitting one of thesecategories. These attachment type descriptions are specifically coined for thisarticle. This is not industry slang.
Type PC Permanently Closed. The original penetration isstructurally unified with the hull and or deck; orenclosed in a surrounding structure that is structurallyunified, e.g. a tube fiberglassed or welded to the hulland/or deck. Leaks are not possible unless somethingbreaks.
Type F Fastened, directly attached. The fitting is attached tothe shell directly, usually with fasteners, and relies onsealant to keep the water out. Chainplates, deckhardware, through hulls would normally fit thiscategory. If the fasteners hold and the sealant is goodit will not leak.
Type HC Hose Clamped. The fitting relies on hose clamps andhose to hold it in place and keep the water out. Theflexibility afforded by a hose mounting is essential forstuffing boxes and most mechanical seals to workproperly.
Type MS Mechanically Sealed. This includes things like stuffingboxes, O-ring seals, and carbon face seals.
Type FS Flexible Sealed. A bellows or other soft or flexible sealenclosure.
Type O Open, or not truly watertight. This is a downfloodingpoint.
Page 11 of 30 Hull & Deck Integrity – Pacific Offshore Academy, Jim Antrim 2011
Rudder (OSR 3.13.6, 4.15.1)
It goes without saying that a rudder is a key component of your boat. Believe me,you will miss it when it's gone. Rudders, steering systems, and emergencysteering options are big topics deserving a chapter on their own. The focus of thisarticle is on how rudders are hung, attached to, and supported by the hull. Butwhile we are on the subject, let me just say this – rudder problems are the mostcommon failures in a race to Hawaii. Your rudder will experience higher loads inthe ocean than in the Bay and will be working continuously for days on end. Bigwaves and big spinnakers work a rudder hard. An emergency steering system isa poor substitute for your primary rudder. If your rudder hasn't been pulled forinspection in the past three years – pull it now, while you still have time to correcta problem. If there is doubt about anything: evidence of a crack starting, slightlyworn bearing, doubt about whether the rudder supports are adequately braced –fix it. The sea will have no mercy.
SST You can detect many rudder problems by just horsing the rudder around ina boatyard. Grab the base of the rudder and yank it back and forth as hard asyou can. Worn rudder bearings and sometimes structural defects can bedetected this way. Rudders develop thousands of pounds of force. You can'tbreak it by hand. Just be careful not to pull your boat off the jack-stands.
Rudders that are hung underneath the hull, as opposed to being mounted on thetransom or in a cassette, have two different methods of sealing the rudder postpenetration. On many small, tiller steered boats there is a tube enclosing therudder post. The tube is continuous and watertight from hull to deck. (Type PCseal). This method has obvious advantages in avoiding leaks. There is noopening into the hull. Furthermore that tube is helpful in connecting the hullstructurally to the deck – more on that later.
On boats that have wheel steering or an under-deck autopilot, a continuousenclosure tube is not possible because the steering quadrant and autopilot tillerneed to be mounted to the post between hull and deck. This system requires amethod to seal the top of the hull tube. Various methods include:
stuffing box (the traditional solution) shaft seal http://www.tidesmarine.com/rudder-seal-i.shtml watertight bearings flexible bellows
Page 12 of 30 Hull & Deck Integrity – Pacific Offshore Academy, Jim Antrim 2011
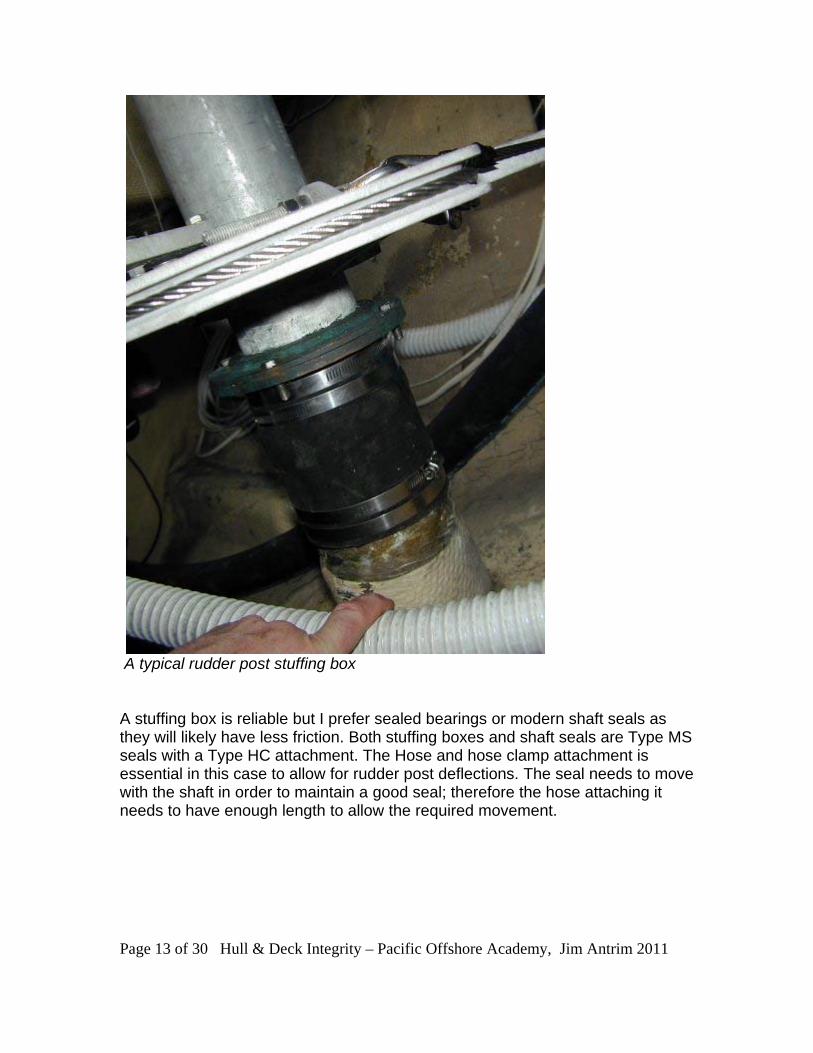
A typical rudder post stuffing box
A stuffing box is reliable but I prefer sealed bearings or modern shaft seals asthey will likely have less friction. Both stuffing boxes and shaft seals are Type MSseals with a Type HC attachment. The Hose and hose clamp attachment isessential in this case to allow for rudder post deflections. The seal needs to movewith the shaft in order to maintain a good seal; therefore the hose attaching itneeds to have enough length to allow the required movement.
Page 13 of 30 Hull & Deck Integrity – Pacific Offshore Academy, Jim Antrim 2011
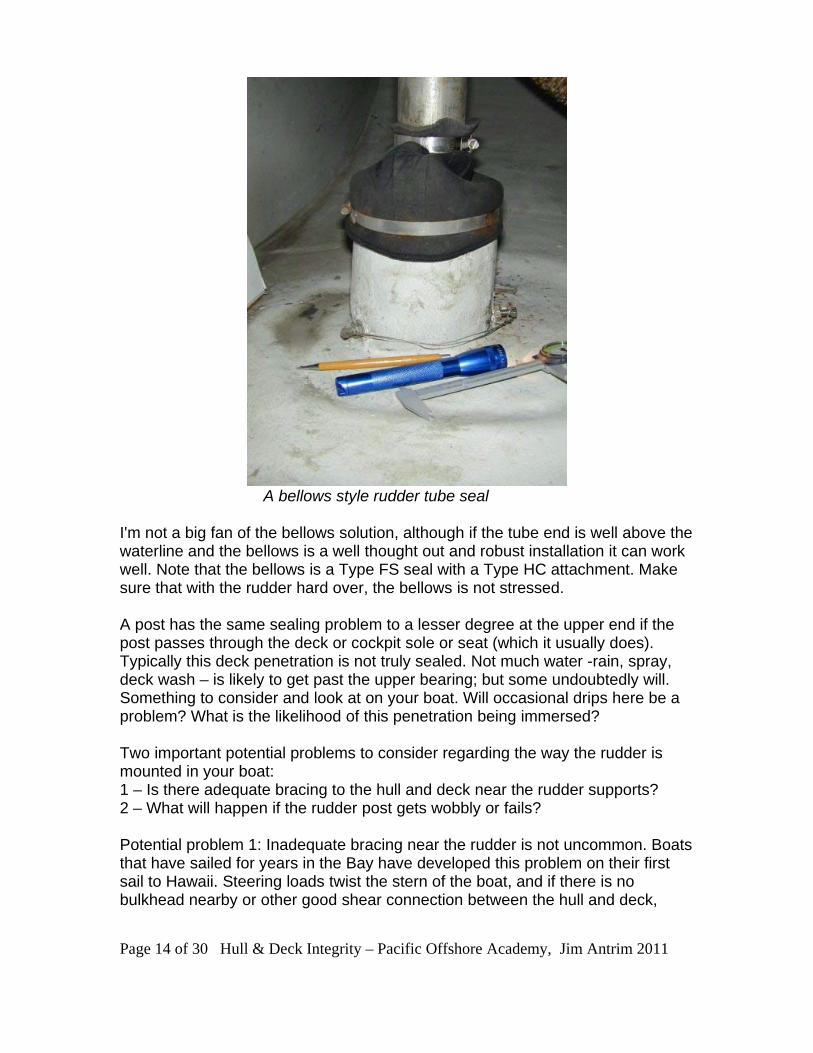
A bellows style rudder tube seal
I'm not a big fan of the bellows solution, although if the tube end is well above thewaterline and the bellows is a well thought out and robust installation it can workwell. Note that the bellows is a Type FS seal with a Type HC attachment. Makesure that with the rudder hard over, the bellows is not stressed.
A post has the same sealing problem to a lesser degree at the upper end if thepost passes through the deck or cockpit sole or seat (which it usually does).Typically this deck penetration is not truly sealed. Not much water -rain, spray,deck wash – is likely to get past the upper bearing; but some undoubtedly will.Something to consider and look at on your boat. Will occasional drips here be aproblem? What is the likelihood of this penetration being immersed?
Two important potential problems to consider regarding the way the rudder ismounted in your boat:1 – Is there adequate bracing to the hull and deck near the rudder supports?2 – What will happen if the rudder post gets wobbly or fails?
Potential problem 1: Inadequate bracing near the rudder is not uncommon. Boatsthat have sailed for years in the Bay have developed this problem on their firstsail to Hawaii. Steering loads twist the stern of the boat, and if there is nobulkhead nearby or other good shear connection between the hull and deck,
Page 14 of 30 Hull & Deck Integrity – Pacific Offshore Academy, Jim Antrim 2011
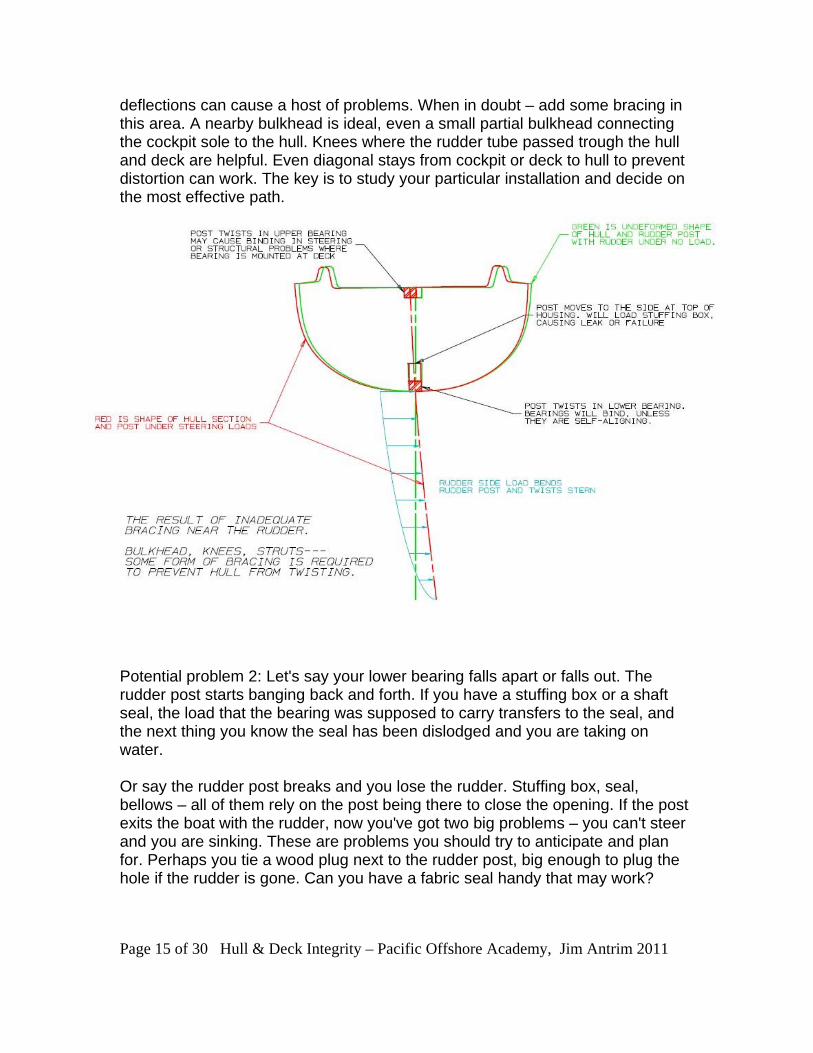
deflections can cause a host of problems. When in doubt – add some bracing inthis area. A nearby bulkhead is ideal, even a small partial bulkhead connectingthe cockpit sole to the hull. Knees where the rudder tube passed trough the hulland deck are helpful. Even diagonal stays from cockpit or deck to hull to preventdistortion can work. The key is to study your particular installation and decide onthe most effective path.
Potential problem 2: Let's say your lower bearing falls apart or falls out. Therudder post starts banging back and forth. If you have a stuffing box or a shaftseal, the load that the bearing was supposed to carry transfers to the seal, andthe next thing you know the seal has been dislodged and you are taking onwater.
Or say the rudder post breaks and you lose the rudder. Stuffing box, seal,bellows – all of them rely on the post being there to close the opening. If the postexits the boat with the rudder, now you've got two big problems – you can't steerand you are sinking. These are problems you should try to anticipate and planfor. Perhaps you tie a wood plug next to the rudder post, big enough to plug thehole if the rudder is gone. Can you have a fabric seal handy that may work?
Page 15 of 30 Hull & Deck Integrity – Pacific Offshore Academy, Jim Antrim 2011
Skeg hung rudders are not without the potential for problems. Certainly they areat least as likely as spade rudders to have worn bearings or corroded fittings orposts. While the skeg does reduce the load on the rudder post significantly, thisjust means the post will be smaller, not necessarily less likely to break. If you dohave a skeg rudder, check for fatigue cracks in the hull and skeg near the top ofthe skeg and near the bearings. This is not a common concern but is worthlooking for.
Keel (OSR 3.02.3 (relates to canting keels only))
Like most of the hull structure, keel attachments are an area where you have tohave faith. Unless there are indications of a problem you are probably safe toassume it was properly engineered and built. But before you know if there areindications of a problem, remember the key words: maintenance and inspection.If your bilge is full of dirt, oil, hair, and muck, you can't even answer thesequestions:
Are the keel bolts and nuts clean and in good condition? Is anything leaking? Hairline cracks or detached bond in the keel floors, or in nearby hull or
interior molded parts? Problems such as this often show up above thetrailing edge of a keel after a grounding, or anywhere in the bilge near thekeel if the structure is getting tired or was poorly designed or built.
If you have corroded bolts, mysterious leaks, cracks and/or failed bonds near thekeel - consult a professional.
Page 16 of 30 Hull & Deck Integrity – Pacific Offshore Academy, Jim Antrim 2011
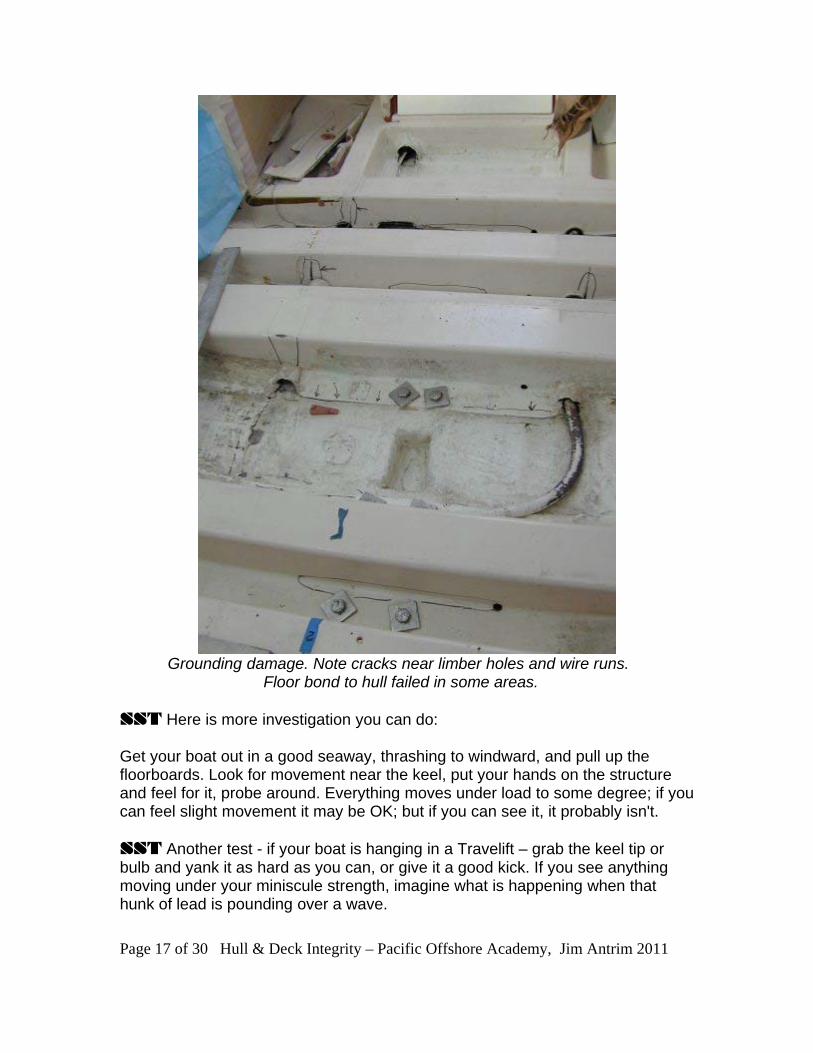
Grounding damage. Note cracks near limber holes and wire runs. Floor bond to hull failed in some areas.
SST Here is more investigation you can do:
Get your boat out in a good seaway, thrashing to windward, and pull up thefloorboards. Look for movement near the keel, put your hands on the structureand feel for it, probe around. Everything moves under load to some degree; if youcan feel slight movement it may be OK; but if you can see it, it probably isn't.
SST Another test - if your boat is hanging in a Travelift – grab the keel tip orbulb and yank it as hard as you can, or give it a good kick. If you see anythingmoving under your miniscule strength, imagine what is happening when thathunk of lead is pounding over a wave.
Page 17 of 30 Hull & Deck Integrity – Pacific Offshore Academy, Jim Antrim 2011
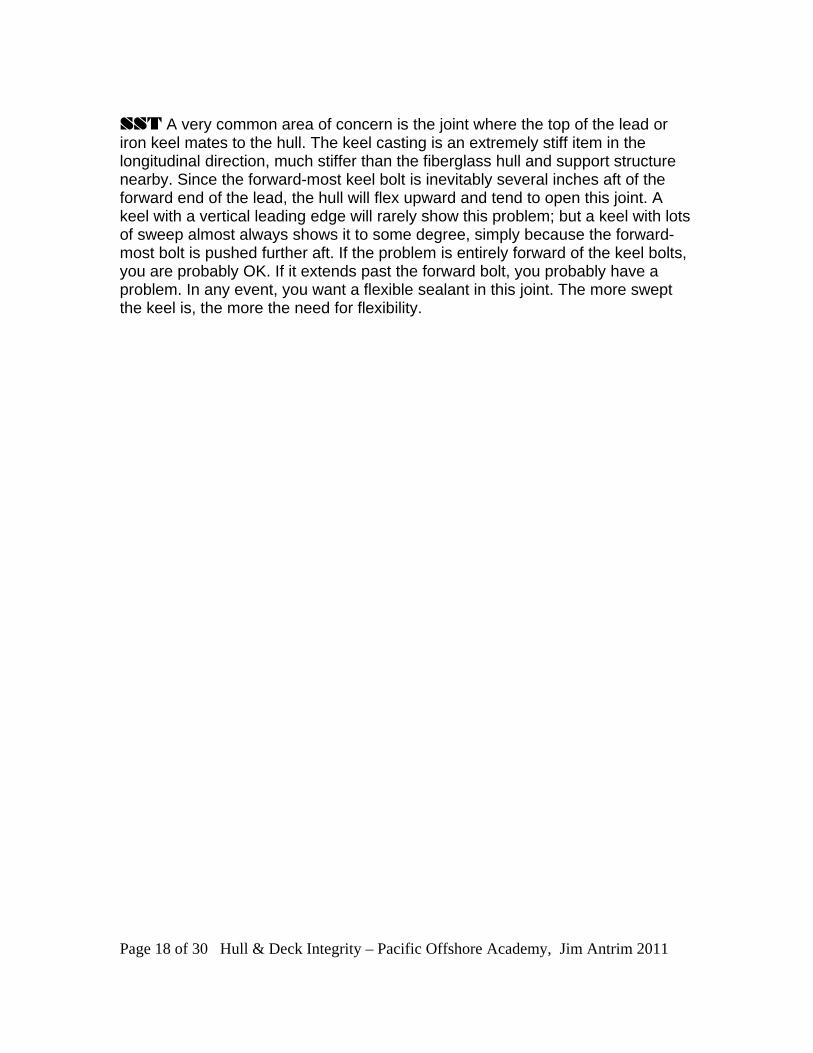
SST A very common area of concern is the joint where the top of the lead oriron keel mates to the hull. The keel casting is an extremely stiff item in thelongitudinal direction, much stiffer than the fiberglass hull and support structurenearby. Since the forward-most keel bolt is inevitably several inches aft of theforward end of the lead, the hull will flex upward and tend to open this joint. Akeel with a vertical leading edge will rarely show this problem; but a keel with lotsof sweep almost always shows it to some degree, simply because the forward-most bolt is pushed further aft. If the problem is entirely forward of the keel bolts,you are probably OK. If it extends past the forward bolt, you probably have aproblem. In any event, you want a flexible sealant in this joint. The more sweptthe keel is, the more the need for flexibility.
Page 18 of 30 Hull & Deck Integrity – Pacific Offshore Academy, Jim Antrim 2011
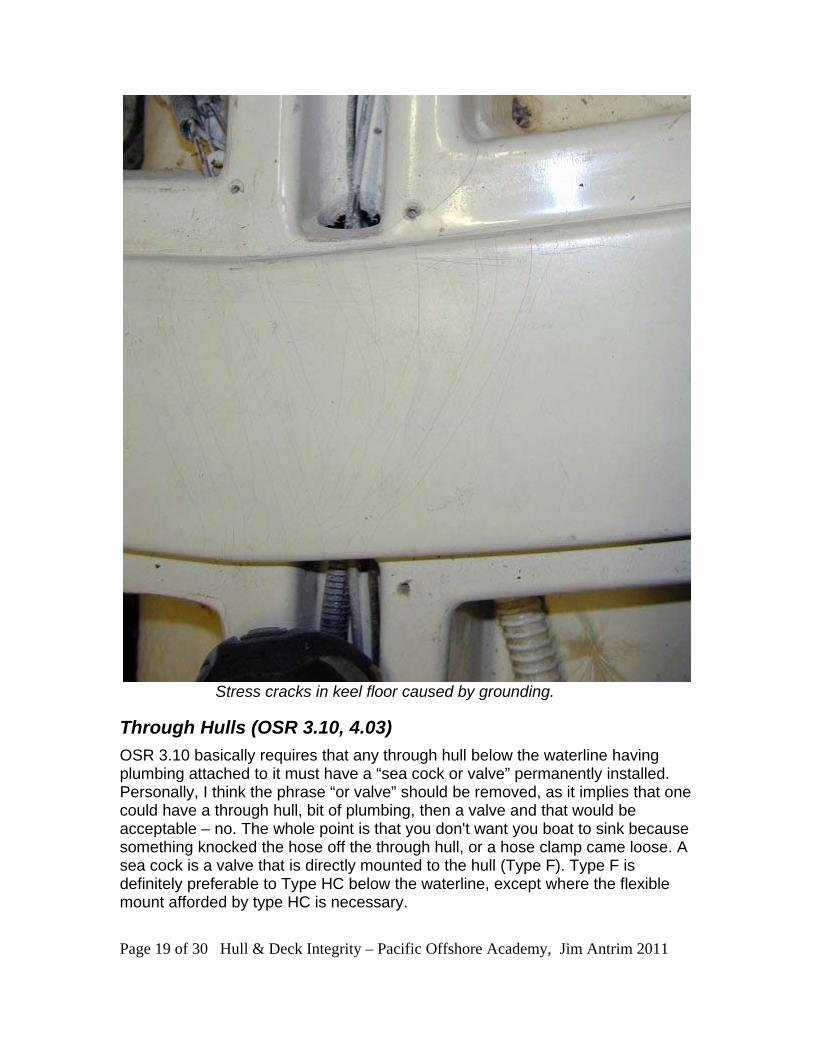
Stress cracks in keel floor caused by grounding.
Through Hulls (OSR 3.10, 4.03)
OSR 3.10 basically requires that any through hull below the waterline havingplumbing attached to it must have a “sea cock or valve” permanently installed.Personally, I think the phrase “or valve” should be removed, as it implies that onecould have a through hull, bit of plumbing, then a valve and that would beacceptable – no. The whole point is that you don't want you boat to sink becausesomething knocked the hose off the through hull, or a hose clamp came loose. Asea cock is a valve that is directly mounted to the hull (Type F). Type F isdefinitely preferable to Type HC below the waterline, except where the flexiblemount afforded by type HC is necessary.
Page 19 of 30 Hull & Deck Integrity – Pacific Offshore Academy, Jim Antrim 2011
There is some dispute on what kind of sea cocks are advisable. For USCGinspected “vessels” (sorry Randy), plastic sea cocks are not allowed. USCGreasoning – if you have a fire, you don't want your sea cocks to melt. Pretty hardto argue with that. Here's the argument: Few boats have sunk because firesmelted their through hulls; more have sunk because electrolysis has made thethrough hulls fall apart, or corrosion has prevented sea cocks from closing. Myown preference is for plastic sea cocks. I recommend Forespar Marelon; andparticularly favor their “FlowTech” sea cocks which have a totally flush surfacewith the hull when closed. If you have metal sea cocks, make sure they arebronze, in good condition, and your electrical system is properly protected fromgalvanic corrosion.
Engine & generator exhaust
Almost all marine exhaust systems are “wet exhaust”, which means that theengine coolant water drains through the exhaust system after cooling the engine.You need to be sure this water returns to the sea, rather than leaking into thebilge - or worse – back into the engine. And I know your boat is very fast andalways outrunning following seas; but sometimes you will be stopped. Perhapsthe mast fell down or a crew went overboard. This would be a bad time for afollowing sea to blast through your exhaust hose and into the engine. Make sureyour exhaust system flows downhill toward the exit and you have good waterlocks. Those flap covered exhaust fittings are a good idea too.
Make sure all segments of the exhaust system are strongly attached. Can theybe knocked loose by a crew crawling through the lazarette, by sail bags or otherstowage knocking something loose? Having exhaust fumes pumping into theinterior is as serious a problem as water intrusion.
Strut drive
Saildrive seals have proven to be very reliable. Does that make you nervous? Metoo. Make sure the seal looks in good condition and the zincs are replacedfrequently. Saildrives are notorious for galvanic corrosion. It's not uncommon fora power washer to blast one to pieces during a haul-out. It would be bad to haveyour saildrive fall to pieces at sea.
Propeller shaft
There are two ways to seal a propeller shaft. Both of them are Type MS held inplace by Type HC.
First is the traditional and ubiquitous shaft log or stuffing box. These are veryreliable; but like every other part you are depending upon to keep the water out,
Page 20 of 30 Hull & Deck Integrity – Pacific Offshore Academy, Jim Antrim 2011

they deserve inspection and a little care. In our section on through hulls wefrowned upon valves that were separated from the hull and attached by hose andhose clamps. Guess what? That's how the stuffing box is attached. Make surethe hose and clamps are in good shape. Double hose clamp if space allows.Occasional drips are typical for stuffing boxes; but if you are having troublegetting a good seal it may be time to replace the packing.
Typical stuffing box. This one needs a little love.
Page 21 of 30 Hull & Deck Integrity – Pacific Offshore Academy, Jim Antrim 2011

Second seal type is a “dripless shaft seal”, the most common brand being a PSS,which stands for “packless sealing system”. “Dripless” and “packless” areappealing words, and in fact these seals work very well. They do rely on hoseclamps, a perfectly smooth contact surface, and proper adjustment.
A PSS shaft seal
Type HC (hose clamp and hose) attachment is essential to both stuffing box &dripless seals to allow for movement between the propeller shaft and the hull.The engine vibrates on its mounts, the propeller shaft flexes slightly. You needan adequate length of hose to allow for this movement.
While some movement is expected you need to minimize it by keeping your drivesystem in good condition. This means a well balanced propeller, a stronglyattached strut, and cutlass bearings that are in good condition. There is nothinglike propeller shaft wobble to destroy a good shaft seal.
Final warning – and this is a big one. Like rudder post seals, propeller shaft sealsonly work when the shaft is there. It is not uncommon for a boat to sink becausethe shaft coupling was loose. The engine is thrown in reverse and the propellerand shaft propel themselves to the bottom of the sea. Now there is a perfectly
Page 22 of 30 Hull & Deck Integrity – Pacific Offshore Academy, Jim Antrim 2011
good seal with a big hole in the center. This would be another excellent place tokeep a wood plug or two in place, one matching the shaft diameter, perhaps onematching the seal diameter.
Cockpit drains (OSR 3.09.3, 3.09.8)
There are many arrangements for cockpit drains. My own preference is for anopen transom. When your cockpit fills with water you want the water to leave in ahurry. Moreover, you want it to depart into the sea, not into the boat; so anyopening into the boat that is below the edge of the cockpit is undesirable at best.More on this in the companionway section.
OSR 3.09.08 basically states that your cockpit drains must have at least the areaof two 1 inch inside diameter if you are a very old boat or are under 28 feet, or offour ¾ inch inside diameter for everyone else. They must be joking, thepranksters. This may be the only instance where the OSR may be too lax. Iwould say that your drain is not too big until you are worried about a baby fallingthrough the hole.
If your cockpit drains through a hose or pipe to the transom or hull, the bestarrangement for a fiberglass boat is to have a permanent fiberglass tube,strongly glassed in at both ends (Type PC). While this is preferable to a hose, itmay not be a good idea to retrofit your cockpit drains with a fixed tube. Oftenthere is significant movement between the cockpit and the hull while sailing. Ahose will tolerate this movement; a fixed pipe may not.
If the cockpit drains through a hose (Type HC), same warnings as elsewhere: hose in good condition double hose clamp make sure loose gear or crew groping in the dark will not knock it loose.
Bowsprit
If you have a new boat - or an old boat - you may have a bowsprit. Designers ofold boats were not foolish enough to retract the bowsprit through an open hole inthe bow (Type FS). If your boat has a bowsprit that retracts into the interior, itshould retract into a watertight casing or trunk that drains overboard. If your spritretracts into the hull with no casing and depends on a flexible seal at the bow tokeep the water out, give some thought to how quickly you will sink if that sealblows out as you are surfing down waves, or worse yet, if the sprit breaks off. Iwould make sure you have a rapidly deployable back up seal and effective planthat everyone on board is familiar with.
Page 23 of 30 Hull & Deck Integrity – Pacific Offshore Academy, Jim Antrim 2011
Kelp Cutters
Kelp cutters have become fairly common on modern racing boats with nearvertical keels. From a leak prevention point of view, there is no worse location tocut a hole in your boat than in the leading edge of a vertical keel on a high speedboat. The water pressure in a kelp cutter tube is enough to create a water spoutseveral feet above the cabin top. If that tube is open to the interior of a keel trunk,water pressure will increase the possibility of leaks around keel bolts. In anyevent you need a strong, well sealed, and well attached enclosure tube betweenthe keel and the cabin top. This tube is often central to the central living spacebelow decks and will make a fine hand hold for crew moving through the cabin. Ifthe crew can grab it, they will; and it had better be strong enough to serve as aserious grab rail.
Mast partners & step (OSR 3.12)
Mast bases are a notorious source of leaks. If you have a keel stepped mast,then by definition you have a rather large hole through your deck. That hole isdifficult to seal properly, and even if it is sealed perfectly, rain and spray will getinto the mast interior through halyard exits and leak into the boat at the maststep.
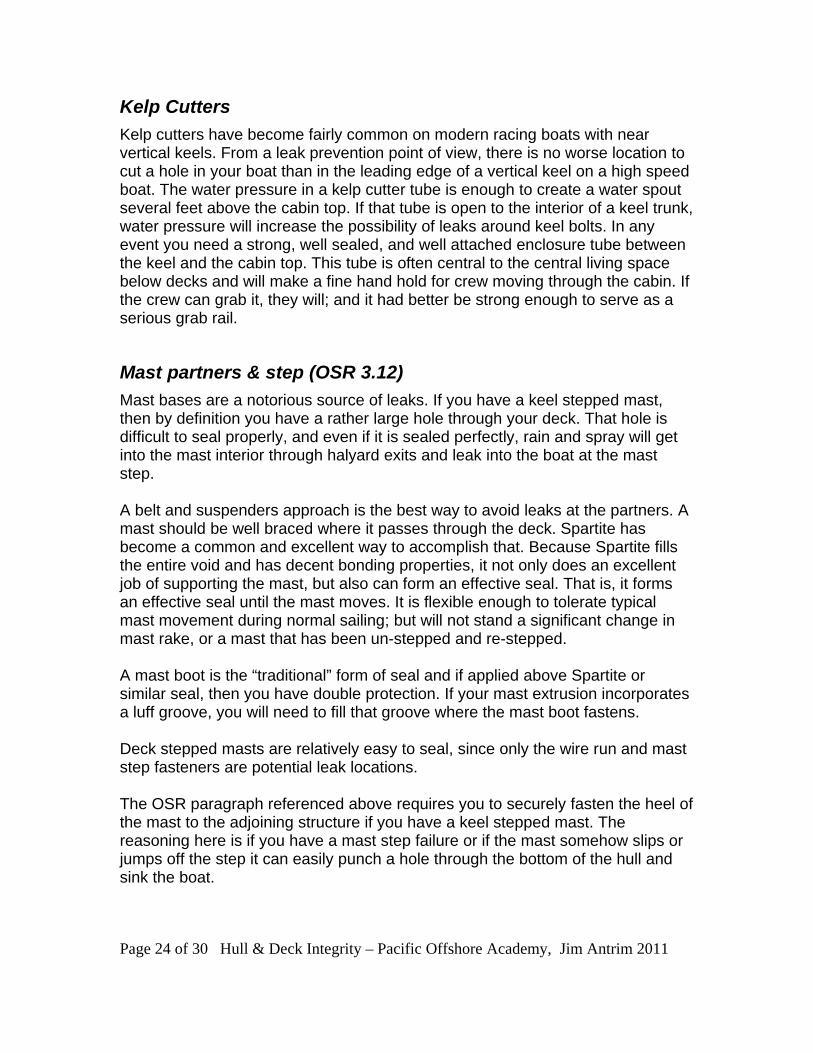
A belt and suspenders approach is the best way to avoid leaks at the partners. Amast should be well braced where it passes through the deck. Spartite hasbecome a common and excellent way to accomplish that. Because Spartite fillsthe entire void and has decent bonding properties, it not only does an excellentjob of supporting the mast, but also can form an effective seal. That is, it formsan effective seal until the mast moves. It is flexible enough to tolerate typicalmast movement during normal sailing; but will not stand a significant change inmast rake, or a mast that has been un-stepped and re-stepped.
A mast boot is the “traditional” form of seal and if applied above Spartite orsimilar seal, then you have double protection. If your mast extrusion incorporatesa luff groove, you will need to fill that groove where the mast boot fastens.
Deck stepped masts are relatively easy to seal, since only the wire run and maststep fasteners are potential leak locations.
The OSR paragraph referenced above requires you to securely fasten the heel ofthe mast to the adjoining structure if you have a keel stepped mast. Thereasoning here is if you have a mast step failure or if the mast somehow slips orjumps off the step it can easily punch a hole through the bottom of the hull andsink the boat.
Page 24 of 30 Hull & Deck Integrity – Pacific Offshore Academy, Jim Antrim 2011
Most of the round the world open class race boats have deck stepped masts. If adeck stepped mast falls down, it usually just falls over with minimal damage tothe deck near the step. If a keel stepped mast falls over it can rip a big hole in thedeck, an obvious safety concern. On the other hand, a keel stepped mast hasstructural advantages. The mast itself is stronger (better supported at the base).Furthermore, mast compression loads need to get down to the keel eventually.Extending the mast section to the keel is just more efficient than adding acompression post under a deck stepped mast.
Typical mast boot
If your mast is deck stepped and supported by a mast column, the loads are thesame at the base of the column as they would be at the base of a keel steppedmast. The column needs just as much structure supporting it and spreading theloads as a normal mast step would. In either case, the downward force on themast is enormous, on the order of two to three times the displacement of yourboat. Imagine you have three sisterships piled on top of your mast, and with thatin mind, take a look at the step and the way it ties into the hull structure. This is avery common problem area, as you have the mast compression and the weightof the keel pulling down, and the bow bending upward under headstay tension,water pressure, and slamming loads.
Page 25 of 30 Hull & Deck Integrity – Pacific Offshore Academy, Jim Antrim 2011
SST The whole area near the front of the keel and the base of the mast shouldbe inspected for signs of movement, cracking, fatigue, or decay. Early fiberglassboats often had wood buried in the mast step or steel structures supporting themast and keel. Many boats from the sixties and seventies are suffering fromdecay in those elements.
Chainplates
Chainplates are a notorious source of leaks and structural problems. The onlychainplates that don't leak are composite chainplates, where the chainplate is anintegral part of the hull/deck structure.
SST Often a chainplate is bolted to a plywood bulkhead. Guess where thebulkhead decays first? If you see discoloration or evidence of decay in theplywood near chainplate bolts, do not delay in repairing this area.
Whether the chainplate is attached to a bulkhead, knee or other form of support,this is another high load area and should be inspected for signs of movement,fatigue, or decay. Chainplates that fasten mid-deck without supporting structureare a waste of rigging wire.
Chainplates leak because shroud tension is very high and it is impossible to builda supporting structure that is entirely rigid. Therefore the chainplate is movingimperceptibly relative to the deck all the time. You need a sealant here that stickswell to both the metal chainplate and the surrounding deck (good luck), and isflexible to tolerate the movement. Your best bet is a good cover plate andgenerous application of 3M 5200.
SST The chainplate itself is usually very durable, but a close inspection isworthwhile. Look for any elongated holes or microcracking - which often revealsitself by a rust spot. Chainplates must be properly aligned with the shroud andtoggle so that no rigging has any bend.
Hull/Deck joint
The best hull/deck joints are a Type PC attachment – they are permanentlyfiberglassed or welded together. No leaks, move on to the next paragraph. Therest are all type F – they rely on sealant and a row of fasteners to hold the jointtogether and watertight. The joint may be reliable and leak free for decades; butsome boats will have a persistent leak or three, other boats are notorious forleaky hull/deck joints. If you have one or two annoying leaky spots you may beable to cure them by loosening local fasteners, perhaps gently prying the joint
Page 26 of 30 Hull & Deck Integrity – Pacific Offshore Academy, Jim Antrim 2011

open slightly and/or digging out bad sealant, and re-caulking. This is anothergood place for 3M 5200. The stuff is flexible and is a strong adhesive. It's not ajoint you plan on ever taking apart again. If you have the misfortune of a boatwith leaks all along the hull/deck joint, it's time to head to the boatyard. They mayhave to take the whole thing apart and rebuild, or perhaps it can be glassed over.
Companionway (OSR 3.08)
Very few boats have a watertight hatch for a companionway, almost all have aclosure that will stop most of the water if a wave inundates the boat; but wouldleak rapidly if underwater. This is a Type O – a downflood location. Some boatshave two companionways, one on each side of the boat. This may look cool; butthe leeward companionway will be a lot closer to the water when you areknocked down. Similarly, some boats have very wide companionways, whichmakes for easy access in and out, nice to carry spinnaker bags through; but youneed to be sure the lower edge of the companionway is well above the waterwhen you are knocked down. Take it from me, there are few things scarier thanan open companionway with 3 inches of freeboard when your boat is pinned onits side.
Sections of OSR 3.08 relate to companionways that extend below the localsheerline. Briefly, such a companionway is not allowed if you have an opentransom, and if you have a closed transom you must be able to block thecompanionway up to that level. This is to prevent a filled cockpit from draininginto the interior.
The faster your boat is, the more important it is to have good water protectionfrom solid water coming over the housetop. Experience at sea sailing the boathard will let you know if you need to improve the protection in this critical area. Aleaky companionway can make for a miserable ocean voyage.
Hatches & Ports (OSR 3.08)
OSR 3.08 has some excellent rules defining where opening hatches are allowed,where they are allowed to open inward, etc. An opening hatch would beconsidered a downflood point. In some cases it will be prudent to fix them so theycannot be opened at sea. Refer to the section on stability.
Almost all fixed ports are either acrylic (Plexiglass) or polycarbonate (Lexan).They are very similar in strength and stiffness; but acrylic is somewhat morebrittle and more vulnerable to scratching. If the window has compound curvatureit needs to be vacuum formed - an easy process with acrylic, a difficult processwith polycarbonate. Proper bedding and sealing of a fixed port is a bit of an
Page 27 of 30 Hull & Deck Integrity – Pacific Offshore Academy, Jim Antrim 2011
artform. Start with a good sealant. GE SCS2000 SilPruf is an excellent productfor this location. Many ports are held in with nothing else. It is worth noting thatcommercial hatches rely on nothing but adhesive to hold the plastic port to theframe. Fasteners may be helpful to prevent a window from coming completelyoff; but fasteners are often a source of cracking, especially with acrylic. Fastenerholes through fixed plastic ports must be overdrilled to allow for expansion,contraction, and deflections of the superstructure.
Leaky hatches are a major annoyance, and opening hatches have two seals toworry about – there is the seal in the hatch itself (Type MS) and the seal betweenthe hatch and the deck (Type F). The hatch seal will depend on the hatch qualityand service rating. We are talking about an ocean voyage here. A hatch rated forserious ocean travel is strongly recommended, especially for fast boats wherethe deck will often be awash and sometimes under solid water. The type F seal isin the hands of the installer, either the builder – or you if you are re-installing aleaky hatch. Use plenty of high quality bedding compound, set the hatch in itcarefully. Tighten the fasteners lightly, say finger tight. Wait for the sealant tocure. After sealant cure, tighten the fasteners again, using a zig-zag tighteningpatterns as you would lug nuts on a wheel. Another technique is to put down aseries of dots of the sealant and let them cure overnight. They will act as aspacer so when you fit the hatch the next day with a full layer of sealant, thegoop won't all squish out.
Vents
Vents are not as leak prone as hatches because they usually incorporate a watertrap; but are similar in that they are a downflood point. See the paragraph ondownflood points; and decide before your voyage whether you want to fix thevent closed or establish a crew routine for closing them in rough weather.
Tank fills and tank vents
Tank fill fittings and vents are a Type F fitting and carry no load; so they are notusually a source of leaks. Tank vents, however, are by definition open to theinterior of the tank. I once sailed a race to Hawaii on a boat where the water tankvent was located in the hull just below the sheer line. We discovered after thefirst night of sailing that one of our fresh water tanks had been contaminated withsalt water coming in through the vent line. Half our water supply was goneovernight. It can be difficult to find a good location for tank vents. You don't wantto smell the fumes from either fuel or holding tanks. You don't want sea watergetting into any tank during a knockdown. Know where your tank vents arelocated and relocate them if the current place poses a risk.
Page 28 of 30 Hull & Deck Integrity – Pacific Offshore Academy, Jim Antrim 2011
Deck hardware
Murphy's Law and personal experience say that if you have done a careful job ofbedding all the deck hardware, only one fitting will leak, and that will be aboveyour berth.
Deck fittings, like chainplates, are more prone to leaking due to the loads thatthey carry. The first step to preventing a leak is to mount them strongly so thatthey won't move, which has a secondary benefit in that they won't rip out of thedeck that way. This is more of a problem with modern race boats built withsandwich construction and thin skins. Fasteners should have generous diameterbushings through the core; and anything highly loaded like a winch, turning block,sheet jammer, or padeye should have a G-10 or other backing plate.
The next step is to bed the hardware with a good layer of quality caulking,making sure it gets down into the holes and blocks the path of water along thethreads. Silicone sealants or polysulfides are a good choice for deck hardware.Avoid 3M 5200 here unless you are sure you never want to remove the partagain. 3M 4200 would work well. One useful thing to know, most polyurethanesrequire moisture to cure, so getting a completely dry surface is not necessary.Some of them even require a damp surface for proper cure.
Control line openings (OSR 3.02.1, 3.09.2)
Control lines that lead under deck have become rather common on race boats.Very nice, keeps the deck clean and clear, free of tripping hazards.Unfortunately, unless they run through a sealed tunnel they are a downfloodpoint and in violation of the safety regulations, which I will paste here toemphasize my point:
3.02.1 A hull, including, deck, coach roof, windows, hatchesand all other parts, shall form an integral, essentiallywatertight unit and any openings in it shall be capableof being immediately secured to maintain this integrity.
3.09.2 Cockpits must be essentially watertight, that is, allopenings to the hull must be capable of being stronglyand rigidly secured.
Anchor lockers & hawse holes
It's common for cruising boat to have an anchor well in the bow, often with a nicebig hawse hole to let the water flood in. Anchor hanging on a bow roller,windlass, big pile of chain; understandable. Secure anchoring is important to acruiser and nobody enjoys carrying a chain and anchor around – but if you aregoing to be at sea without the possibility of anchoring for the next week or two,
Page 29 of 30 Hull & Deck Integrity – Pacific Offshore Academy, Jim Antrim 2011
you might want to get that weight off the bow. But that's not the point of thisparagraph. You don't want that anchor well filling with water every time you putyour bow into a wave. I've seen boats racing where the anchor well was drainingcontinuously for minutes at a time. Give some thought to improving the seal onthe hatch and add a cowling or flaps over hawse holes and drains.
Getting the Water Out
I want to share a secret with you: not everything in life works out the way youhope or expect. Let's say you have done everything in this article, your boat isthe finest design from the most skilled builder. It goes without saying that yourboat has the world's most excellent owner. Everything is exquisitely maintainedand in perfect working order – yet somehow water is getting into the boat! Let'sfigure out how to get it back in the ocean where it belongs.
Bilge pumps and buckets (OSR 3.23, 3.09.3, 3.13.4-6)
Every boat is required to have two buckets. There is nothing like a bucket and ascared man for getting the water out. The good and the bad thing about bucketsis they have a multitude of uses. Be sure you still have them available if neededin a crisis. I am sorry to admit that boats I have sailed on have contributedseveral buckets to the Pacific gyre. They get lost when they are ripped out ofyour hand as you try to clean them. They get lost when a seasick crew memberleaves one in the cockpit and it is washed overboard. Consider carrying morethan two; and make sure they have a good lanyard and a strong handle.
You are also required to have two bilge pumps permanently mounted, one in thecockpit, one below. Make sure the hoses reach the compartments you need tobail. Test the pumps! I sailed one boat for three years before I tried to use thebilge pump after hosing out the bilge. The pump was mounted backwards andwas pumping into the boat! Make sure your bilge is clean and all limber holes areunclogged. I sailed on one boat where brushing your hair below decks wasforbidden. I heard of another that found the limber holes clogged with blue fleece.
Final tip, a small portable hand pump is a wonderful addition to your kit – andplenty of good sponges.
Summation
Know your boat. Common sense and logic will go a long way towardunderstanding the potential for problems and finding solutions. You can learn andaccomplish a lot by surveying the boat yourself. When in doubt, seekprofessional help from a marine surveyor, naval architect, or other marinespecialist. And remember to keep the water out of the boat!
Page 30 of 30 Hull & Deck Integrity – Pacific Offshore Academy, Jim Antrim 2011