HTML & CSS Made Easy a g e | 1 Chapter 1: Introduction to HTML 1.1 What is HTML HTML stands for...
30
-
Upload
truongtruc -
Category
Documents
-
view
217 -
download
2
Transcript of HTML & CSS Made Easy a g e | 1 Chapter 1: Introduction to HTML 1.1 What is HTML HTML stands for...


HTML & CSS Made Easy
AUTHOR
Dr. Liew Voon Kiong
COVER DESIGNER
Liew Yi
Published by Liew Voon Kiong
Copyright ® 2011 Liew Voon Kiong.
All rights reserved. No Part of this e-book may be reproduced or
distributed, in any form or by any means, without permission in writing
from the author

TABLE OF CONTENTS
Chapter 1 Introduction to HTML
1.1 What is HTML
1.2 HTML Structure
1
1
1
Chapter 2 HTML Elements
2.1 Basic HTML Elements
2.2 Properties
3
3
6
Chapter 3 Types of Lists
3.1 Unordered List
3.2 Ordered List
3.3 Nested List
3.4 Definition List
10
10
11
12
14
Chapter 4 Adding Colours
4.1 Adding Colour to the Background
4.2 Adding Colour to the Text
16
16
18
Chapter 5 Inserting Images in a Webpage
21
Chapter 6 Building Links
6.1 Text Link
6.2 Graphical Link
6.3 Email Link
6.4 Linking to a Section of a Webpage
24
24
24
25
26
Chapter 7 Creating Tables
7.1 Basic Table Elements
7.2 The Border Attributes
7.3 The Colour Attributes
7.4 The Height and Width Attributes
27
27
28
29
29
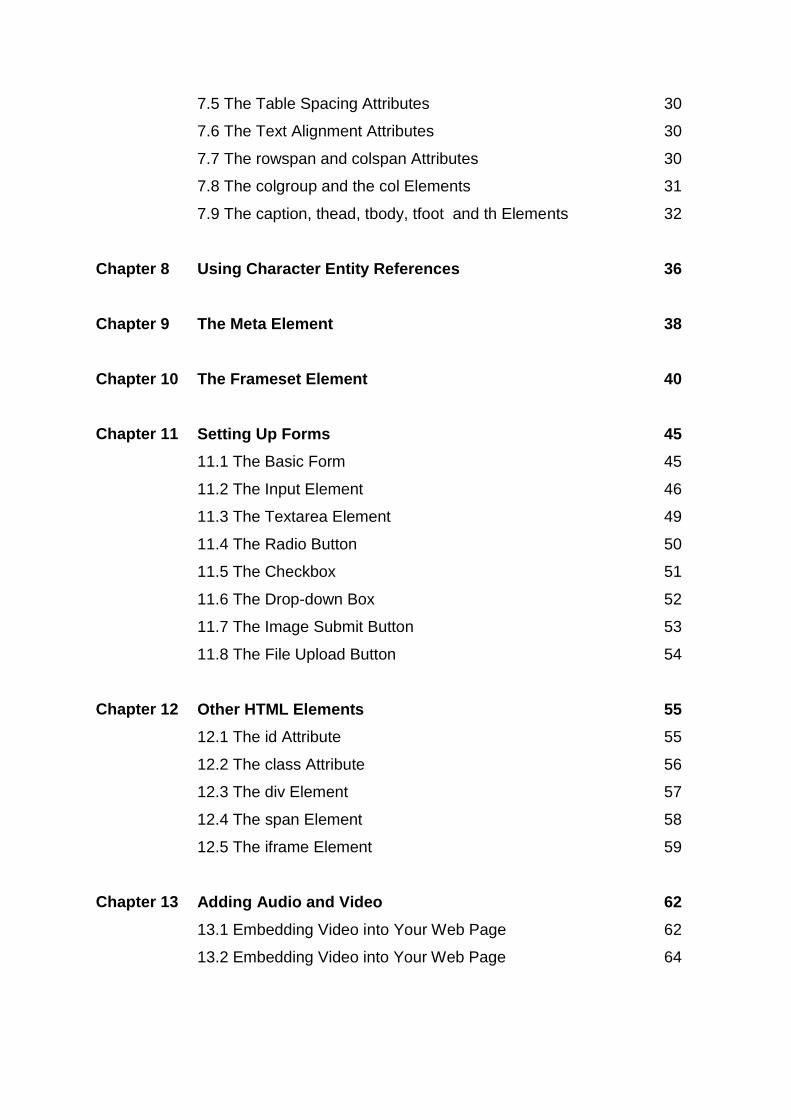
7.5 The Table Spacing Attributes
7.6 The Text Alignment Attributes
7.7 The rowspan and colspan Attributes
7.8 The colgroup and the col Elements
7.9 The caption, thead, tbody, tfoot and th Elements
30
30
30
31
32
Chapter 8 Using Character Entity References
36
Chapter 9 The Meta Element
38
Chapter 10 The Frameset Element
40
Chapter 11 Setting Up Forms
11.1 The Basic Form
11.2 The Input Element
11.3 The Textarea Element
11.4 The Radio Button
11.5 The Checkbox
11.6 The Drop-down Box
11.7 The Image Submit Button
11.8 The File Upload Button
45
45
46
49
50
51
52
53
54
Chapter 12 Other HTML Elements
12.1 The id Attribute
12.2 The class Attribute
12.3 The div Element
12.4 The span Element
12.5 The iframe Element
55
55
56
57
58
59
Chapter 13 Adding Audio and Video
13.1 Embedding Video into Your Web Page
13.2 Embedding Video into Your Web Page
62
62
64

Chapter 14 Introducing HTML5
14.1 Introduction to HTML5
14.2 The <aside> Element
14.3 The <section> Element
14.4 The <hgroup> Element
14.5 The <figure> and <figcaption> Elements
65
65
66
67
68
69
Chapter 15 Introduction to CSS
70
Chapter 16 Inline Style
72
Chapter 17 Embedded Style Sheet
75
Chapter 18 External Style Sheet 77 Chapter 19 Types of CSS Selectors
19.1 Universal Selector
19.2 Type Selector
19.3 ID Selector
19.4 Class Selector
79
79
79
80
80
Chapter 20 Child and Descendent Selectors
20.1 Child Selector
20.2 Descendent Selector
81
81
83
Chapter 21 Sibling Selectors
21.1 Adjacent Sibling Selector
21.2 General Sibling Selector
85
85
86
Chapter 22 The Precedence Rules
22.1 Sequential Rule
22.2 Specificity Rule
22.3 Important Rule
88
88
89
90
Chapter 23 Inheritance
92

Chapter 24 Adding Colours
24.1 RGB Codes
24.2 HEX Codes
24.3 Colour Names
94
94
95
95
Chapter 25 Opacity
25.1 The Opacity Property
25.2 The RGBA Codes
98
98
99
Chapter 26 HSL and HSLA Colour Codes
26.1 HSL
26.2 HSLA
100
100
101
Chapter 27 Typeface and Font-Size
27.1 Typeface
27.2 Font-size
103
103
104
Chapter 28 Text Transformation
106
Chapter 29 Text Decoration
29.1 None
29.2 Underline
29.3 Overline
29.4 Line-Through
108
108
108
108
108
Chapter 30 Font-Weight and Font-Style
30.1 Font-Weight
30.2 Font-Style
110
110
111
Chapter 31 Creating Drop Shadow
112

Chapter 32 Text Positioning
32.1 Horizontal Alignment
32.2 Vertical Alignment
32.3 Text Indentation
114
114
115
117
Chapter 33 Text Spacing
33.1 Line-Height
33.2 Letter Spacing
33.3 Word Spacing
118
118
119
119
Chapter 34 Creating Drop Cap and First Line Styling
34.1 Creating Drop Cap
34.2 Creating Style for First Line
121
121
123
Chapter 35 Creating Link Styles
35.1 a:link
35.2 a:visited
35.3 a:hover
35.4 a:active
125
125
125
126
126
Chapter 36 Customising Box
36.1 Width and Height
36.2 Border
36.3 Border Colour
128
128
129
131
Chapter 37 Customising Lists
37.1 The list-style-type Property
37.2 The list-style-image Property
37.3 the list-style-position property
133
133
135
136
Chapter 38 Customising Tables 138

P a g e | 1
Chapter 1: Introduction to HTML
1.1 What is HTML
HTML stands for Hypertext Markup Language that is used to design web pages and
build Websites. It has the ability to bring together text, pictures, sounds, video and
links all in one place! HTML files are plain-text files, so they can be edited using
standard editors such as Notepad and WordPad. They are stored with the
extensions .html, .htm or .shtml. A webpage written in Hypertext Markup
Language can be viewed using browsers such as Mozilla Firefox, Google’s Chrome,
Safari, Opera, IE and more. Hypertext Markup Language is the standard formatting
tool for WWW because it is cross platforms, meaning that it can be viewed through
different types of computers and mobile devices with different operating system such
as the Mainframes, Apple computers, the UNIX system, the popular IBM compatible
PCs, smart phones and tablets running on Android OS, Apple IOS, Microsoft’s
windows phone and more. It is sort of a common Internet language. The newest
version is HTML5.
1.2 HTML Structure
An HTML document is divided into two parts, the head and the body. The head of
the document contains the document’s title and other information, and the body
contains the contents and everything else. The body is the larger part of the
document, as the body of a letter you would write to a friend would be. Elements are
used to describe and format an HTML document, each element describes different
document content. An example of an element is <head>, which comprises and open
tag written as <head>, its content and an end tag written as </head>. An HTML
document must always begin with a <!DOCTYPE html> . DOCTYPE is a declaration
that defines the document type. We will discuss tags in more details in coming
chapters.

P a g e | 2
Example 1.1
<!DOCTYPE html>
<html> <head><title>HyperText Markup Language Tutorial</title>
<meta http-equiv=”Content-Language” content=”en-us“>
<meta name=”description” content=”Welcome to HyperText Markup Language
Tutorial”>
<meta name=”Author” content=”Dr.Liew Voon Kiong“>
<meta name=”GENERATOR” content=”Microsoft FrontPage 6.0“>
<link rel=”stylesheet” type=”text/css” href=”styles_vb6.css“/>
</head>
<body><h1>Introduction to HyperText Markup Language</h1>
HyperText Markup Language, is the language of the World Wide Web. Web sites
and web pages are written in …………………………………………..
……………………………………………….
</body> </html>
P a g e | 3
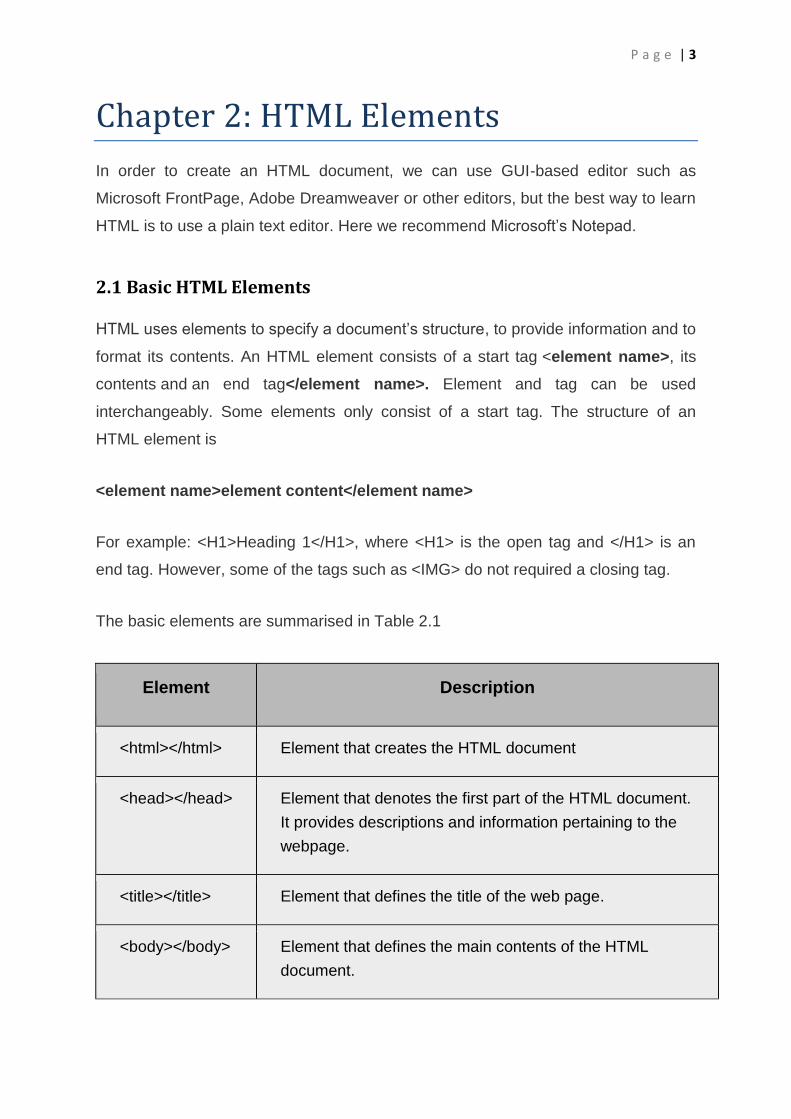
Chapter 2: HTML Elements
In order to create an HTML document, we can use GUI-based editor such as
Microsoft FrontPage, Adobe Dreamweaver or other editors, but the best way to learn
HTML is to use a plain text editor. Here we recommend Microsoft’s Notepad.
2.1 Basic HTML Elements
HTML uses elements to specify a document’s structure, to provide information and to
format its contents. An HTML element consists of a start tag <element name>, its
contents and an end tag</element name>. Element and tag can be used
interchangeably. Some elements only consist of a start tag. The structure of an
HTML element is
<element name>element content</element name>
For example: <H1>Heading 1</H1>, where <H1> is the open tag and </H1> is an
end tag. However, some of the tags such as <IMG> do not required a closing tag.
The basic elements are summarised in Table 2.1
Element Description
<html></html> Element that creates the HTML document
<head></head> Element that denotes the first part of the HTML document.
It provides descriptions and information pertaining to the
webpage.
<title></title> Element that defines the title of the web page.
<body></body> Element that defines the main contents of the HTML
document.

P a g e | 4
<h1></h1> Element that indicates the headings. There are 6
headings, from h1 to h6.
<b></b> Element that displays bold text.
<i></i> Element that displays italic text.
<u></u> Element that underlines the text.
<br> Element that indicates a line break. No closing tag is
required for this element.
Table 2.1: Summary of Basic HTML Elements
Example 2.1
Now, open the notepad in windows and type the following codes:
<html>
<head>
<title>My sample HTML document</title>
</head>
<body bgcolor=”#ffff99″>
<h1><u>My sample HTML document</u></h1>
<h1>This is heading 1</h1>
<h2>This is heading 2</h2>
<h3>This is heading 3</h3>
<h4>This is heading 4</h4>
<h5>This is heading 5</h5>
<h6>This is heading 6</h6>
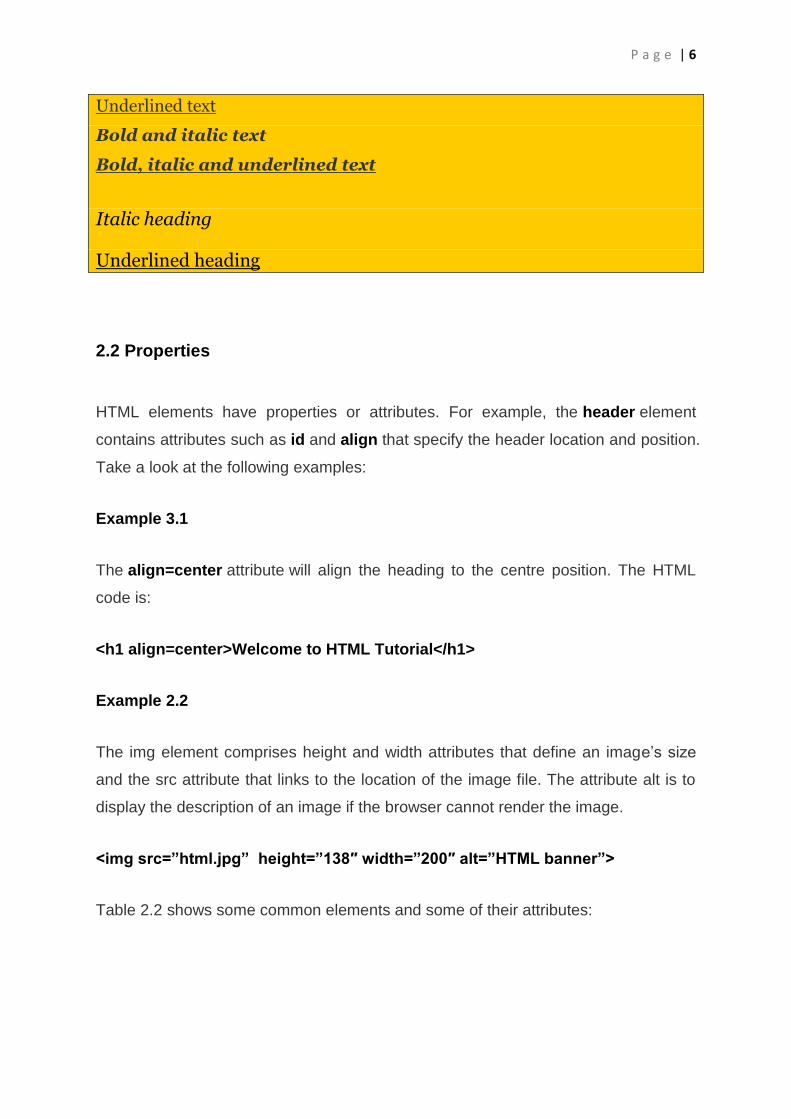
<b> Bold text</b>
<br>
<i>Italic text</i>
<br>
<u>Underlined text</u>
<b><i>Bold and italic text</i></b>

P a g e | 5
<b><i><u>Bold, italic and underlined text</u></i></b>
<h1><i>Italic heading</i></h1>
<h3><u>Underlined heading</u></h3>
</body>
</html>
To save the file, click on the file menu and select Save As, change file type to All
files, save the file as example1.html in My document. (You can also use a different
file name and folder; just make sure that the file type is .html)
To view the web page, start Firefox, Google Chrome, IE or any web browser and
open the above file. Alternatively, you can open the web page by right-clicking on the
file then click Open with… and select your desired web browser.
The output
My sample HTML document
This is heading 1
This is heading 2
This is heading 3
This is heading 4
This is heading 5
This is heading 6
Bold text
Italic text
P a g e | 6
Underlined text
Bold and italic text
Bold, italic and underlined text
Italic heading
Underlined heading
2.2 Properties
HTML elements have properties or attributes. For example, the header element
contains attributes such as id and align that specify the header location and position.
Take a look at the following examples:
Example 3.1
The align=center attribute will align the heading to the centre position. The HTML
code is:
<h1 align=center>Welcome to HTML Tutorial</h1>
Example 2.2
The img element comprises height and width attributes that define an image’s size
and the src attribute that links to the location of the image file. The attribute alt is to
display the description of an image if the browser cannot render the image.
<img src=”html.jpg” height=”138″ width=”200″ alt=”HTML banner”>
Table 2.2 shows some common elements and some of their attributes:

P a g e | 7
Element Description
<h1
align=position></h1>
Element that aligns the heading to the
left, right and the centre
<strong></strong>
Element that strongly emphasizes the
bold format.
<em></em>
Element that gives more emphasis to the
italic text.
<pre></pre> Element that preserves the original text.
<sub></sub> Element that formats text as subscript.
<sup></sup> Element that formats text as superscript.
<hr>
Element that inserts a horizontal ruler.
Closing tag is not required here.
<hr width=n%>
Element that sets the width of a
horizontal ruler.
<hr size=m>
Element that sets the height of a
horizontal ruler.
<hr nonshade>
Element that creates a ruler without the
shadow.
<p></p> Element that defines a paragraph.
<p align=position></p>
Element that aligns the paragraph to the
left, right or centre.
Table 2.2: Attributes of HTML Elements

P a g e | 8
Example 2.3
Now, copy the following paragraph and paste it into your Notepad or any suitable
text editor. Save the file as bean.html.
<html>
<head>
<title>Mr Bean</title>
</head>
<body>
<h1 align=center><u>All about Mr. Bean</u></h1>
<hr>
<h2 align=right>Date: Nov 30,2000</h2>
<hr width=50% size=10>
<p> <strong>Mr. Bean</strong>is a 50 years old boy, currently studying
at <em>Cambridge</em>. His lecturer is <b>Mr. Mike Tyson</b>. There are 33
students in his class.</p>
<p align=center> Here are some facts about Bean</p>
<pre>
Date of Birth :01011900
Height : 100 cm
Weight : 100 kg
Marital Status : Single
Address : 1, Wall street, London,UK.
</pre>
<hr nonshade>
<P align=center> If you wish to match make for Mr. Bean, please contact him
through the following phone number:<b>911<b></p>
<hr>
</body>
</html>

P a g e | 9
The output
All about Mr. Bean
Date: Nov 30,2000
Mr. Bean is a 50 years old boy, currently studying at Cambridge. His lecturer
is Mr. Mike Tyson. There are 33 students in his class.
Here are some facts about Bean
Date of Birth :01011900
Height : 100 cm
Weight : 100 kg
Marital Status : Single
Address : 1, Wall street, London,UK.
If you wish to match make for Mr. Bean, please contact him through the following
phone number:911
P a g e | 10
Chapter 3: Types of Lists
In HTML, if you wish to list out a number of items, you can use the unordered list and
the ordered list. The element for the unordered list is ul and the element for the
ordered list is ol. The element for each item in the list is li. Besides, if you wish to
display a list of definitions, you can use the dl element together with
the dt and dd elements.
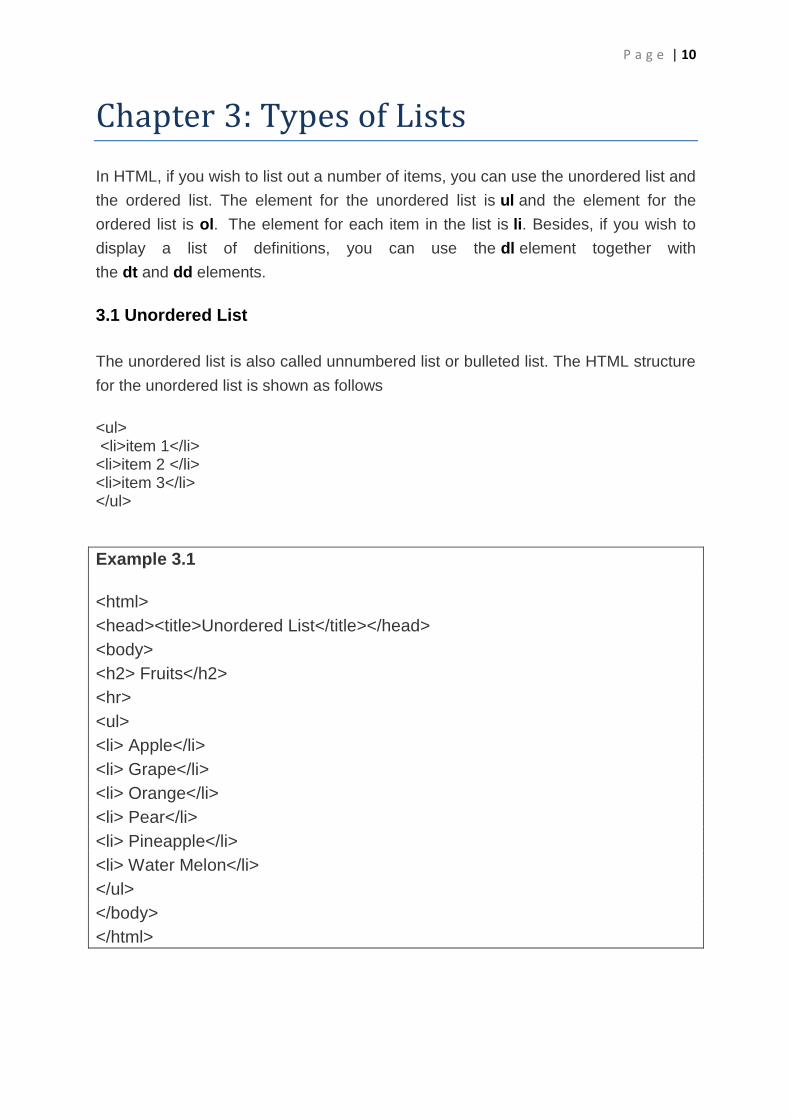
3.1 Unordered List
The unordered list is also called unnumbered list or bulleted list. The HTML structure
for the unordered list is shown as follows
<ul> <li>item 1</li> <li>item 2 </li> <li>item 3</li> </ul>
Example 3.1
<html>
<head><title>Unordered List</title></head>
<body>
<h2> Fruits</h2>
<hr>
<ul>
<li> Apple</li>
<li> Grape</li>
<li> Orange</li>
<li> Pear</li>
<li> Pineapple</li>
<li> Water Melon</li>
</ul>
</body>
</html>

P a g e | 11
Copy and paste the html codes in Example 3.1 to your notepad and save the file as
uorlist.html.
The output is as shown below:
Fruits
Apple
Grape
Orange
Pear
Pineapple
Water Melon
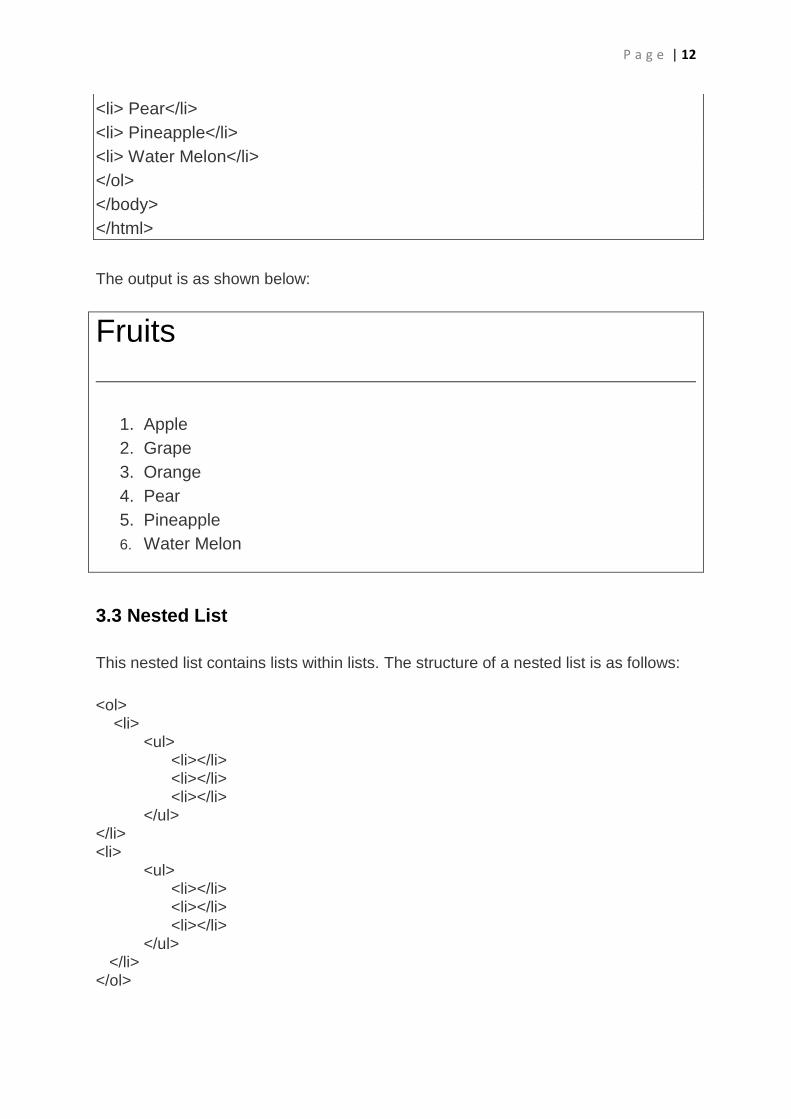
3.2 Ordered List
Also known as the Numbered List. It is very similar in structure to the unordered list,
except each list item has a number in front of it, instead of a bullet. Also, the opening
tag for the list is <ol> instead of <ul>, and the closing tag is </ol> instead of </ul>.
Modify the code in section 4.1 by changing the tags <ul> to <ol> and </ul> to </ol>
and change the title to ordered list. Save the file as orlist.html.
Example 3.2
<html>
<head><title>Ordered List</title></head>
<body>
<h2> Fruits</h2>
<hr>
<ol>
<li> Apple</li>
<li> Grape</li>
<li> Orange</li>
P a g e | 12
<li> Pear</li>
<li> Pineapple</li>
<li> Water Melon</li>
</ol>
</body>
</html>
The output is as shown below:
Fruits
1. Apple
2. Grape
3. Orange
4. Pear
5. Pineapple
6. Water Melon
3.3 Nested List
This nested list contains lists within lists. The structure of a nested list is as follows:
<ol> <li>
<ul> <li></li> <li></li> <li></li>
</ul> </li> <li>
<ul> <li></li> <li></li> <li></li>
</ul> </li> </ol>
P a g e | 13
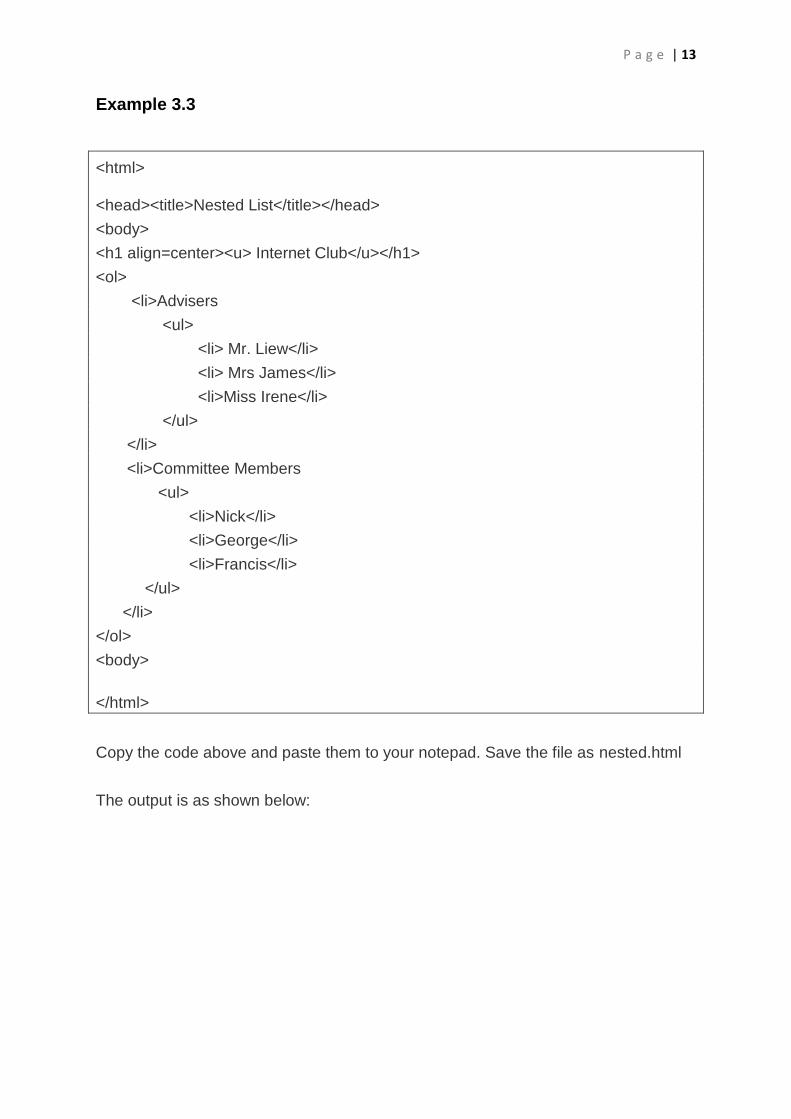
Example 3.3
<html>
<head><title>Nested List</title></head>
<body>
<h1 align=center><u> Internet Club</u></h1>
<ol>
<li>Advisers
<ul>
<li> Mr. Liew</li>
<li> Mrs James</li>
<li>Miss Irene</li>
</ul>
</li>
<li>Committee Members
<ul>
<li>Nick</li>
<li>George</li>
<li>Francis</li>
</ul>
</li>
</ol>
<body>
</html>
Copy the code above and paste them to your notepad. Save the file as nested.html
The output is as shown below:

P a g e | 14
Internet Club
1. Advisers
Mr. Liew
Mrs James
Miss Irene
2. Committee Members
Nick
George
Francis
3.4 Definition List
Definition list comprises a list of definitions or terms and their descriptions. The
elements are:
dl- The element for creating a definition list
dt- The element for creating a definition or term
dd- The element for displaying the description of a term
The structure can be illustrated in the Example 3.4.

P a g e | 15
Example 3.4
<dl>
<dt><b>Internet</b>
<dd>A network of millions of computers connected together to share information.
<dt><b>HTML</b>
<dd>Hypertext Markup Language
<dt><b>JavaScript</b>
<dd>A scripting language that works with HTML to enhance web pages
</dl>
* The dt and dd elements do not require the closing tags
The output:
Internet
A network of millions of computers connected together to share
information.
HTML
Hypertext Markup Language
JavaScript
A scripting language that works with HTML to enhance web pages

P a g e | 16
Chapter 4: Adding Colours
Adding colours to your web pages could achieve certain visual effect and make them
more appealing. However, you should select colours carefully and do not overuse
them. You can add colour to your web page background and the text as well.
4.1 Adding Colour to the Background
You can specify the colour of the page’s background using the bgcolor attribute of
the body element, as shown below:
<body bgcolor=color>
The colour attribute can be specified using normal words like red, yellow, blue etc. or
by using hexadecimal codes. Hexadecimal is a base 16 number system.
Hexadecimal uses A for decimal 10, B for decimal 11, C for decimal 12, D for
decimal 13, E for decimal 14 and F for decimal 15. Every colour code in HTML is
made up of 6 hexadecimal digits, from 000000 to ff ffff . The hexadecimal codes
might seem very complex, however, they actually make up of combination of three
primary colours, i.e. red, green and blue (rgb). The last two digits specify the amount
of red colour, the middle two digits specify the amount of green colour and the first
two digits specify the amount of blue colour.
For example:
0000ff=maximum red 00ff00=maximum green ff0000=maximum blue.
The Colour Codes are shown in Table 4.1

P a g e | 17
Color Code Color Code Color Code Color Code Color Code
. eeeeee . ffffcc . ffccff . ff99ff . ff66ff
. dddddd . ffff99 . ffcccc . ff99cc . ff66cc
. cccccc . ffff66 . ffcc99 . ff9999 . ff6666
. bbbbbb . ffff33 . ffcc66 . ff9966 . ff6633
. aaaaaa . ffff00 . ffcc33 . ff9933 . ff6633
. 999999 . ccffff . ffcc00 . ff9900 . ff6600
. 888888 . ccffcc . ccccff . cc99ff . cc66ff
. 777777 . ccff99 . cccccc . cc99cc . cc66cc
. 666666 . ccff66 . cccc99 . cc9999 . cc6699
. 555555 . ccff33 . cccc66 . cc9966 . cc6666
. 444444 . ccff00 . cccc33 . cc9933 . cc6633
. 333333 . 99ffff . cccc00 . cc9900 . cc6600
. 222222 . 99ffcc . 99ccff . 9999ff . 9966ff
. 111111 . 99ff99 . 99cccc . 9999cc . 9966cc
. ff0000 . 99ff66 . 99cc99 . 999966 . 996699
. ee0000 . 99ff33 . 99cc33 . 999933 . 996633
. cc0000 . 66ffff . 66ccff . 6699ff . 6666ff
. 33ffff . 00ffff . 00ccff . 3399ff . 3366ff
. ff00ff . cc00ff . 00ee00 . 0000ff . 6600ff
Table 4.1 List of HTML RGB Colour Codes
Example 4.1
<html>
<head>
<title>Background Color</title>
</head>
<body bgcolor=cyan>
The background colour of this web page is cyan. You can change the background
colour anytime by changing the colour attribute specified by the bgcolor code. Try
using the hexadecimal codes like bgcolor=”#ff00cc”.
</body>
</html>
Copy and paste the above codes to your notepad and save as bgcolor.html.
The Output is as shown overleaf.

P a g e | 18
The background colour of this web page is cyan. You can change the background
colour anytime by changing the colour attribute specified by the bgcolor code. Try
using the hexadecimal codes like bgcolor=”ff00cc”.
4.2 Adding colour to the text.
4.2.1 Specifying the colour of the normal text
You can specify the colour of the normal text (the default text is black) using the text
attribute of the body element, as shown below:
<body bgcolor=”blue” text=”white”>
You may use normal words for the colour attribute or use hexadecimal notation.
Now, try the following example
Example 4.2
<html> <head>
<title>Text colour</title>
</head>
<body bgcolor=”blue” text=”#ffffcc”>
The text colour can be formatted using the text=”#color code”. It is important that the
colour of the text is not the same as the background colour; otherwise you won’t be
able to see the words.
</body>
</html>
Copy and paste the above codes to your notepad and save the file as txtcolor.html
The output is as shown below:
The text colour can be formatted using the text=”#color code”. It is important that the
colour of the text is not the same as the background colour; otherwise you won’t be
able to see the words.
P a g e | 19
4.2.2 Formatting Individual Font Colour with the Font Tag
If you wish to add colour to an individual character, word, sentence or paragraph,
you may use the font tag. Font tag can also control font size and typeface of fonts.
The codes are as follows:
<font color=red>Red colour text</font>
<font size=1 color=blue>Blue text with font size 1</font>
<font face=”Times New Roman”>Text in Time News Roman</font>
Now, copy the following codes and paste them into your notepad and save the file as
font.html.
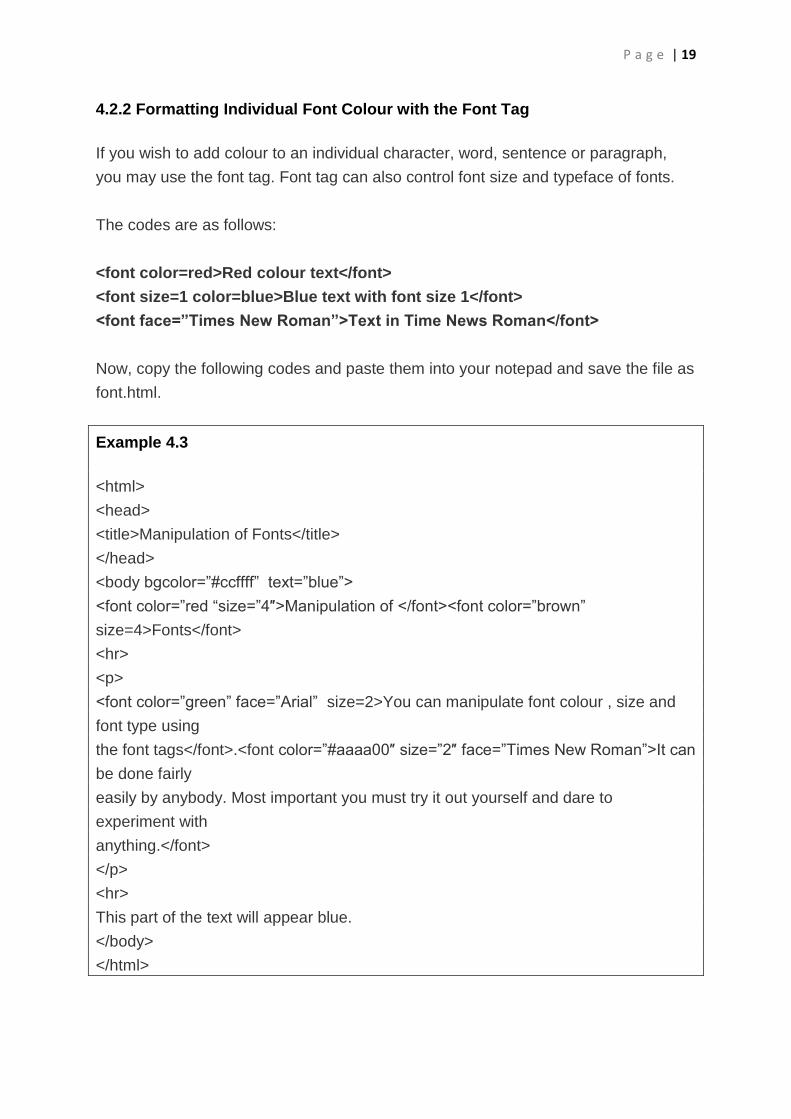
Example 4.3
<html>
<head>
<title>Manipulation of Fonts</title>
</head>
<body bgcolor=”#ccffff” text=”blue”>
<font color=”red “size=”4″>Manipulation of </font><font color=”brown”
size=4>Fonts</font>
<hr>
<p>
<font color=”green” face=”Arial” size=2>You can manipulate font colour , size and
font type using
the font tags</font>.<font color=”#aaaa00″ size=”2″ face=”Times New Roman”>It can
be done fairly
easily by anybody. Most important you must try it out yourself and dare to
experiment with
anything.</font>
</p>
<hr>
This part of the text will appear blue.
</body>
</html>
P a g e | 20
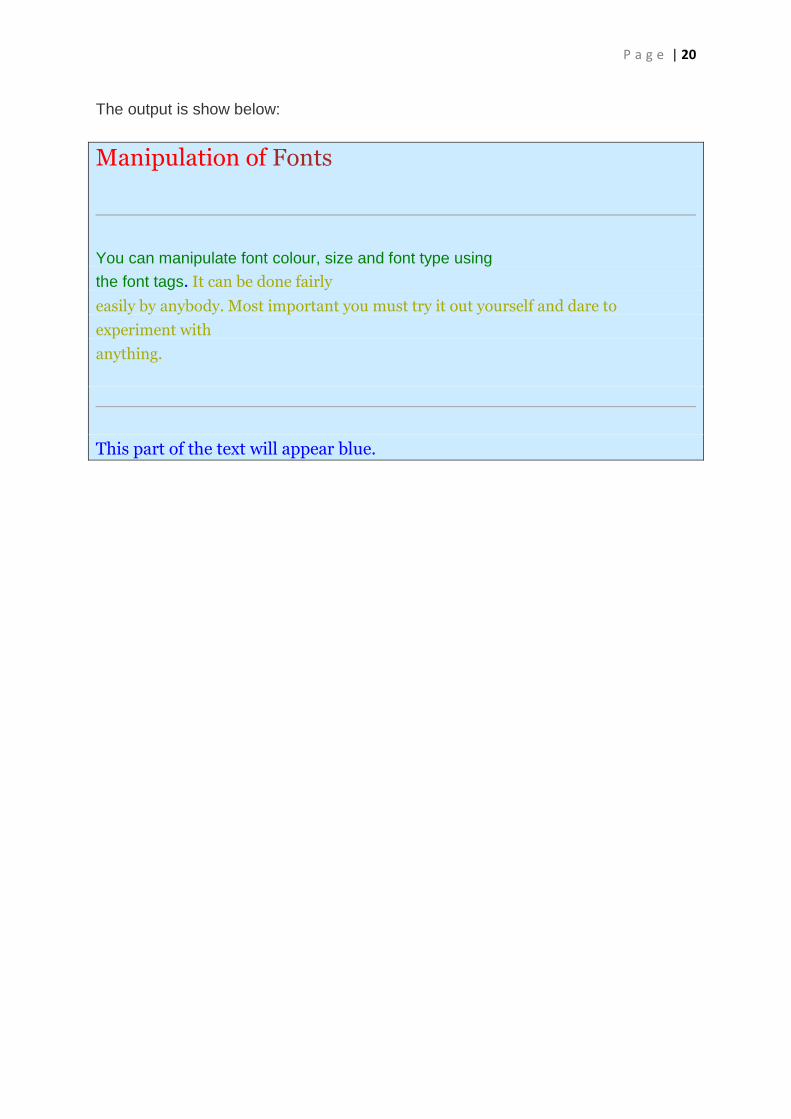
The output is show below:
Manipulation of Fonts
You can manipulate font colour, size and font type using
the font tags. It can be done fairly
easily by anybody. Most important you must try it out yourself and dare to
experiment with
anything.
This part of the text will appear blue.

P a g e | 21
Chapter 5: Inserting Images into a Web Page
The element for inserting an image in a web page is img and the tag is written as
follows:
<img src=”image filename”>
* src is the attribute that points to the source of the image file.
The web browsers support several types of image files, but the usual ones are the
graphic interchange format file(with extension gif ) and jpeg file(with extension jpg).
Besides, they also support png file. You can also create your own images using
scanner and graphics tools like PC Paint Brush, Corel Draw, Adobe Photoshop
and more. Besides, there are countless image files that you might copy from the
World Wide Web but it is better to get consent from the images creators.
You can specify the alignment and size of the image using the align, width and
height attributes of the img element respectively as follows:
<img src=”image.jpg” align=position width=100 height=100 alt=image label>
* The alt attribute is to show the label of the image.
Images can also be used as background for your web pages using the body element
as follows:
<body background=”image.jpg”></body>
Now type the text in Example 5.1 below and save the file as images.htm. You also
need to create four images using any graphic tool and save them as image1.jpg,
image2.jpg and image3.jpg. The image files must be in the same folder as the
images.htm file.

P a g e | 22
Example 5.1
<html>
<head>
<title>Inserting Images</title>
</head>
<body background="back.jpg ">
<h1 align=”center”><font color="red">Inserting Images in Web Page</font></h1>
<hr>
<img src=" image1.jpg">
<br>
<img src="image2.jpg " width=100 height=100 >
<br>
<img src="image3.jpg" width=30% height=50% align=right alt="image3">
</body>
</html>
Inserting Images in Web Page

P a g e | 23