HTML5 Solutions - Essential Techniques for HTML5 Developers PDF

HTML5 Workshop
Prepared by Joan Weeks
February 2014
Table of Contents Course Summary and Objectives ................................................................................................... iii
Unit 1 Overview of HTML5 ............................................................................................................. 1
Topic 1 What is HTML5? ............................................................................................................. 1 Topic 2 HTML5 Document Structure .......................................................................................... 1 Topic 3 Head Element ................................................................................................................. 2 Topic 4 Body Element ................................................................................................................. 4 Topic 5 Designing a Web Page .................................................................................................... 4
Unit 2 Creating a Basic Web Page .................................................................................................. 6 Topic 1 HTML5 Editors ................................................................................................................ 6 Topic 2 Opening Notepad and Entering HTML5 and Head Tags ................................................ 6 Topic 3 Saving and Displaying the Web Page ............................................................................. 8 Topic 4 Entering the Body Element .......................................................................................... 10 Topic 5 HTML5 Color Values ..................................................................................................... 11 Topic 6 Headings ....................................................................................................................... 13 Topic 7 Align Attribute .............................................................................................................. 13 Topic 8 Horizontal Rule ............................................................................................................. 14 Topic 9 Paragraph and Break Tags ............................................................................................ 14 Topic 10 Changing Fonts ........................................................................................................... 16 Topic 11 Bold and Italicized Text .............................................................................................. 17 Topic 12 Unnumbered and Ordered Lists ................................................................................. 18 Topic 14 Adding Images to your Web Site ................................................................................ 20 Topic 15 Tables ......................................................................................................................... 21 Topic 16 Copy Coding ................................................................................................................ 23 Topic 17 Formatting blocks of content with <div> tags ........................................................... 23 Topic 18 Adding Hyperlinks ...................................................................................................... 25 Topic 19 Using the <nav> tag .................................................................................................... 26
Unit 3 Accessibility and Validation .............................................................................................. 28 Topic 1 Accessibility .................................................................................................................. 28 Topic 2 Validation ..................................................................................................................... 29
Unit 4 Load Web Pages on the Server ......................................................................................... 30 Topic 1 Location of the Server and Log in ................................................................................. 30
ii

HTML5 Workshop Course Summary This 3-hour course will enable students to understand and create HTML5 (Hypertext Markup Language) version HTML5, as it is used by major web editors. Although Dreamweaver, the HTML5 editing tool for web editors, allows users to create web pages in the “Design” view, it is critical that they also work in the HTML5 “code” view to troubleshoot problems. This course is not for the purpose of teaching web developers to type HTML5 code from scratch, but rather to give them the skills to enter the correct form of HTML5 tags, especially to correct problems. Students will also learn about HTML5 usability and validation. Learning Objectives: At the end of this course, participants will be able to:
• Define HTML5, tags, elements, attributes, and meta data • Create the Prologue and understand its components • Format the Head and enter title, keywords and description meta data • Format the body text, background and link colors • Add Headings to web pages • Format paragraphs, lines, phrases, font styles and sizes • Create unordered and ordered lists • Add code for images to include height, width, and borders • Create tables and format cell padding and spacing • Add absolute and relative hyperlinks • Assure that web files meet Section 508 standards for accessibility • Validate HTML5 file
iii

HTML5 Workshop Unit 1 Overview of HTML
Unit 1 Overview of HTML5
Topic 1 What is HTML5?
Hypertext Markup Language is a system of codes or tags used by web page designers to enable one computer to display information from another computer over the Internet. The World Wide Web W3C consortium has issued an ISO standard so that different types of computers render and/or display information in a standard format. The tags surround a word or series of words thereby “marking” them.
The standard HTML code is now version 5. Every HTML5 document must begin and end with the HTML element. Place the HTML5 Declaration at the top of the web page. The end tag goes at the very bottom of the page. The other tags are nested in a hierarchy.
In HTML5 there is only one <!doctype> declaration, and it is very simple:
< !doctype html> Let’s see what this means:
!doctype html – declaring that the document is hypertext markup language
Language: <html lang="en"> - our HTML document is in English
Topic 2 HTML5 Document Structure
Elements - An element is a fundamental component of the structure of an HTML5 document. Some examples of elements are the head, tables, paragraphs, and lists. Use HTML5 tags to mark up the elements of a file for your browser.
Tags - To denote the various elements in an HTML5 document, you use tags. HTML5 tags consist of a left angle bracket (<), a tag name, and a right angle bracket (>). Tags are usually
HTML5.doc 1 February 2014
HTML5 Workshop Unit 1 Overview of HTML paired (<xxx> </xxx>) e.g., <Hl> and </Hl> to start and end the tag instruction. The end tag looks just like the start tag except a slash (/) precedes the instruction within the brackets.
Topic 3 Head Element
Head element <head> </head>
The head element is not a heading. This is data about your web page that the user does not see on the web page. For librarians, the data in the Head element is very important to catalog a web resource. It contains meta-data or data about data.
Here are three of the groupings of data that are often found in the head. Meta tags are rendered as : <meta>
• Keywords -<meta name="keywords">: The keywords meta-data allows the page to be indexed by search engines. The search engine then matches the user's search terms with the keywords in the meta tag.
• Description - <meta name="description”>: Some search engines also incorporate the meta tag description in the indexing of files. This enables a description of the page to be returned as part of the search result.
• Title <title> </title> This is the title that displays in the title bar of the browser's window and is the only head element that is visible to the user.
In 1995, the Online Computer Library Center (OCLC) in Dublin, Ohio brought together experts in electronic resource description. They came up with 15 core meta-data elements that are broad and applicable to a wide range of electronic resources. The full list is available at: http://dublincore.org/documents/dces/ Exercise 1:
We will look at the HTML5 code for the Lynda.com page. You can view the source code for web pages to see how the different elements and tags affect the way the browser displays the page to the public.
HTML5.doc 2 February 2014

HTML5 Workshop Unit 1 Overview of HTML Steps:
1. Open Internet Explorer and enter Uniform Resource Locator (URL) http://lynda.com in either Internet Explorer (IE) or Firefox.
2. In the menu bar, select View >>Source in IE or View >>Page Source in Firefox.
You should now see the source code for this web page. Notice the Prologue, HTML and Head elements. <!doctype html> <html lang="en"> <head> <meta charset="utf-8"> <meta name="description" content="Software training and tutorials for Adobe, Microsoft, Apple and so much more at lynda.com." /> <link rel="canonical" href="http://www.lynda.com/member.aspx" /> <script type="text/javascript"> lynda.page.disableLoginConflictedModal = true; </script> </head>
3. What meta data elements do you see?
__________________________________________________________________
__________________________________________________________________
__________________________________________________________________
You also see Java Script which gives users a more interactive experience on the web page as well as Cascading Style Sheets (CSS) that help format the web page. Both Java Script and Cascading Style Sheets are more advanced features and require a solid understanding of HTML.
HTML5.doc 3 February 2014

HTML5 Workshop Unit 1 Overview of HTML Topic 4 Body Element Body element <body> </body> The body element encloses everything the user will see displayed on a web page. Since many of the default display attributes of an HTML5 document can be altered, it is important to override the default settings in the first tag such as background color, text color, text face, link color, visited link color, and background image. Notice the body element tag in the Lynda.com page you displayed above. Here are some common HTML5 tags: <header> main header content <nav> navigation <section> content of the page <footer> footer of the page <video> video <audio> audio
Topic 5 Designing a Web Page
The primary function of the web page is to guide a user to the information the user needs. Here are a few guidelines.
Follow the KISS theory
Keep it simple. The best sites are those that offer simple site navigation. Bells and whistles might look nice, but there comes a point where the gadgets on the page overshadow the content usability should be your guide. Motivate your user Think about the users' goals in coming to the page. In what ways can you facilitate their search and help them accomplish the tasks they are trying to achieve?
HTML5.doc 4 February 2014
HTML5 Workshop Unit 1 Overview of HTML Organization is key Be sure to organize the home page so that a flow can be detected. One guideline to keep in mind -if they can't find it in three clicks they leave the site.
• Keep the number of links on the home page to a minimum.
• Keep file size as low as possible. Pages that are quite large in size take a long time to download. Users tend to frustrate easily and will leave if the page takes to long to download. All kinds of numbers are floating around on recommended file size for a web page. The best indicator, however, is your own use. How long would you wait for a page to download?
• Choose color scheme carefully. While some may think that black is a great color for a web page background, be cautious. Dark colors are not seen as formal colors, whereas light colors are seen to be more professional. Many theories regarding color exist. However, suffice it to say that regardless of the color scheme chosen, the links and font color must coordinate with the remaining image and background colors.
• Type faces -Typesetters try to stick with one font at all times. HTML5documents should also work to minimize the number of fonts in a page. Stick with the two-font maximum. Use one font for the headings and another for the body text. If different fonts are used make sure the fonts look different enough to distinguish one from another.
HTML5.doc 5 February 2014

HTML5 Introduction Unit 2 Creating a Basic Web Page
Unit 2 Creating a Basic Web Page
Topic 1 HTML5 Editors To create HTML5 you will need an HTML5 editor. LIS students can use Adobe Dreamweaver as the HTML5 editor. LIS workstations have the Adobe CS6 version of Dreamweaver, but it is important to learn to code without a WYSIWYG, such as Dreamweaver entering code for you. Since not all students have Dreamweaver, we can create basic HTML5 code using Notepad. All other HTML5 editors must be avoided because they can create “junk” code which could corrupt a web page.
Topic 2 Opening Notepad and Entering HTML5 and Head Tags Notepad is available on all Library workstations and in its simple form is mainly used for word processing and saves documents with the .txt extension. However, when we enter HTML5tags we can save the file as HTML5 that will display in major browsers. Steps:
1. Select Start>>All Programs>>Accessories>>Notepad.
HTML5.doc 6 February 2014
HTML5 Introduction Unit 2 Creating a Basic Web Page When you are entering HTML5 code it helps to keep major tags aligned to the left so that you can debug and find problems more quickly. HTML5 is very forgiving as far as upper and lower case is concerned. Also, many tags are self-closing such as meta data tags so at the end you
just use > However, do not use self-closing tags such as <br/>which combine the opening tag and end tag. This is not required in HTML5. Instead use<br> Something</br> Also, typing tags in upper or lower case does not matter in HTML5. However, it is best to keep everything in lower case and spaces matter.
1. Type the prologue as illustrated below using Shift and the keys above the comma and period. <!doctype html>
2. Type <html lang="en">
3. Type <head>
4. Type <title>put your title</title> The meta data (data about data) in the head in very important in helping web search engines find our web pages and enables computers to transfer the data accurately but does not display to users. Many web pages appear down at the bottom of a Google search hit result because they do not contain meta data. The page will say “untitled” at the top of the window without a title element. Meta data is entered with the <meta> tag and attributes such as name to define the name of the type of meta data such keywords and a value such as “keywords”. <tag attribute=”value”> or <meta name=”keywords”> Use double quotes (“) around the value.
5. Type <meta charset="utf-8"> 6. Type <meta name="description" content="Your description"> 7. Type <meta name="keywords" content="Your keywords, other keywords"> 8. Type </head>
HTML5.doc 7 February 2014
HTML5 Introduction Unit 2 Creating a Basic Web Page Topic 3 Saving and Displaying the Web Page We should save our webpage frequently as we work on it and display the changes in our Browser to see the effect the HTML5 has on the user’s view of the page. Steps:
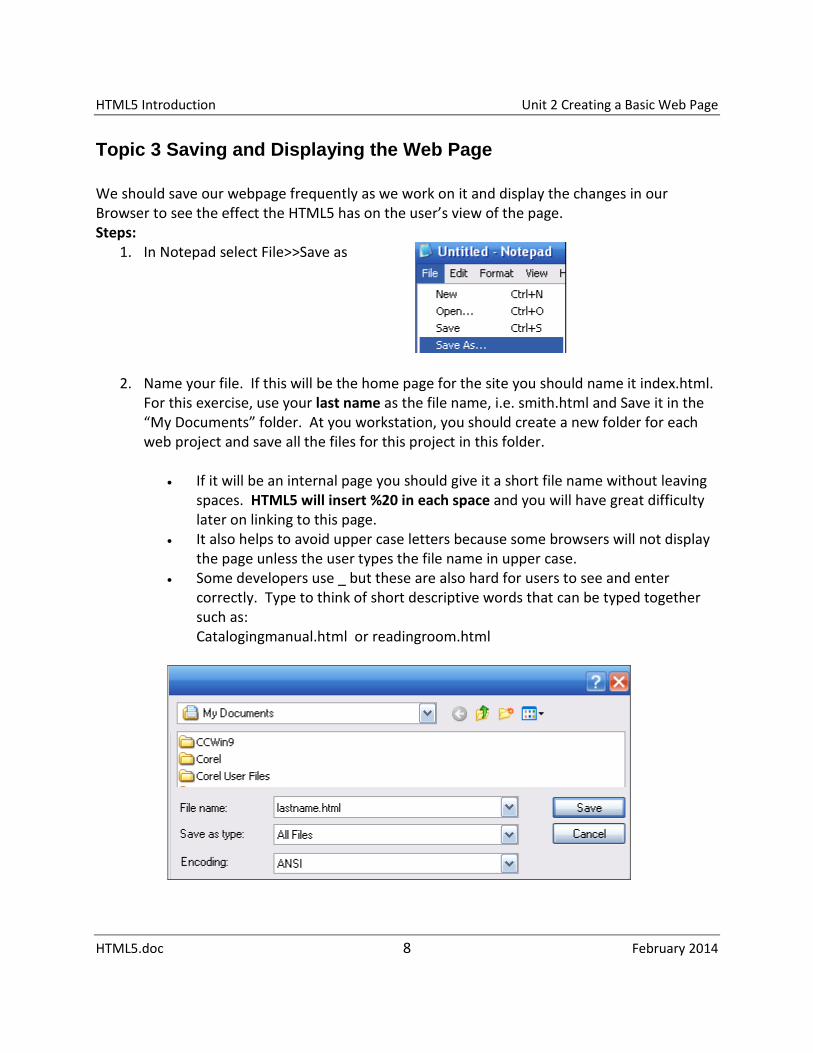
1. In Notepad select File>>Save as
2. Name your file. If this will be the home page for the site you should name it index.html. For this exercise, use your last name as the file name, i.e. smith.html and Save it in the “My Documents” folder. At you workstation, you should create a new folder for each web project and save all the files for this project in this folder.
• If it will be an internal page you should give it a short file name without leaving
spaces. HTML5 will insert %20 in each space and you will have great difficulty later on linking to this page.
• It also helps to avoid upper case letters because some browsers will not display the page unless the user types the file name in upper case.
• Some developers use _ but these are also hard for users to see and enter correctly. Type to think of short descriptive words that can be typed together such as: Catalogingmanual.html or readingroom.html
HTML5.doc 8 February 2014
HTML5 Introduction Unit 2 Creating a Basic Web Page
3. In the Save as type box, use the drop down arrow and specify All Files.
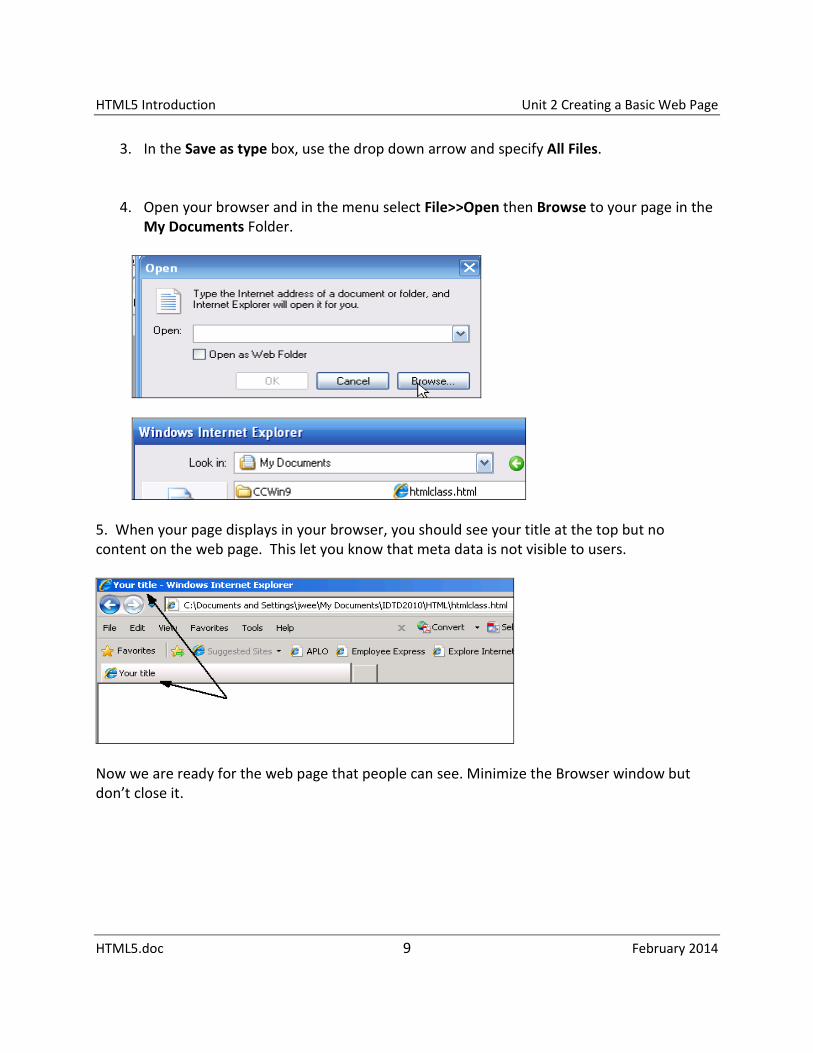
4. Open your browser and in the menu select File>>Open then Browse to your page in the My Documents Folder.
5. When your page displays in your browser, you should see your title at the top but no content on the web page. This let you know that meta data is not visible to users.
Now we are ready for the web page that people can see. Minimize the Browser window but don’t close it.
HTML5.doc 9 February 2014

HTML5 Introduction Unit 2 Creating a Basic Web Page Topic 4 Entering the Body Element
The body element controls what the user sees. We can expand the body tag and add attributes to change the background color, text and hyperlinks colors.
Exercise:
Let's alter the default background color, text color link color, etc. Go back to the Notepad document you started. Enter: <body text="#000000" bgcolor="#ffffcc" link="#336600" vlink="#008800" alink="#00ff00"> My Web Page </body> </html> Save your file and be sure to select “All Files” rather than text.
Refresh your browser and display your page again. What changes have you made?
HTML5.doc 10 February 2014
HTML5 Introduction Unit 2 Creating a Basic Web Page Topic 5 HTML5 Color Values
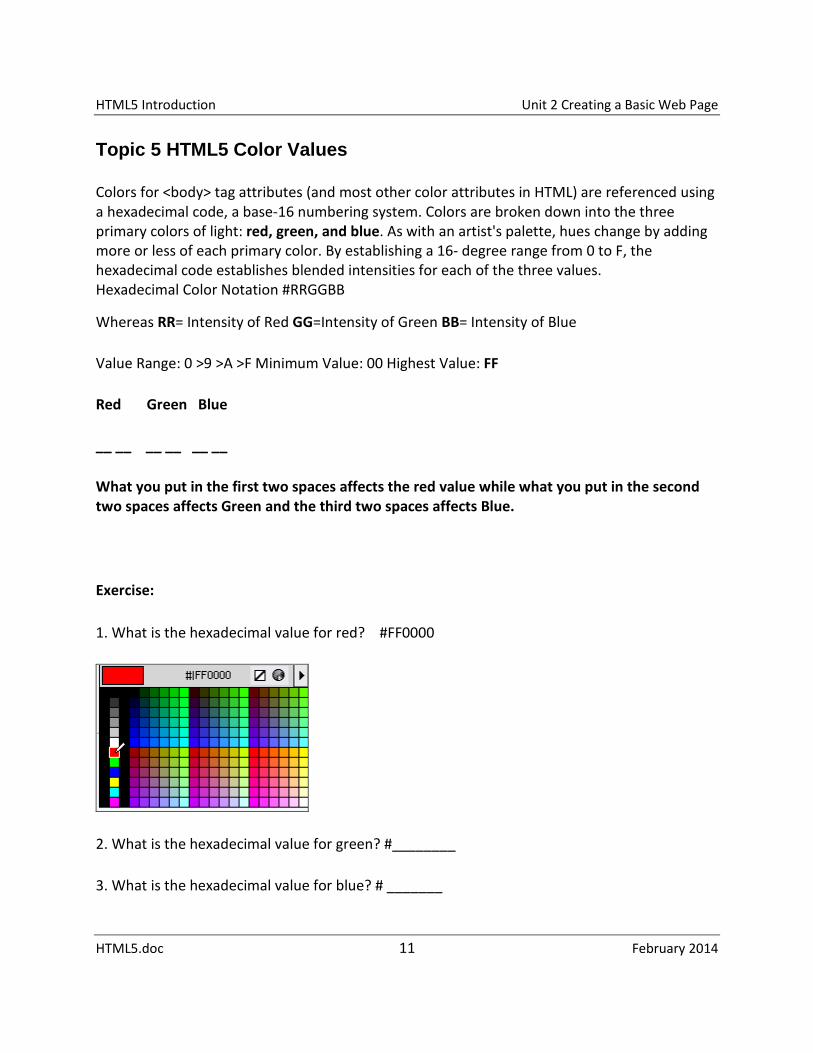
Colors for <body> tag attributes (and most other color attributes in HTML) are referenced using a hexadecimal code, a base-16 numbering system. Colors are broken down into the three primary colors of light: red, green, and blue. As with an artist's palette, hues change by adding more or less of each primary color. By establishing a 16- degree range from 0 to F, the hexadecimal code establishes blended intensities for each of the three values. Hexadecimal Color Notation #RRGGBB
Whereas RR= Intensity of Red GG=Intensity of Green BB= Intensity of Blue
Value Range: 0 >9 >A >F Minimum Value: 00 Highest Value: FF
Red Green Blue
__ __ __ __ __ __
What you put in the first two spaces affects the red value while what you put in the second two spaces affects Green and the third two spaces affects Blue.
Exercise:
1. What is the hexadecimal value for red? #FF0000
2. What is the hexadecimal value for green? #________
3. What is the hexadecimal value for blue? # _______
HTML5.doc 11 February 2014

HTML5 Introduction Unit 2 Creating a Basic Web Page 4. What is the hexadecimal value for white? # _______
5. What is the hexadecimal value for black? # _______
Following basic mathematical calculations, one can easily calculate the number of possible colors available using hexadecimal notation. With 16 possible digits for each character place and six places, 16,777,216 colors can be represented using hexadecimal notation. 6
16 = 16,777,216
However, the webmaster must anticipate the hardware limitations of the target audience. Many, if not most, users have monitors set to 8-bit color, capable of displaying only 256 colors. To further complicate matters, 40 of those of 256 colors display differently on Mac's and PC's and therefore should be avoided. That leaves the designer with only 216 colors considered web safe.
In other words, while millions of colors are technically possible, designers should limit themselves to the 216 that are web or "browser" safe. Colors that are considered browser safe evade the risk of "dithering." When the browsers encounter a color they cannot display they dither, or simulate the color by pattern of the closest colors they can find. This pattern can cause a grainy look and color variations. Many available applications have palettes displaying the 216 browser safe color. Here is another fast trick to determining the "safety" of a color. Multiples of 3 value pairs consisting of 0,3,6,9,C, and F are safe, for example #003399. When you have RGB pairs (both red, green, blue values are the same, in HTML5 you can code only the single value in red, green or blue. For example instead of #ff0000 for red put #f00 Exercise 2
1. Open your Notepad web file and change the text code to “#f00”. 2. Save your document and make sure you specify All Files so it isn’t saved as txt 3. Refresh your browser and see what color the text is now. ____________ 4. Type: #0F0 then save and refresh. What is the text color now? __________ 5. Type: #00F then save and refresh. What is the text color now? __________
HTML5.doc 12 February 2014

HTML5 Introduction Unit 2 Creating a Basic Web Page Topic 6 Headings Headings are not to be confused with Head. We are now ready to code the part of the document you can see on the web. Many web designers like to start out the web page with a Heading (not to be confused with Head which contains the meta data the user can't see). HTML5 has six levels of headings, numbered 1 through 6, with 1 being the largest. Headings are typically displayed in larger and/or bolder fonts than normal body text. The first heading in each document should be tagged <hl>. The syntax of the heading element is: <hy>Text of theheading </hy>
where y is a number between 1 and 6 specifying the level of the heading. <h1>My Web Page</h1> renders:
My Web Page Exercise: 1. Enter the Heading tags for your web page. Type: <h5>My Web Page</h5> 2. Save and view the page. 3. Change the size to 2 and view the results. HTML5 You may want to "center" text and images on your web page. HTML5 is very literal so you need special tags to make the text and images align in the center.
Topic 7 Align Attribute Attributes modify the behavior of tags. An attribute typically consists of an attribute name, an equal sign and a value. Most values are enclosed in double quotes (“). The align attribute can be employed to modify the behavior of a tag such as make the heading align to the left, center or right in the document. The heading tag can be expanded to add the
HTML5.doc 13 February 2014

HTML5 Introduction Unit 2 Creating a Basic Web Page attribute. Remember to use double quotes (“) around the value. Let’s go back and center our heading: <h2 align="center">My Web Page</center></h2> renders:
Topic 8 Horizontal Rule
Many web designers like to use a horizontal rule to delineate the sections of the content on the web page. The horizontal rule tag accomplishes this feature.
Type: <hr> It doesn’t have an /> Save and refresh.
Topic 9 Paragraph and Break Tags <p> The Paragraph Tag will give you a blank space between lines of type or in other words create a double space. Even if you hit return in your HTML5 code in notepad the text will not be double-spaced but rather will still be on the same line. Exercise:
1. In your Notepad file, type: This is some text. 2. Press Enter
HTML5.doc 14 February 2014

HTML5 Introduction Unit 2 Creating a Basic Web Page
3. Type: This is more text.
4. Save your document as HTML5 and view it in the refreshed browser. Notice that the text did not wrap.
5. Put <p>This is some text</p>. Save the document again and refresh the browser.
6. You should see that the text has wrapped and it has been double-spaced. The <p> tag double spaces the text.
HTML5.doc 15 February 2014
HTML5 Introduction Unit 2 Creating a Basic Web Page
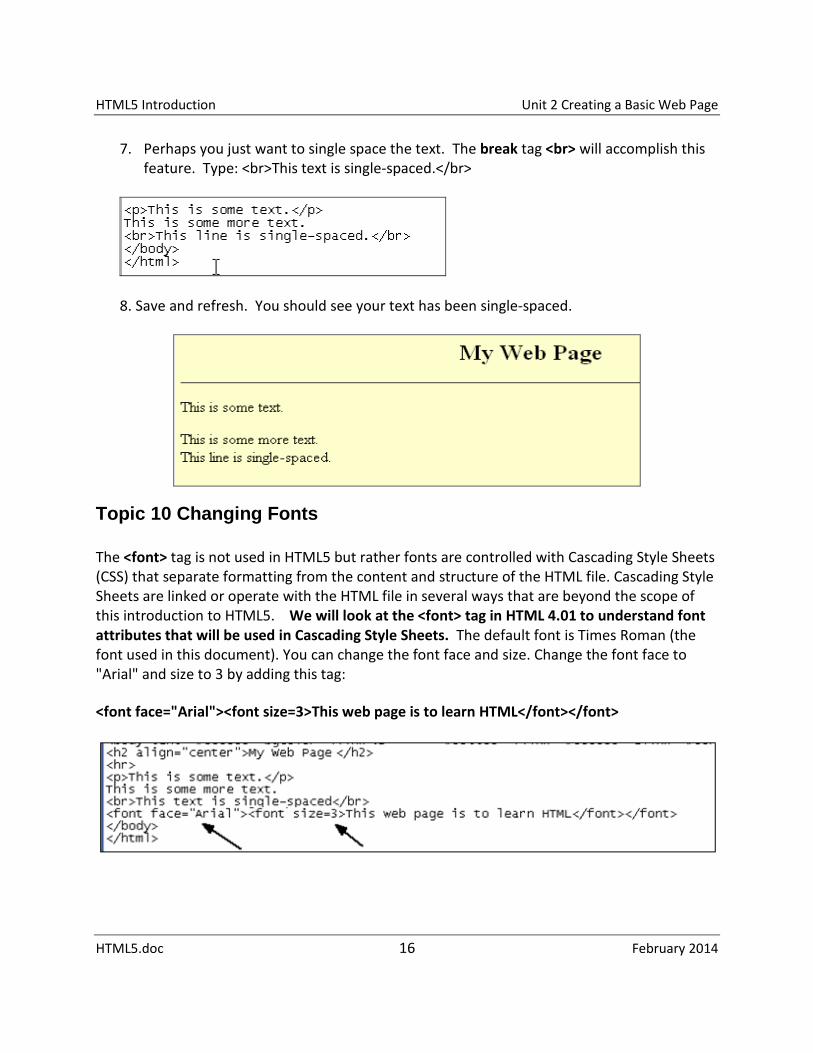
7. Perhaps you just want to single space the text. The break tag <br> will accomplish this feature. Type: <br>This text is single-spaced.</br>
8. Save and refresh. You should see your text has been single-spaced.
Topic 10 Changing Fonts
The <font> tag is not used in HTML5 but rather fonts are controlled with Cascading Style Sheets (CSS) that separate formatting from the content and structure of the HTML file. Cascading Style Sheets are linked or operate with the HTML file in several ways that are beyond the scope of this introduction to HTML5. We will look at the <font> tag in HTML 4.01 to understand font attributes that will be used in Cascading Style Sheets. The default font is Times Roman (the font used in this document). You can change the font face and size. Change the font face to "Arial" and size to 3 by adding this tag:
<font face="Arial"><font size=3>This web page is to learn HTML</font></font>
HTML5.doc 16 February 2014
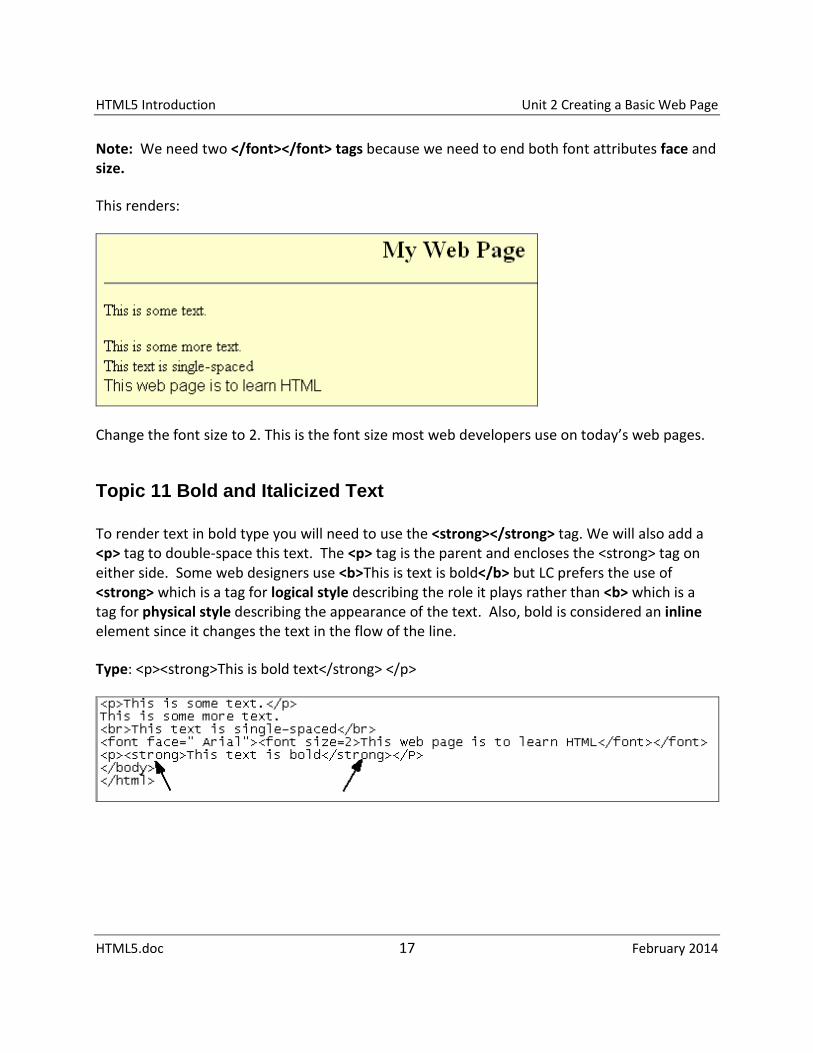
HTML5 Introduction Unit 2 Creating a Basic Web Page Note: We need two </font></font> tags because we need to end both font attributes face and size.
This renders:
Change the font size to 2. This is the font size most web developers use on today’s web pages.
Topic 11 Bold and Italicized Text
To render text in bold type you will need to use the <strong></strong> tag. We will also add a <p> tag to double-space this text. The <p> tag is the parent and encloses the <strong> tag on either side. Some web designers use <b>This is text is bold</b> but LC prefers the use of <strong> which is a tag for logical style describing the role it plays rather than <b> which is a tag for physical style describing the appearance of the text. Also, bold is considered an inline element since it changes the text in the flow of the line.
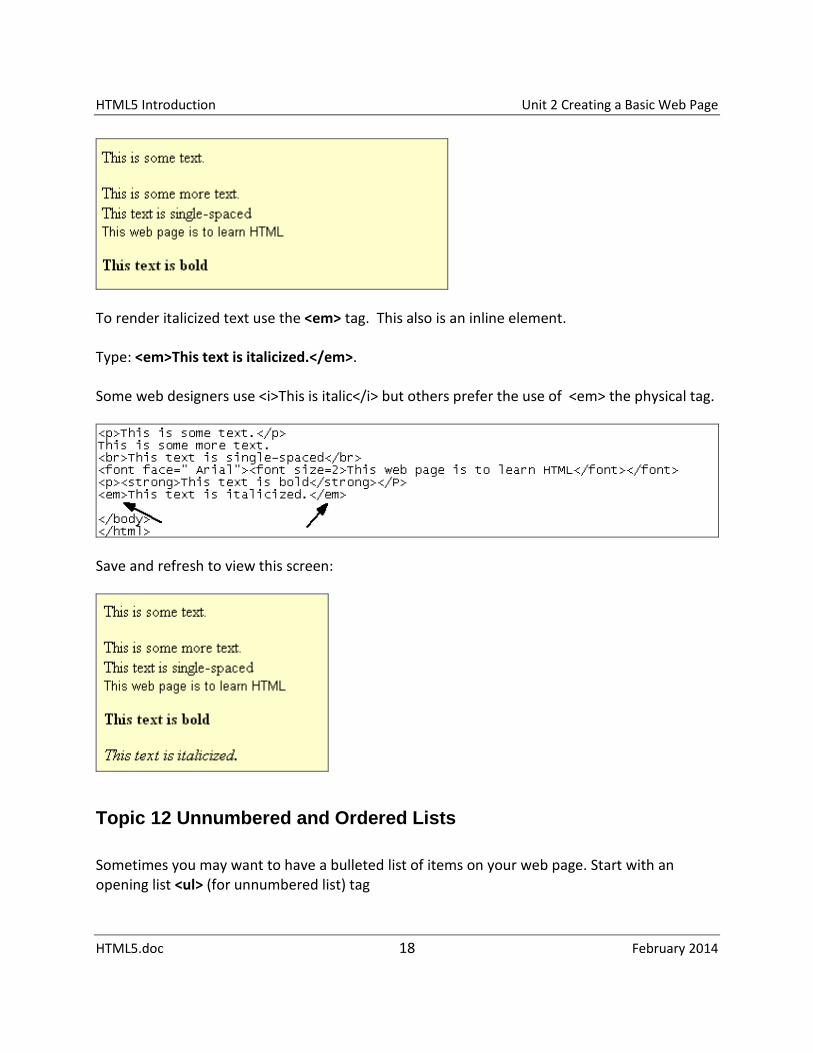
Type: <p><strong>This is bold text</strong> </p>
HTML5.doc 17 February 2014
HTML5 Introduction Unit 2 Creating a Basic Web Page
To render italicized text use the <em> tag. This also is an inline element. Type: <em>This text is italicized.</em>. Some web designers use <i>This is italic</i> but others prefer the use of <em> the physical tag.
Save and refresh to view this screen:
Topic 12 Unnumbered and Ordered Lists Sometimes you may want to have a bulleted list of items on your web page. Start with an opening list <ul> (for unnumbered list) tag
HTML5.doc 18 February 2014
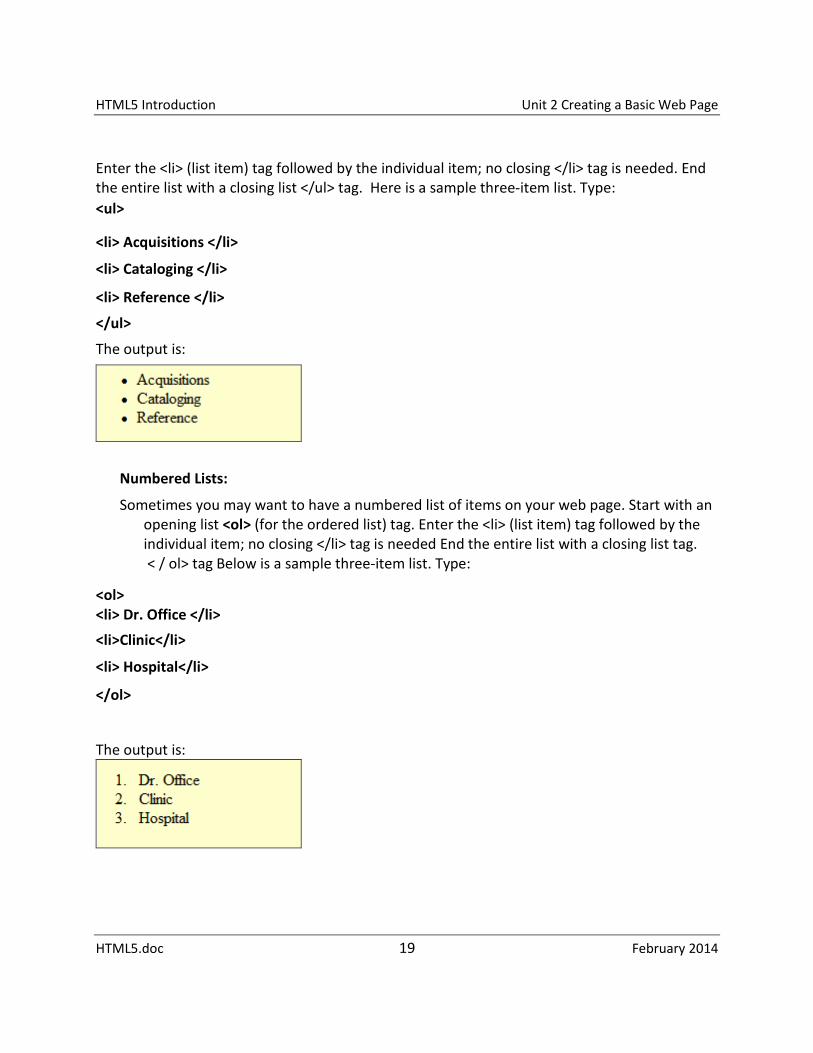
HTML5 Introduction Unit 2 Creating a Basic Web Page Enter the <li> (list item) tag followed by the individual item; no closing </li> tag is needed. End the entire list with a closing list </ul> tag. Here is a sample three-item list. Type: <ul>
<li> Acquisitions </li>
<li> Cataloging </li>
<li> Reference </li>
</ul>
The output is:
Numbered Lists:
Sometimes you may want to have a numbered list of items on your web page. Start with an opening list <ol> (for the ordered list) tag. Enter the <li> (list item) tag followed by the individual item; no closing </li> tag is needed End the entire list with a closing list tag. < / ol> tag Below is a sample three-item list. Type:
<ol> <li> Dr. Office </li>
<li>Clinic</li>
<li> Hospital</li>
</ol>
The output is:
HTML5.doc 19 February 2014

HTML5 Introduction Unit 2 Creating a Basic Web Page Topic 13 Definition List New in HTML5, the Definition List tag give the ability to give a term and then indent and provide a definition in a order manner. It can help in FAQ pages. Type: <dl> <dt>library</dt> <dd>place where people can use and/or borrow books, periodicals, films etc. </dd> <dt>librarian</dt> <dd> a person, typically with a degree in library science, who administers or assists in a library. </dd> </dl> This renders:
Topic 14 Adding Images to your Web Site Images - Images are another feature that makes web pages come alive. However, even though you put the code into the web page, the image will not display unless you place that image object file in the same server space as you point to in the code. The web page merely points to the image.
<img src> Image tag The <img src> tag can have many attributes nested in it, such as the height, width, border size and alignment. Let's code for the image of the Columbus School of Law at: http://lis.cua.edu/about/contactus.cfm Steps:
1. Right click on the image of the Law School and select “Save Picture As” then navigate to the My Documents folder or the folder on your workstation where you save your web files for your project.
HTML5.doc 20 February 2014
HTML5 Introduction Unit 2 Creating a Basic Web Page
2. Right click on the image in the My Documents folder and rename it to law.jpg. 3. In Notepad type:
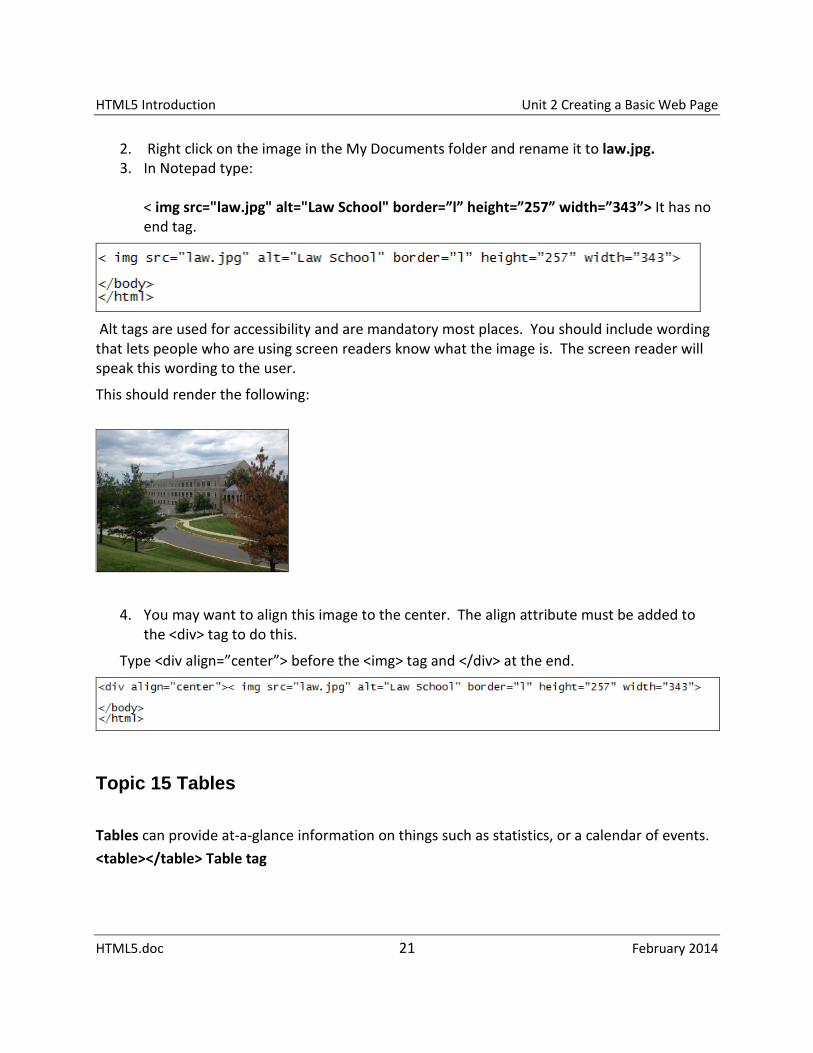
< img src="law.jpg" alt="Law School" border=”l” height=”257” width=”343”> It has no end tag.
Alt tags are used for accessibility and are mandatory most places. You should include wording that lets people who are using screen readers know what the image is. The screen reader will speak this wording to the user.
This should render the following:
4. You may want to align this image to the center. The align attribute must be added to the <div> tag to do this.
Type <div align=”center”> before the <img> tag and </div> at the end.
Topic 15 Tables
Tables can provide at-a-glance information on things such as statistics, or a calendar of events. <table></table> Table tag
HTML5.doc 21 February 2014
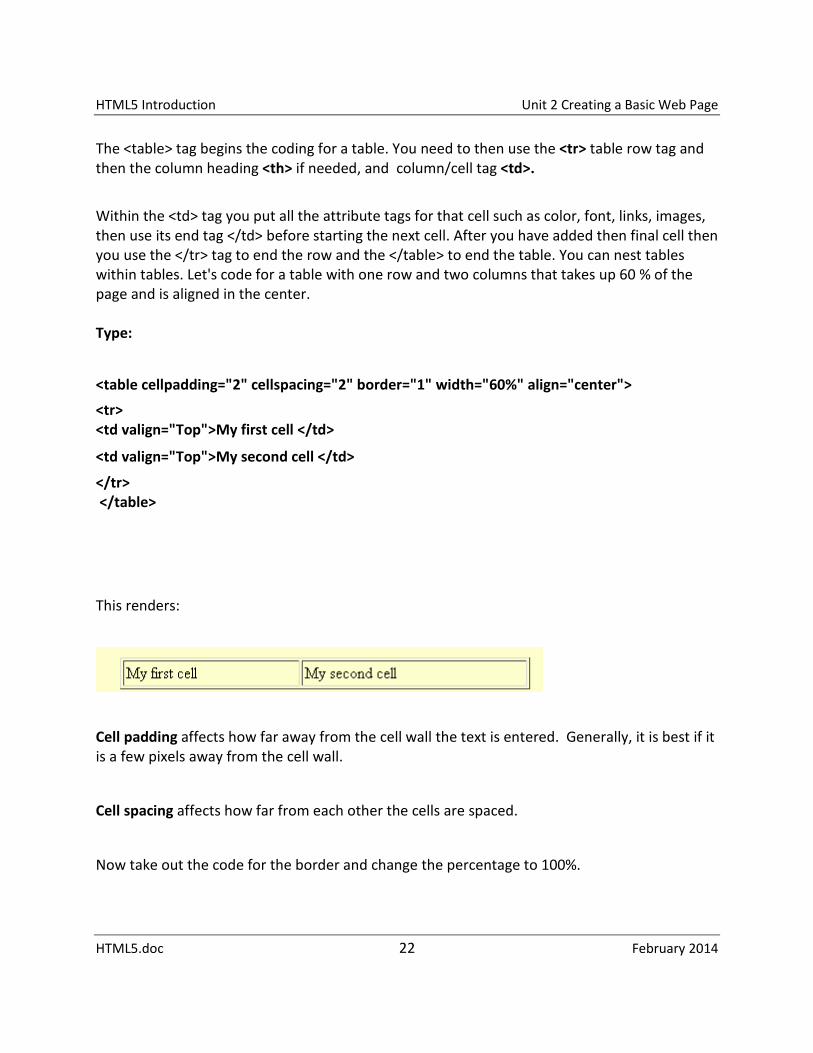
HTML5 Introduction Unit 2 Creating a Basic Web Page The <table> tag begins the coding for a table. You need to then use the <tr> table row tag and then the column heading <th> if needed, and column/cell tag <td>. Within the <td> tag you put all the attribute tags for that cell such as color, font, links, images, then use its end tag </td> before starting the next cell. After you have added then final cell then you use the </tr> tag to end the row and the </table> to end the table. You can nest tables within tables. Let's code for a table with one row and two columns that takes up 60 % of the page and is aligned in the center. Type:
<table cellpadding="2" cellspacing="2" border="1" width="60%" align="center">
<tr> <td valign="Top">My first cell </td>
<td valign="Top">My second cell </td>
</tr> </table>
This renders:
Cell padding affects how far away from the cell wall the text is entered. Generally, it is best if it is a few pixels away from the cell wall.
Cell spacing affects how far from each other the cells are spaced.
Now take out the code for the border and change the percentage to 100%.
HTML5.doc 22 February 2014

HTML5 Introduction Unit 2 Creating a Basic Web Page Topic 16 Copy Coding Because coding is time consuming it is very useful to do "copy coding" for elements that are the same on nearly the same on a page or across several pages. In fact, if you make a design you like, use it for a template and just change the elements that differ. Let's “copy code” the table we have just made.
Type <p></p> to put a double-space between the tables.
Left click and drag across the code for the table, then click Edit in the menu bar and select "copy" on the menu. Move your cursor down in the web code and click Edit in the menu bar again then select "paste" beyond the </p> tag.
Topic 17 Formatting blocks of content with <div> tags In HTML5, it is best to use <div> tags to provide attributes to a block of content within a web page. We will center a block of text. Copy the Dept. of Library & Information Science mission at: http://lis.cua.edu/about/mission.cfm into your code after the <div> tag
<div align="center">
<p>Mission</p>
Library and information Science (LIS) provides professional education and supports lifelong learning in the tradition of The Catholic University of America. We produce innovative leaders with professional values informed by the CUA core values of reason, faith and service; and the LIS values of collaboration, community, innovation and excellence. Our education is characterized by a strong grounding in the theory and practice of the LIS field, engagement with the rich cultural and human resources of the Washington metropolitan area, and the creative use of information technology. LIS is committed to applying the principles of library and information science towards the betterment of the individual, communities and society.
</div>
HTML5.doc 23 February 2014

HTML5 Introduction Unit 2 Creating a Basic Web Page This should render:
Change your code to:
<div style="background: #F96; width: 300px">
<p>Mission</p>
Library and information Science (LIS) provides professional education and supports lifelong learning in the tradition of The Catholic University of America. We produce innovative leaders with professional values informed by the CUA core values of reason, faith and service; and the LIS values of collaboration, community, innovation and excellence. Our education is characterized by a strong grounding in the theory and practice of the LIS field, engagement with the rich cultural and human resources of the Washington metropolitan area, and the creative use of information technology .LIS is committed to applying the principles of library and information science towards the betterment of the individual, communities and society.
</div>
This should render:
HTML5.doc 24 February 2014
HTML5 Introduction Unit 2 Creating a Basic Web Page
Topic 18 Adding Hyperlinks Adding Hyperlinks -One of the most interesting aspects of web pages is the ability to add hyperlinks to other web resources so that a user can click and go to another web page. <a> Hyperlink tag
The hyperlink tag is a two-part tag. The first part contains the Uniform Resource Locator (URL) of the other web site and the second part is the wording you give to alert the user to the nature of the other web site. Let’s add a hyperlink to go to the Department of Library and Information Science web site.
Absolute Link – an Absolute link goes to another website outside of your web site. You will need to add the full Uniform Resource Locator (URL) to the code. You may not just enter LIS.cua.edu for example.
Let’s add an absolute hyperlink to go to the Department of Library and Information Science web site. The <a> tag stands for anchor and expands to add the URL the web page you want to send people once they click the link. The wording between the tags is what users see on the finished web page. It should not have wording such as “home” or “click here,” but rather give a clear indication of what the user will see if they click the link. Go to the top of your web page under the heading before the first line of text.
1. Type:
<a href="http://lis.cua.edu ">Dept. of Library and Information Science</a>
2. Save and refresh your web page.
3. Test the link in your browser.
Relative Link:
A relative link will take us to another page on our own web site and does not need the full web URL, only the file name if it is saved in the same directory/folder on the server. Type the following:
<a href=”secondpage.html”>Go to my second page</a>
Save and refresh your web page.
HTML5.doc 25 February 2014

HTML5 Introduction Unit 2 Creating a Basic Web Page Web designers make many web pages for a website and use relative links to link them to each other. We will make another web page called “secondpage.html” so that this link will take people to our second page.
Exercise:
1. In order to save time in class, we will save the web page we have been creating with the filename: secondpage.html.
2. In the code change the title to <title>My Second Page</title>
3. In the body change My Web Page to <h2 align="center">My Second Web Page</h2>
4. Add a link to link back to your first page. This filename will be your last name.html e.g. smith.html.
<a href=”yourlastname.html”>Go back to my first page</a>
Substitute your last name for “yourlastname” 5. Save this file as secondpage.html.
6. Open this file in the browser and test the link to see if it goes back to your first page.
7. Test your first page link to see if it goes to your second page.
Topic 19 Using the <nav> tag
Now that you have created hyperlinks you can define a navigation bar for users to go to other pages on your website or to other websites.
Let’s add the CUA Libraries link to our top navigation area and use the new HTML5 <nav> </nav> tag to enclose all of our links at the top of the page. The <nav> tag should not be used for inline links but rather to cluster navigation links. Also, the <nav> tag does not work in IE8 and earlier versions.
At the top of your “secondpage.html” page under the heading type:
<nav>
<a href="http://lis.cua.edu">Dept. of Library and Information Science</a> |
HTML5.doc 26 February 2014

HTML5 Introduction Unit 2 Creating a Basic Web Page <a href="http://libraries.cua.edu">CUA Libraries</a> |
<a href=”yourlastname.html”>Go back to my first page</a> |
<a href=”secondpage.html”>Go to my second page</a> |
</nav>
Save your secondpage.html and refresh the browser This should render:
Copy and paste the above navigation code into your first page, save and refresh it.
You are on your way to creating web pages and debugging web pages. There are other web sites that cover web design, the addition of audio and video files, and further HTML5 tags at:
About Web Design and HTML5 tags—Scroll down to see an alphabetized list of tags.
http://webdesign.about.com/od/htmltags/a/bl_index.htm
World Wide Web Consortium
http://www.w3.org/TR/html401/struct/global.html
W3 Schools Tag List
http://www.w3schools.com/tags/default.asp
The preferred web page editor is the Adobe Dreamweaver application. The HTML5 code you have created can be opened in Dreamweaver. We used Notepad because it is available on every workstation and you can practice your skills.
Dreamweaver uses two views: HTML5 code view and the Design View. It is very important to understand HTML5 code to debug and/or enhance web pages you create.
HTML5.doc 27 February 2014

HTML5Introduction Unit 3 Accessibility, Validation & QA
Unit 3 Accessibility and Validation
Topic 1 Accessibility Most institutions are required but more importantly committed to making web pages accessible to all users. The 1998 Rehabilitation Act Section 508 is designed to eliminate barriers in information technology. Institutions require that all HTML5 and PDF files be 508 compliant before they can be published on the Internet. Let’s review designing accessible HTML5 documents at the W3C’s Web Accessibility Initiative site at: http://www.w3.org/WAI/ and the Section 508 website at: http://section508.gov/ and the Section 508 checklist at: http://webaim.org/standards/508/checklist Dreamweaver provides accessibility features under: File >> Check Page >>Accessibility. Brief guidelines:
• Avoid use of deprecated or outdated tags • provide equivalent text for auditory and visual content • avoid the use of colors to emphasize information • ensure that web pages are clear and simple • provide consistent navigation mechanisms
HTML5.doc 28 February 2014
HTML5Introduction Unit 3 Accessibility, Validation & QA Topic 2 Validation Validation of all pages is mandatory for many institutions.
2. W3C HTML5Validation Service http://validator.w3.org/
3. Web Design Group Validator http://www.htmlhelp.com/tools/validator/
3. In addition, Dreamweaver has built-in HTML5validation. File >>Validate >>Validate Current Document
HTML5.doc 29 February 2014

HTML5Introduction Unit 4 Load Web Pages on the Server
Unit 4 Load Web Pages on the Server
All students enrolled in the Department of Library and Information Science for the current semester may publish web pages on the NT server using a standard web browser, either Internet Explorer or Firefox.
Topic 1 Location of the Server and Log in 1. Web to http://home.cua.edu/ .
1. Students log in in the upper right with their NT username and password.
2. Next click on Access My Personal Files
.
HTML5.doc 30 February 2014
HTML5Introduction Unit 4 Load Web Pages on the Server
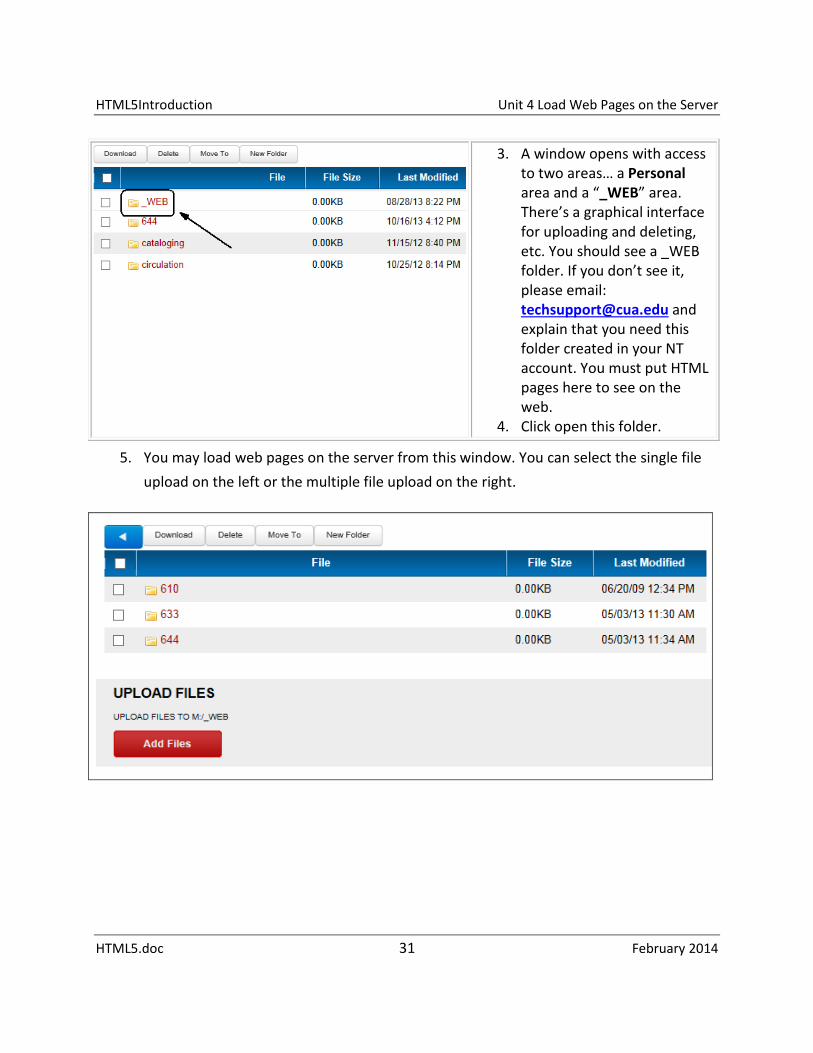
3. A window opens with access to two areas… a Personal area and a “_WEB” area. There’s a graphical interface for uploading and deleting, etc. You should see a _WEB folder. If you don’t see it, please email: [email protected] and explain that you need this folder created in your NT account. You must put HTML pages here to see on the web.
4. Click open this folder.
5. You may load web pages on the server from this window. You can select the single file upload on the left or the multiple file upload on the right.
HTML5.doc 31 February 2014
HTML5Introduction Unit 4 Load Web Pages on the Server
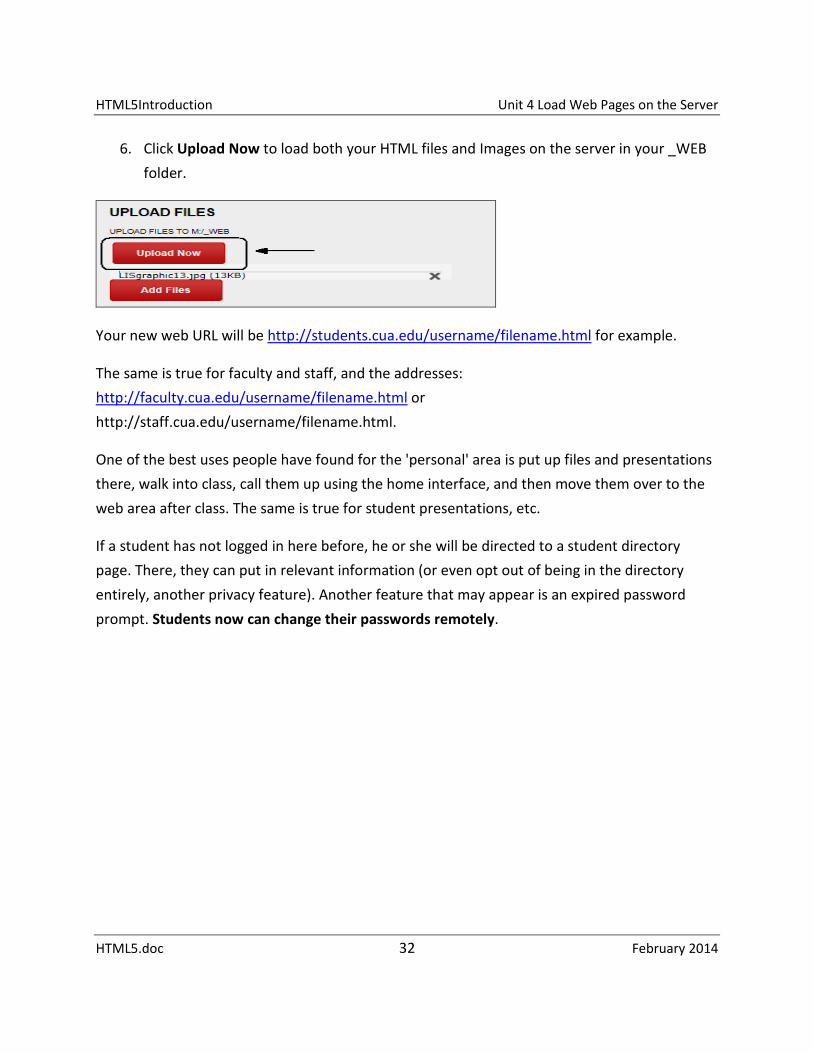
6. Click Upload Now to load both your HTML files and Images on the server in your _WEB folder.
Your new web URL will be http://students.cua.edu/username/filename.html for example.
The same is true for faculty and staff, and the addresses: http://faculty.cua.edu/username/filename.html or http://staff.cua.edu/username/filename.html.
One of the best uses people have found for the 'personal' area is put up files and presentations there, walk into class, call them up using the home interface, and then move them over to the web area after class. The same is true for student presentations, etc.
If a student has not logged in here before, he or she will be directed to a student directory page. There, they can put in relevant information (or even opt out of being in the directory entirely, another privacy feature). Another feature that may appear is an expired password prompt. Students now can change their passwords remotely.
HTML5.doc 32 February 2014


![HTML5 Semantics, Accessibility & Forms [Carsonified HTML5 Online Conference]](https://static.fdocuments.us/doc/165x107/54c70c8c4a79593f288b465a/html5-semantics-accessibility-forms-carsonified-html5-online-conference.jpg)


![[MS-HTML5]: Microsoft Edge / Internet Explorer HTML5 ...interoperability.blob.core.windows.net/web/MS-HTML5/[MS-HTML5].pdf · Microsoft Edge / Internet Explorer HTML5 Standards Support](https://static.fdocuments.us/doc/165x107/5a903bb67f8b9a4a268e1ade/ms-html5-microsoft-edge-internet-explorer-html5-ms-html5pdfmicrosoft.jpg)