HP NextGel TECHNICAL DATA SHEET - Concrete Pavers
15
UPDATE August 26, 2020 Make sure that you have an up-to-date technical data sheet in hand by consulting our website: techniseal.com U.S.A. and Canada: dial 1 800 465-7325 Others: dial (514) 523-8324 (Canada) APPLICATIONS (WITH MECHANICAL COMPACTION) • Concrete pavers, wet-cast pavers, natural stones, slabs, textured or clay pavers and porcelain tiles • Heavy-sloped and high-traffic areas • High-humidity areas and pool decks • Commercial, residential, industrial and public projects • False joints • Concrete overlay • For joints from 1/16” to 4”, ideal for joints from 1/16” to 1” with intersecting spaces up to 2” PROPERTIES • No dust † • No haze • Fast wetting • Optimal strength • Deters ants and other insects • Inhibits weed growth • Eliminates joint erosion – water, frost heaving, wind, power washing, etc. • Stabilizes pavers – Strengthens interlocking TECHNICAL DATA SHEET TECHNICAL DATA SHEET TECHNICAL DATA SHEET TECHNICAL DATA SHEET HP NextGel ™ Jointing Sand Techniseal ® Jointing products contribute to LEED credits, based on the use of regional and recycled materials. When installed following instructions, HP NextGel™ is well below OSHA’s respirable crystalline silica limits (“RCS”) for construction material. See details on page 15 of this document.
Transcript of HP NextGel TECHNICAL DATA SHEET - Concrete Pavers

UPDATE
August 26, 2020Make sure that you have an up-to-date technical data sheet in hand by consulting our website: techniseal.comU.S.A. and Canada: dial 1 800 465-7325Others: dial (514) 523-8324 (Canada)
APPLICATIONS (WITH MECHANICAL COMPACTION)• Concrete pavers, wet-cast pavers, natural stones, slabs, textured or clay pavers and porcelain tiles • Heavy-sloped and high-traffic areas • High-humidity areas and pool decks • Commercial, residential, industrial and public projects • False joints• Concrete overlay• For joints from 1/16” to 4”, ideal for joints from 1/16” to 1” with intersecting spaces up to 2”
PROPERTIES• No dust† • No haze • Fast wetting • Optimal strength • Deters ants and other insects • Inhibits weed growth • Eliminates joint erosion – water, frost heaving, wind, power washing, etc. • Stabilizes pavers – Strengthens interlocking
TECH
NIC
AL D
ATA
SHEE
T TE
CHN
ICAL
DAT
A SH
EET
TECH
NIC
AL D
ATA
SHEE
T TE
CHN
ICAL
DAT
A SH
EET
HP NextGel™ Jointing Sand
Techniseal® Jointing products contribute to LEED credits, based on the use of regional and recycled materials.
When installed following instructions, HP NextGel™ is well below OSHA’s respirable crystalline silica limits (“RCS”) for construction material. See details on page 15 of this document.

TECHNISEAL® – TECHNICAL DATA SHEET –HP NextGel™ Jointing Sand 2
DESCRIPTION
Techniseal® HP NextGel™ Jointing Sand is a state-of-the-art mix of graded sand and binder that flows smoothly down joints for a fast and effective installation of pavers or slabs with false, narrow or wide joints. It is also recommended for surfaces exposed to heavy traffic, for high-humidity areas and concrete overlay. Easy to use, HP NextGel™ Jointing sand starts to set only a few minutes after being activated with water, and quickly becomes resistant to water erosion (rain, splashes, sprinklers, etc.). HP NextGel™ Jointing sand is the go-to solution for all installations where mechanical compaction is done. It offers great resistance to weed growth, insect invasion, and erosion.
Techniseal® HP NextGel™ Jointing Sand is manufactured with a revolutionary technology. NextGel™ radically transforms and improves the properties and behavior of jointing sand, resulting in the first ever true “no dust†”, “no haze” and “no waste” jointing sand for a fast, clean, durable and profitable installation.†NextGel™ contains no dust from additives. The dust that can be found is of natural source and comes exclusively from the sand. This is especially true with grey sand which is made from crushed sub-angular aggregates.
Minimum joint width: 1/16”
Maximum joint width: 4”*
Ideal joint width: from 1/16” to 1” with intersecting spaces up to 2”
Minimum joint depth: 1.5”, except for porcelain tiles**
*For joint width wider than 1”, please refer to the natural stone sections under INSTALLATION QUICK-LINKS below. **For porcelain tile installation, please refer to dedicated section under INSTALLATION QUICK-LINKS below.
DIRECTIONS
ALWAYS TEST ON A SMALL HIDDEN AREA OF APPROXIMATELY 4 SQ. FT. TO ENSURE THAT RESULT MEETS YOUR EXPECTATIONS (SEE WARRANTY).
BEFORE YOU BEGIN
In order to ensure good cohesion and long-term resistance, jointing sand must imperatively dry completely before being exposed to rain (24 to 48 hours minimum). The drying time will be extended in cold or humid weather and for wide joints installations (wider than 1/2’’). Why? Like paint, jointing sand must dry completely to polymerize and offer all its advantages. However, jointing sand will be able to withstand unexpected rain 60 minutes after installation.
INSTALLATION CONDITIONS
• Temperature must be above 32°F for 48 hours following installation. • Surface and joints must be dry. • Sprinkler system must be turned off.
TRAFFIC
Pedestrian: Immediate / Vehicular: 48 to 72 h. Block access during that period.
COMPACTION INFORMATION
Mechanical compaction is MANDATORY when using HP NextGel™ Jointing Sand. Failure to do so may compromise joint integrity and performance. If joint width is greater than ¼” and mechanical compaction is either not possible or traditionally not used, please use Techniseal’s NOCO™ polymeric joint.
1/16” to 1”
2” upto

TECHNISEAL® – TECHNICAL DATA SHEET –HP NextGel™ Jointing Sand 3
CAUTION• Wear appropriate safety gear. • Do not mix product with cement, sand or any other material. • Ensure that joint has hardened before cleaning and sealing the surface. Depending on climate and type of installation,
typical recommended wait time is a minimum of 7 days after installation and may take up to 30 days.• Not for use on submerged or constantly wet surfaces. • Joints become soft when humid but become hard again when dry. • Because product comes from a natural source, color and grain size may vary. • This product starts repelling water a few minutes after initial wetting. Make sure to complete each section per detailed
installation instructions before moving to the next one.• The use of cleaning devices (high pressure washer, etc.) is restricted during the first 30 days. It should be noted that too
direct and violent jets can create alterations, so it is best to consult the machine manufacturers in order to use the specific accessories with soft jets.
• Failure to have recessed joint could lead to premature joint degradation.• Do not sweep product over asphalt.• Bedding layer needs to be able to drain properly in order to allow for the HP NextGel™ Jointing Sand to dry properly.
Certain type of bedding or screening materials may not drain properly which will trap moisture and may cause issues.• Proper maintenance is paramount to maintaining joints in optimal condition. Excessive moisture, shade, inadequate
cleaning and maintenance, presence of soil and organic matters (including grass trimmings) left on the joints may contribute to growth of moss, mold or mildew.
IMPORTANT: Do not use this product as capping sand.
INSTALLATION QUICK-LINKS
Installation on a Draining Base with Pavers (see page 3)
Installation on a Draining Base with Natural Stone and Slabs (see page 5)
Installation on a Draining Base with Porcelain Tiles (see page 7)
Installation on Concrete Overlay with Pavers, Natural Stone and Slabs (see page 9)
Installation on Concrete Overlay with Porcelain Tiles (see page 11)
INSTALLATION ON A DRAINING BASE WITH PAVERS (INCLUDING FALSE JOINTS) (JOINT WIDTH FROM 1/16’’ TO 1/2”)
The hardscape products should be installed following the manufacturer’s recommendation. For pavers, ICPI Technical Specification Spec #2 (www.icpi.org) should be used.
NECESSARY TOOLS
• Street broom with semi-rigid bristles. • Plate compactor or Paver roller.
Plate compactor such as Multiquip’s Mikasa MVB series, Wacker Neuson’s VP and WP series, Toro’s FP series are examples of models that can be used to ensure proper mechanical compaction. Use of a teflon coated plate or paving pad is important to help protect the surface. Plate compactor – Ideally, the plate compactor should have a minimum centrifugal force of 25 kN (5,000 lbf) and a frequency between 80 and 100 Hz. The weight of the plate compactor should not exceed 100 kg (220 lb). A smaller machine can be used for repair work and joint replacement. Paver roller such as Weber MT’s VPR 450 & VPR 700, EZG’s EVPC120, ESI’s EVPC120H are examples of models that can be used to ensure proper mechanical compaction. Use of rubber-coated or nylon rollers is important to help protect the surface.
• Hand tamper may be needed in restricted areas where using heavier equipment may not be possible.• Leaf blower. • Spray nozzle and garden hose.

TECHNISEAL® – TECHNICAL DATA SHEET –HP NextGel™ Jointing Sand 4
INSTALLATION - IMPORTANT
Check for water accumulation at the surface of the jointing sand as a cue to stop watering. Wait until there is no free water at the surface of the joint and verify the depth of activation. If HP NextGel™ is activated at 75% or more of its depth stop watering. If activated at less than 75%, water for an additional 15 seconds and check again after 30 seconds. Avoid overwatering HP NextGel™ as this will significantly lengthen the curing time and may compromise product performance.
END OF SUB-SECTION FOR INSTALLATION ON DRAINING BASE WITH PAVERS
Starting from bottom of the slope, quickly shower a 200 sq. ft. section** to set the sand (10 to 15 seconds). Activation instructions are valid for joint widths from 1/16” to 1/2”.
Immediately afterwards, wet the same section for 30 seconds.
Level the height of the sand with the leaf blower.
Pass the plate compactor or paver roller over the entire surface a second time.For thicker hardscape products, additional mechanical compaction may be required until joint saturation is reached. Proper compaction does not allow a finger to sink into the joint.
Remove excess sand from the surface with the broom.
Pass the plate compactor or paver roller over the entire surface to compact the sand.Mechanical compaction should ideally be done starting from center of installation, working towards the edges. Please follow best practices for mechanical compaction as outlined by ICPI.
Spread more product to fill joints again.
Spread product evenly on a small surface.
Using the street broom, fill joints completely. Spread sand over short distances.
Sand level must be at least 1/8” below top of pavers or up to the bottom of the chamfer.
1
30 sec.
Shower
10
On textured pavers, use the blower to remove the excess water off the surface and into the joints.
11
2
3 4
5 6
7 8
10 - 15 sec.
Shower
9

TECHNISEAL® – TECHNICAL DATA SHEET –HP NextGel™ Jointing Sand 5
INSTALLATION ON A DRAINING BASE WITH NATURAL STONE (INCLUDING FLAGSTONE) AND SLABS (JOINT WIDTH FROM 1/16” TO 4”)
The hardscape products should be installed following the manufacturer’s recommendation. Prior to applying HP NextGel™, make sure that the natural stones or slabs are well embedded in the bedding layer. For flagstone, the Natural Stone Institute guideline should be followed (www.naturalstoneinstitute.org). For slabs, ICPI Technical Specification Spec #2 (www.icpi.org) should be used.
For installation with natural stones, wait two days after installation of the trial area to confirm that there is no staining of the natural stones caused by the migration of some of the ingredients of the polymeric sand mix into the stones (such as a halo effect / picture frame on the outline of the stones, a phenomenon known with all jointing systems such as mortars, epoxy joints, and others).
COMPACTION INFORMATION
Follow the manufacturer’s recommendation for mechanical compaction.
For natural stone, use a paver roller. If joint width is greater than ¼” and mechanical compaction is either not possible or traditionally not used, please use Techniseal’s NOCO™ polymeric joint.
CAUTION SPECIFIC TO NATURAL STONE AND SLABS
If using a plate compactor over natural stone, add a membrane such as a flat-joint plastic snow fence or a 5/8” thick plywood sheet.
For slabs with a sensitive surface, use a plate compactor with a membrane such as a flat-joint plastic snow fence placed on top of the paved surface. For slabs of larger dimensions, it may be possible to use a plate compactor while protecting the slabs by 5/8” thick plywood sheets. This method should however be used with caution to avoid possible damage to the slabs.
NECESSARY TOOLS
• Street broom with semi-rigid bristles. • Plate compactor or Paver roller (slab) / Paver roller (natural stone).
Plate compactor such as Multiquip’s Mikasa MVB series, Wacker Neuson’s VP and WP series, Toro’s FP series are examples of models that can be used to ensure proper mechanical compaction. Use of a teflon coated plate or paving pad is important to help protect the surface. Plate compactor – Ideally, the plate compactor should have a minimum centrifugal force of 25 kN (5,000 lbf) and a frequency between 80 and 100 Hz. The weight of the plate compactor should not exceed 100 kg (220 lb). A smaller machine can be used for repair work and joint replacement. Paver roller such as Weber MT’s VPR 450 & VPR 700, EZG’s EVPC120, ESI’s EVPC120H are examples of models that can be used to ensure proper mechanical compaction. Use of rubber-coated or nylon rollers is important to help protect the surface.
• Hand tamper may be needed in restricted areas where using heavier equipment may not be possible.• Leaf blower. • Spray nozzle and garden hose.
TECHNISEAL® – TECHNICAL DATA SHEET –HP NextGel™ Jointing Sand 6
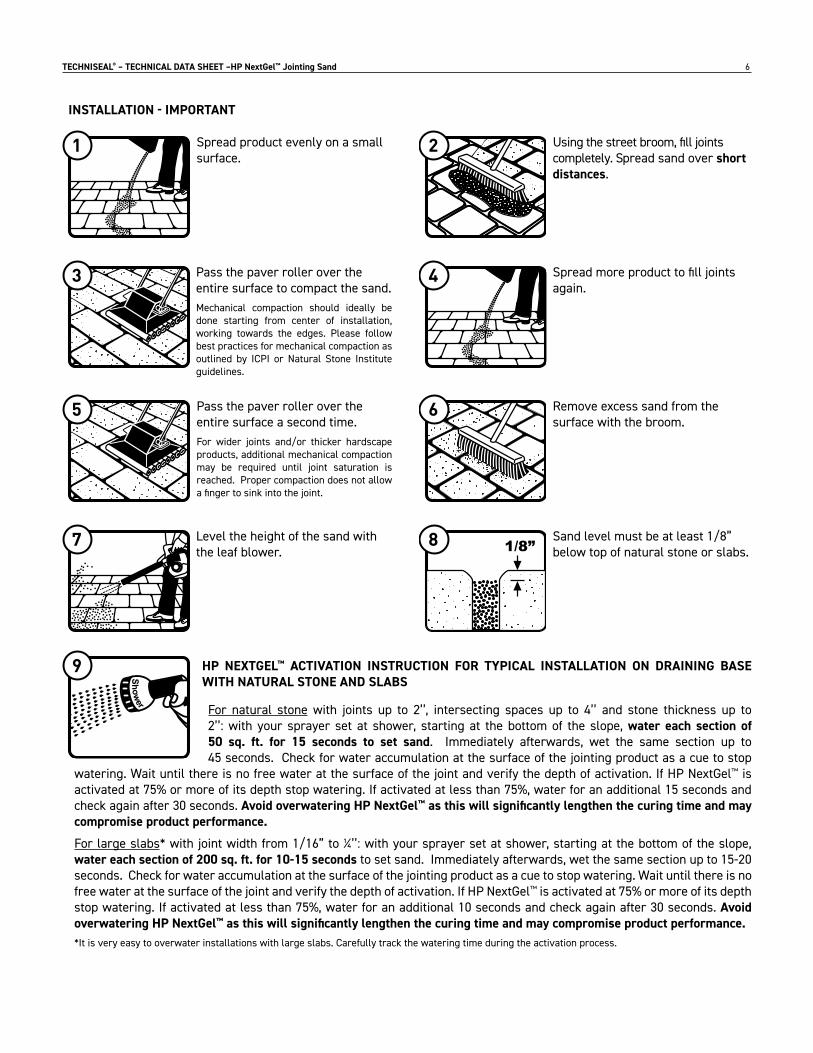
HP NEXTGEL™ ACTIVATION INSTRUCTION FOR TYPICAL INSTALLATION ON DRAINING BASE WITH NATURAL STONE AND SLABS
For natural stone with joints up to 2’’, intersecting spaces up to 4’’ and stone thickness up to 2’’: with your sprayer set at shower, starting at the bottom of the slope, water each section of 50 sq. ft. for 15 seconds to set sand. Immediately afterwards, wet the same section up to 45 seconds. Check for water accumulation at the surface of the jointing product as a cue to stop
watering. Wait until there is no free water at the surface of the joint and verify the depth of activation. If HP NextGel™ is activated at 75% or more of its depth stop watering. If activated at less than 75%, water for an additional 15 seconds and check again after 30 seconds. Avoid overwatering HP NextGel™ as this will significantly lengthen the curing time and may compromise product performance.
For large slabs* with joint width from 1/16” to ¼’’: with your sprayer set at shower, starting at the bottom of the slope, water each section of 200 sq. ft. for 10-15 seconds to set sand. Immediately afterwards, wet the same section up to 15-20 seconds. Check for water accumulation at the surface of the jointing product as a cue to stop watering. Wait until there is no free water at the surface of the joint and verify the depth of activation. If HP NextGel™ is activated at 75% or more of its depth stop watering. If activated at less than 75%, water for an additional 10 seconds and check again after 30 seconds. Avoid overwatering HP NextGel™ as this will significantly lengthen the curing time and may compromise product performance.*It is very easy to overwater installations with large slabs. Carefully track the watering time during the activation process.
INSTALLATION - IMPORTANT
Level the height of the sand with the leaf blower.
Pass the paver roller over the entire surface a second time.For wider joints and/or thicker hardscape products, additional mechanical compaction may be required until joint saturation is reached. Proper compaction does not allow a finger to sink into the joint.
Remove excess sand from the surface with the broom.
Pass the paver roller over the entire surface to compact the sand.Mechanical compaction should ideally be done starting from center of installation, working towards the edges. Please follow best practices for mechanical compaction as outlined by ICPI or Natural Stone Institute guidelines.
Spread more product to fill joints again.
Spread product evenly on a small surface.
Using the street broom, fill joints completely. Spread sand over short distances.
Sand level must be at least 1/8” below top of natural stone or slabs.
1 2
3 4
5 6
7 8
Shower
9

TECHNISEAL® – TECHNICAL DATA SHEET –HP NextGel™ Jointing Sand 7
END OF SUB-SECTION FOR INSTALLATION ON DRAINING BASE WITH NATURAL STONE AND SLABS
INSTALLATION ON A DRAINING BASE WITH PORCELAIN TILES (JOINT WIDTH FROM 1/16” TO 3/8”)
The hardscape products should be installed following the manufacturer’s recommendation. Prior to applying HP NextGel™, make sure that the natural stones or slabs are well embedded in the bedding layer. For flagstone, the Natural Stone Institute guideline should be followed (www.naturalstoneinstitute.org). For slabs, ICPI Technical Specification Spec #2 (www.icpi.org) should be used.
COMPACTION INFORMATION
Follow the manufacturer’s recommendation for mechanical compaction.
For porcelain tiles, use a paver roller. Do not use a plate compactor. If joint width is greater than ¼” and mechanical compaction is either not possible or traditionally not used, please use Techniseal’s NOCO™ polymeric joint.
CAUTION SPECIFIC TO PORCELAIN TILES
Mechanical compaction should be done until joint is saturated. Several passes may be required.
Always pre-compact and strike off your sand leveling course before installing your porcelain pavers in sand set installations.
Water must be able to drain through the native soils or any other appropriate aggregate located underneath the installation. In areas where water is unable to evacuate, excessive moisture and humidity will buildup which will negatively impact the performance of the polymeric sand.
NECESSARY TOOLS
• Street broom with semi-rigid bristles. • Paver roller such as Weber MT’s VPR 450 & VPR 700, EZG’s EVPC120, ESI’s EVPC120H are examples of models that can
be used to ensure proper mechanical compaction. Use of rubber-coated or nylon rollers is important to help protect the surface.
• Hand tamper may be needed in restricted areas where using heavier equipment may not be possible.• Leaf blower. • Spray nozzle and garden hose.
Optional - on porous natural stone, use the blower to remove the excess water off the surface and into the joints.
10

TECHNISEAL® – TECHNICAL DATA SHEET –HP NextGel™ Jointing Sand 8
INSTALLATION - IMPORTANT
Check for water accumulation at the surface of the jointing sand as a cue to stop watering. Wait until there is no free water at the surface of the joint and verify the depth of activation. If HP NextGel™ is activated at 75% or more of its depth stop watering. If activated at less than 75%, water for an additional 10 seconds and check again after 30 seconds. Avoid overwatering HP NextGel™ as this will significantly lengthen the curing time and may compromise product performance.
*It is very easy to overwater installations with large tiles. Carefully track the watering time during the activation process.
END OF SUB-SECTION FOR INSTALLATION ON DRAINING BASE WITH PORCELAIN TILES
Starting from bottom of the slope, quickly shower a 100 sq. ft. section** to set the sand (10 to 15 seconds).
Immediately afterwards, wet the same section for 10-15 seconds.
Level the height of the sand with the leaf blower.
Pass the paver roller over the entire surface a second time. Multiple passes may be required until joint saturation is reached.
Remove excess sand from the surface with the broom.
Pass the paver roller over the entire surface to compact the sand.
Spread more product to fill joints again.
Spread product evenly on a small surface.
Using the street broom, fill joints completely. Spread sand over short distances.
Sand level must be at least 1/8” below top of tiles.
1
10 - 15 sec.
Shower
10
2
3 4
5 6
7 8
10 - 15 sec.
Shower
9

TECHNISEAL® – TECHNICAL DATA SHEET –HP NextGel™ Jointing Sand 9
INSTALLATION ON CONCRETE OVERLAY WITH PAVERS (INCLUDING FALSE JOINTS), NATURAL STONE (INCLUDING FLAGSTONE) AND SLABS (JOINT WIDTH FROM 1/16” TO 4”)
The hardscape products should be installed following the manufacturer’s recommendation. Prior to applying HP NextGel™, make sure that the pavers, stones or slabs are well embedded in the bedding layer. For flagstone, the Natural Stone Institute guideline should be followed (www.naturalstoneinstitute.org). For pavers and slabs, ICPI Technical Specification Spec #10 and #20 (www.icpi.org) should be used for drainage, position and slope requirements.
For installation with natural stones, wait two days after installation of the trial area to confirm that there is no staining of the natural stones caused by the migration of some of the ingredients of the polymeric sand mix into the stones (such as a halo effect / picture frame on the outline of the stones, a phenomenon known with all jointing systems such as mortars, epoxy joints, and others).
COMPACTION INFORMATION
Follow the manufacturer’s recommendation for mechanical compaction.
For natural stone, use a paver roller. If joint width is greater than ¼” and mechanical compaction is either not possible or traditionally not used, please use Techniseal’s NOCO™ polymeric joint.
CAUTION SPECIFIC TO NATURAL STONE AND SLABS
For slabs with a sensitive surface, use a plate compactor with a membrane such as a flat-joint plastic snow fence placed on top of the paved surface.
NECESSARY TOOLS
• Street broom with semi-rigid bristles. • Paver roller such as Weber MT’s VPR 450 & VPR 700, EZG’s EVPC120, ESI’s EVPC120H are examples of models that can
be used to ensure proper mechanical compaction. Use of rubber coated rollers is important to help protect the surface.• Hand tamper may be needed in restricted areas where using heavier equipment may not be possible.• Leaf blower. • Spray nozzle and garden hose.
TECHNISEAL® – TECHNICAL DATA SHEET –HP NextGel™ Jointing Sand 10
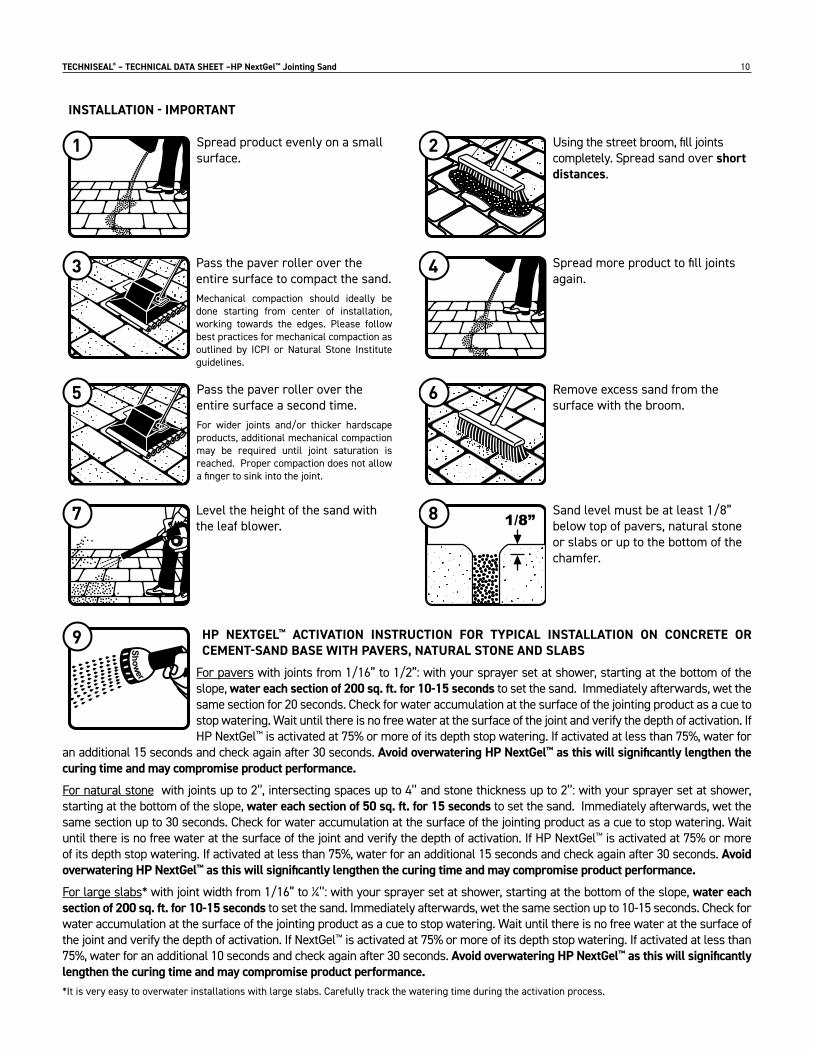
INSTALLATION - IMPORTANT
HP NEXTGEL™ ACTIVATION INSTRUCTION FOR TYPICAL INSTALLATION ON CONCRETE OR CEMENT-SAND BASE WITH PAVERS, NATURAL STONE AND SLABS
For pavers with joints from 1/16” to 1/2”: with your sprayer set at shower, starting at the bottom of the slope, water each section of 200 sq. ft. for 10-15 seconds to set the sand. Immediately afterwards, wet the same section for 20 seconds. Check for water accumulation at the surface of the jointing product as a cue to stop watering. Wait until there is no free water at the surface of the joint and verify the depth of activation. If HP NextGel™ is activated at 75% or more of its depth stop watering. If activated at less than 75%, water for
an additional 15 seconds and check again after 30 seconds. Avoid overwatering HP NextGel™ as this will significantly lengthen the curing time and may compromise product performance.
For natural stone with joints up to 2’’, intersecting spaces up to 4’’ and stone thickness up to 2’’: with your sprayer set at shower, starting at the bottom of the slope, water each section of 50 sq. ft. for 15 seconds to set the sand. Immediately afterwards, wet the same section up to 30 seconds. Check for water accumulation at the surface of the jointing product as a cue to stop watering. Wait until there is no free water at the surface of the joint and verify the depth of activation. If HP NextGel™ is activated at 75% or more of its depth stop watering. If activated at less than 75%, water for an additional 15 seconds and check again after 30 seconds. Avoid overwatering HP NextGel™ as this will significantly lengthen the curing time and may compromise product performance.
For large slabs* with joint width from 1/16” to ¼’’: with your sprayer set at shower, starting at the bottom of the slope, water each section of 200 sq. ft. for 10-15 seconds to set the sand. Immediately afterwards, wet the same section up to 10-15 seconds. Check for water accumulation at the surface of the jointing product as a cue to stop watering. Wait until there is no free water at the surface of the joint and verify the depth of activation. If NextGel™ is activated at 75% or more of its depth stop watering. If activated at less than 75%, water for an additional 10 seconds and check again after 30 seconds. Avoid overwatering HP NextGel™ as this will significantly lengthen the curing time and may compromise product performance.*It is very easy to overwater installations with large slabs. Carefully track the watering time during the activation process.
Level the height of the sand with the leaf blower.
Pass the paver roller over the entire surface a second time.For wider joints and/or thicker hardscape products, additional mechanical compaction may be required until joint saturation is reached. Proper compaction does not allow a finger to sink into the joint.
Remove excess sand from the surface with the broom.
Pass the paver roller over the entire surface to compact the sand.Mechanical compaction should ideally be done starting from center of installation, working towards the edges. Please follow best practices for mechanical compaction as outlined by ICPI or Natural Stone Institute guidelines.
Spread more product to fill joints again.
Spread product evenly on a small surface.
Using the street broom, fill joints completely. Spread sand over short distances.
Sand level must be at least 1/8” below top of pavers, natural stone or slabs or up to the bottom of the chamfer.
1 2
3 4
5 6
7 8
Shower
9

TECHNISEAL® – TECHNICAL DATA SHEET –HP NextGel™ Jointing Sand 11
END OF SUB-SECTION FOR INSTALLATION ON CONCRETE OVERLAY WITH PAVERS, NATURAL STONE AND SLABS
INSTALLATION ON CONCRETE OVERLAY WITH PORCELAIN TILES (JOINT WIDTH FROM 1/16” TO 3/8”)
COMPACTION INFORMATION
Follow the manufacturer’s recommendation for mechanical compaction.
For porcelain tiles, use a paver roller. Do not use a plate compactor. If joint width is greater than ¼” and mechanical compaction is either not possible or traditionally not used, please use Techniseal’s NOCO™ polymeric joint.
CAUTION SPECIFIC TO PORCELAIN TILES
Mechanical compaction should be done until joint is saturated. Several passes may be required.
Never install porcelain pavers without the required spacing between them. The porcelain pavers should never be installed with a porcelain to porcelain contact.
Water must be able to drain through the concrete material located underneath the installation. In areas where water is unable to evacuate, excessive moisture and humidity will buildup which will negatively impact the performance of the polymeric sand.
NECESSARY TOOLS
• Street broom with semi-rigid bristles. • Paver roller such as Weber MT’s VPR 450 & VPR 700, EZG’s EVPC120, ESI’s EVPC120H are examples of models that
can be used to ensure proper mechanical compaction. Use of rubber-coated or nylon rollers is important to help protect the surface.
• Hand tamper may be needed in restricted areas where using heavier equipment may not be possible.• Leaf blower. • Spray nozzle and garden hose.
Optional - on textured pavers or porous natural stone, use the blower to remove the excess water off the surface and into the joints.
10

TECHNISEAL® – TECHNICAL DATA SHEET –HP NextGel™ Jointing Sand 12
INSTALLATION - IMPORTANT
Check for water accumulation at the surface of the jointing sand as a cue to stop watering. Wait until there is no free water at the surface of the joint and verify the depth of activation. If HP NextGel™ is activated at 75% or more of its depth stop watering. If activated at less than 75%, water for an additional 5 seconds and check again after 30 seconds. Avoid overwatering HP NextGel™ as this will significantly lengthen the curing time and may compromise product performance.*It is very easy to overwater installations with large tiles. Carefully track the watering time during the activation process.
END OF SUB-SECTION FOR INSTALLATION ON CONCRETE OVERLAY WITH PORCELAIN TILES
Starting from bottom of the slope, quickly shower a 100 sq. ft. section** to set the sand (10 to 15 seconds).
Immediately afterwards, wet the same section for 10 seconds.
Level the height of the sand with the leaf blower.
Pass the paver roller over the entire surface a second time. Multiple passes may be required until joint saturation is reached.
Remove excess sand from the surface with the broom.
Pass the paver roller over the entire surface to compact the sand.
Spread more product to fill joints again.
Spread product evenly on a small surface.
Using the street broom, fill joints completely. Spread sand over short distances.
Sand level must be at least 1/8” below top of tiles.
1
10 sec.
Shower
10
2
3 4
5 6
7 8
10 - 15 sec.
Shower
9

TECHNISEAL® – TECHNICAL DATA SHEET –HP NextGel™ Jointing Sand 13
COVERAGE
For a 50 lb bag:
Narrow joints: 60 to 120 sq. ft.
Wide joints: 25 to 40 sq. ft. For a more precise evaluation of the coverage, please refer to the product calculator at techniseal.com.
The amount required will depend on the shape and size of the slabs, tiles and pavers, as well as the width and depth of the joints.
STORAGE AND SHELF LIFE
Unused bags can be stored outside if they are still on a pallet and protected by the original packaging.
PACKAGING
Jointing Product Product code Color Retail Size Units per pallet
HPNextGel™
40100596 (291-H37) Tan 50 lb (bag) 56
40100597 (291-H47) Granite 50 lb (bag) 56
40100598 (291-H77) Urban Grey 50 lb (bag) 56
40105612 Grey 50 lb (bag) 56
40108003 (291-H87) Black 50 lb (bag) 56
40105613 (291-H97) Ivory 50 lb (bag) 56
40100600 (2W1-H47) Pacific Grey 50 lb (bag) 56
40100251 (ID21-H37) Western Tan 50 lb (bag) 56
40100590 (ID21-H47) Western Grey 50 lb (bag) 56
40105501 (MI21-H37) Mojave Tan 50 lb (bag) 56
40100592 (MP21-H27) Bourbon Tan 50 lb (bag) 56
40101146 (MP21-H37) Southern Tan 50 lb (bag) 56
40101147 (MP21-H47) Southern Grey 50 lb (bag) 56
40100397 (NE21-H37) Prairie Tan 50 lb (bag) 56
40100396 (NE21-H47) Prairie Grey 50 lb (bag) 56
40105142 Summit Grey 50 lb (bag) 56
Color varies from one region to another. Shipping fees will be added to non-local sands. Consult your Techniseal dealer for color availability, pricing and delivery time.

TECHNISEAL® – TECHNICAL DATA SHEET –HP NextGel™ Jointing Sand 14
SAFETY WARNINGS
MAY IRRITATE EYES. MAY IRRITATE SKIN. CAUSES RESPIRATORY TRACT, DIGESTIVE TRACT AND EYE BURNS. CAUSES SKIN BURNS. MAY CAUSE ALLERGIC SKIN REACTION. Do not swallow. Do not get on skin or clothing. Do not get in eyes. Do not breathe dust.
For information and advice regarding transportation, handling, storage, first aid and disposal of chemicals products, users should refer to the Safety Data Sheet containing physical, ecological, toxicological and other safety-related data.
KEEP OUT OF REACH OF CHILDREN. Keep container tightly closed and sealed until ready for use. Wash thoroughly after handling.
FIRST AID TREATMENT: Contains: Hydraulic Cement. If swallowed, call a Poison Control Centre or doctor immediately. Get medical attention if symptoms occur. DO NOT induce vomiting. If in eyes or on skin, rinse well with water. If breathed in, move person to fresh air.
EMERGENCY PHONE: CANUTEC (613) 996-6666. SEE SAFETY DATA SHEET FOR THIS PRODUCT
SHIPPING
Land and sea
NOT REGULATED
TECHNICAL INFORMATION
Properties Test method SpecificationParticle Size Distribution ASTM C-136 100% passing No 8 sieve (2.38 mm)
< 5% passing No 200 sieve (0.074 mm)Exceeds ASTM C144
Mohs Hardness Scale >5 for grey >6 for tan/beige
Compression Strength ASTM C-109** > 1000 psi (7 MPa)
Water Absorption (15 minutes) ASTM C-642* < 10%
*Results depend on sourcing of sand. For information on a specific sand, please contact the Technical Service Department
**Sample preparation adapted for water activated product.
Techniseal | 300, Liberte Avenue, Candiac (Quebec), CANADA, J5R 6X1 | techniseal.com
TECHNISEAL® – TECHNICAL DATA SHEET –HP NextGel™ Jointing Sand 15
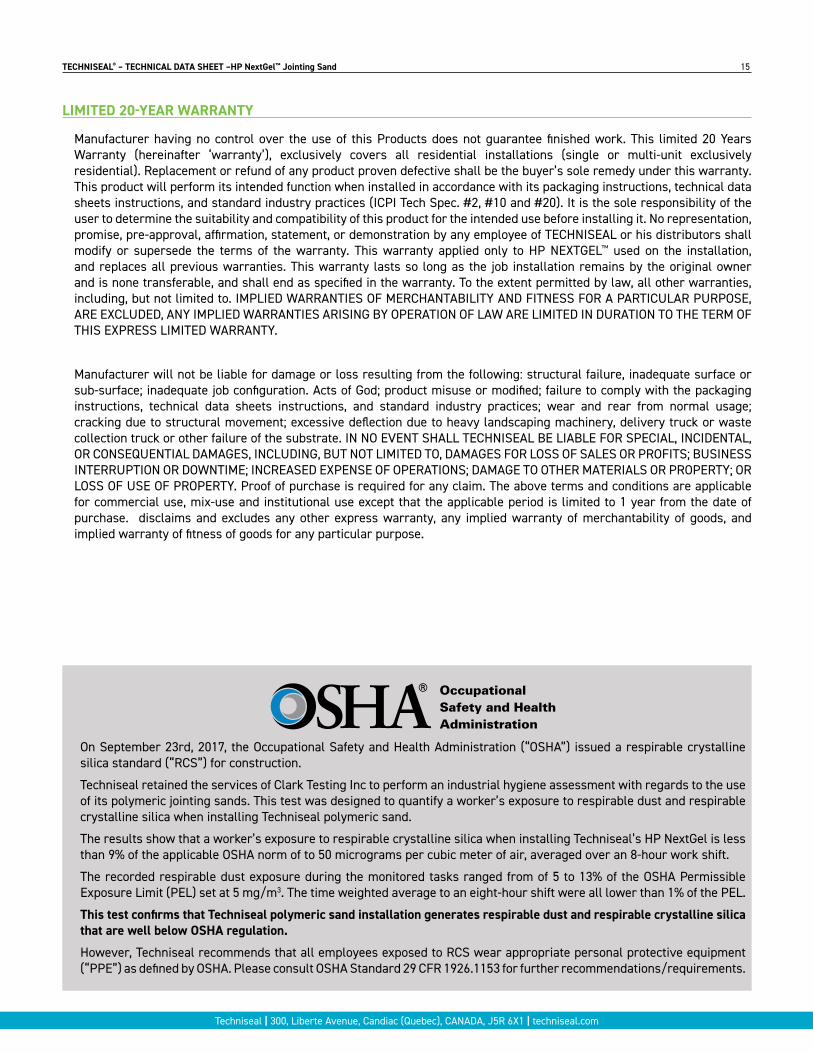
On September 23rd, 2017, the Occupational Safety and Health Administration (“OSHA”) issued a respirable crystalline silica standard (“RCS”) for construction.
Techniseal retained the services of Clark Testing Inc to perform an industrial hygiene assessment with regards to the use of its polymeric jointing sands. This test was designed to quantify a worker’s exposure to respirable dust and respirable crystalline silica when installing Techniseal polymeric sand.
The results show that a worker’s exposure to respirable crystalline silica when installing Techniseal’s HP NextGel is less than 9% of the applicable OSHA norm of to 50 micrograms per cubic meter of air, averaged over an 8-hour work shift.
The recorded respirable dust exposure during the monitored tasks ranged from of 5 to 13% of the OSHA Permissible Exposure Limit (PEL) set at 5 mg/m3. The time weighted average to an eight-hour shift were all lower than 1% of the PEL.
This test confirms that Techniseal polymeric sand installation generates respirable dust and respirable crystalline silica that are well below OSHA regulation.
However, Techniseal recommends that all employees exposed to RCS wear appropriate personal protective equipment (“PPE”) as defined by OSHA. Please consult OSHA Standard 29 CFR 1926.1153 for further recommendations/requirements.
LIMITED 20-YEAR WARRANTY
Manufacturer having no control over the use of this Products does not guarantee finished work. This limited 20 Years Warranty (hereinafter ‘warranty’), exclusively covers all residential installations (single or multi-unit exclusively residential). Replacement or refund of any product proven defective shall be the buyer’s sole remedy under this warranty. This product will perform its intended function when installed in accordance with its packaging instructions, technical data sheets instructions, and standard industry practices (ICPI Tech Spec. #2, #10 and #20). It is the sole responsibility of the user to determine the suitability and compatibility of this product for the intended use before installing it. No representation, promise, pre-approval, affirmation, statement, or demonstration by any employee of TECHNISEAL or his distributors shall modify or supersede the terms of the warranty. This warranty applied only to HP NEXTGEL™ used on the installation, and replaces all previous warranties. This warranty lasts so long as the job installation remains by the original owner and is none transferable, and shall end as specified in the warranty. To the extent permitted by law, all other warranties, including, but not limited to. IMPLIED WARRANTIES OF MERCHANTABILITY AND FITNESS FOR A PARTICULAR PURPOSE, ARE EXCLUDED, ANY IMPLIED WARRANTIES ARISING BY OPERATION OF LAW ARE LIMITED IN DURATION TO THE TERM OF THIS EXPRESS LIMITED WARRANTY.
Manufacturer will not be liable for damage or loss resulting from the following: structural failure, inadequate surface or sub-surface; inadequate job configuration. Acts of God; product misuse or modified; failure to comply with the packaging instructions, technical data sheets instructions, and standard industry practices; wear and rear from normal usage; cracking due to structural movement; excessive deflection due to heavy landscaping machinery, delivery truck or waste collection truck or other failure of the substrate. IN NO EVENT SHALL TECHNISEAL BE LIABLE FOR SPECIAL, INCIDENTAL, OR CONSEQUENTIAL DAMAGES, INCLUDING, BUT NOT LIMITED TO, DAMAGES FOR LOSS OF SALES OR PROFITS; BUSINESS INTERRUPTION OR DOWNTIME; INCREASED EXPENSE OF OPERATIONS; DAMAGE TO OTHER MATERIALS OR PROPERTY; OR LOSS OF USE OF PROPERTY. Proof of purchase is required for any claim. The above terms and conditions are applicable for commercial use, mix-use and institutional use except that the applicable period is limited to 1 year from the date of purchase. disclaims and excludes any other express warranty, any implied warranty of merchantability of goods, and implied warranty of fitness of goods for any particular purpose.