HP Corporate Deployment Guide - OmniBooksomnibooks.info/archive/ob2100-3100/Manuals/Omniboo… ·...
101
. Mobile Computing Division HP OmniBook Corporate Deployment Guide Spring 1998 Worldwide Deployment Guide for IT Managers deploying HP OmniBook notebook PCs
Transcript of HP Corporate Deployment Guide - OmniBooksomnibooks.info/archive/ob2100-3100/Manuals/Omniboo… ·...
. . . . . . . . . .
Mobile Computing Division
HP OmniBookCorporate Deployment Guide Spring 1998
Worldwide Deployment Guide for IT Managers deploying HP OmniBook notebook PCs

Notice
This manual and any examples contained herein are provided “as is” and are subject to change without notice. Hewlett-Packard Company makes no warranty of any kind with regard to this manual, including, but not limited to, the implied warranties of merchantability and fitness for a particular purpose. Hewlett-Packard Co. shall not be liable for any errors or for incidental or consequential damages in connection with the furnishing, performance, or use of this manual or the examples herein.
Consumer transactions in Australia and the United Kingdom: The above disclaimers and limitations shall not apply to Consumer transactions in Australia and the United Kingdom and shall not affect the statutory rights of Consumers.
© Copyright Hewlett-Packard Company 1998. All rights reserved. Reproduction, adaptation, or translation of this manual is prohibited without prior written permission of Hewlett-Packard Company, except as allowed under the copyright laws.
The programs that control this product are copyrighted and all rights are reserved. Reproduction, adaptation, or translation of those programs without prior written permission of Hewlett-Packard Co. is also prohibited.
This product incorporates copyright protection technology that is protected by method claims of certain U.S. patents and other intellectual property rights owned by Macrovision Corporation and other rights owners. Use of this copyright protection technology must be authorized by Macrovision Corporation, and is intended for home and other limited viewing uses only unless otherwise authorized by Macrovision Corporation. Reverse engineering or disassembly is prohibited.
Portions of the programs that control this product may also be copyrighted by Microsoft Corporation, SystemSoft Corp., Crystal Semiconductor Corporation, Phoenix Technologies, Ltd., and ATI Technologies Inc. See the individual programs for additional copyright notices.
Microsoft, MS, MS-DOS, and Windows are registered trademarks of Microsoft Corporation. Pentium and the Intel Inside logo are U.S. registered trademarks and MMX is a U.S. trademark of Intel Corporation. TrackPoint is a U.S. registered trademark of International Business Machines.
For warranty information, see the Support and Service booklet.
Hewlett-Packard Company Mobile Computing Division 19310 Pruneridge Ave. Cupertino, CA 95014
1

HP Software Product License Agreement
Your HP OmniBook PC contains factory-installed software programs. Please read the Software License Agreement before proceeding.
Carefully read this License Agreement before proceeding to operate this equipment. Rights in the software are offered only on the condition that the customer agrees to all terms and conditions of the License Agreement. Proceeding to operate the equipment indicates your acceptance of these terms and conditions. If you do not agree with the terms of the License Agreement, you must now either remove the software from your hard disk drive and destroy the master diskettes, or return the complete computer and software for a full refund.
Proceeding with configuration signifies your acceptance of the License Terms.
Unless otherwise stated below, this HP Software Product License Agreement shall govern the use of all software that is provided to you, the customer, as part of the HP computer product. It shall supersede any non-HP software license terms that may be found online, or in any documentation or other materials contained in the computer product packaging.
Note: Operating System Software by Microsoft is licensed to you under the Microsoft End User License Agreement (EULA) contained in the Microsoft documentation.
The following License Terms govern the use of the software:
Use. Customer may use the software on any one computer. Customer may not network the software or otherwise use it on more than one computer. Customer may not reverse assemble or decompile the software unless authorized by law.
Copies and Adaptations. Customer may make copies or adaptations of the software (a) for archival purposes or (b) when copying or adaptation is an essential step in the use of the software with a computer so long as the copies and adaptations are used in no other manner.
Ownership. Customer agrees that he/she does not have any title or ownership of the software, other than ownership of the physical media. Customer acknowledges and agrees that the software is copyrighted and protected under the copyright laws. Customer acknowledges and agrees that the software may have been developed by a third party software supplier named in the copyright notices included with the software, who shall be authorized to hold the Customer responsible for any copyright infringement or violation of this Agreement.
Product Recovery CD-ROM. If your computer was shipped with a product Recovery CD-ROM: (i) The product recovery CD-ROM and/or support utility software may only be used for restoring the hard disk of the HP computer with which the product recovery CD-ROM was originally provided. (ii) The use of any operating system software by Microsoft contained in any such product recovery CD-ROM shall be governed by the Microsoft End User License Agreement (EULA).
Transfer of Rights in Software. Customer may transfer rights in the software to a third party only as part of the transfer of all rights and only if Customer obtains the prior agreement of the third party to be bound by the terms of this License Agreement. Upon such a transfer, Customer agrees that his/her rights in the software are terminated and
2

that he/she will either destroy his/her copies and adaptations or deliver them to the third party.
Sublicensing and Distribution. Customer may not lease, sublicense the software or distribute copies or adaptations of the software to the public in physical media or by telecommunication without the prior written consent of Hewlett-Packard.
Termination. Hewlett-Packard may terminate this software license for failure to comply with any of these terms provided Hewlett-Packard has requested Customer to cure the failure and Customer has failed to do so within thirty (30) days of such notice.
Updates And Upgrades. Customer agrees that the software does not include updates and upgrades which may be available from Hewlett-Packard under a separate support agreement.
Export Clause. Customer agrees not to export or re-export the software or any copy or adaptation in violation of the U.S. Export Administration regulations or other applicable regulation.
U.S. Government Restricted Rights. Use, duplication, or disclosure by the U.S. Government is subject to restrictions as set forth in subparagraph (c)(1)(ii) of the Rights in Technical Data and Computer Software clause in DFARS 252.227-7013. Hewlett-Packard Company, 3000 Hanover Street, Palo Alto, CA 94304 U.S.A. Rights for non-DOD U.S. Government Departments and Agencies are as set forth in FAR 52.227-19(c)(1,2).
Edition HistoryEdition 1..............................................April 1998
This manual is printed on recycled paper.
3

CONTENTS
HP OmniBook Deployment Guide Objectives..................................................7
Consulting Resources and Support Services..................................................9
The HP Technical Team................................................................................................................................9Worldwide Field Technical Consultants (TCs)............................................................................................9Worldwide Corporate Evaluation Team (CET)...........................................................................................9Worldwide Escalation Team......................................................................................................................10Corporate HelpDesk Support Teams..........................................................................................................10HP Support One Program (U.S. Only).......................................................................................................11
Four Phases of the IT Lifecycle........................................................................13
Customer Lifecycle Needs............................................................................................................................13
Four Phases of the IT Lifecycle...................................................................................................................13Evaluation...................................................................................................................................................13Deployment................................................................................................................................................14Maintenance...............................................................................................................................................14Transition Planning....................................................................................................................................14
What it means to “buy HP”.........................................................................................................................14
Evaluation Phase...............................................................................................16
Evaluation Phase Checklist.........................................................................................................................16
HP Software and Information Resources........................................................19
Information Resources.................................................................................................................................19HP Reference Guide...................................................................................................................................19HP Corporate Evaluator’s Guide................................................................................................................20HP Product Data Sheets..............................................................................................................................20HP OmniBook Worldwide CD Driver Subscription Service.....................................................................20
Operating System Software Services..........................................................................................................21MS Windows 95.........................................................................................................................................21MS Windows 98.........................................................................................................................................21MS Windows NT 4.0..................................................................................................................................21
MS Windows NT 4.0 Unattended Installation Process...................................23
Overview........................................................................................................................................................23
Checklist to Develop Unattended Installation...........................................................................................23
Resources for MS Windows NT Unattended Installation.........................................................................23
4

Order of Installation for MS Windows NT Workstation 4.0...................................................................24STEP 1 - Preparation of client (HP OmniBook notebook PC)..................................................................25STEP 2 –Creating the network client disk.................................................................................................26STEP 3 -Creating the unattend.txt file.......................................................................................................26STEP 4 –Creating the uniqueness database file.........................................................................................27STEP 5 –Organizing installation files on the distribution share................................................................27STEP 6 –Using the sysdiff utility to install applications............................................................................27
Checklist to Test Unattended Installation on a Client Notebook.............................................................29
Additional NT Installation Tips and Tricks...............................................................................................29
Approved and Tested Solutions Program.......................................................32
Approved and Tested Solutions Checklist.................................................................................................33
Deployment Phase............................................................................................35
Deployment Phase Checklist.......................................................................................................................35
Security..........................................................................................................................................................38Security Overview......................................................................................................................................38
Security Checklist.........................................................................................................................................38
Security Features..........................................................................................................................................39Kensington Lock Slot.................................................................................................................................39Controlling Passwords in BIOS..................................................................................................................39Administrator Password.............................................................................................................................39User Password............................................................................................................................................39Password Options.......................................................................................................................................40Hard Disk Drive Lock................................................................................................................................40Floppy Boot................................................................................................................................................40
Smart Card....................................................................................................................................................40Smart Card Technology Summary.............................................................................................................40HP Encryption Smart Card Security System..............................................................................................41Management of Smart Cards across an enterprise.....................................................................................41
Manageability...............................................................................................................................................42Manageability Overview............................................................................................................................42DMI 2.0 Compliant....................................................................................................................................43
Asset Management........................................................................................................................................43PC-ID..........................................................................................................................................................43Serial number..............................................................................................................................................43
Manageability Checklist..............................................................................................................................43
Becoming Familiar with TopTools 2.6 Client............................................................................................44ProtectTools................................................................................................................................................45ConfigTools................................................................................................................................................45McAfee Crash Monitor...............................................................................................................................46SafeTools....................................................................................................................................................46
5

VirusMonitor..............................................................................................................................................47
Deployment Training.........................................................................................49
Deployment Training Overview..................................................................................................................49
Deployment Training Checklist..................................................................................................................49HP OmniBook Frequently Asked Questions (FAQs)................................................................................50
Maintenance Phase...........................................................................................52
Maintenance Phase Checklist......................................................................................................................52
HP Lifecycle Support...................................................................................................................................53Worldwide Customer Support Centers.......................................................................................................53HP Electronic Support Services.................................................................................................................53HP OmniBook Hardware Diagnostic Tool.................................................................................................54Express Pick-up & Delivery Service (US).................................................................................................54Warranty Upgrades.....................................................................................................................................55Special Services Option..............................................................................................................................55
Transition Planning Phase...............................................................................57
Transition Planning Checklist.....................................................................................................................57
Beyond Lifecycle Planning...............................................................................59
HP Global Programs....................................................................................................................................59HP Global Account Program/Summary of benefits...................................................................................59
HP Commerce Center..................................................................................................................................61
HP Information Summary...........................................................................................................................61
Appendix A – Unattend.txt File..................................................................................................................62
Appendix B – Uniqueness Database File....................................................................................................66
Appendix C – Distribution Share Structure..............................................................................................67
6
..........
HP OmniBookCorporate Deployment Guide Spring 1998Worldwide deployment guide forCorporate IT Managers managing rollouts of HP OmniBook notebook PCsacross their enterprises.
HP OmniBook Deployment Guide Objectives
This guide is designed to provide a set of tools and documentation to guide Corporate IT teams through the steps necessary for a successful mobile PC implementation within their enterprises. Although focused on deployment requirements, the HP OmniBook Corporate Deployment Guide includes information for Corporate IT Managers on all four phases of the IT lifecycle. The guide acts as a handy checklist in each case. In some instances it may also act as a course correction or assist by providing Corporate IT Managers with new information recently developed by HP to help in this process.
This guide was developed for the HP OmniBook 2100, 3100, 4100 and 7100 notebook PCs. Any and all references in this guide to features that apply to all HP OmniBook notebook PCs, specifically is referring to the above mentioned notebook PCs only. HP offers several other HP OmniBook notebook PCs. To find out more about the complete line-up of HP OmniBook notebook PCs, visit our website at http://www.hp.com/omnibook.
The format of this guide was developed with an emphasis on using it electronically. There are hyperlinks to various websites and the ability to jump to and explore other relevant topics within this same document. To reach a wide distribution, this document is also available for download from our website in Adobe Acrobat .pdf format. Jump to http://www.hp.com/omnibook and then to the OmniBook 7100, 4100, 3100 or 2100 product pages. Choose the manual tab to download a copy. There is one guide for all the products mentioned here.
7

Consulting Resources andSupport Services
8

Consulting Resources and Support Services
The HP Technical Team
Return to: Evaluation Phase Checklist
Return to: MS Windows NT 4.0
Today’s notebook technology requires that IT Managers and their teams stay on top of understanding some differences and additional technologies over and above what has been required for desktops. HP, as a vendor, provides the technical depth of understanding and experience required.
The following sections describe the comprehensive offering and investment of HP engineers who are called upon during the four phases of the IT Lifecycle to assist HP customers.
For a more complete understanding of the IT Lifecycle, jump to Four Phases of the IT Lifecycle.
Worldwide Field Technical Consultants (TCs)
Description of team
HP Field Technical Consultants are located geographically close to HP customers and within HP’s sales offices worldwide. They work with the HP sales force and channel partners, ensuring that technical questions are addressed promptly and effectively. This team is typically the first to respond as a resource for technical evaluation and deployment questions from HP’s customers.
As customers move into the maintenance phase of the corporate IT lifecycle, the TCs are very closely connected to HP’s lifecycle support partners for both support and service of HP’s notebook PCs.
How to contact
An HP Field Technical Consultant becomes involved at the discretion of the HP sales team. Contact your local HP Sales Representative or the nearest HP sales office for more information.
Worldwide Corporate Evaluation Team (CET)
Description of Team
At times, the HP field Technical Consultant may need assistance or additional product information or assistance during the evaluation phase to ensure that the hardware, software and third-party products all work together as intended. The Corporate Evaluation Team is a core team of HP engineers from HP’s Mobile Computing Division who are called upon as an additional resource in such cases.
9
The Corporate Evaluation Team is closely involved with new product design, product testing and software platform integration. This team, within HP, represents one of the many “voices of the customer” that affects current and future product development. This team has responsibility for ensuring that the HP Technical Consultants, working together with Corporate IT Managers (our customers), have the information they need to enable the IT Managers in turn to be successful in their roles within their organizations. Their goal is to make it easy to go with HP’s products and services.
How to contact
A Corporate Evaluation Engineer becomes involved at the discretion of the HP Technical Consultant. Contact your HP Technical Consultant or the nearest HP sales office for more information.
Worldwide Escalation Team
Description of team
The Worldwide Escalation Team at HP provides a “whole product” quality approach to troubleshooting technical and non-technical issues. This team, at times, is called upon to assist in responding to customer questions. Often this resource is called upon during the deployment or maintenance phases of the IT lifecycle.
The Worldwide Escalation Team has in the past, for example, been involved in customer feedback on the out-of-box experience. Customers have provided feedback resulting in changes to the HP Recovery CD, the contents that are included in the box with HP’s notebook PCs, as well as the development of the Quick Start sheet that graphically assists with the setup of a unit.
This team primarily responds to questions that come through the HP Call Centers worldwide. For example, there may be a request for additional specification information that is needed to configure an HP OmniBook notebook with a third-party product. While HP strives to include as much as possible in our written and electronic documentation, it is difficult to anticipate every question. This team utilizes resources or information within the division to address questions such as this.
How to contact
This team is part of the call path and processes for customers calling into HP’s Call Centers worldwide.
For a listing of HP’s Call Centers jump to: HP Call Centers
Corporate HelpDesk Support Teams
Description of team
The Corporate HelpDesk Support Teams provide support to corporate accounts that may need additional product information or assistance during the evaluation phase to ensure that the hardware, software and third-party products all work together as intended. These teams’ services are non-fee based and are an integral part of the larger inbound and outbound HP Call Centers worldwide. Currently HP has Call Centers located in North America, The Netherlands and Singapore.
The following information refers to some more specific details of the HelpDesk program that pertain to the U.S. and Canada only.
10

Customers who are in the evaluation phase with purchased, consignment or HP PREP OmniBook notebook PCs can sign up for these services. The customer fills out one or more informational and technical profile(s). When the Corporate HelpDesk Team receives the customer profile(s) from the HP Field Technical Consultant, HP Sales Representative, or HP Corporate Account Representative, the customer will be assigned a PIN. The customer can then call in during the evaluation phase to reach an HP Corporate HelpDesk Support Engineer.
How to contact
Contact your HP Corporate Account Representative, HP Sales Representative, HP Field Technical Consultant or the nearest HP sales office to find out more about how to sign up for this free service.
or visit HP’s website to locate the nearest HP Call Center for assistance:
North & Latin America http://www.hp.com/cpso-support/guide/psd/cscus.html Asia Pacific http://www.hp.com/cpso-support/guide/psd/cscap.htmlEurope, Middle East & Africa http://www.hp.com/cpso-support/guide/psd/cscemea.html
Return to: WW Escalation Team
Return to: Manageability Checklist
HP Support One Program (U.S. Only)
Description of program
The Support One Program is a service that involves support for the following HP products: HP NetServers, HP Workstations, HP Kayaks, HP OmniBook PCs and HP Printers. HP Technical Account Managers (TAMs) are assigned to HP customers and are the one-stop shopping focal point for calls related to the above products. HP Support One offers toll-free call-in access, priority-one phone and Email support, as well as several other options.
How to contact
Contact your HP Sales Representative or the nearest HP sales office to find out more about the requirements to enter this program.
11

Four Phases of the IT Lifecycle
12

Four Phases of the IT Lifecycle
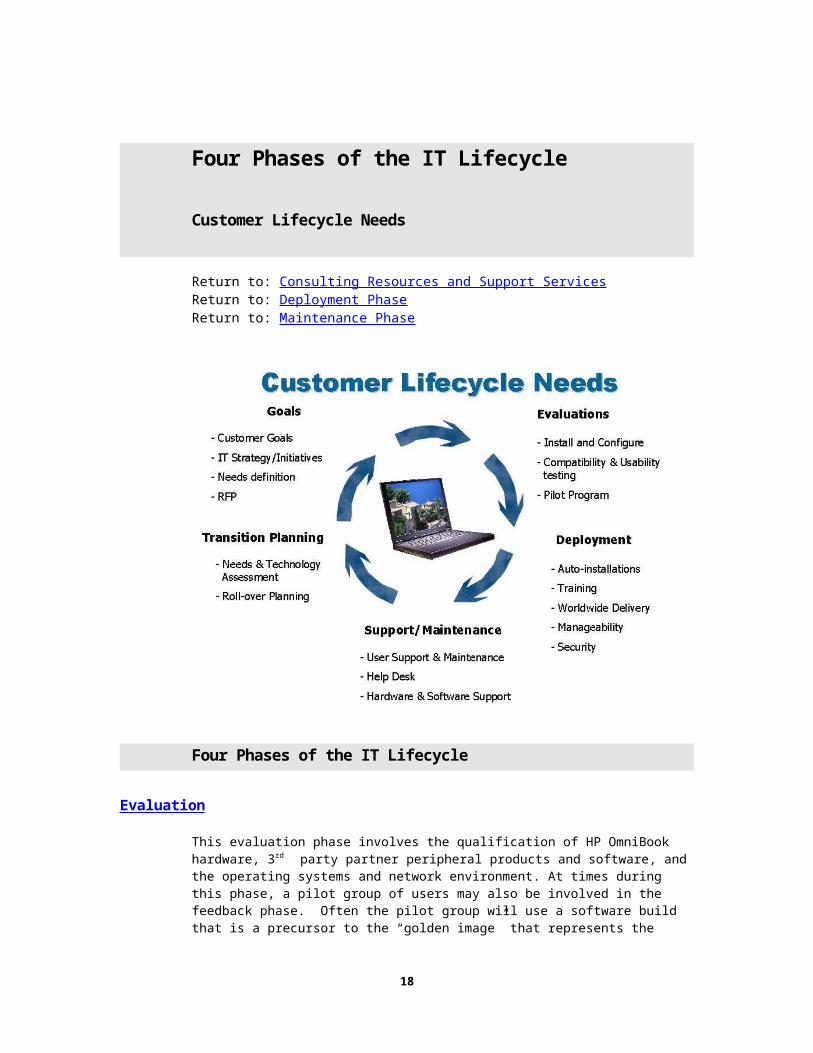
Customer Lifecycle Needs
Return to: Consulting Resources and Support ServicesReturn to: Deployment PhaseReturn to: Maintenance Phase
Four Phases of the IT Lifecycle
Evaluation
This evaluation phase involves the qualification of HP OmniBook hardware, 3rd party partner peripheral products and software, and the operating systems and network environment. At times during this phase, a pilot group of users may also be involved in the feedback phase. Often the pilot group will use a software build that is a precursor to the “golden image” that represents the final qualified software build of the operating system and accompanying drivers.
13

Deployment
The deployment phase represents the transition from a few pilot users to a much larger grouping of users across an enterprise. There are many things to consider prior to the start of the deployment phase; including IT help desk training, end-user training, hardware migration and the deployment schedule.
Maintenance
The maintenance phase centers around the support and services that act as the backbone of an IT organization to respond to their population of notebook customers. The maintenance phase also ensures that the users have available to them any updates that HP may make available. For example BIOS changes or enhancements would occur in this phase of the deployment. The corporate IT help desk may also choose to take advantage of continually larger hard drives, application level product updates from HP, driver updates or changes from other software vendors.
Transition Planning
The transition-planning phase represents an opportunity for HP and IT organizations to transition from older products to newer products in order to take advantage of newer technologies as well as additional features that customers continue to expect. HP offers Corporate IT Managers support during this phase to again help with the qualification and migration process. HP also designs a “family of products” so that the move from one product to its successor is logical and easily achievable. HP’s cross platform docking solution is one example of this.
In summary, HP developed this guide for you, the Corporate IT Manager, to describe HP’s award winning services in the context of the real-world IT lifecycle.
What it means to “buy HP”
Today, customers are faced with exploding choices of products, suppliers and channels. Customers also are more demanding and sophisticated in their buying criteria. The accelerated pace of technological development and the advance of industry standards are making it increasingly difficult to differentiate products solely on technical merits. Added to this, notebook computers can sometimes add an additional layer of considerations for Corporate IT Managers unfamiliar with remote manageability, security, and mobile lifecycle support.
HP understands what it takes to deploy notebook PCs across an enterprise. HP Engineers have, over the years, continued to compile their experience and optimize the process to assist Corporate IT Managers and their teams during the deployment process. Guided by HP’s expertise, these same Corporate IT Managers have built upon this knowledge base, developing a process for how to best deploy notebook PCs across their enterprise. This deployment process expertise continues to improve as new knowledge and experience are collected and applied.
HP strives to achieve long-term customer satisfaction by anticipating and understanding customer needs, responding with products, systems, and services that add substantial value, and making the process of doing business with HP easy and rewarding.
14

Evaluation Phase
15
Evaluation Phase
Go back to: Four Phases of IT Lifecycle
This phase involves the qualification of HP OmniBook hardware, HP accessories,third-party partner peripheral products, software, the operating systems and network environment. At times during this phase a pilot group of users may also be involved and provide feedback. Often the pilot group is using a software build that is a precursor to the “golden image” that represents the final qualified software build of OS and accompanying drivers.
Before this phase begins, the IT organization should set their goals and expectations for the project. It is important to note that at the conclusion of this phase, the goals of the IT organization should be met. As an evaluation period progresses, it is a good practice to revisit the original intent and purpose of why the evaluation was initiated. Looking back periodically to these goals can help IT Managers make good decisions when changes to hardware or software are needed during an evaluation period.
Evaluation Phase Checklist
Establish an evaluation plan, complete with a set of evaluation goals, evaluation criteria with prioritization and ownership assignments
Determine the period of time for testing and communicate this to your HP team
Define the objectives, participation and timing for a pilot deployment, if desired
Gather a sample of representative user hardware, software, networking protocols and average disk space usage
Set up a test lab space for the pilot/evaluation process, including access to the network and dial-in access via an analog line (if applicable)
Set up a server to host files and software needed for the build process
Contact your HP Sales Representative about which HP OmniBook PC hardware you wish to evaluate
HP provides a variety of options and choices for your notebook computer. Whether it's additional memory, docking stations, bigger hard drives or a carrying case, HP has the products you need. Visit HP’s website at http://www.hp.com/omnibook/accessories/hp_acc.html
Review the HP Consulting & Support Services that are available from HP. To go here now, click on Support Services.
16

Obtain third-party accessories and peripherals to evaluate. For additional assistance with Tested and Approved Solutions visit HP’s website at http://www.hp.com/omnibook/accessories/3rdparty_acc.html
Obtain operating system, application software and any current hardware drivers that will be used during the evaluation
Determine if the software build process used will be the default image from the HP OmniBook hard drive out of the box or if the IT team will build an image from a retail MS Windows 95 or Windows NT installation CD
If you are planning on using MS Windows NT and plan to build an image from scratch, jump to NT unattend for more information on how to do this.
If you are planning on installing MS Windows NT or MS Windows 95 from a retail CD and without an unattended installation process, jump to HP Reference Guide for more information on how to do this.
Determine what security your company has chosen to implement
If you would like to find out more about implementing HP’s Mobile System Security, jump to Security.
Evaluate/test HP OmniBook(s) with relevant combination of hardware, software and accessories
17
HP Software and Information Resources
18

HP Software and Information Resources
Information Resources
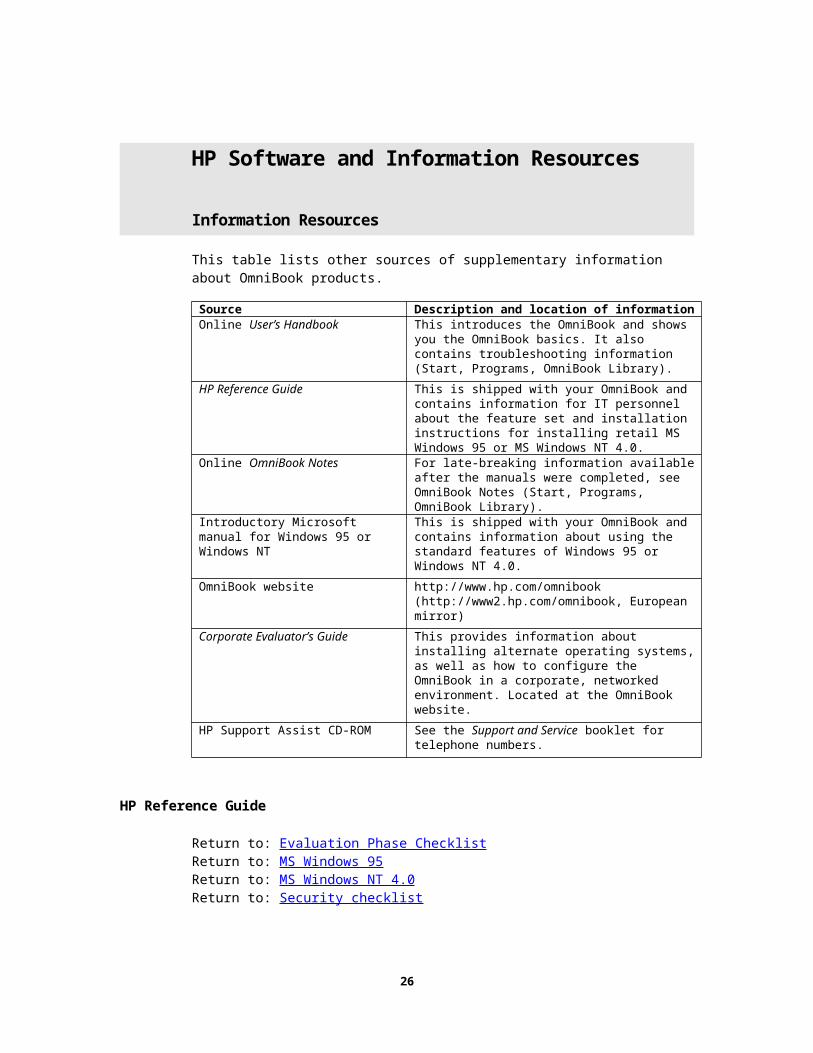
This table lists other sources of supplementary information about OmniBook products.
Source Description and location of informationOnline User’s Handbook This introduces the OmniBook and shows you the
OmniBook basics. It also contains troubleshooting information (Start, Programs, OmniBook Library).
HP Reference Guide This is shipped with your OmniBook and contains information for IT personnel about the feature set and installation instructions for installing retail MS Windows 95 or MS Windows NT 4.0.
Online OmniBook Notes For late-breaking information available after the manuals were completed, see OmniBook Notes (Start, Programs, OmniBook Library).
Introductory Microsoft manual for Windows 95 or Windows NT
This is shipped with your OmniBook and contains information about using the standard features of Windows 95 or Windows NT 4.0.
OmniBook website http://www.hp.com/omnibook(http://www2.hp.com/omnibook, European mirror)
Corporate Evaluator’s Guide This provides information about installing alternate operating systems, as well as how to configure the OmniBook in a corporate, networked environment. Located at the OmniBook website.
HP Support Assist CD-ROM See the Support and Service booklet for telephone numbers.
HP Reference Guide
Return to: Evaluation Phase Checklist Return to: MS Windows 95 Return to: MS Windows NT 4.0 Return to: Security checklist
HP has developed a product-specific HP OmniBook Reference Guide that ships with every HP OmniBook notebook PC. This guide has been developed to provide information to Corporate IT Managers regarding the HP OmniBook notebook PC feature set and notebook power management as well as the necessary steps for installing retail MS Windows NT 4.0 and MS Windows 95. More than a user manual, this guide was re-designed for release in the Spring of ‘98 based on input from our customers and the experience of our HP Technical Consultants. An electronic version of this guide can be soon on HP’s website at http://www.hp.com/omnibook.
19
HP Corporate Evaluator’s Guide
Return to: MS Windows 95
Return to: MS Windows NT 4.0
The HP Corporate Evaluator’s Guide is a more condensed version of the HP Reference Guide and encompasses the HP OmniBook 2100, 3100, 4100 and 7100. While containing the same operating system information, it also provides additional installation information for setting up HP accessory PC Cards, tips and tricks for configuring notebook PCs, etc. The HP Corporate Evaluator’s Guide can be found on HP’s website at http://www.hp.com/omnibook. Choose any of the OmniBook 7100, 4100, 3100 or 2100 product pages to obtain a copy. This document is listed under the manual tab and is titled “HP Corporate Evaluator’s Guide”.
HP Product Data Sheets
HP product data sheets provide specific technical information about the features of each HP OmniBook product. To find out information about a specific HP OmniBook model visit HP’s website at http://www.hp.com/omnibook.
HP OmniBook Worldwide CD Driver Subscription ServiceInformation
HP provides a driver distribution CD called Support Assist for all computing products. HP OmniBook product drivers and technical information are available on this CD.
How to obtain this service
Call HP Support Assist Subscriptions at 1-800-457-1762 option 3. Hours of operation as of this publication are: Mon.-Fri. 6am-6pm MST.
Outside the U.S. please contact HP Support Assist Subscriptions at1-801-431-1587.
You can also reach them via fax (worldwide) at 1-801-431-4045.
20

Operating System Software Services
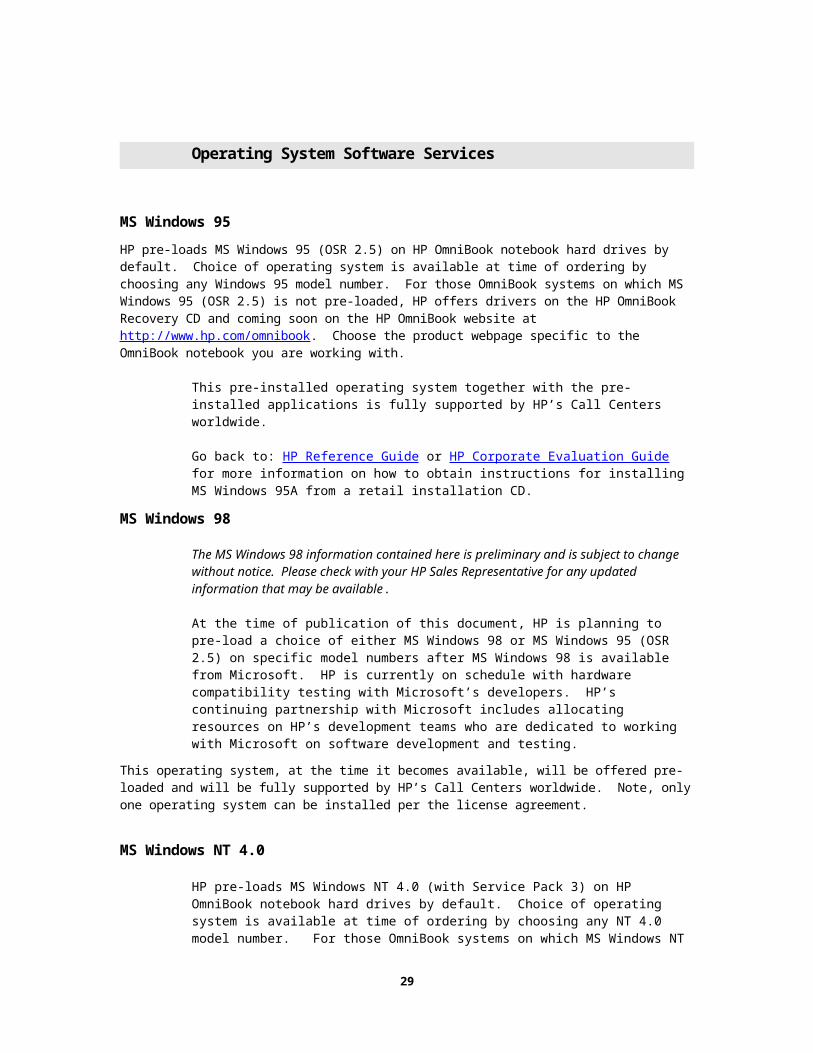
MS Windows 95HP pre-loads MS Windows 95 (OSR 2.5) on HP OmniBook notebook hard drives by default. Choice of operating system is available at time of ordering by choosing any Windows 95 model number. For those OmniBook systems on which MS Windows 95 (OSR 2.5) is not pre-loaded, HP offers drivers on the HP OmniBook Recovery CD and coming soon on the HP OmniBook website at http://www.hp.com/omnibook. Choose the product webpage specific to the OmniBook notebook you are working with.
This pre-installed operating system together with the pre-installed applications is fully supported by HP’s Call Centers worldwide.
Go back to: HP Reference Guide or HP Corporate Evaluation Guide for more information on how to obtain instructions for installing MS Windows 95A from a retail installation CD.
MS Windows 98
The MS Windows 98 information contained here is preliminary and is subject to change without notice. Please check with your HP Sales Representative for any updated information that may be available.
At the time of publication of this document, HP is planning to pre-load a choice of either MS Windows 98 or MS Windows 95 (OSR 2.5) on specific model numbers after MS Windows 98 is available from Microsoft. HP is currently on schedule with hardware compatibility testing with Microsoft’s developers. HP’s continuing partnership with Microsoft includes allocating resources on HP’s development teams who are dedicated to working with Microsoft on software development and testing.
This operating system, at the time it becomes available, will be offered pre-loaded and will be fully supported by HP’s Call Centers worldwide. Note, only one operating system can be installed per the license agreement.
MS Windows NT 4.0
HP pre-loads MS Windows NT 4.0 (with Service Pack 3) on HP OmniBook notebook hard drives by default. Choice of operating system is available at time of ordering by choosing any NT 4.0 model number. For those OmniBook systems on which MS Windows NT 4.0 is not pre-loaded, HP offers drivers on the HP OmniBook Recovery CD and coming soon on the HP OmniBook website at http://www.hp.com/omnibook.
This pre-installed operating system together with the pre-installed applications is fully supported by HP’s Call Centers worldwide.
Go back to: HP Reference Guide or HP Corporate Evaluation Guide for more information about installing MS Windows NT 4.0 from a retail installation CD.
Additional technical assistance is available for Corporate IT Managers who choose to develop an unattended MS Windows NT 4.0 installation process for their golden image of operating system and application software. HP assists with this process through the use of the following reference information and resources.
21

MS Windows NT 4.0 Unattended Installation Process
22

MS Windows NT 4.0 Unattended Installation Process
Overview
Return to: Evaluation Phase Checklist
On the HP Recovery CD in every HP OmniBook box is an example unattend.txt file and several NT drivers and files to configure an automated install of MS Windows NT 4.0 via the network. This process involves using MS Windows NT Server 4.0 Setup Manager and Network Client Administrator utilities, specific ASCII text files provided on HP’s Recovery CD and specific files for hardware chipsets, programs and utilities. The files are then placed on a networked PC (distribution share) preferably running Windows NT Workstation 4.0 or Windows NT Server 4.0.
These tools leverage from Microsoft’s Deployment Guide for Windows NT 4.0. This guide documents the automated installation process for the deployment of NT across an enterprise. To obtain this guide go to Microsoft’s website at http://www.microsoft.com/NTworkstation/Deployment/deployment/default.asp
HP’s assistance in providing this information on the HP Recovery CD ROM provides the advantage of enabling HP drivers for the hardware and specific HP utilities to be loaded easily during the NT install process while unattended.
Checklist to Develop Unattended Installation
HP OmniBook notebook with which to test unattended process
HP OmniBook Recovery CD-ROM
MS Windows NT Server 4.0 CD-ROM
MS Windows NT 4.0 Server PC with distribution share connected to the network
Software application CDs to include in the unattended install process
OEM network PC Card driver disk(s)
Decide what protocol(s) to implement and whether DHCP will be used
Decide if RAS needs to be set up
Several blank formatted 3.5” floppy disks
Resources for MS Windows NT Unattended Installation
For more information or to customize the installation further, please refer to the MS Deployment Guide available on Microsoft’s website at http://www.microsoft.com/NTworkstation/Deployment/deployment/default.asp
23

For more information about corporate deployment, using MS System Management Server for unattended application installations, visit Microsoft’s website at http://www.microsoft.com/ithome/itcycle/deploy
Order of Installation for MS Windows NT Workstation 4.0
Option 1 – The following steps describe the unattended installation process of installing MS Windows NT Workstation 4.0 from a server to a client notebook PC.
1. Unattended installation of NT (without networking)
2. Installation of applications that can be installed via the Sysdiff utility (includesService Pack 3)
3. Installation of Phoenix Advance Power Management*
4. Installation of Phoenix CardExecutive
5. Installation of NT networking at the test client PC
6. Installation of NT Service Pack 3 (again) to update NT 4.0 networking files
7. Installation of Phoenix Advance Power Management*
8. Installation of Phoenix CardExecutive*
* These steps are necessary because Phoenix Advance Power Management and Card Executive must be, at this time, installed before networking and then again after to insure no files have been overwritten (particularly for CardExecutive to work correctly). HP is currently working with Phoenix to see if their software can be incorporated into the Sysdiff process or a runonce command without any issues to avoid these extra steps.
Option 2 – The following steps describe the option of installing MS Windows NT 4.0 using disk imaging software. The image is essentially copied as an image package from the server to the client PC. The installation of software does not occur during this time. The image file essentially is a mirror of another notebook PC, after MS Windows NT Workstation 4.0 and other applications were installed by hand. This enables a IT Manager to duplicate disks very quickly.
1. Use ImageBlaster or Ghost or some other third-party disk imaging software to replicate disk image of test client via server to another client. This is the deployment of the golden image across multiple notebook PCs simultaneously.
2. MS Windows NT Workstation 4.0 uses a SID to identify each PC as unique. During disk duplication, one SID would essentially be copied to every subsequent PC. Please contact the disk imaging or Microsoft to find out more about how to insure SIDs can be changed to insure the unique identity of each PC. This process also assumes that licensing is in place for all client PCs that receive this replicated software.
3. To further simplify this process, there are applications available from third party vendors, that enable IT Managers to create bootable CDs that can be used to hold drive images for this purpose. It is especially useful for travelers who may need to have access to a backup of their image while on the road.
24
STEP 1 - Preparation of client (HP OmniBook notebook PC)
A. Hibernation partition and disk space
Starting with a clean blank hard drive use the HP Recovery CD-ROM and boot disk to create a hibernation partition in the unpartitioned space. The hibernation partition should be the size of the maximum amount of RAM expected to be in the unit plus 5-6 MB. This unpartitioned space is used when the HP OmniBook BIOS saves the contents of RAM to disk or when the user chooses FN + F12 to initiate the hibernation sequence. This is useful if the user is running low on battery and prefers to have the contents of RAM saved automatically if left unattended.
There is an option in BIOS to turn off this function if preferred. Also, if the hibernation feature is not going to be implemented, this step (1A) can be skipped.
B. Partitioning the drive
During the MS Windows NT 4.0 installation process there is an option to partition the drive and decide whether to use FAT or NTFS. It is recommended that the primary partition be set at approximately 2GB in size and set to FAT prior to starting the automated installation. There is an option to convert the partition to NTFS later during setup or after setup is complete using the convert command. The balance of the disk can be left either unpartitioned or partitioned with FAT and then later changed to NTFS. After MS Windows NT 4.0 is installed, use NT Disk Administrator to manage the balance of the disk.
C. HP Recovery CD ROM
The HP Recovery CD-ROM will be used during this process to obtain the drivers and application software for:
Sound
VideoNote: HP OmniBook 7100 uses a ATI chip set: The HP OmniBook 4100, 3100 and 2100 use a NeoMagic chip set
Synaptics TouchPad driver with enhancements (if applicable)
IBM TrackPoint driver (if applicable)
Phoenix Advance Power Management (recommended)
Phoenix Card Executive (recommended)
HP TopTools 2.6 (optional)
HP Guardian 1.1 (optional)
HP Reference Guide (optional)
25
STEP 2 –Creating the network client disk
Special note:
Prior to starting Step 2, it is suggested that a directory on the distribution share be set up that will be used as a holding directory for files created during the preparation of the NT unattended process. Once the files are all collected in this temporary location, they can then be copied to the distribution share on the server where they will be accessed by the end users during the setup process. It is also recommended that this directory be set with NTFS permissions set to avoid accidental changes or deletions of files by others during the preparation stage. This temporary directory is also an ideal place to put text files that document the steps taken for historical purposes and future reference.
A. On the MS Windows NT 4.0 Server
1. Use Network Client Administrator to create a two-disk set of setup disks for the DOS network client. Follow the prompts to choose the correct network client depending on whether the network server is a Novell Netware server or NT server.
2. Create a DOS boot disk to use to boot the client notebook
B. On the HP OmniBook notebook PC
1. Use the DOS boot disk to boot to a:\2. Insert disk 1 of the two disk network client disk set and run setup3. During setup it will ask for the OEM driver disk for the network card being
used4. Insert the network card driver disk (preferably the driver files are the most recent
ones downloaded from the Internet)5. Finish the installation and reboot with the network card inserted in the
notebook6. Modify the autoexec.bat file to create the net use command that will connect the
client to the network share and prompt for user name and password.7. Copy the image from the hard drive to another floppy (this is the master client
disk)8. Make copies of the client master disk for distribution later to end users for
connecting to the distribution share to begin the actual installation process. Keep a copy as well on the distribution share for archive purposes.
STEP 3 -Creating the unattend.txt file
The unattend.txt file is essentially the “answer” file for the default MS Windows NT 4.0 installation. It is a means to install NT without user intervention during the setup process. It is ideal for setting up quantities of notebook PCs with similar hardware. Because the chip sets for the hardware and associated drivers are identical, one answer file can be used to set up multiple notebook PCs simultaneously.
There are three options to create the unattend.txt file. Microsoft offers the first two and HP has provided the third option.
Option 1 - The first option is to take advantage of Setupmgr.exe which offers a GUI interface to walk through the setup prompts that ultimately build the unattend.txt file.
Option 2 - Use the default unattend.txt file on the MS Windows NT 4.0 Server CD. Modify this file manually to include the appropriate information. This can be a tedious
26
process and does not allow for typing mistakes. An ideal reference guide to use to assist with this is the MS Deployment Guide. This guide is available for download at http://www.microsoft.com/NTworkstation/Deployment/deployment/default.asp
Option 3 – Use the unattend.txt file obtained from the HP OmniBook Recovery CD ROM.to append to the one created in Option 1. This version of the unattend.txt file already includes the changes necessary for HP’s hardware chip sets. A sample copy of this unattend.txt file is included in Appendix A. To view it, jump to Appendix A. Note that there are several different unattend.txt files to accommodate the NeoMagic or ATI video drivers and different display resolutions.
STEP 4 –Creating the uniqueness database file
The uniqueness database file is used to include specific unique user information. It can be tailored to include usernames, IP addresses, etc. When using the winnt or winnt32 command to initiate the installation process from the distribution share, the uniqueness IDs are called out specifically as part of the switch in the command line. Each enduser would substitute their ID (where bolded). Multiple uniqueness IDs can be contained within one $unique$.udb file.
Example: WINNT /s:distribution_share /u:answer_file /t:drive_letter:\/e:”command” /udf:wkstat01,$unique$.udb
The uniqueness database file ($unique$.udb) complements the unattend.txt file. Where the $unique$.udb overlaps the sections of the unattend.txt file, it will replace the values in those sections with specific user information for that user’s PC.
Jump to Appendix B to view a sample $unique$.udb file.
STEP 5 –Organizing installation files on the distribution share
The files used during the installation process must be located on a server (“distribution share”). The placement of the files within a specific directory structure is also important. The specific location of the files dictates whether the files will be copied to the end user’s PC and later deleted after installation is complete or whether the files will be copied and retained on the end user’s hard drive.
Place files that replace or are additional files for MS Windows NT 4.0 in the subdirectory of $OEM$\$$.
Place files for applications that support a scripted (silent) installation, and any other files you want to copy to the destination computers, in the subdirectories of $OEM$\drive_letter, where drive_letter is the drive on the destination computer in which the application is to be installed. You could have multiple \driver_letter\ directories or multiple disk partitions. For example, if you want to install MS Office on the C drive of the destination computer, you would put the files in $OEM$\C\MSOffice. If you had files or applications that the users would install from the D partition, at some later time, they could be placed in subdirectories under $OEM$\D\install
Jump to Appendix C to view the file structure for a distribution share.
STEP 6 –Using the sysdiff utility to install applications
The information provides thus far manages the installation of the operating system. In addition to installing the operating system, application software can also be included at
27

the completion of the MS Windows NT 4.0 setup. Sound drivers, MS Office 97 and MS Windows NT 4.0 Service Pack 3 are all examples of files that can be installed using this process. The process to do this requires the utility sysdiff.
Sysdiff works as follows
1. Use a default client PC that has MS Windows NT 4.0 preinstalled with desktop and other customized user settings configured.
2. Use the sysdiff /snap command from the distribution share to capture a snapshot of the hard drive and registry entries. Call this file snapshot.img. The file should be stored on the distribution share in an directory, for example, called x:\images.
3. Install applications on to the default client PC and load data files. Make any customizations to the user interface within the applications as needed. Note, applications that require hardware drivers, other than sound drivers will not necessarily work with sysdiff.
4. Use the sysdiff /diff command from the distribution share to create a difference file (diff_file.img). This file also should be on the distribution share in the x:\images directory.
Note: item 5 requires a decision as to whether applying the software applications will occur after executing the sysdiff /apply command or whether the installation will occur as part of the overall MS Windows NT 4.0 unattended process. If the unattended process is used, then a file called cmdlines.txt will also be created.
Sysdiff on demandThis next step is generally used if the application software image file is going to be applied to the target PC by someone by hand, as needed on each notebook PC.
5. Now move to the target notebook PC and connection to the distribution share. Use the sysdiff /apply command from the distribution share as follows:
sysdiff /apply /m diff_file.img
the /m switch writes registry changes to the default user on the target PC. If you omit this switch the changes will be written to the current user or the sysdiff will fail
OR
Sysdiff as part of unattended installation (cloning)This next step is generally used if sysdiff applications will be included as part of the unattended installation process.
5. There is another option to extract the .ini file and registry change out of the difference file and load them into a new ASCII file on the distribution share. It will also create the entire directory structure and copy all the files necessary for the installation on the target PC under the $OEM$ directory. A file called cmdlines.txt will also be created on the distribution share. Jump to Appendix C to see an example.
The syntax to create this file is:
sysdiff /inf /m x:\images\diff_file.img <distribution share>
28
Additional notes about sysdiff:
Obtain latest version of sysdiff.exe utility from Microsoft’s ftp site at ftp://198.105.232.37/fixes/usa/nt40/utilities/Sysdiff-fix/
For more info refer to Microsoft Windows NT 4.0 Server or Workstation Resource Kit.
Checklist to Test Unattended Installation on a Client Notebook
Network boot disk for client to log on to distribution share – use Network Client Administrator program available on MS Windows NT Server CD to create client boot disk or two-disk set which contains setup program files to install network DOS client
Unattend.txt file (answer file) – HP provides sample for OmniBooks or MS Windows NT Server provides Setupmgr.exe which is a GUI program that creates the ASCII text file in response to prompts within the interface.
Unique.udb file (uniqueness database file) – create if needed to add user names, IP addresses and any other unique information for the users
$OEM$ files from HP Recovery CD ROM copied to server or distribution share
Cmdlines.txt file – use modified file from HP Recovery CD ROM
Sysdiff utility and image file – available on MS Windows NT Server CD in \SUPPORT\DEPTOOLS\I386
Additional NT Installation Tips and Tricks
ATI Driver Tip – HP OmniBook 7100 Only
The ATI drivers that are included on the MS Windows NT 4.0 Service Pack 3 either from the web or the CD are older drivers. These drivers are not compatible with the HP OmniBook 7100. When installing MS Windows NT 4.0 from a retail CD, use the VGA driver for the installation. After installation change the driver using the HP Recovery CD-ROM to obtain the most recent ATI drivers that are compatible with the ATI Rage LT Pro video controller. The drivers can be found in the \omnibook\drivers\nt40\video directory.
Adding An Administrator Password In An Unattended Script-This tip originally appeared on the TipWorld website http://www.tipworld.com/
You can't conventionally add a password for an Administrator account inan unattended script. But you can put a Net Use Password /user:Administrator command in cmdlines.txt and place the net.exe file in the $OEM$ directory.
Making An NT Boot Floppy- This tip originally appeared on the TipWorld website http://www.tipworld.com/-
NT Workstation 4.0 (also works with 3.51)
29

There are times when Windows NT won't start, and you know why. If this occurs, you can go through the usual procedures to restore the system, but since you know what's wrong, you can get running again more quickly if you have a boot floppy. To create one, insert a floppy disk into drive A. Right-click on the floppy disk icon and choose Format. Format the disk using Full Format (just to be safe). Now open Windows NT Explorer and click on the root folder (usually C:\). Copy the following files to the floppy disk:
Boot.iniNtdetect.comBootsect.dos (for dual start-up installations)NTLDRNtbootdd.sys (if it's in the root folder, copy it)
If you don't see these files in your root folder, choose View, Options in Windows NT Explorer. Select the radio button labeled Show All Files. Click Apply and then OK. Now you should see the files. If you don't, press F5 and look again. Using the boot floppy, you can boot into your damaged system and make the appropriate repairs.
Disabling Caching Of Logon Credentials-Contributed by Mark Joseph Edwards, [email protected])
By default, Windows NT caches the logon credentials for the last user who logged on interactively to the system. Caching credentials provide a means to log on, even if the system is disconnected from the network or the domain controllers are unavailable. While credential caching is useful, it can be a risk for some networks that require stronger security. You can disable credential caching on a given NT system, further enhancing the security of your systems, by adjusting or creating a Registry key as shown below. But BE CAREFUL--incorrect modifications to the Registry can render your NT system unbootable.
- Hive: HKEY_LOCAL_MACHINE- Key: Software\Microsoft\Windows NT\CurrentVersion\Winlogon- Name: CachedLogonsCount- Type: REG_DWORD- Value: 0
Courtesy of Win NT Magazine (E-mail subscriptions)
Disabling Autorun For CD-ROMs
By default notebook PCs will not auto suspend if the autorun feature of MS Windows 95 or MS Windows NT is enabled. In most instances you should disable the autorun feature on notebook PCs. The same warning that Windows NT Magazine offers applies when making Registry changes under MS Windows NT. BE CAREFUL--incorrect modifications to the Registry can render your NT system unbootable.
CD-ROM AutorunHKEY_LOCAL-MACHINE\System\CurrentControlSet\Services\Cdrom\Autorunchanging to 0 will turn the feature off
30
Approved and Tested Solutions Program
31

Approved and Tested Solutions Program
Overview
The HP OmniBook Approved and Tested Solutions program identifies strategic third-party products and services that add value to our current HP OmniBook family of products. Because of the large selection of third-party products that are sold into the corporate marketplace, HP’s Mobile Computing Division has realized the importance of building a strong test and support foundation with each vendor. HP believes that this program is an essential ingredient to HP’s success with our OmniBook customers. In HP’s Mobile Computing Division’s selection process, each vendor must have a commitment to providing quality solutions and offer a level of customer satisfaction consistent with HP’s.
The primary objective of this program is to help identify and test third-party products on HP OmniBooks and ensure that they either meet or exceed HP’s expectation for quality and supportability. Each product displaying the Approved Solution designation will receive support directly from HP for the entire configuration (including the add-on product). Products that are classified with the designation of Tested products, are supported by the third-party vendor directly.
Early testing
As a result of HP Mobile Computing Division’s close relationship with each third-party vendor, HP often has access to pre-released third-party products from our strategic vendors for early evaluation and testing.
After the third-party vendor has fully tested the compatibility between its product and the HP OmniBook, a document (application note) is prepared that provides a step-by-step procedure for setting up and configuring the product. This early preparation by HP and our third-party partners allows us to offer customers timely information about new product introductions and product revisions.
If your company is evaluating a new third-party product, check with your local HP Technical Consultant to find out if HP has worked with, or is in the process of working with, the vendor to qualify its product under this program.
32

Approved and Tested Solutions Checklist
Check the HP website or with your HP Sales Representative for more information on HP accessories. HP does offer a number of HP as well as third-party accessories on the HP price list.
Check the HP website for Approved and Tested Solutions listing for supported PC Cards or other third-party products that HP and third party partners have tested. To jump to the HP website go to http://www.hp.com/omnibook
Decide if network cards need to be CardBus, non-CardBus and/or PCI cards. Note CardBus is not supported under MS Windows 95A.
Decide if network cards should be 10/100Mbps or 10Mbps
Decide if modem cards should be 33.6 or 56kbps and standardize on Kflex, x2 or the recently introduced v90 standard (for 56kbps modems)
Obtain the latest drivers for the cards or other product(s) being tested
If using PC Cards, ensure that HP’s Mobile Solution for APM 2.0 and Card Executive are installed under MS Windows NT 4.0
Download any application notes from HP’s website or the vendor’s website, that may be available, for the products being used to assist with configuration settingsDeployment Phase
33
Deployment Phase
34

Deployment Phase
Go back to: Four Phases of the IT Lifecycle
The deployment phase represents the transition from a few pilot users to a full rollout for a large group of users across an enterprise. Many key considerations are involved prior to the start of the deployment phase. Several considerations to include are IT help desk training, end-user training, hardware migration and the deployment schedule. The following deployment checklist describes those actions needed prior to the start of a deployment. This checklist is not meant to be exhaustive, but rather the beginning of the process to develop a comprehensive list.
Deployment Phase Checklist
Define and communicate deployment plan, including owners, responsibilities and schedule
Consider options to purchase or lease from HPTo find out more about HP leasing options visit HP’s website at http://www.hp.com/wcso-support/17TechFin.html
Select and order the HP OmniBook products to deploy
Select and order any HP or third-party accessories
Order spare accessory modules and several spare units for testing and swapping out with users’ units for troubleshooting if needed. Consider language and keyboard differences for a global customer base.
Check HP and third-party accessory manufacturers’ websites to see if any drivers have changed
Check Microsoft’s or other software vendor websites to determine whether any patches, fixes or updates are available or needed for the OS or applications
Determine the type of Security and Desktop Management to implement. For more information jump to Security and/or Manageability. Order security accessories.
Finalize, “freeze” software image(s) and document for IT support what is contained within the software build (include driver version numbers, explanation of configuration changes, etc.)
Define ongoing support responsibilities and processes for the internal IT organization, channel partners, or third-party support providers
Determine service repair options and service provider to use
35
Develop training plan and schedule for IT help desk and/or train the trainers
Develop end users training plan and schedule
Prepare documentation for highly mobile users addressing remote connection needs and support considerations
Ensure there is a backup strategy for users’ data and that this strategy is communicated repeatedly. In addition, it is always a good idea for the IT team to proactively communicate their availability and provide backup instructions, to ensure data is not lost.
Implement billing process for ongoing services
36

Security and Desktop Manageability
37

Security
Security Overview
Return to: Evaluation Checklist
HP believes that security is and should be a major consideration when deploying notebook PCs. Notebook PCs are highly mobile products and are often carried about or placed in high-risk environments. Company information is a highly valued asset that companies must work hard to protect day-to-day. If a notebook and its valuable information is left unattended, it could put the employee’s company at risk and the employee, who relies on the information to perform daily job functions, also at risk.
Even in the office, any PC, whether a desktop, workstation or notebook, should be protected from unwarranted access. Securing the notebook, workstation or desktop PC, securing the information on the notebook and ensuring that access to that information is validated are all key features that HP delivers to IT Managers.
Use the following security checklist and description of security features to determine what security to implement.
Security Checklist
Identify IT Password/Security Administrator(s)
Determine what password scheme to use (i.e. 1-level or 2-level scheme). For more information on HP OmniBook password implementation jump to passwords.
Download a copy of the HP Reference Guide from HP’s website to find out how password removal is administered by HP and the requirements for removal of a password.
Determine population of end-users who will need to secure their notebook PCs in the office or away from the office. Develop plan to track serial numbers with end-user information and location of units. To find out more about what asset management security HP can offer, jump to asset management. To find out more about how HP TopTools 2.6 can help with automated tracking of assets, jump to TopTools.
Build security information into end-user and train-the-trainer training material
For additional hardware encryption security, order HP Encryption Smart Card accessories for end users and extra accessory Smart Card packs for administrators to use. For more information about HP’s Encryption Smart Card jump to smartcard.
38
Security Features
Kensington Lock Slot
Every notebook HP designs has a slot for a Kensington lock. The Kensington lock hardware can be purchased at most computer resellers. This is a simple first line of defense. Kensington locks enables users to lock down their notebook PCs to a non-removable item, such as a desk or office partition. The lock continues to be useful in a hotel or conference center environment where a computer can be locked down to a piece of furniture. They are lightweight and easy to pack.
How to obtain this feature:
Purchase Kensington locks from an HP reseller. Locate the Kensington lock slot on the HP OmniBook. See the HP Omnibook Reference Guide for further information.
Controlling Passwords in BIOS
Return to: Security Checklist
A second line of defense is the use of passwords. HP offers built-in administrator and user password capability on HP OmniBook notebook PCs (available on most models).
Administrator Password
Enables the Administrator to limit access to changes in the CMOS settings. End users can make changes to the power management settings without making changes to IRQ and other configuration settings. This setting also allows Administrators to change or remove user passwords.
How to obtain this feature:
Press F2 when the HP OmniBook logo appears during boot up to enter the BIOS Setup utility.
User Password
Enables the user to control power management settings with some restrictions to CMOS setting access. The user password requires an administrator password be set first. If a one-level password scheme is implemented, the user can choose to set the administrator and user password to the same value.
How to obtain this feature:
Press F2 when the HP OmniBook logo appears during boot up to enter the BIOS Setup utility.
39

Password Options
There are settings for boot, resume, dock and undock. To find out about the impact of each and how to configure specific password settings, refer to the HP Reference Guide on HP’s website at http://www.hp.com/omnibook/products/4100/manuals.html. In this hyperlink the OmniBook 4100 is referenced. Substitute the other product platforms (7100, 3100,2100) once you are at this location.
Hard Disk Drive Lock
When hard disk drive lock is enabled in BIOS Setup (Hard disk drive lock – Enabled), the drive, even when moved to another notebook PC or readable device, cannot be accessed unless the second unit has the identical BIOS password as the first unit. Drive lock requires synchronization of passwords in BIOS and on the drive’s firmware before the drive can be accessed. By default this setting is disabled in BIOS on most HP OmniBook notebook PCs. Note, losing or forgetting a password on a drive that has hard disk drive lock enabled will render the drive inaccessible.
Floppy Boot
When floppy boot is disabled in BIOS Setup, the floppy disk cannot be used to boot the HP OmniBook notebook PC. By default this setting is enabled in BIOS on most HP OmniBook notebook PCs.
Smart Card
HP’s Smart Card products take full advantage of software and hardware security technologies. HP is pleased to offer an HP OmniBook Encryption Smart Card solution jointly developed by several HP product divisions. HP has developed a complement of Smart Card solutions that work with HP OmniBooks, workstations and desktop PCs.
For those unfamiliar with Smart Card technology, the following brief summary highlights key components and how the technology works. If you are already familiar with the technology jump ahead to HP Smart Card to find out more about how HP has designed a comprehensive solution for Corporate IT Enterprises.
Smart Card Technology Summary
This security technology is made up of a secured hardware token, often referred to as a Smart Card. There is memory on board for storage (1K-8K). Some cards have encryption engines built in. They are designed for both personal use as well as for computing. The technology is more secure than a magnetic strip. Some current uses for Smart Cards are telephone cards, credit cards, and secure access to buildings, computers and other sensitive areas. Also cash cards enable access to vending functions, telephones, copiers and office supplies.
40

HP Encryption Smart Card Security System
Return to: Security Checklist Return to: Deployment Checklist Return to: Smart Card
HP’s Encryption Smart Card solution offers a personal tamperproof token for secure storage of electronic keys and user identity. The features of the HP Encryption Smart Card Security System include secure system access (MS Windows NT only) and data encryption (MS Windows 9X and MS Windows NT 4.0). It provides centralized management and secure access to corporate resources whenever required by corporate policy. Centralized management consists of writing changes to the Smart Card, running diagnostics, administering cards across an enterprise as well as recovery should this become necessary with a particular card.
The physical design of the HP Encryption Smart Card solution is a credit card size smart card with a visible chip on it and a Type II PC Card reader that contains a thin flap. The reader can be inserted into a standard notebook PC Card slot and the card is then inserted into the flap of the Smart Card reader.
How to obtain this feature:
HP offers the HP Encryption Smart Card Security System for OmniBooks as an optional accessory. Contact your reseller or HP Sales Representative for more information. HP Smart Card accessories include the following:
US version PC Card reader (2) Smart Cards Software with 128-bit encryption (US & Canada only) Quick Installation Guide
International version PC Card reader (2) Smart Cards Software with 40-bit encryption Quick Installation Guide
Replacement Card Kit
Pack of 5 cards
Management of Smart Cards across an enterprise
HP’s notebook division partners with the HP field organization to assist customers with implementing HP Encryption Smart Card in their enterprises. Additional features including intranet security and Smart Card administration management are available from HP. For more information regarding this product please contact your HP Sales Representative.
41

Manageability
Return to: Deployment Phase Checklist
Manageability Overview
For IT Managers, HP TopTools provides easy-to-use, standards-based management for HP Vectra, Kayak and OmniBook PCs, resulting in increased system up-time and less time for PC administration, because of
Faster end-user support and troubleshooting Accurate inventory and configuration information Efficient administration of PC security Preventive problem notification Remote operation from central management console Efficient upgrade of BIOS
IT executives understand that the key to reducing PC cost of ownership is desktop management. These executives know that the cost to manage a PC desktop or notebook far outweighs the price of the PC platform itself; many report that the average cost to manage a single networked PC is now double to triple the PC's original purchase price.
IT executives know that they have problems managing their enterprise's desktop and notebook PCs. When IT decision-makers have problems, successful suppliers work towards solutions. In 1992, HP and other leading computer hardware and software suppliers founded the Desktop Management Task Force (DMTF) to create open industry standards for desktop interfaces. The result is the DMI (Desktop Management Interface) standard, which hardware and software suppliers are encouraged to incorporate into their products. For more information about the Desktop Management Task Force visit their website at http://www.dmtf.org/.
HP, well known for its support of open systems and standards, has aggressively invested in designing its OmniBook notebook, Kayak workstation and Vectra PC products to be DMI-compliant as well as building software tools that can manage any DMI-compliant PC. The software "glue" between the DMI-compliant hardware and DMI-compliant management software is HP TopTools. TopTools, incorporated with all OmniBook, Kayak and Vectra Corporate PCs, allows IS administrators to view and manage over 350 DMI attributes. And because TopTools is DMI-compliant, it can manage DMI-based PCs from other manufacturers. TopTools can also be integrated with HP's OpenView management environment, providing a complete network and system view of the entire information infrastructure.
42

DMI 2.0 Compliant
A number of notebook vendors’ specifications refer to their products as “DMI tested”. HP has gone beyond HP internal testing for DMI compliance and has received “DMI approved” certification as well from The Desktop Management Task Force (DMTF) for HP Vectra PCs, HP Kayak workstations, HP OmniBook notebook PCs and HP TopTools PC-management software. They are all Desktop Management Interface 2.0 (DMI 2.0) compliant. The DMI standard allows IT managers to view asset information and perform management tasks on multiple PCs in large, multivendor PC environments.
Asset Management
Return to: Security Checklist
PC-ID
Every HP OmniBook notebook comes with a two-line (40 characters per line) field that users can change in System BIOS Setup to include personal identification information. This feature is also referred to as tattooing. The PC-ID is displayed upon boot up of the system.
Serial number
Hewlett-Packard ships all OmniBooks with an electronic serial number. An electronic serial number can help IT managers track assets and software configurations. The serial number can also be used for tracking lost or stolen notebook PCs. Updating the BIOS does not affect the electronic serial number.
The Desktop Management Interface (DMI) TopTools application shipped with our new products can be used to read the serial number locally or remotely across a network.
Manageability Checklist
Assign IT Manageability Administrator contact
HP has developed a TopTools Implementation Guide. Please contact an HP Call Center to learn the status of the release of this guide. This guide addresses both console management and client side management of TopTools 2.6.Jump to HP Call Centers .
It is available in Adobe Acrobat format.
Determine what PC asset management information will be used
PC-id tattooing
Asset tagging
Electronic serial number tracking
Machine/computer name
Physical location
43

User name & phone number
Set up HP OpenView Desktop Administrator on a server(s) to administer TopTools clients. For more information on options to install the system management console, HP has developed a TopTools Implementation Guide. Please contact an HP Call Center to learn the status of the release of this guide. Jump to HP Call Centers .
Review the description of TopTools to determine what features to take advantage of. For detailed information on the features jump to TopTools.
Set up installation of TopTools 2.6 client on all HP OmniBook notebook PCs. For easy implementation, the TopTools 2.6 setup program can be launched by the user from the Start Menu or built into an MS Windows NT 4.0 unattended installation. For more information on automating the installation, refer to the TopTools 2.6 readme.txt file or the HP TopTools Implementation Guide.
Note: Before installing software ensure you have logged in with administrator rights to every PC that TopTools 2.6 is being installed on.
Becoming Familiar with TopTools 2.6 Client
Return to: Security Checklist Return to: Manageability Checklist
HP TopTools addresses each of the following tasks, simplifying them and lowering the total cost of ownership of PCs. The tasks are broken down into three groups:
1. Asset Management – keeping hardware and configuration information current2. Diagnostics/Help Desk Support – lowering support costs3. Software Distribution and License Metering – simplifying the logistics of software
updating
How to obtain HP TopTools 2.6
HP TopTools 2.6 ships on every HP OmniBook notebook. From the Start Menu the setup program can be launched to install TopTools 2.6.
If HP TopTools 2.6 is not installed on the HP OmniBook notebook, go to HP’s website at http://www.hp.com/toptools to download a free copy of the program.
Asset Tools
Features
Collect hardware inventory and configuration information about the PC, its components, BIOS and operating system
Allow administrators to get attributes (such as BIOS manufacturer, processor type, and socket) to meet individual asset management requirements. Other settings are changeable by the administrator (i.e. tattoo string, physical location of the unit, etc.)
Collect and manage information on monitors, disks, memory , ports, boot-ROM and many more hardware items
Eliminate manual asset data collection, which produces savings on PC ownership
44
To implement this feature:
Install TopTools 2.6
During setup, TopTools gathers information from the system to initialize certain user information. Setup provides an opportunity to override these defaults values, or they may be changed later using TopTools.
Make changes to user information as needed
ProtectTools
Features
Enable or disable access to the floppy disk drive
Enable or disable booting from the floppy disk drive, the hard disk drive and the network
Reboot the PC conditionally or unconditionally
View or change tattoo string
To implement this feature
Using the system management console, log into the remote PC with the Administrator password. Change options as needed.
ConfigTools
Features
Allow the BIOS of multiple PCs to be remotely upgraded simultaneouslyNote: this feature not yet available under TopTools 2.6 for MS Windows NT
System name and model prevent BIOS flashing on the wrong PC
Operating system and BIOS information indicate when upgrades are needed
To implement this feature:
Obtain system BIOS update from HP’s website at www.hp.com/omnibook.
Use TopTools 2.6 central management console to host BIOS update files and to initiate BIOS update flashing
45

McAfee Crash Monitor
Features
Protect your PC with automatic crash protection
Monitor the system for low resources, such as disk space and system resources
Monitor the system for disk fragmentation
Select whether DMI events will be generated for application crashes or when resource thresholds have been reached
To implement this feature
Install this product as part of TopTools 2.6. This program requires TopTools 2.6 to run.
Use the Crash Monitor icon on the system tray to open the Crash Monitor menu to configure whether events will be sent. Events are notifications or actions by Crash Monitor in response to application crashes, successful revival of an application or if a monitor threshold has been reached.
SafeTools
Features
Power-on self test
Monitor PC health
Deliver real-time status and alerts of critical operating conditions
To implement this feature
Install TopTools 2.6
Upon installing TopTools 2.6 some initializing of the information occurs during setup to enable disk reliability and power-on self-test monitoring and reporting.
Enable or disable alerts as needed
46

VirusMonitor
Features
Receive Virus Alerts and corrections
To implement this feature
From the Start Menu, install McAfee VirusScan software that ships with the HP OmniBook
If the drive has been reformatted, use the HP Recovery CD ROM to obtain this program
47

Deployment Training
48
Deployment Training
Deployment Training Overview
HP is committed to assisting IT Managers with training materials that will benefit users of HP OmniBook notebook PCs.
HP provides technical training materials for corporate IT departments and help desks. These materials can be found on the HP web site thirty days after product introduction. The materials will be available in both Microsoft PowerPoint and Adobe Acrobat formats. The following is an example of the topics included in the technical training materials:
OmniBook technical specifications
Setting up the OmniBook
Configuring the OmniBook under Windows 95 and Windows NT (including networking)
Operating the OmniBook
Docking and undocking the OmniBook
The technical training materials will not cover the basics of Microsoft Windows 95 and Windows NT. A basic knowledge in using and configuring these operating systems is assumed. These training materials will cover specific information and issues when using the operating systems on notebook PCs and more specifically OmniBooks.
Deployment Training Checklist
Identify someone who will be the Technical Training lead
Determine population of IT and help desk technicians who require technical training and their geographical locations
Decide who will deliver the training (either one person who will travel to each location or multiple trainers at each location)
Download the technical training materials for the OmniBook product(s) that you are deploying in your company from HP’s website at http://www.hp.com/omnibook. Choose the specific OmniBook platform(s) webpages and select manual tab to locate the training materials. HP will be releasing the training materials for these products within thirty days of their introduction.
Make any changes to the training materials (PowerPoint version) or use the training as is (Adobe Acrobat version)
Train the technical trainer(s) that will be presenting the materials
Deliver the train-the-trainer training
49

Schedule the end-user classes
Order and deliver the equipment to the different locations
Print the materials for the students
Deliver the end-user training
Evaluate the success of the training by asking the students to fill out evaluation forms at the end of the class and two weeks after the class
HP OmniBook Frequently Asked Questions (FAQs)
HP’s website provides a listing of support documentation and FAQs that have evolved from HP’s expertise in helping Corporate IT Managers roll out notebook PCs across an enterprise.
Take a look and let us know how useful this information is to you. Look for this and other information being made available via HP’s website to further the success of your deployments. You will find the latest listing available at http://www.hp.com/omnibook.
50
Maintenance Phase
51

Maintenance Phase
Go back to: Four Phase of the IT Lifecycle
The maintenance phase centers around the support and services that act as the backbone for an IT organization to respond to their population of notebook customers. The maintenance phase also ensures that the users have available to them any updates that HP may make available. For example BIOS changes or enhancements would occur in this phase of the deployment. The Corporate IT help desk may also choose to take advantage of continually larger hard drives, application level product updates from HP, driver updates or changes from other software vendors.
Maintenance Phase Checklist
Communicate support process and call path to all responsible IT personnel responsible for support and/or backup support
Develop communication materials or quick guides for users on how to access IT support for their notebook PCs. Include information on what troubleshooting information is needed to assist them.
Generate a ticket system or simple tracking system to log requests coming into the IT organization, document call history, closure of open calls and call reporting.
Discuss with support provider the need for worldwide timezone coverage if applicable to your organization
Become familiar with HP Diagnostics software available on all HP OmniBook notebook PCs and train users in the use of the diagnostics floppy utility. For more information on this tool jump to HP Diagnostics.
Decide whether to stock spare batteries, hard drives and other modules for troubleshooting user configuration issues or for general support maintenance
If the organizations are geographically dispersed, consider what method(s) are used for the IT personnel to communicate and share information regularly among the various entities.
Utilize HP’s Electronic Support Services to stay current on information for support. To find out more about HP’s Electronic Support Services jump to Electronic Support Services.
Establish responsibilities and processes associated with ongoing future deployments of additional systems
52
Plan and implement controlled software and hardware updates as needed
Define, implement and refine an asset management system to minimize loss and to make support more effective
Periodically poll users for new needs, for satisfaction with internal and external support providers, and for satisfaction with the performance of the systems deployed
HP Lifecycle Support
Worldwide Customer Support Centers
HP Customer Support Centers provide technical information via telephone. Trained online agents can assist with setup, configuration, start-up and troubleshooting of HP products.
Customer Support Centers can qualify hardware issues on HP products and, if necessary, initiate the appropriate service procedures.
For phone numbers in each region please visit the following websites or if you are using this document in Word 97 with an internet connection, just click on the hyperlink to jump to the region you are interested in. This information is also enclosed as part of the in-box documentation that ships with every HP OmniBook PC.
North & Latin America http://www.hp.com/cpso-support/guide/psd/cscus.html Asia Pacific http://www.hp.com/cpso-support/guide/psd/cscap.htmlEurope, Middle East & Africa http://www.hp.com/cpso-support/guide/psd/cscemea.html
HP Electronic Support Services
Return to: Maintenance Checklist
World Wide Web
HP OmniBook website: http://www.hp.com/omnibook
HP First (Fax Service)
800-333-1917 (North America)
HP Bulletin Board Services (BBS)
North America (208)344-1691Austria/Germany (1)865.8799 Belgium/Dutch and French (2)778.3819 Belgium/French (2)778.3819 Denmark/Danish (45)991905 Finland/Finnish (9600)7280France/French 3616 HP MICRO (Service Minitel)Germany *HP# Datex J-BTX system
53
Italy (2)753.32.27 Netherlands 0495546909 Norway (2)273.5697 Sweden (8)750.6262 Switzerland/French (64)560200 Switzerland/German (64)560200 United-Kingdom (1344)360880 WorldWide (US) (208)344-1694
CompuServe (“GO HP”)
America Online (HP Forum)
America Online/Bertlesmann (HP Forum -Europe)
Optional Support Assistant CD-ROM
(for information: http://www.hp.com/cposupport/hpsa.html)
HP OmniBook Hardware Diagnostic Tool
Return to: Maintenance Phase
In some instances, before calling HP for support assistance, it may be beneficial to first try the HP OmniBook Hardware Diagnostics utility available on most HP OmniBook notebook PCs. This utility is an MS-DOS based hardware diagnostic software tool created by Hewlett-Packard for its personal computers.
The HP OmniBook Hardware Diagnostics utility is designed to help identify and verify the existence of a hardware problem on an HP OmniBook quickly.
The program is located on your HP OmniBook hard drive or it can be found on the HP Recovery CD-ROM in the omnibook\drivers\hputils directory. Double click on diaginst.bat (you will need a formatted 1.44Mb floppy disk) and follow the instructions
Coming soon – HP’s website at http://www.hp.com/omnibook will offer a FAQ document about this tool that can assist you in more detail..
Express Pick-up & Delivery Service (US)
Turnaround time: 4-6 days Repair and return of same unit Unit picked up at end-user site Repaired unit returned to end-user's site All freight paid by HP Packaging provided by customer
54

Warranty Upgrades
HP makes available for customer purchase, several warranty upgrade programs for extending the warranty period or adjusting the response time and location of service repair. To find out more about these programs please contact your local reseller, HP Sales Representative or nearest HP sales office for more information.
Special Services Option
HP can develop a Special Services option at the customer’s request. This type of program requires a minimum quantity order of greater than 100 notebook PCs.
This option is ideal for IT organizations that:
Require reliable, time-dependent repair
Have a large number of mobile users or remote sites
Require centralized management and reporting of repair activity and costs
Desire a custom support solution
Choose a service option to meet your uptime requirements:
Express Exchange (overnight)
Two-day Rapid Repair
Express Pick-up and Delivery (4-6 days)
These services also include monthly management reports, a single point of contact at HP and monthly billings to consolidate the paperwork for IT management.
55

Transition Planning Phase
56
Transition Planning PhaseGo back to: Four Phases of IT Lifecycle
The transition planning phase represents an opportunity for HP and IT organizations to transition from older products to newer products to take advantage of newer technologies as well as features that customers continue to expect. HP offers Corporate IT Managers support during this phase to again help with the qualification and migration process. HP also designs a “family of products” so that the move from one product to its successor is logical and easily achievable.
Additionally, HP has chosen one product model within each family of products that HP is committed to offering over a 9-12 month lifecycle. While other products will evolve with new technology typically sooner than this timeframe, these “workhorse” SKUs will be available through transitions should they be needed. If important to your company please discuss this with your HP Sales Representative or HP Corporate Account Representative.
Transition Planning Checklist
Discuss HP’s notebook product roadmap under non-disclosure with your HP Sales Representative or HP Corporate Account Representative
Discuss with your HP Sales Representative or HP Corporate Account Representative which HP OmniBook model(s) are being transitioned to newer model(s). Also discuss the schedule for initiating an evaluation of the new product and conducting a pilot (if applicable).
HP offers an 18-24 month platform lifecycle, so consider the option to stay within a platform family while taking advantage of newer technologies and features
Consider evaluating and qualifying a “workhorse sku” to extend the transition planning phase out further
Discuss with your HP Technical Consultant any changes that may be required to qualify a new or existing software build on the new platform. Determine the extent of testing needed for the qualification of the software build.
Notify your HP Technical Consultant if you would like to receive pre-released BIOS changes as part of the new platform evaluation
Consider options to purchase or lease from HP. To find out more about HP’s technology refresh leasing options visit HP’s website at http://www.hp.com/wcso-support/17TechFin.html.
Research options for disposition of existing equipment
57
Beyond Lifecycle Planning
58

Beyond Lifecycle Planning
HP Global Programs
HP Global Account Program/Summary of benefits
In addition to providing you with leading products and services around the world, we recognize that in today's competitive global market, you're also looking for a strategic partner that will make it easier for you to do business with HP globally. A supplier that can help you implement global technology more quickly and more easily to maximize what you get out of your IT investment worldwide.
HP's Global Account Program is focused on three things:
* Flexible and consistent agreements* Streamlined business processes* Access to HP and Reseller Resources Worldwide
Flexible Worldwide Agreements
Together with our International Corporate Resellers, HP offers flexible worldwide terms and conditions for multinational accounts. The HP account manager will handle coordination and implementation through your selected Corporate Resellers / Integrator to ensure contractual consistency. Our worldwide purchase agreements, warranty terms and support programs are designed to minimize administrative paperwork. HP also provides flexible competitive pricing alternatives to accommodate multinational requirements, and a pricing structure that is competitive within each country, and will provide worldwide pricing as appropriate
Streamlined business processes
HP maintains one of the largest distributed networks in the world and has established a Common Operating Environment (COE) for PC users around the world, well before most international companies. In fact, HP just recently passed a threshold of 100, 0000 desktops using this common desktop environment. Around the world, HP employees in sales, consulting, distribution, support and manufacturing use standard software and tools to communicate. ( 80% decrease in total cost of ownership, 6% decrease in software installation and support costs, a 75% decrease in end-user technical support costs and 70% reduction in software license costs). We use worldwide TQC processes and are certified using the strictest certification standards as a base for all countries. For example, our global sales teams can use databases to identify their sales counterparts around the world, obtain key account information and to identify resellers around the world. To strengthen the relationships between HP and multinationals we continually share best practices.
59

Worldwide resources
HP Corporate Sales Organization
There are many more resources within HP’s sales and marketing organizations dedicated to global customers. In addition to the account sales team, there is the support organization and the marketing centers for each division within the Computer Organization.
Account Manager - responsible for corporate headquarters- As a sales representative for account headquarters, they are responsible for coordinating HP sales and support efforts on a worldwide basis. The account manager will work closely with the HP sales reps in the various countries to ensure global terms are made available worldwide, that any special requirements are communicated and delivered through the resellers/ and or HP. Most importantly, act as a focal point for escalation of issues that affect overall customer satisfaction.
Global sales and consulting resources - HP resources are focused directly on understanding large international customer requirements for enterprise IT solutions (both UNIX and Intel based) as well as high-level consulting services. HP has focused industry and account teams that work together and with our worldwide network of resellers, VARs and systems integrators.
Worldwide Network of Corporate Resellers and PC System Integrators
Each country works with local corporate resellers or National Corporate resellers who have an outbound sales force and call on corporate customers either in a part of the country or throughout the entire country. Over the past year and a half, HP has also accredited a selected number of resellers as International Corporate Resellers (ICRs). ICRs are large corporate resellers capable of handling large global projects within a region and typically across regions.
Large and small resellers are opening their boundaries and enlarging their perspectives to gain share in international markets. These world class resellers have the vision, skills and resources to form networks that reach beyond their home countries. Since the introduction of the ICR program in July of 1995, we have accredited six ICRs whose geographic reach extends across four trading regions and over 75 countries worldwide. Many of these ICRs have formalized their alliance partners across international borders to form holding companies by which they represent their organizations to global customers. One example of this model is GlobalServe (known as CompuCom in US, Compugen in Canada, AAG in Asia, Compel in the U.K. and Info'Point in France). The role of this holding company, under the leadership of the participating partners, is to develop global strategies that will position their respective companies as world class leaders and suppliers of choice. Key priorities are driven within their respective regions to satisfy customer requirements through additional country alliance partners.
Please contact your HP Sales Representative or nearest HP sales office for information on all of HP’s ICR partners.
60
HP Commerce Center
To enhance the value of OmniBooks, accessories have been added to the HP Commerce Center. This allows customers to purchase accessories over the web with a credit card. Orders are routed to a chosen reseller for fulfillment. Upcoming phases of the HP Commerce Center program will continue to streamline the buying process over the next six months. You can check out the site in the “what's new“ section at http://www.hp.com/omnibook.
HP Information Summary
HP is the official information-technology hardware and maintenance supplier to the 1998 World Cup soccer tournament.
Hewlett-Packard Company is a leading global provider of computing, Internet and intranet solutions, services, communications products and measurement solutions, all of which are recognized for excellence in quality and support. HP has 123,300 employees and had revenue of $42.9 billion in its 1997 fiscal year. Information about HP and its products can be found on the World Wide Web at http://www.hp.com.
61
Appendix A – Unattend.txt File
Return to unattended installation process
For HP OmniBook 7100
[Unattended]
OemPreinstall = yes
ConfirmHardware = no
NtUpgrade = no
Win31Upgrade = no
TargetPath = WINNT
OverwriteOemFilesOnUpgrade = no
NoWaitAfterTextMode = 0
[GuiUnattended]
TimeZone = ""
[Display]
ConfigureAtLogon = 0
BitsPerPel = 16
XResolution = 1024
YResolution = 768
VRefresh = 60
Flags = 0
AutoConfirm = 1
InstallDriver = 1
INFfile = "ATI.INF"
INFoption = "ATI Technologies Inc. 3D Rage LT Pro"
[Network]
Attended = yes
62
For the HP OmniBook 4100
[Unattended]
OemPreinstall = yes
ConfirmHardware = no
NtUpgrade = no
Win31Upgrade = no
TargetPath = WINNT
OverwriteOemFilesOnUpgrade = no
NoWaitAfterTextMode = 0
[GuiUnattended]
TimeZone = ""
[Display]
ConfigureAtLogon = 0
BitsPerPel = 16
XResolution = 1024
YResolution = 768
VRefresh = 60
Flags = 0
AutoConfirm = 1
InstallDriver = 1
INFfile = "NEOMAGIC.INF"
INFoption = "NeoMagic MagicGraph 128ZV+/XD"
[Network]
Attended = yes
63
For the HP OmniBook 2100 & 3100
1st unattend.txt file for the HP OmniBook 2100/3100 (SVGA)
[Unattended]
OemPreinstall = yes
ConfirmHardware = no
NtUpgrade = no
Win31Upgrade = no
TargetPath = WINNT
OverwriteOemFilesOnUpgrade = no
NoWaitAfterTextMode = 0
[GuiUnattended]
TimeZone = ""
[Display]
ConfigureAtLogon = 0
BitsPerPel = 16
XResolution = 800
YResolution = 600
VRefresh = 60
Flags = 0
AutoConfirm = 1
InstallDriver = 1
INFfile = "NEOMAGIC.INF"
INFoption = "NeoMagic MagicGraph 128ZV+/XD"
[Network]
Attended = yes
64
2 nd unattend.txt file for the HP OmniBook 2100/3100 (XGA )
[Unattended]
OemPreinstall = yes
ConfirmHardware = no
NtUpgrade = no
Win31Upgrade = no
TargetPath = WINNT
OverwriteOemFilesOnUpgrade = no
NoWaitAfterTextMode = 0
[GuiUnattended]
TimeZone = ""
[Display]
ConfigureAtLogon = 0
BitsPerPel = 16
XResolution = 1024
YResolution = 768
VRefresh = 60
Flags = 0
AutoConfirm = 1
InstallDriver = 1
INFfile = "NEOMAGIC.INF"
INFoption = "NeoMagic MagicGraph 128ZV+/XD"
[Network]
Attended = yes
65

Appendix B – Uniqueness Database File
Return to: unattended installation processReturn to: Creating Uniqueness Database File
[UniqueIDs]WKS1 = UserData, TCParameters, SelectedServiceListWKS2 = UserData, TCParametersWKS3 = UserData, TCParameters, SelectedServiceList, SNMPParameters[WKS1:UserData]FullName = Jane DoeComputerName = WKS1[WKS1:TCParameters]DHCP = NoIPAddress = 137.131.24.35
66
Appendix C – Distribution Share Structure
Return to: Organizing Distribution Share
The following is a listing of the directories that should be set up on the distribution share:
\i386 The source files for the installation of MS Windows NT 4.0 should be placed in this directory. They should be copied over from MS Windows NT 4.0 Workstation.
\I386\hp10.txt This is the unattend.txt file. It needs to be renamed to unattend.txt before using. There is a separate unattend.txt file for each of the OmniBook platforms.
\i386\$OEM$
\$$ - Files to be copied to the \winnt directory\C$ - Files to be copied to d (destination)Drive\Display - Display Driverscmdlines.txt - commands to run after installcry180a.infiexplore.reg
\i386\$OEM$\$$\profile\system32$$rename.txt
\i386\$OEM$\C\winnt$$rename.txt
\i386\$OEM$\displayall display driver files go here
Include $OEM$ information –use Appendix to display actual text file
Cmdlines.txt file
The following commands will automatically install MS Windows NT 4.0 Service Pack 3, Crystal sound drivers and Internet Explorer. This command will also disable the CD-ROM autorun feature so the notebook can suspend automatically.
[Commands]
"C:\WINNT\I386\$OEM$\C\SP3\I386\UPDATE /U /Z"
"rundll32 setupapi,InstallHinfSection DefaultInstall 128 .\cry180a.INF"
"regedit /S .\iexplore.reg"
"regedit /S .\autocd.reg"
67
Index
Aaddress
HP website, 19Asset tagging, 47Asset Tools, 48autorun, 34, 72
BBIOS, 14, 28, 43, 44, 46, 47, 48, 49, 50, 57, 62
CCall Centers, 10, 22, 47, 48Checklist, 9, 11, 16, 19, 25, 33, 37, 39, 42, 43, 45, 46,
47, 48, 54, 57, 58, 62Cmdlines.txt file, 33, 72ConfigTools, 49Corporate Evaluator’s Guide, 19, 21Corporate Evaluator's Guide, 19Corporate Resellers, 64, 65
Ddata sheets, 21deployment phase, 14, 39Desktop Management Interface, 46, 47Desktop Management Task Force, 46, 47Diagnostics, 48, 57, 59
EElectronic serial number tracking, 47electronic support services, 58Electronic Support Services, 57, 58Escalation Team, 10, 11evaluation phase, 9, 10, 11, 13
FFAQs, 55
Hhard disk drive lock, 44HP accessory, 21HP Consulting & Support Services, 16HP Encryption Smart Card Security System, 45HP's Global Account Program, 64
IInformation Resources, 18, 19IT Lifecycle, 9, 12, 13, 16, 39, 57, 62
Llicense agreement, 2
Mmaintenance phase, 9, 14, 57McAfee Crash Monitor, 51McAfee VirusScan, 52MS Deployment Guide, 25, 30MS Windows 95, 17, 19, 21, 22, 34MS Windows 98, 22MS Windows NT 4.0, 9, 19, 21, 22, 23, 24, 25, 26, 28,
29, 30, 31, 33, 37, 45, 48, 72
NNT Service Pack 3, 26
OOmniBook
website, 58OmniBook Notes, 19
Ppartition, 28, 30, 43password, 29, 33, 42, 43, 44, 49Phoenix Advance Power Management, 26, 28Phoenix CardExecutive, 26pre-installed operating system, 22ProtectTools, 49
RRapid Repair, 60Reference Guide, 17, 19, 21, 22, 28, 42, 43, 44
SSafeTools, 51security, 14, 17, 34, 39, 42, 44, 45, 46service
booklet, 19software, 2, 3, 9, 10, 13, 14, 16, 17, 22, 23, 26, 28, 31,
39, 44, 46, 47, 48, 52, 57, 58, 59, 62, 64
68

license, 2Support Assist, 19, 21Support One Program, 11
TTechnical Consultant, 9, 10, 11, 36, 62technical support, 19third-party, 9, 10, 16, 26, 36, 37, 39TopTools 2.6, 28, 42, 47, 48, 49, 50, 51TopTools Implementation Guide, 47, 48Training, 53, 54transition planning phase, 62transition-planning, 14
Uuptime requirements, 60User's Handbook (online), 19
VVirusMonitor, 52
Wwebsite, 19, 58Windows 95
documentation, 19Worldwide resources, 65WWW, 58
69