How to use NetBeans with Murach’s Java SE 6 1 How to use ...index-of.co.uk/Java/How to use...
47
How to use NetBeans with Murach’s Java SE 6 NetBeans is a software framework for developing Integrated Development Environments (IDEs). In particular, it is used to develop the NetBeans IDE, which is an IDE for Java. NetBeans is open-source, available for free, and runs on all modern operating systems. This tutorial has been designed to work with our beginning Java book, Murach’s Java SE 6. To make it easy for you to use this tutorial with our Java book, each topic in this tutorial includes references to the related chapters in our book whenever that’s necessary or helpful. How to get started with NetBeans ........................................ 2 How to download and install the NetBeans IDE ............................................ 2 How to start NetBeans .................................................................................... 4 How to create a new project with a main class ............................................... 6 How to save and edit source code ................................................................... 8 How to fix errors ........................................................................................... 10 How to compile and run an application ........................................................ 12 How to run a console application that gets user input .................................. 14 How to open and close projects and import source code ....................................................... 16 How to open a project ................................................................................... 16 How to close a project .................................................................................. 16 How to import existing Java files into a new project .................................... 18 Object-oriented development with NetBeans .................... 22 How to create a new class ............................................................................. 22 How to work with classes ............................................................................. 24 How to work with interfaces ........................................................................ 26 How to start a class that implements an interface ........................................ 28 How to work with packages ......................................................................... 30 How to generate documentation ................................................................... 32 Debugging with NetBeans ................................................... 34 How to set and remove breakpoints .............................................................. 34 How to step through code ............................................................................. 36 How to inspect variables ............................................................................... 36 How to inspect the stack trace ...................................................................... 36 More NetBeans skills ........................................................... 38 How to run an applet .................................................................................... 38 How to add a JAR file to the libraries for a project ...................................... 40 Perspective ............................................................................ 42 MIKE MURACH & ASSOCIATES, INC. 1-800-221-5528 • (559) 440-9071 • Fax: (559) 440-0963 [email protected] • www .m ur ac h.com Copyright © 2007 Mike Murach & Associates. All rights reserved.
Transcript of How to use NetBeans with Murach’s Java SE 6 1 How to use ...index-of.co.uk/Java/How to use...
How to use NetBeans with Murach’s Java SE 6 1
How to use NetBeans withMurach’s Java SE 6NetBeans is a software framework for developing Integrated DevelopmentEnvironments (IDEs). In particular, it is used to develop the NetBeans IDE,which is an IDE for Java. NetBeans is open-source, available for free, and runson all modern operating systems.
This tutorial has been designed to work with our beginning Java book,Murach’s Java SE 6. To make it easy for you to use this tutorial with our Javabook, each topic in this tutorial includes references to the related chapters inour book whenever that’s necessary or helpful.
How to get started with NetBeans ........................................ 2How to download and install the NetBeans IDE ............................................ 2How to start NetBeans .................................................................................... 4How to create a new project with a main class ............................................... 6How to save and edit source code ................................................................... 8How to fix errors ........................................................................................... 10How to compile and run an application ........................................................ 12How to run a console application that gets user input .................................. 14
How to open and close projectsand import source code ....................................................... 16How to open a project ................................................................................... 16How to close a project .................................................................................. 16How to import existing Java files into a new project .................................... 18
Object-oriented development with NetBeans .................... 22How to create a new class ............................................................................. 22How to work with classes ............................................................................. 24How to work with interfaces ........................................................................ 26How to start a class that implements an interface ........................................ 28How to work with packages ......................................................................... 30How to generate documentation ................................................................... 32
Debugging with NetBeans ................................................... 34How to set and remove breakpoints .............................................................. 34How to step through code ............................................................................. 36How to inspect variables ............................................................................... 36How to inspect the stack trace ...................................................................... 36
More NetBeans skills ........................................................... 38How to run an applet .................................................................................... 38How to add a JAR file to the libraries for a project ...................................... 40
Perspective ............................................................................ 42
MIKE MURACH & ASSOCIATES, INC.1-800-221-5528 • (559) 440-9071 • Fax: (559) [email protected] • www.murach.comCopyright © 2007 Mike Murach & Associates. All rights reserved.
2 How to use NetBeans with Murach’s Java SE 6
How to get started with NetBeans
Before you install the NetBeans IDE, you should install the need to installthe Java Development Kit (JDK) for Java SE 6 as described in figure 1-4 inchapter 1 of Murach’s Java SE 6. In addition, if you want to use NetBeans withour book, you should download the NetBeans version of the source code for ourbook from our web site (www.murach.com). To do that, download the zip filefor this source code and unzip it into the C:\murach\java6 folder. If this folderdoesn’t already exist, you can create it.
How to download and install the NetBeans IDE
Once you have installed Java SE 6, you’re ready to install the NetBeansIDE. Since most Java development is still done under Windows, figure 1 showshow to install NetBeans on a Windows system. In summary, once you downloadthe exe file for the NetBeans installation program, you run this installationprogram and respond to the resulting dialog boxes. When you do, the installa-tion program will install NetBeans and create a shortcut to the NetBeans.exe filein your Start menu. Since this works like most Windows installation programs,you shouldn’t have any trouble doing this.
If you encounter any problems, you can view the documentation that’savailable from the NetBeans web site and consult the troubleshooting tips. Ifyou want to install NetBeans on another operating system such as Linux,Solaris, or Mac OS X, you can follow the instructions that are available fromthe NetBeans website.
How to use NetBeans with Murach’s Java SE 6 3
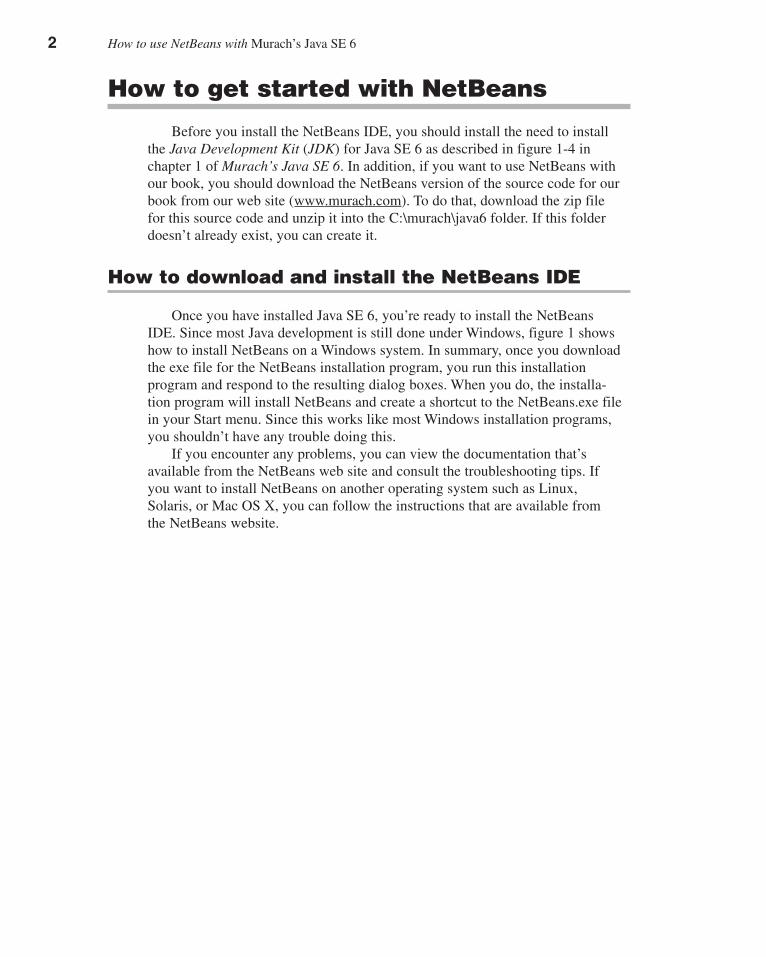
The NetBeans web sitewww.netbeans.org
How to download and install NetBeans1. Go to the NetBeans web site.
2. Download the NetBeans IDE installer. For NetBeans 5.5 on a Windows system, the exefile should be named something like netbeans-5_5-windows.exe.
3. Run the install file and respond to the resulting dialog boxes.
The default install folderC:\Program Files\netbeans-5.5
Description• Although this procedure is for downloading and installing NetBeans for Windows, you
can use a similar procedure for non-Windows systems.
• For information about installing NetBeans on other operating systems or about trouble-shooting installation problems, you can refer to the documentation that’s available fromthe NetBeans web site.
Figure 1 How to download and install NetBeans
4 How to use NetBeans with Murach’s Java SE 6
How to start NetBeans
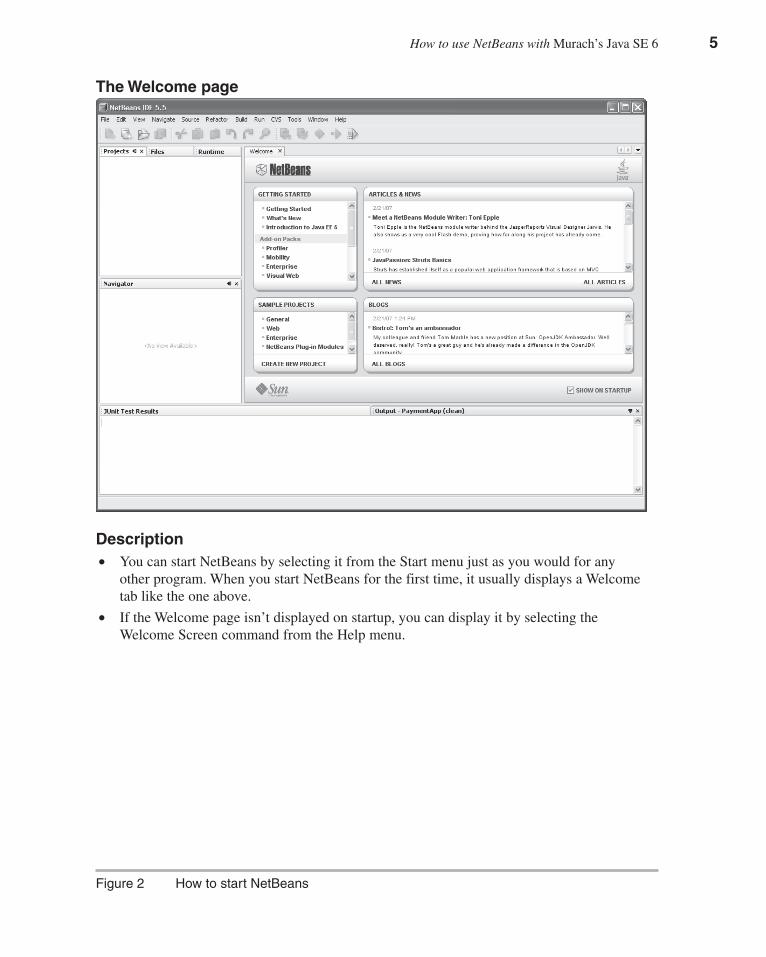
Once you’ve installed the NetBeans IDE, you can start it by selecting itfrom the Start menu. When start NetBeans for the first time, it should display aWelcome tab like the one shown in figure 2. If it doesn’t, you can display thispage by selecting the Welcome Screen command from the Help menu. Sinceyou don’t need this Welcome page to work with NetBeans, you can close it ifyou like. To do that, click the X that’s displayed to the right of the tab for theWelcome page.
If you’re curious to see what version of Java the NetBeans IDE uses bydefault, you can select the Java Platform Manager command from the Toolsmenu to display the Java Platform Manager dialog box. By default, NetBeansuses the latest version of Java that’s installed on your system, which is usuallywhat you want. However, if you want to use another version of Java, you caninstall that version of Java on your system and use the Java Platform Manager tospecify that version of Java.
How to use NetBeans with Murach’s Java SE 6 5
The Welcome page
Description• You can start NetBeans by selecting it from the Start menu just as you would for any
other program. When you start NetBeans for the first time, it usually displays a Welcometab like the one above.
• If the Welcome page isn’t displayed on startup, you can display it by selecting theWelcome Screen command from the Help menu.
Figure 2 How to start NetBeans
6 How to use NetBeans with Murach’s Java SE 6
How to create a new project with a main class
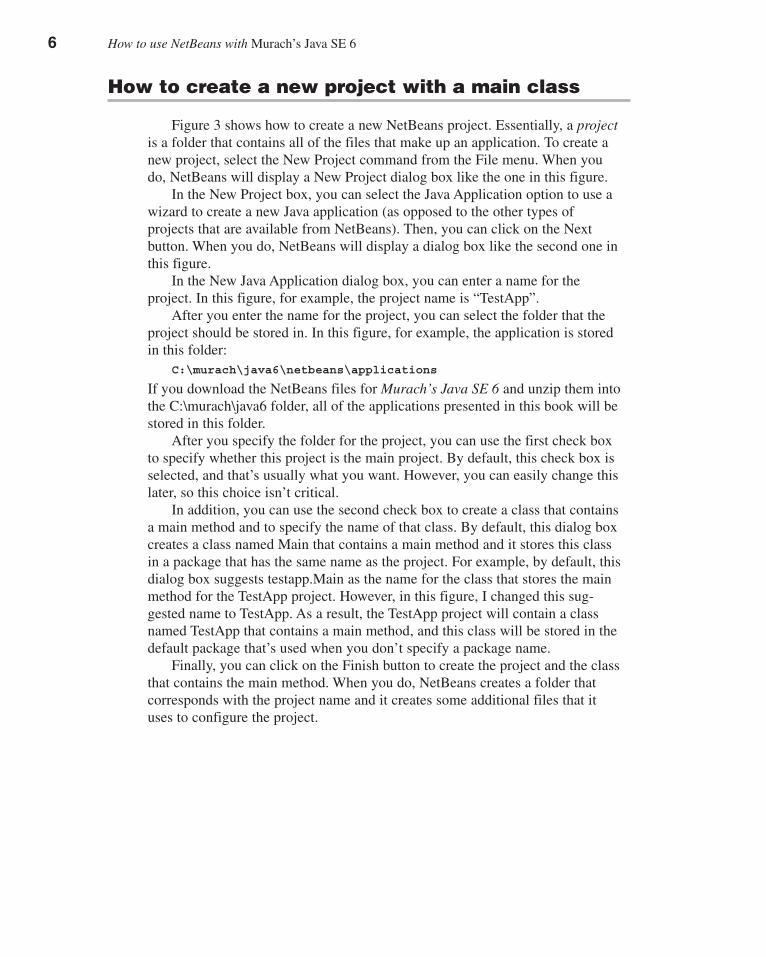
Figure 3 shows how to create a new NetBeans project. Essentially, a projectis a folder that contains all of the files that make up an application. To create anew project, select the New Project command from the File menu. When youdo, NetBeans will display a New Project dialog box like the one in this figure.
In the New Project box, you can select the Java Application option to use awizard to create a new Java application (as opposed to the other types ofprojects that are available from NetBeans). Then, you can click on the Nextbutton. When you do, NetBeans will display a dialog box like the second one inthis figure.
In the New Java Application dialog box, you can enter a name for theproject. In this figure, for example, the project name is “TestApp”.
After you enter the name for the project, you can select the folder that theproject should be stored in. In this figure, for example, the application is storedin this folder:
C:\murach\java6\netbeans\applications
If you download the NetBeans files for Murach’s Java SE 6 and unzip them intothe C:\murach\java6 folder, all of the applications presented in this book will bestored in this folder.
After you specify the folder for the project, you can use the first check boxto specify whether this project is the main project. By default, this check box isselected, and that’s usually what you want. However, you can easily change thislater, so this choice isn’t critical.
In addition, you can use the second check box to create a class that containsa main method and to specify the name of that class. By default, this dialog boxcreates a class named Main that contains a main method and it stores this classin a package that has the same name as the project. For example, by default, thisdialog box suggests testapp.Main as the name for the class that stores the mainmethod for the TestApp project. However, in this figure, I changed this sug-gested name to TestApp. As a result, the TestApp project will contain a classnamed TestApp that contains a main method, and this class will be stored in thedefault package that’s used when you don’t specify a package name.
Finally, you can click on the Finish button to create the project and the classthat contains the main method. When you do, NetBeans creates a folder thatcorresponds with the project name and it creates some additional files that ituses to configure the project.
How to use NetBeans with Murach’s Java SE 6 7
The first dialog box for creating a new project
The second dialog box for creating a new project
Description• To create a new project, select the File�New Project command from the menu system
and respond to the resulting dialog boxes.
Figure 3 How to create a new project with a main class
8 How to use NetBeans with Murach’s Java SE 6
How to save and edit source code
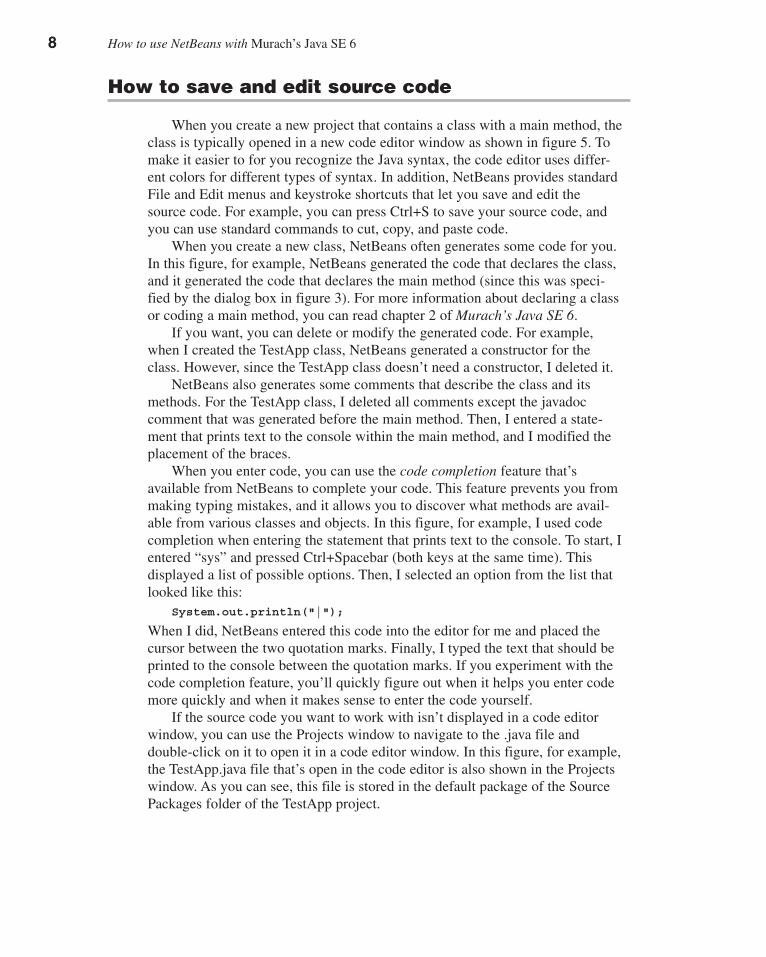
When you create a new project that contains a class with a main method, theclass is typically opened in a new code editor window as shown in figure 5. Tomake it easier to for you recognize the Java syntax, the code editor uses differ-ent colors for different types of syntax. In addition, NetBeans provides standardFile and Edit menus and keystroke shortcuts that let you save and edit thesource code. For example, you can press Ctrl+S to save your source code, andyou can use standard commands to cut, copy, and paste code.
When you create a new class, NetBeans often generates some code for you.In this figure, for example, NetBeans generated the code that declares the class,and it generated the code that declares the main method (since this was speci-fied by the dialog box in figure 3). For more information about declaring a classor coding a main method, you can read chapter 2 of Murach’s Java SE 6.
If you want, you can delete or modify the generated code. For example,when I created the TestApp class, NetBeans generated a constructor for theclass. However, since the TestApp class doesn’t need a constructor, I deleted it.
NetBeans also generates some comments that describe the class and itsmethods. For the TestApp class, I deleted all comments except the javadoccomment that was generated before the main method. Then, I entered a state-ment that prints text to the console within the main method, and I modified theplacement of the braces.
When you enter code, you can use the code completion feature that’savailable from NetBeans to complete your code. This feature prevents you frommaking typing mistakes, and it allows you to discover what methods are avail-able from various classes and objects. In this figure, for example, I used codecompletion when entering the statement that prints text to the console. To start, Ientered “sys” and pressed Ctrl+Spacebar (both keys at the same time). Thisdisplayed a list of possible options. Then, I selected an option from the list thatlooked like this:
System.out.println("|");
When I did, NetBeans entered this code into the editor for me and placed thecursor between the two quotation marks. Finally, I typed the text that should beprinted to the console between the quotation marks. If you experiment with thecode completion feature, you’ll quickly figure out when it helps you enter codemore quickly and when it makes sense to enter the code yourself.
If the source code you want to work with isn’t displayed in a code editorwindow, you can use the Projects window to navigate to the .java file anddouble-click on it to open it in a code editor window. In this figure, for example,the TestApp.java file that’s open in the code editor is also shown in the Projectswindow. As you can see, this file is stored in the default package of the SourcePackages folder of the TestApp project.
How to use NetBeans with Murach’s Java SE 6 9
NetBeans’s code editor with source code in it
Description• To open a code editor window for a file, double-click on the .java file in the Projects
window.
• To enter and edit source code, you can use the same techniques that you use with anytext editor.
• To activate the code completion feature, press Ctrl+Spacebar after entering the first fewletters of a class or object. Or, enter the period after a class or object. Then, you canselect an item from a list of possibilities.
• To save the source code, select the Save command (Ctrl+S) from the File menu.
• By default, NetBeans may generate some code. You can delete this code or modify it foruse in your application.
Figure 4 How to save and edit source code
10 How to use NetBeans with Murach’s Java SE 6
How to fix errors
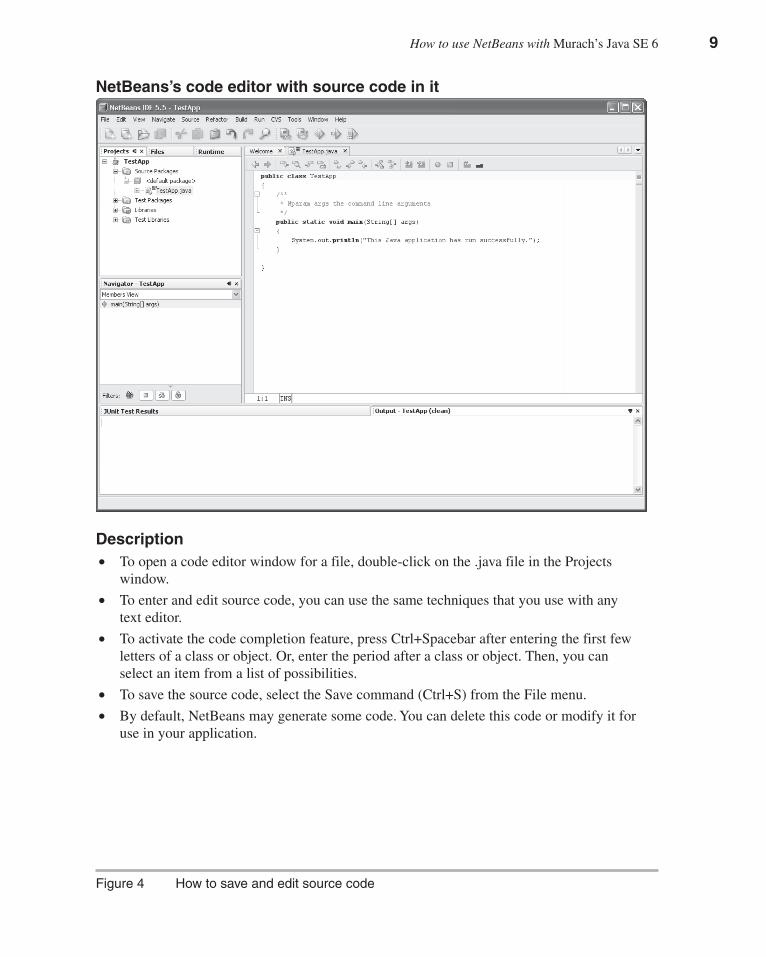
In NetBeans, an error is a line of code that won’t compile. As you enter textinto the code editor, NetBeans displays errors whenever it detects them. Infigure 5, for example, NetBeans has displayed an error that indicates that asemicolon needs to be entered to complete the statement. This error is markedwith a red icon that has an X on it just to the left of the statement that containsthe error. In addition, the statement that contains the error is marked with awavy red underlining.
If you position the mouse cursor over red X icon or over the statementitself, NetBeans will display a description of the message. In this figure, forexample, the description indicates that NetBeans expected a semicolon at theend of the statement. As a result, you can fix the error by typing the semicolonat the end of the statement.
How to use NetBeans with Murach’s Java SE 6 11
An error that’s displayed when you save the source code
Description• NetBeans often displays errors before you attempt to compile or run an application.
• NetBeans marks errors with a red square with an X in it in the code editor window.
• If you position the mouse pointer over the error, NetBeans will display a description ofthe error. This usually provides enough information for you to fix the error.
Figure 5 How to fix errors
12 How to use NetBeans with Murach’s Java SE 6
How to compile and run an application
By default, NetBeans automatically compiles an application before it runsthe application. Since this saves a step in the development process, this isusually what you want.
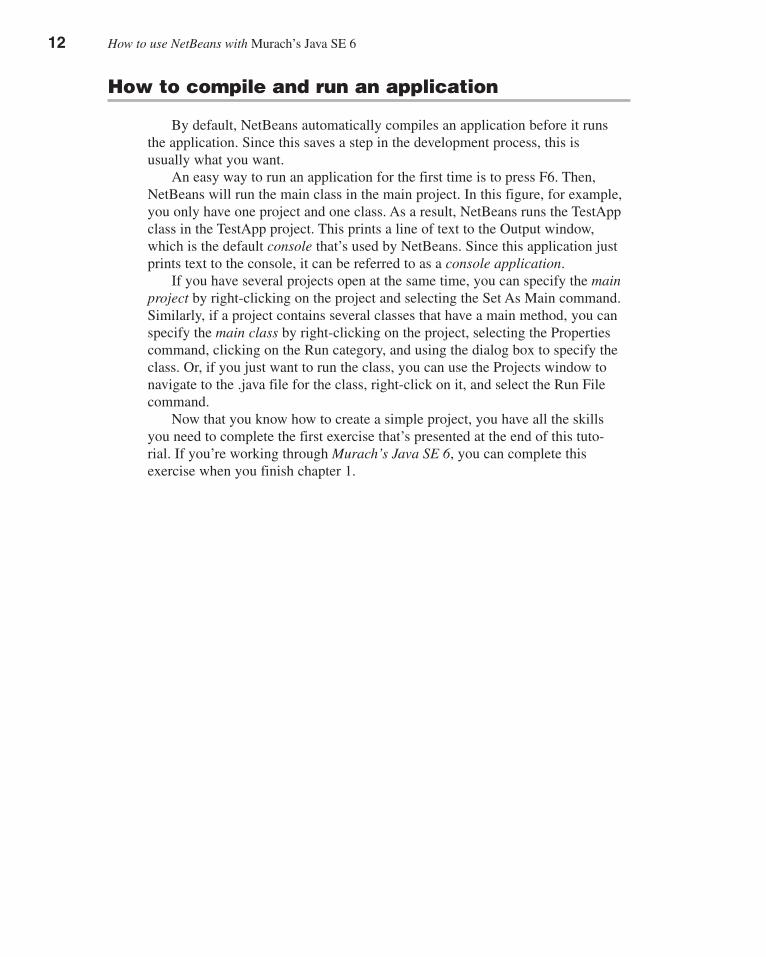
An easy way to run an application for the first time is to press F6. Then,NetBeans will run the main class in the main project. In this figure, for example,you only have one project and one class. As a result, NetBeans runs the TestAppclass in the TestApp project. This prints a line of text to the Output window,which is the default console that’s used by NetBeans. Since this application justprints text to the console, it can be referred to as a console application.
If you have several projects open at the same time, you can specify the mainproject by right-clicking on the project and selecting the Set As Main command.Similarly, if a project contains several classes that have a main method, you canspecify the main class by right-clicking on the project, selecting the Propertiescommand, clicking on the Run category, and using the dialog box to specify theclass. Or, if you just want to run the class, you can use the Projects window tonavigate to the .java file for the class, right-click on it, and select the Run Filecommand.
Now that you know how to create a simple project, you have all the skillsyou need to complete the first exercise that’s presented at the end of this tuto-rial. If you’re working through Murach’s Java SE 6, you can complete thisexercise when you finish chapter 1.
How to use NetBeans with Murach’s Java SE 6 13
An application that prints text to the console
Description• When you run an application, NetBeans automatically compiles the application. As a
result, you don’t need to compile an application separately. If you want to compile anapplication without running it, though, you can select one of the commands from theBuild menu.
• To run the main class from the main project, press F6 or select the Run Main Projectcommand from the Run menu or from the toolbar.
• If necessary, you can set the main project, by right-clicking on the project and selectingthe Set Main Project command.
• If necessary, you can set the main class, by right-clicking on the project, selecting theProperties command, selecting the Run category, and using the dialog box to specify themain class for the project.
• To run a class that has a main method, right-click on the .java file and select the Run Filecommand.
• When the application prints to the console, NetBeans displays an Output window like theone shown above.
Figure 6 How to compile and run an application
14 How to use NetBeans with Murach’s Java SE 6
How to run a console application that gets userinput
In addition to printing data to the console, a console app can also get inputfrom a user. Unfortunately, the Output window that NetBeans uses as the defaultconsole doesn’t act like a typical console window. Worse, NetBeans has a bugthat prevents you from using the print method of the System.out object whenworking with console applications that use the Output window. As a result,when developing console apps that get user input, we recommend using aninteractive console that was developed by Eric G. Berkowitz, an AssociateProfessor at Roosevelt University in Chicago.
To use this interactive console instead of the Output window, you can followthe procedure shown in figure 7. To start, you must add the file named eric.jar tothe Libraries folder for your project. This file is included in the NetBeansversions of the applications that you can download from our web site(www.murach.com).
After you add the eric.jar file to your project, you must add a line of code tothe beginning of your application that starts the interactive console. This line ofcode creates a new instance of the Console class that’s stored in the eric pack-age of the eric.jar file. As a result, the applications use the interactive consoleinstead of the Output window that’s available from NetBeans.
Once you’ve added this line of code to the beginning of your console app,you can run the application as you would normally. When you do, the interac-tive console should appear and the application should print some text to theconsole that prompts you to enter data. Then, you can type the input into theconsole and press Enter. When you do, the application will continue until itfinishes or until it prompts you for more information.
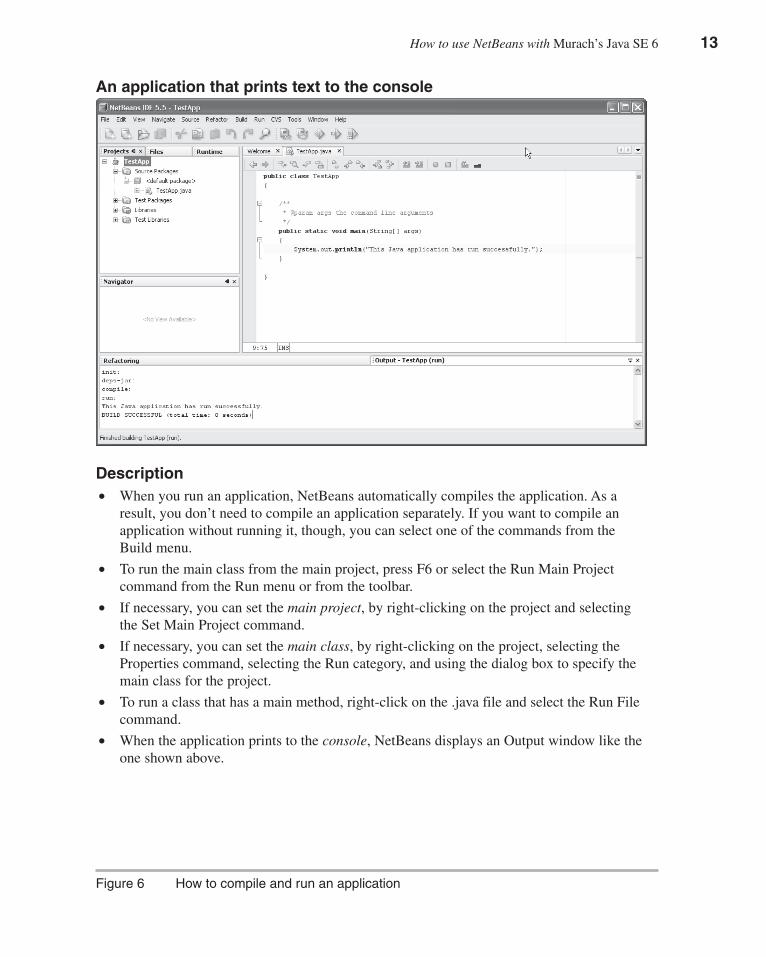
In this figure, for example, the application prompted me to enter a subtotal,and I typed “100” and pressed Enter. Then, the application asked me if I wantedto continue. At this point, the application is still running, and I can enter “y” tocontinue or “n” to stop the application. However, even if I enter “n” to stop theapplication, NetBeans doesn’t finish running the application until you close theinteractive console window. As a result, you should always close the consolewindow after you’re done running an application. Or, if you don’t want to finishrunning the application, you can stop the application at any point during itsexecution by closing the interactive console window.
When you’re learning Java, it’s common to create applications that use theconsole to get input from the user and to display output to the user. You’ll learnhow to create this type of application in chapter 2 of our book, and this type ofapplication is used in chapters 2 through 14.
How to use NetBeans with Murach’s Java SE 6 15
A console app that uses an interactive console to get input from a user
How to use Eric G. Berkowitz’s interactive console• Add the eric.jar file to the Libraries folder for your project. To do that, right-click on the
Libraries folder, select the Add Jar/Folder, and use the resulting dialog box to select thejar file (which should be in c:\murach\java6\netbeans).
• Add the following line of code to the beginning of your console application:new eric.Console();
• When you run the application, the interactive console window will appear and you canenter text by typing text and pressing the Enter key.
• When you’re done running the application, close the console window.
Description• NetBeans has a bug that prevents it from working properly with the print method of the
System.out object. As a result, we recommend using the interactive console that wasdeveloped by Eric G. Berkowitz.
• The eric.jar file is included with the NetBeans versions of the applications that areavailable from our web site, and these applications have already been configured to usethe interactive console.
Figure 7 How to run a console application that gets user input
16 How to use NetBeans with Murach’s Java SE 6
How to open and close projects andimport source code
Once you understand how to use NetBeans to run simple applications likethe ones presented in chapters 1 and 2, you may want to add more projects tothe Projects window. For example, if you have an existing NetBeans project thatisn’t displayed in the Projects window, you may want to add that project to theproject window by opening it. Or, if you have some code that was created with atext editor or another IDE, you may want to add a new project to the Projectswindow and import this code into that project so you can work with it.
Then, if the Projects window becomes cluttered with multiple projects, youmay want to remove one or more of these projects from the Projects window.For example, if you download the NetBeans version of the source code forMurach’s Java SE 6, you’ll find that the applications folder contains more than10 projects. Similarly, the exercises folder contains over 40 projects. As a result,you won’t want to have all of these projects open at the same time. Instead, youcan open the ones you want to work with and close them when you’re done withthem.
How to open a project
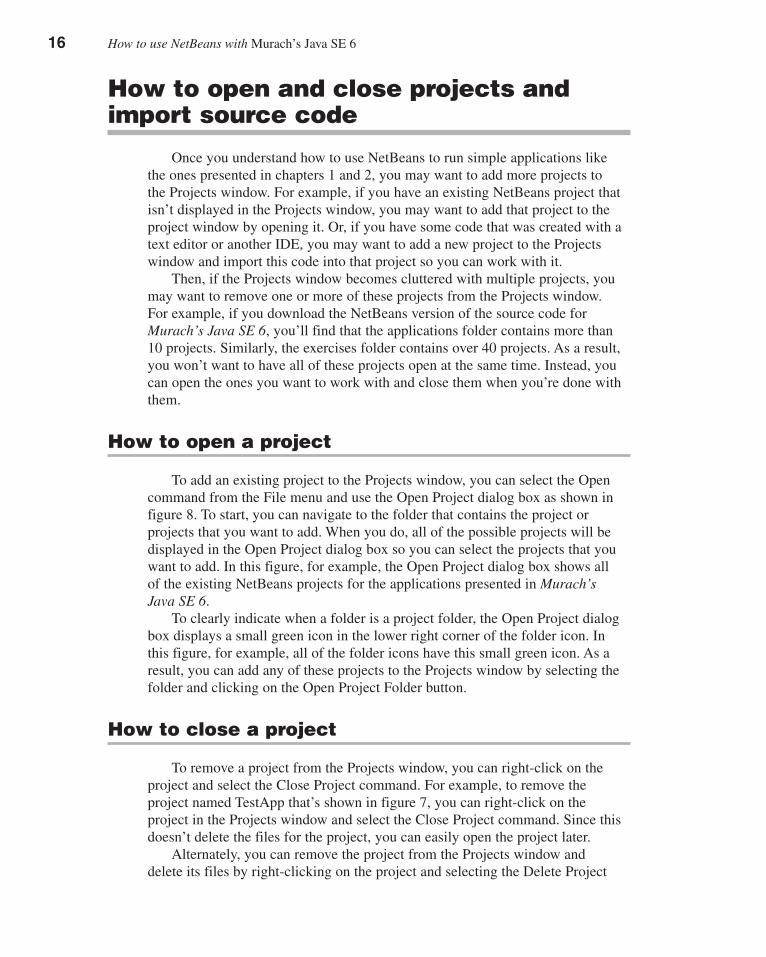
To add an existing project to the Projects window, you can select the Opencommand from the File menu and use the Open Project dialog box as shown infigure 8. To start, you can navigate to the folder that contains the project orprojects that you want to add. When you do, all of the possible projects will bedisplayed in the Open Project dialog box so you can select the projects that youwant to add. In this figure, for example, the Open Project dialog box shows allof the existing NetBeans projects for the applications presented in Murach’sJava SE 6.
To clearly indicate when a folder is a project folder, the Open Project dialogbox displays a small green icon in the lower right corner of the folder icon. Inthis figure, for example, all of the folder icons have this small green icon. As aresult, you can add any of these projects to the Projects window by selecting thefolder and clicking on the Open Project Folder button.
How to close a project
To remove a project from the Projects window, you can right-click on theproject and select the Close Project command. For example, to remove theproject named TestApp that’s shown in figure 7, you can right-click on theproject in the Projects window and select the Close Project command. Since thisdoesn’t delete the files for the project, you can easily open the project later.
Alternately, you can remove the project from the Projects window anddelete its files by right-clicking on the project and selecting the Delete Project
How to use NetBeans with Murach’s Java SE 6 17
The dialog box for opening an existing NetBeans project
Description• To add a project to the Projects window, right-click on the project in the Projects
window and select the Open Project command. Then, use the Open Project dialogbox to locate the folder for the project and click on the Open Project Folderbutton.
• The Open Project dialog box identifies a NetBeans project by displaying a smallicon in the lower right corner of the icon for its project folder.
• To remove a project from the Projects window, right-click on the project in theProjects window and select the Close command.
• You can download a zip file from www.murach.com that contains the NetBeansprojects for all of the applications described in Murach’s Java SE 6.
Figure 8 How to open and close existing projects
18 How to use NetBeans with Murach’s Java SE 6
command. When you do, NetBeans will prompt you to confirm the deletion. Bydefault, NetBeans deletes most of the files for the project but does not delete thesource code. However, if you select the “Also Delete Sources” option, NetBeanswill delete all folders and files for the project. Of course, if you delete the filesfrom a project, it’s no longer easy to open the project with NetBeans. As aresult, you’ll only want to use this option if you don’t plan on using NetBeans towork with the project anymore.
Now that you know how to run the interactive console and how to openexisting projects, you have all the skills you need to complete the secondexercise that’s presented at the end of this tutorial. If you’re working throughMurach’s Java SE 6, you should do this exercise before you do the exercises forchapter 2 of the book.
How to import existing Java files into a newproject
Before you import existing Java files into a NetBeans project, you shouldmove or copy the .java files into the right folder for storing your source code.Often, that means moving the .java files into a subfolder of the folder for theproject. In this figure, for example, the .java files are stored in the src subfolderof the C:\murach\java6\netbeans\applications\Ch02 folder.
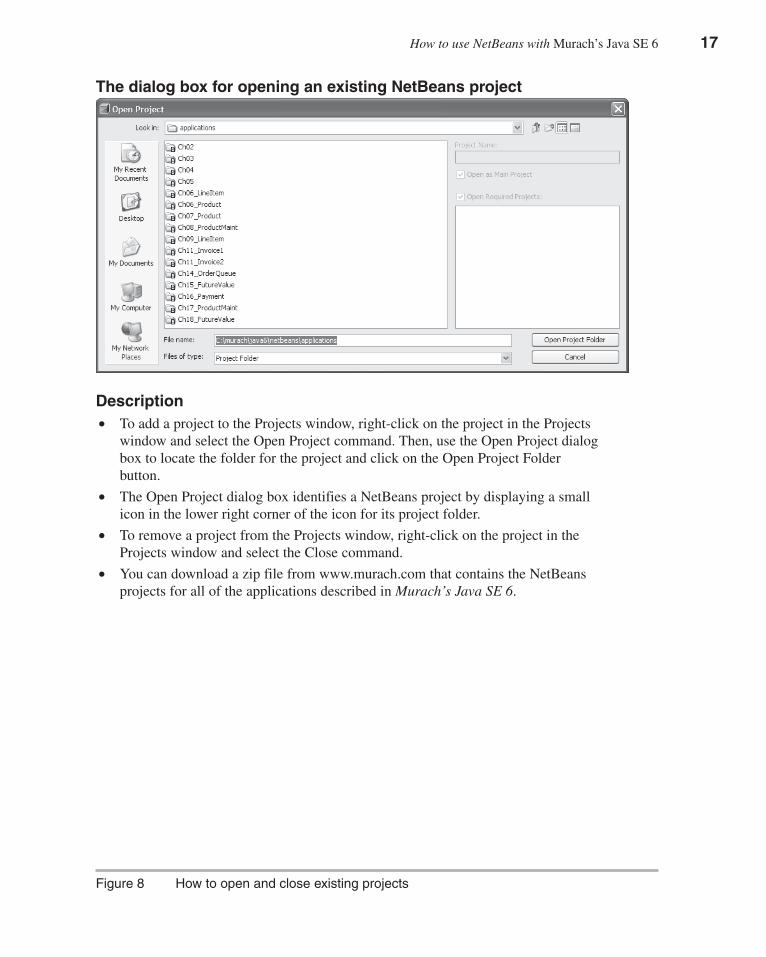
Once you have stored the .java files in the correct folder, you can use theNew Project dialog box to create a new project and import these files into theproject. To start, you can select the New Project command from the File menuto display the first dialog box shown in figure 9. In this dialog box, you canselect the “Java Project with Existing Sources” option to create a new projectthat imports existing .java files.
Then, you can use the second dialog box shown to specify the name andlocation for the project. In this figure, for example, the second dialog boxcreates a project named Ch02 in theC:\murach\java6\netbeans\applications\Ch02 folder. Note that this folderalready exists since it had to be created to store the src subfolder that containsthe .java files.
How to use NetBeans with Murach’s Java SE 6 19
The first dialog box for importing Java files into a NetBeans project
The second dialog box for importing Java files into a NetBeans project
Figure 9 How to import existing Java files into a new project (part 1 of 2)
20 How to use NetBeans with Murach’s Java SE 6
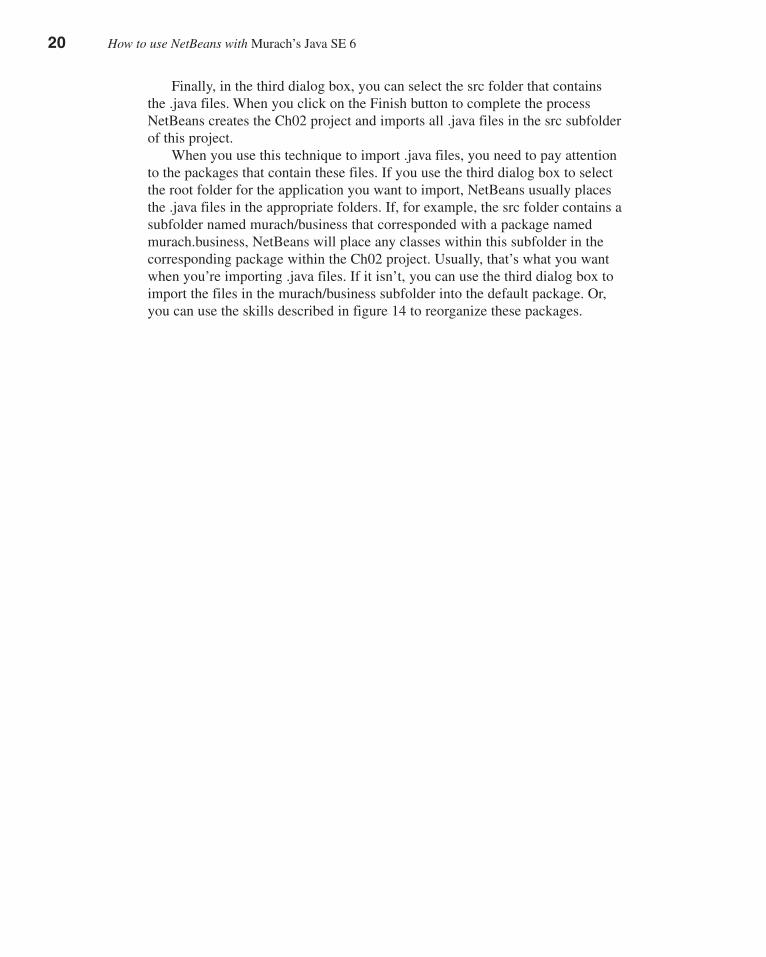
Finally, in the third dialog box, you can select the src folder that containsthe .java files. When you click on the Finish button to complete the processNetBeans creates the Ch02 project and imports all .java files in the src subfolderof this project.
When you use this technique to import .java files, you need to pay attentionto the packages that contain these files. If you use the third dialog box to selectthe root folder for the application you want to import, NetBeans usually placesthe .java files in the appropriate folders. If, for example, the src folder contains asubfolder named murach/business that corresponded with a package namedmurach.business, NetBeans will place any classes within this subfolder in thecorresponding package within the Ch02 project. Usually, that’s what you wantwhen you’re importing .java files. If it isn’t, you can use the third dialog box toimport the files in the murach/business subfolder into the default package. Or,you can use the skills described in figure 14 to reorganize these packages.
How to use NetBeans with Murach’s Java SE 6 21
The third dialog box for importing Java files into a NetBeans project
Description• Before you import existing Java files into a new NetBeans project, you should move or
copy your .java files into the folder where you want to store your source code. In thisfigure, for example, the source files are stored in the Ch02\src folder.
• To import existing Java files into a new NetBeans project, select the New Project com-mand from the File menu, select the “Java Project with Existing Sources” option andrespond to the resulting dialog boxes.
Figure 9 How to import existing Java files into a new project (part 2 of 2)
22 How to use NetBeans with Murach’s Java SE 6
Object-oriented development withNetBeans
NetBeans has many features that make it easier to work with the object-orientedprogramming techniques that are presented in chapters 6 through 9 of Murach’s JavaSE 6. For example, NetBeans makes it easy to create get and set methods for a class, tobegin coding a class that implements an interface, and to store classes and interfaces inpackages. However, these skills don’t make sense until you understand object-orientedprogramming. As a result, you may want to read chapters 6 through 9 of Murach’sJava SE 6 before you go through the topics that follow.
How to create a new class
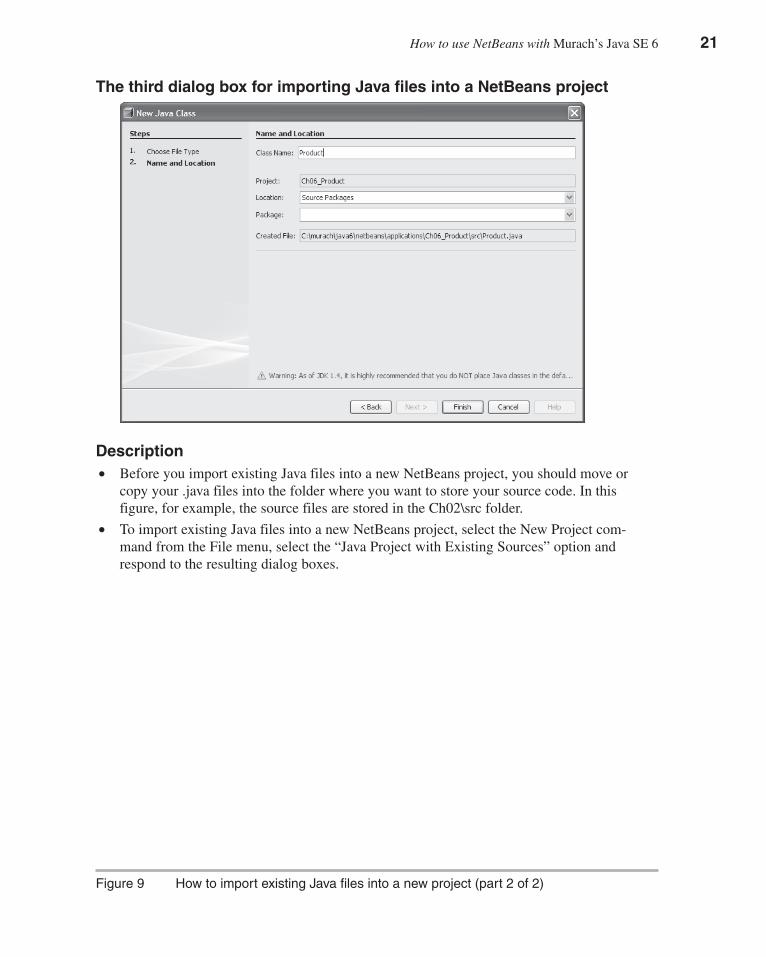
In figure 3, you learned how to create a project that contains a single class thatcontains a main method. However, when you start developing object-oriented applica-tions, you’ll need to add other classes to your project. To do that, you can display theNew Java Class dialog box shown in figure 10. Then, you can use this dialog box toadd new classes to your project. In this figure, for example, the New Java Class dialogspecifies a public class named Product.
Although the New Java Class dialog box encourages you to enter a package for theclass, this isn’t required. If you don’t enter a package for the class, NetBeans will usethe default package. However, if you enter a package for the class, NetBeans willautomatically create a folder for the package and store the class within that package.For more information about working with packages, see figure 14 of this tutorial andchapter 9 of Murach’s Java SE 6.
How to use NetBeans with Murach’s Java SE 6 23
The dialog box for creating a new class
Description• To create a new class, right-click on the package where you want to add the class, select
the New�Java Class command, and respond to the resulting dialog boxes.
• You must enter a name for the class in the Class Name text box.
• Although this dialog box encourages you to enter a package for the class, this isn’trequired. If you don’t enter a package for the class, NetBeans will use the default pack-age.
Figure 10 How to create a new class

24 How to use NetBeans with Murach’s Java SE 6
How to work with classes
Figure 11 describes a few skills that are useful for working with classes. Tostart, after you enter the private fields for a class, you can generate the get andset methods for those fields. In this figure, for example, the Encapsulate Fieldsdialog box will generate one get and one set method for each of the privatefields for the class.
By default, the get and set methods for a field are formatted like this: public String getCode() { return code; }
public void setCode(String code) { this.code = code; }
However, if you have another coding style that you prefer, you can select theTools�Options command, click on the Editor tab, and use it change the codingstyle. For example, you can select the “Add New Line Before Brace” option toadd a new line character before the opening braces.
Once you’ve created a class that contains multiple methods, you can use theNavigator window to navigate to that method. To do that, just double-click onthe method in the Navigator window. In this figure, for example, you coulddouble-click on the getFormattedPrice method to display that method in thecode editor. Although the usefulness of this feature isn’t obvious for a shortclass like the Product class shown in this figure, it’s very helpful for longerclasses.
How to use NetBeans with Murach’s Java SE 6 25
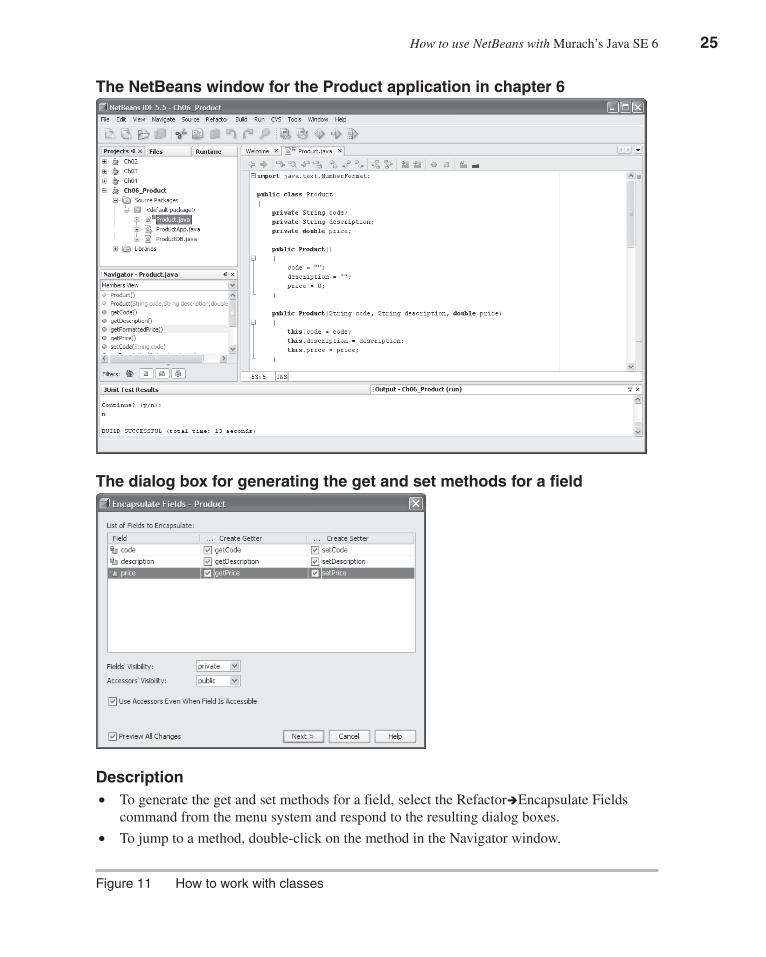
The NetBeans window for the Product application in chapter 6
The dialog box for generating the get and set methods for a field
Description• To generate the get and set methods for a field, select the Refactor�Encapsulate Fields
command from the menu system and respond to the resulting dialog boxes.
• To jump to a method, double-click on the method in the Navigator window.
Figure 11 How to work with classes
26 How to use NetBeans with Murach’s Java SE 6
How to work with interfaces
Figure 12 shows the NetBeans window for the Product Maintenance appli-cation presented in chapter 8. If you look at the Projects window, you can seethat the project for this application contains source code files for several classesand interfaces. If you expand the nodes for the .java files that contain the sourcecode, you can see that NetBeans uses different icons to identify the files asclasses or interfaces. In this figure, for example, the DAOFactory.java filecontains the source code for a class while the ProductDAO.java andProductReader.java files contain the source code for interfaces.
To add an interface, you can right-click on the package where you want toadd the interface and select the New�Java Interface command. Then, you canuse the resulting dialog box to enter a name for the interface. This dialog boxworks like the one for creating a new class that’s shown in figure 10.
Once you’ve added an interface, you shouldn’t have any trouble enteringand editing the code for the interface. In general, you can use many of the sameskills that you use for entering and editing the code for a class.
How to use NetBeans with Murach’s Java SE 6 27
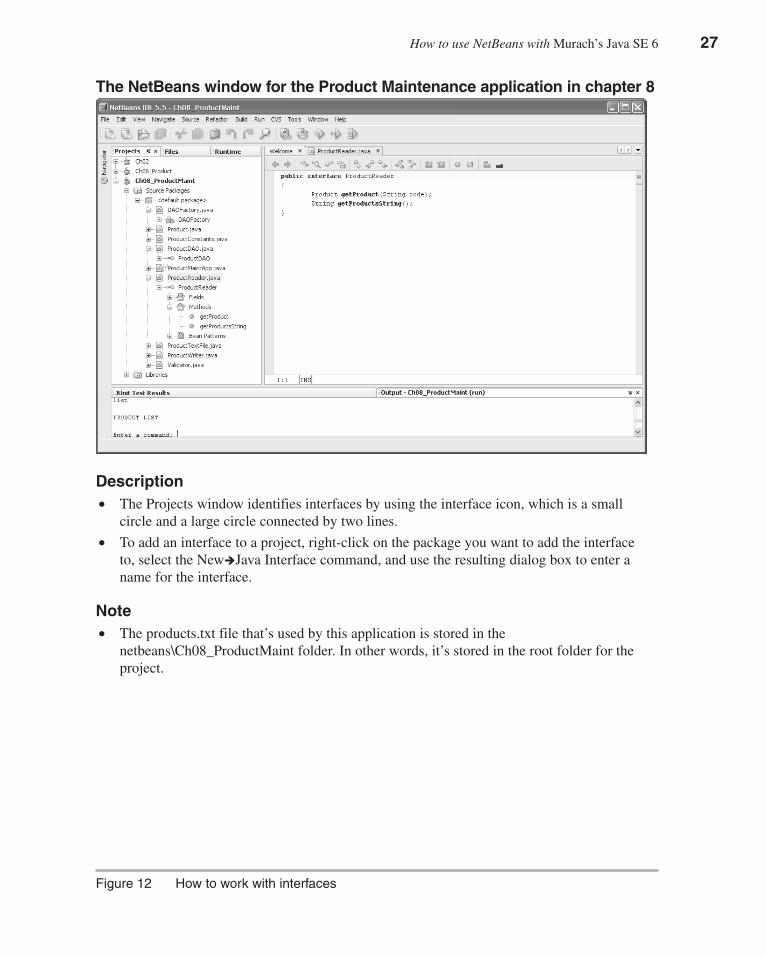
The NetBeans window for the Product Maintenance application in chapter 8
Description• The Projects window identifies interfaces by using the interface icon, which is a small
circle and a large circle connected by two lines.
• To add an interface to a project, right-click on the package you want to add the interfaceto, select the New�Java Interface command, and use the resulting dialog box to enter aname for the interface.
Note• The products.txt file that’s used by this application is stored in the
netbeans\Ch08_ProductMaint folder. In other words, it’s stored in the root folder for theproject.
Figure 12 How to work with interfaces
28 How to use NetBeans with Murach’s Java SE 6
How to start a class that implements an interface
When coding a class that implements an interface, you can automaticallygenerate all the method stubs for the interface. To do that, you can begin bycreating a new class. Then, you enter the implements keyword followed by theinterface or interfaces that the class implements. When you do, a yellow lightbulb icon will be displayed to the left of the declaration for the class.
If you click on this icon, you’ll get a menu with the “Implement all abstractmethods” command as shown in figure 13. To generate all method stubs for theinterfaces specified by the class declaration, you can select this command. Then,NetBeans will generate the method stubs for all of the methods specified by theinterface or interfaces that are implemented by the class.
How to use NetBeans with Murach’s Java SE 6 29
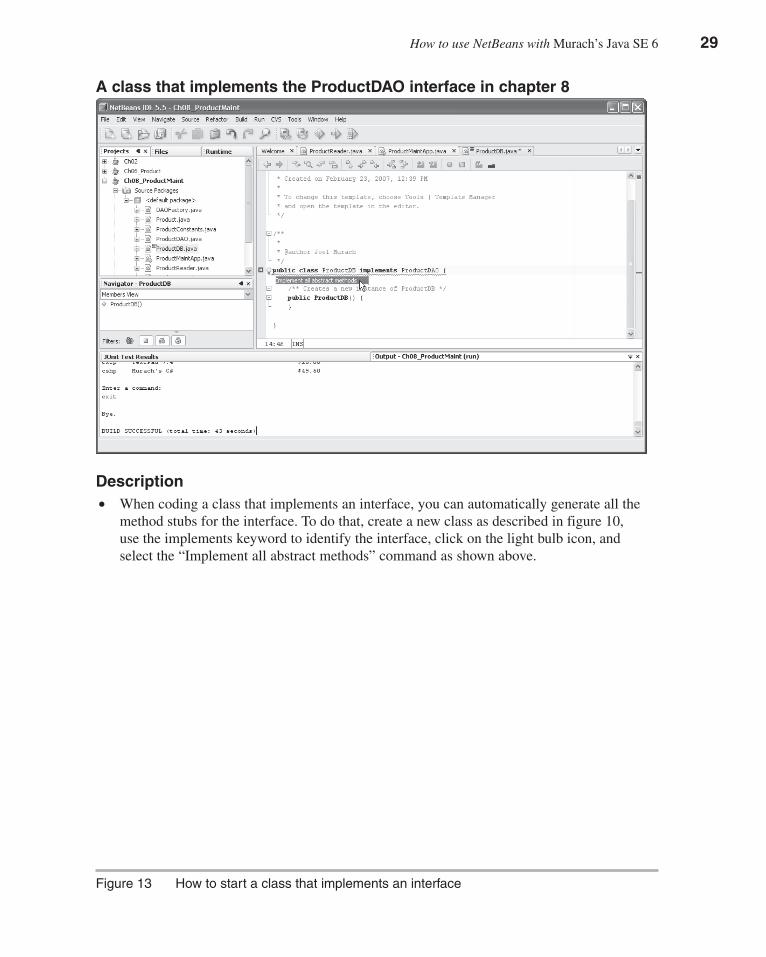
A class that implements the ProductDAO interface in chapter 8
Description• When coding a class that implements an interface, you can automatically generate all the
method stubs for the interface. To do that, create a new class as described in figure 10,use the implements keyword to identify the interface, click on the light bulb icon, andselect the “Implement all abstract methods” command as shown above.
Figure 13 How to start a class that implements an interface
30 How to use NetBeans with Murach’s Java SE 6
How to work with packages
Often, the classes for an application are organized into packages. Comparedto using a text editor, NetBeans makes it easy to create packages and to storeyour classes in packages.
When a project contains packages, you can use the Projects window tonavigate through the project’s packages. To do that, you can click on the plus andminus signs to the left of the packages to expand or collapse them. In figure 14,for example, the Projects window displays the four packages that are used for theLine Item application that’s presented in chapter 9 of Murach’s Java SE 6.
To get started with packages, you can add a new package to a project byright-clicking on the project and selecting the New�Java Package command.When you do, you’ll get a dialog box that allows you to enter a name for thepackage. As you create packages, remember that packages correspond to thefolders and subfolders that are used to store the source code. In this figure, forexample, the murach.business package is stored in the murach/business subfolderof the Ch09 folder.
Once you’ve created some packages for your application, NetBeans canautomatically add the necessary package statements when you create a new classor interface. For example, if you right-click on the murach.business package andselect the New�Java Class command, the murach.business package will auto-matically be added to the New Java Class dialog box. Then, when you completethis dialog box, NetBeans will automatically add the necessary package state-ment at the beginning of the class.
If you need to delete a package, you can right-click on the package and selectthe Delete command from the resulting menu. This will delete the folder for thepackage and all subfolders and classes within that folder.
How to use NetBeans with Murach’s Java SE 6 31
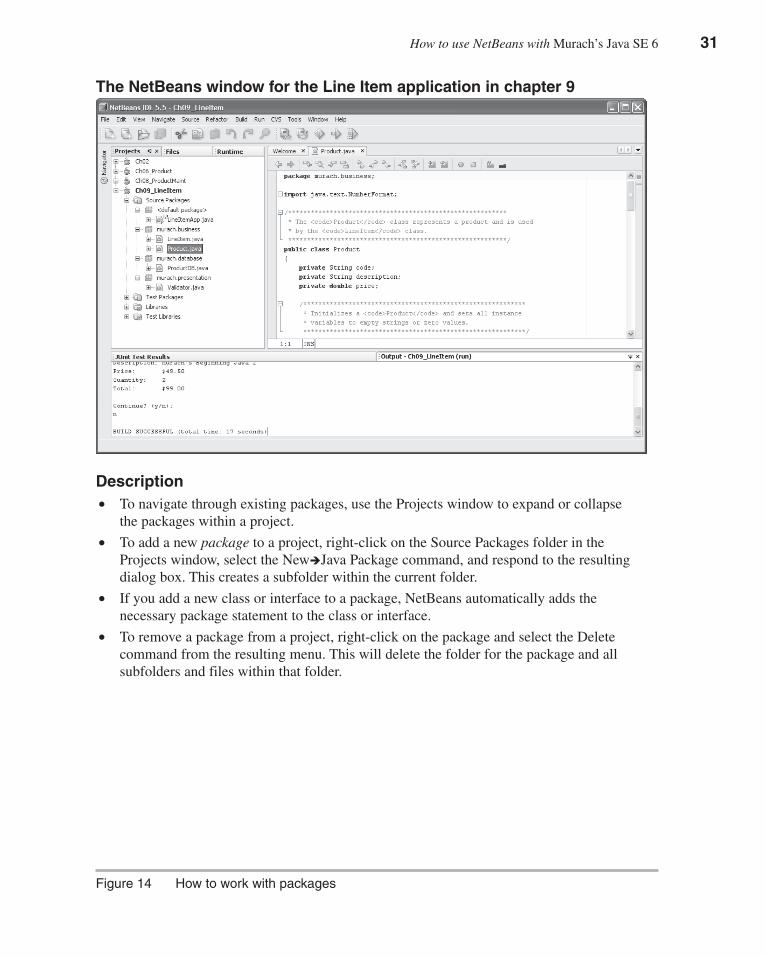
The NetBeans window for the Line Item application in chapter 9
Description• To navigate through existing packages, use the Projects window to expand or collapse
the packages within a project.
• To add a new package to a project, right-click on the Source Packages folder in theProjects window, select the New�Java Package command, and respond to the resultingdialog box. This creates a subfolder within the current folder.
• If you add a new class or interface to a package, NetBeans automatically adds thenecessary package statement to the class or interface.
• To remove a package from a project, right-click on the package and select the Deletecommand from the resulting menu. This will delete the folder for the package and allsubfolders and files within that folder.
Figure 14 How to work with packages
32 How to use NetBeans with Murach’s Java SE 6
How to generate documentation
NetBeans also makes it easy to generate the documentation for your classes. First,you make sure that your document has javadoc comments that describe its constructorsand methods, and you make sure that your classes are stored in the appropriate pack-ages. (Both of these skills are described in chapter 9 of our book.) Then, you cangenerate the documentation by right-clicking on the project in the Projects window andselecting the Generate Javadoc for Project command. When you do, NetBeans willgenerate the Java documentation for the project and display it in the default webbrowser.
By default, NetBeans stores the documentation for a project in a subfolder nameddist\javadoc that’s subordinate to the project’s root folder. If this folder already con-tains documentation when you generate the documentation, NetBeans will overwritethese files with the new ones, which is usually what you want.
How to use NetBeans with Murach’s Java SE 6 33
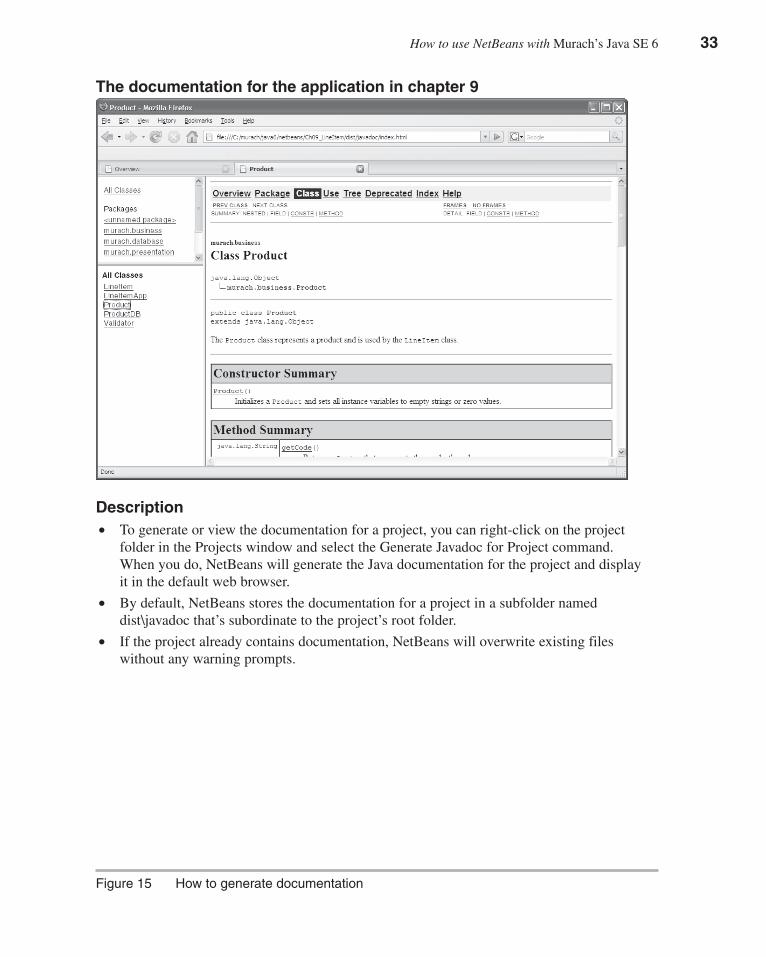
The documentation for the application in chapter 9
Description• To generate or view the documentation for a project, you can right-click on the project
folder in the Projects window and select the Generate Javadoc for Project command.When you do, NetBeans will generate the Java documentation for the project and displayit in the default web browser.
• By default, NetBeans stores the documentation for a project in a subfolder nameddist\javadoc that’s subordinate to the project’s root folder.
• If the project already contains documentation, NetBeans will overwrite existing fileswithout any warning prompts.
Figure 15 How to generate documentation
34 How to use NetBeans with Murach’s Java SE 6
Debugging with NetBeans
As you test applications, you will encounter errors that are commonlyreferred to as bugs. When that happens, you must find and fix those errors. Thisprocess is commonly known as debugging. Fortunately, NetBeans includes apowerful tool known as a debugger that can help you identify and fix theseerrors.
How to set and remove breakpoints
The first step in debugging an application is to figure out what is causingthe bug. To do that, it’s often helpful to view the values of the variables atdifferent points in the application as it is executing. This will help you deter-mine the cause of the bug, which is critical to debugging the application.
The easiest way to view the variables at a particular point in an applicationis to set a breakpoint as shown in figure 16. To do that, you click to the left ofthe line of code on the vertical bar on the left side of the code editor window.Then, the breakpoint is marked by a red square to the left of the line of code.Later, when you run the application with the debugger, execution will stop justprior to the statement at the breakpoint, and you will be able to view the vari-ables that are in scope at that point in the application.
When debugging, it’s important to set the breakpoint before the line in theapplication that’s causing the bug. Often, you can figure out where to set abreakpoint by reading the runtime exception that’s printed to the Consolewindow when your application crashes. However, there are times when you willhave to experiment a little before finding a good location to set a breakpoint.
After you set the breakpoint, you need to run the application with thedebugger attached. To do this, you can use the Debug Main Project button that’savailable from the toolbar (just to the right of the Run Main Project button). Ifyou encounter any problems, try right-clicking on the .java file that contains themain method and selecting the Debug File command to run the application withthe debugger.
When you run the application with the debugger, NetBeans will display thedebugging windows and buttons that are shown in figure 17. After you run theapplication with the debugger, the breakpoints will remain where you set them.If you want to remove a breakpoint, you can do that by clicking on the redsquare for the breakpoint.
How to use NetBeans with Murach’s Java SE 6 35
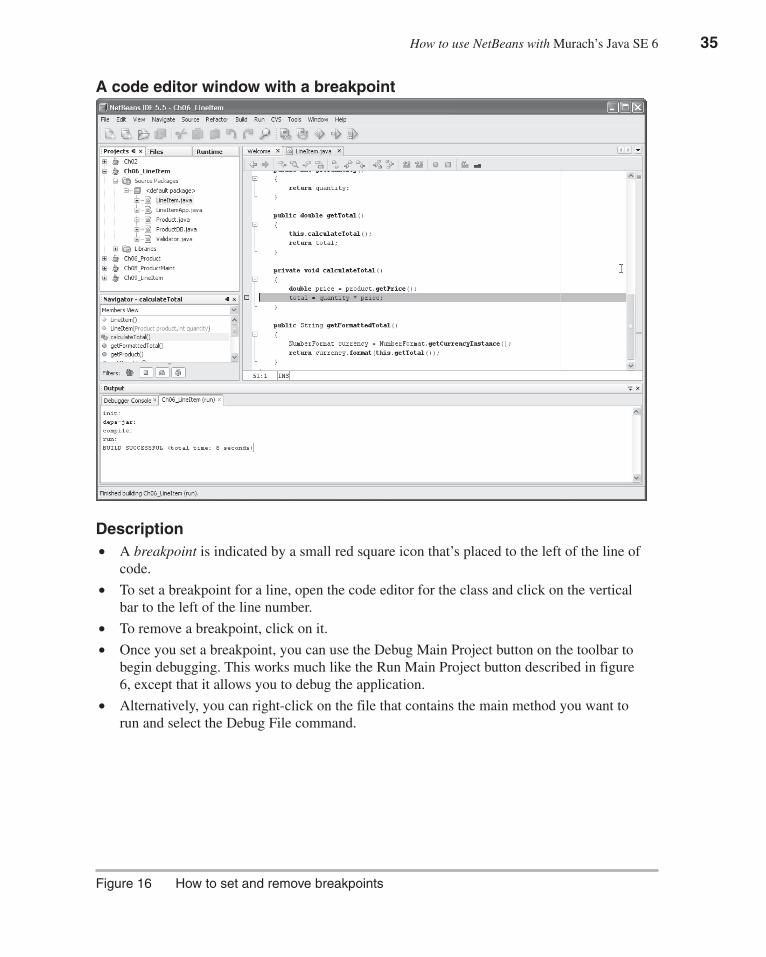
A code editor window with a breakpoint
Description• A breakpoint is indicated by a small red square icon that’s placed to the left of the line of
code.
• To set a breakpoint for a line, open the code editor for the class and click on the verticalbar to the left of the line number.
• To remove a breakpoint, click on it.
• Once you set a breakpoint, you can use the Debug Main Project button on the toolbar tobegin debugging. This works much like the Run Main Project button described in figure6, except that it allows you to debug the application.
• Alternatively, you can right-click on the file that contains the main method you want torun and select the Debug File command.
Figure 16 How to set and remove breakpoints
36 How to use NetBeans with Murach’s Java SE 6
How to step through code
When you run application with the debugger and it encounters a breakpoint,execution will stop just prior to the statement at the breakpoint. Once executionis stopped, a green arrow marks the next statement to be executed. In addition,NetBeans opens several new windows, including the Local Variables, Watches,and Call Stack windows shown in figure 17. Of these windows, the LocalVariables window shows the values of the variables that are in scope at thecurrent point of execution.
NetBeans also displays some extra toolbar buttons while you’re debugging.For instance, you can use the Step Over and Step Into buttons to step throughthe statements in an application, one statement at a time. This lets you observeexactly how and when the variable values change as the application executes,and that can help you determine the cause of a bug. Once you have steppedthrough the code that you’re interested in, you can use the Continue button tocontinue execution until the next breakpoint is encountered. Or, you can use theFinish Debugger Session button to end the application’s execution.
How to inspect variables
When you set breakpoints and step through code, the Local Variableswindow will automatically display the variables that are in scope. In figure 17,the execution point is in the calculateTotal method of the LineItem class. Here,the price variable is a local variable that’s declared to store the price for theproduct. In addition, the quantity, total, and product instance variables of theLineItem object are also in scope. To view these variables, expand the variablenamed this, which is a standard variable name that’s used to refer to the currentobject (in this case, the LineItem object).
For numeric variables and strings, the value of the variable is shown in theLocal Variables window. However, you can also view the values for an object byexpanding the variable that refers to the object. In this figure, for example, youcould expand the product variable by clicking on the plus sign to its left to viewthe values of its code, description, and price variables.
How to inspect the stack trace
When you’re debugging, the Call Stack window shows the stack trace,which is a list of methods in the reverse order in which they were called. Youcan click on any of these methods to display the method and highlight the lineof code that called the next method. This opens a new code editor window ifnecessary. Although the Call Stack window isn’t shown in this figure, you couldclick on the Call Stack tab to display this window. If you experiment with is,you’ll find that it can help you locate the origin of a bug.
How to use NetBeans with Murach’s Java SE 6 37
A debugging session
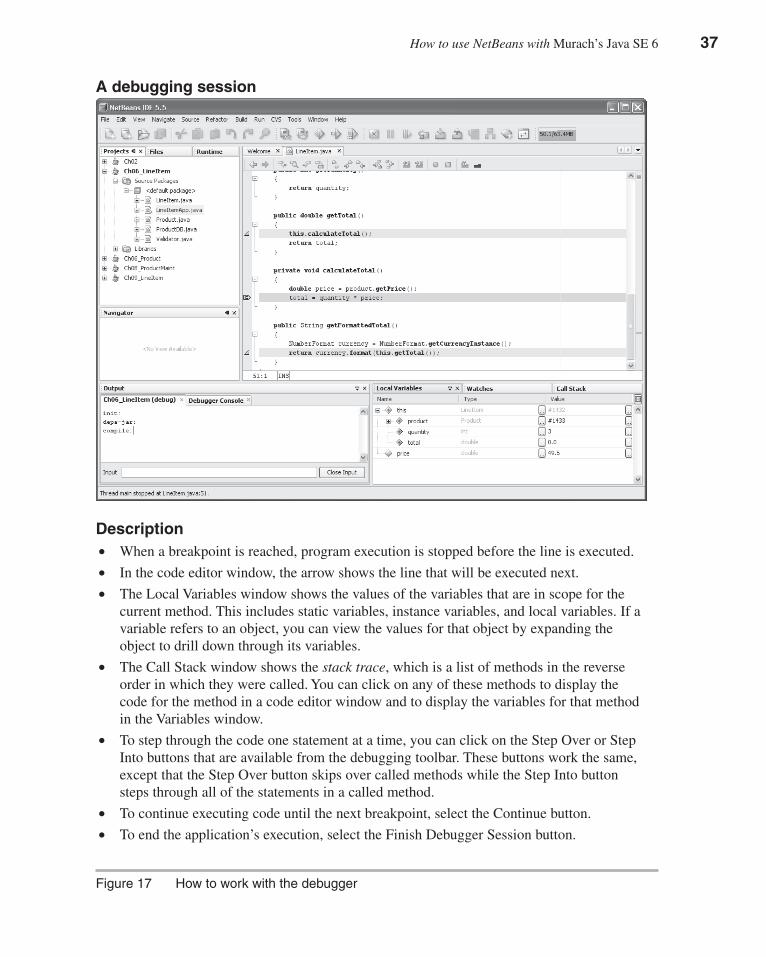
Description• When a breakpoint is reached, program execution is stopped before the line is executed.
• In the code editor window, the arrow shows the line that will be executed next.
• The Local Variables window shows the values of the variables that are in scope for thecurrent method. This includes static variables, instance variables, and local variables. If avariable refers to an object, you can view the values for that object by expanding theobject to drill down through its variables.
• The Call Stack window shows the stack trace, which is a list of methods in the reverseorder in which they were called. You can click on any of these methods to display thecode for the method in a code editor window and to display the variables for that methodin the Variables window.
• To step through the code one statement at a time, you can click on the Step Over or StepInto buttons that are available from the debugging toolbar. These buttons work the same,except that the Step Over button skips over called methods while the Step Into buttonsteps through all of the statements in a called method.
• To continue executing code until the next breakpoint, select the Continue button.
• To end the application’s execution, select the Finish Debugger Session button.
Figure 17 How to work with the debugger
38 How to use NetBeans with Murach’s Java SE 6
More NetBeans skills
So far, this tutorial has presented all of the skills that you need for usingNetBeans to develop the object-oriented Java applications described inMurach’s Java SE 6. However, if you want to develop applets as described inchapter 18, you can use NetBeans to test an applet. Or, if you want to accessclasses that are stored in a JAR file, such as the eric.jar file described in figure 7of this tutorial or the derby.jar file described in chapter 22 of the book, you needto learn how to add a JAR file to the build path.
How to run an applet
An applet is a special type of class that can be downloaded from an Internetor intranet server and run on a client computer within a web browser. To add anapplet to a project, you can add a new class to the project as described in figure10. Then, you can enter the code for the applet. For more information aboutcoding applets, see chapter 18 of our book.
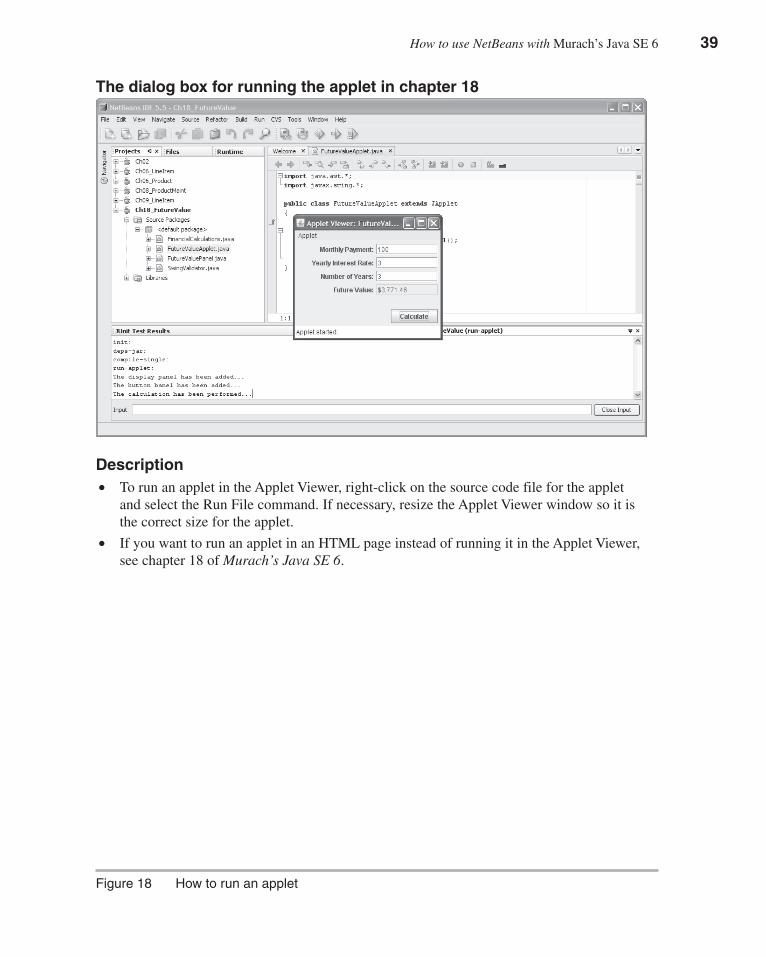
To run an applet in the Applet Viewer, you can find the .java file for theapplet in the Projects window, right-click on it, and select the Run File com-mand. When you do, NetBeans will generate a temporary HTML page for theapplet and display the applet in an Applet Viewer dialog box like the one in thisfigure. However, you may need to resize this dialog box to get the applet todisplay correctly.
If you don’t want to manually resize this dialog box, you can code anHTML page for the applet as described in chapter 18 of Murach’s Java SE 6.Within this HTML page, you can specify the height and width for the applet.Then, you can run the applet by viewing this HTML page in a web browser.
How to use NetBeans with Murach’s Java SE 6 39
The dialog box for running the applet in chapter 18
Description• To run an applet in the Applet Viewer, right-click on the source code file for the applet
and select the Run File command. If necessary, resize the Applet Viewer window so it isthe correct size for the applet.
• If you want to run an applet in an HTML page instead of running it in the Applet Viewer,see chapter 18 of Murach’s Java SE 6.
Figure 18 How to run an applet
40 How to use NetBeans with Murach’s Java SE 6
How to add a JAR file to the libraries for a project
Most of the projects in Murach’s Java SE 6 only use classes that are avail-able from the standard JDK 1.6 libraries, which are available to all projects bydefault. However, to use classes that are stored in other libraries, you can addthe JAR file (Java Archive file) for that library to the build path. In figure 7, forexample, you learned how to add the library for Eric G. Berkowitz’s interactiveconsole to a project.
Once you add a JAR file to a project, your project can use any classeswithin the JAR file when it compiles and runs. If, for example, you want to usea database driver other than the standard JDBC-ODBC bridge driver describedin chapter 21, you need to add the JAR file for the database driver to the librar-ies of your project. Similarly, if you want to work with the Derby databasedescribed in chapter 22, you need to add the appropriate JAR file or files to thelibraries for your project.
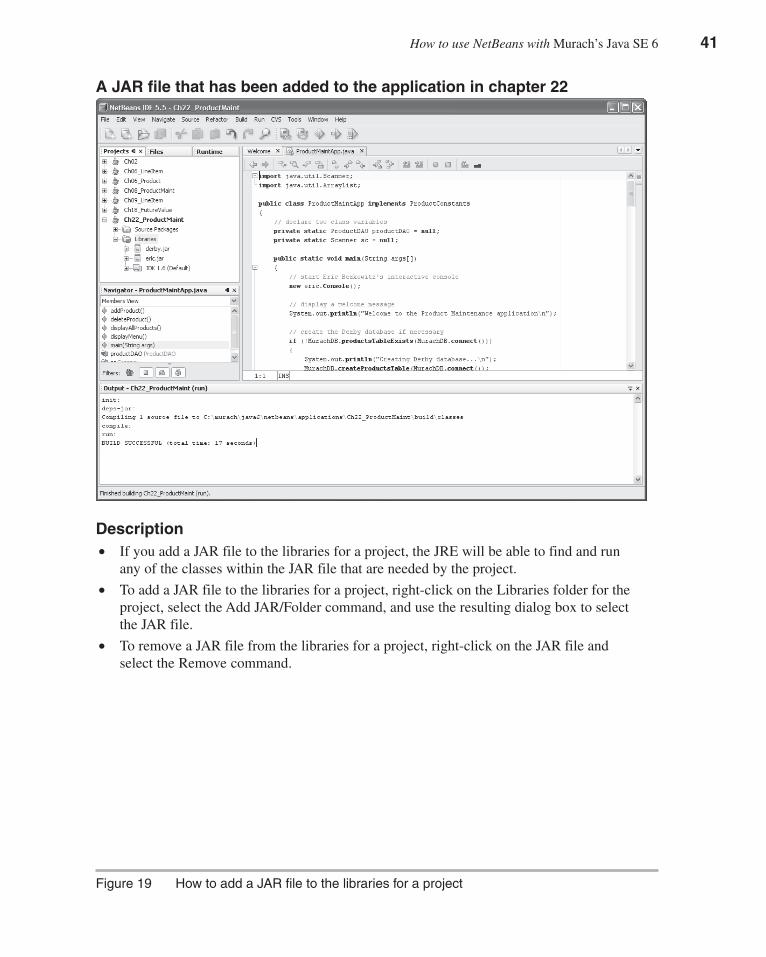
To add a JAR file to the libraries for a project, you can begin by right-clicking on the Libraries folder for the project and selecting the Add JAR/Foldercommand. Then, you can use the resulting dialog box to select the JAR file. Infigure 19, for example, I used this dialog box to select the derby.jar file that’sneeded to run the Product Maintenance application described in chapter 22.
In this figure, you can see that the derby.jar file has been added to theLibraries folder for the project, above the eric.jar file and the JDK 1.6 libraries.As a result, any classes in this project will be able to use any of the classes thatare stored within any of these libraries.
How to use NetBeans with Murach’s Java SE 6 41
A JAR file that has been added to the application in chapter 22
Description• If you add a JAR file to the libraries for a project, the JRE will be able to find and run
any of the classes within the JAR file that are needed by the project.
• To add a JAR file to the libraries for a project, right-click on the Libraries folder for theproject, select the Add JAR/Folder command, and use the resulting dialog box to selectthe JAR file.
• To remove a JAR file from the libraries for a project, right-click on the JAR file andselect the Remove command.
Figure 19 How to add a JAR file to the libraries for a project
42 How to use NetBeans with Murach’s Java SE 6
Perspective
In this tutorial, you learned all of the NetBeans skills that you need for devel-oping the applications that are described in Murach’s Java SE 6. Keep in mind,though, there’s much more to learn about NetBeans. To start, you may want toreview the documentation that’s available from the NetBeans Help menu and fromthe NetBeans web site. Or, you may want to experiment with the commands in theSource and Refactor menus to see how they can help you enter and modify code.
Summary
• NetBeans is a software framework for developing Integrated DevelopmentEnvironments (IDEs). The NetBeans IDE for Java is built on this framework.NetBeans is open-source, available for free from the NetBeans web site(www.netbeans.org), and runs on all modern operating systems.
• A project is a folder that contains all of the files that make up an application.
• The code completion feature can help you enter code.
• In NetBeans, an error is a line of code that won’t compile.
• If you have multiple projects open, you can specify one project as the mainproject. If this project contains multiple classes that have a main method, youcan specify one class as the main class. Then, you can use the Run MainProject command to run the main class in the main project.
• When you run an application from NetBeans, the default console is the Outputwindow. However, this console has a bug that prevents it from working with theprint method of the System.out object. As a result, to use NetBeans to testconsole applications, you may want to use a third-party console such as Eric G.Berkowitz’s interactive console.
• NetBeans includes a debugger that can help you find and fix any bugs in yourapplications. To use the debugger, you can set a breakpoint to stop programexecution. Then, you can step through the statements in your applications andview the values of variables and the stack trace.
How to use NetBeans with Murach’s Java SE 6 43
Before you do any of the exercises that follow…Before you do the exercises that follow, you should use the procedure shown inchapter 1 (figures 1-4) of Murach’s Java SE 6 to install the JDK. Then, youshould do the procedure in figure 1 of this tutorial to install NetBeans. Inaddition, you should download the NetBeans versions of the folders and filesfor our book from our web site (www.murach.com) and unzip them into theC:\murach\java6 folder. If this folder doesn’t already exist, you should create it.
Exercise 1 Use NetBeans to develop anapplication
Please read chapter 1 in Murach’s Java SE 6 before you do this exercise.This exercise will guide you through the process of using NetBeans to enter,save, compile, and run a simple application.
Enter and save the source code1. Start NetBeans.
2. Select the File�New Project command from the NetBeans menu system. Then,use the resulting dialog box to create a project named TestApp that contains aclass named TestApp that has a main method and store this project in this folder:C:\murach\java6\netbeans\exercises
3. Modify the generated code for the TestApp class so it looks like this (typecarefully and use the same capitalization):public class TestApp
{
public static void main(String[] args)
{
System.out.println("This Java application has run successfully");
}
}
4. Enter the statement that starts with System.out again, right after the firststatement. This time, type sys and press Ctrl+Spacebar. Then, selectsystem.out.println by double-clicking on it, and complete the statement.
5. Enter that statement a third time, right after the second statement. This time, typeSystem, enter a period, and select out from the list that’s displayed. Then, enteranother period, select println(String x), and complete the statement. You shouldnow have the same statement three times in a row.
6. Use the Save command (Ctrl+S) in the File menu to save your changes.
44 How to use NetBeans with Murach’s Java SE 6
Run the application7. Click on the Run Main Project button in the toolbar to compile and run the
class. This should display “This Java application has run successfully” threetimes in a row in the Output tab.
8. Press F6 to run the application a second time.
Introduce and correct a compile-time error9. In the code editor window, delete the semicolon at the end of the first println
statement, and NetBeans will display an error icon to the left of the statement.
10. Correct the error, and NetBeans will remove the error icon.
11. Save the files and press F6 to run the application again.
12. Exit NetBeans by selecting the Exit command from the File menu.
Exercise 2 Use NetBeans to open and run anexisting application
Please read chapter 2 in Murach’s Java SE 6 before you do this exercise.This exercise will guide you through the process of using NetBeans to openand run a simple console application that gets input from a user.
Open and run the Invoice application1. Start NetBeans, and open the project named Ch02 as described in figure 8. This
project folder should be stored in this directory:C:\murach\java6\netbeans\exercises
2. Check to make sure that the eric.jar file has been added to the Libraries folder.If it hasn’t, add this JAR file to the Libraries folder as described in figure 7.
3. Open the InvoiceApp.java file in the text editor. Note that the main method forthis class begins with the line of code that starts the interactive console.
4. Run the Invoice application. To do that, right-click on the InvoiceApp.java fileand select the Run File command. Respond to the prompts on the interactiveconsole until you finish running the application.
5. Close the interactive console. Note that this causes the Output window todisplay a message that indicates that the application has finished running.
Open and run the Test Scores application6. Follow steps 3 through 5 for the TestScoreApp.java file.
7. Close the project, and exit from NetBeans.
How to use NetBeans with Murach’s Java SE 6 45
Exercise 3 Test and debug an applicationPlease read chapter 2 in Murach’s Java SE 6 before you do this exercise.This exercise will guide you through the process of using NetBeans to test anddebug an application.
Test the Invoice application with invalid data1. Open the ch02 project, and test the Invoice application with an invalid subtotal
like $1000 (enter the dollar sign too). This time, the application will crash witha run-time error, and an error message will be displayed in the Consolewindow.
2. Study the error message, and note the line number of the statement that causedthe crash. Then, open the InvoiceApp.java file in the text editor and select theView�Show Line Numbers command to display the line numbers to the left ofeach line of code. Based on this information, you should be able to figure outthat the application crashed because $1000 isn’t a valid double value.
Set a breakpoint and step through the application3. Set a breakpoint on this line of code:
double discountPercent = 0.0;
4. Right-click on the InvoiceApp.java file in the Projects tab and select DebugFile. This will run the application with the debugger on.
5. When the application prompts you for a subtotal entry, enter 100. Then, whenthe application reaches the breakpoint and stops, click on the Local Variablestab and note that the choice and subtotal variables have been assigned values.
6. Click on the Step Into button in the toolbar to step through the application onestatement at a time. After each step, review the variables in the Local Variablestab to see how they have changed. Note too how the application steps throughthe if/else statement based on the subtotal value.
7. Click on the Continue button in the toolbar to continue the execution of theapplication at full speed. When prompted, enter the required values until youreach the breakpoint the second time. Then, click the Finish Debugger Sessionbutton to end the application. This should give you some idea of how useful theNetBeans debugging tools can be.
8. End the application, and exit from NetBeans.
46 How to use NetBeans with Murach’s Java SE 6
What else you need to know before you do theexercises for Murach’s Java SE 6…At this point, you have all the NetBeans skills you need for doing the exercisesin Murach’s Java SE 6. However, you need to know (1) how the names weused for the NetBeans exercise starts relate to those in the book exercises, and(2) how to copy and rename files.
In addition, you need to use common sense as you follow the directions in thebook. For example, when you use NetBeans to do these exercises, you’ll findthat NetBeans automatically performs some operations that are done manuallyin the exercises. That’s particularly true when you apply the object-orientedskills described in chapters 6 through 9 to the exercises for those chapters.
How the NetBeans project names relate to the book exercises• By now, you should have unzipped all of the NetBeans exercise starts into:
C:\murach\java6\netbeans\exercises\
• Some of the projects stored in this directory have short names like ch02 andch03 that map directly to the directory names that are used by the exercises inthe book.
• Other projects have longer names that don’t map directly to the directorynames that are used in the exercises in the book. Here’s how project namesused by this workspace map to the directory names that are used by theexercises in the book:
Project name Directory namech06_LineItem ch06\LineItemch08_DisplayableTest ch08\DisplayableText
• As you do the exercises in the book, you need to convert the directory namesthat are used in the book to the project names that are available from theNetBeans directories.
How to use NetBeans to copy and rename files• As you do the exercises in the book, you are often asked to copy an existing
application or to save one with a new name. Most of the time, the easiest wayto do these tasks is to use the Projects tab.
• To copy a file, right-click on the .java file in the Projects tab, select the Copycommand, right-click on the package in the Projects tab, and select the Pastecommand. If you’re copying a file within the same project, NetBeans willautomatically modify the name of the file so it doesn’t conflict with the originalfile.
How to use NetBeans with Murach’s Java SE 6 47
• To rename a file, right-click on the .java file in the Projects tab, select theRefactor�Rename command, and respond to the resulting dialog boxes. To dothat, click on the Next button in the first dialog box. Then, after previewing thechanges in the Refactoring window, click on the Do Refactoring button tocomplete the refactoring.
• If you change the name of a file, NetBeans automatically changes the name ofthe class, which is usually what you want.
Examples of converting the book exercises to NetBeans• Exercise 2-2 in the book asks you to save the TestScoreApp.java file as
ModifiedTestScoreApp.java in the same directory. To do that, open the Ch02project and use the Projects tab to display the TestScoreApp.java file that’sstored in the default package. Then, right-click on the file, select the Copycommand, right-click on the default package, and select the Paste command.When you do, NetBeans will create a new file named TestScoreApp_1.java.Finally, right-click on the TestScoreApp_1.java file, select theRefactor�Rename command, click on the Next button in the first dialog box,and click on the Do Refactoring button in the Refactoring window.
• Exercise 3-2 in the book asks you to open a file namedModifiedTestScoreApp.java in the ch02 directory and save it in the ch03directory as EnhancedTestScoreApp.java. To get the same result, you can usethe Projects tab to open the ch02 and ch03 projects. Then, you can copy the filefrom the default package of the ch02 project to the default package of the ch03project. Finally, you can rename the file by right-clicking on it, selecting theRefactor�Rename command, clicking on the Next button in the first dialogbox, and clicking on the Do Refactoring button in the Refactoring window.
• Exercise 6-1 in the book asks you to open the classes that are in thech06\LineItem directory. To do that, open the existing project namedch06_LineItem. Then, use the Projects tab to open the classes in this project.
• Exercise 9-1 in the books asks you to use the Windows Explorer to create andwork with the subdirectories that correspond with the packages for theapplication. With NetBeans, you can use the Projects tab to create packagesand work with packages as described in figure 14 of this tutorial. Thisautomates many aspects of working with packages.

![Java script nirvana in netbeans [con5679]](https://static.fdocuments.us/doc/165x107/58edc1d51a28ab4d598b466f/java-script-nirvana-in-netbeans-con5679.jpg)