How to use and adapt the Python script for training of ...
6
How to use and adapt the Python script for training of classifiers The main purpose of this script is to efficiently test the performance of several classifiers (k nearest neighbor (KNN), random forest, support vector machine (SVM) on hand-labeled data. Linear SVM extracted and transferred to our classification macro (see: How to use the classification macro). The script is designed to be applied to four-feature vesicle-data extracted from electron-tomograms, but can be modified to work on different input. Software requirements Anaconda: Anaconda is a Python distribution for large scale data processing. https://www.anaconda.com/download/ Python packages sys https://docs.python.org/3.7/library/sys.html http://www.open-std.org/jtc1/sc22/wg14/www/docs/n1256.pdf numpy http://www.numpy.org/ Stéfan van der Walt, S. Chris Colbert and Gaël Varoquaux. The NumPy Array: A Structure for Efficient Numerical Computation, Computing in Science & Engineering, 13, 22-30 (2011), pandas https://pandas.pydata.org/ Wes McKinney. Data Structures for Statistical Computing in Python, Proceedings of the 9th Python in Science Conference, 51-56 (2010) copy https://docs.python.org/3/library/copy.html string https://docs.python.org/3/library/string.html glob https://docs.python.org/2/library/glob.html sklearn Scikit-learn: Machine Learning in Python, Pedregosa et al., JMLR 12, pp. 2825-2830, 2011 conda, spyder and python version used python 3.5.2 and 3.6 conda 4.4.10 spyder 3.2.3 and 3.1.4
Transcript of How to use and adapt the Python script for training of ...

How to use and adapt the Python script for training of classifiers
The main purpose of this script is to efficiently test the performance of several classifiers (k nearest
neighbor (KNN), random forest, support vector machine (SVM) on hand-labeled data. Linear SVM
extracted and transferred to our classification macro (see: How to use the classification macro). The
script is designed to be applied to four-feature vesicle-data extracted from electron-tomograms, but
can be modified to work on different input.
Software requirements Anaconda:
Anaconda is a Python distribution for large scale data processing.
https://www.anaconda.com/download/
Python packages
sys
https://docs.python.org/3.7/library/sys.html
http://www.open-std.org/jtc1/sc22/wg14/www/docs/n1256.pdf
numpy
http://www.numpy.org/
Stéfan van der Walt, S. Chris Colbert and Gaël Varoquaux. The NumPy Array: A Structure for
Efficient Numerical Computation, Computing in Science & Engineering, 13, 22-30 (2011),
pandas
https://pandas.pydata.org/
Wes McKinney. Data Structures for Statistical Computing in Python, Proceedings of the 9th
Python in Science Conference, 51-56 (2010)
copy
https://docs.python.org/3/library/copy.html
string
https://docs.python.org/3/library/string.html
glob
https://docs.python.org/2/library/glob.html
sklearn
Scikit-learn: Machine Learning in Python, Pedregosa et al., JMLR 12, pp. 2825-2830, 2011
conda, spyder and python version used
python 3.5.2 and 3.6
conda 4.4.10
spyder 3.2.3 and 3.1.4

Format of input-data: Point a) is a guide on how to format default input data. Point b) explains how to deal with modified
input.
a) Use standard-format
Input CSV-files need to be formatted with . as decimal mark and , as delimiter. Each row should
represent a measurement (= one vesicle). The first four columns should be numeric features, of which
the second column must be the vesicles’ gv. The fifth column contains the label. The first row should
be the header. Rows labeled with a capital E (error) are deleted. Rows labeled with a capital D
represent DCVs, all other labels represent CCVs. (see figure 1).
Figure 1: Format of input-CSV
b) Modified input
All changes here are made in def prepareData of the script.
Different CSV-format
Search for the line temp = pd.read_csv(filename) in def prepareData (line 135 in
figure 2) and change settings according to
https://pandas.pydata.org/pandas-docs/stable/generated/pandas.read_csv.html
If, for instance, you use , as decimal mark and tab as delimiter, write:
temp = pd.read_csv(filename, sep = ‘\t’, decimal = ‘,’)
Different features
If more than four features, or other features than the ones mentioned in a) should be processed, the
easiest way to do so is to comment out the assertions and gv-offset (figure 2, line 137 – 145). Change
column-indices (figure 2, line 147, 148, 150, marked blue) such, that the number corresponds to the
number of features present.
If, for instance, the first 6 columns are features and the 7th is the label, change the number from 4 to
6.
Figure 2: Positions in the script that deal with input-features are highlighted here
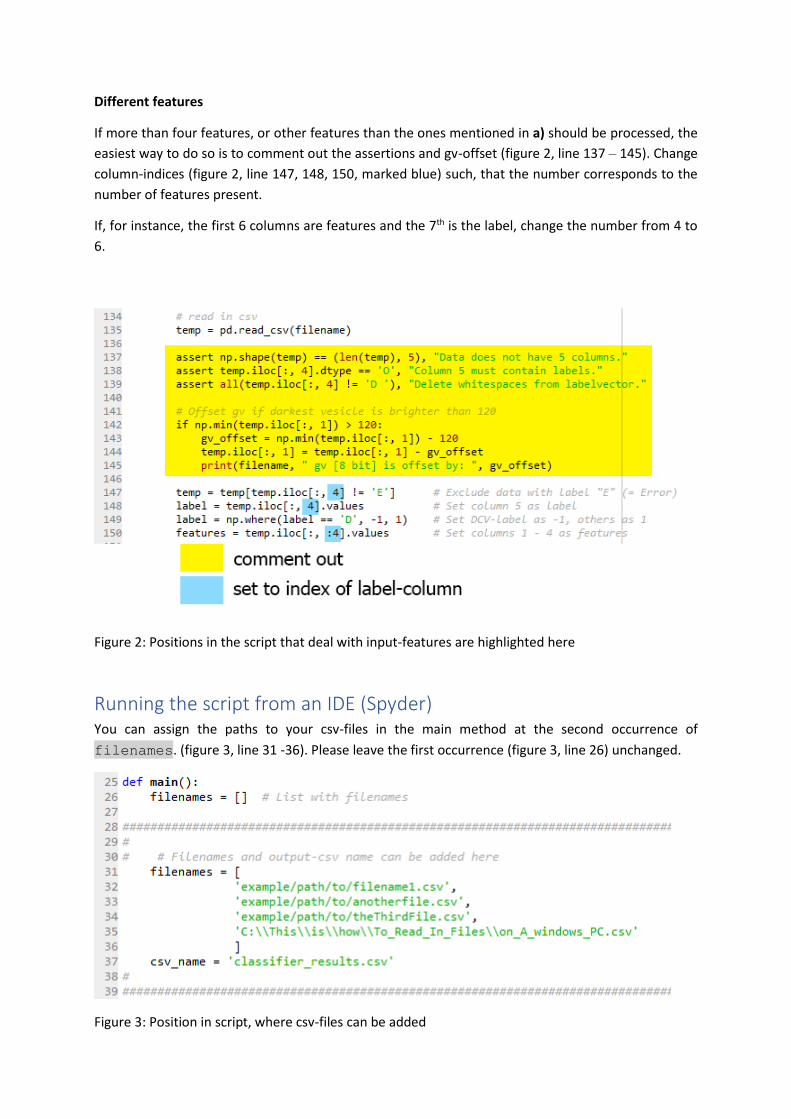
Running the script from an IDE (Spyder) You can assign the paths to your csv-files in the main method at the second occurrence of
filenames. (figure 3, line 31 -36). Please leave the first occurrence (figure 3, line 26) unchanged.
Figure 3: Position in script, where csv-files can be added
Individual file paths should be surrounded by quotation marks and separated by commas. Path
separator is / on Linux and Mac OS and \\ on Windows. File extension .csv should always be present
in Windows.
You can assign the name of your output csv-file to csv_name using quotation marks (figure 3, line 37)
Please comment out or delete the assignment of filenames and csv_name (lines 31 – 37, if you want
to run the script from the command line later.
Running the script from the command line The script is also runnable from a unix-shell or unix-shell emulator (like Git Bash on windows), in case
python is properly installed. Missing packages can be installed with
$ conda install package-name (when anaconda is installed).
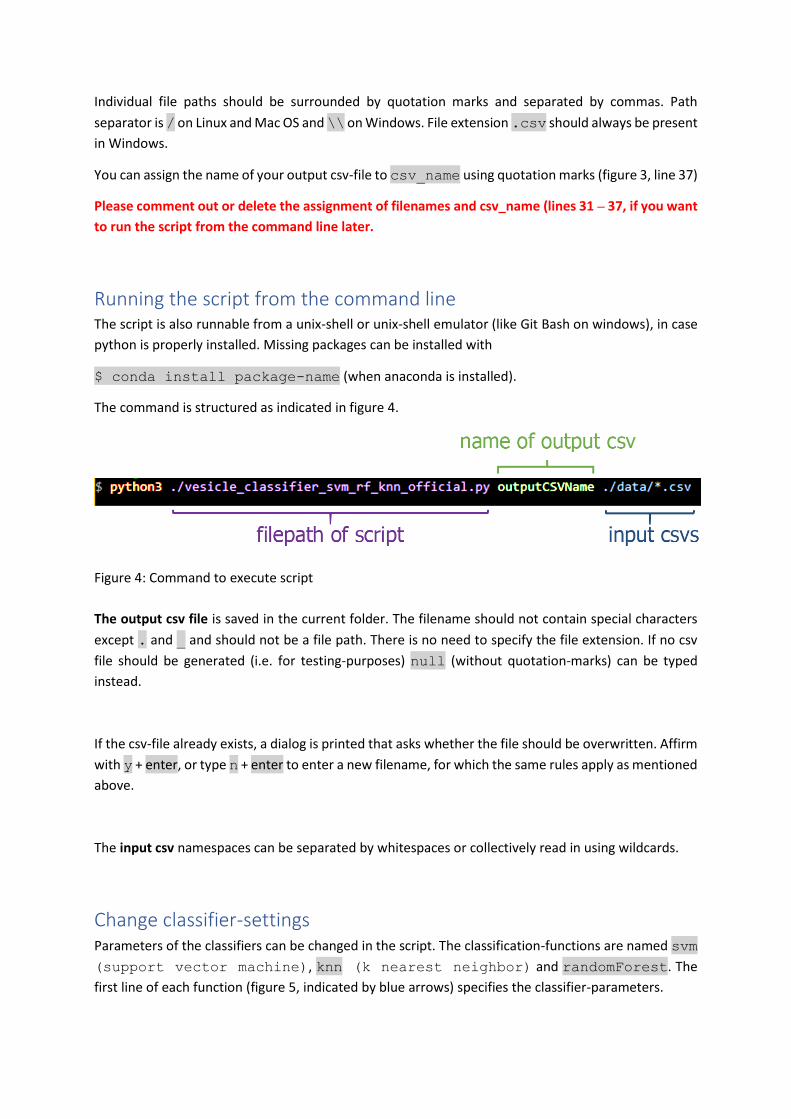
The command is structured as indicated in figure 4.
Figure 4: Command to execute script
The output csv file is saved in the current folder. The filename should not contain special characters
except . and _ and should not be a file path. There is no need to specify the file extension. If no csv
file should be generated (i.e. for testing-purposes) null (without quotation-marks) can be typed
instead.
If the csv-file already exists, a dialog is printed that asks whether the file should be overwritten. Affirm
with y + enter, or type n + enter to enter a new filename, for which the same rules apply as mentioned
above.
The input csv namespaces can be separated by whitespaces or collectively read in using wildcards.
Change classifier-settings Parameters of the classifiers can be changed in the script. The classification-functions are named svm
(support vector machine), knn (k nearest neighbor) and randomForest. The
first line of each function (figure 5, indicated by blue arrows) specifies the classifier-parameters.

Figure 5: classification functions
More information on possible changes can be browsed in the scikit-learn documentation:
http://scikit-learn.org/stable/documentation.html
Output Output is a csv-file as shown in figure 6. Columns from left to right are:
A: Name of the corresponding input csv-file, acquired from shortening the filepaths
B: Accuracy
C: number of misclassified vesicles
D, E, F: precision, recall and F-score of DCV

Figure 6: Output csv file
The first block of rows corresponds to the SVM, next to random forest, third to knn, fourth to a
majority-prediction of the previous three.
The last block outputs SVM-parameters (red box). These can be used in the classification Macro.
Please note that the only variable fields in the output-csv are numeric fields and the file-names.
Classifier-settings and order of header will not change automatically, when they are changed in the
script or in the input-csv.


![Easy Script in Python 2 - Telit · [0 1 1 7] Mod. 0809 2017-01 Rev.8 Easy Script in Python 2.7 Application Note 80378ST10106A Rev. 6 – 2017-02-16](https://static.fdocuments.us/doc/165x107/5b8932d87f8b9a655f8ba4e7/easy-script-in-python-2-telit-0-1-1-7-mod-0809-2017-01-rev8-easy-script.jpg)