How to set up FMOD*, Cocos2D-x*, and OpenAL* Libraries for ...
25
How to set up FMOD*, Cocos2D-x*, and OpenAL* Libraries for Android* on Intel® Architecture Previously, we’ve gone through instructions on how to compile a FFmpeg library on x86 architecture. This step-by-step guide walks you through the process of setting up and compiling different libraries that are used in gaming and multimedia specifically for x86 target platforms. We will go through the setup of FMOD*, Cocos2D-x*, and OpenAL. Setup and Prerequisites: Before starting, we need to fulfill certain download prerequisites. a) Download Android ADT Bundle b) Download NDK c) Download and install Cygwin*: When asked to select packages, search for the following packages and install them: Autoconf, Automake, binutils, gcc-core, gcc-g++, gcc4-core, gcc4-g++, gdb, pcre, pcre-devel, gawk, make, python Note: Select the GUI version of make as well; otherwise, you will not be able to build your project using NDK. d) Download JDK e) Download Apache Ant Now you need to edit some environmental variables. a) Set JAVA_HOME = the path in which you have installed the Java* JDK, for me it is: C:\Program Files\Java\jdk1.7.0_45 b) Set ANDROID_SDK_ROOT = the complete path to the SDK folder. For example: in my case, I have downloaded and extracted the ADT bundle in D:\android\, so my path is: D:\android\adt-bundle-windows-x86-20131030\sdk c) Set NDK_ROOT = the complete path to the NDK folder, my path is: D:\android\android- ndk-r9b d) Set NDK_ROOT = the complete path to the NDK folder, my path is: D:\android\android- ndk-r9b
Transcript of How to set up FMOD*, Cocos2D-x*, and OpenAL* Libraries for ...

How to set up FMOD*, Cocos2D-x*, and OpenAL* Libraries for Android* on Intel® Architecture
Previously, we’ve gone through instructions on how to compile a FFmpeg library on x86 architecture.
This step-by-step guide walks you through the process of setting up and compiling different libraries that
are used in gaming and multimedia specifically for x86 target platforms. We will go through the setup of
FMOD*, Cocos2D-x*, and OpenAL.
Setup and Prerequisites:
Before starting, we need to fulfill certain download prerequisites.
a) Download Android ADT Bundle
b) Download NDK
c) Download and install Cygwin*: When asked to select packages, search for the following
packages and install them:
Autoconf, Automake, binutils, gcc-core, gcc-g++, gcc4-core, gcc4-g++, gdb, pcre, pcre-devel,
gawk, make, python
Note: Select the GUI version of make as well; otherwise, you will not be able to build your
project using NDK.
d) Download JDK
e) Download Apache Ant
Now you need to edit some environmental variables.
a) Set JAVA_HOME = the path in which you have installed the Java* JDK, for me it is:
C:\Program Files\Java\jdk1.7.0_45 b) Set ANDROID_SDK_ROOT = the complete path to the SDK folder. For example: in my case, I
have downloaded and extracted the ADT bundle in D:\android\, so my path is:
D:\android\adt-bundle-windows-x86-20131030\sdk c) Set NDK_ROOT = the complete path to the NDK folder, my path is: D:\android\android-
ndk-r9b
d) Set NDK_ROOT = the complete path to the NDK folder, my path is: D:\android\android-
ndk-r9b

e) Update the Path variable to contain the following = path to the JDK folder, JDK bin folder, NDK,
Cygwin bin folder, ANT bin folder, SDK tools folder and SDK platform-tools folder, each
separated by a semi-colon (;). For example, in my case, I will add the following:
D:\cygwin64\bin;C:\Program Files\Java\jdk1.7.0_40\bin;D:\android\adt-
bundle-windows-x86_64-20131030\sdk\tools;D:\android\adt-bundle-windows-
x86_64-20131030\sdk\platform-tools;%JAVA_HOME%\bin;%ANT_HOME%\bin
NOTE: Do not end any variable with \ or ` or any such special character.
FMOD
FMOD is a commercial library to manage audio. FMOD is a set of audio content creation tools that plays
music files of diverse formats on many different operating system platforms used in games and software
applications to provide audio functionality. Below is a step-by-step guide for integrating the FMOD
library into an Android application with the help of the Eclipse* IDE specifically for an x86 target
platform.
Download FMOD. Download the Android version of FMOD Ex Programmer’s API, as shown below:

To install FMOD, extract “fmodapi44429android.tar.gz” using some tool like 7-zip to any folder
of your choice.
Building using Android NDK:
To implement sounds through FMOD Ex API, you must include it as C/C++ programs in your code and
reference it through jni in your Android application.
FMOD comes with C/C++ libraries that can be called via JNI, or linked to the C/C++ component of your
application:
libfmodex.so for general development.
libfmodexL.so for the same library, but with debug logging which can help to determine
any problems if they exist.
FMOD libraries are currently provided for the armeabi and armeabi-v7a ABIs built against android-3, and
the x86 ABI built against android-9.
{$FMOD INSTALLED PATH}\api\lib\$(ABI)
The all native audio interface OpenSL is the default playback method for devices that support it
(android-9) and requires no additional files. For devices without OpenSL support you will need to use the
Audio Track output mode, which requires an FMOD jar file. This jar file must be added to your Java
application to initialize and drive the FMOD audio output:
fmodex.jar
This is discussed in the next topic.
NOTE: Since the sample application used here is part of the library, we have not included the code for
the example; and instead just the modifications necessary are stated in this document.
Java Initialization
To enable audio output through the Audio Track output mode you must include and initialize the FMOD
Java audio driver in your application (not required if you use the OpenSL output mode). To do this you
will need to ensure fmodex.jar is referenced in your Java project, and you have imported the
org.fmod.FMODAudioDevice package. The FMOD Java audio driver also requires that your
application loads the fmodex library.
The FMODAudioDevice class has two functions you must call for audio to play. They can be called at
any time, but we recommend you put the start() and stop() function calls in the onStart() and
onStop() overrides of your Activity.
Building a sample program for Android on the x86 platform
The process for building a program is the same as building one through NDK. Let’s look at an example to
demonstrate. For this example, we will be using the sample program located in the folder:
{$FMOD INSTALLED PATH}\examples\playsound

We will call this {$PROJECT DIRECTORY}. But before we build it using NDK, we need to make
certain changes:
a) Go to the directory {$PROJECT DIRECTORY}\jni and open the Application.mk file.
b) Change the following code:
APP_ABI := armeabi armeabi-v7a
to
APP_ABI := x86
Now open Cygwin and perform the following tasks to build the application:
a) Update the PATH variable in Cygwin as follows:
export PATH=.:/cygdrive/{$PATH TO NDK}:$PATH
b) cd to the path of the project:
cd /cygdrive/{$PROJECT DIRECTORY}
c) Run the command:
ndk-build
d) This will build the project and make it ready for deployment.
NOTE: In this case replace all the ‘\’ characters from the Windows* path format to ‘/’ character for GNU
based path format.
At the end of a successful build, you will see the following message in Cygwin:
[x86] Prebuilt : libfmodex.so <= jni/../../../api/lib/x86/
[x86] Install : libfmodex.so => libs/x86/libfmodex.so
[x86] Cygwin : Generating dependency file converter script
[x86] Compile : main <= main.c
[x86] SharedLibrary : libmain.so
[x86] Install : libmain.so => libs/x86/libmain.so
Now that your project is built it can be run through the Eclipse IDE.
Running the application through Eclipse IDE
To launch the application from Eclipse IDE, follow these steps:
a) Start Eclipse and click File > Import:
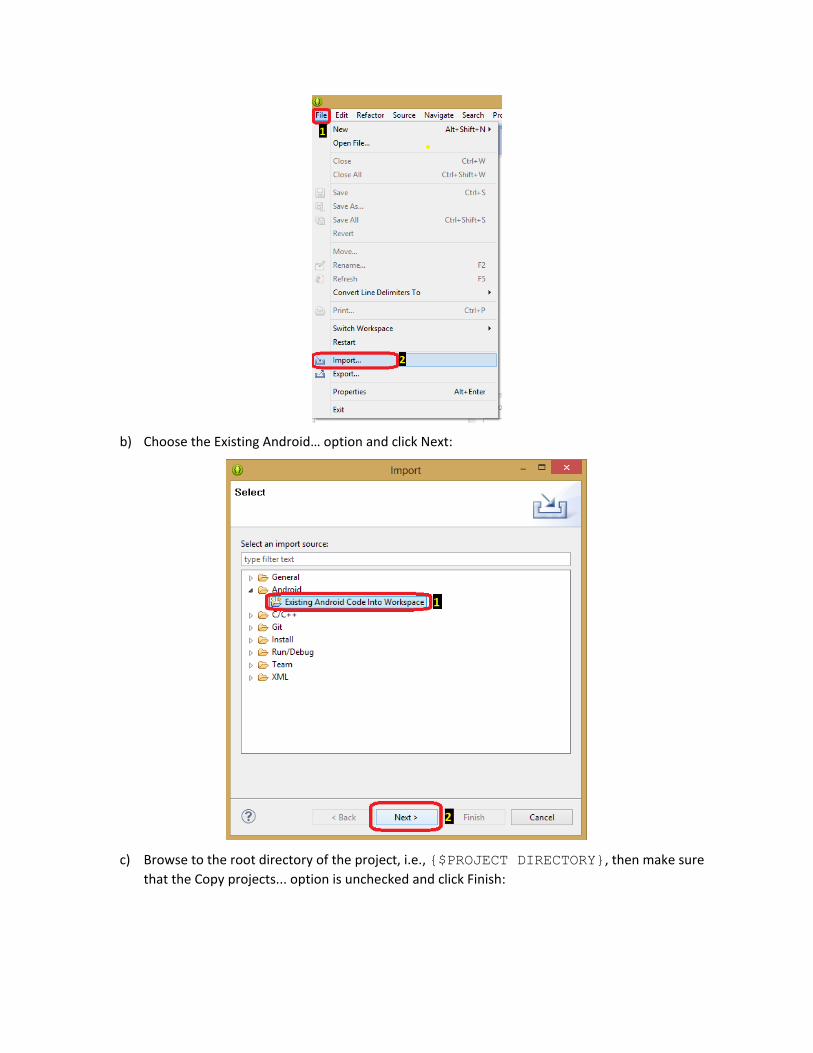
b) Choose the Existing Android… option and click Next:
c) Browse to the root directory of the project, i.e., {$PROJECT DIRECTORY}, then make sure
that the Copy projects... option is unchecked and click Finish:

d) You will notice a red exclamation sign on the imported project in the package explorer tab as
shown below:
e) To resolve that, click Window > Preferences as shown in the previous page, and the following
window appears:

f) Click the New… option and you will see the following:
g) In place of the “Name” field, type:
FMOD_LIB
h) Then click File and browse to locate the following file:
{$FMOD INSTALLED PATH}/api/lib/fmodex.jar
i) Click OK.
j) Then click OK again and the following window will appear; click Yes:
k) The red exclamation error will be resolved.
l) Then click Project > Properties.
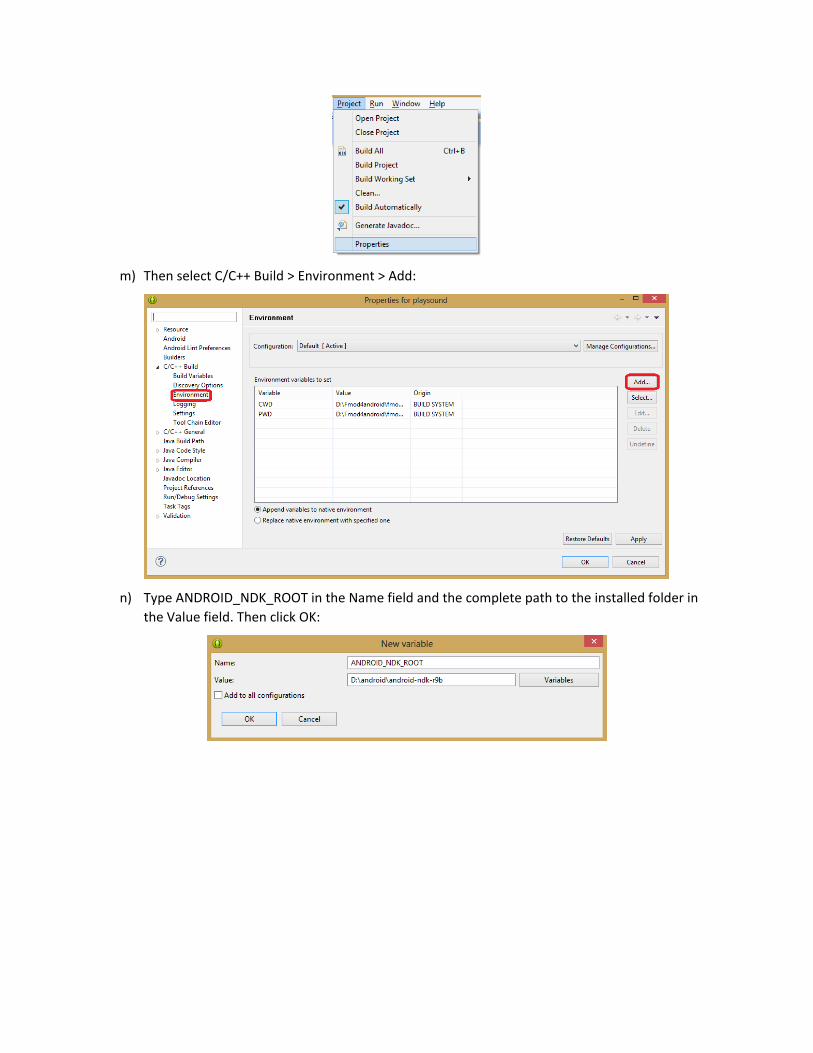
m) Then select C/C++ Build > Environment > Add:
n) Type ANDROID_NDK_ROOT in the Name field and the complete path to the installed folder in
the Value field. Then click OK:

o) Then click Apply and then OK:
Now you may launch the application but only after you copy all the files from the two sets of example
media:
{$FMOD INSTALLED PATH}\examples\media\* and
{$FMOD INSTALLED PATH}\fmoddesignerapi\examples\media\*
To a folder called fmod in the root of the SD card.
NOTE: The application may fail to launch in the simulator.
x86 platform specific settings
It is essential when building an application specifically for the x86 platform that you make the following
changes: (Please note that these changes were incorporated as a part of the procedure in building the
project.)
a) Go to the directory {$PROJECT DIRECTORY}\jni and open the Application.mk file
(create one if not present).
b) Change the following code:
APP_ABI := armeabi armeabi-v7a
to
APP_ABI := x86
Build Output
The output of the build will be located in the {$PROJECT DIRECTORY} in the following manner:

The generated libraries, libmain.so and libfmodex.so, will be present in the {$PROJECT
DIRECTORY}\libs\x86 folder.
The generated objects will be in {$PROJECT DIRECTORY}\obj folder.
Known errors and issues
If there are errors during building through NDK, please set the access permissions to “Full Control” for
“Everyone”.
Also please note that the application may fail to launch in the emulator and that you will be able to
launch it in your device only after copying all the files from the two sets of example media:
{$FMOD INSTALLED PATH}\examples\media\* and
{$FMOD INSTALLED PATH}\fmoddesignerapi\examples\media\*
To a folder called fmod in the root of the SD card.
Cocos2D-x:
So now, let’s go through the process of building a cross-platform Android application with the help of
the Cocos2d-x game engine specifically for x86 target platform.
The sample program used in this document to explain the process is part of the Cocos2d-x Game Engine
and can be found in the \samples\Cpp\ folder within the cocos2d-x-2.1.1 folder.
Cocos2d-X is a multi-platform port written in C++ that can be used with iOS*, Android, Windows,
Marmalade, Linux*, Bada, and BlackBerry* 10. This port has Lua* and JavaScript* as the script binding.
You can read Cocos2d-X support documentation on their site.
Before using Cocos2d-x, be sure you have fulfilled the prerequisites as detailed above in the
Prerequisites section.
Download Cocos2d-x:
Download Cocos2d-x and choose the latest version. Also remember to choose the simple Cocos2d-x
option not the –html5 option.
Steps to Install and set up Cocos2d-X:
a) Extract the zip file downloaded in the previous step to your C:\ Drive. I extracted mine to
D:\Cocos2d-x.

b) There should be two folders in the Cocos2d-x folder. For me they are: D:\Cocos2d-
x\__MACOSX and D:\Cocos2d-x\cocos2d-x-2.2.1.
c) Set up the environment variables for Cocos2d-x as shown below:
COCOS2DX_ROOT = the complete path to the cocos2d-x-2.2.1 folder, in my case it is: D:\Cocos2d-x\cocos2d-x-2.2.1
Before we begin, make note of a few variables as they will be extensively used throughout:
{$ADT PATH} = the complete path to the android ADT bundle, in my case, it is: D:\android\adt-bundle-windows-x86_64-20131030
{$ECLIPSE PATH} = the complete path to the eclipse supplied along with the ADT bundle,
for me, it is: {$ADT PATH}\eclipse
{$COCOS2D-X PATH} = the complete path to the cocos2d-x-2.2.1 folder, in my case, it
is: D:\Cocos2d-x\cocos2d-x-2.2.1
{$WORKSPACE PATH} = the complete path to the Eclipse Android workspace, for me it is: D:\and_proj_coco
Configuring a Cocos2d-x project in Eclipse IDE:
a) Run Eclipse from the following path: {$ECLIPSE PATH}\eclipse.exe
b) Create your workspace when prompted. I made mine in {$WORKSPACE PATH}, as shown
below:
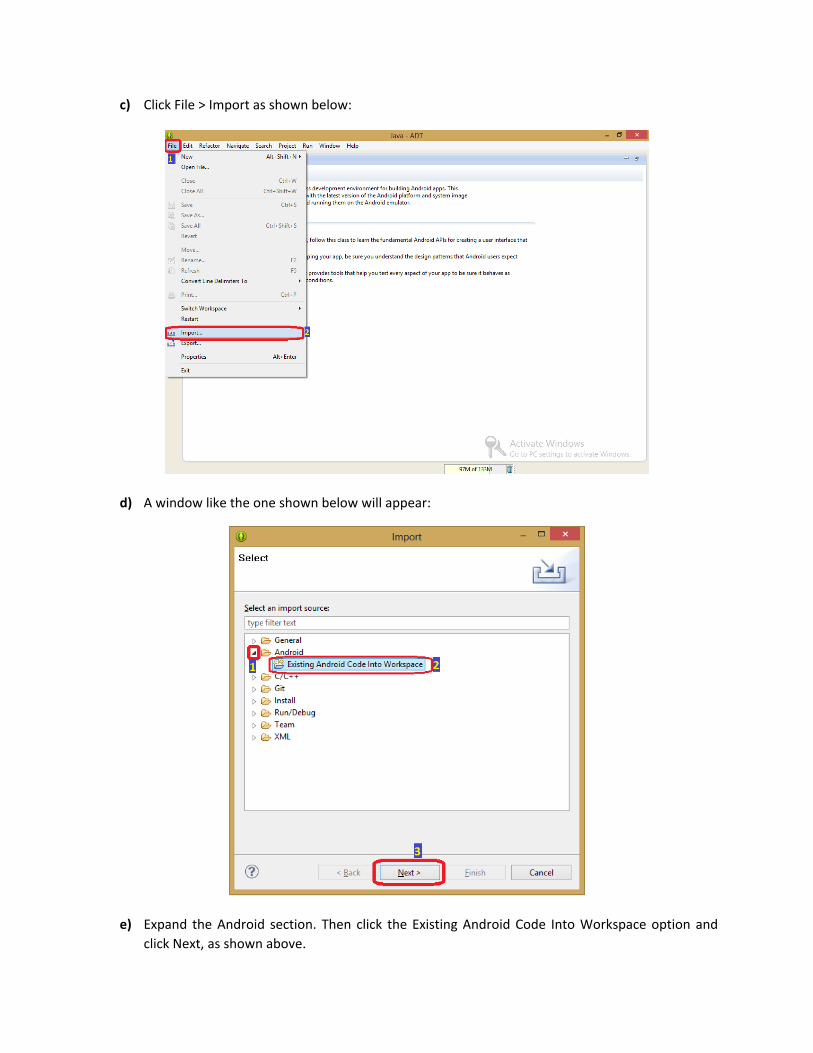
c) Click File > Import as shown below:
d) A window like the one shown below will appear:
e) Expand the Android section. Then click the Existing Android Code Into Workspace option and
click Next, as shown above.

f) Click Browse… as shown below:
g) Browse to {$COCOS2D-X PATH}\samples\Cpp\HelloCpp\proj.android as shown below
and click OK:
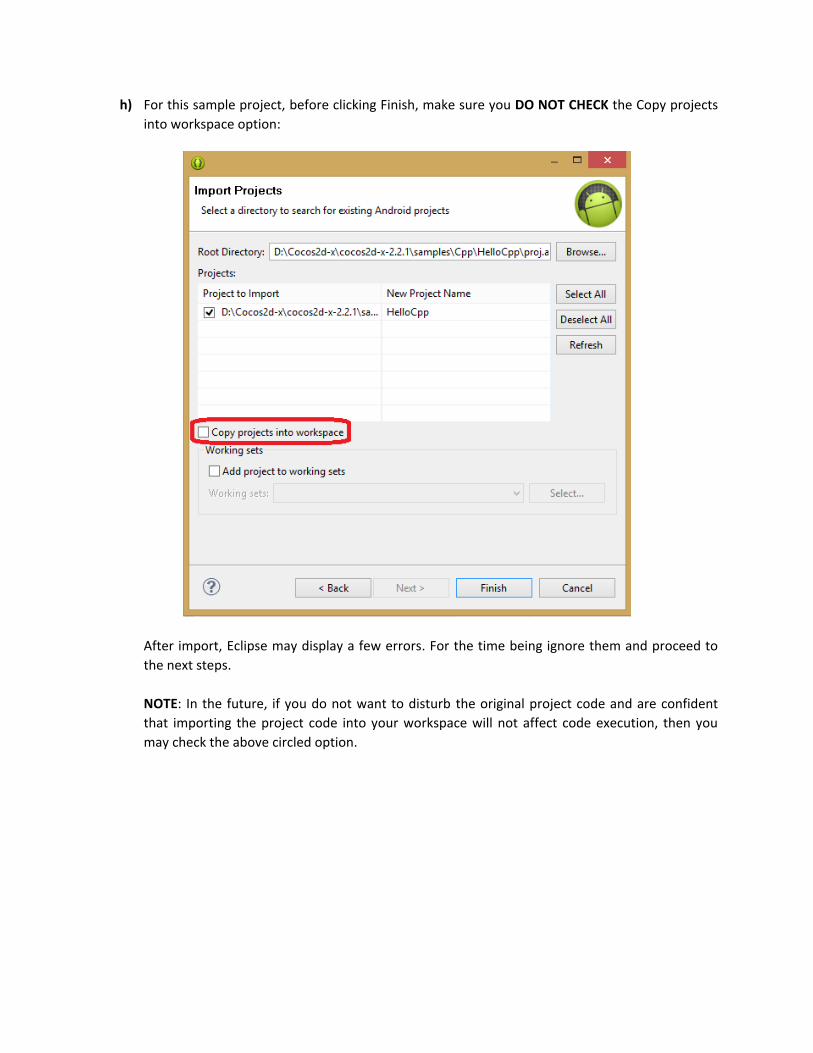
h) For this sample project, before clicking Finish, make sure you DO NOT CHECK the Copy projects
into workspace option:
After import, Eclipse may display a few errors. For the time being ignore them and proceed to
the next steps.
NOTE: In the future, if you do not want to disturb the original project code and are confident
that importing the project code into your workspace will not affect code execution, then you
may check the above circled option.

i) Now repeat Steps c – h with the difference that instead of importing {$COCOS2D-X
PATH}\samples\Cpp\HelloCpp\proj.android, you will import: {$COCOS2D-X
PATH}\cocos2dx\platform\android as shown below, you may check the Copy project into
workspace option if you want:
j) If the errors encountered in Step h are not solved at this point, proceed to the next steps as
below
k) Now, in the Package Explorer tab in the left, right click libcocos2dx and click Properties, as
shown below:

l) In the window that appears, click the Android option in the left tab and make sure that the Is
Library option is checked, as shown below, then click Apply and finally OK.

m) Similarly, open the Properties window for the HelloCpp project by following Steps j – k for the
project HelloCpp. You will then see a window as shown below:
n) Remove anything in the Library section marked with a red cross and click Add.
o) Choose libcocos2dx and click OK as shown below:

p) Now you will see that the Library section is populated with a green check mark as shown below,
then click Apply and OK:
q) At this point, Eclipse will rebuild the project. If all the errors are resolved then ignore this step. If
not, then delete the existing HelloCpp project from the Package Explorer tab and make sure that
while deleting you DO NOT choose to remove from disk, as it CANNOT BE UNDONE, and redo
Steps c – h and Steps m – p:

r) Now, your project should look like this:
Congratulations! You have successfully opened your project in Eclipse IDE. Now let’s move on to building
your project.

Building a Cocos2d-x project in Eclipse IDE:
a) From the Package Explorer tab, navigate to HelloCpp > jni > Application.mk as shown below:
b) Add the following line to build for the x86 platform: APP_ABI := x86
c) Now, from the Project tab in the top menu bar, first click Clean, then Build Project, as shown
below:

Opening and building a Cocos2d-x project through Cygwin:
a) Run Cygwin and navigate to the sample HelloCpp project folder using the following command:
cd /cygdrive/d/Cocos2d-x/cocos2d-x-2.2.1/samples/Cpp/HelloCpp/proj.android
Note that the path is dependent on {$COCOS2D-X PATH}.
b) Make sure that the following line is added to the Application.mk file present in the /jni
folder:
APP_ABI := x86
c) To build the project, while staying in the /proj.android folder, enter the command:
./build_native.sh
NOTE: If any errors occur, make sure that:
The required packages for Cygwin are downloaded properly.
The PATH variable of Cygwin contains the paths to the Android NDK, SDK, JDK, and
COCOS2D-X folders as mentioned in the Prerequisite section.
Once the build procedure is followed and completed, the binaries get generated to the following folder:
proj.android\obj\local\x86
For example:
proj.android\obj\local\x86\libhellocpp.so
proj.android\obj\local\x86\libcocos2d.a
OpenAL (Open Audio Library):
OpenAL (Open Audio Library) is a cross-platform audio application programming interface (API). It is
designed for efficient rendering of multichannel, three dimensional positional audio. Its API style and
conventions deliberately resemble those of OpenGL. Since 1.1, Creative has made its implementation
proprietary. However, OpenAL-Soft is a widely used open source alternative. We will use a version of
OpenAL-Soft that is specially adapted for Android.
Before we start to work on OpenAL, please download as per the above Prerequisites section.
Download a patched source of OpenAL: To work with OpenAL, you need a patched source that is specially adapted for Android.
Thanks to Martins Mozeiko and Chris Robinson a version of OpenAL exists that has been adapted to the
Android platform. Download the latest version of the patched OpenAL source code.
Alternatively, you can also download this source through your Cygwin terminal:
a) Run Cygwin and enter the following command:
git clone http://repo.or.cz/r/openal-soft/android.git OpenAL
b) Now the repository will get cloned in a folder called OpenAL in your pwd, for me it is:
/home/user001 or ~.
NOTE: In the case of the Windows version of Cygwin, the /home folder can be found in the directory in
which Cygwin is installed. In my case, it is: D:\cygwin64
How to configure for x86 platform: Before we start to build, create a normal Hello OpenAL Android project. Let the path for this project
folder be {$PROJECT_DIR}, like: D:\openal_proj\HelloOpenAL.
To compile using OpenAL for Android, follow these steps:
a) To compile OpenAL a file called config.h is needed. Copy it from
{$OPENAL_DIR}/android/jni
To
{$OPENAL_DIR}/include
NOTE: Here, {$OPENAL_DIR} is the complete path to the downloaded OpenAL directory from
the previous step. For me, it is: ~/openal
b) After making the above change, copy this OpenAL folder to your project folder
{$PROJECT_DIR}.
c) Now add the native interface to the project in the subsequent steps.
d) I have used the org_pielot_helloopenal_HelloOpenAL.c file to implement the
audio playback methods from the native interface.
e) Then we need to create two make files, Android.mk and Application.mk and put them
in the jni folder along with the .c folder and its custom .h header file.
NOTE: The detail of these files and their arrangement is given at the end of the document.
To configure the project specifically for x86, make sure that the following files are edited to contain the
given respective values:
Application.mk APP_OPTIM := release
APP_ABI := x86
How to build the project:
a) Open Cygwin and navigate to {$PROJECT_DIR}:
cd /cygdrive/{$PROJECT_DIR}
where {$PROJECT_DIR} is the complete path to the project directory. In my case, it is:
cd /cygdrive/d/openal_proj
b) Now run the following command to include the path to the NDK folder in your Cygwin PATH
environment variable:
export PATH=.:/cygdrive/{$PATH TO NDK}:$PATH
For example, in my case:
export PATH=.:/cygdrive/d/android/android-ndk-r9b:$PATH
c) Run the command:
ndk-build
This will build your OpenAL project for x86 target architecture.
Build output:
The output of the build will be located in the {$PROJECT_DIR}:
The generated libraries, libopenal.so and libopenaltest.so, will be in the
{$PROJECT_DIR}\libs\x86 folder.
The generated objects will be in {$PROJECT_DIR}\obj folder.
OpenSSL* libraries:
The following process describes how to build the OpenSSL libraries for Android on x86.
Prerequisites
a) A host PC running Windows 7 or later.
b) Since the OpenSSL libraries were developed in native C language, the primary
prerequisite for compilation is the Android NDK, which has the built-in support
for cross-compiling the libraries for specific architectures (ARM, x86, etc.).
Android OpenSSL source can be downloaded from either the eighthave project or
the guardian project on github.

Building for x86:
Cross-platform settings can be made as you would any other Android application using the
Application Binary Interface settings.
The following line should be added to the jni/Application.mk file to build the libraries for x86
architecture.
APP_ABI := x86
Once you have the NDK installed and the Android OpenSSL downloaded and unzipped in to a
local disk drive (for example, C:\openssl-android-master), follow the instructions below to build
the libraries for x86:
1. Open the command prompt (Start->All Programs->Accessories->Command Prompt).
2. Move to the OpenSSL Android folder that you downloaded and unzipped,
for example, >cd C:\openssl-android-master.
3. Be sure to set the required configuration settings for x86, for example, APP_ABI := x86.
4. Issue the NDK build command, for example, C:\openssl-android-master > ndk-build.
This will build the libssl, libcrypto, openssl libraries.
The libraries generated can be found at the following location:
C:\openssl-android-master\libs\x86\libcrypto.so
C:\openssl-android-master\libs\x86\libssl.so
About the Author
Praveen Kundurthy works in the Intel® Software and Services Group. He has a Master’s degree in
Computer Engineering. His main interests are mobile technologies, Windows, and game development.
Related Articles and Resources
Development and Optimization for NDK-based Android Game Application on Platforms based on
Intel® Architecture
How to Use the Intel® Hardware Accelerated Execution Manager (Intel® HAXM) Android* Emulator
with Google APIs
Development and Optimization for NDK-based Android Game Application on Platforms based on
Intel® Architecture
Deploying Apps to Google Play*

Notices
No license (express or implied, by estoppel or otherwise) to any intellectual property rights is granted by
this document.
Intel disclaims all express and implied warranties, including without limitation, the implied warranties of
merchantability, fitness for a particular purpose, and non-infringement, as well as any warranty arising
from course of performance, course of dealing, or usage in trade.
This document contains information on products, services and/or processes in development. All
information provided here is subject to change without notice. Contact your Intel representative to
obtain the latest forecast, schedule, specifications and roadmaps.
The products and services described may contain defects or errors known as errata which may cause
deviations from published specifications. Current characterized errata are available on request.
Copies of documents which have an order number and are referenced in this document may be
obtained by calling 1-800-548-4725 or by visiting www.intel.com/design/literature.htm.
Intel and the Intel logo are trademarks of Intel Corporation in the U.S. and/or other countries.
*Other names and brands may be claimed as the property of others
© 2015 Intel Corporation.