How to Make Awesome Tabletop Trees
26
How To Make Awesome Tabletop Trees! July 3, 2014 in Featured , Painting & Hobby , Terrain by crew Building trees that are durable and look good for the miniature gaming table is a difficult task. The internet is full of ideas, tutorials, You-Tube videos, and is a great source of inspiration. Most tree-making tutorials are for the railroad modeller. They look great, but are too delicate or detailed. Miniature gamers need terrain that is modular, durable, and cost effective. The following is a tutorial that combines many elements of terrain building to create trees fantastic that will last many battles. I’ve been building terrain for nearly three decades and was an outrider for Games Workshop in the ‘90s. I’m building the following trees for a new convention in Anchorage, Alaska called “AK Battle Brothers”. My goal was to start off building a b atch of eighty (80) trees – plenty for two forest boards or many scattered forest tiles across multiple boards. The Trunks This current tree project is the result of many ex periments with wires, real branches, foam, commercial tree kits and many other ideas. But they were all too complex, too time consuming or expensive. Recently I thought about the hedges built out of scrubbing pads many years ago. Then I thought of a tree with branches, and the idea of stacking scrubbing pads on top of each other came to mind, all cut to different sizes and shapes. But cutting up the wives scrubbing pads
-
Upload
hamsterglue -
Category
Documents
-
view
220 -
download
0
Transcript of How to Make Awesome Tabletop Trees
8/10/2019 How to Make Awesome Tabletop Trees
http://slidepdf.com/reader/full/how-to-make-awesome-tabletop-trees 1/26
How To Make Awesome Tabletop Trees!
July 3, 2014 in Featured , Painting & Hobby , Terrain by crew
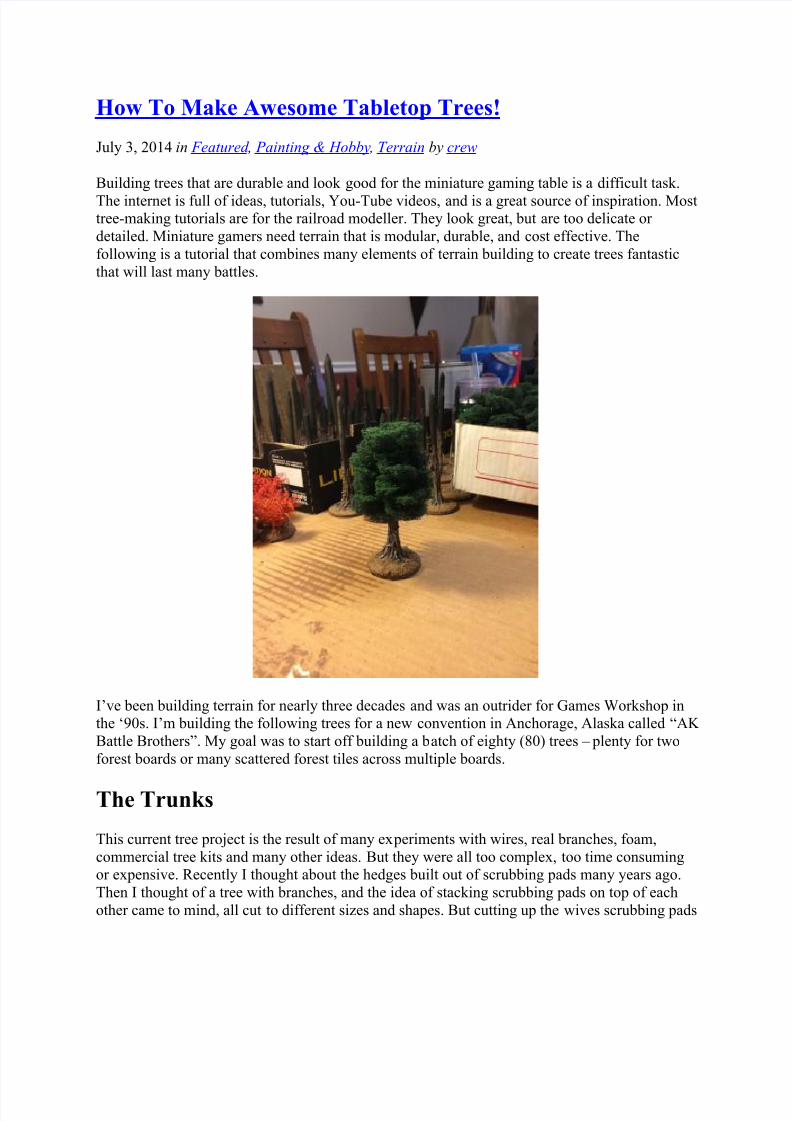
Building trees that are durable and look good for the miniature gaming table is a difficult task.
The internet is full of ideas, tutorials, You-Tube videos, and is a great source of inspiration. Mosttree-making tutorials are for the railroad modeller. They look great, but are too delicate or
detailed. Miniature gamers need terrain that is modular, durable, and cost effective. The
following is a tutorial that combines many elements of terrain building to create trees fantastic
that will last many battles.
I’ve been building terrain for nearly three decades and was an outrider for Games Workshop inthe ‘90s. I’m building the following trees for a new convention in Anchorage, Alaska called “AK
Battle Brothers”. My goal was to start off building a batch of eighty (80) trees – plenty for two
forest boards or many scattered forest tiles across multiple boards.
The Trunks
This current tree project is the result of many experiments with wires, real branches, foam,
commercial tree kits and many other ideas. But they were all too complex, too time consumingor expensive. Recently I thought about the hedges built out of scrubbing pads many years ago.
Then I thought of a tree with branches, and the idea of stacking scrubbing pads on top of each
other came to mind, all cut to different sizes and shapes. But cutting up the wives scrubbing pads

8/10/2019 How to Make Awesome Tabletop Trees
http://slidepdf.com/reader/full/how-to-make-awesome-tabletop-trees 2/26
under the kitchen sink was not an option. So I looked elsewhere and eventually found a great
replacement medium – disposable furnace filters!
The tree trunks and the base was a simple solution – wooden dowels of various sizes cut to
different lengths and metal fender washers for the base to stabilize the tree. The sizes I chose for
these trees are for 28mm gaming, but the same concept can easily be scaled to 15mm or otherscales. For the tree sizes I chose 5”, 6” 7” and 8” tree trunks. The 5”-6” trunks are ¼” diameter
dowels, and the 7”-8” trunks are 3/8” diameter dowels. I shaped the top to a point to make it
easier to push the filter material on the trunk. Here are some of the materials I gathered for this project.

8/10/2019 How to Make Awesome Tabletop Trees
http://slidepdf.com/reader/full/how-to-make-awesome-tabletop-trees 3/26
The sticky foam serves many functions (sticky felt should work too, or any material for that
matter). For one, the sticky foam is easy to mount on the washers. If they don’t quite fit, just letthem hang over the edge a bit, cut them out and move them to another area to cover the rest of
the washer.

8/10/2019 How to Make Awesome Tabletop Trees
http://slidepdf.com/reader/full/how-to-make-awesome-tabletop-trees 4/26
Shown here is a picture of the wooden dowels. I wrapped them in a bundle with tape spacedalong the length, and cut out a handful at a time with a hobby saw. Sharpening them was a chore
– the electric pencil sharpener I used burned up in the process. An exacto knife worked easy
enough.

8/10/2019 How to Make Awesome Tabletop Trees
http://slidepdf.com/reader/full/how-to-make-awesome-tabletop-trees 5/26
To mount the trunks, press them on the sticky foam in the centre of the washer. That’s the second
function of the sticky pads. Then I spooned a thick mixture of sand and yellow wood glue intothe hole and around the tree trunk.
8/10/2019 How to Make Awesome Tabletop Trees
http://slidepdf.com/reader/full/how-to-make-awesome-tabletop-trees 6/26
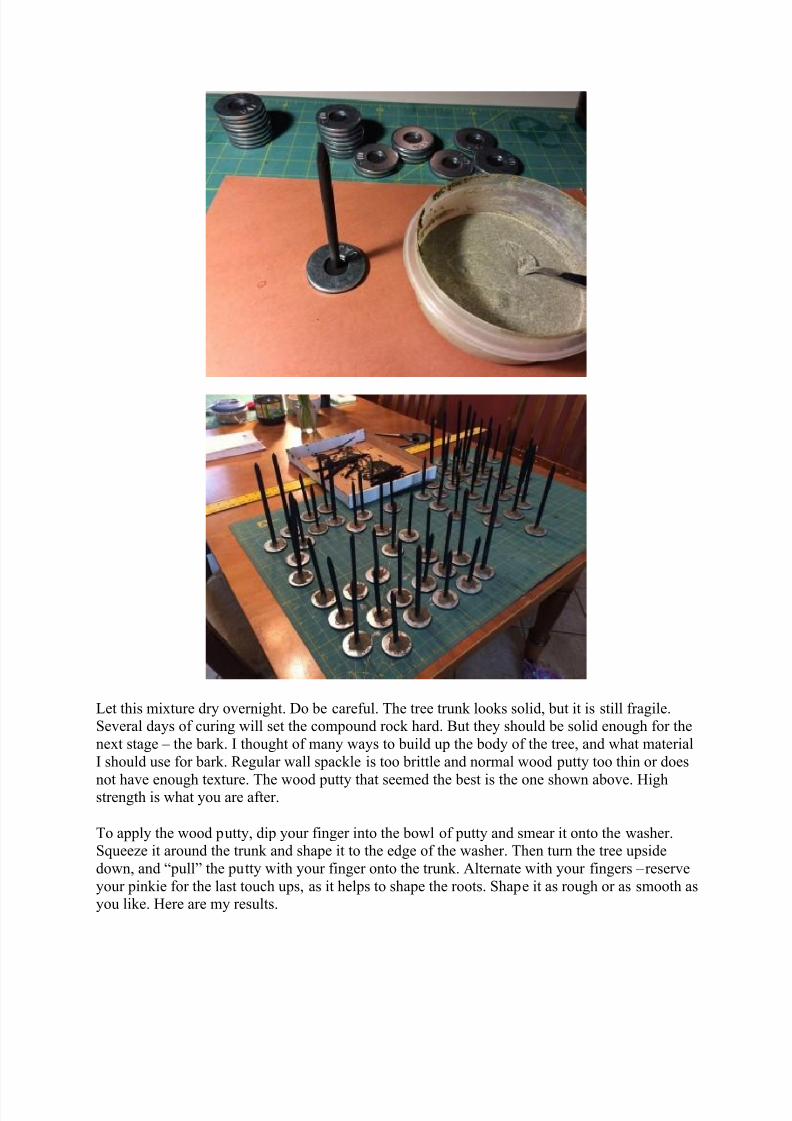
Let this mixture dry overnight. Do be careful. The tree trunk looks solid, but it is still fragile.Several days of curing will set the compound rock hard. But they should be solid enough for the
next stage – the bark. I thought of many ways to build up the body of the tree, and what material
I should use for bark. Regular wall spackle is too brittle and normal wood putty too thin or does
not have enough texture. The wood putty that seemed the best is the one shown above. Highstrength is what you are after.
To apply the wood putty, dip your finger into the bowl of putty and smear it onto the washer.Squeeze it around the trunk and shape it to the edge of the washer. Then turn the tree upside
down, and “pull” the putty with your finger onto the trunk. Alternate with your fingers – reserve
your pinkie for the last touch ups, as it helps to shape the roots. Shape it as rough or as smooth asyou like. Here are my results.

8/10/2019 How to Make Awesome Tabletop Trees
http://slidepdf.com/reader/full/how-to-make-awesome-tabletop-trees 7/26
8/10/2019 How to Make Awesome Tabletop Trees
http://slidepdf.com/reader/full/how-to-make-awesome-tabletop-trees 8/26
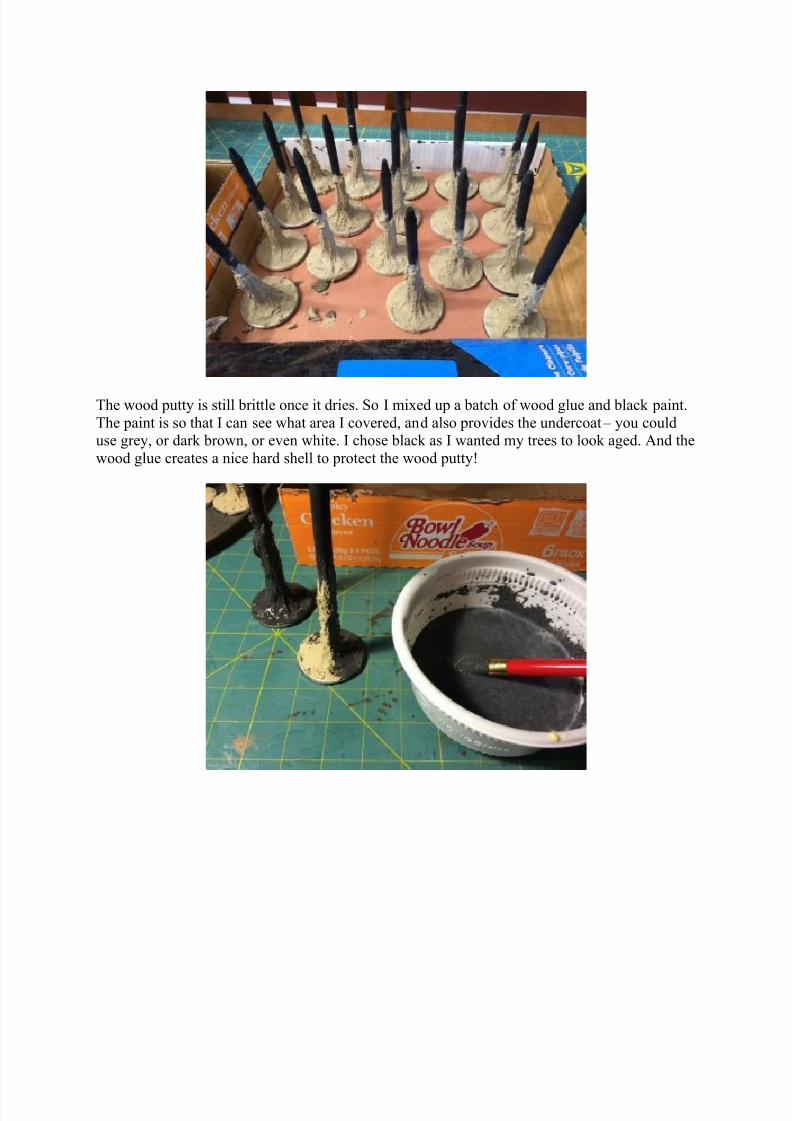
The wood putty is still brittle once it dries. So I mixed up a batch of wood glue and black paint.
The paint is so that I can see what area I covered, and also provides the undercoat – you coulduse grey, or dark brown, or even white. I chose black as I wanted my trees to look aged. And the
wood glue creates a nice hard shell to protect the wood putty!

8/10/2019 How to Make Awesome Tabletop Trees
http://slidepdf.com/reader/full/how-to-make-awesome-tabletop-trees 9/26

8/10/2019 How to Make Awesome Tabletop Trees
http://slidepdf.com/reader/full/how-to-make-awesome-tabletop-trees 10/26
Next I sanded the base – you can use the same black paint and glue mixture. I used playground
sand. I used to scavenge this in the dead of night from the neighbourhood playgrounds. But that
requires washing, sifting and you find all sorts of things like glass in your sand. This time aroundI chose to just buy a bag of sand at the hardware store. Easy to acquire, it’s clean sand, and
contains no sharp glass (speaking from experience here).

8/10/2019 How to Make Awesome Tabletop Trees
http://slidepdf.com/reader/full/how-to-make-awesome-tabletop-trees 11/26
Then paint and dry brush your sand. Shown here is a new batch of paint I use for all the otherterrain I’m building. A smaller paint jar will be fine if you only build one table of terrain. I feel
it’s important to match all your terrain as best you can, and paint is the easiest way to ensure that.

8/10/2019 How to Make Awesome Tabletop Trees
http://slidepdf.com/reader/full/how-to-make-awesome-tabletop-trees 12/26
The Foliage
The filter material I chose was about one inch thick, blue plastic fibres. It’s the fibres that youneed. Think of the old Games Workshop hedges. It’s the same concept. To create the shape of
the tree, I decided that the small and medium trees will have a three inch (3”) diameter at the
widest point, and the taller trees four inches (4”) in diameter. As most trees have a round or eggshape to the body, I chose to cut up the filter into one inch, two inch, three inch and four inch
strips and then into squares. I chose to spray paint the material with black first. But you can wait
for that until later if you want. Cut the material into long strips and then into squares and keep
them in separate piles or boxes.

8/10/2019 How to Make Awesome Tabletop Trees
http://slidepdf.com/reader/full/how-to-make-awesome-tabletop-trees 13/26
Then shape each square by rounding the corners and cut V shapes out of the sides. Create
random shapes. Use sharp scissors but be careful. Last night I discovered that bending the
rounded shape and cutting out a chunk at the edge will give you a nice result and quicker thancutting the V shapes. But clover leaf like designs (with 3, 4 or even 5 leaves) worked best for me.
(For the crown of the tree, you want to cut up a one inch square by rounding it, and then shape
this into a dome. Rough up the top a bit. The idea is to glue the bottom flat side of this dome thatis now about ¾”-1” thick on the final layer, pinned over the sharpened point. See more below.)

8/10/2019 How to Make Awesome Tabletop Trees
http://slidepdf.com/reader/full/how-to-make-awesome-tabletop-trees 14/26
After you shape the square, it’s now time to pull it apart. You want to separate the one inch thick
material into two half inch thick layers. Do this by snipping sideways halfway into each of the
clover leaves. Then snip into the centre. Hold the foliage gently on the top and bottom, and peeleach half away – it’s perfectly fine and desirable to pull and get more body out of the fibre
material. This image is the only one I have that shows this concept on a square piece. Tear the
edges as much as you want, and cut up any clean straight lines. A little shaping is all you need.
This process takes several evenings. Alternate working on the tree trunk drying time with foliagework and you can get a lot of work finished inside a week. Let’s talk about flocking real quickly.
Terrain Maker has a huge selection of colours and ground flocking. For these trees I used thedark green powder. But any colours will work. Just start with a dark one. Later I will layer somelighter colours as highlights. Here is a picture of the selection at my local store, Hobbycraft, in
Anchorage, Alaska.

8/10/2019 How to Make Awesome Tabletop Trees
http://slidepdf.com/reader/full/how-to-make-awesome-tabletop-trees 15/26
The next step is to get that flocking to stick to your fibre filter material. Lay them out in an area
where you don’t have to worry about wind and dirt, or leaves blowing on your work. Lay outeach layer of the clover shaped foliage as tight as you can. Then spray it with green – I chose a
nice camouflage green. Just a slight dusting is all you need, if you sprayed the fibres black or
brown. The idea is to create the illusion of depth. And if any green powder rubs off, you won’t
notice it.
And immediately afterwards, spray everything with a good quality spray glue. Do not buy cheapspray glue. Trust me. It’s not worth the hassle. Then sprinkle your flocking material over the
foliage as shown – let it fall like snow from 2 feet up or so. Let this dry overnight. Rinse and
repeat if you feel they are dry enough that evening – I just closed the garage door and turned upthe heater. It takes patience flipping each one of the foliage pieces over.

8/10/2019 How to Make Awesome Tabletop Trees
http://slidepdf.com/reader/full/how-to-make-awesome-tabletop-trees 16/26
Let your foliage dry for a few days. When it does no longer feel spongy and moist, they are
ready for mounting. Gather your trunks and start spearing on the layers. I started with a smalltwo inch (2”) layer or two, to create the smaller bottom branches.
Push them down until you get to the wood putty bark. Tack it down with glue (I used wood glue,which will run down your tree trunk) or hot glue (that’s what I will try next). I might wrap the
trunk below the branches with aluminium foil next time. This will protect the tree trunk from
running glue, and shield the trunk from later spray glue.
Layer the three inch (3”) clover leaf designs in a random fashion for the bulk of the foliage, and
try to layer a branch over a gap below – when you near the top of the tree, use small 2” patchesto give the tree a nice shape. Cut a hole in the centre with the exacto blade to make it easier tomount them on the wooden dowel trunk.
8/10/2019 How to Make Awesome Tabletop Trees
http://slidepdf.com/reader/full/how-to-make-awesome-tabletop-trees 17/26
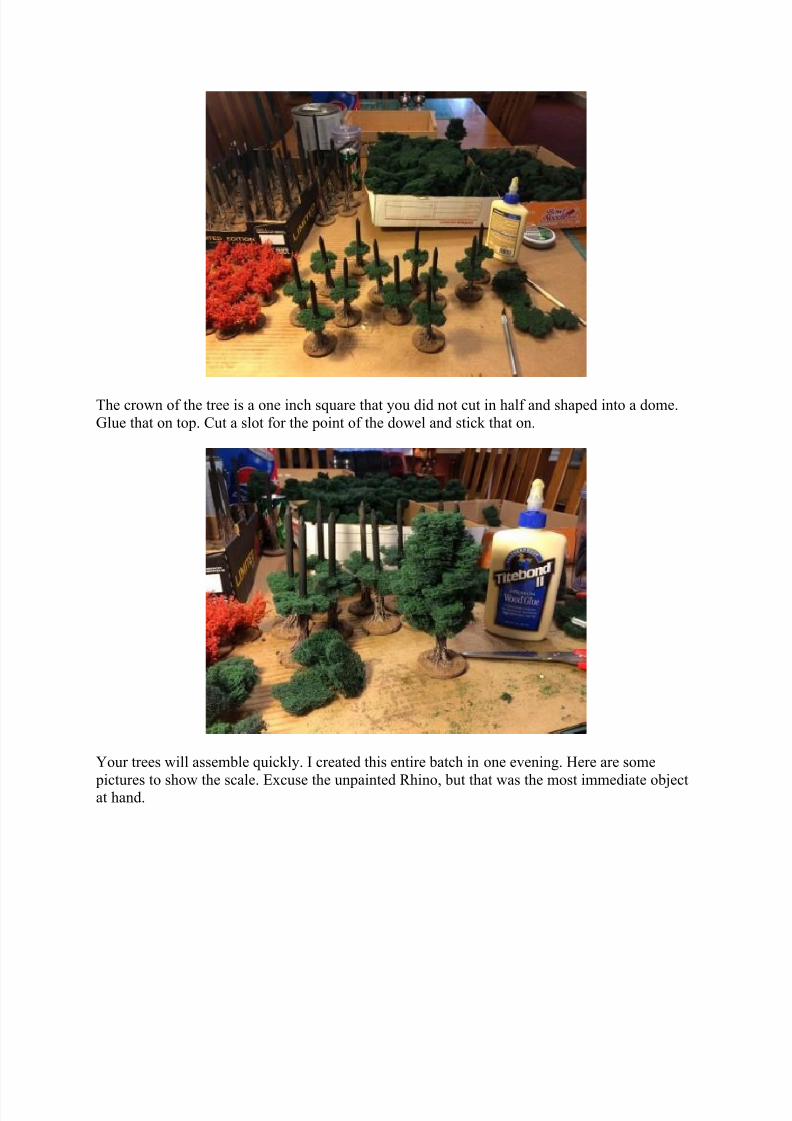
The crown of the tree is a one inch square that you did not cut in half and shaped into a dome.
Glue that on top. Cut a slot for the point of the dowel and stick that on.
Your trees will assemble quickly. I created this entire batch in one evening. Here are some
pictures to show the scale. Excuse the unpainted Rhino, but that was the most immediate objectat hand.

8/10/2019 How to Make Awesome Tabletop Trees
http://slidepdf.com/reader/full/how-to-make-awesome-tabletop-trees 18/26
Some foot sloggers – once again, ancient miniatures from the glory days of Games Workshop
gaming, hence the light green bases.
I placed the trees on their side so that the glue stops running down the trunks. It made a bit of a
mess, but it stopped once they lay sideways. The picture also serves to show you a scale. Theseare 1” squares (25mm) on the mat.

8/10/2019 How to Make Awesome Tabletop Trees
http://slidepdf.com/reader/full/how-to-make-awesome-tabletop-trees 19/26
By creating slightly larger and smaller trees, and even some leaning, you get a nice realistic look
and feel to your forest. Shown here are the tall 8” trunks which I have yet to work on.
Using two filters of about 32”x20” I managed to build all these trees. I have to buy more material
for the rest of the trees.

8/10/2019 How to Make Awesome Tabletop Trees
http://slidepdf.com/reader/full/how-to-make-awesome-tabletop-trees 20/26
The next step is to cover the trunks with foil, then spray the trees with spray glue and more green
flocking to cover the sides. Then flock several light layers of lighter coloured powder to simulate
light on the upper branches and leaves. I’ll probably just set them all side by side for the finallayer, spray the glue over the top and dust them lightly from up high.
My next project is to try Pine Trees. I saw a video on You-Tube where a guy used a drill and a
sanding disk to shape his pine trees. I might try that, and run the wood putty all the way up the
trunk, a bit lighter and not so thick. Then shape the filter material into star shapes, and let a lot ofgaps show the trunk. That requires finishing the foliage beforehand. We will see…perhaps that
will be another article.
Thomas Hoellering
If you would like to write an article for us at Beasts of War then please get in contact at
[email protected] and we’ll help you get started!

8/10/2019 How to Make Awesome Tabletop Trees
http://slidepdf.com/reader/full/how-to-make-awesome-tabletop-trees 21/26
"If you swish the brush across the trunk sideways you will get horizontal streaks and that looks terrible. Experiment -
take your time!"
"Do not buy cheap spray glue. Trust me. It’s not worth the
hassle..."
19 Comments
1.
abstractalien 271p said: On July 3, 2014
Damn, those look fantastic! Really impressed.
Log in to Reply

8/10/2019 How to Make Awesome Tabletop Trees
http://slidepdf.com/reader/full/how-to-make-awesome-tabletop-trees 22/26
2.
hairystef 3p said: On July 3, 2014
Great tutorial Tom, well adapted from your FB post. Kudos!
Log in to Reply
3.
barretem30 176p said: On July 3, 2014
Thanks, those look awesome. Its another great technique to have in the terrain toolbox.
Here is another technique I saw not to long ago thats really easy and has a great effect if
anyone is interested.
https://www.youtube.com/watch?v=ntmEP46g40Q&list=UU9Eaq7e8PGCtWTAS4EHCWVA&index=8
Rubbishinrubbishout has lots of good terrain advice and tutorials
Log in to Reply
4.
dyscordya said: On July 3, 2014
Very nice!
Log in to Reply
5.
brydeemer 3p said: On July 3, 2014
Awesome tutorial. Thank you so much!
Log in to Reply

8/10/2019 How to Make Awesome Tabletop Trees
http://slidepdf.com/reader/full/how-to-make-awesome-tabletop-trees 23/26
6.
ghostbear 125p said: On July 3, 2014
Having a mixture of these and the BoW trees would be great on a table.
Log in to Reply
7.
king 7p said: On July 3, 2014
awesome, I will definitely be doing some
Log in to Reply
8.
lotan2012 68p said: On July 3, 2014
Saw these on the Bolt Action forum on FB, so glad you did an article I can bookmark and
come back to easily. Never ceases to impress me. All this terrain stuff makes me want to
build, despite the fact I have neither the resources nor space for it. For that I both loveand hate all the inspiration terrain stuff……but mostly love.
Log in to Reply
9.
huscarle 1213p said: On July 3, 2014
Great article. Leaves me wondering if you have any other terrain making ideas. Theremust be a lot of techniques other community members use but have not felt the need or
had the platform to share.
Log in to Reply
10.

8/10/2019 How to Make Awesome Tabletop Trees
http://slidepdf.com/reader/full/how-to-make-awesome-tabletop-trees 24/26
dorthonion 470p said: On July 3, 2014
Most ingenious and very effective looking. And the tutorial is very sensibly illustratedwith great photos and lots of text.
Log in to Reply
11.
leadmountain 11p said: On July 3, 2014
Very interesting, had not thought of the stacking with filter material. May give it a go
once I have found some suitable filter material in the UK
Log in to Reply
12.
kirkanos said: On July 4, 2014
Great article and the end result has all the feel of an expensive model tree with the
durability a wargamer needs. Well done.
Log in to Reply
13.
thetrygon 34p said: On July 4, 2014
Nice! Looks great. I notice there are some shrubs next to the finished trees, possibly a
good way to use the scrap material?
Log in to Reply
14.
lamenter40k 11p said: On July 4, 2014
Nice work. I’ll be at Battle Brothers so it will be cool to see your work in person!

8/10/2019 How to Make Awesome Tabletop Trees
http://slidepdf.com/reader/full/how-to-make-awesome-tabletop-trees 25/26
Log in to Reply
15.
greaper 4p said: On July 4, 2014
Very nice work love this!!!!!
Log in to Reply
16.
lukeyboy 3p said: On July 4, 2014
They look awesome! Anyone have a suggestion on material to use for the foliage as
furnace filters don’t seem to be too common
Log in to Reply
o
shinra 20p said: On July 4, 2014
Pond pump filters
Log in to Reply
17.
crispypete 45p said: On July 6, 2014
Thanks Barretem30, I picked up. A cheap broom head with already green fibre bristles
but struggled as my garden wire wasn’t thick enough but after watching the link you
mentioned picked up a 5m length of gutter protector for less than £6 on eBay-even easierso cant wait to give it a try. Also saw a method on te Infinity forums where some uses
golf tees upside down for trunks and just sticks aquarium plant stuff on top, sounds
rubbish but looked really cool.
Log in to Reply

8/10/2019 How to Make Awesome Tabletop Trees
http://slidepdf.com/reader/full/how-to-make-awesome-tabletop-trees 26/26
18.
tomdanna1 1p said: On August 1, 2014
Thank you for the kind reviews and additional ideas you shared. That’s how the scratch
building hobby grows and learns, by sharing what we discover. I like many commercial products and not looking to upset anyone with this guide – but I just really enjoy making
something out of common objects and just have fun with it. I sent Ben a part 2 of this
tutorial which he will be posting soon. Just a few additional pictures of what the treeslook like when completed. When I run my convention thisAugust I will take some
additional pictures to share. Cheers and thank you once again for your review. Thomas
Hoellering – Anchorage, Alaska
Log in to Reply