How to Knit for Beginners - Carleton University to Knit for Beginners Easy ... The Knit Stitch ......
10
How to Knit for Beginners Easy Knitting Instructions to Help you Learn to Knit from the Experts
Transcript of How to Knit for Beginners - Carleton University to Knit for Beginners Easy ... The Knit Stitch ......

How to Knitfor BeginnersEasy Knitting Instructions to Help you Learn to Knit
from the
Experts
Copyright © 2011 Interweave.
2
Dear Beginning Knitter,So you’ve decided you want to learn how to knit! Congratulations; I think you’ve made a great
choice.Knitting is a centuries-old craft, mostly practiced out of necessity; if you wanted socks or a
sweater, you had to knit it yourself.Today knitting is much more of a hobby, although I think it’s an art form, and some might say
it becomes an obsession!When a new knitter looks at all of the yarn and patterns out there, it can seem overwhelming.
But don’t let it get to you—even the most accomplished knitter was once a beginner. It might surprise you to know that there are only two stitches used to make any knitted ob-
ject: the knit stitch and the purl stitch.The knit stitch is a versatile stitch that is one of the building blocks for all knitted items. When
you knit every row, you’re actually knitting a stitch pattern called “garter stitch.” It’s called that because of the inherent lengthwise elasticity that made bands of garter stitch good at keeping stockings up.
When you add the purl stitch, your knitting options open up even more! Knitting one row and then purling the next row creates the imminently versatile stockinette stitch, used in so many knitting patterns.
We’re going to go through the process of knitting the knit stitch and the purl stitch step by step, and we’ll also cover things you need to know before you start knitting, and several impor-tant techniques (such as how to start your knitting and how to end it!).
At the end of this eBook, you’ll find a pattern for a garter stitch wash cloth, a garter stitch scarf, and a ribbed scarf. You'll be able to knit all three of these patterns after a bit of practice swatching!
Here’s to knitting!
Cheers,
ContentsBefore You Start..........................................................................................................................................................2Casting On .........................................................................................................................................................................4The Knit Stitch .............................................................................................................................................................5The Purl Stitch..............................................................................................................................................................6Binding Off .......................................................................................................................................................................7Joining New Yarn ...................................................................................................................................................7OOPS! Fixing Common Mistakes ............................................................................................................7Your First Projects .................................................................................................................................................8Recommended Reading ..................................................................................................................................9Credits ..........................................................................................................................................................................10
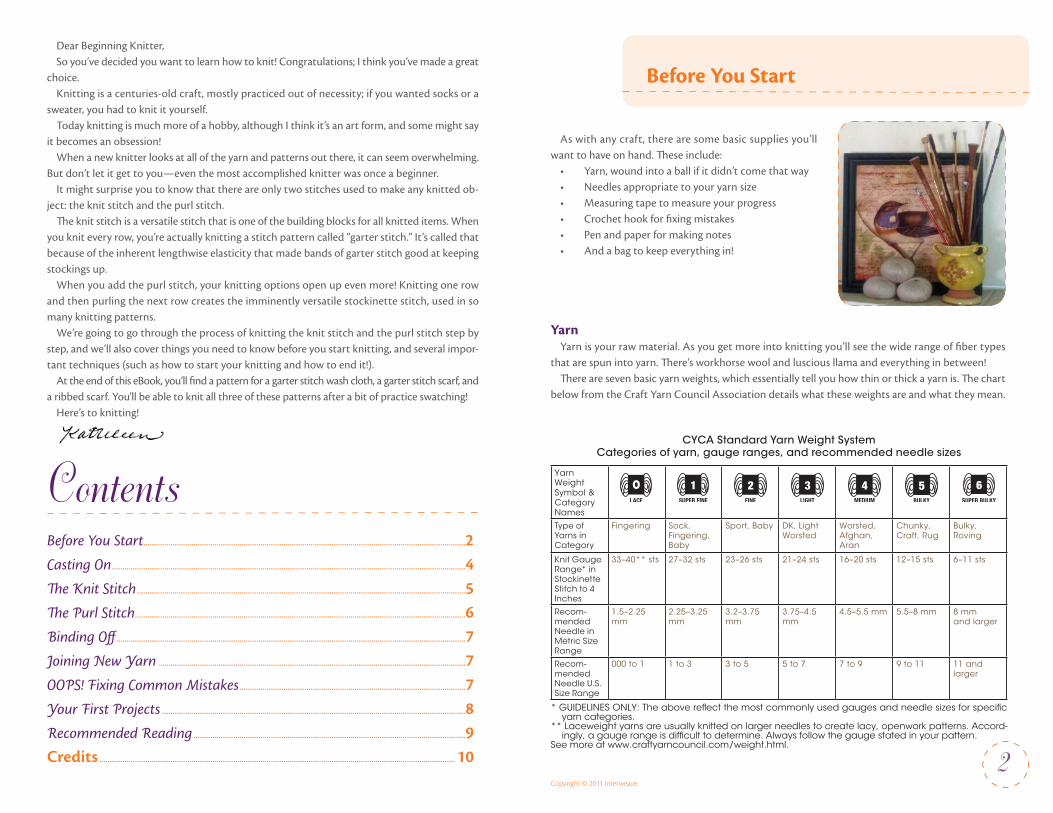
As with any craft, there are some basic supplies you’ll want to have on hand. These include:• Yarn, wound into a ball if it didn’t come that way• Needles appropriate to your yarn size• Measuring tape to measure your progress• Crochet hook for fixing mistakes• Pen and paper for making notes• And a bag to keep everything in!
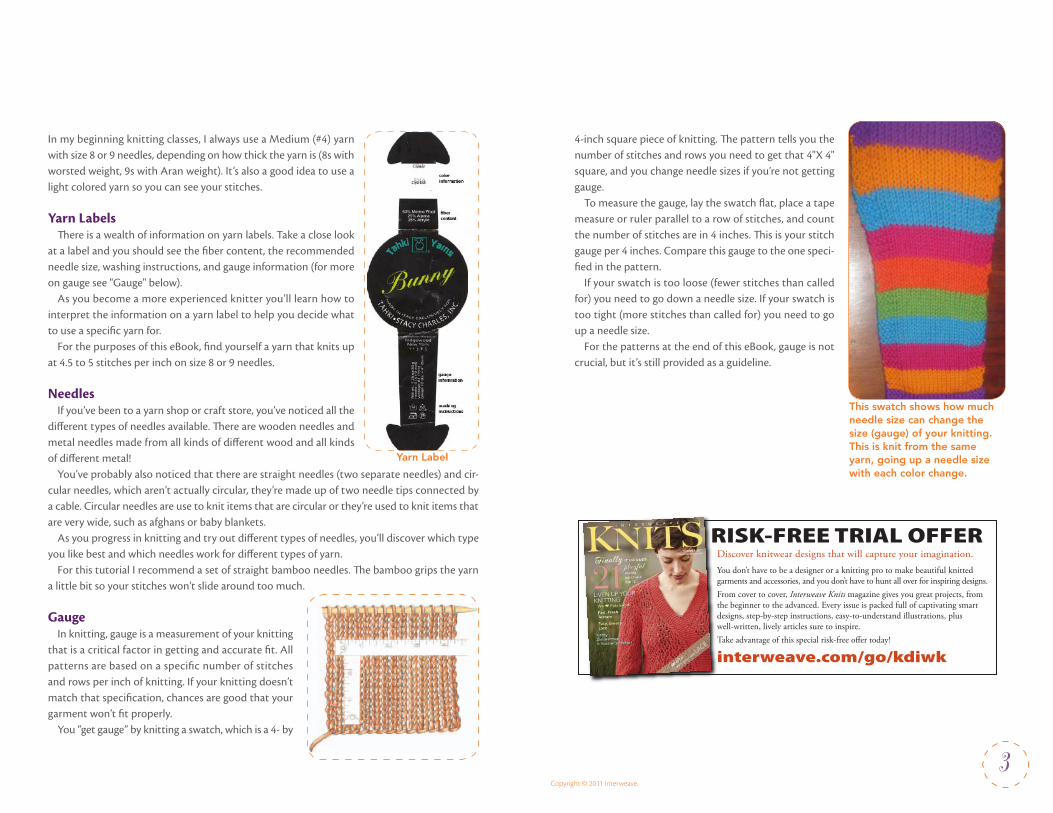
YarnYarn is your raw material. As you get more into knitting you’ll see the wide range of fiber types
that are spun into yarn. There’s workhorse wool and luscious llama and everything in between!There are seven basic yarn weights, which essentially tell you how thin or thick a yarn is. The chart
below from the Craft Yarn Council Association details what these weights are and what they mean.
Before You Start
Yarn WeightSymbol &CategoryNames
Type ofYarns inCategory
Fingering Sock, Fingering, Baby
Sport, Baby DK, Light Worsted
Worsted, Afghan, Aran
Chunky, Craft, Rug
Bulky,Roving
Knit GaugeRange* inStockinetteStitch to 4 Inches
33–40** sts 27–32 sts 23–26 sts 21–24 sts 16–20 sts 12–15 sts 6–11 sts
Recom-mendedNeedle inMetric SizeRange
1.5–2.25 mm
2.25–3.25 mm
3.2–3.75 mm
3.75–4.5 mm
4.5–5.5 mm 5.5–8 mm 8 mmand larger
Recom-mendedNeedle U.S.Size Range
000 to 1 1 to 3 3 to 5 5 to 7 7 to 9 9 to 11 11 andlarger
CYCA Standard Yarn Weight SystemCategories of yarn, gauge ranges, and recommended needle sizes
* GUIDELINES ONLY: The above reflect the most commonly used gauges and needle sizes for specific yarn categories.
** Laceweight yarns are usually knitted on larger needles to create lacy, openwork patterns. Accord-ingly, a gauge range is difficult to determine. Always follow the gauge stated in your pattern.
See more at www.craftyarncouncil.com/weight.html.
Copyright © 2011 Interweave.
3
In my beginning knitting classes, I always use a Medium (#4) yarn with size 8 or 9 needles, depending on how thick the yarn is (8s with worsted weight, 9s with Aran weight). It’s also a good idea to use a light colored yarn so you can see your stitches.
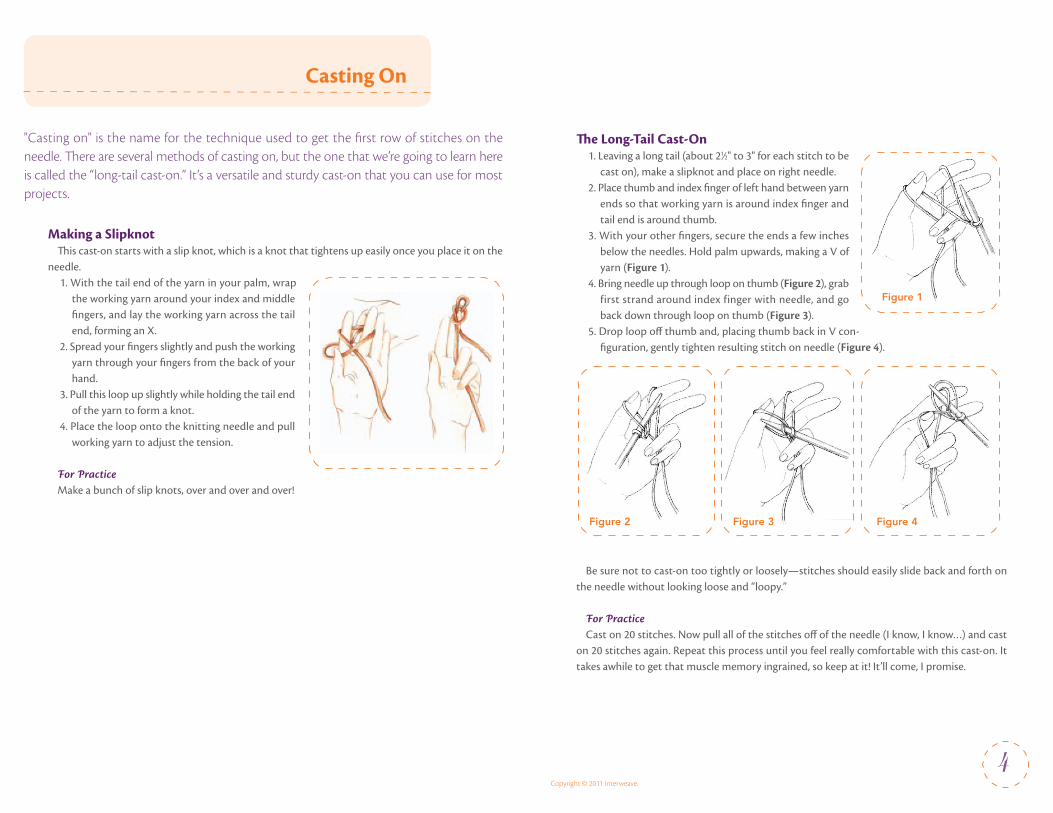
Yarn LabelsThere is a wealth of information on yarn labels. Take a close look
at a label and you should see the fiber content, the recommended needle size, washing instructions, and gauge information (for more on gauge see "Gauge" below).
As you become a more experienced knitter you’ll learn how to interpret the information on a yarn label to help you decide what to use a specific yarn for.
For the purposes of this eBook, find yourself a yarn that knits up at 4.5 to 5 stitches per inch on size 8 or 9 needles.
NeedlesIf you’ve been to a yarn shop or craft store, you’ve noticed all the
different types of needles available. There are wooden needles and metal needles made from all kinds of different wood and all kinds of different metal!
You’ve probably also noticed that there are straight needles (two separate needles) and cir-cular needles, which aren’t actually circular, they’re made up of two needle tips connected by a cable. Circular needles are use to knit items that are circular or they’re used to knit items that are very wide, such as afghans or baby blankets.
As you progress in knitting and try out different types of needles, you’ll discover which type you like best and which needles work for different types of yarn.
For this tutorial I recommend a set of straight bamboo needles. The bamboo grips the yarn a little bit so your stitches won’t slide around too much.
GaugeIn knitting, gauge is a measurement of your knitting
that is a critical factor in getting and accurate fit. All patterns are based on a specific number of stitches and rows per inch of knitting. If your knitting doesn’t match that specification, chances are good that your garment won’t fit properly.
You “get gauge” by knitting a swatch, which is a 4- by
4-inch square piece of knitting. The pattern tells you the number of stitches and rows you need to get that 4"X 4" square, and you change needle sizes if you’re not getting gauge.
To measure the gauge, lay the swatch flat, place a tape measure or ruler parallel to a row of stitches, and count the number of stitches are in 4 inches. This is your stitch gauge per 4 inches. Compare this gauge to the one speci-fied in the pattern.
If your swatch is too loose (fewer stitches than called for) you need to go down a needle size. If your swatch is too tight (more stitches than called for) you need to go up a needle size.
For the patterns at the end of this eBook, gauge is not crucial, but it’s still provided as a guideline.
RISK-FREE TRIAL OFFERDiscover knitwear designs that will capture your imagination. You don’t have to be a designer or a knitting pro to make beautiful knitted garments and accessories, and you don’t have to hunt all over for inspiring designs.From cover to cover, Interweave Knits magazine gives you great projects, from the beginner to the advanced. Every issue is packed full of captivating smart designs, step-by-step instructions, easy-to-understand illustrations, plus well-written, lively articles sure to inspire.Take advantage of this special risk-free o�er today!
interweave.com/go/kdiwk
Yarn Label
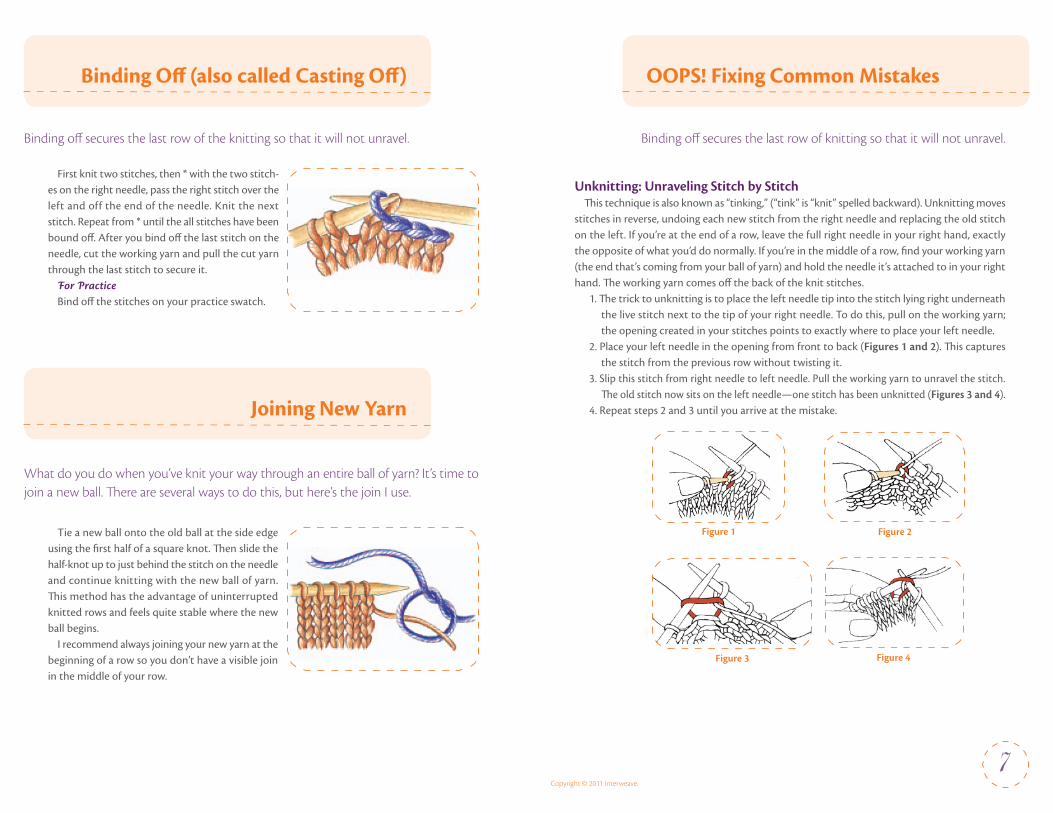
This swatch shows how much needle size can change the size (gauge) of your knitting. This is knit from the same yarn, going up a needle size with each color change.
Copyright © 2011 Interweave.
4
"Casting on" is the name for the technique used to get the first row of stitches on the needle. There are several methods of casting on, but the one that we’re going to learn here is called the “long-tail cast-on.” It’s a versatile and sturdy cast-on that you can use for most projects.
Making a SlipknotThis cast-on starts with a slip knot, which is a knot that tightens up easily once you place it on the
needle.1. With the tail end of the yarn in your palm, wrap
the working yarn around your index and middle fingers, and lay the working yarn across the tail end, forming an X.
2. Spread your fingers slightly and push the working yarn through your fingers from the back of your hand.
3. Pull this loop up slightly while holding the tail end of the yarn to form a knot.
4. Place the loop onto the knitting needle and pull working yarn to adjust the tension.
For PracticeMake a bunch of slip knots, over and over and over!
Casting On
The Long-Tail Cast-On1. Leaving a long tail (about 21⁄2" to 3" for each stitch to be
cast on), make a slipknot and place on right needle. 2. Place thumb and index finger of left hand between yarn
ends so that working yarn is around index finger and tail end is around thumb.
3. With your other fingers, secure the ends a few inches below the needles. Hold palm upwards, making a V of yarn (Figure 1).
4. Bring needle up through loop on thumb (Figure 2), grab first strand around index finger with needle, and go back down through loop on thumb (Figure 3).
5. Drop loop off thumb and, placing thumb back in V con-figuration, gently tighten resulting stitch on needle (Figure 4).
Be sure not to cast-on too tightly or loosely—stitches should easily slide back and forth on the needle without looking loose and “loopy.”
For PracticeCast on 20 stitches. Now pull all of the stitches off of the needle (I know, I know…) and cast
on 20 stitches again. Repeat this process until you feel really comfortable with this cast-on. It takes awhile to get that muscle memory ingrained, so keep at it! It’ll come, I promise.
Figure 1
Figure 2 Figure 3 Figure 4

Copyright © 2011 Interweave.
5
One of the objects of the knitting game is to move stitches from your left-hand needle to your right-hand needle, making new rows of stitches in the process.
Let's get started!1. Cast on 20 stitches.2. Hold the needle with the cast-on stitches in your left hand, the empty needle in your right
hand. Hold the needles a few inches from the tips, between your thumb and first couple of fingers.
3. With the working yarn in back of the needle, insert the right needle into the front of the first stitch (the one closest to the tip) from left to right (Figure 1).
4. Now with your right index finger, bring the yarn between the needles from back to front. (Figure 2).
5. With your right hand, pull the right needle—which now has a loop of yarn around it—toward you and through the stitch (Figure 3).
You now have a stitch on the right needle. All you need to do to finish the stitch is to slip the old stitch off the left needle. Tug gently on the working yarn to secure the new stitch.
Repeat this process through the end of the row! When you have knitted every stitch on the row, you will have an empty needle in your left hand. Swap needles so that the “full” needle is in your left hand and the empty one is in your right hand, and do it all over again!
Figure 3
Figure 1 Figure 2
The Continental MethodThere are several ways to accomplish the knit stitch; the two most popular are the English
method (also called “throwing”) and the Continental method (also called “picking”). The infor-mation at left pertains to the English method, in which the working yarn is held in the right hand. In the Continental method, the yarn is held in the left hand. Practice both methods to see which feels best to you. There’s no right or wrong way to knit—well, I suppose there is a right way: whichever works best for you!
To use the Continental method of knitting, follow the steps below.1. With the working yarn under and in the back of the needle, place the tip of your right
needle between the front and back legs of the first stitch on the left needle (Figure 1). The tip of the needle should point away from you.
2 . Wr ap the yarn counterclockwise around the right needle (the one y o u j u s t p u t through the stitch (Figure 2).
3 . Pu l l the r ig ht needle back just enough to s l ip underneath the lef t needle and p u l l t h e y a r n a l o n g w i t h i t , through the stitch on the left needle (Figure 3).
4. Slip the stitch off the left needle (Figure 4). You just created a new stitch!For PracticeMake a practice swatch—just keep knitting rows! If you make a mistake, keep going. You
aren’t making anything but practice knitting, so you can ignore mistakes if you want to. If you want to correct them, though, please see the OOPS tion on page 6.
The Knit Stitch
Figure 3
Figure 2
Figure 4
Figure 1
Right-Leg RuleEvery stitch has a front and a back leg. Each stitch
should sit on the needle with its right leg in front of the needle. Think “right leg forward.” If you knit a stitch with its left leg perched in front of the needle, the stitch will be twisted. Right Leg Forward

Copyright © 2011 Interweave.
6
Identifying the Working YarnThe working yarn, the yarn that runs from
your needle to the ball, is attached to the last stitch you made. That last stitch worked should be the stitch closes to the tip of your right needle. "Inevitably, you’ll get interrupted while knitting. When you return to your knitting, simply find the working yarn, make sure you’re holding the needle with the last stitch worked in your right hand, and away you go."
Working yarn
Step 1: As with the knit stitch, start by holding the needle with the stitches in your left hand and the empty needle in your right.
Step 2: Pull the working yarn in front of the needles. Insert the tip of the right needle into the front of the first stitch on the left needle, from right to left (Figure 1).
Step 3: With the yarn in front of the needles, travel around the tip of right needle in a counterclockwise movement, passing between the needles from right to left and back around to the front again (Figure 2).
Step 4: Pull the right needle, with the loop of working yarn around it, down and back (mov-ing away from you) through the stitch on the left needle (Figure 3). Slip the old stitch off the left needle and tighten the new stitch on the right needle. You have your first purl stitch.
Repeat this process through the end of the row. When you have purled every stitch on the row, you will have an empty needle in your left hand. Swap needles so that the “full” needle is in your left hand and the empty one in your right, and you’re ready to begin the next row.
Note: If you purl every row, you also get garter stitch!
Figure 1
Figure 2
Figure 3
The Purl Stitch
Tension“Tensioning” yarn simply refers to how you hold your working yarn. You want to find a
way to hold your yarn so that your stitches come out firm, but not too firm to slide easily along the needle, and look even (no particularly loose stitches and no particularly tight stitches). Figures 1 and 2 show just two ways to hold the yarn; Figure 1 shows tension for the English style of knitting and Figure 2 shows tension for the Continental style.
When you tension yarn, you’re doing two things at once—slowing yarn as it comes off the ball and guiding yarn around the needle. Sounds complicated, but it’s not. Why? Because there’s no wrong way to do it. Once your hand acquires muscle memory of holding tension, you’ll do it without thinking.
One way to tension yarn for the Eng-lish method (Figure 1).
One way to tension yarn for the Con-tinental method (Figure 2).
What doesn't work: Holding the yarn between your your thumb and fore-finger to tension and guide the yarn at the same time. The trouble is that it provides irregular tension because you drop the yarn at each stitch.
Copyright © 2011 Interweave.
First knit two stitches, then * with the two stitch-es on the right needle, pass the right stitch over the left and off the end of the needle. Knit the next stitch. Repeat from * until the all stitches have been bound off. After you bind off the last stitch on the needle, cut the working yarn and pull the cut yarn through the last stitch to secure it.
For PracticeBind off the stitches on your practice swatch.
Tie a new ball onto the old ball at the side edge using the first half of a square knot. Then slide the half-knot up to just behind the stitch on the needle and continue knitting with the new ball of yarn. This method has the advantage of uninterrupted knitted rows and feels quite stable where the new ball begins.
I recommend always joining your new yarn at the beginning of a row so you don’t have a visible join in the middle of your row.
Binding off secures the last row of the knitting so that it will not unravel.
What do you do when you’ve knit your way through an entire ball of yarn? It’s time to join a new ball. There are several ways to do this, but here’s the join I use.
7
Binding Off (also called Casting Off)
Joining New Yarn
OOPS! Fixing Common Mistakes
Unknitting: Unraveling Stitch by StitchThis technique is also known as “tinking,” (“tink” is “knit” spelled backward). Unknitting moves
stitches in reverse, undoing each new stitch from the right needle and replacing the old stitch on the left. If you’re at the end of a row, leave the full right needle in your right hand, exactly the opposite of what you’d do normally. If you’re in the middle of a row, find your working yarn (the end that’s coming from your ball of yarn) and hold the needle it’s attached to in your right hand. The working yarn comes off the back of the knit stitches.
1. The trick to unknitting is to place the left needle tip into the stitch lying right underneath the live stitch next to the tip of your right needle. To do this, pull on the working yarn; the opening created in your stitches points to exactly where to place your left needle.
2. Place your left needle in the opening from front to back (Figures 1 and 2). This captures the stitch from the previous row without twisting it.
3. Slip this stitch from right needle to left needle. Pull the working yarn to unravel the stitch. The old stitch now sits on the left needle—one stitch has been unknitted (Figures 3 and 4).
4. Repeat steps 2 and 3 until you arrive at the mistake.
Binding off secures the last row of knitting so that it will not unravel.
Figure 1
Figure 4
Figure 2
Figure 3

Copyright © 2011 Interweave.
8
Avoiding Extra Stitches When you’re beginning to knit, it’s a good idea
to count your stitches at the end of each row. If you end a row with more stitches than you began with, you’ve probably added some extra stitches. Look for slanted stitches on your needle (See Fig-ure 1). If you see any, you may have accidentally made what’s called a "yarnover".
This happens when you accidentally place the working yarn in the front when making a knit stitch, taking the working yarn over the right needle so that the loop on the needle looks like a stitch.
To fix the accidental yarnover, unknit to the slanted yarnover—there’s your working yarn, on the incorrect side of the work. The yarnover will fall off the needle. Move the working yarn to the back and then finish your row without the extra stitch!
Accidentally Working the First Stitch as Two Stitches
This common problem is a variation of the acci-dental yarnover: the working yarn is thrown over the needle at the end of the row, front to back, in-stead of under the needle. That pulls the first stitch up so that it looks like two stitches (Figure 1).
To fix this mistake, simply unknit to the double stitch and remove it.
Figure 1
Figure 1
OOPS! Fixing Common Mistakes Your First Projects
Project 1: Garter Stitch ScarfThis scarf is both good practice for begin-ning knitters and a stylish accessory! Finished Size: 5" wide and 44" longYarn: CYCA #6, super chunky. Yarn Shown is Misti Alpaca Super Chunky Handpaint (50% cotton, 50% wool, 55yd [50 m]/100 g) SCH04, Oberon, 2 skeins.Needles: Size 11 USGauge: 10 stitches and 18 rows in garter stitch (knit every row) equals 4 inches squareSkill Level: Easy
ScarfCast on 12 stitches.Row 1: Knit.Repeat Row 1 until you have 24 inches of yarn left.Bind off all stitches and sew in ends.Wear with pride!
Project 2: Garter Stitch DishclothYou'll love knitting these dishcloths for yourself and for gifts. This is a fun project for practicing increasing and decreasing stitches. Finished Size: 91⁄2 inches squareYarn: CYCA #3, worsted. Yarn Shown is Lily Sugar’n Cream Solid (100 % cotton 120 yd [110 m]/70 g) 01222, Country GreenNeedles: Size 7 USGauge: 16 to 18 stitches = 4 inchesSkill Level: Easy
Stitch GuideYarn OverBring working yarn to the front and wrap around the needle from front to back.
Copyright © 2011 Interweave.
9
Recommended Reading
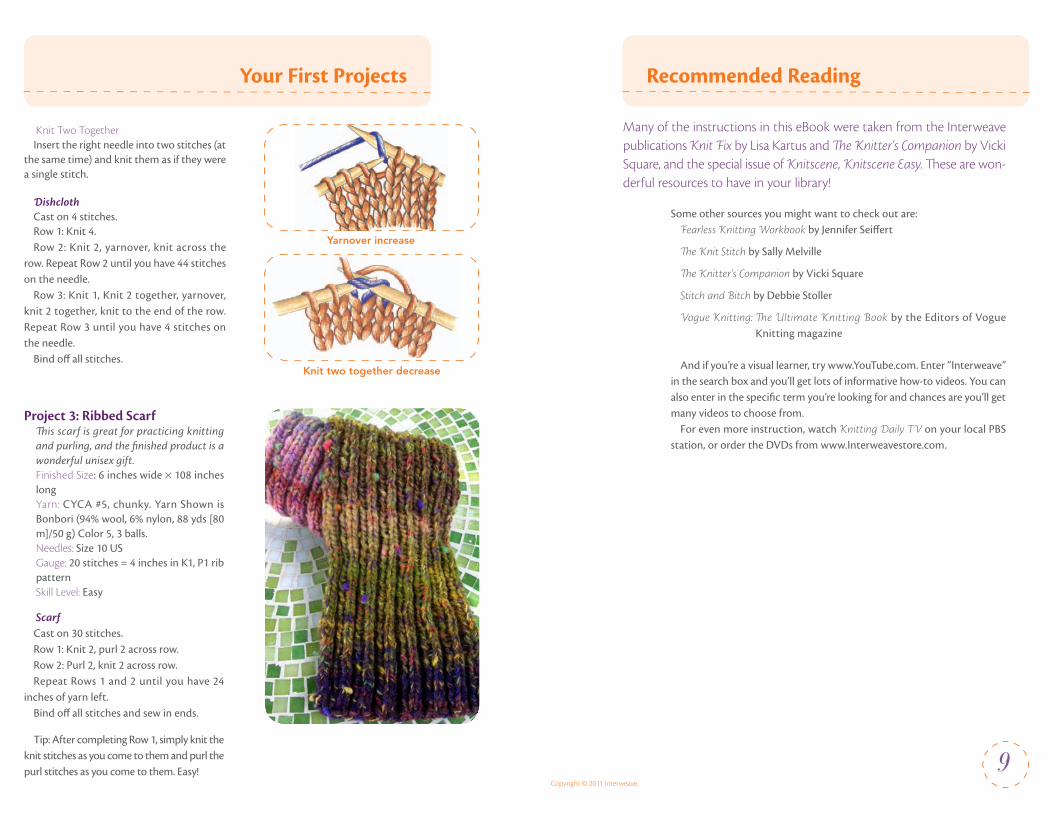
Knit Two TogetherInsert the right needle into two stitches (at
the same time) and knit them as if they were a single stitch.
DishclothCast on 4 stitches.Row 1: Knit 4.Row 2: Knit 2, yarnover, knit across the
row. Repeat Row 2 until you have 44 stitches on the needle.
Row 3: Knit 1, Knit 2 together, yarnover, knit 2 together, knit to the end of the row. Repeat Row 3 until you have 4 stitches on the needle.
Bind off all stitches.
Your First Projects
Some other sources you might want to check out are:Fearless Knitting Workbook by Jennifer Seiffert
The Knit Stitch by Sally Melville
The Knitter's Companion by Vicki Square
Stitch and Bitch by Debbie Stoller
Vogue Knitting: The Ultimate Knitting Book by the Editors of Vogue Knitting magazine
And if you’re a visual learner, try www.YouTube.com. Enter “Interweave” in the search box and you’ll get lots of informative how-to videos. You can also enter in the specific term you’re looking for and chances are you’ll get many videos to choose from.
For even more instruction, watch Knitting Daily TV on your local PBS station, or order the DVDs from www.Interweavestore.com.
Many of the instructions in this eBook were taken from the Interweave publications Knit Fix by Lisa Kartus and The Knitter’s Companion by Vicki Square, and the special issue of Knitscene, Knitscene Easy. These are won-derful resources to have in your library!
Project 3: Ribbed ScarfThis scarf is great for practicing knitting and purling, and the finished product is a wonderful unisex gift. Finished Size: 6 inches wide × 108 inches longYarn: CYCA #5, chunky. Yarn Shown is Bonbori (94% wool, 6% nylon, 88 yds [80 m]/50 g) Color 5, 3 balls.Needles: Size 10 USGauge: 20 stitches = 4 inches in K1, P1 rib patternSkill Level: Easy
ScarfCast on 30 stitches.Row 1: Knit 2, purl 2 across row.Row 2: Purl 2, knit 2 across row.Repeat Rows 1 and 2 until you have 24
inches of yarn left. Bind off all stitches and sew in ends.
Tip: After completing Row 1, simply knit the knit stitches as you come to them and purl the purl stitches as you come to them. Easy!
Yarnover increase
Knit two together decrease

Copyright © 2011 Interweave.
10
Text and Illustrations Copyright 2011 Interweave Press LLCAll rights reserved (unless otherwise noted).The information in this eBook was augmented with text and images from the following Interweave Press publications.
Books:Knit Fix: Problem Solving for Knitters by Lisa Kartus, Interweave 2006The Knitter's Companion, Expanded and Updated by Vicki Square, Interweave 2006
Magazines:Knitscene Easy, Interweave 2010
Credits
• Watch Knitting Daily TV on Public Television.
• Subscribe to knittingdaily.com to receive weekly e-newsletters, free patterns, tips, and much more.
• Find more DVDs and hundreds of patterns at interweavestore.com.
H O W T O K N I T F O r B e G I N N e r S :
e a S Y K N I T T I N G I N S T r u C T I O N S T O
H e L p Y O u L e a r N T O K N I T
T H e K N I T S T I T C H
A Knitting Daily eBook edited by Kathleen Cubley
C r e a T I V e S e r V I C e S
DeSIGNerS Lee ann Short, Janice Tapia
Projects and information are for inspiration and personal use only. Interweave Knits and Knitting Daily do not recommend, approve, or endorse any of the advertisers, products, services, or views advertised in this publication. Nor does Knits or Knitting Daily evaluate the advertisers’ claims in any way. You should, therefore, use your own judgment in evalu ating the advertisers, products, services, and views advertised in Knits or Knitting Daily.
RISK-FREETRIAL OFFER
Discover knitwear designs that will capture your imagination. You don’t have to be a designer or a knitting pro to make beautiful knitted garments and accessories, and you don’t have to hunt all over for inspiring designs.From cover to cover, Interweave Knits magazine gives you great projects, from the beginner to the advanced. Every issue is packed full of captivating smart designs, step-by-step instructions, easy-to-understand illustrations, plus well-written, lively articles sure to inspire.Take advantage of this special risk-free o�er today!
interweave.com/go/kdiwk