How to create customizable, resizable graphics in MS Publisher for print or on the web
7
How to create customizable, resizable graphics in MS Publisher for print or on the web Being able to create your own resizable, customizable graphics in MS Publisher is one of the most useful and fun things I’ve ever done with this program. This is a very basic lesson and in it I’ll show you how to create this graphic that you can resize and use n many ways on the web or in print: What you need to know before this lesson: This is a tutorial on how to create resizable graphics with MS Publisher, a task not often associated with this software. This tutorial is not a basic primer on MS Publisher. It assumes that you know: • How to use MS Publisher • Basic steps to open, create, modify, and save a publication in MS Pub- lisher • How to use text, wordart, and graphics in MS Publisher—all basic tasks If you do not know how to do that, I strongly recommend that you get training from: www.lynda.com—it only costs $25 for a month of unlimited, online training and you can learn Publisher in a day or so from them, plus have the option of learning many more programs. You can also purchase training videos from them for Publisher. They are $49 for MS Publisher 2003 and $99 for MS Pub- lisher 2007. What you can do with what you learn after this lesson: The sky is the limit with what you can do! You can create book covers, custom web headers, banners, side-bar graphics, layered, resizable graphics with photographs like the ones here. Other tutorials on www.effectivechurchcom.com will show you how.
Transcript of How to create customizable, resizable graphics in MS Publisher for print or on the web

How to create customizable, resizable graphics in MS Publisher for print or on the web
Being able to create your own resizable, customizable graphics in MS Publisher is one of the most useful and fun things I’ve ever done with this program. This is a very basic lesson and in it I’ll show you how to create this graphic that you can resize and use n many ways on the web or in print: What you need to know before this lesson: This is a tutorial on how to create resizable graphics with MS Publisher, a task not often associated with this software. This tutorial is not a basic primer on MS Publisher. It assumes that you know: • How to use MS Publisher • Basic steps to open, create, modify, and save a publication in MS Pub-
lisher • How to use text, wordart, and graphics in MS Publisher—all basic tasks If you do not know how to do that, I strongly recommend that you get training from: www.lynda.com—it only costs $25 for a month of unlimited, online training and you can learn Publisher in a day or so from them, plus have the option of learning many more programs. You can also purchase training videos from them for Publisher. They are $49 for MS Publisher 2003 and $99 for MS Pub-lisher 2007. What you can do with what you learn after this lesson: The sky is the limit with what you can do! You can create book covers, custom web headers, banners, side-bar graphics, layered, resizable graphics with photographs like the ones here. Other tutorials on www.effectivechurchcom.com will show you how.

1. Open Publisher 2. Select Blank Publications
3. Select Business Card, though it really doesn’t matter what you select because you can resize it however you want later.
4. Add clipart and text. Clipart was from MS Publisher clipart gallery. Text is New Times Roman.
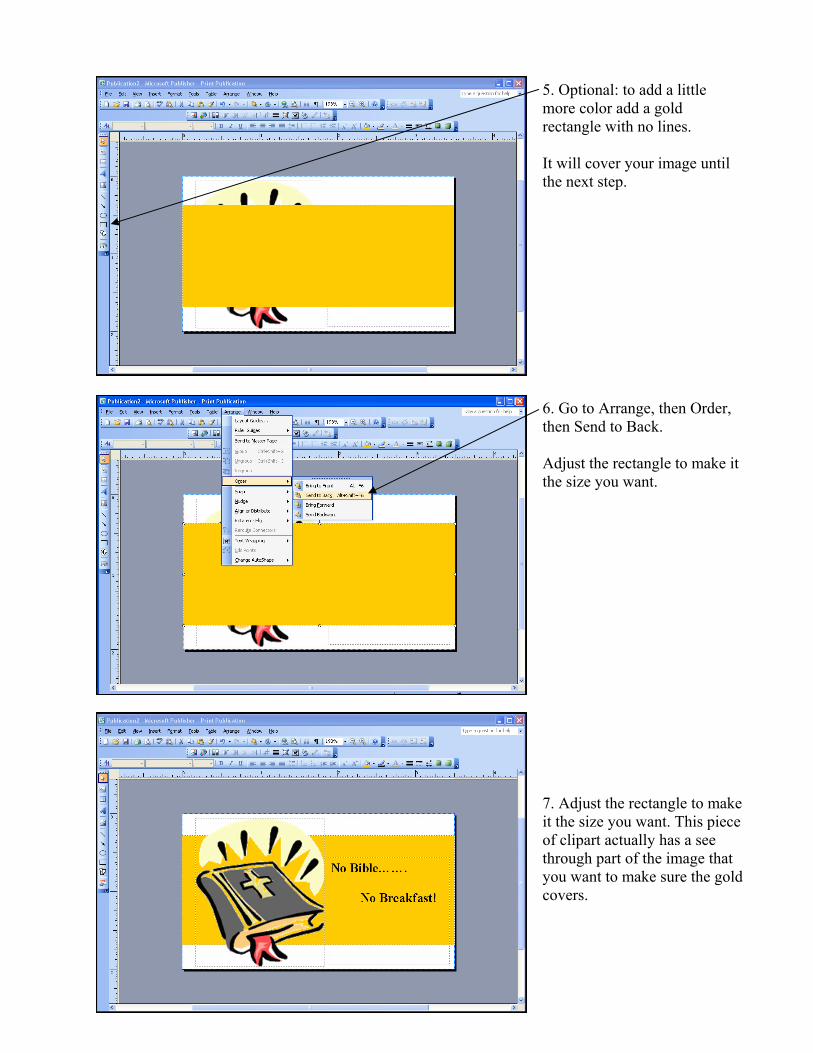
5. Optional: to add a little more color add a gold rectangle with no lines. It will cover your image until the next step.
6. Go to Arrange, then Order, then Send to Back. Adjust the rectangle to make it the size you want.
7. Adjust the rectangle to make it the size you want. This piece of clipart actually has a see through part of the image that you want to make sure the gold covers.

10. Deselect Boundaries and Guides to see how your finished product looks.
9. Change the typeface and increase the size. The typeface here is Albertus Extra Bold, size 16.
8. If you want even more color, you can add a blue rectangle on top, and then send it to back.

11. First select everything and click the “group” command. That will allow you to move it and copy and place it in another Publisher publication, but……...
10. Your finished card looks great and is useful for business card reminders, to use to make a refrigerator magnet for your church, or however you want to use it at this size. ***However, if we want to use this as a logo for the No Bible, No Breakfast campaign, will that work? No….and here is what you can try first, why it won’t work and what will—
12. When we try to resize a “grouped” image it doesn’t work and the very idea of being able to import it into something like the web is impossible.
But there is another way!

13. Instead of saving your publication as a Publisher file….keep scrolling down the Save as type box until you get to the graphic formats: JPEG or PNG Both of these will work on the web and for print. Save it as one of these and you will have a resizable graphic image.
14. In addition to being able to save it as a graphic image, you can also save your image at different resolutions. Click the “Change” box and a “Change Resolutions” box comes up. You then have the options to save your image in 3 formats, from low resolution for the web up to high resolution for commercial printing. Save in all the formats you need—or in the middle and will work any-where.
The final result: A resizable image you can use in print, on the web, however and whenever you need it—done inexpen-sively and easily!!
more ideas……..
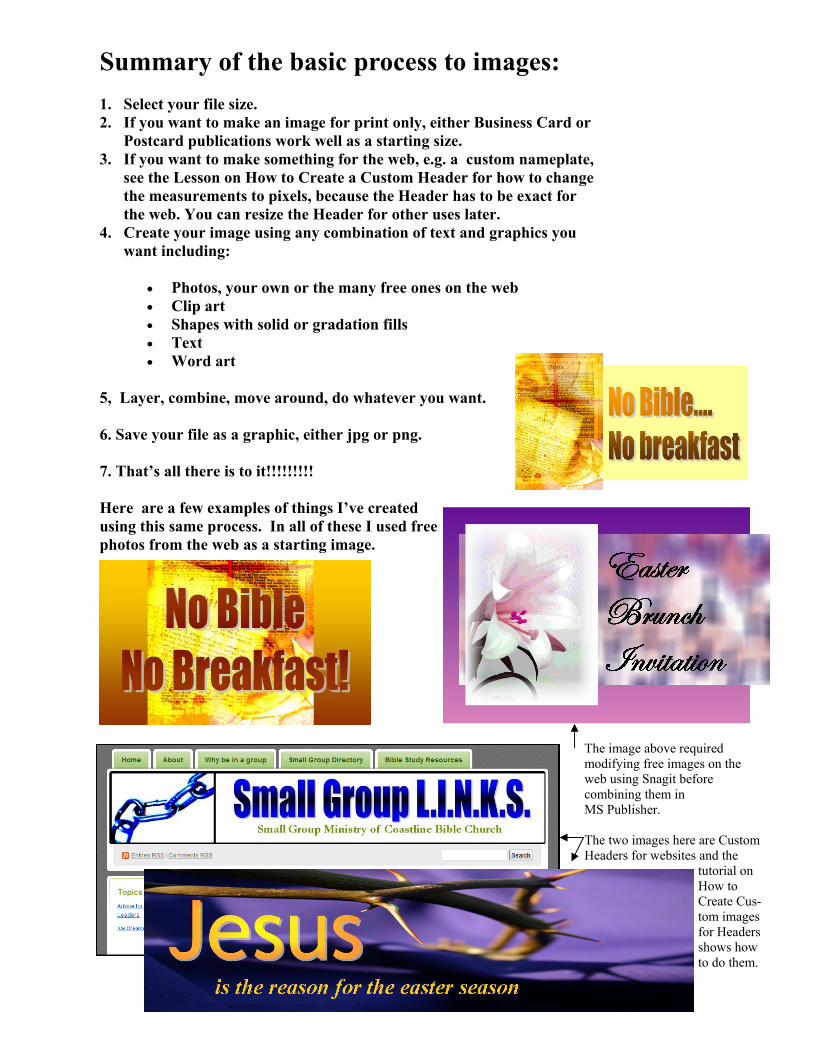
The image above required modifying free images on the web using Snagit before combining them in MS Publisher. The two images here are Custom Headers for websites and the
tutorial on How to Create Cus-tom images for Headers shows how to do them.
Summary of the basic process to images: 1. Select your file size. 2. If you want to make an image for print only, either Business Card or
Postcard publications work well as a starting size. 3. If you want to make something for the web, e.g. a custom nameplate,
see the Lesson on How to Create a Custom Header for how to change the measurements to pixels, because the Header has to be exact for the web. You can resize the Header for other uses later.
4. Create your image using any combination of text and graphics you want including:
• Photos, your own or the many free ones on the web • Clip art • Shapes with solid or gradation fills • Text • Word art
5, Layer, combine, move around, do whatever you want. 6. Save your file as a graphic, either jpg or png. 7. That’s all there is to it!!!!!!!!! Here are a few examples of things I’ve created using this same process. In all of these I used free photos from the web as a starting image.


![12.3mm cv 8mm cv - c1p1 blog · 0mm cv cv Actual,microSIM3FF, resizable,to,nanoSIM, 15.0mm cv Actual,SIM2FF[non, micro],resizable,to, ... 2 Print the “Cutting Mask” page 3 Select](https://static.fdocuments.us/doc/165x107/5ac1b8c47f8b9a1c768d1c74/123mm-cv-8mm-cv-c1p1-blog-cv-cv-actualmicrosim3ff-resizabletonanosim-150mm.jpg)