How did you use media technologies in the research, planning, construction and evaluation stages?
Upload
natalia-dominguezCategory
view
99download
0
HOW DID YOU USE MEDIA
TECHNOLOGIES IN THE
CONSTRUCTION AND
RESEARCH, PLANNING
AND EVALUATION
STAGES?

THROUGHOUT THE DURATION OF THE COURSE MY GROUP AND MYSELF USED A NUMBER OF FORMS OF TECHNOLOGY INORDER TO RESEARCH, PLAN, CONSTRUCT AND EVALUATE, BUT BEFORE DOING SO, WE HAD TO SET UP A BLOG PAGE INORDER TO KEEP TRACK OF THE WORK WE HAD PRODUCED - THE WEBSITE WE USED IN ORDER TO DO SO WAS 'WORDPRESS'
Whilst setting up our own pages we had the choice of choosing a theme
out of a range of choices - I resulted in choosing 'Twenty Twelve' simply due
to the fact it was simple & clear without too many options for the user to get
confused.
In addition to this, word press incorporated features which allowed us to
create search tabs, that of which I took to my advantage and created 7
different tabs:
- Home
- Audience Research
- Film Research
- Digipaks
- Production Planning
- Final Product
- Evaluation
All tabs had a clear purpose
and structure which not only
made the page look more
visually appealing but made
user accessibility much
easier.
Alongside these functions, the
website had a number of features
which allowed me to embed
videos, create drafts, upload
sound etc - All in all, the blogging
site allowed me to successfully
upload all forms of work with
different forms of media which
were necessary whilst maintaining
a presentable page.
Secondly, a key factor in ensuring everything went to plan was
communication, with this being said, we created a group chat
with the use of the app whatsapp on or mobile phones.
The group chat was called 'Media' and consisted of myself, Abdul,
Shannon and Natalia W - this allowed us to discuss any group work
we had such as filming and allowed us to help each other out in
any pieces of work
In addition to this we collected each others emails seeing as there
was a variety of pieces of group work we had to email to
eachother, such as shooting list, storyboards etc - this made it a lot
easier for when we were not in lesson and needed quick access to
the work.
Although, during lesson rather than emailing eachother the work we each
had access to USB sticks which Shannon had provided us each with which
allowed us to quickly transfer work to eachother without wasting time - the
USB sticks also helped in carrying work we had done in lesson to our homes
in order to continue working & backing up any work we had done.

There were 3 main forms of media technology which I used and would not have been able to complete
my coursework without - Google chrome, Microsoft Word & Microsoft Powerpoint.
Google chrome, the
search engine, was the
main source which I used
in order to retrieve all
forms of research - with
the help of google I was
able to search and find
any piece of information I
needed
All forms of written work which are seen on the blog were initially written on Microsoft word first then copied and pasted onto the blog - reason for this was it allowed me to directly make any changes to the work before uploading it onto the blog and also allowed me to keep a copy incase anything happened to the blog and I had to start again, seeing as I had had experiences when first using the word press software in which It occurred numerous times.
The presentations which are seen on the blog were originally created on PowerPoint and then uploaded to slide share in which I then copied the html code and embedded it into the blog -this was an important part in maintaining the appearance of the blog seeing as If i did not have access to this then the blog would have been filled with long essays.

Other than the use of word & power point to construct my essays and presentations, my film research
predominantly revolved around YouTube - A video sharing website.
With the use of YouTube I was able to look into a variety of different official music videos which the artist
themselves had uploaded via vevo - this made it a lot easier for me to investigate different forms and
conventions in music videos which were both mainstream and underground in order to compare
different techniques I could use - this also allowed me to complete my video analysis.
Aswell as YouTube, I used
Wikipedia in order to get
further information about
the videos I had decided
to analyze in order to gain
a better understanding of
the context of the video
as well as the meaning
behind the video and the
artist .

During audience research I conducted a questionnaire in which the questions were
influenced by my AS work and research I had conducted online.
The questionnaire was created on word and later uploaded to slide share in order for me to
upload my work onto the blog.
Once I asked a number of people which suited my
target audience I used Microsoft Excel in order to
formulate the results into bar charts and graphs in order
for me to be able to analyze the results with more ease
rather than going through each questionnaire and
individually picking out the information.
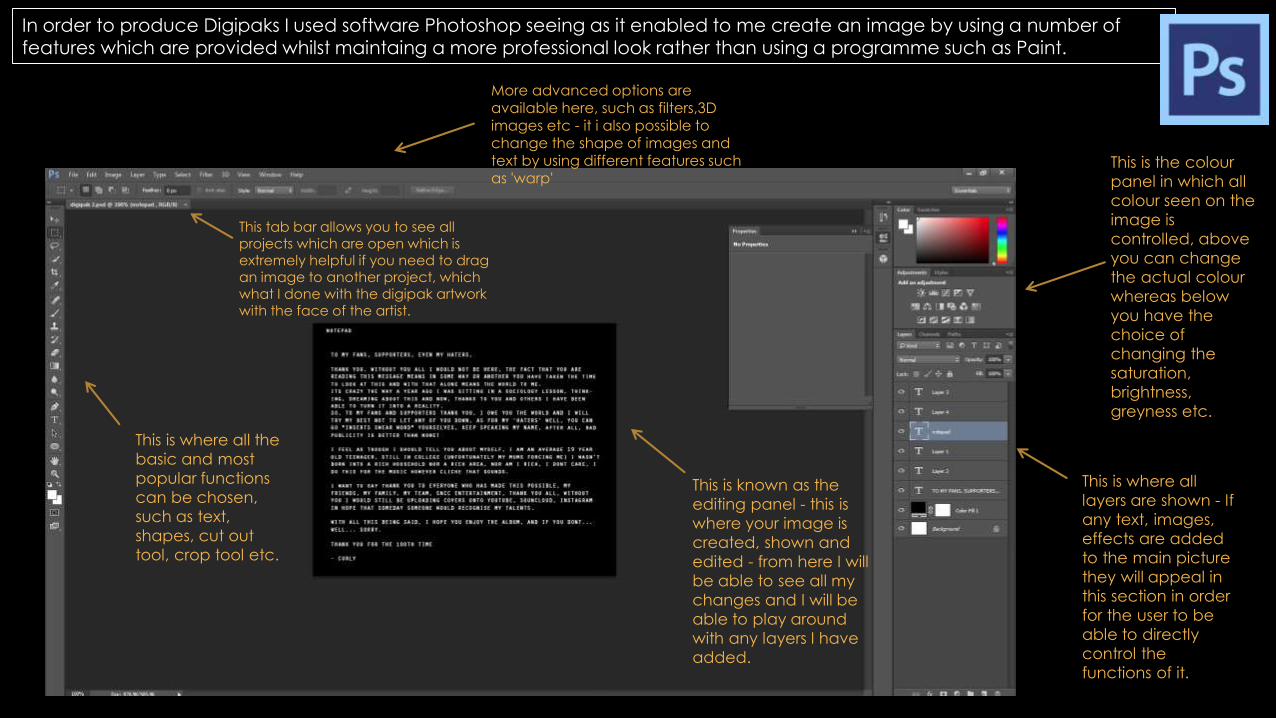
In order to produce Digipaks I used software Photoshop seeing as it enabled to me create an image by using a number of features which are provided whilst maintaing a more professional look rather than using a programme such as Paint.
This is known as the
editing panel - this is
where your image is
created, shown and
edited - from here I will
be able to see all my
changes and I will be
able to play around
with any layers I have
added.
This is the colour
panel in which all
colour seen on the
image is
controlled, above
you can change
the actual colour
whereas below
you have the
choice of
changing the
saturation,
brightness,
greyness etc.
This is where all
layers are shown - If
any text, images,
effects are added
to the main picture
they will appeal in
this section in order
for the user to be
able to directly
control the
functions of it.
More advanced options are available here, such as filters,3D images etc - it i also possible to change the shape of images and text by using different features such as 'warp'
This is where all the
basic and most
popular functions
can be chosen,
such as text,
shapes, cut out
tool, crop tool etc.
This tab bar allows you to see all projects which are open which is extremely helpful if you need to drag an image to another project, which what I done with the digipak artwork with the face of the artist.

During filming, we used two different types of video cameras, this is due to the fact that we filmed in a studio and in college.
The first camera we can see is a more advanced, professional camera that we used, this was provided for us in the studio and had better quality for filming allowing us to have high definition footage for the majority of the video.
The second camera, a much smaller canon camera was used to film smaller parts in which the studio was not needed - this was provided by the college.
Alongside the camera, we used a tripod in order
to keep the camera still and maneuver it's movement in order to produce perfect footage which looked professional.
This allowed us to move the camera around -extremely helpful with tracking shots.
This plate at the top of the tripod held the camera in place and prevented any jolting or shaking.
These small joints allowed us to adjust the length of the tripod which was essential at some points during filming when filming different characters due to height differences.
Both cameras had similar features, such as a small
screen to see the shot and access to zoom, although,
the top camera had a better quality zoom whereas the bottom
camera became blurry after a certain extent.
The top camera also had a built in microphone but this was not needed seeing as
later, when editing I deleted all the sound that was made and replaced it
with the track.
3 sets of lights similar to the ones shown
above were used in order to produce
high key lighting - we decided to use
this as it would give the artist more of
the limelight and direct focus and
attention.
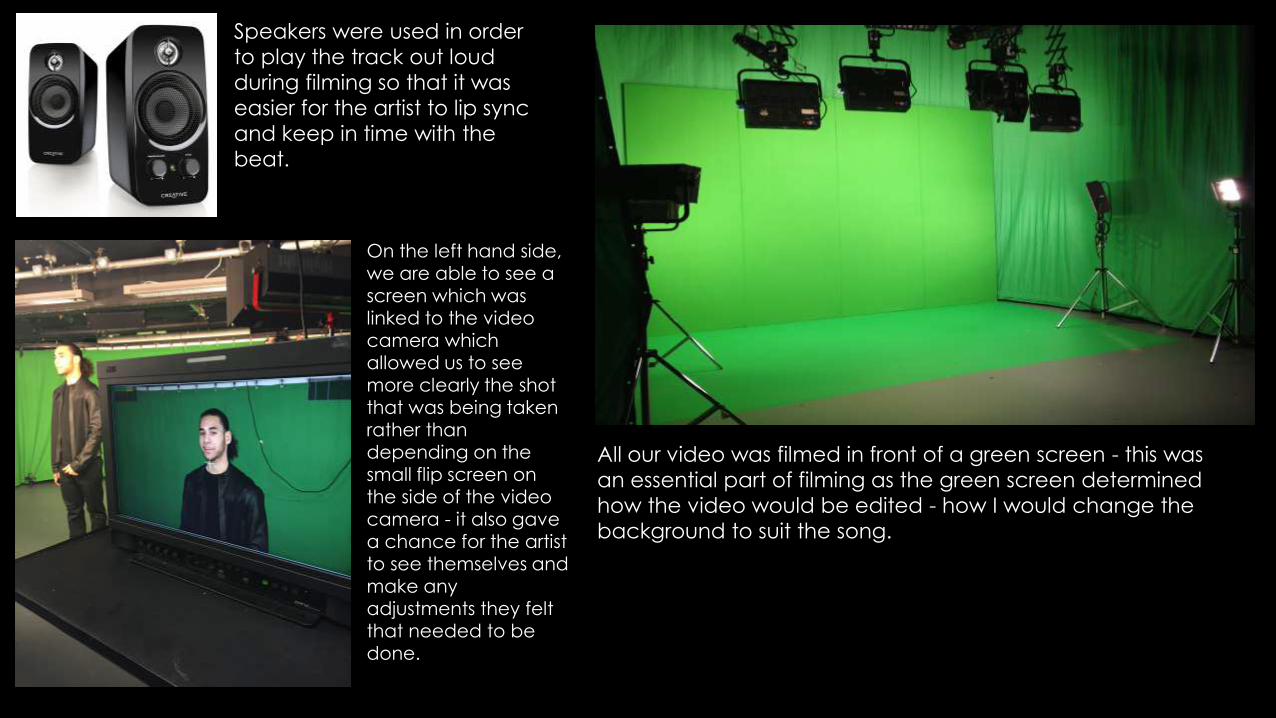
Speakers were used in order
to play the track out loud
during filming so that it was
easier for the artist to lip sync
and keep in time with the
beat.
On the left hand side, we are able to see a screen which was linked to the video camera which allowed us to see more clearly the shot that was being taken
rather than depending on the small flip screen on the side of the video camera - it also gave a chance for the artist to see themselves and make any adjustments they felt that needed to be done.
All our video was filmed in front of a green screen - this was
an essential part of filming as the green screen determined
how the video would be edited - how I would change the
background to suit the song.
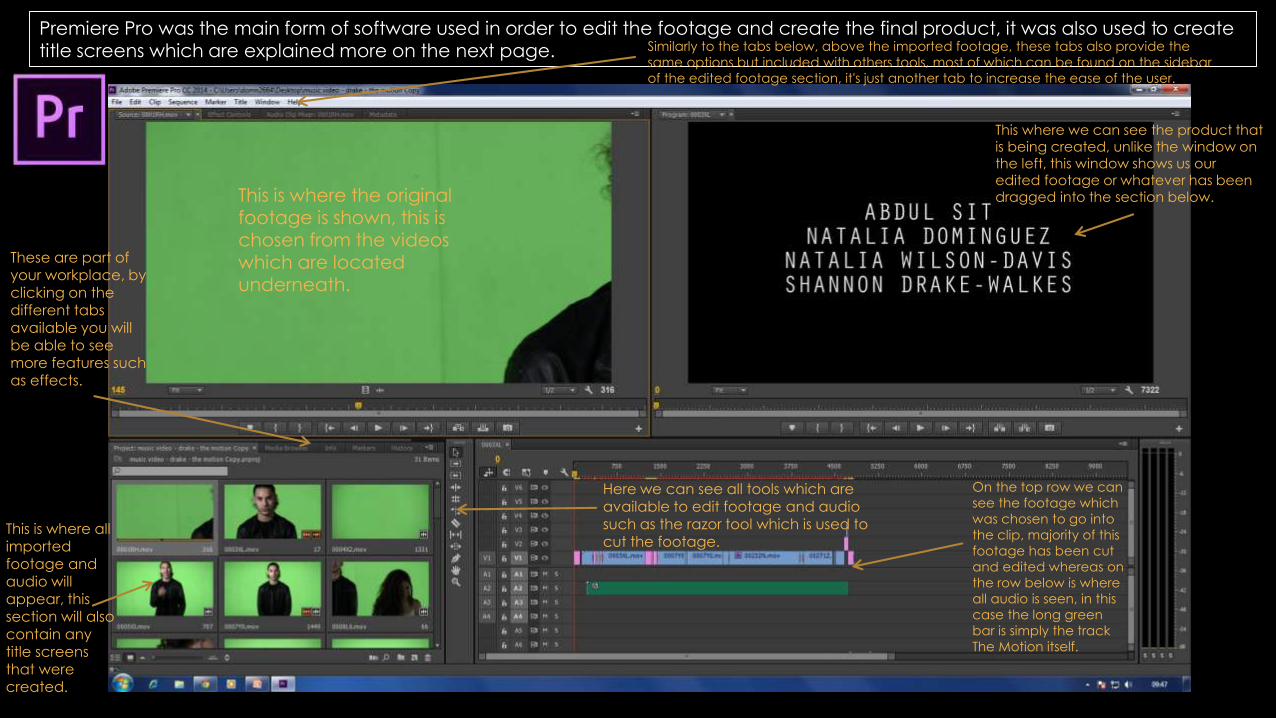
Premiere Pro was the main form of software used in order to edit the footage and create the final product, it was also used to create title screens which are explained more on the next page.
On the top row we can
see the footage which
was chosen to go into
the clip, majority of this
footage has been cut
and edited whereas on
the row below is where
all audio is seen, in this
case the long green
bar is simply the track
The Motion itself.
This is where the original footage is shown, this is chosen from the videos which are located underneath.
Here we can see all tools which are available to edit footage and audio such as the razor tool which is used to cut the footage.
This where we can see the product that is being created, unlike the window on the left, this window shows us our edited footage or whatever has been dragged into the section below.
This is where all imported footage and audio will appear, this section will also contain any title screens that were created.
These are part of your workplace, by clicking on the different tabs available you will be able to see more features such as effects.
Similarly to the tabs below, above the imported footage, these tabs also provide the
same options but included with others tools, most of which can be found on the sidebar
of the edited footage section, it's just another tab to increase the ease of the user.

Again, YouTube was used in
order to upload video drafts
which can be seen on the
blog in the Pre Production
section & was also used in
order to upload the final
version.
This is where all text styles can be
seen visually before choosing one,
which is extremely helpful when
wanting to pick a font quickly rather
than going through all of them.
This is the main working window in which
you will be able to see your actual
product, similarly to photoshop you will
also be able to directly move any layers
you have added.
Again, you are able to see the
text style name but you have the
chance to edit the text in terms of
size, positioning and opacity, for
instance, with the title screen in
the window you can see that the
'presents' has less opacity than the
SCNN ENTERTAINMENT sign, this is
because I altered the opacity.
Similar to below and the side bar, it shows the text style again and gives us normal options such as bold, italic, center, right etc.
Here, you can see features which you can add onto your title screen such as shapes& more text.

Seeing as the evaluation had to be created using multi media there was a number of different software's I
used in order to do this.
Prezi was used for Question 2 & 3 - It is a cloud based programme meaning it is accessible from anywhere at anytime -I used this because it allowed me to create a clear structure for the question & it is a very smart form of multimedia in order to create presentations - it is extremely interactive and user accessible. The programme allowed me to
embed pictures and videos whilst allowing me to create a path for my viewers to follow.
Soundcloud was used for Question 1 -It is a user online audio distribution platform meaning I was able to upload myself answering the question - the sound was directly recorded from the app on my phone which allowed me to pause at any moment and continue recording when I was ready which was extremely helpful as it gave me the chance to speak, stop then read what I was about to say before saying it helping me reduce any mistakes.
Powerpoint and Slideshare was used for Question 4 - I created the presentation on powerpoint using different slides then uploaded the presentation onto slideshare which allowed me to get a html code which was then copied and embed onto the evaluation section of my blog.

ALL IN ALL, MEDIA TECHNOLOGIES PLAYED AN ESSENTIAL PART IN
ALL ASPECTS OF THE WORK - RESEARCHING, PLANNING & CONSTRUCTING.
ALL ASPECTS WHICH WERE SHOWN IN THE PRESENTATION WERE USED
A NUMBER OF TIMES AND WERE ALSO USED ACROSS MY WHOLE
PEER GROUP IN ORDER TO WORK BOTH COLLABORATIVELY AND
INDEPENDENTLY.