HotEx RADIUS Manager Installation Guide
40
h h o o t t E E x x R R A A D D I I U U S S M M a a n n a a g g e e r r Installation Guide
Transcript of HotEx RADIUS Manager Installation Guide
hhhoootttEEExxx RRRAAADDDIIIUUUSSS MMMaaannnaaagggeeerrr
Installation Guide
Hotspot Express Installation Guide 2
2008-2009 Hotspot Express.
All rights reserved.
No part of this work may be reproduced, stored in a retrieval system, adopted or transmitted in any form
or by any means: electronic, mechanical, photographic, graphic, optic recording or otherwise, translated
in other language or computer language, without the prior written permission of Hotspot Express.
Due care has been taken to make this Installation Guide and accompanying software package as
accurate as possible. However Hotspot Express makes no representation or warranties with respect to
the contents hereof and shall not be responsible for any loss or damage caused to the user by the direct
or indirect use of this Installation Guide and accompanying Software System.
Hotspot Express reserves the rights to alter, modify or otherwise change in any manner, the contents
hereof, without obligation of Hotspot Express limited to notify any person of such revision or changes.
Mention of third-party companies and products is for informational purposes only and does not constitute
an endorsement. Hotspot Express assumes no responsibility with regard to the selection, performance, or
use of these products. All understandings, agreements or warranties, if any, take place directly between
the vendor and prospective users.
Registered Office: No.5, PK Lane, North Andar Street, Trichy 620002, TN, INDIA Phone: 91-431-2702310 City Office: No. 21/8, Ramanujam St., West Saidapet, Chennai 600015, TN, INDIA. Phone: 93602 55005

hotEx RADIUS Manager Installation Guide 3
Table of Contents
About this guide 4
Intended Audience ........................................................................................................................... 5
Purpose of this Guide....................................................................................................................... 5
Typographical Conventions ............................................................................................................. 5
Typeface .......................................................................................................................................... 5
Meaning ........................................................................................................................................... 5
Customer Support ............................................................................................................................ 5
Installation (RADIUS Manager) 6
System Requirements ..............................................................................6
Hardware requirement ..................................................................................................................... 6
Software requirement....................................................................................................................... 6
Network Setup...........................................................................................7
Installing hotEx RADIUS Manager ...........................................................8
Assign IP Address ..................................................................................18
To check the Internet connectivity ........................................................22
Installation (hotspot client gateway) 27
System Requirements ............................................................................27
Hardware requirement ................................................................................................................... 27
Software requirement..................................................................................................................... 27
Network Setup.........................................................................................28
Installing hotspot client gateway...........................................................29

About this guide
Hotspot Express Installation Guide 4
About this guide
This section includes the following topics:
�� Intended Audience
�� Purpose of this Guide
�� Typographical Conventions
�� Customer Support

About this guide
hotEX RADIUS Manager – Installation Guide 5
Intended Audience
This guide is intended as an installation manual for the administrators, the agents and the clients on how to install the hotEx RADIUS Manager application.
Purpose of this Guide
This guide describes the step-by-step installation process of the hotEx RADIUS Manager application.
Typographical Conventions
Before starting, it is important to understand the typographical conventions used in this guide.
TABLE 1: TYPOGRAPHICAL CONVENTIONS
Typeface Meaning
Bold Menu items, input fields, radio button names, check boxes, drop-down lists, tab
names, buttons on the screen.
CAPS Keys on the keyboard.
“Quotes” Messages displayed on the screen.
Note: A note that calls attention to a topic with related information.
Warning: An Important message not to be ignored.
Customer Support
If you have problems, questions, comments or suggestions regarding HOTSPOT application and the documentation, contact us by e-mail at [email protected]. You can also call our customer support centre at (+91) 9362055005.
Hotspot Express Installation Guide 6
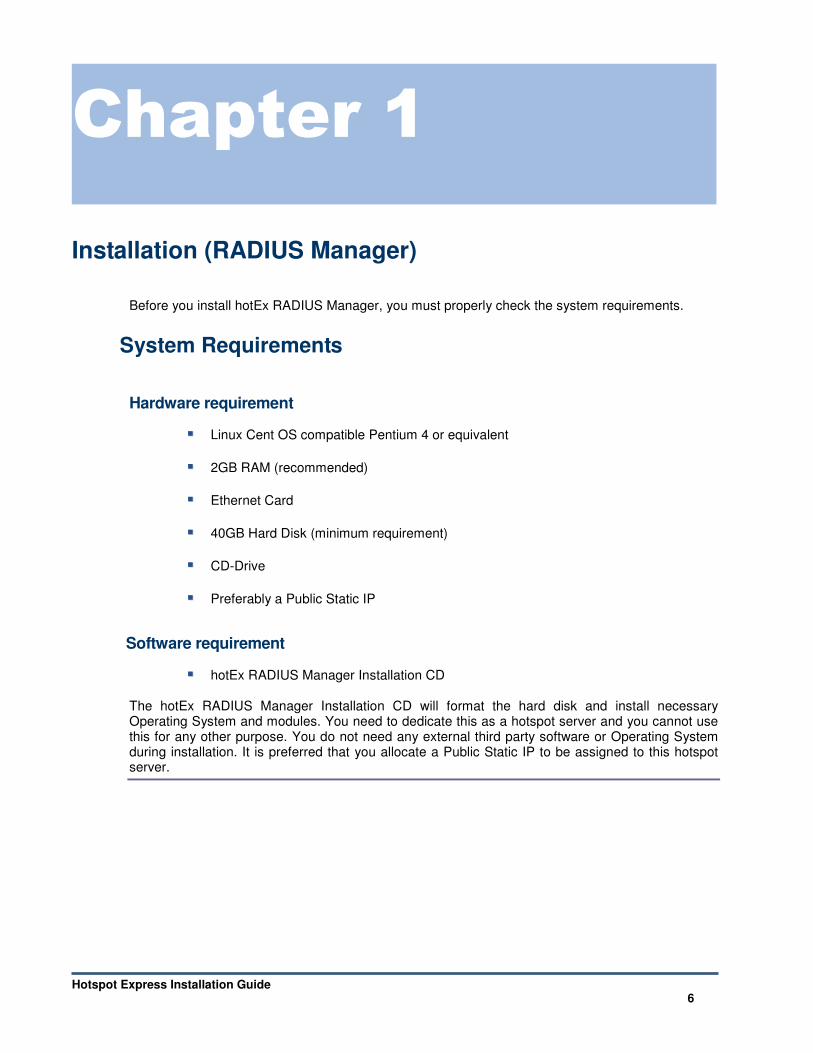
Installation (RADIUS Manager)
Before you install hotEx RADIUS Manager, you must properly check the system requirements.
System Requirements
Hardware requirement
�� Linux Cent OS compatible Pentium 4 or equivalent
�� 2GB RAM (recommended)
�� Ethernet Card
�� 40GB Hard Disk (minimum requirement)
�� CD-Drive
�� Preferably a Public Static IP
Software requirement
�� hotEx RADIUS Manager Installation CD
The hotEx RADIUS Manager Installation CD will format the hard disk and install necessary Operating System and modules. You need to dedicate this as a hotspot server and you cannot use this for any other purpose. You do not need any external third party software or Operating System during installation. It is preferred that you allocate a Public Static IP to be assigned to this hotspot server.
Chapter 1
HOTSPOT EXPRESS
hotEX RADIUS Manager – Installation Guide 7
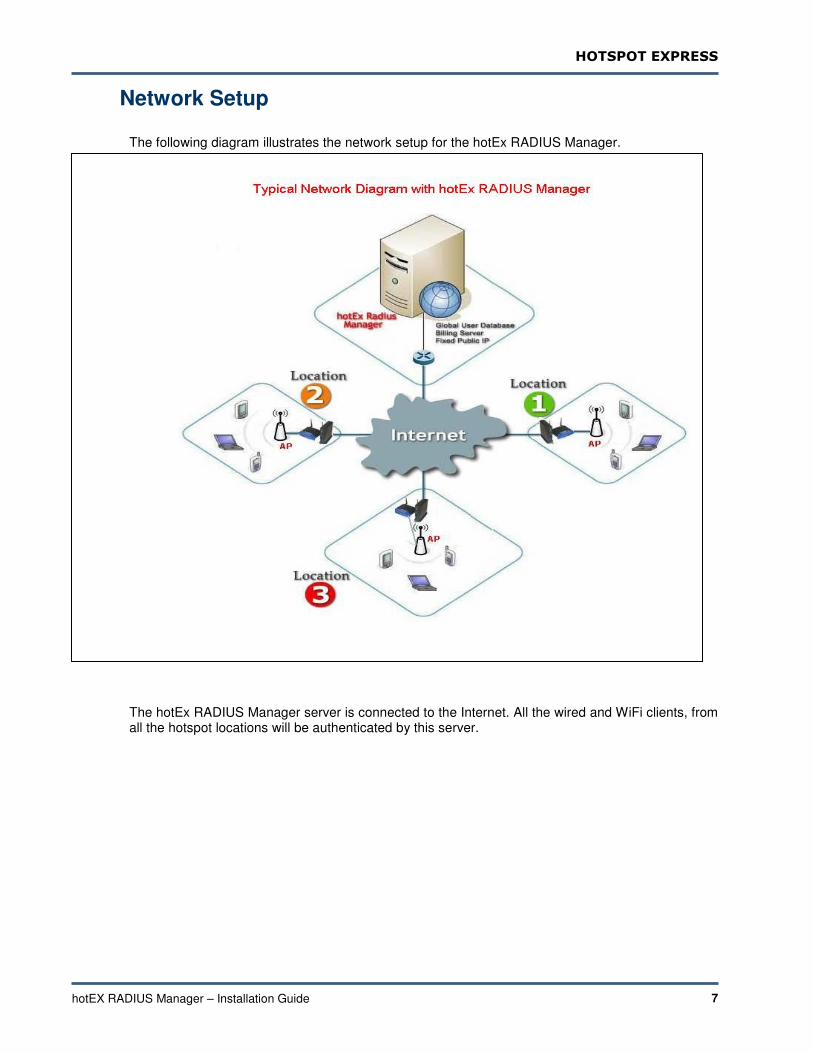
Network Setup
The following diagram illustrates the network setup for the hotEx RADIUS Manager.
The hotEx RADIUS Manager server is connected to the Internet. All the wired and WiFi clients, from all the hotspot locations will be authenticated by this server.

HOTSPOT EXPRESS
hotEX RADIUS Manager – Installation Guide 8
Installing hotEx RADIUS Manager
Insert the hotEx RADIUS Manager Installation CD and configure as shown below. We will call this server as ‘hotspot server’ for convenience throughout this guide.
To start the installation
1. Insert the hotEx RADIUS Manager Installation CD. You will see the Welcome to hotEx
RADIUS Manager Software Installation screen as below. Press ENTER to continue the
installation. You will see the screens as below.
Warning:
The installation CD will completely format your hard disk. You will lose all
data in the hard disk. Please backup the hard disk before use, if
necessary. Please also ensure that this hard disk is having only one
partition.

HOTSPOT EXPRESS
hotEX RADIUS Manager – Installation Guide 9
2. To initialise the new partitions, click yes.
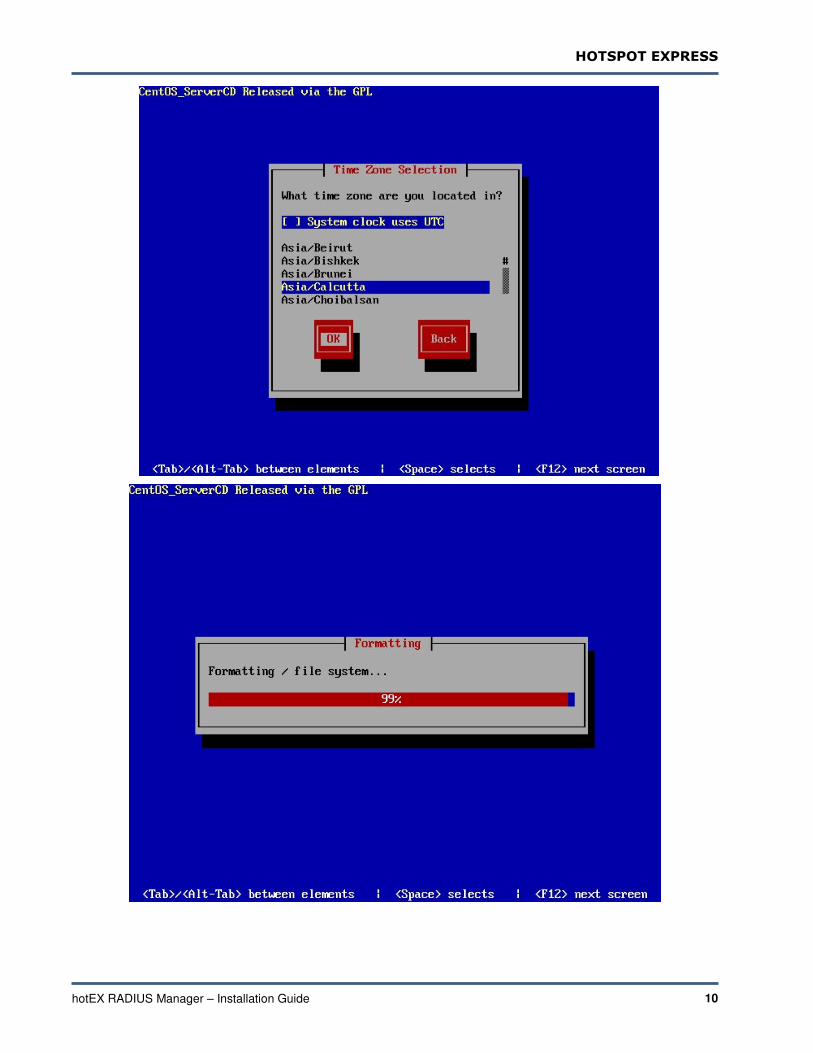
3. Select the appropriate ‘Time Zone’ and click OK.
HOTSPOT EXPRESS
hotEX RADIUS Manager – Installation Guide 10

HOTSPOT EXPRESS
hotEX RADIUS Manager – Installation Guide 11

HOTSPOT EXPRESS
hotEX RADIUS Manager – Installation Guide 12

HOTSPOT EXPRESS
hotEX RADIUS Manager – Installation Guide 13
HOTSPOT EXPRESS
hotEX RADIUS Manager – Installation Guide 14
HOTSPOT EXPRESS
hotEX RADIUS Manager – Installation Guide 15
HOTSPOT EXPRESS
hotEX RADIUS Manager – Installation Guide 16
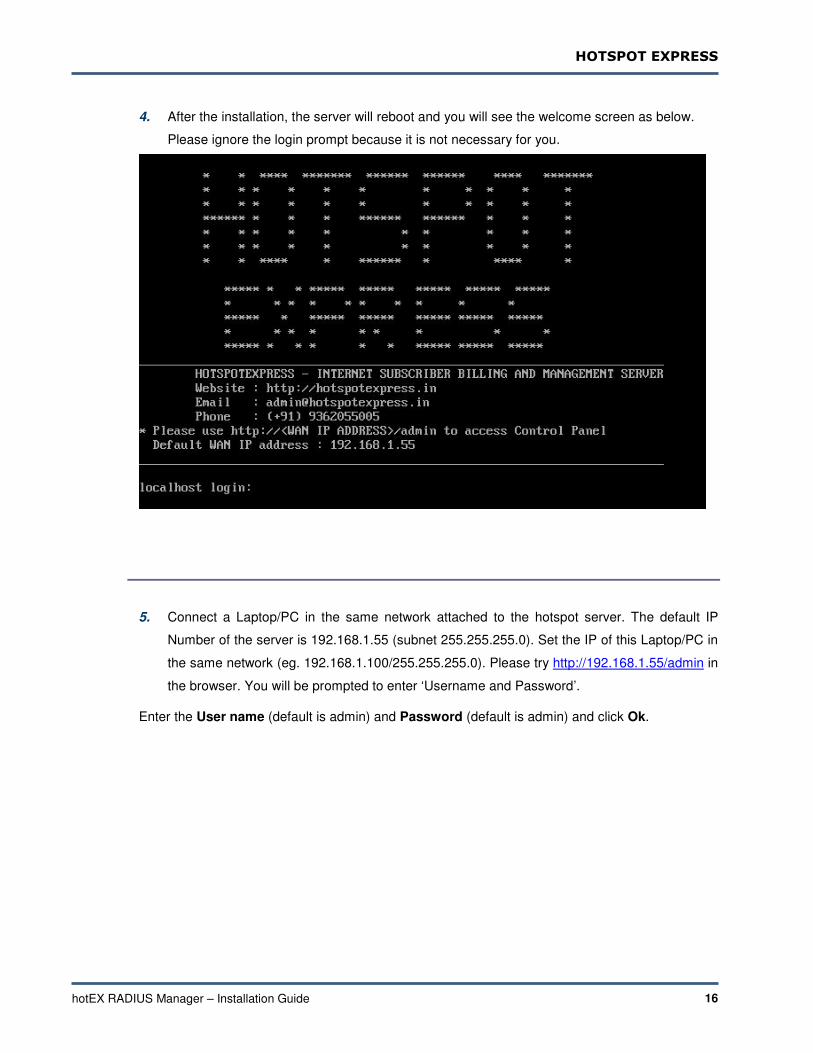
4. After the installation, the server will reboot and you will see the welcome screen as below.
Please ignore the login prompt because it is not necessary for you.
5. Connect a Laptop/PC in the same network attached to the hotspot server. The default IP
Number of the server is 192.168.1.55 (subnet 255.255.255.0). Set the IP of this Laptop/PC in
the same network (eg. 192.168.1.100/255.255.255.0). Please try http://192.168.1.55/admin in
the browser. You will be prompted to enter ‘Username and Password’.
Enter the User name (default is admin) and Password (default is admin) and click Ok.

HOTSPOT EXPRESS
hotEX RADIUS Manager – Installation Guide 17
Typical Network Diagram illustrating
how to connect an Administrator PC/Laptop to setup hotEx RADIUS Manager

HOTSPOT EXPRESS
hotEX RADIUS Manager – Installation Guide 18
6. You will now see the web admin control panel of hotEx RADIUS Manager.
Assign IP Address
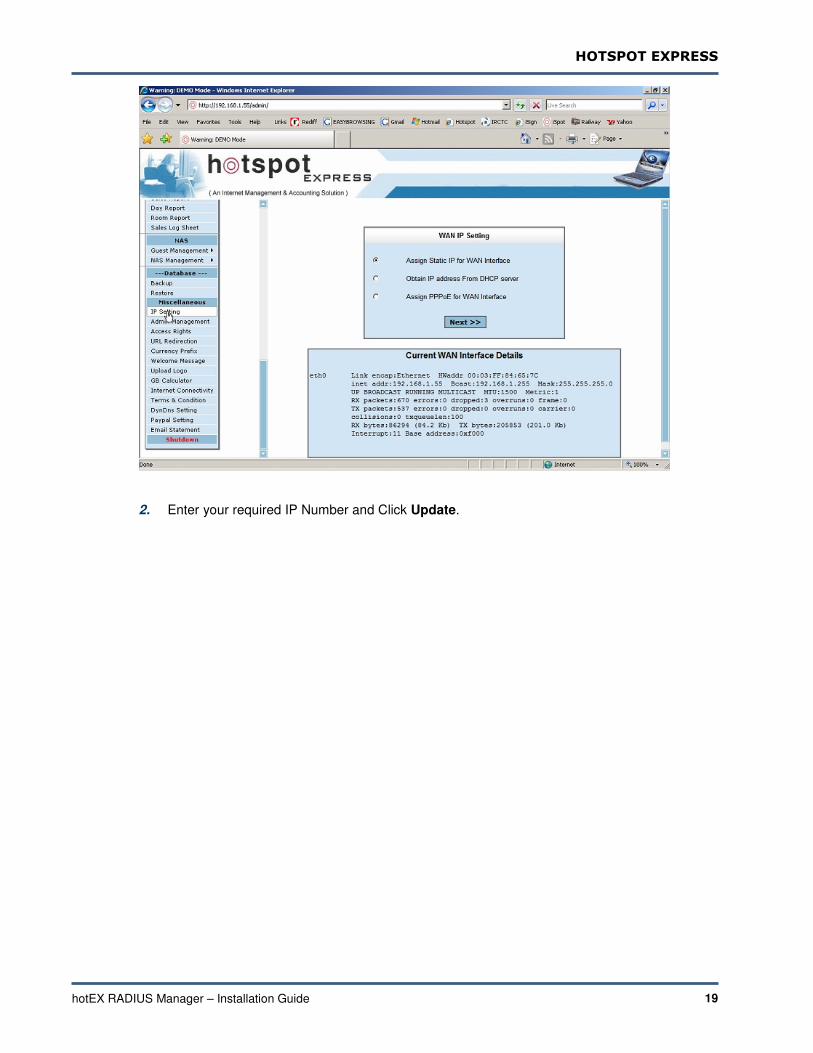
The default IP number assigned to the hotspot server is 192.168.1.55. You can change this IP Number as below.
1. Goto the Main Screen. Clicking on the left top Home button will bring you to the Main-Screen
always. Get into the screen as below. Home -> Miscellaneous -> IP Setting -> WAN IP
Setting -> Assign Static IP for WAN Interface.
HOTSPOT EXPRESS
hotEX RADIUS Manager – Installation Guide 19
2. Enter your required IP Number and Click Update.

HOTSPOT EXPRESS
hotEX RADIUS Manager – Installation Guide 20
Note:
Use WAN IP Address, when you configure Hotspot Client Gateway
3. The new IP number will be effective only after rebooting. To reboot, click ‘Reboot’.

HOTSPOT EXPRESS
hotEX RADIUS Manager – Installation Guide 21
4. Please wait until it reboots and you see the login screen.

HOTSPOT EXPRESS
hotEX RADIUS Manager – Installation Guide 22
To check the Internet connectivity
1. Goto the Main Screen selects the menu Miscellaneous -> Internet Connectivity. You will
see the menu Test Internet Connectivity. You may enter any valid Internet domain name or
IP Address (eg. Yahoo.com) and click PING.

HOTSPOT EXPRESS
hotEX RADIUS Manager – Installation Guide 23
2. You will get the SUCCESSFUL PING RESULTS, if the hotspot server is connected to
Internet.
HOTSPOT EXPRESS
hotEX RADIUS Manager – Installation Guide 24
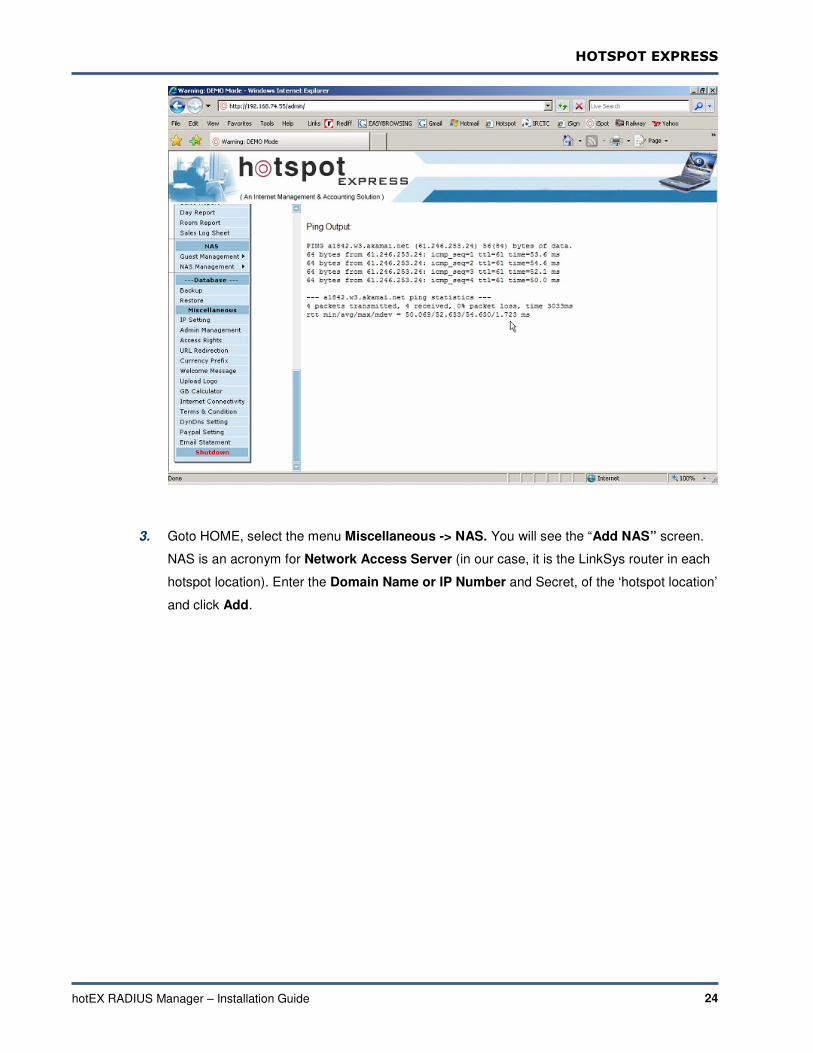
3. Goto HOME, select the menu Miscellaneous -> NAS. You will see the “Add NAS” screen.
NAS is an acronym for Network Access Server (in our case, it is the LinkSys router in each
hotspot location). Enter the Domain Name or IP Number and Secret, of the ‘hotspot location’
and click Add.

HOTSPOT EXPRESS
hotEX RADIUS Manager – Installation Guide 25
Note:
If the ‘hotspot location’ does not have a Public Static IP number or domain
name, you may enter “ 0.0.0.0/0 ”.
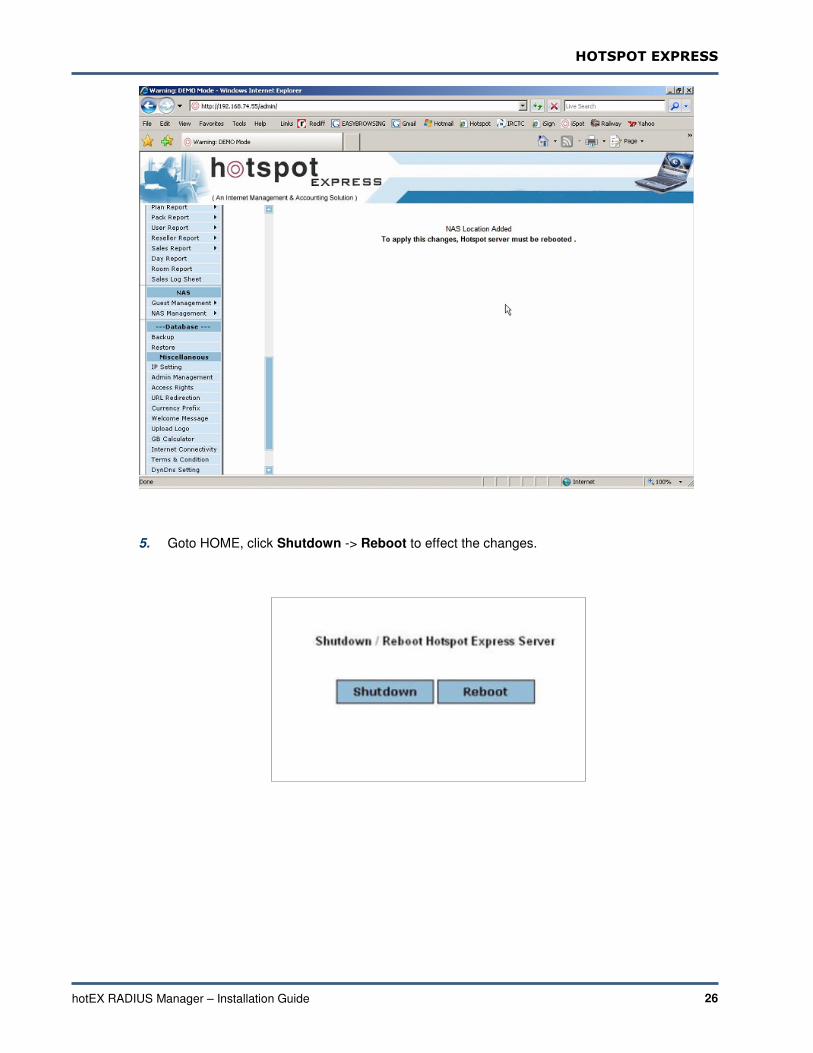
4. NAS Location is added.
HOTSPOT EXPRESS
hotEX RADIUS Manager – Installation Guide 26
5. Goto HOME, click Shutdown -> Reboot to effect the changes.

HOTSPOT EXPRESS
hotEX RADIUS Manager – Installation Guide 27
Installation (hotspot client gateway)
Before you install hotspot client gateway, please check for the below system requirements.
System Requirements
Hardware requirement
�� LinkSys WiFi Router (Model WRT54GL)
�� Laptop/PC (for initial Setup only)
Software requirement
�� Openwrt Firmware
�� RADIUS Client Configuration File
You are going to connect LinkSys Router with the Laptop/PC through WiFi. No other software or
Operating System is necessary.
Note:
Please download the Openwrt firmware from
http://hotspotexpress.in/ispot/openwrt-wrt54g-squashfs.bin
And RADIUS Client configurations file from http://hotspotexpress.in/ispot/config.tgz
and save them in your desktop.
HOTSPOT EXPRESS
hotEX RADIUS Manager – Installation Guide 28
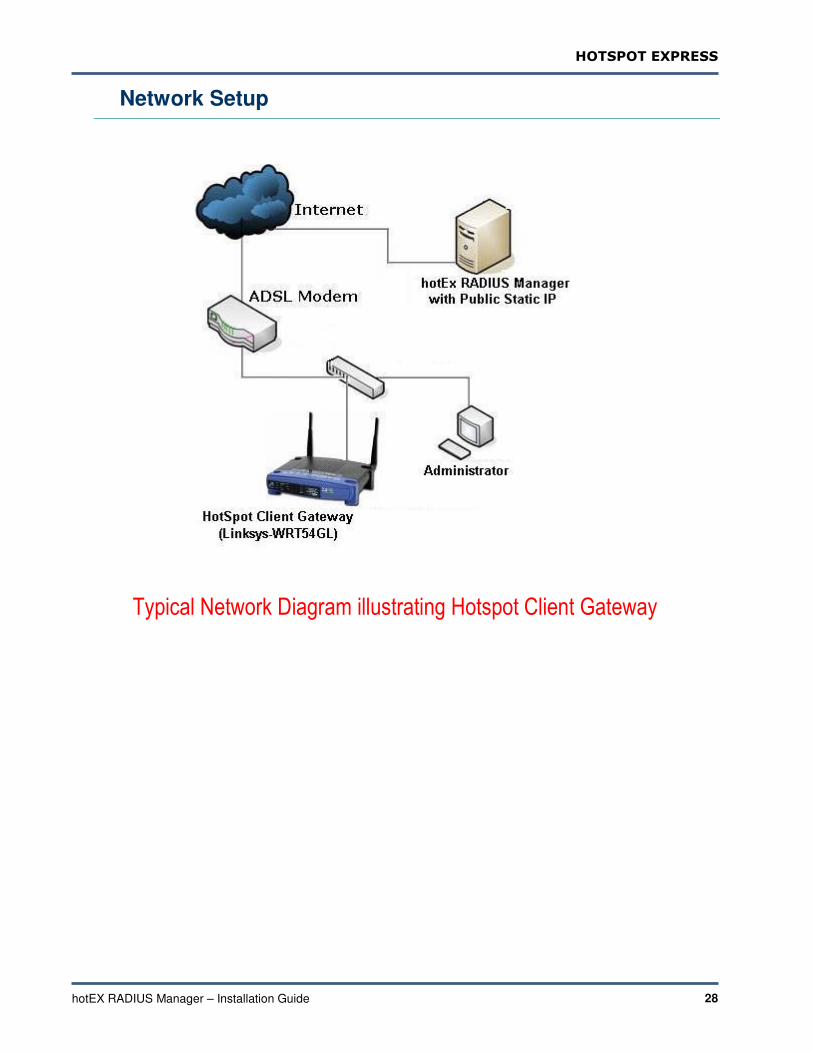
Network Setup
Typical Network Diagram illustrating Hotspot Client Gateway

HOTSPOT EXPRESS
hotEX RADIUS Manager – Installation Guide 29
Installing hotspot client gateway
� You are now going to convert LinkSys router as a hotspot client gateway, using the
Laptop/PC.
� Switch on the LinkSys router.
� Ensure the WiFi network adapter of the Laptop/PC is enabled and working, and set it in
DHCP Mode (i.e., ‘Obtain IP Address Automatically) as shown below.
1. After Setup the LinkSys, Open the browser (eg: Internet Explorer) and enter the ip
“192.168.1.1”. You will see the login prompt. Type the User name and Password (default
password is admin) and Click Ok.
2. You will see the Setup screen as below.

HOTSPOT EXPRESS
hotEX RADIUS Manager – Installation Guide 30
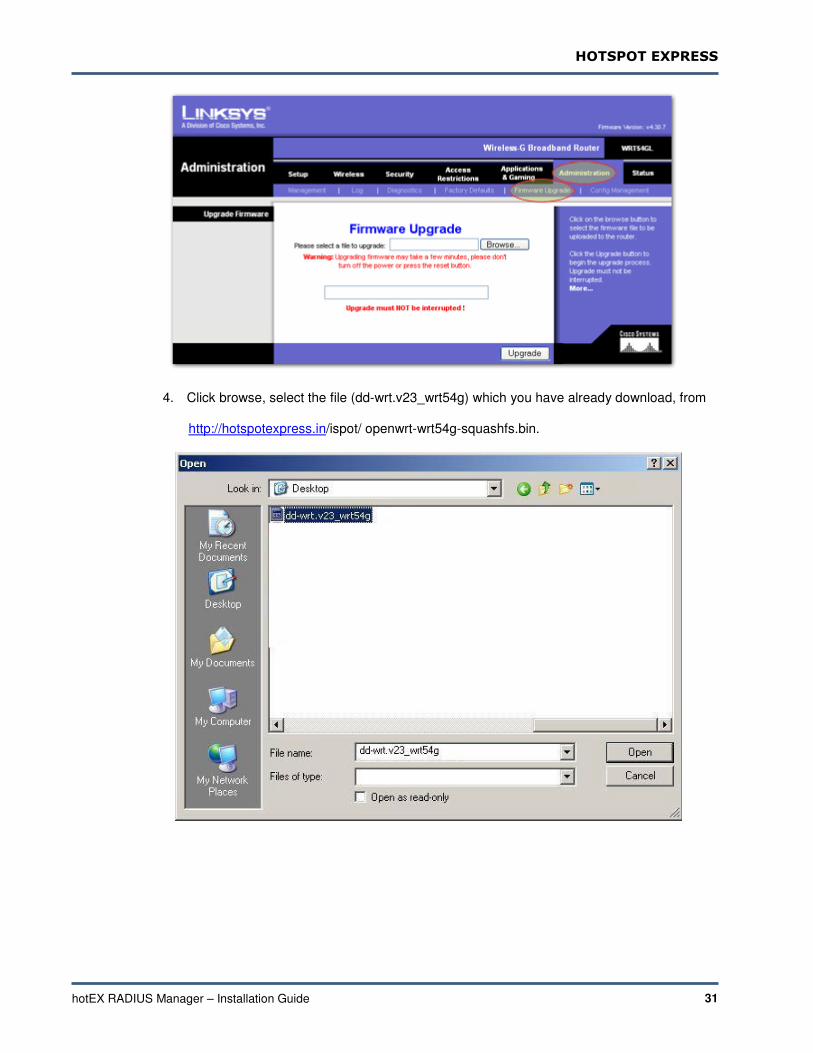
3. To upgrade the firmware, Please use the menu, ‘Administration � Firmware Upgrade’
and get the screen as below.
HOTSPOT EXPRESS
hotEX RADIUS Manager – Installation Guide 31
4. Click browse, select the file (dd-wrt.v23_wrt54g) which you have already download, from
http://hotspotexpress.in/ispot/ openwrt-wrt54g-squashfs.bin.
HOTSPOT EXPRESS
hotEX RADIUS Manager – Installation Guide 32
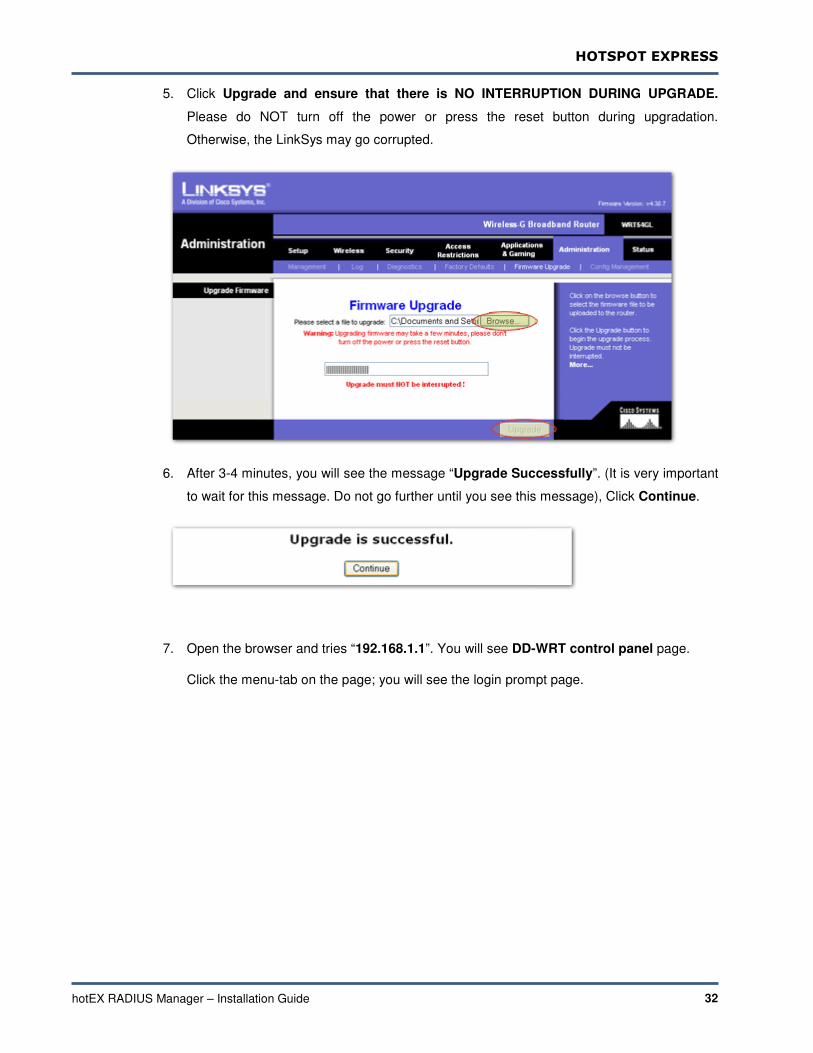
5. Click Upgrade and ensure that there is NO INTERRUPTION DURING UPGRADE.
Please do NOT turn off the power or press the reset button during upgradation.
Otherwise, the LinkSys may go corrupted.
6. After 3-4 minutes, you will see the message “Upgrade Successfully”. (It is very important
to wait for this message. Do not go further until you see this message), Click Continue.
7. Open the browser and tries “192.168.1.1”. You will see DD-WRT control panel page.
Click the menu-tab on the page; you will see the login prompt page.
HOTSPOT EXPRESS
hotEX RADIUS Manager – Installation Guide 33
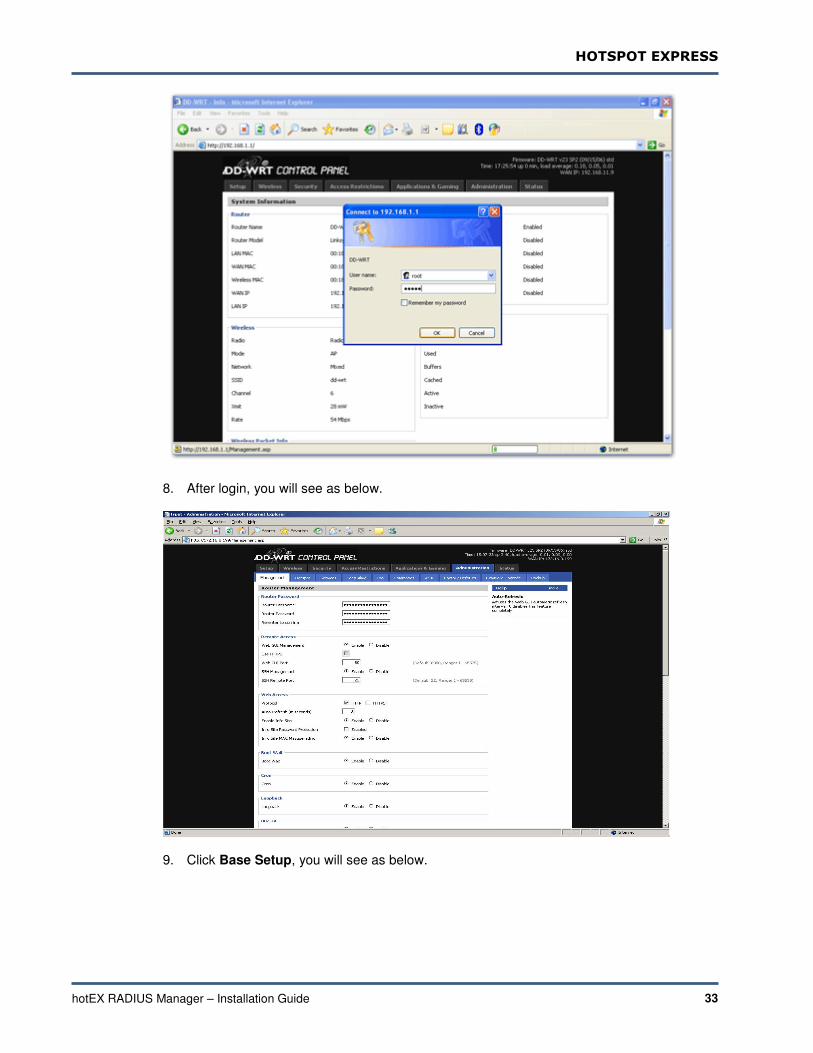
8. After login, you will see as below.
9. Click Base Setup, you will see as below.

HOTSPOT EXPRESS
hotEX RADIUS Manager – Installation Guide 34
10. Go to Administration � Backup.
HOTSPOT EXPRESS
hotEX RADIUS Manager – Installation Guide 35
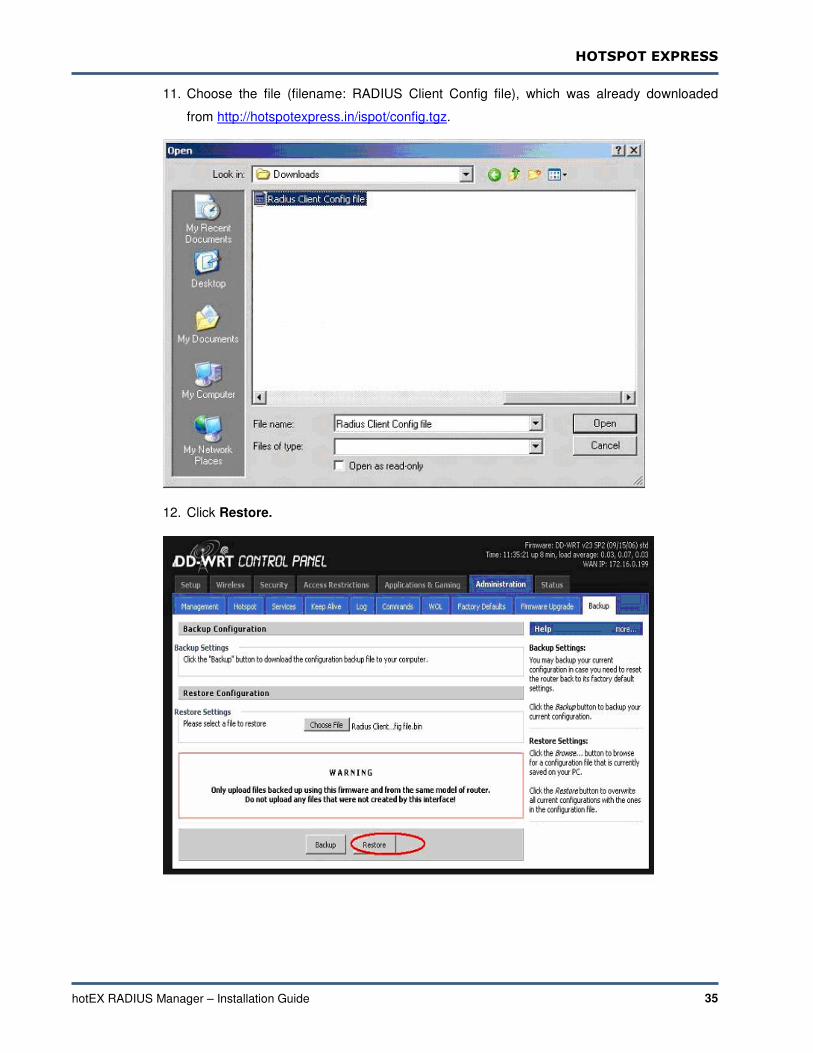
11. Choose the file (filename: RADIUS Client Config file), which was already downloaded
from http://hotspotexpress.in/ispot/config.tgz.
12. Click Restore.
HOTSPOT EXPRESS
hotEX RADIUS Manager – Installation Guide 36
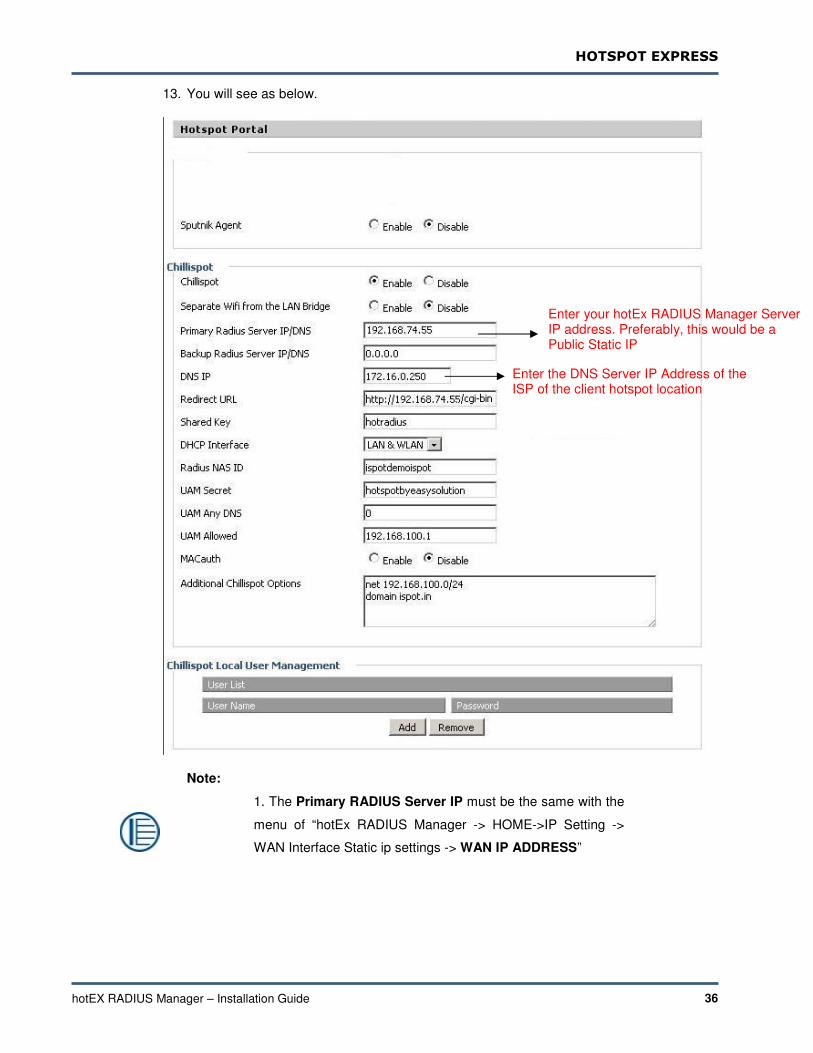
13. You will see as below.
Note:
1. The Primary RADIUS Server IP must be the same with the
menu of “hotEx RADIUS Manager -> HOME->IP Setting ->
WAN Interface Static ip settings -> WAN IP ADDRESS”
Enter your hotEx RADIUS Manager Server IP address. Preferably, this would be a Public Static IP
Enter the DNS Server IP Address of the ISP of the client hotspot location
HOTSPOT EXPRESS
hotEX RADIUS Manager – Installation Guide 37
2. The shared key highlighted in this screen, must be the
same, with the menu of "hotEx RADIUS Manager -> HOME ->
ADD NAS -> NAS Client Location -> SECRET"
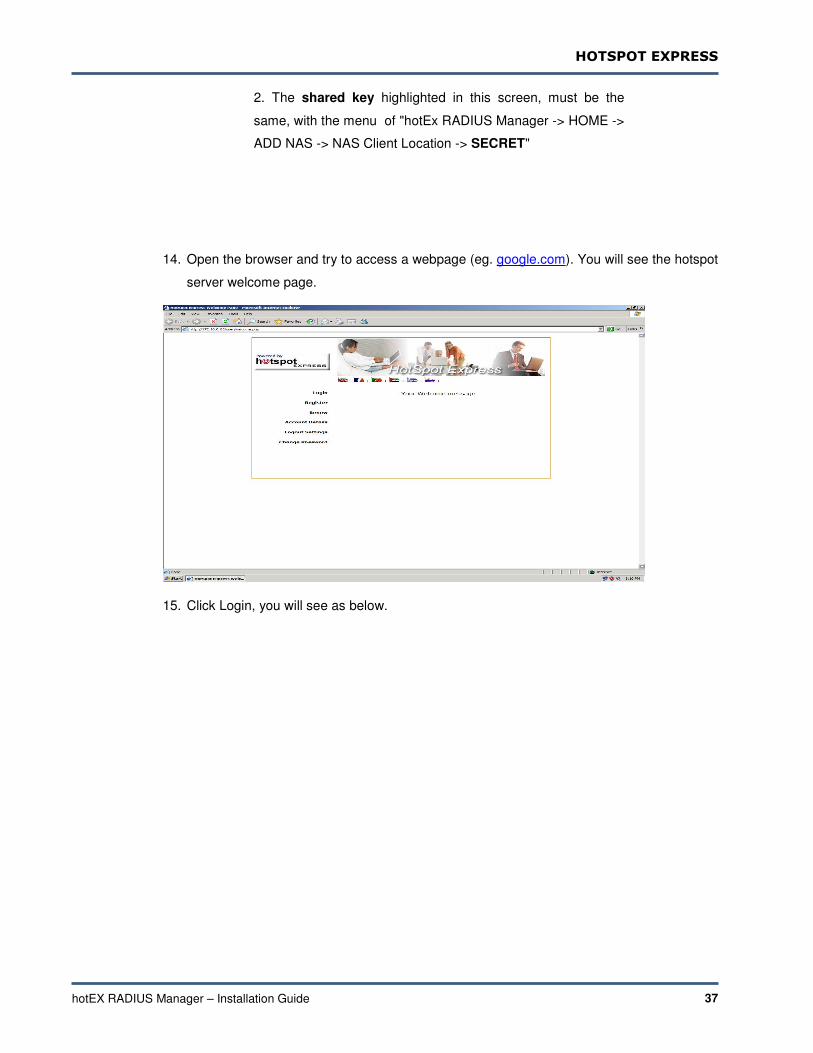
14. Open the browser and try to access a webpage (eg. google.com). You will see the hotspot
server welcome page.
15. Click Login, you will see as below.
HOTSPOT EXPRESS
hotEX RADIUS Manager – Installation Guide 38
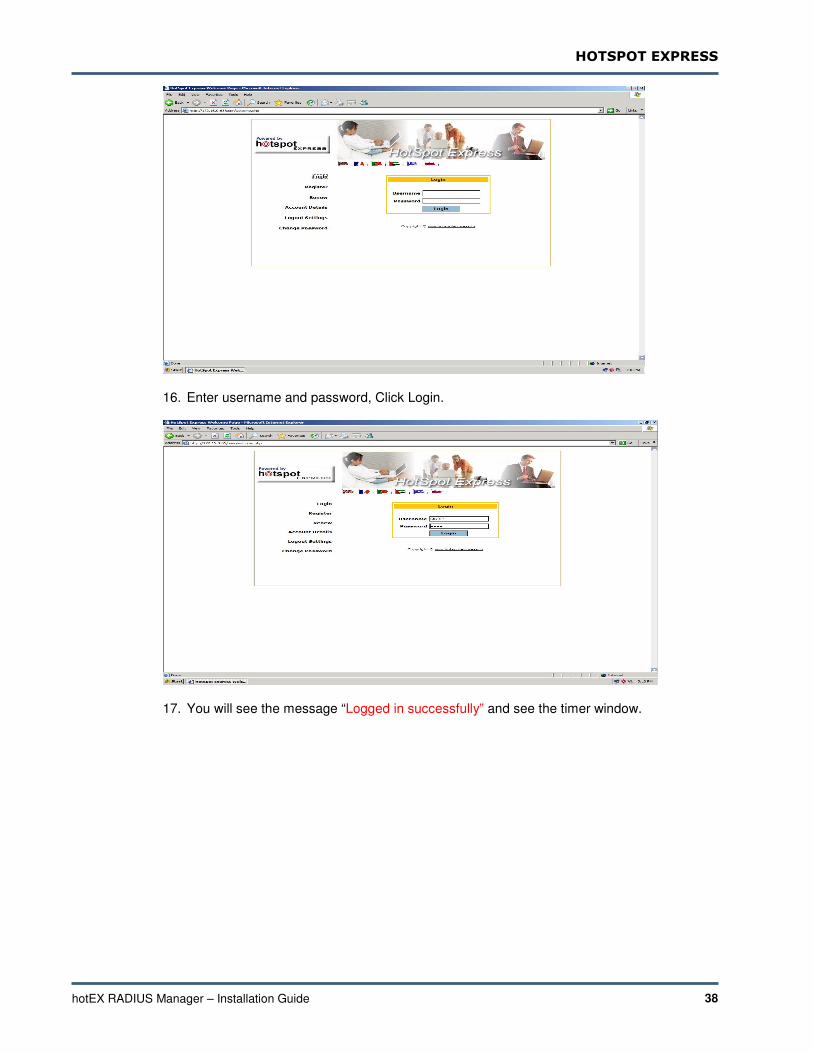
16. Enter username and password, Click Login.
17. You will see the message “Logged in successfully” and see the timer window.

HOTSPOT EXPRESS
hotEX RADIUS Manager – Installation Guide 39
18. Now, you are logged in successfully and you can start using Internet.
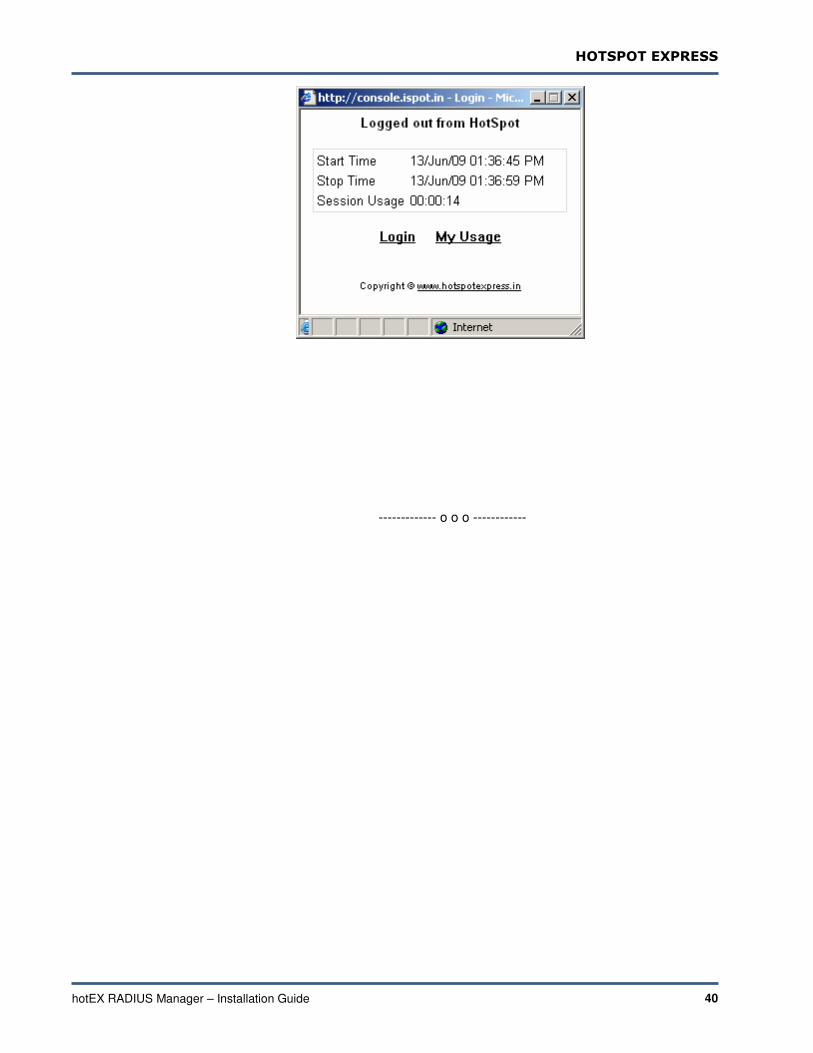
19. To logout, please enter “ http://exit ” or “ http://logout ” in the browser.
HOTSPOT EXPRESS
hotEX RADIUS Manager – Installation Guide 40
------------- o o o ------------