Hot Spot Jump Ring Soldering Machine - Rio Grande Spot ® Jump Ring Soldering Machine Hot Spot® is...
4
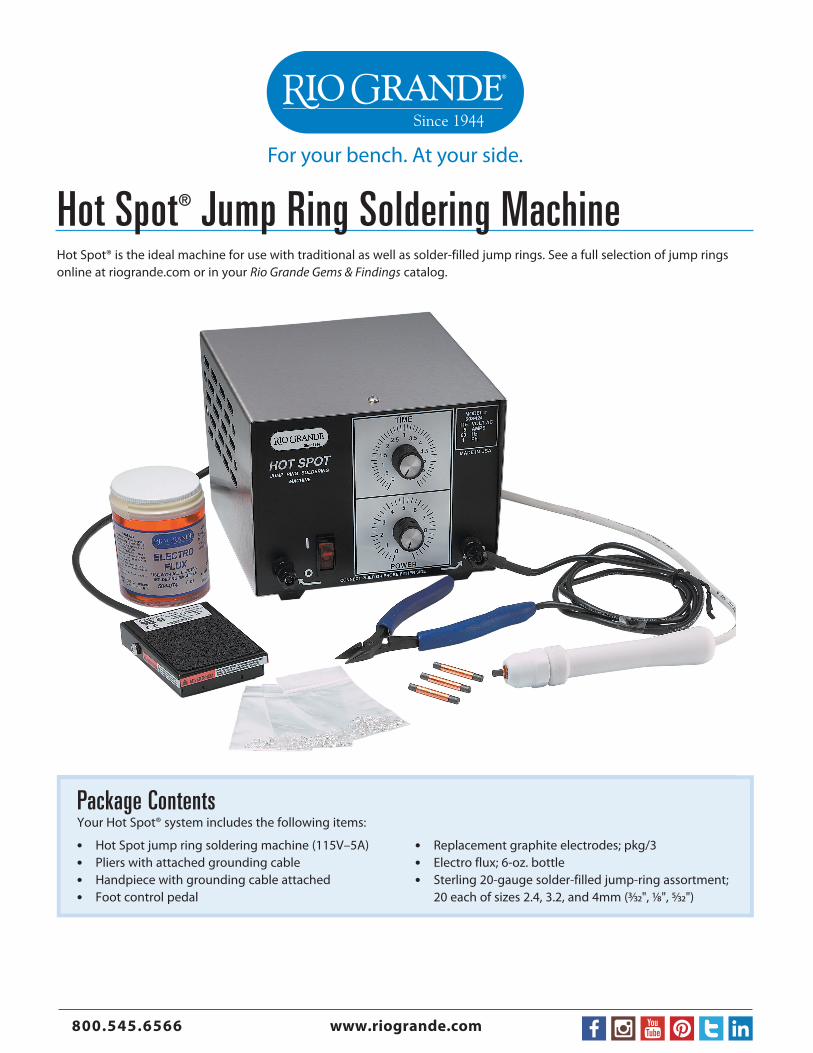
Hot Spot ® Jump Ring Soldering Machine Hot Spot® is the ideal machine for use with traditional as well as solder-filled jump rings. See a full selection of jump rings online at riogrande.com or in your Rio Grande Gems & Findings catalog. Package Contents Your Hot Spot® system includes the following items: • Hot Spot jump ring soldering machine (115V–5A) • Pliers with attached grounding cable • Handpiece with grounding cable attached • Foot control pedal • Replacement graphite electrodes; pkg/3 • Electro flux; 6-oz. bottle • Sterling 20-gauge solder-filled jump-ring assortment; 20 each of sizes 2.4, 3.2, and 4mm (3/32", 1/8", 5/32") 800.545.6566 www.riogrande.com
Transcript of Hot Spot Jump Ring Soldering Machine - Rio Grande Spot ® Jump Ring Soldering Machine Hot Spot® is...
Hot Spot® Jump Ring Soldering MachineHot Spot® is the ideal machine for use with traditional as well as solder-filled jump rings. See a full selection of jump rings online at riogrande.com or in your Rio Grande Gems & Findings catalog.
Package ContentsYour Hot Spot® system includes the following items:
• Hot Spot jump ring soldering machine (115V–5A)• Pliers with attached grounding cable• Handpiece with grounding cable attached• Foot control pedal
• Replacement graphite electrodes; pkg/3 • Electro flux; 6-oz. bottle• Sterling 20-gauge solder-filled jump-ring assortment;
20 each of sizes 2.4, 3.2, and 4mm (3⁄32", 1⁄8", 5⁄32")
800.545.6566 www.riogrande.com

Because the power sources on the Hot Spot® have no polarity, you can connect the cable on the handpiece or the pliers to either connection point on the front panel.
Setting Up the Machine• Take all components out of the box.• Place the Hot Spot machine on a sturdy, level surface.• Attach the grounding cables to either of the power sources on the front of
the Hot Spot machine.• Install a graphite electrode into the collet:
a. Unscrew the cap on the handpiece and push out the cord to expose collet.
b. Gently push the graphite electrode into the collet.c. Screw the handpiece cap back on to secure the electrode. Hand-
tighten only to avoid stripping the threads. The electrode should protrude approximately 1/4" to 1/2" from the tip of the handpiece cap.
• Plug the foot control cable into the back of the machine. Place the foot pedal beneath the machine on the floor.
• While the machine is off, plug the power cord into a grounded 115V AC outlet.
Handpiece lead
Carbon electrode
Paste solder
(or solder-filled
jump-ring)
Needle-nose plier lead
Teflon handle
Please Note:• Getting consistently good results with
the Hot Spot will take practice; give yourself time to get comfortable with the machine and to get familiar with how it operates.
• Use only the accessories included with the Hot Spot machine for best results.
• When the carbon electrode wears down to the bottom of the copper fitting paper, remove it from the hand piece, turn it around and reinstall it (electrodes are two-sided so you can use both ends). Replace the electrode only when both ends are exhausted.
• The tip of the electrode must fully contact the solder joint on jump rings.
• Use liquid Electro flux as needed when working with solder-filled jump rings.
• Excess flux on the jump rings may cause arcing (sparks) to occur; this will not cause any damage.
Safety Precautions• Carefully read all instructions before operating the Hot Spot.• Always wear safety glasses.• Use only with a properly grounded 115V AC outlet.• Keep long hair and loose clothing away from work area when
operating the unit.• Keep cords and the foot control pedal away from traffic areas.• To avoid serious burns, do not touch heated equipment.• Always apply the graphite electrode to jump rings before
activating power with the foot pedal; this will help prevent sparks.
ImportantAlways apply the graphite electrode to your jump rings
before activating the Hot Spot with the foot pedal.
800.545.6566 www.riogrande.com
Hot Spot® Jump Ring Soldering Machine page 2
Preparing Solder-Filled Jump Rings1. Apply Electro flux to the jump rings with a flux brush or simply dip the rings into the flux using the pliers. Use care to
avoid getting any flux on the pliers themselves.2. Close jump rings, making certain that no gap exists. The ends should be neatly butted together, with full and complete
contact, to ensure a secure connection and proper solder flow. We recommend using an Optivisor™ to get the best view of the contact point.
3. If there is excess flux on the ring, you can catch it with a cotton swab; use care to avoid wiping off too much as this could prevent the solder from flowing properly. Again, some sparks due to excess flux are normal and harmless.
Preparing Standard Jump Rings1. Using paste solder is very effective when working with rings that are not made from solder-filled wire; simply put a dab of
paste on the underside of the closed joint of the ring (inside the ring) with your solder pick.2. Place the electrode on top of the ring and solder as usual. You will be able to actually see the solder reach its melt point,
and it will flow upward where the ends of the ring meet.3. As you become more proficient with the Hot Spot, you will use less paste and achieve a smooth, clean, joint that will be
virtually undetectable.4. When soldering standard (not solder-filled) rings, the paste will build up on jaws of your
pliers and the electrode. You’ll want to purchase the electrode sharpener/dresser to clean and re-surface your electrode as needed. Fine-grit polishing paper can be used to clean the jaws of your pliers.
Operating the machine1. Press the red “ON" switch on the front left of the machine.2. Start with a time setting (top knob) between 2 and 3. The timer is
calibrated in half-second increments up to three seconds. Different rings require different times; it helps to keep a record of the best settings for your particular applications and materials. Different machines behave somewhat differently, and it will take time to get familiar with yours.
3. Set the power (bottom knob) to approximately 2.5; start low and slowly increase as needed to flow solder. If arcing occurs, or if the ring melts, reduce time. It is better to reduce or increase time first if you think you are a bit too hot or to cold; adjusting both knobs will muliply the tweaks necessary. If time alone doesn’t correct the issue, then adjust the temperature knob.
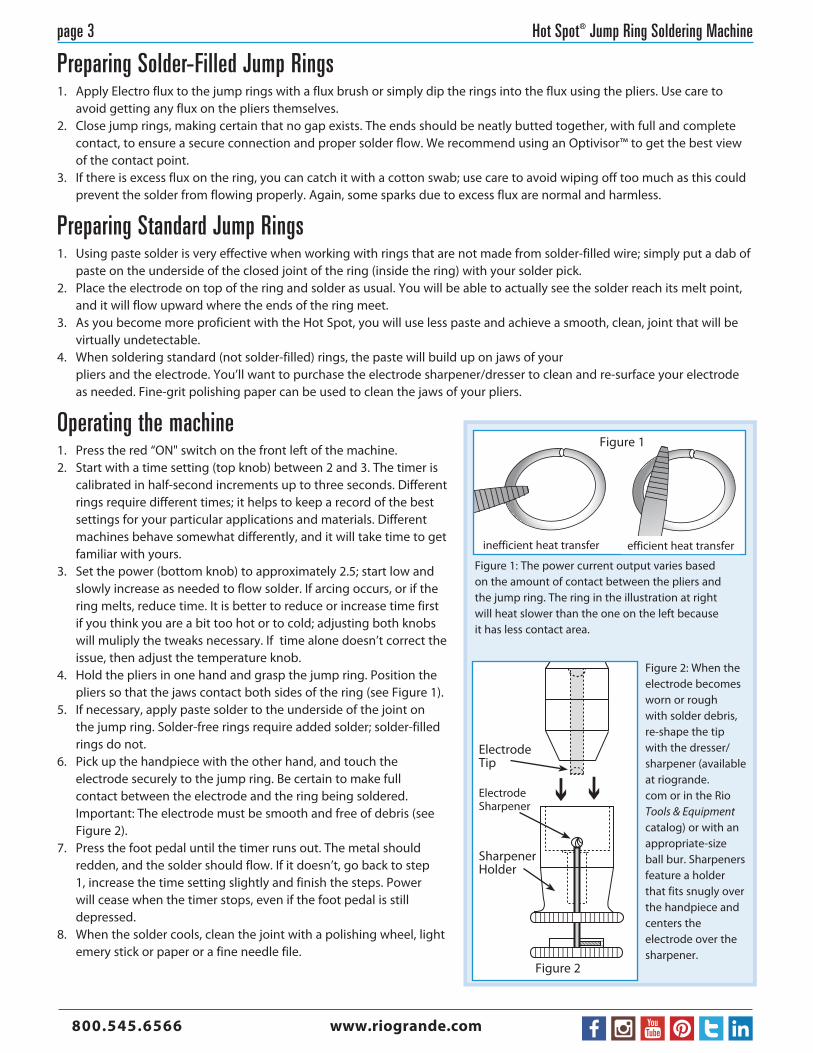
4. Hold the pliers in one hand and grasp the jump ring. Position the pliers so that the jaws contact both sides of the ring (see Figure 1).
5. If necessary, apply paste solder to the underside of the joint on the jump ring. Solder-free rings require added solder; solder-filled rings do not.
6. Pick up the handpiece with the other hand, and touch the electrode securely to the jump ring. Be certain to make full contact between the electrode and the ring being soldered. Important: The electrode must be smooth and free of debris (see Figure 2).
7. Press the foot pedal until the timer runs out. The metal should redden, and the solder should flow. If it doesn’t, go back to step 1, increase the time setting slightly and finish the steps. Power will cease when the timer stops, even if the foot pedal is still depressed.
8. When the solder cools, clean the joint with a polishing wheel, light emery stick or paper or a fine needle file.
Figure 2: When the electrode becomes worn or rough with solder debris, re-shape the tip with the dresser/sharpener (available at riogrande.com or in the Rio Tools & Equipment catalog) or with an appropriate-size ball bur. Sharpeners feature a holder that fits snugly over the handpiece and centers the electrode over the sharpener.
Figure 1: The power current output varies based on the amount of contact between the pliers and the jump ring. The ring in the illustration at right will heat slower than the one on the left because it has less contact area.
inefficient heat transfer efficient heat transfer
Figure 1
Electrode Tip
Sharpener Holder
Electrode Sharpener
Figure 2
800.545.6566 www.riogrande.com
page 3 Hot Spot® Jump Ring Soldering Machine
©2016 Rio Grande Inc. All rights reserved.
Setting SuggestionsThe suggested time- and power settings for the silver solder-filled jump rings included with your Hot Spot are below. Please Note: These settings are guidelines only; there is no specific setting for any one ring type or size. You will need to vary the time and power settings to achieve combinations appropriate to your applications.
Safety Features• Durable Teflon® handpiece has phenolic insulators
to protect your hands from heat.• Three-second timer cuts off heat automatically—
even when foot pedal is depressed.• “Re-cirk-it" switch on the back of the machine
recirculates power to the machine if it overheats.• Hot Spot produces little or no noise and releases
little or no harmful fumes when using liquid flux with solder-filled jump rings. If using a paste solder, do not choose a low-temperature paste flux.
MaintenanceKeep the graphite electrodes and plier tips free from carbon buildup. Wipe plier tips with a clean, soft cloth or clean them with a fine-grit sanding paper or stick. For the most efficient soldering, use an electrode sharpener to reshape the electrode whenever it becomes rough or worn.
TroubleshootingThe Hot Spot® jump ring soldering machine is relatively easy to use; however, getting consistently good results with the Hot Spot will take practice; give yourself time to get comfortable with the machine and to get familiar with how it operates. The table below offers solutions to some more common questions. Please call our technical support team at 800-545-6566 if you require more information.
Sterling Jump Rings solder-filled Gauge Diameter Time Setting Power
#693-407, #693-408, #693-409 20 gauge 2.4mm 2.5–3 7.5–8
Possible CauseOveruse; too much pressure applied; poor contact with piece
Handpiece collar has overheated
Too much power going through
Loose connection to power source
Exposed to heat too long; too much pressure applied to jump ring; operator touched electrode to jump ring after activating power with the foot pedal
Too much power or poor electrode contact on the metal surface
IssueElectrode is worn
Electrode becomes loose in the collar after long use
Machine is overheated
Heat is not conducting through the collet
Jump rings are melting
Metal sparks and burns
SolutionsUse the opposite end of the electrode; reshape the electrode using the sharpener or fine-grain sandpaper; replace the electrode.
Power off the machine and let it cool for 30–60 mins.
Ensure that you are using a 115V AC outlet, or press the “Re-cirk-it" button on the back of the machine.
Tighten the handpiece connection.
Reduce the heating time and/or pressure; touch elec-trode to jump ring before pressing the foot pedal.
Clean and reshape the electrode; clean plier tips; reduce power setting/adjust dwell time downward; ensure that the electrode does not contact any flux.
Replacement Parts & Supplies Available (see riogrande.com)
• Replacement electrodes • Electrode sharpener• Replacement Teflon® handle • Electro flux• Needle-nose pliers accessory• Sterling solder-filled jump-ring assortment* *Assortment contains 20-gauge jump rings; 50 each of sizes 2.4, 3.2 and 4mm (3⁄32", 1⁄8", 5⁄32")
800.545.6566 www.riogrande.com
Hot Spot® Jump Ring Soldering Machine page 4