Hook, Needle, Pencil CaseHook, Needle, Pencil Case How to make a pretty, handy holder for your...
24
Hook, Needle, Pencil Case How to make a pretty, handy holder for your crafty tools. 3 by Diane Gilleland www.craftypod.com Materials: • 1 sheet 10-count plastic canvas, either translucent or color (See notes on page 3) • 2 plastic canvas coaster rounds, any size • Small amount of non- stretchy yarn (see page 3) • Scissors • Sharpie marker • Rubbing alcohol and cotton ball • Nail clippers (optional) • Large-eyed, blunt-tipped needle • Medium binder clip • Needle-nose pliers • 1 Sew-through button, at least 1" (2.5 cm) in diameter • Hand-sewing needle • Coordinating sewing thread
Transcript of Hook, Needle, Pencil CaseHook, Needle, Pencil Case How to make a pretty, handy holder for your...

Hook, Needle, Pencil CaseHow to make a pretty, handy holder for your crafty tools.
3by Diane Gillelandwww.craftypod.com
Materials:
• 1 sheet 10-count plastic canvas, either translucent or color (See notes on page 3)
• 2 plastic canvas coaster rounds, any size
• Small amount of non-stretchy yarn (see page 3)
• Scissors
• Sharpie marker
• Rubbing alcohol and cotton ball
• Nail clippers (optional)
• Large-eyed, blunt-tipped needle
• Medium binder clip
• Needle-nose pliers
• 1 Sew-through button, at least 1" (2.5 cm) in diameter
• Hand-sewing needle
• Coordinating sewing thread

Hook, Needle, Pencil Case Page 1
Copyright ©2009 Diane Gilleland. All Rights Reserved Worldwide. www.craftypod.com
Cutting Canvas3
In this first section, you’ll learn how to custom-size your case for your tools.
Plastic canvas sheets are usually 10.5 x 13.5" (or, 26.7 x 34.3 cm), so you can make your case to accom-modate even longer knitting needles.
We’ll also talk about the best way to cut plastic canvas, and learn how to clean up mistakes.
Part 1:
Step 1: Begin by laying your tools out on a sheet of plastic canvas. Line up the bottom tips, and place them about 1/4" (.64 cm) from the edge of the canvas, as shown.
Step 2: Next, look at the tops of your tools. Make a mark with a Sharpie 1" (2.5 cm) from the tops of your tools, as shown.
3 A Little Tip:Here’s an important little bit of physics: your tools should stick up no more than 1" (2.5 cm) from the top of the case. If they stick up more, you could have trouble getting the case to close. These photos illustrate:
Oops! Tools stick out too far. Case won’t close!
Tools stick out just 1".Case closes perfectly!
1"
Hook, Needle, Pencil Case Page 2
Copyright ©2009 Diane Gilleland. All Rights Reserved Worldwide. www.craftypod.com
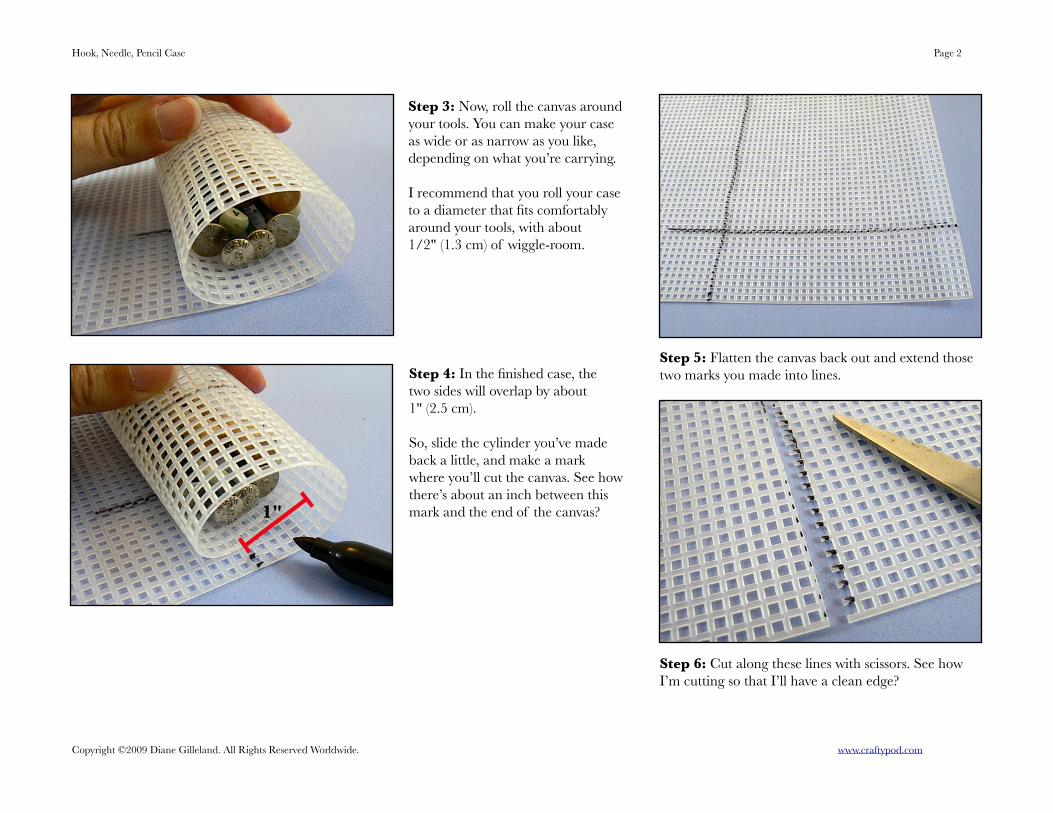
Step 3: Now, roll the canvas around your tools. You can make your case as wide or as narrow as you like, depending on what you’re carrying.
I recommend that you roll your case to a diameter that fits comfortably around your tools, with about 1/2" (1.3 cm) of wiggle-room.
Step 4: In the finished case, the two sides will overlap by about 1" (2.5 cm).
So, slide the cylinder you’ve made back a little, and make a mark where you’ll cut the canvas. See how there’s about an inch between this mark and the end of the canvas?
Step 5: Flatten the canvas back out and extend those two marks you made into lines.
Step 6: Cut along these lines with scissors. See how I’m cutting so that I’ll have a clean edge?
1"

Hook, Needle, Pencil Case Page 3
Copyright ©2009 Diane Gilleland. All Rights Reserved Worldwide. www.craftypod.com
3Cleaning Up Your Canvas
After you cut out your pieces, take a moment to rub off any leftover marker marks, using rubbing alcohol on a cotton ball. You don’t want them showing through the stitching in your finished case!
If your cut pieces have any little nubs at the edges, no worries - a set of nail clippers will take them right off.
Step 7: Next, we need a second piece to make the lid of our case. Use the base piece you’ve already cut as a measuring guide. The lid should be as wide as the base piece, and tall enough so that it’s about 1" (2.5 cm) taller than the tops of your tools.
Okay, here are the two main pieces for our case. (We’ll deal with the round end pieces later.)
A few notes, before we get into stitching:
3 The plastic canvas shows through the woven design just a little, but it’ll be practically invisible if your canvas is either translucent or a color that matches your stitching. Avoid contrasting canvas, which obscures the woven effect.
3 You’ll need a yarn that has virtually no stretchiness to it for this project. I love cotton yarns like Sugar n’ Cream, which are inexpensive and come in great colors. www.sugarncream.com
3 You might want to play around with a variegated yarn, especially for the weaving. (One of the cases on the front page uses variegated yarn, so you can see how this looks.)

Hook, Needle, Pencil Case Page 4
Copyright ©2009 Diane Gilleland. All Rights Reserved Worldwide. www.craftypod.com
Stitching It Up3
We’re using a very simple stitch pattern as the basis of our woven texture.
While we’re learning that, we’ll also look at how to start and finish a strand of yarn, and how to keep your yarn from tangling as you stitch.
Part 2:
Step 8: Start with a strand of yarn about 36" (91 cm) long. Thread it on your needle, but don’t tie a knot. Bring the needle up through the bottom right corner of the canvas, as shown.
Step 9: Leave about a 3" (7.6 cm) tail of yarn hanging down below the canvas. Then, pass the needle back down through the canvas, leaving two holes open, as shown.
Step 10: Next, bring the needle back up through the very next hole. Keep that 3" (7.6 cm) tail of yarn tucked out of your way for now - we’ll anchor it in a minute.
Step 11: Repeat that stitch pattern all the way across the canvas. When you reach the other end, you may have to take a shorter stitch. This is completely fine.
Hook, Needle, Pencil Case Page 5
Copyright ©2009 Diane Gilleland. All Rights Reserved Worldwide. www.craftypod.com
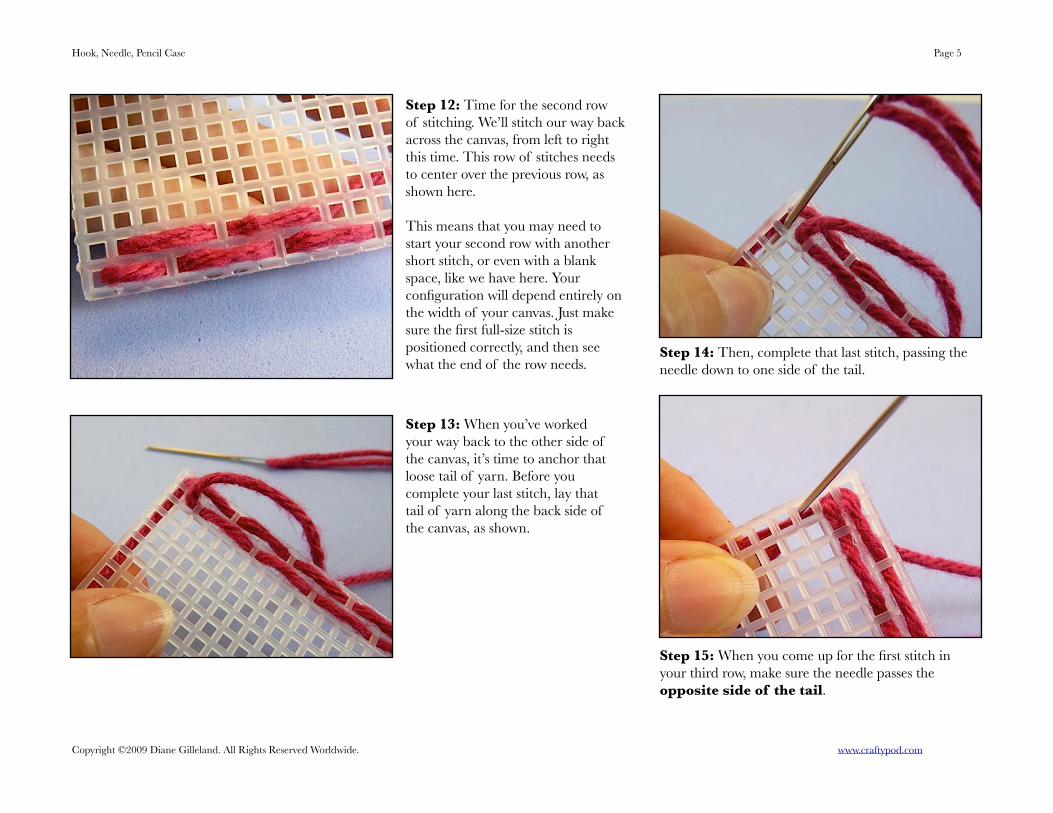
Step 12: Time for the second row of stitching. We’ll stitch our way back across the canvas, from left to right this time. This row of stitches needs to center over the previous row, as shown here.
This means that you may need to start your second row with another short stitch, or even with a blank space, like we have here. Your configuration will depend entirely on the width of your canvas. Just make sure the first full-size stitch is positioned correctly, and then see what the end of the row needs.
Step 13: When you’ve worked your way back to the other side of the canvas, it’s time to anchor that loose tail of yarn. Before you complete your last stitch, lay that tail of yarn along the back side of the canvas, as shown.
Step 14: Then, complete that last stitch, passing the needle down to one side of the tail.
Step 15: When you come up for the first stitch in your third row, make sure the needle passes the opposite side of the tail.

Hook, Needle, Pencil Case Page 6
Copyright ©2009 Diane Gilleland. All Rights Reserved Worldwide. www.craftypod.com
Step 16: On the back of the canvas, this makes a little loop around that tail. Pull the yarn snug.
Each time you complete a row on this side, you’ll make another loop like this until you’ve anchored the entire tail.
Step 17: Continue stitching back and forth in this manner until you’ve filled the canvas. Then, cover the lid piece with stitching as well. This all goes pretty quickly, especially with a nice movie.
3 Tip: Keeping Your Yarn from Tangling
I like to work with fairly long strands of yarn for the stitching and weaving steps of this project, so I don’t have to knot the yarn as often.
But, when you work with long strands, they can easily become tangled as you’re pulling them through the canvas. And these tangles will rub and pull the yarn, which weakens it. If the yarn gets too beat-up, it will break.
Fortunately, it’s really easy to prevent tangles - when you’re pulling a stitch through the canvas, just hold the end of the yarn away from the hole you’re pulling through, as shown here.
(Incidentally, this anchored tail becomes very useful for anchoring other yarns later in the project. But don’t worry about that right now.)

Hook, Needle, Pencil Case Page 7
Copyright ©2009 Diane Gilleland. All Rights Reserved Worldwide. www.craftypod.com
Adding Some Weaving
3
...Technically, this is more of a hybrid between stitching and weaving, but it looks like weaving, so we’ll call it that.
While we’re on this subject, we’ll also look at some fun ways to create various patterns in the woven surface of your case.
Part 3: See these strands of plastic running vertically along the canvas? We’re going to cover them with some woven strands now. Thread your needle with about 24" (61 cm) of contrasting yarn.
Step 18: To begin weaving, bring the needle up through the canvas, behind a stitch, as shown. Leave a 3" (7.6 cm) tail of yarn hanging below the canvas. We’ll anchor this in a minute.
See how you have a choice of two holes to bring the needle up through? You can use either the right-hand one or the left. Just keep that consistent as you weave each new row.
Step 19: Next, pass the needle under each stitch, as shown. Your needle will likely be long enough to pass under about four stitches at a time.

Hook, Needle, Pencil Case Page 8
Copyright ©2009 Diane Gilleland. All Rights Reserved Worldwide. www.craftypod.com
Step 20: When you’ve woven as far as your needle will go, just pull the yarn through and then pass the needle through the next set of four stitches.
Repeat this process to weave your way across the canvas.
Step 21: When you get to the other end of the canvas, pass your needle back down through the last hole.
(Take a peek back at Step 18. See how we came up through the left-hand hole? Now we’re going back down through the left-hand hole at this end, too.)
3 A Little Tip:
Be careful not to split the yarn in your stitches when you weave the needle under them.
You might find it helpful to bend the canvas a little as you weave, as shown here. This makes it a bit easier to pass your needle completely under the stitches without catching any strands.

Hook, Needle, Pencil Case Page 9
Copyright ©2009 Diane Gilleland. All Rights Reserved Worldwide. www.craftypod.com
3 Finishing off:Step 22: Bring your needle back up through the canvas to start the second row of weaving. Repeat Steps 18-21 to weave your way back across the canvas.
Now, to anchor that tail of yarn. We’ll do it a lot like we did during the stitching phase (Steps 14-16).
Step 23: When you pass your needle back up through the canvas to start your third row of weaving, make sure you loop around that initial tail of yarn.
You’ll make another loop around this tail each time you start a new row at this end of the canvas, until the whole tail is anchored.
Weave your way back and forth across the canvas until it’s covered. Repeat the process to weave on the lid as well.
...Or, you can pass the needle under another anchored yarn a few times.
If you need to end a strand of yarn while weaving, you can pass your needle under a few stitches on the back of the canvas and then cut it.
Hook, Needle, Pencil Case Page 10
Copyright ©2009 Diane Gilleland. All Rights Reserved Worldwide. www.craftypod.com
Playing with Pattern
3
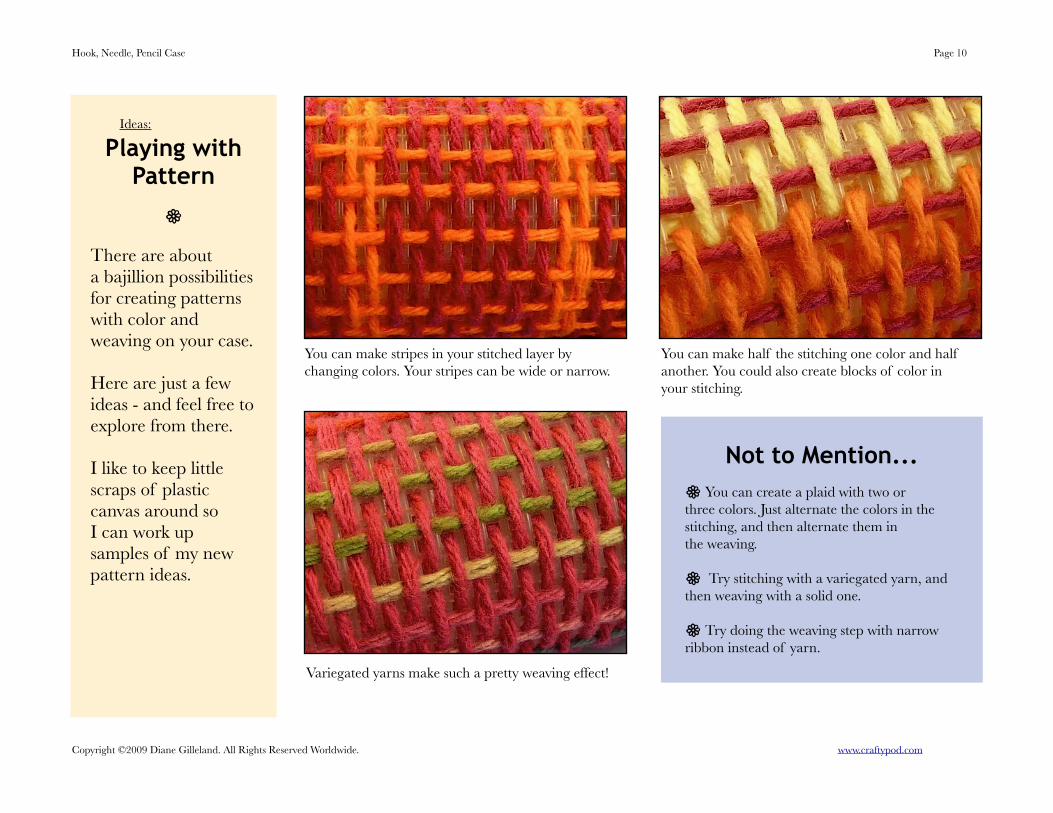
There are about a bajillion possibilities for creating patterns with color and weaving on your case.
Here are just a few ideas - and feel free to explore from there.
I like to keep little scraps of plastic canvas around so I can work up samples of my new pattern ideas.
Ideas:
You can make stripes in your stitched layer by changing colors. Your stripes can be wide or narrow.
You can make half the stitching one color and half another. You could also create blocks of color in your stitching.
Variegated yarns make such a pretty weaving effect!
Not to Mention...3 You can create a plaid with two or three colors. Just alternate the colors in the stitching, and then alternate them in the weaving.
3 Try stitching with a variegated yarn, and then weaving with a solid one.
3 Try doing the weaving step with narrow ribbon instead of yarn.

Hook, Needle, Pencil Case Page 11
Copyright ©2009 Diane Gilleland. All Rights Reserved Worldwide. www.craftypod.com
Assembling the Tubes
3
It’s time to build our case now - and we’ll take this in stages.
Plastic canvas construction isn’t that difficult. The main tricks are knowing how to start and finish a strand of yarn, and understanding how to maneuver your needle through tight spots.
Part 4:
Step 24: First, we need to finish one side of the case - and this means, one of the sides that runs parallel to your weaving, as seen here.
We’ll use a simple whip stitch for this - it’s a great stitch for covering up the edges of plastic canvas.
Bring your needle up through the first hole in the canvas, leaving about a 3" (7.6 cm) tail. Lay this tail alongside the edge of the canvas, as shown.
Step 25: Bring your needle up through the next hole, and the next, and the next. As you make whip stitches, you’ll cover up that tail of yarn.
Step 26: To finish off the stitching, pass your needle under the nearest anchor yarn a few times, and cut it close to your work.

Hook, Needle, Pencil Case Page 12
Copyright ©2009 Diane Gilleland. All Rights Reserved Worldwide. www.craftypod.com
Step 27: Now, roll the canvas into a cylinder, placing the finished side on top of the unfinished side.
Remember, the two edges of the canvas should overlap by about 1" (2.5 cm), as you planned it back in Step 4.
Step 28: Anchor one end of the tube with a binder clip. Leave the other end open - we’ll start sewing this tube together there.
Step 29: Adjust the rest of the whip-stitched edge so it’s straight. This is easy to see, by the way - just line that edge up with the woven pattern, as shown.
On the next page, we’ll sew a seam to hold this tube shape. As you sew, keep checking to make sure you have your canvas lined up correctly.
Hook, Needle, Pencil Case Page 13
Copyright ©2009 Diane Gilleland. All Rights Reserved Worldwide. www.craftypod.com
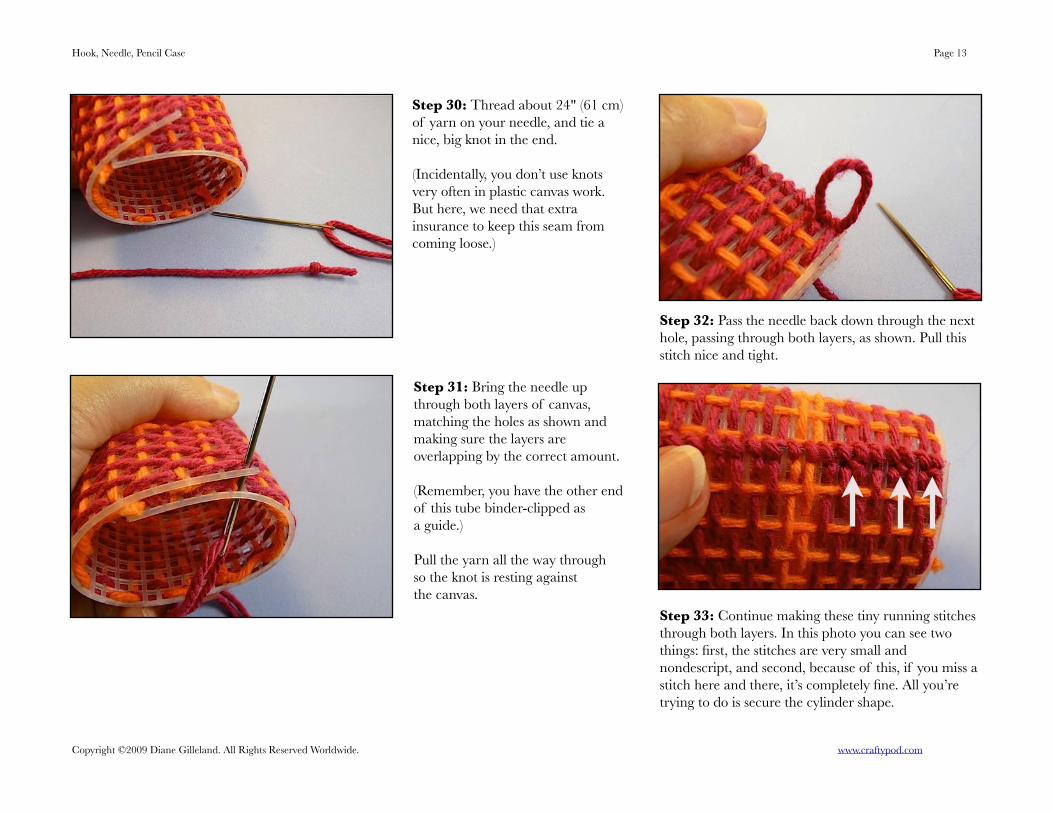
Step 30: Thread about 24" (61 cm) of yarn on your needle, and tie a nice, big knot in the end.
(Incidentally, you don’t use knots very often in plastic canvas work. But here, we need that extra insurance to keep this seam from coming loose.)
Step 31: Bring the needle up through both layers of canvas, matching the holes as shown and making sure the layers are overlapping by the correct amount.
(Remember, you have the other end of this tube binder-clipped as a guide.)
Pull the yarn all the way through so the knot is resting against the canvas.
Step 32: Pass the needle back down through the next hole, passing through both layers, as shown. Pull this stitch nice and tight.
Step 33: Continue making these tiny running stitches through both layers. In this photo you can see two things: first, the stitches are very small and nondescript, and second, because of this, if you miss a stitch here and there, it’s completely fine. All you’re trying to do is secure the cylinder shape.

Hook, Needle, Pencil Case Page 14
Copyright ©2009 Diane Gilleland. All Rights Reserved Worldwide. www.craftypod.com
3 A Little Tip:The trickiest part of sewing this seam is maneuvering your needle in and out of the canvas.
You’ll be able to get pretty far across the seam by reaching into the tube and grabbing the needle with your fingers, as shown here.
(Remember, pull those stitches nice and tight.)
Once you can’t reach the needle anymore, needle-nose pliers will let you continue sewing. Just use them to pull the needle through the canvas.
Eventually, then, you’ll stitch your way to where you can easily reach in through the other end of the tube with your fingers.
And again, if you have to skip a stitch or two at the center of the tube because you can’t reach, this is totally okay.
Step 34: When you’ve finished sewing this seam, pass the needle under some stitches or anchored yarn on the inside of the canvas a few times, and then cut.
Repeat Steps 24-34 to turn the lid piece into a tube.
Step 35: Use the whip stitch method on page 11 to stitch along one end of each tube. Leave the other end unfinished.

Hook, Needle, Pencil Case Page 15
Copyright ©2009 Diane Gilleland. All Rights Reserved Worldwide. www.craftypod.com
3 A Little Tip:
Making the Ends
3
Now we need to cap off these two tubes.
We’re using plastic canvas coaster rounds for this step - and these are available at many craft stores. (See page 21 for links to some online sources.)
Part 5:
Step 36: Place a plastic canvas coaster on your work surface, with one of your tubes on top. Center the tube over the canvas. Carefully trace around the tube, as shown.
Step 37: Use this traced line to cut two rounds to the same size.
If your tube seems to be an odd size, remember that it’s always better to have your rounds be slightly too small than slightly too big. Aim for something that looks more like the photo on the right.

Hook, Needle, Pencil Case Page 16
Copyright ©2009 Diane Gilleland. All Rights Reserved Worldwide. www.craftypod.com
Step 38: Time to stitch these circles - and they’re a little interesting to work with.
Begin at the outermost row, as shown here. Remember how we anchored the start of the yarn for the whip stitch (page 11)? You can use the same method here.
Step 39: We’re using a traditional needlepoint stitch here: bring the needle up, and then down again so that the thread will pass over a cross-point in the canvas.
When you’ve stitched your way around the circle, bring your needle up, and begin stitching the new row in the same direction.
Step 40: Stitching gets a little less straightforward at this point. Basically, you have two goals: a) to have almost every stitch pass over a cross-point in the canvas, and b) to cover the canvas.
See how, in the second row, there are some extra spaces to fill because the squares are larger?
You may need to take an extra stitch here and there to fill in those gaps.
This space is a little big...
...So I added another stitch.
Hook, Needle, Pencil Case Page 17
Copyright ©2009 Diane Gilleland. All Rights Reserved Worldwide. www.craftypod.com
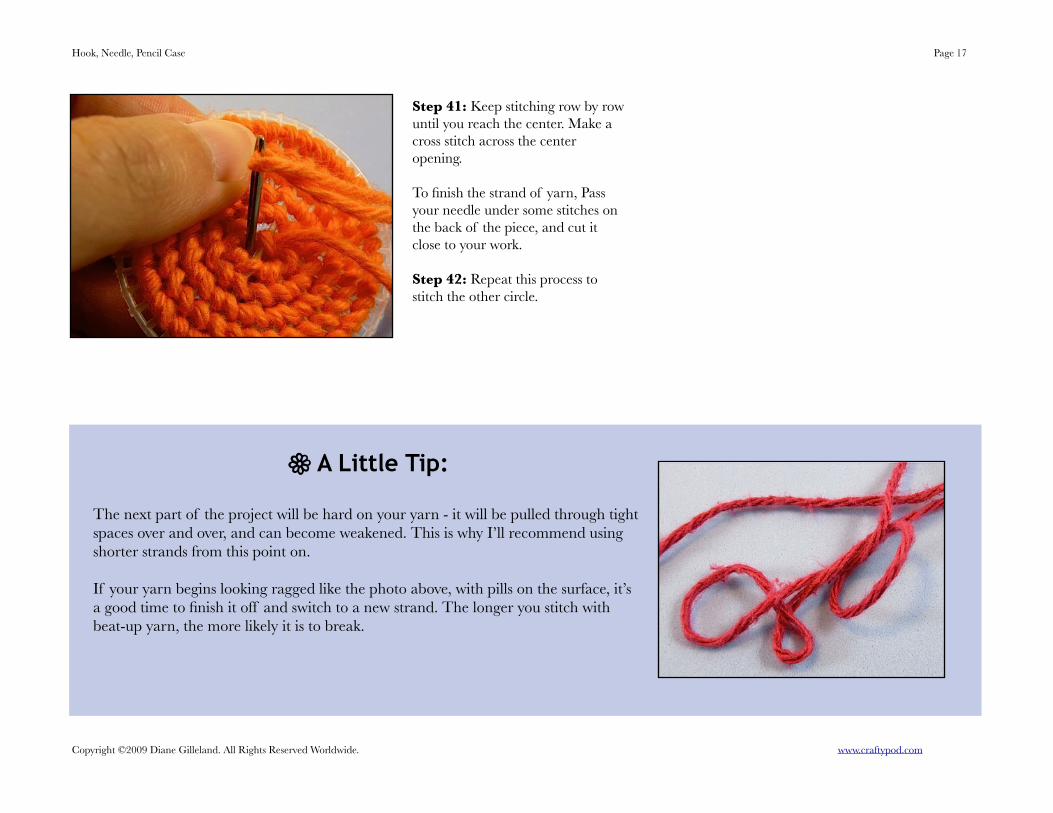
Step 41: Keep stitching row by row until you reach the center. Make a cross stitch across the center opening.
To finish the strand of yarn, Pass your needle under some stitches on the back of the piece, and cut it close to your work.
Step 42: Repeat this process to stitch the other circle.
3 A Little Tip:
The next part of the project will be hard on your yarn - it will be pulled through tight spaces over and over, and can become weakened. This is why I’ll recommend using shorter strands from this point on.
If your yarn begins looking ragged like the photo above, with pills on the surface, it’s a good time to finish it off and switch to a new strand. The longer you stitch with beat-up yarn, the more likely it is to break.

Hook, Needle, Pencil Case Page 18
Copyright ©2009 Diane Gilleland. All Rights Reserved Worldwide. www.craftypod.com
Attaching the Ends
3
Once you’ve done this part of the project, you have the basic skills to build just about any shape from plastic canvas.
When you’re joining two pieces of canvas, the main challenge is finding a good spot to finish a strand of yarn. You’ll need to pass the needle under some stitches at the back of the canvas. Sometimes, this takes a little bit of creative maneuvering.
Part 6:
Step 43: I’d recommend starting with the lid piece - it’s a little easier to work with. (Remember, we already whip stitched one end of this tube in Step 35. So we’re going to sew the round to the other end.)
Place the round on the tube. Bring your needle up through the round only, pulling the yarn through until you have a 3" (7.6 cm) tail. Lay this tail along the two pieces, as shown.
3 A Little Tip:In this photo, I want you to notice where the seam in the tube is - right behind where we began stitching. That’s important! Make sure you begin stitching in the same spot. I'll explain why in a moment.
Step 44: Bring the needle up through both layers of canvas, matching the holes as shown. Pull the yarn through. We’re whip stitching here, and the stitches, as you can see, will also catch that tail of yarn and anchor it. Keep whip stitching your way around the tube.
Seam is here.

Hook, Needle, Pencil Case Page 19
Copyright ©2009 Diane Gilleland. All Rights Reserved Worldwide. www.craftypod.com
3 A Little Tip:
As you’re joining the two pieces together, you might need to make a little adjustment here and there in your stitching. In some places, you might notice that the holes aren’t lining up anymore.
See how the needle has to pass through both holes at an angle here?
If this is happening, just take an extra stitch in the same set of holes, as shown here. That will close the gap, and now you can stitch on with the holes lining up better.
Step 45: When you’ve stitched all the way around, it’s time to finish off this yarn. Pass the needle between the two layers of canvas at the seam, as shown here, and pass it out through the wall of the case. It’s important that your needle pass between the two layers of canvas - this is what will anchor the yarn.
Step 46: Pull the yarn taut and cut it close to your work. Be very careful not to cut any of your weaving!
Repeat this process to attach the other round to the body of the case.

Hook, Needle, Pencil Case Page 20
Copyright ©2009 Diane Gilleland. All Rights Reserved Worldwide. www.craftypod.com
Attaching the Lid
3
We’re almost done!
By now, you should have a finished case and a lid. We just need to bring the two pieces together with a little yarn hinge.
Part 7:
Tip: When you’re attaching the case to its lid, you’ll want to make sure the seams in both pieces are lined up, as shown here.
Step 47: Now, bring the needle up through the lid, as shown. Leave a 3" (7.6 cm) tail of yarn, and lay it along the edge of the case, as also shown here.
Step 48: Then, place the two pieces side by side, with the seams together and the edges lined up, as shown here. Bring the needle up through both layers, matching the holes.

Hook, Needle, Pencil Case Page 21
Copyright ©2009 Diane Gilleland. All Rights Reserved Worldwide. www.craftypod.com
Step 49: This might look a bit familiar by now: we’re essentially whip stitching these two pieces together, and anchoring that tail of yarn in the process.
You only need to make 5-7 whip stitches to attach the lid to the case. You’re essentially creating a “hinge.”
Step 50: To finish this yarn, pass the needle back through your stitches and cut it close.
3 Where to Find Plastic Canvas Online:
If your local craft store doesn’t have plastic canvas, you can always order it online. Here are some places:
Annie’s Attic: You’ll find tons of canvas colors here, and all kinds of fun shapes. They also sell canvases with smaller holes, for finer work. www.anniesattic.com
Create For Less: They have sheets and shapes at great prices. www.createforless.com
Everything Plastic Canvas: This retailer even has 3D plastic canvas spheres and eggs! www.everythingplasticcanvas.com

Hook, Needle, Pencil Case Page 22
Copyright ©2009 Diane Gilleland. All Rights Reserved Worldwide. www.craftypod.com
Adding a Closure
3
I like to use a sew-through button rather than a shank button for this project.
This closure design works best when the yarn can wrap tightly around the button, and it’s hard to get that same snug fit with a shank button.
Part 8:
Step 51: Use a hand sewing needle and thread to sew a button to the body of the case.
Just pass your needle through the holes in the canvas. The needle will also tend to poke through some of the fibers in your stitching, and this is totally fine.
Step 52: I like to wind the thread around the base of the button a few times before I knot it. This lifts the button a little from the surface of the canvas and helps the closure work more smoothly.
Copyright and Usage: This digital tutorial is intended for you to enjoy on your screen, or print out for your personal use. The specific design herein is copyrighted, so please don’t reproduce it for commercial use. The technique itself, however, is yours to use in creating your own original designs.
This version of the tutorial has been licensed for free distribution by CRAFT (O’Reilly Media).
Any questions at all? Email me: [email protected] .

Hook, Needle, Pencil Case Page 23
Copyright ©2009 Diane Gilleland. All Rights Reserved Worldwide. www.craftypod.com
Step 53: Next, thread about 12" (30.5 cm) of yarn onto your larger needle. Don’t tie a knot.
Make one small stitch into the lid, passing the needle in and back out again so both ends of the yarn are hanging from the front of the lid, as shown.
This yarn should be placed to one side of the button, as shown here.
Step 54: Match the two ends of the yarn, and then twist the strands of yarn loosely together. Tie a knot in the end and trim away any excess. The finished strand should be about 5" (12.7 cm) in length.
To operate the closure, just wind the yarn around the button firmly a few times.
3 Like this tutorial? Want more?
You’ll find lots of interesting ebooks and craft projects over at CraftyPod Publishing!


![Review Article TheRoleofContinuousPeripheralNerveBlocksdownloads.hindawi.com/journals/arp/2012/560879.pdf · [46, 47]. For fascia iliaca blocks a blunt needle (pencil point or Tuohy)](https://static.fdocuments.us/doc/165x107/5eb755b704d40b63ae662241/review-article-theroleofcontinuousperipheral-46-47-for-fascia-iliaca-blocks.jpg)


![[Clement Hal] Clement, Hal - Needle 1 - Needle](https://static.fdocuments.us/doc/165x107/577cb1001a28aba7118b67ae/clement-hal-clement-hal-needle-1-needle.jpg)