
helpinator
51
Helpinator Version 3.1 User Manual Copyright © 2011 Major Mind Software
-
Upload
mastermanish13 -
Category
Documents
-
view
129 -
download
18
Transcript of helpinator
Helpinator
Version 3.1
User Manual
Copyright © 2011 Major Mind Software

Table of Contents
About 4What's New 6How To Buy 7Support 8Overview 9
Project 9Templates 11Images 11Text Snippets 11Variables 12Multiple Languages 14Styles 14Project Storage Modes 15
How To... 16Add Topic 16Add Subtopic 16Edit Topic 17Insert Image 18Insert Table 18Insert Link To Another Topic 18Insert Link To External Web Page 19Compile Help 20Assign Keywords 21Import and Export 22Add Several Topics 22
Edit Topic 23Topic Properties 23Topic Editor Toolbars 25
Work With Keywords 26From Topic Editor 26Manage Keywords 26
Work With Library Images 28Add Image 28Delete Image 29Rename Image 29Insert Image Placeholder 29Image Editor 29
Helpinator 3.1 Manual
2

Add New Empty Image 31Work With Text Snippets 32
Add Text Snippet 33Delete Snippet 33Insert Snippet Placeholder 33Edit Snippet 33
Understanding Templates 34RTF Templates 35HTML Templates 37Template Builder 38
Compile Help 41CHM 41RTF 41PDF 41Website 42Compile All 43Conditional Compilation 43
Command Line Utility 45Reports 49Project Verification 51
Helpinator 3.1 Manual
3
About
Help authoring requires a lot of work especially if you need documentation in several different formats. Helpinator doesthis work for you. You can concentrate on your content and leave all format handling to Helpinator. Above that you cansignificantly reduce time spent on help authoring by using exclusive productivity enhancements built in Helpinator.
Basic features:
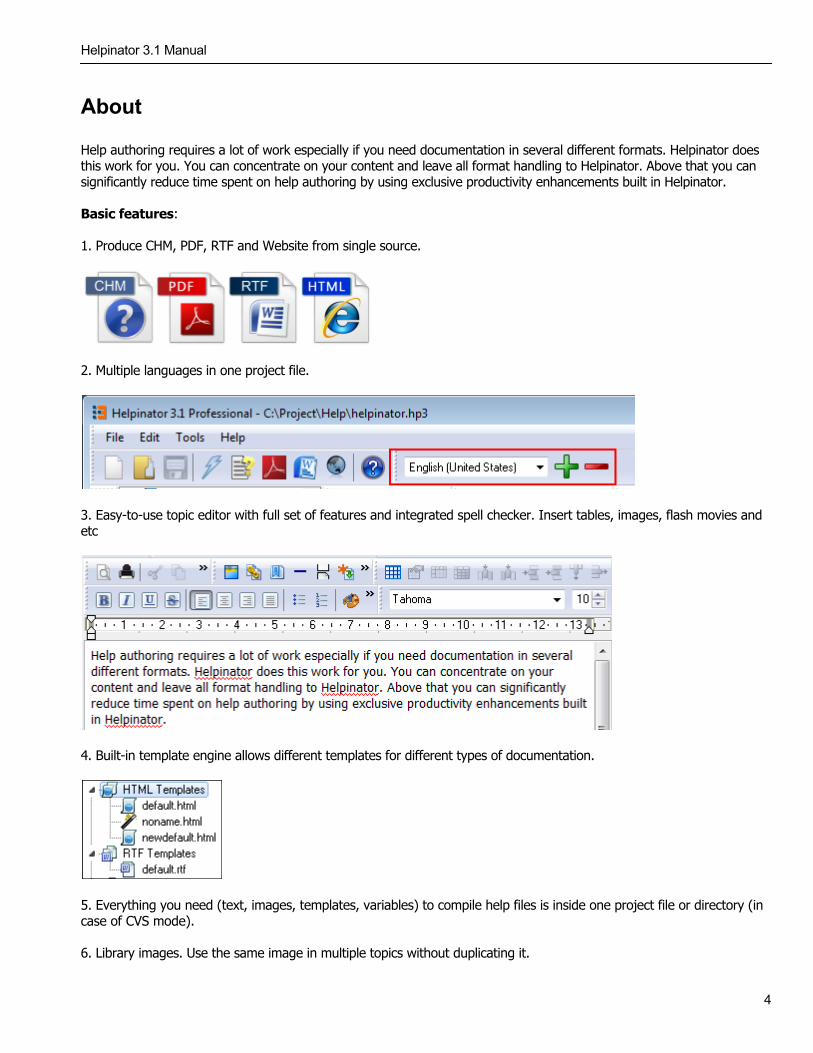
1. Produce CHM, PDF, RTF and Website from single source.
2. Multiple languages in one project file.
3. Easy-to-use topic editor with full set of features and integrated spell checker. Insert tables, images, flash movies andetc
4. Built-in template engine allows different templates for different types of documentation.
5. Everything you need (text, images, templates, variables) to compile help files is inside one project file or directory (incase of CVS mode).
6. Library images. Use the same image in multiple topics without duplicating it.
Helpinator 3.1 Manual
4
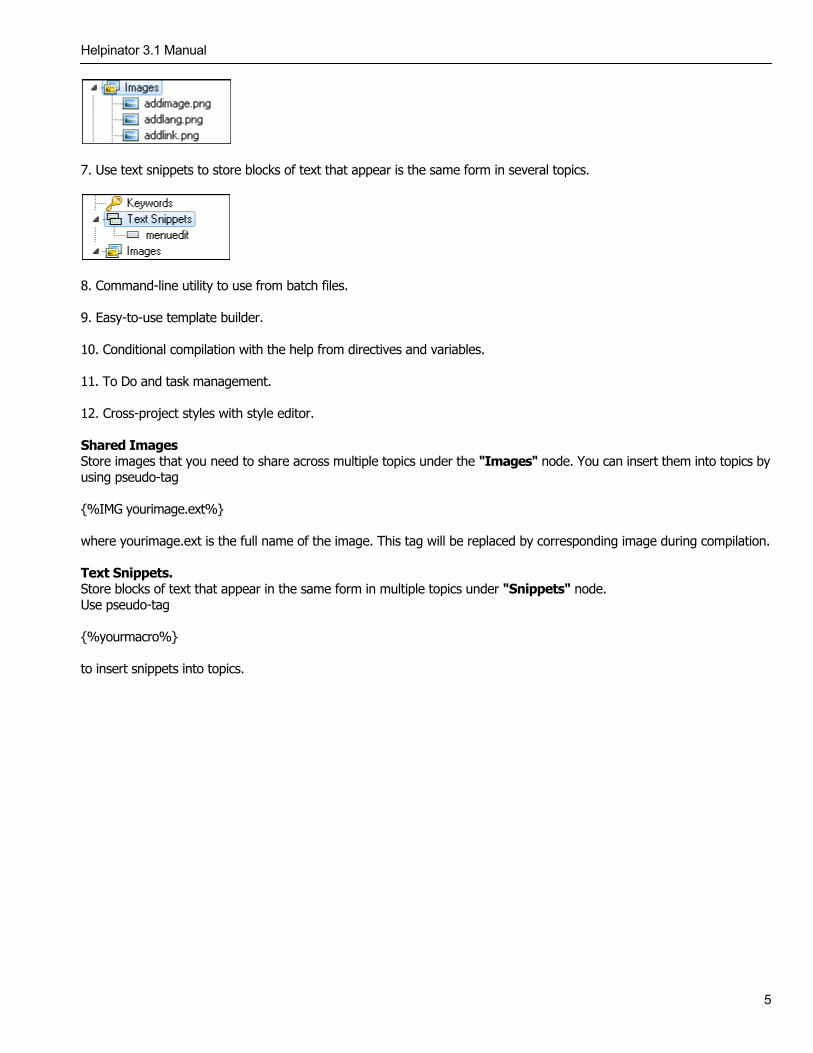
7. Use text snippets to store blocks of text that appear is the same form in several topics.
8. Command-line utility to use from batch files.
9. Easy-to-use template builder.
10. Conditional compilation with the help from directives and variables.
11. To Do and task management.
12. Cross-project styles with style editor.
Shared ImagesStore images that you need to share across multiple topics under the "Images" node. You can insert them into topics byusing pseudo-tag
{%IMG yourimage.ext%}
where yourimage.ext is the full name of the image. This tag will be replaced by corresponding image during compilation.
Text Snippets.Store blocks of text that appear in the same form in multiple topics under "Snippets" node.Use pseudo-tag
{%yourmacro%}
to insert snippets into topics.
Helpinator 3.1 Manual
5
What's New
Version 3.1:- Links and actionable TOC in PDF files- Better unicode support- Cross-project styles with editor- Better CSS support in HTML-based documentation- CVS-friendly storage mode where every project item is in separate file.- Cloned images - library images that share the same background.
Version 2.3:- Built-in reports help you to manage help authoring projects better.- Project verification before compilation.- New Compile Log window with HTML formatting.
Version 2.0:- Multiple Languages in one project file.- Conditional compilation and Variable presets- Image Editor with shapes- Library images now can be shown in full size inside topic editor- Template Builder- To-Do for project and individual topics.- Import and Export RTF and HTML files with project structure.- Header and Footer for PDF output.- PDF outline corresponding to topic structure- Page numbers in Table of Contents in PDF documents.
Helpinator 3.1 Manual
6

How To Buy
To register Helpinator Professional:
1. Follow this link to buy product:https://www.plimus.com/jsp/buynow.jsp?contractId=18400262. Wait for the email with your registration code.3. Select Main Menu->Help->About4. Click "Register".5. Enter registration information exactly as it is in registration confirmation email.
As a registered user you are eligible to:1. One-year free updates (even major version updates).2. Priority ticket support.
Helpinator 3.1 Manual
7
Support
Registered users can get priority support using ticket system here:
http://www.majormind.com/helpdesk/
We do not provide support for users of FREE edition. However you can purchase one year of support for 50$ from ourwebsite "Order" page:
http://www.helpinator.com/order.html
Helpinator 3.1 Manual
8
Overview
This topic contains brief information on:1. Project2. Templates3. Images4. Text Snippets5. Variables6. Multiple languages in one project file.
Project
Project stores all the data you need to compile documentation:1. Topics in hierarchical order with separate text for different languages.2. Templates. Both HTML and RTF are stored inside project file. You can use different templates for different languages.3. Library Images.4. Text snippets.5. Variables.
Helpinator 3.1 Manual
9
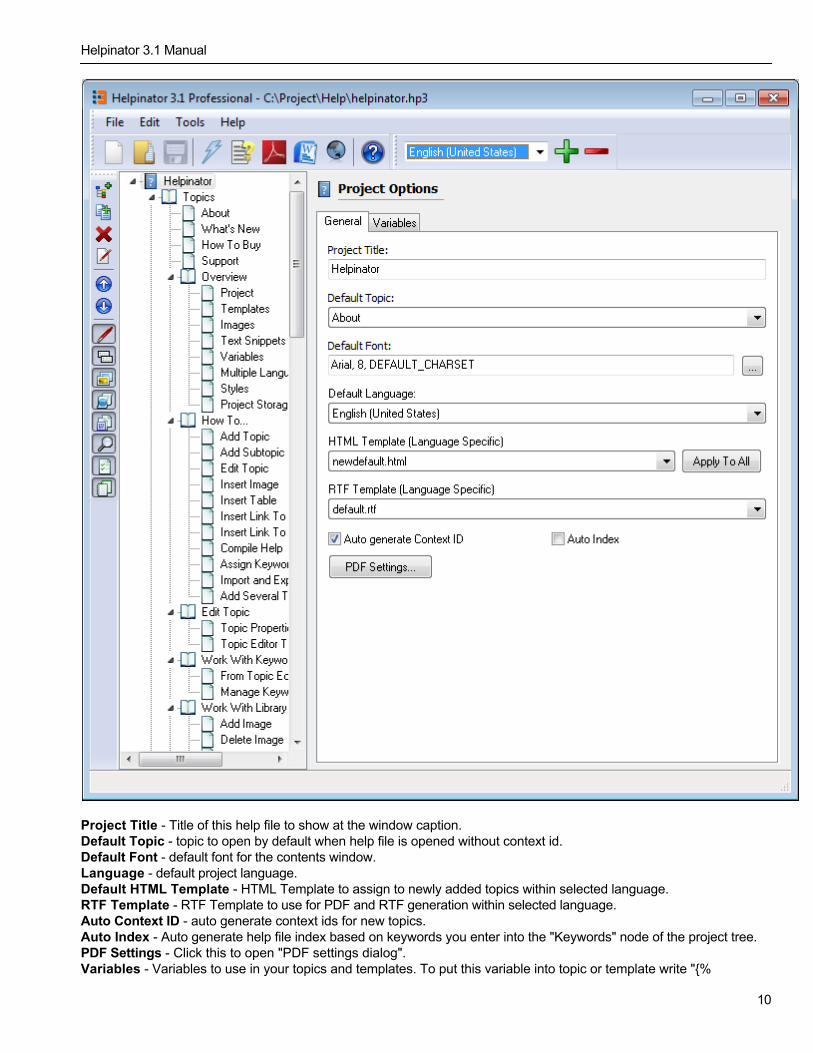
Project Title - Title of this help file to show at the window caption.Default Topic - topic to open by default when help file is opened without context id.Default Font - default font for the contents window.Language - default project language.Default HTML Template - HTML Template to assign to newly added topics within selected language. RTF Template - RTF Template to use for PDF and RTF generation within selected language.Auto Context ID - auto generate context ids for new topics.Auto Index - Auto generate help file index based on keywords you enter into the "Keywords" node of the project tree.PDF Settings - Click this to open "PDF settings dialog".Variables - Variables to use in your topics and templates. To put this variable into topic or template write "{%
Helpinator 3.1 Manual
10

yourvariable%}" where yourvariable is the name of the variable.
Templates
Templates are used to to customize appearance of your documentation.
1. HTML Templates. Use HTML Templates to change CHM file looks. Each page can have it's own HTML template. HTML templates aredivided into HTML and CSS parts. Use HTML to create topic page structure and CSS to change layout.Helpinator has built-in Template Builder so you don's even have to know HTML and CSS to create your own template.
2. RTF TemplatesRTF Templates are used to produce RTF and PDF files.
Read more about templates.
Images
Images in Helpinator are divided into 2 categories:
1. In-topic images. This images are inserted into WYSIWYG editor and belong to only one topic. To place this imageinto another topic you need to create another copy of it in that topic. This images are considered hard to change sinceyou need to browse through all the topics when something in your program's interface changes.
2. Images that are stored under "Images" node of the project. These images do not belong to any topic and thuscan be shared by several of them. To use a shared image inside a topic you need to place a pseudo-tag like this:
{%IMG yourimage.ext%}
where yourimage.ext is a full name of the shared image with extension. During the compilation phase this pseudo-tagwould be replaced by the corresponding image. Alternatively you can insert library image without pseudo-tags usingtopic editor context menu and it will look like in-topic image except that it will have a small description at the top.
Shared images are easy to change. If you need to change an image you don't have to browse through topics to find it'soccurrences. Just replace it under "Images" node of the project.
Cloned Images
Library images can also be cloned. That means "cloned" image share common background with it's "donor" image. Thisis especially useful when you need to have several different images with different annotations all dancing around thesame application window. Once application window changes you normally need to update a bunch of images. But with"cloned" images you only need to update one "donor" image and all "clones" will be updated automatically.
Text Snippets
Snippets are named blocks of text that you can use in several topics. For example, when writing tutorials you needrepetitive lines of text like "Select Main Menu -> File -> Open". But when your main menu structure changes and yourename menu "File" into something like "Project" you need to update all topics that describe actions associated withthis menu. Instead of that you can create Snippets named "menufileopen" with the text "Select Main Menu -> File ->Open" and use it whenever you need to reference this menu. Now when your menu structure changes you only need toedit this snippet and recompile help file.
Helpinator 3.1 Manual
11

Snippets can also be parameterized, e.g. you can define block of text that will replace TEXTFORSNIPPET placeholderin the snippet text.Example
Here's sample snippet "Warning":
And here's how we will use it in our topic:
This is how it will look like when project compiled:
Warning!This is warning text.
Variables
Variables are similar to text snippets but are for different purpose. The main differences are:1. Variables can not have text formatting.2. Variables can be used in templates.3. Variables can be used to control compilation process.
There are 3 main groups of variables:1. Global Variables. These variables have the same value for all languages.2. Language-Specific variables. These variables have different values for every language in the project.3. Variable Preset. Variables in preset have values specific to that preset.4. Predefined variables. Values of predefined values depend on compile mode and cannot be changed by user.
Helpinator 3.1 Manual
12
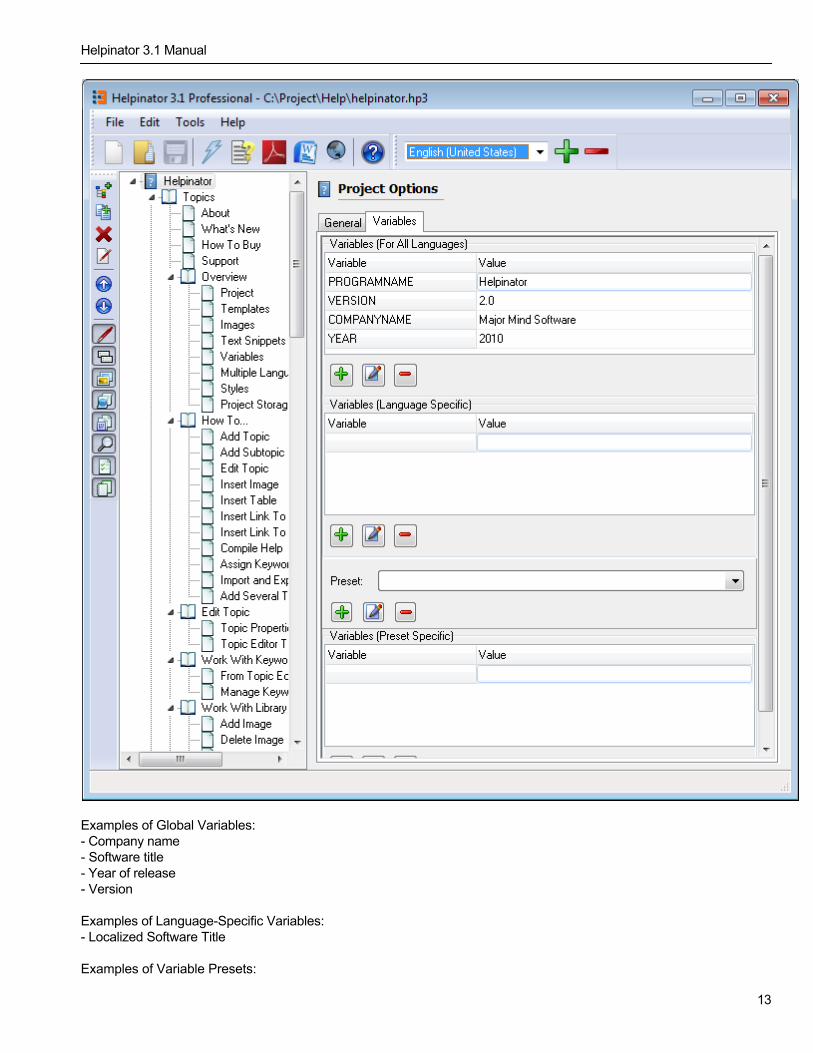
Examples of Global Variables:- Company name- Software title- Year of release- Version
Examples of Language-Specific Variables:- Localized Software Title
Examples of Variable Presets:
Helpinator 3.1 Manual
13
- Edition- Software Title - for branding of your product.
Predefined Variables are:- FORMAT - can be CHM, PDF, RTF, HTML- Language - LangID of the current project language.
Presets can be used to control compilation process using Conditional Compilation.For example you have two editions of your product - LITE and PRO, PRO edition has specific features that LITE doesnot have and you don't want those topics in the help file of LITE edition. You can solve this problem by having twodifferent projects or you can use variable presets. Add two presets - PRO and LITE, and EDITION variable to them. Nowyou can put line "EDITION='PRO'" into the "Condition" property of topics you want to skip from LITE edition help file. AtCompile time select "PRO" preset to compile help for PRO edition and "LITE" preset to compile LITE edition help file. Tolearn more see "Conditional Compilation" topic.
Multiple Languages
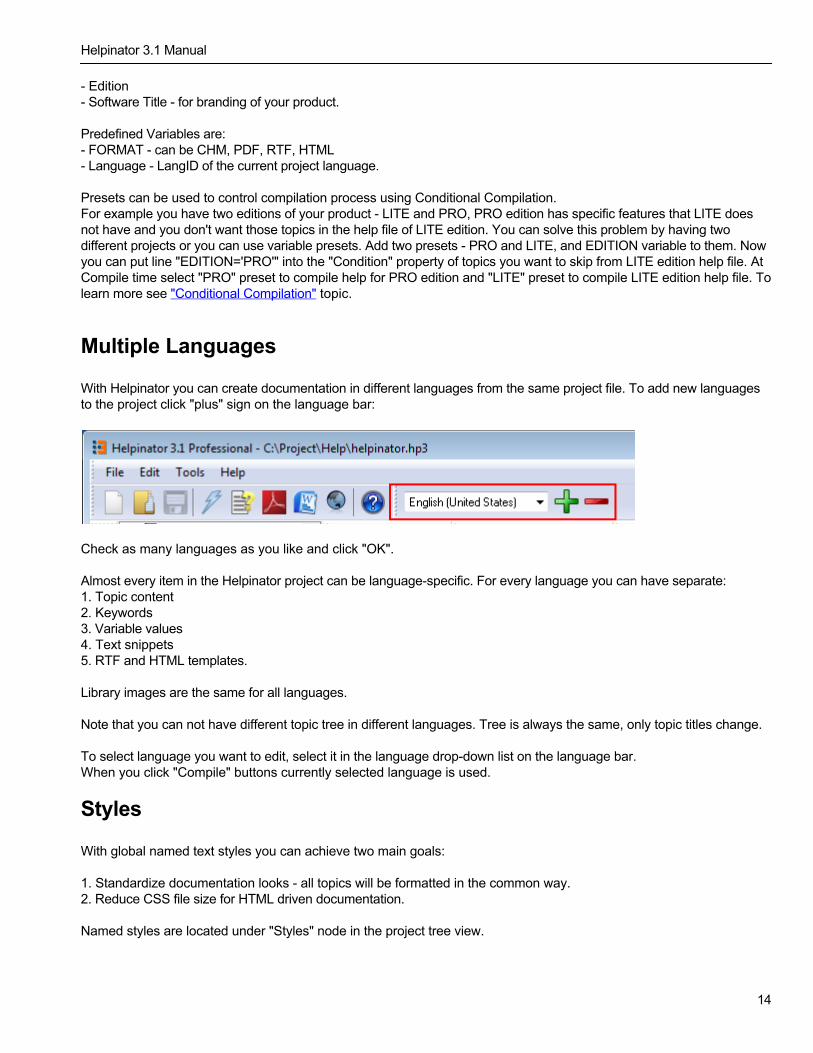
With Helpinator you can create documentation in different languages from the same project file. To add new languagesto the project click "plus" sign on the language bar:
Check as many languages as you like and click "OK".
Almost every item in the Helpinator project can be language-specific. For every language you can have separate:1. Topic content2. Keywords3. Variable values4. Text snippets5. RTF and HTML templates.
Library images are the same for all languages.
Note that you can not have different topic tree in different languages. Tree is always the same, only topic titles change.
To select language you want to edit, select it in the language drop-down list on the language bar.When you click "Compile" buttons currently selected language is used.
Styles
With global named text styles you can achieve two main goals:
1. Standardize documentation looks - all topics will be formatted in the common way.2. Reduce CSS file size for HTML driven documentation.
Named styles are located under "Styles" node in the project tree view.
Helpinator 3.1 Manual
14
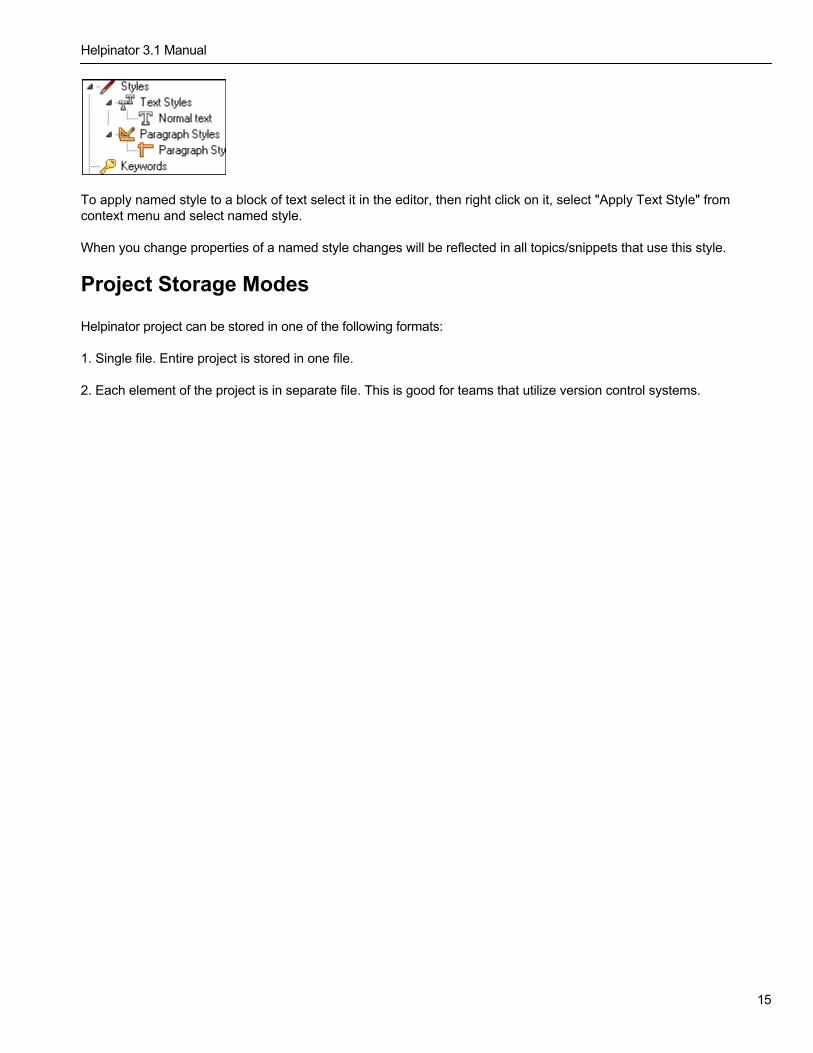
To apply named style to a block of text select it in the editor, then right click on it, select "Apply Text Style" fromcontext menu and select named style.
When you change properties of a named style changes will be reflected in all topics/snippets that use this style.
Project Storage Modes
Helpinator project can be stored in one of the following formats:
1. Single file. Entire project is stored in one file.
2. Each element of the project is in separate file. This is good for teams that utilize version control systems.
Helpinator 3.1 Manual
15
How To...
This topic covers some basic functions available in Helpinator.You can learn how to:{%SUBTOPICS%}
Add Topic
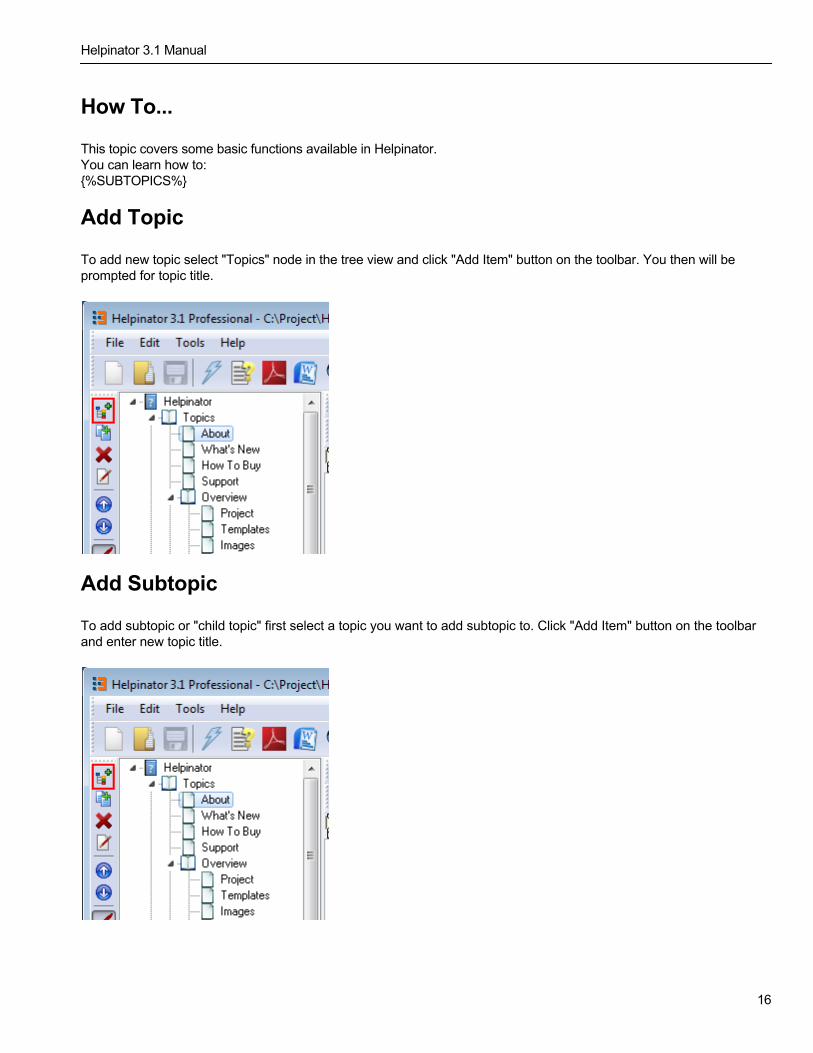
To add new topic select "Topics" node in the tree view and click "Add Item" button on the toolbar. You then will beprompted for topic title.
Add Subtopic
To add subtopic or "child topic" first select a topic you want to add subtopic to. Click "Add Item" button on the toolbarand enter new topic title.
Helpinator 3.1 Manual
16
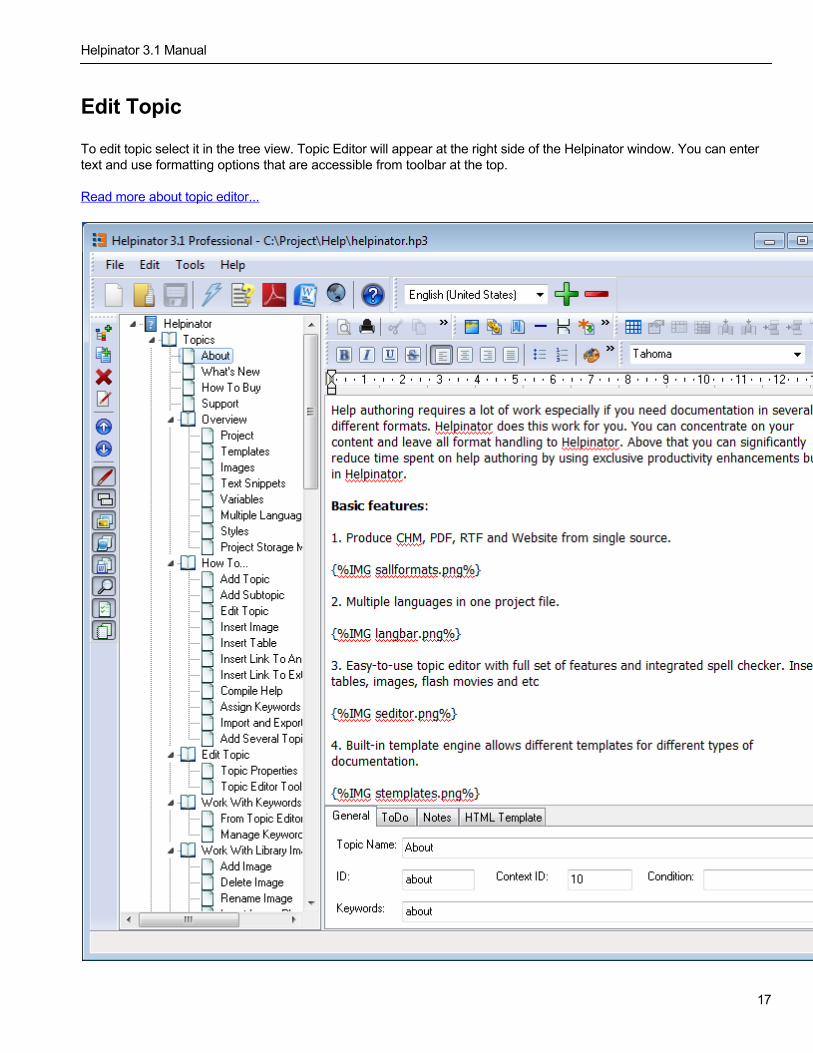
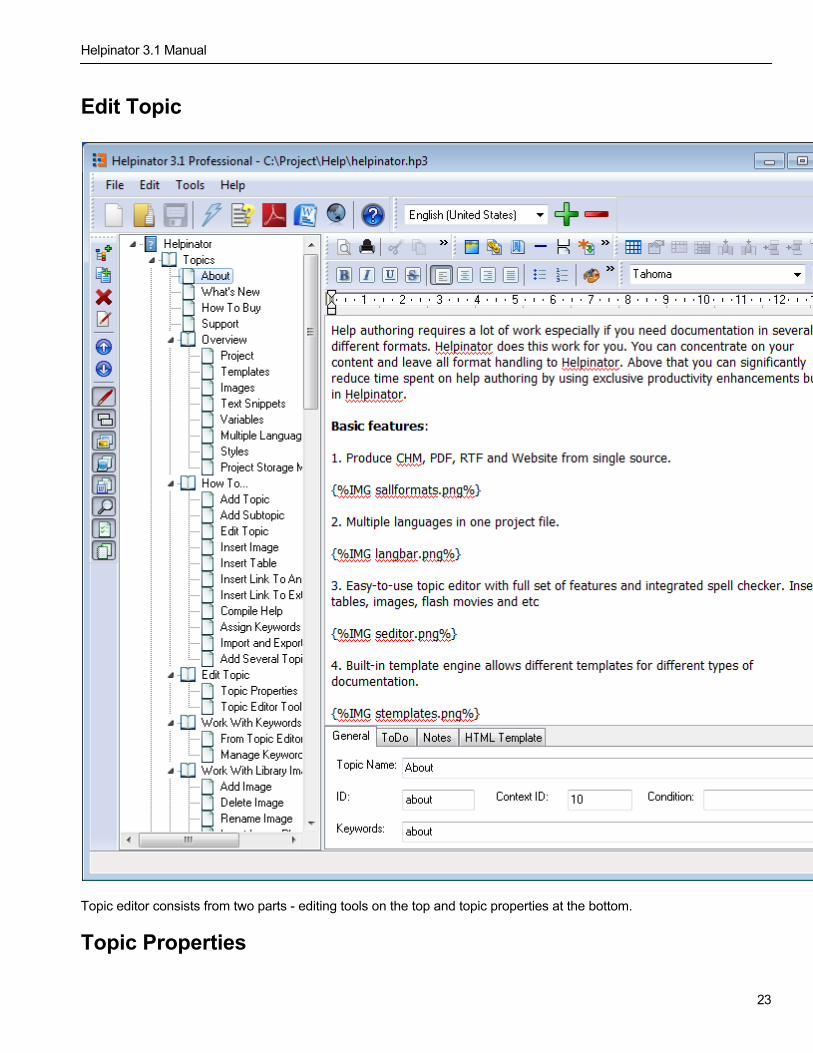
Edit Topic
To edit topic select it in the tree view. Topic Editor will appear at the right side of the Helpinator window. You can entertext and use formatting options that are accessible from toolbar at the top.
Read more about topic editor...
Helpinator 3.1 Manual
17

Insert Image
You can add image to the topic by two ways:1. Click "Picture" button on the topic editor toolbar and select image file name. This image will be "local" topic image.
2. First add image to the "Images" node. This will make your image global or "library" and you will be able to use it inmultiple topics. When image is in the "library" place a pseudo-tag like{%IMG yourimage.ext%} where you want this image to be. "yourimage.ext" is the name of your "library" image.
There's an alternate way to insert a Library Image. Place cursor into the topic editor where you need image to beplaced. Right-click, select "Insert Library Image" and select library image name. Image will be shown as it is withheader like "Lib img: <image name>". This is more WYSIWYG-style but image occupies more space in editor than justa placeholder.
Insert Table
To insert table click "Table" button on the toolbar. You then will be prompted for number of rows and columns. Press"OK" and table will be inserted in the position of cursor.
Insert Link To Another Topic
To insert link to another topic select text that will become a link and click "Hypertext Link" button on the tool bar.
Helpinator 3.1 Manual
18

In the "Insert Hyperlink" dialog select "Topic" page and select topic to link to in the tree. If you want to link to an anchorinside that topic select it from the "Anchor" list.
Insert Link To External Web Page
To insert link to another topic select text that will become a link and click "Hypertext Link" button on the tool bar.
Helpinator 3.1 Manual
19
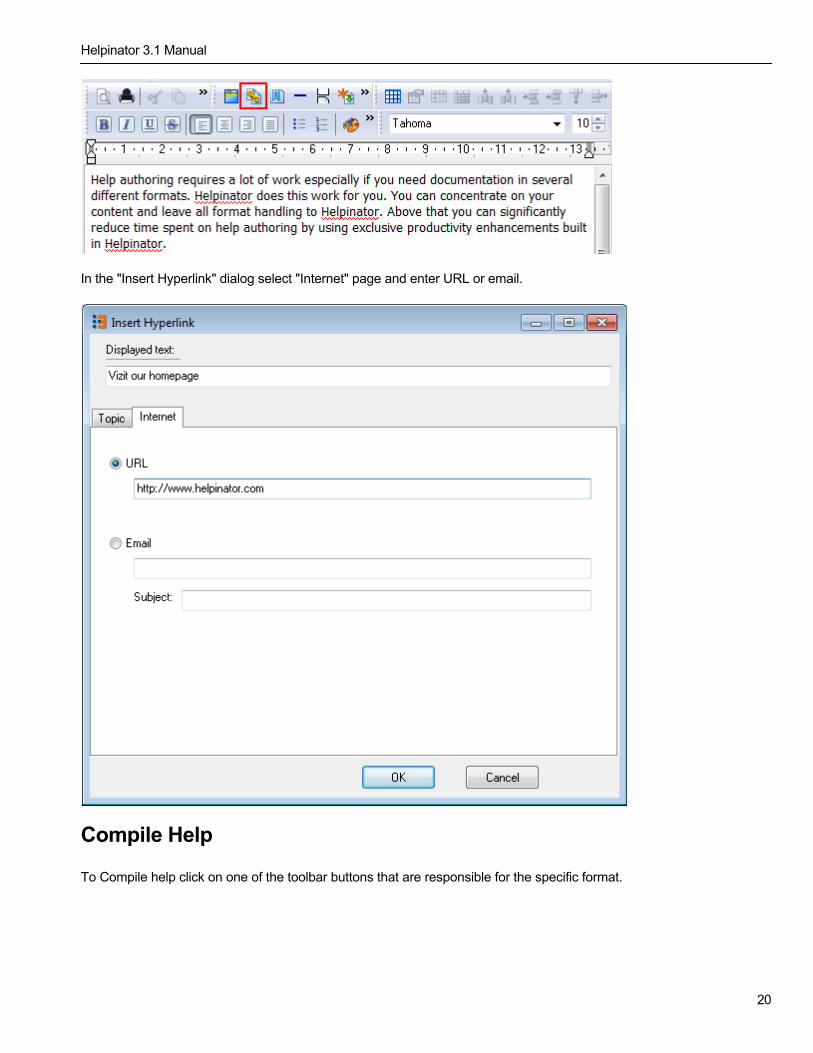
In the "Insert Hyperlink" dialog select "Internet" page and enter URL or email.
Compile Help
To Compile help click on one of the toolbar buttons that are responsible for the specific format.
Helpinator 3.1 Manual
20

Compiled file (CHM, PDF or RTF) will be placed in the same directory where your project is. Browser-based HTML helpwill be in "HTML" subfolder of the folder where your project resides.
To put compiled files into different location select "Compile All". Also this dialog lets you to compile several formats atthe same time and select variable preset for compilation.
Assign Keywords
You can assign keywords to topics by two ways:1. Enter them into "Keywords" field of the topic editor. Separate individual keywords with commas.2. Select keyword in the topic editor, right-click it and select "Add to keywords" from the context menu.
Helpinator also has "Auto Index" feature. All you need is to add keywords for each language into "Keywords" section ofproject tree view. Then Helpinator will append keywords to topics automatically at compile time. To enable "Auto Index"select Project root in the tree, select "General" tab and check "Auto Index" checkbox.
Helpinator 3.1 Manual
21
Import and Export
Helpinator can import and export RTF and HTML documents. You can import/export just files with topic content or withsome additional info like keywords and project structure. This allows easy communication with external translationservices. You can export RTF/HTML with project structure info, send this files to your translator or use translationsoftware, then import in back to another language keeping project structure.
To Import HTML and RTF do the following:1. Select menu File->Import->Import RTF or Import HTML.2. "Import" dialog appears.
{%IMG import.png%}
3. Select folder where your files are located.4. Select project language to import data to.5. Select import mode - whether you want to import only files or project info is present too.6. Click OK.
Export works just like Import.
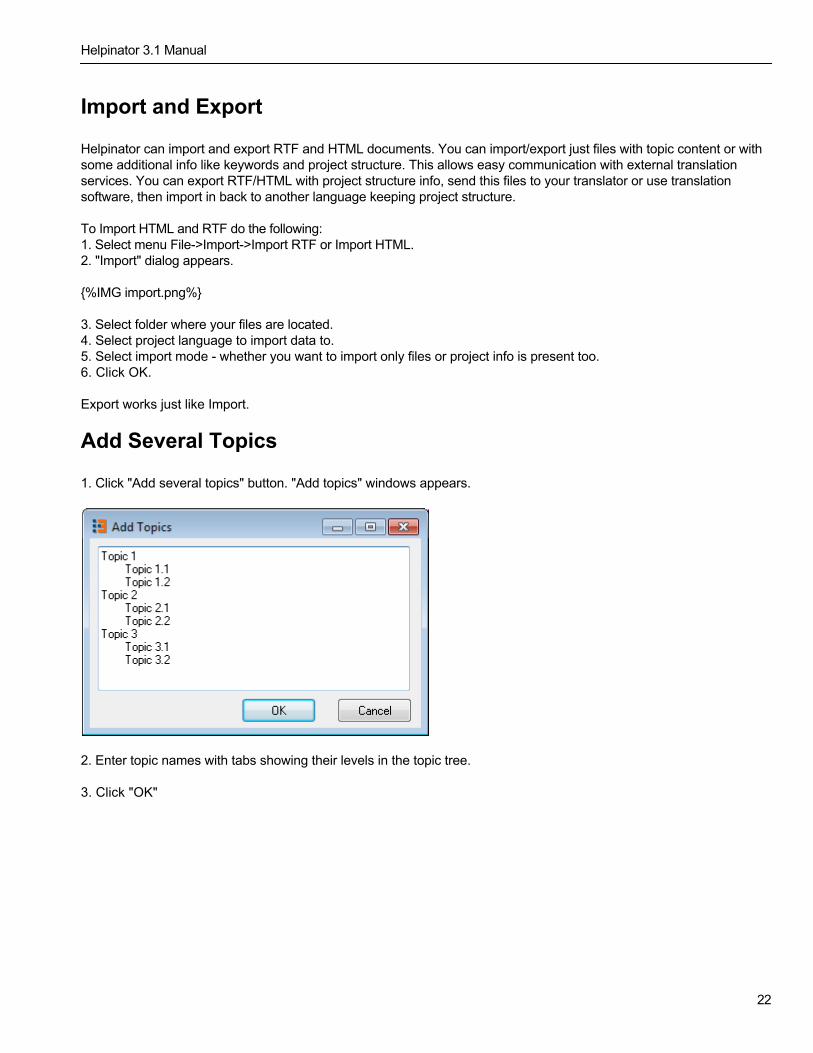
Add Several Topics
1. Click "Add several topics" button. "Add topics" windows appears.
2. Enter topic names with tabs showing their levels in the topic tree.
3. Click "OK"
Helpinator 3.1 Manual
22
Edit Topic
Topic editor consists from two parts - editing tools on the top and topic properties at the bottom.
Topic Properties
Helpinator 3.1 Manual
23
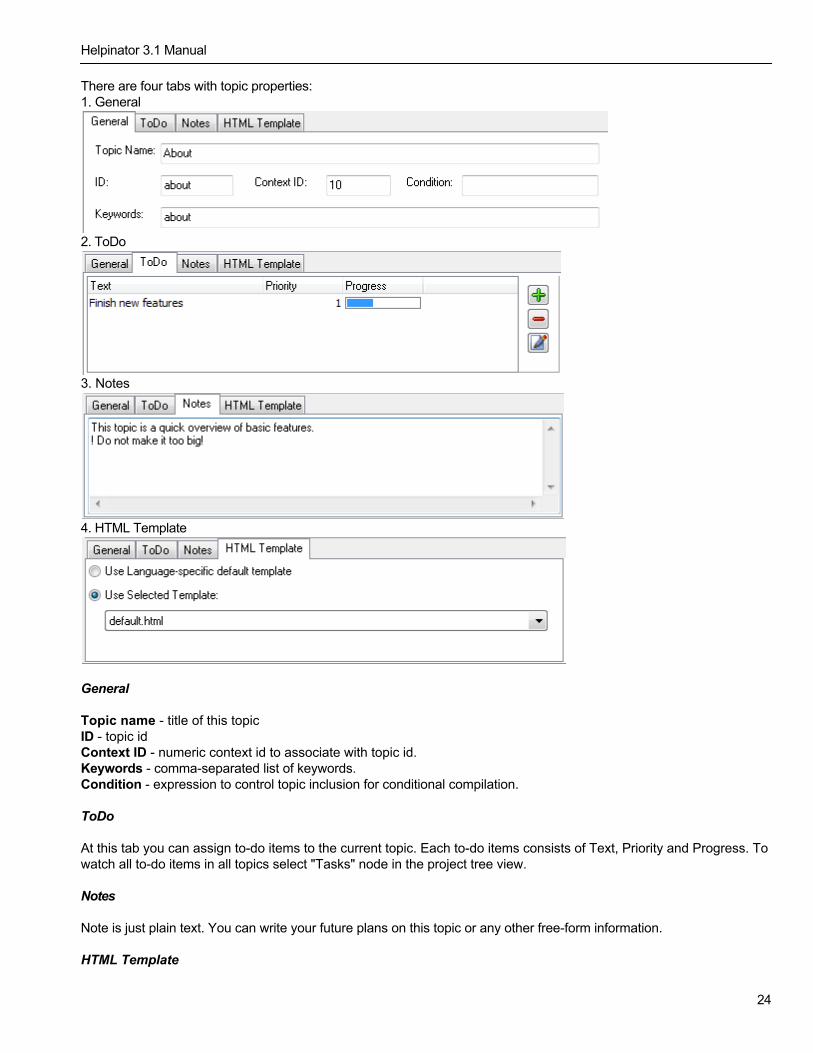
There are four tabs with topic properties:1. General
2. ToDo
3. Notes
4. HTML Template
General
Topic name - title of this topicID - topic idContext ID - numeric context id to associate with topic id.Keywords - comma-separated list of keywords.Condition - expression to control topic inclusion for conditional compilation.
ToDo
At this tab you can assign to-do items to the current topic. Each to-do items consists of Text, Priority and Progress. Towatch all to-do items in all topics select "Tasks" node in the project tree view.
Notes
Note is just plain text. You can write your future plans on this topic or any other free-form information.
HTML Template
Helpinator 3.1 Manual
24
On this tab you can select what template to use for this topic on CHM and HTML compilation. You can use projectdefault template for selected language or specific template for this topic.
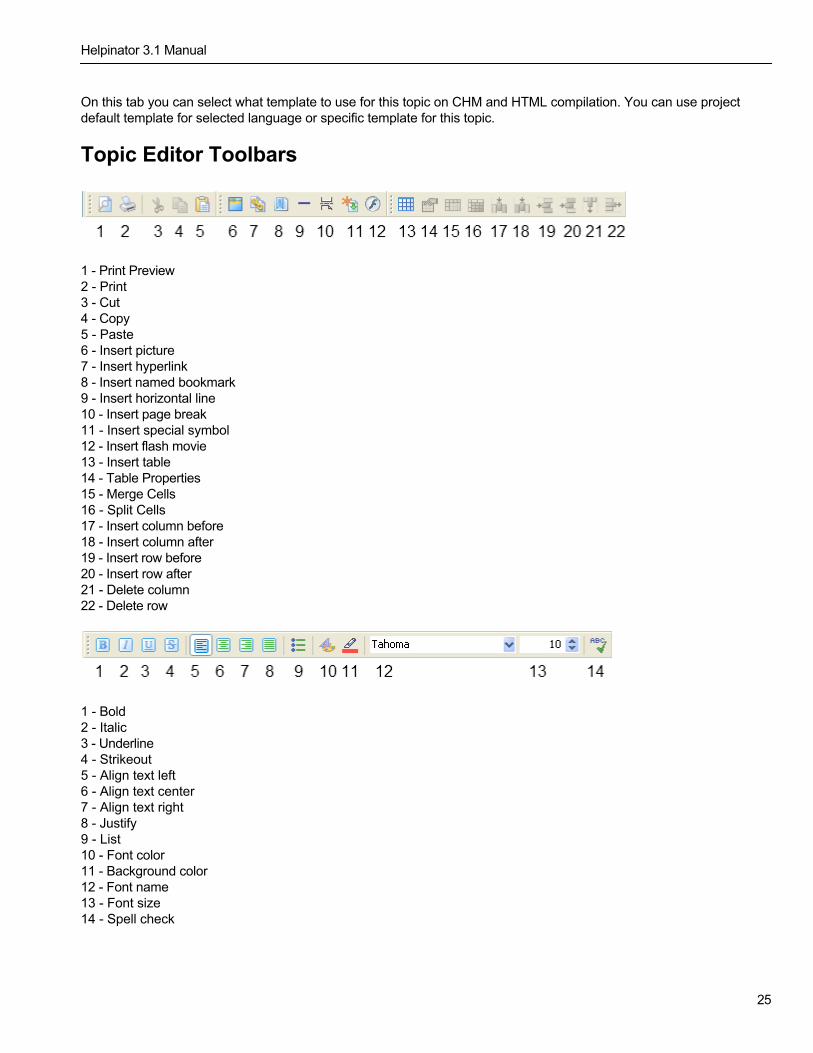
Topic Editor Toolbars
1 - Print Preview2 - Print3 - Cut4 - Copy5 - Paste6 - Insert picture7 - Insert hyperlink8 - Insert named bookmark9 - Insert horizontal line10 - Insert page break11 - Insert special symbol12 - Insert flash movie13 - Insert table14 - Table Properties15 - Merge Cells16 - Split Cells17 - Insert column before18 - Insert column after19 - Insert row before20 - Insert row after21 - Delete column22 - Delete row
1 - Bold2 - Italic3 - Underline4 - Strikeout5 - Align text left6 - Align text center7 - Align text right8 - Justify9 - List10 - Font color11 - Background color12 - Font name13 - Font size14 - Spell check
Helpinator 3.1 Manual
25

Work With Keywords
Keywords are used to fill "Index" tab in the HTML Help Viewer. You can check "Auto Index" option in project settingsand leave all index generation work to Helpinator. Or you can create keywords manually from topic editor or fromKeyword Manager.
Keywords are highlighted with dotted blue line in topic editor.
From Topic Editor
To edit keywords associated with the topic enter them into "Keywords" edit field and separate by commas.
You can add keyword to the list by selecting it in topic editor and clicking "Add To Keywords" option in the contextmenu.
Manage Keywords
Helpinator 3.1 Manual
26
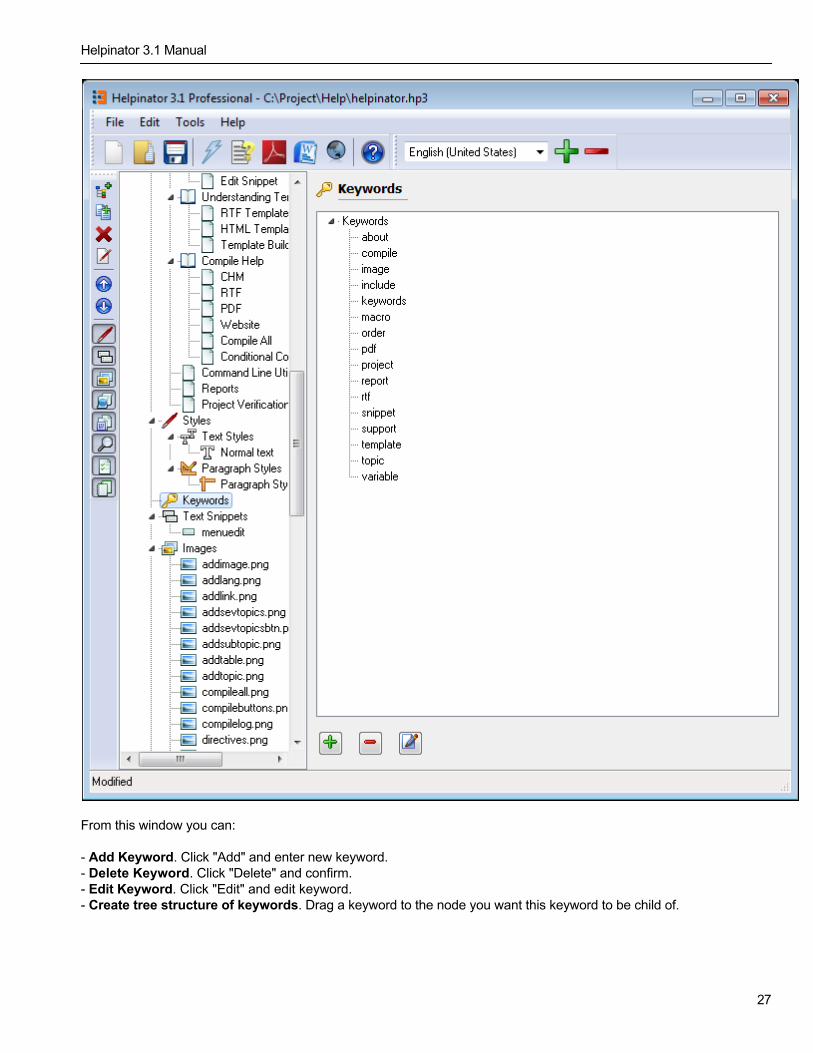
From this window you can:
- Add Keyword. Click "Add" and enter new keyword.- Delete Keyword. Click "Delete" and confirm.- Edit Keyword. Click "Edit" and edit keyword.- Create tree structure of keywords. Drag a keyword to the node you want this keyword to be child of.
Helpinator 3.1 Manual
27

Work With Library Images
This topic covers image handling with Helpinator.
Add Image
Helpinator 3.1 Manual
28
1. Select "Images" node.2. Click "Add" button.3. Select the image you with to add.
Delete Image
1. Select "Images" node.2. Click "Delete".3. Confirm your action.
Rename Image
1. Select "Images" node.2. Click "Rename"3. Enter new image file name with extension.
Insert Image Placeholder
1. Select a topic in the tree.2. Move a cursor to a place where you want image to be placed.3. Enter pseudo-tag as follows:
{%IMG yourimage.ext%}
where yourimage.ext - is a full name of your image with extension.
Also you can insert library images in full-size. Place cursor where you want to library image to be, right-click, select"Insert Library Image" and select an image from the list.
Image Editor
Helpinator comes with simplistic image editor. With it's help you can add various shapes to your images andscreenshots. Shapes are stored as vector data but at compile time Helpinator converts them to raster images.
Helpinator 3.1 Manual
29
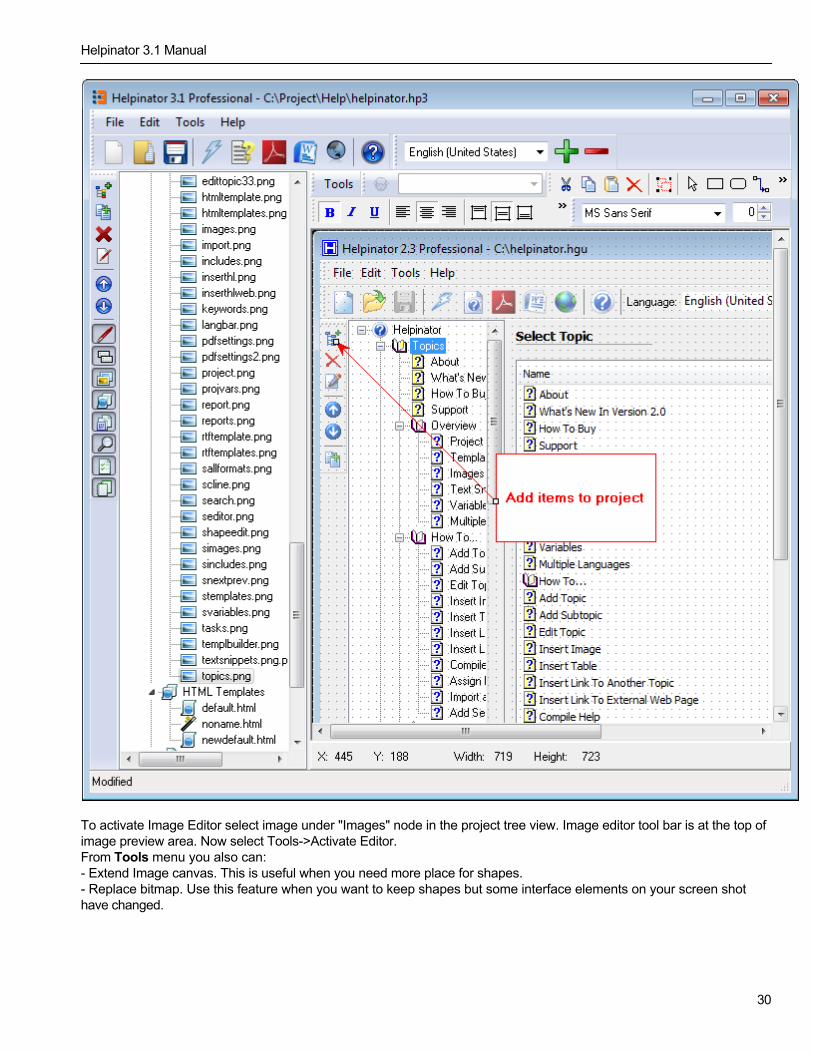
To activate Image Editor select image under "Images" node in the project tree view. Image editor tool bar is at the top ofimage preview area. Now select Tools->Activate Editor.From Tools menu you also can:- Extend Image canvas. This is useful when you need more place for shapes.- Replace bitmap. Use this feature when you want to keep shapes but some interface elements on your screen shothave changed.
Helpinator 3.1 Manual
30

Add New Empty Image
If you just need an image with shapes, e.g. some kind of flow chart, you can add new blank image to library. Select"Images" node from the project tree view, right-click on it and select "New Image". "New Image" dialog will appear. Youcan select image name, size and background color.
Helpinator 3.1 Manual
31
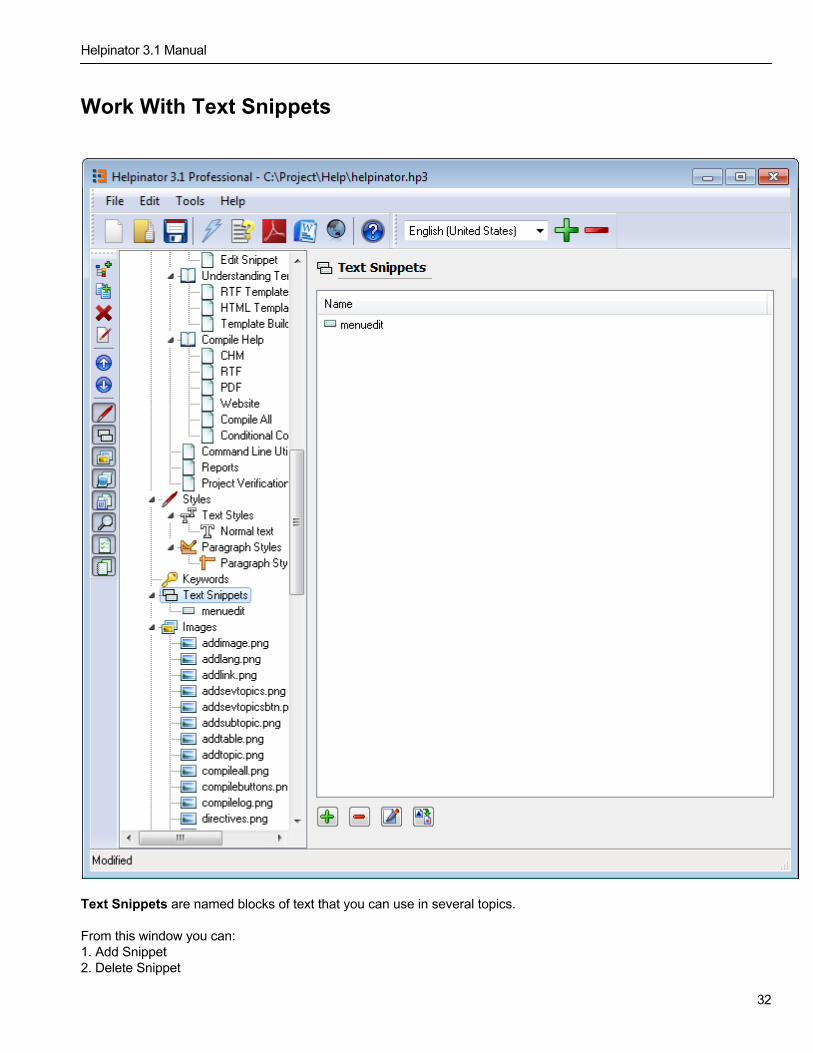
Work With Text Snippets
Text Snippets are named blocks of text that you can use in several topics.
From this window you can:1. Add Snippet2. Delete Snippet
Helpinator 3.1 Manual
32
3. Rename Snippets
Subtopics:{%SUBTOPICS%}
Add Text Snippet
To add Include:1. Select "Text Snippets" node.2. Click "Add"3. Enter name for your snippet.
Delete Snippet
To delete include:1. Select "Text Snippets" node.2. Click "Delete"3. Confirm deletion.
Insert Snippet Placeholder
To insert snippet placeholder into a topic enter this pseudo tag:
{%yoursnippet%}
where yoursnipet - is the name of snippet to be placed here during compilation phase.
Edit Snippet
To edit snippet select it under "Text Snippets" node and edit just like you edit a topic.
Helpinator 3.1 Manual
33
Understanding Templates
Templates are used to to customize appearance of your documentation.Templates are stored inside project file. To use template you need to add it to project first. Read this to know how.Some default templates are in the "templates" sub folder of Helpinator installation folder.
1. HTML Templates. Use HTML Templates to change CHM file and Web help looks. Each page can have it's own HTML template. HTMLtemplates are divided into HTML and CSS parts. Use HTML to create topic page structure and CSS to change layout.Templates use pseudo-tags to define layout. Pseudo-tags are lines of text in the format {%tagname%} where tagnameis the name of the tag to be used.You can use the following pseudo-tags to fit topic inside template
Tag DescriptionTITLE Title of the topic.CONTENT Topic text.
PREVNEXTTOPIC Navigation links to previous and next topics. It Looks like:Previous | Next
NEXTTOPIC
Link to the next topic.You can change title of this link from default "Next" tosomething else with this format:%NEXTTOPIC="Tag Title"%
PREVTOPIC
Link to the previous topic.You can change title of this link from default "Previous" tosomething else with this format:%PREVTOPIC="Tag Title"%
BREADCRUMBS
Path to the current topic. It contains links to the topics thatlead to the current topic.For example:About > Order > How To Purchase.
SEEALSO
Links to related topics. Keywords assigned to the currenttopic are used to create this list. If some topics have thesame keywords that the current topic has then they will bein this list.You need to specify title of this block. For example:SEEALSO="Related Topics:"
Also you can use project's variables.Predefined variables:
Variable DescriptionCOMPANYNAME Your software company.YEAR Year of the release.VERSION Release version.PROGRAMNAME Software title.
2. RTF TemplatesRTF Templates are used to produce RTF and PDF files. RTF Template consists of 3 pages:- Front Page- Contents Page- Topic Page
Helpinator 3.1 Manual
34
Also RTF template has two additional areas for PDF output that you can change:- Header- Footer
Front page defines the looks of the first page of your document. It is recommended to use project variables to customizeit.
Contents Page is used to render contents of the document. It consists from lines like "LEVEL1 TEXT", "LEVEL2 TEXT"and so on. The number after "LEVEL" word identifies level of this entry. For example, if you have a topic in your help filenamed "Main Topic" and a subtopic "Sub Topic" then style of the line "LEVEL1 TEXT" is used to render "Main Topic"entry and "LEVEL2 TEXT" to render "Subtopic".
Topic page doesn't allow much customization. You can only use "CONTENT" and "TITLE" pseudo-tags.
Header and Footer are only for PDF. Header and footer apply only for pages with content (e.g. except front page).Beside project variables header and footer can have the following variables:- 1 - current page number.
RTF Templates
Helpinator 3.1 Manual
35
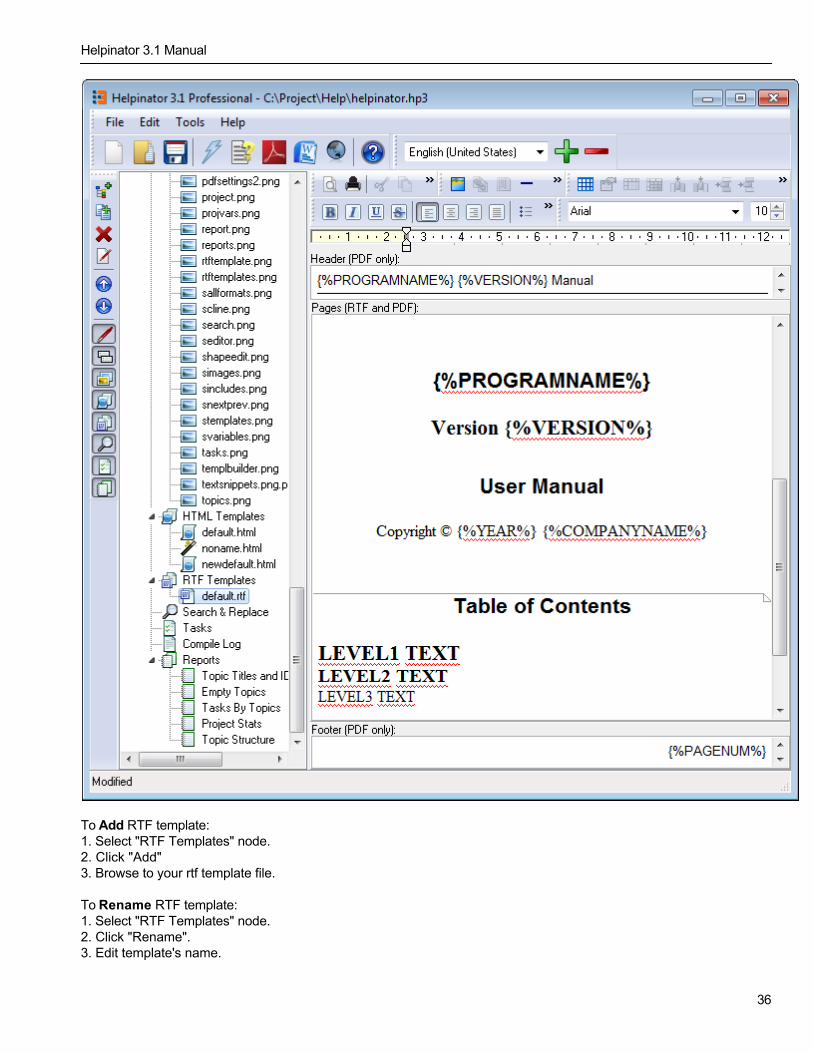
To Add RTF template:1. Select "RTF Templates" node.2. Click "Add"3. Browse to your rtf template file.
To Rename RTF template:1. Select "RTF Templates" node.2. Click "Rename".3. Edit template's name.
Helpinator 3.1 Manual
36
To Delete RTF Template:1. Select "RTF Templates" node.2. Click "Delete"3. Confirm your choice.
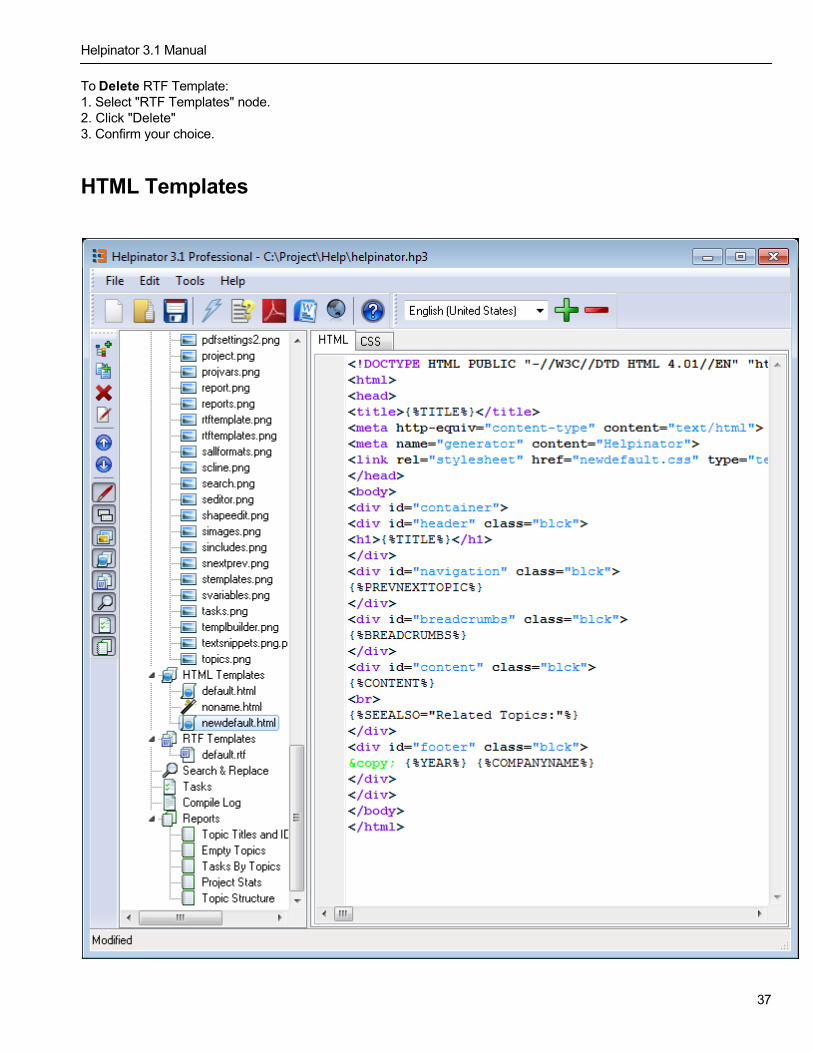
HTML Templates
Helpinator 3.1 Manual
37

To Add HTML template:1. Select "HTML Templates" node.2. Click "Add"3. Browse to your html template file. CSS file must have the same name, must be located in the same folder as html fileand .css extension.
To Rename HTML template:1. Select "HTML Templates" node.2. Click "Rename".3. Edit template's name.
To Delete HTML Template:1. Select "HTML Templates" node.2. Click "Delete"3. Confirm your choice.
Template Builder
If you do not have enough HTML knowledge to create your own template you can use "Template Builder" feature:1. Select "HTML Templates" node in project tree.2. Right-click on it.3. Select "Add Template Builder" from pop-up menu.4. You will be prompted for a unique name of template. 5. Template Builder window appear.
Helpinator 3.1 Manual
38
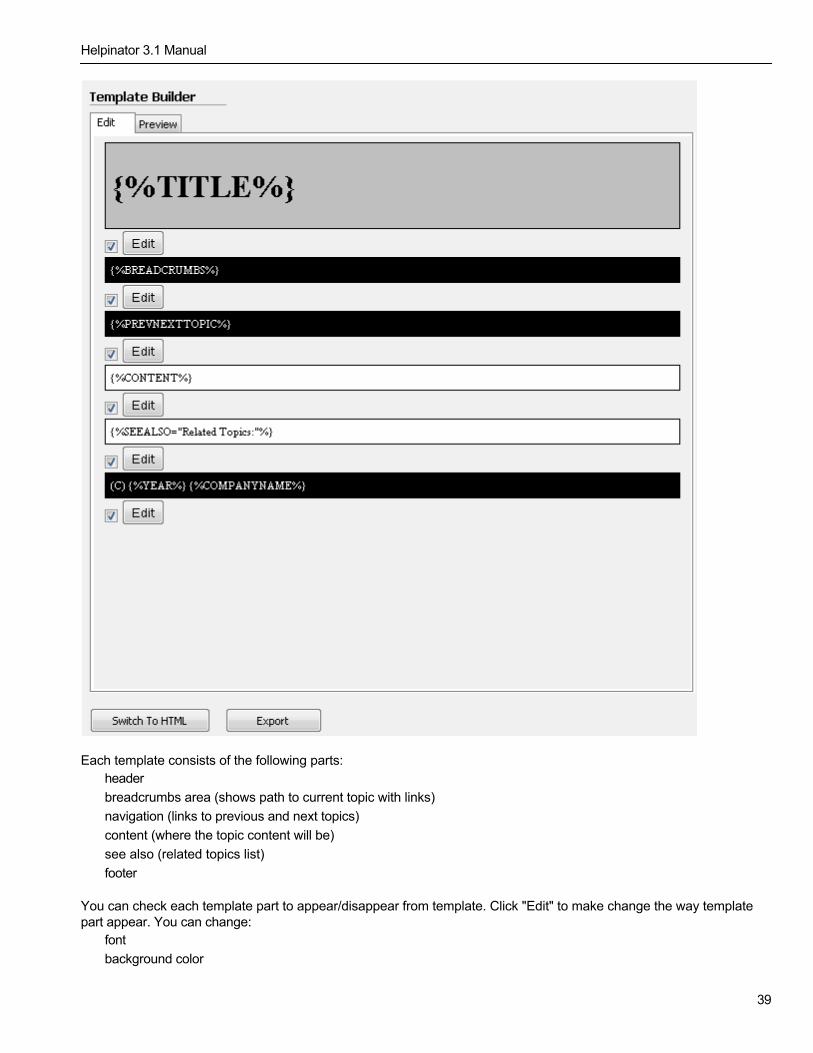
Each template consists of the following parts:· header· breadcrumbs area (shows path to current topic with links)· navigation (links to previous and next topics)· content (where the topic content will be)· see also (related topics list)· footer
You can check each template part to appear/disappear from template. Click "Edit" to make change the way templatepart appear. You can change:· font· background color
Helpinator 3.1 Manual
39

· border color, line style and width
Click "Switch to HTML" if you want to edit your template in normal HTML mode. Note that you can not revert back toTemplate Builder from HTML.Click "Export" to export current template to HTML so you can import it to other Helpinator projects.
Helpinator 3.1 Manual
40
Compile Help
Helpinator can produce documentation in the following formats:1. CHM2. PDF3. RTF4. Website.
CHM
To compile CHM you need Microsoft HTML Help Workshop installed on your computer.
Click CHM button on the toolbar or select Tools->Compile CHM.Helpinator creates CHM file with the same file name as your project and in the same directory.
RTF
Click RTF button on the toolbar or select Tools->Compile RTF.Helpinator creates RTF file with the same file name as your project and in the same directory.
Click "PDF" button on the toolbar or select "Tools->Compile PDF".Helpinator creates PDF file with the same file name as your project and in the same directory.
You can change some aspects of PDF generation using PDF Settings dialog. You can call it by pressing "PDFSettings..." button in the project options window.
PDF Options.
Helpinator 3.1 Manual
41
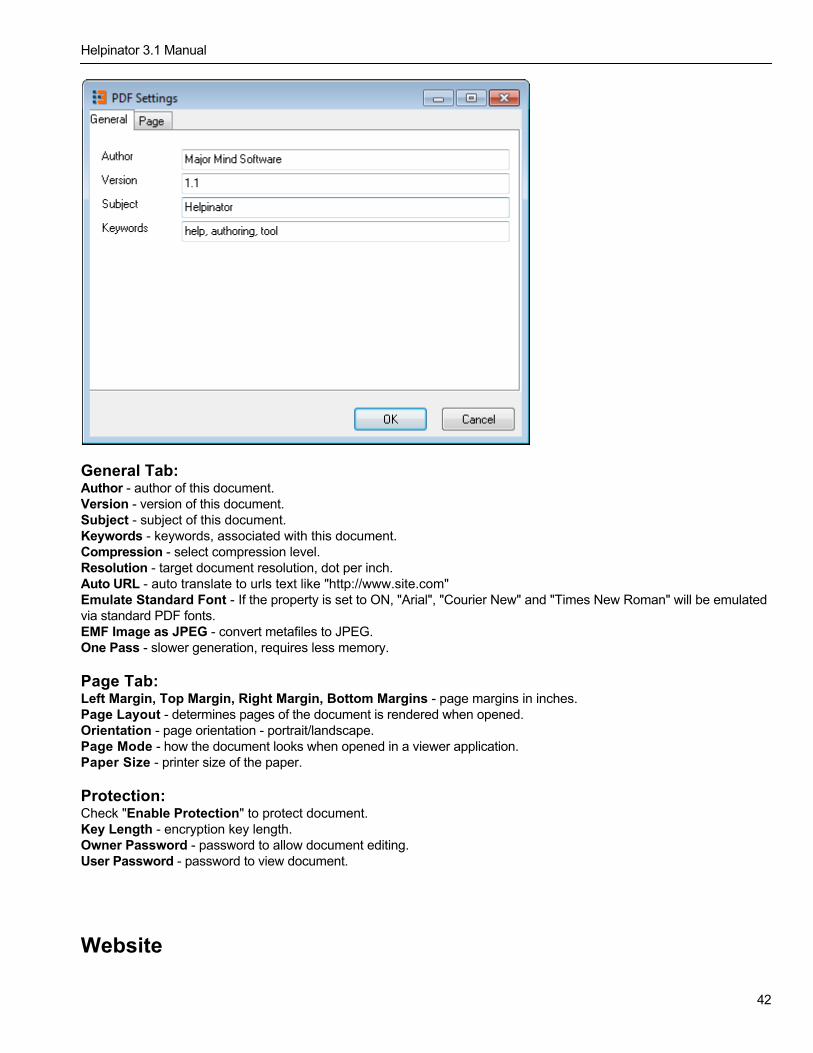
General Tab:Author - author of this document.Version - version of this document.Subject - subject of this document.Keywords - keywords, associated with this document.Compression - select compression level.Resolution - target document resolution, dot per inch.Auto URL - auto translate to urls text like "http://www.site.com"Emulate Standard Font - If the property is set to ON, "Arial", "Courier New" and "Times New Roman" will be emulatedvia standard PDF fonts.EMF Image as JPEG - convert metafiles to JPEG.One Pass - slower generation, requires less memory.
Page Tab:Left Margin, Top Margin, Right Margin, Bottom Margins - page margins in inches.Page Layout - determines pages of the document is rendered when opened.Orientation - page orientation - portrait/landscape.Page Mode - how the document looks when opened in a viewer application.Paper Size - printer size of the paper.
Protection:Check "Enable Protection" to protect document.Key Length - encryption key length.Owner Password - password to allow document editing.User Password - password to view document.
Website
Helpinator 3.1 Manual
42
Click "Web" button on the toolbar or select "Tools->Compile Website".Helpinator create "html" folder in the directory where your project file is located and stores website in it.
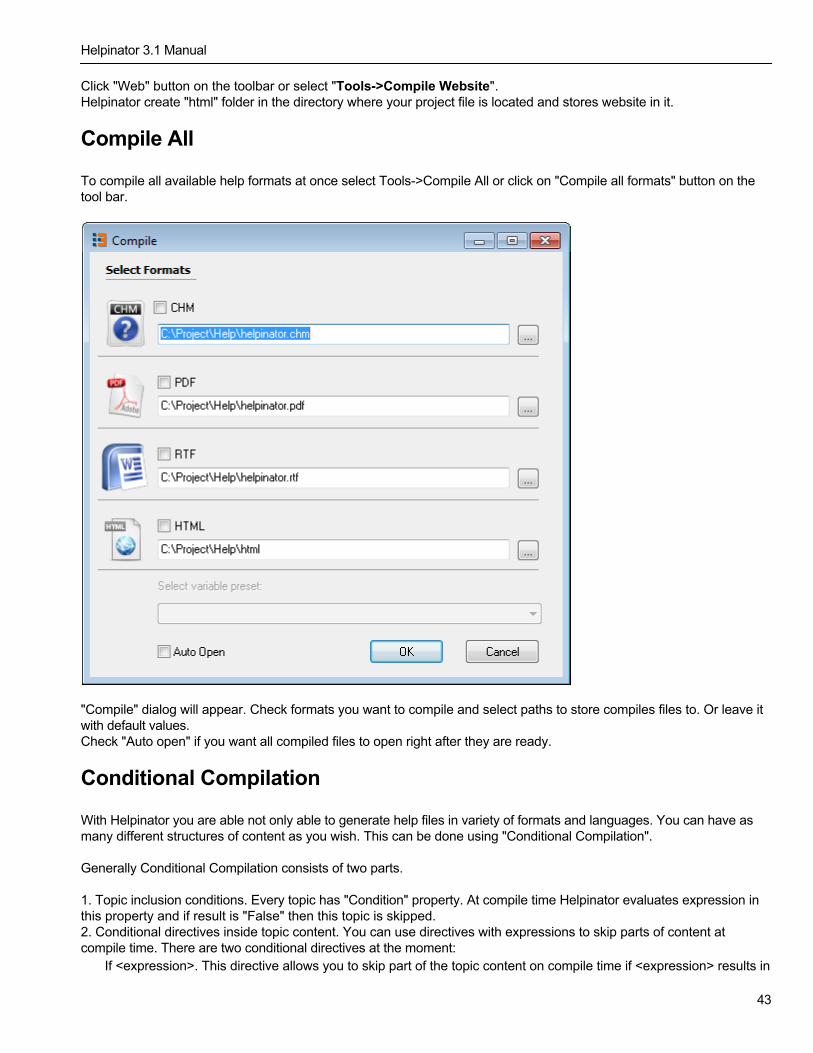
Compile All
To compile all available help formats at once select Tools->Compile All or click on "Compile all formats" button on thetool bar.
"Compile" dialog will appear. Check formats you want to compile and select paths to store compiles files to. Or leave itwith default values.Check "Auto open" if you want all compiled files to open right after they are ready.
Conditional Compilation
With Helpinator you are able not only able to generate help files in variety of formats and languages. You can have asmany different structures of content as you wish. This can be done using "Conditional Compilation".
Generally Conditional Compilation consists of two parts.
1. Topic inclusion conditions. Every topic has "Condition" property. At compile time Helpinator evaluates expression inthis property and if result is "False" then this topic is skipped.2. Conditional directives inside topic content. You can use directives with expressions to skip parts of content atcompile time. There are two conditional directives at the moment:· If <expression>. This directive allows you to skip part of the topic content on compile time if <expression> results in
Helpinator 3.1 Manual
43
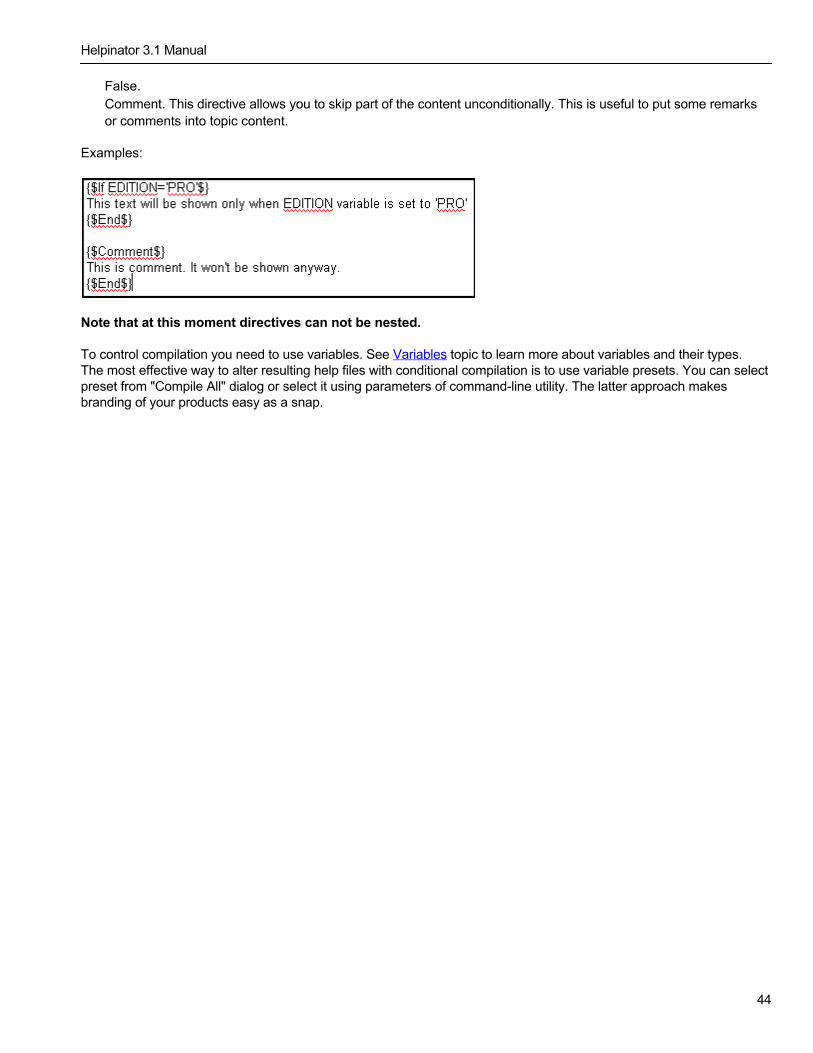
False.· Comment. This directive allows you to skip part of the content unconditionally. This is useful to put some remarks
or comments into topic content.
Examples:
Note that at this moment directives can not be nested.
To control compilation you need to use variables. See Variables topic to learn more about variables and their types.The most effective way to alter resulting help files with conditional compilation is to use variable presets. You can selectpreset from "Compile All" dialog or select it using parameters of command-line utility. The latter approach makesbranding of your products easy as a snap.
Helpinator 3.1 Manual
44
Command Line Utility
Helpinator comes with command-line compiler chelpinator.exe that you can use in batch files.It has the following parameters:
chelpinator.exe <format> <outputfileorfolder> [/v<variables.ini>] [/lang:LangID] <projectfile>
<format> (required) - specifies output format. Can have the following values:- /chm - for CHM format- /rtf - for RTF format- /pdf - for PDF format- /html - for browser-based html help.
<outputfileorfolder> (required) - specifies full output folder or file name. Filename is for CHM, PDF and RTF formats andfolder is for HTML format.
/v<variables.ini> (optional) - you can override values of project variables using this switch. Create a file with variables youwant to override in the form:VARIABLE=VALUEFor example:VERSION=1.5.1
If the text after "/v" has no extension it is treated as variable preset name and the corresponding preset is selected.
/lang:LangID (optional) - one of project languages. Specify this parameter if you want to generate documentation for oneof the languages in the project. LangID is required. You can find possible values in the following table:
LangID Language0436 Afrikaans041c Albanian1401 Arabic (Algeria)3c01 Arabic (Bahrain)0c01 Arabic (Egypt)0801 Arabic (Iraq)2c01 Arabic (Jordan)3401 Arabic (Kuwait)3001 Arabic (Lebanon)1001 Arabic (Libya)1801 Arabic (Morocco)2001 Arabic (Oman)4001 Arabic (Qatar)0401 Arabic (Saudi Arabia)2801 Arabic (Syria)1c01 Arabic (Tunisia)3801 Arabic (U.A.E.)2401 Arabic (Yemen)042b Armenian082c Azeri (Cyrillic)042c Azeri (Latin)042d Basque0423 Belarusian141a Bosnian (Latin, Bosnia and Herzegovina)0402 Bulgarian0403 Catalan
Helpinator 3.1 Manual
45
0c04 Chinese (Hong Kong S.A.R.)1404 Chinese (Macau S.A.R.)0804 Chinese (PRC)1004 Chinese (Singapore)0404 Chinese (Taiwan)041a Croatian101a Croatian (Bosnia and Herzegovina)0405 Czech0406 Danish0465 Divehi0813 Dutch (Belgium)0413 Dutch (Netherlands)0c09 English (Australia)2809 English (Belize)1009 English (Canada)2409 English (Caribbean)1809 English (Ireland)2009 English (Jamaica)1409 English (New Zealand)3409 English (Philippines)1c09 English (South Africa)2c09 English (Trinidad)0809 English (United Kingdom)0409 English (United States)3009 English (Zimbabwe)0425 Estonian042f FYRO Macedonian0438 Faeroese0429 Farsi040b Finnish080c French (Belgium)0c0c French (Canada)040c French (France)140c French (Luxembourg)180c French (Monaco)100c French (Switzerland)0456 Galician0437 Georgian0c07 German (Austria)0407 German (Germany)1407 German (Liechtenstein)1007 German (Luxembourg)0807 German (Switzerland)0408 Greek0447 Gujarati040d Hebrew0439 Hindi040e Hungarian040f Icelandic0421 Indonesian0410 Italian (Italy)0810 Italian (Switzerland)0411 Japanese044b Kannada043f Kazakh0457 Konkani
Helpinator 3.1 Manual
46
0412 Korean0440 Kyrgyz (Cyrillic)0426 Latvian0427 Lithuanian083e Malay (Brunei Darussalam)043e Malay (Malaysia)043a Maltese0481 Maori044e Marathi0450 Mongolian (Cyrillic)046c Northern Sotho0414 Norwegian (Bokmal)0814 Norwegian (Nynorsk)0415 Polish0416 Portuguese (Brazil)0816 Portuguese (Portugal)0446 Punjabi046b Quechua (Bolivia)086b Quechua (Ecuador)0c6b Quechua (Peru)0418 Romanian0419 Russian243B Sami, Inari (Finland)103b Sami, Lule (Norway)143b Sami, Lule (Sweden)0c3b Sami, Northern (Finland)043b Sami, Northern (Norway)083b Sami, Northern (Sweden)203b Sami, Skolt (Finland)183b Sami, Southern (Norway)1c3b Sami, Southern (Sweden)044f Sanskrit0c1a Serbian (Cyrillic)1c1a Serbian (Cyrillic, Bosnia and Herzegovina)081a Serbian (Latin)181a Serbian (Latin, Bosnia and Herzegovina)041b Slovak0424 Slovenian2c0a Spanish (Argentina)400a Spanish (Bolivia)340a Spanish (Chile)240a Spanish (Colombia)140a Spanish (Costa Rica)1c0a Spanish (Dominican Republic)300a Spanish (Ecuador)440a Spanish (El Salvador)100a Spanish (Guatemala)480a Spanish (Honduras)0c0a Spanish (International Sort)080a Spanish (Mexico)4c0a Spanish (Nicaragua)180a Spanish (Panama)3c0a Spanish (Paraguay)280a Spanish (Peru)500a Spanish (Puerto Rico)040a Spanish (Traditional Sort)
Helpinator 3.1 Manual
47
380a Spanish (Uruguay)200a Spanish (Venezuela)0441 Swahili041d Swedish081d Swedish (Finland)045a Syriac0449 Tamil0444 Tatar044a Telugu041e Thai0432 Tswana041f Turkish0422 Ukrainian0420 Urdu0843 Uzbek (Cyrillic)0443 Uzbek (Latin)042a Vietnamese0452 Welsh0434 Xhosa0435 Zulu
<projectfile> (required) - full path to the Helpinator project you are about to compile.
Example.Suppose path to your project is C:\Project\Help\myproject.hgu.You need to compile PDF help from it and place it into C:\PDF folder. You have variable preset "pro" and want to use it.You have several languages in the project and you want to use "English (United States)"You can use the following command line to do that:
chelpinator.exe /pdf /vpro /lang:0409 C:\PDF\myproject.pdf C:\Project\Help\myproject.hgu
Helpinator 3.1 Manual
48
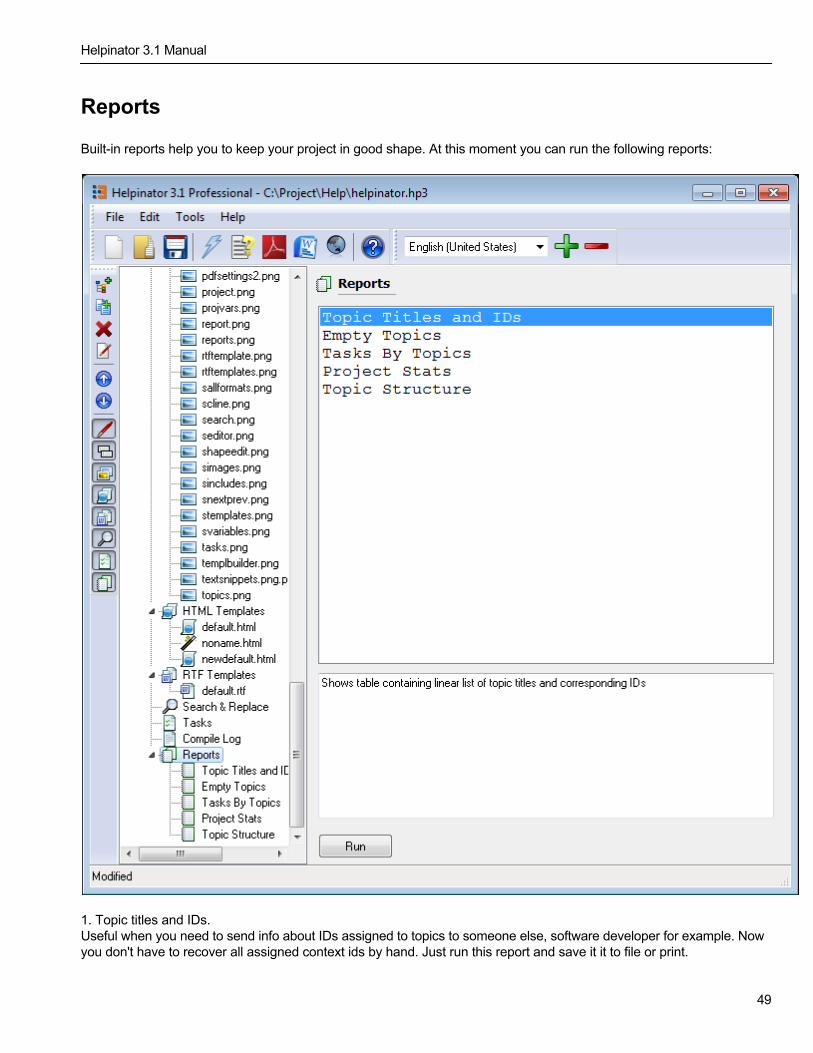
Reports
Built-in reports help you to keep your project in good shape. At this moment you can run the following reports:
1. Topic titles and IDs.Useful when you need to send info about IDs assigned to topics to someone else, software developer for example. Nowyou don't have to recover all assigned context ids by hand. Just run this report and save it it to file or print.
Helpinator 3.1 Manual
49
2. Empty Topics.Sometimes some topics remain empty - you have created project structure and forgot to write all texts. This report canhelp you to easily find topics that you missed.
3. Tasks By Topics.Helpinator's task management is useful but sometimes you need not only to view them but print out to send to yourproject leader or another help author. Run this report and you will have a list of all tasks with titles of topics they areassigned to.
4. Project Stats.This report shows different project statistics like number of words and characters. Useful for freelancers because it helpsyou to track financial issues.
5. Topic Structure.Sometimes brainstorming goes better with printed documents, not those on screen. When deciding project structure -run this report to have topic structure in easy-to-print format.
Note that we will add more reports in the future. Contact support if you need specific report.
Helpinator 3.1 Manual
50
Project Verification
Project verification allows you to know that project has some problems before you release documentation to the public.At this moment project verification checks for the following:1. Empty Topics2. Broken library image references, e.g. IMG pseudo-tags that reference images that do not exist.3. Duplicate context IDs4. Duplicate topics IDs5. Empty topics IDs.
List of possible problems to check will enhance in the future.
Helpinator 3.1 Manual
51


