Help & Manual - Pangolin Laser Systemspangolin.com/_Files/Realizzer3d_manual.pdf · Help & Manual....
48
© 2014 Syncronorm GmbH Help & Manual
Transcript of Help & Manual - Pangolin Laser Systemspangolin.com/_Files/Realizzer3d_manual.pdf · Help & Manual....
© 2014 Syncronorm GmbH
Help & Manual

Realizzer 3D2
© 2014 Syncronorm GmbH
Table of Contents
Foreword 0
Part I Introduction 4
................................................................................................................................... 51 System Requirements
................................................................................................................................... 62 Realizzer License KEY
Part II Getting Started 7
................................................................................................................................... 71 Installation Process
................................................................................................................................... 82 Projects and Library
................................................................................................................................... 83 Multiple Graphic Adapters
................................................................................................................................... 94 First Start
.......................................................................................................................................................... 9Project Dialog
Part III Program overview 10
................................................................................................................................... 111 Coordinate System
................................................................................................................................... 112 Camera Movement
.......................................................................................................................................................... 11Save Camera
................................................................................................................................... 123 3D Window
................................................................................................................................... 134 Objects & Scene Graph Window
................................................................................................................................... 135 Object Settings
................................................................................................................................... 146 Library Window
................................................................................................................................... 157 Supported File Formats
Part IV Scene Contruction 16
................................................................................................................................... 161 Import 3D-Models from Library
................................................................................................................................... 162 Import 3D-Model from external File
................................................................................................................................... 173 Move, Rotate and Scale Objects
.......................................................................................................................................................... 17Selection
.......................................................................................................................................................... 18Move Objects
.......................................................................................................................................................... 19Rotate Objects
.......................................................................................................................................................... 19Scale Objects
................................................................................................................................... 204 Arrange Objects
.......................................................................................................................................................... 20Line Arrange
.......................................................................................................................................................... 21Circle Arrange
.......................................................................................................................................................... 22Matrix Arrange
................................................................................................................................... 235 Duplicate Objects
................................................................................................................................... 236 Delete Objects
................................................................................................................................... 237 Group Objects
................................................................................................................................... 238 Materials
.......................................................................................................................................................... 24Material Settings

3Contents
3
© 2014 Syncronorm GmbH
................................................................................................................................... 259 Realpacks
Part V DMX-Fixtures 26
................................................................................................................................... 261 Add Fixtures
................................................................................................................................... 272 DMX Patching
.......................................................................................................................................................... 28Patching Window
......................................................................................................................................................... 28Export Patch
................................................................................................................................... 293 Lighting Fixture Settings
Part VI DMX Input and Network 30
................................................................................................................................... 301 ArtNET
Part VII Offline Console 31
................................................................................................................................... 331 PanTilt Mouse Tracking
Part VIII Laser Projectors 34
................................................................................................................................... 351 Setup Laser-Output from Pangolin Beyond
................................................................................................................................... 362 Setup Laser-Output from Lasergraph DSP
Part IX Video Sources 37
................................................................................................................................... 381 Using Video-Files
................................................................................................................................... 382 Using Live-Capture Devices
................................................................................................................................... 383 Using CITP Video
................................................................................................................................... 394 Video Projectors
Part X Visual Settings 40
Part XI Video Rendering 41
................................................................................................................................... 421 DMX-Stream
................................................................................................................................... 432 Render a Video
................................................................................................................................... 443 DMX Camera
Part XII Version Changelog 45
................................................................................................................................... 451 1.3.0.0
................................................................................................................................... 452 1.2.0.0
................................................................................................................................... 453 1.1.0.0
Index 47
Realizzer 3D4
© 2014 Syncronorm GmbH
1 Introduction
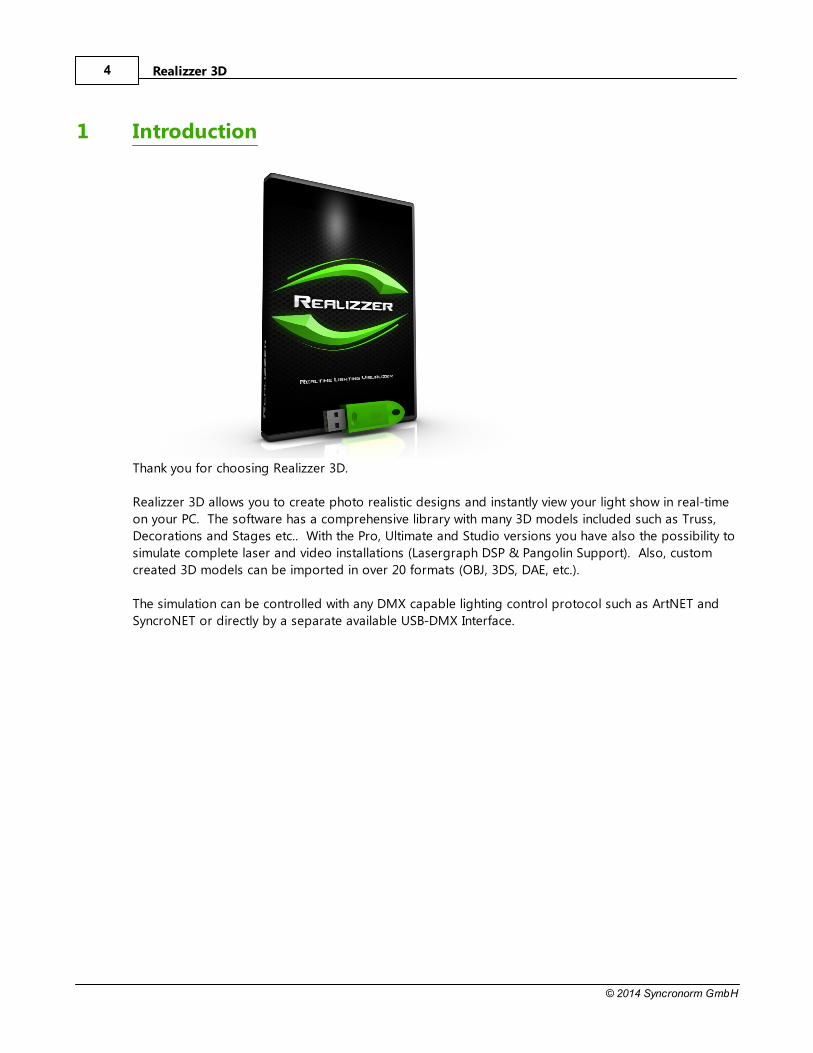
Thank you for choosing Realizzer 3D.
Realizzer 3D allows you to create photo realistic designs and instantly view your light show in real-time
on your PC. The software has a comprehensive library with many 3D models included such as Truss,
Decorations and Stages etc.. With the Pro, Ultimate and Studio versions you have also the possibility to
simulate complete laser and video installations (Lasergraph DSP & Pangolin Support). Also, custom
created 3D models can be imported in over 20 formats (OBJ, 3DS, DAE, etc.).
The simulation can be controlled with any DMX capable lighting control protocol such as ArtNET and
SyncroNET or directly by a separate available USB-DMX Interface.
Introduction 5
© 2014 Syncronorm GmbH
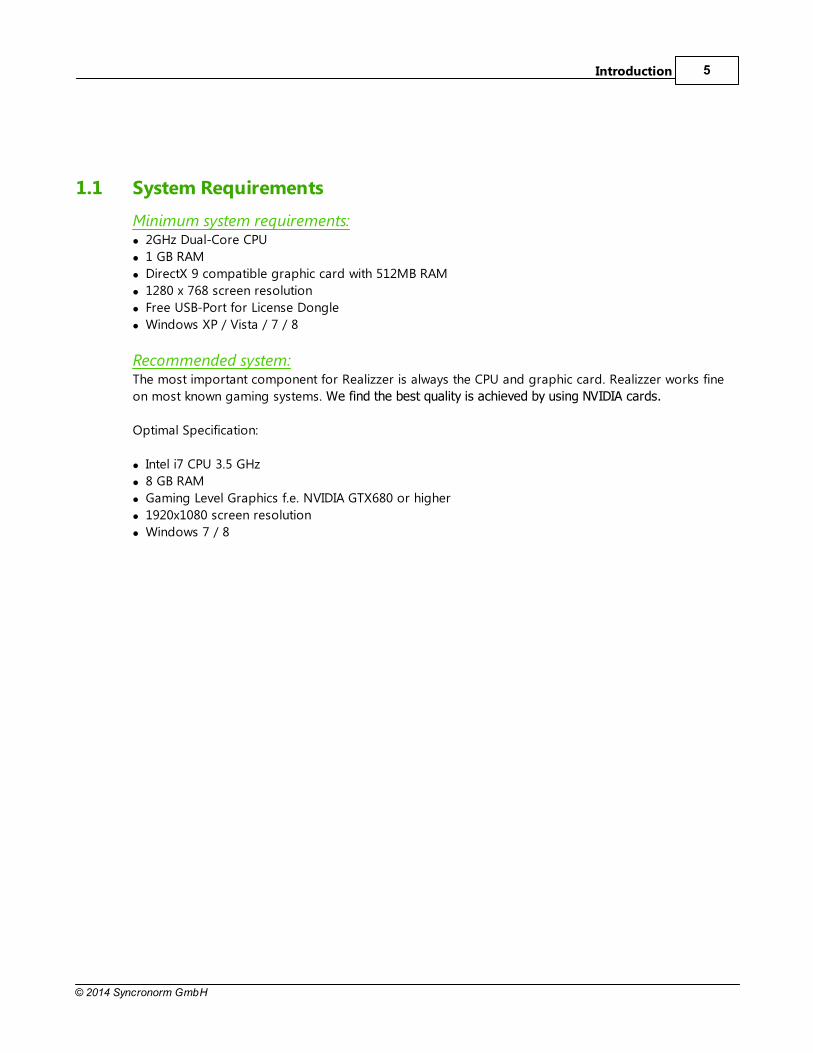
1.1 System Requirements
Minimum system requirements:2GHz Dual-Core CPU
1 GB RAM
DirectX 9 compatible graphic card with 512MB RAM
1280 x 768 screen resolution
Free USB-Port for License Dongle
Windows XP / Vista / 7 / 8
Recommended system:The most important component for Realizzer is always the CPU and graphic card. Realizzer works fine
on most known gaming systems. We find the best quality is achieved by using NVIDIA cards.
Optimal Specification:
Intel i7 CPU 3.5 GHz
8 GB RAM
Gaming Level Graphics f.e. NVIDIA GTX680 or higher
1920x1080 screen resolution
Windows 7 / 8

Realizzer 3D6
© 2014 Syncronorm GmbH
1.2 Realizzer License KEY
The Realizzer License Key is a USB dongle. This
Dongle needs to be connected to the computer
during while running Realizzer to activate the Full
Version. You will receive your personal Dongle when
purchasing Realizzer.
The Realizzer USB-Dongle is available as:
Realizzer Basic
Realizzer Professional
Realizzer Ultimate
Realizzer Studio
The USB Dongle is used for software protection. Thank your for understanding.
Please contact your Realizzer Dealer/supplier if you would like to purchase an upgrade for your
Realizzer License.
Demo VersionIf no Realizzer USB-Dongle is connected the software will run in Demo mode.
Which features are limited in Demo Mode?
You cannot save a project
The software will stop working after 30-Min. Realizzer needs to be restarted.
Important Information
The Realizzer USB-Dongle is the most important item when you buy Realizzer. Do not lose it!
The Realizzer USB-Dongle is not bound to one computer and can be used with each of your
computers individually.
Please always connect the USB-Dongle before starting Realizzer.
Do not disconnect the USB-Dongle while running the software.
Introduction 7
© 2014 Syncronorm GmbH
2 Getting Started
2.1 Installation Process
It is strongly recommend to use always the latest version available from our website. Just visit
www.Realizzer.com to download the latest setup file. When using a Realizzer CD-ROM for installation,
please insert the CD into your CD-ROM drive and the Setup will startup automaticly. If the Auto Installer
does not launch, please navigate to the CD using the Windows Explorer and run the RealizzerSetup.exe
manually.
Please make sure to:
1. Log into Windows as administrator and accept windows UAC if this message displays
2. Wait until the setup has been installed successfully. This can take some minutes depending on your
computer speed.
3. Make sure DirectX 9 is installed on your PC. You can check this by run Start>Run> "dxdiag".
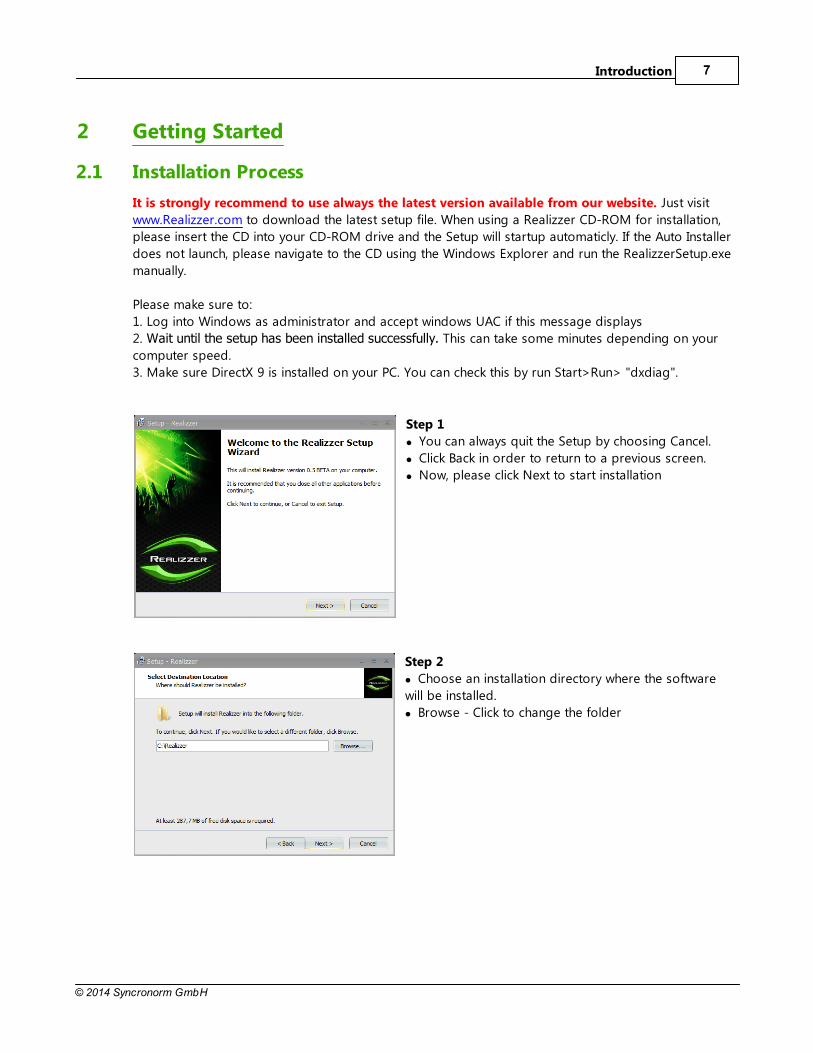
Step 1
You can always quit the Setup by choosing Cancel.
Click Back in order to return to a previous screen.
Now, please click Next to start installation
Step 2
Choose an installation directory where the software
will be installed.
Browse - Click to change the folder

Realizzer 3D8
© 2014 Syncronorm GmbH
Step 3
Define the directory where the Setup will install all
Library files.
This path is used later to save all future projects and
settings
Make sure to have enough disk space future projects
Follow the next three steps by instructions and wait until Setup is finished completely.
2.2 Projects and Library
In the installation process the setup will ask for the Realizzer Work-Path. By default Realizzer will use
your Documents folder to create a folder called "Realizzer".
This is the Place where Realizzer will save all future projects and library data. Your Realizzer folder
contains following directories:
MyLibrarys - Contains all Library Fixtures, Models and Materials
MyProjects - Contains all your Project files
All files will be copied!One important feature of Realizzer is that it will copy all files you are using in your project like,
materials, fixtures, models or videos, in your Project folder. This makes it easy to exchange projects on
different PCs. Simply copy or ZIP the current project folder and you will have everything in there. So you
don't have to take care about shipping fixture files or models together with the project.
2.3 Multiple Graphic Adapters
Most laptops have more than one graphic card installed to save the battery. Most common are Intel HD
Onboard graphics. Realizzer supports them, too but with lesser performance. During first startup,
Realizzer will check how many adapters are installed and will ask which one it should take.
Always use NVIDIA or ATI if available. If you have an NVIDIA card installed you can also use the NVIDIA
System configuration to define the default graphics adapter.
Getting Started 9
© 2014 Syncronorm GmbH
2.4 First Start
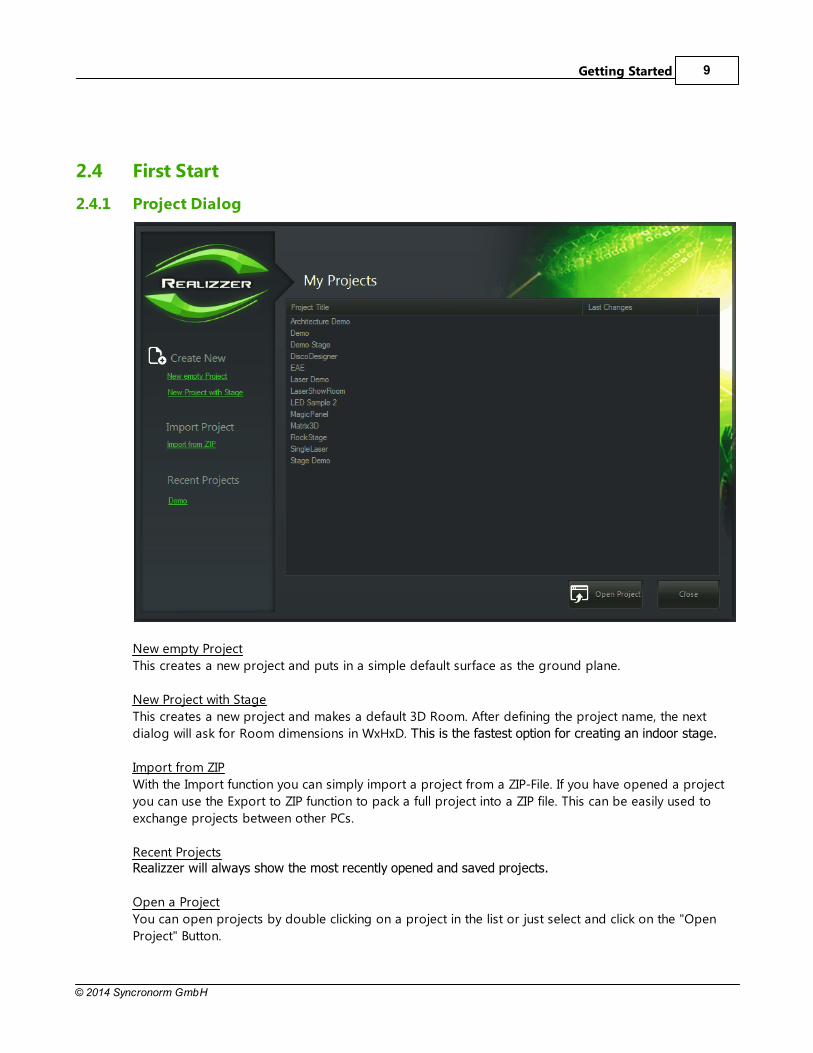
2.4.1 Project Dialog
New empty Project
This creates a new project and puts in a simple default surface as the ground plane.
New Project with Stage
This creates a new project and makes a default 3D Room. After defining the project name, the next
dialog will ask for Room dimensions in WxHxD. This is the fastest option for creating an indoor stage.
Import from ZIP
With the Import function you can simply import a project from a ZIP-File. If you have opened a project
you can use the Export to ZIP function to pack a full project into a ZIP file. This can be easily used to
exchange projects between other PCs.
Recent ProjectsRealizzer will always show the most recently opened and saved projects.
Open a Project
You can open projects by double clicking on a project in the list or just select and click on the "Open
Project" Button.

Realizzer 3D10
© 2014 Syncronorm GmbH
3 Program overview
The User-Interface of Realizzer 3D is split in 4 main areas. All Windows can be drag&dropped onto
other windows and can be also released to other screens.
3D Window:
This window has 3 Modes: Live-, Contruction- and Plot View. Depending on the selected mode you can
just view, edit or print your 3D Scene.
Objects Window:
This window contains all scene and fixture elements in a tree structure, called Scene Graph.
Settings Window:
Depending on the current selected Objects you can change here all properties of the objects, like
position, rotation, intensity, color, etc.
Library Window:
This window contains all library files currently installed in your MyLibrary path.

Program overview 11
© 2014 Syncronorm GmbH
3.1 Coordinate System
Realizzer 3D uses a left handed coordinate System.
All Measures are defined in Centimeters. Check the Application Settings to change the Measure units.
3.2 Camera Movement
Realizzer uses an Orbit-Camera which is always "orbiting" (rotating) around the selected object.
Use the left
mouse button to
rotate the
Camera around
Y and X Axis.
Use the right
mouse button to
move the
camera position
in view space.
Use the mouse
wheel to Zoom
in & out from
current view
position.
By holding the CTRL- or Shift-Key on your Keyboard you can change the move speed to slow or fast.
3.2.1 Save Camera
Realizzer gives you the possibility to save a current Camera-View to one of your Keyboard F-Keys.
Simply move the Camera to the desired Position, HOLD the CTRL-Key and click on one of your F-Key f.e.
F2 on your Keyboard. Now the position is saved to this Key. If you later click again on F2 the Camera
will moves you back to this position.
Realizzer 3D12
© 2014 Syncronorm GmbH
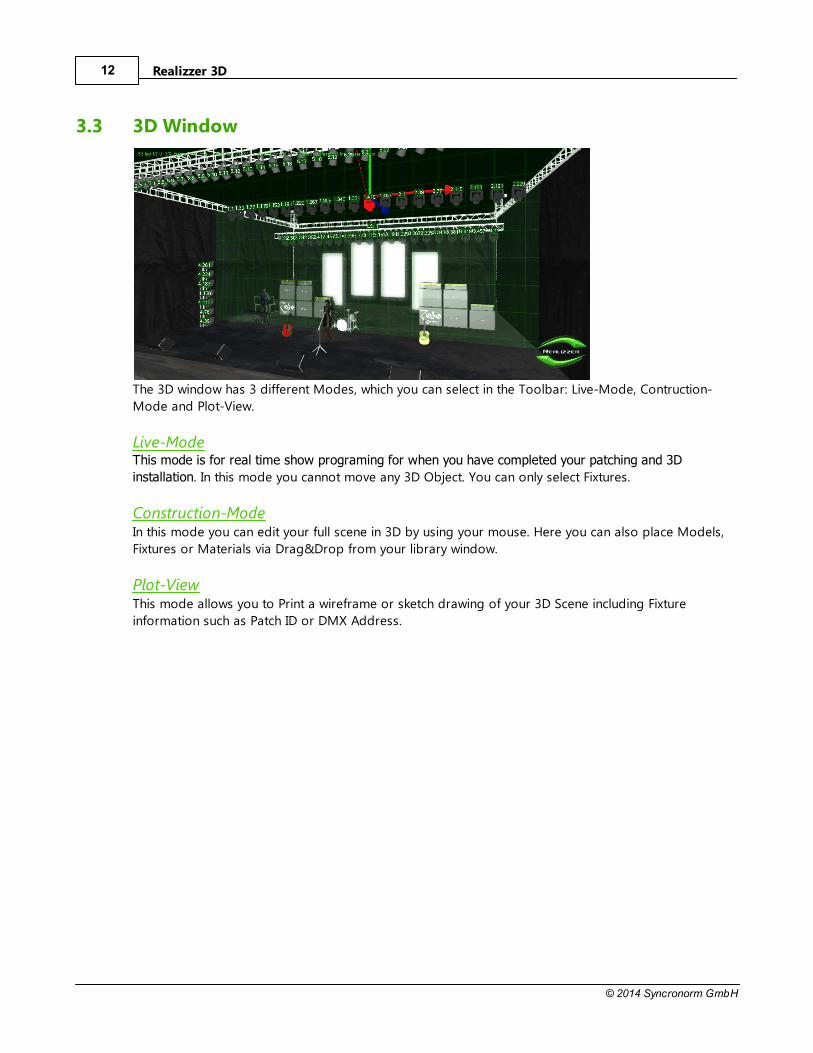
3.3 3D Window
The 3D window has 3 different Modes, which you can select in the Toolbar: Live-Mode, Contruction-
Mode and Plot-View.
Live-ModeThis mode is for real time show programing for when you have completed your patching and 3D
installation. In this mode you cannot move any 3D Object. You can only select Fixtures.
Construction-ModeIn this mode you can edit your full scene in 3D by using your mouse. Here you can also place Models,
Fixtures or Materials via Drag&Drop from your library window.
Plot-ViewThis mode allows you to Print a wireframe or sketch drawing of your 3D Scene including Fixture
information such as Patch ID or DMX Address.

Program overview 13
© 2014 Syncronorm GmbH
3.4 Objects & Scene Graph Window
The Objects-Window contains all Objects like Fixtures,
3D-Models and Groups of your Project. All objects can
be structured in a Tree called Scene Graph.
Scene Graph
That means that an object's position, rotation and scale
is depending on its parent objects. F.e. if you put a
Group-Object on X = 20m and all child's of this group
on X = 10m the resulting World-Position of the child's
are 30m.
To change the objects hirachy simply drag and drop
the selected objects to the new parent object.
3.5 Object Settings
In the Object Settings window you can change the properties and options for the selected objects.
In the Transformation Section you can change Position, Rotation and Objects Scale.
Visible - Object will be rendered in 3D
Selectable - Object can be selected in 3D
Locked - Object cannot be changed in 3D
Name - Change the Objects name
The Advanced Settings Window allows you to change extended properties of each object. This is for
advanced users only.

Realizzer 3D14
© 2014 Syncronorm GmbH
3.6 Library Window
The Library window shows all installed Library files like Fixtures, 3D-Models, Realpacks and Materials.
Add own files to LibraryIf you want to add files to the library, navigate to your Library path (Documents\Realizzer\MyLibrarys).
Fixture files need to be in the "Fixtures" Directory
Material files need to be in the "Materials" Directory
Model files and Realpacks need to be in the "Models" Directory
To see the Thumbnail image of a 3D-Model, you need to add a thumbnail file with the same Filename
as the model:
f.e. a Thumbnail-Filename for "House.3ds" needs to be "House.jpg". The Image format should be
squared and not bigger than 128x128 pixel.
Checkout Supported File Formats for more information.
Program overview 15
© 2014 Syncronorm GmbH
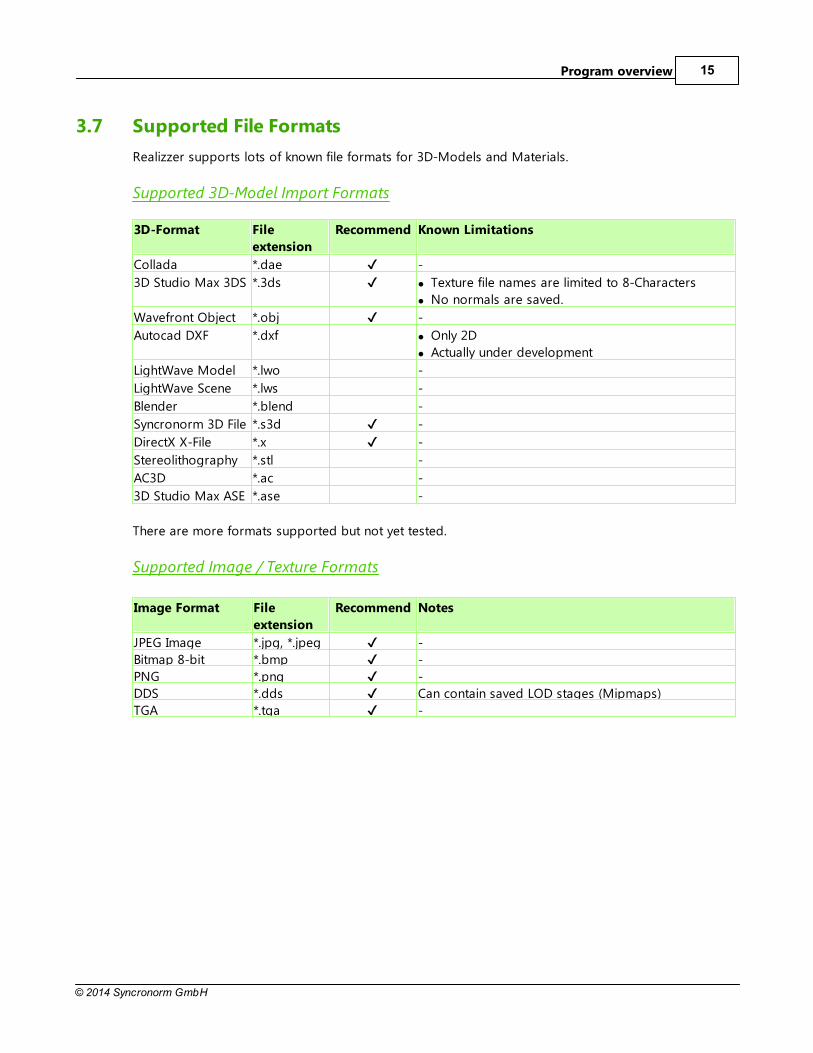
3.7 Supported File Formats
Realizzer supports lots of known file formats for 3D-Models and Materials.
Supported 3D-Model Import Formats
3D-Format File
extension
Recommend Known Limitations
Collada *.dae -
3D Studio Max 3DS *.3ds Texture file names are limited to 8-Characters
No normals are saved.
Wavefront Object *.obj -
Autocad DXF *.dxf Only 2D
Actually under development
LightWave Model *.lwo -
LightWave Scene *.lws -
Blender *.blend -
Syncronorm 3D File *.s3d -
DirectX X-File *.x -
Stereolithography *.stl -
AC3D *.ac -
3D Studio Max ASE *.ase -
There are more formats supported but not yet tested.
Supported Image / Texture Formats
Image Format File
extension
Recommend Notes
JPEG Image *.jpg, *.jpeg -
Bitmap 8-bit *.bmp -
PNG *.png -
DDS *.dds Can contain saved LOD stages (Mipmaps)
TGA *.tga -
Realizzer 3D16
© 2014 Syncronorm GmbH
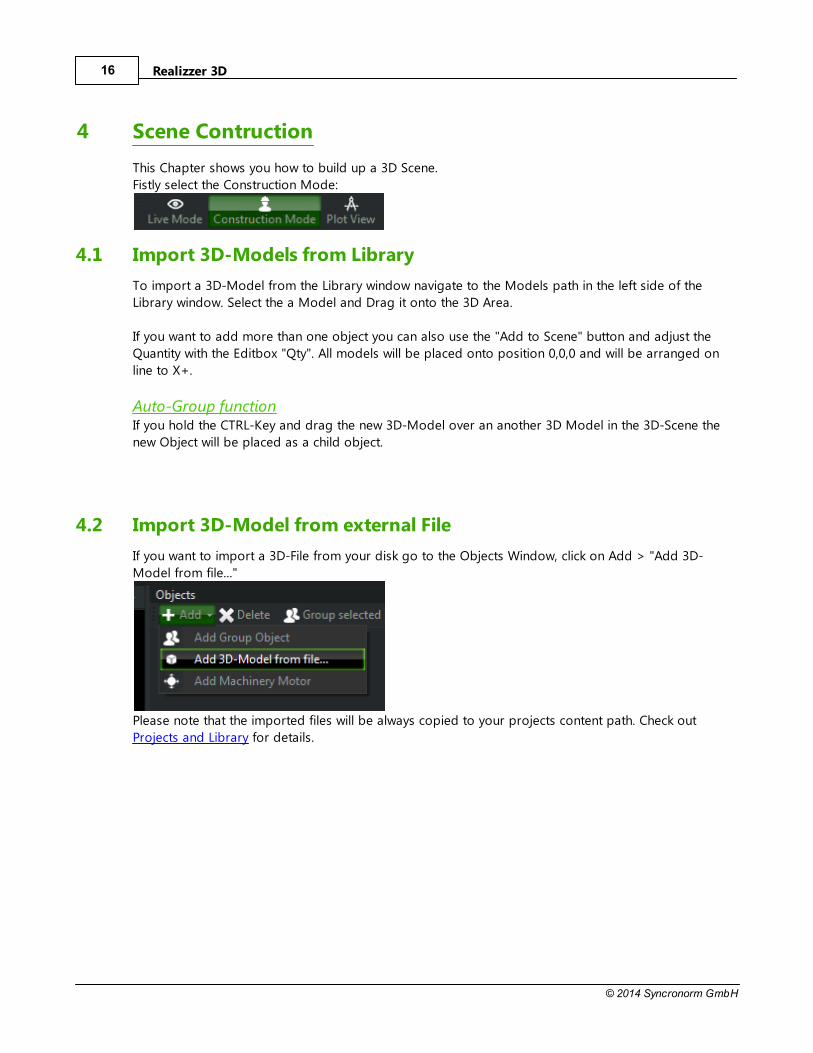
4 Scene Contruction
This Chapter shows you how to build up a 3D Scene.
Fistly select the Construction Mode:
4.1 Import 3D-Models from Library
To import a 3D-Model from the Library window navigate to the Models path in the left side of the
Library window. Select the a Model and Drag it onto the 3D Area.
If you want to add more than one object you can also use the "Add to Scene" button and adjust the
Quantity with the Editbox "Qty". All models will be placed onto position 0,0,0 and will be arranged on
line to X+.
Auto-Group function If you hold the CTRL-Key and drag the new 3D-Model over an another 3D Model in the 3D-Scene the
new Object will be placed as a child object.
4.2 Import 3D-Model from external File
If you want to import a 3D-File from your disk go to the Objects Window, click on Add > "Add 3D-
Model from file..."
Please note that the imported files will be always copied to your projects content path. Check out
Projects and Library for details.

Scene Contruction 17
© 2014 Syncronorm GmbH
4.3 Move, Rotate and Scale Objects
The Realizzer 3D Editor offers you a comfortable way to move, rotate and scale objects directly in 3D
with your mouse. Please note: if an object is marked as Locked it cannot be changed in 3D. You can
also Move, Rotate and Scale objects using the Transformation in the Objects Settings window.
4.3.1 Selection
In the Realizzer 3D-Editor you can select objects directly in 3D with your mouse. Therefore simply click
in the 3D-View with the left mouse button. For Fixtures and 3D-Models you can decide which ones are
selectable by the mouse. Hold CTRL- or Shift-Key for selecting or deselecting multiple objects.
MultiselectionTo select multiple objects with your mouse, click and hold the Middle-Mouse button and move.
Selection Modes
If "Select Fixtures" is active you can only select Fixtures.
If "Select Meshes" is active you can only select 3D Models
If both are selected you can select all.
Selection OrderAll Objects will be added to the Selection List in same order as you have selected them. If you are using
the rectangular Multiselection, the selection will be sorted from left to right in the current View. The
Selection Order is important if you are doing Autopatch or Arrange objects.

Realizzer 3D18
© 2014 Syncronorm GmbH
4.3.2 Move Objects
At first select the Move-Mouse mode by clicking on the Toolbar button "Move"
For moving an object you have three possibilities.
Move Object on view planeIf you select an Object in Move-Mode a green 1m Raster
will always be visible and change if you rotate the camera.
This is the actual XYZ Axis between Object- and
Cameraposition. If you pick a 3D-Model directly it will
move on this Raster. You can also see the current distance
from the last position.
The Raster can also help to see if objects are parallel to
each other.
Move Object with PivotsBy clicking with the left mouse button on one of the
Arrows of the visible Pivot you can move the selected
Objects only on the clicked Axis. This is independent from
the View-Raster.
Each Axis is defined by a color.
Red = X-Axis, Green = Y-Axis, Blue = Z-Axis
Scene Contruction 19
© 2014 Syncronorm GmbH
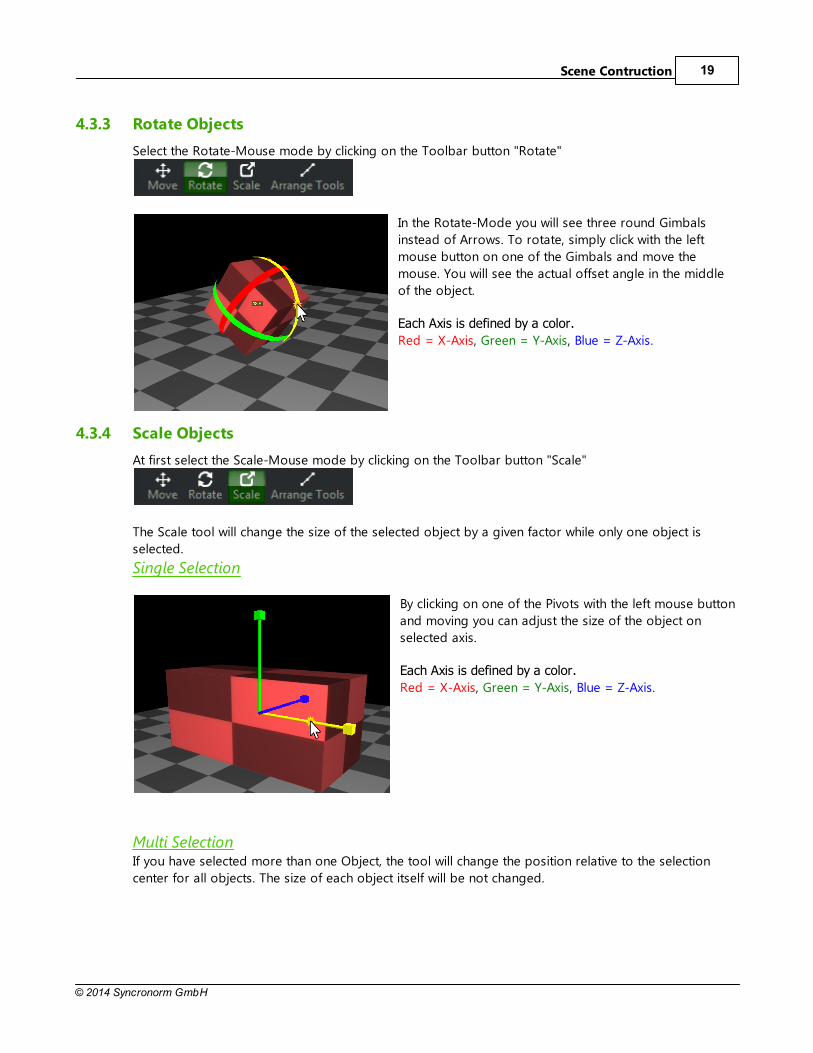
4.3.3 Rotate Objects
Select the Rotate-Mouse mode by clicking on the Toolbar button "Rotate"
In the Rotate-Mode you will see three round Gimbals
instead of Arrows. To rotate, simply click with the left
mouse button on one of the Gimbals and move the
mouse. You will see the actual offset angle in the middle
of the object.
Each Axis is defined by a color.
Red = X-Axis, Green = Y-Axis, Blue = Z-Axis.
4.3.4 Scale Objects
At first select the Scale-Mouse mode by clicking on the Toolbar button "Scale"
The Scale tool will change the size of the selected object by a given factor while only one object is
selected.
Single Selection
By clicking on one of the Pivots with the left mouse button
and moving you can adjust the size of the object on
selected axis.
Each Axis is defined by a color.
Red = X-Axis, Green = Y-Axis, Blue = Z-Axis.
Multi SelectionIf you have selected more than one Object, the tool will change the position relative to the selection
center for all objects. The size of each object itself will be not changed.

Realizzer 3D20
© 2014 Syncronorm GmbH
4.4 Arrange Objects
Realizzer comes with an inbuilt Arranger tool, which helps you to arrange objects by Line, Circle or in a
Matrix. At first select the objects you want to arrange, then click on the Toolbar Button "Arrange Tools".
A new window will appear beside the Object Settings.
Important node:
All Objects will be arranged in selection order. See Selection for more Information.
4.4.1 Line Arrange
Positions:
The position section defines the distance between each object on the line. You can define a distance for
each Axis separately, this will produce angular lines.
Angles:
With active Angles, you can add a relative rotation offset to each Object. This feature will add (Deg /
Count) * N degree to each object.
Arrange:Click this button to arrange.
Realtime Update:
If this option is active, the arrangement will be done immediately after changing any value.
Scene Contruction 21
© 2014 Syncronorm GmbH
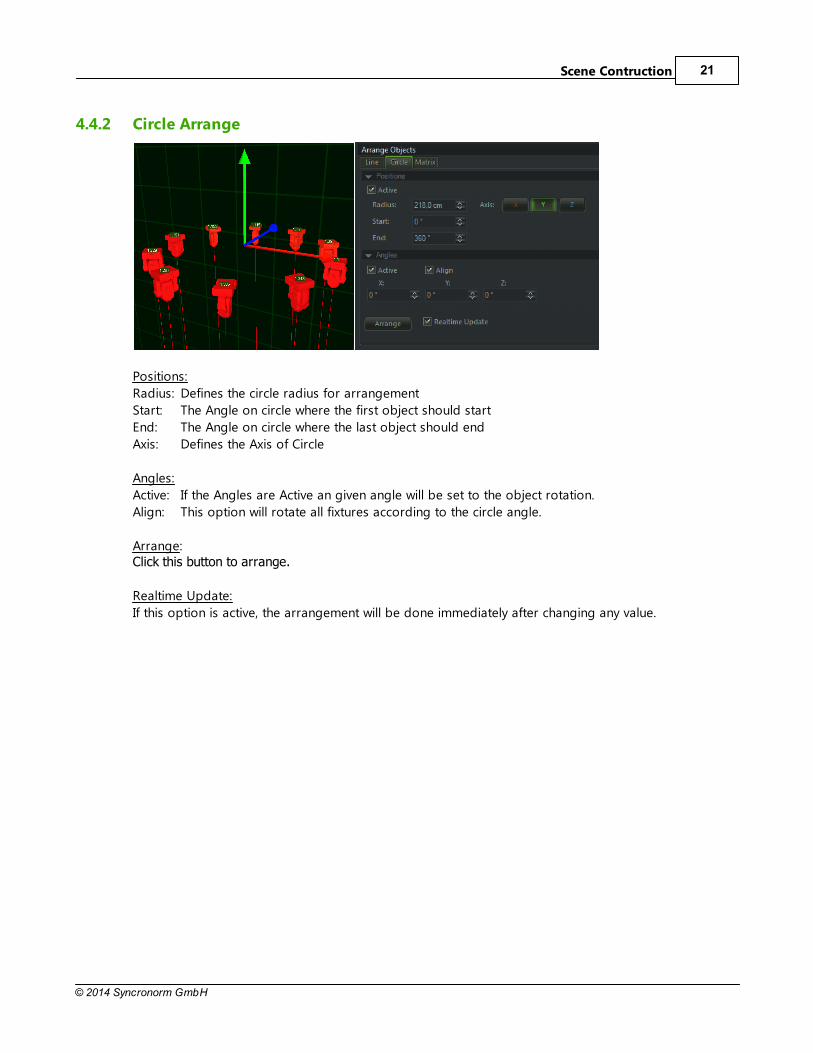
4.4.2 Circle Arrange
Positions:
Radius: Defines the circle radius for arrangement
Start: The Angle on circle where the first object should start
End: The Angle on circle where the last object should end
Axis: Defines the Axis of Circle
Angles:
Active: If the Angles are Active an given angle will be set to the object rotation.
Align: This option will rotate all fixtures according to the circle angle.
Arrange:Click this button to arrange.
Realtime Update:
If this option is active, the arrangement will be done immediately after changing any value.
Realizzer 3D22
© 2014 Syncronorm GmbH
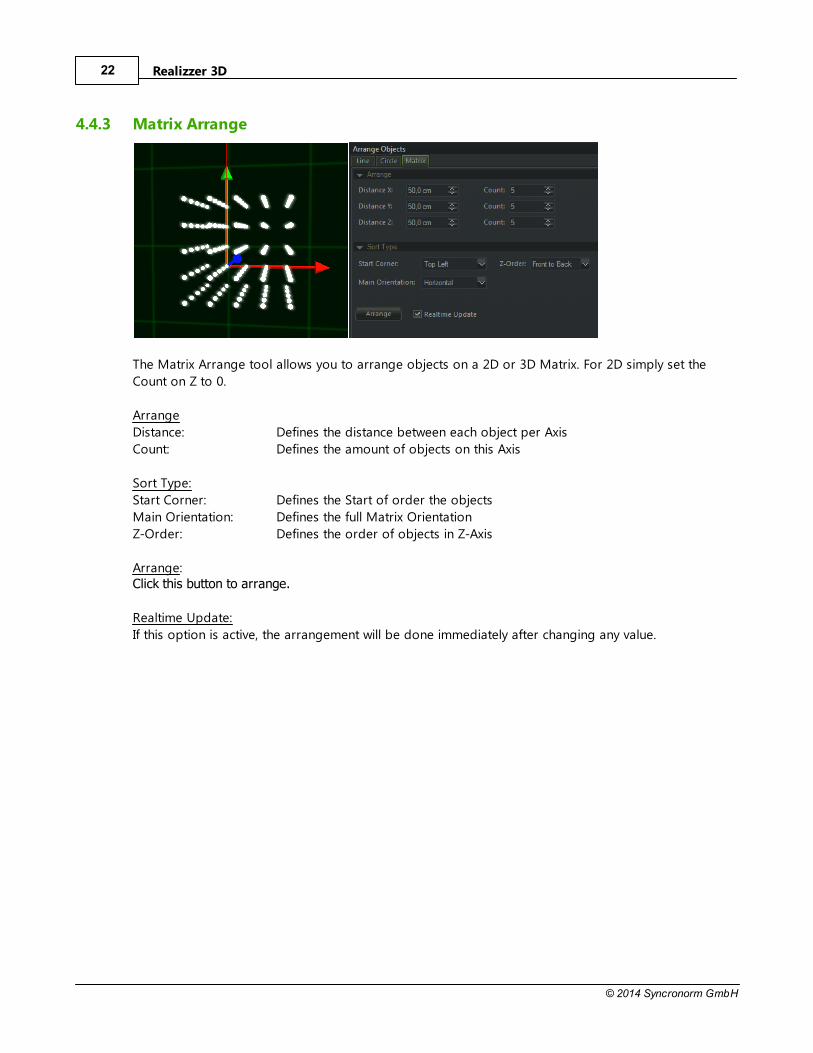
4.4.3 Matrix Arrange
The Matrix Arrange tool allows you to arrange objects on a 2D or 3D Matrix. For 2D simply set the
Count on Z to 0.
Arrange
Distance: Defines the distance between each object per Axis
Count: Defines the amount of objects on this Axis
Sort Type:
Start Corner: Defines the Start of order the objects
Main Orientation: Defines the full Matrix Orientation
Z-Order: Defines the order of objects in Z-Axis
Arrange:Click this button to arrange.
Realtime Update:
If this option is active, the arrangement will be done immediately after changing any value.
Scene Contruction 23
© 2014 Syncronorm GmbH
4.5 Duplicate Objects
To make copies of selected objects, make a right click on the selection in 3D- or Objects window and
click on "Duplicate". In the next Dialog you can define how many of copies you want. You can also
duplicate your Objects while holding CTRL-Key and move using the Pivot.
4.6 Delete Objects
To delete objects, right-click on the selection in 3D- or Objects window and click on "Delete"
4.7 Group Objects
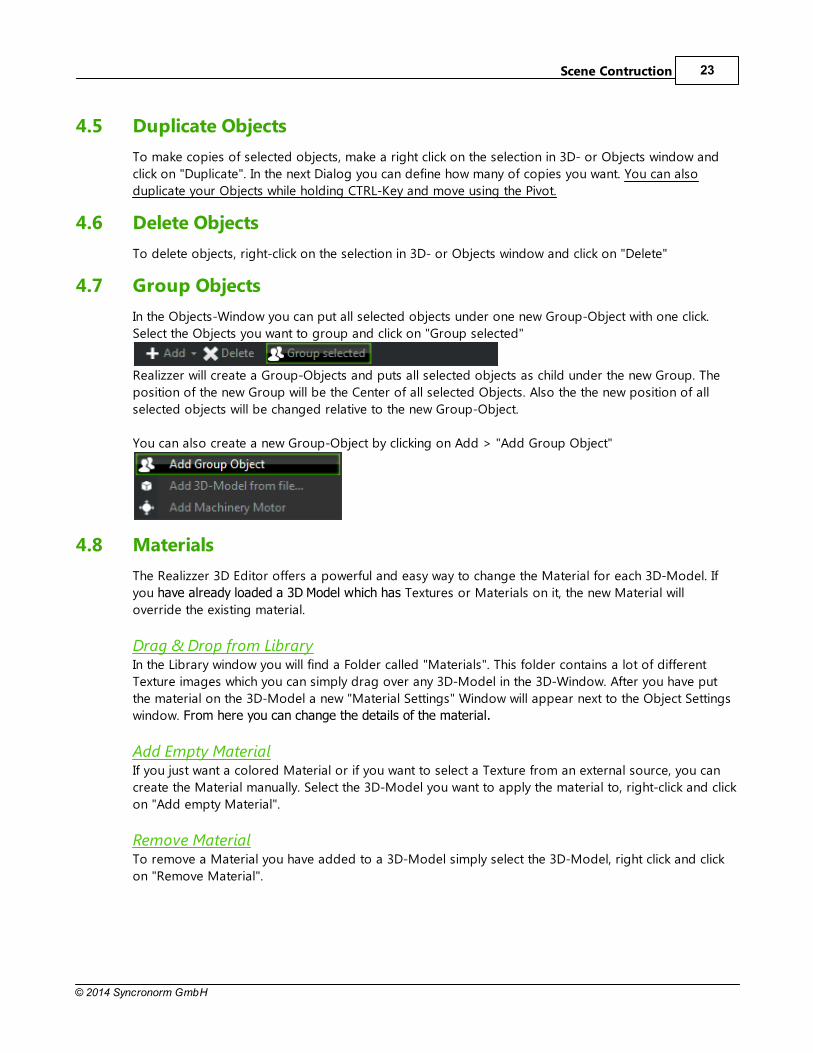
In the Objects-Window you can put all selected objects under one new Group-Object with one click.
Select the Objects you want to group and click on "Group selected"
Realizzer will create a Group-Objects and puts all selected objects as child under the new Group. The
position of the new Group will be the Center of all selected Objects. Also the the new position of all
selected objects will be changed relative to the new Group-Object.
You can also create a new Group-Object by clicking on Add > "Add Group Object"
4.8 Materials
The Realizzer 3D Editor offers a powerful and easy way to change the Material for each 3D-Model. If
you have already loaded a 3D Model which has Textures or Materials on it, the new Material will
override the existing material.
Drag & Drop from LibraryIn the Library window you will find a Folder called "Materials". This folder contains a lot of different
Texture images which you can simply drag over any 3D-Model in the 3D-Window. After you have put
the material on the 3D-Model a new "Material Settings" Window will appear next to the Object Settings
window. From here you can change the details of the material.
Add Empty Material If you just want a colored Material or if you want to select a Texture from an external source, you can
create the Material manually. Select the 3D-Model you want to apply the material to, right-click and click
on "Add empty Material".
Remove Material To remove a Material you have added to a 3D-Model simply select the 3D-Model, right click and click
on "Remove Material".

Realizzer 3D24
© 2014 Syncronorm GmbH
4.8.1 Material Settings
A Material contains various settings to change the look of the 3D-Model.
Material Color
This will change the Diffuse Color of the Material. Use the RGB Sliders to adjust the color. By clicking on
the color panel an additional Color-Dialog will come up.
Texture:
The Texture defines the Image that will be shown on the 3D-Object. If you have inserted a Texture from
the library the File path will be filled automatically. By clicking on "Import from file" you can select
another image from any other source. (Note that all files will be copied to your projects content path).
The Button "Remove", will clear the texture of the Material.
Texture Mapping:
The Texture Mapping defines how the texture will scaled on the 3D-Model. Offset-X and Offset-Y will
move the full texture horizontally or vertically. Tiles-X and Tiles-Y will adjust the size of texture.
Brightness:
Specular: Produces a shiny/glossy finish on the 3D-Model
Emissive: Emissive means that the Object will be emit light itself and will glow
Alpha: Changes the transparency of the 3D-Object
Video Texture:
This displays the Live-Input from any Video-Source into the Texture. Select the "Active" Checkbox and
select a Video-Source. See Video-Sources for more Information.
Scene Contruction 25
© 2014 Syncronorm GmbH
4.9 Realpacks
A Realpack is a specially designed File-Type for Realizzer. It can contain one or multiple objects
including all necessary resource files like Models and Textures. For example, with this function you
export a whole Stage including all Fixtures, Materials and Models in one File and reuse it in other
projects. It is also perfect for making default fixture groups that you use all the time f.e. 10
MovingHeads on a 8m truss.
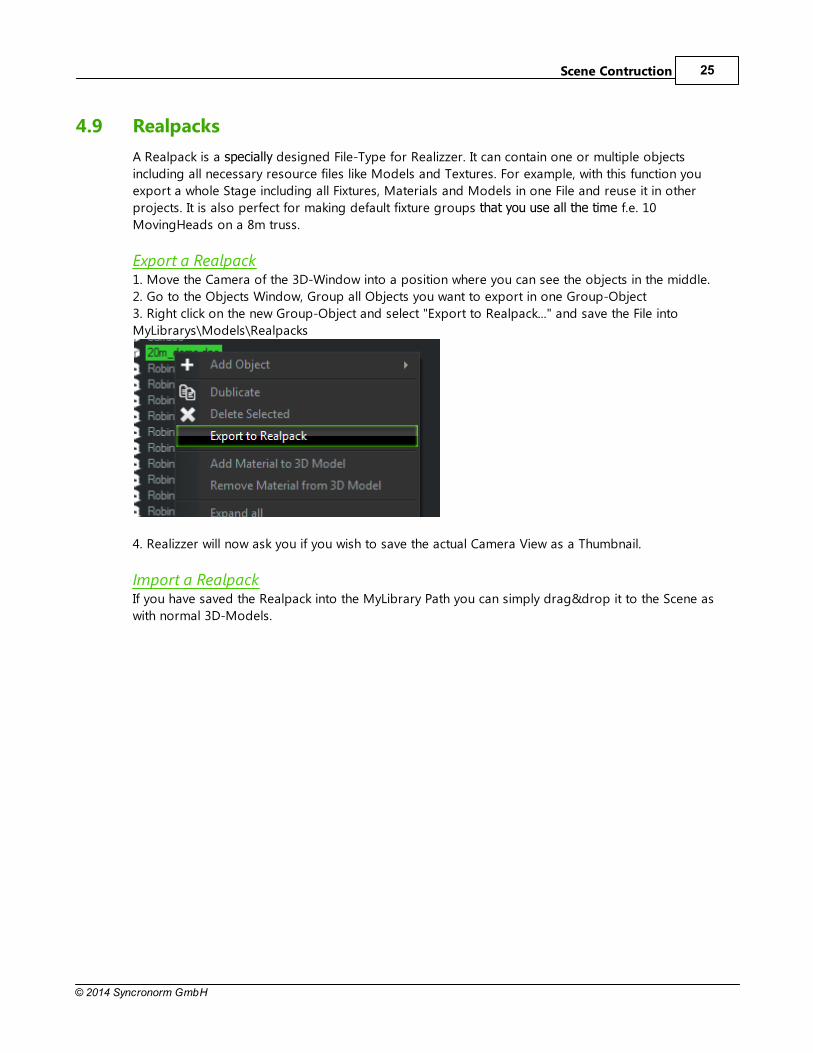
Export a Realpack1. Move the Camera of the 3D-Window into a position where you can see the objects in the middle.
2. Go to the Objects Window, Group all Objects you want to export in one Group-Object
3. Right click on the new Group-Object and select "Export to Realpack..." and save the File into
MyLibrarys\Models\Realpacks
4. Realizzer will now ask you if you wish to save the actual Camera View as a Thumbnail.
Import a RealpackIf you have saved the Realpack into the MyLibrary Path you can simply drag&drop it to the Scene as
with normal 3D-Models.

Realizzer 3D26
© 2014 Syncronorm GmbH
5 DMX-Fixtures
Realizzer can simulate three different Types of Stage devices: Lighting, Machinery and Lasers. Each of
these devices (later called Fixtures) will be defined by Fixture-Profile-Files (snf2 file). A Fixture-Profile
contains all necessary information like DMX-Protocol, Dimensions, 3D-Model, photometric data,
Thumbnail Images, Gobo-, Color-, Effect Wheels and much more. Realizzer comes with a Library of
standard fixtures.
If you cannot find your fixture in the library, you can build up your own Fixture-Profile using the easy to
use Fixture-Builder that is a part of Realizzer. Please refer to the Fixture Builder section of the Manual formore information.
Make sure you have read the Section Scene Construction before continuing.
5.1 Add Fixtures
In the Library-Window you will find the path called "Fixtures". Here you find all fixtures sorted by
Manufacturer name. As with 3D-Models you can drag&drop the fixtures to the 3D-Window or using the
"Add to Scene" Button.
If the Fixture has more than one DMX-Mode a separate Dialog will display and ask you to select the
current Mode.
You can also change the DMX-Mode later in Object-Settings.
DMX-Fixtures 27
© 2014 Syncronorm GmbH
5.2 DMX Patching
As in the same as real installations you need to give each fixture a DMX-Start address to get them
work. Realizzer has two methods for patching.
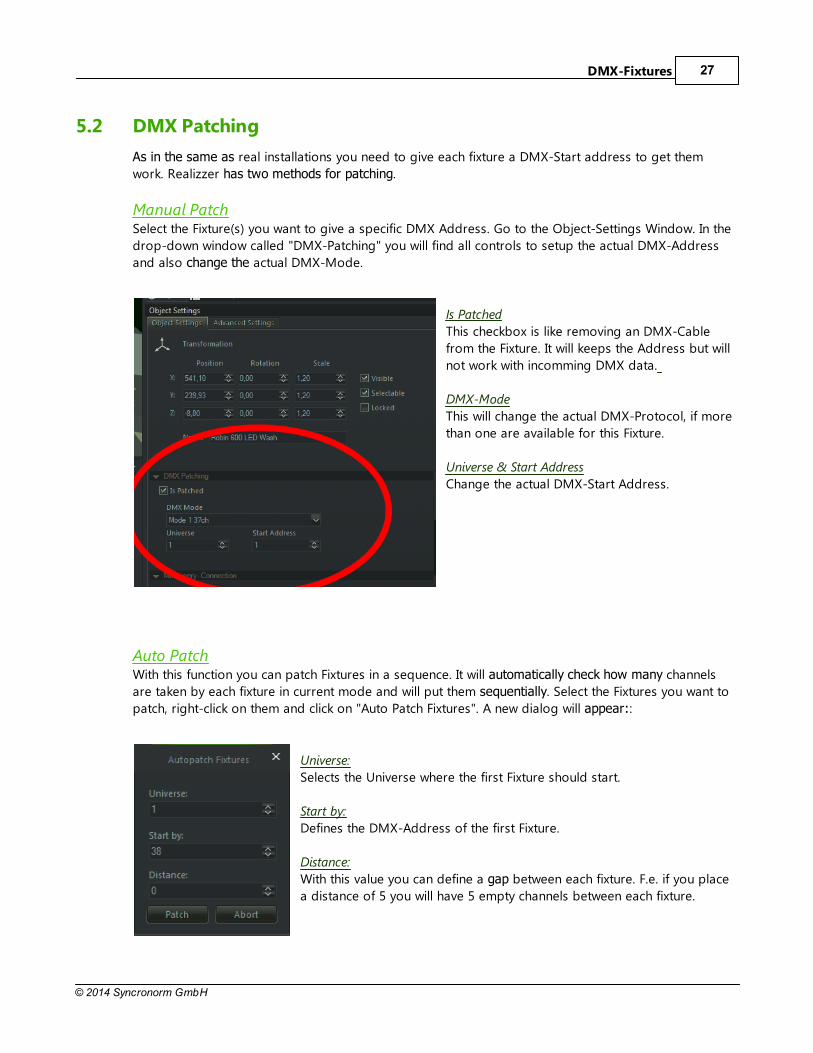
Manual Patch Select the Fixture(s) you want to give a specific DMX Address. Go to the Object-Settings Window. In the
drop-down window called "DMX-Patching" you will find all controls to setup the actual DMX-Address
and also change the actual DMX-Mode.
Is Patched
This checkbox is like removing an DMX-Cable
from the Fixture. It will keeps the Address but will
not work with incomming DMX data.
DMX-Mode
This will change the actual DMX-Protocol, if more
than one are available for this Fixture.
Universe & Start Address
Change the actual DMX-Start Address.
Auto PatchWith this function you can patch Fixtures in a sequence. It will automatically check how many channels
are taken by each fixture in current mode and will put them sequentially. Select the Fixtures you want to
patch, right-click on them and click on "Auto Patch Fixtures". A new dialog will appear::
Universe:
Selects the Universe where the first Fixture should start.
Start by:
Defines the DMX-Address of the first Fixture.
Distance:
With this value you can define a gap between each fixture. F.e. if you place
a distance of 5 you will have 5 empty channels between each fixture.
Realizzer 3D28
© 2014 Syncronorm GmbH
5.2.1 Patching Window
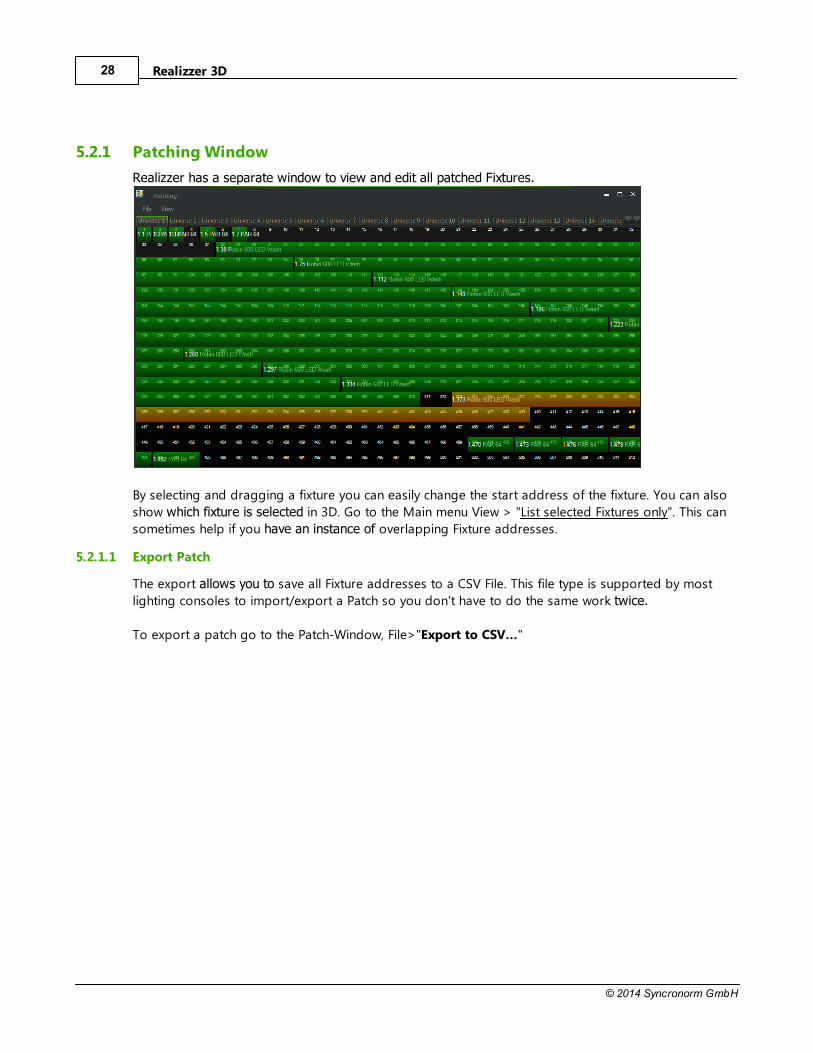
Realizzer has a separate window to view and edit all patched Fixtures.
By selecting and dragging a fixture you can easily change the start address of the fixture. You can also
show which fixture is selected in 3D. Go to the Main menu View > "List selected Fixtures only". This can
sometimes help if you have an instance of overlapping Fixture addresses.
5.2.1.1 Export Patch
The export allows you to save all Fixture addresses to a CSV File. This file type is supported by most
lighting consoles to import/export a Patch so you don't have to do the same work twice.
To export a patch go to the Patch-Window, File>"Export to CSV..."
DMX-Fixtures 29
© 2014 Syncronorm GmbH
5.3 Lighting Fixture Settings
Each Fixture can have additional Settings which can be also setup in the Object Settings Window when
the Fixture(s) are selected. Depending on type of selected Fixture some Features will not be available
(Video, Laser, etc.)
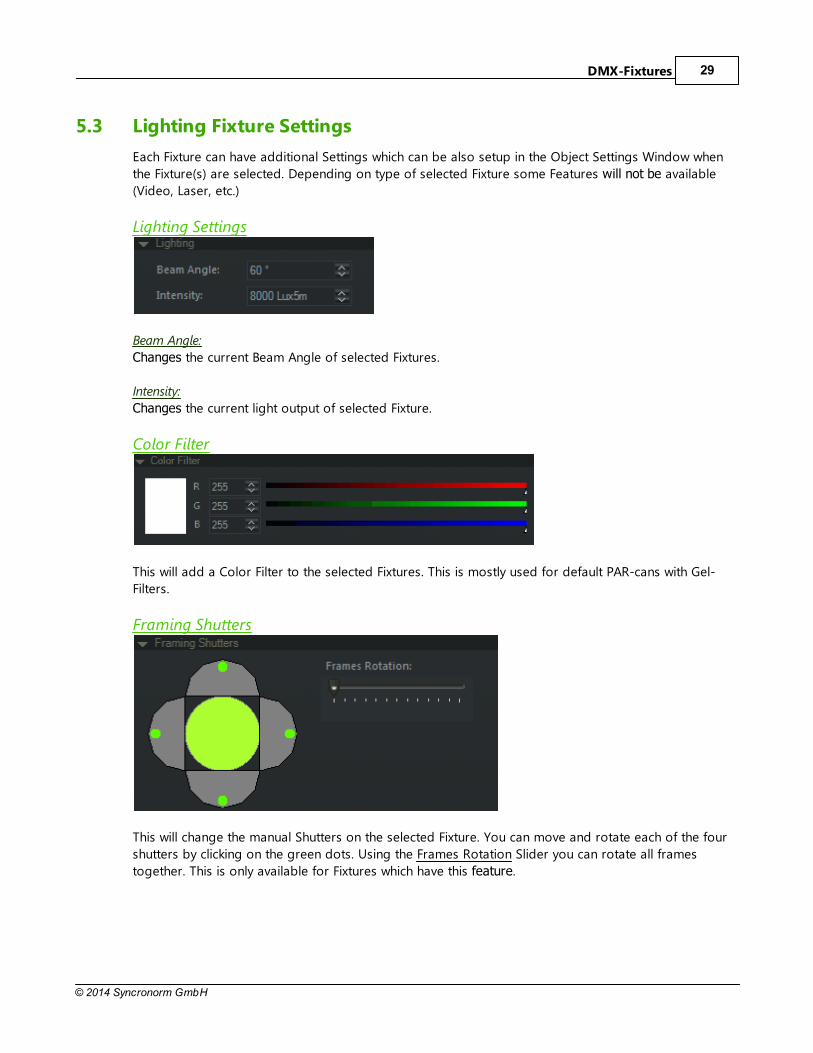
Lighting Settings
Beam Angle:
Changes the current Beam Angle of selected Fixtures.
Intensity:
Changes the current light output of selected Fixture.
Color Filter
This will add a Color Filter to the selected Fixtures. This is mostly used for default PAR-cans with Gel-
Filters.
Framing Shutters
This will change the manual Shutters on the selected Fixture. You can move and rotate each of the four
shutters by clicking on the green dots. Using the Frames Rotation Slider you can rotate all frames
together. This is only available for Fixtures which have this feature.

Realizzer 3D30
© 2014 Syncronorm GmbH
6 DMX Input and Network
Realizzer receives DMX-Data via: ArtNET, RealNet, USB-DMX. To activate a DMX-Input go to the Main-
Menu > Input > DMX-Input and select an Input.
Network SettingsIt can sometimes be necessary to change the used Ethernet Adapter for a selected Input Protocol. By
default Realizzer always takes the first Adapter which is connected to a network. But for example, if you
have a Wireless Adapter and a seperate Ethernet-LAN connection specialy for ArtNET you need to
define the adapter to be used.
Go to Input > Network Settings...
In this Dialog you can define the Network Adapter to use, for all supported Network protocols.
6.1 ArtNET
Realizzer Supports ArtNET 2.0 DMX Input. To enable the ArtNET Input go to Input > DMX Input >
ArtNET and select them. Now other Consoles should be able to find Realizzer using the ArtNET Poll.
Important Notes:
The ArtNET Protocol specifies the beginning of Universes (called Ports) at 0. So on some consoles
you have to patch your fixtures in Universe 0 to get the DMX Data in Realizzer on Universe 1.
Finally Realizzer's Universes always start at 1.

DMX Input and Network 31
© 2014 Syncronorm GmbH
7 Offline Console
Realizzer also comes with an inbuild small offline console. If you just want to make a small design
without any connected DMX controller, you can use the offline console fast and easy. To open the
Offline Console click on "Console".
A new window will be docked to the Library Section window.
The DMX-Channels of each selected fixture in 3D will be shown in that window and can be controlled
manually. The Console will be always utilize HTP (highest takes present), it means if you get f.e. ArtNET
Input at the same time, the channel will get the highest DMX Value actually set.
Full Open / Close
In the Toolbar of the Console you can find the Full Open & Close button. The Full-Open Button will
automatically find all channels to be set for turning the light on. The Close-Button will shut off the light.
Preset MenuIf a channel contains Presets you can simply set them by clicking on the fader with the right mouse
button and select one of the presets.

Realizzer 3D32
© 2014 Syncronorm GmbH
Tools
Click on the button to the right of the Close-Button in the Toolbar of Console:
Now the Tool-Section will be docked to the left side of the Console-Window. It contains tools such as
PanTilt and Color-Mix, which help you to change the Pan/Tilt or Color of a Fixture.
PanTilt
By clicking with the left mouse button in the PanTilt picker you can move the current PanTilt position for
all selected fixtures. By using the two Fanning faders you can adjust the spread between each Fixture for
the specific axis. To move all fixtures relative select the "Relative" Button. The "Center" Button will set all
back to the middle.
Color Mix
By clicking with the left mouse button onto the ColorPicker you will change the RGB or CMY color of
selected Fixtures. The Intensity-Fader will reduce the intensity for the current color. By using the
Arranger-Fader you can arrange all fixtures on the Color-Circle. This produces very nice color gradient
effects. Using the additional Arrange Modes Mirror & Linear you can change the behavior of the
Arranger tool.

Offline Console 33
© 2014 Syncronorm GmbH
7.1 PanTilt Mouse Tracking
Realizzer offers a simple way to focus all moveable Spots like Moving-Heads and Scanners to a specific
3D-Position. Also, fixed Spots like PAR and Followspots are able to focus on a specific position. This can
really help whilst placing your lights.
1. Select all Fixtures you want to focus
2. Hold the ALT-Key on your Keyboard and click on your desired target position with the left mouse
button onto the 3D-Window. Now all Fixtures will try to follow this target.
3. By still holding the ALT-Key and using the middle mouse wheel you can change the height of the
follow target.
Realizzer 3D34
© 2014 Syncronorm GmbH
8 Laser Projectors
With Realizzer you can simulate all kinds of ILDA controlled Laser-Projectors via a Live-Signal from a
supported Laser-Controller. Realizzer supports Laseranimation Sollinger GmbH and Pangolin Beyond
controllers. Realizzer will automatically detect an incoming signal from Laser controller and route it to
the specific Laser-Source.
Add a Laser-Projector1. Select the Construction-Mode
2. Open the Library to insert a Laser-Projector Fixture and add them same way as you would for a 3D-
Model or Lighting Fixture.
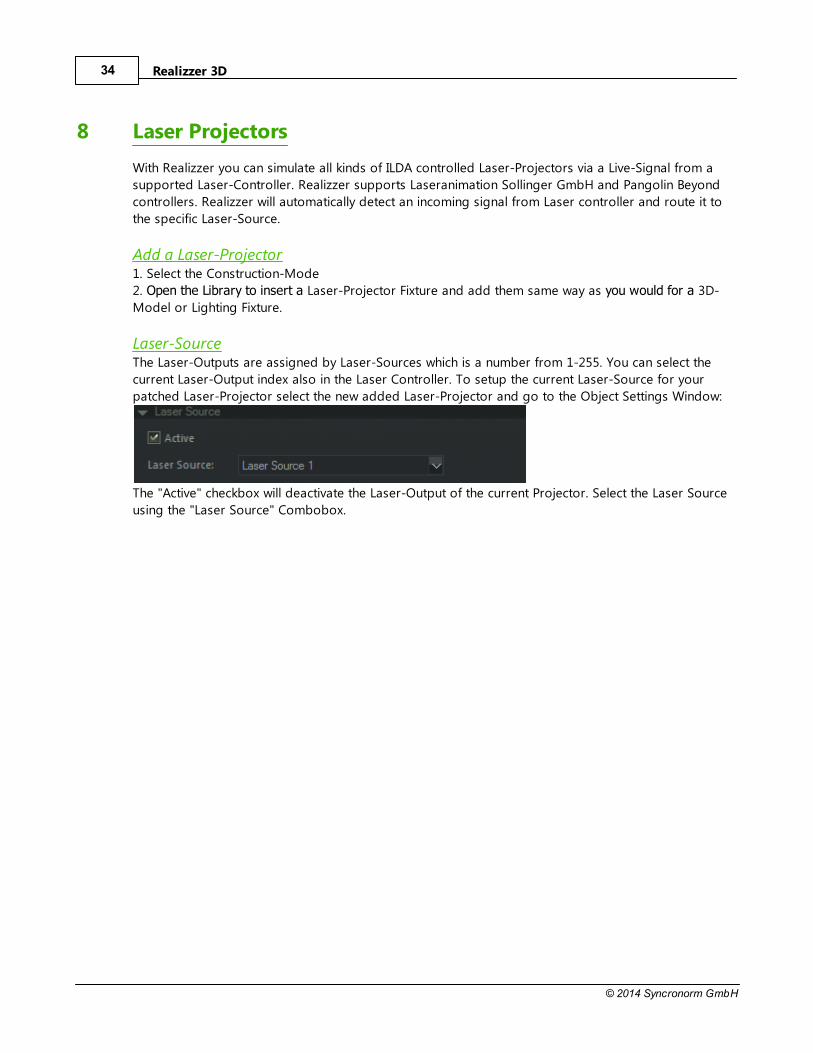
Laser-SourceThe Laser-Outputs are assigned by Laser-Sources which is a number from 1-255. You can select the
current Laser-Output index also in the Laser Controller. To setup the current Laser-Source for your
patched Laser-Projector select the new added Laser-Projector and go to the Object Settings Window:
The "Active" checkbox will deactivate the Laser-Output of the current Projector. Select the Laser Source
using the "Laser Source" Combobox.

Laser Projectors 35
© 2014 Syncronorm GmbH
8.1 Setup Laser-Output from Pangolin Beyond
For the communication between Realizzer and Pangolin Beyond an Ethernet/Multicast Protocol is used.
The advantage of this is that multiple receivers are possible and can also be on the same PC at the
same time. Make sure your using a Router or Network switch which supports Multicast.
To activate the realtime Laser-Data Output in Pangolin Beyond do following steps:
1. Start Realizzer & Pangolin Beyond
2. In Beyond's Mainmenu go to View > "Enable visualization via external software..."
Setup Zone-SettingsIn Beyond you can assign to a Projection-Zone to a specific Laser-Output which is equal to the Laser-
Source number in Realizzer. Go to "Settings > Projection-Zones". Here you can change all Zone relating
properties. In the "Advanced" tab you can set the Laser Source Output Index for Visualization. In Beyond
its called "Fixture Number".
Realizzer 3D36
© 2014 Syncronorm GmbH
8.2 Setup Laser-Output from Lasergraph DSP
For the communication between Realizzer and the Lasergraph DSP from Laseranimation Sollinger an
Ethernet/Multicast Protocol is used. The advantage of this is that multiple receivers are possible and
also on same PC at the same time. Make sure your using a Router or Network switch which supports
Multicast.
Make sure you are using a Lasergraph DSP which has newest system software (minimum 2014) from
Laseranimation Sollinger.
1. Start Realizzer and Boot the DSP.
2. Start the LGRemote Software and connect to your DSP.
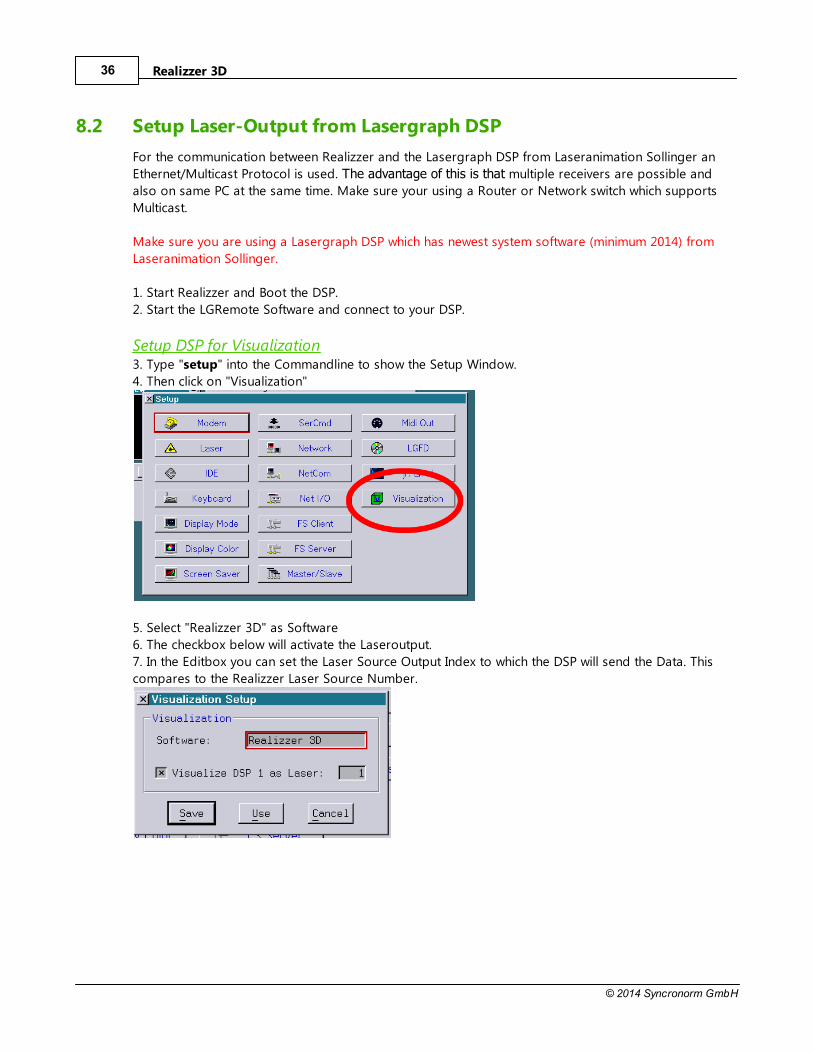
Setup DSP for Visualization3. Type "setup" into the Commandline to show the Setup Window.
4. Then click on "Visualization"
5. Select "Realizzer 3D" as Software
6. The checkbox below will activate the Laseroutput.
7. In the Editbox you can set the Laser Source Output Index to which the DSP will send the Data. This
compares to the Realizzer Laser Source Number.
Laser Projectors 37
© 2014 Syncronorm GmbH
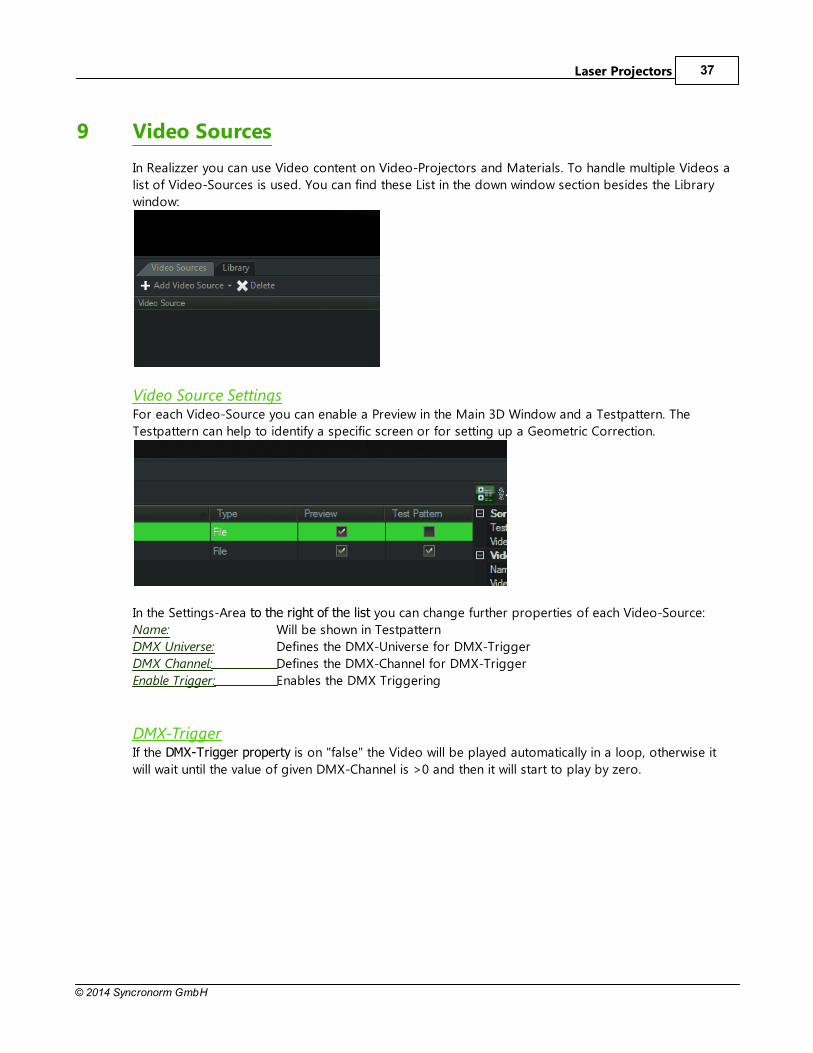
9 Video Sources
In Realizzer you can use Video content on Video-Projectors and Materials. To handle multiple Videos a
list of Video-Sources is used. You can find these List in the down window section besides the Library
window:
Video Source SettingsFor each Video-Source you can enable a Preview in the Main 3D Window and a Testpattern. The
Testpattern can help to identify a specific screen or for setting up a Geometric Correction.
In the Settings-Area to the right of the list you can change further properties of each Video-Source:
Name: Will be shown in Testpattern
DMX Universe: Defines the DMX-Universe for DMX-Trigger
DMX Channel: Defines the DMX-Channel for DMX-Trigger
Enable Trigger: Enables the DMX Triggering
DMX-TriggerIf the DMX-Trigger property is on "false" the Video will be played automatically in a loop, otherwise it
will wait until the value of given DMX-Channel is >0 and then it will start to play by zero.
Realizzer 3D38
© 2014 Syncronorm GmbH
9.1 Using Video-Files
To add a Video-File into the Video Sources click on the Button "Add Video Source" and select "Add
Video Source File...".
Supported Video Codecs: Realizzer uses Windows DirectShow to decode Videos. So it is basically depending on the installed
Video-Codecs on your System. Its recommend to install any known Codec-Pack like the KLite-Codec
Pack, after this you should be able to load any kind of video or image file.
9.2 Using Live-Capture Devices
Realizzer supports Live-Video data from any installed Capture device like Webcams or DVI capture
cards. As with Videofiles click on "Add Video Source" and select "Add Capture Device". Realizzer check
for installed devices and list them in a dialog where you can select it.
9.3 Using CITP Video
Coming soon.
Video Sources 39
© 2014 Syncronorm GmbH
9.4 Video Projectors
Realizzer supports realtime projection of Video-Sources using Video-Projector Fixtures. Open the
Library and patch a VideoProjector f.e. in the "_Generic" folder. Depending on the Fixture-Profile a
Projector can also have all intelligent lighting features as any other Fixture like Shutter, RGB, CMY,
PanTilt, etc. so this means it can also have DMX-Channels. Therefore this will need to be patched like anyother fixture.
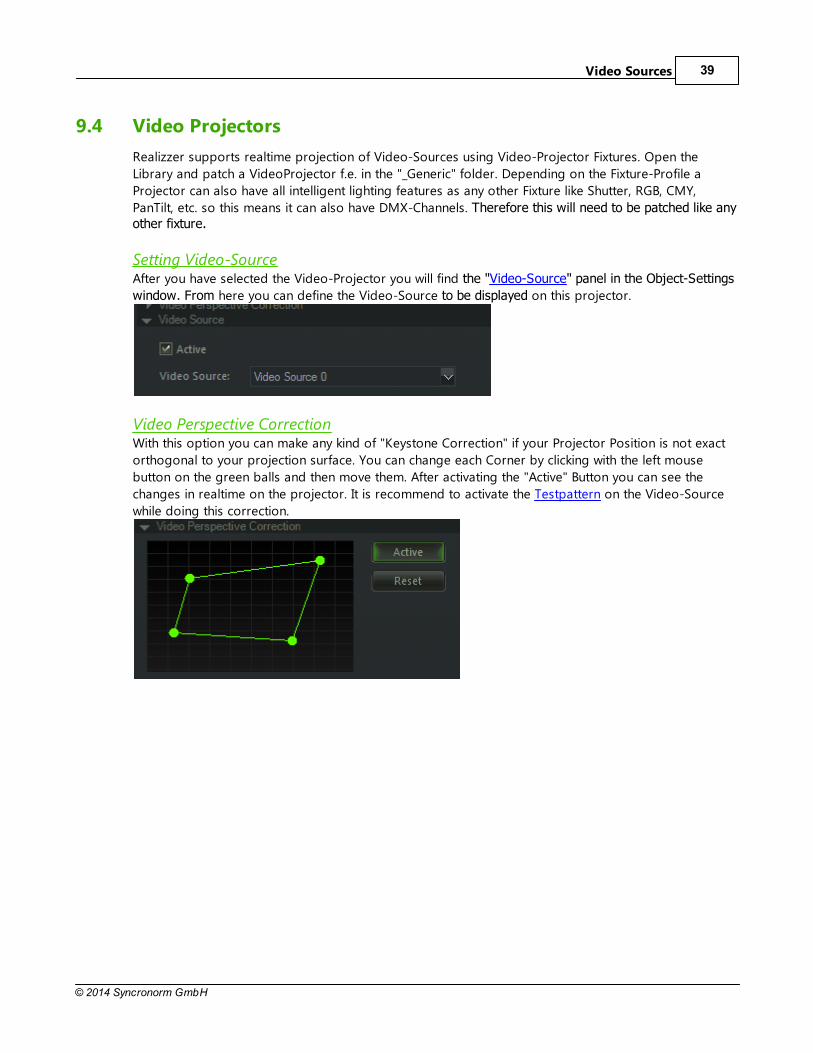
Setting Video-SourceAfter you have selected the Video-Projector you will find the "Video-Source" panel in the Object-Settings
window. From here you can define the Video-Source to be displayed on this projector.
Video Perspective CorrectionWith this option you can make any kind of "Keystone Correction" if your Projector Position is not exact
orthogonal to your projection surface. You can change each Corner by clicking with the left mouse
button on the green balls and then move them. After activating the "Active" Button you can see the
changes in realtime on the projector. It is recommend to activate the Testpattern on the Video-Source
while doing this correction.

Realizzer 3D40
© 2014 Syncronorm GmbH
10 Visual Settings
The Visual-Settings Window contains all controls to change the visual properties of the current 3D-View.
Use the "Visual Settings" Button in the Main Toolbar.
The Visual Settings are grouped to 4 Sections:
Global
Global Light: Changes the Global Light Intensity
Haze: Changes the intensity for all light beams
Glow: Produces a Bloom/Glow effect for all bright
areas
Quality:
This section changes the render-quality for
Shadows, Beams and Antialising. If the frame rate
quality of Realizzer goes down, try to reduce the
quality from here.
Laser:
Realizzer Supports a physical Scanner-Simulation.
Depending on selected Sampling Rate 8x or 16x
this takes less or more performance.
3D Smoke
Using the Structure and Clouds fader you can
adjust the the density of 3D Clouds that are visible
for Laser- and Light beams.
Direction: Changes the vector direction of Cloud
movement
Speed: Changes the speed of Cloud Movement

Visual Settings 41
© 2014 Syncronorm GmbH
11 Video Rendering
Starting with a Studio-license, Realizzer is also able to render out a high quality video file of your Light-
or Lasershow together with audio.
Of course this feature give you the possibility to create very impressive Show-Videos for your clients in
HD. Independently of your hardware resources you can render much more lights in highest quality
without slow fps.
Realizzer 3D42
© 2014 Syncronorm GmbH
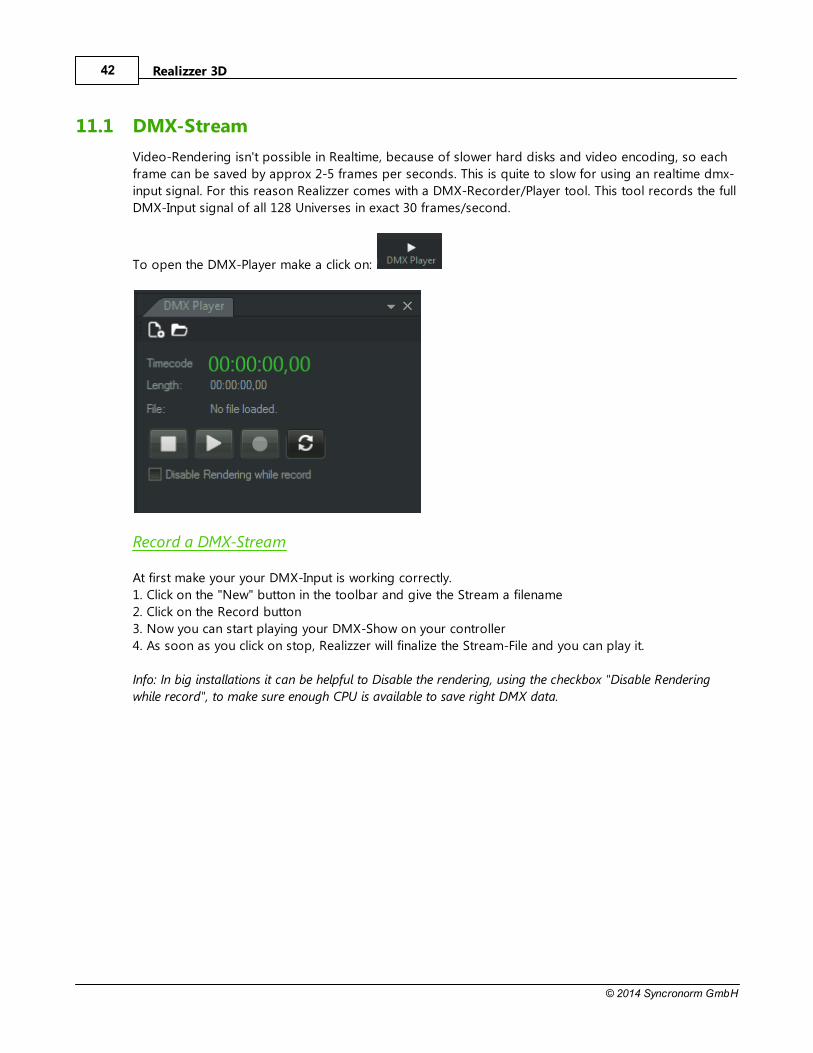
11.1 DMX-Stream
Video-Rendering isn't possible in Realtime, because of slower hard disks and video encoding, so each
frame can be saved by approx 2-5 frames per seconds. This is quite to slow for using an realtime dmx-
input signal. For this reason Realizzer comes with a DMX-Recorder/Player tool. This tool records the full
DMX-Input signal of all 128 Universes in exact 30 frames/second.
To open the DMX-Player make a click on:
Record a DMX-Stream
At first make your your DMX-Input is working correctly.
1. Click on the "New" button in the toolbar and give the Stream a filename
2. Click on the Record button
3. Now you can start playing your DMX-Show on your controller
4. As soon as you click on stop, Realizzer will finalize the Stream-File and you can play it.
Info: In big installations it can be helpful to Disable the rendering, using the checkbox "Disable Rendering
while record", to make sure enough CPU is available to save right DMX data.

Video Rendering 43
© 2014 Syncronorm GmbH
11.2 Render a Video
Open the Video-Rendering tool in the main toolbar of Realizzer.
General Settings:Output Path:
Here you can define the output file where the video will be saved and also predefine the format.
DMX-Stream:
Here you can input your recorded DMX-Stream file as descripted in DMX-Stream. If you want to render
without DMX-Signal leave this field empty.
Video-Length:
This field defines the full length of the Output-Video file. If you load in a DMX-Stream, the length will be
automatically set to the duration of the stream.
OutputOutput Size:
Defines the Video resolution which should be mostly in 16:9 or 4:3. Other resolutions are possible but
can cause problems on several media players.
Framerate:
Defines the Video-Framerate of the Output-Video file.
Output Format:
Same as in Output-Path dialog here you can also decide between JPEG, MP4 H264, WMV or AVI. To
change the detailed settings click on "Settings..."
Laser SynchronizationAs explained in DMX-Stream the Video-Rendering is not running in realtime, so also the Laser-Signal
haves to be synchron with the frames are rendered. For that reason the Lasergraph DSP and Pangolin
Beyond supports Ethernet Timecode format NTC and SNTC.
AudioYou can also add any Audio-File to your Video. The Start-Position will define where the Audio will starts
to play.

Realizzer 3D44
© 2014 Syncronorm GmbH
11.3 DMX Camera
To make Camera-Movements in your Animation, Realizzer provides a DMX controllable Camera.
Here you can define the DMX-Address where the Camera should take the DMX-Signals. For each
Position- & Rotation axis an 16-Bit value is used. The Position area defines the min/max area where the
Camera-Position is working. If you define f.e. 2000cm the Camera will be at 100% DMX on +2000cm
and on 0% DMX on -2000cm on the specific axis. The Rotations are working from -180 to 180 degree.

Video Rendering 45
© 2014 Syncronorm GmbH
12 Version Changelog
This chapter gives you an overview of all features and fixes for each new software release.
12.1 1.3.0.0
Realizzer 3D - 1.3.0.0 Build 2014-08-19
- 0000168: [Main Software] Progress Dialog while loading/creating project
- 0000165: [Main Software] Error after closed Material Window
- 0000166: [Main Software] Duplicate while CTRL-Key and move object using pivots
- 0000150: [Main Software] Duplicate doesn't work for multiselected items
- 0000163: [Main Software] Sometimes losing saved global light on switching between editor modes
- 0000161: [Main Software] Reset values if double click on Position, Rotation or Scale Text in Transform
- 0000162: [Main Software] Fast 45° rotation steps button in Transformation
- 0000149: [Main Software] Pan Tilt inversion
- 0000159: [Main Software] Automatically switch to Construction Mode after add an object from library
- 0000158: [Main Software] Draw BoundingBoxes of Selection to make visible hidden objects
- 0000157: [Main Software] Ask for X/Y/Z Offset on Add and Duplicate objects
- 0000156: [Main Software] Studio - Video Rendering using JPEG/MP4 H246/WMV/AVI
- 0000153: [Main Software] LED Matrix - distance limited to 100cm
- 0000144: [Library] Show Fixture Info
12.2 1.2.0.0
Realizzer 3D - 1.2.0.0 Build 2014-05-30
- 0000148: [Main Software] Getting all 128 Universes via ArtNET from Madrix
- 0000147: [Main Software] Strobe will be not disabled when its in a specific preset range
- 0000146: [Main Software] Material Map Editor
- 0000044: [Main Software] Scale factor for Clouds and Structure fog in Visual Settings
- 0000145: [Main Software] Multiselection for Material editing
- 0000143: [Main Software] Save Selections in a List
- 0000142: [Main Software] Out of memory on big projects
- 0000141: [Main Software] Adding Random Offsets for Matrix Arrange tool
- 0000140: [Main Software] Beams are visible through objects if camera is inside the beam
12.3 1.1.0.0
Realizzer 3D - 1.1.0.0 Build 2014-03-14
- 0000127: [Fixture Builder] Manufacturer selectection does not work
- 0000139: [Main Software] Cuelists will be not cleared after load new project
- 0000138: [Main Software] ENTTEC USB-Pro Support
- 0000137: [Main Software] Save QuadView Mode while switching between Live & Constr. Mode
- 0000129: [Fixture Builder] Ask for close
- 0000130: [Library] Some compound fixtures where case is scaled to zero
- 0000131: [Library] Some fixures where DegPerSec is not working for PanTilt
- 0000123: [Main Software] Laser InvertX fails if ScannerSimulation is active
- 0000126: [Main Software] show fixture info for selected fixtures in library
- 0000136: [Main Software] Laser SoftBeams
Realizzer 3D46
© 2014 Syncronorm GmbH
- 0000135: [Main Software] New Volumetric Light Beam Rendering
- 0000125: [Main Software] Fixturepatch Abort on Modeselection or Qty does not work
- 0000133: [Main Software] Default Universe for Fixtures is still on 2
- 0000122: [Main Software] Crashes after loading a project
- 0000015: [Main Software] Integration of USBone for DMX In
Index 47
© 2014 Syncronorm GmbH
Index- 3 -3D Smoke 40
3D Studio Max 3DS 15
3D Window 10
3D-Model 16
- A -Add a Laser-Projector 34
Add Empty Material 23
Add Fixtures 26
Alpha 24
Arrange Objects 20
ArtNET 30
Auto Patch 27
Autocad DXF 15
- B -Beam Angle 29
Beyond 35
Brightness: 24
- C -Clouds 40
Collada 15
Color Filter 29
Color Mix 31
Construction-Mode 12
Coordinate System 11
- D -Delete Objects 23
DirectX 9 7
DirectX X-File 15
DMX-Mode 27
DMX-Start Address 27
DMX-Trigger 37
Drag & Drop from Library 23
Duplicate Objects 23
DVI capture cards 38
- E -Emissive 24
Export to CSV 28
- F -Fanning 31
Framing Shutters 29
Full Open / Close 31
- G -Global 40
Group Objects 23
- I -Import from ZIP 9
Intensity 29
Is Patched 27
- L -Laser 40
Lasergraph DSP 36
Laser-Source 34
Library 14
Library Window 10
License Key 6
Lighting Settings 29
Live-Mode 12
Locked 13
- M -Manual Patch 27
Material Color 24
Materials 23
Measures 11
MyLibrarys 8
MyProjects 8
Realizzer 3D48
© 2014 Syncronorm GmbH
- N -Name 13
Network Settings 30
New empty Project 9
New Project with Stage 9
- O -Objects Window 10
Offline Console 31
Open a Project 9
Orbit-Camera 11
- P -Pangolin 35
PanTilt 31
PanTilt Mouse Tracking 33
Plot-View 12
Preset Menu 31
- Q -Quality 40
- R -Recent Projects 9
Remove Material 23
- S -Save Camera 11
Scanner-Simulation 40
Scene Graph 13
Select Fixtures 17
Select Meshes 17
Selectable 13
Selection 17
Selection Order 17
Settings Window 10
Setup 7
Specular 24
Structure 40
Supported File Formats 15
Syncronorm 3D File 15
System Requirements 5
- T -Testpattern 37
Texture Mapping: 24
Texture: 24
Transformation 17
- U -USB Dongle 6
- V -Video Codecs 38
Video Perspective Correction 39
Video Projectors 39
Video Sources 37
Video Texture 24
Visible 13
Visual Settings 40
- W -Wavefront Object 15
Webcams 38
Work-Path 8
World-Position 13