Help and tutorials - Adobe€¦ · What’s new in Photoshop Elements 12 ... and textures without...
425
ADOBE ® PHOTOSHOP ® ELEMENTS Help and tutorials April 2014
Transcript of Help and tutorials - Adobe€¦ · What’s new in Photoshop Elements 12 ... and textures without...

ADOBE® PHOTOSHOP® ELEMENTSHelp and tutorials
April 2014
Contents
What’s new 1...................................................................................................................................................What’s new in Photoshop Elements 12 2..................................................................................................................................
What’s new in Elements Organizer 12 7....................................................................................................................................
What’s new in Photoshop Elements 11 9..................................................................................................................................
Workspace and workflows 16..........................................................................................................................Workspace basics 17.................................................................................................................................................................
Panels and bins 20....................................................................................................................................................................
Tools 25.....................................................................................................................................................................................
Rulers, grids, and guides 28......................................................................................................................................................
Undo, redo, and cancel actions 30............................................................................................................................................
Scratch disks and plug-ins 33....................................................................................................................................................
Enhanced Quick Mode | Photoshop Elements 12 36................................................................................................................
Viewing images 39.....................................................................................................................................................................
Using Windows 7 features 42....................................................................................................................................................
Multitouch support 43................................................................................................................................................................
Importing 44.....................................................................................................................................................Importing files 45.......................................................................................................................................................................
File management 47........................................................................................................................................Opening files 48.........................................................................................................................................................................
File information 54.....................................................................................................................................................................
Scratch disks and plug-ins 58....................................................................................................................................................
Editing photos 61.............................................................................................................................................Adjusting color, saturation, and hue 62.....................................................................................................................................
Retouching and correcting 69....................................................................................................................................................
Enhancing 80.............................................................................................................................................................................
Adjusting shadows and light 89.................................................................................................................................................
Transforming 98.........................................................................................................................................................................
Cropping 103.............................................................................................................................................................................
Correcting color casts 110.........................................................................................................................................................
Auto Smart Tone | Photoshop Elements 12 113.......................................................................................................................
Using actions to process photos 116.........................................................................................................................................
Painting overview 117................................................................................................................................................................
Painting tools 121......................................................................................................................................................................
Adjustment filters 127................................................................................................................................................................
Processing camera raw image files 131....................................................................................................................................
Recomposing 136......................................................................................................................................................................
Resizing 139..............................................................................................................................................................................
Selecting 144...................................................................................................................................................Using tools to make selections 145...........................................................................................................................................
Moving and copying selections 159...........................................................................................................................................
Modifying selections 162...........................................................................................................................................................
Smoothing selection edges withanti-aliasing and feathering 166..............................................................................................
Saving selections 168................................................................................................................................................................
Color 170.........................................................................................................................................................Understanding color 171............................................................................................................................................................
Color and tonal correction basics 173.......................................................................................................................................

Adjusting color, saturation, and hue 182...................................................................................................................................
Processing camera raw image files 189....................................................................................................................................
Color and camera raw 194........................................................................................................................................................
Correcting color casts 198.........................................................................................................................................................
Setting up color management 201.............................................................................................................................................
Using image modes and color tables 204..................................................................................................................................
Drawing and painting 210................................................................................................................................Painting overview 211................................................................................................................................................................
Painting tools 215......................................................................................................................................................................
Enhanced Quick Mode | Photoshop Elements 12 221..............................................................................................................
Choosing colors 224..................................................................................................................................................................
Setting up brushes 228..............................................................................................................................................................
Fills and strokes 233..................................................................................................................................................................
Creating shapes 236..................................................................................................................................................................
Gradients 241............................................................................................................................................................................
Editing shapes 246....................................................................................................................................................................
Patterns 248..............................................................................................................................................................................
Effects and filters 250......................................................................................................................................Effects 251.................................................................................................................................................................................
Gradients 255............................................................................................................................................................................
Guided mode 260......................................................................................................................................................................
Filters 271..................................................................................................................................................................................
Adjustment filters 276................................................................................................................................................................
Distort filters 280........................................................................................................................................................................
Render filters 286......................................................................................................................................................................
Other filters 287.........................................................................................................................................................................
Sketch filters 289.......................................................................................................................................................................
Noise filters 292.........................................................................................................................................................................
Blur filters 294............................................................................................................................................................................
Artistic filters 296.......................................................................................................................................................................
Brush Stroke filters 299.............................................................................................................................................................
Stylize filters 301........................................................................................................................................................................
Texture filters 304......................................................................................................................................................................
Adjusting shadows and light 306...............................................................................................................................................
Text and shapes 315.......................................................................................................................................Add text 316...............................................................................................................................................................................
Edit text 322...............................................................................................................................................................................
Work with Asian type 326..........................................................................................................................................................
Layers 328.......................................................................................................................................................Creating layers 329....................................................................................................................................................................
Copying and arranging layers 333.............................................................................................................................................
Editing layers 338......................................................................................................................................................................
Adjustment and fill layers 341....................................................................................................................................................
Layer masks 345.......................................................................................................................................................................
Clipping masks 346...................................................................................................................................................................
Opacity and blending modes 348..............................................................................................................................................
Layer styles 350.........................................................................................................................................................................
Printing, sharing, and exporting 353................................................................................................................Print or share photos online 354................................................................................................................................................

Create Photo Prints 359............................................................................................................................................................
Printing photos 362....................................................................................................................................................................
Saving and exporting images 366.............................................................................................................................................
Photo projects 372...........................................................................................................................................Project basics 373.....................................................................................................................................................................
Making photo projects 374.........................................................................................................................................................
Create a greeting card 378........................................................................................................................................................
Create a photo book 380...........................................................................................................................................................
Editing photo projects 382.........................................................................................................................................................
Create photo calendars 385......................................................................................................................................................
Web graphics 386............................................................................................................................................Optimizing images 387..............................................................................................................................................................
Dithering in web images 389.....................................................................................................................................................
Optimizing images for the PNG-24 format 391..........................................................................................................................
Optimizing images for the GIF or PNG-8 format 392.................................................................................................................
Using transparency and mattes 395..........................................................................................................................................
Optimizing images for the JPEG format 398.............................................................................................................................
Previewing web images 400......................................................................................................................................................
Keyboard shortcuts 402...................................................................................................................................Keys for the Magic Extractor dialogbox | Photoshop Elements 10, 11 403...............................................................................
Windows 7 keyboard shortcuts 404...........................................................................................................................................
Keys for selecting tools 405.......................................................................................................................................................
Keys for painting and brushes 407............................................................................................................................................
Keys for transforming selections 408.........................................................................................................................................
Keys for the Liquify filter 409.....................................................................................................................................................
Keys for the Filter Gallery
Keys for the Color Swatches panel 410.....................................................................................................................................
Keys for using blending modes 411...........................................................................................................................................
Keys for showing or hiding panels(expert mode) 413................................................................................................................
Keys for the Camera Raw dialogbox 414..................................................................................................................................
Keys for using text 415..............................................................................................................................................................
Keys for selecting and moving objects 416...............................................................................................................................
Keys for the Layers panel 418...................................................................................................................................................
Keys for viewing images (expertmode) 420...............................................................................................................................
Keys for using Photomerge Panorama | Photoshop Elements 10, 11 421................................................................................

What's new
1

What's new in Photoshop Elements 12
To the top
To the top
Content-aware MoveAuto Smart ToneEnhanced Quick edit mode (frames, textures, and effects)Greeting card printing | USA, Canada, & JapanNew Guided EditsContent-aware fill for edges of straightened photosPet eye effect removalPrinting and sharing photos from EditorRevel Albums in EditorOpen in Camera Raw
For information on the new features in Organizer, see What’s new in Elements Organizer 12.
Content-aware Move
You can now reposition objects in your photograph, and automatically have the background filled in with an intelligent content-aware fill. In additionto removing something with the Healing Brush, you can now select an object in your photo and move it to another position.
For more information and a video, see the article on how you can move and reposition objects.
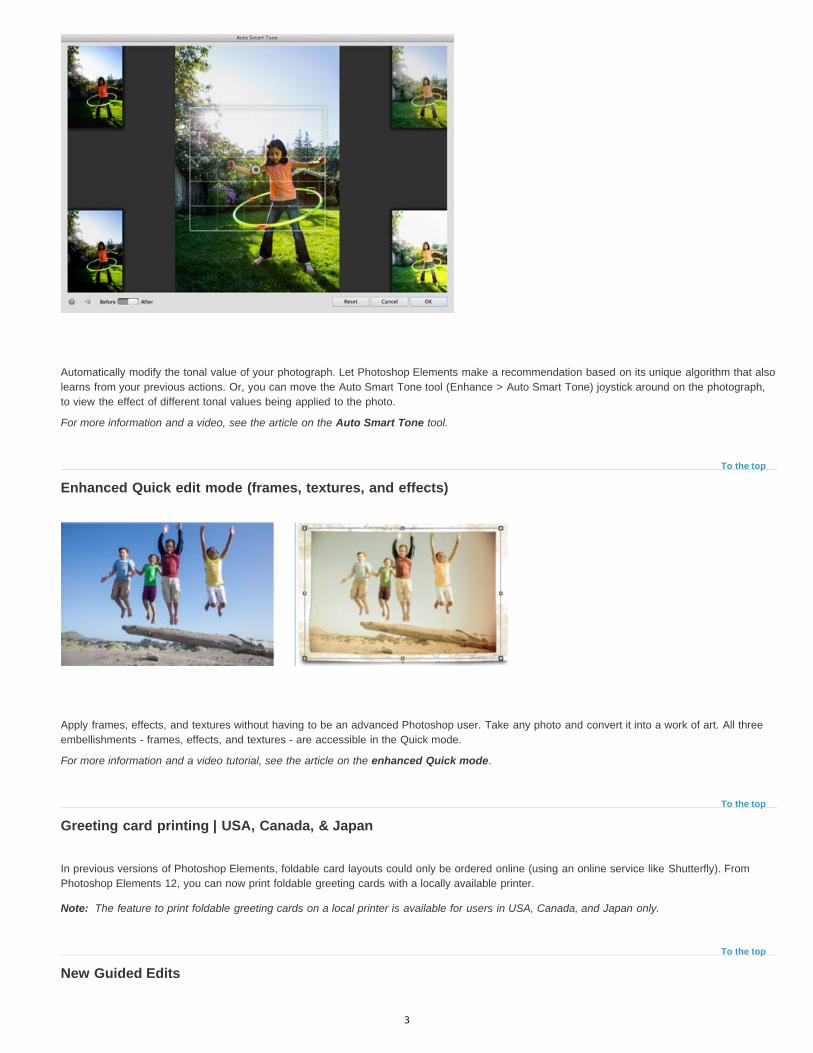
Auto Smart Tone
2
To the top
To the top
Note:
To the top
Automatically modify the tonal value of your photograph. Let Photoshop Elements make a recommendation based on its unique algorithm that alsolearns from your previous actions. Or, you can move the Auto Smart Tone tool (Enhance > Auto Smart Tone) joystick around on the photograph,to view the effect of different tonal values being applied to the photo.
For more information and a video, see the article on the Auto Smart Tone tool.
Enhanced Quick edit mode (frames, textures, and effects)
Apply frames, effects, and textures without having to be an advanced Photoshop user. Take any photo and convert it into a work of art. All threeembellishments - frames, effects, and textures - are accessible in the Quick mode.
For more information and a video tutorial, see the article on the enhanced Quick mode.
Greeting card printing | USA, Canada, & Japan
In previous versions of Photoshop Elements, foldable card layouts could only be ordered online (using an online service like Shutterfly). FromPhotoshop Elements 12, you can now print foldable greeting cards with a locally available printer.
The feature to print foldable greeting cards on a local printer is available for users in USA, Canada, and Japan only.
New Guided Edits
3

You can consider a Guided Edit a set of step-by-step instructions, to accomplish a complex-looking effect, with just a few selections and mouseclicks. In Photoshop Elements 12, three new Guided Edits have been added.
Zoom Burst Guided Edit
The Zoom Burst Guided Edit simulates a technique in manual photography, of zooming into an object with the shutter on the camera open.
For more information on how you can apply this effect, see the section on the Zoom Burst Guided Effect.
Puzzle Effect Guided Edit
The Puzzle Effect Guided Edit simulates the effect of a photograph being put together in the form of pieces of a puzzle. You can choose fromoptions that let you determine the size of the individual puzzle pieces. Displace a few pieces of the puzzle to make the effect look even morerealistic.
For more information, see the section on the Puzzle Effect Guided Edit.
Restore Old Photo Guided Edit
4
To the top
To the top
The Restore Old Photo Guided Edit brings all the tools you need to retouch a photo, into one location. The tools available in this Guided Edit arethe most often-used tools by professional retouchers and gives you considerable, finely-tuned control. Use the Guided Edit's tools to removeblemishes, repair imperfections, and restore your older photos.
For more information, see the section on the Restore Old Photo Guided Edit.
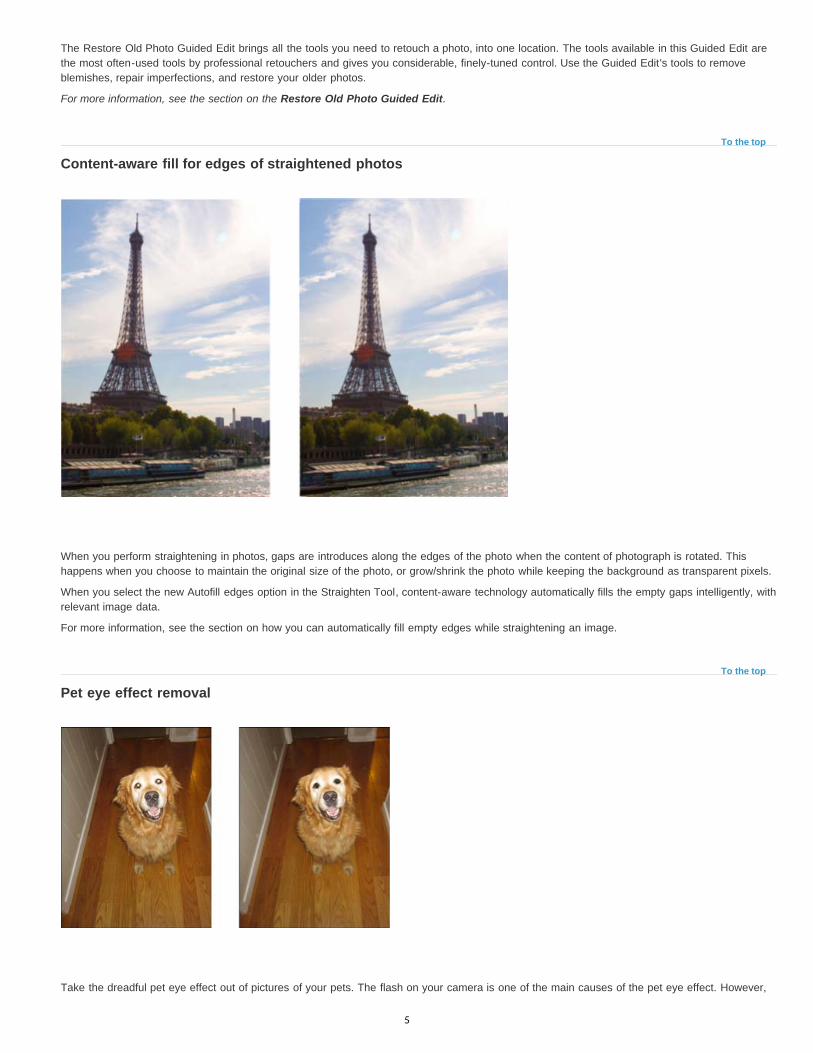
Content-aware fill for edges of straightened photos
When you perform straightening in photos, gaps are introduces along the edges of the photo when the content of photograph is rotated. Thishappens when you choose to maintain the original size of the photo, or grow/shrink the photo while keeping the background as transparent pixels.
When you select the new Autofill edges option in the Straighten Tool, content-aware technology automatically fills the empty gaps intelligently, withrelevant image data.
For more information, see the section on how you can automatically fill empty edges while straightening an image.
Pet eye effect removal
Take the dreadful pet eye effect out of pictures of your pets. The flash on your camera is one of the main causes of the pet eye effect. However,
5

Twitter™ and Facebook posts are not covered under the terms of Creative Commons.
Legal Notices | Online Privacy Policy
To the top
To the top
To the top
taking pictures of your pet indoors or in low-light conditions without a flash is, often, not an option. Now, use the Pet Eye option available in theRed Eye Removal Tool, to make the eyes of your pets look more realistic.
For more information and a video, see the article on removing the pet eye effect.
Printing and sharing photos from Editor
From Photoshop Elements 12, you can used Editor to easily and quickly share and print photos online. Social sites that you can share with onlineare Revel, Flickr, Twitter, Smugmug, or Facebook. Service providers whom you can use to print your photos and creations include Shutterfly,Costco, Photoworld, and more.
The availability of online sharing and printing services, however, depend on the locale you are in. For a description of services and availability, seethe article on how to print or share photos online.
Revel Albums in Editor
Integration with the Revel online service has been extended into Photoshop Elements Editor as well. You can now access any Revel photograph inEditor, using the Photo Bin drop down. Log in to to the Revel service only from Organizer, though. Some important features in Editor:
If you are logged in to Revel (through Organizer), then all your Revel folders are displayed in Editor (in the Photo Bin dropdown)Photos from Revel-based albums that have been downloaded in Organizer, are available for use in Editor (in the Photo Bin dropdown)Any dialog that displays the folders (and options to select photos from folders) already available in Organizer, will display your Revel-basedfolders and downloaded photos. For example, in the Print dialog in Editor, you can choose to add photos from your Revel albums by clickingthe + button.Any changes that you perform on your Revel photos, or versions of Revel photos that you create, are automatically synced back to youronline Revel account. A Revel agent that runs on your computer constantly monitors your Revel-based folders and keeps them in sync at alltimes.Any changes to your online Revel photos through other applications are automatically updated on your computer, through PhotoshopElements Organizer.
Open in Camera Raw
The Open as menu item has been replaced with the Open in Camera Raw option. You can now open your files directly in the Adobe Camera Rawdialog and process them, before opening them for further work in Photoshop Elements Editor. You can use the ACR dialog to open files of type:
Photoshop,Camera Raw,JPEG, and,TIFF.
6

What's new in Elements Organizer 12
To the top
To the top
Access your media anywhere using Adobe RevelTagging featuresOther enhancements
Elements Organizer is available with Adobe Photoshop Elements and Adobe Premiere Elements. For information on new features in theseproducts, see:
What’s new in Photoshop Elements 12What’s new in Adobe Premiere Elements 12
Elements Organizer 12 ships with new features and enhancements that make it easier for you to work with digital media. Read on for a quickintroduction to new features and links to resources offering more information.
Access your media anywhere using Adobe Revel
New in Elements Organizer 12
Photoshop Elements lets you upload your media to Adobe® Revel and then access it from any device. Media already present in your Revellibraries is downloaded into Elements Organizer, so that you can work with it.
Adobe Revel is an app that lets you store your media in the cloud and share it privately or publicly.
See this article for more information.
Upload local albums to Revel
Tagging features
Enhanced in Elements Organizer 12
Elements 12 features several exciting tagging enhancements:
Place tags in Elements 12 have GPS coordinates associated with them. These coordinates are also associated with any media tagged withthese place tags.You can now create people, place, and event tags from the right panel in the Media view.You can now create and view place stacks in the Places view.
7

Twitter™ and Facebook posts are not covered under the terms of Creative Commons.
Legal Notices | Online Privacy Policy
To the top
Media stacked by place
See these Help topics for more information:
Work with people, place, or event tagsView place stacks in the Places view
Other enhancements
You can now sort media alphabetically by name. See this Help article for details.
Improvements in the way you can search for media files. See this Help article for details.
Support for sharing photos using Twitter
64-bit support on Mac OS
8

What's new in Photoshop Elements 11
To the top
High key
Low key
Guided EditsFiltersExposure and Vibrance (Quick edit mode)Usability EnhancementsActions PanelAdobe Camera Raw (ACR) 7.1Photo service provider for users in Europe - CEWE ColorTool enhancementsOnline ContentEffects and StylesPreferences
Guided Edits
Adobe Photoshop Elements Editor 11 includes four new guided edits, to quickly enhance your images with special effects. You can apply effectsthat generally take many complex steps to obtain. Use the step-by-step instructions on the guided edits panel to get the exact effect you want toobtain. For more information, see the video on the new guided edits.
Pictures with high key lighting convey a positive vibe. Negate shadows and transform a portrait or family picture into a memorablemoment, with the professional-looking high key effect (Elements Editor > Guided mode > High Key). For more information, see Add high keyeffect.For a quick tutorial, watch this video on working with the high key guided edit.
Picture before applying the high key effect (left), and after (right)
Photographs with low key lighting portray a darker edge in the theme of the photo. Accentuate shadows and create dramatic play withdominant aspects of your photo, with the low-key effect (Elements Editor > Guided mode > Low Key). For more information, see Add low keyeffect.For a quick tutorial, watch this video on creating dynamic effects with the low key guided edit.
Picture before applying the low key effect (left), and after (right)
9
Tilt-shift
Vignette
To the top
Comic Filter
Pen and Ink filter
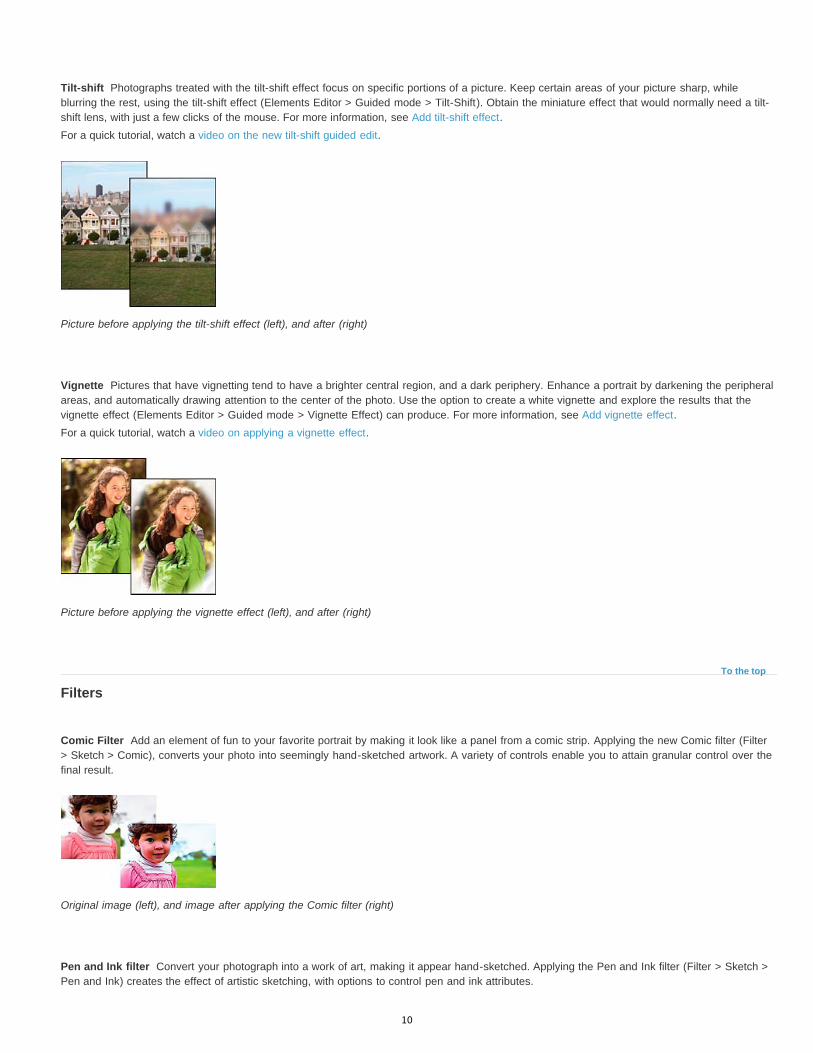
Photographs treated with the tilt-shift effect focus on specific portions of a picture. Keep certain areas of your picture sharp, whileblurring the rest, using the tilt-shift effect (Elements Editor > Guided mode > Tilt-Shift). Obtain the miniature effect that would normally need a tilt-shift lens, with just a few clicks of the mouse. For more information, see Add tilt-shift effect.For a quick tutorial, watch a video on the new tilt-shift guided edit.
Picture before applying the tilt-shift effect (left), and after (right)
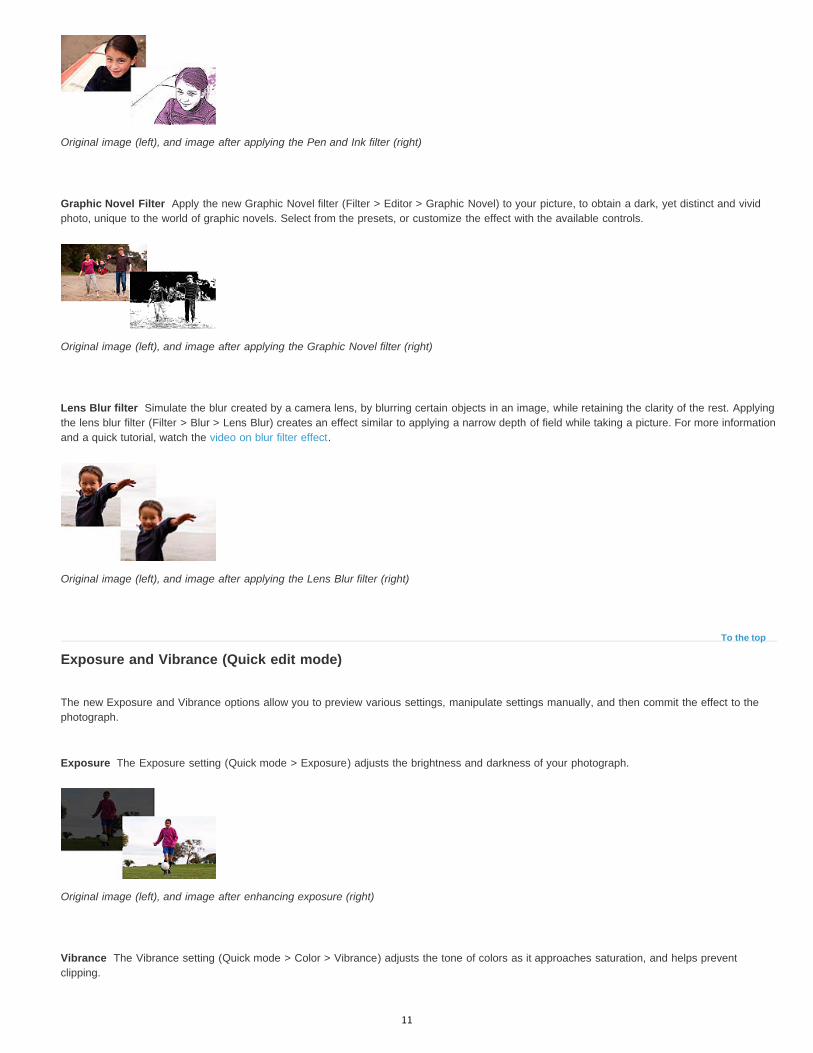
Pictures that have vignetting tend to have a brighter central region, and a dark periphery. Enhance a portrait by darkening the peripheralareas, and automatically drawing attention to the center of the photo. Use the option to create a white vignette and explore the results that thevignette effect (Elements Editor > Guided mode > Vignette Effect) can produce. For more information, see Add vignette effect.For a quick tutorial, watch a video on applying a vignette effect.
Picture before applying the vignette effect (left), and after (right)
Filters
Add an element of fun to your favorite portrait by making it look like a panel from a comic strip. Applying the new Comic filter (Filter> Sketch > Comic), converts your photo into seemingly hand-sketched artwork. A variety of controls enable you to attain granular control over thefinal result.
Original image (left), and image after applying the Comic filter (right)
Convert your photograph into a work of art, making it appear hand-sketched. Applying the Pen and Ink filter (Filter > Sketch >Pen and Ink) creates the effect of artistic sketching, with options to control pen and ink attributes.
10
Graphic Novel Filter
Lens Blur filter
To the top
Exposure
Vibrance
Original image (left), and image after applying the Pen and Ink filter (right)
Apply the new Graphic Novel filter (Filter > Editor > Graphic Novel) to your picture, to obtain a dark, yet distinct and vividphoto, unique to the world of graphic novels. Select from the presets, or customize the effect with the available controls.
Original image (left), and image after applying the Graphic Novel filter (right)
Simulate the blur created by a camera lens, by blurring certain objects in an image, while retaining the clarity of the rest. Applyingthe lens blur filter (Filter > Blur > Lens Blur) creates an effect similar to applying a narrow depth of field while taking a picture. For more informationand a quick tutorial, watch the video on blur filter effect.
Original image (left), and image after applying the Lens Blur filter (right)
Exposure and Vibrance (Quick edit mode)
The new Exposure and Vibrance options allow you to preview various settings, manipulate settings manually, and then commit the effect to thephotograph.
The Exposure setting (Quick mode > Exposure) adjusts the brightness and darkness of your photograph.
Original image (left), and image after enhancing exposure (right)
The Vibrance setting (Quick mode > Color > Vibrance) adjusts the tone of colors as it approaches saturation, and helps preventclipping.
11

To the top
User interface
Guided edits
Panel shortcuts
Original image (left), and image after increasing vibrance (right)
Usability Enhancements
Adobe Photoshop Elements 11 has numerous advancements and new features. However, much effort has been invested in ensuring that workingin Elements Editor is easier and faster than ever before. For more information, see the video on the new Photoshop Elements 11 user interface.
Photoshop Elements in Expert mode A. Inactive tab B. Active tab C. Active image area D. Menu bar E. Options bar F. Toolbox G. Tool Options bar / Photo bin H. Taskbar I. Panel bar
Photoshop Elements has been reworked to present the working spaces, tools, modes, and panels in neat and efficient layouts.The user interface is simpler to navigate, more intuitive, and ensures that learning is a natural outcome of working Photoshop Elements.Enhancements to the user interface include:
Taskbar The taskbar contains buttons to important shortcuts to aspects of Photoshop Elements, and important tasks.Photo bin The Photo bin displays open images that you are currently working on in Photoshop Elements, or photos or albums selected inPhotoshop Elements Organizer.Tools bar The Tools bar contains all the available tools in a particular mode. Tools are grouped logically.Tool Options bar The Tool Options bar displays all the options of the currently selected tool, below an open image.Panels By default, Photoshop Elements opens in the Basic panel view, that displays the Layers, Effects, Graphics, and Favorites panels.Thus, novice users always have a consistent view of the most important panels. Advanced users can open the Custom view to view or dockadditional panels into the interface.
Guided edits are available in the Guided mode. Some enhancements include:Guided edits have an icon associated with them, enabling users to quickly understand what that particular edit does.Step numbers enable the user to always have context of the actions being performed.Guided edits are better categorized, and step-wise descriptions for each edit have been simplified.
Important panels now have keyboard shortcuts associated with them. For example, you can press F11 to view the Layers panel.
12

Quick mode toolbar
Create menu
Panels
To the top
To the top
Process Version 2012
Additional control
To the top
To the top
Sharpen tool
Move tool
The Text tool and the Spot Healing Brush tools are now available in Quick mode.
The Create drop-down, above the Panel bin, lists all the projects that you can start with your photographs. You can easily start aproject, in any mode that you are in.
Panels can be viewed in two modes, Basic and Custom.Basic To enable novice users to have a consistent view in Photoshop Elements, this mode displays the most important panels - Layers,Effects, Graphics, and Favorites.Custom To enable advanced users to choose the panels that they need, the Custom mode displays panels in floating or tabbed mode. Inthis mode, users can open a panel, and dock it in the Panel bin.
Actions Panel
An action is a series of tasks that Photoshop Elements performs with a click of a button. Actions are now available in the Actions panel (Window >Actions). Use the Actions panel menu to load, play, delete, or reset actions.
For more information on the Actions panel and how to use it, see Using actions to process photos.
Also, watch this video on adding actions to speed up editing tasks.
Adobe Camera Raw (ACR) 7.1
Photoshop Elements 11 uses the newest algorithms and technology to process raw file formats. Enhancements include:
The Adobe Camera Raw 7.1 (ACR 7.1) converter introduces Process Version 2012, a newer form of decipheringthe raw file format. The ACR 7.1 dialog allows you to choose the latest process version (2012), or any of the older versions - 2010 or2003.
Process Version 2012 exposes three new sliders - Luminance Detail, Luminance Contrast, and Color Detail.
For more information, see Process Versions.
Photo service provider for users in Europe - CEWE Color
For Photoshop Elements users in Europe, Adobe has partnered with CEWE Color, an online photo service company. CEWE Color services areavailable in 24 European countries. You can place orders for photos, photo books, calendars, and other projects with CEWE Color, from withinPhotoshop Elements.
Tool enhancements
Tools have been refined to obtain optimal results. Additional features have been added to existing tools:
The Sharpen tool now has a Protect Detail option, that ensures minimized pixelated artifacts while enhancing and sharpeningdetails.
The Move tool now has a layer selection option, that enables you to right-click a multi-layered image and select a specific layer.Choosing a layer this way automatically selects the layer in the Layers panel.
13
Color Picker
Color Replacement tool
Refine edges tool
To the top
To the top
To the top
Reset Preferences on next launch
The Color Picker tool has been equipped with additional settings in the Tool Options bar. You can now choose to sample color froma selected layer, or all available layers.
The Color Replacement tool now has a sampling option to choose how a color is picked for replacement. You canchoose to control how the color is replaced using the Continuous, Once, or Background Swatch settings.
Refine Edges tool The Refine Edges tool has been enhanced to provide the ability to select the more granular and finer detailsfrom an image. For more information, see Refine edges of a selection.
Online Content
Most sample and collateral graphics, backgrounds, frames, and themes have been moved online. Storing files online saves a large amount of diskspace on the computer where you have Photoshop Elements 11 installed.
When you install Photoshop Elements 11, these files are downloaded as thumbnails. Files that have not been downloaded have a small blue bandthat runs diagonally across the upper-right corner of the thumbnail (similar to a blue photo-corner).
Thumbnails in the Graphics panel, with a blue photo corner to indicate if graphic is available for download A. Blue photo corner B. Graphic not downloaded, but available online C. Graphic downloaded to computer, available for use
When you choose to use the file in a project (for example, a background in a photo book project), these files are downloaded in their full size.Double-click a graphic to download it from the online repository in its full size.
Effects and Styles
Photoshop Elements 11 enables you to import your favorite effects and styles. Use the preset manager (Edit > Preset Manager), or the panelmenu in the Effects panel, to load, use, or delete effect (.atn) or style (.asl) files.
For more information, see Use the Preset Manager.
Preferences
Preferences have been added or modified to ensure that working in Photoshop Elements 11 is a pleasing and consistent experience.
Click this button to ensure that all product preferences are reset to default settings when Elements
14

Twitter™ and Facebook posts are not covered under the terms of Creative Commons.
Legal Notices | Online Privacy Policy
Save As to Original Folder
Maximize PSD File Compatibility
Editor is restarted next. Available at Preferences > General.
Specifies the folder location that is opened by default in the Save As dialog. When this option is cleared, theSave As dialog always opens the folder where you last saved a file. When selected, the Save As dialog always opens the folder fromwhere you last opened a file. Available at Preferences > Saving Files.
Specifies if compatibility settings must be enforced when you save a photograph to PSD file format.Never Compatibility settings are never appliedAlways Compatibility settings are always appliedAsk While saving to PSD format, a Photoshop Elements Format Options dialog is displayed. You can now select the Don't showagain option.
15

Workspace and workflows
16
Workspace basics
To the top
To the top
The Welcome screenPhotoshop Elements windowUse context menusUsing keyboard commands and modifier keysExit Photoshop Elements
The Welcome screen
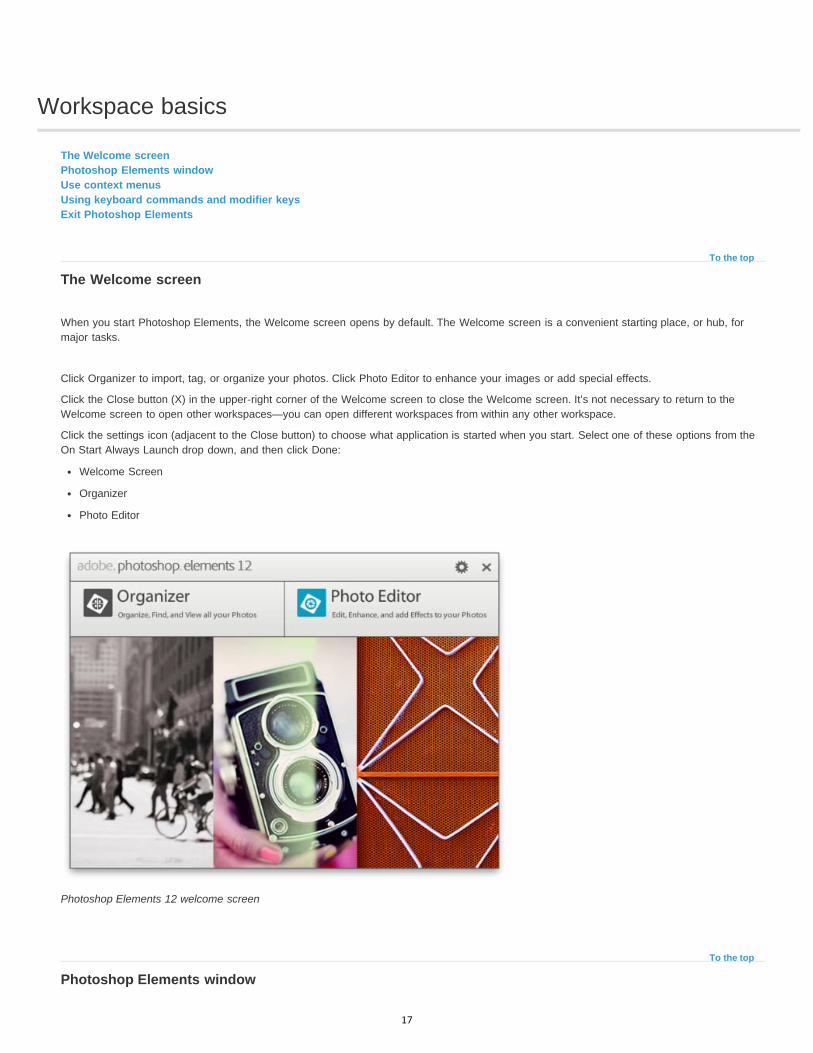
When you start Photoshop Elements, the Welcome screen opens by default. The Welcome screen is a convenient starting place, or hub, formajor tasks.
Click Organizer to import, tag, or organize your photos. Click Photo Editor to enhance your images or add special effects.
Click the Close button (X) in the upper-right corner of the Welcome screen to close the Welcome screen. It’s not necessary to return to theWelcome screen to open other workspaces—you can open different workspaces from within any other workspace.
Click the settings icon (adjacent to the Close button) to choose what application is started when you start. Select one of these options from theOn Start Always Launch drop down, and then click Done:
Welcome Screen
Organizer
Photo Editor
Photoshop Elements 12 welcome screen
Photoshop Elements window
17

Menu bar
Mode selector
Toolbox
Panel bin
Photo Bin / Tools Options
Taskbar
The Photoshop Elements window provides modes to create and edit images. Select one of the following options:
Quick
Enables you to edit photos in the Quick mode.
Guided
Enables you to edit photos in the Guided Edit mode.
Expert
Enables you to edit photos in the Expert mode.
The Expert mode has tools to correct color problems, create special effects, and enhance photos. The Quick mode contains simple tools forcorrecting color and lighting, and commands to quickly fix common problems, such as red eye. The Guided mode contains tools for basic photoedits, guided activities, and photographic effects. If you are new to digital imaging, Quick or Guided modes are a good place to start fixingphotos.
If you’ve worked with image-editing applications before, you’ll find that the Expert mode provides a flexible and powerful image-correctionenvironment. It has lighting and color-correction commands, along with tools for fixing image defects, making selections, adding text, andpainting on your images. You can rearrange the Expert workspace to best suit your needs. You can move, hide, and show panels, and arrangepanels in the Panel Bin. You can also zoom in or out of the photo, scroll to a different area of the document window, and create multiplewindows and views.
Photoshop Elements in Expert mode A. Inactive tab B. Active tab C. Active image area D. Menu bar E. Options bar F. Toolbox G. Tool Options bar / Photo bin H. Taskbar I. Panelbar
Contains menus for performing tasks. The menus are organized by topic. For example, the Enhance menu contains commands forapplying adjustments to an image.
Contains buttons to enter the three available editing modes. Also, contains the Open (recently used files) drop-down and theCreate (photo projects) drop-down.
Holds tools for editing images.
Logically grouped features, actions, or controls.
Toggles between Photo Bin (display and manage thumbnails of currently used photos) and Tools Options (displaysand sets options for the currently selected tool)
Displays the most frequently used actions as buttons, for quick and easy access.
18

Twitter™ and Facebook posts are not covered under the terms of Creative Commons.
Legal Notices | Online Privacy Policy
To the top
Note:
To the top
To the top
Use context menus
You can use context menus in both the Photo Editor and Organizer workspaces. Context-sensitive menus display commands that are relevantto the active tool, selection, or panel. These menus are often another way to access the commands in the main menus.
1. Position the pointer over an image or panel item.
Not all panels offer context menus.
2. Right-click and choose a command from the menu.
Using keyboard commands and modifier keys
You can use keyboard shortcuts in both the Photo Editor and Organizer workspaces. Keyboard commands let you quickly execute commandswithout using a menu; modifier keys let you alter how a tool operates. When available, the keyboard command appears to the right of thecommand name in the menu.
Exit Photoshop Elements
To exit Photoshop Elements, close both the Photo Editor and Organizer workspaces—closing one does not automatically close the other.
1. From any workspace, do one of the following:
In Windows, choose File > Exit. In Mac, choose Photoshop Elements > Quit Photoshop Elements.
Click the Close button (X) in the upper-right corner of the workspace.
2. When closing Photoshop Elements, choose whether to save any open files.
19

Panels and bins
To the top
About panelsWork with panelsPanels in the Expert modeUse the taskbarUse the Photo Bin
About panels
Panels are available in both Photoshop Elements and Elements Organizer; however, they behave a little differently in each. Panels help youmanage, monitor, and modify images. Some panels have menus that provide additional commands and options. You can organize panels in thebasic and custom workspaces in Expert mode. You can store panels in the Panel Bin to keep them out of your way, but easily accessible.
Dragging a panel.
Panel menus
Some commands appear in both the panel menu and the menu bar. Other commands are exclusive to panel menus. Click panel menu to view thedifferent commands in each panel.
Pop-up sliders within panels
Some panels and dialog boxes contain settings that use pop-up sliders (for example, the Opacity option in the Layers panel). If there is a trianglenext to the text box, you can activate the pop-up slider by clicking the triangle. Position the pointer over the triangle next to the setting, hold downthe mouse button, and drag the slider or angle radius to the desired value. Click outside the slider box or press Enter to close the slider box. Tocancel changes, press Esc.
To increase or decrease values in 10% increments when the pop-up slider box is open, hold down Shift and press the Up or Down Arrow keys.
20

To the top
To the top
Basic Workspace
Custom Workspace
Note:
Different ways to enter values A. Dial B. Click to open window C. Text box D. Menu arrow E. Scrubby slider F. Check box G. Hotkey H. Pop-up slider triangle
Work with panels
Panels contain features, information, or functionality, in logical groups, for fast and easy access. The Panel Bin is on the right side of PhotoshopElements. It displays tabs and panels, depending on the mode you are in, or the kind of elements you want to work with. The Panel Bin displays:
Quick mode: lists the quick-mode effects that can be applied to a photoGuided mode: lists all the guided-mode edits that you can apply to a photoExpert mode: lists the options for a selected panel (Layers, Effects, Graphics, or Favorites)
Panels in the Expert mode
In the Expert mode, panels can be displayed in two ways - Basic Workspace, and Custom Workspace.
By default, the available workspace displayed is the Basic Workspace. In this view, buttons for the most frequently used panelsare placed in the taskbar. The buttons in this workspace are Layers, Effects, Graphics, and Favorites. For example, clicking the Layers buttondisplays all the layers-related options. To view all the other available tabs, or close open tabs, click More.
To view panels in a tabbed layout in the Panel Bin, click the arrow next to More, and select Custom Workspace. Click Moreto view a list of all the available tabs, and select one from the pop-up list. The selected tab is displayed. You can keep the frequently used panelsopen in the custom workspace. Group panels together or dock one panel at the bottom of another panel. You can drag title bar of the tab and dropit in the tabbed layout, or drag and drop the tabs dialog into the tabbed layout.
Drag a panel out of the Panel Bin if you want to remove it from the Panel Bin and keep it open.
21

The Panel Bin
1. To show or hide the Panel Bin, Choose Window > Panel Bin.
2. In the Panel Bin (Custom Workspace),
To remove a panel from the Panel Bin, drag the title bar of the panel out of the Panel Bin.
To add a panel to the Panel Bin, drag the title bar of the panel into the Panel Bin.
To rearrange panels in the Panel Bin, drag the title bar of the panel to a new location.
To expand or collapse panels in the Panel Bin, double-click the name of the panel.
3. To use panels outside the Panel Bin, in Custom Workspace view, do any of the following:
To open a panel, choose the name of the panel from the Window menu, or click the arrow next to the More button in the taskbar andselect a panel.
To close a panel, choose the name of the panel from the Window menu. Or click the Close button in the title bar of the panel.
To change the size of a panel, drag any corner of the panel.
To group panels (one panel with multiple tabs), drag the panel onto the body of the target panel. A thick line appears around the body ofthe target panel when the pointer is over the correct area for grouping to occur. If you want to move a panel to another group, drag thetab of the panel to that group. To separate a panel from a group, drag the tab of the panel outside the group.
To move a panel group, drag the title bar.
To expand or collapse a panel or panel group, double-click the tab of the panel or title bar.
To dock panels together (stacked panels), drag a tab of the panel or the title bar to the bottom of another panel. A double line appears atthe bottom of the target panel when the pointer is over the correct area.
22

To the top
To the top
Note:
To reset panels to their default positions, choose Window > Reset Panels.
Use the taskbar
Taskbar
At the bottom of the Photoshop Elements, the taskbar displays buttons for the most frequently used panels and operations performed while editingand modifying images. You can use the Photo Bin and Tool Options buttons to toggle between displaying thumbnails and tool options. You canquickly undo and redo operations, or rotate images using the options available taskbar, or Organizer to start Photoshop Elements Organizer. In theExpert mode, click the arrow beside the More button, to see the option to toggle between Basic and Custom workspaces.
Use the Photo Bin
Located toward the bottom of the Photoshop Elements window, above the taskbar, the Photo Bin displays thumbnails of open photos. It’s useful forswitching between multiple open photos in your workspace. The Photo Bin has controls that let you open or close images, hide images, navigatethrough open images, make a specific image the frontmost image, duplicate an image, rotate an image, or view file information. You can easilybring open images into Quick mode for editing. Multipage projects created using the Create tab open in the Create panel.
The Photo Bin
Do any of the following:
(Windows only) To open an image, drag a file from any location on your computer (including the Photo Browser) or from any storagedevice connected to your computer into the Photo Bin.
To bring an opened image forward as the frontmost image, double-click a thumbnail.
To rearrange photos, drag thumbnails in the Photo Bin. The order here does not impact the photo’s order in the Elements Organizer.
To close an image, right-click a thumbnail in the Photo Bin and choose Close.
To hide an image that is in a floating window, right-click the thumbnail and choose Minimize from the context menu.
To show an image after hiding it, double-click its thumbnail in the Photo Bin, or right-click the thumbnail and choose Restore from thecontext menu.
To view a photo’s file information, right-click a thumbnail and choose File Info from the context menu.
To duplicate an image, right-click a thumbnail, choose Duplicate from the context menu, and name the file.
23
Twitter™ and Facebook posts are not covered under the terms of Creative Commons.
Legal Notices | Online Privacy Policy
To rotate an image, right-click a thumbnail and choose Rotate 90° Left or Rotate 90° Right from the context menu.
To show filenames, right-click in the Photo Bin and choose Show Filenames from the context menu.
To manually show or hide the bin, click the Photo Bin taskbar icon.
The flyout menu of the Photo Bin contains additional options to work with the images that are available in the Photo Bin:Print Bin Files. Opens the Photoshop Elements Print dialog box, with options to print the photos currently selected in the Photo Bin.Save Bin as an Album. Enables you to name and save an album containing the images in the Photo Bin. The new album is availablein Organizer.Reset Style Bin. Resets the Style bin images, while performing a photomerge style match (Enhance > Photomerge > PhotomergeStyle Match) .Show Grid. Displays a grid around images in the Photo bin.
24

Tools
To the top
About the toolboxSelect a toolSet Edit preferencesSet the appearance of a tool pointerResize or change the hardness of painting cursors by draggingSet tool options
About the toolbox
You use tools in the Photoshop Elements toolbox to select, edit, and view images; some tools let you paint, draw, and type. The toolboxappears on the left side in the Quick and Expert modes.
Tools in the toolbox are grouped logically, in the Quick and Expert modes. For example, in the Expert view, the Move, Rectangular Marquee,Lasso, and Quick Selection tools are placed together in the Select group.
Select a tool in the toolbox to use it. Once selected, the tool is highlighted in the toolbox. Optional settings for the tool appear in the ToolOptions bar, towards the bottom of the Photoshop Elements window.
note: You cannot deselect a tool—once you select a tool, it remains selected until you select a different tool. For example, if you’ve selected theLasso tool, and you want to click your image without selecting anything, select the Hand tool.
Toolbox overview
25

To the top
To the top
To the top
Standard
Precise
Normal Brush Tip
Full Size Brush Tip
Show Crosshair In Brush Tip
Standard
Select a tool
Do one of the following:
Click a tool in the toolbox. If there are additional tool options, they are displayed in the Tool Options bar. Click the tool you want toselect.
Press the tool’s keyboard shortcut. The keyboard shortcut is displayed in its tool tip. For example, you can select the Brush tool bypressing the B key.
Set Edit preferences
1. In Windows, choose Edit > Preferences > General. In Mac, choose Photoshop Elements > Preferences > General.
2. Set one or more of the following options, and click OK.
Select Show Tool Tips to show or hide tool tips.
Select Use Shift Key For Tool Switch to cycle through a set of hidden tools by holding down the Shift key. When this option isdeselected, you can cycle through a set of tool options by pressing the shortcut key (without holding down Shift). For example,pressing B on your keyboard repeatedly, cycles through all the Brush tool options (Brush, Impressionist Brush, and ColorReplacement tools)
Set the appearance of a tool pointer
1. In Windows, choose Edit > Preferences > Display & Cursors. In Mac, choose Photoshop Elements > Preferences > Display & Cursors.
2. Select a setting for the Painting Cursors:
Displays pointers as tool icons.
Displays pointers as cross-hairs.
Displays pointers as circles at 50% of the size you specify for the brush.
Displays pointers as circles at the full size you specify for the brush.
Displays cross-hairs in the circles when you choose either Normal Brush Tip or Full Size Brush Tip.
3. Select a setting for Other Cursors:
Displays pointers as tool icons.
26

Twitter™ and Facebook posts are not covered under the terms of Creative Commons.
Legal Notices | Online Privacy Policy
Precise
To the top
To the top
Note:
Displays pointers as cross-hairs.
Resize or change the hardness of painting cursors by dragging
You can resize or change the hardness of a painting cursor by dragging in the image. As you drag, you preview both the size and hardness ofthe painting tool.
To resize a cursor, right-click + press Alt (Windows only), and drag to the left or right.
To change the hardness of a cursor, right-click + press Alt (Windows only), and drag up or down.
Set tool options
The Tool Options bar appears above the taskbar at the bottom of the Photoshop Elements window. The Tool Options bar displays differentoptions when you select different tools.
A. Tool icon B. Active tool in the Tool Options bar C. Hidden tools D. Tool options
1. Select a tool.
2. Look in the Tool Options bar to see the available options. For more information on setting options for a specific tool, search for the tool’sname in Photoshop Elements Help.
To return a tool or all tools to their default settings, click the tool icon, select the flyout menu from the Tool Options bar, and thenchoose Reset Tool or Reset All Tools.
3. To close the Tool Options bar, click Tool Options in the task bar. To reopen the bar, click Tool Options from the task bar.
27

Rulers, grids, and guides
To the top
To the top
Note:
Note:
To the top
About rulers, grids, and guidesChange the rulers’ zero origin and settingsChange the guides and grid settings
About rulers, grids, and guides
In Expert mode, rulers, grids, and guides help you position items (such as selections, layers, and shapes) precisely across the width or length ofan image. In Quick mode, only grids are available.
When visible, rulers appear along the top and left side of the active window. Markers in the ruler display the pointer’s position when you move it.Changing the ruler origin (the 0, 0 mark on the top and left rulers) lets you measure from a specific point on the image. The ruler origin alsodetermines the grid’s point of origin.
Use the View menu to show or hide the rulers (Expert mode only), the grid, or the guide. The View menu also helps you to enable or disable thesnapping of items to the grid or guide.
Change the rulers’ zero origin and settings
In Expert mode, do one of the following:
To change the rulers’ zero origin, position the pointer over the intersection of the rulers in the upper-left corner of the window, and dragdiagonally down onto the image. A set of cross hairs appears, marking the new origin on the rulers. The new zero origin will be set whereyou release the mouse button.
To reset the ruler origin to its default value, double-click the upper-left corner of the rulers.
Dragging to create a new ruler origin.
To change the rulers’ settings, double-click a ruler, or choose Edit > Preferences > Units & Rulers. For Rulers, choose a unit ofmeasurement. Click OK.
Changing the units on the Info panel automatically changes the units on the rulers.
Change the guides and grid settings
28

Twitter™ and Facebook posts are not covered under the terms of Creative Commons.
Legal Notices | Online Privacy Policy
1. Choose Edit > Preferences > Guides & Grid.
2. Under the Guides or Grids area:
Choose a preset color, or click the color swatch to choose a custom color.
Choose the line style for the grid. Choose Lines for solid lines, or choose Dashed lines or Dots for broken lines.
3. For Gridline Every, enter a number value, and then choose the unit of measurement to define the spacing of major grid lines.
4. For Subdivisions, enter a number value to define the frequency of minor grid lines, and click OK.
Adobe also recommendsChange the size of the canvas
Change print dimensions and resolution without resampling
29

Undo, redo, and cancel actions
To the top
To the top
Undo, redo, or cancel actionsUsing the History panel while editingClear memory used by the clipboard and the History panelRestore default preferencesRedisplay disabled warning messages
Undo, redo, or cancel actions
Many operations in both the Elements Organizer and Photoshop Elements can be undone or redone. For example, you can restore all or part ofan image to its last saved version. Low amounts of available memory limit your ability to use these options.
1. To undo or redo an operation, Choose Edit > Undo or choose Edit > Redo.
2. To cancel an operation, hold down the Esc key until the operation in progress has stopped.
Using the History panel while editing
The History panel (F10 or Window > History) lets you jump to any recent state of the image created during the current work session. Each timeyou apply a change to pixels in an image, the new state of that image is added to the History panel.
For example, if you select, paint, and rotate part of an image, each of those states is listed separately in the panel. You can then select any ofthe states, and the image reverts to how it looked when that change was first applied. You can then work from that state.
Actions, such as zooming and scrolling, do not affect pixels in the image and do not appear in the History panel. Nor do program-wide changes,such as changes to panels, color settings, and preferences.
A. Original state B. State C. Selected state
Note the following guidelines when using the History panel:
By default, the History panel lists 50 previous states. Older states are automatically deleted to free more memory for Photoshop Elements.You can set the number of states in the application settings (Preferences > Performance > History States). The maximum number of statesis 1000.
The original state of the photo is always displayed at the top of the History panel. You can always revert an image to its original state byclicking this top state. Clicking the original state is also handy for comparing before and after versions of your editing.
When you close and reopen the document, all states from the last working session are cleared from the panel.
30

Note:
To the top
Note:
States are added to the bottom of the list. That is, the oldest state is at the top of the list, the most recent one is at the bottom.
Each state is listed with the name of the tool or command used to change the image.
Selecting a state dims the subsequent states (steps that were performed after the selected step). This way you can easily see whichchanges will be discarded if you continue working from the selected state.
Selecting a state and then changing the image eliminates all states that came after it. Likewise, deleting a state deletes that state and allstates (edits) after it.
Revert to a previous state of an image
In Quick and Expert modes, do any of the following:
Click the name of the state in the History panel.
Click the Undo or Redo buttons in the taskbar.
Choose Undo or Redo from the History panel menu or the Edit menu.
To set the keyboard command for Step Forward and Step Backward, choose Edit > Preferences > Generalin Windows (PhotoshopElements > Preferences > General in Mac), and choose from the Step Back/Fwd menu.
Delete one or more states from the Undo History panel
Do one of the following:
To delete a state, click the name of the state, and choose Delete from the History panel menu. States following the one you selectedare also deleted.
To delete the list of states from the History panel, without changing the image, choose Clear History from the panel menu or chooseEdit > Clear > Clear History. Clearing is useful for freeing up memory, especially if you get an alert that Photoshop Elements is low onmemory.
Clearing the History panel cannot be undone.
Clear memory used by the clipboard and the History panel
You can delete items copied to the clipboard or states in the Undo History panel to free up memory.
In Expert mode, do one of the following:
To clear memory used by the clipboard, choose Edit > Clear > Clipboard Contents.
To clear memory used by the Undo History panel, choose Edit > Clear > Clear History or choose Clear History from the History panelflyout menu.
To clear the memory used in both the clipboard and the History panel simultaneously, choose Edit > Clear > All.
Clearing the History panel or clipboard cannot be undone.
31

Twitter™ and Facebook posts are not covered under the terms of Creative Commons.
Legal Notices | Online Privacy Policy
To the top
Note:
To the top
Restore default preferences
Preference settings control how Photoshop Elements displays images, cursors, and transparencies, saves files, uses plug-ins and scratch disks,and so on. If the application exhibits unexpected behavior, the preferences file may be damaged. You can restore all preferences to theirdefaults.
Deleting the preferences file is an action that cannot be undone.
Do one of the following:
Press and hold Alt+Control+Shift (Mac: Option+Command+Shift) immediately after Photoshop Elements begins launching. Click Yes todelete the Adobe Photoshop Elements settings file.Go to Edit > Preferences (Mac: Photoshop Elements > Preferences > General), click the Reset Preferences on next launch button, andthen click OK. When you restart Adobe Photoshop Elements, all preferences are reset to default settings.
A new preferences file is created the next time you start Photoshop Elements. For information on a specific preference option, search for thepreference name in Help.
Redisplay disabled warning messages
In certain situations, messages containing warnings or prompts are displayed. You can disable the display of these messages by selecting theDon’t Show Again option in the message. You can also reset the messages you’ve disabled at a later time.
1. In Windows, choose Edit > Preferences > General. In Mac, choose Photoshop Elements > Preferences > General.
2. Click Reset All Warning Dialogs, and click OK.
32

Scratch disks and plug-ins
To the top
To the top
To the top
About scratch disksChange scratch disksAbout plug-in modulesInstall plug-in modulesSelect an additional plug-ins folderLoad default plug-ins only
About scratch disks
When your system does not have enough RAM to perform an operation, Photoshop Elements uses scratch disks. A scratch disk is any drive orpartition of a drive with free memory. By default, Photoshop Elements uses the hard drive on which the operating system is installed as its primaryscratch disk.
You can change the primary scratch disk, or designate additional scratch disks. When the primary disk is full, additional scratch disks are used. Setyour fastest hard disk as your primary scratch disk. Ensure that the disk has plenty of defragmented space available.
For best performance, use the following guidelines when assigning scratch disks:
Do no create scratch disks on the same physical drive as Photoshop Elements or any large files you are editing.
Do not create scratch disks on the same physical drive as the one used for the operating system’s virtual memory.
Create scratch disks on a local drive, not a network location.
Create scratch disks on conventional (non-removable) media.
RAID disks/disk arrays are good choices for dedicated scratch disk volumes.
Defragment drives with scratch disks regularly. Or better yet, use an empty drive or a drive with plenty of unused space, to avoidfragmentation issues.
Change scratch disks
Photoshop Elements needs contiguous hard drive space to create a scratch disk. Frequently defragmenting your hard drive ensures that there iscontiguous space available, especially the disk containing your scratch disk. Adobe recommends that you use a disk tool utility, such as WindowsDisk Defragmenter, to defragment your hard drive on a regular basis. See your Windows documentation for information on defragmentationutilities.
1. In Windows, choose Edit > Preferences > Performance. In Mac, choose, Photoshop Elements > Preferences > Performance.
2. Select the desired disks from the Scratch Disks listing (you can assign up to four scratch disks).
3. Select a scratch disk and use the arrow keys next to the Scratch Disks list to rearrange the order in which scratch disks will be used.
4. Click OK, and restart Photoshop Elements for the change to take effect.
About plug-in modules
33

Note:
To the top
To the top
Note:
To the top
Adobe Systems and other software developers create plug-ins to add functionality to Photoshop Elements. A number of importing, exporting, andspecial-effects plug-ins come with your program; they are inside the Photoshop Elements plug-ins and optional plug-ins folders.
Once installed, plug-in modules appear as:
Options added to the Import or Export menuFilters added to the Filter menu, or,File formats in the Open and Save As dialog boxes.
If you install a large number of plug-ins, Photoshop Elements may not be able to list them all in their appropriate menus. If so, newly installedplug-ins appear in the Filter > Other submenu. To prevent a plug-in or folder of plug-ins from loading, add a tilde character (~) at the beginning ofthe plug-in name, folder, or directory. The program ignores files marked with a tilde character, while starting. To view information about installedplug-ins, choose Help > About Plug-In and select a plug-in from the submenu.
To use an optional plug-in module, copy the plug-in module from the optional plug-ins folder to the relevant subfolder in the plug-ins folder.Then, install the plug-in module, and relaunch Photoshop Elements.
You can select an additional plug-ins folder in which to load compatible plug-ins stored with another application. You can also create a shortcut fora plug-in stored in another folder on your system. You can then add the shortcut or alias to the plug-ins folder to use that plug-in withPhotoshop Elements.
Install plug-in modules
Do one of the following:
Use the plug-in installer, if provided.
Follow the installation instructions that came with the plug-in module.
Make sure the plug-in files are uncompressed, and then copy them to the appropriate plug-ins folder in the Photoshop Elements folder.
Select an additional plug-ins folder
You can select an additional plug-ins folder in which to load compatible plug-ins stored with another application.
1. In Windows, choose Edit > Preferences > Plug-Ins. In Mac, choose Photoshop Elements > Preferences > Plug-Ins.
2. In the Preferences dialog, select Additional Plug-Ins Folder, select a folder from the list, and click Choose.
3. To display the contents of a folder, double-click the directory. The path to the folder appears in the preferences window.
Do not select a location inside the plug-ins folder for Photoshop Elements.
4. Restart Photoshop Elements to load the plug-ins.
Load default plug-ins only
When Photoshop Elements starts, all plug-ins that are pre-installed, third-party, or located in additional plugins-folders, are loaded. To load onlythe preinstalled plug-ins Photoshop Elements was shipped with, press and hold the Shift key while starting the software. When asked, click yes onthe dialog that requests confirmation to skip loading optional and third-party plug-ins.
34

Twitter™ and Facebook posts are not covered under the terms of Creative Commons.
Legal Notices | Online Privacy Policy
35

Enhanced Quick Mode | Photoshop Elements 12
To the top
To the top
EffectsTexturesFramesApply an Effect, Texture, or Frame
The Quick mode groups basic photo-fixing tools in one place, to quickly fix the exposure, color, sharpness, and other aspects of an image. FromPhotoshop Elements 12, in addition to correcting your photos, you can also transform your photos into professional-looking objects of art. Threenew panels - Effects, Textures, and Frames - are now available.
These panels are placed next to the Adjustments panel. Each panel has ten thumbnails. Each thumbnail is a live preview. Clicking a thumbnailapplies the effect, texture, or frame, to your image. Names for these effects, textures, and frames is displayed when you hover the mouse pointeron the thumbnail.
Effects
The ten available effects transform your photo by applying an effect preset. The clickable thumbnails for available Effects are live previews, tounderstand how the effect looks on the image without actually applying it. Effects range from Black & White effect to Old Vintage look to Cross-processed preset. Effects are applied as a new layer with layer mask. You can edit the layer mask in Expert mode to remove/reduce effect fromcertain areas.
Textures
36

To the top
To the top
Use the Textures panel to choose from ten textures you can apply to your photo. Textures simulate various surfaces or backgrounds that thephoto could be printed on. For example, old paper look, cracked paint texture, rough blue grid, chrome feel. Textures are applied as a new layerwith layer mask. You can edit the layer mask in Expert mode to remove/reduce texture from certain areas (face/skin).
Frames
Use the Frames panel to choose and apply from ten available frames for your photo. The frame is automatically fitted in best possible way. Youcan also move or transform the image and frame. This can be done by using the move tool and double-clicking the frame. You can change thebackground color from white to any other choice in Expert mode by modifying the Color Fill layer
Apply an Effect, Texture, or Frame
1. Open a photograph in Photoshop Elements Editor, and switch to the Quick mode.
2. Three panels - Effects, Textures, and Frames - are available, in addition to the Adjustments panel. Click the icon for any of the panels.
3. The Panel bar displays ten live preview thumbnails of the open image. Click a thumbnail to apply the Effect, Texture, or Frame.
37

Twitter™ and Facebook posts are not covered under the terms of Creative Commons.
Legal Notices | Online Privacy Policy
4. (Optional) Switch to the Expert mode, and modify the effect, texture, or frame that you used on the image. The modification applied in theQuick mode is available in a separate layer.
38

Viewing images
To the top
To the top
Note:
Viewing images in Expert or Quick modesZoom in or outDisplay an image at 100%Fit an image to the screenResize the window while zoomingUsing the Navigator panelOpen multiple windows of the same imageView and arrange multiple windowsClose windows
Viewing images in Expert or Quick modes
The Hand tool, the Zoom tools, the Zoom commands, and the Navigator panel let you view different areas of an image at different magnifications.
You can magnify or reduce your view using various methods. The window’s title bar displays the zoom percentage (unless the window is too smallfor the display to fit).
If you want to view another area of an image, either use the window scroll bars or select the Hand tool and drag to pan over the image. You canalso use the Navigator panel.
To use the Hand tool while another tool is selected, hold down the spacebar as you drag within the image.
Dragging the Hand tool to view another area of an image.
Zoom in or out
Do one of the following:
Select the Zoom tool from the toolbar, and click either the Zoom In or Zoom Out button in the Tool Options bar. Click the area you wantto magnify. Each click magnifies or reduces the image to the next preset percentage, and centers the display around the point you click.When the image has reached its maximum magnification level of 3200% or minimum reduction level of 1 pixel, the magnifying glassappears empty.
You can drag a Zoom tool over the part of an image you want to magnify. Make sure that the Zoom In button is selected in the ToolOptions bar. To move the zoom marquee around the image, begin dragging a marquee, and then hold down the spacebar while dragging themarquee to a new location.
Drag the Zoom slider in the Tool Options bar.
39

To the top
To the top
To the top
To the top
Note:
To the top
Choose View > Zoom In or View > Zoom Out.Enter the desired magnification level in the Zoom text box, in the Tool Options bar.
When using a Zoom tool, hold down Alt to switch between zooming in and zooming out.
Display an image at 100%
Do one of the following:
Double-click the Zoom tool in the toolbox.
Select the Hand tool or a Zoom tool and click the 1:1 button in the Tool Options bar.
Choose View > Actual Pixels, or right-click the image and choose Actual Pixels.
Enter 100% in the status bar and press Enter.
Fit an image to the screen
Do one of the following:
Double-click the Hand tool in the toolbox.
Select a Zoom tool or the Hand tool, and then click the Fit Screen button in the Tool Options bar. Or, right-click the image and choose FitOn Screen.
Choose View > Fit On Screen.
These options scale both the zoom level and the window size to fit the available screen space.
Resize the window while zooming
With a Zoom tool active, select Resize Windows To Fit in the Tool Options bar. The window changes size as you magnify or reduce the viewof the image.
When Resize Windows To Fit is deselected, the window maintains a constant size regardless of the image’s magnification. This can behelpful when you are using smaller monitors or working with tiled images.
Using the Navigator panel
The Navigator panel lets you adjust the image’s magnification and area of view. Typing a value in the text box, clicking the Zoom Out or Zoom Inbutton, or dragging the zoom slider changes the magnification. Drag the view box in the image thumbnail to move the view of an image. The viewbox represents the boundaries of the image window. You can also click in the thumbnail of the image to designate the area of view.
To change the color of the view box, choose Panel Options from the Navigator panel menu. Choose a color from the Color menu or clickthe color swatch to open the Color Picker and select a custom color. Click OK.
Open multiple windows of the same image
40

Twitter™ and Facebook posts are not covered under the terms of Creative Commons.
Legal Notices | Online Privacy Policy
To the top
Note:
To the top
In Expert mode, you can open multiple windows to display different views of the same file. A list of open windows appears in the Window menu,and thumbnails of each open image appear in the Photo Bin. Available memory may limit the number of windows per image.
Choose View > New Window For [image filename]. Depending on the position of the first window, you may have to move the second windowto view both simultaneously.
You can use the New Window command when you’re working with a zoomed image to see what the image will look like at 100% size in aseparate window.
View and arrange multiple windows
In Expert mode, do one of the following:
To display windows stacked and cascading from the upper left to the lower right of the screen, choose Window > Images > Cascade.
To display windows edge-to-edge, choose Window > Images > Tile. As you close images, the open windows are resized to fill theavailable space.
To view all open images at the same magnification as the active image, choose Window > Images > Match Zoom.
To view the same section (upper-left corner, center, lower-right corner, and so on) of all open photos, choose Window > Images > MatchLocation. The view in all windows shifts to match the active (frontmost) image. The zoom level does not change.
For more options to arrange images, in the Taskbar, click Layout, and choose a new layout from the pop-up menu.
The Window > Images options are enabled only when Allow Floating Documents In Expert Mode is selected in preferences.
Close windows
In Expert mode, do one of the following:
Choose File > Close to close the active window.
Click the Close button on the title bar of the active window.
Right-click a thumbnail in the Photo Bin and choose Close.
Choose File > Close All to close all open windows.
41
Using Windows 7 features
Twitter™ and Facebook posts are not covered under the terms of Creative Commons.
Legal Notices | Online Privacy Policy
Live Taskbar
Aero Peek
Aero Shake
Aero Snap
Photoshop Elements supports the following Windows 7 features:
Displays icons for all running and pinned applications. The icons for all running applications are highlighted with a border. Point toan icon to view images of the open files and applications. To work with an application, point to its icon, move over the images to preview in fullscreen, and click the full screen image.
Makes all windows transparent, allowing you to view the desktop. To view a hidden window, point to its taskbar icon.
Allows you to focus on a window by hiding all others. To work in an application, click its pane and shake the mouse. This hides allother windows, except the selected window. To display the hidden windows, shake the mouse again.
Allows you to quickly resize and organize windows. To resize a window, drag it to a side of the display and expand vertically orhorizontally.
42

Multitouch support
Twitter™ and Facebook posts are not covered under the terms of Creative Commons.
Legal Notices | Online Privacy Policy
If the hardware and operating system of your computer supports the Touch functionality, you can scroll, rotate, and zoom in on an image.Multitouch is supported in all three modes: Quick, Guided, and Expert.
Flicking
Scrolls the image horizontally or vertically. Touch the screen with one finger (two fingers on the trackpad for a Mac) and move the finger left orright, and up or down.
Twisting
Rotates the image clockwise or counterclockwise by 90 degrees. To rotate an image, touch two spots on the image (trackpad on a Mac) and twistthe image just like you would twist a real photo. Move two fingers in the opposite direction or use one finger to pivot around the other.
Pinching in or out
Zooms in or out of the image. To zoom out, place two fingers on the image (trackpad on a Mac) and pinch. Similarly, to zoom in, pinch, and movethe two fingers apart.
43

Importing
44
Importing files
To the top
To the top
Import frames from videoImport images from a digital camera using WIA (Windows only)
Import frames from video
You can play a video from within Photoshop Elements and grab frames to edit and save as images.
1. Select File > Import > Frame From Video.
2. Browse and select the video.
3. Click Play.
The video starts playing in the Frame From Video dialog box. You can use the playback controls to display the frames your want to grab.If you find the audio distracting, select Mute.
4. Click Grab Frame.
Photoshop Elements places the grabbed frames as images in new files., ready for editing.
5. Click Done.
Import images from a digital camera using WIA (Windows only)
Certain digital cameras import images using Windows Image Acquisition (WIA) support. When you use WIA, Photoshop Elements works withWindows and your digital camera or scanner software to import images directly into Photoshop Elements.
1. Choose File > Import > WIA Support.
2. Choose a destination in which to save your image files on your computer.
3. Make sure that Open Acquired Image(s) in Photoshop is selected. If you are importing a large number of images, or if you want to edit theimages later, deselect this option.
4. To save the imported images directly into a folder whose name is the current date, select Create Unique Subfolder Using Date Today.
5. Click Start.
6. Select the digital camera from which to import images.
45

Twitter™ and Facebook posts are not covered under the terms of Creative Commons.
Legal Notices | Online Privacy Policy
Note: If the name of your camera does not appear in the submenu, verify that the software and drivers were properly installed and thatthe camera is connected.
7. Choose the image or images you want to import:
Click the image from the list of thumbnails to import the image.
Hold down Shift and click multiple images to import them at the same time.
Click Select All to import all available images.
8. Click Get Picture to import the image.
46

File management
47
Opening files
To the top
Name
Preset
Size
Width, Height, and Resolution
Color Mode
Background Contents
To the top
Create a new blank fileOpen a fileOpen a PDF filePlace a PDF file in a new layerProcess multiple filesClose a file
Working in the Edit workspace of Photoshop Elements gives you choices about working with your files. You can set options for opening, saving,and exporting files by type, by file size, and resolution. You can also process and save camera raw files. These tools make it easy to combine filesof different types and optimize them in Adobe Photoshop Elements.
In the Edit workspace, you can create a blank file, open a recently used file, specify which files types to open in Photoshop Elements, and more.
An additional option for working in the Edit workspace is to use the Guided Edit feature. Guided Edits helps you when you’re unsure of a workflowor how to accomplish a task. They empower users to complete complex editing workflows in a small number of easy steps.
Create a new blank file
You may want to create a web graphic, banner, or company logo and letterhead, in which case you need to start from a new blank file.
1. Choose File > New > Blank File.
2. Enter options for the new image and click OK.
Names the new image file.
Provides options for setting the width, height, and resolution of images that you intend to print or to view on-screen. Select Clipboardto use the size and resolution of data that you copied to the clipboard. You can also base a new image on the size and resolution of anyopen image by choosing its name from the bottom of the Preset menu.
Choose from a list of standard sizes available for the selected preset.
Sets these options individually. The default values are based on the last image you created, unless you’vecopied data to the clipboard.
Sets an image to RGB color, grayscale, or bitmap (1-bit mode).
Sets the color of the image Background layer. White is the default. Select Background Color to use the currentbackground color (shown in the toolbox). Select Transparent to make the default layer transparent, with no color values—the new image willhave a Layer 1 instead of a Background layer.
You can also right-click the background of an image to choose a background color (gray, black, or a custom color).
Open a file
48

Note:
Note:
To the top
You can open and import images in various file formats. The available formats appear in the Open dialog box, the Open As dialog box, and theImport submenu.
To open a file from Elements Organizer, select it, click Editor in the task bar.
1. Do one of the following
Choose File > Open. Locate and select the file you want to open. If the file does not appear, choose All Formats from the Files Of Typemenu. Click Open.
Click the Open drop-down (above the tool box). The Open drop-down is a list of recently opened files.
Drag an image from a folder on your computer or storage device, and drop it in the Editor.
2. In the dialog box that appears, set format-specific options, and continue opening the file.
There may be instances when Photoshop Elements cannot determine the correct format of a file. For example, transferring a file betweenMac OS® and Windows can cause the format to be mislabeled. In such cases, you must specify the correct format in which to open the file.
1. Drag a file from any location on your computer into the Application Frame. You can also drag photos from the Photo Browser and anystorage device connected to your computer.
2. To drag additional images into the Application Frame to open them, enable floating document windows (see View and arrange multiplewindows). Convert open images into floating document windows to view the Application Frame.
Open a recently edited file
Choose File > Open Recently Edited File, and select a file from the submenu.
To specify the number of files that are available in the Open Recently Edited File submenu, choose Edit > Preferences > Saving Files,and enter a number in the Recent File List Contains text box.
Specify the file format in which to open a file
Choose File > Open As, and select the file you want to open. Then choose the desired format from the Open As menu, and click Open.
If the file does not open, then the chosen format may not match the file’s true format, or the file may be damaged.
Open a PDF file
Portable Document Format (PDF) is a versatile file format that can represent both vector and bitmap data and can contain electronic documentsearch and navigation features. PDF is the primary format for Adobe® Acrobat®.
With the Import PDF dialog box, you can preview the pages and images in a multipage PDF file, then decide if you want to open them in thePhotoshop Editor. You can choose to import full pages (including text and graphics), or you can import just the images from a PDF file. If youimport only the images, the resolution, size, and color mode of the images remains unchanged. If you import pages, you can change the resolutionand color mode.
49

To the top
Importing pages from a PDF file
Each page is shown as a thumbnail. To increase the size, choose an option from the Thumbnail Size menu.
1. Choose File > Open.
2. Select a PDF file, and click Open. You can change which types of files are shown by selecting an option from the Files Of Type menu.
3. To import just the images from a PDF file, choose the Images option from the Select area, in the Import PDF dialog box. Select the image orimages you want to open. (To select multiple images, hold Ctrl (Windows) or Command (Mac OS) and click each image). If you do not wantto import pages, skip to step 5.
4. To import pages from a PDF file, choose the Pages option from the Select area in the Import PDF dialog box, and then do any of thefollowing:
If the file contains multiple pages, select the page or pages you want to open, and click OK. (To select multiple pages, press Ctrl(Windows) or Command (Mac OS) and click each page.)
Under Page Options, accept the existing name, or type a new filename in the Name box.
Select Anti-aliased to minimize the jagged edges as the image is rasterized (bitmapped).
Specify the Width and Height. Enable Constrain Proportions to avoid image distortion due to change in size.
For Resolution, accept the default (300 ppi) or type a new value. A higher resolution increases the file size.
Choose an option from the Mode menu (RGB to keep the photos in color, or Grayscale to automatically make them black and white). Ifthe file has an embedded ICC (International Color Consortium) profile, you can choose the profile from the menu.
5. Select Suppress Warnings to hide any error messages during the import process.
6. Click OK to open the file.
1. In the Edit workspace, choose File > Open.
2. Select the file you want to open, and click Open.
3. Indicate the desired dimensions, resolution, and mode. To maintain the same height-to-width ratio, select Constrain Proportions.
4. Select Anti-aliased to minimize the jagged appearance of edges, and then click OK.
Place a PDF file in a new layer
You can place pages or images from PDF files into a new layer in an image. Because the placed artwork is rasterized (bitmapped), you cannotedit text or vector data in placed artwork. The artwork is rasterized at the resolution of the file into which it is placed.
50

To the top
Note:
Folder
Import
1. In Photoshop Elements, open the image into which you want to place the artwork.
2. Choose File > Place, select the file you want to place, and click Place.
3. If you are placing a PDF file that contains multiple pages, select the page you want to place from the provided dialog box, and click OK.
The placed artwork appears inside a bounding box at the center of the Photoshop Elements image. The artwork maintains its original aspectratio; however, if the artwork is larger than the Photoshop Elements image, it is resized to fit.
4. (Optional) Reposition the placed artwork by positioning the pointer inside the bounding box of the placed artwork and dragging.
5. (Optional) Scale the placed artwork by doing one or more of the following:
Drag one of the handles at the corners or sides of the bounding box.
In the Tool Options bar, enter values for W and H to specify the width and height of the artwork. By default, these options representscale as a percentage. However, you can enter a different unit of measurement—in (inches), cm (centimeters), or px (pixels). Toconstrain the proportions of the artwork, click the Constrain Proportions box. This option is on when the icon has a white background.
6. (Optional) Rotate the placed artwork by doing one of the following:
Position the pointer outside the bounding box of the placed artwork (the pointer turns into a curved arrow), and drag.
In the Tool Options bar, click and drag the pointer in the Angle option.
7. (Optional) Skew the placed artwork by holding down Ctrl (Command in Mac OS) and dragging a side handle of the bounding box.
8. To blend edge pixels during rasterization, select the Anti-alias option. To produce a hard-edged transition between edge pixels duringrasterization, deselect the Anti-alias option.
9. To commit the placed artwork to a new layer, click Commit .
Process multiple files
The Process Multiple Files command applies settings to a folder of files. If you have a digital camera or a scanner with a document feeder, you canalso import and process multiple images. (Your scanner or digital camera’s software driver may need an acquire plug-in module that supportsthese actions.)
When processing files, you can leave all the files open, close and save the changes to the original files, or save modified versions of the files to anew location (leaving the originals unchanged). If you are saving the processed files to a new location, you may want to create a new folder for theprocessed files before starting the batch.
The Process Multiple Files command does not work on multiple page files.
1. Choose File > Process Multiple Files.
2. Choose the files to process from the Process Files From pop-up menu:
Processes files in a folder you specify. Click Browse to locate and select the folder.
Processes images from a digital camera or scanner.
51
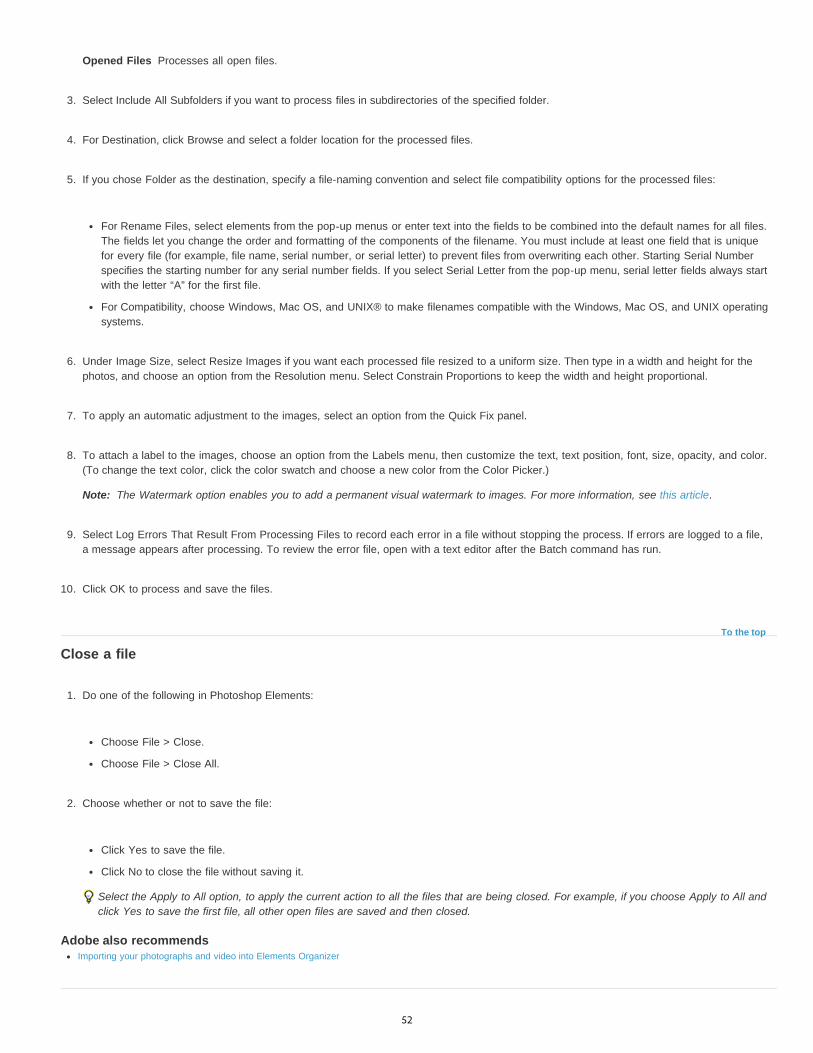
Opened Files
Note:
To the top
Processes all open files.
3. Select Include All Subfolders if you want to process files in subdirectories of the specified folder.
4. For Destination, click Browse and select a folder location for the processed files.
5. If you chose Folder as the destination, specify a file-naming convention and select file compatibility options for the processed files:
For Rename Files, select elements from the pop-up menus or enter text into the fields to be combined into the default names for all files.The fields let you change the order and formatting of the components of the filename. You must include at least one field that is uniquefor every file (for example, file name, serial number, or serial letter) to prevent files from overwriting each other. Starting Serial Numberspecifies the starting number for any serial number fields. If you select Serial Letter from the pop-up menu, serial letter fields always startwith the letter “A” for the first file.
For Compatibility, choose Windows, Mac OS, and UNIX® to make filenames compatible with the Windows, Mac OS, and UNIX operatingsystems.
6. Under Image Size, select Resize Images if you want each processed file resized to a uniform size. Then type in a width and height for thephotos, and choose an option from the Resolution menu. Select Constrain Proportions to keep the width and height proportional.
7. To apply an automatic adjustment to the images, select an option from the Quick Fix panel.
8. To attach a label to the images, choose an option from the Labels menu, then customize the text, text position, font, size, opacity, and color.(To change the text color, click the color swatch and choose a new color from the Color Picker.)
The Watermark option enables you to add a permanent visual watermark to images. For more information, see this article.
9. Select Log Errors That Result From Processing Files to record each error in a file without stopping the process. If errors are logged to a file,a message appears after processing. To review the error file, open with a text editor after the Batch command has run.
10. Click OK to process and save the files.
Close a file
1. Do one of the following in Photoshop Elements:
Choose File > Close.
Choose File > Close All.
2. Choose whether or not to save the file:
Click Yes to save the file.
Click No to close the file without saving it.
Select the Apply to All option, to apply the current action to all the files that are being closed. For example, if you choose Apply to All andclick Yes to save the first file, all other open files are saved and then closed.
Adobe also recommendsImporting your photographs and video into Elements Organizer
52

Twitter™ and Facebook posts are not covered under the terms of Creative Commons.
Legal Notices | Online Privacy Policy
53
File information
To the top
To the top
Note:
To the top
About file information (metadata)View or add file informationUse the Info panelDisplay file information in the Info panel or status barSave or delete metadata templatesUse a saved metadata template
About file information (metadata)
When you take a photo with your digital camera, each image file includes information such as the date and time the photo was taken, the shutterspeed and aperture, the specific camera model, and so on. All of this information is called metadata, and you can view it and add to it in theProperties panel of the Elements Organizer and the File Info dialog box in the Photoshop Elements.
You can add file information, such as a title, keyword tags, and descriptions, to help identify your images as you manage and organize yourcollection. As you edit your images, Photoshop Elements automatically keeps track of the file’s edit history and adds this information to the file’smetadata.
In addition, opened images are automatically scanned for Digimarc watermarks. If a watermark is detected, Photoshop Elements displays acopyright symbol in the image window’s title bar and includes the information in the Copyright Status, Copyright Notice, and Copyright Info URLsections of the File Info dialog box.
You can add visual watermarks to images to indicate them as your own work. Visual watermarks are not tracked in file information. For informationabout how to create visual watermarks, see the following articles:
Adding permanent watermarks to a batch of photos
Create a watermark using text layering
Create a watermark brush
For a video about creating a watermark, see www.adobe.com/go/lrvid927_pse_en.
View or add file information
The File Info dialog box displays camera data, caption, and copyright and authorship information that has been added to the file. Using this dialogbox, you can modify or add information to files saved in Photoshop Elements. The information you add is embedded in the file using XMP(Extensible Metadata Platform). XMP provides Adobe applications and workflow partners with a common XML framework that standardizes thecreation, processing, and interchange of document metadata across publishing workflows. If you have metadata that you repeatedly enter fordifferent files, you can create metadata templates to expedite the adding of information to files.
You cannot edit the information displayed for the Camera Data metadata category.
Tags added to a file in the Photo Browser appear as keywords in the File Info dialog box. Some file formats, such as PDF and BMP, do notsupport tags as keywords.
1. With an image open, choose File > File Info. (You can also right-click a thumbnail in the Photo Bin and choose File Info.)
2. Click the Description tab on the top of the dialog box to display specific information. In Description, you can add or modify the document title,author information, keywords, and copyright information. Type in the appropriate text boxes and click OK to embed the information. Forcopyright status, choose from the Copyright Status drop-down list.
54

To the top
Use the Info panel
In the Expert mode, the Info panel displays file information about an image and shows the color value beneath the pointer. Depending on the toolin use, the Info panel also provides other useful information.
Make sure the Info panel is visible in your work area if you want to view information while dragging in the image.
1. Choose Window > Info (F8) to display the Info panel.
2. Select a tool.
3. Move the pointer into the image, or drag within the image to use the tool. The following information may appear, depending on which toolyou’re using:
The numeric values for the color beneath the pointer
The x- and y-coordinates of the pointer.
The width (W) and height (H) of a marquee or shape as you drag, or the width and height of an active selection.
The x- and y-coordinates of your starting position (when you click in the image).
The change in position along the x-coordinate and y-coordinate as you move a selection, layer, or shape.
The angle (A) of a line or gradient, the change in angle as you move a selection, layer, or shape, or the angle of rotation during atransformation. The change in distance (D) as you move a selection, layer, or shape.
The percentage of change in width (W) and height (H) as you scale a selection, layer, or shape.
The angle of horizontal skew (H) or vertical skew (V) as you skew a selection, layer, or shape.
Set color modes and units of measurement in the Info panel
Do one of the following:
To change the mode of color values displayed, choose a color mode from the pop-up menu. You can also choose Panel Options fromthe More menu in the Info panel, then choose a color mode for First Color Readout and/or Second Color Readout:
Grayscale
Displays the grayscale values beneath the pointer.
RGB Color
Displays the RGB (red, green, blue) values beneath the pointer.
Web Color
Displays the hexadecimal code for the RGB values beneath the pointer.
HSB Color
Displays the HSB (hue, saturation, brightness) values beneath the pointer.
To change the unit of measurement displayed, choose a unit of measurement from the pop-up menu. You can also choose Panel Optionsfrom the More menu in the Info panel. Choose a unit of measurement from the Mouse Coordinates option, and click OK.
Display file information in the Info panel or status bar
You can change the information displayed in the Info panel or the status bar. (The leftmost section of the status bar, which is located at the bottomof the document window, displays the current magnification. The section next to the leftmost one displays information about the current file.)
55
Document Sizes
Document Profile
Document Dimensions
Scratch Sizes
Efficiency
Timing
Current Tool
To the top
To the top
1. In the Info panel, choose Panel Options from the More menu.
2. Select a view option:
Displays information on the amount of data in the image. The number on the left represents the printing size of the image—approximately the size of the saved, flattened file in PSD format. The number on the right indicates the file’s approximate size, includinglayers.
Displays the name of the color profile used by the image.
Displays the size of the image in the currently selected units.
Displays RAM and scratch disk space utilized to process the image. The number on the left indicates the amount of memorycurrently being used by Photoshop Elements to display all open images. The number on the right indicates the amount of RAM available toPhotoshop Elements to process images.
Displays the percentage of time actually spent performing an operation instead of reading from or writing to the scratch disk. Ifthe value is below 100%, Photoshop Elements is using the scratch disk and, therefore, is operating more slowly.
Shows how long it took to complete the last operation.
Shows the name of the active tool.
Save or delete metadata templates
If you have metadata that you repeatedly enter, you can save the metadata entries in metadata templates. The templates can be used for enteringinformation, and they save you the effort of retyping metadata in the File Info dialog box. In the Photo Browser, you can search for metadata tolocate files and photos.
Open the File Info dialog box (File > File Info) and do one of the following:
To save metadata as a template, click the drop-down button in the row of buttons in the File Info dialog box, and select Export. Enter atemplate name, and click Save.
To delete a metadata template, click Show Templates Folder. Browse and select the template you want to delete, and press Delete.
Use a saved metadata template
1. Choose File > File Info, click the drop-down button in the row of buttons in the File Info dialog box, and select Import.
2. Select an import option and click OK.
3. Choose a template from the list of saved metadata templates and click Open.
Adobe also recommendsAbout scratch disks
Find media files by details (metadata)
56

Twitter™ and Facebook posts are not covered under the terms of Creative Commons.
Legal Notices | Online Privacy Policy
57

Scratch disks and plug-ins
To the top
To the top
To the top
About scratch disksChange scratch disksAbout plug-in modulesInstall plug-in modulesSelect an additional plug-ins folderLoad default plug-ins only
About scratch disks
When your system does not have enough RAM to perform an operation, Photoshop Elements uses scratch disks. A scratch disk is any drive orpartition of a drive with free memory. By default, Photoshop Elements uses the hard drive on which the operating system is installed as its primaryscratch disk.
You can change the primary scratch disk, or designate additional scratch disks. When the primary disk is full, additional scratch disks are used. Setyour fastest hard disk as your primary scratch disk. Ensure that the disk has plenty of defragmented space available.
For best performance, use the following guidelines when assigning scratch disks:
Do no create scratch disks on the same physical drive as Photoshop Elements or any large files you are editing.
Do not create scratch disks on the same physical drive as the one used for the operating system’s virtual memory.
Create scratch disks on a local drive, not a network location.
Create scratch disks on conventional (non-removable) media.
RAID disks/disk arrays are good choices for dedicated scratch disk volumes.
Defragment drives with scratch disks regularly. Or better yet, use an empty drive or a drive with plenty of unused space, to avoidfragmentation issues.
Change scratch disks
Photoshop Elements needs contiguous hard drive space to create a scratch disk. Frequently defragmenting your hard drive ensures that there iscontiguous space available, especially the disk containing your scratch disk. Adobe recommends that you use a disk tool utility, such as WindowsDisk Defragmenter, to defragment your hard drive on a regular basis. See your Windows documentation for information on defragmentationutilities.
1. In Windows, choose Edit > Preferences > Performance. In Mac, choose, Photoshop Elements > Preferences > Performance.
2. Select the desired disks from the Scratch Disks listing (you can assign up to four scratch disks).
3. Select a scratch disk and use the arrow keys next to the Scratch Disks list to rearrange the order in which scratch disks will be used.
4. Click OK, and restart Photoshop Elements for the change to take effect.
About plug-in modules
58

Note:
To the top
To the top
Note:
To the top
Adobe Systems and other software developers create plug-ins to add functionality to Photoshop Elements. A number of importing, exporting, andspecial-effects plug-ins come with your program; they are inside the Photoshop Elements plug-ins and optional plug-ins folders.
Once installed, plug-in modules appear as:
Options added to the Import or Export menuFilters added to the Filter menu, or,File formats in the Open and Save As dialog boxes.
If you install a large number of plug-ins, Photoshop Elements may not be able to list them all in their appropriate menus. If so, newly installedplug-ins appear in the Filter > Other submenu. To prevent a plug-in or folder of plug-ins from loading, add a tilde character (~) at the beginning ofthe plug-in name, folder, or directory. The program ignores files marked with a tilde character, while starting. To view information about installedplug-ins, choose Help > About Plug-In and select a plug-in from the submenu.
To use an optional plug-in module, copy the plug-in module from the optional plug-ins folder to the relevant subfolder in the plug-ins folder.Then, install the plug-in module, and relaunch Photoshop Elements.
You can select an additional plug-ins folder in which to load compatible plug-ins stored with another application. You can also create a shortcut fora plug-in stored in another folder on your system. You can then add the shortcut or alias to the plug-ins folder to use that plug-in withPhotoshop Elements.
Install plug-in modules
Do one of the following:
Use the plug-in installer, if provided.
Follow the installation instructions that came with the plug-in module.
Make sure the plug-in files are uncompressed, and then copy them to the appropriate plug-ins folder in the Photoshop Elements folder.
Select an additional plug-ins folder
You can select an additional plug-ins folder in which to load compatible plug-ins stored with another application.
1. In Windows, choose Edit > Preferences > Plug-Ins. In Mac, choose Photoshop Elements > Preferences > Plug-Ins.
2. In the Preferences dialog, select Additional Plug-Ins Folder, select a folder from the list, and click Choose.
3. To display the contents of a folder, double-click the directory. The path to the folder appears in the preferences window.
Do not select a location inside the plug-ins folder for Photoshop Elements.
4. Restart Photoshop Elements to load the plug-ins.
Load default plug-ins only
When Photoshop Elements starts, all plug-ins that are pre-installed, third-party, or located in additional plugins-folders, are loaded. To load onlythe preinstalled plug-ins Photoshop Elements was shipped with, press and hold the Shift key while starting the software. When asked, click yes onthe dialog that requests confirmation to skip loading optional and third-party plug-ins.
59

Twitter™ and Facebook posts are not covered under the terms of Creative Commons.
Legal Notices | Online Privacy Policy
60

Editing photos
61

Adjusting color, saturation, and hue
To the top
Adjust saturation and hueAdjust the color of skin toneAdjust saturation in isolated areasChange the color of an objectPrecisely convert to black and whiteAutomatically convert to black and whiteAdd custom presets for black and white conversionAdd color to a grayscale image
Adjust saturation and hue
The Hue/Saturation command adjusts the hue (color), saturation (purity), and lightness of the entire image or of individual color components inan image.
Use the Hue slider to add special effects, to color a black and white image (like a sepia effect), or to change the range of colors in a portion ofan image.
Changing colors in an image using the Hue/Saturation command A. Original B. Entire image changed to sepia using the Colorize option C. Magenta colors targeted in the Edit menu and changed using the Hueslider
Use the Saturation slider to make colors more vivid or more muted. For example, you could add a color punch to a landscape by saturating thecolors in it. Or, tone down a distracting color, like a vivid red sweater in a portrait.
Before and after adjusting color saturation
Use the Lightness slider with the other adjustments to lighten or darken a portion of an image. Take care not to use it on an entire image—thisadjustment reduces the overall tonal range.
Change color saturation or hue
62

1. Do one of the following:
Choose Enhance > Adjust Color > Adjust Hue/Saturation.
Choose Layer > New Adjustment Layer > Hue/Saturation, or open an existing Hue/Saturation adjustment layer.
The two color bars in the dialog box represent the colors in their order on the color wheel. The upper bar shows the color before theadjustment; the lower bar shows how the adjustment affects all hues at full saturation.
2. In the Edit drop-down menu, choose which colors to adjust:
Choose Master to adjust all colors at once.
Choose one of the other preset color ranges listed for the color you want to adjust. An adjustment slider appears between the colorbars, which you can use to edit any range of hues.
3. For Hue, enter a value or drag the slider until the colors appear as you want.
The values displayed in the text box reflect the number of degrees of rotation around the color wheel from the pixel’s original color. Apositive value indicates clockwise rotation, a negative value counterclockwise rotation. Values range from -180 to +180.
4. For Saturation, enter a value or drag the slider to the right to increase the saturation or to the left to decrease it. Values range from -100 to+100.
5. For Lightness, enter a value or drag the slider to the right to increase the lightness or to the left to decrease it. Values range from -100 to+100. Be careful when using this slider on an entire image. It will reduce the tonal range of the overall image.
6. Click OK. Or, to cancel your changes and start over, hold down Alt (Option in Mac OS), and click Reset.
Modify the range of Hue/Saturation sliders
1. Do one of the following:
Choose Enhance > Adjust Color > Adjust Hue/Saturation.
Choose Layer > New Adjustment Layer > Hue/Saturation, or open an existing Hue/Saturation adjustment layer.
2. Choose an individual color from the Edit menu.
3. Do any of the following to the adjustment slider:
Drag one of the triangles to adjust the amount of color fall-off without affecting the range.
Drag one of the gray bars to adjust the range without affecting the amount of color fall-off.
Drag the gray center part to move the entire adjustment slider, selecting a different color area.
63

Note:
To the top
Drag one of the vertical white bars next to the dark gray center part to adjust the range of the color component. Increasing the rangedecreases the color fall-off, and vice versa.
To move the color bar and the adjustment slider bar together, Ctrl-drag (Command-drag in Mac OS) the color bar.
Adjustment slider A. Adjusts color fall-off without affecting range B. Adjusts range without affecting color fall-off C. Adjusts the range of color component D.Moves entire slider
If you modify the adjustment slider so that it falls into a different color range, the name changes to reflect this. For example, if youchoose Yellow and alter its range so that it falls in the red part of the color bar, the name changes to Red 2. You can convert up to sixof the individual color ranges to varieties of the same color range (for example, Red 1 through Red 6).
By default, the color range selected when you choose a color component is 30° wide, with 30° color fall-off on either side. Settingthe fall-off too low can produce banding in the image.
4. To edit the range by choosing colors from the image, select the color picker, and click the image. Use the color picker tool to add to therange; use the color picker - tool to subtract from the range.
While the color picker tool is selected, you can also press Shift to add to the range or press Alt (Option in Mac OS) to subtract from it.
Adjust the color of skin tone
The Adjust Color For Skin Tone command adjusts the overall color in a photo to bring out more natural skin tones. When you click an area ofskin in the photo, Photoshop Elements adjusts the skin tone—as well as all other colors in the photo. You can manually adjust the brown andred colors separately to achieve the final color you want.
Original (top), and after adjusting skin tone (bottom)
1. Open the photo and select the layer that needs correction.
64

Note:
Tan
Blush
Temperature
To the top
Mode
Brush
Size
Flow
2. Choose Enhance > Adjust Color > Adjust Color For Skin Tone.
3. Click an area of skin.
Photoshop Elements automatically adjusts the colors in the image. Changes might be subtle.
Make sure Preview is selected so that you can see the color changes as they occur.
4. (Optional) Drag any of the following sliders to fine-tune the correction:
Increases or decreases the level of brown in skin tones.
Increases or decreases the level of red in skin tones.
Changes the overall color of skin tones.
5. When you’re finished, click OK. Or, to cancel your changes and start over, click Reset.
Adjust saturation in isolated areas
The Sponge tool changes the color saturation of an area.
Increasing saturation by scrubbing with the Sponge tool
1. Select the Sponge tool.
2. Set tool options in the options bar:
Increases or decreases color saturation. Choose Saturate to intensify the color’s saturation. In grayscale, Saturate increasescontrast. Choose Desaturate to dilute the color’s saturation. In grayscale, Desaturate decreases contrast.
Sets the brush tip. Click the arrow next to the brush sample, choose a brush category from the Brushes pop-up menu, and thenselect a brush thumbnail.
Sets the size of the brush, in pixels. Drag the Size slider or enter a size in the text box.
Sets the rate of saturation change. Drag the Flow pop-up slider or enter a value in the text box.
65

To the top
Selection
Image
To the top
3. Drag over the part of the image you want to modify.
Change the color of an object
The Replace Color command replaces a specific color in an image. You can set the hue, saturation, and lightness of the replacement color.
1. Choose Enhance > Adjust Color > Replace Color.
2. Select a display option under the image thumbnail:
Displays the mask, which looks like a black and white version of the image, in the preview box.
Displays the image in the preview box. This option is useful when you are working with a magnified image or have limited screenspace.
3. Click the color picker button, and then click the color you want to change in the image or in the preview box. Use the color picker + tool toadd colors, or use the color picker - tool to remove colors to keep them from changing.
4. Drag the Fuzziness slider to control the degree to which related colors are included in the selection.
5. Do one of the following to specify a new color:
Drag the Hue, Saturation, and Lightness sliders (or enter values in the text boxes).
Click the Results box and specify a new color in the Color Picker, then click OK.
6. To cancel your changes and start over, hold down Alt (Option in Mac OS), and click Reset.
Precisely convert to black and white
For a video about this process, see www.adobe.com/go/lrvid2325_pse9_en.
The Convert To Black And White command lets you choose a specific conversion style to be applied to the image. This is unlike the RemoveColor command, which automatically converts to black and white for you.
In the Convert To Black And White dialog box, the available image styles help you compare and choose from different conversion presets.Select a style and then use the available sliders to fine-tune the conversion.
66
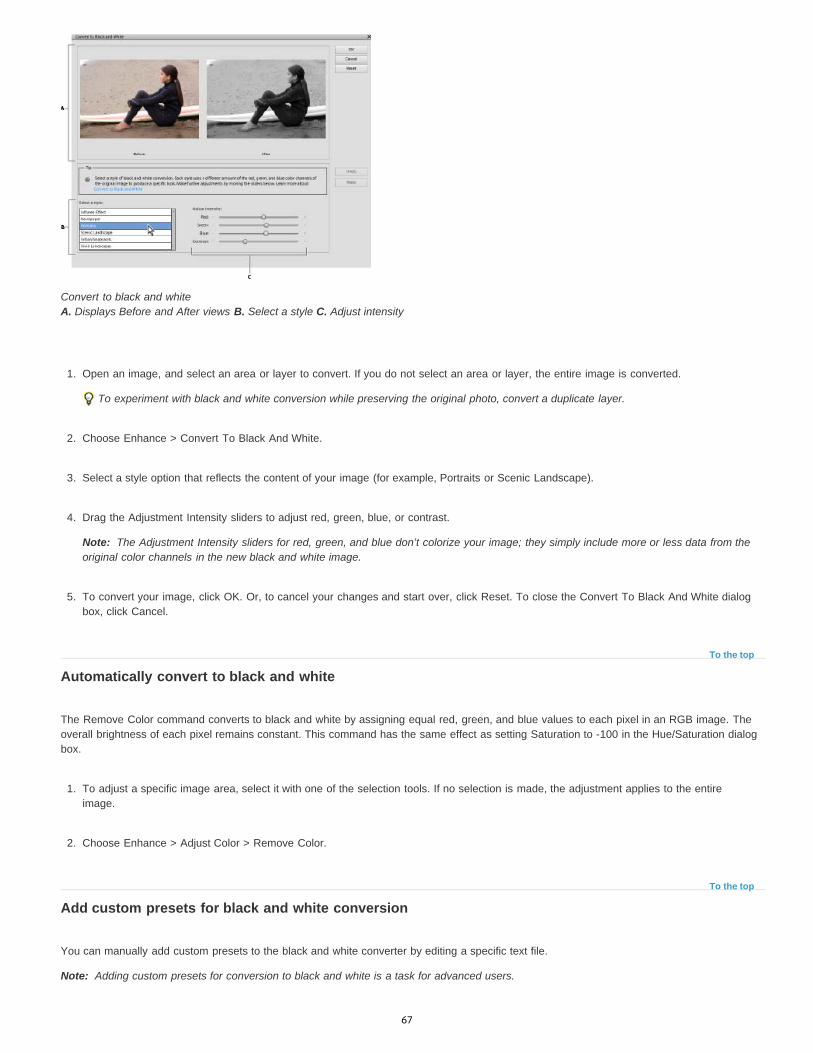
Note:
To the top
To the top
Note:
Convert to black and white A. Displays Before and After views B. Select a style C. Adjust intensity
1. Open an image, and select an area or layer to convert. If you do not select an area or layer, the entire image is converted.
To experiment with black and white conversion while preserving the original photo, convert a duplicate layer.
2. Choose Enhance > Convert To Black And White.
3. Select a style option that reflects the content of your image (for example, Portraits or Scenic Landscape).
4. Drag the Adjustment Intensity sliders to adjust red, green, blue, or contrast.
The Adjustment Intensity sliders for red, green, and blue don’t colorize your image; they simply include more or less data from theoriginal color channels in the new black and white image.
5. To convert your image, click OK. Or, to cancel your changes and start over, click Reset. To close the Convert To Black And White dialogbox, click Cancel.
Automatically convert to black and white
The Remove Color command converts to black and white by assigning equal red, green, and blue values to each pixel in an RGB image. Theoverall brightness of each pixel remains constant. This command has the same effect as setting Saturation to -100 in the Hue/Saturation dialogbox.
1. To adjust a specific image area, select it with one of the selection tools. If no selection is made, the adjustment applies to the entireimage.
2. Choose Enhance > Adjust Color > Remove Color.
Add custom presets for black and white conversion
You can manually add custom presets to the black and white converter by editing a specific text file.
Adding custom presets for conversion to black and white is a task for advanced users.
67

Twitter™ and Facebook posts are not covered under the terms of Creative Commons.
Legal Notices | Online Privacy Policy
To the top
Note:
1. Close the Photoshop Elements, and navigate to the folder that contains the bwconvert.txt file.
In Windows, [Photoshop Elements 11 installation directory]\Required\bwconvert.txt
In Mac, /Applications/Adobe Photoshop Elements/Support Files/Adobe Photoshop ElementsEditor.app/Contents/Required/bwconvert.txt. Command-click Adobe Photoshop Elements and select Show PackageContents. Navigate to the folder Contents/Required.
2. Open the bwconvert.txt file in a plain text editor (such as Notepad).
3. Following the same naming convention as the presets already in the file, add your new preset and give it a unique name.
4. Save the file (keeping the original filename).
5. Start the Photoshop Elements and choose Enhance > Convert To Black And White to view the presets.
Add color to a grayscale image
You can colorize an entire grayscale image, or select areas to colorize with different colors. For example, you can select a person’s hair andcolor it brown, and then add pink to the person’s cheeks after making another selection.
If the image you are coloring is in grayscale mode, convert it into RGB by choosing Image > Mode > RGB Color.
1. Choose Enhance > Adjust Color > Adjust Hue/Saturation, or Layer > New Adjustment Layer > Hue/Saturation to work on an adjustmentlayer.
2. Select Colorize. If the foreground color isn’t black or white, Photoshop Elements converts the image into the hue of the current foregroundcolor. The lightness value of each pixel does not change.
3. Use the Hue slider to select a new color if desired. Use the Saturation slider to adjust the saturation. Then click OK.
68
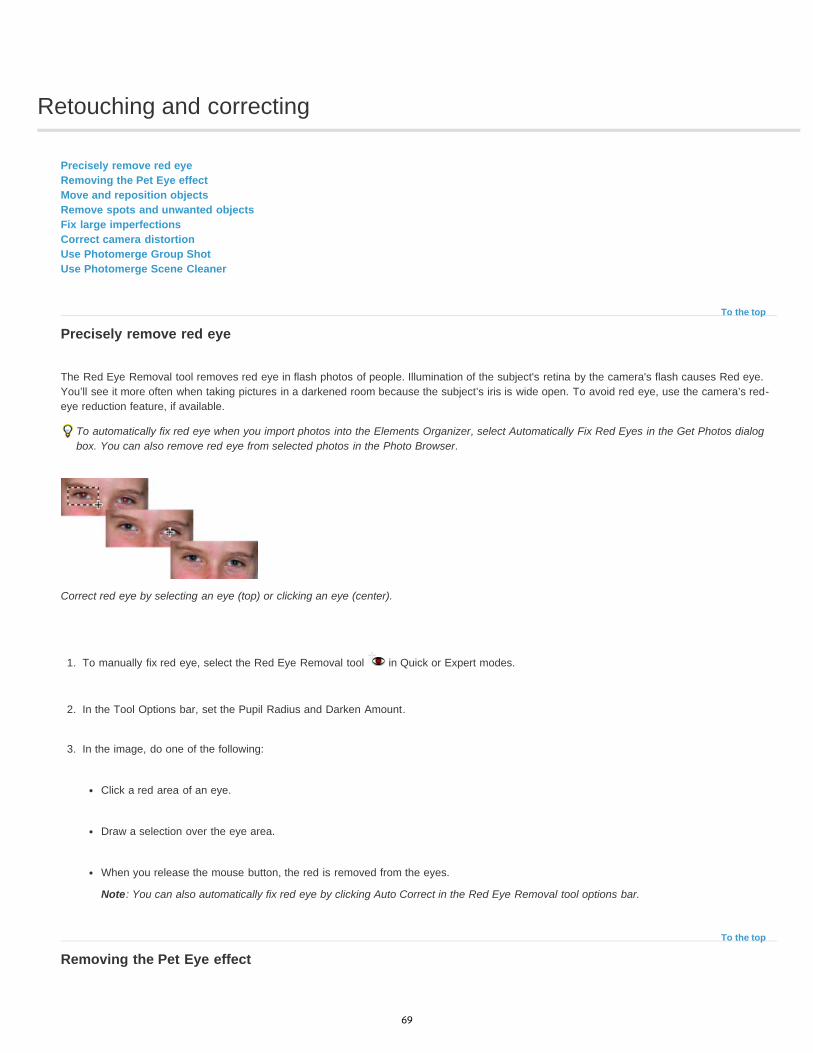
Retouching and correcting
To the top
To the top
Precisely remove red eyeRemoving the Pet Eye effectMove and reposition objects Remove spots and unwanted objectsFix large imperfectionsCorrect camera distortionUse Photomerge Group ShotUse Photomerge Scene Cleaner
Precisely remove red eye
The Red Eye Removal tool removes red eye in flash photos of people. Illumination of the subject's retina by the camera's flash causes Red eye.You’ll see it more often when taking pictures in a darkened room because the subject’s iris is wide open. To avoid red eye, use the camera’s red-eye reduction feature, if available.
To automatically fix red eye when you import photos into the Elements Organizer, select Automatically Fix Red Eyes in the Get Photos dialogbox. You can also remove red eye from selected photos in the Photo Browser.
Correct red eye by selecting an eye (top) or clicking an eye (center).
1. To manually fix red eye, select the Red Eye Removal tool in Quick or Expert modes.
2. In the Tool Options bar, set the Pupil Radius and Darken Amount.
3. In the image, do one of the following:
Click a red area of an eye.
Draw a selection over the eye area.
When you release the mouse button, the red is removed from the eyes.
Note: You can also automatically fix red eye by clicking Auto Correct in the Red Eye Removal tool options bar.
Removing the Pet Eye effect
69

Note:
To the top
The red-eye removal tool enables you to remove the reddish glow in the eyes, due to reflection of light (resulting from low ambient light or the useof a flash). For animals, the eyes glow white, green, red, or yellow, and the often-used red-eye removal tools may not fix the effect correctly.
Golden retriever with the pet eye effect (left), and after applying the Pet Eye tool (right)
To fix the Pet Eye effect:
1. In the Quick or Expert mode, select the Red Eye Removal Tool.
2. In the Tool Options bar, select the Pet Eye checkbox.
3. Do one of the following using a mouse:
Draw a rectangle around the eye regionClick on the eye in the picture
When you select the Pet Eye checkbox, the Auto Correct button is disabled.
Move and reposition objects
The Content-Aware Move tool allows you to select an object in your photograph and move the selection to a different location, or extend it.
70

Move
Extend
New
Add
Subtract
Intersect
(left)The original photograph(middle)The kite has been positioned closer to the ground(right)The kite has been moved higher into the sky
1. Select the Content-Aware Move tool .
2. Choose a mode, to specify whether you want to move an object, or if you want to create a copy of the object.
Enables you to move objects to a different location in the image.
Enables you to replicate the object multiple times.
3. Choose the type of selection you want to make:
Drag your mouse around the object you want to move or extend, to create a new selection
Any selection you make adds to the previous selection
When you make a new selection over an existing selection, the overlapping portion is removed from the resulting selection.
When you make a new selection over an existing selection, only the common area overlapping the new and old selectioncontinues to be selected.
4. Drag the mouse pointer ( ) over the image, select the object you want to move or extend.
71
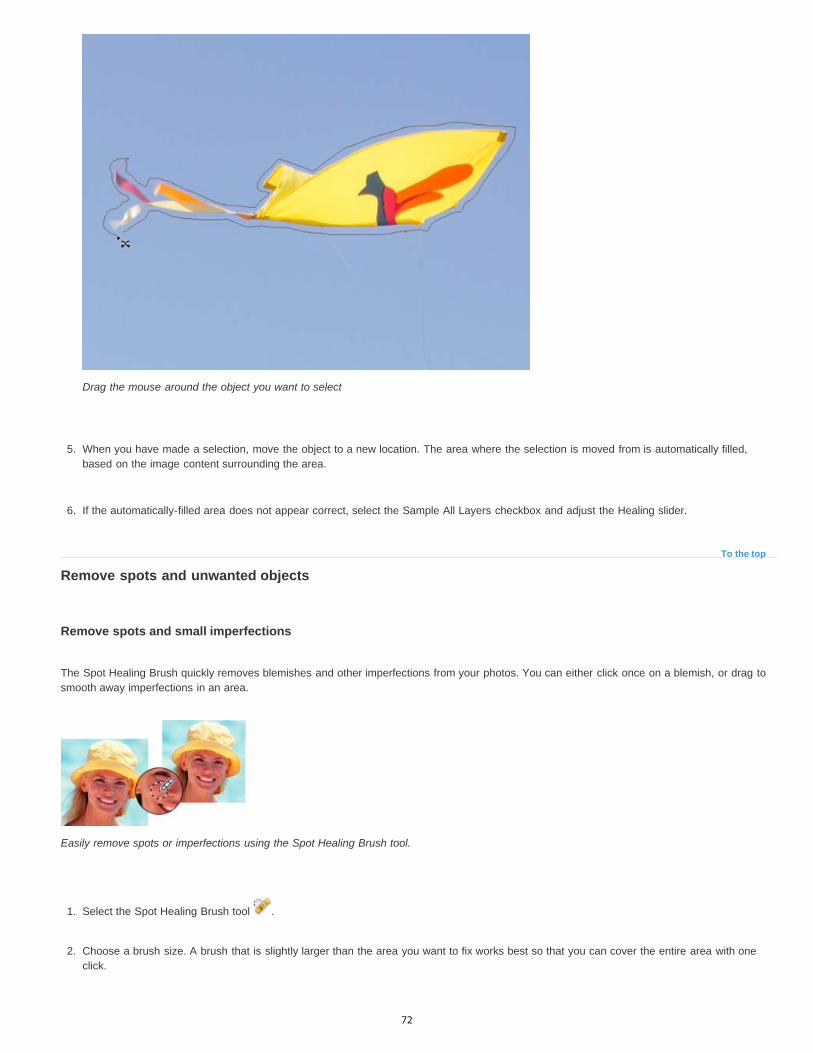
To the top
Drag the mouse around the object you want to select
5. When you have made a selection, move the object to a new location. The area where the selection is moved from is automatically filled,based on the image content surrounding the area.
6. If the automatically-filled area does not appear correct, select the Sample All Layers checkbox and adjust the Healing slider.
Remove spots and unwanted objects
Remove spots and small imperfections
The Spot Healing Brush quickly removes blemishes and other imperfections from your photos. You can either click once on a blemish, or drag tosmooth away imperfections in an area.
Easily remove spots or imperfections using the Spot Healing Brush tool.
1. Select the Spot Healing Brush tool .
2. Choose a brush size. A brush that is slightly larger than the area you want to fix works best so that you can cover the entire area with oneclick.
72

Proximity Match
Create Texture
To the top
3. Choose one of the following Type options in the Tool Options bar.
Uses the pixels around the edge of the selection to find an image area to use as a patch for the selected area. If thisoption doesn’t provide a satisfactory fix, choose Edit > Undo, and try the Create Texture option.
Uses all the pixels in the selection to create a texture with which to fix the area. If the texture doesn’t work, try draggingthrough the area a second time.
note: Click Sample All Layers to apply your change to all layers of the image.
4. Click the area you want to fix in the image, or click and drag over a larger area.
Remove unwanted objects with content-aware healing
You can remove unwanted objects or figures from your photos without destroying the photos. Using the Content-Aware option with the SpotHealing Brush tool, you can remove selected objects constructively from one photo. Photoshop Elements compares nearby image content toseamlessly fill the selection, realistically maintaining key details such as shadows and object edges.
Image before and after an unwanted object (the brush) is removed with content-aware fill
To remove an unwanted object:
1. Select the Spot Healing Brush tool.
2. Select Content-Aware in the Tool Options bar.
3. Paint over the object that you want to remove from the image.
Spot healing works best on small objects. If the image you're working on is large and has a large unwanted object, make sure that you work withhigh-end machine configuration. If you experience problems with large images, try the following approaches:
Draw smaller brush strokes at a time.Downsample the image.Increase the RAM allocated and relaunch the application.
Fix large imperfections
The Healing Brush fixes large areas of imperfections when you drag over them. You can remove objects from a uniform background, such as anobject in a field of grass.
73

Mode
Source
Aligned
Sample All Layers
Note:
To the top
Before and after using Healing Brush.
1. Select the Healing Brush tool .
2. Choose a brush size from the Tool Options bar and set healing brush options:
Determines how the source or pattern blends with existing pixels. Normal mode lays new pixels over the original pixels. Replacemode preserves film grain and texture at the edges of the brush stroke.
Sets the source to use for repairing pixels. Sampled uses pixels from the current image. Pattern uses pixels from the pattern youspecify in the Pattern panel.
Samples pixels continuously without losing the current sampling point, even if you release the mouse button. Deselect Aligned tocontinue using the sampled pixels from the initial sampling point each time you stop and resume painting.
Choose Sample All Layers to sample data from the current layer, the current layer and below, or all visible layers.
3. Position the pointer in any open image and press Alt (Option in Mac OS) click to sample data.
If you are sampling from one image and applying to another, both images must be in the same color mode unless one of the imagesis in Grayscale mode.
4. Drag the image over the flaw to meld existing data with sampled data. The sampled pixels meld with the existing pixels each time yourelease the mouse button.
If there is a strong contrast at the edges of the area you want to heal, make a selection before you use the Healing Brush tool. Make theselection bigger than the area you want to heal but precisely follow the boundary of contrasting pixels. When you paint with the HealingBrush tool, the selection prevents colors from bleeding in from the outside.
Correct camera distortion
The Correct Camera Distortion dialog box enables you to fix common lens distortion problems, like darkened edges due to lens faults or improperlens shading. For example, in a picture of the sky taken in low light, the corners of the image are darker than the center. Changing the vignetteamount and midtone settings fixes the distortion.
Adjust distortions due to vertical or horizontal camera tilt by using the perspective controls. Rotate an image or fix image perspective to adjustdistortions. Correct Camera Distortion filter’s image grid helps make easy and accurate adjustments.
74
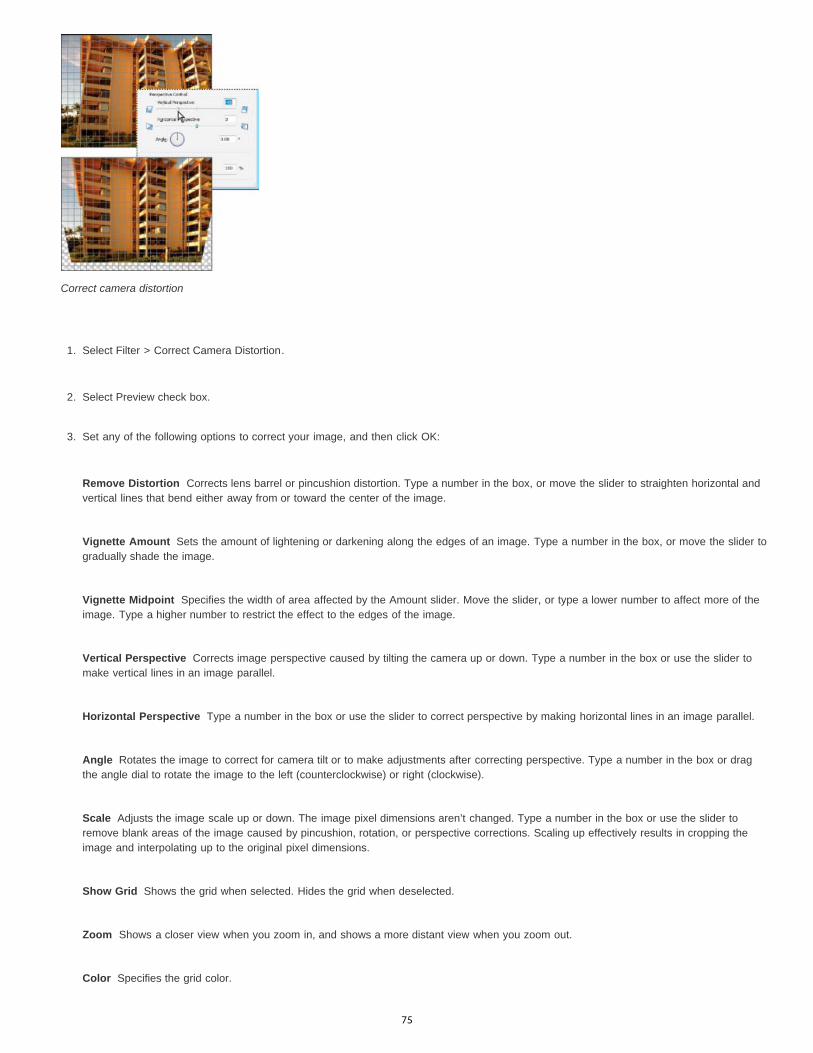
Remove Distortion
Vignette Amount
Vignette Midpoint
Vertical Perspective
Horizontal Perspective
Angle
Scale
Show Grid
Zoom
Color
Correct camera distortion
1. Select Filter > Correct Camera Distortion.
2. Select Preview check box.
3. Set any of the following options to correct your image, and then click OK:
Corrects lens barrel or pincushion distortion. Type a number in the box, or move the slider to straighten horizontal andvertical lines that bend either away from or toward the center of the image.
Sets the amount of lightening or darkening along the edges of an image. Type a number in the box, or move the slider togradually shade the image.
Specifies the width of area affected by the Amount slider. Move the slider, or type a lower number to affect more of theimage. Type a higher number to restrict the effect to the edges of the image.
Corrects image perspective caused by tilting the camera up or down. Type a number in the box or use the slider tomake vertical lines in an image parallel.
Type a number in the box or use the slider to correct perspective by making horizontal lines in an image parallel.
Rotates the image to correct for camera tilt or to make adjustments after correcting perspective. Type a number in the box or dragthe angle dial to rotate the image to the left (counterclockwise) or right (clockwise).
Adjusts the image scale up or down. The image pixel dimensions aren’t changed. Type a number in the box or use the slider toremove blank areas of the image caused by pincushion, rotation, or perspective corrections. Scaling up effectively results in cropping theimage and interpolating up to the original pixel dimensions.
Shows the grid when selected. Hides the grid when deselected.
Shows a closer view when you zoom in, and shows a more distant view when you zoom out.
Specifies the grid color.
75
To the top
Note:
Show Strokes
Show Regions
Advanced Options
Alignment Tool
Pixel Blending
Use Photomerge Group Shot
For a video about Photomerge features, see www.adobe.com/go/lrvid2342_pse9_en.
Use Photomerge Group Shot to create the perfect group photo from multiple photos.
For best results, pick the multiple images used to create a Photomerge Group Shot from the same photo session.
1. Do one of the following to select the group photos you want to use as source images for the Photomerge Group Shot:
In Elements Organizer, select the photos.
In Photoshop Elements, open the photos.
2. Choose Enhance > Photomerge > Photomerge Group Shot.
3. Select the best group photo, and drag it from the Photo Bin to the Final window.
4. Click other photos in the Photo Bin (color coded to help you keep track). Use the Pencil tool to mark over the areas that you want to mergeinto the final photo. To fine-tune the final image, use the Pencil tool to add additional content, or the Eraser tool to remove content.
5. Set any of the following:
Click this option to show the Pencil strokes you marked in the source image.
Click this option to reveal the selected regions in the final image.
Expand or collapse this arrow for Advanced Options.
To correct the alignment of multiple photos, click the Alignment Tool, place three markers in the source image and threemarkers in the final image, then click Align Photos.
Note: Photomerge Group Shot uses auto alignment. Use the Alignment Tool only if the automatic alignment didn’t produce the expectedresult.
Click this option to blend pixels.
6. Click Reset to start the process over, Done to complete the Photomerge Group Shot, or Cancel to close Photomerge Group Shot.
76

To the top
Note:
Photomerge Group Shot window
Use Photomerge Scene Cleaner
Use Photomerge Scene Cleaner to create the perfect scenic photo from multiple photos. For example, you can eliminate unwanted elements liketourists that inadvertently wandered into the scenery.
For best results, use images from the same scene taken from the same angle.
1. Do one of the following to select 2 - 10 photos you want to use for the Photomerge Scene Cleaner:
In the Elements Organizer, select the photos.
In Photoshop Elements, open the photos.
2. Choose Enhance > Photomerge > Photomerge Scene Cleaner.
77

Show Strokes
Show Regions
Alignment Tool
Pixel Blending
3. Select the best photo and then drag it from the Photo Bin to the Final window.
This photo becomes the base image for the final photo.
4. Click a photo in the Photo Bin (color-coded to help you keep track).
It appears in the Source window.
5. Do any of the following to add or remove areas from the Final window:
To remove an area, use the Pencil tool to mark the area in the Final window.
To add an area to the Final window, use the Pencil tool to mark the area in the Source window.
To fine-tune the final image, use the Pencil tool to add additional content or the Eraser tool to remove content.
6. (Optional) Select one of the following:
Shows your Pencil strokes in the source image.
Reveals the selected regions in the final image.
7. (Optional) If there’s a problem with the photos aligning properly, click the Advanced Options arrow to access the following:
Corrects the alignment of the multiple photos. Click the Alignment Tool to place three markers in the source image andthree markers in the final image. Drag markers to similar areas in each photo and then click Align Photos.
note: Photomerge Scene Cleaner uses auto alignment. The Alignment Tool should only be used if the automatic alignment didn’t producethe result you want.
Blends pixels using different options. Experiment to see whether this option improves the photo or not.
8. (Optional) Select other photos in the Photo Bin for use in the Source window and repeat step 5.
9. Click Reset to start the process over, Done to complete the Photomerge Scene Cleaner, or Cancel to close Photomerge Scene Cleaner.
Photomerge Scene Cleaner A. Dragging a photo to the Final window B. Using the Pencil tool to the mark area to be replaced in the Final window C. Result in the Finalwindow
78

Twitter™ and Facebook posts are not covered under the terms of Creative Commons.
Legal Notices | Online Privacy Policy
79

Enhancing
To the top
Brush
Size
Mode
Strength
Sample All Layers
To the top
Blur or soften edgesReplace colors in an imageClone images or areas in an imagePhotomerge FacesPhotomerge ExposurePhotomerge Style Match
Blur or soften edges
The Blur tool softens hard edges or areas in an image by reducing detail. Blurring a busy background can bring your target images more intofocus. You can also use Blur filters for this purpose.
Original photo (left), and photo after blurring the background (right).
1. Select the Blur tool.
2. Set options in the options bar:
Sets the brush tip, from the brush popup menu. For more brush shapes, click the Brush drop-down inside the popup, and thenselect a brush thumbnail.
Sets the size of the brush, in pixels. Drag the Size slider, or enter a size in the text box.
Specifies how the pixels you blur blend into other pixels in the image.
Specifies the amount of blur that occurs with each stroke.
Blurs all visible layers. If this is deselected, the tool blurs only the active layer.
3. Drag over the part of the image you want to blur.
Replace colors in an image
The Color Replacement tool simplifies replacing specific colors in your image. You can paint over a targeted color—for example, a yellow flowerin an image—with a different color, like red. You can also use the Color Replacement tool to correct colors.
80
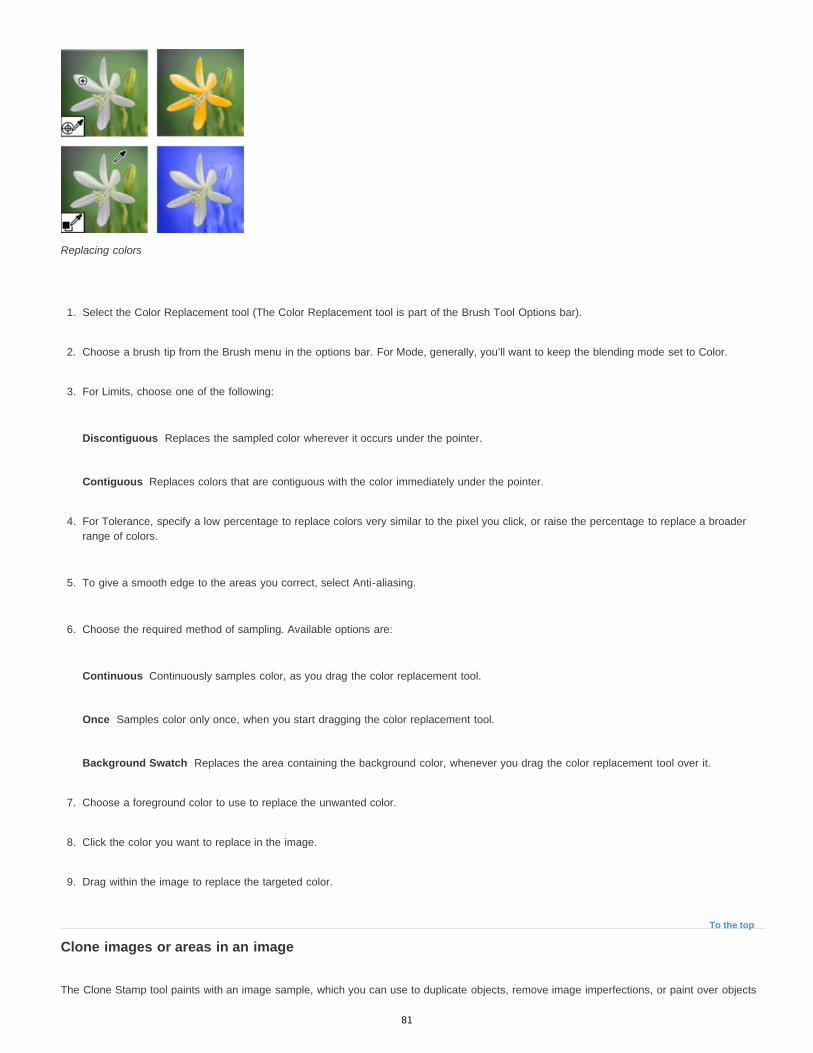
Discontiguous
Contiguous
Continuous
Once
Background Swatch
To the top
Replacing colors
1. Select the Color Replacement tool (The Color Replacement tool is part of the Brush Tool Options bar).
2. Choose a brush tip from the Brush menu in the options bar. For Mode, generally, you’ll want to keep the blending mode set to Color.
3. For Limits, choose one of the following:
Replaces the sampled color wherever it occurs under the pointer.
Replaces colors that are contiguous with the color immediately under the pointer.
4. For Tolerance, specify a low percentage to replace colors very similar to the pixel you click, or raise the percentage to replace a broaderrange of colors.
5. To give a smooth edge to the areas you correct, select Anti-aliasing.
6. Choose the required method of sampling. Available options are:
Continuously samples color, as you drag the color replacement tool.
Samples color only once, when you start dragging the color replacement tool.
Replaces the area containing the background color, whenever you drag the color replacement tool over it.
7. Choose a foreground color to use to replace the unwanted color.
8. Click the color you want to replace in the image.
9. Drag within the image to replace the targeted color.
Clone images or areas in an image
The Clone Stamp tool paints with an image sample, which you can use to duplicate objects, remove image imperfections, or paint over objects
81

Brush
Sample All Layers
Opacity
Size
Mode
Aligned
Show Overlay
Opacity
in your photo.
Original photo (top), after adding two starfish with the Clone Stamp tool (center), and after removing a person with the Clone Stamp tool(bottom).
1. Select the Clone Stamp tool.
2. (Optional) Set options in the options bar:
Sets the brush tip. Click the arrow next to the brush sample, choose a brush category from the Brushes pop-up menu, and thenselect a brush thumbnail.
To sample (copy) data from all visible layers, select Sample All Layers. To sample data from only the active layer,deselect this option.
Sets the opacity of the paint you apply. A low opacity setting allows pixels under a paint stroke to show through. Drag the slider,or enter an opacity value.
Sets the size of the brush in pixels. Drag the Size slider, or enter a size in the text box.
Determines how the source or pattern blends with existing pixels. Normal mode lays new pixels over the original pixels.
Moves the sampled area with the cursor as you begin to paint, regardless of how many times you stop and resume painting.Selecting this option is useful when you want to eliminate unwanted areas, such as a telephone line across the skyline or a rip in ascanned photo. If Aligned is deselected, the Clone Stamp tool applies the sampled area from the initial sampling point each time you stopand resume painting. Deselecting this option is useful for applying multiple copies of the same part of an image to different areas withinthe same image or to another image.
3. Click Clone Overlay, and set the following options:
Select show Overlay for the overlay to be visible inside brush size.
To set the opacity of the overlay, enter a percentage value in the Opacity text box.
82

Clipped
Auto Hide
Invert Overlay
To the top
Show Strokes
Show Regions
To clip overlay to the brush size, enable the Clipped option.
To hide the overlay while you apply the paint strokes, select Auto Hide.
To invert the colors in the overlay, select Invert.
4. Position the pointer on the part of any open image you want to sample, and press Alt (Option in Mac OS) and click. The tool duplicatesthe pixels at this sample point in your image as you paint.
5. Drag or click to paint with the tool.
Photomerge Faces
For a video about Photomerge features, see www.adobe.com/go/lrvid2342_pse9_en.
Use Photomerge Faces to combine multiple facial features to create one composite face.
1. Do one of the following to select the face images you want to use as source images for Photomerge Faces:
In Elements Organizer, select the face image photos.
Open the face image photos.
2. Choose Enhance > Photomerge > Photomerge Faces.
3. Pick a face photo as your base image, and drag it from the Photo Bin to the Final window.
4. Click another image in the Photo Bin, and click the Alignment tool. Place the three alignment markers on the eyes and mouth on thesource image and the final image, and click Align Photos.
5. Click other photos in the Photo Bin (color coded to help you keep track). Use the Pencil tool to mark the areas that you would like tomerge into the final photo. To fine-tune the final image, use the Pencil tool to add additional content, or the Eraser tool to remove content.
6. Set the following:
Click this option to show the Pencil strokes you marked in the source image.
Click this option to reveal the selected regions in the final image.
7. Click Reset to start the process over, Done to complete the Photomerge Faces, or Cancel to close Photomerge Faces.
83
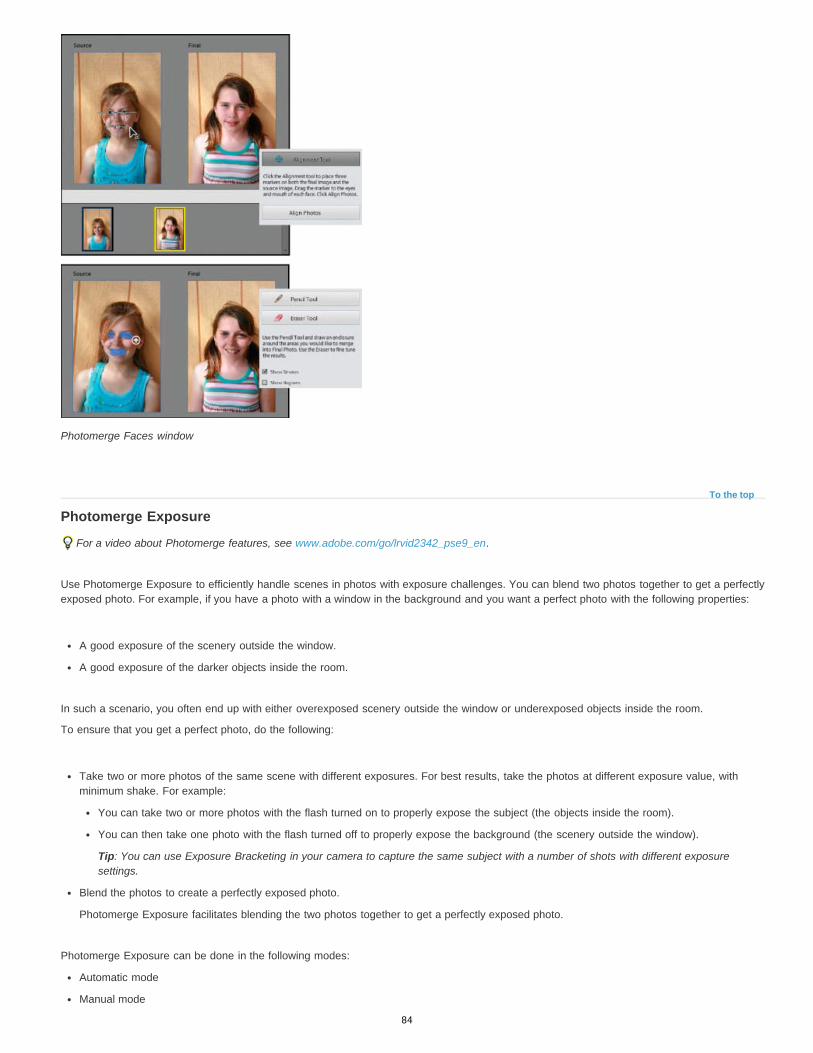
To the top
Photomerge Faces window
Photomerge Exposure
For a video about Photomerge features, see www.adobe.com/go/lrvid2342_pse9_en.
Use Photomerge Exposure to efficiently handle scenes in photos with exposure challenges. You can blend two photos together to get a perfectlyexposed photo. For example, if you have a photo with a window in the background and you want a perfect photo with the following properties:
A good exposure of the scenery outside the window.
A good exposure of the darker objects inside the room.
In such a scenario, you often end up with either overexposed scenery outside the window or underexposed objects inside the room.
To ensure that you get a perfect photo, do the following:
Take two or more photos of the same scene with different exposures. For best results, take the photos at different exposure value, withminimum shake. For example:
You can take two or more photos with the flash turned on to properly expose the subject (the objects inside the room).
You can then take one photo with the flash turned off to properly expose the background (the scenery outside the window).
Tip: You can use Exposure Bracketing in your camera to capture the same subject with a number of shots with different exposuresettings.
Blend the photos to create a perfectly exposed photo.
Photomerge Exposure facilitates blending the two photos together to get a perfectly exposed photo.
Photomerge Exposure can be done in the following modes:
Automatic mode
Manual mode
84

Simple Blending
Smart Blending
Highlight
Shadows
To obtain best results while using the Automatic mode, use photos that are shot at different exposure values, using Exposure Bracketing. Toobtain best results while using the manual mode, use photos shot with flash turned on and flash turned off.
Photomerge Exposure
Automatic Photomerge Exposure
You can select the required photos from Elements Organizer, and select and deselect the photos through the Photo Bin.
1. Do one of the following:
In Elements Organizer, select a minimum of two and a maximum of ten photos, and select Enhance > Photomerge > PhotomergeExposure.
Open the required files using File > Open.
a. i. Select Show Open Files In The Photo Bin to view all the opened files.
ii. Select a minimum of two and a maximum of ten photos from the Photo Bin.
iii. Select Enhance > Photomerge > Photomerge Exposure.
Photoshop Elements displays the selected photos.
2. In the Photomerge panel, select Automatic.
3. Select one of the following options:
This option does not allow you to change the Photomerge Exposure settings. Selecting this option displays the mergedphoto.
Selecting this option enables you to adjust the settings using the sliders. You can view the final photo based on thesettings you provide. You can adjust the following settings:
Enables you to increase or decrease the details that are in the highlight.
Enables you to lighten or darken the shadows.
85

Saturation
Note:
Show Strokes
Show Regions
Note:
To the top
Enables you to change the intensity of the color.
4. After you get the desired result, click Done to complete Photomerge Exposure.
Manual Photomerge Exposure
For Photomerge Exposure, if you are using photos that have been taken with your flash on, then manual Photomerge Exposure is thedefault mode.
1. Do one of the following:
In Elements Organizer, select a minimum of two and a maximum of ten photos and select Enhance > Photomerge > PhotomergeExposure.
Open the required files using File > Open.
a. i. Select Show Open Files In The Photo Bin to view all the opened files.
ii. Select a minimum of two and a maximum of ten photos from the Photo Bin.
iii. Select Enhance > Photomerge > Photomerge Exposure.
Photoshop Elements displays the selected photos.
2. In the Photomerge panel, select Manual.
The first image in the Photo Bin is displayed as the source photo. You can select an image from the Photo Bin as the final photo.
3. Set the following:
Click to show your Pencil strokes in the source image.
Click to reveal the selected regions in the final image.
4. Select exposed regions from the current source image by using the pencil tool. Change the source photo, and select regions from thisphoto if necessary.
You can now view a final image with different regions copied from different source photos above the initially selected final photo.
5. Change the transparency of these selected regions to blend them properly with the background by using the Transparency Slider. SelectEdge Blending to smoothen the blended edges.
Transparency Slider affects only those regions that are selected from the currently displayed source image. Change to a differentsource image if you want to change the transparency of the regions selected from the other images. It remembers the value used for aparticular image. If the slider is not changed, the default is set to 0.
6. To correct the alignment of multiple photos, select Advanced Option, and click the Alignment tool. Place three markers in the sourceimage and three markers in the final image, then click Align Photos. Click Done.
86
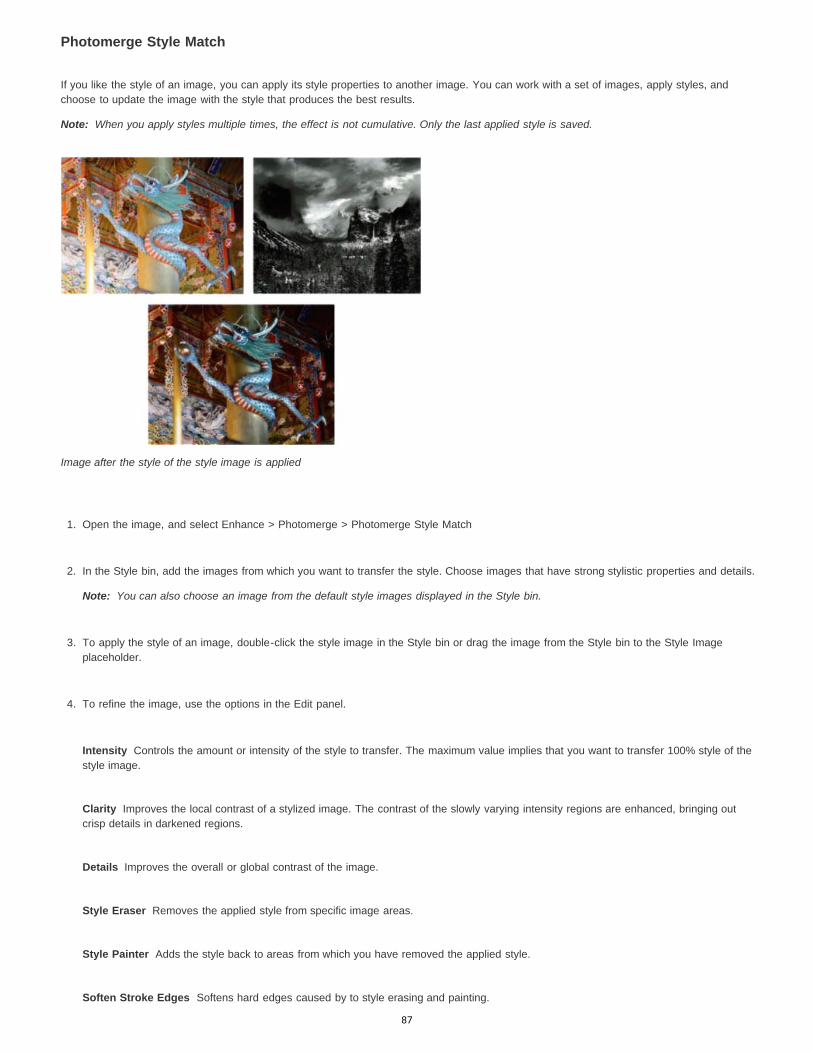
Note:
Note:
Intensity
Clarity
Details
Style Eraser
Style Painter
Soften Stroke Edges
Photomerge Style Match
If you like the style of an image, you can apply its style properties to another image. You can work with a set of images, apply styles, andchoose to update the image with the style that produces the best results.
When you apply styles multiple times, the effect is not cumulative. Only the last applied style is saved.
Image after the style of the style image is applied
1. Open the image, and select Enhance > Photomerge > Photomerge Style Match
2. In the Style bin, add the images from which you want to transfer the style. Choose images that have strong stylistic properties and details.
You can also choose an image from the default style images displayed in the Style bin.
3. To apply the style of an image, double-click the style image in the Style bin or drag the image from the Style bin to the Style Imageplaceholder.
4. To refine the image, use the options in the Edit panel.
Controls the amount or intensity of the style to transfer. The maximum value implies that you want to transfer 100% style of thestyle image.
Improves the local contrast of a stylized image. The contrast of the slowly varying intensity regions are enhanced, bringing outcrisp details in darkened regions.
Improves the overall or global contrast of the image.
Removes the applied style from specific image areas.
Adds the style back to areas from which you have removed the applied style.
Softens hard edges caused by to style erasing and painting.
87

Twitter™ and Facebook posts are not covered under the terms of Creative Commons.
Legal Notices | Online Privacy Policy
Transfer Tones Transfers the tones of the style image. For example, if the style image is black and white or sepia, and the image towhich you want to apply Photomerge Style Transfer is colored, selecting Transfer Tones transfers the style tone (black and white or sepia)to the colored image.
Original colored image changed to black and white through Transfer Tones
5. Click Done to update the image with the applied style.
88

Adjusting shadows and light
To the top
Adjust color and tonality using the Smart Brush toolsApply the Smart Brush toolsAbout Levels adjustmentsImprove shadow and highlight detailAdjust shadows and brightness using LevelsAdjust brightness and contrast in selected areasQuickly lighten or darken isolated areasQuickly saturate or desaturate isolated areas
Adjust color and tonality using the Smart Brush tools
The Smart Brush tool and the Detail Smart Brush tool apply tonal and color adjustments to specific areas of a photo. Certain effects can also beapplied using these tools. You simply pick a preset adjustment and apply the correction. Both tools automatically create adjustment layers. Thisfeature offers you flexibility in working with your photos because the original image layer is not altered. You can go back and tweak theadjustments and no image information is discarded.
When you apply the Smart Brush tool, it makes a selection based on color and texture similarly. The adjustment is simultaneously applied to theselected area. You can adjust shadows, highlights, colors, and contrasts. Apply colors of the objects in your image, add textures, apply variousphotographic effects.
Smart Brush tool applying an adjustment selection
1. Select the Smart Brush tool.
2. Select an effect from the preset drop-down in the Tools Options bar, and then drag your mouse on the objects in the image to which youwant to apply the effect.
You can apply various effects and patterns using smart brush from the available preset options.
89

Available presets
However you cannot change the settings of an effect because the layer with the effect is a pixel layer and not an adjustment layer.
There is an exciting new set of presets, now available under the Textures category for Smart Brush.
Textures Option
The 15 new presets help provide the following effects to your images:
Enhance dull and boring backgrounds.
Create a Satin effect for clothes/textiles in an image.
Add flowery patterns to dresses in an image.
Add designer patterns to walls or backgrounds in an image.
The Detail Smart Brush tool enables you to paint the adjustment to specific areas of the photo just like a painting tool. This tool helps adjust finedetails with pattern and effect presets. Painting and applying the preset in small areas is more precise. Click an effect from the drop-down list and
90

To the top
paint over the area to apply the effect. You can choose from a range of brushes. It has settings for brush size and shape in the options bar.
It also works like a Selection tool; you can click Refine Edge in the options bar to modify the selection’s shape and size. To remove an area fromthe selection, click the Remove area from Selection brush.
Both brush tools enable you to add to or subtract from the areas being adjusted. You can also have more than one adjustment preset applied to aphoto. Each preset adjustment is applied to its own adjustment layer. You can tweak the settings for each correction separately.
When a correction is made, a pin appears where you first applied the adjustment. The pin provides a reference for the specific adjustment. A newpin appears when a different adjustment preset is applied. This feature makes it easier to modify a specific correction, especially if you applydifferent adjustments.
Detail Smart Brush tool applying an adjustment stroke
Apply the Smart Brush tools
1. Select the Smart Brush tool or the Detail Smart Brush tool from the toolbox.
A pop-up panel opens displaying adjustment presets.
2. Select an effect from the preset drop-down in the Tools Options bar.
Choose an option from the pop-up panel menu to view different sets of adjustments. For more information on configuring the pop-uppanel, see About presets.
3. (Optional) Adjust the size and quality of the brush tool by doing one of the following:
If you selected the Smart Brush tool, open the Brush Picker in the options bar and adjust the settings.
If you selected the Detail Smart Brush tool, select a preset brush tip from the Brush presets pop-up panel. Then adjust the brush sizesetting in the options bar.
4. Paint or drag the tool in the image.
The correction is applied on its own adjustment layer and a color pin appears where you first applied the brush tool.
5. (Optional) Do any of the following:
To add the current adjustment to more areas of the photo, paint or drag in the image. If necessary, make sure Add To Selection isselected.
91
Note:
Note:
To remove parts of the current adjustment, select Subtract From Selection and paint in the image.
To apply a different type of adjustment, select New Selection, select a preset from the pop-up panel, and then paint in the image.
To smooth the edges of the selection, click Refine Edges in the options bar, adjust the settings in the dialog box, and then click OK. Formore information, see Smoothing selection edges with anti-aliasing and feathering.
If you use a different tool from the toolbox and then return to the Smart Brush tool or Detail Smart Brush tool, the last adjustment youapplied is active.
6. (Optional) If you have multiple adjustments, do one of the following to select the adjustment you want to add to, subtract from, or modify:
Click a pin.
Right-click in the photo and choose the adjustment listed in the bottom portion of the menu.
Modify Smart Brush tool correction settings
1. Do any of the following:
In the image, right-click a pin or an active selection and choose Change Adjustment Settings.
In the Layers panel, double-click the layer thumbnail for the specific adjustment layer.
Double-click a pin.
2. Adjust the settings in the dialog box and then click OK.
Change the Smart Brush tool correction preset
1. Click a pin or active selection and then open the preset pop-up panel in the options bar.
2. Choose an adjustment preset from the pop-up panel.
Delete a Smart Brush tool correction
Right-click a pin or an active selection and choose Delete Adjustment.
In the Layers panel, you can also delete a Smart Brush tool correction by deleting the specific adjustment layer.
Smart Brush pop-up panel
Photoshop Elements lets you apply many different preset adjustments using the Smart Brush tool and the Detail Smart Brush tool . Youpick an adjustment from the preset pop-up panel in the options bar. Like all pop-up panels, the Smart Brush preset pop-up panel can beconfigured. Use the panel menu to display the adjustments as thumbnails or in a list. You can also drag the picker out of the options bar so it floatswhere you want it in the workspace.
Specific sets of adjustments or all adjustments can be viewed by choosing from a menu near the upper-left area of the panel. The adjustments
92

To the top
To the top
Lighten Shadows
Darken Highlights
range from tonal and corrections.
About Levels adjustments
The Levels dialog box is a powerful tonal and color-adjustment tool. You can make levels adjustments in the entire image or a selected portion.(To access the dialog box, choose Enhance > Adjust Lighting > Levels.)
You can do any of the following with the Levels dialog box:
Levels dialog box A. Channels to adjust color B. Shadow values C. Middle tones D. Highlight values
Set the shadow and highlight values to make sure that your image uses the full tonal range.
Adjust the brightness of the image’s middle tones without affecting the shadow and highlight values.
Fix a color cast by making grays neutral. You can also enhance an image by adding a slight color cast, for example, by adding a warmingeffect on a sunset.
Target shadow and highlight RGB values if you are preparing images for commercial printing.
When you work with Levels, you can work directly on the image pixels or through an adjustment layer. Adjustment layers give you flexibility in thefollowing ways:
You can modify an adjustment at any time by double-clicking the adjustment layer to reopen the Levels dialog box.
You can reduce the effect of an adjustment by lowering the adjustment layer’s opacity in the Layers panel.
You can stack adjustment layers to make multiple adjustments without degrading the image because of too many successive adjustments.
You can use the adjustment layer’s layer mask to confine an adjustment to a portion of your image.
Improve shadow and highlight detail
1. Choose Enhance > Adjust Lighting > Shadow/Highlights.
2. Drag any of the adjustment sliders or enter values in the text boxes, then click OK.
Brightens the dark areas of your photo and reveals more of the shadow detail that was captured in your image.
Darkens the light areas of your photo and reveals more of the highlight detail that was captured in your image. Purewhite areas of your photo don’t have any detail and aren’t affected by this adjustment.
93
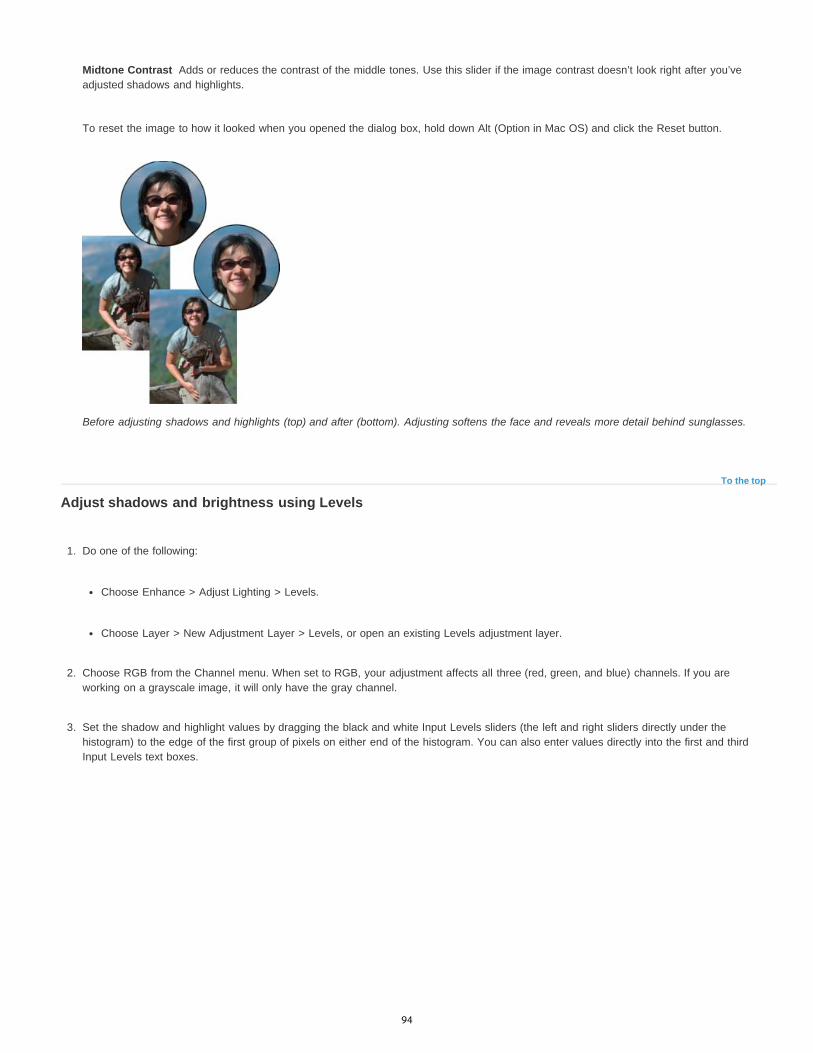
Midtone Contrast
To the top
Adds or reduces the contrast of the middle tones. Use this slider if the image contrast doesn’t look right after you’veadjusted shadows and highlights.
To reset the image to how it looked when you opened the dialog box, hold down Alt (Option in Mac OS) and click the Reset button.
Before adjusting shadows and highlights (top) and after (bottom). Adjusting softens the face and reveals more detail behind sunglasses.
Adjust shadows and brightness using Levels
1. Do one of the following:
Choose Enhance > Adjust Lighting > Levels.
Choose Layer > New Adjustment Layer > Levels, or open an existing Levels adjustment layer.
2. Choose RGB from the Channel menu. When set to RGB, your adjustment affects all three (red, green, and blue) channels. If you areworking on a grayscale image, it will only have the gray channel.
3. Set the shadow and highlight values by dragging the black and white Input Levels sliders (the left and right sliders directly under thehistogram) to the edge of the first group of pixels on either end of the histogram. You can also enter values directly into the first and thirdInput Levels text boxes.
94

Note:
To the top
To the top
Dragging the highlight slider to the left lightens the photo.
Press Alt (Option in Mac OS) and drag the Shadow slider to see which areas will be clipped to black (level 0). Press Alt (Option in MacOS) and drag the Highlight slider to see which areas will be clipped to white (level 255). Colored areas show clipping in individualchannels.
4. To adjust the brightness of the middle tones without affecting the shadow and highlight values, drag the gray Input Levels (middle) slider.You can also enter values directly in the middle Input Levels text box. (A value of 1.0 represents the current unadjusted midtone value.) ClickOK.
You can see the adjustment reflected in the Histogram panel.
You can click Auto to move the Highlight and Shadow sliders automatically to the brightest and darkest points in each channel. This isthe same as using the Auto Levels command and may cause a color shift in your image.
Adjust brightness and contrast in selected areas
The Brightness/Contrast command is best used on selected portions of an image. Use this command to adjust the brightness of an entire image orto reduce contrast results in an image. The Levels and Shadow/Highlight commands are better choices for making tonal adjustments.
1. Do one of the following:
Choose Enhance > Adjust Lighting > Brightness/Contrast to make adjustments directly to image pixels.
Choose Layer > New Adjustment Layer > Brightness/Contrast to make adjustments to a layer.
2. Drag the sliders to adjust the brightness and contrast, then click OK.
Dragging to the left decreases the level; dragging to the right increases it. The number at the right of each slider displays the brightness orcontrast value.
Quickly lighten or darken isolated areas
95
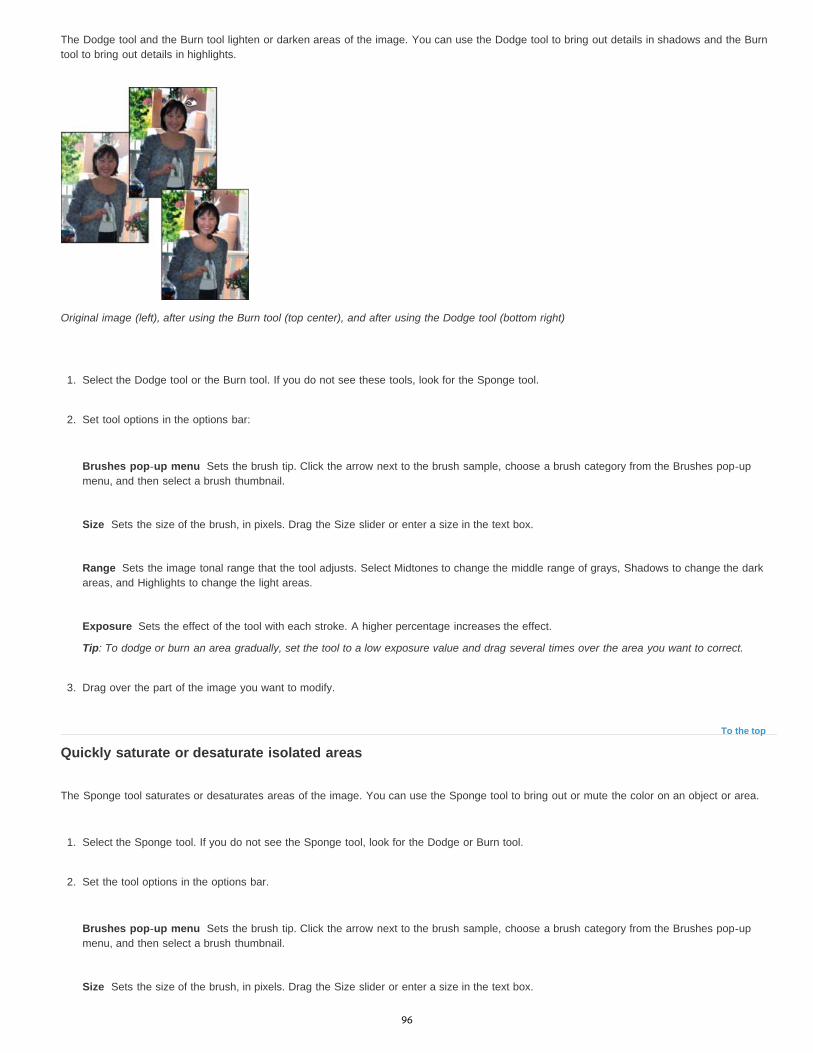
Brushes pop-up menu
Size
Range
Exposure
To the top
Brushes pop-up menu
Size
The Dodge tool and the Burn tool lighten or darken areas of the image. You can use the Dodge tool to bring out details in shadows and the Burntool to bring out details in highlights.
Original image (left), after using the Burn tool (top center), and after using the Dodge tool (bottom right)
1. Select the Dodge tool or the Burn tool. If you do not see these tools, look for the Sponge tool.
2. Set tool options in the options bar:
Sets the brush tip. Click the arrow next to the brush sample, choose a brush category from the Brushes pop-upmenu, and then select a brush thumbnail.
Sets the size of the brush, in pixels. Drag the Size slider or enter a size in the text box.
Sets the image tonal range that the tool adjusts. Select Midtones to change the middle range of grays, Shadows to change the darkareas, and Highlights to change the light areas.
Sets the effect of the tool with each stroke. A higher percentage increases the effect.
Tip: To dodge or burn an area gradually, set the tool to a low exposure value and drag several times over the area you want to correct.
3. Drag over the part of the image you want to modify.
Quickly saturate or desaturate isolated areas
The Sponge tool saturates or desaturates areas of the image. You can use the Sponge tool to bring out or mute the color on an object or area.
1. Select the Sponge tool. If you do not see the Sponge tool, look for the Dodge or Burn tool.
2. Set the tool options in the options bar.
Sets the brush tip. Click the arrow next to the brush sample, choose a brush category from the Brushes pop-upmenu, and then select a brush thumbnail.
Sets the size of the brush, in pixels. Drag the Size slider or enter a size in the text box.
96

Twitter™ and Facebook posts are not covered under the terms of Creative Commons.
Legal Notices | Online Privacy Policy
Mode
Flow
Sets whether to saturate or desaturate.
Sets the strength of the tool with each stroke. In Saturate mode, a higher percentage increases the saturation. In Desaturate mode, ahigher percentage increases the desaturation.
97
Transforming
To the top
90° Left, Layer 90° Left, or Selection 90° Left
90° Right, Layer 90° Right, or Selection 90° Right
180°, Layer 180°, or Selection 180°
Custom
Flip Horizontal, Flip Layer Horizontal, or Flip Selection Horizontal
Flip Vertical, Flip Layer Vertical, or Flip Selection Vertical
Rotate or flip an itemFreely rotate an itemScale an itemSkew or distort an itemApply perspective to an itemFreely transform an itemApply a transformation to a Background layer
Rotate or flip an item
You can rotate or flip a selection, a layer, or an entire image. Make sure to choose the correction command depending on the item you want torotate or flip.
1. In the Edit workspace, select the photo, layer, selection, or shape you want to rotate or flip.
2. Choose Image > Rotate, and choose one of the following commands from the submenu:
Rotates the photo, layer, or selection a quarter-turn counterclockwise. (Rotate Selectionis only available when you have an active selection in an image.)
Rotates the photo, layer, or selection a quarter-turn clockwise.
Rotates the photo, layer, or selection a half-turn.
Rotates the item by the amount you specify. If you select this option, enter the number of degrees you want to rotate the item by,and the direction in which you want to rotate the item.
note: A positive number rotates the object clockwise, and a negative number rotates the object counterclockwise.
When you are finished, click OK.
Flips the photo, layer, or selection horizontally.
Flips the photo, layer, or selection vertically.
98

To the top
Note:
Rotating an image
Freely rotate an item
With the Free Rotate Layer and Free Rotate Selection commands, you can rotate an item by any amount.
Use the Free Rotate Layer command to straighten the image, and click the Commit button to apply the rotation.
1. In the Edit workspace, select the layer or selection you want to rotate.
2. Choose Image > Rotate > Free Rotate Layer or Selection. A bounding box appears in the image.
If you select an image that is a Background layer (such as a photo imported from a camera or scanner), you are given the option ofturning it into a regular layer so that you can transform it.
3. (Optional) To change the point around which the item rotates, click a square on the reference point locator in the options bar.
4. Do one of the following to specify the rotation amount:
Click and drag the rotate handle at the bottom of the bounding box. The cursor will change to concentric arrows when it’s hoveringover the handle. To constrain the rotation to 15° increments, hold down Shift as you drag.
99

To the top
Note:
To the top
Note:
Type an angle of rotation between -180 (maximum counterclockwise rotation) and 180 (maximum clockwise rotation) in the SetRotation text box of the options bar.
5. Do one of the following:
To apply the transformation, double-click inside the bounding box, click the Commit button , or press Enter.
To cancel the transformation, click the Cancel button , or press Esc.
Scale an item
1. In the Edit workspace, select the photo, layer, selection, or shape you want to scale.
2. Choose Image > Resize > Scale.
If you select a photo that is a Background layer (such as a photo imported from a camera or scanner), you are given the option ofturning it into a regular layer so that you can transform it.
3. Do any of the following to specify the scale amount:
To maintain the relative proportions (avoiding image distortion) as you scale, select Constrain Proportions, and then drag a cornerhandle. Alternatively, press Alt (Option in Mac OS) as you drag a corner handle.
To scale only the height or the width, drag a side handle.
Enter a percentage for the Width, Height, or both in the options bar.
4. Do one of the following:
To apply the transformation, double-click inside the bounding box, click the Commit button or press Enter.
To cancel the transformation, click the Cancel button or press Esc.
Skew or distort an item
Skewing applies a vertical or horizontal slant to an item. Distorting stretches or squishes an item.
1. In the Edit workspace, select the photo, layer, selection, or shape you want to transform.
2. Choose Image > Transform > Skew or Image > Transform > Distort. If you are transforming a shape with the Shape tool selected, chooseImage > Transform Shape > Skew or Image > Transform Shape > Distort.
If you select a photo that is a Background layer (such as a photo imported from a camera or scanner), you are given the option ofturning it into a regular layer so that you can transform it.
3. Drag a handle to skew or distort the bounding box.
4. Do one of the following:
100

To the top
Note:
To the top
Note:
To apply the transformation, double-click inside the bounding box, click the Commit button , or press Enter.
To cancel the transformation, click the Cancel button , or press Esc.
Apply perspective to an item
Applying perspective creates the appearance of objects existing in three dimensions.
Original image (left) and image after perspective applied (right).
1. In the Edit workspace, select the item you want to transform.
2. Choose Image > Transform > Perspective. If you are transforming a shape with the Shape tool selected, choose Image > TransformShape > Perspective.
If you select a photo that is a background layer (such as a photo imported from a camera or scanner), you are given the option ofturning it into a regular layer so that you can transform it.
3. Drag a corner handle on the bounding box to apply perspective.
4. Do one of the following:
To commit the transformation, double-click inside the bounding box, click the Commit button , or press Enter.
To cancel the transformation, click the Cancel button , or press Esc.
Freely transform an item
The Free Transform command lets you apply transformations (rotating, scaling, skewing, distorting, and perspective) in one step. Instead ofchoosing different commands, you simply hold down a key on your keyboard to switch between transformation types.
1. In the Edit workspace, select the item you want to transform.
2. Choose Image > Transform > Free Transform. If you are transforming a shape, choose Image > Transform Shape > Free TransformShape.
If you select a photo that is a Background layer (such as a photo imported from a camera or scanner), you are given the option ofturning it into a regular layer so that you can transform it.
3. (Optional) To change the point around which the item rotates, click a square on the reference point locator in the options bar.
101

Twitter™ and Facebook posts are not covered under the terms of Creative Commons.
Legal Notices | Online Privacy Policy
To the top
4. Do one or more of the following to transform the object:
To scale, drag any handle of the bounding box. To scale the width and height proportionally, either press Shift as you drag a cornerhandle, or select Constrain Proportions in the options bar, and then drag a corner handle.
To rotate, move the pointer outside of the bounding box and drag. When positioned outside the bounding box, the pointer becomes acurved, two-sided arrow . Press Shift and drag to constrain the rotation to 15° increments.
To distort, press Ctrl (Command in Mac OS), and drag any handle. When positioned over a handle, the pointer becomes a grayarrowhead .
To skew, press Ctrl+Shift (Command+Shift in Mac OS) and drag a handle in the middle of any side of the bounding box. Whenpositioned over a side handle, the pointer becomes a gray arrowhead with a small double arrow .
To apply perspective, press Ctrl+Alt+Shift (Command+Option+Shift), and drag a corner handle. When positioned over a corner handle,the pointer becomes a gray arrowhead .
5. Do one of the following:
To commit the transformation, double-click inside the bounding box, and then click the Commit button , or press Enter.
To cancel the transformation, click the Cancel button , or press Esc.
Apply a transformation to a Background layer
Before you can apply transformations to the Background layer, you need to convert it into a regular layer.
1. In the Edit workspace, select the Background layer in the Layers panel.
2. Convert the background.
3. Apply the transformation.
102

Cropping
To the top
No Restriction
Use Photo Ratio
Preset Size
Crop an imageCrop to a selection boundaryUsing guides for better cropping resultsUse the Cookie Cutter toolChange the size of the canvasStraighten an imageDivide a scanned image containing multiple photos
Crop an image
The Crop tool removes the part of an image surrounding the crop marquee, or selection. Cropping is useful for removing distracting backgroundelements and creating a focus for your photo. By default, when you crop a photo, the resolution remains the same as the original photo. Using thePhoto Ratio option allows you to view and modify the size and resolution when cropping a photo. If you use a preset size, the resolution changesto fit the preset.
Crop a photo to remove some of the distracting background.
1. Select the Crop tool .
2. From the Tool Options bar, select a cropping guide that meets your requirement. You can choose one of Rule of Thirds, Grid, Golden Ratio,or None. For more information on cropping guides, see the section on Using guides for better cropping results in this article.
3. If you want to use a resolution other than that of the original photo, select one of the following options from the Aspect Ratio menu or specifynew custom values in the Width and Height boxes in the options bar:
Lets you resize the image to any dimension.
Displays the original aspect ratio of the photo when you crop. The Width and Height boxes show the values that are usedfor the cropped image. The Resolution box allows you to change the image resolution.
Specifies a preset size for the cropped photo. If you want your final output to be a specific size, such as 4 x 6 inches to fit apicture frame, choose that preset size.
103

Note:
To the top
When you specify values for the Width and Height boxes, the Aspect Ratio menu changes to Custom.
4. Drag over the part of the image you want to keep. When you release the mouse button, the crop marquee appears as a bounding box withhandles at the corners and sides.
5. (Optional) Adjust the crop marquee by doing any of the following:
To change the preset size or aspect ratio, choose new values from the Aspect Ratio menu in the options bar.
To move the marquee to another position, place the pointer inside the bounding box and click-drag, or use the arrow keys to move themarquee.
To resize the marquee, drag a handle. (If you choose No Restriction from the Aspect Ratio menu, you can constrain the proportionswhile scaling by holding down Shift as you drag a corner handle.)
To swap Width and Height values, click the Swap icon in the options bar.
To rotate the marquee, position the pointer outside the bounding box (the pointer turns into a curved arrow ), and drag. (You can’trotate the crop marquee for an image in Bitmap mode.)
note: You can change the color and opacity of the crop shield (the cropped area surrounding the image) by changing the Crop toolpreferences. Choose Edit > Preferences > Display & Cursors and specify a new Color and Opacity value in the Crop Tool area of thePreferences dialog box. If you don’t want to see a colored shield while cropping, deselect Use Shield.
6. Click the green Commit button located in the lower-right corner of the marquee, or double-click the bounding box to finish the cropping. Ifyou want to cancel the cropping operation, click the red Cancel button or press Esc.
Click the Commit button to accept a crop.
Crop to a selection boundary
Using the Crop command, you can remove the areas that fall outside the current selection. When you crop to a selection boundary,Photoshop Elements trims the image to the bounding box that contains the selection. (Irregularly shaped selections, such as those made by usingthe Lasso tool, are cropped to a rectangular bounding box that contains the selection.) If you use the Crop command without first making aselection, Photoshop Elements trims the image by 50 pixels from each visible edge.
1. Use any selection tool, such as the Rectangular Marquee tool , to select the part of the image you want to keep.
104
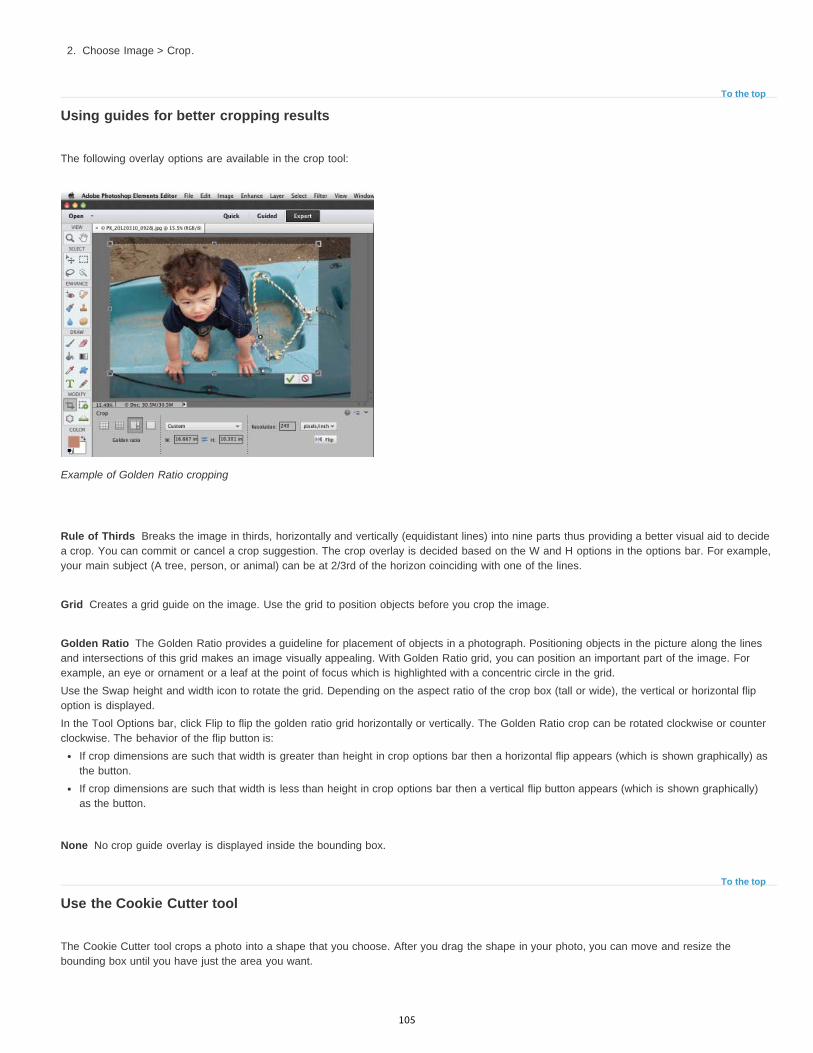
To the top
Rule of Thirds
Grid
Golden Ratio
None
To the top
2. Choose Image > Crop.
Using guides for better cropping results
The following overlay options are available in the crop tool:
Example of Golden Ratio cropping
Breaks the image in thirds, horizontally and vertically (equidistant lines) into nine parts thus providing a better visual aid to decidea crop. You can commit or cancel a crop suggestion. The crop overlay is decided based on the W and H options in the options bar. For example,your main subject (A tree, person, or animal) can be at 2/3rd of the horizon coinciding with one of the lines.
Creates a grid guide on the image. Use the grid to position objects before you crop the image.
The Golden Ratio provides a guideline for placement of objects in a photograph. Positioning objects in the picture along the linesand intersections of this grid makes an image visually appealing. With Golden Ratio grid, you can position an important part of the image. Forexample, an eye or ornament or a leaf at the point of focus which is highlighted with a concentric circle in the grid.Use the Swap height and width icon to rotate the grid. Depending on the aspect ratio of the crop box (tall or wide), the vertical or horizontal flipoption is displayed.In the Tool Options bar, click Flip to flip the golden ratio grid horizontally or vertically. The Golden Ratio crop can be rotated clockwise or counterclockwise. The behavior of the flip button is:
If crop dimensions are such that width is greater than height in crop options bar then a horizontal flip appears (which is shown graphically) asthe button.If crop dimensions are such that width is less than height in crop options bar then a vertical flip button appears (which is shown graphically)as the button.
No crop guide overlay is displayed inside the bounding box.
Use the Cookie Cutter tool
The Cookie Cutter tool crops a photo into a shape that you choose. After you drag the shape in your photo, you can move and resize thebounding box until you have just the area you want.
105

Unconstrained
Defined Proportions
Defined Size
Fixed Size
From Center
Feather
Crop
Use the Cookie Cutter tool to clip a photo into a fun shape.
1. Select the Cookie Cutter tool.
2. Click the Cookie Cutter popup menu in the Tool Options bar, and select a shape. To view other libraries, select a different library from theShapes drop-down.
3. Double-click a shape to select it.
4. Set Shape Options:
Draws the shape to any size or dimension.
Keeps the height and width of the cropped shape in proportion.
Crops the photo to the exact size of the shape you chose.
Specifies the exact measurements of the finished shape. The measurements are picked up from the height and width settingsthat you provide.
Draws the shape from the center.
Decides how soft the edges of the finished shape must be. Feathering softens the edges of the cropped image so that the edgesfade out and blend into the background.
Select to trim the image to the bounding box that contains the shape created
5. Drag within the image to create the shape boundary and move it to the desired location in the image.
6. Click the Commit button , or press Enter to finish the cropping. If you want to cancel the cropping operation, click the Cancel button orpress Esc.
106

To the top
To the top
Change the size of the canvas
The canvas is the workspace around an existing image, within the image window. It is the full editable area of an image. You can increase ordecrease the size of the canvas, on any side of an image. Added canvas appears in the currently selected background color on the Backgroundlayer (by default), or selected canvas extension color from the Canvas size window. In other layers, the added canvas is transparent.
Increasing the size of the canvas makes room for a colored border.
1. Choose Image > Resize > Canvas Size.
2. Do one of the following:
In the Width and Height boxes, enter the full dimensions of the new canvas. Choose the units of measurement you want from theadjacent drop-downs.
Select Relative, and enter the amount by which you want to increase or decrease the size of the canvas. Enter a negative number todecrease the size of the canvas. Use this option if you want to increase the canvas by a specified amount, such as 2 inches on eachside.
3. Click an arrow on the Anchor icon to indicate the position at which the existing image should be, on the new canvas.
4. To change the color of the added canvas, choose an option from the Canvas Extension Color menu and click OK.
Straighten an image
107
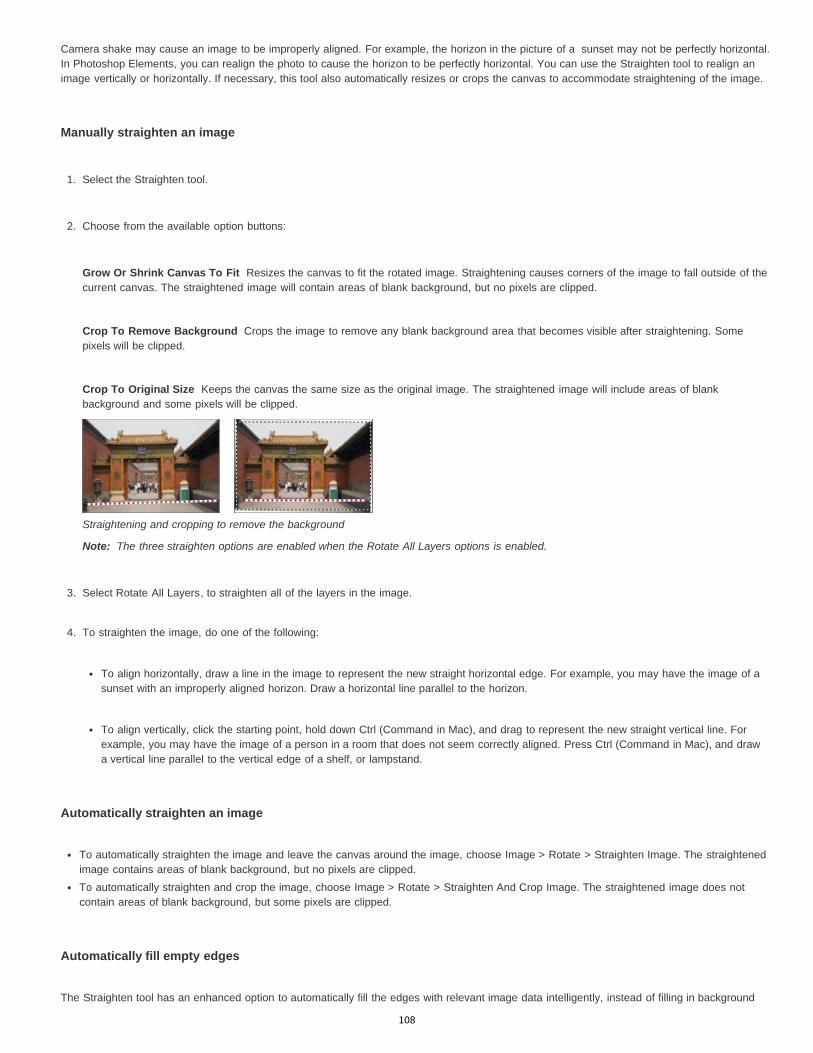
Grow Or Shrink Canvas To Fit
Crop To Remove Background
Crop To Original Size
Note:
Camera shake may cause an image to be improperly aligned. For example, the horizon in the picture of a sunset may not be perfectly horizontal.In Photoshop Elements, you can realign the photo to cause the horizon to be perfectly horizontal. You can use the Straighten tool to realign animage vertically or horizontally. If necessary, this tool also automatically resizes or crops the canvas to accommodate straightening of the image.
Manually straighten an image
1. Select the Straighten tool.
2. Choose from the available option buttons:
Resizes the canvas to fit the rotated image. Straightening causes corners of the image to fall outside of thecurrent canvas. The straightened image will contain areas of blank background, but no pixels are clipped.
Crops the image to remove any blank background area that becomes visible after straightening. Somepixels will be clipped.
Keeps the canvas the same size as the original image. The straightened image will include areas of blankbackground and some pixels will be clipped.
Straightening and cropping to remove the background
The three straighten options are enabled when the Rotate All Layers options is enabled.
3. Select Rotate All Layers, to straighten all of the layers in the image.
4. To straighten the image, do one of the following:
To align horizontally, draw a line in the image to represent the new straight horizontal edge. For example, you may have the image of asunset with an improperly aligned horizon. Draw a horizontal line parallel to the horizon.
To align vertically, click the starting point, hold down Ctrl (Command in Mac), and drag to represent the new straight vertical line. Forexample, you may have the image of a person in a room that does not seem correctly aligned. Press Ctrl (Command in Mac), and drawa vertical line parallel to the vertical edge of a shelf, or lampstand.
Automatically straighten an image
To automatically straighten the image and leave the canvas around the image, choose Image > Rotate > Straighten Image. The straightenedimage contains areas of blank background, but no pixels are clipped.To automatically straighten and crop the image, choose Image > Rotate > Straighten And Crop Image. The straightened image does notcontain areas of blank background, but some pixels are clipped.
Automatically fill empty edges
The Straighten tool has an enhanced option to automatically fill the edges with relevant image data intelligently, instead of filling in background
108

Keywords: cropping, image size, image resolution, retouching, sharpening, transforming, 3D transform, rotate, skew, scale, Unsharp Mask,Photomerge Group Shot, Photomerge Scene Cleaner, Photomerge Faces, clone
Twitter™ and Facebook posts are not covered under the terms of Creative Commons.
Legal Notices | Online Privacy Policy
To the top
color or transparent pixels.
The Autofill edges option is available only in the Grow or Shrink and Original Size modes. Before you draw a line to enable image straightening,select the Autofill edges checkbox. When you draw the line, any gaps created along the edges of the photo are automatically and intelligentlyfilled.
Divide a scanned image containing multiple photos
If you scanned several pictures at once on a flatbed scanner, you can automatically divide and straighten the scanned image into its componentphotos. The photos must have a clear separation between them.
Separating images scanned from one page into three separate images
Choose Image > Divide Scanned Photos. Photoshop Elements automatically divides the image and places each photo in a separate file.
For images with white around the border (images of light skies, snow, and so on), this command works best if you cover the image on thescanner with a piece of dark paper.
109
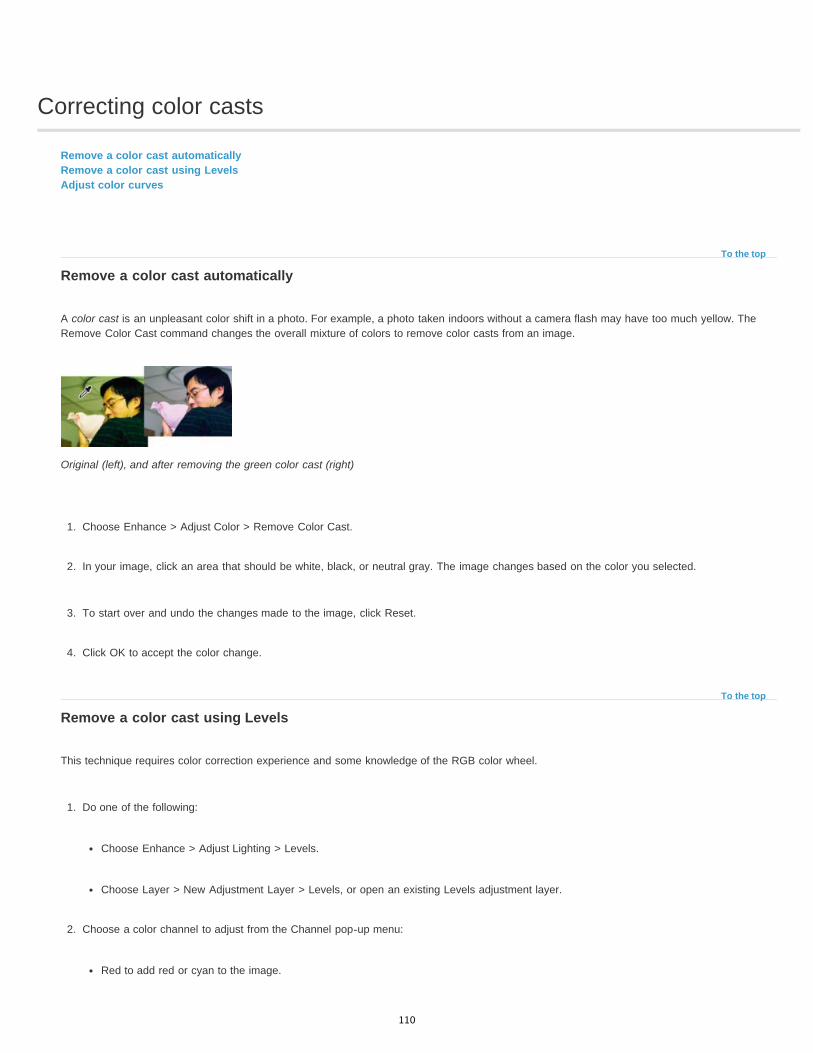
Correcting color casts
To the top
To the top
Remove a color cast automaticallyRemove a color cast using LevelsAdjust color curves
Remove a color cast automatically
A color cast is an unpleasant color shift in a photo. For example, a photo taken indoors without a camera flash may have too much yellow. TheRemove Color Cast command changes the overall mixture of colors to remove color casts from an image.
Original (left), and after removing the green color cast (right)
1. Choose Enhance > Adjust Color > Remove Color Cast.
2. In your image, click an area that should be white, black, or neutral gray. The image changes based on the color you selected.
3. To start over and undo the changes made to the image, click Reset.
4. Click OK to accept the color change.
Remove a color cast using Levels
This technique requires color correction experience and some knowledge of the RGB color wheel.
1. Do one of the following:
Choose Enhance > Adjust Lighting > Levels.
Choose Layer > New Adjustment Layer > Levels, or open an existing Levels adjustment layer.
2. Choose a color channel to adjust from the Channel pop-up menu:
Red to add red or cyan to the image.
110

To the top
Green to add green or magenta to the image.
Blue to add blue or yellow to the image.
3. Drag the middle input slider left or right to add or subtract color.
4. Click OK when you are satisfied with the overall color.
You can use the gray color picker in the Levels dialog box to quickly remove a color cast. Double-click the color picker and make sure that theRGB values are equal. After you close the Color Picker, click an area in your image that should be a neutral gray.
Adjust color curves
The Adjust Color Curves command improves color tones in a photo by adjusting highlights, midtones, and shadows in each color channel. Forexample, this command can fix photos with silhouetted images resulting from strong backlighting, or slightly washed-out objects that were too closeto the camera’s flash.
In the Adjust Color Curves dialog box, you can compare and choose different tonal presets. Select from the list of styles in the Select A Style box.To fine-tune the adjustment, adjust the highlights, midtone brightness and contrast, and shadows.
Adjusting color curves in an image A. Select a Style (choose from presets) B. Adjust Sliders (custom options)
1. In Photoshop Elements, open an image.
2. To adjust a specific image area or layer, select it with one of the selection tools. (If no selection is made, the adjustment applies to the entireimage.)
To preserve the original photo while experimenting with tonal adjustments, adjust the color curves in a duplicate layer.
3. Choose Enhance > Adjust Color > Adjust Color Curves.
4. Select a style (for example, Backlight or Solarize).
5. Adjust the sliders for Highlights, Midtone Brightness, Midtone Contrast, and Shadows.
6. To apply the adjustment to your image, click OK. To cancel the adjustment and start over, click Reset. To close the Adjust Color Curves
111

Twitter™ and Facebook posts are not covered under the terms of Creative Commons.
Legal Notices | Online Privacy Policy
dialog box, click Cancel.
112

Auto Smart Tone | Photoshop Elements 12
Apply Auto Smart Tone to a photographAuto Smart Tone LearningResetting Auto Smart Tone learning
The Auto Smart Tone feature uses an intelligent algorithm to modify the tonal value of your image. The Auto Smart tone feature applies acorrection to your photograph. In addition to this, you have a a joystick control that you can move around on the image to fine-tune the results.
As you move the joystick across different regions of your photo, Photoshop Elements analyzes the tonal quality of area being sampled. A tonalcorrection is then applied to the entire photo. Thus, moving the joystick to different regions of the photo will produce different results. In the photo(below), moving the joystick to the brighter parts (bright sky or grass) causes the overall image to turn brighter. This is evident in the images in thetop-right and bottom-right corner.
The Auto Smart Tone tool is available in the Quick and Expert modes.
113

To the top
(left) Moving the joystick to the darker regions (foliage or shade) causes the overall image to turn darker. This is evident in the thumbnails on theleft of the main image.(right) Moving the joystick to the brighter parts (bright sky or grass) causes the overall image to turn brighter. This is evident in the thumbnails onthe right of the main image.
Apply Auto Smart Tone to a photograph
1. With an image open, click Enhance > Auto Smart Tone.
A default tonal correction is applied automatically.
114

Twitter™ and Facebook posts are not covered under the terms of Creative Commons.
Legal Notices | Online Privacy Policy
To the top
To the top
A. Options for the Auto Smart Tone feature B. Toggle, to view a before-after image C. Bounding box, within which you can move thejoystick D. Joystick, that can be dragged in the bounding box E. Reset button, returns the joystick to the original location suggested by AutoSmart Tone F. One of the four automatically-generated live preview thumbnails
2. Move the joystick control that appears on the image, to fine-tune the resulting image.
3. To see how the image will appear when you move the joystick control in a specific direction, view the thumbnail images that appear at thefour corners of the photograph.
Auto Smart Tone Learning
While using the Auto Smart Tone feature, you can select the Learn from this Correction option. When you select this option, Photoshop Elementskeeps learning from your editing actions. The algorithm learns from the tonal ranges of an image, before and after you applied the Auto SmartTone tool. This helps the Auto Smart Tone feature make better automatic tonal suggestions for a new image.
Thus, each time you use the feature on an image, the algorithm suggests tonal treatment (placement of the joystick control) based on correctionsyou have applied to previous images. The more images you correct tonally through this feature, the more intelligent it becomes at predicting thekind of changes you would prefer on a new image. The feature uses this learning to provide you with similar corrections on images of the sametype.
Resetting Auto Smart Tone learning
To reset the learning that the Auto Smart Tone feature has learned from your usage and actions, in the Preferences dialog, click General > ResetAuto Smart Tone Learning.
115

Using actions to process photos
Twitter™ and Facebook posts are not covered under the terms of Creative Commons.
Legal Notices | Online Privacy Policy
To the top
Note:
To the top
To the top
Add actions
Remove actions
Reset actions
Actions overviewPlay an action file on an imageManage action files
Actions overview
An action is a series of steps (tasks) that you play back on a photo. These steps can be menu commands, panel options, tool actions, and so on.For example, an action that creates a snapshot effect, is a series of steps that changes the size of the image, applies an effect to the image,creates a border that extends below the image, and then saves the file in the desired format.
A set of actions is available in Photoshop Elements, in the Actions panel (Window > Actions). You can play one or more of these actions on aphotograph. Action files cannot be created in Photoshop Elements. However, you can load more action files (.atn files) that have been created inAdobe Photoshop.
Actions that share a theme are grouped into Action Sets.
Photoshop actions that contain steps that are unsupported in Photoshop Elements will fail to play. Not all action that are created inPhotoshop can be played in Photoshop Elements.
Play an action file on an image
1. Open an image that you want to process using an action.
2. If the Actions panel is not open, click Window > Actions.
3. In the Actions panel, click an action, or click the triangle next to an Action Set.
4. Click the Play button to apply the action to the image, or click the Actions panel menu, and then click Play.
Manage action files
In the Actions panel, click the panel menu icon, and then choose Load Actions. Specify a .atn file, and access the added actionsfrom the Actions panel.
In the Actions panel, select an action or action set, and then click the Delete button. Click Ok to confirm deletion of the action.
In the Actions panel, click the panel menu icon, and then choose Reset Actions. All actions available in Photoshop Elements bydefault are restored.
116

Painting overview
To the top
To the top
About painting toolsAbout foreground and background colorsAbout blending modesWeb-safe colors
The painting tools change the color of pixels in an image. The Brush tool and the Pencil tool work like traditional drawing tools by applying colorwith brush strokes. The Gradient tool, Fill command, and Paint Bucket tool apply color to large areas. Tools like the Eraser tool, Blur tool, andSmudge tool modify the existing colors in an image.
The power of painting in Adobe Photoshop Elements is in the options that you can set to specify how a tool applies or modifies color. You canapply color gradually, with soft edges, with large brush strokes, with various brush dynamics, with different blending properties, and with brushes ofdifferent shapes. You can simulate spraying paint with an airbrush.
About painting tools
Photoshop Elements provides various tools for applying and editing color. When you select a painting tool, the Tool Options bar displays variouspreset brush tips and settings for brush size, paint blending, opacity, and airbrush effects. You can create new brush presets and save them inbrush libraries. You can customize the brush and settings for any of the painting and editing tools and manage them using the Preset Manager.
Brush options in the Tool Options bar A. Brush size slider and text box B. Brush pop-up panel and brush thumbnail C. More menu
The Brush tool paints smooth, anti-aliased lines. Other painting tools include the Pencil tool for making hard-edged lines and the Eraser tool forerasing color pixels from layers. The Paint Bucket tool and Fill command fill areas of your image with color or patterns. The pattern Stamp toolpaints with one of the predefined patterns or a pattern that you design.
The Impressionist Brush tool affects existing color by applying stylized brush strokes. The Smudge tool also affects existing image colors bysimulating the action of dragging a finger through wet paint.
The Detail Smart Brush tool automatically creates an adjustment layer as you paint. It doesn’t alter the original image layer. You can paint andchange the adjustments as many times as you want without degrading your original photo. See Adjust color and tonality using the Smart Brushtools.
About foreground and background colors
You apply the foreground color when you paint with the Brush or Pencil tools, and when you fill selections with the Paint Bucket tool. The color youapply to the Background layer with the Eraser tool is called the background color. You can see and change the foreground and background colorsin the two overlapping boxes at the bottom of the toolbox. The top box is the foreground color, and the bottom box is the background color. Theforeground and background colors are also used together by the Gradient tool and some special effects filters.
117
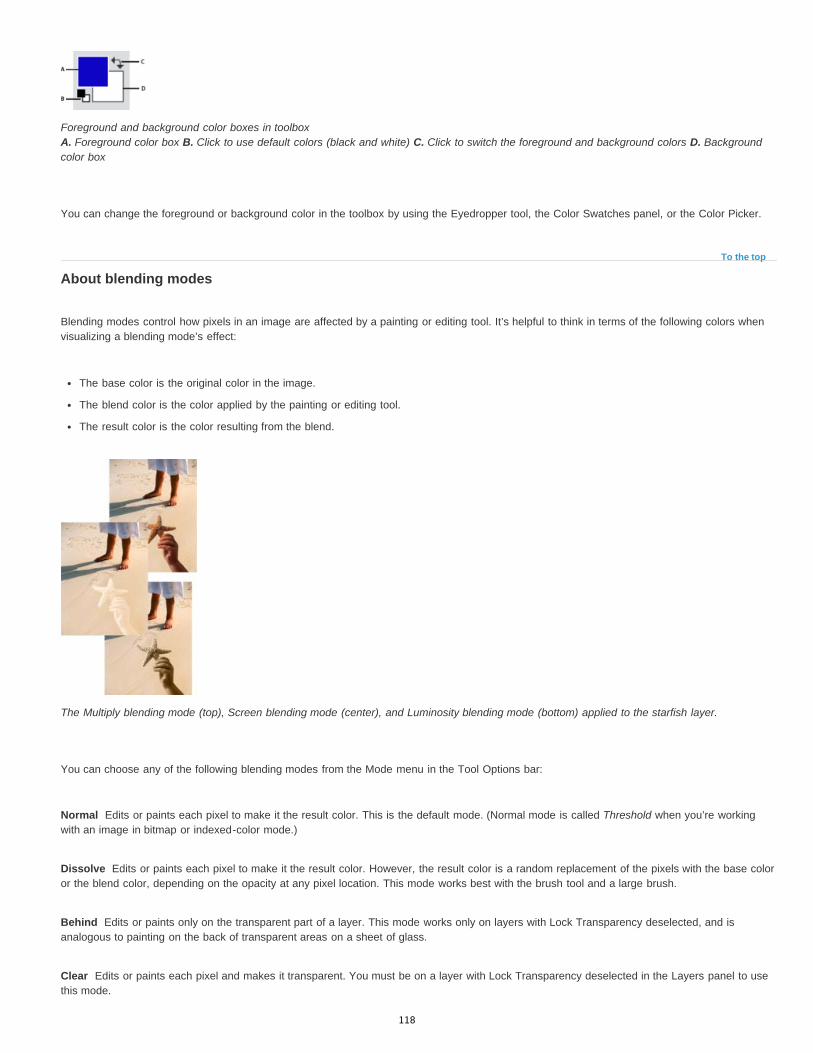
To the top
Normal
Dissolve
Behind
Clear
Foreground and background color boxes in toolbox A. Foreground color box B. Click to use default colors (black and white) C. Click to switch the foreground and background colors D. Backgroundcolor box
You can change the foreground or background color in the toolbox by using the Eyedropper tool, the Color Swatches panel, or the Color Picker.
About blending modes
Blending modes control how pixels in an image are affected by a painting or editing tool. It’s helpful to think in terms of the following colors whenvisualizing a blending mode’s effect:
The base color is the original color in the image.
The blend color is the color applied by the painting or editing tool.
The result color is the color resulting from the blend.
The Multiply blending mode (top), Screen blending mode (center), and Luminosity blending mode (bottom) applied to the starfish layer.
You can choose any of the following blending modes from the Mode menu in the Tool Options bar:
Edits or paints each pixel to make it the result color. This is the default mode. (Normal mode is called Threshold when you’re workingwith an image in bitmap or indexed-color mode.)
Edits or paints each pixel to make it the result color. However, the result color is a random replacement of the pixels with the base coloror the blend color, depending on the opacity at any pixel location. This mode works best with the brush tool and a large brush.
Edits or paints only on the transparent part of a layer. This mode works only on layers with Lock Transparency deselected, and isanalogous to painting on the back of transparent areas on a sheet of glass.
Edits or paints each pixel and makes it transparent. You must be on a layer with Lock Transparency deselected in the Layers panel to usethis mode.
118
Darken
Multiply
Color Burn
Linear Burn
Darker Color
Lighten
Screen
Color Dodge
Linear Dodge (Add)
Lighter Color
Overlay
Soft Light
Hard Light
Vivid Light
Linear Light
Pin Light
Looks at the color information in each channel and selects the base or blend color—whichever is darker—as the result color. Pixelslighter than the blend color are replaced, and pixels darker than the blend color do not change.
Looks at the color information in each channel and multiplies the base color by the blend color. The result color is always a darker color.Multiplying any color by black produces black. Multiplying any color by white leaves the color unchanged. When you’re painting with a color otherthan black or white, successive strokes with a painting tool produce progressively darker colors. The effect is similar to drawing on the image withmultiple felt-tipped pens.
Looks at the color information in each channel and darkens the base color to reflect the blend color. Blending with white produces nochange.
Looks at the color information in each channel and darkens the base color to reflect the blend color by decreasing the brightness.Blending with white produces no change.
Compares the total of all channel values for the blend and base color and displays the lower value color. Darker Color does notproduce a third color, which can result from the Darken blend, because it chooses the lowest channel values from both the base and the blendcolor to create the result color.
Looks at the color information in each channel and selects the base or blend color—whichever is lighter—as the result color. Pixelsdarker than the blend color are replaced, and pixels lighter than the blend color do not change.
Looks at each channel’s color information and multiplies the inverse of the blend and base colors. The result color is always a lightercolor. Screening with black leaves the color unchanged. Screening with white produces white. The effect is similar to projecting multiplephotographic slides on top of each other.
Looks at the color information in each channel and brightens the base color to reflect the blend color. Blending with black producesno change.
Looks at the color information in each channel and brightens the base color to reflect the blend color by increasing thebrightness. Blending with black produces no change.
Compares the total of all channel values for the blend and base color and displays the higher value color. Does not produce a thirdcolor, which can result from the Lighten blend, because it chooses the highest channel values from both the base and blend color to create theresult color.
Multiplies or screens the colors, depending on the base color. Patterns or colors overlay the existing pixels while preserving thehighlights and shadows of the base color. The base color is mixed with the blend color to reflect the lightness or darkness of the original color.
Darkens or lightens the colors, depending on the blend color. The effect is similar to shining a diffused spotlight on the image. If theblend color is lighter than 50% gray, the image is lightened. If the blend color is darker than 50% gray, the image is darkened. Painting with pureblack or white produces a distinctly darker or lighter area but does not result in pure black or white.
Multiplies or screens the colors, depending on the blend color. The effect is similar to shining a harsh spotlight on the image. If theblend color is lighter than 50% gray, the image is lightened. This is useful for adding highlights to an image. If the blend color is darker than 50%gray, the image is darkened. This is useful for adding shadows to an image. Painting with pure black or white results in pure black or white.
Burns or dodges the colors by increasing or decreasing the contrast, depending on the blend color. If the blend color (light source) islighter than 50% gray, the image is lightened by decreasing the contrast. If the blend color is darker than 50% gray, the image is darkened byincreasing the contrast.
Burns or dodges the colors by decreasing or increasing the brightness, depending on the blend color. If the blend color (light source)is lighter than 50% gray, the image is lightened by increasing the brightness. If the blend color is darker than 50% gray, the image is darkened bydecreasing the brightness.
Replaces the colors, depending on the underblend color. If the blend color (light source) is lighter than 50% gray, pixels darker than the
119

Twitter™ and Facebook posts are not covered under the terms of Creative Commons.
Legal Notices | Online Privacy Policy
Hard Mix
Difference
Exclusion
Hue
Saturation
Color
Luminosity
To the top
blend color are replaced, and pixels lighter than the blend color do not change. If the blend color is darker than 50% gray, pixels lighter than theblend color are replaced, and pixels darker than the blend color do not change. This mode is useful for adding special effects to an image.
Reduces colors to white, black, red, green, blue, yellow, cyan, and magenta—depending on the base color and the blend color.
Looks at the color information in each channel and subtracts either the blend color from the base color or the base color from theblend color, depending on which has the greater brightness value. Blending with white inverts the base color values; blending with black producesno change.
Creates an effect similar to, but lower in contrast, than the Difference mode. Blending with white inverts the base color values.Blending with black produces no change.
Creates a result color with the luminance and saturation of the base color and the hue of the blend color.
Creates a result color with the luminance and hue of the base color and the saturation of the blend color. Painting with this mode in anarea with zero saturation (a neutral gray area) causes no change.
Creates a result color with the luminance of the base color and the hue and saturation of the blend color. This preserves the gray levels inthe image and is useful for coloring monochrome images and for tinting color images.
Using the Color blending mode to change the color of a shirt
Creates a result color with the hue and saturation of the base color and the luminance of the blend color. This mode creates aninverse effect from that of the Color mode.
Web-safe colors
Web-safe colors are the 216 colors used by browsers on both the Windows and Mac OS platforms. By working only with these colors, you ensurethat colors in art you prepare for the web display accurately in a web browser.
You can identify web-safe colors in the Adobe Color Picker by using either of the following methods:
Select Only Web Colors in the lower-left corner of the Color Picker, and then choose any color in the Color Picker. When this option isselected, any color you pick is web-safe.
Choose a color in the Color Picker. If you choose a color that isn’t web-safe, an alert cube appears next to the color rectangle in the upper-right area of the Color Picker. Click the alert cube to select the closest web-safe color. (If no alert cube appears, the color you chose isweb-safe.)
Adobe also recommends
120

Painting tools
To the top
Airbrush Mode
Brush
Size
Opacity
Mode
Tablet Options
Brush Settings
To the top
Use the Brush toolUse the Pencil toolUse the Impressionist Brush toolUse the Smudge toolUse the Eraser toolUse the Magic Eraser toolUse the Background Eraser tool
Use the Brush tool
The Brush tool creates soft or hard strokes of color. You can use it to simulate airbrush techniques. (If you don’t see it in the toolbox, select eitherthe Impressionist Brush or the Color Replacement tool , and then click the Brush tool icon in the Tool Options bar.)
1. Select a color to paint by setting the foreground color.
2. From the Draw section in the toolbox, select the Brush tool.
3. Specify Brush tool options in the Tool Options bar as desired, and then drag within the image to paint.
To draw a straight line, click a starting point in the image. Then hold down Shift and click an ending point.
You can specify any of the following Brush tool options:
Enables airbrush capabilities. This option applies gradual tones to an image, simulating traditional airbrush techniques.
Sets the brush tip. Click the arrow next to the brush sample, choose a brush category from the Brush drop-down, and then select abrush thumbnail.
Sets the size of the brush in pixels. Drag the Size slider or enter a size in the text box.
Sets the opacity of the paint you apply. A low opacity setting allows pixels under a paint stroke to show through. Drag the slider, orenter an opacity value.
Specifies how the paint that you apply blends with the existing pixels in the image.
Sets the options to control with your stylus if you are using a pressure sensitive drawing tablet instead of a mouse.
Sets additional brush options.
Use the Pencil tool
121

Brush tip
Size
Opacity
Mode
Auto Erase
To the top
The Pencil tool creates hard-edged freehand lines.
1. Select a color to paint by setting the foreground color.
2. From the Draw section in the toolbox, select the Pencil tool.
3. Set Pencil tool options in the Tool Options bar, as desired, and then drag within the image to paint.
To draw a straight line, click a starting point in the image. Then hold down Shift and click an ending point.
You can specify any of the following Pencil tool options:
Sets the tip. Click the arrow next to the brush sample, choose a brush category from the Brush drop-down, and then select abrush thumbnail.
Sets the size of the brush in pixels. Drag the Size slider or enter a size in the text box.
Sets the opacity of the paint you apply. A low opacity setting allows pixels under a paint stroke to show through. Drag the slider, orenter an opacity value.
Specifies how the paint that you apply blends with the existing pixels in the image.
If you begin drawing and drag over an area that doesn’t contain the foreground color, the tool paints with the foreground color.That is, if we start with color other than foreground color, it paints the foreground color only. Click and paint on the areas containing theforeground color, pencil paints with the Background color.
Use the Impressionist Brush tool
The Impressionist Brush tool changes the existing colors and details in your image so your photo looks like it was painted using stylized brushstrokes. By experimenting with different style, area size, and tolerance options, you can simulate the textures associated with painting in differentartistic styles.
1. Witht he Brush tool selected in the toolbox, select the the Impressionist Brush tool from the Tool Options bar.
2. Set options in the Tool Options bar as desired, and then drag within the image to paint.
Original photo (left), and after using the Impressionist Brush tool (right)
You can specify any of the following options:
122
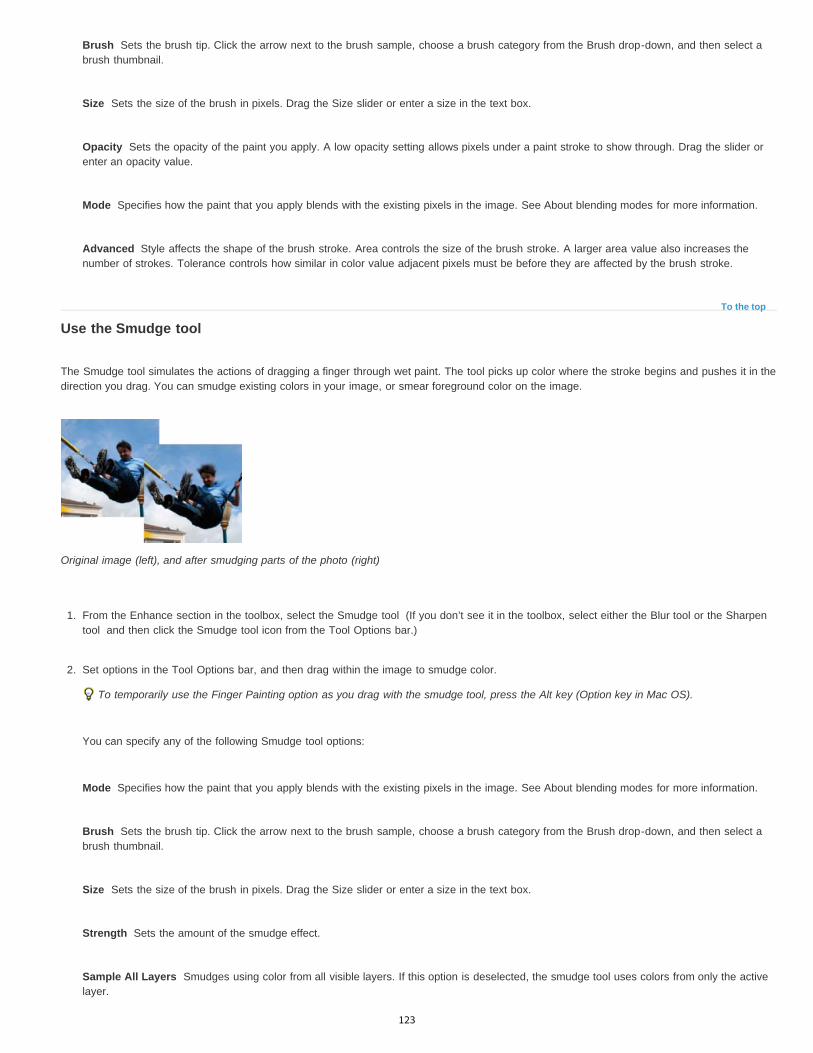
Brush
Size
Opacity
Mode
Advanced
To the top
Mode
Brush
Size
Strength
Sample All Layers
Sets the brush tip. Click the arrow next to the brush sample, choose a brush category from the Brush drop-down, and then select abrush thumbnail.
Sets the size of the brush in pixels. Drag the Size slider or enter a size in the text box.
Sets the opacity of the paint you apply. A low opacity setting allows pixels under a paint stroke to show through. Drag the slider orenter an opacity value.
Specifies how the paint that you apply blends with the existing pixels in the image. See About blending modes for more information.
Style affects the shape of the brush stroke. Area controls the size of the brush stroke. A larger area value also increases thenumber of strokes. Tolerance controls how similar in color value adjacent pixels must be before they are affected by the brush stroke.
Use the Smudge tool
The Smudge tool simulates the actions of dragging a finger through wet paint. The tool picks up color where the stroke begins and pushes it in thedirection you drag. You can smudge existing colors in your image, or smear foreground color on the image.
Original image (left), and after smudging parts of the photo (right)
1. From the Enhance section in the toolbox, select the Smudge tool (If you don’t see it in the toolbox, select either the Blur tool or the Sharpentool and then click the Smudge tool icon from the Tool Options bar.)
2. Set options in the Tool Options bar, and then drag within the image to smudge color.
To temporarily use the Finger Painting option as you drag with the smudge tool, press the Alt key (Option key in Mac OS).
You can specify any of the following Smudge tool options:
Specifies how the paint that you apply blends with the existing pixels in the image. See About blending modes for more information.
Sets the brush tip. Click the arrow next to the brush sample, choose a brush category from the Brush drop-down, and then select abrush thumbnail.
Sets the size of the brush in pixels. Drag the Size slider or enter a size in the text box.
Sets the amount of the smudge effect.
Smudges using color from all visible layers. If this option is deselected, the smudge tool uses colors from only the activelayer.
123

Finger Painting
To the top
Brush
Size
Opacity
Type
To the top
Smears the foreground color at the beginning of each stroke. If this option is deselected, the smudge tool uses the colorunder the pointer at the beginning of each stroke.
Use the Eraser tool
The Eraser tool changes pixels in the image as you drag through them. If you’re working in the Background layer or in a layer with lockedtransparency, erased pixels change to the background color; otherwise, erased pixels become transparent. Transparent pixels are indicated by thetransparency grid.
1. From the Draw section in the toolbox, select the Eraser tool. (If you don’t see it in the toolbox, select either the Background Eraser tool orthe Magic Eraser tool , and then click the Eraser tool icon in the Tool Options bar.)
2. Set options in the Tool Options bar as desired, and then drag through the area you want to erase.
You can specify any of the following Eraser tool options:
Sets the brush tip. Click the arrow next to the brush sample, choose a brush category from the Brush drop-down, and then select abrush thumbnail.
Sets the size of the brush in pixels. Drag the Size slider or enter a size in the text box.
Defines the strength of the erasure. An opacity of 100% erases pixels to complete transparency on a layer and to the backgroundcolor on the Background layer. A lower opacity erases pixels to partial transparency on a layer and paints partially with the background coloron the Background layer. (If Block mode is selected in the Tool Options bar, the Opacity option isn’t available.)
Brush mode erases by using characteristics of the brush tool, so you can make soft-edged erasures. Pencil mode makes hard-edgeerasures like a pencil. Block mode uses a hard-edged 16-pixel square as an eraser.
Use the Magic Eraser tool
The Magic Eraser tool changes all similar pixels when you drag within a photo. If you’re working in a layer with locked transparency, the pixelschange to the background color; otherwise, the pixels are erased to transparency. You can choose to erase contiguous pixels only, or all similarpixels on the current layer.
124

Note:
Tolerance
Opacity
Sample All Layers
Contiguous
Anti-aliasing
To the top
Original image (left), and after erasing the clouds (right)
1. In the Layers panel, select the layer containing the areas you want to erase.
If you select the Background, it automatically becomes a layer when you use the Magic Eraser.
2. From the Draw section in the toolbox, select the Magic Eraser tool in the toolbox. (If you don’t see it in the toolbox, select either the Erasertool or the Background Eraser tool , and then click the Magic Eraser tool icon in the Tool Options bar.)
3. Set options in the Tool Options bar, as desired, and then click the area of the layer you want to erase.
You can set any of the following Magic Eraser tool options:
Defines the range of colors that will be erased. A low tolerance erases pixels within a range of color values very similar to thepixel you click. A high tolerance erases pixels within a broader range.
Defines the strength of the erasure. An opacity of 100% erases pixels to complete transparency on a layer and to the backgroundcolor on a locked layer. A lower opacity erases pixels to partial transparency on a layer and paints partially with the background color on alocked layer.
Samples the erased color using combined data from all visible layers. Deselect the option if you want to erase only thepixels on the active layer.
Erases only pixels that are adjacent to the one you click. Deselect this option to erase all similar pixels in the image.
Smoothes the edges of the area you erase, making the edge look more natural.
Use the Background Eraser tool
The Background Eraser tool turns color pixels to transparent pixels so that you can easily remove an object from its background. With careful use,you can maintain the edges of the foreground object while eliminating background fringe pixels.
The tool pointer is a circle with a cross hair indicating the tool’s hotspot. As you drag the pointer, pixels within the circle and of a similar color valueas the pixel under the hotspot are erased. If the circle overlaps your foreground object, and it doesn’t contain pixels similar to the hotspot pixel, theforeground object won’t be erased.
Erasing the distracting background. You can replace the background with another background by using the Clone Stamp tool or by adding anotherlayer.
1. In the Layers panel, select the layer containing the areas you want to erase.
125
Twitter™ and Facebook posts are not covered under the terms of Creative Commons.
Legal Notices | Online Privacy Policy
Note:
Size
Tolerance
Brush Settings
Limits
If you select Background, it automatically becomes a layer when you use the Background Eraser.
2. From the Draw section in the toolbox, select the Background Eraser tool . (If you don’t see it in the toolbox, select either the Eraser tool orthe Magic Eraser tool , and then click the Background Eraser tool icon in the Tool Options bar.)
3. Set options in the Tool Options bar as desired, and then drag through the area you want to erase. Keep the tool’s hotspot off of areas thatyou don’t want to erase.
You can specify any of the following Background Eraser tool options:
Pixel width of the brush
Defines how similar in color to the hotspot a pixel must be to be affected by the tool. A low tolerance limits erasure to areas thatare very similar to the hotspot color. A high tolerance erases a broader range of colors.
Sets the presets of the brush, such as size, diameter, hardness, and spacing. Drag the Size sliders or enter numbers intext boxes.
Choose Contiguous to erase areas that contain the hotspot color and are connected to one another. Discontiguous erases anypixels within the circle that are similar to the hotspot color.
Adobe also recommends
126

Adjustment filters
To the top
To the top
Apply the Equalize filterApply the Gradient Map filterApply the Invert filterApply the Posterize filterApply the Threshold filterApply the Photo filter
Apply the Equalize filter
The Equalize filter redistributes the brightness values of the pixels in an image so that they more evenly represent the entire range of brightnesslevels. When you apply this command, Photoshop Elements finds the brightest and darkest values in the composite image. It then remaps themso that the brightest value represents white and the darkest value represents black. Photoshop Elements then equalizes the brightness—that is,distributes the intermediate pixel values—evenly throughout the grayscale.
1. Select an image, layer, or area.
2. Choose Filter > Adjustments > Equalize.
3. If you selected an area of the image, select what to equalize in the dialog box, and click OK:
Equalize Selected Area Only to evenly distribute only the selection’s pixels.
Equalize Entire Image Based On Selected Area to evenly distribute all image pixels based on those in the selection.
Apply the Gradient Map filter
The Gradient Map filter maps the grayscale range of an image to the colors of a specified gradient fill.
Using the Gradient Map filter to simulate a sepia tone
1. Select an image, layer, or area.
2. Do one of the following:
127

To the top
To the top
Choose Filter > Adjustments > Gradient Map.
Using the Layers panel or Layer menu, create a new Gradient Map adjustment layer, or open an existing Gradient Map adjustmentlayer.
3. Specify the gradient fill you want to use:
To choose from a list of gradient fills, click the triangle to the right of the gradient fill displayed in the Gradient Map dialog box. Click toselect the desired gradient fill, and then click in a blank area of the dialog box to dismiss the list.
To edit the gradient fill currently displayed in the Gradient Map dialog box, click the gradient fill. Then modify the existing gradient fillor create a new gradient fill.
By default, the shadows, midtones, and highlights of the image are mapped respectively to the starting (left) color, midpoint, and ending(right) color of the gradient fill.
4. Select neither, one, or both of the Gradient Options:
Dither adds random noise to smooth the appearance of the gradient fill and reduce banding effects.
Reverse switches the direction of the gradient fill, reversing the gradient map.
5. Click OK.
Apply the Invert filter
The Invert filter inverts the colors in an image. Use this command, for example, to make a positive black-and-white image negative or to make apositive from a scanned black-and-white negative.
note: Because color print film contains an orange mask in its base, the Invert command cannot make accurate positive images from scannedcolor negatives. Be sure to use the proper settings for color negatives when scanning film on slide scanners.
When you invert an image, the brightness value of each pixel is converted into the inverse value on the 256-step color-values scale. Forexample, a pixel in a positive image with a value of 255 is changed to 0.
1. Select an image, layer, or area.
2. Choose Filter > Adjustments > Invert.
Apply the Posterize filter
The Posterize filter lets you specify the number of tonal levels (or brightness values) for each channel in an image. It then maps pixels to theclosest matching level. For example, choosing two tonal levels in an RGB image gives six colors, two for red, two for green, and two for blue.
This command is useful for creating special effects, such as large, flat areas in a photograph. Its effects are most evident when you reduce thenumber of gray levels in a grayscale image. But it also produces interesting effects in color images.
If you want a specific number of colors in your image, convert the image to grayscale and specify the number of levels you want. Thenconvert the image back to the previous color mode, and replace the various gray tones with the colors you want.
1. Select an image, layer, or area.
128

To the top
To the top
2. Do one of the following:
Choose Filter > Adjustments > Posterize.
From the Layers panel or Layer menu, create a new Posterize adjustment layer, or open an existing Posterize adjustment layer.
3. Use the slider to get the right effect, or enter the number of tonal levels you want, and click OK.
Apply the Threshold filter
The Threshold filter converts grayscale or color images into high-contrast, black-and-white images. You can specify a certain level as athreshold. All pixels lighter than the threshold are converted to white; and all pixels darker are converted to black. The Threshold command isuseful for determining the lightest and darkest areas of an image.
1. Select an image, layer, or area.
2. Do one of the following:
Choose Filter > Adjustments > Threshold.
From the Layers panel or Layer menu, create a new Threshold adjustment layer, or open an existing Threshold adjustment layer.
The Threshold dialog box displays a histogram of the luminance levels of the pixels in the current selection.
3. Select Preview and do any of the following:
To change the image to black and white, drag the slider below the histogram until the threshold level you want appears at the top ofthe dialog box, and click OK. As you drag, the image changes to reflect the new threshold setting.
To identify a representative highlight, drag the slider to the right until the image is pure black. Then drag the slider back until somesolid white areas appear in the image.
To identify a representative shadow, drag the slider to the left until the image is pure white. Then drag the slider back until some solidblack areas appear in the image.
4. (Optional) To return to default settings, hold down Alt (Option in Mac OS) and click Reset.
5. (Optional) Click Cancel to close the Threshold dialog box without applying changes to the image.
Apply the Photo filter
The Photo Filter command mimics the technique of putting a colored filter in front of the camera lens. A colored filter adjusts the color balanceand color temperature of the light transmitted through the lens and exposing the film. The Photo Filter command also lets you choose a colorpreset to apply a hue adjustment to an image. If you want to apply a custom color adjustment, the Photo Filter command lets you specify a colorusing the Adobe Color Picker.
129

Twitter™ and Facebook posts are not covered under the terms of Creative Commons.
Legal Notices | Online Privacy Policy
Warming Filter (85) and Cooling Filter (80)
Warming Filter (81) and Cooling Filter (82)
Individual Colors
Original image (left), and Warming Filter (81) with 60% Density applied (right)
1. Do one of the following:
Choose Filter > Adjustments > Photo Filter.
Choose Layer > New Adjustment Layer > Photo Filter. Click OK in the New Layer dialog box.
2. To choose the filter color, do one of the following in the Photo Filter dialog box:
Color conversion filters that tune the white balance in an image. If an image wasphotographed at a lower color temperature of light (yellowish), the Cooling Filter (80) makes the image colors bluer to compensate for thelower color temperature of the ambient light. Conversely, if the photo was taken at a higher color temperature of light (bluish), the WarmingFilter (85) makes the image colors warmer to compensate for the higher color temperature of the ambient light.
Light balancing filters for minor adjustments in the color quality of an image. The WarmingFilter (81) makes the image warmer (yellower) and the Cooling Filter (82) makes the image cooler (bluer).
Apply a hue adjustment to the image depending on the color preset you choose. Your choice of color depends on howyou're using the Photo Filter command. If your photo has a color cast, you can choose a complement color to neutralize the color cast.You can also apply colors for special color effects or enhancements. For example, the Underwater color simulates the greenish-blue colorcast caused when photographing underwater.
Select the Filter option, and choose a preset from the Filter menu.
Select the Color option, click the color square, and use the Adobe Color Picker to specify the color of a custom color filter.
Make sure Preview is selected to view the results of using a color filter.
If you don’t want the image darkened by adding the color filter, be sure that the Preserve Luminosity option is selected.
3. To adjust the amount of color applied to the image, use the Density slider or enter a percentage in the Density text box. A higher Densityapplies a stronger color adjustment.
4. Click OK.
130

Processing camera raw image files
To the top
To the top
About camera raw image filesProcess VersionsOpen and process camera raw filesAdjust sharpness in camera raw filesReducing noise in camera raw imagesSave changes to camera raw imagesOpen a camera raw image in the Edit workspaceSettings and controls
About camera raw image files
In digital photography, a picture is captured by a camera's image sensor in an image file. An image file is generally processed and compressed,before being stored on your camera's memory card. However, cameras can also store a picture without processing or compressing it - as a rawfile. Think of camera raw files as photo negatives. You can open a raw file in Photoshop Elements, process it, and save it, rather than relying onthe camera to process the file. Working with camera raw files lets you set the proper white balance, tonal range, contrast, color saturation, andsharpness.
To use raw files, set your camera to save files in its own raw file format. When you download the files from the camera, they have filenameextensions like NEF, CR2, CRW, or other raw formats. Photoshop Elements can open raw files only from supported cameras. Visit the Adobewebsite to view a list of supported cameras.
Photoshop Elements does not save your changes to the original raw file (non-destructive editing). After processing the raw image file using thefeatures of the Camera Raw dialog box, You can choose to open a processed raw file in Photoshop Elements. You can then edit the file and saveit in a Photoshop Elements supported format. The original raw file remains unaltered.
Process Versions
A Process Version is a method of deciphering the raw file format. The default version used in Adobe Photoshop Elements 11 is Process Version2012. This method of deciphering the raw file format provides you with ways to work with the most recent and improved features in the raw fileformat. Photoshop Elements 11 contains three Process Versions (one current, and two legacy versions). The complete list of versions is:
Process Version 2012 (default, used in Adobe Photoshop Elements 11)Process Version 2010 (used in Adobe Photoshop Elements 10)Process Version 2003 (used in Adobe Photoshop Elements 9, or earlier)
What Process Version is applied to my raw image?
When you open a raw file that has not been opened in an earlier edition of Photoshop Elements, the default Process Version 2012 is used.However, if you open a raw file opened in an earlier version of Photoshop Elements, an older Process Version is used.
To check the Process Version applied to your raw image, in the Camera Raw 7.1 dialog box, click the Camera Calibration tab. The Process fielddisplays the current Process Version being used.
Note: If not using Process Version 2012, an icon displayed below the raw image indicates that an older version is being used.
Can I switch between Process Versions?
Yes. In the Camera Raw 7.1 dialog box, click the Camera Calibration tab, and select the Process Version you want to use from the Process drop-down list.
Which version is best for you?
Process Version 2012 enables you to work with the latest enhancements in the raw format. However, if you have many raw images that wereopened with previous editions of Photoshop Elements (and hence using older Process Versions), you may choose to apply an older ProcessVersion to your newer raw images. This helps with consistency while processing past and present images, and helps maintain your older workflow.
What are the differences in the Process Versions?
131

To the top
Note:
Basic tab. In Process Version 2012, the Highlights, Shadows, and Whites sliders replace the Recovery, Fill light, and Brightness sliders.Detail tab:
In Process Version 2012, the Color Detail slider has been introduced. This slider remains disabled until the Color slider is modified.In Process Version 2012, Luminance Detail and Luminance Contrast have been added. These sliders remain disabled until theLuminance is modified.
Note: When switching to an older Process Version, the newer sliders compatible with the latest Process Versions are disabled.
Camera Raw dialog box A. View options B. Click the Basic or Detail tab to access different controls C. RGB values D. Histogram E. Image settings F. More menu G.Tools H. Zoom levels I. Bit depth options
Open and process camera raw files
1. In the Edit workspace, choose File > Open.
2. Browse to select one or more camera raw files, and click Open.
The histogram in the Camera Raw dialog box shows the tonal range of the image at the current settings. As you make settings adjustments,the histogram is updated automatically.
3. (Optional) Adjust the image view using the controls, such as the Zoom tool, and options, such as Shadows and Highlights, which revealclipping in the preview area. (See Camera raw controls.)
Selecting Preview displays a preview of the image with the settings changes you make. Deselecting Preview displays the camera rawimage at the original settings of the current tab combined with the settings in the hidden tabs.
4. To rotate the image 90° counterclockwise or 90° clockwise, click the Rotate Image buttons .
5. To apply the settings used in the previous camera raw image or the default settings for your camera, choose an option from the Settingsmenu (Settings menu > Previous Conversion). Using the same options is useful, for example, if you want to quickly process images withsimilar lighting conditions. (See Set custom camera settings.)
6. (Optional) Set options to adjust the white balance. (See White balance controls for camera raw.)
You can monitor the RGB values of pixels in your image as you adjust them in the Camera Raw dialog box. Position the Zoom tool, Handtool, White Balance tool, or Crop tool over the preview image to display the RGB values directly beneath the pointer.
7. Make tonal adjustments using the Exposure, Brightness, Contrast, and Saturation sliders. (See Tonal and image adjustments in camera rawfiles.)
132

Note:
To the top
To the top
To undo your manual adjustments and make the adjustments automatically, select Auto. To restore all options to their initial settings, pressAlt (Option in Mac OS) and click Reset.
8. Do one of the following:
To open a copy of the camera raw image file (with the camera raw settings applied) in Photoshop Elements, click Open Image. You canedit the image and save it in a Photoshop Elements-supported format. The original camera raw file remains unaltered.
To cancel the adjustments and close the dialog box, click Cancel.
To save the adjustments to a DNG file, click Save Image. (See Save changes to camera raw images.)
The Digital Negative (DNG) format is Adobe’s proposed standard format for camera raw files. DNG files are useful for archivingcamera raw images because they contain the raw camera sensor data and data specifying how the image should look. Camera raw imagesettings can be stored in DNG files instead of in sidecar XMP files or the camera raw database.
Adjust sharpness in camera raw files
The Sharpness slider adjusts the image sharpness to provide the edge definition you want. The Sharpness adjustment is a variation of the AdobePhotoshop Unsharp Mask filter. This adjustment locates pixels that differ from surrounding pixels based on the threshold you specify, andincreases the pixels’ contrast by the amount you specify. When opening a camera raw file, the Camera Raw plug-in calculates the threshold to usebased on the camera model, ISO, and exposure compensation. You can choose whether sharpening is applied to all images or to previews.
1. Zoom the preview image to at least 100%.
2. Click the Detail tab.
3. Move the Sharpness slider to the right to increase sharpening and to the left to decrease it. A value of zero turns off sharpening. In general,set the Sharpness slider to a lower value for cleaner images.
If you don’t plan to edit the image extensively in Photoshop Elements, use the camera raw Sharpness slider. If you do plan to edit theimage extensively in Photoshop Elements, turn off camera raw sharpening. Then use the sharpening filters in Photoshop Elements as thelast step after all other editing and resizing are complete.
Reducing noise in camera raw images
The Detail tab in the Camera Raw dialog box contains controls for reducing image noise—the extraneous visible artifacts that degrade imagequality. Image noise includes luminance (grayscale) noise, which makes an image look grainy, and chroma (color) noise, which is visible ascolored artifacts in the image. Photos taken at high ISO speeds or with less sophisticated digital cameras can have noticeable noise.
Moving the Luminance Smoothing slider to the right reduces grayscale noise, and moving the Color Noise Reduction slider to the right reduceschroma noise.
When making Luminance Smoothing or Color Noise Reduction adjustments, it’s a good idea to preview images at 100% for a better view.
133

To the top
To the top
To the top
Zoom tool
Moving the Luminance Smoothing slider to the right reduces grayscale noise.
Save changes to camera raw images
You can save changes you’ve made to a camera raw file. The Camera Raw dialog box saves the camera raw image with your changes in a .dngfile. Saving the file does not automatically open it in Photoshop Elements. (To open a camera raw file, use the Open command, like you would withany other file. Then you can edit and save the file like any other image.)
1. In the Camera Raw dialog box, apply adjustments to one or more camera raw images.
2. Click the Save Image button.
3. In the Save Options dialog box, specify where to save the file and how to name the file if you're saving more than one camera raw file.
New options in Photoshop Elements 11:
Embed Fast Load Data: Embeds a much smaller copy of the raw image in the DNG file, to enhance the speed at which the raw imageis previewed.Use Lossy Compression: Reduces the file size of your DNG file, and causes loss of quality. Recommended only for the raw imagesthat are to be stored for archival purposes, and will never be used for printing or production (other use).
4. Click Save.
Open a camera raw image in the Edit workspace
After you process a camera raw image in the Camera Raw dialog box, you can open the image and edit it in the Edit workspace.
1. In the Camera Raw dialog box, apply adjustments to one or more camera raw images.
2. Click the Open Image button. The Camera Raw dialog box closes, and the photo opens in the Edit workspace.
Settings and controls
Camera row controls
Sets the preview zoom to the next preset zoom value when you click within the preview image. Alt-click (Option-click in Mac OS) to
134

Twitter™ and Facebook posts are not covered under the terms of Creative Commons.
Legal Notices | Online Privacy Policy
Hand tool
White Balance tool
Crop tool
Straighten tool
Red Eye removal
Open Preferences dialog
Rotate buttons
zoom out. Drag the Zoom tool in the preview image to zoom in on a selected area. To return to 100%, double-click the Zoom tool.
Moves the image in the preview window if the preview image is set at a zoom level higher than 100%. Hold down the spacebar toaccess the Hand tool while using another tool. Double-click the Hand tool to fit the preview image in the window.
Sets the area you click to a neutral gray tone to remove color casts and adjust the color of the entire image. TheTemperature and Tint values change to reflect the color adjustment.
Removes part of an image. Drag the tool within the preview image to select the portion you want to keep, and then press Enter.
You can use the Straighten tool to realign an image vertically or horizontally. This tool also resizes or crops the canvas toaccommodate straightening the image.
Removes red eye in flash photos of people and green or white eye in pets.
Opens the Camera Raw Preferences dialog.
Rotates the photo either counterclockwise or clockwise.
Set custom camera settings
When you open a camera raw file, Photoshop Elements reads information in the file to see which model of camera created it, and then applies theappropriate camera settings to the image. If you are always making similar adjustments, you can change the default settings of your camera. Youcan also change settings for each model of camera you own, but not for multiple cameras of the same model.
1. To save the current settings as the default for the camera that created the image, click the triangle next to the Settings menu and chooseSave New Camera Raw Default.
2. In the Edit workspace, open a camera raw file and adjust the image.
3. To use the Photoshop Elements default settings for your camera, click the triangle next to the Settings menu and choose Reset CameraRaw Default.
135

Recomposing
Note:
To the top
Use Normal Highlight
Recompose a photo in Guided modeRecompose a photo in Expert modeRecompose options
The Recompose tool facilitates intelligent resizing of photos without changing important visual content such as people, building, animals, and more.Normal scaling affects all pixels uniformly when resizing an image. Recompose affects pixels in areas that don’t have important visual content.Recompose enables you to upscale or downscale images to improve a composition, fit a layout, or change the orientation.
If you want to preserve or remove specific areas when scaling an image, Recompose enables you to protect content intelligently during resizing.
Recompose can also be performed without using the protect areas option. For example, to recompose a photo without marking any areasfor protection or removal, drag the image handles.
Before Recompose (left) and after Recompose
A. Photo selected for Recompose B. Areas marked for protection (green) and for removal (red) C. Photo after Recompose
Recompose a photo in Guided mode
1. Open a photo in the photo bin that you want to resize, and select the Guided mode.
2. In the Guided mode panel, expand Touchups, and select Recompose.
3. Mark the areas you want to protect using the Protect brush. Right-click the photo, and select one of the following modes:
This mode is similar to painting. Mark all the regions that require protection. For example, protecting a circle usingNormal Highlight requires marking or painting the entire circle.
136

Use Quick Highlight
To the top
Note:
You can quickly highlight the required regions for protection. Encircle the subject to highlight the required regions. Forexample, to highlight the area within a circle, trace the boundary of the circle. Quick Highlight ensures that the area within the circle ismarked for protection.
You can specify the size of the brush and the photo.
Green indicates the areas marked for protection.
4. To erase portions of unwanted marked areas (green), right-click the photo, and select Clear Protect Highlights.
5. Mark the areas you want to remove (areas that are unimportant) using the Remove brush tool.
Red indicates the areas marked for removal.
Right-click the photo, and select Clear All Highlights to erase protected and unprotected marked areas.
6. To erase portions of unwanted marked areas (red), right-click the photo, and select Clear Remove Highlights.
7. Drag the image handles or select a size from the Preset drop-down, to Recompose your photo.
Recompose a photo in Expert mode
1. Open a photo in the photo bin that you want to resize, and select Image > Recompose, or click the Recompose tool.
2. Mark the areas you want to protect using the Protect brush. Right-click the photo, and select one of the following modes:
Use Normal Highlight
Use Quick Highlight
You can specify the size of the brush and the photo.
Green indicates the areas marked for protection.
Recompose can also be performed without using the protect areas option. For example, to recompose a photo without marking anyareas for protection or removal, drag the image handles .
3. Do one of the following to erase portions of unwanted marked areas (green):
Erase using the Eraser tool.
Right-click the photo, and select Clear Protect Highlights.
4. Mark the areas you want to remove (areas that are unimportant) using the Remove brush tool.
Red indicates the areas marked for removal.
Right-click the photo, and select Clear All Highlights to erase protected and unprotected marked areas.
137

Twitter™ and Facebook posts are not covered under the terms of Creative Commons.
Legal Notices | Online Privacy Policy
To the top
Size
Preset
Amount
Highlight Skin Tones
Swap height and width
5. Do one of the following to erase portions of unwanted marked areas (red):
Erase using the Eraser tool.
Right-click the photo, and select Clear Remove Highlights.
You can specify the size of the brush and the photo.
6. Drag the handles of the image to Recompose your photo. On completion, click the Commit Current Operation icon.
Recompose options
You can use the following options while using the Recompose tool.
Enables you to define the brush size.
Used to specify the ratio that you want to use for resizing. Preset works on the photo ratio and not the dimensions of the photo. Forexample, if you use a preset ratio 3x5, the image is resized using this ratio. If you want to scale the photo using the same ratio, hold the Shift keyand drag the corner handles. A preset that crops the image in the 16:9 ratio has been added to the Preset menu.note: If you don’t hold down the Shift key, the image is resized in any ratio.
Used to set the Recompose threshold. Setting the threshold to 100% indicates a 100% Recompose. If it is set to 0%, then the behaviorof Recompose tool is similar to the Transform tool.
Identifies and highlights skin tones for protection. You can preserve regions that contain skin tones. Click the Highlight SkinTones icon to view the suggested skin tones region. To erase the identified regions that contain skin tones, use the Protect Eraser tool, or right-click the image and select Clear Protect Highlights.
Used to swap the values specified for height and width. For example, you have specified the following values: H: 10 andW: 15. Click the Swap Height and Width icon to interchange these values. The new values are: H: 15 and W: 10.
138

Resizing
To the top
About image size and resolutionAbout monitor resolutionDisplay the image size of an open fileView the print size onscreenChange print dimensions and resolution without resamplingResample an image
About image size and resolution
The image size (or pixel dimensions) of an image is a measure of the number of pixels along an image’s width and height. For example, yourdigital camera may take a photo that is 1500 pixels wide and 1000 pixels high. These two measurements indicate the amount of image data in aphoto and determine the file size.
Resolution is the amount of image data in a given space. It is measured in pixels per inch (ppi). The more pixels per inch, the greater theresolution. Generally, the higher the resolution of your image, the better the printed image quality. Resolution determines the fineness of detail youcan see in an image.
Although a digital image contains a specific amount of image data, it doesn’t have a specific physical output size or resolution. As you change theresolution of an image, its physical dimensions change, and as you change the width or height of an image, its resolution changes.
Two images (A and B) with same image data and file size but different image size and resolution; C shows that a higher resolution means betterquality
You can see the relationship between image size and resolution in the Image Size dialog box (choose Image > Resize > Image Size). As youchange one value, the other two values change accordingly.
139

To the top
To the top
To the top
Constrain Proportions lets you change image size without altering any image data
The Constrain Proportions option lets you maintain the aspect ratio (the ratio of image width to image height). If you select this option and changethe image size and resolution, the image does not stretch or shrink.
The Resample Image option lets you change the size of an image without changing the resolution. If you need to print at a specific resolution, or ata smaller or larger resolution than the current image allows, resample the image. However, resampling can degrade image quality.
About monitor resolution
Your monitor’s resolution is described in pixel dimensions. For example, if your monitor resolution is set to 1600 x 1200 and your photo’s pixeldimensions are the same size, at 100%, the photo will fill the screen. The size an image appears onscreen depends on a combination of factors:the pixel dimensions of the image, the monitor size, and the monitor resolution setting. In Photoshop Elements, you can change the imagemagnification onscreen, so you can easily work with images of any pixel dimensions.
A 620 x 400-pixel image displayed on monitors of different sizes and resolutions
When preparing images for onscreen viewing, you should consider the lowest monitor resolution that your photo is likely to be viewed on.
Display the image size of an open file
Click-hold the file information box at the bottom of the document. The box displays the width and height of the image (in pixels, and in theunit of measurement currently selected for the rulers), the number of color channels, and the image resolution (ppi).
View the print size onscreen
Do one of the following:
Choose View > Print Size.
140

To the top
Note:
Note:
To the top
Select the Hand tool or Zoom tool, and click Print Size in the Tool Options bar.
The magnification of the image is adjusted to display its approximate printed size, as specified in the Document Size section of the ImageSize dialog box. Keep in mind that the size and resolution of your monitor affect the onscreen print size.
Change print dimensions and resolution without resampling
You might need to change the print dimensions and resolution if you are sending the image to a print shop that requires files to be at a specificresolution.
If you are printing directly from Photoshop Elements, you don’t have to perform this procedure. Instead, you can choose a size in the Print dialogbox and Photoshop Elements applies the appropriate image resolution.
To change only the print dimensions or the resolution, and adjust the total number of pixels in the image proportionately, you must resamplethe image.
1. Choose Image > Resize > Image Size.
2. Make sure that Resample Image is deselected. If deselected, you can change the print dimensions and resolution without changing the totalnumber of pixels in the image, but the image may not keep its current proportions.
Resample Image must be selected in order to use the Constrain Proportions and Scale Style functions.
3. To maintain the current aspect ratio, select Constrain Proportions. This option automatically updates the width as you change the height, andvice versa.
4. Under Document Size, enter new values for the height and width. If desired, choose a new unit of measurement.
5. For Resolution, enter a new value. If desired, choose a new unit of measurement, and then click OK.
To return to the original values displayed in the Image Size dialog box, use Alt (Option in Mac OS) + click Reset.
Resample an image
Changing the pixel dimensions of an image is called resampling. Resampling affects not only the size of an image onscreen, but also its imagequality and its printed output—either its printed dimensions or its image resolution. Resampling can degrade image quality. When you downsample,meaning that you decrease the number of pixels in your image, information is removed from the image. When you upsample, or increase thenumber of pixels in your image, new pixels are added based on the color values of existing pixels, and the image loses some detail andsharpness.
To avoid the need for upsampling, scan or create the image at the resolution required for your printer or output device. If you want to preview theeffects of changing pixel dimensions onscreen or print proofs at different resolutions, resample a duplicate of your file.
141

Nearest Neighbor
Bilinear
Bicubic
Bicubic Smoother
Bicubic Sharper
Resampling an image A. Image downsampled B. Original image C. Image upsampled
If you’re preparing images for the web, it’s useful to specify image size in terms of the pixel dimensions.
1. Choose Image > Resize > Image Size.
2. Select Resample Image, and choose an interpolation method:
Fast, but less precise. This method is recommended for use with illustrations containing edges that are not anti-aliased,to preserve hard edges and produce a smaller file. However, this method can create jagged edges, which become apparent when distortingor scaling an image or performing multiple manipulations on a selection.
Medium-quality.
Slow, but more precise, resulting in the smoothest tonal gradations.
Use when you're enlarging images.
Use when you’re reducing the size of an image. This method maintains the detail in a resampled image. It may, however,oversharpen some areas of an image. In this case, try using Bicubic.
3. To maintain the current aspect ratio, select Constrain Proportions. This option automatically updates the width as you change the height, andvice versa.
4. In Pixel Dimensions, enter values for Width and Height. To enter values as percentages of the current dimensions, choose Percent as theunit of measurement.
The new file size of the image appears next to Pixel Dimensions, with the old file size in parentheses.
5. Click OK to change the pixel dimensions and resample the image.
For best results in producing a smaller image, downsample and apply the Unsharp Mask (Enhance > Unsharp Mask). To produce a larger
142

Keywords: cropping, image size, image resolution, retouching, sharpening, transforming, 3D transform, rotate, skew, scale, Unsharp Mask,Photomerge Group Shot, Photomerge Scene Cleaner, Photomerge Faces, clone
Twitter™ and Facebook posts are not covered under the terms of Creative Commons.
Legal Notices | Online Privacy Policy
image, rescan the image at a higher resolution.
143

Selecting
144

Using tools to make selections
To the top
Note:
To the top
About selectionsAbout the selection toolsUse the Rectangular and Elliptical Marquee toolsUse the Lasso toolUse the Polygonal Lasso toolUse the Magnetic Lasso toolUse the Magic Wand toolUse the Quick Selection toolUse the Selection Brush toolUse the Magic ExtractorRefined edges of a selectionDelete a selected areaSelect and deselect areas using commands
About selections
A selection defines the editable area in a photo (for example, you can lighten one part of a photo without affecting the rest). You can make aselection with either a selection tool or a selection command. A selection border, which you can hide, surrounds the selection. You can change,copy, or delete pixels inside the selection border, but you can’t touch areas outside the selection border until you deselect the selection.
Adobe Photoshop Elements 11 provides several selection tools that suits different kinds of selections that need to be made. For example, theElliptical Marquee tool selects circular and elliptical areas, and the Magic Wand tool can select an area of similar colors with one click. Morecomplex selections can be made with one of the Lasso tools. You can even smooth the edges of a selection with feathering and anti-aliasing.
Selections are limited to the active layer—to make changes to all layers at once, you first need to flatten the image.
Selection made with Elliptical Marquee tool, color adjusted in selected area
About the selection tools
The selection tools are located in the Tools panel, which is located, by default, on the left side of your screen.
145

Rectangular Marquee tool:Draws square or rectangular selection borders.
Elliptical Marquee tool: Draws round or elliptical selection borders.
Lasso tool: Draws freehand selection borders, best for precision.
Polygonal Lasso tool: Draws multiple straight-edged segments of a selection border.
146

To the top
Magnetic Lasso tool: Draws a selection border that automatically snaps to edges when you drag over in the photo.
Magic Wand tool: Selects pixels of similar color with one click
Quick Selection tool: Quickly and automatically makes selection based on color and texture when you click or click-drag an area.
Selection Brush tool: Automatically selects or deselects the area you paint, depending on whether you’re in selection or mask mode.
Smart Brush tool: Applies color and tonal adjustments and effects to a selection. The tool automatically creates an adjustment layer for non-destructive editing.
Use the Rectangular and Elliptical Marquee tools
147

To the top
The Rectangular Marquee tool draws square or rectangular selection borders, and the Elliptical Marquee tool draws round or elliptical selectionborders.
Rectangular and Elliptical Marquee tool options A. Rectangular Marquee tool B. Elliptical Marquee tool C. New selection D. Add to selection E. Subtract from selection F. Intersect with selection
1. Select the Rectangular Marquee tool or the Elliptical Marquee tool in the toolbox.
2. (Optional) Set marquee tool options in the Tool Options bar:
Specify whether to create a new selection, add to a selection, subtract from a selection, or select an area intersected by other selections.
To soften the selection border so that it blends into the area outside the selection, enter a Feather value.
To smooth the edges of your selection, select Anti-aliased (Elliptical Marquee tool only).
From the Mode pop-up menu, choose Normal to visually set the size and proportions of the selection border; Fixed Ratio to set a width-to-height ratio for the selection border; or Fixed Size to specify the marquee’s height and width.
3. Drag over the area you want to select. Hold down the Shift key as you drag to constrain the selection marquee to a square or circle.
To drag a marquee from the center, hold down Alt (Windows) or Option (Mac OS) after you begin dragging.
To reposition a marquee tool selection border, hold down the spacebar as you drag with the selection tool. Release the spacebar oncethe selection border is in the correct area.
4. Click Refine Edge to make further adjustments to your selection and make it more precise. See how you can refine the edges of a selection.
Use the Lasso tool
The Lasso tool draws freehand selection borders. This tool lets you make very precise selections.
Lasso tool options A. Lasso tool B. Polygonal Lasso tool C. Magnetic Lasso tool D. New selection E. Add to selection F. Subtract from selection G. Intersect withselection
148

To the top
1. Select the Lasso tool from the toolbox.
2. (Optional) Set Lasso tool options in the Tool Options bar:
Specify whether to create a new selection, add to an existing selection, subtract from a selection, or select an area intersected by otherselections.
To soften the selection border so that it blends into the area outside the selection, enter a Feather value.
To smooth the edges of your selection, select Anti-aliased.
3. Drag to draw a freehand selection border:
To add to the selection, release the mouse button; then press Shift and, when the pointer changes to , drag.
To subtract from the selection, release the mouse button; then press Alt (Option in Mac OS) and when the pointer changes to , drag.
To add straight-edge segments, hold the mouse button and press Alt (Option in Mac OS); then release the mouse button and, when thepointer changes click where you want to position the end of the segment.
4. To close the selection border, release the mouse button. A straight selection segment is drawn from where you released the mouse buttonto the starting point of your selection.
5. Click Refine Edge to make further adjustments to your selection and make it more precise. See how you can refine the edges of a selection.
Use the Polygonal Lasso tool
The Polygonal Lasso tool draws straight-edged segments of a selection border. You can create as many segments as you need to draw aselection border.
Polygonal Lasso tool options A. Lasso tool B. Polygonal Lasso tool C. Magnetic Lasso tool D. New selection E. Add to selection F. Subtract from selection G. Intersect withselection
1. Select the Polygonal Lasso tool from the toolbox.
2. (Optional) Set Polygonal Lasso tool options in the Tool Options bar:
149
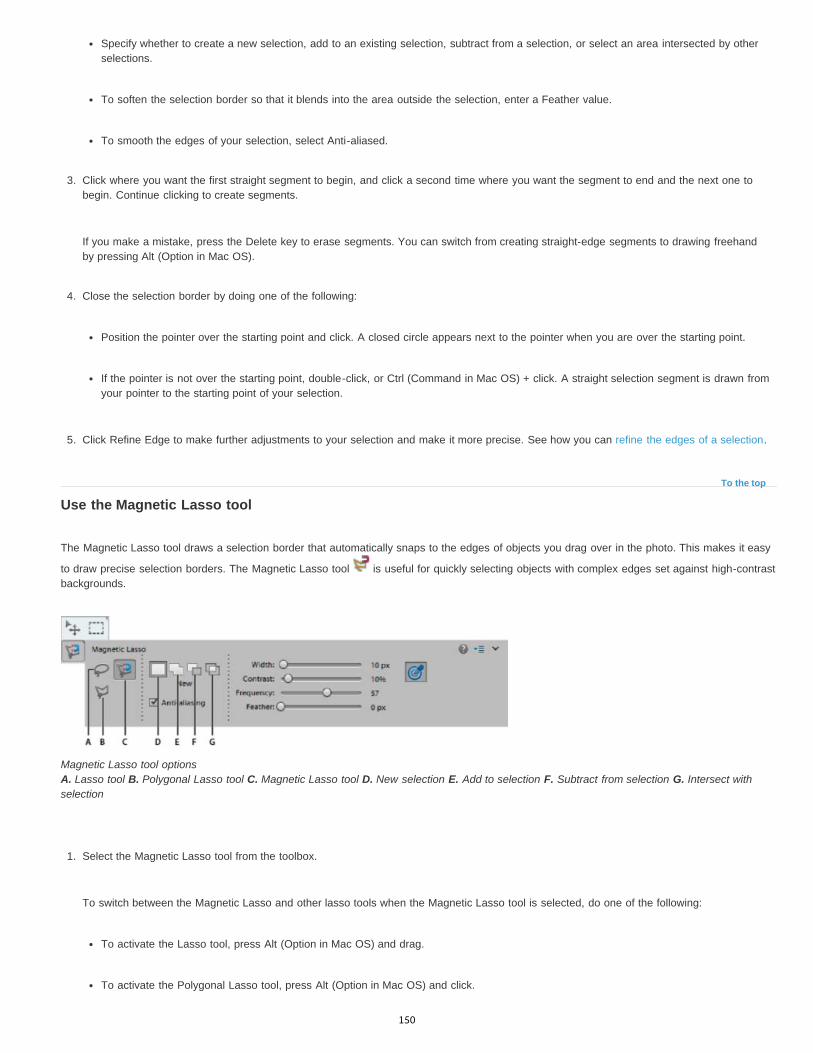
To the top
Specify whether to create a new selection, add to an existing selection, subtract from a selection, or select an area intersected by otherselections.
To soften the selection border so that it blends into the area outside the selection, enter a Feather value.
To smooth the edges of your selection, select Anti-aliased.
3. Click where you want the first straight segment to begin, and click a second time where you want the segment to end and the next one tobegin. Continue clicking to create segments.
If you make a mistake, press the Delete key to erase segments. You can switch from creating straight-edge segments to drawing freehandby pressing Alt (Option in Mac OS).
4. Close the selection border by doing one of the following:
Position the pointer over the starting point and click. A closed circle appears next to the pointer when you are over the starting point.
If the pointer is not over the starting point, double-click, or Ctrl (Command in Mac OS) + click. A straight selection segment is drawn fromyour pointer to the starting point of your selection.
5. Click Refine Edge to make further adjustments to your selection and make it more precise. See how you can refine the edges of a selection.
Use the Magnetic Lasso tool
The Magnetic Lasso tool draws a selection border that automatically snaps to the edges of objects you drag over in the photo. This makes it easy
to draw precise selection borders. The Magnetic Lasso tool is useful for quickly selecting objects with complex edges set against high-contrastbackgrounds.
Magnetic Lasso tool options A. Lasso tool B. Polygonal Lasso tool C. Magnetic Lasso tool D. New selection E. Add to selection F. Subtract from selection G. Intersect withselection
1. Select the Magnetic Lasso tool from the toolbox.
To switch between the Magnetic Lasso and other lasso tools when the Magnetic Lasso tool is selected, do one of the following:
To activate the Lasso tool, press Alt (Option in Mac OS) and drag.
To activate the Polygonal Lasso tool, press Alt (Option in Mac OS) and click.
150

To the top
2. (Optional) Set Magnetic Lasso tool options in the Tool Options bar:
Specify whether to create a new selection, add to an existing selection, subtract from a selection, or select an area intersected by otherselections.
To soften the selection border so that it blends into the area outside the selection, enter a Feather value.
To smooth the edges of your selection, select Anti-aliased.
To specify the area of edge detection, enter a pixel value between 1 and 256 for Width. The tool detects edges only within the specifieddistance from the pointer.
To change the Magnetic Lasso pointer so that it indicates the area of edge detection (the Width value), press the Caps Lock key.
To specify the Magnetic Lasso tool’s sensitivity to edges in the photo, enter a value between 1% and 100% for Edge Contrast. A highervalue detects only edges that contrast sharply with their surroundings; a lower value detects lower-contrast edges.
To specify the rate at which the Magnetic Lasso tool sets fastening points, enter a value between 0 and 100 for Frequency. A highervalue anchors the selection border in place more quickly.
3. Add segments of a selection border by doing one of the following:
Click points along the edge.
Drag along the edge while pressing the mouse button.
The selection border snaps to the edge in the photo. If the border doesn’t snap to the desired edge, click once to add a point manually;then continue tracing the border and clicking points as needed. If you make a mistake, press the Delete key to erase points along theborder.
4. Close the selection border by doing one of the following:
To close the border manually, drag back over the starting point and click. A closed circle appears next to the pointer when you are overthe starting point.
To close the border with a freehand magnetic segment, double-click or press Enter.
To close the border with a straight segment, double-click while pressing Alt (Option in Mac OS).
Use the Magic Wand tool
The Magic Wand tool selects pixels within a similar color range with one click. You specify the color range, or tolerance, for the Magic Wand tool’sselection. Use the Magic Wand tool when you have an area of similar colors, like a blue sky.
151
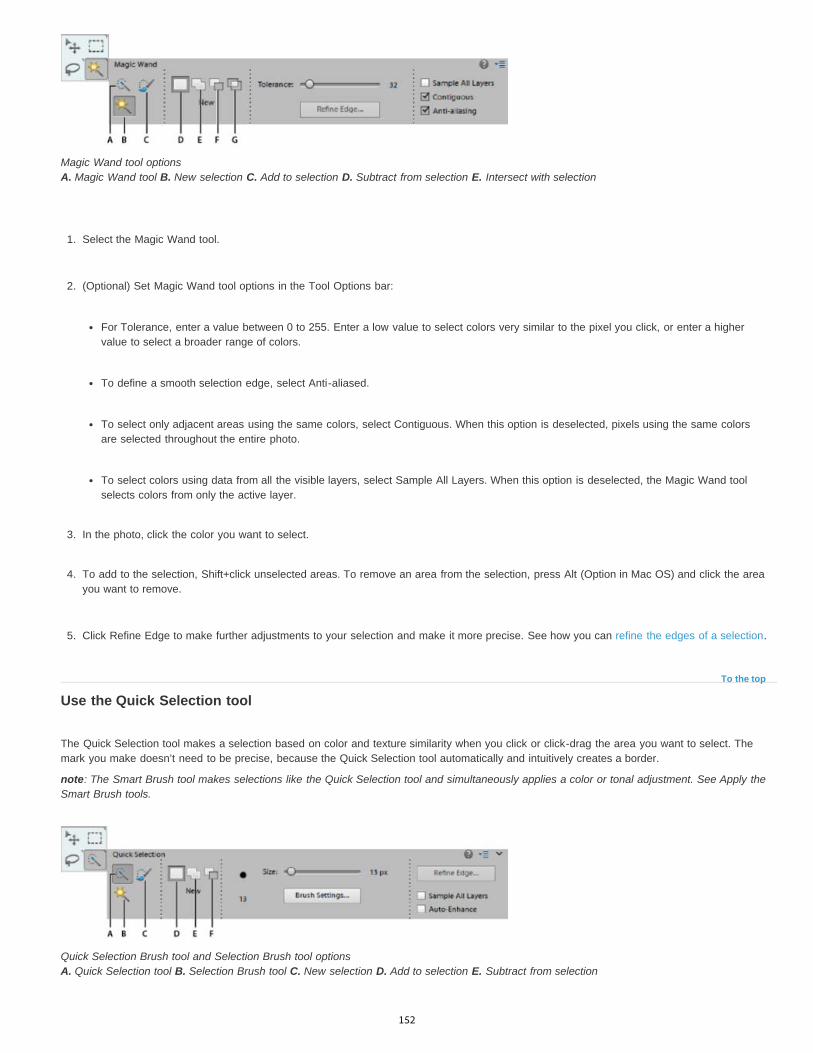
To the top
Magic Wand tool options A. Magic Wand tool B. New selection C. Add to selection D. Subtract from selection E. Intersect with selection
1. Select the Magic Wand tool.
2. (Optional) Set Magic Wand tool options in the Tool Options bar:
For Tolerance, enter a value between 0 to 255. Enter a low value to select colors very similar to the pixel you click, or enter a highervalue to select a broader range of colors.
To define a smooth selection edge, select Anti-aliased.
To select only adjacent areas using the same colors, select Contiguous. When this option is deselected, pixels using the same colorsare selected throughout the entire photo.
To select colors using data from all the visible layers, select Sample All Layers. When this option is deselected, the Magic Wand toolselects colors from only the active layer.
3. In the photo, click the color you want to select.
4. To add to the selection, Shift+click unselected areas. To remove an area from the selection, press Alt (Option in Mac OS) and click the areayou want to remove.
5. Click Refine Edge to make further adjustments to your selection and make it more precise. See how you can refine the edges of a selection.
Use the Quick Selection tool
The Quick Selection tool makes a selection based on color and texture similarity when you click or click-drag the area you want to select. Themark you make doesn’t need to be precise, because the Quick Selection tool automatically and intuitively creates a border.
note: The Smart Brush tool makes selections like the Quick Selection tool and simultaneously applies a color or tonal adjustment. See Apply theSmart Brush tools.
Quick Selection Brush tool and Selection Brush tool options A. Quick Selection tool B. Selection Brush tool C. New selection D. Add to selection E. Subtract from selection
152

New Selection
Add To Selection
Subtract From Selection
To the top
1. Select the Quick Selection Brush tool.
2. In the Tool Options bar, choose one of the following:
Lets you draw a new selection. This option is selected by default.
Lets you add to an existing selection.
Lets you subtract from an existing selection. This option is only available after you make a selection.
3. Choose a brush from the Brush Picker in the options bar. If you want to select a large area, you can use a larger brush. For more preciseselections, choose a smaller brush size.
4. Click or click-drag over the area that covers the range of colors in the object you want to select, and then release the mouse button.
The selection border appears.
5. Do any of the following to refine the selection:
To add to the selection, click the Add To Selection button in the options bar, and click or click-drag across the area you want to add.
To remove an area from the selection, click the Subtract From Selection button in the options bar, and click or click-drag across the areayou want to subtract from the selection.
To start a new selection, click the New Selection button in the options bar, and click or draw to specify the new selection area.
6. Click Refine Edge to make further adjustments to your selection and make it more precise. See how you can refine the edges of a selection.
Use the Selection Brush tool
The Selection Brush tool makes selections two ways: you can paint over the area you want to select in Selection mode, or you can paint overareas you don’t want to select using a semiopaque overlay in Mask mode.
You can first make a rough selection with a marquee tool, Quick Selection tool, or other selection tool, and then fine-tune your selection with theSelection Brush tool. You can add to the selection using the Selection Brush tool in Selection mode, or subtract from it in Mask mode.
153

Selection Brush tool options A. Selection Brush B. Add to selection C. Subtract from selection D. Selection pop-up E. Brush pop-up F. Brush size G. Hardness
1. Select the Selection Brush tool from the toolbox. You may need to click the Quick Selection tool in the toolbox and select the SelectionBrush from the list of hidden tools that appears.
2. By default, the tool is set to Add To Selection . To subtract from the selection, click Subtract From Selection in the options bar.
3. (Optional) Set Selection Brush tool options in the Tool Options bar:
Choose a brush from the brush presets pop-up panel.
Specify the brush size.
Choose Selection (to add to the selection) or Mask (to subtract from the selection) from the Mode menu.
Set the brush tip’s hardness to a value between 1% and 100%.
If you use a soft-edged brush with the Selection Brush tool, changing the Mode option to Mask can help you see the soft edges of theselection.
When using Mask mode, specify an Overlay Opacity between 1% and 100%.
When using Mask mode, click the Overlay Color swatch and select a color in the Color Picker to set the mask color. This is useful whenthe mask color (Overlay Color) is too similar to the colors in the photo.
4. Draw in your photo to select or deselect areas.
154

To the top
Note:
Adding to a selection while in Selection mode (left) and subtracting from a selection while in Mask mode (right)
Use the Magic Extractor
The Magic Extractor feature is not available in Adobe Photoshop Elements 12.
Use the Magic Extractor to make accurate selections based on the appearance of foreground and background areas that you specify. You canspecify these areas by placing colored marks in the areas you want to select. After you mark the areas and close the dialog box, only theforeground area appears in the photo.
The Magic Extractor makes it easy to select people or objects so that you can superimpose them on other backgrounds. For example, you canremove yourself from a photo of you on your bicycle at home, and superimpose it on a photo of cyclists in the Tour de France. You can save theextracted image as a file that you can use again and again.
Using the Magic Extractor A. Area you want to extract marked with red dots B. Background marked with blue dots C. Extracted image
1. Open the photo containing the object you want to extract.
2. To limit what appears in the Magic Extractor dialog box, make a preliminary selection using the Oval or Rectangular selection tool.
3. Choose Image > Magic Extractor.
The Magic Extractor dialog box opens with the Foreground Brush tool selected by default.
4. Click multiple times or draw lines to mark the area you want to extract.
5. Select the Background Brush tool and click multiple times or draw lines to mark the area that you do not want included in your selection.
When selecting objects with varied colors and textures, drag across all the colors and textures to ensure a more accurate selection.
6. To help mark your selection, use the Zoom tool or the Hand tool to magnify and navigate around the photo. Press Alt (Option in Mac OS) asyou use the Zoom tool to zoom out.
155
To the top
7. To specify a different brush size or color, do one of the following:
Choose a new size from the Brush Size menu.
Click the Foreground Color or Background Color swatch, choose a new color in the Color Picker, and then click OK.
8. Click Preview to see the current selection.
9. To specify preview settings, do one of the following:
To change what is displayed in the preview area, choose either Selection Area or Original Photo from the Display menu. Or press the Xkey on your keyboard to switch between the two views.
To specify a different background, choose an option from the Background menu.
10. Do any of the following to fine-tune the selection, and then preview the results again:
To add to or subtract from the selection, draw more dots or lines using either the Foreground or Background Brush tool.
To erase foreground or background dots, select the Point Eraser tool and click or drag over the marks you want to remove.
To add areas to a selection, select the Add To Selection tool, and click or drag over the area you want to add.
To remove areas from the selection, select the Remove From Selection tool and drag over the areas you want to remove.
To smooth the edges of your foreground selection, select the Smoothing Brush tool and drag over the areas you want to smooth.
To soften the edges of your selection, specify a higher value in the Feather box.
To fill remaining holes in the main selection, click Fill Holes.
To separate and remove an area from the main selection, select the Remove From Selection Tool and drag a line between the mainselection and the area you want to remove. Then click Fill Holes.
To remove fringe colors left between the foreground and background, click Defringe. To increase or decrease the amount of fringeremoved, specify a value from the Defringe Width menu.
11. Click OK to extract the selected areas. If you want to start over, click Reset to remove all marks.
Refined edges of a selection
156

To the top
In Photoshop Elements 11, you can fine-tune your selection using the Refine Edge (select a portion of an image > right-click theselection > select Refine Edge) dialog box. You can also open the Refine Edge dialog by clicking Select > Refine Edge.
View Mode. From the View pop-out menu, choose a view mode in which you want see the selection. Press F to cycle through the modes
Show Radius. Displays the radius within which edge refinement occurs.
Refine Radius and Erase Refinements tools. Precisely adjust the border area in which edge refinement occurs. To quickly toggle fromone tool to the other, press E. To change the brush size, press the bracket keys. Note: Brush over soft areas such as hair or fur to add fine detailsto the selection.
Smart Radius. Automatically adjusts the radius for hard and soft edges found in the border region. Deselect this option if the border isuniformly hard- or soft-edged, or if you want to control the Radius setting and refinement brushes more precisely.
Radius. Determines the size of the selection border in which edge refinement occurs. Use a small radius for sharp edges, and a largeone for softer edges.
Smooth. Reduces irregular areas (“hills and valleys”) in the selection border to create a smoother outline.
Feather. Blurs the transition between the selection and surrounding pixels.
Contrast. When increased, soft-edged transitions along the selection border become more abrupt.Typically, the Smart Radius option andrefinement tools are more effective.
Shift Edge. Moves soft-edged borders inward with negative values or outward with positive ones. Shifting these borders inward can helpremove unwanted background colors from selection edges.
Decontaminate Colors. Replaces color fringes with the color of fully selected pixels nearby. The strength of color replacement isproportionate to the softness of selection edges.Important: Because this option changes pixel color, it requires output to a new layer or document. Retain the original layer so you can revertback to it if needed. (To easily see changes in pixel color, choose Reveal Layer for the View Mode.)
Amount. Changes the level of decontamination and fringe replacement.
Output To. Determines whether the refined selection becomes a selection or mask on the current layer, or produces a new layer ordocument.
Delete a selected area
157
Twitter™ and Facebook posts are not covered under the terms of Creative Commons.
Legal Notices | Online Privacy Policy
To the top
Note:
On deleting a selection on a background layer, the selected area is replaced with the background color or checkerboard background pattern(transparent pixels).
Do any of the following:
Choose Edit > Delete to remove the selection. (If you delete a selection by mistake, you can choose Edit > Undo to get it back.)
Press the Backspace or Delete key to remove the selection.
Choose Edit > Cut to cut the selection to the Clipboard. You can then paste it elsewhere.
Select and deselect areas using commands
1. Do any of the following:
To deselect selections, choose Select > Deselect.
To select all pixels in a layer, select the layer in the Layers panel and choose Select > All.
To reselect the most recent selection, choose Select > Reselect.
2. To show or hide selection borders, choose View > Selection.
You can also deselect by clicking anywhere in the photo outside the selected area. However, you might accidentally make furtherselections if you’re using a selection tool that selects based on clicking, such as the Magic Wand tool.
158

Moving and copying selections
To the top
Auto Select Layer
Show Bounding Box
Note:
Show Highlight On Rollover
Move a selectionCopying selections or layersCopy selections with the Move toolCopy a selection using commandsPaste one selection into another
Move a selection
The Move tool lets you cut and drag a pixel selection to a new location in the photo. You can also use the tool to move or copy selections betweenphotos in Photoshop Elements, and to photos in other applications that support selections.
Moving a selection from one photo into another using the Move tool
To activate the Move tool when another tool is selected, hold down Ctrl (Command in Mac OS). (This technique does not work when the Handtool is selected.)
1. In the Edit workspace, make a selection with a selection tool and select the Move tool from the toolbox.
2. (Optional) Change Move tool settings in the options bar.
3. Move the pointer inside the selection border, and drag the selection to a new position. If you’ve selected multiple areas, all pixel selectionsmove as you drag.
Move tool options
When you select the Move tool, you can change the following settings in the options bar:
Selects the topmost layer that has pixels under the Move tool cursor, rather than the currently selected layer.
Displays the bounding box around the selection in the image, or around the currently selected layer (if there is no activeselection on the image). The boxes on the sides and corners allow you to resize the selection or layer.
A bounding box is not visible for a Background layer.
Highlights individual layers as the mouse hovers over the image. Click on a highlighted layer to select and move it.Layers that are already selected do not highlight on rollover.
159
Arrange menu
Align menu
Distribute menu
To the top
To the top
Note:
To the top
Moves the selected layer in front, in between, or in back of other layers. Options include Bring To Front, Bring Forward, SendBackward, and Send To Back. To arrange a layer, select the layer, and then choose an item from the Arrange menu.
Aligns the selected layers. Options include Top Edges, Vertical Centers, Bottom Edges, Left Edges, Horizontal Centers, and RightEdges. Multiple layers can be aligned simultaneously. To align layers, select a layer, hold down Shift, select another layer, and then choose anitem from the Align menu.
Spaces selected layers equally apart. Options include Top Edges, Vertical Centers, Bottom Edges, Left Edges, HorizontalCenters, and Right Edges. Multiple layers can be spaced simultaneously. For this option to be enabled, you must have a minimum of threeselected layers. To space layers apart, select a layer, hold down Shift, select other layers, and then choose an item from the Distribute menu.
Copying selections or layers
You can copy and paste selections using the Move tool or the Copy, Copy Merged, Cut, Paste, or Paste Into Selection commands in the Editmenu.
Keep in mind that when a selection or layer is pasted between photos with different resolutions, the pasted data retains its original pixeldimensions. This can make the pasted portion appear out of proportion to the new image. Use the Image > Resize > Image Size command tomake the source and destination photos the same resolution before copying and pasting.
Selections that you cut or copy are stored in the Clipboard. Only one selection is stored in the Clipboard at a time.
Copy selections with the Move tool
When copying between photos, drag the selection from the active image window into the other image window. A border highlights the imagewindow when you can drop the selection into it.
1. Select the part of the image you want to copy.
2. In the Edit workspace, select the Move tool from the toolbox.
3. Press Alt (Option in Mac OS) while dragging the selection you want to copy and move.
4. To make additional copies of the same selection, do one of the following:
Hold down Alt (Option in Mac OS) while dragging the selection to each new location.
To offset the duplicate by 1 pixel, hold down Alt (Option in Mac OS), and press an arrow key. (This moves the pixels and copies thepixels, creating a blur effect.)
To offset the duplicate by 10 pixels, press Alt (Option in Mac OS) + Shift and press an arrow key. (This moves the pixels rather thancopying them.)
When you drag a selection (with Shift key pressed) from one image to another image, the selection is pasted at the center.
Copy a selection using commands
1. In the Edit workspace, use a selection tool to select the area you want to copy.
160

Twitter™ and Facebook posts are not covered under the terms of Creative Commons.
Legal Notices | Online Privacy Policy
To the top
Note:
2. Do one of the following:
Choose Edit > Copy to copy the selection to the Clipboard.
Choose Edit > Copy Merged to copy all layers in the selected area to the Clipboard.
Paste one selection into another
You can use the Paste Into Selection command to paste clipboard, or copied content, within a selection. This command lets you take advantage ofelements within the selected area and prevent the pasted image from looking flat and unnatural. For example, you can use a Hard Light blendingmode at 85% opacity to retain the reflection in a pair of sunglasses. When using blending modes this way, you need to create a new layer andpaste the selection into that layer.
Copying a selection from one image to another A. Part of the original photo selected B. Photo to copy and paste into original C. Resulting image
1. In the Edit workspace, use the Copy command to copy the part of the photo you want to paste. (You can even copy from photos in otherapplications.)
2. Make a selection in the photo into which you want to paste the copied photo.
3. Choose Edit > Paste Into Selection.
The copied photo appears only within the selection border. You can move the copied photo within the border, but if you move itcompletely out of the border, it won’t be visible.
4. With your pointer within the selection border, drag the pasted image to the proper location.
5. When you’re satisfied with the results, deselect the pasted image to commit the changes.
To activate the Move tool when another tool is selected, hold down Ctrl (Command in Mac OS). (This technique does not work with theHand tool.)
161
Modifying selections
To the top
Note:
To the top
To the top
Move a selection borderInvert a selectionAdd to or subtract from a selectionSelect an area that intersects an existing selectionExpand or contract a selection by a specific number of pixelsFrame an existing selection with a new selection borderInclude areas of similar color in a selectionRemove stray pixels from a color-based selectionDefringe a selection
Move a selection border
Moving a selection border repositions just the border without altering the photo.
1. Using any selection tool, click New Selection in the options bar, and position the pointer inside an existing selection border. The pointerchanges to indicate that you can move the selection .
The New Selection option appears in the options bar when any selection tool is selected—except the Selection Brush tool. Switchto another selection tool temporarily, if necessary, to select this option.
2. Do one of the following:
Drag the border to enclose a different area of the photo. You can drag a selection border beyond the canvas boundaries; however,this makes it hard to get back. You can also drag the selection border to another image window.
To move the selection in 1-pixel increments, use an arrow key.
To move the selection in 10-pixel increments, hold down Shift, and use an arrow key.
To constrain the direction to multiples of 45°, begin dragging, and then hold down Shift as you continue to drag.
Invert a selection
Inverting a selection changes the unselected areas into selected areas, protecting the area you previously selected.
In a photo with an existing selection border, choose Select > Inverse.
You can use this command to easily select an object that appears against a solid-colored area. Select the solid color using the MagicWand tool, and then choose Select > Inverse.
Add to or subtract from a selection
You can add to or subtract from an existing selection to fine-tune selection borders. For example, you could make a donut-shaped selection by
162

To the top
To the top
first making a circular selection and then subtracting a circular selection within it.
Select a selection tool, and do one of the following:
Hold down Shift (a plus sign appears next to the pointer) to add to the selection, or hold down Alt (Option in Mac OS) to subtract (aminus sign appears next to the pointer) from a selection. Then select the area to add or subtract and make another selection.
Click Add To Selection or Subtract From Selection in the options bar, and make another selection. (The Add To Selection andSubtract From Selection options appear in the options bar when any selection tool is selected.)
Select an area that intersects an existing selection
You can limit the area a selection affects. For example, in a picture of snow-capped mountains, you can select white clouds in the sky withoutselecting parts of the white mountain below them by selecting the entire sky, and then using the Magic Wand tool with Intersect With Selectionselected and Contiguous deselected to select only the white areas included within the existing sky selection.
Selecting the sky and top of mountains with the Rectangular Marquee tool (top). Selecting the Intersect With Selection option and using theMagic Wand tool to select the clouds (middle). Resulting image after increasing the brightness of the clouds (bottom).
Select a selection tool, and do one of the following:
Select Intersect With Selection in the options bar, and select an area that intersects the existing selection.
Hold down Alt (Option in Mac OS) + Shift so that cross-hairs appear next to the pointer, and select an area that intersects the existingselection.
Expand or contract a selection by a specific number of pixels
You can use commands in the Select menu to increase or decrease the size of an existing selection and to clean up stray pixels left inside oroutside a color-based selection.
1. Use a selection tool to make a selection.
2. Choose Select > Modify > Expand or Contract.
163

To the top
To the top
Note:
To the top
3. For Expand By or Contract By, enter a pixel value between 1 and 100, and click OK.
The selection border is moved outward or inward by the specified number of pixels. Any portion of the selection border that runs along thecanvas edge is unaffected.
Frame an existing selection with a new selection border
The Border command creates a soft-edged, anti-aliased selection border. When you add the new selection border, only pixels between the twoselection borders are selected.
Using the Border command to create a 4-pixel border selection (top). Copying the selection to a new layer and filling to make an outline of theimage (center). Filling the selection into the original image to create an outline around the image (bottom).
1. Use a selection tool to make a selection.
2. Choose Select > Modify > Border.
3. Enter a value between 1 and 200 pixels in the Width text box, and click OK.
Include areas of similar color in a selection
1. Make a selection with a selection tool and do one of the following:
Choose Select > Grow to include all adjacent pixels falling within the tolerance range specified in the options bar. (You may have toswitch to a selection tool that includes a tolerance range, such as the Magic Wand tool.) A higher Tolerance value adds a broaderrange of colors.
Choose Select > Similar to include pixels throughout the photo, not just adjacent ones, that fall within the tolerance range.
2. To increase the selection incrementally, choose either command multiple times.
You cannot use the Grow and Similar commands on photos in bitmap mode.
Remove stray pixels from a color-based selection
164

Twitter™ and Facebook posts are not covered under the terms of Creative Commons.
Legal Notices | Online Privacy Policy
To the top
The Smooth command searches around each selected pixel for other pixels within the specified color range and selects them.
1. Make a selection with a selection tool and choose Select > Modify > Smooth.
2. For Sample Radius, enter a pixel value between 1 and 100, and click OK.
Defringe a selection
When you move or paste a selection, some of the pixels surrounding the selection border are included with the selection. These extra pixels canresult in a fringe or halo around the edges of the selection. The Defringe Layer command replaces the color of any fringe pixels with the colorsof nearby pixels containing pure colors (those without background color). For example, if you select a yellow object on a blue background andthen move the selection, some of the blue background is moved with the object. Defringe Layer replaces the blue pixels with yellow pixels.
Dog selected and copied to a new image where artifacts from the dark background are visible (top). Image after using the Defringe Layercommand (bottom).
1. Copy and paste a selection into a new or existing layer.
2. Choose Enhance > Adjust Color > Defringe Layer.
3. In the Defringe dialog box, type the number of pixels you’d like to replace around the object. A value of 1 or 2 should be sufficient.
4. Click OK.
165

Smoothing selection edges withanti-aliasing and feathering
To the top
To the top
To the top
Smooth the edges of a selection by anti-aliasingBlur the edges of a selection by featheringDefine a feathered edge for a selection toolDefine a feathered edge for an existing selection
Smooth the edges of a selection by anti-aliasing
You can smooth the hard edges of a selection by anti-aliasing or feathering. Anti-aliasing smoothes the jagged edges of a selection by softeningthe color transition between edge pixels and background pixels. Because only the edge pixels change, no detail is lost. Anti-aliasing is usefulwhen cutting, copying, and pasting selections to create composite images.
You can select anti-aliasing with the Lasso, Polygonal Lasso, Magnetic Lasso, Elliptical Marquee, and Magic Wand tools. To anti-alias, youmust select the Anti-Alias option before making the selection; you cannot add anti-aliasing to an existing selection.
1. In the Edit workspace, select the Lasso, Polygonal Lasso, Magnetic Lasso, Elliptical Marquee, or Magic Wand tool.
2. Select Anti-aliased in the options bar.
3. Make a selection in the image window.
Blur the edges of a selection by feathering
You can smooth the hard edges of a selection by feathering. Feathering blurs edges by building a transition between the selection andsurrounding pixels. This blurring can cause some loss of detail at the edge of the selection.
You can create a feathered selection with the Elliptical Marquee, Rectangular Marquee, Lasso, Polygonal Lasso, or Magnetic Lasso tool.You can also add feathering to an existing selection by using the Select menu. Feathering effects are apparent when you move, cut, copy,or fill the selection.
Original image (left), and after making a feathered selection, applying the Inverse command, and filling with white (right)
Define a feathered edge for a selection tool
1. In the Edit workspace, do one of the following:
166

Twitter™ and Facebook posts are not covered under the terms of Creative Commons.
Legal Notices | Online Privacy Policy
To the top
Select any of the lasso or marquee tools from the toolbox, and enter a Feather value in the options bar to define the width of thefeathering. The feathering begins at the selection border.
Select the Selection Brush tool, and select a soft-edged brush from the brushes pop-up panel in the options bar.
2. Make a selection in the image window.
Define a feathered edge for an existing selection
1. In the Edit workspace, use a selection tool from the toolbox to make a selection.
2. Choose Select > Feather.
3. Type a value between .2 and 250 in the Feather Radius text box, and click OK. The feather radius defines the width of the featherededge.
167

Saving selections
To the top
To the top
Save, load, or delete a selectionModify a saved selectionModify a new selection with a saved selection
Save, load, or delete a selection
Saving a selection allows you to edit a selected area of a photo at a later time. You can work on other parts of the photo before loading thesaved selection.
Saving selection (top), loading selection (center), and using the selection to fill with a solid color (bottom)
1. In the Edit workspace, make a selection in your photo.
2. Choose Select > Save Selection.
3. In the Save Selection dialog box, choose New from the Selection pop-up menu.
4. Enter a name for the selection in the Name box, and then click OK.
5. To load the selection, choose Select > Load Selection, choose the saved selection from the Selection menu, and then click OK.
6. To delete a selection, choose Select > Delete Selection, choose a saved selection from the Selection menu, and then click OK.
Modify a saved selection
168

Twitter™ and Facebook posts are not covered under the terms of Creative Commons.
Legal Notices | Online Privacy Policy
Replace Selection
Add To Selection
Subtract From Selection
Intersect With Selection
To the top
Add To Selection
Subtract From Selection
Intersect With Selection
You can modify saved selections by replacing, adding to, or subtracting from them.
1. In the Edit workspace, make a selection in your photo.
2. Choose Select > Save Selection.
3. In the Save Selection dialog box, choose the selection you want to modify from the Selection menu.
4. Select one of the following and click OK:
Replaces the saved selection with the current selection.
Adds the current selection to the saved selection.
Subtracts the current selection from the saved selection.
Replaces the saved selection with the intersection between the current selection and the saved selection.
You can also modify a saved selection by loading it and using selection tools to add to it (Shift-drag) or subtract from it (Alt-drag inWindows, Option-drag in Mac). (See Add to or subtract from a selection.)
Modify a new selection with a saved selection
1. In the Edit workspace, open a photo that contains a saved selection.
2. Make a new selection in your photo.
3. Choose Select > Load Selection.
4. Choose a saved selection from the Selection menu.
5. Select one of the following operations:
Adds the saved selection to the current selection.
Subtracts the saved selection from the current selection.
Replaces the current selection with the intersection between the current selection and the saved selection.
6. To invert the selected area, select Invert and click OK.
169

Color
170
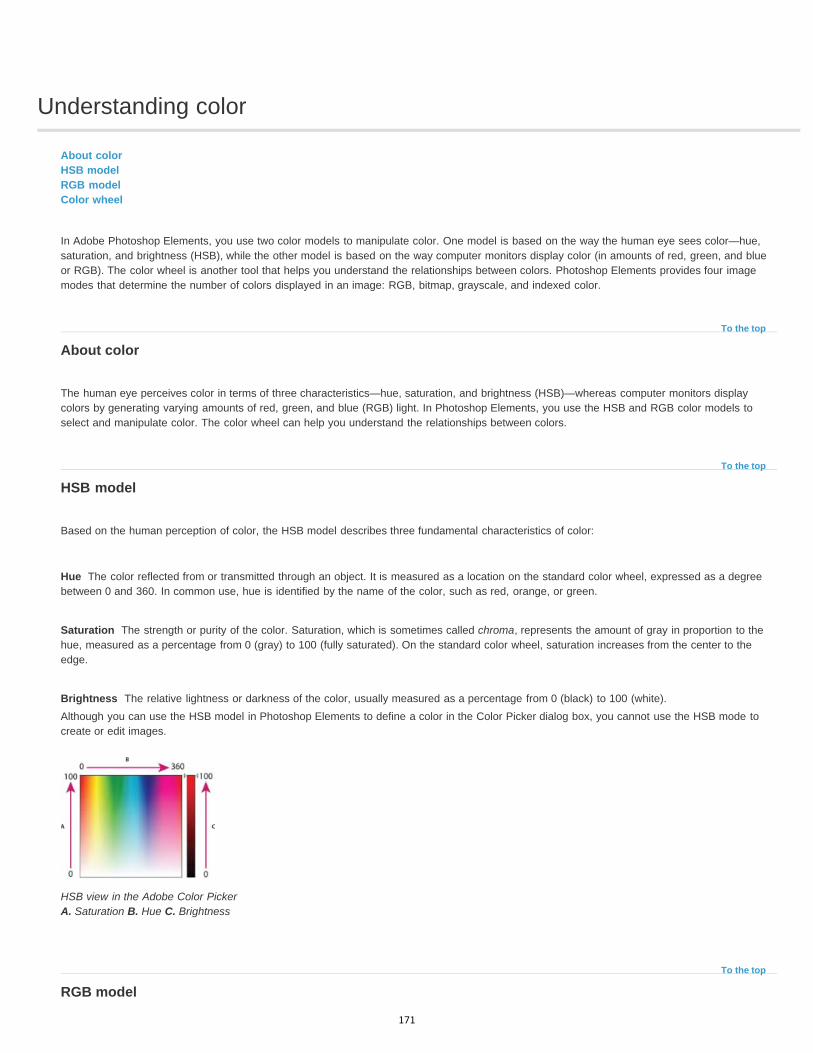
Understanding color
To the top
To the top
Hue
Saturation
Brightness
To the top
About colorHSB modelRGB modelColor wheel
In Adobe Photoshop Elements, you use two color models to manipulate color. One model is based on the way the human eye sees color—hue,saturation, and brightness (HSB), while the other model is based on the way computer monitors display color (in amounts of red, green, and blueor RGB). The color wheel is another tool that helps you understand the relationships between colors. Photoshop Elements provides four imagemodes that determine the number of colors displayed in an image: RGB, bitmap, grayscale, and indexed color.
About color
The human eye perceives color in terms of three characteristics—hue, saturation, and brightness (HSB)—whereas computer monitors displaycolors by generating varying amounts of red, green, and blue (RGB) light. In Photoshop Elements, you use the HSB and RGB color models toselect and manipulate color. The color wheel can help you understand the relationships between colors.
HSB model
Based on the human perception of color, the HSB model describes three fundamental characteristics of color:
The color reflected from or transmitted through an object. It is measured as a location on the standard color wheel, expressed as a degreebetween 0 and 360. In common use, hue is identified by the name of the color, such as red, orange, or green.
The strength or purity of the color. Saturation, which is sometimes called chroma, represents the amount of gray in proportion to thehue, measured as a percentage from 0 (gray) to 100 (fully saturated). On the standard color wheel, saturation increases from the center to theedge.
The relative lightness or darkness of the color, usually measured as a percentage from 0 (black) to 100 (white).Although you can use the HSB model in Photoshop Elements to define a color in the Color Picker dialog box, you cannot use the HSB mode tocreate or edit images.
HSB view in the Adobe Color Picker A. Saturation B. Hue C. Brightness
RGB model
171

Twitter™ and Facebook posts are not covered under the terms of Creative Commons.
Legal Notices | Online Privacy Policy
To the top
A large percentage of the visible spectrum can be represented by mixing red, green, and blue (RGB) light in various proportions and intensities.These three colors are called the additive primaries. Added together, red, green, and blue light make white light. Where two colors overlap, theycreate cyan, magenta, or yellow.
The additive primary colors are used for lighting, video, and monitors. Your monitor, for example, creates color by emitting light through red, green,and blue phosphors.
Additive colors (RGB). A. Red B. Green C. Blue D. Yellow E. Magenta F. Cyan
Color wheel
The color wheel is a convenient way to understand and remember the relationship between colors. Red, green, and blue are the additiveprimaries. Cyan, magenta, and yellow are the subtractive primaries. Directly across from each additive primary is its complement: red-cyan, green-magenta, and blue-yellow.
Each subtractive primary is made up of two additive primaries, but not its complement. So, if you increase the amount of a primary color in yourimage, you reduce the amount of its complement. For example, yellow is composed of green and red light, but there is no blue light in yellow.When adjusting yellow in Photoshop Elements, you change the color values in the blue color channel. By adding blue to your image, you subtractyellow from it.
Color wheel. A. Magenta B. Red C. Yellow D. Green E. Cyan F. Blue
172

Color and tonal correction basics
To the top
Quick
Guided
Expert
Camera Raw
To the top
Color correction overviewCorrect color in Quick modeCorrecting color in Expert modeAutomatically correct lighting and colorAbout histogramsView a histogram
Color correction overview
Photoshop Elements provides several tools and commands for fixing the tonal range, color, and sharpness in your photos, and for removing dustspots or other defects. You can work in one of three modes, depending on your experience and needs.
If you have limited knowledge of digital imaging, Quick mode is a good place to start fixing photos. It has many of the basic tools forcorrecting color and lighting.
If you are new to digital imaging and Photoshop Elements, you can use Guided Edit to guide you through the color correction task. Thisis also a good way to increase your understanding of the workflow.
If you’ve worked with images before, you’ll find that the Expert mode provides the most flexible and powerful image-correctionenvironment. It has the lighting and color-correction commands, along with tools for fixing image defects, making selections, adding text, andpainting on your images.When working with some of the adjustment commands, you can make adjustments directly to the image pixels. Or you can use adjustment layersto make nondestructive adjustments that you can easily tweak until your image is right. In this mode, the Smart Brush tool and Detail Smart Brushtool automatically create an adjustment layer for the correction you’re applying. See Apply the Smart Brush tools.
If you shoot digital images in your camera’s raw format, you can open and correct raw files in the Camera Raw dialog box. Becauseyour camera has not yet processed the raw files, you can adjust the color and exposure to improve the images. Often you may not need to makeother adjustments in Photoshop Elements. To open camera raw files in Photoshop Elements, first save them in a supported file format.
Correct color in Quick mode
For a video about using Quick mode, see www.adobe.com/go/lrvid905_pse_en.
The Quick mode conveniently groups many of the basic photo-fixing tools in Photoshop Elements. As you work in Quick mode, limit the number ofcolor and lighting controls that you apply to a photo. Generally, you use only one of the auto controls on a photo. If that control doesn’t achievewhat you want, click the Reset and try another one. You can also adjust your image using the slider controls, whether you’ve used an auto controlor not. Perform the Sharpening fix last on an image.
173

Using the Auto Lighten Shadows adjustment in Quick mode to instantly fix the photo
1. Do one of the following:
With a photo open, click Quick.
Any photos that you have stored in the Photo Bin are accessible while you are in Quick mode.
2. (Optional) Set preview options by making a selection from the menu (located in the bar above the image that is open). You can set thepreview to show how the photo looks before and after you make a fix, or to show both previews side by side (horizontally or vertically).
3. (Optional) Use the tools in the toolbox to zoom, move, and crop the image. You can also make a selection, fix red eye, whiten teeth, andadd text to the image.
4. To rotate the image in 90° increments in the counterclockwise direction (rotate left), click the Rotate button in the taskbar. To rotate theimage in the clockwise direction, click the arrow next to the Rotate button, and then click the rotate right button.
5. Select one of the image fixing controls (for example, Levels, Color, Contrast). If a control has additional options (for example, the Colorcontrol contains the Saturation, Hue and Vibrance tabs), select the corresponding tab to fix that aspect of the image.
6. To apply a fix, do one of the following:
Make the necessary adjustment using the sliders, and preview the adjustment on the photo, or enter a value in the text box next to thesliders.Hover the mouse over the thumbnails to preview the adjustment on the photo. Click the thumbnail to apply the adjustment on the imagetemporarily.Fine-tune a picture using a preview as the starting point, click and hold the mouse button on a preview thumbnail, and then drag right orleft.
Note: When you apply fixes in a sequence, all previous fixes are automatically applied as soon as you move to a new control. Forexample, if you move from the Balance control to the Exposure control, any changes you performed in the Balance control areautomatically applied.
7. To undo a fix or reset the picture, do the following:
To cancel the fix applied while still in the same control, press Ctrl + Z, or, in the menu bar, click Edit > Undo.
Note: If you have performed a sequence of fixes (for example, Exposure, Balance, and Contrast, it is not possible to undo changesperformed in the step where the Balance was fixed. You can undo only the control that you are currently in.
174
Smart Fix
Exposure
Contrast
Color
Balance
Sharpen
To cancel all fixes applied to picture, click Reset. The picture is restored to the state it was in at the beginning of the current editingsession.
Quick mode tools
To fine-tune a picture using a preview as the starting point, click and hold the mouse button, and then drag right or left.
The Quick mode provides the following tools to refine your photos:
Adjusts lighting and color. Smart Fix corrects overall color balance and improves shadow and highlight detail, if necessary.Auto
Automatically adjusts the image to apply optimum values for settings.
Adjusts the overall picture brightness. Use this control to ensure that the image you are viewing is of the desired brightness.
Adjusts the overall contrast of an image, and sometimes affects its color. If your image needs more contrast and it has a color cast, youcan use the following two options:
Auto Levels and Auto Contrast
The Auto Levels and Auto Contrast options work by individually mapping the lightest and darkest pixels in each color channel tomonochrome. To apply the settings, click the Auto button beside any of these options. (See About Levels adjustments or The Adjust LevelsGuided Edit.)
Shadows
Drag the slider to lighten the darkest areas of your photo without affecting the highlights. Pure black areas are not affected.Midtones
Adjusts the contrast within the middle tonal values (values that are about half way between pure white and pure black). It does not affect theextreme highlights and shadows.
Highlights
Drag the slider to darken the lightest areas of your photo without affecting the shadows. Pure white areas are not affected.
Adjusts the color by identifying shadows, midtones, and highlights in the image rather than in individual color channels. It neutralizes themidtones, and clips the white and black pixels using a default set of values. Click the Auto button to apply this command.
Saturation
Drag the slider to make colors more vivid or more muted, or choose the preview thumbnail that best suits your requirement.Hue
Shifts all colors in an image. This control is best used in small amounts or with selected objects whose color you want to change.Vibrance
Causes lower saturated colors to turn vivid, without allowing clipping to occur for the higher-saturation colors. This control enables you tovary skin tones without becoming oversaturated.
Adjusts the color balance of an image without affecting its contrast.Temperature
Drag the slider to make the colors warmer (red) or cooler (blue). Use this control to enhance sunsets or skin tones, or when the colorbalance set by your camera is off.
Tint
Drag the slider to make the color more green or more magenta. Use this control to fine-tune the colors after using the Temperature control.
Adjusts the sharpness of your image. Click Auto to use the default amount of sharpening.Sharpen
Drag the slider to vary the amount of sharpening. Zoom your preview at 100% to get a more accurate view of the amount of sharpening youare trying to apply.
175

Zoom tool
Hand tool
Quick Selection tool
Crop tool
To the top
Fix photos with touch up buttons
The touch up buttons are available in Quick mode, in the Modify panel. These buttons enable you to apply corrections and adjustments to selectedparts of an image. The red eye removal tool, spot healing tool, and healing brush tool modify the same layer. The whiten teeth tool creates andworks on a new adjustment layer. Also, the text tools create a new layer for edits. As a result, some tools do not permanently edit information onthe image layer. You can always change adjustment settings without degrading the original image. The Whiten Teeth, Touch Up buttons applyadjustments found in the Smart Brush tool. See Adjust color and tonality using the Smart Brush tools and About adjustment and fill layers.
1. In the Quick mode, do any of the following:
Click the Red Eye Removal button to remove red eye from a photo. This tool removes red eye in flash photos of people. Drag the tool inthe image around an eye you want to fix, or click the Auto button in the options bar. See Precisely remove red eye.
Click the Whiten Teeth button to apply a whiten teeth in an image. Drag in the image area with the teeth that you want to brighten.
2. (Optional) If you carried out Whiten Teeth adjustment, you can do any of the following:
Add the adjustment to more parts of the photo, by clicking the Add To Selection button, and dragging in the image.
Remove the adjustment from parts of the photo, by clicking the Subtract From Selection button, and dragging in the image.
Quick mode options
Sets the magnification of the preview image. Controls and options work like the Zoom tool in the toolbox. (See Zoom in or out.)
Moves the image around in the preview window if the entire image is not visible. Press the spacebar to access the Hand tool whenanother tool is selected.
Selects portions of the image based on where you click or drag the tool. (See Use the Quick Selection tool.)
Removes part of an image. Drag the tool within the preview image to select the portion you want to keep, and then press Enter. (SeeCrop an image.)
Correcting color in Expert mode
If you’ve worked with images before, you’ll find that Photoshop Elements provides the most flexible and powerful image-correction environment. Ithas lighting and color-correction commands, along with tools for fixing image defects, making selections, adding text, and painting on yourimages. When working with some of the adjustment commands, you can make adjustments directly on the image pixels. Or you can useadjustment layers to make nondestructive adjustments that you can easily tweak until your image is right. The Smart Brush tool and Detail SmartBrush tool automatically create an adjustment layer as you apply a correction. See Apply the Smart Brush tools or About adjustment and fill layers.
176

Expert mode A. There are many tools for correcting problems and selecting portions of a photo. B. The Photo Bin lets you see which photos are open. C. ThePanel Bin holds panels that you use to transform and enhance photos.
As you work on your photos, perform the following tasks that apply to your image. Not all tasks are required for every image, but the following listis a recommended workflow:
Specify a color management option.
Specify color management options.
View the image at 100% and crop, if necessary.
Before making any color corrections, view the image at a zoom percentage of 100%. At 100%, Photoshop Elements displays the image mostaccurately. You can also check for image defects, such as dust spots and scratches. If you plan to crop the file, do it now to reduce memoryrequirements and to ensure that the histogram uses only relevant information. Using the Zoom tool to zoom out may optimize the view beforecropping an image, so that you crop a well-centered selection.
Check the scan quality and tonal range.
Look at the image’s histogram to evaluate whether the image has sufficient detail to produce high-quality output.
Resize your image, if necessary.
Resize your image to the size that you need if you are going to use it in another application or project. If you are going to print it or use it in aPhotoshop Elements project, you generally don’t need to resize it. (See About image size and resolution.)
Adjust the highlights and shadows.
Begin corrections by adjusting the values of the extreme highlight and shadow pixels in the image (also known as the tonal range). Setting anoverall tonal range allows for the most detail possible throughout the image. This process is known as setting the highlight and shadow or settingthe white and black points. (See About Levels adjustments or The Adjust Levels Guided Edit.)
Adjust the color balance.
177

To the top
Auto Smart Fix
Auto Levels
Auto Contrast
Auto Color Correction
Auto Sharpen
Auto Red Eye Fix
To the top
After correcting the tonal range, you can adjust the image’s color balance to remove unwanted color casts or to correct oversaturated or mutedcolors. With some Photoshop Elements auto commands, both the tonal range and color are corrected in one step. (See Adjust saturation andhue.)
Make other special color adjustments.
Once you have corrected the overall color balance of your image, you can make optional adjustments to enhance colors. For example, you canincrease the saturation to make the colors in your image more vivid.
Retouch the image.
Use the retouching tools, like the Spot Healing Brush, to remove any dust spots or defects in the image. (See Remove spots and smallimperfections.)
Sharpen the clarity of the image.
As a final step, sharpen the clarity of edges in the image. This process helps restore detail and sharpness that tonal adjustments may reduce.(See Sharpening overview.)
Automatically correct lighting and color
Photoshop Elements provides several automatic lighting and color-correction commands in both Quick mode and Expert mode. The command youchoose depends on the needs of your image.
You can experiment with each of the auto commands. If you don’t like the result of one, undo the command by choosing Edit > Undo, and tryanother command. You will rarely need to use more than one auto command to fix an image.
1. To adjust a specific image area, select it with one of the selection tools. If no selection is made, the adjustment applies to the entire image.
2. Choose one of the following commands from the Enhance menu:
Corrects overall color balance and improves shadow and highlight detail, if necessary.
Adjusts the overall contrast of an image and may affect its color. If your image needs more contrast, and it has a color cast, trythis command. Auto Levels works by individually mapping the lightest and darkest pixels in each color channel to black and white.
Adjusts the overall contrast of an image without affecting its color. Use when your image needs more contrast, but the colorslook right. Auto Contrast maps the lightest and darkest pixels in the image to white and black, which makes highlights appear lighter andshadows appear darker.
Adjusts the contrast and color by identifying shadows, midtones, and highlights in the image, rather than inindividual color channels. It neutralizes the midtones and sets the white and black points using a default set of values.
Adjusts the sharpness of the image by clarifying the edges and adding detail that tonal adjustments may reduce.
Automatically detects and repairs red eye in an image.
About histograms178

To the top
You can use the histogram to analyze the image’s tonal distribution to see if you need to correct it. A histogram shows the distribution of animage’s pixel values in a bar chart. The left side of the chart shows the values of the image shadow (starting at level 0), and the right side showsthe highlight (level 255). The vertical axis of the chart represents the total number of pixels within a given level.
You can view an image’s histogram in the Histogram panel (F9). Histograms are also available in the Levels dialog box and the Camera Rawdialog box. You can update the histogram as you work so that you can see how your adjustments are affecting the tonal range. When the CachedData Warning icon appears, click it to refresh the histogram’s data.
Histogram panel A. Channel menu B. Panel menu C. Uncached Refresh button D. Cache Data Warning icon E. Statistics
If many pixels are bunched up at either the shadow or highlight ends of the chart, it may indicate that image detail in the shadows or highlightsmay be clipped—blocked up as pure black or pure white. There is little you can do to recover this type of image. If you are working with a scannedimage, you can try rescanning to produce a better tonal range. If your digital camera can display an image histogram, check it to see whether yourexposure is correct and make exposure adjustments if necessary. See your camera’s documentation for more information.
The histogram may show that an image is not using the full tonal range available if some pixels aren’t available in the shadows and highlights. Youcan fix an image with limited tonal range by stretching the tonal range using either the Levels command or one of the Enhance > Auto commands.
How to read a histogram A. Overexposed photo with clipped highlights B. Properly exposed photo with full tonality C. Underexposed photo with clipped shadows
View a histogram
179

Entire Image
Selected Layer
Adjustment Composite
RGB
Red, Green, and Blue
Luminosity
Colors
Mean
Standard Deviation (Std Dev)
Median
Pixels
Level
Count
Percentile
Cache Level
1. If the Histogram panel is not open in the Panel Bin, choose Window > Histogram.
2. Choose the source of the histogram’s display from the Source menu:
Displays a histogram of the entire image, including all layers in the multilayered document.
Displays a histogram of the selected layer in the Layers panel.
Displays a histogram of an adjustment layer selected in the Layers panel, including all the layers below theadjustment layer.
3. To view the histogram for a portion of your image, make a selection in your image, and choose an option from the Channel menu:
Displays a histogram that is a composite of individual color channels placed on top of each other.
Displays the histograms for the individual color channels.
Displays a histogram representing the luminance or intensity values of the composite channel.
Displays the composite RGB histogram individually by color. Red, green, and blue represent the pixels in those channels. Cyan,magenta, and yellow represent where the histograms of two channels overlap. Gray represents areas where all three color channelhistograms overlap.
Grayscale images have a single channel option: Gray.
4. To view the following statistical information about a range of values, drag in the histogram and hold down the mouse button to highlight therange. To view information about a specific area of the histogram, place the pointer over the area:
Represents the average intensity value.
Represents how widely intensity values vary.
Shows the middle value in the range of intensity values.
Represents the total number of pixels used to calculate the histogram.
Displays the intensity level of the area underneath the pointer.
Shows the total number of pixels at the intensity level underneath the pointer.
Displays the percentage of pixels at and below the level underneath the pointer. This value is expressed as a percentage of allthe pixels in the image, from 0% at the far left to 100% at the far right.
Shows the setting for the image cache. If Use Cache For Histograms is selected in the Preferences dialog box,Photoshop Elements displays histograms more quickly but less accurately. To display more accurate histograms, deselect this option.
180

Twitter™ and Facebook posts are not covered under the terms of Creative Commons.
Legal Notices | Online Privacy Policy
181

Adjusting color, saturation, and hue
To the top
Adjust saturation and hueAdjust the color of skin toneAdjust saturation in isolated areasChange the color of an objectPrecisely convert to black and whiteAutomatically convert to black and whiteAdd custom presets for black and white conversionAdd color to a grayscale image
Adjust saturation and hue
The Hue/Saturation command adjusts the hue (color), saturation (purity), and lightness of the entire image or of individual color components inan image.
Use the Hue slider to add special effects, to color a black and white image (like a sepia effect), or to change the range of colors in a portion ofan image.
Changing colors in an image using the Hue/Saturation command A. Original B. Entire image changed to sepia using the Colorize option C. Magenta colors targeted in the Edit menu and changed using the Hueslider
Use the Saturation slider to make colors more vivid or more muted. For example, you could add a color punch to a landscape by saturating thecolors in it. Or, tone down a distracting color, like a vivid red sweater in a portrait.
Before and after adjusting color saturation
Use the Lightness slider with the other adjustments to lighten or darken a portion of an image. Take care not to use it on an entire image—thisadjustment reduces the overall tonal range.
Change color saturation or hue
182
1. Do one of the following:
Choose Enhance > Adjust Color > Adjust Hue/Saturation.
Choose Layer > New Adjustment Layer > Hue/Saturation, or open an existing Hue/Saturation adjustment layer.
The two color bars in the dialog box represent the colors in their order on the color wheel. The upper bar shows the color before theadjustment; the lower bar shows how the adjustment affects all hues at full saturation.
2. In the Edit drop-down menu, choose which colors to adjust:
Choose Master to adjust all colors at once.
Choose one of the other preset color ranges listed for the color you want to adjust. An adjustment slider appears between the colorbars, which you can use to edit any range of hues.
3. For Hue, enter a value or drag the slider until the colors appear as you want.
The values displayed in the text box reflect the number of degrees of rotation around the color wheel from the pixel’s original color. Apositive value indicates clockwise rotation, a negative value counterclockwise rotation. Values range from -180 to +180.
4. For Saturation, enter a value or drag the slider to the right to increase the saturation or to the left to decrease it. Values range from -100 to+100.
5. For Lightness, enter a value or drag the slider to the right to increase the lightness or to the left to decrease it. Values range from -100 to+100. Be careful when using this slider on an entire image. It will reduce the tonal range of the overall image.
6. Click OK. Or, to cancel your changes and start over, hold down Alt (Option in Mac OS), and click Reset.
Modify the range of Hue/Saturation sliders
1. Do one of the following:
Choose Enhance > Adjust Color > Adjust Hue/Saturation.
Choose Layer > New Adjustment Layer > Hue/Saturation, or open an existing Hue/Saturation adjustment layer.
2. Choose an individual color from the Edit menu.
3. Do any of the following to the adjustment slider:
Drag one of the triangles to adjust the amount of color fall-off without affecting the range.
Drag one of the gray bars to adjust the range without affecting the amount of color fall-off.
Drag the gray center part to move the entire adjustment slider, selecting a different color area.
183
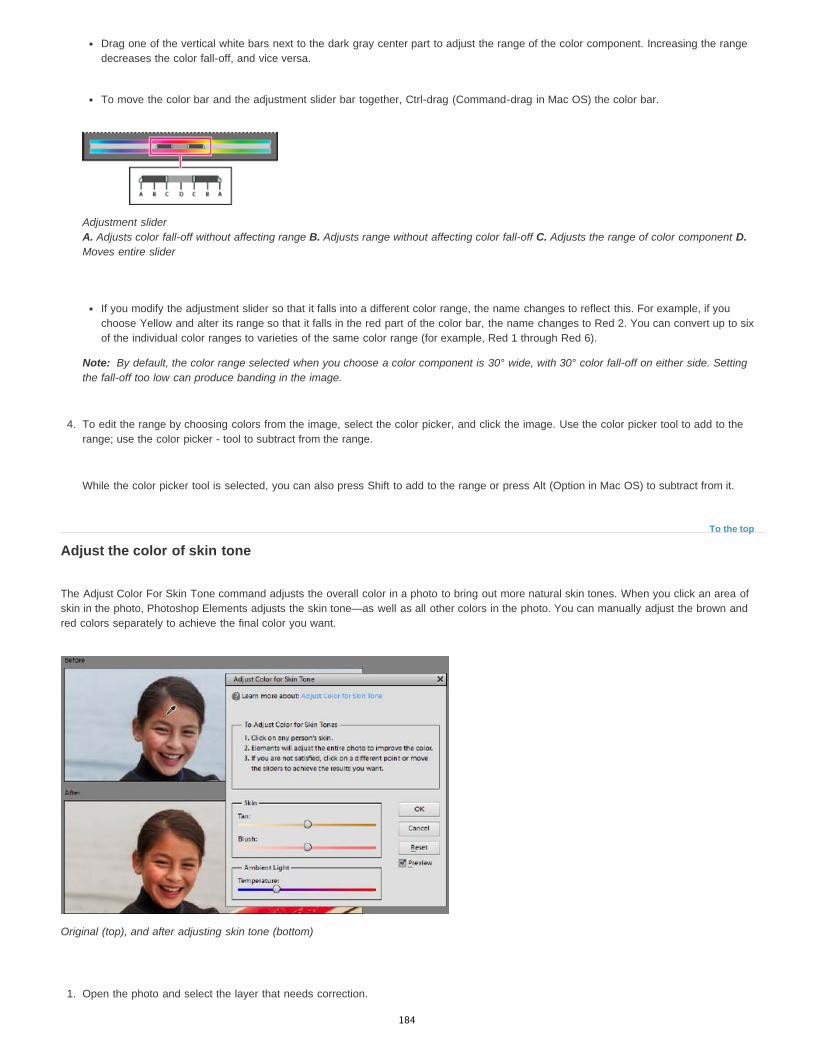
Note:
To the top
Drag one of the vertical white bars next to the dark gray center part to adjust the range of the color component. Increasing the rangedecreases the color fall-off, and vice versa.
To move the color bar and the adjustment slider bar together, Ctrl-drag (Command-drag in Mac OS) the color bar.
Adjustment slider A. Adjusts color fall-off without affecting range B. Adjusts range without affecting color fall-off C. Adjusts the range of color component D.Moves entire slider
If you modify the adjustment slider so that it falls into a different color range, the name changes to reflect this. For example, if youchoose Yellow and alter its range so that it falls in the red part of the color bar, the name changes to Red 2. You can convert up to sixof the individual color ranges to varieties of the same color range (for example, Red 1 through Red 6).
By default, the color range selected when you choose a color component is 30° wide, with 30° color fall-off on either side. Settingthe fall-off too low can produce banding in the image.
4. To edit the range by choosing colors from the image, select the color picker, and click the image. Use the color picker tool to add to therange; use the color picker - tool to subtract from the range.
While the color picker tool is selected, you can also press Shift to add to the range or press Alt (Option in Mac OS) to subtract from it.
Adjust the color of skin tone
The Adjust Color For Skin Tone command adjusts the overall color in a photo to bring out more natural skin tones. When you click an area ofskin in the photo, Photoshop Elements adjusts the skin tone—as well as all other colors in the photo. You can manually adjust the brown andred colors separately to achieve the final color you want.
Original (top), and after adjusting skin tone (bottom)
1. Open the photo and select the layer that needs correction.
184

Note:
Tan
Blush
Temperature
To the top
Mode
Brush
Size
Flow
2. Choose Enhance > Adjust Color > Adjust Color For Skin Tone.
3. Click an area of skin.
Photoshop Elements automatically adjusts the colors in the image. Changes might be subtle.
Make sure Preview is selected so that you can see the color changes as they occur.
4. (Optional) Drag any of the following sliders to fine-tune the correction:
Increases or decreases the level of brown in skin tones.
Increases or decreases the level of red in skin tones.
Changes the overall color of skin tones.
5. When you’re finished, click OK. Or, to cancel your changes and start over, click Reset.
Adjust saturation in isolated areas
The Sponge tool changes the color saturation of an area.
Increasing saturation by scrubbing with the Sponge tool
1. Select the Sponge tool.
2. Set tool options in the options bar:
Increases or decreases color saturation. Choose Saturate to intensify the color’s saturation. In grayscale, Saturate increasescontrast. Choose Desaturate to dilute the color’s saturation. In grayscale, Desaturate decreases contrast.
Sets the brush tip. Click the arrow next to the brush sample, choose a brush category from the Brushes pop-up menu, and thenselect a brush thumbnail.
Sets the size of the brush, in pixels. Drag the Size slider or enter a size in the text box.
Sets the rate of saturation change. Drag the Flow pop-up slider or enter a value in the text box.
185

To the top
Selection
Image
To the top
3. Drag over the part of the image you want to modify.
Change the color of an object
The Replace Color command replaces a specific color in an image. You can set the hue, saturation, and lightness of the replacement color.
1. Choose Enhance > Adjust Color > Replace Color.
2. Select a display option under the image thumbnail:
Displays the mask, which looks like a black and white version of the image, in the preview box.
Displays the image in the preview box. This option is useful when you are working with a magnified image or have limited screenspace.
3. Click the color picker button, and then click the color you want to change in the image or in the preview box. Use the color picker + tool toadd colors, or use the color picker - tool to remove colors to keep them from changing.
4. Drag the Fuzziness slider to control the degree to which related colors are included in the selection.
5. Do one of the following to specify a new color:
Drag the Hue, Saturation, and Lightness sliders (or enter values in the text boxes).
Click the Results box and specify a new color in the Color Picker, then click OK.
6. To cancel your changes and start over, hold down Alt (Option in Mac OS), and click Reset.
Precisely convert to black and white
For a video about this process, see www.adobe.com/go/lrvid2325_pse9_en.
The Convert To Black And White command lets you choose a specific conversion style to be applied to the image. This is unlike the RemoveColor command, which automatically converts to black and white for you.
In the Convert To Black And White dialog box, the available image styles help you compare and choose from different conversion presets.Select a style and then use the available sliders to fine-tune the conversion.
186

Note:
To the top
To the top
Note:
Convert to black and white A. Displays Before and After views B. Select a style C. Adjust intensity
1. Open an image, and select an area or layer to convert. If you do not select an area or layer, the entire image is converted.
To experiment with black and white conversion while preserving the original photo, convert a duplicate layer.
2. Choose Enhance > Convert To Black And White.
3. Select a style option that reflects the content of your image (for example, Portraits or Scenic Landscape).
4. Drag the Adjustment Intensity sliders to adjust red, green, blue, or contrast.
The Adjustment Intensity sliders for red, green, and blue don’t colorize your image; they simply include more or less data from theoriginal color channels in the new black and white image.
5. To convert your image, click OK. Or, to cancel your changes and start over, click Reset. To close the Convert To Black And White dialogbox, click Cancel.
Automatically convert to black and white
The Remove Color command converts to black and white by assigning equal red, green, and blue values to each pixel in an RGB image. Theoverall brightness of each pixel remains constant. This command has the same effect as setting Saturation to -100 in the Hue/Saturation dialogbox.
1. To adjust a specific image area, select it with one of the selection tools. If no selection is made, the adjustment applies to the entireimage.
2. Choose Enhance > Adjust Color > Remove Color.
Add custom presets for black and white conversion
You can manually add custom presets to the black and white converter by editing a specific text file.
Adding custom presets for conversion to black and white is a task for advanced users.
187

Twitter™ and Facebook posts are not covered under the terms of Creative Commons.
Legal Notices | Online Privacy Policy
To the top
Note:
1. Close the Photoshop Elements, and navigate to the folder that contains the bwconvert.txt file.
In Windows, [Photoshop Elements 11 installation directory]\Required\bwconvert.txt
In Mac, /Applications/Adobe Photoshop Elements/Support Files/Adobe Photoshop ElementsEditor.app/Contents/Required/bwconvert.txt. Command-click Adobe Photoshop Elements and select Show PackageContents. Navigate to the folder Contents/Required.
2. Open the bwconvert.txt file in a plain text editor (such as Notepad).
3. Following the same naming convention as the presets already in the file, add your new preset and give it a unique name.
4. Save the file (keeping the original filename).
5. Start the Photoshop Elements and choose Enhance > Convert To Black And White to view the presets.
Add color to a grayscale image
You can colorize an entire grayscale image, or select areas to colorize with different colors. For example, you can select a person’s hair andcolor it brown, and then add pink to the person’s cheeks after making another selection.
If the image you are coloring is in grayscale mode, convert it into RGB by choosing Image > Mode > RGB Color.
1. Choose Enhance > Adjust Color > Adjust Hue/Saturation, or Layer > New Adjustment Layer > Hue/Saturation to work on an adjustmentlayer.
2. Select Colorize. If the foreground color isn’t black or white, Photoshop Elements converts the image into the hue of the current foregroundcolor. The lightness value of each pixel does not change.
3. Use the Hue slider to select a new color if desired. Use the Saturation slider to adjust the saturation. Then click OK.
188

Processing camera raw image files
To the top
To the top
About camera raw image filesProcess VersionsOpen and process camera raw filesAdjust sharpness in camera raw filesReducing noise in camera raw imagesSave changes to camera raw imagesOpen a camera raw image in the Edit workspaceSettings and controls
About camera raw image files
In digital photography, a picture is captured by a camera's image sensor in an image file. An image file is generally processed and compressed,before being stored on your camera's memory card. However, cameras can also store a picture without processing or compressing it - as a rawfile. Think of camera raw files as photo negatives. You can open a raw file in Photoshop Elements, process it, and save it, rather than relying onthe camera to process the file. Working with camera raw files lets you set the proper white balance, tonal range, contrast, color saturation, andsharpness.
To use raw files, set your camera to save files in its own raw file format. When you download the files from the camera, they have filenameextensions like NEF, CR2, CRW, or other raw formats. Photoshop Elements can open raw files only from supported cameras. Visit the Adobewebsite to view a list of supported cameras.
Photoshop Elements does not save your changes to the original raw file (non-destructive editing). After processing the raw image file using thefeatures of the Camera Raw dialog box, You can choose to open a processed raw file in Photoshop Elements. You can then edit the file and saveit in a Photoshop Elements supported format. The original raw file remains unaltered.
Process Versions
A Process Version is a method of deciphering the raw file format. The default version used in Adobe Photoshop Elements 11 is Process Version2012. This method of deciphering the raw file format provides you with ways to work with the most recent and improved features in the raw fileformat. Photoshop Elements 11 contains three Process Versions (one current, and two legacy versions). The complete list of versions is:
Process Version 2012 (default, used in Adobe Photoshop Elements 11)Process Version 2010 (used in Adobe Photoshop Elements 10)Process Version 2003 (used in Adobe Photoshop Elements 9, or earlier)
What Process Version is applied to my raw image?
When you open a raw file that has not been opened in an earlier edition of Photoshop Elements, the default Process Version 2012 is used.However, if you open a raw file opened in an earlier version of Photoshop Elements, an older Process Version is used.
To check the Process Version applied to your raw image, in the Camera Raw 7.1 dialog box, click the Camera Calibration tab. The Process fielddisplays the current Process Version being used.
Note: If not using Process Version 2012, an icon displayed below the raw image indicates that an older version is being used.
Can I switch between Process Versions?
Yes. In the Camera Raw 7.1 dialog box, click the Camera Calibration tab, and select the Process Version you want to use from the Process drop-down list.
Which version is best for you?
Process Version 2012 enables you to work with the latest enhancements in the raw format. However, if you have many raw images that wereopened with previous editions of Photoshop Elements (and hence using older Process Versions), you may choose to apply an older ProcessVersion to your newer raw images. This helps with consistency while processing past and present images, and helps maintain your older workflow.
What are the differences in the Process Versions?
189

To the top
Note:
Basic tab. In Process Version 2012, the Highlights, Shadows, and Whites sliders replace the Recovery, Fill light, and Brightness sliders.Detail tab:
In Process Version 2012, the Color Detail slider has been introduced. This slider remains disabled until the Color slider is modified.In Process Version 2012, Luminance Detail and Luminance Contrast have been added. These sliders remain disabled until theLuminance is modified.
Note: When switching to an older Process Version, the newer sliders compatible with the latest Process Versions are disabled.
Camera Raw dialog box A. View options B. Click the Basic or Detail tab to access different controls C. RGB values D. Histogram E. Image settings F. More menu G.Tools H. Zoom levels I. Bit depth options
Open and process camera raw files
1. In the Edit workspace, choose File > Open.
2. Browse to select one or more camera raw files, and click Open.
The histogram in the Camera Raw dialog box shows the tonal range of the image at the current settings. As you make settings adjustments,the histogram is updated automatically.
3. (Optional) Adjust the image view using the controls, such as the Zoom tool, and options, such as Shadows and Highlights, which revealclipping in the preview area. (See Camera raw controls.)
Selecting Preview displays a preview of the image with the settings changes you make. Deselecting Preview displays the camera rawimage at the original settings of the current tab combined with the settings in the hidden tabs.
4. To rotate the image 90° counterclockwise or 90° clockwise, click the Rotate Image buttons .
5. To apply the settings used in the previous camera raw image or the default settings for your camera, choose an option from the Settingsmenu (Settings menu > Previous Conversion). Using the same options is useful, for example, if you want to quickly process images withsimilar lighting conditions. (See Set custom camera settings.)
6. (Optional) Set options to adjust the white balance. (See White balance controls for camera raw.)
You can monitor the RGB values of pixels in your image as you adjust them in the Camera Raw dialog box. Position the Zoom tool, Handtool, White Balance tool, or Crop tool over the preview image to display the RGB values directly beneath the pointer.
7. Make tonal adjustments using the Exposure, Brightness, Contrast, and Saturation sliders. (See Tonal and image adjustments in camera rawfiles.)
190

Note:
To the top
To the top
To undo your manual adjustments and make the adjustments automatically, select Auto. To restore all options to their initial settings, pressAlt (Option in Mac OS) and click Reset.
8. Do one of the following:
To open a copy of the camera raw image file (with the camera raw settings applied) in Photoshop Elements, click Open Image. You canedit the image and save it in a Photoshop Elements-supported format. The original camera raw file remains unaltered.
To cancel the adjustments and close the dialog box, click Cancel.
To save the adjustments to a DNG file, click Save Image. (See Save changes to camera raw images.)
The Digital Negative (DNG) format is Adobe’s proposed standard format for camera raw files. DNG files are useful for archivingcamera raw images because they contain the raw camera sensor data and data specifying how the image should look. Camera raw imagesettings can be stored in DNG files instead of in sidecar XMP files or the camera raw database.
Adjust sharpness in camera raw files
The Sharpness slider adjusts the image sharpness to provide the edge definition you want. The Sharpness adjustment is a variation of the AdobePhotoshop Unsharp Mask filter. This adjustment locates pixels that differ from surrounding pixels based on the threshold you specify, andincreases the pixels’ contrast by the amount you specify. When opening a camera raw file, the Camera Raw plug-in calculates the threshold to usebased on the camera model, ISO, and exposure compensation. You can choose whether sharpening is applied to all images or to previews.
1. Zoom the preview image to at least 100%.
2. Click the Detail tab.
3. Move the Sharpness slider to the right to increase sharpening and to the left to decrease it. A value of zero turns off sharpening. In general,set the Sharpness slider to a lower value for cleaner images.
If you don’t plan to edit the image extensively in Photoshop Elements, use the camera raw Sharpness slider. If you do plan to edit theimage extensively in Photoshop Elements, turn off camera raw sharpening. Then use the sharpening filters in Photoshop Elements as thelast step after all other editing and resizing are complete.
Reducing noise in camera raw images
The Detail tab in the Camera Raw dialog box contains controls for reducing image noise—the extraneous visible artifacts that degrade imagequality. Image noise includes luminance (grayscale) noise, which makes an image look grainy, and chroma (color) noise, which is visible ascolored artifacts in the image. Photos taken at high ISO speeds or with less sophisticated digital cameras can have noticeable noise.
Moving the Luminance Smoothing slider to the right reduces grayscale noise, and moving the Color Noise Reduction slider to the right reduceschroma noise.
When making Luminance Smoothing or Color Noise Reduction adjustments, it’s a good idea to preview images at 100% for a better view.
191

To the top
To the top
To the top
Zoom tool
Moving the Luminance Smoothing slider to the right reduces grayscale noise.
Save changes to camera raw images
You can save changes you’ve made to a camera raw file. The Camera Raw dialog box saves the camera raw image with your changes in a .dngfile. Saving the file does not automatically open it in Photoshop Elements. (To open a camera raw file, use the Open command, like you would withany other file. Then you can edit and save the file like any other image.)
1. In the Camera Raw dialog box, apply adjustments to one or more camera raw images.
2. Click the Save Image button.
3. In the Save Options dialog box, specify where to save the file and how to name the file if you're saving more than one camera raw file.
New options in Photoshop Elements 11:
Embed Fast Load Data: Embeds a much smaller copy of the raw image in the DNG file, to enhance the speed at which the raw imageis previewed.Use Lossy Compression: Reduces the file size of your DNG file, and causes loss of quality. Recommended only for the raw imagesthat are to be stored for archival purposes, and will never be used for printing or production (other use).
4. Click Save.
Open a camera raw image in the Edit workspace
After you process a camera raw image in the Camera Raw dialog box, you can open the image and edit it in the Edit workspace.
1. In the Camera Raw dialog box, apply adjustments to one or more camera raw images.
2. Click the Open Image button. The Camera Raw dialog box closes, and the photo opens in the Edit workspace.
Settings and controls
Camera row controls
Sets the preview zoom to the next preset zoom value when you click within the preview image. Alt-click (Option-click in Mac OS) to
192

Twitter™ and Facebook posts are not covered under the terms of Creative Commons.
Legal Notices | Online Privacy Policy
Hand tool
White Balance tool
Crop tool
Straighten tool
Red Eye removal
Open Preferences dialog
Rotate buttons
zoom out. Drag the Zoom tool in the preview image to zoom in on a selected area. To return to 100%, double-click the Zoom tool.
Moves the image in the preview window if the preview image is set at a zoom level higher than 100%. Hold down the spacebar toaccess the Hand tool while using another tool. Double-click the Hand tool to fit the preview image in the window.
Sets the area you click to a neutral gray tone to remove color casts and adjust the color of the entire image. TheTemperature and Tint values change to reflect the color adjustment.
Removes part of an image. Drag the tool within the preview image to select the portion you want to keep, and then press Enter.
You can use the Straighten tool to realign an image vertically or horizontally. This tool also resizes or crops the canvas toaccommodate straightening the image.
Removes red eye in flash photos of people and green or white eye in pets.
Opens the Camera Raw Preferences dialog.
Rotates the photo either counterclockwise or clockwise.
Set custom camera settings
When you open a camera raw file, Photoshop Elements reads information in the file to see which model of camera created it, and then applies theappropriate camera settings to the image. If you are always making similar adjustments, you can change the default settings of your camera. Youcan also change settings for each model of camera you own, but not for multiple cameras of the same model.
1. To save the current settings as the default for the camera that created the image, click the triangle next to the Settings menu and chooseSave New Camera Raw Default.
2. In the Edit workspace, open a camera raw file and adjust the image.
3. To use the Photoshop Elements default settings for your camera, click the triangle next to the Settings menu and choose Reset CameraRaw Default.
193

Color and camera raw
To the top
To the top
White Balance
Note:
Temperature
Using the histogram and RGB values in camera rawWhite balance controls for camera rawTonal and image adjustments in camera raw files
In the Camera Raw dialog, you can perform preliminary adjustments and modifications to a raw image before editing it in Photoshop Elements.With the Preview option enabled, you can see how the modified image appears.
The options available include sliders to modify the attributes of the image. For example, you can change the exposure, brightness, clarity, andsaturation and vibrance. The number of options available to modify the image also depends on the Process Version used. For example, somesliders like Shadows and Whites that appear while using Process Version 2012 do not appear when Process Version 2010 is used. Likewise, theFill Light slider that appears when Process Version 2010 is used does not appear when Process Version 2012 is used.
Using the histogram and RGB values in camera raw
The Camera Raw histogram shows all three channels (red, green, and blue) of the image simultaneously. The histogram changes automatically asyou adjust the settings in the Camera Raw dialog box.
As you move the Zoom tool, Hand tool, or White Balance tool over the preview image, you see the RGB values in the upper-right corner of thedialog box.
RGB values of an image
White balance controls for camera raw
A digital camera records the white balance at the time of exposure as metadata, which you can see when you open the file in the Camera Rawdialog box. This setting usually yields the correct color temperature. You can adjust it if the white balance is not quite right.
The Adjust tab in the Photoshop Camera Raw dialog box includes the following three controls for correcting a color cast in your image:
Sets the color balance of the image to reflect the lighting conditions under which the photo was taken. In some cases, choosing awhite balance from the White Balance menu provides satisfactory results. In many cases, you may want to customize the white balance using theTemperature and Tint adjustments.
The Camera Raw plug-in can read the white balance settings of some cameras. Leave White Balance set to As Shot to use the camera’swhite balance settings. For cameras whose white balance settings are not recognized, selecting As Shot is the same as choosing Auto: theCamera Raw plug-in reads the image data and automatically adjusts the white balance.
Fine-tunes the white balance to a custom color temperature. Set the color temperature using the Kelvin color temperature scale.Move the slider to the left to correct a photo taken at a lower color temperature of light: the plug-in makes the image colors cooler (bluish) to
194

Tint
To the top
Exposure
compensate for the lower color temperature (yellowish) of the ambient light. Conversely, move the slider to the right to correct a photo taken at ahigher color temperature of light: the plug-in makes the image colors warmer (yellowish) to compensate for the higher color temperature (bluish) ofthe ambient light.
A. Moving the Temperature slider to the right corrects a photo taken at a higher color temperature of light. B. Moving the Temperature slider to theleft corrects a photo taken at a lower color temperature of light. C. Photo after the color temperature has been adjusted.
Fine-tunes the white balance to compensate for a green or magenta tint. Move the slider to the left (negative values) to add green to thephoto; move it to the right (positive values) to add magenta.Tip: To adjust the white balance quickly, select the White Balance tool, and then click an area in the preview image that should be a neutral grayor white. The Temperature and Tint sliders automatically adjust to make the selected color exactly neutral (if possible). If you’re clicking whites,choose a highlight area that contains significant white detail rather than a specular highlight.
Using White Balance to click a neutral white area, and resulting correction
Tonal and image adjustments in camera raw files
Adjusts the brightness or darkness of an image. Move the slider to the left to darken the image; move it to the right to brighten theimage. The values are in increments equivalent to f-stops. An adjustment of +1.50 is similar to widening the aperture one and one-half stops.Likewise, an adjustment of -1.50 is similar to reducing the aperture one and one-half stops.Tip: Hold down Alt (Option key in Mac) while moving the Exposure slider to preview where the highlights are clipped. (Clipping is the shifting ofpixel values to either the highest highlight value or the lowest shadow value. Clipped areas are either completely white or completely black andhave no image detail.) Move the slider until the highlights (not specular highlights) are completely clipped, and then reverse the adjustment slightly.Black indicates unclipped areas, and color indicates areas clipped in only one or two channels.
195

Contrast
Recovery
Highlights
Shadows
Whites
Blacks
Clarity
Vibrance
Saturation
Fill Light
Blacks
Brightness
Sharpening
Hold down Alt (Option key in Mac) while moving the Exposure slider to show clipped highlights.
Adjusts the midtones in an image. Higher values increase the midtone contrast, and lower values produce an image with less contrast.Generally, use the Contrast slider to adjust the contrast of the midtones after setting the Exposure, Shadow, and Brightness values.
Attempts to recover details from highlights. Camera Raw can reconstruct some details from areas in which one or two color channelsare clipped to white.
Recovers detail in overexposed highlight areas of an image.
Recovers detail in underexposed shadow areas of an image.
Adjusts the highlights in an image.
Adjusts the shadows and underexposed areas in an image.
Sharpens the clarity of edges in the image. This process helps restore detail and sharpness that tonal adjustments may reduce.
Adjusts the saturation so that clipping is minimized as colors approach full saturation, changing the saturation of all lower-saturatedcolors with less impact on the higher-saturated colors. Vibrance also prevents skin tones from becoming oversaturated.
Adjusts the color saturation of the image from –100 (pure monochrome) to +100 (double the saturation).
Attempts to recover details from shadows, without brightening blacks. Camera Raw can reconstruct some details from areas in whichone or two color channels are clipped to black. Using Fill Light is similar to using the shadows portion of the Photoshop Shadow/Highlight filter orthe After Effects Shadow/Highlight effect.
Specifies which input levels are mapped to black in the final image. Increasing Blacks expands the areas that are mapped to black. Thissometimes creates the appearance of increased contrast in the image. The greatest change is in the shadows, with less change in the midtonesand highlights. Using the Blacks slider is similar to using the black point slider for input levels when using the Photoshop Levels command or theAfter Effects Levels effect.
Adjusts the brightness of the image, much as the Exposure slider does. Brightness compresses the highlights and expands theshadows when you move the slider to the right. Brightness does not clip image highlights (areas that are completely white, with no detail) orshadows (areas that are completely black, with no detail). In general, use the Brightness slider to adjust the overall brightness after you set thewhite and black clipping points with the Exposure and Shadow sliders.
Sharpening enhances the definition of edges in an image. Additional controls are available in the Detail panel. To view the effects ofthese controls, set the zoom level to 100% or greater.
Amount: Adjusts edge definition. Increase the Amount value to increase sharpening. A value of zero turns off sharpening. In general, setAmount to a lower value for cleaner images. The adjustment locates pixels that differ from surrounding pixels based on the threshold youspecify and increases the pixels’ contrast by the amount you specify.
Radius: Adjusts the size of the details that sharpening is applied to. Photos with fine details may need a lower radius setting. Photos withlarger details may be able to use a larger radius. Using too large a radius generally results in unnatural results.
196

Twitter™ and Facebook posts are not covered under the terms of Creative Commons.
Legal Notices | Online Privacy Policy
Noise Reduction
Camera Profile
Detail: Adjusts how much high-frequency information is sharpened in the image and how much the sharpening process emphasizes edges.Lower settings primarily sharpen edges to remove blur. Higher values are useful for making the textures in the image more pronounced.
Masking: Controls an edge mask. At a setting of zero, everything in the image receives the same amount of sharpening. At a setting of 100,sharpening is mostly restricted to areas near the strongest edges.
Adjusts the color saturation of the image from –100 (pure monochrome) to +100 (double the saturation).Luminance: Adjusts grayscale noise.Luminance Detail: Controls the luminance noise threshold. Useful for noisy photos. Higher values preserve more detail but can producenoisier results. Lower values produce cleaner results but also remove some detail.Luminance Contrast: Controls the luminance contrast. Useful for noisy photos. Higher values preserve contrast but can produce noisyblotches or mottling. Lower values produce smoother results but can also have less contrast.Color: Adjusts chroma noise.Color Detail: Controls the color noise threshold. Higher values protect thin, detailed color edges but can result in color specking. Lowervalues remove color speckles but can result in color bleeding.
Chooses the Adobe Camera Raw (ACR) profile. For each camera model it supports, Camera Raw uses profiles to process rawimages. To choose from the various camera profiles present in Camera Calibration tab, choose either ACR 4.4, ACR 2.4, or Adobe Standard. Thehigher version number represents the newer and improved camera profile for some cameras. You may want to choose the lower version numberfor consistent behavior with legacy images.
197

Correcting color casts
To the top
To the top
Remove a color cast automaticallyRemove a color cast using LevelsAdjust color curves
Remove a color cast automatically
A color cast is an unpleasant color shift in a photo. For example, a photo taken indoors without a camera flash may have too much yellow. TheRemove Color Cast command changes the overall mixture of colors to remove color casts from an image.
Original (left), and after removing the green color cast (right)
1. Choose Enhance > Adjust Color > Remove Color Cast.
2. In your image, click an area that should be white, black, or neutral gray. The image changes based on the color you selected.
3. To start over and undo the changes made to the image, click Reset.
4. Click OK to accept the color change.
Remove a color cast using Levels
This technique requires color correction experience and some knowledge of the RGB color wheel.
1. Do one of the following:
Choose Enhance > Adjust Lighting > Levels.
Choose Layer > New Adjustment Layer > Levels, or open an existing Levels adjustment layer.
2. Choose a color channel to adjust from the Channel pop-up menu:
Red to add red or cyan to the image.
198
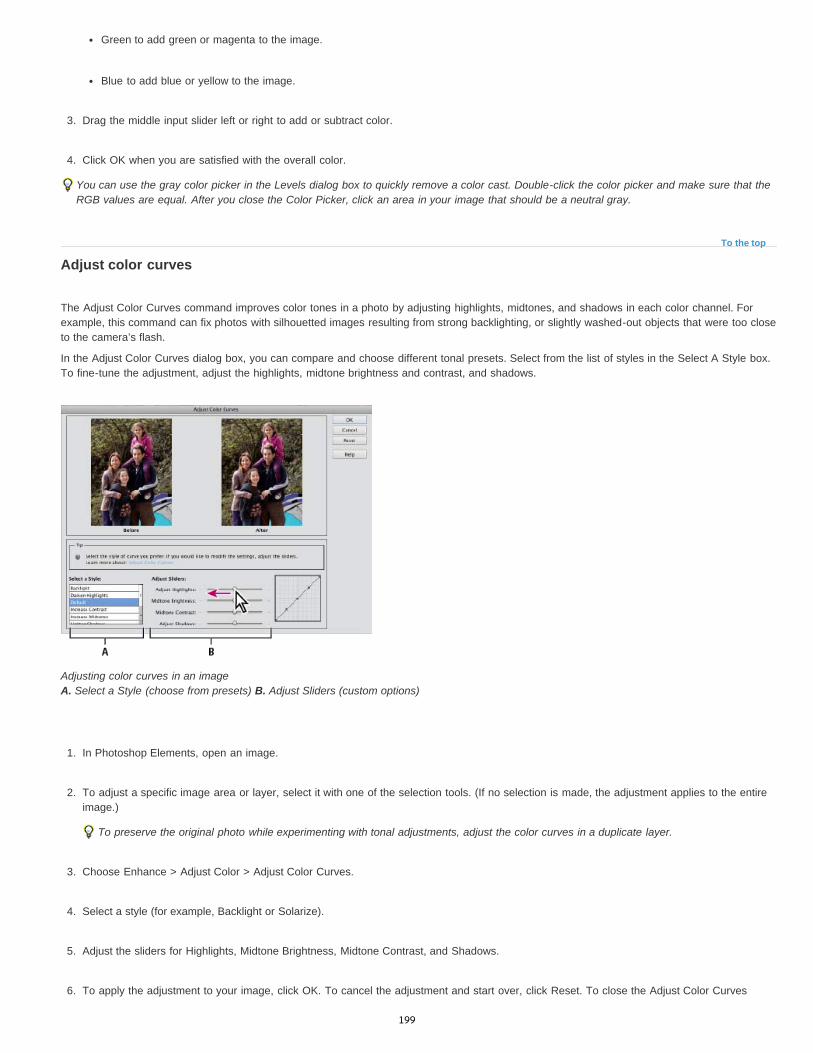
To the top
Green to add green or magenta to the image.
Blue to add blue or yellow to the image.
3. Drag the middle input slider left or right to add or subtract color.
4. Click OK when you are satisfied with the overall color.
You can use the gray color picker in the Levels dialog box to quickly remove a color cast. Double-click the color picker and make sure that theRGB values are equal. After you close the Color Picker, click an area in your image that should be a neutral gray.
Adjust color curves
The Adjust Color Curves command improves color tones in a photo by adjusting highlights, midtones, and shadows in each color channel. Forexample, this command can fix photos with silhouetted images resulting from strong backlighting, or slightly washed-out objects that were too closeto the camera’s flash.
In the Adjust Color Curves dialog box, you can compare and choose different tonal presets. Select from the list of styles in the Select A Style box.To fine-tune the adjustment, adjust the highlights, midtone brightness and contrast, and shadows.
Adjusting color curves in an image A. Select a Style (choose from presets) B. Adjust Sliders (custom options)
1. In Photoshop Elements, open an image.
2. To adjust a specific image area or layer, select it with one of the selection tools. (If no selection is made, the adjustment applies to the entireimage.)
To preserve the original photo while experimenting with tonal adjustments, adjust the color curves in a duplicate layer.
3. Choose Enhance > Adjust Color > Adjust Color Curves.
4. Select a style (for example, Backlight or Solarize).
5. Adjust the sliders for Highlights, Midtone Brightness, Midtone Contrast, and Shadows.
6. To apply the adjustment to your image, click OK. To cancel the adjustment and start over, click Reset. To close the Adjust Color Curves
199

Twitter™ and Facebook posts are not covered under the terms of Creative Commons.
Legal Notices | Online Privacy Policy
dialog box, click Cancel.
200

Setting up color management
To the top
About color managementSet up color managementConvert color profile
About color management
Color management helps you to achieve consistent color among digital cameras, scanners, computer monitors, and printers. Each of thesedevices reproduces a different range of colors, called a color gamut. As you move an image from your digital camera to your monitor, and finally toa printer, the image colors shift. This shift occurs because every device has a different color gamut and thus reproduces the colors differently.
The color gamuts of different devices and documents A. Lab color space (entire visible spectrum) B. Documents (working space) C. Devices
Color management translates the image colors so that each device can reproduce them in the same way and the colors you see on your monitorwill be close to the colors in your printed image. All colors may not match exactly because the printer may not reproduce the same range of colorsas the monitor.
Managing color with profiles A. Profiles describe the color spaces of the input device and the document. B. Using the profiles’ descriptions, the color management systemidentifies the document’s actual colors. C. The monitor’s profile tells the color management system how to translate the numeric values into themonitor’s color space. D. Using the output device’s profile, the color management system translates the document’s numeric values into the colorvalues of the output device, so the actual colors are printed.
201

Capture devices
Monitors
Printers
To the top
No Color Management
Always Optimize Colors For Computer Screens
Always Optimize For Printing
Allow Me To Choose
Profiling devices
For color management to work, you must profile your devices or use an ICC profile created by the device’s manufacturer.
Profiling is not critical for capture devices such as digital cameras or scanners. You may want to profile a scanner, however, ifyou want to accurately reproduce the colors in scanned transparencies, and reduce your color correction workload in Photoshop Elements.
Calibrating and profiling your monitor is important. If you are using a laptop or other LCD monitor, you can use the profile provided bythe manufacturer. If you own a colorimeter and corresponding software to create profiles, you can use those profiles in Photoshop Elements.
Profiling your inkjet printer will generally give you better results, though you can make excellent prints without a printer profile by usingthe controls in your printer driver. Many printer manufacturers provide ICC printer profiles on their websites. You need a separate profile for eachprinter, ink, and type of paper. You can also have profiles made for your favorite combination of ink and paper.When you work on a photo and save it, Photoshop Elements can embed (tag) an ICC profile that reflects the colors on your computer monitor orthe device that produced it. Embedding profiles with an image makes its color portable, so that different devices can translate its color values. Forexample, if you send the photo to your inkjet printer, the color management system reads the embedded profile and translates the color data usingthe printer’s profile. Your printer can then use the translated color data to accurately translate its color into the selected media.
Color management tasks
If you want to use color management, you need to perform the following tasks:
Set up color management by embedding a color profile and using device profiles when scanning or printing. (See Set up color management.)
Calibrate and profile your computer monitor. If you use an LCD monitor, use the profile that came with your monitor. See your LCD monitordocumentation for instructions.
When you print an image from Photoshop Elements, make sure that the correct color profile is specified in the Color Management area of theMore Options dialog box. Or, if you don’t have a printer profile, specify colors using the color controls in the printer driver. In addition, choosea color setting that’s appropriate for your workflow, such as Optimize For Printing.
Set up color management
1. In Photoshop Elements, choose Edit > Color Settings.
2. Select one of the following color management options, then click OK.
Leaves your image untagged. This option uses your monitor profile as the working space. It removes anyembedded profiles when opening images, and does not tag when saving.
Uses sRGB as the RGB working space; the Grayscale working space is Gray Gamma2.2. This option preserves embedded profiles, and assigns sRGB when opening untagged files.
Uses Adobe RGB as the RGB working space; the Grayscale working space is Dot Gain 20%. This optionpreserves embedded profiles and assigns Adobe RGB when opening untagged files.
Lets you choose sRGB (the default) or Adobe RGB when opening untagged files.
3. When you save a file, select ICC Profile in the Save As dialog box.
202

Twitter™ and Facebook posts are not covered under the terms of Creative Commons.
Legal Notices | Online Privacy Policy
To the top
Remove Profile
Convert To sRGB Profile
Convert To Adobe RGB Profile
Convert color profile
You don’t often change the color profile of a document. Photoshop Elements automatically assigns the color profile based on the setting you selectin the Color Settings dialog box. However, one reason to manually change a color profile is when preparing a document for a different outputdestination. The other time to change a color profile is for correcting a policy behavior that you no longer want implemented in the document.Changing the color profile is recommended for advanced users only.
Choose Image > Convert Color Profile and then choose one of the following:
Removes the profile so that the document is no longer color-managed.
Embeds an sRGB profile in the document.
Embeds an Adobe RGB profile in the document.
Adobe also recommends
203
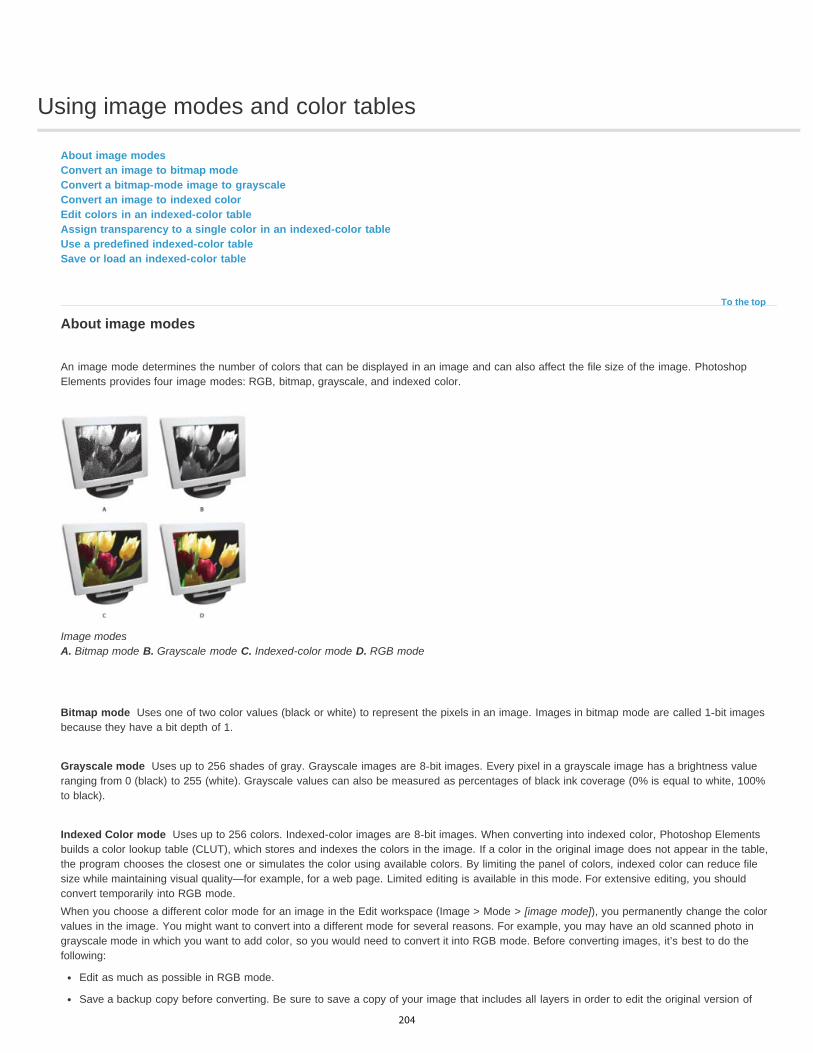
Using image modes and color tables
To the top
Bitmap mode
Grayscale mode
Indexed Color mode
About image modesConvert an image to bitmap modeConvert a bitmap-mode image to grayscaleConvert an image to indexed colorEdit colors in an indexed-color tableAssign transparency to a single color in an indexed-color tableUse a predefined indexed-color tableSave or load an indexed-color table
About image modes
An image mode determines the number of colors that can be displayed in an image and can also affect the file size of the image. PhotoshopElements provides four image modes: RGB, bitmap, grayscale, and indexed color.
Image modes A. Bitmap mode B. Grayscale mode C. Indexed-color mode D. RGB mode
Uses one of two color values (black or white) to represent the pixels in an image. Images in bitmap mode are called 1-bit imagesbecause they have a bit depth of 1.
Uses up to 256 shades of gray. Grayscale images are 8-bit images. Every pixel in a grayscale image has a brightness valueranging from 0 (black) to 255 (white). Grayscale values can also be measured as percentages of black ink coverage (0% is equal to white, 100%to black).
Uses up to 256 colors. Indexed-color images are 8-bit images. When converting into indexed color, Photoshop Elementsbuilds a color lookup table (CLUT), which stores and indexes the colors in the image. If a color in the original image does not appear in the table,the program chooses the closest one or simulates the color using available colors. By limiting the panel of colors, indexed color can reduce filesize while maintaining visual quality—for example, for a web page. Limited editing is available in this mode. For extensive editing, you shouldconvert temporarily into RGB mode.When you choose a different color mode for an image in the Edit workspace (Image > Mode > [image mode]), you permanently change the colorvalues in the image. You might want to convert into a different mode for several reasons. For example, you may have an old scanned photo ingrayscale mode in which you want to add color, so you would need to convert it into RGB mode. Before converting images, it’s best to do thefollowing:
Edit as much as possible in RGB mode.
Save a backup copy before converting. Be sure to save a copy of your image that includes all layers in order to edit the original version of
204

Note:
RGB Color mode
To the top
50% Threshold
Pattern Dither
Diffusion Dither
the image after the conversion.
Flatten the file before converting it. The interaction of colors between layer blending modes will change when the mode changes.
Hidden layers are discarded and images are flattened automatically when you convert them into bitmap or indexed-color mode, becausethese modes do not support layers.
The default mode of new Photoshop Elements images and images from your digital camera. In RGB mode, the red, green, andblue components are each assigned an intensity value for every pixel—ranging from 0 (black) to 255 (white). For example, a bright red color mighthave an R value of 246, a G value of 20, and a B value of 50. When the values of all three components are equal, the result is a shade of neutralgray. When the value of all components is 255, the result is pure white; when the value is 0, the result is pure black.
Convert an image to bitmap mode
To convert an image to bitmap mode, you must first convert it to grayscale mode, simplifying the color information in the image and reducing its filesize. Converting to grayscale removes the hue and saturation information from the pixels and leaves just the brightness values. However, becausefew editing options are available for bitmap-mode images, it’s usually best to edit the image in grayscale mode and then convert it.
1. Choose Image > Mode > Bitmap.
2. If the image is RGB, click OK to convert it to grayscale.
3. For Output, enter a value for the output resolution of the bitmap-mode image, and choose a unit of measurement. By default, the currentimage resolution appears as both the input and the output resolutions.
4. Select one of the following bitmap conversion methods, and click OK:
Converts pixels with gray values above the middle gray level (128) to white, and those below to black. The result is a veryhigh-contrast, black-and-white representation of the image.
Original grayscale image (left) and 50% Threshold conversion method applied (right).
Converts an image by organizing the gray levels into geometric configurations of black and white dots.
Converts an image by using an error-diffusion process, starting at the pixel in the upper-left corner of the image. If thepixel’s value is above middle gray (128), the pixel is changed to white—if it’s below middle gray, it’s changed to black. Because the originalpixel is rarely pure white or pure black, error is inevitably introduced. This error is transferred to surrounding pixels and diffused throughoutthe image, resulting in a grainy, film-like texture. This option is useful for viewing images on a black-and-white screen.
205
To the top
To the top
Note:
Note:
Palette
Pattern Dither and Diffusion Dither conversion methods
Convert a bitmap-mode image to grayscale
Before converting, keep in mind that a bitmap-mode image edited in grayscale mode may not look the same when converted back to bitmapmode. For example, consider a pixel that is black in bitmap mode and then edited to a shade of gray in grayscale mode. If the gray value of thepixel is light enough, it will become white when converted back to bitmap mode.
1. Choose Image > Mode > Grayscale.
2. Enter a value from 1 to 16 for the size ratio.
The size ratio is the factor for scaling down the image. For example, to reduce a grayscale image by 50%, enter 2 for the size ratio. If youenter a number greater than 1, the program averages multiple pixels in the bitmap-mode image to produce a single pixel in the grayscaleimage. This process lets you generate multiple shades of gray from an image scanned on a 1-bit scanner.
Convert an image to indexed color
Converting to indexed color reduces the number of colors in the image to a maximum of 256—the standard number of colors supported by the GIFand PNG-8 formats and many web browsers. This conversion reduces file size by deleting color information from the image.
To convert to indexed color, you must start with either a grayscale or an RGB image.
1. Choose Image > Mode > Indexed Color.
2. Click OK to flatten layers.
This will flatten all visible layers and discard hidden layers.
For grayscale images, the conversion happens automatically. For RGB images, the Indexed Color dialog box appears.
3. Select Preview in the Indexed Color dialog box to display a preview of the changes.
4. Specify any of the following conversion options and click OK.
Specifies the color palette to apply to the indexed-color image. There are 10 color palettes available:
Exact
Creates a panel using the exact colors that appear in the RGB image—an option available only if the image uses 256 or fewer colors.Because the image’s panel contains all of the colors in the image, there is no dithering.
System (Mac OS)
Uses the Mac OS default 8-bit panel, which is based on a uniform sampling of RGB colors.
System (Windows)
Uses the Windows system’s default 8-bit panel, which is based on a uniform sampling of RGB colors.
Web
Uses the 216 colors that web browsers, regardless of platform, use to display images on a monitor limited to 256 colors. Use this option toavoid browser dither when images are viewed on a monitor display limited to 256 colors.
Uniform
206
Colors
Forced
Transparency
Matte
Dither
Creates a panel by uniformly sampling colors from the RGB color cube. For example, if Photoshop Elements takes 6 evenly spaced colorlevels, each of red, green, and blue, the combination produces a uniform panel of 216 colors (6 cubed = 6 x 6 x 6 = 216). The total numberof colors displayed in an image corresponds to the nearest perfect cube (8, 27, 64, 125, or 216) that is less than the value in the Colors textbox.
Local or Master Perceptual
Creates a custom panel by giving priority to colors to which the human eye has greater sensitivity. Local Perceptual applies the panel toindividual images; Master Perceptual applies the selected panel to multiple images (for example, for multimedia production).
Local or Master Selective
Creates a color table similar to the Perceptual color table, but favoring broad areas of color and the preservation of web colors. This optionusually produces images with the greatest color integrity. Local Selective applies the panel to individual images; Master Selective applies theselected panel to multiple images (for example, for multimedia production).
Local or Master Adaptive
Creates a panel by sampling the colors from the spectrum appearing most often in the image. For example, an RGB image with only thecolors green and blue produces a panel made primarily of greens and blues. Most images concentrate colors in particular areas of thespectrum. To control a panel more precisely, first select a part of the image that contains the colors you want to emphasize. PhotoshopElements weights the conversion toward these colors. Local Adaptive applies the panel to individual images; Master Adaptive applies theselected panel to multiple images (for example, for multimedia production).
Custom
Creates a custom panel by using the Color Table dialog box. Either edit the color table and save it for later use, or click Load to load apreviously created color table. This option also displays the current Adaptive panel, which is useful for previewing the colors most often usedin the image.
Previous
Uses the custom panel from the previous conversion, making it easy to convert several images with the same custom panel.
Specifies the number of colors to include in the color table (up to 256) for Uniform, Perceptual, Selective, or Adaptive panels.
Provides options to force the inclusion of certain colors in the color table. Black And White adds a pure black and a pure white tothe color table; Primaries adds red, green, blue, cyan, magenta, yellow, black, and white; Web adds the 216 web-safe colors; and Customlets you define custom colors to add.
Specifies whether to preserve transparent areas of the image during conversion. Selecting this option adds a special indexentry in the color table for a transparent color. Deselecting this option fills transparent areas with the matte color, or with white if no mattecolor is chosen.
Specifies the background color used to fill anti-aliased edges that lie adjacent to transparent areas of the image. With Transparencyselected, the matte is applied to edge areas to help blend the edges into a web background of the same color. With Transparencydeselected, the matte is applied to transparent areas. Choosing None for the matte creates hard-edged transparency, if Transparency isselected; otherwise, all transparent areas are filled with 100% white.
Specifies whether to use a dither pattern or not. Unless you’re using the Exact color table option, the color table may not contain allthe colors used in the image. To simulate colors not in the color table, you can dither the colors. Dithering mixes the pixels of the availablecolors to simulate the missing colors.
None
Does not dither colors but, instead, uses the color closest to the missing color. This tends to result in sharp transitions between shades ofcolor in the image, creating a posterized effect.
Diffusion
Uses an error-diffusion method that produces a less structured dither than the Pattern option. To protect colors in the image that containentries in the color table from being dithered, select Preserve Exact Colors. This is useful for preserving fine lines and text for web images.
Pattern
Uses a halftone-like square pattern to simulate any colors not in the color table.
Noise
Helps to reduce seam patterns along the edges.
207

Amount
Preserve Exact Colors
To the top
To the top
To the top
Black Body
Grayscale
Specifies the percentage of image colors to dither. A higher amount dithers more colors, but may increase file size.
Prevents colors in the image that are in the color table from being dithered.
Edit colors in an indexed-color table
You can edit colors in the color table to produce special effects, or assign transparency in the image to a single color in the table.
1. Open the indexed-color image in Photoshop Elements.
2. Choose Image > Mode > Color Table.
3. Click or drag within the table to choose the color or range of colors you want to change.
4. Choose a color from the Color Picker or sample a color from the image.
If you are changing a range of colors, Photoshop Elements creates a gradient in the color table between the starting and ending colors. Thefirst color you choose in the Color Picker is the beginning color in the range. When you click OK, the Color Picker reappears, so that you canchoose the last color in the range.
The colors you selected in the Color Picker are placed in the range you selected in the Color Table dialog box.
5. Click Preview to view the results of the changes you have made to the image.
6. Click OK in the Color Table dialog box to apply the new colors to the indexed-color image.
Assign transparency to a single color in an indexed-color table
1. Choose Image > Mode > Color Table.
2. Select the eyedropper, and click the desired color in the table or in the image. The sampled color is replaced with transparency in the image.Click OK.
Use a predefined indexed-color table
1. Choose Image > Mode > Color Table.
2. Select an option from the Table menu:
Displays a panel based on the different colors a black body radiator emits as it is heated—from black to red, orange, yellow,and white.
Displays a panel based on 256 levels of gray—from black to white.
208

Twitter™ and Facebook posts are not covered under the terms of Creative Commons.
Legal Notices | Online Privacy Policy
Spectrum
System
To the top
Note:
Displays a panel based on the colors produced as white light passes through a prism—from violet, blue, and green to yellow,orange, and red.
Displays the standard 256-color system panel for Mac OS or Windows.
Save or load an indexed-color table
To save a table, click the Save button in the Color Table dialog box.To load a table, click the Load button in the Color Table dialog box. After you load a color table into an image, the colors in the imagechange to reflect the color positions they reference in the new color table.
You can also load saved color tables into the Color Swatches panel.
Adobe also recommends
209

Drawing and painting
210

Painting overview
To the top
To the top
About painting toolsAbout foreground and background colorsAbout blending modesWeb-safe colors
The painting tools change the color of pixels in an image. The Brush tool and the Pencil tool work like traditional drawing tools by applying colorwith brush strokes. The Gradient tool, Fill command, and Paint Bucket tool apply color to large areas. Tools like the Eraser tool, Blur tool, andSmudge tool modify the existing colors in an image.
The power of painting in Adobe Photoshop Elements is in the options that you can set to specify how a tool applies or modifies color. You canapply color gradually, with soft edges, with large brush strokes, with various brush dynamics, with different blending properties, and with brushes ofdifferent shapes. You can simulate spraying paint with an airbrush.
About painting tools
Photoshop Elements provides various tools for applying and editing color. When you select a painting tool, the Tool Options bar displays variouspreset brush tips and settings for brush size, paint blending, opacity, and airbrush effects. You can create new brush presets and save them inbrush libraries. You can customize the brush and settings for any of the painting and editing tools and manage them using the Preset Manager.
Brush options in the Tool Options bar A. Brush size slider and text box B. Brush pop-up panel and brush thumbnail C. More menu
The Brush tool paints smooth, anti-aliased lines. Other painting tools include the Pencil tool for making hard-edged lines and the Eraser tool forerasing color pixels from layers. The Paint Bucket tool and Fill command fill areas of your image with color or patterns. The pattern Stamp toolpaints with one of the predefined patterns or a pattern that you design.
The Impressionist Brush tool affects existing color by applying stylized brush strokes. The Smudge tool also affects existing image colors bysimulating the action of dragging a finger through wet paint.
The Detail Smart Brush tool automatically creates an adjustment layer as you paint. It doesn’t alter the original image layer. You can paint andchange the adjustments as many times as you want without degrading your original photo. See Adjust color and tonality using the Smart Brushtools.
About foreground and background colors
You apply the foreground color when you paint with the Brush or Pencil tools, and when you fill selections with the Paint Bucket tool. The color youapply to the Background layer with the Eraser tool is called the background color. You can see and change the foreground and background colorsin the two overlapping boxes at the bottom of the toolbox. The top box is the foreground color, and the bottom box is the background color. Theforeground and background colors are also used together by the Gradient tool and some special effects filters.
211

To the top
Normal
Dissolve
Behind
Clear
Foreground and background color boxes in toolbox A. Foreground color box B. Click to use default colors (black and white) C. Click to switch the foreground and background colors D. Backgroundcolor box
You can change the foreground or background color in the toolbox by using the Eyedropper tool, the Color Swatches panel, or the Color Picker.
About blending modes
Blending modes control how pixels in an image are affected by a painting or editing tool. It’s helpful to think in terms of the following colors whenvisualizing a blending mode’s effect:
The base color is the original color in the image.
The blend color is the color applied by the painting or editing tool.
The result color is the color resulting from the blend.
The Multiply blending mode (top), Screen blending mode (center), and Luminosity blending mode (bottom) applied to the starfish layer.
You can choose any of the following blending modes from the Mode menu in the Tool Options bar:
Edits or paints each pixel to make it the result color. This is the default mode. (Normal mode is called Threshold when you’re workingwith an image in bitmap or indexed-color mode.)
Edits or paints each pixel to make it the result color. However, the result color is a random replacement of the pixels with the base coloror the blend color, depending on the opacity at any pixel location. This mode works best with the brush tool and a large brush.
Edits or paints only on the transparent part of a layer. This mode works only on layers with Lock Transparency deselected, and isanalogous to painting on the back of transparent areas on a sheet of glass.
Edits or paints each pixel and makes it transparent. You must be on a layer with Lock Transparency deselected in the Layers panel to usethis mode.
212

Darken
Multiply
Color Burn
Linear Burn
Darker Color
Lighten
Screen
Color Dodge
Linear Dodge (Add)
Lighter Color
Overlay
Soft Light
Hard Light
Vivid Light
Linear Light
Pin Light
Looks at the color information in each channel and selects the base or blend color—whichever is darker—as the result color. Pixelslighter than the blend color are replaced, and pixels darker than the blend color do not change.
Looks at the color information in each channel and multiplies the base color by the blend color. The result color is always a darker color.Multiplying any color by black produces black. Multiplying any color by white leaves the color unchanged. When you’re painting with a color otherthan black or white, successive strokes with a painting tool produce progressively darker colors. The effect is similar to drawing on the image withmultiple felt-tipped pens.
Looks at the color information in each channel and darkens the base color to reflect the blend color. Blending with white produces nochange.
Looks at the color information in each channel and darkens the base color to reflect the blend color by decreasing the brightness.Blending with white produces no change.
Compares the total of all channel values for the blend and base color and displays the lower value color. Darker Color does notproduce a third color, which can result from the Darken blend, because it chooses the lowest channel values from both the base and the blendcolor to create the result color.
Looks at the color information in each channel and selects the base or blend color—whichever is lighter—as the result color. Pixelsdarker than the blend color are replaced, and pixels lighter than the blend color do not change.
Looks at each channel’s color information and multiplies the inverse of the blend and base colors. The result color is always a lightercolor. Screening with black leaves the color unchanged. Screening with white produces white. The effect is similar to projecting multiplephotographic slides on top of each other.
Looks at the color information in each channel and brightens the base color to reflect the blend color. Blending with black producesno change.
Looks at the color information in each channel and brightens the base color to reflect the blend color by increasing thebrightness. Blending with black produces no change.
Compares the total of all channel values for the blend and base color and displays the higher value color. Does not produce a thirdcolor, which can result from the Lighten blend, because it chooses the highest channel values from both the base and blend color to create theresult color.
Multiplies or screens the colors, depending on the base color. Patterns or colors overlay the existing pixels while preserving thehighlights and shadows of the base color. The base color is mixed with the blend color to reflect the lightness or darkness of the original color.
Darkens or lightens the colors, depending on the blend color. The effect is similar to shining a diffused spotlight on the image. If theblend color is lighter than 50% gray, the image is lightened. If the blend color is darker than 50% gray, the image is darkened. Painting with pureblack or white produces a distinctly darker or lighter area but does not result in pure black or white.
Multiplies or screens the colors, depending on the blend color. The effect is similar to shining a harsh spotlight on the image. If theblend color is lighter than 50% gray, the image is lightened. This is useful for adding highlights to an image. If the blend color is darker than 50%gray, the image is darkened. This is useful for adding shadows to an image. Painting with pure black or white results in pure black or white.
Burns or dodges the colors by increasing or decreasing the contrast, depending on the blend color. If the blend color (light source) islighter than 50% gray, the image is lightened by decreasing the contrast. If the blend color is darker than 50% gray, the image is darkened byincreasing the contrast.
Burns or dodges the colors by decreasing or increasing the brightness, depending on the blend color. If the blend color (light source)is lighter than 50% gray, the image is lightened by increasing the brightness. If the blend color is darker than 50% gray, the image is darkened bydecreasing the brightness.
Replaces the colors, depending on the underblend color. If the blend color (light source) is lighter than 50% gray, pixels darker than the
213

Twitter™ and Facebook posts are not covered under the terms of Creative Commons.
Legal Notices | Online Privacy Policy
Hard Mix
Difference
Exclusion
Hue
Saturation
Color
Luminosity
To the top
blend color are replaced, and pixels lighter than the blend color do not change. If the blend color is darker than 50% gray, pixels lighter than theblend color are replaced, and pixels darker than the blend color do not change. This mode is useful for adding special effects to an image.
Reduces colors to white, black, red, green, blue, yellow, cyan, and magenta—depending on the base color and the blend color.
Looks at the color information in each channel and subtracts either the blend color from the base color or the base color from theblend color, depending on which has the greater brightness value. Blending with white inverts the base color values; blending with black producesno change.
Creates an effect similar to, but lower in contrast, than the Difference mode. Blending with white inverts the base color values.Blending with black produces no change.
Creates a result color with the luminance and saturation of the base color and the hue of the blend color.
Creates a result color with the luminance and hue of the base color and the saturation of the blend color. Painting with this mode in anarea with zero saturation (a neutral gray area) causes no change.
Creates a result color with the luminance of the base color and the hue and saturation of the blend color. This preserves the gray levels inthe image and is useful for coloring monochrome images and for tinting color images.
Using the Color blending mode to change the color of a shirt
Creates a result color with the hue and saturation of the base color and the luminance of the blend color. This mode creates aninverse effect from that of the Color mode.
Web-safe colors
Web-safe colors are the 216 colors used by browsers on both the Windows and Mac OS platforms. By working only with these colors, you ensurethat colors in art you prepare for the web display accurately in a web browser.
You can identify web-safe colors in the Adobe Color Picker by using either of the following methods:
Select Only Web Colors in the lower-left corner of the Color Picker, and then choose any color in the Color Picker. When this option isselected, any color you pick is web-safe.
Choose a color in the Color Picker. If you choose a color that isn’t web-safe, an alert cube appears next to the color rectangle in the upper-right area of the Color Picker. Click the alert cube to select the closest web-safe color. (If no alert cube appears, the color you chose isweb-safe.)
Adobe also recommends
214
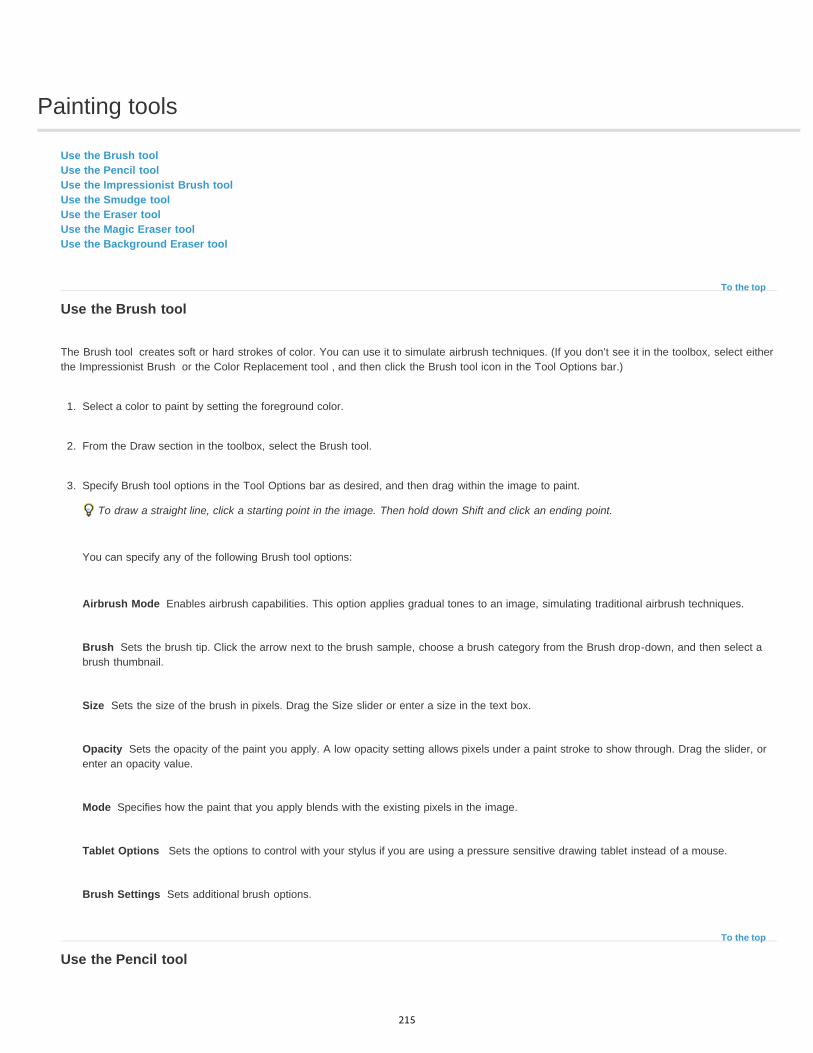
Painting tools
To the top
Airbrush Mode
Brush
Size
Opacity
Mode
Tablet Options
Brush Settings
To the top
Use the Brush toolUse the Pencil toolUse the Impressionist Brush toolUse the Smudge toolUse the Eraser toolUse the Magic Eraser toolUse the Background Eraser tool
Use the Brush tool
The Brush tool creates soft or hard strokes of color. You can use it to simulate airbrush techniques. (If you don’t see it in the toolbox, select eitherthe Impressionist Brush or the Color Replacement tool , and then click the Brush tool icon in the Tool Options bar.)
1. Select a color to paint by setting the foreground color.
2. From the Draw section in the toolbox, select the Brush tool.
3. Specify Brush tool options in the Tool Options bar as desired, and then drag within the image to paint.
To draw a straight line, click a starting point in the image. Then hold down Shift and click an ending point.
You can specify any of the following Brush tool options:
Enables airbrush capabilities. This option applies gradual tones to an image, simulating traditional airbrush techniques.
Sets the brush tip. Click the arrow next to the brush sample, choose a brush category from the Brush drop-down, and then select abrush thumbnail.
Sets the size of the brush in pixels. Drag the Size slider or enter a size in the text box.
Sets the opacity of the paint you apply. A low opacity setting allows pixels under a paint stroke to show through. Drag the slider, orenter an opacity value.
Specifies how the paint that you apply blends with the existing pixels in the image.
Sets the options to control with your stylus if you are using a pressure sensitive drawing tablet instead of a mouse.
Sets additional brush options.
Use the Pencil tool
215

Brush tip
Size
Opacity
Mode
Auto Erase
To the top
The Pencil tool creates hard-edged freehand lines.
1. Select a color to paint by setting the foreground color.
2. From the Draw section in the toolbox, select the Pencil tool.
3. Set Pencil tool options in the Tool Options bar, as desired, and then drag within the image to paint.
To draw a straight line, click a starting point in the image. Then hold down Shift and click an ending point.
You can specify any of the following Pencil tool options:
Sets the tip. Click the arrow next to the brush sample, choose a brush category from the Brush drop-down, and then select abrush thumbnail.
Sets the size of the brush in pixels. Drag the Size slider or enter a size in the text box.
Sets the opacity of the paint you apply. A low opacity setting allows pixels under a paint stroke to show through. Drag the slider, orenter an opacity value.
Specifies how the paint that you apply blends with the existing pixels in the image.
If you begin drawing and drag over an area that doesn’t contain the foreground color, the tool paints with the foreground color.That is, if we start with color other than foreground color, it paints the foreground color only. Click and paint on the areas containing theforeground color, pencil paints with the Background color.
Use the Impressionist Brush tool
The Impressionist Brush tool changes the existing colors and details in your image so your photo looks like it was painted using stylized brushstrokes. By experimenting with different style, area size, and tolerance options, you can simulate the textures associated with painting in differentartistic styles.
1. Witht he Brush tool selected in the toolbox, select the the Impressionist Brush tool from the Tool Options bar.
2. Set options in the Tool Options bar as desired, and then drag within the image to paint.
Original photo (left), and after using the Impressionist Brush tool (right)
You can specify any of the following options:
216

Brush
Size
Opacity
Mode
Advanced
To the top
Mode
Brush
Size
Strength
Sample All Layers
Sets the brush tip. Click the arrow next to the brush sample, choose a brush category from the Brush drop-down, and then select abrush thumbnail.
Sets the size of the brush in pixels. Drag the Size slider or enter a size in the text box.
Sets the opacity of the paint you apply. A low opacity setting allows pixels under a paint stroke to show through. Drag the slider orenter an opacity value.
Specifies how the paint that you apply blends with the existing pixels in the image. See About blending modes for more information.
Style affects the shape of the brush stroke. Area controls the size of the brush stroke. A larger area value also increases thenumber of strokes. Tolerance controls how similar in color value adjacent pixels must be before they are affected by the brush stroke.
Use the Smudge tool
The Smudge tool simulates the actions of dragging a finger through wet paint. The tool picks up color where the stroke begins and pushes it in thedirection you drag. You can smudge existing colors in your image, or smear foreground color on the image.
Original image (left), and after smudging parts of the photo (right)
1. From the Enhance section in the toolbox, select the Smudge tool (If you don’t see it in the toolbox, select either the Blur tool or the Sharpentool and then click the Smudge tool icon from the Tool Options bar.)
2. Set options in the Tool Options bar, and then drag within the image to smudge color.
To temporarily use the Finger Painting option as you drag with the smudge tool, press the Alt key (Option key in Mac OS).
You can specify any of the following Smudge tool options:
Specifies how the paint that you apply blends with the existing pixels in the image. See About blending modes for more information.
Sets the brush tip. Click the arrow next to the brush sample, choose a brush category from the Brush drop-down, and then select abrush thumbnail.
Sets the size of the brush in pixels. Drag the Size slider or enter a size in the text box.
Sets the amount of the smudge effect.
Smudges using color from all visible layers. If this option is deselected, the smudge tool uses colors from only the activelayer.
217

Finger Painting
To the top
Brush
Size
Opacity
Type
To the top
Smears the foreground color at the beginning of each stroke. If this option is deselected, the smudge tool uses the colorunder the pointer at the beginning of each stroke.
Use the Eraser tool
The Eraser tool changes pixels in the image as you drag through them. If you’re working in the Background layer or in a layer with lockedtransparency, erased pixels change to the background color; otherwise, erased pixels become transparent. Transparent pixels are indicated by thetransparency grid.
1. From the Draw section in the toolbox, select the Eraser tool. (If you don’t see it in the toolbox, select either the Background Eraser tool orthe Magic Eraser tool , and then click the Eraser tool icon in the Tool Options bar.)
2. Set options in the Tool Options bar as desired, and then drag through the area you want to erase.
You can specify any of the following Eraser tool options:
Sets the brush tip. Click the arrow next to the brush sample, choose a brush category from the Brush drop-down, and then select abrush thumbnail.
Sets the size of the brush in pixels. Drag the Size slider or enter a size in the text box.
Defines the strength of the erasure. An opacity of 100% erases pixels to complete transparency on a layer and to the backgroundcolor on the Background layer. A lower opacity erases pixels to partial transparency on a layer and paints partially with the background coloron the Background layer. (If Block mode is selected in the Tool Options bar, the Opacity option isn’t available.)
Brush mode erases by using characteristics of the brush tool, so you can make soft-edged erasures. Pencil mode makes hard-edgeerasures like a pencil. Block mode uses a hard-edged 16-pixel square as an eraser.
Use the Magic Eraser tool
The Magic Eraser tool changes all similar pixels when you drag within a photo. If you’re working in a layer with locked transparency, the pixelschange to the background color; otherwise, the pixels are erased to transparency. You can choose to erase contiguous pixels only, or all similarpixels on the current layer.
218

Note:
Tolerance
Opacity
Sample All Layers
Contiguous
Anti-aliasing
To the top
Original image (left), and after erasing the clouds (right)
1. In the Layers panel, select the layer containing the areas you want to erase.
If you select the Background, it automatically becomes a layer when you use the Magic Eraser.
2. From the Draw section in the toolbox, select the Magic Eraser tool in the toolbox. (If you don’t see it in the toolbox, select either the Erasertool or the Background Eraser tool , and then click the Magic Eraser tool icon in the Tool Options bar.)
3. Set options in the Tool Options bar, as desired, and then click the area of the layer you want to erase.
You can set any of the following Magic Eraser tool options:
Defines the range of colors that will be erased. A low tolerance erases pixels within a range of color values very similar to thepixel you click. A high tolerance erases pixels within a broader range.
Defines the strength of the erasure. An opacity of 100% erases pixels to complete transparency on a layer and to the backgroundcolor on a locked layer. A lower opacity erases pixels to partial transparency on a layer and paints partially with the background color on alocked layer.
Samples the erased color using combined data from all visible layers. Deselect the option if you want to erase only thepixels on the active layer.
Erases only pixels that are adjacent to the one you click. Deselect this option to erase all similar pixels in the image.
Smoothes the edges of the area you erase, making the edge look more natural.
Use the Background Eraser tool
The Background Eraser tool turns color pixels to transparent pixels so that you can easily remove an object from its background. With careful use,you can maintain the edges of the foreground object while eliminating background fringe pixels.
The tool pointer is a circle with a cross hair indicating the tool’s hotspot. As you drag the pointer, pixels within the circle and of a similar color valueas the pixel under the hotspot are erased. If the circle overlaps your foreground object, and it doesn’t contain pixels similar to the hotspot pixel, theforeground object won’t be erased.
Erasing the distracting background. You can replace the background with another background by using the Clone Stamp tool or by adding anotherlayer.
1. In the Layers panel, select the layer containing the areas you want to erase.
219

Twitter™ and Facebook posts are not covered under the terms of Creative Commons.
Legal Notices | Online Privacy Policy
Note:
Size
Tolerance
Brush Settings
Limits
If you select Background, it automatically becomes a layer when you use the Background Eraser.
2. From the Draw section in the toolbox, select the Background Eraser tool . (If you don’t see it in the toolbox, select either the Eraser tool orthe Magic Eraser tool , and then click the Background Eraser tool icon in the Tool Options bar.)
3. Set options in the Tool Options bar as desired, and then drag through the area you want to erase. Keep the tool’s hotspot off of areas thatyou don’t want to erase.
You can specify any of the following Background Eraser tool options:
Pixel width of the brush
Defines how similar in color to the hotspot a pixel must be to be affected by the tool. A low tolerance limits erasure to areas thatare very similar to the hotspot color. A high tolerance erases a broader range of colors.
Sets the presets of the brush, such as size, diameter, hardness, and spacing. Drag the Size sliders or enter numbers intext boxes.
Choose Contiguous to erase areas that contain the hotspot color and are connected to one another. Discontiguous erases anypixels within the circle that are similar to the hotspot color.
Adobe also recommends
220
Enhanced Quick Mode | Photoshop Elements 12
To the top
To the top
EffectsTexturesFramesApply an Effect, Texture, or Frame
The Quick mode groups basic photo-fixing tools in one place, to quickly fix the exposure, color, sharpness, and other aspects of an image. FromPhotoshop Elements 12, in addition to correcting your photos, you can also transform your photos into professional-looking objects of art. Threenew panels - Effects, Textures, and Frames - are now available.
These panels are placed next to the Adjustments panel. Each panel has ten thumbnails. Each thumbnail is a live preview. Clicking a thumbnailapplies the effect, texture, or frame, to your image. Names for these effects, textures, and frames is displayed when you hover the mouse pointeron the thumbnail.
Effects
The ten available effects transform your photo by applying an effect preset. The clickable thumbnails for available Effects are live previews, tounderstand how the effect looks on the image without actually applying it. Effects range from Black & White effect to Old Vintage look to Cross-processed preset. Effects are applied as a new layer with layer mask. You can edit the layer mask in Expert mode to remove/reduce effect fromcertain areas.
Textures
221
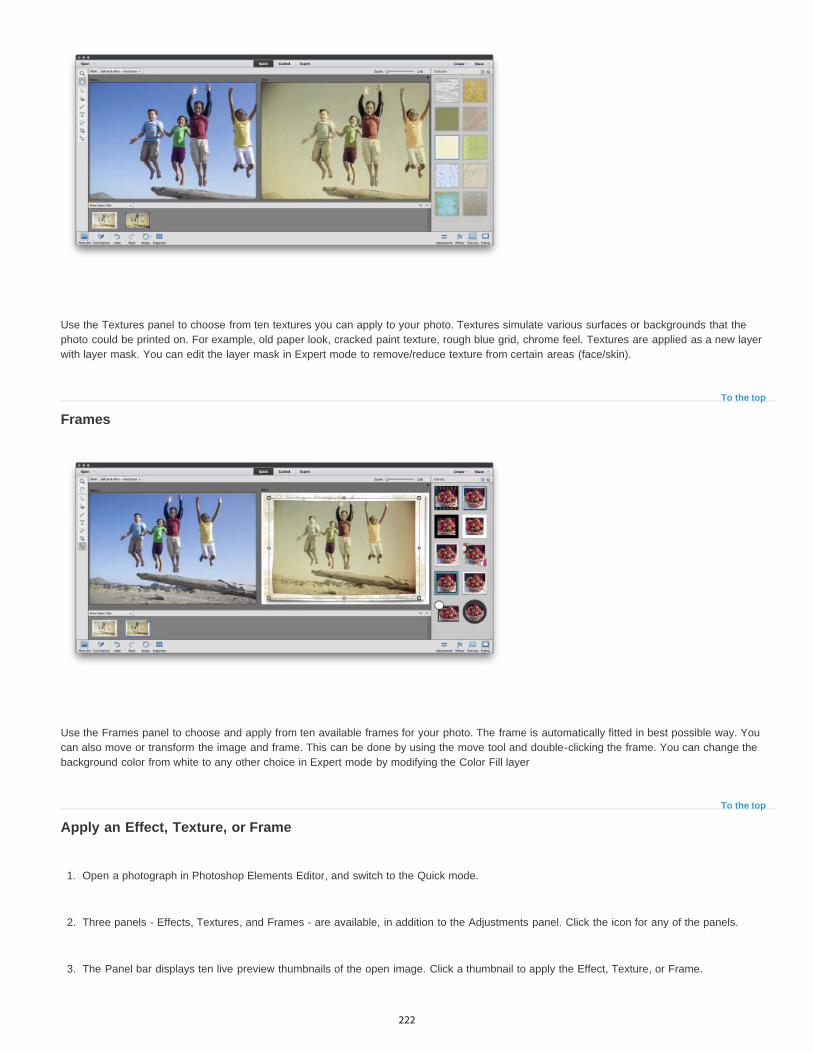
To the top
To the top
Use the Textures panel to choose from ten textures you can apply to your photo. Textures simulate various surfaces or backgrounds that thephoto could be printed on. For example, old paper look, cracked paint texture, rough blue grid, chrome feel. Textures are applied as a new layerwith layer mask. You can edit the layer mask in Expert mode to remove/reduce texture from certain areas (face/skin).
Frames
Use the Frames panel to choose and apply from ten available frames for your photo. The frame is automatically fitted in best possible way. Youcan also move or transform the image and frame. This can be done by using the move tool and double-clicking the frame. You can change thebackground color from white to any other choice in Expert mode by modifying the Color Fill layer
Apply an Effect, Texture, or Frame
1. Open a photograph in Photoshop Elements Editor, and switch to the Quick mode.
2. Three panels - Effects, Textures, and Frames - are available, in addition to the Adjustments panel. Click the icon for any of the panels.
3. The Panel bar displays ten live preview thumbnails of the open image. Click a thumbnail to apply the Effect, Texture, or Frame.
222

Twitter™ and Facebook posts are not covered under the terms of Creative Commons.
Legal Notices | Online Privacy Policy
4. (Optional) Switch to the Expert mode, and modify the effect, texture, or frame that you used on the image. The modification applied in theQuick mode is available in a separate layer.
223

Choosing colors
To the top
Note:
Choose a color with the Eyedropper toolChoose a color from the toolboxUse the Color Swatches panelUse the Adobe Color Picker
Choose a color with the Eyedropper tool
The Eyedropper tool makes it easy to copy a color without having to select a swatch. It copies, or samples, the color of an area in your photo toset a new foreground or background color. You can sample from the active image, from another open image, or from your computer’s desktop.
If you want the color always to be available, you can add the sampled color to the Color Swatches panel. You can also specify the size of the areathat the Eyedropper tool samples. For example, you can set the eyedropper to sample the average color values of a 5-by-5- or 3-by-3-pixel areaunder the pointer.
Selecting a foreground color with the eyedropper. A. Point sample B. 5 by 5 Average sample
1. Select the Eyedropper tool in the toolbox.
2. (Optional) To change the sample size of the eyedropper, choose an option from the Sample Size menu in the Tool Options bar:
Point Sample to get the precise value of the pixel you click.
3 By 3 Average or 5 By 5 Average to get the average value of the specified number of pixels within the area you click.
3. In the Tool Options bar, select where the color picker tool must sample from. Choose from All Layers or Current Layer.
4. Do one of the following to choose a color:
To select a new foreground color from an image, click the desired color in your image. To select a color that appears elsewhere on yourcomputer screen, click inside your image and drag away from it.
To select a new background color from an image, Alt-click (Option-click in Mac OS) the color you want.
As you click and drag the Eyedropper tool, the foreground color box changes.
5. Release the mouse button to pick the new color.
You can temporarily switch to the Eyedropper tool while using most painting tools, which allows you to change colors quickly withoutselecting another tool. Simply hold down the Alt key (Option key in Mac OS). Once you’ve chosen your color, release the Alt key (Option key inMac OS).
224

To the top
To the top
Choose a color from the toolbox
Do one of the following:
To set the foreground and background boxes to black and white, click the Default Colors icon.
To switch the colors in the two boxes, click the Switch Colors icon.
To change the foreground color, click the topmost color box in the toolbox, and then choose a color from the Color Picker.
To change the background color, click the bottom color box in the toolbox, and then choose a color from the Color Picker.
Use the Color Swatches panel
The Color Swatches panel (Window > Color Swatches) is a good place to store the colors that you use often in your images. You can select aforeground or background color by clicking a color swatch in the Color Swatches panel. You can add or delete colors to create a custom swatchlibrary, save a library of swatches, and reload them for use in another image. You can change the way thumbnails are displayed in the ColorSwatches panel by choosing an option from the More menu.
Although you can add many colors to the Color Swatches panel, you should manage its size and organization to improve performance. Creatinglibraries can help you group related or special swatches and manage panel size.
The Photoshop Elements installation folder\Presets\Color Swatches (for Mac, Photoshop Elements installation folder\Support Files\Presets\ColorSwatches)folder contains the various swatch libraries. When you create custom libraries, saving them to the Color Swatches folder makes themautomatically appear in the panel libraries pop-up menu.
Choose a color using the Color Swatches panel
1. If the Color Swatches panel is not already open, choose Window > Color Swatches.
2. (Optional) In the Color Swatches panel, choose a swatch library name from the Swatches menu.
3. Do one of the following:
To choose a foreground color, click a color in the panel.
To choose a background color, Ctrl-click (Command-click in Mac OS) a color in the panel.
Add a color to the Color Swatches panel
If there is a color you’d like to use often, you can save the color as a swatch in the Color Swatches panel. Saved swatches are added to the libraryof colors in the panel. To permanently save your custom swatches, you must save the entire library.
1. Set the foreground color in the toolbox to the color you want to add.
2. Do one of the following in the Color Swatches panel:
Click the New Swatch button at the bottom of the panel. The color swatch is added and automatically named Color Swatch 1.
Choose New Swatch from the More menu.
Position the pointer over an empty space in the bottom row of the Color Swatches panel (the pointer turns into the Paint Bucket tool),and click to add the color.
225

Note:
Note:
Selecting a color with the eyedropper and adding it as a new swatch
3. Enter a name for the new color and click OK.
4. If prompted to save the swatch library, enter a new name in the Save dialog box and click Save.
Save and use custom swatch libraries
Do any of the following in the Color Swatches panel:
To save a library of swatches, choose Save Swatches from the More menu. To make the set appear in the panel’s swatch librariespop-up menu, save the file to the Photoshop Elements\Presets\Color Swatches (For Mac, Photoshop Elements\SupportFiles\Presets\Color Swatches) folder.
To see the new swatch set in the menu, you must restart Photoshop Elements.
To select and load a swatch library, choose Load Swatches from the More menu in the panel.To replace the current swatch library with a different library, choose Replace Swatches from the More menu in the panel and select alibrary.
Reset a swatch library to its default color swatches
1. Choose a swatch library from the pop-up menu in the Color Swatches panel.
2. From the More menu in the Color Swatches panel, choose Preset Manager.
3. In the Preset Manager dialog box, choose Swatches from the Preset Type menu.
4. Choose Reset Swatches from the More menu, and confirm the action when prompted.
Delete a color from the Color Swatches panel
1. Do one of the following:
Drag the color swatch to the Trash button in the panel, and click OK to confirm the deletion.
Press Alt (Option key in Mac OS) to change the pointer to a scissors icon, and click a color in the Color Swatches panel.
2. If prompted to save the library, enter a name in the Save dialog box and click Save.
To permanently remove swatches you delete, you must resave the library that contained them.
226

Twitter™ and Facebook posts are not covered under the terms of Creative Commons.
Legal Notices | Online Privacy Policy
To the top
Note:
Use the Adobe Color Picker
You can use the Adobe Color Picker to select the foreground or background color by choosing from a color spectrum or by defining colorsnumerically. In addition, you can select colors based on HSB or RGB color models, or choose to select only web-safe colors.
Adobe Color Picker. A. Adjusted color B. Original color C. HSB color values D. RGB color values E. Displays only web colors F. Color field G. Color slider H.Hexadecimal color value
1. Click the foreground or background color boxes in the toolbox to display the Color Picker.
2. Click inside the color field. When you click in the color field, a circular marker indicates the color’s position in the field, and the numericalvalues change to reflect the new color.
3. Drag the white triangles along the slider to move to another color.
4. Alternately, to specify a number visually, do any of the following:
Enter the hexadecimal value for your color in the text box under the RGB values. (Hexadecimal color values are often used by webdesigners.)
For RGB color, select a radio button and specify component values from 0 to 255 (0 is no light and 255 is the brightest light).
For HSB color, select a radio button and specify saturation and brightness as percentages; specify hue as an angle from 0° to 360° thatcorresponds to a location on the color wheel.
5. The color rectangle to the right of the color slider displays the new color in the top section of the rectangle. The original color appears at thebottom of the rectangle.
6. Click OK to begin painting with the new color.
You can select colors using your system’s built-in color picker or a plug-in color picker. Choose Preferences > General and choose thecolor picker.
Adobe also recommends
227

Setting up brushes
To the top
Spacing
Fade
Hue Jitter
About brush optionsAdd a new brush to the brush libraryDelete a brushCreate a custom brush shape from an imageSet up pressure-sensitive tablet supportUsing Elements Organizer on Wacom tablets
About brush options
You can simulate actual brush strokes by setting the rates at which the brush tool strokes fade out. You can specify which options dynamicallychange over the course of a brush stroke, including scattering, size, and color. The brush thumbnail in the Tool Options bar reflects the brushchanges as you adjust the brush dynamics options.
You set brush dynamics options by selecting a brush tool and then clicking Brush Settings (or Advanced, for some tools) from the Tool Optionsbar.
Controls the distance between the brush marks in a stroke. To change the spacing, type a number, or use the slider to enter a value thatis a percentage of the brush diameter. (The brush thumbnail in the Tool Options bar dynamically changes to reflect your spacing adjustments.)
Increasing the spacing makes the brush skip.
Sets the number of steps until the paint flow fades to nothing. A low value makes the paint stroke fade away very quickly, while a value ofzero has no fading effect. Each step is equal to one mark of the brush tip. Possible values range from 0 to 9999. For example, entering 10 forFade produces a fade in 10 increments. For smaller brushes, you may want to set a value of 25 or larger. If strokes fade too quickly, increase thevalues.
Fade showing setting of 40, 60, and 80 steps
Sets the rate at which the stroke color switches between the foreground and background colors. Higher values cause more frequentswitches between the two colors than lower values. (To set the colors used by the color jitter option, see About foreground and backgroundcolors.)
228

Hardness
Scatter
Angle
Roundness
Paint stroke without and with color jitter
Controls the size of the brush’s hard center. Type a number, or use the slider to enter a value that’s a percentage of the brushdiameter.
Brush strokes with different hardness values
Brush scattering determines how brush marks are distributed in a stroke. A low value produces a denser stroke with less paint scattering,and higher values increase the scattering area.
Brush stroke with low and high scatter values
Specifies the angle by which an elliptical brush’s long axis is offset from horizontal. Type a value in degrees, or drag the arrowhead of theangle icon to mark the desired angle.
Angled brushes create a chiseled stroke
Specifies the ratio between the brush’s short and long axes. Enter a percentage value, or drag a dot in the angle icon away from ortoward the arrow. A value of 100% indicates a circular brush, a value of 0% indicates a linear brush, and intermediate values indicate ellipticalbrushes.
Adjusting roundness affects the shape of a brush tip.
229
Set this as a default
To the top
To the top
To the top
This option, available for certain tools that can have brush attributes, enable you to set the currently selected settings asyour default settings.
Add a new brush to the brush library
1. From the Draw section in the toolbox, select the Brush tool .
2. In the Tools Options bar, click the arrow next to the Brush pop-up to display the pop-up panel; choose a category from the Brush drop-down, and then select a brush to modify.
3. Click Brush Settings, and use the sliders to modify the original brush.
4. In the Brush pop-up, click the pop-up menu, and then choose Save Brush.
5. Enter a name in the Brush Name dialog box and click OK.
The new brush is selected in the Tool Options bar, and is added to the bottom of the brushes pop-up panel.
Delete a brush
1. From the Draw section in the toolbox, select the Brush tool .
2. Click the arrow next to the brush sample to display the brushes pop-up panel in the Tool Options bar.
3. Do one of the following:
Press the Alt key (Option key in Mac OS) to change the pointer to scissors, and then click the brush you want to delete.
Select the brush in the pop-up panel, and choose Delete Brush from the panel menu.
Choose Preset Manager from the panel menu, select Brushes from the Preset Type list, select the brush from the list in the dialog box,and click Delete.
Create a custom brush shape from an image
You can create a custom brush by selecting an area in a photo. The brush uses a grayscale version of that selection to apply the foreground colorto your image. For example, you could select a leaf and then paint using a fall color. You can also draw a new brush shape using the Brush tool.You can create a custom brush shape either from an entire layer or from a selection. A custom brush shape can be up to 2500 pixels by 2500pixels in size.
230
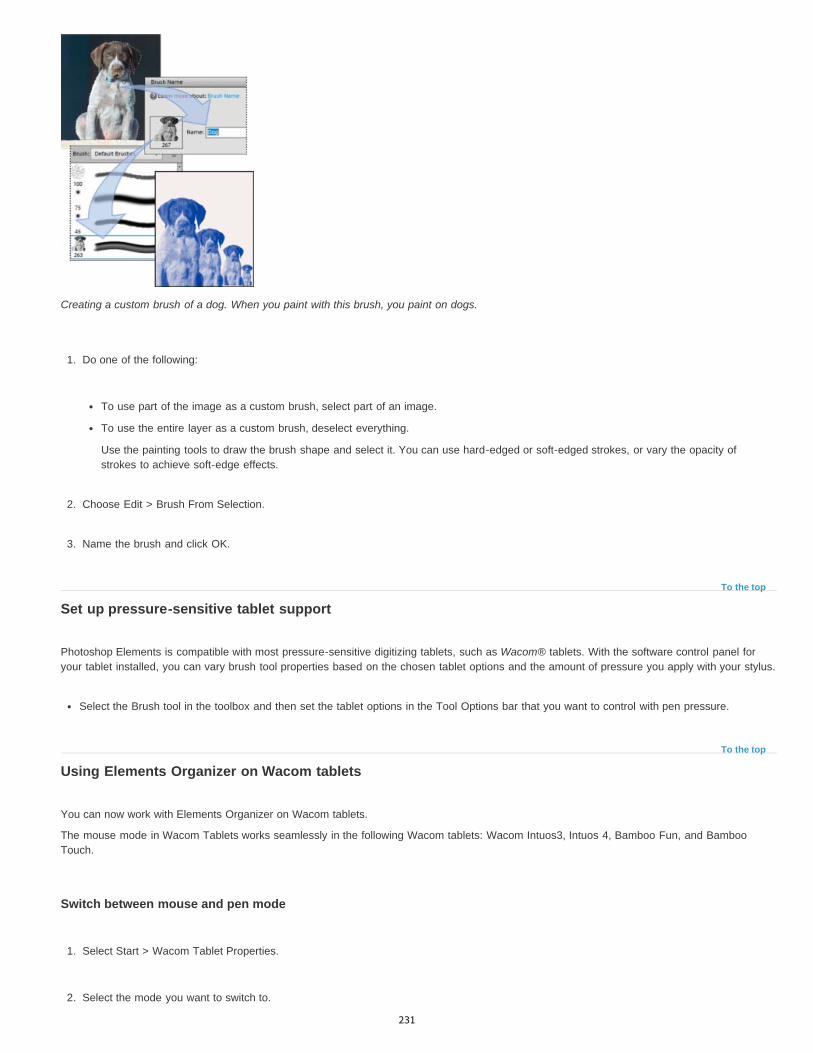
To the top
To the top
Creating a custom brush of a dog. When you paint with this brush, you paint on dogs.
1. Do one of the following:
To use part of the image as a custom brush, select part of an image.
To use the entire layer as a custom brush, deselect everything.
Use the painting tools to draw the brush shape and select it. You can use hard-edged or soft-edged strokes, or vary the opacity ofstrokes to achieve soft-edge effects.
2. Choose Edit > Brush From Selection.
3. Name the brush and click OK.
Set up pressure-sensitive tablet support
Photoshop Elements is compatible with most pressure-sensitive digitizing tablets, such as Wacom® tablets. With the software control panel foryour tablet installed, you can vary brush tool properties based on the chosen tablet options and the amount of pressure you apply with your stylus.
Select the Brush tool in the toolbox and then set the tablet options in the Tool Options bar that you want to control with pen pressure.
Using Elements Organizer on Wacom tablets
You can now work with Elements Organizer on Wacom tablets.
The mouse mode in Wacom Tablets works seamlessly in the following Wacom tablets: Wacom Intuos3, Intuos 4, Bamboo Fun, and BambooTouch.
Switch between mouse and pen mode
1. Select Start > Wacom Tablet Properties.
2. Select the mode you want to switch to.
231

Twitter™ and Facebook posts are not covered under the terms of Creative Commons.
Legal Notices | Online Privacy Policy
Wacom Tablet Preference Settings
Adobe also recommends
232

Fills and strokes
To the top
Paint / Pattern
Opacity
Tolerance
Mode
All Layers
Contiguous
Anti-aliasing
To the top
Use the Paint Bucket toolFill a layer with a color or patternStroke (outline) objects on a layer
Use the Paint Bucket tool
The Paint Bucket tool fills an area, that is similar in color value to the pixels you click. You can fill an area with the foreground color or a pattern.
1. Choose a foreground color.
2. Select the Paint Bucket tool in the toolbox.
3. Set options in the Tool Options bar, as desired, and then click the part of the image you want to fill.
If you don’t want to fill transparent areas in a layer, you can lock the layer’s transparency in the Layers panel.
You can specify any of the following Paint Bucket tool options:
Sets a foreground color (Paint) or a pattern design (Pattern) to use as the fill.
Sets the opacity of the paint you apply. A low opacity setting allows pixels under a paint stroke to show through. Drag the slider orenter an opacity value.
Defines how similar in color filled pixels must be. A low tolerance fills pixels with color values very similar to the pixel you click. Ahigh tolerance fills pixels that have a broader range of colors.
Specifies how the paint that you apply blends with the existing pixels in the image.
Fills similar pixels on any visible layer that are within the levels set by the Tolerance and Contiguous options.
Fills similarly colored pixels that are next to each other. Deselect this option to fill all similar pixels in the image, including thosethat aren’t touching. The Tolerance option defines how similar the colors must be.
Smoothes the edges of the filled selection.
Fill a layer with a color or pattern
You can use a Fill Layer to apply a fill or a pattern to your image, instead of using one of the brush tools. The fill layer gives you the addedflexibility of changing the fill and pattern properties and editing the fill layer’s mask to limit the gradient to a portion of your image.
1. Specify a foreground or background color.
233

Contents
Custom Pattern
Mode
Opacity
Preserve Transparency
To the top
Note:
Width
Color
Location
Mode
Opacity
Preserve Transparency
2. Select the area you want to fill. To fill an entire layer, select the layer in the Layers panel.
3. Choose Edit > Fill Layer, or Edit > Fill Selection .
4. Set options in the Fill dialog box, and then click OK.
Choose a color from the Use menu. To select a different color, choose Color, and then select a color from the Color Picker.Choose Pattern to fill with a pattern.
Specifies the pattern to use if you choose Pattern from the Use menu. You can use patterns from the pattern libraries orcreate your own patterns.
Specifies how the color pattern that you apply blends with the existing pixels in the image.
Sets the opacity of the color pattern to apply.
Fills only opaque pixels.
Stroke (outline) objects on a layer
You can use the Stroke command to automatically trace a colored outline around a selection or the content of a layer.
To add an outline to the background, you must first convert it to a regular layer. The background contains no transparent pixels, so theentire layer is outlined.
1. Select the area in the image or a layer in the Layers panel.
2. Choose Edit > Stroke (Outline) Selection.
3. In the Stroke dialog box, set any of the following options, and then click OK to add the outline:
Specifies the width of the hard-edged outline. Values can range from 1 to 250 pixels.
Sets the color of the outline. Click the color swatch to select a color in the Color Picker.
Specifies whether to place the outline inside, outside, or centered over the selection or layer boundaries.
Specifies how the paint that you apply blends with the existing pixels in the image.
Sets the opacity of the paint you apply. Enter an opacity value or click on the arrow and drag the slider.
Strokes only areas containing opaque pixels on a layer. If your image has no transparency, this option isn’tavailable.
Adobe also recommends
234

Twitter™ and Facebook posts are not covered under the terms of Creative Commons.
Legal Notices | Online Privacy Policy
235

Creating shapes
To the top
To the top
Note:
Unconstrained
About shapesDraw a rectangle, square, or rounded rectangleDraw a circle or ellipseDraw a multisided shapeDraw a line or arrowDraw a custom shapeCreate multiple shapes in the same layer
In Photoshop Elements, shapes are resolution-independent vector graphics (lines and curves defined by their geometric characteristics instead ofpixels) that can be moved, resized, or changed without losing detail, clarity, or quality. Both text and shapes are created in separate layers.
About shapes
In Photoshop Elements, shapes are vector graphics, which means they are made up of lines and curves defined by their geometric characteristicsinstead of pixels. Vector graphics are resolution-independent—that is, they can be scaled to any size and printed at any resolution without losingdetail or clarity. You can move, resize, or change them without losing the quality of the graphic. Because computer monitors display images on apixel grid, vector data is displayed on-screen as pixels.
Shapes are created in shape layers. A shape layer can contain a single shape or multiple shapes, depending on the shape area option you select.You can choose to have more than one shape in a layer.
You can change the color of a shape by editing its fill layer and applying layer styles to it. Shape tools provide an easy way to create buttons,navigation bars, and other items used on web pages.
Vector objects created with the shape tools in Photoshop Elements
Draw a rectangle, square, or rounded rectangle
1. Select the Rectangle tool or Rounded Rectangle tool. You can select also select the Rectangle and Rounded Rectangle tools from the ToolOptions bar.
Press Alt/Option and click a shape tool to cycle through all the available tools.
2. (Optional) In the Tool Options bar, you can set the following options:
Lets you set the width and height of a rectangle by dragging.
236

Square
Fixed Size
Proportional
Radius
From Center
Snap
Simplify
To the top
Note:
Unconstrained
Circle
Fixed Size
Proportional
From Center
Simplify
To the top
Note:
Constrains a rectangle to a square.
Draws a rectangle at the exact size you specified in the Width and Height text boxes.
Draws a rectangle in proportion to the specified Width and Height values.
Specifies the radius of the rounded corner. Smaller values result in sharper corners.
Draws a rectangle from the center of where you begin drawing (usually a rectangle is drawn from the upper-left corner).
Snaps edges of a rectangle to the pixel boundaries.
Converts the shape drawn into a raster graphic. Once converted to raster form, shrinking or expanding the shape may result injagged edges and pixelated appearance.
3. Drag within your image to draw the shape.
Draw a circle or ellipse
1. In the Edit workspace, select the Ellipse tool .
Press Alt/Option and click a shape tool to cycle through all the available tools.
2. (Optional) In the Tool Options bar, you can set the following options:
Lets you set the width and height of an ellipse by dragging.
Draws a perfect circle instead of an ellipse.
Draws an ellipse at the exact size you specified in the Width and Height text boxes.
Draws a proportional ellipse based on the numbers you type in the Width and Height text boxes.
Draws an ellipse from the center of where you begin drawing (usually an ellipse is drawn from the upper-left corner).
Converts the shape drawn into a raster graphic. Once converted to raster form, shrinking or expanding the shape may result injagged edges and pixelated appearance.
3. Drag in your image to draw the ellipse.
Draw a multisided shape
1. Select the Polygon tool or the Star tool .
Press Alt/Option and click a shape tool to cycle through all the available tools.
237

Smooth Corners
Indent Sides By
Smooth Indents
Simplify
To the top
Arrow head
Arrowheads Width and Length
Concavity
Simplify
To the top
2. (Optional) In the Tool Options bar, you can set the following options:
Renders a polygon with smooth corners.
Specifies the depth of the star’s indentations. This option is available for the Star tool only.
Renders a star-shaped polygon with smooth indents. This option is available for the Star tool only.
Converts the shape drawn into a raster graphic. Once converted to raster form, shrinking or expanding the shape may result injagged edges and pixelated appearance.
3. In the Sides box, specify the number of sides for the polygon.
4. Drag within your image to draw the polygon.
Draw a line or arrow
1. Select the Line tool .
2. (Optional) In the Tool Options bar, you can set the following options:
Renders a line with arrowheads. To specify the end that the arrows are rendered on, choose from Select At the Start, At theEnd, or At Both Ends.
Choose options for an Arrow head
Specify the proportions of the arrowhead as a percentage of the line width (10% to 1000% for Width, and10% to 5000% for Length).
Defines the amount of curvature on the widest part of the arrowhead, where the arrowhead meets the line. Enter a value for theconcavity of the arrowhead (from -50% to +50%).
Converts the shape drawn into a raster graphic. Once converted to raster form, shrinking or expanding the shape may result injagged edges and pixelated appearance.
3. In the Width box, specify the width of the line in pixels.
4. Drag within your image to draw the line.
Draw a custom shape
238

Unconstrained
Defined Proportions
Defined Size
Fixed Size
From Center
Simplify
To the top
Add
The Custom Shape tool provides many different shape options for you to draw. When you select the custom shape tool, you can access theseshapes in the options bar.
1. Select the Custom Shape tool .
2. In the options bar, select a shape from the Custom Shape picker pop-up. Click the arrow at the top right of the panel to list the shapes youcan choose from and how to display them.
3. (Optional) In the Tool Options bar, you can set the following options:
Lets you set the width and height of a rectangle, rounded rectangle, ellipse, or custom shape by dragging.
Draws a custom shape based on the proportions with which it was created.
Draws a custom shape based on the size at which it was created.
Draws a custom shape as a fixed shape based on the values you enter in the Width and Height text boxes.
Draws a custom shape from the center.
Converts the shape drawn into a raster graphic. Once converted to raster form, shrinking or expanding the shape may result injagged edges and pixelated appearance.
4. Drag within your image to draw the shape.
The Custom Shape tool has ready-made frames that you can drag around a photo.
Create multiple shapes in the same layer
1. Select a shape layer in the Layers panel (Expert mode) or create a new shape layer.
2. If you want to create a different type of shape, select a different shape tool.
3. Select a shape area option to determine how shapes should overlap, and then drag within the image to draw new shapes:
Adds an additional shape to the existing shape. The combined shape will cover the entire area of the shapes you drew using the Addoption.
239

Twitter™ and Facebook posts are not covered under the terms of Creative Commons.
Legal Notices | Online Privacy Policy
Subtract
Intersect
Exclude
Removes the area where shapes overlap. The rest of the shapes’ areas are preserved.
Shows only the area where shapes intersect. The other areas will be removed.
Removes the overlapping areas in the new and existing shapes.
Adobe also recommends
240

Gradients
To the top
Linear gradient
Radial gradient
Angle gradient
Reflected gradient
Diamond gradient
About gradientsApply a gradientApply gradient fill to textDefine a gradientSpecify gradient transparencyCreate a noise gradient
About gradients
You fill an area with a gradient by dragging within the image or by selecting with the Gradient tool. The distance between the starting point (whereyou first press the mouse button) and ending point (where you release the mouse button) affects the gradient appearance, as does the gradienttype.
Using the Gradient tool and Gradient Editor, you can create a custom mix of colors in your photos.
You can choose any of the following gradient types in the Tool Options bar.
Shades from the starting point to the ending point in a straight line.
Shades from the starting point to the ending point in a circular pattern.
Shades in a counterclockwise sweep around the starting point.
Shades using symmetric linear gradients on either side of the starting point.
Shades from the starting point outward in a diamond pattern. The ending point defines one corner of the diamond.You can also use a Fill Layer to apply a gradient to your image. The fill layer gives you the added flexibility of changing the gradient propertiesand editing the fill layer’s mask to limit the gradient to a portion of your image.
Gradients are stored in libraries. You can choose a different library of gradients to display in the Gradient Picker menu by clicking the the menuand selecting a library at the bottom of the list. You can also save and load your own libraries of gradients in this menu. You can also managegradients by using the Preset Manager.
241

To the top
Mode
Opacity
Reverse
Transparency
Dither
To the top
To the top
Apply a gradient
1. To fill part of the image, select the area with one of the selection tools. Otherwise, the gradient fill is applied to the entire active layer.
2. Select the Gradient tool .
3. In the Tool Options bar, click the desired gradient type.
4. Choose a gradient fill from the Gradient Picker panel in the Tool Options bar.
5. (Optional) Set gradient options in the Tool Options bar.
Specifies how the gradient blends with the existing pixels in the image.
Sets the opacity of the gradient. A low opacity setting allows pixels under the gradient to show through. Drag the slider or enter anopacity value.
Switches the order of the colors in the gradient fill.
Uses the gradient’s transparency (instead of any transparent areas in the image) if the gradient has transparent areas.
Creates a smoother blend with less obvious bands of color.
6. In the image, position the pointer where you want to set the starting point of the gradient, and drag to define the ending point. To constrainthe gradient angle to a multiple of 45°, hold down Shift as you drag.
Apply gradient fill to text
1. Select the text you want to fill.
2. Choose Layer > Simplify Layer to convert the vector text to a bitmap image. You won’t be able to edit the text after you simplify the layer.
3. Control-click (Command-click in Mac OS) the thumbnail for the text layer in the Layers panel to select the text.
4. Select the Gradient tool.
5. In the Tool Options bar, click the desired gradient type.
6. Choose a gradient fill from the Gradient Picker panel.
7. Position the pointer on the text where you want to set the starting point of the gradient, and drag to define the ending point.
Define a gradient
242

To the top
You can define your own gradients in the Gradient Editor dialog box. A gradient can include two or more colors, or one or more colors that fade totransparency.
Gradient Editor dialog box. A. Color Stop B. Color Midpoint C. Opacity Stop
To define a gradient, you add a color stop to add a color to the gradient, drag the color stop and the midpoint icon to define the range between twocolors, and adjust the Opacity stops to specify the transparency that you want in the gradient.
1. From the Draw section in the toolbox, select the Gradient tool.
2. To display the Gradient Editor dialog box, click the Edit button below the gradient sample.
3. In the Preset section of the Gradient Editor dialog box, select a gradient on which to base your new gradient.
4. To choose colors for your gradient, double-click the color stop, or click the Color swatch to display the Color Picker. Choose a color, andclick OK.
5. To adjust the color stop location of a color, drag the stop left or right.
6. To add a color to the gradient, click below the gradient bar to define another color stop.
7. To adjust the location of the transition midpoint between colors, drag the diamond below the gradient bar to the left or right.
8. To delete the color stop you are editing, click Delete.
9. To set the color transition’s smoothness, enter a percentage in the Smoothness text box, or drag the slider.
10. If desired, set transparency values for the gradient by dragging the Opacity stops.
11. To save the gradient in the gradient presets, enter a name for the new gradient, and then click Add to preset.
12. Click OK. The newly created gradient is selected and ready to use.
Specify gradient transparency
Each gradient fill contains settings (opacity stops) that control the opacity of the fill at different locations in the gradient. The checkerboard patternindicates the amount of transparency in the gradient preview. Gradients need at least two opacity stops.
1. Create a gradient.
2. To adjust the starting opacity in the Gradient Editor, click the left opacity stop above the gradient bar. The triangle below the stop turnsblack, indicating that you’re editing the starting transparency.
3. Set the Opacity by doing one of the following:
243

To the top
Enter a value between 0 (fully transparent) and 100% (fully opaque).
Drag the arrow on the Opacity slider.
4. To adjust the opacity of the endpoint, click the right transparency stop above the gradient bar. Then set the opacity as described in step 3.
5. To adjust the location of the starting or ending opacity, do one of the following:
Drag the corresponding opacity stop to the left or right.
Select the corresponding opacity stop, and enter a value for Location.
6. To adjust the location of the midpoint opacity (the point midway between the starting and ending opacities), do one of the following:
Drag the diamond above the gradient bar to the left or right.
Select the diamond, and enter a value for Location.
7. To delete the opacity stop you are editing, click Delete, or drag the stop away from the gradient bar.
8. To add an intermediate opacity, click above the gradient bar to define a new opacity stop. You can then adjust and move this opacity as youwould a starting or ending opacity.
To remove an intermediate opacity, drag its transparency stop up and off the gradient bar, or select the stop and click the Delete button.
9. To save the gradient to the gradient presets, enter a new name in the Name text box, and then click New. This creates a new gradientpreset with the transparency setting you specified.
10. Click OK to exit the dialog box and select the newly created gradient. Make sure that Transparency is selected in the Tool Options bar.
Create a noise gradient
A noise gradient is a gradient that contains randomly distributed colors within a range of colors that you specify.
Noise gradients with different noise values. A. 10% noise B. 50% noise C. 90% noise
1. Select the Gradient tool.
2. To display the Gradient Editor dialog box, click the Edit button in the Tool Options bar.
3. Choose Noise from the Gradient Type menu.
4. Set options for the gradient.
244
Twitter™ and Facebook posts are not covered under the terms of Creative Commons.
Legal Notices | Online Privacy Policy
Roughness
Color Model
Restrict Colors
Add Transparency
Sets the amount of softness in the transition between colors in the pattern.
Specifies the color model to use to set the color range to include in the gradient. To define the range of colors, drag thesliders for each color component.
Prevents oversaturated colors.
Adds transparency to random colors.
5. To randomly mix the colors, click the Randomize button until you find a gradient you like.
6. Enter a name for the new gradient.
7. To add your gradient preset, click New.
8. Click OK to exit the dialog box, and then select the newly created gradient.
Adobe also recommends
245

Editing shapes
To the top
To the top
To the top
Note:
To the top
Select or move a shapeTransform a shapeChange the color of all shapes in a layerApply a layer style to a shape
Select or move a shape
Use the Shape Selection tool to select shapes with one click. If you convert a shape into a bitmap element by simplifying the shape layer, theShape Selection tool will no longer select the shape (use the Move tool instead).
If a layer contains multiple shapes, you can reposition all the shapes together using the Move tool. However, if you want to reposition a specificshape in a layer, you must use the Shape Selection tool.
1. Use the Shape Selection tool to select shapes:
2. To select the shape, click it.
3. To move the shape, drag it to a new location.
Transform a shape
1. Select the Shape Selection tool , and then select the Show Bounding Box option.
2. Do one of the following:
Click the shape you want to transform, and then drag an anchor to transform the shape.
Select the shape you want to transform, choose Image > Transform Shape, and then choose a transformation command.
Change the color of all shapes in a layer
1. In the Expert mode, double-click the thumbnail of the shape layer in the Layers panel.
2. Select a new color and click OK.
If the color of a shape doesn’t change when you pick a new color, check to see if the layer has a layer style (represented by a styleicon in the Layers panel). Some layer styles override the base color of a shape.
Apply a layer style to a shape
You can apply effects—such as drop shadows and bevels—to shapes quickly and easily using layer styles. Keep in mind that a layer style is
246
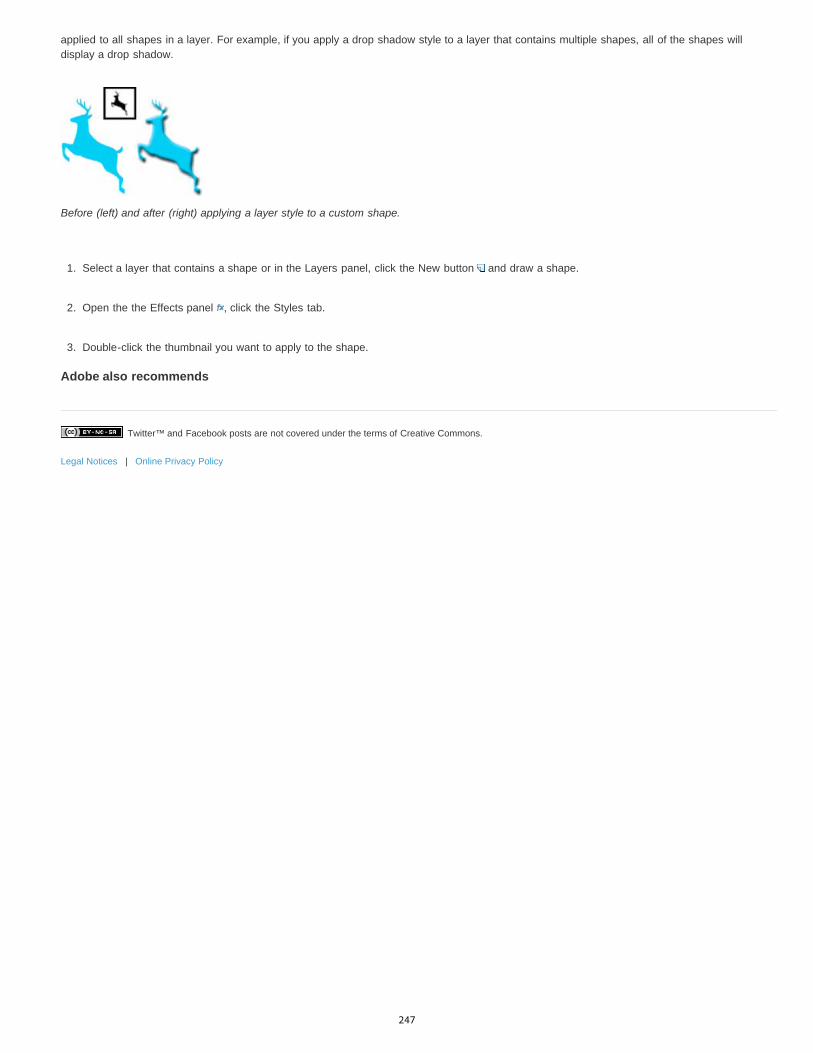
Twitter™ and Facebook posts are not covered under the terms of Creative Commons.
Legal Notices | Online Privacy Policy
applied to all shapes in a layer. For example, if you apply a drop shadow style to a layer that contains multiple shapes, all of the shapes willdisplay a drop shadow.
Before (left) and after (right) applying a layer style to a custom shape.
1. Select a layer that contains a shape or in the Layers panel, click the New button and draw a shape.
2. Open the the Effects panel , click the Styles tab.
3. Double-click the thumbnail you want to apply to the shape.
Adobe also recommends
247

Patterns
To the top
To the top
Brush
Impressionist
About patternsUse the Pattern Stamp toolAdd a custom pattern to the pattern picker
About patterns
You can paint a pattern with the Pattern stamp tool or fill a selection or layer with a pattern that you choose from the pattern libraries. PhotoshopElements has several patterns you can choose from.
To customize your images, or to make one-of-a-kind scrapbook pages, you can create your own patterns. You can save patterns that you createin a library, and then load libraries of patterns using the Preset Manager or the Pattern pop-up panel, which appears in the Tool Options bar of thePattern Stamp tool and the Paint Bucket tool. Saving patterns allows you to easily use a pattern in multiple images.
Creating a custom pattern A. Rectangular selection used to define a pattern B. Custom pattern in pattern picker C. New image filled with custom pattern
Use the Pattern Stamp tool
The Pattern Stamp tool paints with a pattern defined from your image, another image, or a preset pattern.
1. From the Enhance section in the toolbox, select the the Pattern Stamp tool. (If you don’t see it in the toolbox, select the Clone Stamp tool ,and then click the Pattern Stamp tool icon in the Tool Options bar.)
2. Choose a pattern from the Pattern pop-up panel in the Tool Options bar. To load additional pattern libraries, select a library name from thepanel menu, or choose Load Patterns and navigate to the folder where the library is stored. You can also define your own pattern.
3. Set Pattern Stamp tool options in the Tool Options bar, as desired, and then drag within the image to paint.
You can specify any of the following Pattern Stamp tool options:
Sets the brush tip. Click the arrow next to the brush sample, choose a brush category from the Brush drop-down, and then select abrush thumbnail.
Paints the pattern using paint daubs to create an impressionist effect.
248

Twitter™ and Facebook posts are not covered under the terms of Creative Commons.
Legal Notices | Online Privacy Policy
Size
Opacity
Mode
Aligned
To the top
Sets the size of the brush in pixels. Drag the Size slider or enter a size in the text box.
Sets the opacity of the pattern you apply. A low opacity setting allows pixels under a pattern stroke to show through. Drag theslider or enter an opacity value.
Specifies how the paint that you apply blends with the existing pixels in the image. (See About blending modes.)
Repeats the pattern as a contiguous, uniform design. The pattern is aligned from one paint stroke to the next. If Aligned isdeselected, the pattern is centered on the pointer each time you stop and resume painting.
Add a custom pattern to the pattern picker
1. Do one of the following:
To create a pattern from part of the image, make a rectangular selection with Feather set to 0 pixels.
To create a pattern from the entire image, deselect everything.
2. Choose Edit > Define Pattern From Selection.
3. Enter a name for the pattern in the Pattern Name dialog box.
4. To deselect the original selection, choose Select > Deselect.
1. Choose File > Open.
2. Navigate to Photoshop Elements 10.0/Presets/Patterns/PostScript Patterns.
3. Select the pattern file you want to use, and click Open.
4. When the Rasterize Generic EPS Format dialog opens, click OK to proceed.
5. Choose Select > All, or make a rectangular selection around the pattern with Feather set to 0 pixels in the Tool Options bar.
6. Choose Edit > Define Pattern From Selection. The pattern is defined as an Adobe Photoshop Elements pattern.
7. Enter a name for the pattern in the Pattern Name dialog box, and click OK.
Adobe also recommendsAbout selections
249

Effects and filters
250

Effects
Filters
Styles
Photo Effects
To the top
To the top
Using the Graphics panelAdd stylized shapes or graphics to an imageAdd an artistic background to an imageAdd a frame or theme to an imageAbout photo effectsApply an effectAdd stylized text to an imageAdd graphics or effects to Favorites
The Effects panel provides a single location from which you can apply effects. By default, the Effects panel is located on the top of the Panel Bin.
Apply filters to your image.
Apply Styles to your image.
Apply photo effects to your image.
Each section displays thumbnail examples of the artwork or effects that you can add or apply to an image. Most sections offer a menu of categoryoptions and corresponding subcategories.
Using the Graphics panel
The Graphics panel provides a single location from which you can apply artwork, theme decorations, and text styles to your images. To show theGraphics panel, choose Window > Graphics.
In the Graphics panel, the following sections provide various items that can enhance your images. For example, you can select from varieties offilters, styles, and effects. Under each tab, a drop-down helps in choosing the right filter, style, or effect to reproduce.
Each section displays thumbnail examples of the artwork or effects that you can add or apply to an image. Most sections offer a menu of categoryoptions and corresponding subcategories.
Add stylized shapes or graphics to an image
When you add a shape or graphic to an image, the shape or graphic is a new layer and does not affect the original image.
1. In the Graphics panel,
Choose from the category menu (for example, By Event or By Activity), and choose a subcategory (for example, Baby or Cooking).
2. In the toolbox, choose a color for the shape.
3. Do one of the following:
251

To the top
To the top
To the top
Double-click a thumbnail.
Drag the thumbnail to the image.
4. Use the Move tool to relocate or resize the shape or graphic.
Add an artistic background to an image
When you add an artistic background to an image, you replace the existing background layer. For example, you could use the selection tools tocreate a layer separating your family members from a kitchen background, and then replace the kitchen with a nature background.
1. If your image has only a background layer, select it, and choose Layer > Duplicate Layer. Name the layer and click OK.
2. Select the Background layer in the Layers panel.
3. In the Graphics panel, select Backgrounds from the drop-down.
4. Do one of the following:
Double-click a thumbnail.
Drag the thumbnail to the image.
Add a frame or theme to an image
When you add a frame or theme to a photo project, frames appear with a blank (gray) area for the image. Click and drag an image from the PhotoBin to the blank area.
1. In the Graphics panel, choose Frames from the drop-down menu.
2. Do one of the following:
Select a thumbnail and click Apply.
Double-click a thumbnail.
Drag the thumbnail to the blank background.
3. Drag the desired image from the Photo Bin to the frame.
4. Use the slider to resize the image in the frame or theme border, then click the Commit icon to apply the change, or click the Cancel icon .
5. Use the Move tool to center the image, then click the Commit icon to apply the change, or click the Cancel icon .
About photo effects
252

Frame
Image Effects
Textures
To the top
Note:
To the top
Photo effects let you quickly create different looks for your images. In the Effects panel, click Photo Effects and choose one of thesubcategories, such as Faded Photo, Frame, Misc. Effects, Monotone Color, Old Photo or Vintage Photo.
Apply a variety of effects to the edges of a selected layer, or to a portion of a layer. A frame also creates a drop zone where you can addor change the contents easily.
Apply effects to a copy of a selected layer. Adding the Blizzard effect to an image makes it look like it’s snowing. The Neon Gloweffect turns the image into a dramatic neon picture. You can use Image effects, such as Oil Pastel or Soft Focus, to soften colors or blur an image.You can also combine Image effects, but you may be prompted to flatten layers first.
Apply texture layers to an image. You can add texture to a new, blank image as a background, or add a texture to an existing image. Byarranging layers, and working with opacity and other layer tools, you can create interesting and attractive images.
Many photo effects apply filters with modified values.
Apply an effect
If you want to experiment with an effect, modify a duplicate layer and preserve the original image.
1. Do one of the following:
To apply an effect to an entire layer, deselect any selected areas in the image, and then select the layer in the Layers panel.
To apply an effect to a portion of a layer, use any selection tool to select the area.
To apply an effect to text, select or create text, and use any text effect from the Graphics panel.
2. In the Effects panel, choose a category of photo effects, and do one of the following:
Double-click an effect.
Drag an effect to the image.
Select an effect, and click Apply.
In some cases, when applying an effect to an image with multiple layers, you are prompted to flatten the image first.
Dragging an image effect to a photo
Add stylized text to an image
When you add text to an image, a text layer is added, so you can modify the text without affecting the original image.
253
Twitter™ and Facebook posts are not covered under the terms of Creative Commons.
Legal Notices | Online Privacy Policy
To the top
1. In the Graphics panel, select Text from the drop-down, and then do one of the following:
Select a thumbnail, and click Apply.
Double-click a thumbnail.
Drag a thumbnail to the image.
2. A text frame appears over the image and the Text tool becomes active. Type in the new text.
3. When you are finished changing the text, either click the Commit icon to apply the change, or click the Cancel icon .
4. Use the Move tool to relocate or resize the text frame.
5. (Optional) Add color to the text using the pop-up Color panel in the options bar.
6. When you finish adjusting the text, either click the Commit icon to apply the change, or click the Cancel icon .
7. (Optional) To experiment with different text effects, drag a different thumbnail over the text frame.
Add graphics or effects to Favorites
When you see graphics or effects that you would like to quickly access in the future, add it to the Favorites section of the Effects panel.
In the Effects or Graphics panel, right-click on the thumbnail and choose Add To Favorites.
Adobe also recommendsAbout projects
About projects
About projects
About projects
About projects
About projects
About projects
About projects
254

Gradients
To the top
Linear gradient
Radial gradient
Angle gradient
Reflected gradient
Diamond gradient
About gradientsApply a gradientApply gradient fill to textDefine a gradientSpecify gradient transparencyCreate a noise gradient
About gradients
You fill an area with a gradient by dragging within the image or by selecting with the Gradient tool. The distance between the starting point (whereyou first press the mouse button) and ending point (where you release the mouse button) affects the gradient appearance, as does the gradienttype.
Using the Gradient tool and Gradient Editor, you can create a custom mix of colors in your photos.
You can choose any of the following gradient types in the Tool Options bar.
Shades from the starting point to the ending point in a straight line.
Shades from the starting point to the ending point in a circular pattern.
Shades in a counterclockwise sweep around the starting point.
Shades using symmetric linear gradients on either side of the starting point.
Shades from the starting point outward in a diamond pattern. The ending point defines one corner of the diamond.You can also use a Fill Layer to apply a gradient to your image. The fill layer gives you the added flexibility of changing the gradient propertiesand editing the fill layer’s mask to limit the gradient to a portion of your image.
Gradients are stored in libraries. You can choose a different library of gradients to display in the Gradient Picker menu by clicking the the menuand selecting a library at the bottom of the list. You can also save and load your own libraries of gradients in this menu. You can also managegradients by using the Preset Manager.
255
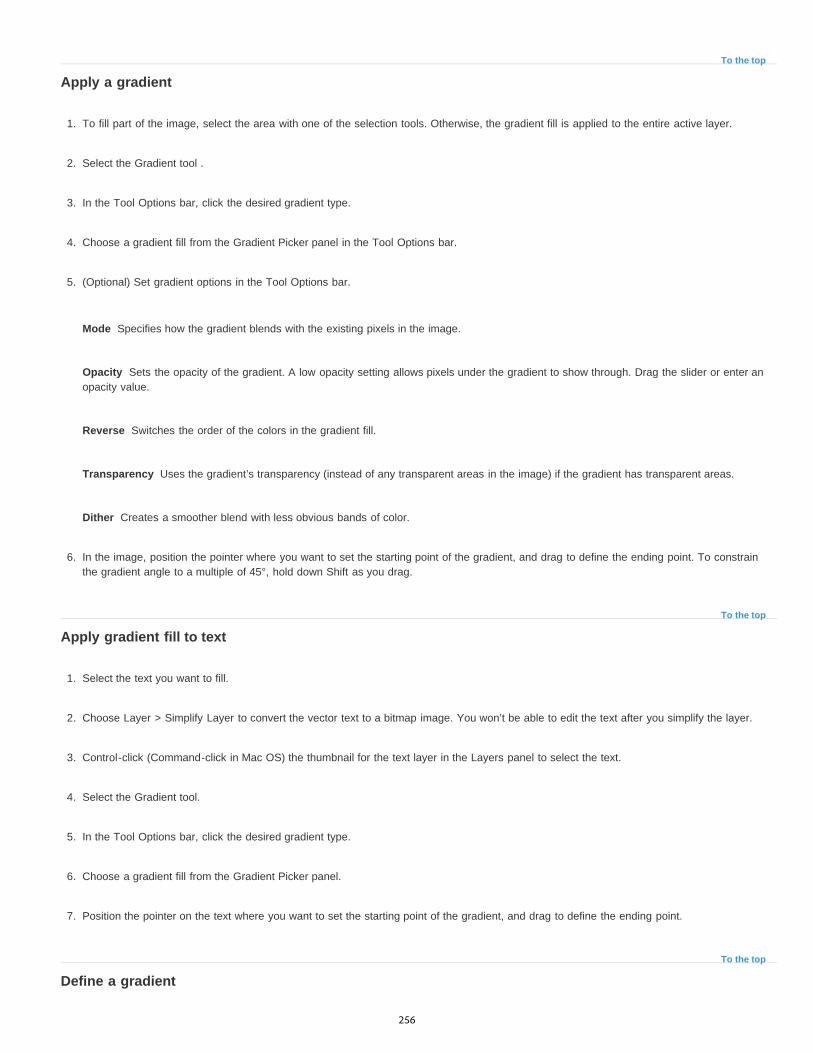
To the top
Mode
Opacity
Reverse
Transparency
Dither
To the top
To the top
Apply a gradient
1. To fill part of the image, select the area with one of the selection tools. Otherwise, the gradient fill is applied to the entire active layer.
2. Select the Gradient tool .
3. In the Tool Options bar, click the desired gradient type.
4. Choose a gradient fill from the Gradient Picker panel in the Tool Options bar.
5. (Optional) Set gradient options in the Tool Options bar.
Specifies how the gradient blends with the existing pixels in the image.
Sets the opacity of the gradient. A low opacity setting allows pixels under the gradient to show through. Drag the slider or enter anopacity value.
Switches the order of the colors in the gradient fill.
Uses the gradient’s transparency (instead of any transparent areas in the image) if the gradient has transparent areas.
Creates a smoother blend with less obvious bands of color.
6. In the image, position the pointer where you want to set the starting point of the gradient, and drag to define the ending point. To constrainthe gradient angle to a multiple of 45°, hold down Shift as you drag.
Apply gradient fill to text
1. Select the text you want to fill.
2. Choose Layer > Simplify Layer to convert the vector text to a bitmap image. You won’t be able to edit the text after you simplify the layer.
3. Control-click (Command-click in Mac OS) the thumbnail for the text layer in the Layers panel to select the text.
4. Select the Gradient tool.
5. In the Tool Options bar, click the desired gradient type.
6. Choose a gradient fill from the Gradient Picker panel.
7. Position the pointer on the text where you want to set the starting point of the gradient, and drag to define the ending point.
Define a gradient
256
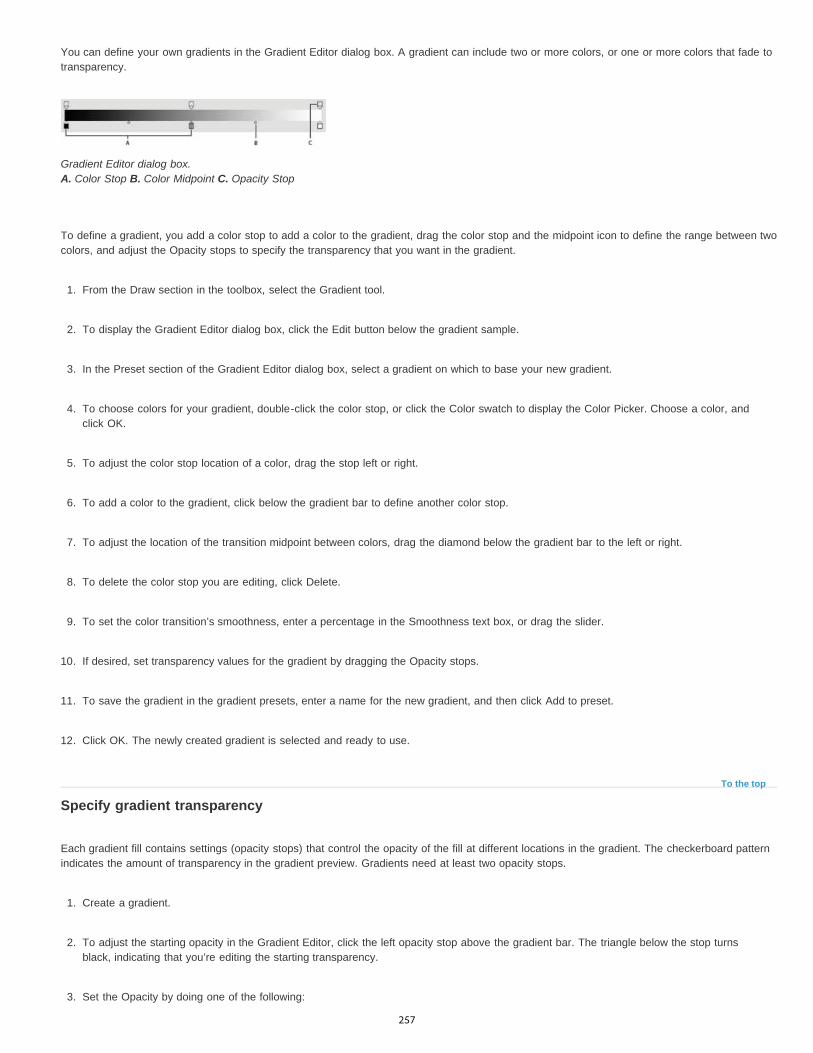
To the top
You can define your own gradients in the Gradient Editor dialog box. A gradient can include two or more colors, or one or more colors that fade totransparency.
Gradient Editor dialog box. A. Color Stop B. Color Midpoint C. Opacity Stop
To define a gradient, you add a color stop to add a color to the gradient, drag the color stop and the midpoint icon to define the range between twocolors, and adjust the Opacity stops to specify the transparency that you want in the gradient.
1. From the Draw section in the toolbox, select the Gradient tool.
2. To display the Gradient Editor dialog box, click the Edit button below the gradient sample.
3. In the Preset section of the Gradient Editor dialog box, select a gradient on which to base your new gradient.
4. To choose colors for your gradient, double-click the color stop, or click the Color swatch to display the Color Picker. Choose a color, andclick OK.
5. To adjust the color stop location of a color, drag the stop left or right.
6. To add a color to the gradient, click below the gradient bar to define another color stop.
7. To adjust the location of the transition midpoint between colors, drag the diamond below the gradient bar to the left or right.
8. To delete the color stop you are editing, click Delete.
9. To set the color transition’s smoothness, enter a percentage in the Smoothness text box, or drag the slider.
10. If desired, set transparency values for the gradient by dragging the Opacity stops.
11. To save the gradient in the gradient presets, enter a name for the new gradient, and then click Add to preset.
12. Click OK. The newly created gradient is selected and ready to use.
Specify gradient transparency
Each gradient fill contains settings (opacity stops) that control the opacity of the fill at different locations in the gradient. The checkerboard patternindicates the amount of transparency in the gradient preview. Gradients need at least two opacity stops.
1. Create a gradient.
2. To adjust the starting opacity in the Gradient Editor, click the left opacity stop above the gradient bar. The triangle below the stop turnsblack, indicating that you’re editing the starting transparency.
3. Set the Opacity by doing one of the following:
257

To the top
Enter a value between 0 (fully transparent) and 100% (fully opaque).
Drag the arrow on the Opacity slider.
4. To adjust the opacity of the endpoint, click the right transparency stop above the gradient bar. Then set the opacity as described in step 3.
5. To adjust the location of the starting or ending opacity, do one of the following:
Drag the corresponding opacity stop to the left or right.
Select the corresponding opacity stop, and enter a value for Location.
6. To adjust the location of the midpoint opacity (the point midway between the starting and ending opacities), do one of the following:
Drag the diamond above the gradient bar to the left or right.
Select the diamond, and enter a value for Location.
7. To delete the opacity stop you are editing, click Delete, or drag the stop away from the gradient bar.
8. To add an intermediate opacity, click above the gradient bar to define a new opacity stop. You can then adjust and move this opacity as youwould a starting or ending opacity.
To remove an intermediate opacity, drag its transparency stop up and off the gradient bar, or select the stop and click the Delete button.
9. To save the gradient to the gradient presets, enter a new name in the Name text box, and then click New. This creates a new gradientpreset with the transparency setting you specified.
10. Click OK to exit the dialog box and select the newly created gradient. Make sure that Transparency is selected in the Tool Options bar.
Create a noise gradient
A noise gradient is a gradient that contains randomly distributed colors within a range of colors that you specify.
Noise gradients with different noise values. A. 10% noise B. 50% noise C. 90% noise
1. Select the Gradient tool.
2. To display the Gradient Editor dialog box, click the Edit button in the Tool Options bar.
3. Choose Noise from the Gradient Type menu.
4. Set options for the gradient.
258

Twitter™ and Facebook posts are not covered under the terms of Creative Commons.
Legal Notices | Online Privacy Policy
Roughness
Color Model
Restrict Colors
Add Transparency
Sets the amount of softness in the transition between colors in the pattern.
Specifies the color model to use to set the color range to include in the gradient. To define the range of colors, drag thesliders for each color component.
Prevents oversaturated colors.
Adds transparency to random colors.
5. To randomly mix the colors, click the Randomize button until you find a gradient you like.
6. Enter a name for the new gradient.
7. To add your gradient preset, click New.
8. Click OK to exit the dialog box, and then select the newly created gradient.
Adobe also recommends
259

Guided mode
Touchups
Photo Effects
Photo Play
Note:
To the top
TouchupsPhoto EffectsPhoto Play
The Guided mode provides you with guided edits - a wizard-like interface to accomplish certain predefined effects. Each guided edit has anassociated image that displays the applied effect when you hover the mouse pointer on it.
Guided mode features are basically grouped into three categories:
Crop, rotate and straighten or both, sharpen photos, adjust color, lighting, and overall tonal quality of the photo. Also fix minorscratches and blemishes.
Apply special effects in easy steps, that would otherwise require professional expertise or expensive lenses to achieve.
Transform an image into pop art, add a reflection effect, create a picture stack, and apply the out of bounds effect.
The Guided Edits available may vary in your version of Photoshop Elements.
Touchups
The Brightness And Contrast Guided Edit
Use the Brightness And Contrast Guided Edit to adjust brightness or contrast in an image.
You can view the after image only, or view both the before and after images either vertically or horizontally.
For more on adjusting brightness and contrast, see Adjusting shadows and light.
The Correct Skin Tones Guided Edit
Use the Correct Skin Tone Guided Edit to correct skin tones (tan, blush, and light) in an image.
You can view the after image only, or view both the before and after images either vertically or horizontally.
For more on correcting color casts, see Adjust the color of skin tone.
The Crop Photo Guided Edit
Use the Crop Photo Guided Edit to crop an image.
You can view the after image only, or view both the before and after images either vertically or horizontally.
For more information on cropping, see Cropping.
The Enhance Colors Guided Edit
Use the Enhance Colors Guided Edit to enhance the hue, saturation, and lightness in an image.
260

You can view the after image only, or view both the before and after images either vertically or horizontally.
For more on enhancing colors, see Adjusting color saturation and hue.
The Levels Guided Edit
For more information on using Levels, see About Levels adjustments.
The Lighten and Darken Guided Edit
Use the Lighten or Darken Guided Edit to lighten or darken an image.
You can view the after image only, or view both the before and after images either vertically or horizontally.
For more on lightening or darkening an image, see Adjusting shadows and light.
The Perfect Portrait Guided Edit
In Guided Edit, create a perfect portrait by removing blemishes and enhancing various parts of the image with easy-to-use tools.
1. In Guided mode, from the Touchups section, click Perfect Portrait.
2. Enhance the texture of the skin.
a. Click Apply Smart Blur to smoothen the skin and remove wrinkles. For information about Smart Blur controls, see Smart Blur.
b. Click Reveal Original. When the original skin is revealed from beneath the blurred skin, use the Blur brush to brush in the smooth skinwhere it is required.
c. Click Increase Contrast to add clarity.
3. Enhance facial features.
a. Click Spot Healing Tool to fix small flaws. For help with using the Spot Healing brush, see Remove spots and small imperfections.
b. Click Red Eye Removal Tool to precisely remove red eye. See Precisely remove red eye.
c. Click Brighten Eyes to brighten the eyes.
d. Click Darken Eyebrows to darken the eye lashes and eye brows. See Quickly lighten or darken isolated areas.
e. Click White Teeth Tool to brighten the smile.
4. Add special touch-ups.
261
Note:
a. Click Add Glow. Adjust the sliders until you achieve the desired results.
b. Click Slim.
Each click intensifies the effect.
The Recompose Guided Edit
For more information on the features used in the Recompose Photo Guided Edit, see Recomposing.
The Remove A Color Cast Guided Edit
Use the Remove a Color Cast Guided Edit to correct color casts in an image.
You can view the after image only, or view both the before and after images either vertically or horizontally.
For more on correcting color casts, see Correcting color casts.
The Restore Old Photo Guided Edit | Photoshop Elements 12
Photographs, over time, may get damaged due to the effects of the weather, quality of paper, or neglect. After digitization of a damagedphotograph, various tools can be used to restore the image to remove cracks, discoloration, smudges, or other imperfections. The Restore OldPhoto guided edit takes you through a step-by-step process, and presents you with all the tools you need to restore an image in one workflow.
1. Use the Crop (C) tool and the rotate cropping frame to decide on the section of the photograph that you would like to restore.
2. Use the Spot Healing tool to repair smaller spots, lines, and tears.
3. Use the Healing Brush tool to heal a damaged part of an image with an undamaged section of the same photograph. Press Alt + Click asuitable part of the image, and then drag the portion to the damaged part of the image.
4. Use the Clone Stamp tool to copy one part of an image to another. To repair portions, press Alt + click the source area, and then drag onthe damaged area.
5. Use the Blur tool to smooth the areas where there is undesirable granulation of the photo.
6. Use the Dust Remover tool to heal smaller lines, dust impressions, and other imperfections.
7. Use the available buttons to apply corrections related to levels, contrast, and color. You can also convert the photo into a black and whiteimage in a single click.
8. Use the Sharpen tool to enhance the clarity of the final output.
The Rotate and Straighten Guided Edit
Use the Rotate and/or Straighten Photo Guided Edit to rotate a picture in 90-degree increments or draw a line through an image to realign it.
262

To the top
You can view the after image only, or view both the before and after images either vertically or horizontally.
For more on rotating an image, see Rotate or flip an item.
For more on straightening an image, see Straighten an image.
The Sharpen Guided Edit
Use the Sharpen Photo Guided Edit to sharpen an image.
You can view the after image only, or view both the before and after images either vertically or horizontally.
For more on sharpening images, see Sharpening overview or Sharpen an image.
Photo Effects
Depth of Field effect
The Depth of Field effect allows you to focus on selected areas of the image by blurring out the rest of the image.
Simple method
In this method, a copy of the background layer is created and a uniform blur applied to it. Choose selected areas that you want to focus on. Youcan customize the degree of blur applied to the rest of the image.
1. In Guided mode, from the Photo Effects section, click Depth of Field.
2. Click Simple.
3. Click Add Blur. A uniform blur appears across the image.
4. To define areas of focus, click Add Focus Area and drag the cursor across areas of the image you want to focus on.
5. To customize the blur for the rest of the image, drag the Blur slider until you achieve the desired blur effect.
Custom method
In this method, you choose the objects you want to focus on using the quick selection tool. The blur is applied to unselected areas of the image.You can customize the degree of blur applied to the rest of the image.
1. In Guided mode, from the Photo Effects section, click Depth of Field.
2. Click Custom.
3. Click the Quick Selection tool and move over areas of the image you want to focus on.
263

Note:
4. Click Add Blur. A uniform blur is applied to the rest of the image.
5. To customize the blur for the rest of the image, drag the Blur slider until you achieve the desired blur effect.
The High Key Guided Edit
Add an ethereal, dreamy effect to your photos to give them an upbeat and positive feel.
Picture before applying the high key effect (left), and after
1. Open a photo, and in the Guided Edits panel click Photo Effects > High Key.
Pictures that have been taken in excess light, or are over-exposed will appear bleached out when the High Key effect is applied.Slightly darker images will produce better results.
2. Click Color or B&W, to choose whether you want to work with a color or black and white high key effect.
The high key effect is added.
3. Use the Add Diffuse Glow button to emphasize the high key effect by adding a glow to the brighter portions of the image. Click this buttonmore than once to continue to add a diffused glow across the picture.
4. Click Done to apply the effect, or Cancel to return to the Guided Edits panel.
The Line Drawing Guided Edit
For more information on the features used in this Guided Edit. See Precisely convert to black and white, About Levels adjustments, Add Noise,and Adjust saturation and hue.
The Lomo Camera Effect Guided Edit
In Guided Edit, apply the effect of the Lomo camera.
1. In Photo Effects, select Lomo Camera Effect.
264

2. Click Cross Process Image.
3. Click Apply Vignette.
Each time you click Cross Process Image or Apply Vignette, Photoshop Elements intensifies the last applied effect. At any point, you canclick Reset to remove all the applied effects and restore the original image.
The Low Key Guided Edit
Emphasize shadows, highlight edges, and add a dramatic finish to your photographs by applying the low key effect.
Picture before applying the low key effect (left), and after
1. Open a photo, and in the Guided Edits panel click Photo Effects > Low Key.
2. Click Color or B&W, to choose whether you want to work with a color or black and white low key effect.
The low key effect is added. Darker colors are pushed darker, brighter objects seem to be slightly overexposed. Contrast is high.
3. Use the Background Brush and Reduce Effect buttons to find the exact effect you want to apply to your photo.
4. Click Done to apply the effect, or Cancel to return to the Guided Edits panel.
The Old Fashioned Photo Guided Edit
For more information on the features used in this Guided Edit, see Using the Effects panel, Specify the opacity of a layer, and About Levelsadjustments.
Apply the Orton Effect
The Orton effect provides a dreamy effect to your photographs.
265
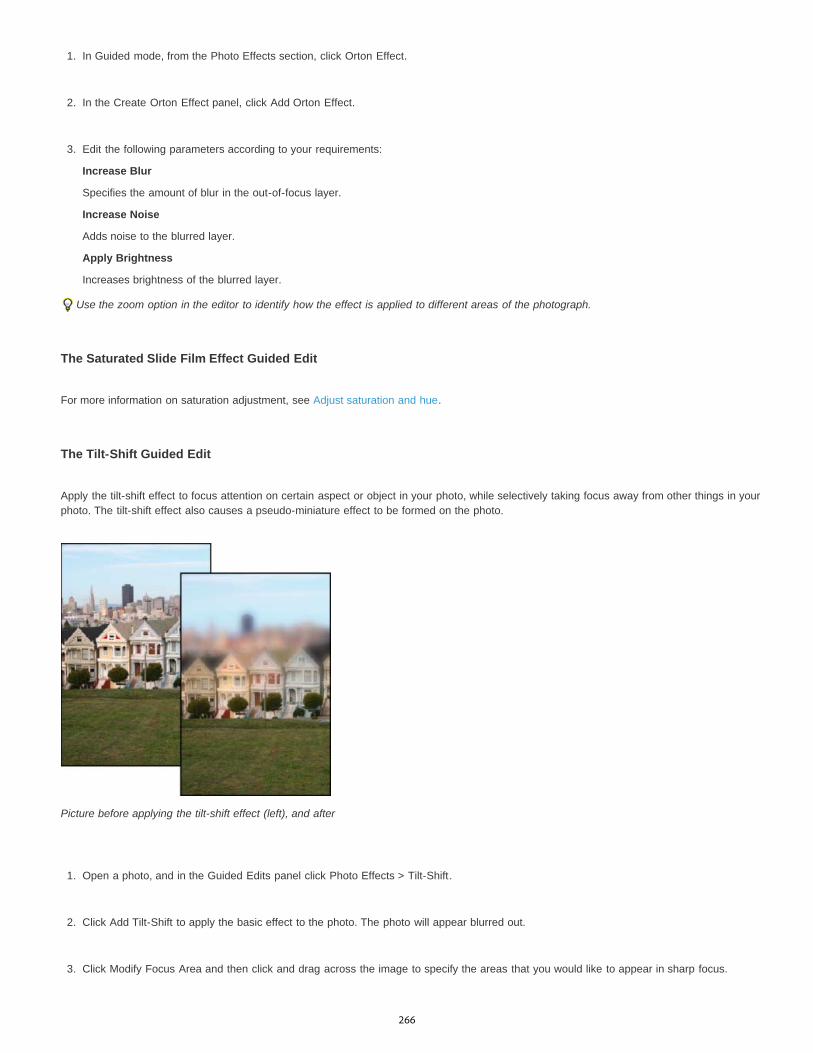
1. In Guided mode, from the Photo Effects section, click Orton Effect.
2. In the Create Orton Effect panel, click Add Orton Effect.
3. Edit the following parameters according to your requirements:
Increase Blur
Specifies the amount of blur in the out-of-focus layer.
Increase Noise
Adds noise to the blurred layer.
Apply Brightness
Increases brightness of the blurred layer.
Use the zoom option in the editor to identify how the effect is applied to different areas of the photograph.
The Saturated Slide Film Effect Guided Edit
For more information on saturation adjustment, see Adjust saturation and hue.
The Tilt-Shift Guided Edit
Apply the tilt-shift effect to focus attention on certain aspect or object in your photo, while selectively taking focus away from other things in yourphoto. The tilt-shift effect also causes a pseudo-miniature effect to be formed on the photo.
Picture before applying the tilt-shift effect (left), and after
1. Open a photo, and in the Guided Edits panel click Photo Effects > Tilt-Shift.
2. Click Add Tilt-Shift to apply the basic effect to the photo. The photo will appear blurred out.
3. Click Modify Focus Area and then click and drag across the image to specify the areas that you would like to appear in sharp focus.
266
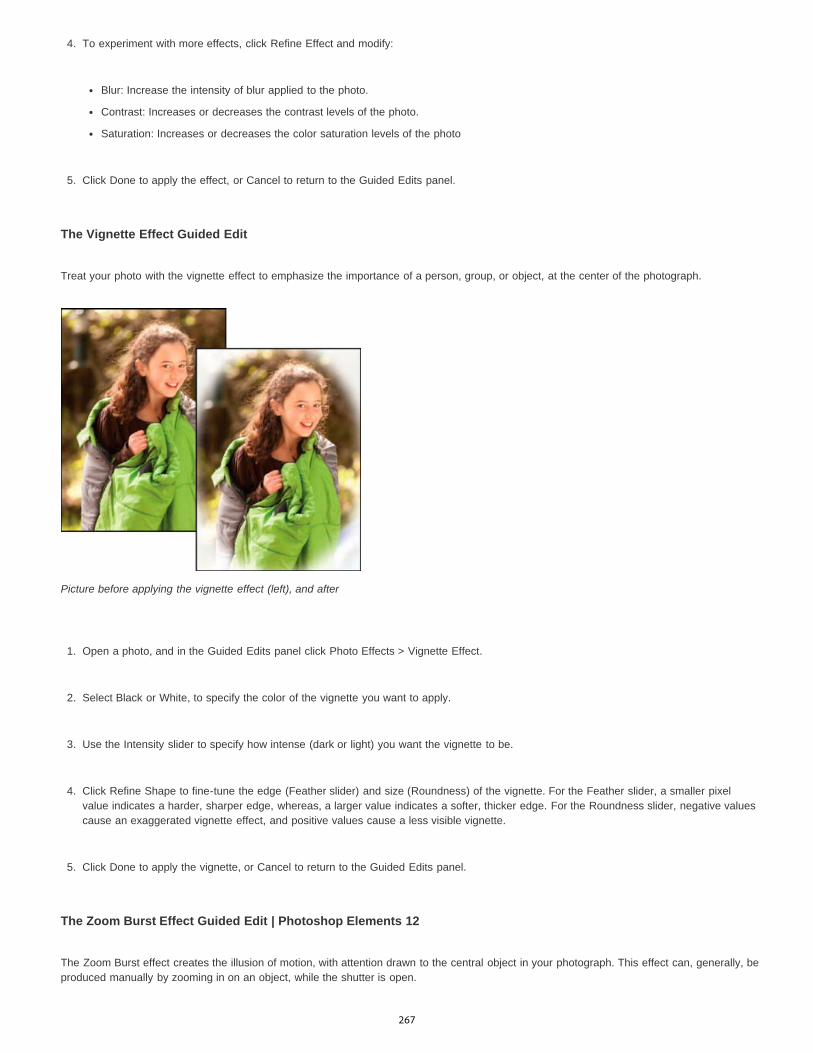
4. To experiment with more effects, click Refine Effect and modify:
Blur: Increase the intensity of blur applied to the photo.
Contrast: Increases or decreases the contrast levels of the photo.
Saturation: Increases or decreases the color saturation levels of the photo
5. Click Done to apply the effect, or Cancel to return to the Guided Edits panel.
The Vignette Effect Guided Edit
Treat your photo with the vignette effect to emphasize the importance of a person, group, or object, at the center of the photograph.
Picture before applying the vignette effect (left), and after
1. Open a photo, and in the Guided Edits panel click Photo Effects > Vignette Effect.
2. Select Black or White, to specify the color of the vignette you want to apply.
3. Use the Intensity slider to specify how intense (dark or light) you want the vignette to be.
4. Click Refine Shape to fine-tune the edge (Feather slider) and size (Roundness) of the vignette. For the Feather slider, a smaller pixelvalue indicates a harder, sharper edge, whereas, a larger value indicates a softer, thicker edge. For the Roundness slider, negative valuescause an exaggerated vignette effect, and positive values cause a less visible vignette.
5. Click Done to apply the vignette, or Cancel to return to the Guided Edits panel.
The Zoom Burst Effect Guided Edit | Photoshop Elements 12
The Zoom Burst effect creates the illusion of motion, with attention drawn to the central object in your photograph. This effect can, generally, beproduced manually by zooming in on an object, while the shutter is open.
267

To the top
1. Use the Crop tool, to crop your image in a way that enables your primary object to be in focus .
2. Use the Zoom Burst button, to apply a selective radial blur effect to your image. This effect provides the illusion of motion.
3. Use the Add Focus Area button, to add an area of focus on the image. This button provides a gradient tool. Drag the gradient tool on thepart of image you want to bring in focus.
Add more focus areas if you would like more than one portion of the photo to appear in focus.
4. Use the Apply Vignette button to automatically apply a vignetted effect. This helps to intensify the appearance of the Guided Edit.
Photo Play
The Out of Bounds Guided Edit
The Out Of Bounds option in Guided Edit helps you add a frame to an image and display a selected part of the image outside the frame.
A. Original image B. After adding a frame C. After selecting the part to extend D. Final image
1. In the Guided Edits panel, click Photo Play, and select Out Of Bounds.
2. Click Add Frame to add a frame to the image.
268

Style A
Style B
3. Drag the corners of the frame to leave a part of the main subject outside the frame.
4. Add a perspective by pressing Control + Alt + Shift (Command + Option + Shift in Mac OS) and dragging the handles of the frame. ClickCommit.
5. Adjust the width of the frame border by dragging the boundaries. Click Commit.
6. Using the Quick Selection tool, select the part of the image that should extend outside the frame.
7. Click Out of Bounds Effect.
8. (Optional) Add a shadow.
9. (Optional) Click Add A Background Gradient.
The Pop Art Guided Edit
In Guided Edit, transform an image into pop art in three simple steps. What’s more, you have a choice of two styles.
1. Click Photo Play and select Pop Art.
2. Choose a style and follow the onscreen instructions:
Convert the image mode, add color, and duplicate the image with different pop colors.
Posterize the image, add a neon glow, and duplicate the image with different pop colors.
The Puzzle Effect Guided Edit | | Photoshop Elements 12
The new Puzzle Effect Guided Edit creates the visual effect of a photograph being created by putting together pieces of a puzzle. With theGuided Edit, you can extract a few pieces of the puzzle from their slots, and move them around to simulate the feel of an unfinished puzzle
The Puzzle Effect Guided Edit enables you to leave a few tiles out of place, to render a realistic view of a puzzle.
269

Twitter™ and Facebook posts are not covered under the terms of Creative Commons.
Legal Notices | Online Privacy Policy
1. Click Small, Medium, or Large, to select the size of the tiles that your photo will be sliced into.
2. To make the puzzle look real, you can select a few tiles to be out of their intended place. Click Select Puzzle Piece Button, and then clickon a tile in the puzzle. The tile is selected.
3. Click Extract Piece to displace the selected tile. The Move Tool is automatically selected.
4. Drag the selected tile around to any location on the canvas, or use the handles to rotate or scale it.
Repeat steps 2, 3, and 4, to extract and move around multiple tiles.
5. (Optional) Click Eraser Tool to remove any unnecessary artifacts that may have been introduced as a result of applying this Guided Edit.
The Reflection Guided Edit
In Guided Edit, choose a predefined reflection effect and apply it to an image in a few steps.
For best results, avoid skipping a step or performing the steps in a random order.
1. In Guided mode, from the Photo Play section, click Reflection.
2. Click Add Reflection to create an inverted duplicate layer.
3. Click Eydropper tool, to choose the background color for reflection.
4. Choose a color from the image and click Fill Background.
5. Click one of the following buttons to apply a reflection type:
Floor Reflection
Glass Reflection
Water Reflection
6. (Optional) Adjust the intensity of reflection.
7. (Optional) Click Add Distortion to distort the reflection in a realistic way.
8. (Optional) Click Crop Tool to remove unnecessary areas.
9. (Optional) Click Gradient Tool and drag a gradient line from the bottom of the reflection to the bottom of the image.
270

Filters
To the top
Filter menu
Filter Gallery
Effects panel
About filtersApply a filterFilter categoriesFilter GalleryTexture and glass surface optionsImprove performance with filters and effects
About filters
You can use filters to clean up or retouch photos. You can also use filters to apply special art effects or create unique transformations usingdistortion effects. In addition to the filters provided by Adobe, some filters provided by third-party developers are available as plug-ins. Onceinstalled, these plug-in filters appear at the bottom of the Filter lists.
Filters can radically change the mood of a photo or image.
You can apply filters in any of three ways:
Contains all of the available filters and lets you apply filters individually.
Displays thumbnail examples of what each filter does, like the panel. The Filter Gallery lets you apply filters cumulatively and applyindividual filters more than once. You can also rearrange filters and change the settings of each filter you’ve applied to achieve the effect you want.Because it is so flexible, the Filter Gallery is often the best choice for applying filters. However, not all filters listed in the Filter menu are availablein the Filter Gallery.
Displays thumbnail examples of what each filter listed in the Filter menu does. However, you can also use it to apply effects andStyles.
Tips for applying filters
The following information can help you understand the process of applying filters to your images.
Preview the filter’s result. Applying filters to a large image can be time-consuming. It’s quicker to preview what the filter does in the Filter
271
To the top
Gallery. Most filters also let you preview their result in the Filter Options dialog box and the document window. You can then choose to applythe filter or cancel the operation without losing time.
Filters apply only to the active part of an image. Filters affect only the active, visible layer or a selected area of the layer.
Filters don’t work on all images. You can’t use some filters on images in grayscale mode, or any filters on images in bitmap or indexed-colormode. Many filters don’t work on 16-bit images.
You can reapply the previous filter. The last filter you applied appears at the top of the Filter menu. You can reapply it with the same settingsyou last used to further enhance the image.
Tips for creating visual effects with filters
Use the following techniques to achieve special visual results with filters:
Feature the filter edges. If you’re applying a filter to a selected area, you can soften the edges of the filter effect by feathering the selectionbefore you apply the filter.
Apply filters in succession to build up effects. You can apply filters to individual layers or to several layers in succession to build up an effect.Choosing different blending modes in the Layers panel blends the effect. For a filter to affect a layer, the layer must be visible and mustcontain pixels.
Create textures and backgrounds. By applying filters to solid-color or grayscale images, you can generate a variety of backgrounds andtextures. You can then blur these textures. Although some filters (for example, the Glass filter) have little or no visible effect when applied tosolid colors, others produce interesting effects. For such colors, you can use Add Noise, Chalk & Charcoal, Clouds, Conté Crayon, DifferenceClouds, Glass, Graphic Pen, Halftone Pattern, Mezzotint, Note Paper, Pointillize, Reticulation, Rough Pastels, Sponge, or Underpainting. Youcan also use any of the filters in the Texture submenu.
Improve image quality and consistency. You can disguise faults, alter or enhance images, or make a series of images look similar byapplying the same filter to each.
Apply a filter
1. Choose the area you want to apply the filter to:
To apply a filter to an entire layer, deselect any selected areas, and then select the layer in the Layers panel.
To apply a filter to a portion of a layer, use any selection tool to select an area.
2. Choose how to apply the filter:
To use the Filter gallery, choose Filter > Filter Gallery, select a category, and click the filter you want to apply.
To use the Effects panel, choose Window > Effects, select a category, and double-click the filter you want to apply. You can also drag afilter to the image.
To use the Filter menu, choose Filter, then choose a submenu followed by the filter you want to apply. If a filter name is followed byellipses (…), a Filter Options dialog box appears.
3. If a dialog box appears, enter values or select options.
4. If available, select the Preview option to preview the filter in the document window. Depending on the filter and how you are applying it, useone of the following methods to preview the filter:
Use the + button or - button under the preview window to zoom in or zoom out.
Click the zoom bar (where the zoom percentage appears) to choose a zoom percentage.
Click-drag within the preview window to center a specific area of the image in the window.
Click the Show/Hide button at the top of the dialog box to hide the filter thumbnails. Hiding the thumbnails expands the preview area.
272

Note:
To the top
Correct Camera Distortion
Adjustment filters
Artistic filters
Blur filters
Brush Stroke filters
Distort filters
Noise filters
Pixelate filters
Render filters
Sketch filters
Stylize filters
Click the eye icon next to a filter to hide the effect in the preview image.
5. If the dialog box contains sliders, hold down Alt (Option in Mac OS) while dragging a slider to see a real-time preview (real-time rendering).
6. Click in the image window to center a specific area of the image in the preview window. (This may not work with all preview windows.)
A blinking line beneath the preview size indicates that the preview is being rendered.
7. If you are using the Filter Gallery, or the filter opens in the Filter Gallery, do any of the following and click OK:
Click the New Effect Layer button at the bottom of the dialog box and choose an additional filter to apply. You can add multiple effectlayers to apply multiple filters.
Rearrange applied filters by dragging a filter name to another position in the list of applied filters at the bottom of the dialog box.Rearranging the order of filters can dramatically change the way your image looks.
Remove applied filters by selecting the filter and clicking the Delete Effect Layer button .
8. If you are using a Filter command or the Effects panel, do one of the following and click OK:
Double-click the filter.
Drag the filter onto the image.
Filter categories
You can apply the following categories of filters:
Fixes common lens flaws such as barrel and pincushion distortion, and vignetting. The filter also rotates an imageand fixes image perspective caused by vertical or horizontal camera tilt.
Change the brightness values, color, grayscale range, and tonal levels of pixels in an image. Convert color pixels into blackand white.
Simulate a painterly appearance on traditional media and create a unique look.
Soften a selection or an image. Useful for retouching.
Give a painterly or fine-arts look using different brush and ink stroke effects.
Geometrically distort an image, creating three-dimensional and other reshaping effects.
Blend a selection into the surrounding pixels and remove problem areas, such as dust and scratches.
Sharply define an image or selection by clumping pixels of similar color values.
Create cloud patterns, lens flare, fibers, and lightning effects in an image.
Add texture for depth or to give a hand-drawn look.
Produce a painted or impressionistic effect by displacing pixels and heightening contrast.
273

Texture filters
Other filters
Digimarc filter
To the top
To the top
Give the appearance of depth or substance, or add an organic look.
Let you create your own filter effects, modify masks, offset a selection within an image, and make quick color adjustments.
Lets you read a Digimarc watermark.
Filter Gallery
The Filter Gallery (Filter > Filter Gallery) lets you apply filters cumulatively, and apply individual filters more than once. You can also rearrangefilters and change the settings of each filter you’ve applied to achieve the effect you want. Because you can apply more than one filter to an imagewhen you use the Filter Gallery dialog box, you have a lot of control over the way your image is affected by each filter. The Filter Gallery is oftenthe best choice for applying filters because it’s flexible and easy to use.
Applying filters through the Filter Gallery A. Original photo B. Photos each with a single filter applied C. Three filters applied cumulatively
Filter Gallery dialog box A. Filter category B. Thumbnail of selected filter C. Show/Hide filter thumbnails D. Filter menu E. Options for selected filter F. List of filter effects toapply or arrange G. Hidden filter H. Filters applied cumulatively but not selected I. Filter selected but not applied
However, not all filters are available from the Filter Gallery. Some are available only as individual commands from the Filter menu. Also, youcannot apply effects and Styles from the Filter Gallery, as you can from the Effects panel.
Texture and glass surface options
274

Twitter™ and Facebook posts are not covered under the terms of Creative Commons.
Legal Notices | Online Privacy Policy
Texture
Scaling
Relief (if available)
Light (if available)
Invert
To the top
The Conté Crayon, Glass, Rough Pastels, Texturizer, and Underpainting filters have texturizing options. These options make images appear as ifthey were painted onto textures, such as canvas or brick, or viewed through glass blocks.
Specifies the type of texture to apply. You can also click Load Texture to specify a Photoshop file.
Increases or decreases the effect on the image surface.
Adjusts the depth of the texture’s surface.
Sets the direction of the light source on the image.
Reverses the surface’s light and dark colors.
Improve performance with filters and effects
Some filters and effects are memory intensive, especially when applied to high-resolution images. You can use these techniques to improveperformance:
Try filters and settings on a small selected area of the image.Try filters and settings on a smaller, resized copy of your image. When you’re satisfied with the results, apply the filter with the same settingsto your original image.Free up memory before running the filter or effect by clearing the clipboard, the undo history, or both. Choose Edit > Clear > [command].Exit from other applications to make more memory available.Adjust filter settings to make memory-intensive filters less complex. Memory-intensive filters include Cutout, Stained Glass, Chrome, Ripple,Spatter, Sprayed Strokes, and Glass. (For example, to reduce the complexity of the Stained Glass filter, increase cell size. To reduce thecomplexity of the Cutout filter, increase Edge Simplicity, decrease Edge Fidelity, or both.)
Adobe also recommends
275

Adjustment filters
To the top
To the top
Apply the Equalize filterApply the Gradient Map filterApply the Invert filterApply the Posterize filterApply the Threshold filterApply the Photo filter
Apply the Equalize filter
The Equalize filter redistributes the brightness values of the pixels in an image so that they more evenly represent the entire range of brightnesslevels. When you apply this command, Photoshop Elements finds the brightest and darkest values in the composite image. It then remaps themso that the brightest value represents white and the darkest value represents black. Photoshop Elements then equalizes the brightness—that is,distributes the intermediate pixel values—evenly throughout the grayscale.
1. Select an image, layer, or area.
2. Choose Filter > Adjustments > Equalize.
3. If you selected an area of the image, select what to equalize in the dialog box, and click OK:
Equalize Selected Area Only to evenly distribute only the selection’s pixels.
Equalize Entire Image Based On Selected Area to evenly distribute all image pixels based on those in the selection.
Apply the Gradient Map filter
The Gradient Map filter maps the grayscale range of an image to the colors of a specified gradient fill.
Using the Gradient Map filter to simulate a sepia tone
1. Select an image, layer, or area.
2. Do one of the following:
276

To the top
To the top
Choose Filter > Adjustments > Gradient Map.
Using the Layers panel or Layer menu, create a new Gradient Map adjustment layer, or open an existing Gradient Map adjustmentlayer.
3. Specify the gradient fill you want to use:
To choose from a list of gradient fills, click the triangle to the right of the gradient fill displayed in the Gradient Map dialog box. Click toselect the desired gradient fill, and then click in a blank area of the dialog box to dismiss the list.
To edit the gradient fill currently displayed in the Gradient Map dialog box, click the gradient fill. Then modify the existing gradient fillor create a new gradient fill.
By default, the shadows, midtones, and highlights of the image are mapped respectively to the starting (left) color, midpoint, and ending(right) color of the gradient fill.
4. Select neither, one, or both of the Gradient Options:
Dither adds random noise to smooth the appearance of the gradient fill and reduce banding effects.
Reverse switches the direction of the gradient fill, reversing the gradient map.
5. Click OK.
Apply the Invert filter
The Invert filter inverts the colors in an image. Use this command, for example, to make a positive black-and-white image negative or to make apositive from a scanned black-and-white negative.
note: Because color print film contains an orange mask in its base, the Invert command cannot make accurate positive images from scannedcolor negatives. Be sure to use the proper settings for color negatives when scanning film on slide scanners.
When you invert an image, the brightness value of each pixel is converted into the inverse value on the 256-step color-values scale. Forexample, a pixel in a positive image with a value of 255 is changed to 0.
1. Select an image, layer, or area.
2. Choose Filter > Adjustments > Invert.
Apply the Posterize filter
The Posterize filter lets you specify the number of tonal levels (or brightness values) for each channel in an image. It then maps pixels to theclosest matching level. For example, choosing two tonal levels in an RGB image gives six colors, two for red, two for green, and two for blue.
This command is useful for creating special effects, such as large, flat areas in a photograph. Its effects are most evident when you reduce thenumber of gray levels in a grayscale image. But it also produces interesting effects in color images.
If you want a specific number of colors in your image, convert the image to grayscale and specify the number of levels you want. Thenconvert the image back to the previous color mode, and replace the various gray tones with the colors you want.
1. Select an image, layer, or area.
277
To the top
To the top
2. Do one of the following:
Choose Filter > Adjustments > Posterize.
From the Layers panel or Layer menu, create a new Posterize adjustment layer, or open an existing Posterize adjustment layer.
3. Use the slider to get the right effect, or enter the number of tonal levels you want, and click OK.
Apply the Threshold filter
The Threshold filter converts grayscale or color images into high-contrast, black-and-white images. You can specify a certain level as athreshold. All pixels lighter than the threshold are converted to white; and all pixels darker are converted to black. The Threshold command isuseful for determining the lightest and darkest areas of an image.
1. Select an image, layer, or area.
2. Do one of the following:
Choose Filter > Adjustments > Threshold.
From the Layers panel or Layer menu, create a new Threshold adjustment layer, or open an existing Threshold adjustment layer.
The Threshold dialog box displays a histogram of the luminance levels of the pixels in the current selection.
3. Select Preview and do any of the following:
To change the image to black and white, drag the slider below the histogram until the threshold level you want appears at the top ofthe dialog box, and click OK. As you drag, the image changes to reflect the new threshold setting.
To identify a representative highlight, drag the slider to the right until the image is pure black. Then drag the slider back until somesolid white areas appear in the image.
To identify a representative shadow, drag the slider to the left until the image is pure white. Then drag the slider back until some solidblack areas appear in the image.
4. (Optional) To return to default settings, hold down Alt (Option in Mac OS) and click Reset.
5. (Optional) Click Cancel to close the Threshold dialog box without applying changes to the image.
Apply the Photo filter
The Photo Filter command mimics the technique of putting a colored filter in front of the camera lens. A colored filter adjusts the color balanceand color temperature of the light transmitted through the lens and exposing the film. The Photo Filter command also lets you choose a colorpreset to apply a hue adjustment to an image. If you want to apply a custom color adjustment, the Photo Filter command lets you specify a colorusing the Adobe Color Picker.
278

Twitter™ and Facebook posts are not covered under the terms of Creative Commons.
Legal Notices | Online Privacy Policy
Warming Filter (85) and Cooling Filter (80)
Warming Filter (81) and Cooling Filter (82)
Individual Colors
Original image (left), and Warming Filter (81) with 60% Density applied (right)
1. Do one of the following:
Choose Filter > Adjustments > Photo Filter.
Choose Layer > New Adjustment Layer > Photo Filter. Click OK in the New Layer dialog box.
2. To choose the filter color, do one of the following in the Photo Filter dialog box:
Color conversion filters that tune the white balance in an image. If an image wasphotographed at a lower color temperature of light (yellowish), the Cooling Filter (80) makes the image colors bluer to compensate for thelower color temperature of the ambient light. Conversely, if the photo was taken at a higher color temperature of light (bluish), the WarmingFilter (85) makes the image colors warmer to compensate for the higher color temperature of the ambient light.
Light balancing filters for minor adjustments in the color quality of an image. The WarmingFilter (81) makes the image warmer (yellower) and the Cooling Filter (82) makes the image cooler (bluer).
Apply a hue adjustment to the image depending on the color preset you choose. Your choice of color depends on howyou're using the Photo Filter command. If your photo has a color cast, you can choose a complement color to neutralize the color cast.You can also apply colors for special color effects or enhancements. For example, the Underwater color simulates the greenish-blue colorcast caused when photographing underwater.
Select the Filter option, and choose a preset from the Filter menu.
Select the Color option, click the color square, and use the Adobe Color Picker to specify the color of a custom color filter.
Make sure Preview is selected to view the results of using a color filter.
If you don’t want the image darkened by adding the color filter, be sure that the Preserve Luminosity option is selected.
3. To adjust the amount of color applied to the image, use the Density slider or enter a percentage in the Density text box. A higher Densityapplies a stronger color adjustment.
4. Click OK.
279
Distort filters
To the top
To the top
To the top
Stretch To Fit
Diffuse GlowDisplaceApply the Displace filterGlassLiquifyOcean RipplePinchPolar CoordinatesRippleShearSpherizeTwirlWaveZigZag
Diffuse Glow
The Diffuse Glow filter renders an image as though it were viewed through a soft diffusion filter. This filter adds see-through white noise to animage, with the glow fading from the center of a selection.
Displace
The Displace filter uses an image, called a displacement map, to determine how to distort a selection. For example, using a parabola-shapeddisplacement map, you can create an image that appears to be printed on a cloth held at its corners.
This filter requires a displacement map file composed of either a flattened image saved in Photoshop format or an image in bitmap mode. You canuse your own files or the files included in the Photoshop Elements 8/Plug-Ins/Displacement Maps folder or the Photoshop Elements8/Presets/Textures folder.
Apply the Displace filter
1. In the Edit or, select an image, layer, or area.
2. Choose Distort > Displace from the Filter menu.
3. To define the magnitude of the displacement, enter a value between -999 and 999 in the Horizontal and Vertical Scale text boxes.
When the horizontal and vertical scales are 100%, the greatest displacement is 128 pixels (because middle gray produces no displacement).
4. If the displacement map is not the same size as the selection, select how you want the map to fit the image:
Resizes the map.
280
Tile
Wrap Around
Repeat Edge Pixels
To the top
To the top
Warp
Turbulence
Twirl Clockwise
Twirl Counter Clockwise
Fills the selection by repeating the map in a pattern.
5. Select how to fill voids that are created by the filter in the image, and click OK.
Fills voids with content from the opposite edge of the image.
Extends the colors of pixels along the image’s edge in the direction you specify.
6. Select and open the displacement map. Photoshop Elements applies the map to the image.
Glass
The Glass filter makes an image appear as if it were being viewed through different types of glass. You can choose a glass effect or create yourown glass surface as a Photoshop file and apply it. You can adjust scaling, distortion, and smoothness settings. When using surface controls with afile, follow the instructions for the Displace filter.
Liquify
The Liquify filter makes it easy to manipulate areas of an image as if those areas had been melted. You work with a preview image of the currentlayer, using special tools to warp, twirl, expand, contract, shift, or reflect areas of the image. You can make subtle changes to retouch an image ordrastic distortions to create an artistic effect.
Apply the Liquify filter
1. In the Edit workspace, select an image, layer, or area.
2. Choose Filter > Distort > Liquify.
3. To zoom in on or out of the image preview, do one of the following:
Choose a zoom level from the pop-up menu in the lower-left area of the dialog box.
Select the Zoom tool from the toolbox in the dialog box, and click in the image to zoom in, or Alt-click (Option-click in Mac OS) to zoomout. You can also use the Zoom tool to drag over an area of the preview you want to magnify.
Select a tool from the toolbox.
4. Select one of the following tools from the toolbox:
Pushes pixels forward as you drag.
Smoothly scrambles pixels and creates fire, clouds, waves, and similar effects. To adjust the smoothness, drag the TurbulentJitter pop-up slider in the Tool Options section, or enter a value between 1 and 100 in the text box. Higher values increase smoothness.
Rotates pixels clockwise as you hold down the mouse button or drag.
Rotates pixels counterclockwise as you hold down the mouse button or drag.
281

Pucker
Bloat
Shift Pixels
Reflection
Reconstruct
To the top
To the top
Moves pixels toward the center of the brush area as you hold down the mouse button or drag.
Moves pixels away from the center of the brush area as you hold down the mouse button or drag.
Moves pixels perpendicularly to the stroke direction. Drag to move pixels to the left, and Alt-drag (Option-drag in Mac OS) tomove pixels to the right.
Copies pixels to the brush area. Drag to reflect the area perpendicular to the direction of the stroke (to the left of or below thestroke). Alt-drag (Option-drag in Mac OS) to reflect the area in the direction opposite the stroke (for example, the area above a downwardstroke). Use overlapping strokes to create an effect similar to a reflection in water.
Fully or partially reverses the changes you’ve made.
5. In the Tool Options section, adjust the brush size and pressure of the tool, as needed:
To change the brush size, drag the pop-up slider, or enter a brush size value from 1 to 600 pixels.
To change the brush pressure, drag the pop-up slider, or enter a brush pressure value from 1 to 100.
A low brush pressure makes more gradual changes.
If you’re using a stylus tablet, select Stylus Pressure.
To create the effect of dragging in a straight line between the current point and the previous point that you clicked, Shift-click with theWarp, Shift Pixels, or Reflection tool.
6. To apply the changes in the preview image to the actual image, click OK.
7. (Optional) To revert to a previous state, do one of the following:
Select the Reconstruct tool , and hold down the mouse button or drag over the distorted areas. The restoration occurs more quicklyat the brush center. Shift-click to reconstruct in a straight line between the current point and the previous point that you clicked.
To restore the entire preview image to its state when you opened the dialog box, press Alt (Option in Mac OS) and click Reset.Alternatively, click Revert to restore the original image and reset the tools to their previous settings.
Ocean Ripple
The Ocean Ripple filter adds randomly spaced ripples to the image's surface, making the image look as if it were under water.
Pinch
The Pinch filter squeezes a selection or layer inward or outward.
Apply the Pinch filter
1. In the Edit workspace, select an image, layer, or area.
282

To the top
To the top
To the top
Wrap Around
Repeat Edge Pixels
To the top
2. Choose Distort > Pinch from the Filter menu.
3. Drag the slider to the right, into positive values, to pinch a selection inward toward its center; or to the left, into negative values, to shift aselection outward. Then click OK.
Polar Coordinates
The Polar Coordinates filter converts a selection from its rectangular to polar coordinates, and vice versa, according to a selected option. You canuse this filter to create a cylinder anamorphosis—art popular in the 18th century—in which the distorted image appears normal when viewed in amirrored cylinder.
Ripple
The Ripple filter creates an undulating pattern on a selection, like ripples on the surface of a pond. For greater control, use the Wave filter. Optionsinclude the amount and size of ripples.
Shear
The Shear filter distorts an image along a curve.
Apply the Shear filter
1. In the Edit workspace, select an image, layer, or area.
2. Choose Distort > Shear from the Filter menu.
3. To define a distortion curve, do one of the following in the Shear dialog box:
Click anywhere on either side of the vertical line.
Click on the vertical line, and then drag the new curve point.
You can drag any point along the curve to adjust the distortion, and you can add additional curve points.
4. Select one of the following in the Undefined Areas options and click OK:
Fills new voids in the image with content from the opposite side of the image.
Extends the colors of pixels. Banding may result if the edge pixels are different colors.
You can click Defaults to start over and return the curve to a straight line.
Spherize
283

To the top
To the top
The Spherize filter gives objects a 3D effect by wrapping a selection around or inside a spherical shape, distorting and stretching the image.
Apply the Spherize filter
1. In the Edit workspace, select an image, layer, or area.
2. Choose Distort > Spherize from the Filter menu.
3. For Amount, enter a positive value to stretch the image outward as though it were wrapped around a sphere. Enter a negative amount tocompress the image inward as though it were wrapped inside a sphere.
4. For Mode, choose normal, horizontal, or vertical, and then click OK.
Twirl
The Twirl filter rotates an image or selection more sharply in the center than at the edges. Specifying an angle produces a twirl pattern. You candrag the slider to the right into positive values to twirl the image clockwise, drag the slider to the left into negative values to twirl counterclockwise,or enter a value between -999 and 999.
Wave
The Wave filter creates an undulating pattern on a layer or selection.
Apply the Wave filter
1. In the Edit workspace, select an image, layer, or area.
2. Choose Distort > Wave from the Filter menu.
3. Select a wave type in the Type section: Sine (creates a rolling wave pattern), Triangle, or Square.
4. To set the number of wave generators, drag the slider or enter a number between 1 and 999.
5. Drag the minimum and maximum Wavelength sliders to set the distance from one wave crest to the next. Set both sliders to the same valueto create a consistent pattern of wave crests.
6. Drag the minimum and maximum Amplitude sliders to set the wave strength.
7. Drag the horizontal and vertical Scale sliders to set the height and width of the wave effect.
8. To apply random results based on the set of values in the dialog box, click Randomize. You can click Randomize multiple times to get moreresults.
9. Select one of the following and click OK:
284

Twitter™ and Facebook posts are not covered under the terms of Creative Commons.
Legal Notices | Online Privacy Policy
Wrap Around
Repeat Edge Pixels
To the top
Around Center
Out From Center
Pond Ripples
Fills the voids in the image with content from the opposite edge of the image.
Extends the colors of pixels along the image’s edge in the direction specified.
ZigZag
The ZigZag filter distorts a selection radially, depending on the radius of the pixels in your selection.
Apply the ZigZag filter
1. In the Edit workspace, select an image, layer, or area.
2. Choose Distort > ZigZag from the Filter menu.
3. Drag the Amount slider to set the level and direction of distortion.
4. Drag the Ridges slider to set the number of direction reversals for the zigzag from the center to the edge of the selection.
5. Choose a displacement option from the Style menu and click OK:
Rotates the pixels around the center of the selection.
Produces a rippling effect toward or away from the center of the selection.
Produces a rippling effect that distorts the selection to the upper left or lower right.
Adobe also recommends
285

Render filters
Twitter™ and Facebook posts are not covered under the terms of Creative Commons.
To the top
To the top
To the top
To the top
To the top
Note:
CloudsDifference CloudsFibersLens FlareTexture Fill
Clouds
The Clouds filter generates a soft cloud pattern using random values that vary between the foreground and the background color in the toolbar.
To generate a starker cloud pattern, hold down Alt (Option in Mac OS) as you choose Filter > Render > Clouds.
Difference Clouds
The Difference Clouds filter uses randomly generated values that vary between the foreground and background color in the toolbox to produce acloud pattern. The first time you choose this filter, portions of the image are inverted in a cloud pattern. Applying the filter several times creates riband vein patterns that resemble a marble texture.
Fibers
The Fibers filter creates the look of woven fibers using the foreground and background colors. You can control how the colors vary with theVariance option (a low value creates longer streaks of color, while a high value makes very short fibers with more varied distribution of color). TheStrength option controls how each fiber looks. A low setting creates spread out fibers, while a high setting produces short, stringy fibers.Randomize changes how the pattern looks; you can select this option until you find a pattern you like. When you apply the Fibers filter, the imagedata on the active layer is replaced with fibers.
Add a gradient map adjustment layer to colorize the fibers. (See About adjustment and fill layers.)
Lens Flare
The Lens Flare filter simulates the light refraction caused by shining a bright light into a camera lens. You can set the flare brightness, flarelocation, and flare shape (the lens type). Click in the preview window in the dialog box to set the flare location.
Texture Fill
The Texture Fill filter is not available in Photoshop Elements 12.
The Texture Fill filter uses a grayscale Photoshop image as a texture for an image.
286
Other filters
To the top
Note:
To the top
Custom filtersHigh PassMaximum and MinimumOffsetPlug-in filtersDigimarc filter
Custom filters
Custom filters let you design your own filter effect. With the Custom filter, you can change the brightness values of each pixel in the imageaccording to a predefined mathematical operation known as convolution. Each pixel is reassigned a value based on the values of surroundingpixels. You can save the custom filters you create and use them with other Photoshop images.
Use the Save and Load buttons to save and reuse custom filters.
Apply a Custom filter
1. In the Edit workspace, select an image, layer, or area.
2. Choose Other > Custom from the Filter menu.
3. Select the center text box, which represents the pixel being evaluated. Enter the value by which you want to multiply that pixel’s brightnessvalue, from -999 to +999.
4. Select a text box representing an adjacent pixel. Enter the value by which you want the pixel in this position multiplied.
For example, to multiply the brightness value of the pixel to the immediate right of the current pixel by 2, enter 2 in the text box to theimmediate right of the center text box.
To avoid turning the image completely white or black, the sum of the values in the matrix should equal 1.
5. Repeat steps 3 and 4 for all pixels you want to include in the operation. You don’t have to enter values in all the text boxes.
6. For Scale, enter the value by which to divide the sum of the brightness values of the pixels included in the calculation.
7. For Offset, enter the value to be added to the result of the scale calculation.
8. Click OK. The custom filter is applied to each pixel in the image, one at a time.
High Pass
The High Pass filter retains edge details in the specified radius where sharp color transitions occur and suppresses the rest of the image. (Aradius of 0.1 pixel keeps only edge pixels.) The filter removes low-frequency detail in an image and has an effect opposite to that of the GaussianBlur filter.
287

Twitter™ and Facebook posts are not covered under the terms of Creative Commons.
Legal Notices | Online Privacy Policy
To the top
To the top
To the top
Note:
To the top
You can use the High Pass filter to extract line art and large black-and-white areas from scanned images. To do so, apply the filter beforeusing the Filter > Adjustments > Threshold command or converting the image to bitmap mode.
Maximum and Minimum
The Maximum and Minimum filters look at individual pixels in a selection, like the Median filter. Within a specified radius, the Maximum andMinimum filters replace the current pixel’s brightness value with the highest or lowest brightness value of the surrounding pixels. The Maximumfilter has the effect of applying a choke—spreading out white areas and choking in black areas. The Minimum filter has the effect of applying aspread—spreading out black areas and shrinking white areas.
Offset
The Offset filter moves a selection a specified amount to the right horizontally or down vertically, leaving an empty space at the selection’s originallocation. Depending on the size of the selection, you can fill the empty area with a transparent background, with the edge pixels, or with pixelsfrom the right or bottom edges of an image.
Plug-in filters
You can install plug-in filters developed by non-Adobe software developers. Once installed, the plug-in filters appear at the bottom of the Filtermenu unless the developer has specified another location.
If you are interested in creating plug-in modules, contact Adobe Systems Developer Support.
If you have problems or questions about a third-party plug-in, contact the plug-in’s manufacturer for support.
Digimarc filter
Photoshop Elements automatically scans opened images for Digimarc® watermarks. If a watermark is detected, the application displays acopyright symbol in the image window’s title bar and includes the information in the Copyright Status, Copyright Notice, and Owner URL sectionsof the File Info dialog box.
Detect the Digimarc filter
1. Choose Filter > Digimarc > Read Watermark. If the filter finds a watermark, a dialog box displays the Digimarc ID, copyright year (if present),and image attributes.
2. Click OK. If you have a web browser installed, click Web Lookup to get more information about the owner of the image. This option opensthe browser and displays the Digimarc website, where contact details appear for the given Digimarc ID.
Adobe also recommendsAbout plug-in modules
288

Sketch filters
To the top
To the top
To the top
To the top
To the top
Bas ReliefChalk & CharcoalCharcoalChromeComicConté CrayonGraphic NovelGraphic PenHalftone PatternNote PaperPen and InkPhotocopyPlasterReticulationStampTorn EdgesWater Paper
Bas Relief
The Bas Relief filter transforms an image to appear carved in low relief and lit to accent the surface variations. Dark areas of the image take onthe foreground color, light areas use the background color. You can set relief detail and smoothness.
Chalk & Charcoal
The Chalk & Charcoal filter redraws an image’s highlights and midtones with a solid midtone gray background drawn in coarse chalk. Shadowareas are replaced with black diagonal charcoal lines. The charcoal is drawn in the foreground color, the chalk in the background color. You canset stroke pressure, and the charcoal and chalk areas.
Charcoal
The Charcoal filter redraws an image to create a smudged effect. Major edges are boldly drawn, and midtones are sketched using a diagonalstroke. Charcoal is the foreground color, and the paper is the background color. You can set the charcoal thickness, level of image detail, andlight/dark balance.
Chrome
The Chrome filter gives the image a polished chrome surface using highlights as high points and shadows as low points in the reflecting surface.You can set the level of chrome surface detail and smoothness.
After applying the Chrome filter, use the Levels dialog box to add more contrast to the image.
289

To the top
To the top
To the top
To the top
To the top
To the top
Comic
The Comic filter (Filter > Sketch > Comic) creates the impression that the image was hand-created by a comic artist. The final outcome can beadjusted to include the level of detailing that you need. The main controls are to change the range of colors (Soften), the number of colorsreproduced (Shades), how the colors transition from one to another (steepness), and the vividness of the colors (Vibrance). In addition to this, youcan adjust the thickness of the pen strokes that are used to outline shapes.
Conté Crayon
The Conté Crayon filter replicates the texture of dense dark and pure white Conté crayons on an image. The Conté Crayon filter uses theforeground color for dark areas and the background color for light areas. You can set the level of foreground and background emphasis, andtexture options. Texture options make images appear as if they were painted onto textures, such as canvas and brick, or viewed through glassblocks, for example.
For a more realistic effect, change the foreground color to one of the common Conté Crayon colors (black, sepia, or sanguine) before applyingthis filter. For a muted effect, change the background color to white with some foreground color added to it.
Graphic Novel
The Graphic Novel filter (Filter > Sketch > Graphic Novel) creates the impression that the image was sketched for the graphic novel genre ofartwork. Graphic novel artwork is restricted to shades of grey, and black and white. The adjustments you can make to the outcome include theoverall amount of whites in the image (Darkness), the amount of details available in the outcome (Clean Look), the contrast levels (Contrast), andthe thickness of the strokes used to define shapes and outlines.
Graphic Pen
The Graphic Pen filter uses fine, linear ink strokes to capture the details in the original image and is especially striking with scanned images. Thefilter replaces color in the original image, using the foreground color for ink and background color for paper. You can set the stroke length anddirection, and the light/dark balance.
Halftone Pattern
The Halftone Pattern filter simulates the effect of a halftone screen while maintaining the continuous range of tones. You can set the halftone size,contrast, and pattern type.
Note Paper
The Note Paper filter simulates the texture of handmade paper by combining the effects of the Emboss and Grain filters. Dark areas in the imageappear as holes in the top layer of paper, revealing the background color. You can set the image balance, graininess, and relief.
Pen and Ink
The Pen and Ink filter (Filter > Sketch > Pen and Ink) simulates artistic sketching to its closest form. To ensure that you get the best effects, adjustink-related settings to preserve details (Detail), the thickness of artistic strokes (Width), the saturation of darker aspects (Darkness), and thecontrast levels (Contrast). You can also manipulate the Pen settings to introduce a dominant color in the image with settings like choice of color
290
Twitter™ and Facebook posts are not covered under the terms of Creative Commons.
Legal Notices | Online Privacy Policy
To the top
To the top
To the top
To the top
To the top
To the top
(Hue), contrast values (Contrast), and degree to which the color must be filled (Fill).
Photocopy
The Photocopy filter simulates the effect of photocopying an image. Large areas of darkness tend to copy only around their edges, and midtonesfall away to either solid black or white. You can set the level of detail and darkness.
Plaster
The Plaster filter molds the layer into a 3D plaster effect, and then colorizes the result using the foreground and background color. Dark areas areraised, light areas are sunken. You can set the image balance, smoothness, and light direction.
Reticulation
The Reticulation filter simulates the controlled shrinking and distorting of film emulsion to create an image that appears clumped in the shadowareas and lightly grained in the highlights. You can set the density, foreground, and background levels.
Stamp
The Stamp filter simplifies the image so that it seems made with a rubber or wood stamp. You can set the smoothness, and the balance betweenlight and dark. This filter works best with black-and-white images.
Torn Edges
The Torn Edges filter reconstructs the image as ragged, torn pieces of paper, and then colorizes the image using the foreground and backgroundcolor. You can set the image balance, smoothness, and contrast. This filter is particularly useful for images consisting of text or high-contrastobjects.
Water Paper
The Water Paper filter uses blotchy daubs that appear to be painted onto fibrous, damp paper, causing the colors to flow and blend. You can setthe paper’s fiber length, brightness, and contrast.
291

Noise filters
To the top
To the top
To the top
To the top
To the top
Add NoiseDespeckleDust & ScratchesMedianReduce Noise
Add Noise
The Add Noise filter applies random pixels to an image, simulating the result of shooting pictures on high-speed film. This filter can also be used toreduce banding in feathered selections or graduated fills, to give a more realistic look to heavily retouched areas, or to create a textured layer. Youcan set the amount of noise, the type of noise distribution, and color mode. The Uniform option creates a subtle distribution appearance andGaussian creates a speckled distribution look. Monochromatic applies the filter using the existing tones of the image without changing the colors.
Despeckle
The Despeckle filter detects the edges in a layer (areas where significant color changes occur) and blurs all of the selection except those edges.This blurring removes noise while preserving detail. You can use this filter to remove banding or visual noise that often appears in scans ofmagazines or other printed materials.
Dust & Scratches
The Dust & Scratches filter reduces visual noise by changing dissimilar pixels.
Median
The Median filter reduces noise in a layer by blending the brightness of pixels within a selection. The filter searches for pixels of similar brightness,discarding pixels that differ too much from adjacent pixels, and replaces the center pixel with the median brightness value of the searched pixels.This filter is useful for eliminating or reducing the appearance of motion in an image, or undesirable patterns that may appear in a scanned image.
Reduce Noise
The Reduce Noise filter reduces luminous noise and color noise, such as the noise introduced by photographing with insufficient light. Select theRemove JPEG Artifacts option to remove the blotchy artifacts and halos that are caused by saving an image at a low JPEG quality setting.
292

Twitter™ and Facebook posts are not covered under the terms of Creative Commons.
Legal Notices | Online Privacy Policy
In this photo, taken with a mobile phone, there’s noise in the boy’s face (left). The Reduce Noise filter smoothes away the stray pixels (right).
293

Blur filters
To the top
To the top
Blur
Blur More
Note:
To the top
AverageBlur and Blur MoreGaussian BlurLens BlurMotion BlurRadial BlurSmart BlurSurface Blur
Average
The Average filter finds the average color of an image or selection, and then fills the image or selection with the color to create a smooth look. Forexample, if you select an area of grass, the filter changes the area into a homogeneous patch of green.
Blur and Blur More
The Blur filters soften a selection or an image and are useful for retouching. They smooth transitions by averaging the color values of pixels nextto the hard edges of defined lines and shaded areas.
Eliminates noise where significant color transitions occur in an image. Blur filters smooth transitions by averaging the color values of pixelsnext to the hard edges of defined lines and shaded areas.
Produces an effect several times stronger than that of the Blur filter.
Before applying a Blur filter, deselect the Lock transparent pixels option in the Layers panel.
Blurring the background of a photo
Gaussian Blur
The Gaussian Blur filter quickly blurs a selection by an adjustable amount. Gaussian refers to the bell-shaped curve that Photoshop Elementsgenerates when it applies a weighted average to the pixels. The Gaussian Blur filter adds low-frequency detail and can produce a hazy effect. Youcan set the blur radius in the filter options to determine how far the filter searches for dissimilar pixels to blur.
294
Twitter™ and Facebook posts are not covered under the terms of Creative Commons.
Legal Notices | Online Privacy Policy
To the top
To the top
To the top
To the top
To the top
Lens Blur
Lens Blur can be used to give the effect of narrower depth of field so that some objects in the image stay in the focus and others are blurred. Theportions of the image that are blurred and those that remain in focus depend on the layer mask, saved selection, or transparency settings applied.The way the blur appears depends on the iris shape you choose. Iris shapes are determined by the number of blades they contain. You canchange blades of an iris by curving them (making them more circular) or rotating them. Use the preview options to see how changing the settingsin the Lens Blur dialog affect your photograph.
Motion Blur
The Motion Blur filter blurs in a particular direction (from -360º to +360º) and at a specific distance (from 1 to 999). The filter’s effect is analogousto taking a picture of a moving object with a fixed exposure time. You can set the blur angle and distance.
Radial Blur
The Radial Blur filter simulates the blur of a zooming or rotating camera to produce a soft blur. The Amount option controls the blur amount. Spinblurs along concentric circular lines and lets you specify a degree of rotation. Zoom blurs along radial lines, as if zooming in on or out of the imageand lets you specify an amount from 1 to 100. Blur quality ranges from Draft for fast but grainy, results to Good and Best for smoother results,which are indistinguishable except on a large selection. You can specify the origin of the blur by dragging the pattern in the Blur Center box.
Smart Blur
The Smart Blur filter precisely blurs an image. You can specify a radius to determine how far the filter searches for dissimilar pixels to blur, athreshold to determine how different the pixels’ values must be before they are eliminated, and a blur quality. You can also set a mode for theentire selection (Normal) or for the edges of color transitions (Edge Only and Overlay Edge). Where significant contrast occurs, Edge Only appliesblack-and-white edges and Overlay Edge applies white.
Surface Blur
The Surface Blur filter blurs an image while preserving edges. This filter is useful for creating special effects and for removing noise andgraininess. The Radius option specifies the size of the area sampled for the blur. The Threshold option controls how much the tonal values ofneighboring pixels must diverge from the center pixel value before becoming a part of the blur. Pixels with tonal value differences less than theThreshold value are excluded from the blur.
295
Artistic filters
To the top
Note:
To the top
To the top
To the top
To the top
Colored PencilCutoutDry BrushFilm GrainFrescoNeon GlowPaint DaubsPalette KnifePlastic WrapPoster EdgesRough PastelsSmudge StickSpongeUnderpaintingWatercolor
Colored Pencil
The Colored Pencil filter redraws an image using colored pencils on a solid background. This filter retains important edges and gives them a roughcrosshatch appearance; the solid background color shows through the smoother areas. You can set the pencil width, stroke pressure, and paperbrightness.
For a parchment effect, change the background color before applying the Colored Pencil filter to a selected area.
Cutout
The Cutout filter portrays an image as though it were made from roughly cut-out pieces of colored paper. High-contrast images appear as if insilhouette, while colored images are built up from several layers of colored paper. You can set the number of levels, edge simplicity, and edgefidelity.
Dry Brush
The Dry Brush filter paints an image using a dry brush technique (between oil and watercolor). The filter simplifies an image by reducing its rangeof colors to areas of common color. You can set the brush size, brush detail, and texture.
Film Grain
The Film Grain filter applies an even, grainy pattern to an image. It adds a smoother, more saturated pattern to the image’s lighter areas. This filteris useful for eliminating banding in blends and visually unifying elements from various sources. You can set the grain, highlight area, and intensity.
Fresco
296

To the top
To the top
To the top
To the top
To the top
To the top
To the top
To the top
The Fresco filter paints a layer in a coarse style using short, rounded, and hastily applied dabs. You can set the brush size, brush detail, andtexture.
Neon Glow
The Neon Glow filter uses the foreground color, background color, and glow color to colorize an image while softening its look. You can set theglow size, glow brightness, and glow color. Lower glow size values restrict the glow color to the shadow areas, and higher values move the glowcolor to the midtones and highlight areas of a layer. To select a glow color, click the Glow Color box, and select a color in the Color Picker.
Paint Daubs
The Paint Daubs filter makes an image appear painted. You can set the brush size, sharpness, and brush types.
Palette Knife
The Palette Knife filter reduces detail in an image to give the effect of a thinly painted canvas that reveals the texture underneath. You can set thestroke size, stroke detail, and softness.
Plastic Wrap
The Plastic Wrap filter renders a layer as if it were coated in shiny plastic, accentuating the surface detail. You can set the highlight strength,detail, and smoothness.
Poster Edges
The Poster Edges filter reduces the number of colors in an image according to the posterization option you set, finds the edges of the image, anddraws black lines on them. Large broad areas of the image receive simple shading, while fine dark details are distributed throughout the image.You can set the edge thickness, edge intensity, and posterization.
Rough Pastels
The Rough Pastels filter makes an image appear as if it were made with rough strokes of pastel chalk on a textured background. In areas of brightcolor, the chalk appears thick with little texture; in darker areas, the chalk appears scraped off to reveal the texture. You can set the stroke length,stroke detail, and texture. Texture options make images appear as if they were painted onto textures, such as canvas, brick, burlap, or sandstone.
Smudge Stick
The Smudge Stick filter softens an image using short diagonal strokes to smudge or smear the darker areas of the images. Lighter areas becomebrighter and lose detail. You can set the stroke length, highlight area, and intensity.
297
Twitter™ and Facebook posts are not covered under the terms of Creative Commons.
Legal Notices | Online Privacy Policy
To the top
To the top
Sponge
The Sponge filter paints a layer with highly textured areas of contrasting color. You can set the brush size, definition, and smoothness.
Underpainting
The Underpainting filter paints a layer as if it were on a textured background. You can set the brush size, texture coverage area, and textureoptions. Texture options make images appear as if they were painted onto textures, such as canvas, brick, burlap, or standstone.
Watercolor
The Watercolor filter paints an image in a watercolor style, simplifying details in an image by using a medium brush loaded with water and color.Where significant tonal changes occur at edges, the filter saturates colors. You can set the brush detail, shadow intensity, and texture.
298

Brush Stroke filters
To the top
To the top
To the top
To the top
To the top
To the top
Accented EdgesAngled StrokesCrosshatchDark StrokesInk OutlinesSpatterSprayed StrokesSumi-e
Accented Edges
The Accented Edges filter accentuates the edges of an image. When the edge brightness control is set to a high value, the accents resemblewhite chalk; when set to a low value, the accents resemble black ink. You can set the edge width, edge brightness, and smoothness.
Angled Strokes
The Angled Strokes filter repaints an image using diagonal strokes. The strokes in the lighter areas of the image go in the opposite direction of thestrokes in the darker areas. You can set the stroke direction balance, stroke length, and sharpness.
Crosshatch
The Crosshatch filter preserves the details and features of the original image while adding texture and roughening the edges of the colored areasin the image with simulated pencil hatching. You can set the stroke length, sharpness, and strength (the number of hatching passes).
Dark Strokes
The Dark Strokes filter paints dark areas of an image closer to black with short, tight strokes, and paints lighter areas of the layer with long, whitestrokes. You can set the stroke balance and black and white intensity levels.
Ink Outlines
The Ink Outlines filter redraws an image with fine narrow lines over the original details, in pen-and-ink style. You can set the stroke length anddark and light intensity levels.
Spatter
The Spatter filter replicates the effect of a spatter airbrush. You can set the spray radius and smoothness.
299

Twitter™ and Facebook posts are not covered under the terms of Creative Commons.
Legal Notices | Online Privacy Policy
To the top
To the top
Sprayed Strokes
The Sprayed Strokes filter repaints a layer using its dominant colors with angled, sprayed strokes of color. You can set the stroke length, sprayradius, and stroke direction.
Sumi-e
The Sumi-e filter redraws a layer in a Japanese style, as if with a wet brush full of black ink on rice paper. The effect is soft blurry edges with richblacks. You can set stroke width, stroke pressure, and contrast.
300
Stylize filters
To the top
To the top
To the top
Blocks
Pyramids
Size
Depth
DiffuseEmbossExtrudeFind EdgesGlowing EdgesSolarizeTilesTrace ContourWind
Diffuse
The Diffuse filter shuffles pixels in a selection to make the selection look less focused according to the option you select: Normal moves pixelsrandomly, ignoring color values; Darken Only replaces light pixels with darker pixels; Lighten Only replaces dark pixels with lighter pixels; andAnisotropic softens all pixels.
Emboss
The Emboss filter makes a selection appear raised or stamped by converting its fill color to gray and tracing the edges with the original fill color.You can set the embossing angle, height, and a percentage for the amount of color within the selection.
Extrude
The Extrude filter gives a three-dimensional texture to a selection or layer.
Apply the Extrude filter
1. In the Edit workspace, select an image, layer, or area.
2. Choose Stylize > Extrude from the Filter menu.
3. Set the following options and click OK:
Creates objects with a square front face and four side faces.
Creates objects with four triangular sides that meet at a point.
Determines the length of the object’s base, from 2 to 255 pixels.
Indicates how far the tallest object appears to protrude from the screen, from 1 to 255.
301

Random
Level-based
Solid Front Faces
Mask Incomplete Blocks
To the top
Note:
To the top
To the top
To the top
To the top
To the top
Gives each block or pyramid an arbitrary depth.
Makes each object’s depth correspond to its brightness—bright objects protrude more than dark.
Fills the front face of each block with an averaged color of the block. Deselect Solid Front Faces to fill the front face ofeach block with the image. This option is not available for Pyramids.
Hides any object extending beyond the selection.
Find Edges
The Find Edges filter identifies areas of the image with significant transitions and emphasizes edges. Like the Trace Contour filter, Find Edgesoutlines the edges of an image with dark lines against a white background and is useful for creating a border around an image.
After using filters like Find Edges and Trace Contour that highlight edges, you can apply the Invert filter to outline the edges of a colorimage with colored lines or a grayscale image with white lines.
Glowing Edges
The Glowing Edges filter identifies the edges of color and adds a neon-like glow to them. You can set the edge width, brightness, andsmoothness.
Solarize
The Solarize filter blends a negative and a positive image, for a result similar to exposing a photographic print briefly to light during development.
Tiles
The Tiles filter breaks up an image into a series of tiles, offsetting the selection from its original position. You can set the number of tiles and theoffset percentage. You can also choose one of the following to fill the empty area between the tiles: Background Color, Foreground Color, InverseImage, or Unaltered Image, which puts the tiled version on top of the original and reveals part of the original image underneath the tiled edges.
Trace Contour
The Trace Contour filter finds the transitions between major areas of brightness and thinly outlines them for an effect similar to the lines in acontour map. You can set the level for evaluating color values, and specify whether to outline pixels that are below (Lower) or above (Upper) thatlevel.
Use the Info panel in grayscale mode to identify a color value that you want traced. Then enter the value in the Level text box.
Wind
302

Twitter™ and Facebook posts are not covered under the terms of Creative Commons.
Legal Notices | Online Privacy Policy
The Wind filter creates tiny horizontal lines in the image to simulate a wind effect. You can set the wind strength and direction.
Adobe also recommends
303

Texture filters
To the top
To the top
To the top
To the top
To the top
To the top
CraquelureGrainMosaic TilesPatchworkStained GlassTexturizer
Craquelure
The Craquelure filter paints an image onto a high-relief plaster surface, producing a fine network of cracks that follow the contours of the image.Use this filter to create an embossing effect with images that contain a broad range of color or grayscale values. You can set the crack spacing,depth, and brightness.
Grain
The Grain filter adds texture to an image by simulating different kinds of grain. The sprinkles and stippled grain types use the background color.You can set the grain intensity, contrast, and type.
Mosaic Tiles
The Mosaic Tiles filter draws the image as if it were made up of small chips or tiles and adds grout between the tiles. (In contrast, the Pixelate >Mosaic filter breaks up an image into blocks of different-colored pixels.) You can set the tile size, grout width, and lighten grout.
Patchwork
The Patchwork filter breaks up an image into squares filled with the predominant color in different areas of the image. The filter randomly reducesor increases the tile depth to replicate the highlights and shadows. You can set the square size and relief.
Stained Glass
The Stained Glass filter repaints an image as single-colored adjacent cells outlined in the foreground color. You can set the cell size, borderthickness, and light intensity.
Texturizer
The Texturizer filter allows you to simulate different texture types or select a file to use as a texture. Texture options make images appear as ifthey were painted onto textures, such as canvas and brick, or viewed through glass blocks.
304

Twitter™ and Facebook posts are not covered under the terms of Creative Commons.
Legal Notices | Online Privacy Policy
305

Adjusting shadows and light
To the top
Adjust color and tonality using the Smart Brush toolsApply the Smart Brush toolsAbout Levels adjustmentsImprove shadow and highlight detailAdjust shadows and brightness using LevelsAdjust brightness and contrast in selected areasQuickly lighten or darken isolated areasQuickly saturate or desaturate isolated areas
Adjust color and tonality using the Smart Brush tools
The Smart Brush tool and the Detail Smart Brush tool apply tonal and color adjustments to specific areas of a photo. Certain effects can also beapplied using these tools. You simply pick a preset adjustment and apply the correction. Both tools automatically create adjustment layers. Thisfeature offers you flexibility in working with your photos because the original image layer is not altered. You can go back and tweak theadjustments and no image information is discarded.
When you apply the Smart Brush tool, it makes a selection based on color and texture similarly. The adjustment is simultaneously applied to theselected area. You can adjust shadows, highlights, colors, and contrasts. Apply colors of the objects in your image, add textures, apply variousphotographic effects.
Smart Brush tool applying an adjustment selection
1. Select the Smart Brush tool.
2. Select an effect from the preset drop-down in the Tools Options bar, and then drag your mouse on the objects in the image to which youwant to apply the effect.
You can apply various effects and patterns using smart brush from the available preset options.
306
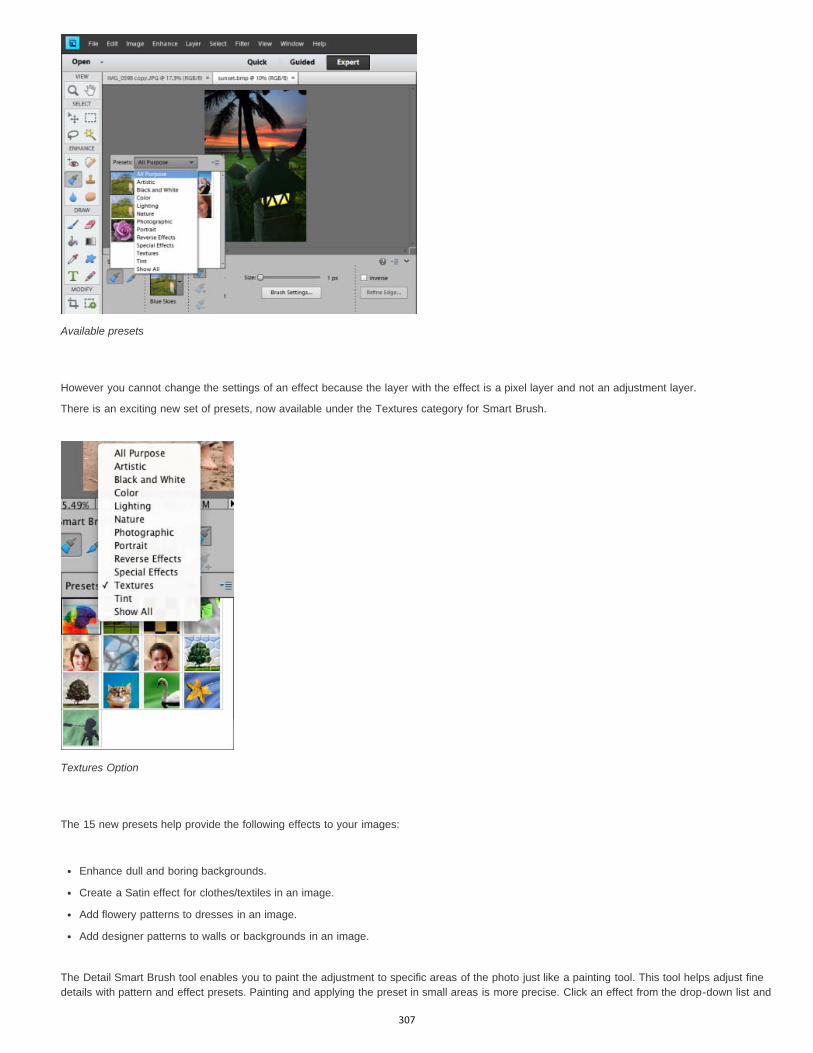
Available presets
However you cannot change the settings of an effect because the layer with the effect is a pixel layer and not an adjustment layer.
There is an exciting new set of presets, now available under the Textures category for Smart Brush.
Textures Option
The 15 new presets help provide the following effects to your images:
Enhance dull and boring backgrounds.
Create a Satin effect for clothes/textiles in an image.
Add flowery patterns to dresses in an image.
Add designer patterns to walls or backgrounds in an image.
The Detail Smart Brush tool enables you to paint the adjustment to specific areas of the photo just like a painting tool. This tool helps adjust finedetails with pattern and effect presets. Painting and applying the preset in small areas is more precise. Click an effect from the drop-down list and
307

To the top
paint over the area to apply the effect. You can choose from a range of brushes. It has settings for brush size and shape in the options bar.
It also works like a Selection tool; you can click Refine Edge in the options bar to modify the selection’s shape and size. To remove an area fromthe selection, click the Remove area from Selection brush.
Both brush tools enable you to add to or subtract from the areas being adjusted. You can also have more than one adjustment preset applied to aphoto. Each preset adjustment is applied to its own adjustment layer. You can tweak the settings for each correction separately.
When a correction is made, a pin appears where you first applied the adjustment. The pin provides a reference for the specific adjustment. A newpin appears when a different adjustment preset is applied. This feature makes it easier to modify a specific correction, especially if you applydifferent adjustments.
Detail Smart Brush tool applying an adjustment stroke
Apply the Smart Brush tools
1. Select the Smart Brush tool or the Detail Smart Brush tool from the toolbox.
A pop-up panel opens displaying adjustment presets.
2. Select an effect from the preset drop-down in the Tools Options bar.
Choose an option from the pop-up panel menu to view different sets of adjustments. For more information on configuring the pop-uppanel, see About presets.
3. (Optional) Adjust the size and quality of the brush tool by doing one of the following:
If you selected the Smart Brush tool, open the Brush Picker in the options bar and adjust the settings.
If you selected the Detail Smart Brush tool, select a preset brush tip from the Brush presets pop-up panel. Then adjust the brush sizesetting in the options bar.
4. Paint or drag the tool in the image.
The correction is applied on its own adjustment layer and a color pin appears where you first applied the brush tool.
5. (Optional) Do any of the following:
To add the current adjustment to more areas of the photo, paint or drag in the image. If necessary, make sure Add To Selection isselected.
308

Note:
Note:
To remove parts of the current adjustment, select Subtract From Selection and paint in the image.
To apply a different type of adjustment, select New Selection, select a preset from the pop-up panel, and then paint in the image.
To smooth the edges of the selection, click Refine Edges in the options bar, adjust the settings in the dialog box, and then click OK. Formore information, see Smoothing selection edges with anti-aliasing and feathering.
If you use a different tool from the toolbox and then return to the Smart Brush tool or Detail Smart Brush tool, the last adjustment youapplied is active.
6. (Optional) If you have multiple adjustments, do one of the following to select the adjustment you want to add to, subtract from, or modify:
Click a pin.
Right-click in the photo and choose the adjustment listed in the bottom portion of the menu.
Modify Smart Brush tool correction settings
1. Do any of the following:
In the image, right-click a pin or an active selection and choose Change Adjustment Settings.
In the Layers panel, double-click the layer thumbnail for the specific adjustment layer.
Double-click a pin.
2. Adjust the settings in the dialog box and then click OK.
Change the Smart Brush tool correction preset
1. Click a pin or active selection and then open the preset pop-up panel in the options bar.
2. Choose an adjustment preset from the pop-up panel.
Delete a Smart Brush tool correction
Right-click a pin or an active selection and choose Delete Adjustment.
In the Layers panel, you can also delete a Smart Brush tool correction by deleting the specific adjustment layer.
Smart Brush pop-up panel
Photoshop Elements lets you apply many different preset adjustments using the Smart Brush tool and the Detail Smart Brush tool . Youpick an adjustment from the preset pop-up panel in the options bar. Like all pop-up panels, the Smart Brush preset pop-up panel can beconfigured. Use the panel menu to display the adjustments as thumbnails or in a list. You can also drag the picker out of the options bar so it floatswhere you want it in the workspace.
Specific sets of adjustments or all adjustments can be viewed by choosing from a menu near the upper-left area of the panel. The adjustments
309
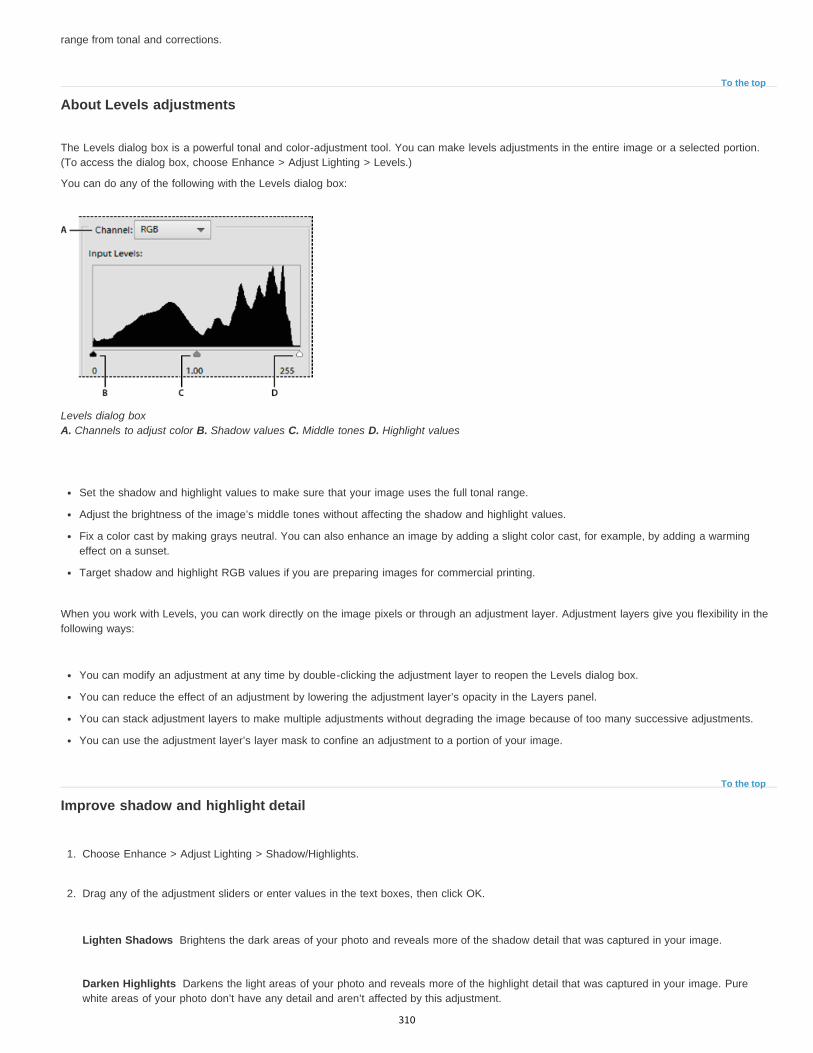
To the top
To the top
Lighten Shadows
Darken Highlights
range from tonal and corrections.
About Levels adjustments
The Levels dialog box is a powerful tonal and color-adjustment tool. You can make levels adjustments in the entire image or a selected portion.(To access the dialog box, choose Enhance > Adjust Lighting > Levels.)
You can do any of the following with the Levels dialog box:
Levels dialog box A. Channels to adjust color B. Shadow values C. Middle tones D. Highlight values
Set the shadow and highlight values to make sure that your image uses the full tonal range.
Adjust the brightness of the image’s middle tones without affecting the shadow and highlight values.
Fix a color cast by making grays neutral. You can also enhance an image by adding a slight color cast, for example, by adding a warmingeffect on a sunset.
Target shadow and highlight RGB values if you are preparing images for commercial printing.
When you work with Levels, you can work directly on the image pixels or through an adjustment layer. Adjustment layers give you flexibility in thefollowing ways:
You can modify an adjustment at any time by double-clicking the adjustment layer to reopen the Levels dialog box.
You can reduce the effect of an adjustment by lowering the adjustment layer’s opacity in the Layers panel.
You can stack adjustment layers to make multiple adjustments without degrading the image because of too many successive adjustments.
You can use the adjustment layer’s layer mask to confine an adjustment to a portion of your image.
Improve shadow and highlight detail
1. Choose Enhance > Adjust Lighting > Shadow/Highlights.
2. Drag any of the adjustment sliders or enter values in the text boxes, then click OK.
Brightens the dark areas of your photo and reveals more of the shadow detail that was captured in your image.
Darkens the light areas of your photo and reveals more of the highlight detail that was captured in your image. Purewhite areas of your photo don’t have any detail and aren’t affected by this adjustment.
310

Midtone Contrast
To the top
Adds or reduces the contrast of the middle tones. Use this slider if the image contrast doesn’t look right after you’veadjusted shadows and highlights.
To reset the image to how it looked when you opened the dialog box, hold down Alt (Option in Mac OS) and click the Reset button.
Before adjusting shadows and highlights (top) and after (bottom). Adjusting softens the face and reveals more detail behind sunglasses.
Adjust shadows and brightness using Levels
1. Do one of the following:
Choose Enhance > Adjust Lighting > Levels.
Choose Layer > New Adjustment Layer > Levels, or open an existing Levels adjustment layer.
2. Choose RGB from the Channel menu. When set to RGB, your adjustment affects all three (red, green, and blue) channels. If you areworking on a grayscale image, it will only have the gray channel.
3. Set the shadow and highlight values by dragging the black and white Input Levels sliders (the left and right sliders directly under thehistogram) to the edge of the first group of pixels on either end of the histogram. You can also enter values directly into the first and thirdInput Levels text boxes.
311

Note:
To the top
To the top
Dragging the highlight slider to the left lightens the photo.
Press Alt (Option in Mac OS) and drag the Shadow slider to see which areas will be clipped to black (level 0). Press Alt (Option in MacOS) and drag the Highlight slider to see which areas will be clipped to white (level 255). Colored areas show clipping in individualchannels.
4. To adjust the brightness of the middle tones without affecting the shadow and highlight values, drag the gray Input Levels (middle) slider.You can also enter values directly in the middle Input Levels text box. (A value of 1.0 represents the current unadjusted midtone value.) ClickOK.
You can see the adjustment reflected in the Histogram panel.
You can click Auto to move the Highlight and Shadow sliders automatically to the brightest and darkest points in each channel. This isthe same as using the Auto Levels command and may cause a color shift in your image.
Adjust brightness and contrast in selected areas
The Brightness/Contrast command is best used on selected portions of an image. Use this command to adjust the brightness of an entire image orto reduce contrast results in an image. The Levels and Shadow/Highlight commands are better choices for making tonal adjustments.
1. Do one of the following:
Choose Enhance > Adjust Lighting > Brightness/Contrast to make adjustments directly to image pixels.
Choose Layer > New Adjustment Layer > Brightness/Contrast to make adjustments to a layer.
2. Drag the sliders to adjust the brightness and contrast, then click OK.
Dragging to the left decreases the level; dragging to the right increases it. The number at the right of each slider displays the brightness orcontrast value.
Quickly lighten or darken isolated areas
312

Brushes pop-up menu
Size
Range
Exposure
To the top
Brushes pop-up menu
Size
The Dodge tool and the Burn tool lighten or darken areas of the image. You can use the Dodge tool to bring out details in shadows and the Burntool to bring out details in highlights.
Original image (left), after using the Burn tool (top center), and after using the Dodge tool (bottom right)
1. Select the Dodge tool or the Burn tool. If you do not see these tools, look for the Sponge tool.
2. Set tool options in the options bar:
Sets the brush tip. Click the arrow next to the brush sample, choose a brush category from the Brushes pop-upmenu, and then select a brush thumbnail.
Sets the size of the brush, in pixels. Drag the Size slider or enter a size in the text box.
Sets the image tonal range that the tool adjusts. Select Midtones to change the middle range of grays, Shadows to change the darkareas, and Highlights to change the light areas.
Sets the effect of the tool with each stroke. A higher percentage increases the effect.
Tip: To dodge or burn an area gradually, set the tool to a low exposure value and drag several times over the area you want to correct.
3. Drag over the part of the image you want to modify.
Quickly saturate or desaturate isolated areas
The Sponge tool saturates or desaturates areas of the image. You can use the Sponge tool to bring out or mute the color on an object or area.
1. Select the Sponge tool. If you do not see the Sponge tool, look for the Dodge or Burn tool.
2. Set the tool options in the options bar.
Sets the brush tip. Click the arrow next to the brush sample, choose a brush category from the Brushes pop-upmenu, and then select a brush thumbnail.
Sets the size of the brush, in pixels. Drag the Size slider or enter a size in the text box.
313

Twitter™ and Facebook posts are not covered under the terms of Creative Commons.
Legal Notices | Online Privacy Policy
Mode
Flow
Sets whether to saturate or desaturate.
Sets the strength of the tool with each stroke. In Saturate mode, a higher percentage increases the saturation. In Desaturate mode, ahigher percentage increases the desaturation.
314
Text and shapes
315

Add text
To the top
Note:
To the top
About textAdd textText on ShapeText on SelectionText on Custom PathCreate and use masked type
You can add text and shapes of different color, styles, and effects to an image. Use the Horizontal Type and Vertical Type tools to create and edittext. You can create single-line text or paragraph text.
About text
Use the Horizontal Type ( )and Vertical Type ( )tools to create and edit text. The new text you type is entered in a new text layer. You can createsingle-line text or paragraph text. Each line of single line text you enter is independent—the length of a line grows or shrinks as you edit it, but itdoesn’t wrap to the next line. To create a new line of text, press Enter. Paragraph text wraps within the paragraph boundaries you specify.
Single-line text (top of image) and paragraph text (bottom of image).
You can use the type mask tools (Alt/Option-click the Type tool to change the current tool) to create a selection in the shape of text. You canthen create different effects and cutouts with the text.
Clicking in an image with a type tool puts the tool in edit mode so you can enter and edit text. You must commit changes to the type before you
can perform other operations, like selecting menu commands. The Type tool is in edit mode when you see the Confirm button and Rejectbutton below the text.
When you add text to an image that’s in indexed color mode, Photoshop Elements does not create a new text layer. The text you typeappears as masked text.
Add text
1. From the toolbar, select the Horizontal Type tool or the Vertical Type tool .
2. Do one of the following:
To create a single line of text, click in the image to set an insertion point for the type.
To create paragraph text, drag a rectangle to create a textbox for the type.
316

Font Family
Font Style
Font Size
Color menu
Leading menu
Faux Bold
Faux Italic
Underline
Strikethrough
Align Text
Toggle Text Orientation
Warp text
Anti-aliased
The small line through the I-beam marks the position of the type baseline. For horizontal type, the baseline marks the line on which the typerests; for vertical type, the baseline marks the center axis of the type characters.
3. (Optional) Select type options, such as font, style, size, and color, in the Tool Options bar.
4. Type the characters you want. If you did not create a textbox, press Enter to create a new line.
The text appears in its own layer. To view the layers, in the Expert mode, press F11.
5. Commit the text layer by doing one of the following:
Click the Commit button .
Press the Enter key on the numeric keypad.
Click in the image, outside the textbox.
Select a different tool in the toolbox.
Type tool options
In the options bar, set the following Type tool options:
Applies a font family to new or existing text.
Applies font styles, such as bold, to new or existing text.
Applies a font size to new or existing text.
Applies a color to new text or selected text.
Sets the space between lines of new or selected text.
Applies a bold style to new or existing text. Use this option if your font doesn’t have a true bold style that you can select from the FontStyle menu.
Applies an italic style to new or existing text. Use this option if your font doesn’t have a true italic or oblique style that you can selectfrom the Font Style menu.
Applies an underline to new text or selected existing text.
Applies a line through new text or selected existing text.
Specifies text alignment. If text orientation is horizontal, lets you align text: left, center, or right. For vertical orientaion text: top, center,or bottom.
Changes vertical text to horizontal and horizontal text to vertical.
Warps text on the selected layer.
Applies anti-aliasing to make text appear smoother.
317

To the top
To the top
Applying anti-aliasing A. Anti-aliasing off B. Anti-aliasing on
Text on Shape
You can add text to the shapes available in the Text on Shape tool.
1. Select the Text on Shape Tool . To quickly change the current text tool, press Option and click on the current tool.
Text On Shape
2. From the available shapes, select the shape on which you want to add text. Drag the cursor on the image to create the shape.
3. To add text to the image, hover the mouse over the path until the cursor icon changes to depict text mode. Click the point to add text.
Modify text in the same way that you modify normal text.
Click and Enter Text
4. After adding text, click Commit . For some of the shapes the text has to be written inside. You can move the text around the path or byinside/outside by holding Cmd while clicking and dragging the mouse (The text appears in a small arrow). You can drag that cursor into aselected area, the text path is allowed inside/outside an area.
Text on Selection
Add text on the outline of a path created from a selection. When you commit a selection, the selection is converted to a path on which you can
318

type text.
1. Select the Text on Shape Tool . To quickly change the current text tool, press Option and click on the current tool.
Text On Selection
2. Place the cursor on the object in the image and drag the cursor till you get your desired selection. You can adjust the size of your selectionusing the Offset slider.
Make Selection
When you confirm the selection, the selection is converted to a path.
3. To add text to the image, hover the mouse over the path when cursor icon changes to depict text mode. Click the point to add text.
Add Text
After you add text, you can modify it like regular text.
4. After you have completed adding text, click the Commit . Cancel to start your workflow again.
319

To the top
To the top
Text on Custom Path
You can draw and add text along the custom path.
1. Select the Text on Custom Path Tool . To quickly change the current text tool, press Option and click on the current tool.
Text On Custom Path
2. Draw a custom path over the image. You can commit/cancel the drawn path to redraw from the tool options bar.
3. To refine or redraw the path, click Modify in the tool options bar. Use the nodes that appear on the path to modify it.
4. After you have completed creating a path, click the mouse at any point along the path to add text. Modify text in the same way that youmodify normal text.
Add Text
5. After adding text, click the Commit .
Create and use masked type
The Horizontal Type Mask tool and Vertical Type Mask tool create a selection in the shape of text. You can have fun with text selection borders bycutting text out of an image to show the background, or pasting the selected text into a new image. Experiment with different options topersonalize your images and compositions.
320

Twitter™ and Facebook posts are not covered under the terms of Creative Commons.
Legal Notices | Online Privacy Policy
Horizontal type mask used to create a filled selection.
1. Using the Expert mode, select the layer on which you want the selection to appear. For best results, don’t create the type selection borderon a text layer.
2. Select the Horizontal Type Mask tool or the Vertical Type Mask tool .
3. Select additional type options (See Type tool options), and enter your text.
The type selection border appears in the image on the active layer.
Adobe also recommends
321

Edit text
To the top
To the top
Edit type in a type layerSelect charactersChoose a font family and styleChoose a font sizeChange text colorApply style to textWarp typeChange the orientation of a type layer
Edit type in a type layer
After you create a text layer, you can edit the text and apply layer commands to it. You can insert new text, change existing text, and delete text intext layers. If any styles are applied to a text layer, all text inherits the attributes of those styles.
You can also change the orientation (either horizontal or vertical) of a text layer. When a text layer is vertical, the type lines flow from top tobottom. When a text layer is horizontal, the type lines flow from left to right.
1. Do one of the following:
Select the Horizontal Type tool or the Vertical Type tool (or select the Move tool and double-click the text).
In the Expert mode, select the text layer in the Layers panel.
When you click in an existing text layer, the Type tool changes at the insertion point to match the orientation of the layer.
2. Position the insertion point in the text, and do one of the following:
Click to set the insertion point.
Select one or more characters you want to edit.
Enter text as desired.
3. Commit the text layer by doing one of the following:
Click the Commit button in the options bar.
Click in the image.
Select a different tool in the toolbox.
Select characters
1. Select a type tool.
2. Select the text layer in the Layers panel, or click in the text flow to automatically select a text layer.
322

To the top
Note:
To the top
3. Position the insertion point in the text, and do one of the following:
Drag to select one or more characters.
Double-click to select a single word.
Triple-click to select an entire line of text.
Click a point in the text and then Shift-click to select a range of characters.
Choose Select > All to select all the characters in the layer.
To use the arrow keys to select characters, hold down Shift and press the Right Arrow or Left Arrow key.
Using a type tool, click the Align options from the tool options bar. I
Choose a font family and style
A font is a set of characters—letters, numbers, or symbols—that share a common weight, width, and style. When you select a font, you can selectthe font family (for example, Arial) and its type style independently. A type style is a variant version of an individual font in the font family (forexample, regular, bold, or italic). The range of available type styles varies with each font.
If a font doesn’t include the style you want, you can apply faux (fake) versions of bold and italic. A faux font is a computer-generated version of afont that approximates an alternative typeface design.
1. If you’re changing the existing text, select one or more characters whose font you want to change. To change the font of all characters in alayer, select the text layer in the Layers panel, and then use the buttons and menus in the options bar to change the font type, style, size,alignment, and color.
2. In the options bar, choose a font family from the Font Family pop-up menu.
3. Do one of the following:
Choose a font style from the Font Style pop-up menu in the options bar.
If the font family you chose does not include a bold or italic style, click the Faux Bold button, Faux Italic button, or both.
The type you enter gets its color from the current foreground color; however, you can change the type color before or after you entertext. When editing existing text layers, you can change the color of individual characters or all type in a layer.
Choose a font size
The type size determines how large the type appears in the image. The physical size of the font depends on the resolution of the image. A capitalletter in 72-point text is approximately 1-inch high in an image that is 72 ppi. Higher resolutions reduce a given text point size because the pixelsare packed more tightly in higher resolution images.
1. If you’re changing existing text, select one or more characters whose size you want to change. To change the size of all the characters in alayer, select the text layer in the Layers panel.
2. Select the Horizontal Type tool or the Vertical Type tool .
3. In the options bar, enter or select a new value for Size. You can enter a size larger than 72 points. The value you enter is converted into thedefault unit of measurement. To use an alternate unit of measurement, enter the unit (in, cm, pt, px, or pica) after the value in the Size textbox.
323

To the top
To the top
To the top
The default unit of measurement for type is points. However, you can change the unit of measurement in the Units & Rulers section ofthe Preferences dialog box. Choose Edit > Preferences > Units & Rulers, and then select a unit of measurement for Type.
Change text color
You can change the type color before or after you enter text. When editing existing text layers, you can change the color of individual characters orall type in a layer. You can also apply a gradient to text in a text layer.
1. Do one of the following:
To change the color of text before you type it, select a type tool.
To change the color of existing text, select a type tool and then drag to select the text.
2. To choose a color from a list of color swatches, click the the Color menu in the options bar. To select a color and add it to the palette, click .
Apply style to text
You can apply effects to text. Any effect from the Effects panel can be applied to text in a layer.
Before (top) and after (middle and bottom) applying styles to text.
1. For new text, write and commit the text you want to apply a style to. Then, select from the available presets in the Tool Options bar.
2. For existing text, select a layer that contains text.
3. Open the Effects panel, and double-click the thumbnail of a style you want to apply to the text.
Warp type
Warping allows you to distort type to conform to a variety of shapes; for example, you can warp type in the shape of an arc or a wave. Warpingapplies to all characters in a text layer—you cannot warp individual characters. Also, you can’t warp faux bold text.
Text layer with warp applied
324
Twitter™ and Facebook posts are not covered under the terms of Creative Commons.
Legal Notices | Online Privacy Policy
To the top
1. In the Edit workspace, select a text layer.
2. Do one of the following:
Select a type tool, and click the Warp button in the tool options bar.
Choose Layer > Type > Warp Text.
3. Choose a warp style from the Style pop-up menu. The style determines the basic shape of the warped text.
4. Select an orientation for the warp effect—Horizontal or Vertical.
5. (Optional) Specify values for additional warping options to control the orientation and perspective of the warp effect:
Bend to specify the amount of warp.
Horizontal Distortion and Vertical Distortion to apply perspective to the warp.
6. Click OK.
Unwarp type
1. Select a text layer that has warping applied to it.
2. Select a type tool, and click the Warp button in the options bar; or choose Layer > Type > Warp Text.
3. Choose None from the Style pop-up menu, and click OK.
Change the orientation of a type layer
Do one of the following:
Select the text and then click the Toggle Text Orientation button in the options bar.
Select a text layer and then choose Layer > Type > Horizontal, or choose Layer > Type > Vertical.
Adobe also recommends
325

Work with Asian type
To the top
To the top
Note:
To the top
Display Asian type optionsReduce spacing between Asian charactersTurn on or turn off tate-chuu-yokoTurn on or turn off mojikumi
Display Asian type options
Photoshop Elements provides several options for working with Asian type. Asian fonts are often referred to as double-byte fonts or CJK fonts,meaning Chinese, Japanese, and Korean fonts.
1. In Windows, choose Edit > Preferences > Type. In Mac OS, choose Photoshop Elements > Preferences > Type.
2. Set text options:
Show Asian Text Options to display Asian type options.
Show Font Names in English to display Asian font names in English.
3. Click OK. The Asian type options button is added to the type tool options bar.
Reduce spacing between Asian characters
Tsume reduces the space around a character (but not the character itself) by a specified percentage value. When tsume is added to acharacter, spacing around both sides of the character is reduced by an equal percentage.
1. If you’re working with an existing layer, select the text layer in the Layers panel and then select a type tool.
2. Select the characters you want to adjust.
3. Click the Show Asian Text Options button in the options bar. If you don’t see the button, make sure that preferences are set to showAsian type options.
4. Select a percentage for Tsume from the pop-up menu, and press the Enter or Return key. The greater the percentage, the tighter thecompression between characters. At 100% (the maximum value), there is no space between the character’s bounding box and its em box.
An em box is a space whose height and width roughly correspond to the width of the letter “M” (also called a mutton).
Turn on or turn off tate-chuu-yoko
Tate-chuu-yoko (also called kumimoji and renmoji) is a block of horizontal type laid out within a vertical type line.
326

Twitter™ and Facebook posts are not covered under the terms of Creative Commons.
Legal Notices | Online Privacy Policy
To the top
Before and after tate-chuu-yoko is applied
1. If you’re working with an existing layer, select the text layer in the Layers panel and then select a type tool.
2. Select the characters that you want to rotate.
3. Click the Asian Text Options button in the options bar.
4. Enable Tate-Chuu-Yoko.
Turn on or turn off mojikumi
Mojikumi determines spacing between punctuation, symbols, numbers, and other character classes in Japanese type. When mojikumi is on,half-width spacing is applied to these characters.
Mojikumi off (top), and mojikumi on (bottom)
1. If you’re working with an existing layer, select the text layer in the Layers panel and then select a type tool.
2. Click the Asian Text Options button in the options bar.
3. Enable Mojikumi.
327

Layers
328

Creating layers
To the top
Fill layers
Adjustment layers
Type layers and shape layers
To the top
Understanding layersAbout the Layers panelAdding layersCreate and name a new blank layerCreate a new layer from part of another layerConvert the Background layer into a regular layerMake a layer the Background layer
Understanding layers
Layers are useful because they let you add components to an image and work on them one at a time, without permanently changing your originalimage. For each layer, you can adjust color and brightness, apply special effects, reposition layer content, specify opacity and blending values,and so on. You can also rearrange the stacking order, link layers to work on them simultaneously, and create web animations with layers.
Layers are like stacked, transparent sheets of glass on which you can paint images. You can see through the transparent areas of a layer to thelayers below. You can work on each layer independently, experimenting to create the effect you want. Each layer remains independent until youcombine (merge) the layers. The bottommost layer in the Layers panel, the Background layer, is always locked (protected), meaning you cannotchange its stacking order, blending mode, or opacity (unless you convert it into a regular layer).
Transparent areas on a layer let you see through to the layers below.
Layers are organized in the Layers panel. It’s a good idea to keep this panel visible whenever you’re working in Adobe Photoshop Elements. Withone glance, you can see the active layer (the selected layer that you are editing). You can link layers, so they move as a unit, helping you managelayers. Because multiple layers in an image increase the file size, you can reduce the file size by merging layers that you’re done editing. TheLayers panel is an important source of information as you edit photos. You can also use the Layer menu to work with layers.
Ordinary layers are pixel-based (image) layers. There are several other layer types you can use to create special effects:
Contain a color gradient, solid color, or pattern.
Enable you to fine-tune color, brightness, and saturation without making permanent changes to your image (until you flatten,or collapse, the adjustment layer).
Let you create vector-based text and shapes.You can’t paint on an adjustment layer, although you can paint on its mask. To paint on fill or type layers, you must first convert them into regularimage layers.
About the Layers panel
329
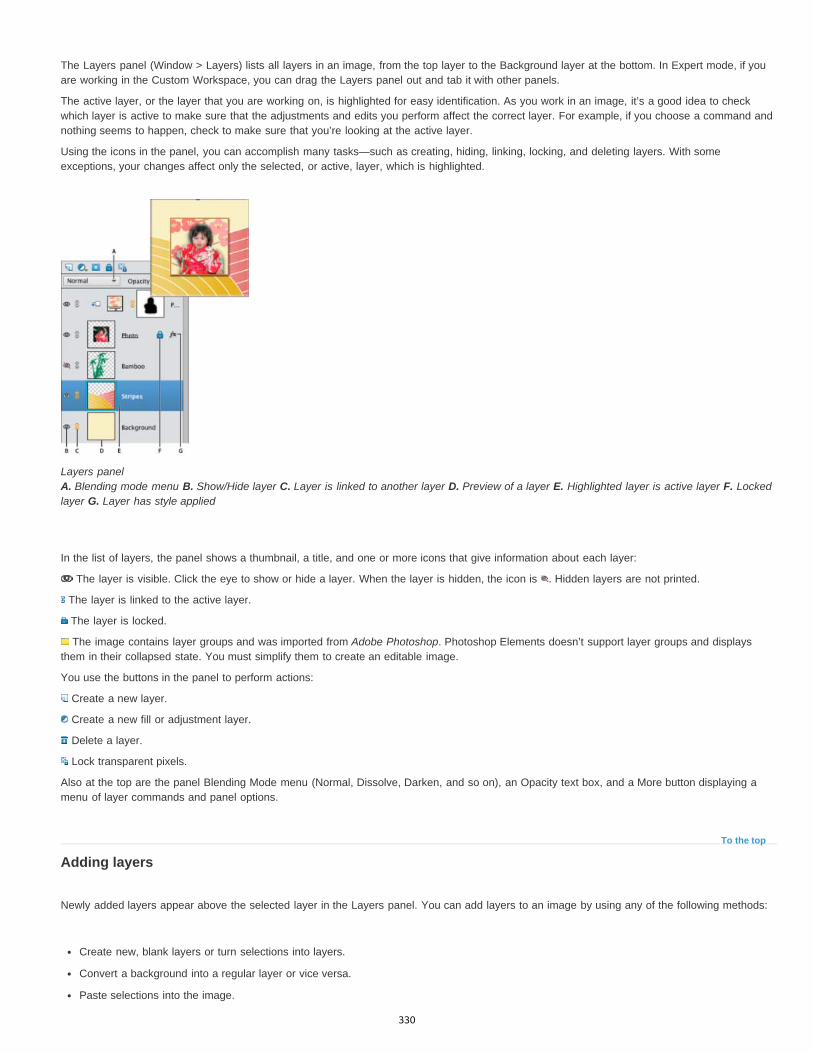
To the top
The Layers panel (Window > Layers) lists all layers in an image, from the top layer to the Background layer at the bottom. In Expert mode, if youare working in the Custom Workspace, you can drag the Layers panel out and tab it with other panels.
The active layer, or the layer that you are working on, is highlighted for easy identification. As you work in an image, it’s a good idea to checkwhich layer is active to make sure that the adjustments and edits you perform affect the correct layer. For example, if you choose a command andnothing seems to happen, check to make sure that you’re looking at the active layer.
Using the icons in the panel, you can accomplish many tasks—such as creating, hiding, linking, locking, and deleting layers. With someexceptions, your changes affect only the selected, or active, layer, which is highlighted.
Layers panel A. Blending mode menu B. Show/Hide layer C. Layer is linked to another layer D. Preview of a layer E. Highlighted layer is active layer F. Lockedlayer G. Layer has style applied
In the list of layers, the panel shows a thumbnail, a title, and one or more icons that give information about each layer:
The layer is visible. Click the eye to show or hide a layer. When the layer is hidden, the icon is . Hidden layers are not printed.
The layer is linked to the active layer.
The layer is locked.
The image contains layer groups and was imported from Adobe Photoshop. Photoshop Elements doesn’t support layer groups and displaysthem in their collapsed state. You must simplify them to create an editable image.
You use the buttons in the panel to perform actions:
Create a new layer.
Create a new fill or adjustment layer.
Delete a layer.
Lock transparent pixels.
Also at the top are the panel Blending Mode menu (Normal, Dissolve, Darken, and so on), an Opacity text box, and a More button displaying amenu of layer commands and panel options.
Adding layers
Newly added layers appear above the selected layer in the Layers panel. You can add layers to an image by using any of the following methods:
Create new, blank layers or turn selections into layers.
Convert a background into a regular layer or vice versa.
Paste selections into the image.
330

To the top
To the top
To the top
Use the Type tool or a shape tool.
Duplicate an existing layer.
You can create up to 8000 layers in an image, each with its own blending mode and opacity. However, memory constraints may lower thislimit.
Create and name a new blank layer
Do one of the following in the Photoshop Elements:
To create a layer with default name and settings, click the New Layer button in the Layers panel. The resulting layer uses Normal modewith 100% opacity, and is named according to its creation order. (To rename the new layer, double-click it and type a new name.)
To create a layer and specify a name and options, choose Layer > New > Layer, or choose New Layer from the Layers panel menu.Specify a name and other options, and then click OK.
The new layer is automatically selected and appears in the panel above the layer that was last selected.
Create a new layer from part of another layer
You can move part of an image from one layer to a newly created one, leaving the original intact.
1. Select an existing layer, and make a selection.
2. Choose one of the following:
Layer > New > Layer Via Copy to copy the selection into a new layer.
Layer > New > Layer Via Cut to cut the selection and paste it into a new layer.
The selected area appears in a new layer in the same position relative to the image boundaries.
Creating a new layer by copying part of another layer and pasting it into a new layer
Convert the Background layer into a regular layer
The Background layer is the bottom layer in an image. Other layers stack on top of the Background layer, which usually (but not always) containsthe actual image data of a photo. To protect the image, the Background layer is always locked. If you want to change its stacking order, blendingmode, or opacity, you must first convert it into a regular layer.
331

Twitter™ and Facebook posts are not covered under the terms of Creative Commons.
Legal Notices | Online Privacy Policy
To the top
1. Do one of the following:
Double-click the Background layer in the Layers panel.
Choose Layer > New > Layer From Background.
Select the Background layer, and choose Duplicate Layer from the Layers panel flyout menu, to leave the Background layer intact andcreate a copy of it as a new layer.
You can create a duplicate layer of the converted Background layer no matter how you convert the layer; simply select the convertedBackground layer and choose Duplicate Layer from the More menu.
2. Name the new layer.
If you drag the Background Eraser tool onto the Background layer, it is automatically converted into a regular layer, and erased areasbecome transparent.
Make a layer the Background layer
You can’t convert a layer into the Background layer if the image already has a Background layer. In this case, you must first convert the existingBackground layer into a regular layer.
1. Select a layer in the Layers panel.
2. Choose Layer > New > Background From Layer.
Any transparent areas in the original layer are filled with the background color.
Adobe also recommendsAbout selections
332

Copying and arranging layers
To the top
To the top
To the top
Duplicate a layer within an imageDuplicate one or more layers in another imageCopy a layer from one image to anotherMove the content in a layerChange the stacking order of layersLink and unlink layersMerge layersMerge layers into another layerFlatten an image
Duplicate a layer within an image
You can duplicate any layer, including the Background layer, within an image.
Select one or more layers in the Layers panel, and do one of the following to duplicate it:
To duplicate and rename the layer, choose Layer > Duplicate Layer, or choose Duplicate Layer from the Layers panel More menu. Namethe duplicate layer, and click OK.
To duplicate without naming, select the layer and drag it to the New Layer button in the Layers panel.
Right-click the layer name or thumbnail, and choose Duplicate Layer.
Duplicate one or more layers in another image
You can take any layer, including the Background layer, from one image and duplicate it in another. Keep in mind that the pixel dimensions of thedestination image determine how large the printed copy of the duplicated layer can be. Also, if the pixel dimensions of the two images are not thesame, the duplicated layer may appear smaller or larger than you’d expect.
1. Open the source image. If you plan to copy a layer to an existing image rather than a new one, open the destination image as well.
2. In the source document’s Layers panel, select the name of the layer or layers you want to duplicate. To select more than one layer, holddown the Ctrl key (Command key in Mac OS) and click each layer’s name.
3. Choose Layer > Duplicate Layer, or choose Duplicate Layer from the More menu in the Layers panel.
4. Type a name for the duplicate layer in the Duplicate Layer dialog box, and choose a destination document for the layer, and then click OK:
To duplicate the layer in an existing image, choose a filename from the Document pop-up menu.
To create a new document for the layer, choose New from the Document menu, and enter a name for the new file. An image created byduplicating a layer has no background.
Copy a layer from one image to another
333

To the top
You can copy any layer, including the Background layer, from one image to another. Keep in mind that the resolution of the destination imagedetermines how large the printed copy of the layer can be. Also, if the pixel dimensions of the two images are not the same, the copied layer mayappear smaller or larger than you’d expect.
1. Open the two images you want to use.
2. In the Layers panel of the source image, select the layer that you want to copy.
3. Do one of the following:
Choose Select > All to select all of the pixels in the layer, and choose Edit > Copy. Then make the destination image active, and chooseEdit > Paste.
Drag the layer’s name from the Layers panel of the source image into the destination image.
Use the Move tool (Select section of the toolbox), to drag the layer from the source image to the destination image.
The copied layer appears in the destination image, above the active layer in the Layers panel. If the layer you’re dragging is larger thanthe destination image, only part of the layer is visible. You can use the Move tool to drag other sections of the layer into view.
Hold down Shift as you drag a layer to copy it to the same position it occupied in the source image (if the source and destination imageshave the same pixel dimensions) or to the center of the destination image (if the source and destination images have different pixeldimensions).
Dragging the bamboo layer to another image
Move the content in a layer
Layers are like stacked images on panes of glass. You can “slide” a layer in a stack to change what portion of its content is visible in relation to thelayers above and below.
1. To move multiple layers at the same time, link the layers together in the Layers panel by selecting the layers and then clicking the LinkLayer icon of any one layer.
2. From the Select section of the Tools panel, select the Move tool.
3. Do one of the following:
Drag within the image to slide the selected layer or layers to the desired position.
Press the arrow keys on your keyboard to move the layer or layers in 1-pixel increments, or press Shift and an arrow key to move thelayer in 10-pixel increments.
Hold down Shift as you drag to move the layer or layers directly up or down, directly to either side, or on a 45° diagonal.
334

To the top
To the top
To the top
Change the stacking order of layers
The stacking order determines whether a layer appears in front of or behind other layers.
By default, the Background layer must remain at the bottom of the stack. To move the Background layer, you need to convert it into a regular layerfirst.
Dragging a layer below another layer changes the stacking order
1. In the Layers panel, select one or more layers. To select more than one layer, hold down the Ctrl key and click each layer.
2. To change the stacking order, do one of the following:
Drag the layer or layers up or down the Layers panel to the new position.
Choose Layer > Arrange, and then choose Bring To Front, Bring Forward, Send Backward, or Send To Back.
Link and unlink layers
When layers are linked, you can move their contents together. You can also copy, paste, merge, and apply transformations to all linked layerssimultaneously. At some point, you may want to edit or move one linked layer. You can simply unlink the layers to work on one layer at a time
1. To link layers, do one of the following:
With one layer selected, click the link icon of another layer.
Select the layers you would like to link. To select more than one layer, hold down Ctrl (Command in Mac OS) and click the layers youwant to select. Click the link icon of any one layer.
With multiple layers selected, right click and select the Lin Layers option.
2. To unlink layers, do one of the following:
To unlink one layer, click the link icon of a layer.
To unlink multiple layers, select more than one layer, right click and select the Unlink Layers option.
Merge layers
335

Note:
Note:
To the top
Layers can greatly increase the file size of an image. Merging layers in an image reduces file size. You should merge layers only after you havefinished manipulating them to create the image you want.
Example of merging
You can choose to merge only the linked layers, only the visible layers, only a layer with the layer below it, or only selected layers. You can alsomerge the contents of all visible layers into a selected layer, yet not delete the other visible layers (in this case, there is no reduction in file size).
When you complete work on an image, you can flatten it. Flattening merges all visible layers, discards all hidden layers, and fills transparent areaswith white.
1. Go to the Layers panel and make sure that an eye icon appears (not crossed) next to each of the layers you want to merge.
2. Do one of the following:
To merge selected layers, select more than one layer by holding down the Ctrl key (Command key in Mac OS) and clicking each layer.Right click and choose Merge Layers.
To merge a layer with the one below, select the top layer of the pair and choose Merge Down from either the Layer menu or the Layerspanel flyout menu.
If the bottom layer in the pair is a shape, type, or fill layer, you must simplify the layer. If the bottom layer in the pair is an adjustmentlayer, you can’t choose Merge Down.
To merge all visible layers, hide any layers you don’t want to merge and choose Merge Visible from the Layer menu or Layers panelflyout menu.
To merge all visible linked layers, select one of the linked layers and choose Merge Linked from the Layer menu or Layers panel flyoutmenu.
If the bottom-most merged layer is a type, shape, solid color fill, gradient fill, or pattern fill layer, you must first simplify the layer.
Merge layers into another layer
Use this procedure when you want to keep the layers you are merging intact. The result is a new merged layer plus all the original layers.
1. Click the eye icon next to layers you don’t want to merge (the icon appears with a line across it), and make sure that the eye icon is visible(not crossed) for the layers you do want to merge..
336

Twitter™ and Facebook posts are not covered under the terms of Creative Commons.
Legal Notices | Online Privacy Policy
To the top
2. Specify a layer in which to merge all visible layers. You can either create a new layer in which to merge or select an existing layer in theLayers panel.
3. Hold down Alt (Option in Mac OS), and choose Merge Visible from either the Layers menu or the Layers panel More menu. PhotoshopElements merges a copy of all visible layers into the selected layer.
Flatten an image
When you flatten an image, Photoshop Elements merges all visible layers into the background, greatly reducing the file size. Flattening an imagediscards all hidden layers, and fills any transparent areas with white. In most cases, you won’t want to flatten a file until you’ve finished editingindividual layers.
1. Make sure that the layers you want to keep in your image are visible.
2. Choose Flatten Image from either the Layer menu or the Layers panel More menu.
You can see the difference between your image’s layered file size and its flattened file size by choosing Document Sizes from the statusbar pop-up menu at the bottom of the image window.
Adobe also recommendsAbout image size and resolution
About image size and resolution
337

Editing layers
To the top
To the top
To the top
Select a layerShow or hide a layerResize or hide layer thumbnailsLock or unlock a layerRename a layerSimplify a layerDelete a layerSample color from all visible layers
Select a layer
Any change you make to an image only affects the active layer. If you don’t see the desired results when you manipulate an image, make surethat the correct layer is selected.
Do one of the following:
In the Layers panel, select a layer’s thumbnail or name.
To select more than one layer, hold down Ctrl (Command in Mac OS) and click each layer.
Show or hide a layer
In the Layers panel, the eye icon, in the leftmost column next to a layer means that the layer is visible. A line across the eye symbol indicates thatthe layer is not visible.
1. Choose Window > Layers if the Layers panel is not already open.
2. Do one of the following:
To hide a layer, click the eye icon. When a line appears across the eye icon, the layer is not visible. Click in the eye column again toshow the layer.
Drag through the eye column to show or hide more than one layer.
To display just one layer, Alt-click (Option-click in Mac OS) the eye icon for that layer. Alt-click (Option-click in Mac OS) in the eyecolumn again to show all the layers.
Resize or hide layer thumbnails
1. Choose Panel Options from the Layers panel flyout menu.
2. Select a new size, or select None to hide the thumbnails. Then click OK.
338

To the top
Note:
To the top
Note:
To the top
To the top
Lock or unlock a layer
You can fully or partially lock layers to protect their contents. When a layer is locked, a lock icon appears to the right of the layer name, and thelayer cannot be edited or deleted. Except for the Background layer, you can move locked layers to different locations in the stacking order of theLayers panel.
Select the layer in the Layers panel, and do one of the following:
Click the Lock all pixels icon in the Layers panel, to lock all layer properties. Click the icon again to unlock them.
Click the Lock Transparency icon in the Layers panel, to lock the transparent areas of the layer, so that no painting occurs in them. Clickthe icon again to unlock.
For type and shape layers, transparency is locked by default and cannot be unlocked without first simplifying the layer.
Rename a layer
As you add layers to an image, it’s helpful to rename layers according to their content. Use descriptive layer names so that you can easily identifylayers in the Layers panel.
You can’t rename the Background layer unless you change it into a normal layer.
Do one of the following:
Double-click the layer’s name in the Layers panel, and enter a new name.
Right-click the layer and choose Rename Layer from the context menu.
Simplify a layer
You simplify a smart object, frame layer, type layer, shape layer, solid color layer, gradient layer, or pattern fill layer (or a layer group importedfrom Photoshop) by converting it into an image layer. You need to simplify these layers before you can apply filters to them or edit them with thepainting tools. However, you can no longer use the type- and shape-editing options on simplified layers.
1. Select a type layer, shape layer, fill layer, or a Photoshop layer group in the Layers panel.
2. Simplify the layer or imported layer group:
If you selected a shape layer, click Simplify in the Tools Options bar.
If you selected a type, shape, or fill layer, or a Photoshop layer group, choose Simplify Layer from either the Layer menu, or from theLayers panel flyout menu.
Delete a layer
Deleting layers that you no longer need reduces the size of your image file.
1. Select the layer in the Layers panel.
339
Twitter™ and Facebook posts are not covered under the terms of Creative Commons.
Legal Notices | Online Privacy Policy
To the top
2. Do one of the following:
Click the Delete Layer icon in the Layers panel, and click Yes in the delete confirmation dialog box. To bypass this dialog box, press Alt(Option in Mac OS) as you click the Delete icon.
Choose Delete Layer from either the Layer menu or the Layers panel More menu, and click Yes.
Sample color from all visible layers
By default, when you work with certain tools, the color you apply is sampled only from the active layer. With this default behavior, you can smudgeor sample in a single layer even when other layers are visible, and you can sample from one layer and paint in another one.
If you want to paint using sampled data from all visible layers, do the following:
1. Select the Color Picker tool, Magic Wand tool, Paint Bucket tool, Smudge tool, Blur tool, Sharpen tool, or Clone Stamp tool.
2. In the Tool Options bar, select All Layers.
Adobe also recommendsCopy selections with the Move tool
340

Adjustment and fill layers
To the top
To the top
About adjustment and fill layersCreate adjustment layersCreate fill layersEdit an adjustment or fill layerMerging adjustment layersEdit the layer masks
About adjustment and fill layers
Adjustment layers let you experiment with color and make tonal adjustments without permanently modifying the pixels in an image. You can thinkof an adjustment layer as a veil coloring the underlying layers. By default, an adjustment layer affects all layers below it, although you can changethis behavior. When you create an adjustment layer, the Layers panel displays a white box representing the adjustment for that layer.
Fill layers let you fill a layer with a solid color, gradient, or pattern. Unlike adjustment layers, fill layers do not affect the layers below them. To painton a fill layer, you must first convert it (simplify it) into a regular layer.
Adjustment and fill layers have the same opacity and blending mode options as image layers, and you can move and reposition them just as youdo image layers. By default, adjustment and fill layers are named for their type (for example, Solid Color fill layer and Invert adjustment layer).
Create Adjustment Layer menu A. Fill layers B. Adjustment layers
Create adjustment layers
1. In the Layers panel, select the topmost layer you want to affect.
2. To confine the effects of the adjustment layer to a selected area in that layer, make a selection.
3. Do one of the following:
To affect all the layers below the adjustment layer, click the Create New Fill or Adjustment Layer button in the Layers panel. Then,choose one of the following adjustment types. (The first three options in the menu are fill layers, not adjustment layers.)
341
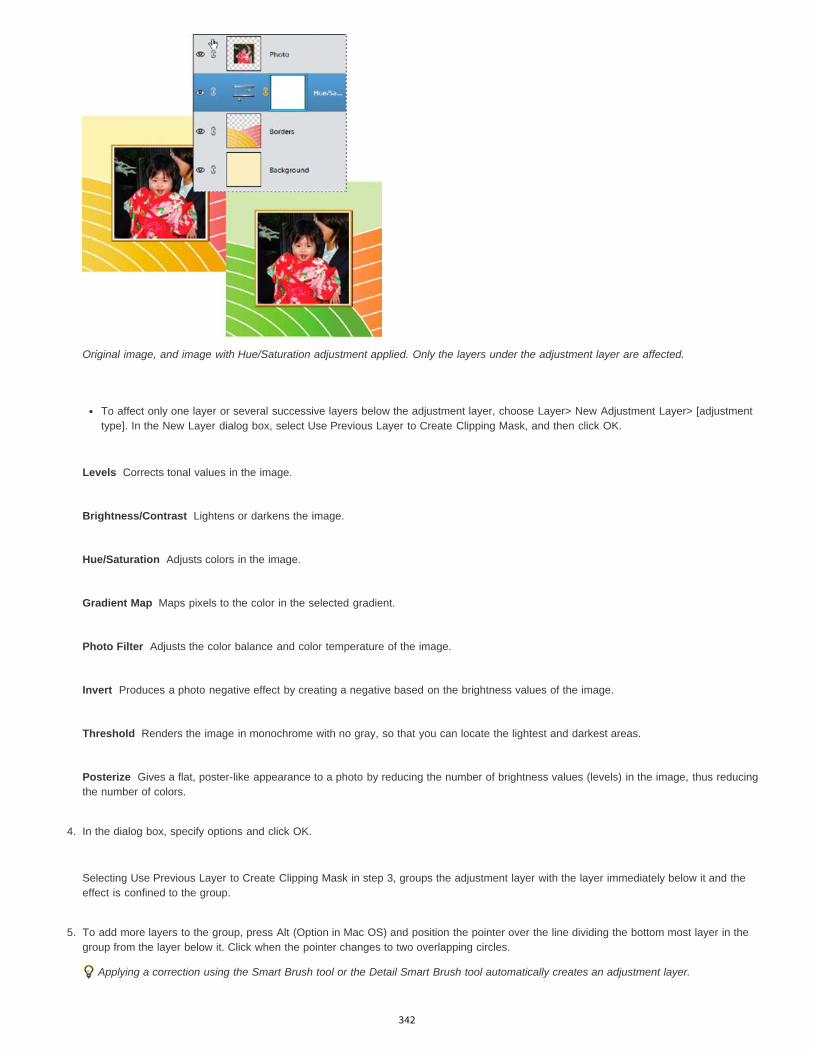
Levels
Brightness/Contrast
Hue/Saturation
Gradient Map
Photo Filter
Invert
Threshold
Posterize
Original image, and image with Hue/Saturation adjustment applied. Only the layers under the adjustment layer are affected.
To affect only one layer or several successive layers below the adjustment layer, choose Layer> New Adjustment Layer> [adjustmenttype]. In the New Layer dialog box, select Use Previous Layer to Create Clipping Mask, and then click OK.
Corrects tonal values in the image.
Lightens or darkens the image.
Adjusts colors in the image.
Maps pixels to the color in the selected gradient.
Adjusts the color balance and color temperature of the image.
Produces a photo negative effect by creating a negative based on the brightness values of the image.
Renders the image in monochrome with no gray, so that you can locate the lightest and darkest areas.
Gives a flat, poster-like appearance to a photo by reducing the number of brightness values (levels) in the image, thus reducingthe number of colors.
4. In the dialog box, specify options and click OK.
Selecting Use Previous Layer to Create Clipping Mask in step 3, groups the adjustment layer with the layer immediately below it and theeffect is confined to the group.
5. To add more layers to the group, press Alt (Option in Mac OS) and position the pointer over the line dividing the bottom most layer in thegroup from the layer below it. Click when the pointer changes to two overlapping circles.
Applying a correction using the Smart Brush tool or the Detail Smart Brush tool automatically creates an adjustment layer.
342

To the top
Solid Color
Gradient
Pattern
To the top
To the top
To the top
Create fill layers
1. In the Layers panel, select the layer above which the fill layer should be.
2. To confine the effects of the fill layer to a selected area, make a selection.
3. Do one of the following:
Click the Create New Fill or Adjustment Layer button in the Layers panel, and choose the fill type you want to create. (The first threeoptions listed in the panel are fill layers, the others are adjustment layers.)
Choose Layer > New Fill Layer > [fill type]. In the New Layer dialog box, click OK.
Creates a layer filled with a solid color chosen from the Color Picker.
Creates a layer filled with a gradient. You can choose a predefined gradient from the Gradient menu. To edit the gradient in theGradient Editor, click the color gradient. You can drag within the image window to move the center of the gradient.
You can also specify the shape of the gradient (Style) and the angle at which it is applied (Angle). Select Reverse to flip its orientation,Dither to reduce banding, and Align With Layer to use the layer’s bounding box to calculate the gradient fill.
Creates a layer filled with a pattern. Click the pattern, and choose a pattern from the pop-up panel. You can scale the pattern andchoose Snap To Origin to position the origin of the pattern with that of the document window. To specify that the pattern moves with the Filllayer as it is relocated, select Link With Layer. When this option is selected, you can drag within the image to position the pattern while thePattern Fill dialog box is open. To create a new preset pattern after editing pattern settings, click the New Preset button.
Edit an adjustment or fill layer
1. Open the adjustment or fill options dialog box by doing one of the following:
Double-click the adjustment or fill layer’s leftmost thumbnail in the Layers panel.
Select the layer in the panel and choose Layer > Layer Content Options.
2. Make your changes, and click OK.
Merging adjustment layers
You can merge an adjustment or fill layer in several ways: with the layer below it, with other selected layers, with the layers in its own group, withthe layers it’s linked to, and with all other visible layers. You cannot, however, use an adjustment layer or fill layer as the base or target layer for amerge.
When you merge an adjustment layer or fill layer with the layer below it, the adjustments are simplified and permanently applied to the mergedlayer. The adjustment no longer affects other layers below the merged adjustment layer. You can also convert (simplify) a fill layer into an imagelayer without merging it.
Adjustment layers and fill layers with masks (the layer’s rightmost thumbnail in the Layers panel) that contain only white values do not addsignificantly to the file size, so you don’t need to merge these adjustment layers to conserve file space.
343
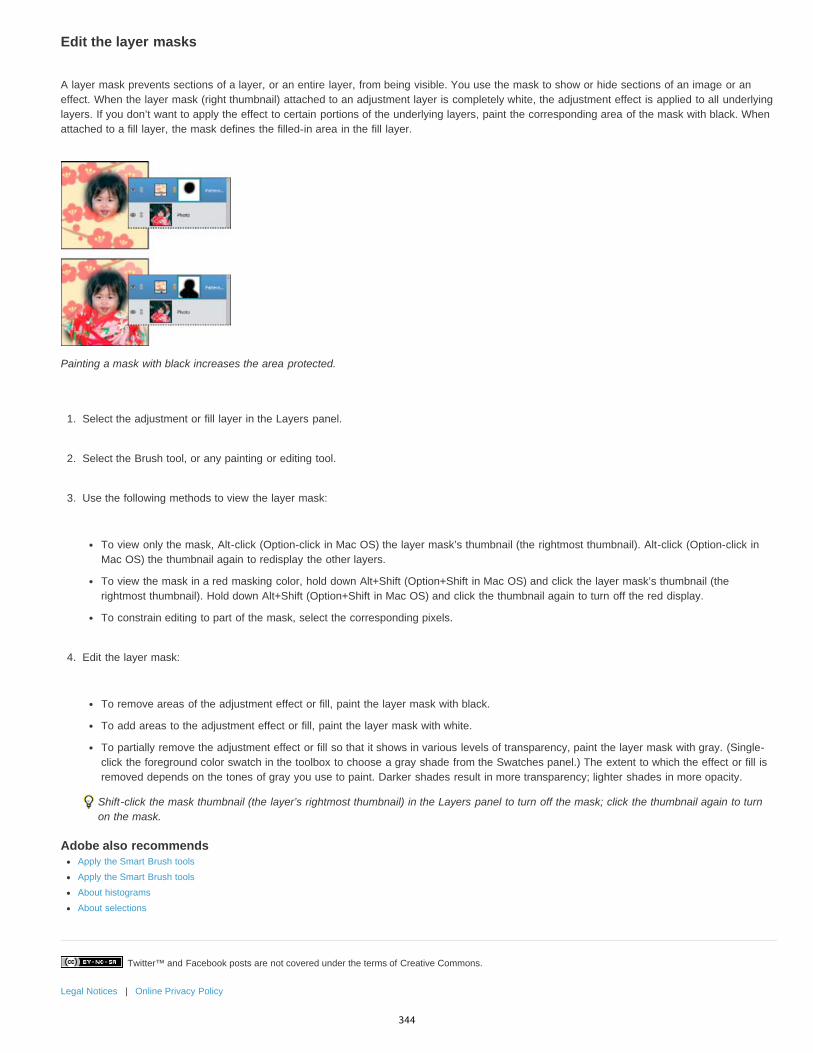
Twitter™ and Facebook posts are not covered under the terms of Creative Commons.
Legal Notices | Online Privacy Policy
Edit the layer masks
A layer mask prevents sections of a layer, or an entire layer, from being visible. You use the mask to show or hide sections of an image or aneffect. When the layer mask (right thumbnail) attached to an adjustment layer is completely white, the adjustment effect is applied to all underlyinglayers. If you don’t want to apply the effect to certain portions of the underlying layers, paint the corresponding area of the mask with black. Whenattached to a fill layer, the mask defines the filled-in area in the fill layer.
Painting a mask with black increases the area protected.
1. Select the adjustment or fill layer in the Layers panel.
2. Select the Brush tool, or any painting or editing tool.
3. Use the following methods to view the layer mask:
To view only the mask, Alt-click (Option-click in Mac OS) the layer mask’s thumbnail (the rightmost thumbnail). Alt-click (Option-click inMac OS) the thumbnail again to redisplay the other layers.
To view the mask in a red masking color, hold down Alt+Shift (Option+Shift in Mac OS) and click the layer mask’s thumbnail (therightmost thumbnail). Hold down Alt+Shift (Option+Shift in Mac OS) and click the thumbnail again to turn off the red display.
To constrain editing to part of the mask, select the corresponding pixels.
4. Edit the layer mask:
To remove areas of the adjustment effect or fill, paint the layer mask with black.
To add areas to the adjustment effect or fill, paint the layer mask with white.
To partially remove the adjustment effect or fill so that it shows in various levels of transparency, paint the layer mask with gray. (Single-click the foreground color swatch in the toolbox to choose a gray shade from the Swatches panel.) The extent to which the effect or fill isremoved depends on the tones of gray you use to paint. Darker shades result in more transparency; lighter shades in more opacity.
Shift-click the mask thumbnail (the layer’s rightmost thumbnail) in the Layers panel to turn off the mask; click the thumbnail again to turnon the mask.
Adobe also recommendsApply the Smart Brush tools
Apply the Smart Brush tools
About histograms
About selections
344

Layer masks
Twitter™ and Facebook posts are not covered under the terms of Creative Commons.
Legal Notices | Online Privacy Policy
To the top
To the top
Note:
About layer masksAdd a layer mask to an image
About layer masks
Layer masks are resolution-dependent bitmap images that are edited with the painting or selection tools. A layer mask controls the visibility of thelayer to which it is added. You can edit a layer mask to add or subtract from the masked region without losing the layer pixels.
A layer mask is a grayscale image, so areas you paint in black are hidden, areas you paint in white are visible, and areas you paint in shades ofgray appear in various levels of transparency. You can use the paint brush or the eraser to paint over the mask.
Add a layer mask to an image
To add a layer mask, select the part of the image that you want to show and click the Add Layer Mask button in the Layers panel.
A mask thumbnail linked with the layer thumbnail is added. This thumbnail represents the grayscale channel that is created when youadd the layer mask.
345

Clipping masks
To the top
To the top
To the top
About layer clipping masksCreate a clipping maskRemove a layer from a clipping maskRelease clipping mask
About layer clipping masks
A clipping mask is a group of layers to which a mask is applied. The bottommost layer, or base layer, defines the visible boundaries of the entiregroup. For example, suppose you have a shape in the base layer, a photograph in the layer above it, and text in the topmost layer. If thephotograph and text appear only through the shape outline in the base layer, they also take on the opacity of the base layer.
You can group only successive layers. The name of the base layer in the group is underlined, and the thumbnails for the overlying layers areindented. Additionally, the overlying layers display the clipping mask icon.
You can link the layers in a clipping mask so that they move together.
The shape in the bottom layer of the clipping mask determines what area of the photo layer above shows through.
Create a clipping mask
1. Do one of the following:
Hold down Alt (Option in Mac OS), position the pointer over the line dividing two layers in the Layers panel (the pointer changes to twooverlapping circles), and then click.
In the Layers panel, select the top layer of a pair of layers you want to group, and choose Layer > Create Clipping Mask.
2. When making a clipping mask from an existing layer and one you are about to create, first select the existing layer in the Layers panel. Thenchoose New Layer from the Layer menu or the Layers panel More menu. In the New Layer dialog box, select Use Previous Layer To CreateClipping Mask, and click OK.
The layers in the clipping mask have the opacity and mode attributes of the bottommost base layer in the group.
To change the stacking order of the clipping mask relative to other layers in the image, select all layers in the group. Then drag thegroup’s base layer up or down in the Layers panel. (Dragging a layer without selecting all the layers in the group removes that layer fromthe group.)
Remove a layer from a clipping mask
346

Twitter™ and Facebook posts are not covered under the terms of Creative Commons.
Legal Notices | Online Privacy Policy
To the top
Ungrouping the base layer from the layer above it ungroups all layers in the clipping mask.
Do one of the following:
Hold down Alt (Option in Mac OS), position the pointer over the line separating two grouped layers in the Layers panel (the pointerchanges to two overlapping circles), and click.
In the Layers panel, select a layer in the clipping mask, and choose Layer > Release Clipping Mask. This command removes theselected layer and any layers above it from the clipping mask.
In the Layers panel, select any layer in the group except the base layer. Either drag the layer below the base layer, or drag it betweentwo ungrouped layers in the image.
Release clipping mask
1. In the Layers panel, select any layer other than the base layer in the clipping mask.
2. Choose Layer > Release Clipping Mask.
Adobe also recommends
347

Opacity and blending modes
To the top
To the top
To the top
About opacity and blending options in layersSpecify the opacity of a layerSpecify a blending mode for a layerSelect all opaque areas in a layerCustomize the transparency grid
About opacity and blending options in layers
A layer’s opacity determines the degree to which it obscures or reveals the layer beneath it. A layer with 1% opacity is nearly transparent, while alayer with 100% opacity is opaque. Transparent areas remain transparent regardless of the opacity setting.
You use layer blending modes to determine how a layer blends with the pixels in layers beneath it. Using blending modes, you can create variousspecial effects.
A layer’s opacity and blending mode interact with the opacity and blending mode of painting tools. For example, a layer uses Dissolve mode at50% opacity. You paint on this layer with the Paintbrush tool set to Normal mode at 100% opacity. The paint appears in Dissolve mode at 50%opacity. Similarly, if a layer uses Normal mode at 100% opacity, and you use the Eraser tool at 50% opacity, only 50% of the paint disappearsfrom the layer as you erase.
Blending layers. A. Bamboo layer and Borders layer B. Bamboo layer with 100% opacity and Color Burn mode C. Bamboo layer with 50% opacity and Color Burnmode
Specify the opacity of a layer
1. Select the layer in the Layers panel.
2. In the Layers panel, enter a value between 0 and 100 for Opacity, or click the arrow at the right of the Opacity box and drag the Opacityslider that appears.
Specify a blending mode for a layer
348

Twitter™ and Facebook posts are not covered under the terms of Creative Commons.
Legal Notices | Online Privacy Policy
To the top
To the top
1. Select a layer that you have added, in the Layers panel.
2. Choose an option from the Blending Mode menu.
(Windows) Immediately after you choose a blending mode, you can press the up or down arrows on your keyboard to try other blendingmode options in the menu.
Select all opaque areas in a layer
You can quickly select all the opaque areas in a layer. This procedure is useful when you want to exclude transparent areas from a selection.
1. In the Layers panel, Ctrl-click (Command-click in Mac OS) the layer thumbnail:
2. To add the pixels to an existing selection, press Ctrl+Shift (Command+Shift in Mac OS) and click the layer thumbnail in the Layers panel.
3. To remove the pixels from an existing selection, press Ctrl+Alt (Command+Option in Mac OS) and click the layer thumbnail in the Layerspanel.
4. To load the intersection of the pixels and an existing selection, press Ctrl+Alt+Shift (Command+Option+Shift in Mac OS) and click the layerthumbnail in the Layers panel.
Customize the transparency grid
The checkerboard grid identifies transparency in a layer. You can change the appearance of this grid; however, do not change it to solid whitebecause you’ll eliminate the visual distinction between opaque (white) and transparent (checkerboard).
1. In Windows, choose Edit > Preferences > Transparency. In Mac, choose Photoshop Elements > Preferences > Transparency.
2. Choose a pattern size from the Grid Size menu.
3. Choose a pattern color from the Grid Colors menu. To choose a custom color instead, click one of the two boxes below the Grid Colorsmenu and select a color from the Color Picker.
Adobe also recommendsAbout selections
349

Layer styles
To the top
Lighting Angle
Drop Shadow
Glow (Outer)
Glow (Inner)
Bevel Size
Bevel Direction
Stroke Size
About layer stylesWork with layer styles
About layer styles
Layer styles let you quickly apply effects to an entire layer. In the Effects panel, you can view a variety of predefined layer styles and apply a stylewith just a click of the mouse.
Three different layer styles applied to text
The boundaries of the effect are automatically updated when you edit that layer. For example, if you apply a drop shadow style to a text layer, theshadow changes automatically when you edit the text.
Layer styles are cumulative, which means that you can create a complex effect by applying multiple styles to a layer. You can apply one style fromeach style library per layer. You can also change a layer’s style settings to adjust the final result.
When you apply a style to a layer, a style icon appears to the right of the layer’s name in the Layers panel. Layer styles are linked to the layercontents. When you move or edit the contents of the layer, the effects are modified correspondingly.
Once you choose Layer > Layer Style > Style Settings, you can edit the settings of a layer’s style or apply other style settings or attributesavailable in the dialog box.
Specifies the lighting angle at which the effect is applied to the layer.
Specifies the distance of a drop shadow from the layer’s content. You can also set the size and opacity with the sliders.
Specifies the size of a glow that emanates from the outside edges of the layer’s content. You can also set the opacity with theslider.
Specifies the size of a glow that emanates from the inside edges of the layer’s content. You can also set the opacity with the slider.
Specifies the size of beveling along the inside edges of the layer’s content.
Specifies the direction of the bevel, either up or down.
Specifies the size of the stroke.
350

Stroke Opacity
To the top
Specifies the opacity of the stroke.
Work with layer styles
You can apply special effects to a layer, hide or show the styles in a layer, and even change the scale of a layer style (for example, decrease orincrease the size of a glow effect). It’s easy to copy a style from one layer to another.
Apply a layer style
1. Select a layer in the Layers panel.
2. In the Effects panel, choose Layer Styles from the category menu.
3. Do any of the following:
Select a style, and click Apply.
Double-click a style.
Drag a style onto a layer.
A style icon indicates a layer style is applied to the layer.
If you don’t like the result, press Ctrl+Z (Command + Z in Mac OS) to remove the style, or choose Edit > Undo.
You can also drag the style to the image, where it is applied to the selected layer.
Hide or show all layer styles in an image
Choose one of the following:
Layer > Layer Style > Hide All Effects.
Layer > Layer Style > Show All Effects.
Edit a layer’s style settings
You can edit a layer’s style settings to adjust the effect. You can also copy style settings between layers and remove a style from a layer.
1. Choose Layer > Layer Style > Style Settings.
2. To preview the changes in your image, select Preview.
351

Twitter™ and Facebook posts are not covered under the terms of Creative Commons.
Legal Notices | Online Privacy Policy
3. Adjust one or more of the layer style settings or add new ones, and click OK.
Change the scale of a layer style
1. In the Layers panel, select the layer containing style effects you want to scale.
2. Choose Layer > Layer Style > Scale Effect.
3. To preview the changes in your image, select Preview.
4. Specify how much you want to scale the effects. For example, if you are increasing the size of an outer glow, 100% is the current scale;200% doubles the glow size. Then click OK.
Copy style settings between layers
1. In the Layers panel, select the layer containing the style settings you want to copy.
2. Choose Layer > Layer Style > Copy Layer Style.
3. Select the destination layer in the Layers panel, and choose Layer > Layer Style > Paste Layer Style.
Remove a layer style
1. In the Layers panel, select the layer containing the style you want to remove.
2. Choose Layer > Layer Style > Clear Layer Style.
Adobe also recommends
352

Printing, sharing, and exporting
353

Print or share photos online
To the top
Note:
Note:
Print photos onlineSetting service provider preferences for online printing
Share photos online | Photoshop Elements 12Photo sharing service providersPrivate Web AlbumFlickrTwitterSmugmug GalleryFacebook
Print photos online
You can now use Photoshop Elements Editor to order photos, photo books, greeting cards, and calendars from online service providers. The list ofcurrent online service providers supported through Photoshop Elements is listed below:
Support for various service providers is available in certain geographical locations.
Setting service provider preferences for online printing
Different locales have different sharing and printing service providers. To see the most up-to-date services available, you can update partnerservices from within Editor.
If you have changed your locale, choose a new Location setting for Photoshop Elements. You can choose this setting only from PhotoshopElements Organizer. For example, if you move from Germany to the United States, change the location setting in Elements Organizer.
Region Photo Prints Photo Book Greeting Card Calendar
USA & Canada
(inches)
Shutterfly
Costco
Shutterfly
8 x 811 x 812 x 12
Shutterfly
4 x 8 Flat8 x 4 Flat5 x 7 Folded7 x 5 Folded
None
United Kingdom
(mm)Photoworld
Photoworld
276 x 211
Photoworld
195 x 105
Photoworld
303 x 216
France
(mm)Service PhotoOnline
Service PhotoOnline
276 x 211
Service PhotoOnline
195 x 105
Service PhotoOnline
303 x 216
Germany
(mm)Online Foto Service
Service PhotoOnline
276 x 211
Service PhotoOnline
195 x 105
Service PhotoOnline
303 x 216
Rest of the world Not available Not available Not available Not available
354

To the top
Note:
1. (Optional, if you have changed location) In Organizer, click Preferences > Adobe Partner Services > Location > Choose, select a newlocation, and then restart Organizer.
2. In Editor, open the Preferences dialog (Ctrl / Cmd + K), browse to Adobe Partner Services, and then click Refresh.
3. Click the Automatically check for services checkbox, to ensure that Editor automatically refreshes partner services. When this checkbox isselected, services are refreshed once every 24 hours, when you restart Photoshop Elements.
Share photos online | Photoshop Elements 12
You can share images using websites like Revel (Private Web Albums in Photoshop Elements), Flickr, Twitter, SmugMug, and Facebook, directlyfrom Photoshop Elements Editor. You can view the photo sharing services available to you using the Sharing dropdown in Photoshop Elements.
The new Share drop-down menu in Photoshop Elements Editor
Photo sharing service providers
A list of online service providers:
Support for various service providers is available in certain geographical locations.
Location Service providers
USA & Canada
Private Web AlbumFlickrTwitterSmugmugFacebook
China Flickr
Rest of the World
Private Web AlbumFlickrTwitterFacebook
355
Private Web Album
1. In Editor, click the Share dropdown, and choose Private Web Album. If the photos currently open have not been saved, you will beprompted to automatically save files. Click OK to proceed.
2. (First Use) If you have not shared with Revel before, you must authorize Photoshop Elements 12 to work with Revel. Follow the on-screeninstruction to sign in to your Revel account, and authorize Photoshop Elements to post photos online.
3. In the Private Web Album dialog, choose the Library and Album that you want to upload the photo to. Click the minus symbol (-) below thePhotos preview area, to remove a photo from the collection selected for upload.
Click Start Sharing.
To create a new Album, click the + button next to the Album dropdown, and provide a name for the new Album.
4. When uploaded, the Private Web Album dialog displays two links:
URL. Click this link to view the uploaded photos in the default web browser. You can copy the link from the browser window.Email link. Click this link to start composing a new email containing the URL to the uploaded album.
Click Done.
Flickr
1. In Editor, click the Share dropdown, and choose Flickr. If the photos currently open have not been saved, you will be prompted toautomatically save files. Click OK to proceed.
2. (First Use) If you have not shared with Flickr before, you must authorize Photoshop Elements 12 to work with Flickr. Follow the on-screeninstructions to authorize Photoshop Elements to post photos to your Flickr account.
3. On the Flickr dialog, specify the options for the photo or set of photos you are uploading:
Add / Remove photos. Click the plus (+) or minus (-) symbol above the Items preview area, and add or remove photos to be uploadedto Flickr. Sets. You can upload a batch of photos as a Set. This is better for slideshows in Flickr. Click the Upload as a Set checkbox, and thenmodify Set options. You can choose an existing Set, or create a new one. Provide a name and description for the Set.Audience. Use the Who can see these photos? section to control or limit the visibility of the Set to external users.Tags. Provide a set of keywords to tag the album with.
4. When the photos have been uploaded, the Flickr dialog displays two buttons:
Visit Flickr. Click this button to open the view the uploaded photos in your web browser. You can copy the URL to your Flickr photosfrom the web browser.Done. Click Done to close the dialog.
Only one image must be selected when you choose to share a photo with Twitter. Also, ensure that the image is less than 3 MB (megabytes) insize.
1. In Editor, click the Share dropdown, and choose Twitter. If the photos currently open have not been saved, you will be prompted toautomatically save files. Click OK to proceed.
356

2. (First Use) If you have not shared with Twitter before, you must authorize Photoshop Elements 12 to post to Twitter on your behalf. Followthe on-screen instruction to sign in to your Twitter account, and authorize Photoshop Elements to post photos online.
3. In Editor, type your message in the Twitter dialog, and then click Tweet.
4. When your message has been successfully tweeted, the Twitter dialog displays two buttons:
Visit Twitter. Click this button to view your tweet in a web browser.Done. Click Done to close the dialog.
Smugmug Gallery
1. In Editor, click the Share dropdown, and choose SmugMug Gallery. If the photos currently open have not been saved, you will be promptedto automatically save files. Click OK to proceed.
2. With one or more photos open, from the Share dropdown, select SmugMug Gallery.
3. In the SmugMug Gallery (Step 1/3) dialog, enter your SmugMug account credentials, and then click Log In.
4. In the SmugMug Gallery (Step 2/3) dialog, select a gallery to upload the picture to.
Click Create Gallery to create a new gallery to upload photographs to.
5. When your photos have been successfully transferred, the SmugMug Gallery (Step 3/3) dialog displays buttons:
View Gallery. Click this button to view your uploaded photos in a web browser.Done. Click Done to close the dialog.Log Out. Click this button to end the session with Smug Mug. The dialog returns to the Step 1/3 Login screen.
1. In Editor, click the Share dropdown, and choose Facebook. If the photos currently open have not been saved, you will be prompted toautomatically save files. Click OK to proceed.
2. (First Use) If you have not shared with Facebook before, perform this step. Follow the on-screen instructions to authorize PhotoshopElements 12 to upload to Facebook on your behalf.
3. In the Facebook upload dialog, choose the following details to determine the where the photos will be uploaded and who can see them:
Add / Remove photos. Click the plus (+) or minus (-) symbol below the preview area, to add or remove photos to be uploaded toFacebook.Album: Choose to upload the photos to an existing Album, or create a new Album in this dialog itself (provide a name, location, anddescription, to describe the photos in the new Album).Audience. Use the Who can see these photos? dropdown to control the visibility of the Album.Upload quality. For high quality photos (generally large in size), choose whether you want to upload at a high quality. If you chooseStandard, the photos are compressed and the upload takes lesser time.
Click Upload.
357

Twitter™ and Facebook posts are not covered under the terms of Creative Commons.
Legal Notices | Online Privacy Policy
4. When the photos have been uploaded, the Facebook dialog displays two buttons:
Visit Facebook. Click this button to open the view the uploaded photos in your web browser. You can copy the URL to your Facebookphotos from the web browser.Done. Click Done to close the dialog.
358
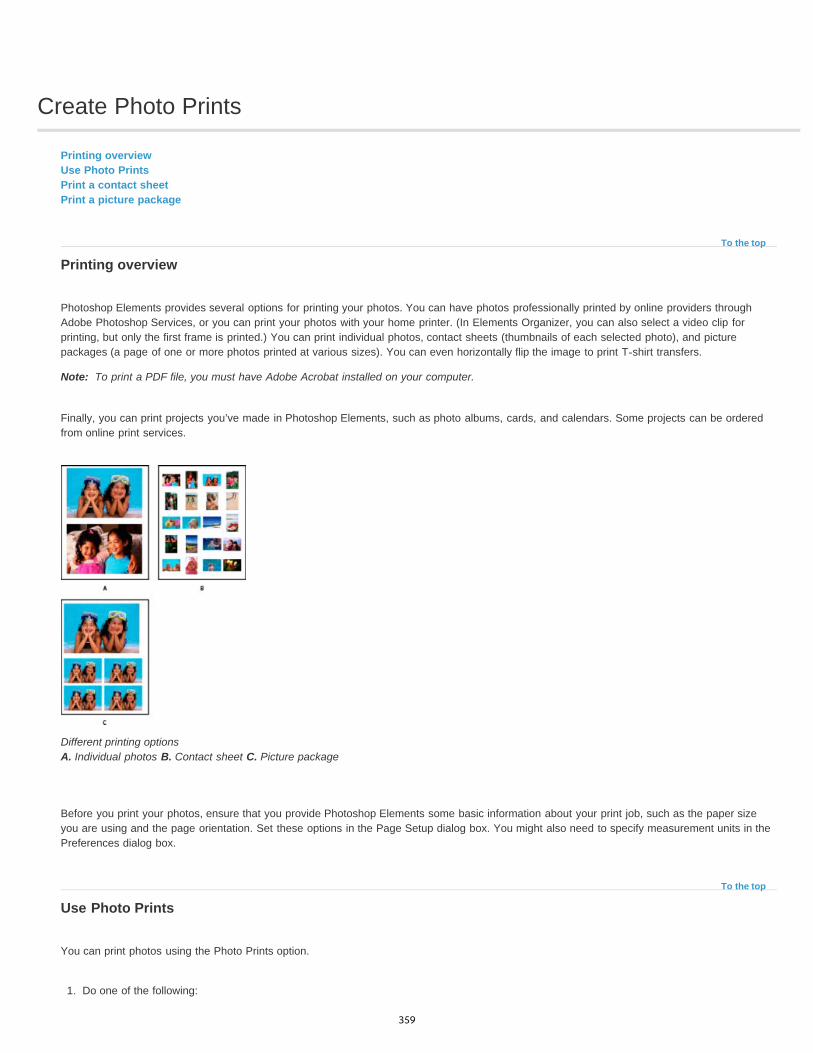
Create Photo Prints
To the top
Note:
To the top
Printing overviewUse Photo PrintsPrint a contact sheetPrint a picture package
Printing overview
Photoshop Elements provides several options for printing your photos. You can have photos professionally printed by online providers throughAdobe Photoshop Services, or you can print your photos with your home printer. (In Elements Organizer, you can also select a video clip forprinting, but only the first frame is printed.) You can print individual photos, contact sheets (thumbnails of each selected photo), and picturepackages (a page of one or more photos printed at various sizes). You can even horizontally flip the image to print T-shirt transfers.
To print a PDF file, you must have Adobe Acrobat installed on your computer.
Finally, you can print projects you’ve made in Photoshop Elements, such as photo albums, cards, and calendars. Some projects can be orderedfrom online print services.
Different printing options A. Individual photos B. Contact sheet C. Picture package
Before you print your photos, ensure that you provide Photoshop Elements some basic information about your print job, such as the paper sizeyou are using and the page orientation. Set these options in the Page Setup dialog box. You might also need to specify measurement units in thePreferences dialog box.
Use Photo Prints
You can print photos using the Photo Prints option.
1. Do one of the following:
359

Note:
Note:
Note:
Note:
To the top
To the top
Open the photos in Photoshop Elements.
Use Ctrl+Click to select multiple photos from the Photo Bin.
You can select the photos in Elements Organizer and select the option Show Files From Organizer. The photos are displayed in thePhoto Bin.
2. Select Create > Photo Prints.
3. Do one of the following:
Click Print With Local Printer to print the photos using a printer that is configured on your computer. The Print dialog box launches. Formore information, see Print photos from the Edit workspace.
Click Print Picture Package.
In Windows, selecting this option launches the Print dialog box in Elements Organizer. For more information, see Print a picturepackage.
Click Print Contact Sheet.
In Windows, selecting this option launches the Print dialog box in Elements Organizer. For more information, see Print a picturepackage.
Select Order Prints from Shutterfly.
Sign up for Shutterfly membership to use their services.
4. Follow the onscreen instructions to print your photos.
Print a contact sheet
Contact sheets enable you to easily preview groups of images by displaying a series of thumbnail images on a single page. You can print acontact sheet from the Elements Organizer. However, you can initiate the process from Photoshop Elements. Select contact sheet from the Printdialog box. Elements Organizer opens and enables you to print the required contact sheet. For more information about printing a contact sheetfrom Elements Organizer, see Print a contact sheet in the Elements Organizer guide.
Sample contact sheet
Print a picture package
Picture Package enables you to place multiple copies of one or more photos on a single page, much as traditional portrait studios do. You canselect from various size and placement options to customize your package layout. You can print picture packages from Elements Organizer.However, you can initiate the process from Photoshop Elements. Select Picture Package from the Print dialog box. Elements Organizer opens and
360

Twitter™ and Facebook posts are not covered under the terms of Creative Commons.
Legal Notices | Online Privacy Policy
enables you to print the required picture package. For more information about printing a picture package from Elements Organizer, see Print apicture package in the Elements Organizer guide.
Picture packages come in various sizes
361

Printing photos
Note:
Note:
Individual Prints
Picture Package
Contact Sheet
Print photos using a local printer
Use this option to print the photos using a printer that is configured on your computer.
1. Do one of the following:
Open the photos in Photoshop Elements.
Select photos in the Photo Bin ( ). Use Ctrl+click (Command + click in Mac OS) to select multiple photos from the Photo Bin.
You can select the photos in Elements Organizer, and select the option Show Files Selected In Organizer. The photos are displayedin the Project Bin.
2. Select File > Print.
You can add photos to a print job from within the Print dialog box. See Add photos using the Print dialog box for more information.
3. Select a printer from the Select Printer drop-down list.
4. (Windows only) Click the Change Settings button to modify the printer settings. You can change the following settings in the ChangeSettings dialog box:
Printer
Paper Type
Paper Tray
Paper Size
Print Quality
Advanced Settings - Use this button to open the printer driver options.
5. Select a paper size from the Select Paper Size drop-down list. Click Portrait or Landscape to specify the orientation.
6. (Windows Only) Select Individual Prints from the Select Type Of Print drop-down list.
Print individual photos
Arrange photos in various layouts and frames (borders for individual photos)
Automatically arrange selected photos in a single-column or multi-column layout.
7. Select a print size for the photos. See the scale an image in the Print dialog box topic if you plan to use the Custom print size option.
8. To fit the individual image to the specified print layout, select Crop To Fit. The image is scaled and, if necessary, cropped to match theaspect ratio of the print layout. Deselect this option if you don’t want your photos cropped.
362

Note:
Photos Currently In Browser
Entire Catalog
Album
Keyword Tag
Only Show Photos with Ratings
Also Show Hidden Photos
9. Select or enter a number in the Print copies of each page text box.
10. To place the image at a specific location, deselect the Center Image check box and specify Top and Left values. Leave the option selectedif you want the image to appear at the center.
If you pan the image inside the photo holder or drag the photo holder, the Center Image check box gets deselected automatically.
You can choose any other unit from the predefined list of units.
11. (Optional) Click More Options to change additional settings.
12. Click Print.
If your photos are not printing at a particular size, try resizing the photo to the specific dimensions you want before you print.
Add photos using the Print dialog box
1. In the Print dialog box, click the Add button ( ).
2. In the Add Photos dialog box, select one of the following:
Displays photos currently visible in the Media Browser.
Displays all photos in your catalog.
Displays photos from a specific album. Use the menu to select an album.
Displays photos with a specific tag. Use the menu to select a tag.
Displays only photos marked with the Favorites tag.
Displays photos marked as hidden.
3. Click one or more thumbnails, or click Select All, and then click Add Selected Photos.
4. Click Done.
Image and Photoholder rotation
An image can be rotated in the Print dialog box. Both the Photoholder and the image in specific can be rotated.
Click the Rotate Image buttons to rotate the Photoholder.
Check Image Only to rotate just the image. The Photoholder does not rotate.
You can Zoom In or Out of the image using the slider.
363

Printing Choices
Note:
Custom print Size
Print Size
Color Management
Color Handling
Image Photoholder Rotation A. Rotate Image B. Zoom slider
More options for printing from the Print dialog box
When you click More Options in the Print dialog box, the following options are displayed:
Enables you to specify the following settings:Photo DetailsYou can print the date, caption, and filename by selecting the following options:
Show Date
Show Caption
Show File Name
BorderYou can specify the following details for the border:
Thickness in inches, mm, or points.
Color of the border
Background color
Iron-on TransferSelect Flip Image to use image for T-shirt transfers.
Some printers have the inverting images option. If so, ensure that you use either your printer driver settings or the Invert image option toinvert images. Selecting both the options horizontally flips the image twice.
Trim Guidelines
Select Print Crop Marks (guide lines on all four edges of the photo) to make it easier to trim a photo.
Enables you to specify the following settings:
You can specify the width and height in inches, centimeters, and millimeters. Select Scale To Fit Media to scale the image to fiton the page.
Displays the color profile of the image. Image Space shows the color space embedded in your photo file. (The print previewin the Print dialog box is not color managed and doesn’t update as you choose a profile.) You can change the profile for printing from the followingoptions:
You can choose to have either your printer or Photoshop Elements manage colors.
364

Twitter™ and Facebook posts are not covered under the terms of Creative Commons.
Legal Notices | Online Privacy Policy
Printer Profile
Rendering Intent
Sets a custom printer profile to convert image colors to the printer’s color space, or turns off color conversion. If you havean ICC profile for your printer and paper combination, choose it from the menu. Make sure that you turn off the printer driver’s colormanagement.
Specifies how colors are translated from the image’s source color space when certain colors are not available in theprint space.
Scale an image in the Print dialog box
Scaling an image in the Print dialog box changes the size and resolution of the printed image (the file size of the image doesn’t change).
Choose File > Print. Click More Options in the Print dialog box. Select Custom Print Size option and do one of the following:
Select Scale To Fit Media to scale the image to fit on the page.
Specify the units of measurement from the Units menu and enter values for Height and Width to rescale the image numerically. Thedimensions are constrained, meaning that changing one dimension proportionately changes the other dimension.
Print multilayer images
If your image (PSD or TIFF) is multi-layered, use the Layers panel to temporarily hide the layers from view and prevent them from printing.
1. In Expert mode, open a multilayer image.
2. In the Layers panel, click the Eye icon to make a layer invisible.
3. When only the layers you want to print are visible, select File > Print. The Print dialog box opens with only the visible layers showing in thethumbnail preview.
4. Set your printing options and click Print.
Adobe also recommends
365
Saving and exporting images
To the top
To the top
BMP
CompuServe GIF (Graphics Interchange Format)
JPEG (Joint Photographic Experts Group)
Photoshop (PSD)
Photo Creations Format (PSE)
Photoshop PDF (Portable Document Format)
Note:
About saving images and file formatsFile formats for savingSave changes in different file formatsUnderstanding file compressionSet file-saving preferences
About saving images and file formats
For a video about this process, see www.adobe.com/go/lrvid2321_pse9_en.
After you edit an image in Photoshop Elements, ensure that you save it. To ensure that all the image data is preserved, save regular images inPhotoshop (PSD) format. Multiple-page creations are always saved in Photo Creations (PSE) format. These formats don’t compress your imagedata.
Save your photos in PSD format (instead of JPEG), unless you plan to share your photos or use them in a web page. Each time you save in JPEGformat, the image data is compressed, potentially causing some data to be lost. You may start to notice reduced image quality after saving the fileas a JPEG 2-3 times. The disadvantage of saving in PSD format is that the file size increases significantly because the file is not compressed.
Photoshop Elements can save images in several file formats, depending on how you plan to use them. If you are working with web images, theSave For Web command provides many options for optimizing images. To convert several images to the same file format, or the same size andresolution, use the Process Multiple Files command.
File formats for saving
Photoshop Elements can save images in the following file formats:
A standard Windows image format. You can specify either Windows or OS/2 format and a bit depth for the image. For 4-bit and 8-bit imagesusing Windows format, you can also specify RLE compression.
Commonly used to display graphics and small animations in web pages. GIF is a compressedformat designed to minimize file size and transfer time. GIF supports only 8-bit color images (256 or fewer colors). You can also save an image asa GIF file using the Save For Web command.
Used to save photographs, JPEG format retains all color information in an image but compressesfile size by selectively discarding data. You can choose the level of compression. Higher compression results in lower image quality and a smallerfile size; lower compression results in better image quality and a larger file size. JPEG is a standard format for displaying images over the web.
The standard Photoshop Elements format for images. You should generally use this format for edited images to save yourwork and preserve all your image data and layers in a single page file.
The standard Photoshop Elements format for multiple page creations. You should generally use this format forphoto creations to save your work and preserve all your image data and layers in a multiple page file.
A cross-platform and cross-application file format. PDF files accurately display and preservefonts, page layouts, and both vector and bitmap graphics.
PDF and PDP are the same except that PDPs are opened in Adobe Photoshop® and PDFs are opened in Acrobat.
366

Pixar
PNG (Portable Network Graphics)
TIFF (Tagged-Image File Format)
To the top
Note:
File Name
Format
Include In the Elements Organizer
Save In Version Set with Original
Layers
As a Copy
ICC Profile
Thumbnail
Use Lower Case Extension
Used for exchanging files with Pixar image computers. Pixar workstations are designed for high-end graphics applications, such as thoseused for three-dimensional images and animation. Pixar format supports RGB and grayscale images.
Used for lossless compression and for displaying images on the web. Unlike GIF, PNG supports 24-bitimages and produces background transparency without jagged edges; however, some web browsers do not support PNG images. PNG preservestransparency in grayscale and RGB images.
Used to exchange files between applications and computer platforms. TIFF is a flexible bitmap image formatsupported by most paint, image-editing, and page-layout applications. Most desktop scanners can produce TIFF files.In addition, Photoshop Elements can open files in several other older formats: Pixel Paint, Portable Bit Map, SGI RGB, Soft Image, WavefrontRLA, and ElectricImage.
Save changes in different file formats
You can set options for saving image files, such as the format, and whether to include the saved file in the Elements Organizer catalog or topreserve layers in an image. Depending on the format you select, other options may be available to set.
Change file-saving options
1. In the Photoshop Elements, choose File > Save.
2. To change file-saving options, such as the filename or format, choose File > Save As, set any of the following file-saving options, and thenclick Save.
Some file formats open another dialog box with additional options.
Specifies the filename for the saved image.
Specifies the file format for the saved image.
Includes the saved file in your catalog so that it displays in the Photo Browser. Note that some fileformats supported in the Edit workspace are not supported in the Elements Organizer. If you save a file in one of these formats, like EPS,this option is unavailable.
Saves the file, then adds it to a version set in the Photo Browser to keep the different versions of theimage organized. This option is unavailable unless Include In The Organizer is selected.
Preserves all layers in the image. If this option is disabled or unavailable, there are no layers in the image. A warning icon at theLayers check box indicates that the layers in your image will be flattened or merged for the selected format. In some formats, all layers aremerged. To preserve layers, select another format.
Saves a copy of the file while keeping the current file open. The copy is saved to the folder containing the currently open file.
Embed a color profile in the image for certain formats.
Saves thumbnail data for the file. This option is available when the Ask When Saving option for Image Previews is set in thePreferences dialog box.
Makes the file extension lowercase.
367
Note:
Normal
Interlaced
Note:
Baseline (“Standard”)
Baseline Optimized
UNIX file servers are often used to help send information over networks and the Internet. Some of these servers do not recognizeuppercase extensions. To make sure your images arrive at their destinations, use lowercase extensions.
Save a file in GIF format
1. Choose File > Save As.
2. Specify a filename and location, and choose CompuServe GIF Format from the format list.
Your image is saved as a copy in the specified directory (unless it's already in indexed-color mode).
3. If you are creating an animated GIF, select the Layers As Frames option. Each layer in the final file will play as a single frame in theanimated GIF.
4. Click Save. If your original image is RGB, the Indexed Color dialog box appears.
5. If necessary, specify indexed color options in the Indexed Color dialog box and click OK.
6. In the GIF Options dialog box, select a row order for the GIF file and click OK:
Displays the image in a browser only when the image is fully downloaded.
Displays a series of low-resolution versions of the image while the full image file is downloaded to the browser. Interlacing canmake downloading time seem shorter and assures viewers that downloading is in progress. However, interlacing also increases file size.
Save a file in JPEG format
1. In the Edit workspace, choose File > Save As, and choose JPEG from the format list.
You cannot save indexed-color and bitmap mode images in JPEG format.
2. Specify a filename and location, select file-saving options, and click Save.
The JPEG Options dialog box opens.
3. If the image contains transparency, select a Matte color to simulate the appearance of background transparency.
4. Specify image compression and quality by choosing an option from the Quality menu, dragging the Quality slider, or entering a valuebetween 1 and 12.
5. Select a format option:
Uses a format that is recognizable to most web browsers.
Optimizes the color quality of the image and produces a slightly smaller file size. This option is not supported by allweb browsers.
368

Progressive
None
Interlaced
Creates an image that is gradually displayed as it is downloaded to a web browser. Progressive JPEG files are slightly largerin size, require more RAM for viewing, and are not supported by all applications and web browsers.
6. Click OK.
1. In the Edit workspace, choose File > Save As, and choose Photoshop EPS from the format list.
2. Specify a filename and location, select file-saving options, and click Save.
3. In the EPS Options dialog box, set the following options:
4. To display white areas in the image as transparent, select Transparent Whites. This option is available only for images in bitmap mode.
5. If you want to apply anti-aliasing to a printed low-resolution image, select Image Interpolation.
6. Click OK.
Save a file in Photoshop PDF format
1. In the Edit workspace, choose File > Save As, and choose Photoshop PDF from the format list.
2. Specify a filename and location, select file-saving options, and click Save.
3. In the Save Adobe PDF dialog box, select a compression method. (See Understanding file compression.)
4. Choose an option from the Image Quality menu.
5. To view the PDF file, select View PDF After Saving to launch Adobe Acrobat or Adobe® Reader (depending on which application is installedon your computer).
6. Click Save PDF.
If you've made changes to an Acrobat Touchup file, but the changes are not reflected when you open the file, check the Saving Filepreferences dialog box. Choose Edit > Preferences > Saving Files, and then choose Save Over Current File from the On First Save menu.
Save a file in PNG format
1. In the Edit workspace, choose File > Save As, and choose PNG from the format list.
2. Specify a filename and location, select file-saving options, and click Save.
3. In the PNG Options dialog box, select an Interlace option and click OK.
Displays the image in a web browser only after it is completely downloaded.
Displays low-resolution versions of the image while the full image file is downloading to the browser. Interlacing can makedownloading time seem shorter and assures viewers that downloading is in progress. However, interlacing also increases file size.
369

To the top
RLE (Run Length Encoding)
LZW (Lemple-Zif-Welch)
JPEG
CCITT
ZIP
To the top
Save a file in TIFF format
1. In the Edit workspace, choose File > Save As, and choose TIFF from the format list.
2. Specify a filename and location, select file-saving options, and click Save.
3. In the TIFF Options dialog box, select options:
Image Compression
Specifies a method for compressing the composite image data.
Pixel Order
Choose Interleaved to be able to add the photo to the Elements Organizer.
Byte Order
Most recent applications can read files using Mac or Windows byte order. However, if you don’t know what kind of program the file may beopened in, select the platform on which the file will be read.
Save Image Pyramid
Preserves multiresolution information. Photoshop Elements does not provide options for opening multiresolution files; the image opens at thehighest resolution within the file. However, Adobe InDesign® and some image servers provide support for opening multiresolution formats.
Save Transparency
Preserves transparency as an additional alpha channel when the file is opened in another application. (Transparency is always preservedwhen the file is reopened in Photoshop Elements.)
Layer Compression
Specifies a method for compressing data for pixels in layers (as opposed to composite data).
Many applications cannot read layer data and skip it when opening a TIFF file. Photoshop Elements can read layer data in TIFF files.Although files that include layer data are larger than those that don’t, saving layer data eliminates the need to save and manage a separatePSD file to hold the layer data.
Understanding file compression
Many image file formats compress image data to reduce file size. Lossless compression preserves all image data without removing detail; lossycompression removes image data and loses some detail.
The following are commonly used compression techniques:
Lossless compression technique that compresses the transparent portions of each layer in images with multiplelayers containing transparency.
Lossless compression that provides the best results in compressing images that contain large areas of a single color.
Lossy compression that provides the best results with photographs.
A family of lossless compression techniques for black-and-white images.
Lossless compression technique that is most effective for images that contain large areas of a single color.
Set file-saving preferences
370

Twitter™ and Facebook posts are not covered under the terms of Creative Commons.
Legal Notices | Online Privacy Policy
On First Save
Image Previews
File Extension
Save As to Original Folder
Ignore Camera Data (EXIF) Profiles
Maximize PSD File Compatibility
Note:
Recent File List Contains: _ Files
In the Edit workspace, choose Edit > Preferences > Saving Files, and set the following options:
Gives you the ability to control how files are saved:
Ask If Original (default) opens the Save As dialog box the first time you edit and save the original file. All subsequent saves overwrite theprevious version. If you open the edited copy in the Edit workspace (from Elements Organizer), the first save, as well as all subsequentsaves, overwrites the previous version.
Always Ask opens the Save As dialog box the first time you edit and save the original file. All subsequent saves overwrite the previousversion. If you open the edited copy in the Edit workspace (from Elements Organizer), the first save opens the Save As dialog box.
Save Over Current File does not open the Save As dialog box. The first save overwrites the original.
Saves a preview image with the file. Select Never Save to save files without previews, Always Save to save files withspecified previews, or Ask When Saving to assign previews on a file-by-file basis.
Specifies an option for the three-character file extensions that indicate a file’s format: Select Use Upper Case to append fileextensions using uppercase characters, or Use Lower Case to append file extensions using lowercase characters. Generally, it’s a good ideato keep this option set to Use Lower Case.
pecifies the folder location that is opened by default in the Save As dialog. When this option is cleared, theSave As dialog always opens the folder where you last saved a file. When selected, the Save As dialog always opens the folder from whereyou last opened a file. Available at Preferences > Saving Files.
Select this option to automatically discard any color profiles used by your digital camera. The colorprofile you use in Photoshop Elements is saved with the image.
Saves a composite image in a layered Photoshop file so that it can be imported or opened by a widerrange of applications. Do one of the following:
Select Never to skip this step
Select Always to automatically save the composite
Select Ask if you’d like to be prompted each time you save a file.
When set to Ask, a dialog prompts for confirmation to maximize PSD compatibility. The dialog has a Don't Show Again check box. Ifselected, this confirmation dialog is never displayed again, and the Maximize PSD File Compatibility preference is set to Always.
Specifies how many files are available in the File > Open Recently Edited File submenu. Enter a valuefrom 0 to 30. The default value is 10.
Adobe also recommendsAbout version sets
371

Photo projects
372

Project basics
Twitter™ and Facebook posts are not covered under the terms of Creative Commons.
Legal Notices | Online Privacy Policy
Note:
Elements Organizer and Photoshop Elements provide quick and easy ways to be creative with your photos. You can use your photos to createphoto books, greeting cards, calendars, collages, and CD/DVD jackets among other projects. You can complete some projects in ElementsOrganizer. For other projects, you select the photos you want to use in Elements Organizer, and then complete the project in Photoshop Elements.
Click Create to view a list of projects that guide you through the process of using professionally designed templates to create your own uniqueproject. When you complete a project, you can either share it online, or print it on your home computer or through a professional printing service.
Your projects are displayed in Elements Organizer. The project file and related subfolders that contain the document or web page files for eachproject are created on your local hard drive. To maintain the link between these project files, subfolders, and page files, avoid moving them usingExplorer (Windows) or Finder (Mac). Instead, use the Move command in Elements Organizer.
You can share projects in various ways. For example, you can burn a slideshow onto a CD. You can also have your projects professionally printedthrough Adobe Photoshop Elements Online Services.
Projects from previous versions of Photoshop Elements might not open in the current version. You may have to use a previous version toopen some projects.
Elements Organizer projects overview
Creating slide shows (Windows only)
Sharing photos using online services
373

Making photo projects
To the top
Note:
Note:
To the top
Sizes
Themes
Autofill With Selected Images
About photo projectsSetting photo project optionsTypes of photo projectsAbout slide showsMake a photo collage, label, CD, and DVD Jacket
About photo projects
Photo projects include photo books, photo calendars, photo collages, greeting cards, and CD/DVD jackets and labels. The Create button,available at the upper-right corner of the Photoshop Elements window, lists the available photo projects in Photoshop Elements.
Note: Photo books are designed specifically for online printing. You can print them locally, but each side of a spread is treated as a separatepage.
Photo projects are saved in the Photo Projects Format (.pse) format. Unlike conventional image formats, which require you to open and editeach image separately, you can print up to 30 pages from the PSE format.
Because multipage files can be large, a computer with at least 1 GB of RAM is recommended for optimum performance.
When you start a photo project, you can specify a size, printing option (local or through a service provider), and theme for the project type. Forexample, the CD Jacket template has different size options than the Photo Collage template. However, both offer layout and theme options thatare common to most projects. At this time, you also specify whether to use the Autofill With Selected Images and Number Of Pages options(when applicable).
After you specify these primary options, the photo project opens in Photoshop Elements. The Pages, Layouts, and Graphics buttons on thebottom-right of the application window, let you add or modify frames, backgrounds, and layer styles. For example, instead of defaultbackgrounds, you can apply a unique background to every page of a photo album using the Graphics tab.
After you finish a project, you can share it in various ways. For example, you can print or email greeting cards or photo collages from ElementsOrganizer. You can also have your projects professionally printed using online services, if available in your region.
If a photo project has missing files, you can save the project but can’t print it.
Setting photo project options
The Create drop-down list is the starting point for making new photo projects. When you select a photo project, say a photo book, you canspecify a size, printing option, and theme. Only a limited number of sizes are supported for each printing option. Select Autofill With SelectedImages to add all the images open in the Photo Bin in one step, instead of manually adding them later.
For example, if you click Photo Collage in the Create tab, the photo projects dialog box provides the following options:
Provides preset page sizes for each project. The size chosen becomes the default for all pages in the project. Each project type offersdifferent size options. For example, the greeting card template sizes are smaller than the photo book template sizes.
Provides various preset designs to complement your images with preset frames and backgrounds. The theme and frame chosenbecomes the default for all pages in the project, but they can be modified later in the Layouts and Graphics panels. For example, you may wantto apply a different background to each page of a scrapbook.
Places selected images in the project automatically in the same order they are arranged in the Photo Bin. Youcan select open files, albums, or files selected in the Elements Organizer to autofill the project. You can also open the images in the Photo Binand autofill the project later through the Photo Bin context menu. To arrange images in a particular order, rearrange them in the Photo Bin
374

To the top
before starting a project. To rearrange the images later, drag them from the Photo Bin or add them directly from their folder location.
Types of photo projects
About photo collages
Photo collages let you create large picture projects, such as photo collages or unique photo prints. You can print photo collages with your homeprinter, order them online, save them to your hard drive, or email them.
Sample photo collages
About greeting cards
Greeting cards let you add various layouts and designs to your images, and allows adding up to 22 photos on a page. You can print greetingcards with your home printer, save them to your hard drive, or email them. Greetings cards can also be ordered online from Adobe PhotoshopElements Online Services for some locales.
Sample photo greeting cards
About CD and DVD jackets
Photoshop Elements lets you create disc jackets (covers) for a CD and DVD case. You can print them with your home printer, save to your harddrive, or email them as PDFs.
375
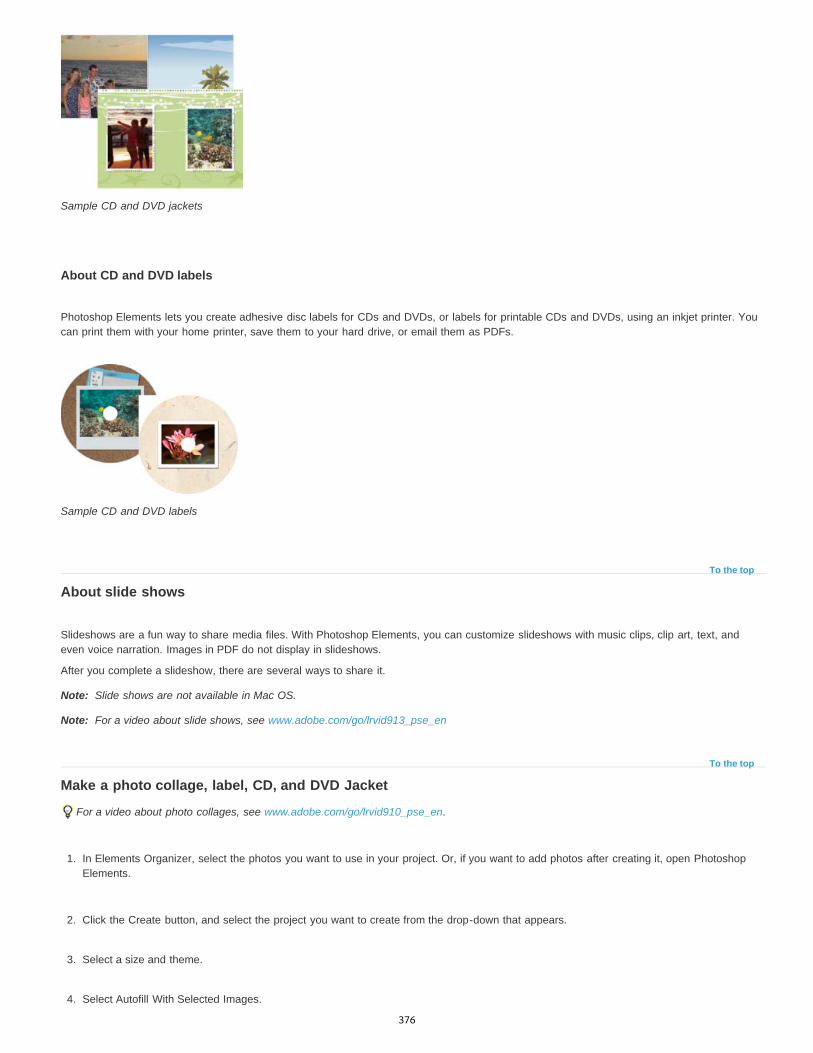
To the top
Note:
Note:
To the top
Sample CD and DVD jackets
About CD and DVD labels
Photoshop Elements lets you create adhesive disc labels for CDs and DVDs, or labels for printable CDs and DVDs, using an inkjet printer. Youcan print them with your home printer, save them to your hard drive, or email them as PDFs.
Sample CD and DVD labels
About slide shows
Slideshows are a fun way to share media files. With Photoshop Elements, you can customize slideshows with music clips, clip art, text, andeven voice narration. Images in PDF do not display in slideshows.
After you complete a slideshow, there are several ways to share it.
Slide shows are not available in Mac OS.
For a video about slide shows, see www.adobe.com/go/lrvid913_pse_en
Make a photo collage, label, CD, and DVD Jacket
For a video about photo collages, see www.adobe.com/go/lrvid910_pse_en.
1. In Elements Organizer, select the photos you want to use in your project. Or, if you want to add photos after creating it, open PhotoshopElements.
2. Click the Create button, and select the project you want to create from the drop-down that appears.
3. Select a size and theme.
4. Select Autofill With Selected Images.
376

Twitter™ and Facebook posts are not covered under the terms of Creative Commons.
Legal Notices | Online Privacy Policy
5. Click OK.
The project opens, and you can modify the design using the Pages, Layouts, and Graphics tabs in the Create panel.
6. Add photos (if you have not yet added) to the photo project.
7. Click Advanced Mode or Basic Mode, to set the mode in which you want to view and modify the photos you want to work with. You canperform basic operations like adding text in the basic mode, to retouching the images and pages in the advanced mode.
8. In the Taskbar, click Save, or choose File > Save. By default, projects are saved in your My Pictures folder, although you can saveprojects to another location.
9. By default, Include In The Elements Organizer is selected, which places the project in Elements Organizer. Deselect this option if you donot want the project placed in Elements Organizer.
10. Type a filename, and click Save.
377

Create a greeting card
To the top
Note:
Pages
Layouts
Graphics
Greeting cards let you add various layouts and designs to your images, and enables you to add up to 22 photos on a page. You can printgreeting cards with your home printer, save them on your hard drive, or send by email.
You can also order a print online from Shutterfly, from within Photoshop Elements. Greeting cards can also be ordered online from AdobePhotoshop Elements Online Services from some regions.
Sample photo greeting cards
For a video about greeting cards, see www.adobe.com/go/lrvid912_pse_en.
Create a greeting card
1. Click Create, and select Greeting Card from the list.
2. Select an appropriate size and theme.
The Sizes panel displays options suitable for online services. You can print cards created using online templates, but you can'torder online if you use a local print template.
3. Select Autofill With Selected Images to add all the photos already open in the Photo Bin.
4. Click OK.
Photoshop Elements creates the greeting card and displays Pages, Layouts, Artwork, and Text tabs in the Create panel.
5. Use the following options to fine-tune and add creative designs to your greeting card:
Select a page thumbnail to open it in the editing workspace.
Double-click a layout to apply it. Or drag and drop a layout to apply.
Choose a background, frame, and graphics. Double-click or drag and drop an artwork to add it.
378

Twitter™ and Facebook posts are not covered under the terms of Creative Commons.
Legal Notices | Online Privacy Policy
Note:
6. Use the Move tool and Select tool to modify the card. Click Advanced Mode to access Full Edit options.
7. Do one of the following:
Click Print. If your card layout can be printed locally, specify the options, and then click Print.
Click Order. Follow the onscreen instructions to create and order greeting cards.
You need to sign up for Shutterfly membership to use their services. Certain cards (for example, folded layouts) can be printedlocally only in USA/Canada and Japan.
8. Click Save to save the creation.
379

Create a photo book
Note:
To the top
Note:
Note:
Pages
Layouts
Graphics
Note:
Note:
Photo Books let you add various layouts and designs to your images. Photo books can be printed on your home printer, ordered online fromAdobe Photoshop Elements Online Services, saved to your hard drive, and shared via email. You can upload your photos, create photo books,and print using Shutterfly. You can also order a digital scrapbook using Shutterfly.
Sign up for Shutterfly membership to use their services. The online services available to you depend on your location. For example,Shutterfly is available only in the United States and Canada. Also, some options differ between Asia, Europe, and North America.
Create a photo book
1. Select the images that you want to add to the photo book in Elements Organizer or open them in Photoshop Elements. Click Create andselect Photo Book.
2. Select the appropriate size and theme.
The Sizes panel displays options suitable for various online services.
3. Select Autofill With Selected Images to add all the photos already open in the Photo Bin.
4. Specify the number of pages in the photo book.
Photoshop Elements supports different ranges of pages depending upon the method of printing that you select. For example, therange for the locally printed photo book is 2 – 78 pages. The minimum and maximum number of pages also varies based on the locale.
5. Click OK.
Photoshop Elements creates the photo book and displays Pages, Layouts, and Graphics tabs in the Create panel.
6. Use the following options to fine-tune and add creative designs to your photo book:
Drag and drop pages in the Pages panel to rearrange pages in photo book, or add more pages.
Double-click a layout to apply it. Or drag and drop a layout to apply it.
Choose a background, frame, and graphics. Double-click, or drag and drop graphics, to add to the existing graphics.
7. Click Advanced Mode to access all Expert mode options.
In advanced mode, Photoshop Elements changes the resolution from 72 PPI to 220 PPI. You cannot resize a creation in theadvanced mode.
8. Click Print or Order, depending on whether you are using your printer or an online service.
Photoshop Elements prints pages at a resolution of 220 PPI.
380

Keywords: create, creating, photobook, photo book
Twitter™ and Facebook posts are not covered under the terms of Creative Commons.
Legal Notices | Online Privacy Policy
9. Follow any other on-screen instructions, and then click Save.
381

Editing photo projects
To the top
To the top
To the top
To the top
About photo project editsAdd images to a photo projectEdit photos in the Quick modeAdd new pages to a photo project [Photo Books only]Reposition or resize photos in a photo projectReplace or remove photos in a photo projectRotate photos in a photo projectEdit photo project pages in Photoshop
About photo project edits
In Photoshop Elements, you can modify photo collages, greeting cards, and CD/DVD disc jackets and labels. The Create panel lets you addvarious frames, textures, backgrounds, and graphics to your projects, as well as apply text effects. You can also resize, rotate, and move images.
Add images to a photo project
You can add images to a photo project, and then rearrange, modify, or replace them.
Photoshop Elements adds all the images in a project to your default catalog.
Photo projects (Creations) are saved as .pse files. When you save a photo project, Photoshop Elements saves any unsaved images added to theproject. Photoshop Elements saves the image as a copy of the original image in the same location.
Note: If the location is not writable, Photoshop Elements saves the image in %My Documents%Adobe\Photo Creations.
If you relocate the images used in a photo book, missing file icons appear in the photo book instead of the images. Reimport the images byclicking the ? sign, or reconnect all the missing files in the Organize workspace. After reconnecting the files, close the project and reopen it.
To add photos to project, do one of the following:
Click an empty photo placeholder and then select a photo, or right-click an existing photo and click Replace Photo.Drag a photo to an empty photo placeholder.Choose File > Open. Choose the photos you want to add. If you do not see the images, navigate to where they are located, and then clickOpen, which places them in the Photo Bin. Drag photos into your photo project from your photo bin.
Edit photos in the Quick mode
1. Right-click the photo and select Edit Quick.
2. Use the controls on the right side to modify the images.
3. Click Back To Creations to return to the Create panel.
Add new pages to a photo project [Photo Books only]
382

To the top
To the top
1. In the Pages panel, select the page that will precede the new page.
2. At the top of the Pages panel, click the Add Page panel to add a new page after the current page.
Reposition or resize photos in a photo project
1. To adjust a photo and frame together, click the photo once. To adjust a photo within a frame, double-click the photo.
A bounding box appears showing the edges of the photo, even if the edges are masked by the frame.
2. Do any of the following:
To reposition the photo, click anywhere within the bounding box and drag the photo.
To resize the photo, drag the slider that appears above the selected image. Or, position the Move tool over a corner, top, bottom, orside; when the diagonal double-headed arrow appears, drag it.
3. After repositioning or resizing the photo within the frame, click the Commit button or the Cancel button when you’re finished.
Resizing a photo A. Drag a corner of the photo to resize it B. Move the resize slider C. Areas outside the photo frame are hidden
Replace or remove photos in a photo project
Do any of the following:
Double-click the photo, then click
Drag a new photo from the Photo Bin onto a photo placeholder.
To replace a photo on a page, right-click and select Replace Photo.
383

Twitter™ and Facebook posts are not covered under the terms of Creative Commons.
Legal Notices | Online Privacy Policy
To the top
To the top
Note:
To remove (clear) a photo from a page, right-click and select Clear Photo.
Rotate photos in a photo project
1. To rotate a photo and frame together, click the photo once. To rotate a photo within a frame, double-click the photo.
2. Do any of the following:
Click anywhere within the bounding box and a circle appears below the selection. Position the cursor over the circle. When the curvedfour-headed arrow appears, drag the track ball handle to rotate the image.
Position the Move tool over a corner. When the curved double-headed arrow appears, drag it to rotate the photo. The further awaythe cursor is from the corner, the more control you have to make more accurate changes.
Double-click the photo, and then click the rotate button next to the slider (only rotates in 90° increments).
3. When you are finished, click the Commit button or the Cancel button .
Edit photo project pages in Photoshop
If you have Adobe® Photoshop® and Photoshop Elements installed on the same computer, you can send JPEG, GIF, and other single-pagephoto files to Photoshop. In Elements Organizer, choose Edit > Edit with Photoshop. Photoshop does not support the multipage PSE file format, soit cannot edit entire photo projects. However, Photoshop can edit individual pages of a photo project, which are in the single-page PSD format.
Photoshop offers direct control over many aspects of photo project pages, including direct editing of photo layers (called Smart Objects inPhotoshop) and frames. These features are limited in Photoshop Elements to preserve its easy, automatic image-editing workflow.
1. In Elements Organizer, right-click the photo project.
2. Select Show File Info.
3. In the General section, click the Location link next to the path of the project.
4. Locate and open the folder with the same name as the PSE file.
5. Right-click the PSD file for the page you want to edit, and choose Open With > Adobe Photoshop.
6. In Photoshop, make your changes, and then choose File > Save. When Photoshop asks if you want to replace the existing file, click Yes.
Do not reorder or rename layers in the PSD file. Doing so could prevent the automatic editing features in Photoshop Elements fromworking as expected.
384

Create photo calendars
Twitter™ and Facebook posts are not covered under the terms of Creative Commons.
Legal Notices | Online Privacy Policy
Note:
Pages
Layouts
Graphics
Create photo calendars for local printing
1. In Photoshop Elements, click Create, and select Photo Calendar (or from Elements Organizer, click the Create drop-down, and selectPhoto Calendar).
2. Select the starting month and year.
3. Select the appropriate size and theme.
The Sizes panel displays options suitable for online services.
4. Select Autofill With Selected Images to add all the photos already open, or those selected in the Photo Bin.
5. Click OK.
Photoshop Elements creates the photo calendar and displays Pages, Layouts, and Graphics panels.
6. Use the following options to fine-tune and add creative designs to your photo calendar:
Move between pages, and select pages to view and modify them.
Double-click a layout to apply it, or just drag and drop a layout on a page.
Choose a background, frame, and graphics.
7. Click Switch To Advanced Mode to access options available in the expert mode.
8. Click Print.
9. Click Save.
385

Web graphics
386

Optimizing images
To the top
To the top
About optimizingUsing the Save For Web dialog boxOptimized file formats for the webApply a preset optimization setting
About optimizing
Optimization for the web is the process of compressing images and setting display options for optimal use on the Internet. When you put imageson the Internet, file size becomes important; you want to achieve a file size that is small enough to allow a reasonable download time, but largeenough to preserve colors and details to your satisfaction. There are three major graphic file formats that are used on the web: GIF, JPEG, andPNG.
When you put images on the web, you need to think about file size. The goal is a file size that is small enough to allow reasonable download timesbut that preserves colors and details to your satisfaction.
Three major graphic file formats are used on the web: GIF, JPEG, and PNG. You can optimize images in these formats using one of the followingmethods:
To precisely optimize an image for use in web authoring applications, such as Adobe® Dreamweaver®, you can use the Save For Webcommand. The Save For Web dialog box lets you preview your image in different file formats and with different optimization settings. You canalso set transparency and animation settings.
For basic optimization, you can use the Save As command. Depending on the file format, you can specify image quality, backgroundtransparency or matting, color display, and downloading method.
Using the Save For Web dialog box
Use the Save For Web dialog box to preview the effects of different optimization options on a photo you want to share on the web. The process issimple. Open a photo, and choose File > Save For Web. Then choose a format from the file format menu (GIF, JPEG, PNG-8, or PNG-24) and setoptions as desired. (The file format menu is directly beneath the Preset menu.) This saves a copy of your file, without overwriting the originalimage.
Save For Web dialog box A. Toolbox B. Eyedropper color C. Optimization settings and flyout menu for more options D. Image Size E. Animation options F. Zoom levelmenu G. Browser preview menu H. Original Image I. Optimized image
387

Twitter™ and Facebook posts are not covered under the terms of Creative Commons.
To the top
JPEG
PNG-24
GIF
PNG-8
To the top
Note:
Optimization options appear on the right side of the Save For Web dialog box. In addition to selecting a web file format, you can choosecompression and color options, preserve background transparency or set background matting, and change the size of the image. You can usepredefined settings (by choosing a format from the Preset menu), or select format-specific options to fine-tune the optimization.
The image windows show your original image (on the left) and a preview of the optimized image (on the right). Under each window is optimizationinformation—the current settings, the size of the optimized file, and the estimated download time. As you make adjustments, the information underthe optimized image changes to reflect your new settings.
A small toolbox is located in the upper-left corner of the dialog box. To view different areas of an image, select the Hand tool and drag to bringthose areas into view. To zoom in on an image, select the Zoom tool and click in a view; then hold down Alt, and click again to zoom out.(Alternatively, you can use the Zoom box at the bottom of the dialog box.) To create matte colors, use the Eyedropper Color tool.
Optimized file formats for the web
You can choose between four formats for the web. Use the following guidelines when choosing the format for your web image:
In most cases, this is the best format in which to save photographs.
Like JPEG, this is a good format for photographs. Choose PNG-24 rather than JPEG only when your image contains transparency.(JPEG does not support transparency; you must fill it with a matte color.) PNG-24 files are often much larger than JPEG files of the same image.
GIF is the format to use for line art, illustrations with large areas of solid color and crisp detail, and text. Also, if you want to export ananimated image, you must use GIF.
PNG-8 is a lesser-known alternative to GIF. Use it for the same purposes (except animation).
Images in GIF and PNG-8 formats, sometimes called indexed-color images, can display up to 256 colors. To convert an image to indexed-colorformat, Photoshop Elements builds a color lookup table. If a color in the original image does not appear in the color lookup table, the applicationeither chooses the closest color in the table or simulates the color using a combination of available colors.
JPEG and PNG-24 files support 24-bit color, so they can display up to 16 million colors. Depending on the format, you can specify image quality,background transparency or matting, color display, and the method a browser should use to display the image while downloading.
The appearance of an image on the web also depends on the colors displayed by the computer platform, operating system, monitor, and browser.You may want to preview images in different browsers and on different platforms to see how they will appear on the web.
Apply a preset optimization setting
You can quickly and easily optimize an image for the web by choosing a predefined optimization setting, called a preset, from the Preset menunear the upper-right corner of the Save For Web dialog box. Presets are tailored to meet the optimization needs of different types of images.
The name of each preset reflects its file format and quality level. For example, choose JPEG High to optimize an image in JPEG format with highimage quality and low compression. Choose GIF 32 Dithered to optimize an image in GIF format, reduce the number of colors to 32, and applydithering.
1. In the Save For Web dialog box, choose a setting name from the Preset menu, and then click OK.
2. In the Save Optimized As dialog box, type a filename and click Save.
If you change the options in a preset, the Preset menu displays the word “[Unnamed]”. You cannot save a custom setting; however,the current settings appear in the Save For Web dialog box the next time you display it.
Adobe also recommends
388

Dithering in web images
To the top
Application dither
Browser dither
To the top
About ditheringControl dither in web imagesPreview dither
About dithering
Most web images are created by designers using 24-bit color displays (which display over 16 million colors), although some users view web pageson computers with 8-bit color displays (which display only 256 colors). As a result, web images often contain colors not available on somecomputers. Computers use a technique called dithering to simulate colors they can’t display. Dithering uses adjacent pixels of different colors togive the appearance of a third color. For example, a red color and a yellow color may dither in a mosaic pattern to produce the illusion of anorange color that the 8-bit color panel doesn’t contain.
Dithering simulates continuous tones
Use colors in the Web panel to ensure that colors won’t dither when displayed in Windows or Mac OS systems capable of displaying 256colors. When creating an original image, you can use the Color Picker to choose web-safe colors.
When optimizing images, keep in mind that two kinds of dithering can occur:
Occurs in GIF and PNG-8 images when Photoshop Elements attempts to simulate colors that aren’t in the current color table.You can control application dither by choosing a dithering pattern, or you can try to avoid application dither by adding more colors to the table.
Occurs when a web browser using an 8-bit color display (256-color mode) attempts to simulate colors that aren’t in the 8-bit colorpanel. Browser dither can occur with GIF, PNG, or JPEG images. In Photoshop Elements, you can control the amount of browser dither by shiftingselected colors in the image to web-safe colors. You can also specify web-safe colors when choosing a color in the Color Picker.
You can preview application dither in GIF and PNG-8 images. Images with primarily solid colors may work well without dithering. Conversely,images with continuous-tone color (especially color gradients) may require dithering to prevent color banding.
Control dither in web images
1. Open an image and choose File > Save For Web.
2. Choose your optimization settings.
3. Enter a value in the Dither text box, or click the Dither menu arrow and drag the slider that appears.
4. The Dither percentage controls the amount of dithering that is applied to the image. A higher dithering percentage creates the appearance of
389

Twitter™ and Facebook posts are not covered under the terms of Creative Commons.
Legal Notices | Online Privacy Policy
To the top
more colors and more detail in an image but can also increase the file size. For optimal compression and display quality, use the lowestpercentage of application dither that provides the color detail you require.
Preview dither
You can preview browser dither directly in Photoshop Elements or in a browser that uses an 8-bit color display (256-color mode).
1. Open an image and choose File > Save For Web.
2. Choose your optimization settings.
3. To preview dither in Photoshop Elements, choose Browser Dither from the document panel menu in the Save For Web dialog box. (To viewthe menu, click the triangle in the upper-right corner of the optimized image.)
4. To preview dither in a browser, follow these steps:
Set your computer’s color display to 8-bit color (256 colors). See your operating system’s documentation for information on changing thecolor display.
Select a browser from the Preview In menu in the Save For Web dialog box.
Adobe also recommends
390

Optimizing images for the PNG-24 format
Twitter™ and Facebook posts are not covered under the terms of Creative Commons.
Legal Notices | Online Privacy Policy
To the top
To the top
About the PNG-24 formatOptimize as PNG-24
About the PNG-24 format
The PNG-24 format supports 24-bit color. Like the JPEG format, PNG-24 preserves the subtle variations in brightness and hue found inphotographs. Like the GIF and PNG-8 formats, PNG-24 preserves sharp details like those in line art, logos, or type.
The PNG-24 format uses the same lossless compression method as the PNG-8 format. For that reason, PNG-24 files are usually larger thanJPEG files of the same image. You may want to avoid PNG-24 format when you are distributing your image to a wide audience.
In addition to supporting background transparency and background matting, the PNG-24 format supports multilevel transparency. You can have upto 256 degrees of transparency from opaque to completely transparent, so you can blend the edges of an image smoothly with any backgroundcolor. However, not all browsers support multilevel transparency.
Optimize as PNG-24
PNG-24 format is suitable for compressing photographs. However, PNG-24 files are often much larger than JPEG files of the same image.PNG-24 format is recommended only when you work with an image that includes multiple levels of partial transparency.
1. Open an image and choose File > Save For Web.
2. Choose PNG-24 for the optimization format.
3. Select Interlaced to create an image that is displayed at low-resolution in a browser while the full-resolution image is downloading.Interlacing can make downloading time seem shorter and gives viewers feedback that downloading is in progress.
4. If the image contains transparency, select Transparency to preserve transparent pixels; deselect Transparency to fill fully and partiallytransparent pixels with the Matte color.
5. To save your optimized image, click OK. In the Save Optimized As dialog box, type a filename, and click Save.
Adobe also recommends
391

Optimizing images for the GIF or PNG-8 format
To the top
To the top
Note:
About the GIF formatAbout the PNG-8 formatOptimize as GIF or PNG-8 formatCreate an animated GIF
About the GIF format
The GIF format uses 8-bit color and efficiently compresses solid areas of color while preserving sharp details like those in line art, logos, or type.You also use the GIF format to create an animated image and preserve transparency in an image. GIF is supported by most browsers.
The GIF format uses LZW compression, which is a lossless compression method. However, because GIF files are limited to 256 colors, optimizingan original 24-bit image as an 8-bit GIF can subtract colors from an image.
GIF image with selective color (left), and GIF image with web color (right)
You can choose the number of colors in a GIF image and control how colors dither in a browser. GIF supports background transparency orbackground matting, by which you blend the edges of the image with a web page background color.
About the PNG-8 format
The PNG-8 format uses 8-bit color. Like the GIF format, PNG-8 efficiently compresses areas of solid color while preserving sharp detail like thosein line art, logos, or type.
Because PNG-8 is not supported by all browsers, you may want to avoid this format when you are distributing the image to a wide audience.
The PNG-8 format uses more advanced compression schemes than GIF does, and a PNG-8 file can be 10% to 30% smaller than a GIF file of thesame image, depending on the image’s color patterns. Although PNG-8 compression is lossless, optimizing an original 24-bit image as an 8-bitPNG file can subtract colors from the image.
With certain images, especially those with simple patterns and few colors, GIF compression can create a smaller file than PNG-8compression. View optimized images in GIF and PNG-8 format to compare file size.
As with the GIF format, you can choose the number of colors in an image and control how colors dither in a browser. The PNG-8 format supportsbackground transparency and background matting, by which you blend the edges of the image with a web page background color.
392

To the top
Perceptual
Selective
Adaptive
Restrictive (Web)
PNG-8 with 256 colors and no dither (left), and PNG-8 with 16 colors and dithering (right)
Optimize as GIF or PNG-8 format
GIF is the standard format for compressing images with large areas of solid colors and crisp details like those in line art, logos, or type. Like theGIF format, PNG-8 supports transparency and efficiently compresses areas of solid color while preserving sharp detail; however, not all webbrowsers can display PNG-8 files.
1. Open an image and choose File > Save For Web.
2. Choose GIF or PNG-8 from the optimization format menu.
3. To display an image at low resolution while the full-resolution image is downloading, select Interlaced. Interlacing can make downloadingtime seem shorter and gives viewers feedback that downloading is in progress.
4. Under the optimization format menu, choose a color-reduction algorithm for generating the color lookup table:
Creates a custom color table by giving priority to colors for which the human eye has greater sensitivity.
Creates a color table similar to the Perceptual color table, but favoring broad areas of color and the preservation of web colors.This color table usually produces images with the greatest color integrity. (Selective is the default choice.)
Creates a custom color table by sampling colors from the spectrum appearing most commonly in the image. For example, animage with only shades of green and blue produces a color table made primarily of greens and blues. Most images concentrate colors inparticular areas of the spectrum.
Uses the standard, 216-color, web-safe color table common to the 8-bit (256-color) panels of Windows and Mac OS.This option ensures that no browser dither is applied to colors when the image is displayed using 8-bit color. If your image has fewer than216 colors, unused colors are removed from the table.
5. To specify the maximum number of colors in the color panel, select a number from the Colors menu, enter a value in the text box, or clickthe arrows to change the number of colors. If the image contains fewer colors than the panel, the color table reflects the smaller number ofcolors in the image.
6. If you chose Restrictive (Web) for the color-reduction algorithm, you can choose Auto from the Colors menu. Choose Auto if you wantPhotoshop Elements to determine the optimal number of colors in the color table based on the frequency of colors in the image.
7. Choose a dithering percentage, either by entering a percentage in the Dither text box or by clicking the Dither menu arrow and dragging theslider that appears.
8. If the image contains transparency, select Transparency to preserve transparent pixels; deselect Transparency to fill fully and partiallytransparent pixels with the matte color.
9. To create an animated GIF, select Animate.
393
Twitter™ and Facebook posts are not covered under the terms of Creative Commons.
Legal Notices | Online Privacy Policy
To the top
Note:
Looping Options
Frame Delay
10. To save your optimized image, click OK. In the Save Optimized As dialog box, type a filename, and click Save.
Create an animated GIF
1. Place the images you want to appear in each frame of the animation on separate layers of the Layers panel. For example, to create ananimation of an eye blinking, you would place an image of the open eye on one layer, and an image of the closed eye on another layer.
2. Choose File > Save for Web.
If your image has multiple layers, you can also open the Save For Web dialog box from the Save As dialog box by choosingCompuServe GIF Format and selecting Layers As Frames.
3. Optimize the image in GIF format.
4. Select Animate.
5. Set additional options in the Animation section of the dialog box:
Continuously repeat the animation in a web browser, or animate only once. You can also choose Other to specify thenumber of times the animation must loop.
Specifies the number of seconds that each frame is displayed in a web browser. Use a decimal value to specify fractions of asecond. For example, use .5 to specify half a second.
Adobe also recommends
394

Using transparency and mattes
To the top
To the top
About transparent and matted web imagesPreserve background transparency in a GIF or PNG imageCreate a matted GIF or PNG imageCreate hard-edged transparency in a GIF or PNG-8 fileCreate a matted JPEG image
About transparent and matted web images
Transparency makes it possible to create nonrectangular images for the web. Background transparency, supported by the GIF and PNG formats,preserves transparent pixels in the image and allows the background of the web page to show through the transparent areas of your image.(Although the JPEG format does not support transparency, you can specify a matte color to simulate the appearance of transparency in the originalimage.)
Web button without transparency (left), and with transparency (right)
Background matting, supported by the GIF, PNG, and JPEG formats, simulates transparency by filling or blending transparent pixels with a mattecolor that matches the web page background. Background matting works best if the web page background is a solid color and if you know whatthat color is.
To create background transparency or background matting in the optimized image, you must start with an image that contains transparency. Youcan create transparency when you create a new layer or use the Background Eraser or Magic Eraser.
When working with GIF or PNG-8 files, you can create hard-edged transparency: all pixels that are more than 50% transparent in the originalimage are fully transparent in the optimized image, and all pixels that are more than 50% opaque in the original image are fully opaque in theoptimized image. Use hard-edged transparency when you don’t know the background color of a web page, or when the web page backgroundcontains a texture or pattern. However, keep in mind that hard-edged transparency can cause jagged edges in the image.
GIF without hard-edges transparency (left), and with hard-edged transparency (right)
Preserve background transparency in a GIF or PNG image
GIF and PNG-8 formats support one level of transparency—pixels can be fully transparent or fully opaque, but not partially transparent. (Bycontrast, PNG-24 format supports multilevel transparency; that is, you can have up to 256 degrees of transparency in an image, ranging fromopaque to completely transparent.)
395

To the top
To the top
To the top
1. Open or create an image that contains transparency, and choose File > Save For Web.
2. In the Save For Web dialog box, select GIF, PNG-8, or PNG-24 as the optimization format.
3. Select Transparency.
4. For the GIF and PNG-8 formats, specify how to treat partially transparent pixels in the original image. You can blend these pixels with amatte color, or you can create hard-edged transparency.
Create a matted GIF or PNG image
When you know the background color of the web page on which an image will be displayed, you can use the matting feature to fill or blendtransparent pixels with a matte color that matches the web page background.
1. Open or create an image that contains transparency, and choose File > Save For Web.
2. In the Save For Web dialog box, select GIF, PNG-8, or PNG-24 as the optimization format.
3. For GIF and PNG-8 format, do one of the following:
To keep fully transparent pixels transparent, and blend partially transparent pixels with the matte color, select Transparency. This optionprevents the halo effect you see when you place an anti-aliased image on a web page background that differs from the imagebackground. This option also prevents the jagged edges of hard-edged transparency.
To fill transparent pixels with the matte color and blend partially transparent pixels with the matte color, deselect Transparency.
4. Select a color from the Matte menu:
Eyedropper Color (to use the color in the eyedropper sample box)
White, Black, or Other (to select a color using the Color Picker)
Create hard-edged transparency in a GIF or PNG-8 file
Use hard-edged transparency when you don’t know the background color of a web page, or when the web page background contains a texture orpattern. However, keep in mind that hard-edged transparency can cause jagged edges in the image.
1. Open or create an image that contains transparency, and choose File > Save For Web.
2. In the Save For Web dialog box, select GIF or PNG-8 as the optimization format.
3. Select Transparency.
4. Select None from the Matte menu.
Create a matted JPEG image
396

Twitter™ and Facebook posts are not covered under the terms of Creative Commons.
Legal Notices | Online Privacy Policy
Although the JPEG format does not support transparency, you can specify a matte color to simulate the appearance of transparency in the originalimage. The matte color fills fully transparent pixels and blends with partially transparent pixels. When you place the JPEG on a web page with abackground that matches the matte color, the image appears to blend with the background.
1. Open or create an image that contains transparency, and choose File > Save For Web.
2. In the Save For Web dialog box, select JPEG as the optimization format.
3. Select a color from the Matte menu: None, Eyedropper Color (to use the color in the eyedropper sample box), White, Black, or Other (toselect a color using the Color Picker).
When you select None, white is used as the matte color.
Adobe also recommends
397

Optimizing images for the JPEG format
To the top
Note:
To the top
About the JPEG formatOptimize as JPEG
About the JPEG format
The JPEG format supports 24-bit color, so it preserves the subtle variations in brightness and hue found in photographs. A progressive JPEG filedisplays a low-resolution version of the image in the web browser while the full image is downloading.
JPEG image compression is called lossy because it selectively discards image data. A higher quality setting results in less data being discarded,but the JPEG compression method may still degrade sharp detail in an image, particularly in images containing type or vector art.
Artifacts, such as wavelike patterns or blocky areas of banding, are created each time you save an image in JPEG format. Therefore, youshould always save JPEG files from the original image, not from a previously saved JPEG.
Original image (left), and optimized JPEG with Low quality setting (right)
The JPEG format does not support transparency. When you save an image as a JPEG file, transparent pixels are filled with the matte colorspecified in the Save For Web dialog box. To simulate the effect of background transparency, you can match the matte color to the web pagebackground color. If your image contains transparency and you do not know the web page background color, or if the background is a pattern, youshould use a format that supports transparency (GIF, PNG-8, or PNG-24).
Optimize as JPEG
JPEG is the standard format for compressing photographs.
1. Open an image and choose File > Save For Web.
2. Choose JPEG from the optimization format menu.
3. To optimize to a specific file size, click the arrow to the right of the Preset menu, and then click Optimize To File Size. Enter a number in theDesired File Size text box, and select either Current Settings, which optimizes for the current settings, or Auto Select GIF/JPEG, whichautomatically determines whether JPEG or GIF is the better format.
4. Do one of the following to specify the compression level:
Choose a quality option (Low, Medium, High, and so on) from the pop-up menu under the optimization format menu.
Click the arrow in the Quality menu and drag the Quality pop-up slider.
Enter a value between 0 and 100 in the Quality box.
398
Twitter™ and Facebook posts are not covered under the terms of Creative Commons.
Legal Notices | Online Privacy Policy
Note:
The higher the Quality setting, the more detail is preserved in the optimized image, but the larger the file size. View the optimized imageat several quality settings to determine the best balance between quality and file size.
5. Select Progressive to display the image progressively in a web browser; that is, to display it first at a low resolution, and then at progressivelyhigher resolutions as downloading proceeds.
Some browsers do not support progressive JPEGs.
6. To preserve the ICC profile of the original image in the optimized file, select ICC Profile.
Some browsers use ICC profiles for color correction. The ICC profile of the image depends on your current color setting.
7. If the original image contains transparency, select a Matte color that matches the background of your web page. Transparent areas in youroriginal image are filled with the Matte color.
8. To save your optimized image, click OK. In the Save Optimized As dialog box, type a filename, and click Save.
Adobe also recommends
399

Previewing web images
To the top
To the top
To the top
Preview an optimized image in a web browserView estimated download timePreview variations in color displayPreview an animation
Preview an optimized image in a web browser
You can preview an optimized image in any web browser installed on your system. The browser preview displays the image with a caption listingthe image’s file type, pixel dimensions, file size, compression specifications, and other HTML information.
1. Open the image you want to preview.
2. Select File > Save For Web, and apply your optimization settings.
3. Choose a browser from the Preview In menu in the lower-right corner of the optimized image, or click the browser icon to launch your defaultweb browser.
Add a browser to the Preview In menu
1. Choose File > Save For Web.
2. Click the down arrow in the Preview In menu, and choose Edit List.
3. In the Browsers dialog box, click Find All. The dialog box displays all installed browsers.
4. Select a browser, click Add, and then click OK.
View estimated download time
1. Open an image and choose File > Save For Web.
2. Choose your optimization settings.
3. Click the triangle to the upper right of the optimized image to view the document panel menu.
4. Choose an Internet access speed, including modem, ISDN, cable, or DSL Internet access.
5. When you change the Internet access speed, the estimated download time displayed under the optimized image is updated. If the downloadtime seems too long, try different optimization settings, or change the image size in the Save For Web dialog box.
400

Twitter™ and Facebook posts are not covered under the terms of Creative Commons.
Uncompensated Color
Standard Windows Color
Standard Macintosh Color
Use Document Color Profile
Note:
To the top
Preview variations in color display
When optimizing an image for the web, consider how the image will appear on different monitors. In general, an image appears darker in Windowssystems than on Mac OS systems. You can simulate cross-platform display differences in the Save For Web dialog box.
1. Open an image and choose File > Save For Web.
2. Choose your optimization settings.
3. Click the triangle to the right of the optimized image to view the document panel menu.
4. Choose a display option:
Shows the image with no color adjustment (the default option).
Adjusts the color to simulate a standard Windows monitor.
Adjusts the color to simulate a standard Macintosh® monitor.
Shows image with its color profile, if one exists.
These preview options adjust color only in the Save For Web dialog box; they don’t change colors in the original or optimized image.
Preview an animation
You can preview an animation in the Save For Web dialog box or in a web browser. The Save For Web dialog box shows the animation as stillframes. You must preview the animation in a browser to view the frames in timed sequence.
1. Set up an animated image and choose File > Save For Web.
2. To preview an animation from the Save For Web dialog box, do one of the following:
To view the next frame in the animation, click the Next Frame button.
To view the previous frame in the animation, click the Previous Frame button.
To view the last frame in the animation, click the Last Frame button.
To view the first frame in the animation, click the First Frame button.
3. To preview an animation in a web browser, do the following:
Choose a browser from the Preview In menu below the lower-right corner of the optimized image, or click the browser icon to launchyour default web browser.
Use your browser’s Stop, Refresh, or Reload commands to stop or replay the animation.
Adobe also recommends
401

Keyboard shortcuts
402
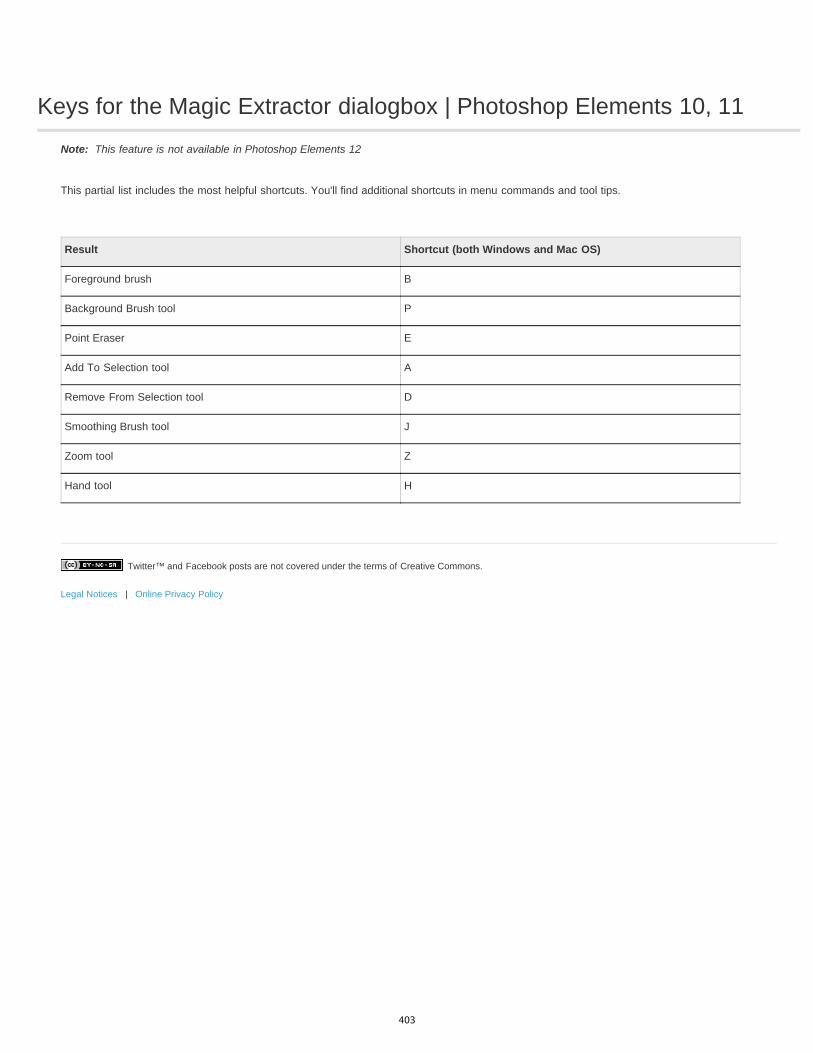
Keys for the Magic Extractor dialogbox | Photoshop Elements 10, 11
Twitter™ and Facebook posts are not covered under the terms of Creative Commons.
Legal Notices | Online Privacy Policy
Note: This feature is not available in Photoshop Elements 12
This partial list includes the most helpful shortcuts. You'll find additional shortcuts in menu commands and tool tips.
Result Shortcut (both Windows and Mac OS)
Foreground brush B
Background Brush tool P
Point Eraser E
Add To Selection tool A
Remove From Selection tool D
Smoothing Brush tool J
Zoom tool Z
Hand tool H
403

Windows 7 keyboard shortcuts
Twitter™ and Facebook posts are not covered under the terms of Creative Commons.
Legal Notices | Online Privacy Policy
Photoshop Elements supports the following Windows 7 keyboard shortcuts:
Result Shortcut
Activate Aero Peek Windows + Spacebar
Activate Aero Shake Windows + Home
Maximize Windows + Up Arrow
Restore or minimize Windows + Down Arrow
Maximize the current window vertically Windows + Shift + Up Arrow
Snap the current window to the left or right half of the display
Note: In a multi-monitor configuration, repeat the command to movethe window to other monitors.
Windows + Left Arrow
Windows + Right Arrow
Move the current window to the left or right display Windows + Shift + Left Arrow
Windows + Shift + Right Arrow
Zoom in on the desktop Windows ++
Zoom out of the desktop Windows +- (minus)
Navigate the windows (or tabs) within a grouped icon on the taskbar Control + click
404

Keys for selecting tools
This partial list includes the most helpful shortcuts. You'll find additional shortcuts in menu commands and tool tips.
Result Windows Mac OS
Cycle through tools that have thesame keyboard shortcut
Shift-press keyboard shortcut(preference setting, Use Shift Key forTool Switch, must be enabled)
Shift-press keyboard shortcut(preference setting, Use Shift Key forTool Switch, must be enabled)
Cycle through nested tools Alt-click tool Option-click tool
Move tool V V
Zoom tool Z Z
Hand tool H H
Eyedropper tool I I
Rectangular Marquee tool
Elliptical Marquee tool
M M
Lasso tool
Magnetic Lasso tool
Polygonal Lasso tool
L L
Magic Wand tool
Selection Brush tool
Quick Selection tool
A A
Horizontal Type tool
Vertical Type tool
Horizontal Type Mask tool
Vertical Type Mask tool
Text on Selection
Text on Shape
Text on Path
T T
Crop tool C C
Recompose tool W W
Cookie Cutter tool Q Q
Straighten tool P P
Red Eye Removal tool Y Y
Spot Healing Brush tool
Healing Brush tool
J J
Clone Stamp tool S S
405

Twitter™ and Facebook posts are not covered under the terms of Creative Commons.
Legal Notices | Online Privacy Policy
Pattern Stamp tool
Eraser tool
Background Eraser tool
Magic Eraser tool
E E
Pencil tool N N
Brush tool
Impressionist Brush
Color Replacement tool
B B
Smart Brush tool
Detail Smart Brush tool
F F
Paint Bucket tool K K
Gradient tool G G
Custom Shape tool
Rectangle tool
Rounded Rectangle tool
Ellipse tool
Polygon tool
Star tool
Line tool
Shape Selection tool
U U
Blur tool
Sharpen tool
Smudge tool
R R
Sponge tool
Dodge tool
Burn tool
O O
Show/Hide all panels Tab Tab
Default foreground and backgroundcolors
D D
Switch foreground and backgroundcolors
X X
406

Keys for painting and brushes
Twitter™ and Facebook posts are not covered under the terms of Creative Commons.
Legal Notices | Online Privacy Policy
This partial list includes the most helpful shortcuts. You'll find additional shortcuts in menu commands and tool tips.
Result Windows Mac OS
Switch to Eyedropper tool Any painting tool or shape tool + Alt(except Impressionist Brush)
Any painting tool or shape tool +Option (except Impressionist Brush)
Select background color Eyedropper tool + Alt-click Eyedropper tool + Option-click
Set opacity, tolerance, or exposure forpainting
Any painting or editing tool + numberkeys (for example, 0 = 100%, 1 =10%, 4 and 5 in quick succession =45%). When airbrush option isenabled, use Shift + number keys.
Any painting or editing tool + numberkeys (for example, 0 = 100%, 1 = 10%,4 and 5 in quick succession = 45%).When airbrush option is enabled, useShift + number keys.
Cycle through blending modes Shift + + (plus) or - (minus) Shift + + (plus) or - (minus)
Fill selection/layer with foreground orbackground color
Alt + Backspace, or Control +Backspace
Option + Delete (Backspace), orCommand + Delete (Backspace)
Display Fill dialog box Shift + Backspace Shift + Delete (Backspace)
Lock transparent pixels on/off / (forward slash) / (forward slash)
Connect points with a straight line(draw a straight line)
Any painting tool + Shift-click Any painting tool + Shift-click
Delete brush Alt-click brush Option-click brush
Decrease/increase brush size [ or ] [ or ]
Decrease/increase brushsoftness/hardness in 25% increments
Shift + [ or ] Shift + [ or ]
Select previous/next brush size , (comma) or . (period) , (comma) or . (period)
Select first/last brush Shift + , (comma) or . (period) Shift + , (comma) or . (period)
Display precise cross hair for brushes Caps Lock Caps Lock
407

Keys for transforming selections
Twitter™ and Facebook posts are not covered under the terms of Creative Commons.
Legal Notices | Online Privacy Policy
This partial list includes the most helpful shortcuts. You'll find additional shortcuts in menu commands and tool tips.
Result Windows Mac OS
Transform from center or reflect Alt Option
Constrain Shift Shift
Distort Control Command
Skew Control + Shift Command + Shift
Change perspective Control + Shift + Alt Command + Shift + Option
Apply Enter Enter
Cancel Esc or Control + . (period) Esc or Command + . (period)
408
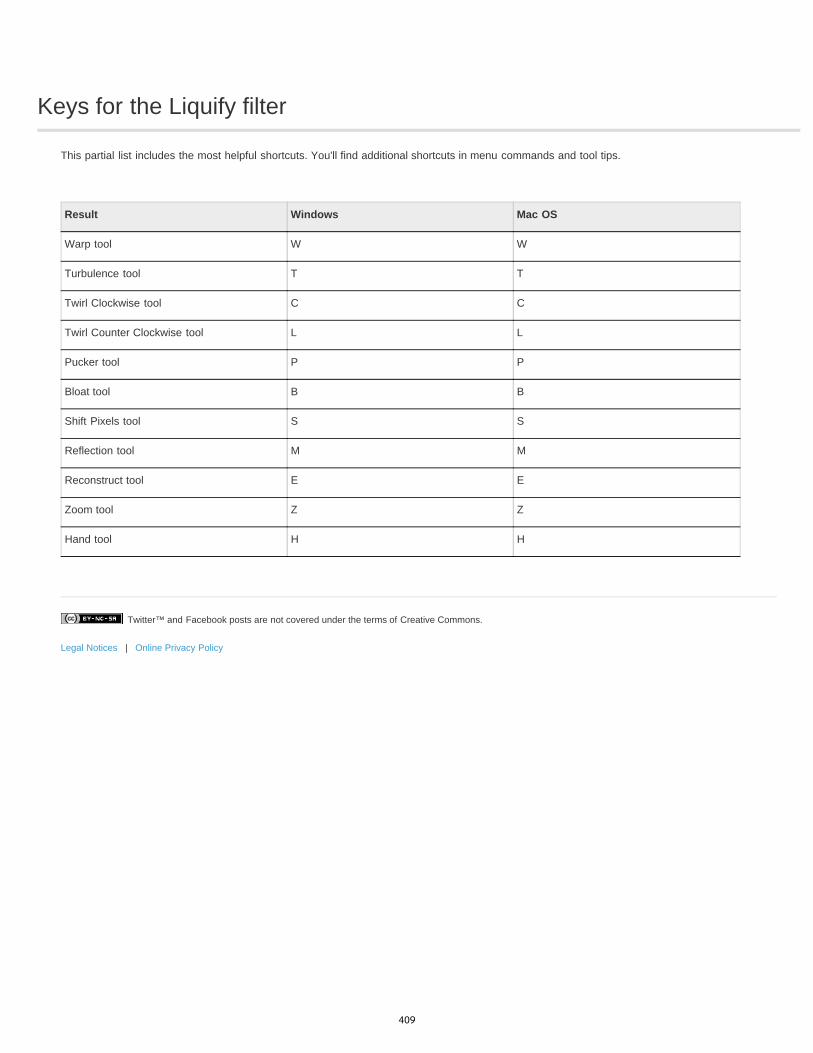
Keys for the Liquify filter
Twitter™ and Facebook posts are not covered under the terms of Creative Commons.
Legal Notices | Online Privacy Policy
This partial list includes the most helpful shortcuts. You'll find additional shortcuts in menu commands and tool tips.
Result Windows Mac OS
Warp tool W W
Turbulence tool T T
Twirl Clockwise tool C C
Twirl Counter Clockwise tool L L
Pucker tool P P
Bloat tool B B
Shift Pixels tool S S
Reflection tool M M
Reconstruct tool E E
Zoom tool Z Z
Hand tool H H
409

Keys for the Color Swatches panel
Twitter™ and Facebook posts are not covered under the terms of Creative Commons.
Legal Notices | Online Privacy Policy
This partial list includes the most helpful shortcuts. You'll find additional shortcuts in menu commands and tool tips.
Result Windows Mac OS
Create new swatch from foregroundcolor
Click in empty area of panel Click in empty area of panel
Select background color Control-click swatch Command-click swatch
Delete color Alt-click swatch Option-click swatch
410

Keys for using blending modes
This partial list includes the most helpful shortcuts. You'll find additional shortcuts in menu commands and tool tips.
Result Windows Mac OS
Cycle through blending modes Shift + + (plus) or - (minus) Shift + + (plus) or - (minus)
Normal Shift + Alt + N Shift + Option + N
Dissolve Shift + Alt + I Shift + Option + I
Behind Shift + Alt + Q Shift + Option + Q
Clear Shift + Alt + R Shift + Option + R
Darken Shift + Alt + K Shift + Option + K
Multiply Shift + Alt + M Shift + Option + M
Color Burn Shift + Alt + B Shift + Option + B
Linear Burn Shift + Alt + A Shift + Option + A
Lighten Shift + Alt + G Shift + Option + G
Screen Shift + Alt + S Shift + Option + S
Color Dodge Shift + Alt + D Shift + Option + D
Linear Dodge Shift + Alt + W Shift + Option + W
Overlay Shift + Alt + O Shift + Option + O
Soft Light Shift + Alt + F Shift + Option + F
Hard Light Shift + Alt + H Shift + Option + H
Vivid Light Shift + Alt + V Shift + Option + V
Linear Light Shift + Alt + J Shift + Option + J
Pin Light Shift + Alt + Z Shift + Option + Z
Hard Mix Shift + Alt + L Shift + Option + L
Difference Shift + Alt + E Shift + Option + E
Exclusion Shift + Alt + X Shift + Option + X
Hue Shift + Alt + U Shift + Option + U
Saturation Shift + Alt + T Shift + Option + T
Color Shift + Alt + C Shift + Option + C
Luminosity Shift + Alt + Y Shift + Option + Y
411

Twitter™ and Facebook posts are not covered under the terms of Creative Commons.
Legal Notices | Online Privacy Policy
412

Keys for showing or hiding panels(expert mode)
Twitter™ and Facebook posts are not covered under the terms of Creative Commons.
Legal Notices | Online Privacy Policy
This partial list includes the most helpful shortcuts. You'll find additional shortcuts in menu commands and tool tips.
Result Windows Mac OS
Open Help F1 command+ ?
Show/Hide Tool Options F4 F4
Show/Hide Photo Bin F5 F5
Show/Hide Effects panel F6 F6
Show/Hide Graphics panel F7 F7
Show/Hide Info panel F8 F8
Show/Hide Histogram panel F9 Option + F9
Show/Hide History panel F10 Option + F10
Show/Hide Layers panel F11 Option + F11
Show/Hide Navigator panel F12 Option + F12
413

Keys for the Camera Raw dialogbox
Twitter™ and Facebook posts are not covered under the terms of Creative Commons.
Legal Notices | Online Privacy Policy
This partial list includes the most helpful shortcuts. You'll find additional shortcuts in menu commands and tool tips.
Result Windows Mac OS
Display highlights that will be clippedin Preview
Alt-drag Exposure, Blacks sliders, orRecovery bar
Option-drag Exposure, or Blackssliders, or Recovery Bar
Enable Open Copy button in theCamera Raw dialog box
Alt Option
414
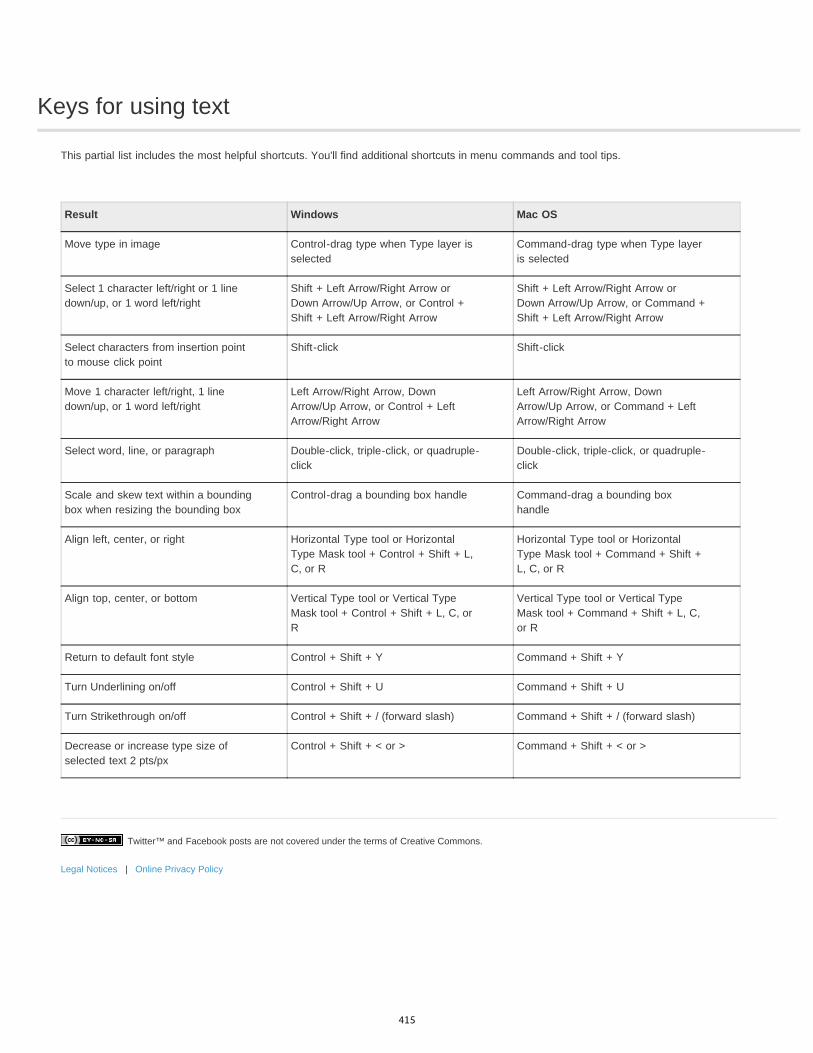
Keys for using text
Twitter™ and Facebook posts are not covered under the terms of Creative Commons.
Legal Notices | Online Privacy Policy
This partial list includes the most helpful shortcuts. You'll find additional shortcuts in menu commands and tool tips.
Result Windows Mac OS
Move type in image Control-drag type when Type layer isselected
Command-drag type when Type layeris selected
Select 1 character left/right or 1 linedown/up, or 1 word left/right
Shift + Left Arrow/Right Arrow orDown Arrow/Up Arrow, or Control +Shift + Left Arrow/Right Arrow
Shift + Left Arrow/Right Arrow orDown Arrow/Up Arrow, or Command +Shift + Left Arrow/Right Arrow
Select characters from insertion pointto mouse click point
Shift-click Shift-click
Move 1 character left/right, 1 linedown/up, or 1 word left/right
Left Arrow/Right Arrow, DownArrow/Up Arrow, or Control + LeftArrow/Right Arrow
Left Arrow/Right Arrow, DownArrow/Up Arrow, or Command + LeftArrow/Right Arrow
Select word, line, or paragraph Double-click, triple-click, or quadruple-click
Double-click, triple-click, or quadruple-click
Scale and skew text within a boundingbox when resizing the bounding box
Control-drag a bounding box handle Command-drag a bounding boxhandle
Align left, center, or right Horizontal Type tool or HorizontalType Mask tool + Control + Shift + L,C, or R
Horizontal Type tool or HorizontalType Mask tool + Command + Shift +L, C, or R
Align top, center, or bottom Vertical Type tool or Vertical TypeMask tool + Control + Shift + L, C, orR
Vertical Type tool or Vertical TypeMask tool + Command + Shift + L, C,or R
Return to default font style Control + Shift + Y Command + Shift + Y
Turn Underlining on/off Control + Shift + U Command + Shift + U
Turn Strikethrough on/off Control + Shift + / (forward slash) Command + Shift + / (forward slash)
Decrease or increase type size ofselected text 2 pts/px
Control + Shift + < or > Command + Shift + < or >
415

Keys for selecting and moving objects
This partial list includes the most helpful shortcuts. You'll find additional shortcuts in menu commands and tool tips.
Result Windows Mac OS
Deselect a selection Control + D Command + D
Reposition marquee while selecting Spacebar-drag Spacebar-drag
Add to or subtract from a selection Any selection tool + Shift or Alt-drag Any selection tool + Shift or Option-drag
Intersect a selection Any selection tool (except QuickSelection tool and Selection Brushtool) + Shift + Alt-drag
Any selection tool (except QuickSelection tool and Selection Brushtool) + Shift + Option-drag
Constrain marquee to square or circle(if no other selections are active)
Shift-drag Shift-drag
Draw marquee from center (if no otherselections are active)
Alt-drag Option-drag
Constrain shape and draw marqueefrom center
Shift + Alt-drag Shift + Option-drag
Switch to Move tool Control (except when Hand or anyshape tool is selected)
Command (except when Hand or anyshape tool is selected)
Switch from Magnetic Lasso tool toPolygonal Lasso tool
Alt-click and drag Option-click and drag
Delete last anchor point for Magneticor Polygonal Lasso tool
Delete Delete
Apply/cancel an operation of theMagnetic Lasso tool
Enter/Esc Enter/Esc
Move copy of selection Move tool + Alt-drag selection Move tool + Option-drag selection
Move selection area 1 pixel Any selection + Right Arrow, LeftArrow, Up Arrow, or Down Arrow
Any selection + Right Arrow, LeftArrow, Up Arrow, or Down Arrow
Move selection 1 pixel Move tool + Right Arrow, Left Arrow,Up Arrow, or Down Arrow
Move tool + Right Arrow, Left Arrow,Up Arrow, or Down Arrow
Move layer 1 pixel when nothingselected on layer
Control + Right Arrow, Left Arrow, UpArrow, or Down Arrow
Command + Right Arrow, Left Arrow,Up Arrow, or Down Arrow
Increase/decrease detection width Magnetic Lasso tool + [ or ] Magnetic Lasso tool + [ or ]
Accept cropping or exit cropping Crop tool + Enter or Esc Crop tool + Enter or Esc
Toggle crop shield off and on / (forward slash) / (forward slash)
416

Twitter™ and Facebook posts are not covered under the terms of Creative Commons.
Legal Notices | Online Privacy Policy
417

Keys for the Layers panel
This partial list includes the most helpful shortcuts. You'll find additional shortcuts in menu commands and tool tips.
Result Windows Mac OS
Set layer options Alt-click New button Option-click New button
Delete without confirmation Alt-click Trash button Option-click Trash button
Apply value and keep text box active Shift + Enter Shift + Enter
Load layer transparency as a selection Control-click layer thumbnail Command-click layer thumbnail
Add to current selection Control + Shift-click layer Command + Shift-click layer thumbnail
Subtract from current selection Control + Alt-click layer thumbnail Command + Option-click layerthumbnail
Intersect with current selection Control + Shift + Alt-click layerthumbnail
Command + Shift + Option-click layerthumbnail
Merge visible layers Control + Shift + E Command + Shift + E
Create new empty layer with dialog Alt-click New Layer button Option-click New Layer button
Create new layer below target layer Control-click New Layer button Command-click New Layer button
Activate bottom/top layer Alt + .(period)/ ,(comma) Option + .(period)/ ,(comma)
Select next layer down/up Alt + [ or ] Option + [ or ]
Move target layer down/up Control + [ or ] Command + [ or ]
Merge a copy of all visible layers intotarget layer
Control + Shift + Alt + E Command + Shift + Option + E
Merge down Control + E Command + E
Copy current layer to layer below Alt + Merge Down command from thepanel pop-up menu
Option + Merge Down command fromthe panel pop-up menu
Copy all visible layers to active layer Alt + Merge Visible command from thepanel pop-up menu
Option + Merge Visible command fromthe panel pop-up menu
Show/hide all other currently visiblelayers
Alt-click the eye icon Option-click the eye icon
Toggle lock transparency for targetlayer, or last applied lock
/ (forward slash) / (forward slash)
Edit layer properties Double-click layer thumbnail Double-click layer thumbnail
Select all text; temporarily select Typetool
Double-click text layer thumbnail Double-click text layer thumbnail
Create a clipping mask Alt-click the line dividing two layers Option-click the line dividing two layers
418

Twitter™ and Facebook posts are not covered under the terms of Creative Commons.
Legal Notices | Online Privacy Policy
Rename layer Double-click the layer name Double-click the layer name
Add to layer selection in Layers panel Shift + Alt + [ or ] Shift + Option + [ or]
Copy the mask from one layer toanother, and ask to replace if themask is already present
Alt + drag layer mask Alt + drag layer mask
419

Keys for viewing images (expertmode)
Twitter™ and Facebook posts are not covered under the terms of Creative Commons.
Legal Notices | Online Privacy Policy
This partial list includes the most helpful shortcuts. You'll find additional shortcuts in menu commands and tool tips.
Result Windows Mac OS
Cycle forward through opendocuments
Control + Tab
Control + Tab
Cycle backward through opendocuments
Control + Shift + Tab
Control + Shift + Tab
Fit image in window Ctrl + 0 (or double-click Hand tool) Command + 0 (or double-click Handtool)
Magnify 100% Ctrl + Alt + 0 (or double-click Zoomtool)
Command + Option + 0 (or double-click Zoom tool)
Switch to Hand tool (when not in text-edit mode)
Spacebar Spacebar
Switch to Zoom In tool Control + Spacebar Spacebar + Command
Switch to Zoom Out tool Spacebar + Alt Spacebar + Option
Reposition zoom marquee whiledragging
Spacebar-drag Spacebar-drag
Zoom in on specified area of an image Control-drag over preview in Navigatorpanel
Command-drag over preview inNavigator panel
Scroll image with Hand tool Drag, or drag view area box inNavigator panel
Drag, or drag view area box inNavigator panel
Scroll up or down 1 screen Page Up or Page Down Page Up or Page Down
Scroll up or down 10 units Shift + Page Up or Page Down Shift + Page Up or Page Down
Scroll left or right 1 screen Ctrl + Page Up or Page Down Command + Page Up or Page Down
Scroll left or right 10 units Ctrl + Shift + Page Up or Page Down Command + Shift + Page Up or PageDown
Move view to upper-left corner orlower-right corner
Home or End Home or End
420

Keys for using Photomerge Panorama | Photoshop Elements 10, 11
Twitter™ and Facebook posts are not covered under the terms of Creative Commons.
Legal Notices | Online Privacy Policy
Note: This dialog box only appears for Interactive Layouts.
This partial list includes the most helpful shortcuts. You'll find additional shortcuts in menu commands and tool tips.
Result Windows Mac OS
Select Image tool A A
Rotate Image tool R R
Set Vanishing Point tool (Perspectiveoption selected)
V V
Zoom tool Z Z
Hand tool H H
Switch to Hand tool Spacebar Spacebar
Step backward Control + Z Command + Z
Step forward Control + Shift + Z Command + Shift + Z
Move selected image 1 pixel Right Arrow, Left Arrow, Up Arrow, orDown Arrow
Right Arrow, Left Arrow, Up Arrow, orDown Arrow
Change Cancel button to Reset Alt Option
Show individual image border Alt-move pointer over image Option-move pointer over image
421