Helmer Scientific · 3.4 Glycol Sample Bottle and Temperature Sensors ... 7 Troubleshooting ......
38
Helmer Scientific 1.8 cu ft Countertop Refrigerator operation and service manual 360209-1/A
Transcript of Helmer Scientific · 3.4 Glycol Sample Bottle and Temperature Sensors ... 7 Troubleshooting ......

Helmer Scientific1.8 cu ft Countertop Refrigerator
operation and service manual
360209-1/A

Document Updates
The document is furnished for information use only, is subject to change without notice and should not be construed as a commitment by Helmer Scientific. Helmer Scientific assumes no responsibility or liability for any errors or inaccuracies that may appear in the informational content contained in this material. For the purpose of clarity, Helmer Scientific considers only the most recent revision of this document to be valid.
Notices and DisclaimersConfidential / Proprietary Notices
Use of any portion(s) of this document to copy, translate, disassemble or decompile, or create or attempt to create by reverse engineering or otherwise the information from Helmer Scientific products is expressly prohibited.
Copyright and Trademark
Copyright © 2016 Helmer, Inc. Helmer® and Rel.i™ are registered trademarks or trademarks of Helmer, Inc. in the United States of America. All other trademarks and registered trademarks are the property of their respective owners. Helmer, Inc., doing business as (DBA) Helmer Scientific and Helmer.
Disclaimer
This manual is intended as a guide to provide the operator with necessary instructions on the proper use and maintenance of certain Helmer Scientific products.Any failure to follow the instructions as described could result in impaired product function, injury to the operator or others, or void applicable product warranties. Helmer Scientific accepts no responsibility for liability resulting from improper use or maintenance of its products.The screenshots and component images appearing in this guide are provided for illustrative purposes only, and may vary slightly from the actual software screens and/or product components.
Helmer Scientific14400 Bergen BoulevardNoblesville, IN 46060 USAwww.helmerinc.comISO 13485:2003 CERTIFIED Part No. 360209-1/Rev A
Document History
Revision Date CO Supersession Revision Description
A 16 JUN 2016 11841 n/a Initial release.
Helmer Scientific 1.8 cu ft Countertop Refrigerator Operation and Service Manual
360209-1/A 3
Contents
1 About this Manual . . . . . . . . . . . . . . . . . . . . . . . . . . . . . . . . . . . . . . . . . . . . . . . . . . . . . . . . . . . . . . . . . . . . . . . . . . . . . . . . . . . . . . . . . . . . . . . . 4
1.1 Safety Precautions & Symbols . . . . . . . . . . . . . . . . . . . . . . . . . . . . . . . . . . . . . . . . . . . . . . . . . . . . . . . . . . . . . . . . . . . . . . . . . . . . . . . . . . . . . . . . . 4
1.2 General Recommendations . . . . . . . . . . . . . . . . . . . . . . . . . . . . . . . . . . . . . . . . . . . . . . . . . . . . . . . . . . . . . . . . . . . . . . . . . . . . . . . . . . . . . . . . . . . 5
2 Installation . . . . . . . . . . . . . . . . . . . . . . . . . . . . . . . . . . . . . . . . . . . . . . . . . . . . . . . . . . . . . . . . . . . . . . . . . . . . . . . . . . . . . . . . . . . . . . . . . . . . . . . 6
2.1 Unpacking the Helmer Scientific Countertop Refrigerator . . . . . . . . . . . . . . . . . . . . . . . . . . . . . . . . . . . . . . . . . . . . . . . . . . . . . . . . . . . . . . . . . 6
2.2 Location . . . . . . . . . . . . . . . . . . . . . . . . . . . . . . . . . . . . . . . . . . . . . . . . . . . . . . . . . . . . . . . . . . . . . . . . . . . . . . . . . . . . . . . . . . . . . . . . . . . . . . . . . . . . 6
2.3 Placement & Leveling . . . . . . . . . . . . . . . . . . . . . . . . . . . . . . . . . . . . . . . . . . . . . . . . . . . . . . . . . . . . . . . . . . . . . . . . . . . . . . . . . . . . . . . . . . . . . . . . 7
2.4 AC Power Cord . . . . . . . . . . . . . . . . . . . . . . . . . . . . . . . . . . . . . . . . . . . . . . . . . . . . . . . . . . . . . . . . . . . . . . . . . . . . . . . . . . . . . . . . . . . . . . . . . . . . . 7
2.5 Checking the Glycol Sample Bottle . . . . . . . . . . . . . . . . . . . . . . . . . . . . . . . . . . . . . . . . . . . . . . . . . . . . . . . . . . . . . . . . . . . . . . . . . . . . . . . . . . . . 8
2.6 External Probe . . . . . . . . . . . . . . . . . . . . . . . . . . . . . . . . . . . . . . . . . . . . . . . . . . . . . . . . . . . . . . . . . . . . . . . . . . . . . . . . . . . . . . . . . . . . . . . . . . . . . . 9
2.7 Getting to Know the Helmer Countertop Refrigerator . . . . . . . . . . . . . . . . . . . . . . . . . . . . . . . . . . . . . . . . . . . . . . . . . . . . . . . . . . . . . . . . . . .10
3 Operation . . . . . . . . . . . . . . . . . . . . . . . . . . . . . . . . . . . . . . . . . . . . . . . . . . . . . . . . . . . . . . . . . . . . . . . . . . . . . . . . . . . . . . . . . . . . . . . . . . . . . . 13
3.1 Navigating Controls . . . . . . . . . . . . . . . . . . . . . . . . . . . . . . . . . . . . . . . . . . . . . . . . . . . . . . . . . . . . . . . . . . . . . . . . . . . . . . . . . . . . . . . . . . . . . . . . .13
3.2 Interpreting System Icons and Alerts . . . . . . . . . . . . . . . . . . . . . . . . . . . . . . . . . . . . . . . . . . . . . . . . . . . . . . . . . . . . . . . . . . . . . . . . . . . . . . . . . .14
3.3 Clearing an Alert . . . . . . . . . . . . . . . . . . . . . . . . . . . . . . . . . . . . . . . . . . . . . . . . . . . . . . . . . . . . . . . . . . . . . . . . . . . . . . . . . . . . . . . . . . . . . . . . . . .14
3.4 Glycol Sample Bottle and Temperature Sensors . . . . . . . . . . . . . . . . . . . . . . . . . . . . . . . . . . . . . . . . . . . . . . . . . . . . . . . . . . . . . . . . . . . . . . . . .15
3.5 Settings . . . . . . . . . . . . . . . . . . . . . . . . . . . . . . . . . . . . . . . . . . . . . . . . . . . . . . . . . . . . . . . . . . . . . . . . . . . . . . . . . . . . . . . . . . . . . . . . . . . . . . . . . . .16
3.6 Alert Settings . . . . . . . . . . . . . . . . . . . . . . . . . . . . . . . . . . . . . . . . . . . . . . . . . . . . . . . . . . . . . . . . . . . . . . . . . . . . . . . . . . . . . . . . . . . . . . . . . . . . . . .18
3.7 Tools . . . . . . . . . . . . . . . . . . . . . . . . . . . . . . . . . . . . . . . . . . . . . . . . . . . . . . . . . . . . . . . . . . . . . . . . . . . . . . . . . . . . . . . . . . . . . . . . . . . . . . . . . . . . . .20
3.8 Data Log . . . . . . . . . . . . . . . . . . . . . . . . . . . . . . . . . . . . . . . . . . . . . . . . . . . . . . . . . . . . . . . . . . . . . . . . . . . . . . . . . . . . . . . . . . . . . . . . . . . . . . . . . .21
3.9 Defrost Cycles . . . . . . . . . . . . . . . . . . . . . . . . . . . . . . . . . . . . . . . . . . . . . . . . . . . . . . . . . . . . . . . . . . . . . . . . . . . . . . . . . . . . . . . . . . . . . . . . . . . . . .22
4 Product Specifications . . . . . . . . . . . . . . . . . . . . . . . . . . . . . . . . . . . . . . . . . . . . . . . . . . . . . . . . . . . . . . . . . . . . . . . . . . . . . . . . . . . . . . . . . . . . 23
5 Service and Maintenance . . . . . . . . . . . . . . . . . . . . . . . . . . . . . . . . . . . . . . . . . . . . . . . . . . . . . . . . . . . . . . . . . . . . . . . . . . . . . . . . . . . . . . . . . 24
5.1 Service Information . . . . . . . . . . . . . . . . . . . . . . . . . . . . . . . . . . . . . . . . . . . . . . . . . . . . . . . . . . . . . . . . . . . . . . . . . . . . . . . . . . . . . . . . . . . . . . . . .24
5.2 Helmer Unit Service Zones . . . . . . . . . . . . . . . . . . . . . . . . . . . . . . . . . . . . . . . . . . . . . . . . . . . . . . . . . . . . . . . . . . . . . . . . . . . . . . . . . . . . . . . . . . .25
5.3 Clean Refrigerator . . . . . . . . . . . . . . . . . . . . . . . . . . . . . . . . . . . . . . . . . . . . . . . . . . . . . . . . . . . . . . . . . . . . . . . . . . . . . . . . . . . . . . . . . . . . . . . . . .26
5.4 CR123A Backup Battery . . . . . . . . . . . . . . . . . . . . . . . . . . . . . . . . . . . . . . . . . . . . . . . . . . . . . . . . . . . . . . . . . . . . . . . . . . . . . . . . . . . . . . . . . . . . .27
5.5 Defrost Cycles . . . . . . . . . . . . . . . . . . . . . . . . . . . . . . . . . . . . . . . . . . . . . . . . . . . . . . . . . . . . . . . . . . . . . . . . . . . . . . . . . . . . . . . . . . . . . . . . . . . . . .27
5.6 Upgrade System Firmware . . . . . . . . . . . . . . . . . . . . . . . . . . . . . . . . . . . . . . . . . . . . . . . . . . . . . . . . . . . . . . . . . . . . . . . . . . . . . . . . . . . . . . . . . . .28
6 Critical System Errors . . . . . . . . . . . . . . . . . . . . . . . . . . . . . . . . . . . . . . . . . . . . . . . . . . . . . . . . . . . . . . . . . . . . . . . . . . . . . . . . . . . . . . . . . . . . . 29
7 Troubleshooting . . . . . . . . . . . . . . . . . . . . . . . . . . . . . . . . . . . . . . . . . . . . . . . . . . . . . . . . . . . . . . . . . . . . . . . . . . . . . . . . . . . . . . . . . . . . . . . . . 31
8 Replacement Parts . . . . . . . . . . . . . . . . . . . . . . . . . . . . . . . . . . . . . . . . . . . . . . . . . . . . . . . . . . . . . . . . . . . . . . . . . . . . . . . . . . . . . . . . . . . . . . . 32
9 Wiring Diagram . . . . . . . . . . . . . . . . . . . . . . . . . . . . . . . . . . . . . . . . . . . . . . . . . . . . . . . . . . . . . . . . . . . . . . . . . . . . . . . . . . . . . . . . . . . . . . . . . 33
10 Compliance . . . . . . . . . . . . . . . . . . . . . . . . . . . . . . . . . . . . . . . . . . . . . . . . . . . . . . . . . . . . . . . . . . . . . . . . . . . . . . . . . . . . . . . . . . . . . . . . . . . . . 34
10.1 Product Specification Label . . . . . . . . . . . . . . . . . . . . . . . . . . . . . . . . . . . . . . . . . . . . . . . . . . . . . . . . . . . . . . . . . . . . . . . . . . . . . . . . . . . . . . . . . .34
Appendix A - Preprogrammed Setting, Alert, and Alarm Values . . . . . . . . . . . . . . . . . . . . . . . . . . . . . . . . . . . . . . . . . . . . . . . . . . . . . . . . . . . . . 35
Appendix B – FAQs . . . . . . . . . . . . . . . . . . . . . . . . . . . . . . . . . . . . . . . . . . . . . . . . . . . . . . . . . . . . . . . . . . . . . . . . . . . . . . . . . . . . . . . . . . . . . . . . . . . 36
Appendix C – Warranty . . . . . . . . . . . . . . . . . . . . . . . . . . . . . . . . . . . . . . . . . . . . . . . . . . . . . . . . . . . . . . . . . . . . . . . . . . . . . . . . . . . . . . . . . . . . . . . 37

Helmer Scientific 1.8 cu ft Countertop Refrigerator Operation and Service Manual
360209-1/A 4
1 About this ManualThis manual provides information on how to use and maintain the Helmer Scientific 1.8 cu ft Countertop Refrigerator. It is intended for use by end users of the refrigerator and authorized service technicians.
1 .1 Safety Precautions & Symbols
All electrical appliances present some risk of injury. The Countertop Refrigerator is designed to meet safety standards.Take care to carry and move the refrigerator with caution. Do not place it where it can fall (off a shelf), or be dropped, or where the electrical connection can be submerged into water or other liquids. Make sure all four leveling feet are on the countertop and that the door can be opened and closed without unbalancing it.
Symbols found in this document
The following symbols are used in this manual to emphasize certain details for the user:
Task Indicates procedures which need to be followed.
Note Provides useful information regarding a procedure or operating technique when using Helmer Scientific products.
NOTICE Advises the user against initiating an action or creating a situation which could result in damage to equipment: personal injury is unlikely.
CAUTION Advises the user against initiating an action or creating a situation which could result in damage to equipment or impair the quality of the products or cause minor injury.
Symbols found on the refrigerator
The following symbols may be found on the refrigerator or refrigerator packaging:
Do not remove the rear cover or operate unit with rear cover removed. Removal of the rear cover can result in electrical shock. Service only by a factory authorized service person.
Caution: Risk of damage to equipment or danger to operator Earth/ground terminal
Caution: Hot surface Protective earth/ground terminal
Caution: Shock/electrical hazard Underwriters Laboratories Certified
Avoiding injury
Review safety instructions before installing, using, or maintaining the equipment. ♦ Before moving unit, ensure door is closed. ♦ Before moving unit, disconnect the AC power cord and secure the cord. ♦ Never physically restrict any moving component. ♦ Avoid removing electrical service panels and access panels unless instructed to do so. ♦ Keep hands away from pinch points when closing the door. ♦ Avoid sharp edges when working inside the electrical compartment and refrigeration compartment. ♦ Ensure biological materials are stored at recommended temperatures determined by standards, literature, or good laboratory practices. ♦ Ensure biological materials are stored safely, in accordance with all applicable organizational, regulatory, and legal requirements. ♦ Proceed with caution when adding and removing samples from the refrigerator. ♦ Use manufacturer supplied power cord only. ♦ Using the equipment in a manner not specified may impair the protection provided by the equipment. ♦ The refrigerator is not considered to be a storage cabinet for flammable or hazardous materials.
CAUTIONDecontaminate parts prior to sending for service or repair. Contact Helmer Scientific for decontamination instructions and a Return Authorization Number
Helmer Scientific 1.8 cu ft Countertop Refrigerator Operation and Service Manual
360209-1/A 5
1 .2 General RecommendationsIntended Use
Helmer refrigerators are intended for the storage of medications, vacccines, and other medical and scientific products.
Initial Loading
For the initial loading, and when loading after refrigerator has been off for any length of time, allow internal temperature to stabilize at the setpoint before storing product.
Product Loading Guidelines
When loading the refrigerator, take care to observe the following guidelines: ♦ When loading room temperature products, monitor the temperature display to ensure the the temperature inside the refrigerator does not go too high. Load room temperature samples in small increments to help maintain a stable temperature.
♦ Never load a refrigerator beyond capacity. ♦ Always store items on shelves. ♦ Temperature uniformity is maintained by air circulation, which could be impeded if unit is overfilled, particularly at the top or back. Ensure proper clearance is provided below the fan, and around the air and glycol sensors.
Notes ♦ Do not overload the top shelf such that airflow from the fan is obstructed. Temperature uniformity is maintained by air circulation, which could be impeded if unit is overfilled, particularly at the top or back.
♦ Do not overload the top shelf such that the proper clearance around the air and glycol sensors are compromised. ♦ Do not force items onto the top shelf, and make sure the glycol sensor remains properly connected. ♦ Products stacked against back wall may obstruct air flow and affect performance of unit.
Tips for Managing Door Openings
When a refrigerator door is opened, warmer ambient air enters and causes the interior temperature to fluctuate. To limit this: ♦ List a detailed inventory of the refrigerator’s contents on a chart posted outside the unit to reduce the time spent searching for items when the door is opened.
♦ Use clearly labeled bins to organize and quickly identify contents. ♦ Avoid storing beverages or any non-sample items (like food) in any unit used for sensitive inventory. Not only is this a health hazard, it also leads to more frequent opening of the door.
NoteHelmer Scientific Countertop Refrigerators have a visible and an audible open door alarm that sounds when a door has been open for more than 1 minute.
Defrosting
An automatic defrost cycle will run every 24 hours during standard operation. This is preprogrammed and runs in the background without any user interaction.
Notes ♦ The fan will turn on and off during the defrost cycle. ♦ Access the Defrost menu and select Defrost to manually run a defrost cycle.

Helmer Scientific 1.8 cu ft Countertop Refrigerator Operation and Service Manual
360209-1/A 6
CAUTIONS• The fans will run at intervals of variable speeds and may turn off completely. If the fans run frequently, the product may require more space for ventilation. For more information, refer to the Troubleshooting section on how to clean and troubleshoot the fan.• This unit has uninsulated live parts and hot parts, and the fans have sharp moving parts. Do not remove the back panel except to install a third-party probe following instructions in the Service section of this manual. Do not attempt repairs. For repairs or operating issues please call Helmer Technical Service for guidance and instructions.• To avoid damaging the unit, do not insert objects into the fan screens.
2 InstallationPlace the box as close as possible to its final location before unpacking. The unit weighs nearly 75 pounds, and it is recommended having two people lift the refrigerator whenever it is necessary to move it.
2 .1 Unpacking the Helmer Scientific Countertop RefrigeratorInspecting for Damage
Inspect the refrigerator for damages that may have occurred during shipping. Contact the delivery carrier directly to report any damage.
Unboxing
The refrigerator was built, inspected, tested, and packaged with extreme care. Follow the directions provided to unpack the new product safely and easily.
Identifying All Parts
The following parts are in the box: ♦ Helmer Scientific 1.8 cu ft Countertop Refrigerator ♦ Power cord ♦ Door lock keys ♦ User Guide
2 .2 Location
Ensure the location chosen for the refrigerator meets these specifications: ♦ Is built, reinforced and/or braced to hold the weight of the refrigerator and its contents. ♦ Has a grounded outlet meeting the electrical requirements listed on the product specification label. ♦ Is clear of direct sunlight, high temperature sources, heating vents, and air conditioning vents. ♦ Has a minimum of 3” (76 mm) of space behind the refrigerator for clearance and feature access. ♦ Meets the limits specified for ambient temperature (15° C to 32° C) and relative humidity.
CAUTIONDo not locate or store the refrigerator outdoors. This model was designed for indoor use only and violation of this will void the terms of the warranty.
Providing Ventilation
Two rubber bumpers are attached to the back of the refrigerator to help ensure a minimum clearance for adequate ventilation. Do not remove the bumpers.
Helmer Scientific 1.8 cu ft Countertop Refrigerator Operation and Service Manual
360209-1/A 7
2 .3 Placement & Leveling
1. Move refrigerator into place. 2. Ensure the refrigerator is level. Adjust the leveling feet by turning clockwise to extend the feet, counter- clockwise to
shorten them.
CAUTION• Ensure the door is closed before moving the refrigerator.• Do not sit, lean, push or place heavy objects on the top surface.
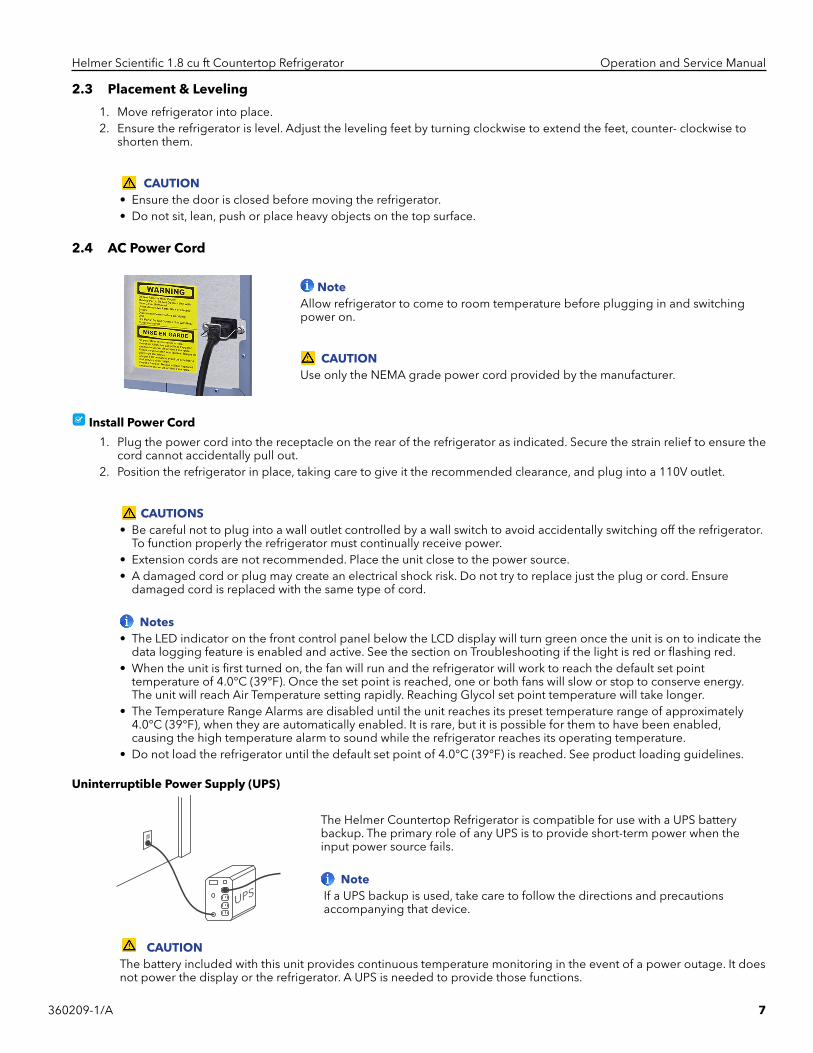
2 .4 AC Power Cord
Note
Allow refrigerator to come to room temperature before plugging in and switching power on.
CAUTIONUse only the NEMA grade power cord provided by the manufacturer.
Install Power Cord
1. Plug the power cord into the receptacle on the rear of the refrigerator as indicated. Secure the strain relief to ensure the cord cannot accidentally pull out.
2. Position the refrigerator in place, taking care to give it the recommended clearance, and plug into a 110V outlet.
CAUTIONS• Be careful not to plug into a wall outlet controlled by a wall switch to avoid accidentally switching off the refrigerator. To function properly the refrigerator must continually receive power.• Extension cords are not recommended. Place the unit close to the power source.• A damaged cord or plug may create an electrical shock risk. Do not try to replace just the plug or cord. Ensure damaged cord is replaced with the same type of cord.
Notes• The LED indicator on the front control panel below the LCD display will turn green once the unit is on to indicate the data logging feature is enabled and active. See the section on Troubleshooting if the light is red or flashing red. • When the unit is first turned on, the fan will run and the refrigerator will work to reach the default set point temperature of 4.0°C (39°F). Once the set point is reached, one or both fans will slow or stop to conserve energy. The unit will reach Air Temperature setting rapidly. Reaching Glycol set point temperature will take longer. • The Temperature Range Alarms are disabled until the unit reaches its preset temperature range of approximately 4.0°C (39°F), when they are automatically enabled. It is rare, but it is possible for them to have been enabled, causing the high temperature alarm to sound while the refrigerator reaches its operating temperature.• Do not load the refrigerator until the default set point of 4.0°C (39°F) is reached. See product loading guidelines.
Uninterruptible Power Supply (UPS)
UPS
The Helmer Countertop Refrigerator is compatible for use with a UPS battery backup. The primary role of any UPS is to provide short-term power when the input power source fails.
Note If a UPS backup is used, take care to follow the directions and precautions accompanying that device.
CAUTIONThe battery included with this unit provides continuous temperature monitoring in the event of a power outage. It does not power the display or the refrigerator. A UPS is needed to provide those functions.

Helmer Scientific 1.8 cu ft Countertop Refrigerator Operation and Service Manual
360209-1/A 8
2 .5 Checking the Glycol Sample Bottle
The glycol sample bottle comes pre-filled, sealed, and already installed inside the unit. The sample bottle and the attached temperature probe allows constant monitoring of the internal temperature of items being stored in the refrigerator.
CAUTIONS• Failure to keep probe bottles filled to the appropriate level may cause the chamber temperature not to stabilize at the refrigerator setpoint or may cause the chamber temperature to display higher or lower than the actual temperature. • Keep the probe bottle upright.• Temperature probes are fragile; handle with care.
Please verify: ♦ The sample bottle is filled. ♦ The glycol sample bottle temperature probe is fully inserted into the glycol
sample bottle in order to monitor the temperature of the substance in the bottle. ♦ The cord for the sample bottle is firmly plugged into the back wall of the
interior of the unit. ♦ The sample bottle is securely mounted.
NotesIn the event the glycol sample bottle or temperature probes break, please contact the service department for replacements.

Helmer Scientific 1.8 cu ft Countertop Refrigerator Operation and Service Manual
360209-1/A 9
2 .6 External Probe
CAUTION• Ensure unit is discounnected from AC power when performing this procedure.• Chamber temperature may increase above allowable temperature range for stored inventory. Take precaution to protect items in the unit from extended exposure to adverse temperature .
Install External Temperature Probe .
1. Disconnect the power cord.2. Remove the 4 screws holding the rear cover in place (there are 2 on each side).3. Remove the strain relief from the power cord receptacle.4. Holding the rear cover by the sides and lower portion, pull the lower portion outward and lift upward to remove the
rear cover.5. Locate the probe pass-through, below the fan mount and above the power supply.
Phillips screws to remove back panel Probe pass-through (2 on each side)
Power cord strain relief
6. Remove the 2 foam plugs inserted in the probe pass-through port, one at a time, by getting a firm hold of the foam with a straight pair of hemostats and pulling carefully.
7. Working from inside the refrigerator, carefully run the probe wire out the back of the unit. 8. Tuck the wiring into the slit in the long foam plug (you may need to slightly enlarge the slit to get the wiring/cables to
fit). Using the same straight pair of hemostats to assist, push the long foam plug back into the port, keeping it around the wiring/cables so that it can act as both an insulator against the wiring/cables touching the metal and as a plug to maintain the refrigerator’s thermal characteristics. Once inserted, continue to compress the long foam plug into the port to allow for some expansion of the foam. You can then try to insert the shorter plug, but it is not needed when an external probe is installed. The picture below shows an approved installation using just the long foam plug.
9. There is a cut-out on each side of the bottom of the rear cover, each with a rubber grommet installed. Use either of the
cut outs, and run the probe cable through the grommet and out the bottom of the unit. If may be necessary to cut a slit in the grommet when inserting the probe cable to ensure it fits.
10. Replace the back panel, holding it by the sides and lowering it back into position. 11. Replace the power cord strain relief.12. Replace the 4 screws (2 on each side).
13. Reconnect the power cord and the installation of the external probe is completed.
NoteTie the probe wire to the main, jacketed, wire harnesses coming out of the back of the unit to ensure it staysclear of the power supply.
Probe wire Main, jacketed wire harness

Helmer Scientific 1.8 cu ft Countertop Refrigerator Operation and Service Manual
360209-1/A 10
2 .7 Getting to Know the Helmer Countertop Refrigerator
Product Front
Control Panel
Temperature and alarm features are managed through the Control Panel.
Door Lock
A set of keys is provided for the door lock. Verify there are two identical keys.
USB Port
Located to the right of the door lock is a USB port. This port is available to download the data log to a USB memory device (not included). Use the USB port to download and clear the data log when the storage is full. It can also be used to update the firmware. Verify the port is intact by inserting a USB drive in the USB port and verifying the USB icon appears in the icon bar at the top of the LCD display on the Control Panel.
Control Panel
The control panel features an LCD display , an LED indicator and three interactive buttons used to manage the features of the Helmer Countertop Refrigerator.
Scroll Buttons
Use the and buttons to navigate through the menu options.
LCD Display
The LCD Display provides an overview of how the refrigerator is operating. LED Indicator
The LED indicator will illuminate green when the data logging feature is enabled and active.
Control/Select Button
Use the control/select button to display the menu and then to confirm menu options.

Helmer Scientific 1.8 cu ft Countertop Refrigerator Operation and Service Manual
360209-1/A 11
Product Exterior - Side
CAUTIONThe battery provides continuous temperature monitoring in the event of a power outage. It does not power the display or the refrigerator. The battery will need to be replaced periodically.
Product Exterior – Rear
Pass-through Port
An additional Pass-through Port is located at the access panel.
Battery
A battery is used to support continuous data logging. The battery compartment is located on the lower rear of the left side panel of the unit. The monitoring system is designed to display an alert when the battery drops below 30% remaining capacity.
The unit is shipped with a battery installed. A protective tab is inserted to prevent the battery power from being drained during shipping. To activate the battery, remove the red tab from the access panel by simply pulling on the tab.
Access Port
An insulated Access Port supports usage of an independent monitoring probe. The port is located behind the removable back panel.
Fans
Although the Helmer refrigeration system is a solid-state system, it does have two external fans with moving parts. The functioning of the fans are integral to heat dissipation. The fans are mounted on the back of the unit as shown. They will run continuously at first until the preprogrammed temperature set point is achieved. After that, fans will run independently as needed to stabilize the refrigerator temperature.
Power Cord Receptacle
The power cord receptacle includes a strain relief to ensure the refrigerator is not accidentally unplugged.
Helmer Scientific 1.8 cu ft Countertop Refrigerator Operation and Service Manual
360209-1/A 12
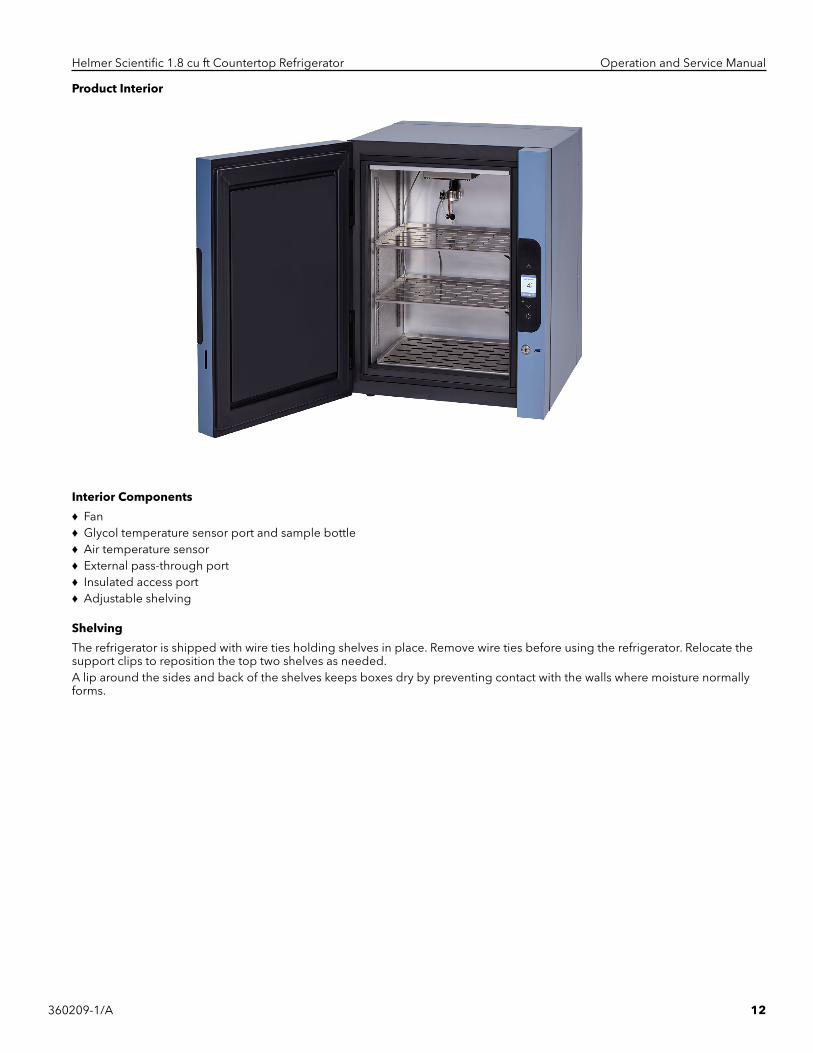
Product Interior
Interior Components
♦ Fan ♦ Glycol temperature sensor port and sample bottle ♦ Air temperature sensor ♦ External pass-through port ♦ Insulated access port ♦ Adjustable shelving
Shelving
The refrigerator is shipped with wire ties holding shelves in place. Remove wire ties before using the refrigerator. Relocate the support clips to reposition the top two shelves as needed.A lip around the sides and back of the shelves keeps boxes dry by preventing contact with the walls where moisture normally forms.
Helmer Scientific 1.8 cu ft Countertop Refrigerator Operation and Service Manual
360209-1/A 13
3 Operation3 .1 Navigating Controls
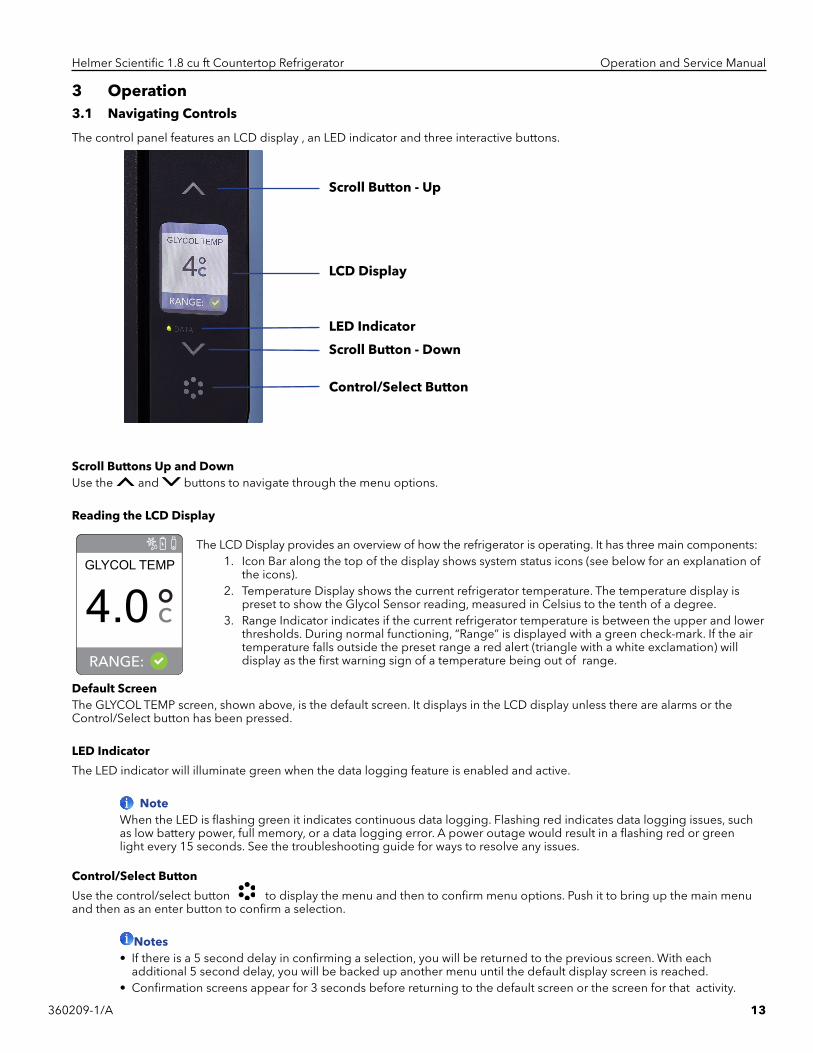
The control panel features an LCD display , an LED indicator and three interactive buttons.
Scroll Button - Up
LCD Display
LED Indicator
Scroll Button - Down
Control/Select Button
Scroll Buttons Up and DownUse the and buttons to navigate through the menu options.
Reading the LCD Display
4.0GLYCOL TEMP
The LCD Display provides an overview of how the refrigerator is operating. It has three main components:1. Icon Bar along the top of the display shows system status icons (see below for an explanation of
the icons).2. Temperature Display shows the current refrigerator temperature. The temperature display is
preset to show the Glycol Sensor reading, measured in Celsius to the tenth of a degree. 3. Range Indicator indicates if the current refrigerator temperature is between the upper and lower
thresholds. During normal functioning, “Range” is displayed with a green check-mark. If the air temperature falls outside the preset range a red alert (triangle with a white exclamation) will display as the first warning sign of a temperature being out of range.
Default ScreenThe GLYCOL TEMP screen, shown above, is the default screen. It displays in the LCD display unless there are alarms or the Control/Select button has been pressed.
LED Indicator
The LED indicator will illuminate green when the data logging feature is enabled and active.
NoteWhen the LED is flashing green it indicates continuous data logging. Flashing red indicates data logging issues, such as low battery power, full memory, or a data logging error. A power outage would result in a flashing red or green light every 15 seconds. See the troubleshooting guide for ways to resolve any issues.
Control/Select Button
Use the control/select button to display the menu and then to confirm menu options. Push it to bring up the main menu and then as an enter button to confirm a selection.
Notes
• If there is a 5 second delay in confirming a selection, you will be returned to the previous screen. With each additional 5 second delay, you will be backed up another menu until the default display screen is reached. • Confirmation screens appear for 3 seconds before returning to the default screen or the screen for that activity.
Helmer Scientific 1.8 cu ft Countertop Refrigerator Operation and Service Manual
360209-1/A 14
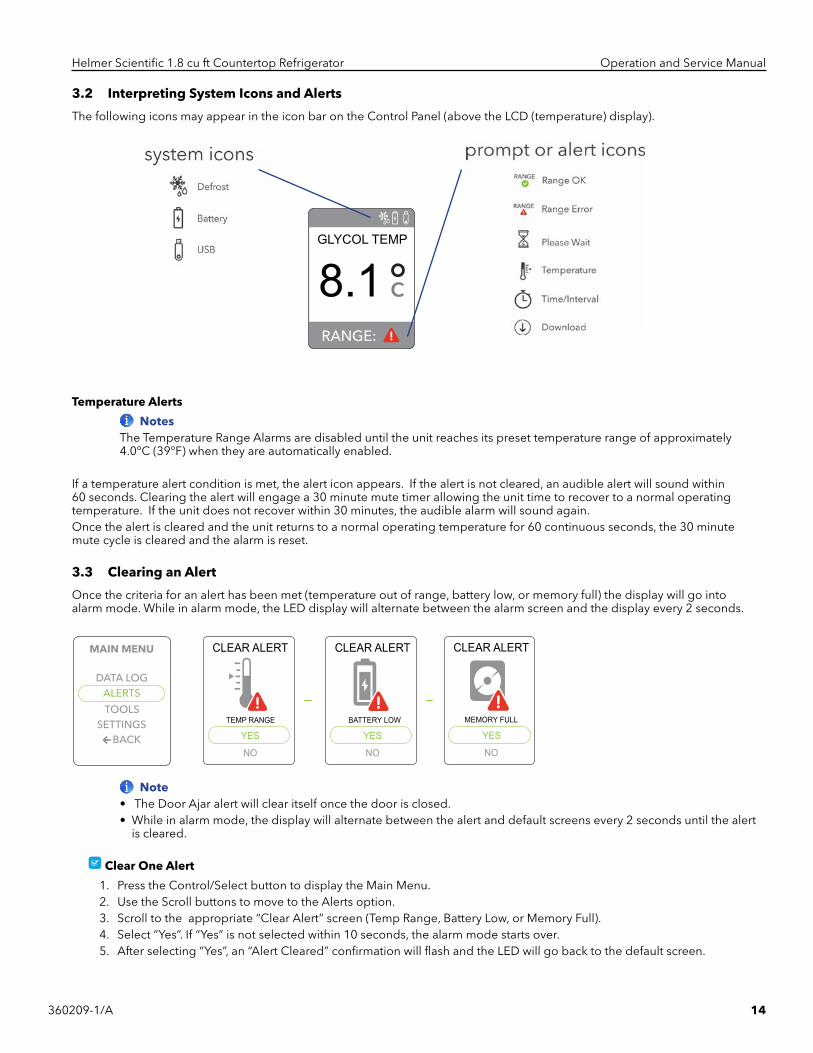
3 .2 Interpreting System Icons and Alerts
The following icons may appear in the icon bar on the Control Panel (above the LCD (temperature) display).
Temperature Alerts
NotesThe Temperature Range Alarms are disabled until the unit reaches its preset temperature range of approximately 4.0°C (39°F) when they are automatically enabled.
If a temperature alert condition is met, the alert icon appears. If the alert is not cleared, an audible alert will sound within 60 seconds. Clearing the alert will engage a 30 minute mute timer allowing the unit time to recover to a normal operating temperature. If the unit does not recover within 30 minutes, the audible alarm will sound again.Once the alert is cleared and the unit returns to a normal operating temperature for 60 continuous seconds, the 30 minute mute cycle is cleared and the alarm is reset.
3 .3 Clearing an Alert
Once the criteria for an alert has been met (temperature out of range, battery low, or memory full) the display will go into alarm mode. While in alarm mode, the LED display will alternate between the alarm screen and the display every 2 seconds.
Note• The Door Ajar alert will clear itself once the door is closed.• While in alarm mode, the display will alternate between the alert and default screens every 2 seconds until the alert is cleared.
Clear One Alert
1. Press the Control/Select button to display the Main Menu.2. Use the Scroll buttons to move to the Alerts option.3. Scroll to the appropriate “Clear Alert” screen (Temp Range, Battery Low, or Memory Full). 4. Select “Yes”. If “Yes” is not selected within 10 seconds, the alarm mode starts over.5. After selecting “Yes”, an “Alert Cleared” confirmation will flash and the LED will go back to the default screen.
CLEAR ALERT
TEMP RANGE
YES
NO
CLEAR ALERT
BATTERY LOW
YES
NO
CLEAR ALERT
MEMORY FULL
YES
NO
8.1GLYCOL TEMP

Helmer Scientific 1.8 cu ft Countertop Refrigerator Operation and Service Manual
360209-1/A 15
Clear Multiple Alerts
If there are multiple alerts, each alert screen will display for 2 seconds, followed by the default screen, and then starting over with each of the alert screens until the alerts are cleared. As each alert is cleared and its “alert cleared” confirmation appears, the display will move to the next alert to be cleared until all alerts are cleared.
1. Press the Control/Select button to display the Main Menu.2. Use the Scroll buttons to move to the Alerts option.3. Scroll to the first “Clear Alert” screen (Temp Range, Battery Low, or Memory Full). 4. Select “Yes”. If “Yes” is not selected within 10 seconds, the alerts start over.5. After selecting “Yes”, an “Alert Cleared” confirmation will flash and you will be taken to the next alarm to clear until all
active alerts are cleared.
3 .4 Glycol Sample Bottle and Temperature Sensors
Glycol Sample Bottle
The glycol sample bottle and the attached temperature probe monitors the internal temperature of items being stored in the refrigerator.
CAUTIONS• Failure to fill keep probe bottles filled to the appropriate level may cause the chamber temperature not to stabilize at the refrigerator setpoint or may cause the chamber temperature to display higher or lower than the actual temperature. • Keep the probe bottle upright.• Temperature probes are fragile; handle with care.
Glycol Sample Bottle Temperature Probe
The glycol sample bottle temperature probe must be fully inserted into the glycol sample bottle in order to monitor the temperature of the substance in the bottle.
To ensure continued accuracy in temperature management, it is a good idea to check the following regularly:
♦ Ensure the cord for the sample bottle is firmly plugged into the back wall.
♦ Verify the sample bottle is securely mounted in the desired location.
CAUTIONTemperature probes are fragile; handle with care.
NoteContact Helmer Technical Service for a replacement glycol bottle and probe if needed.

Helmer Scientific 1.8 cu ft Countertop Refrigerator Operation and Service Manual
360209-1/A 16
3 .5 Settings
To adjust settings, press the Control/Select button to display the Main Menu and scroll down to select the Settings option. From the Settings Menu, scroll to select the desired settings.
4.0GLYCOL TEMP
Notes• See Appendix A for a table of preset settings.• Activation of the Hi/Low temperature alert is based on the setting chosen from the Temp Display & Alarm menu.
Adjust Display Settings
1. Press the Control/Select button to display the Main Menu.2. Scroll down to select the Settings option. Press the Control/Select button to confirm/select Settings. 3. Scroll to select Display. Press the Control/Select button to confirm/select Display.4. Choose between Glycol or Air temperature readings to be displayed by scrolling to the desired setting and pressing
the Control/Select button to confirm.5. Scroll to select temperature readings in either Fahrenheit or Celsius and press the Control/Select button to confirm.6. Scroll to select unit precision in whole Degrees or Tenths and confirm selection.
FAHRENHEIT
Adjust Temperature Set Point
1. Press the Control/Select button to display the Main Menu.2. Scroll down to select the Settings option. Press the Control/Select button to confirm/select Settings. 3. Scroll to select Temp. Press the Control/Select button to confirm/select Temp.4. Scroll to select the Set Point Temperature and press the Control/Select button to confirm.5. Temp Set will display to confirm the selected Set Point Temperature.
4.24.14.03.93.8

Helmer Scientific 1.8 cu ft Countertop Refrigerator Operation and Service Manual
360209-1/A 17
Set Date & Time
1. Press the Control/Select button to display the Main Menu.2. Scroll down to select the Settings option. Press the Control/Select button to confirm/select.3. Scroll to select Date/Time. Press the Control/Select button to confirm/select.4. Use the Scroll buttons to enter the Set Time one number at a time. Press the Control/Select button to confirm/select
each number selected before proceeding to the next.5. Use the Scroll buttons to enter the Set Date one number at a time. Press the Control/Select button to confirm/select
each number selected before proceeding to the next.6. When the date and time are set, the last display will be Time & Date Set, showing the time and date entered. The
display will revert back to the default screen.
988
9 p12:30 am
Adjust Data Log Interval
1. Press the Control/Select button to display the Main Menu.2. Scroll down to select the Settings option. Press the Control/Select button to confirm/select. 3. Scroll to select Data Log. Press the Control/Select button to confirm/select.4. Scroll to select the Set Data Interval and press the Control/Select button to confirm.5. Interval Set will display to confirm the selected Set Data Interval (the unit is preprogrammed to record temperature
readings every 15 minutes).
CAUTIONDo not disable data logging. Disabling data logging removes temperature data from future data downloads.
Helmer Scientific 1.8 cu ft Countertop Refrigerator Operation and Service Manual
360209-1/A 18
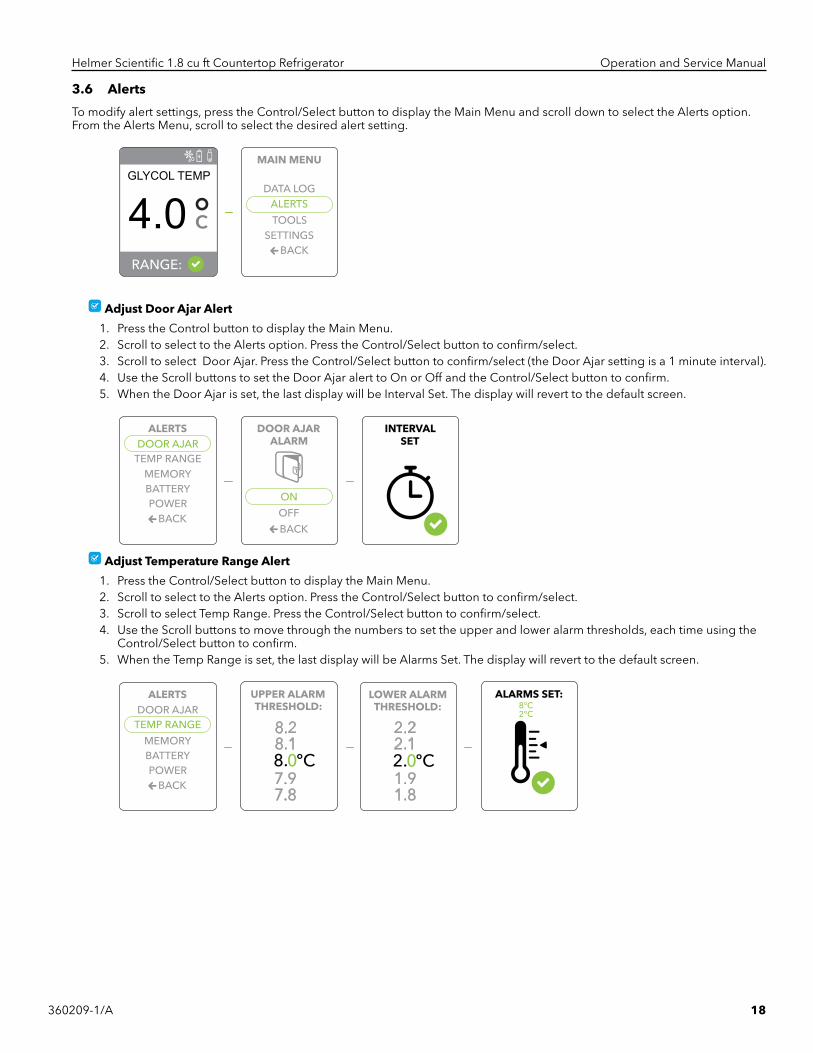
3 .6 Alerts
To modify alert settings, press the Control/Select button to display the Main Menu and scroll down to select the Alerts option. From the Alerts Menu, scroll to select the desired alert setting.
4.0GLYCOL TEMP
Adjust Door Ajar Alert
1. Press the Control button to display the Main Menu.2. Scroll to select to the Alerts option. Press the Control/Select button to confirm/select.3. Scroll to select Door Ajar. Press the Control/Select button to confirm/select (the Door Ajar setting is a 1 minute interval).4. Use the Scroll buttons to set the Door Ajar alert to On or Off and the Control/Select button to confirm.5. When the Door Ajar is set, the last display will be Interval Set. The display will revert to the default screen.
Adjust Temperature Range Alert
1. Press the Control/Select button to display the Main Menu.2. Scroll to select to the Alerts option. Press the Control/Select button to confirm/select.3. Scroll to select Temp Range. Press the Control/Select button to confirm/select.4. Use the Scroll buttons to move through the numbers to set the upper and lower alarm thresholds, each time using the
Control/Select button to confirm.5. When the Temp Range is set, the last display will be Alarms Set. The display will revert to the default screen.
2.18.1
1.87.8
2.28.2
1.97.9

Helmer Scientific 1.8 cu ft Countertop Refrigerator Operation and Service Manual
360209-1/A 19
Adjust Memory Alert
1. Press the Control/Select button to display the Main Menu.2. Scroll to select to the Alerts option. Press the Control/Select button to confirm/select.3. Scroll to select Memory. Press the Control/Select button to confirm/select.4. Use the Scroll buttons to set the Memory Alarm to On or Off and the Control/Select button to confirm.5. Use the Scroll buttons to move through the numbers to set the minimum remaining capacity, and use the Control/
Select button to confirm.6. When the Memory Alarm is set, the last display will be Capacity Set. The display will revert to the default screen.
Adjust Battery Alert
1. Press the Control/Select button to display the Main Menu.2. Scroll to select to the Alerts option. Press the Control/Select button to confirm/select.3. Scroll to select Battery. Press the Control/Select button to confirm/select.4. Scroll to set the Battery Alarm to On or Off and the Control/Select button to confirm.5. Use the Scroll buttons to move through the numbers to set the remaining battery strength, and use the Control/Select
button to confirm.6. When the Battery Alarm is set, the last display will be Batt Alarm Set. The display will revert to the default screen.
98
Adjust Power Alert
1. Press the Control/Select button to display the Main Menu.2. Scroll to select to the Alerts option. Press the Control/Select button to confirm/select Alerts.3. Scroll to select Power. Press the Control/Select button to confirm/select.4. Scroll to set the Power Out Alarm to On or Off and the Control/Select button to confirm.5. Scroll to move through the numbers to set the delay and use the Control/Select button to confirm.6. When the Power Alarm is set, the last display will be Power Alarm Set. The display will revert back to the default screen.
98

Helmer Scientific 1.8 cu ft Countertop Refrigerator Operation and Service Manual
360209-1/A 20
3 .7 Tools
To obtain product information, or perform maintenance and service tasks, press the Control/Select button to display the Main Menu and scroll down to select the Tools option. From the Tools Menu, scroll to select the desired option.
4.0GLYCOL TEMP
Obtain Product Information
1. Press the Control/Select button to display the Main Menu.2. Scroll to select the Tools option. Press the Control/Select button to select. 3. Press the Control/Select button to select Info.4. The display will show the product information that’s needed for service assistance.
PRODUCT INFO:
Calibrate Unit
1. Press the Control/Select button to display the Main Menu.2. Scroll to select the Tools option. Press the Control/Select button to select.3. Scroll to select Calibration. Press the Control/Select button to select.4. Use the Scroll buttons to enter the last 4 digits of the product Serial Number (see Tools / Info) one number at a time,
each time pressing the Control/Select button to confirm.5. Scroll to either Control (to calibrate the control sensor) or to Glycol (to calibrate the monitoring sensor) and press the
Control/Select button to confirm.6. Scroll to enter the desired Calibration offset and press the Control/Select button to confirm.7. After a few seconds Calibration Complete will be displayed.
76
0.543
0.5
CAUTIONWhen calibrating, it is recommended to calibrate the control sensor first and allow time for the system to equalize before making any adjustments to Glycol.
Examples of calculating an offset value:
♦ If the certified temperature reading is 3.7° C, the unit reading is 4.2° C, the offset would be -0.5° C (3.7° C minus 4.2° C). ♦ If the certified temperature reading is 4.3° C, the unit reading is 3.9° C, the offset would be 0.4° C (4.3° C minus 3.9° C).
Helmer Scientific 1.8 cu ft Countertop Refrigerator Operation and Service Manual
360209-1/A 21
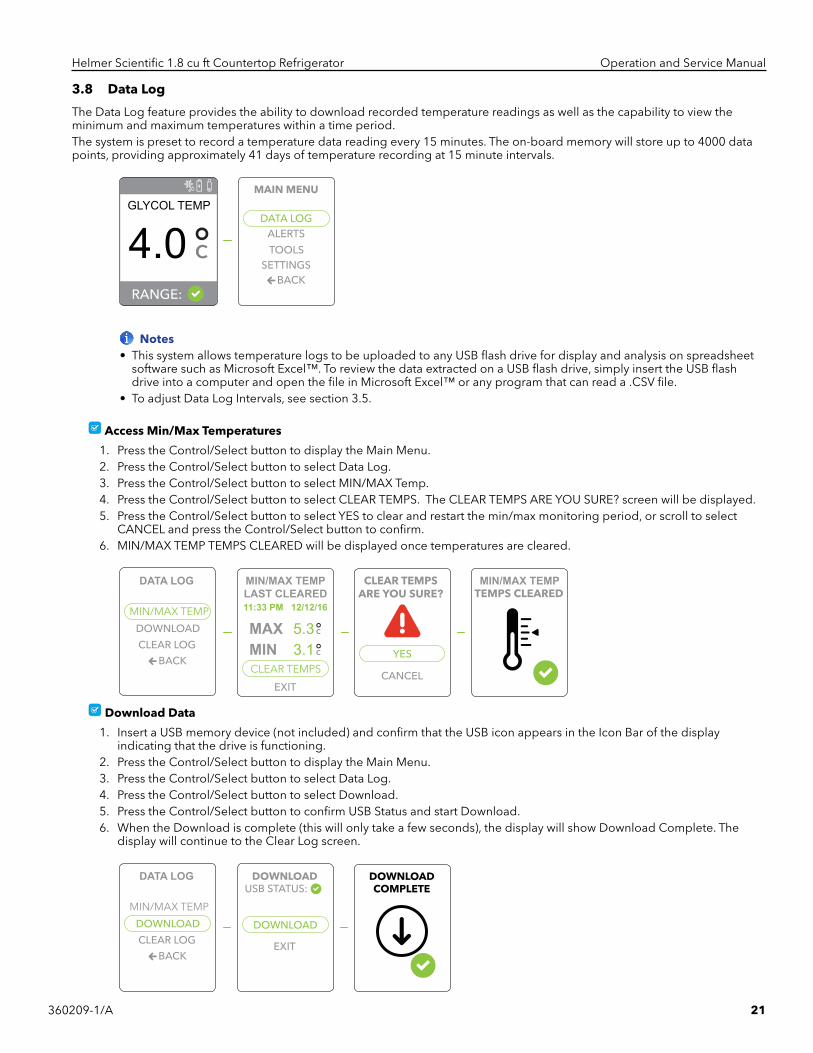
3 .8 Data Log
The Data Log feature provides the ability to download recorded temperature readings as well as the capability to view the minimum and maximum temperatures within a time period.The system is preset to record a temperature data reading every 15 minutes. The on-board memory will store up to 4000 data points, providing approximately 41 days of temperature recording at 15 minute intervals.
4.0GLYCOL TEMP
Notes• This system allows temperature logs to be uploaded to any USB flash drive for display and analysis on spreadsheet software such as Microsoft Excel™. To review the data extracted on a USB flash drive, simply insert the USB flash drive into a computer and open the file in Microsoft Excel™ or any program that can read a .CSV file.• To adjust Data Log Intervals, see section 3.5.
Access Min/Max Temperatures
1. Press the Control/Select button to display the Main Menu.2. Press the Control/Select button to select Data Log.3. Press the Control/Select button to select MIN/MAX Temp.4. Press the Control/Select button to select CLEAR TEMPS. The CLEAR TEMPS ARE YOU SURE? screen will be displayed.5. Press the Control/Select button to select YES to clear and restart the min/max monitoring period, or scroll to select
CANCEL and press the Control/Select button to confirm.6. MIN/MAX TEMP TEMPS CLEARED will be displayed once temperatures are cleared.
DATA LOG
MIN/MAX TEMP
MIN/MAX TEMPTEMPS CLEARED
5.33.1
MAXMIN
CLEAR TEMPSARE YOU SURE?
CLEAR TEMPS
MIN/MAX TEMPLAST CLEARED11:33 PM 12/12/16
Download Data
1. Insert a USB memory device (not included) and confirm that the USB icon appears in the Icon Bar of the display indicating that the drive is functioning.
2. Press the Control/Select button to display the Main Menu.3. Press the Control/Select button to select Data Log.4. Press the Control/Select button to select Download.5. Press the Control/Select button to confirm USB Status and start Download.6. When the Download is complete (this will only take a few seconds), the display will show Download Complete. The
display will continue to the Clear Log screen.
DATA LOG
MIN/MAX TEMP
Helmer Scientific 1.8 cu ft Countertop Refrigerator Operation and Service Manual
360209-1/A 22
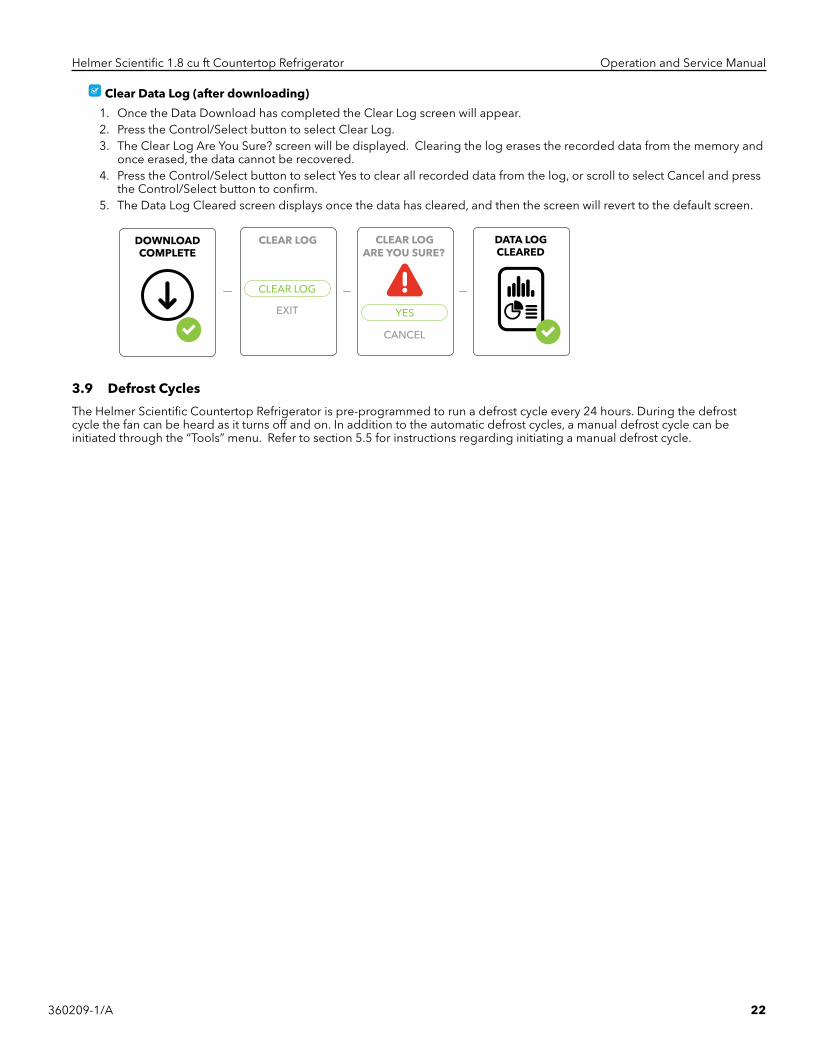
Clear Data Log (after downloading)
1. Once the Data Download has completed the Clear Log screen will appear.2. Press the Control/Select button to select Clear Log.3. The Clear Log Are You Sure? screen will be displayed. Clearing the log erases the recorded data from the memory and
once erased, the data cannot be recovered.4. Press the Control/Select button to select Yes to clear all recorded data from the log, or scroll to select Cancel and press
the Control/Select button to confirm.5. The Data Log Cleared screen displays once the data has cleared, and then the screen will revert to the default screen.
3 .9 Defrost Cycles
The Helmer Scientific Countertop Refrigerator is pre-programmed to run a defrost cycle every 24 hours. During the defrost cycle the fan can be heard as it turns off and on. In addition to the automatic defrost cycles, a manual defrost cycle can be initiated through the “Tools” menu. Refer to section 5.5 for instructions regarding initiating a manual defrost cycle.

Helmer Scientific 1.8 cu ft Countertop Refrigerator Operation and Service Manual
360209-1/A 23
4 Product Specifications
General Specifications and Features
Model Number MLR102
Model Type Countertop, medical-grade
Storage Volume 1.8 cu.ft. / 51 liters
Uniformity +/- 1 °C
Cooling System AdvanceCore™ solid-state thermoelectric heat pump technology with forced-air circulation
Refrigerant R744 (CO2), non-flammable, zero ozone depleting, low toxicity
Door Solid, left-hinged
Shelves 3 stainless steel (2 adjustable); 40lb (18 kg) maximum capacity/shelf
Energy requirements 0.62 kWh/24hrs @ 4 °C
Electrical Power 115 Volts, 60 Hz
Maximum Current 0.75 Amps
Physical Dimensions
Net Weight 75 lb (34 kg)
Exterior Dimensions (w x h x d) (includes leveling feet) 20.5 x 23 x 22.1 in (520 x 584 x 561mm)
Environmental Operating Conditions
Temperature range 2 °C to 8 °C
Application Environment Indoor use only. Non-corrosive, non-flammable, non-explosive, 10 °C to 32 °C (50 °F to 90 °F)

Helmer Scientific 1.8 cu ft Countertop Refrigerator Operation and Service Manual
360209-1/A 24
5 Service and Maintenance5 .1 Service Information
Service Assistance Telephone Numbers
For service and maintenance information, contact Helmer Technical Service at 800-743-5637, or visit our website at www.helmerinc.com.
Product Information to Supply When Contacting Service
♦ Serial Number ♦ Model Number ♦ Firmware version
Locating Product Information
1. With unit powered on, press the Control/Select button to display the MAIN MENU.2. Scroll to select the Tools option. Press the Control/Select button to select. 3. Press the Control/Select button to select.4. The display will then show the important product information.
Notes• It is advisable to record this information to have handy if ever needed.• Product Information is also supplied on a sticker on the back panel.
PRODUCT INFO:
4.0GLYCOL TEMP

Helmer Scientific 1.8 cu ft Countertop Refrigerator Operation and Service Manual
360209-1/A 25
5 .2 Helmer Unit Service Zones
Front (Right Side Front Panel and Door):
Service Areas ♦ User Interface Control Panel (UI Pod) ♦ Speaker ♦ USB Port ♦ Lock ♦ Door Hinges ♦ Door Gasket ♦ Feet
Back (Rear Panel Access)
Service Areas ♦ External Fans ♦ Battery Compartment ♦ AC Power Plug Receptacle ♦ Condensation Catch Tray
Interior
Service Areas ♦ Internal Fan and Fan Power Supply ♦ Temperature Sensors
Electronics Power Supply
Service Areas ♦ Power Supply

Helmer Scientific 1.8 cu ft Countertop Refrigerator Operation and Service Manual
360209-1/A 26
5 .3 Clean RefrigeratorInterior Condensation
With cold wall refrigerators, condensation may form on the interior of the cabinet. This is normal and may require periodic wipe-down with an absorbent cloth.
Suitable Products for Cleaning
♦ Interior: Mild detergent and a damp cloth. ♦ Powder coated exterior: Mild detergent and a damp cloth.
CAUTIONImportant - avoid the use of chlorides (cleaners with bleach) as well as abrasive cleaners and scrubbers such as steel wool. They will degrade the protective coatings and leave surfaces vulnerable to rust.
Cleaning External Fan Area
Periodically inspect and monitor the fan area of the rear cover for dust accumulation. It may be cleaned with a duster or vacuum cleaner with a dust attachment.
CAUTIONDo not remove the rear cover. Do not attempt to clean the power supply located below the fan assembly to avoid damage to the unit.
NoteCleaning the unit annually or more frequently if dust build-up is observed near the fan intake screens is recommended.
Cleaning Fans
♦ Estimated Time Required: 30 Minutes ♦ Service Part Needed: Wicking Felt ♦ Equipment Needed: Small Phillips Head Screwdriver, Compressed Air Canister, Vacuum (if preferred), Paper Towel
1. Remove the rear cover. 2. Remove all visible dust and debris with a duster, paper towel or cloth.3. If dust is visible around the fans you can remove the metal fan housing to vacuum the heat fins. 4. Use a vacuum cleaner to remove unseen dust or use a can of compressed air to release dust from tight places5. Clean the moisture catch tray (following the removal instructions given in another section of this manual) replacing the
felt wicks if dirty. 6. Reassemble unit and power on when complete.
Cleaning the Catch Tray
The catch tray is used to capture excessive moisture and spills and should be cleaned as needed. It can be accessed by removing the bottom shelf.
Helmer Scientific 1.8 cu ft Countertop Refrigerator Operation and Service Manual
360209-1/A 27
5 .4 Backup Battery for Datalogging
The Low Battery alert will appear in the LCD display when the battery drops below 30% remaining capacity. Replacing the battery soon after the alert appears is recommended.
CAUTIONS• The battery provides continuous temperature monitoring in the event of a power outage. The battery will need to be replaced periodically. • This battery will not power the refrigerator or the display. There must be uninterrupted power to the refrigerator and monitoring system at all times.
Replace Backup Battery
1. Remove the 2 screws securing the Pass-through Port on the lower left side panel of the unit.2. Remove the panel.3. Remove and replace the CR123A battery.4. Replace the panel and tighten the 2 screws.
5 .5 Defrost Cycles
The Helmer Scientific Countertop Refrigerator is pre-programmed to run a defrost cycle every 24 hours. A manual defrost cycle can be initiated through the “Tools” menu.
NoteThe fan can be heard turning off and on during the defrost cycle.
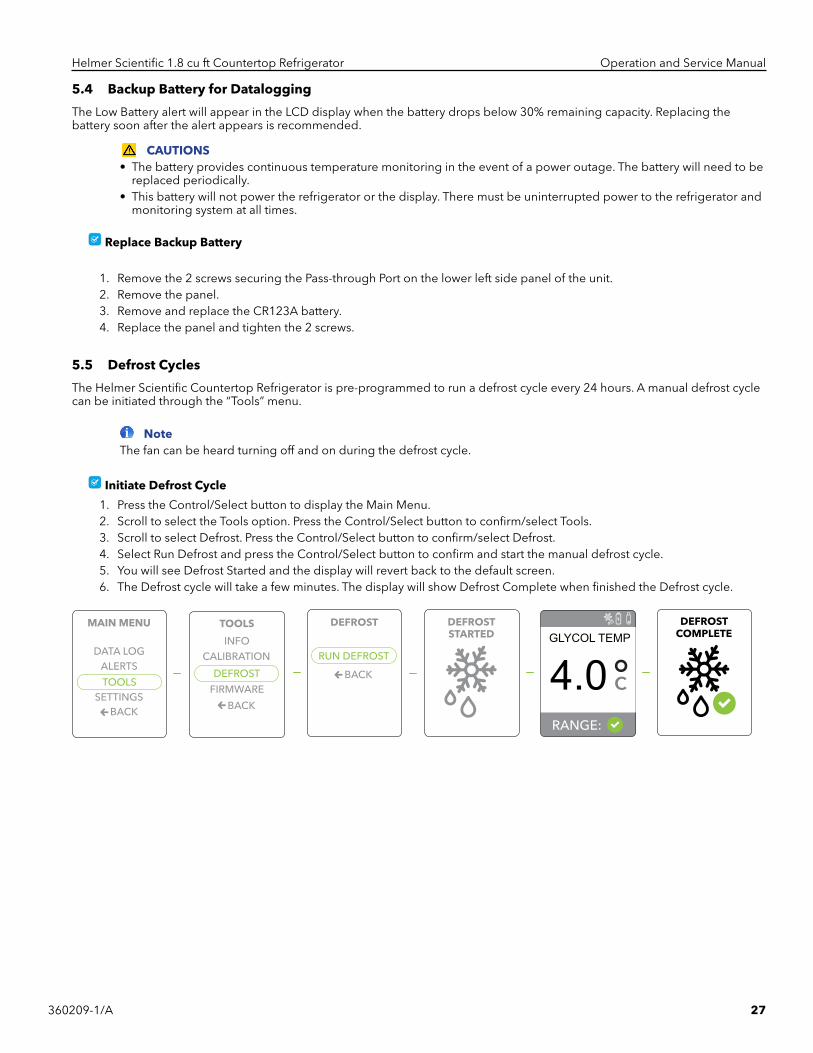
Initiate Defrost Cycle
1. Press the Control/Select button to display the Main Menu.2. Scroll to select the Tools option. Press the Control/Select button to confirm/select Tools.3. Scroll to select Defrost. Press the Control/Select button to confirm/select Defrost.4. Select Run Defrost and press the Control/Select button to confirm and start the manual defrost cycle.5. You will see Defrost Started and the display will revert back to the default screen.6. The Defrost cycle will take a few minutes. The display will show Defrost Complete when finished the Defrost cycle.
4.0GLYCOL TEMP

Helmer Scientific 1.8 cu ft Countertop Refrigerator Operation and Service Manual
360209-1/A 28
5 .6 Upgrade System Firmware
Helmer may occasionally issue firmware updates. Follow the upgrade instructions provided below to complete the upgrade.
Update Firmware
1. Insert a USB drive with the updated Firmware loaded into the USB port on the front of the refrigerator.2. Press the Control/Select button to display the Main Menu.3. Scroll to select the Tools option. Press the Control/Select button to select.4. Scroll to select Firmware. Press the Control/Select button to select.5. Use the Scroll buttons to enter the last 4 digits of the product Serial Number (see Tools / Info) one number at a time,
each time pressing the Control/Select button to confirm. Confirming the final digit will start the update process.6. It will only take a few seconds for the firmware to be updated after which the Firmware Update Complete screen will
display. To complete the process, the unit will then shut down and restart in a few seconds.
F012
E
Helmer Scientific 1.8 cu ft Countertop Refrigerator Operation and Service Manual
360209-1/A 29
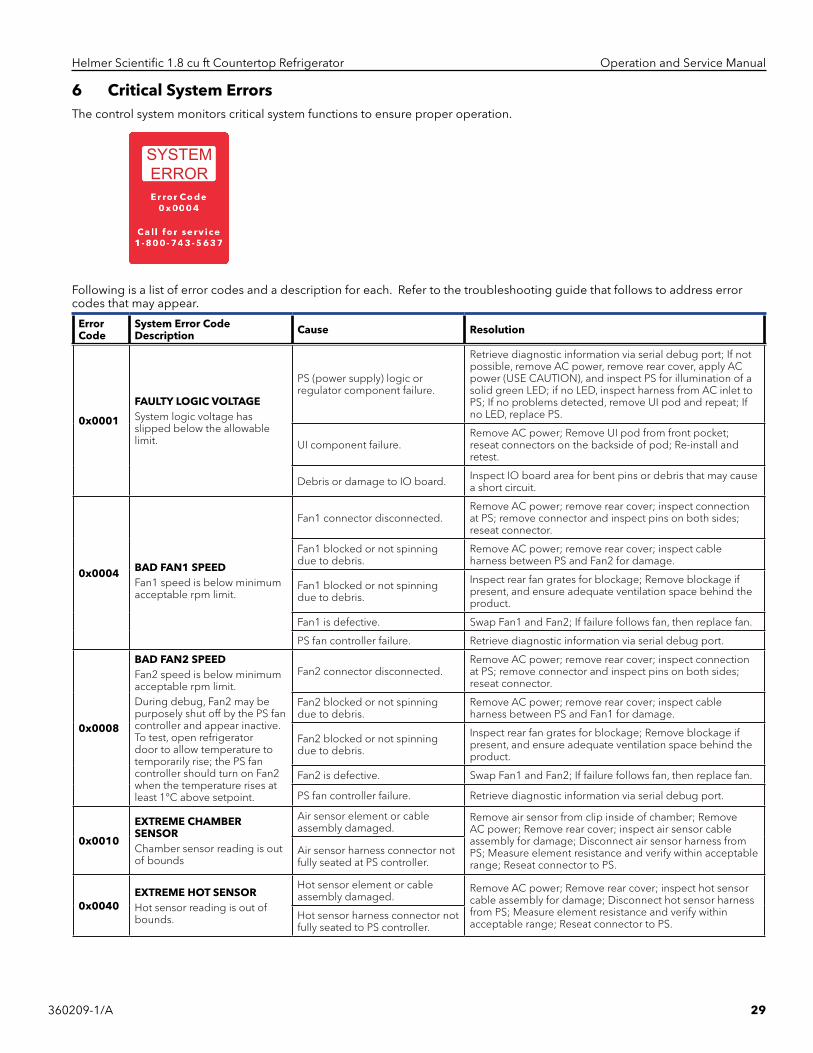
6 Critical System ErrorsThe control system monitors critical system functions to ensure proper operation.
Following is a list of error codes and a description for each. Refer to the troubleshooting guide that follows to address error codes that may appear.
Error Code
System Error Code Description Cause Resolution
0x0001
FAULTY LOGIC VOLTAGESystem logic voltage has slipped below the allowable limit.
PS (power supply) logic or regulator component failure.
Retrieve diagnostic information via serial debug port; If not possible, remove AC power, remove rear cover, apply AC power (USE CAUTION), and inspect PS for illumination of a solid green LED; if no LED, inspect harness from AC inlet to PS; If no problems detected, remove UI pod and repeat; If no LED, replace PS.
UI component failure.Remove AC power; Remove UI pod from front pocket; reseat connectors on the backside of pod; Re-install and retest.
Debris or damage to IO board. Inspect IO board area for bent pins or debris that may cause a short circuit.
0x0004 BAD FAN1 SPEED Fan1 speed is below minimum acceptable rpm limit.
Fan1 connector disconnected.Remove AC power; remove rear cover; inspect connection at PS; remove connector and inspect pins on both sides; reseat connector.
Fan1 blocked or not spinning due to debris.
Remove AC power; remove rear cover; inspect cable harness between PS and Fan2 for damage.
Fan1 blocked or not spinning due to debris.
Inspect rear fan grates for blockage; Remove blockage if present, and ensure adequate ventilation space behind the product.
Fan1 is defective. Swap Fan1 and Fan2; If failure follows fan, then replace fan.
PS fan controller failure. Retrieve diagnostic information via serial debug port.
0x0008
BAD FAN2 SPEEDFan2 speed is below minimum acceptable rpm limit.During debug, Fan2 may be purposely shut off by the PS fan controller and appear inactive. To test, open refrigerator door to allow temperature to temporarily rise; the PS fan controller should turn on Fan2 when the temperature rises at least 1°C above setpoint.
Fan2 connector disconnected.Remove AC power; remove rear cover; inspect connection at PS; remove connector and inspect pins on both sides; reseat connector.
Fan2 blocked or not spinning due to debris.
Remove AC power; remove rear cover; inspect cable harness between PS and Fan1 for damage.
Fan2 blocked or not spinning due to debris.
Inspect rear fan grates for blockage; Remove blockage if present, and ensure adequate ventilation space behind the product.
Fan2 is defective. Swap Fan1 and Fan2; If failure follows fan, then replace fan.
PS fan controller failure. Retrieve diagnostic information via serial debug port.
0x0010
EXTREME CHAMBER SENSORChamber sensor reading is out of bounds
Air sensor element or cable assembly damaged.
Remove air sensor from clip inside of chamber; Remove AC power; Remove rear cover; inspect air sensor cable assembly for damage; Disconnect air sensor harness from PS; Measure element resistance and verify within acceptable range; Reseat connector to PS.
Air sensor harness connector not fully seated at PS controller.
0x0040EXTREME HOT SENSORHot sensor reading is out of bounds.
Hot sensor element or cable assembly damaged.
Remove AC power; Remove rear cover; inspect hot sensor cable assembly for damage; Disconnect hot sensor harness from PS; Measure element resistance and verify within acceptable range; Reseat connector to PS.
Hot sensor harness connector not fully seated to PS controller.
SYSTEM ERROR

Helmer Scientific 1.8 cu ft Countertop Refrigerator Operation and Service Manual
360209-1/A 30
Error Code
System Error Code Description Cause Resolution
0x0080REJECT CRITICALHot side of thermal system is exceeding the acceptable limit.
Ambient temperature too hot. Place unit in an environment with a lower ambient temperature and adequate ventilation behind the unit.
Poor PHP (heat pump) interface to thermal system.
Remove AC power; Wait for system to reach ambient temperature; Reapply AC power; Wait for system to reach setpoint temperature; If symptom reappears, return unit for repair.
Poor thermal system charge.
Remove AC power; Wait for system to reach ambient temperature; Reapply AC power; Wait for system to reach setpoint temperature; If symptom reappears, return unit for repair.
Rear fans are blocked.Inspect rear fan grates for blockage; Remove blockage if present, and ensure adequate ventilation space behind the product.
Dirty thermal system heatsink fins.Remove AC power; remove rear cover; inspect thermal system heatsink fins for debris and blockage; Clean as necessary, re-install rear cover, and run unit.
At least one fan is not spinning. (See Error Code 0x0004 and 0x0008 resolutions)
0x0100
POWER SUPPLY OUTPUT OVERVOLTAGEThe PS output voltage has exceeded the allowable limit.
PS malfunction.
Remove AC power; re-apply AC power after waiting 30 seconds; If symptom reappears, remove AC power, remove rear cover and inspect PHP harness for damage or faulty connection to PS. Replace PS if symptom continually reappears after cycling AC power.
PHP malfunction.Remove AC power; Wait for system to reach ambient temperature; Disconnect PHP and measure ACR; Replace if outside of allowable range.
0x0200
POWER SUPPLY OUTPUT UNDERVOLTAGEThe PS output voltage has dipped below the allowable limit.
PS malfunction.
Remove AC power; re-apply AC power after waiting 30 seconds; If symptom reappears, remove AC power, remove rear cover and inspect PHP harness for damage or faulty connection to PS. Replace PS if symptom continually reappears after cycling AC power.
PHP malfunction.Remove AC power; Wait for system to reach ambient temperature; Disconnect PHP and measure ACR; Replace if outside of allowable range.

Helmer Scientific 1.8 cu ft Countertop Refrigerator Operation and Service Manual
360209-1/A 31
7 Troubleshooting
Issue Actions
Power
Unit doesn't power on Check for proper installation of the power plug.
Unit's audible alarm doesn't sound when out of temp range?
Was the refrigerator just turned on and is the system pulling down to set point temperature? No alarm will sound until the set point is met (4.0°C (39°F) default)Was there a recent power failure and is the system pulling down to set point temperature? No alarm will sound until the set point is met (4.0°C (39°F) default)
LED Display Issues
Solid RedData logging error but unit is operating normal
Download data and clear the data log. If light remains red there may be another issue with the internal data log; download data and contact Helmer Technical Service.
Flashing RedData logging error during power failure mode(15 second intervals)
Download data and clear the data log. If continues flashing red, possibly there’s an issue with the backup battery power running low. Replace it with a CR123A battery.
Not LitPower failure and no battery backup power
Change the battery
Solid GreenNormal operation
No action required
Flashing GreenData Logging is active in a power failure mode(15 second intervals
No action required
Interior Concerns
Condensation I have frost forming on the walls
Is the door being opened frequently? If so, the cooling system is working hard to maintain the target set point and condensation may freeze on the walls. It will thaw during the next defrost cycle. Run a manual defrost cycle if desired.
I have condensation collecting on the walls In a cold-wall system, humidity will cause condensation to form on the walls.
Door doesn't close/closes incorrectly Check to make sure something isn't blocking it from closing completely.
Door alarm keeps sounding Check to make sure the door is properly aligned in the frame by looking for uneven surfaces. For example, is the gap from the hinge to edge equal in width all the way across the surface?
Other Concerns
I can't hear any noise from the unit?Is the power on? Is the LED on front a solid green? If so, the unit is powered and operating normally. Once the refrigerator reaches its set point temperature then it will be very quiet during normal operating conditions.
I hear more fan noise than normal Has the temperature risen recently? Is back free & clear? If the door was recently held open for an extended period of time or warmer product put in the refrigerator then the unit is likely recovering to its set point temperature. Only be alarmed if there are abnormal fan sounds.
How long do I have to wait before I can load the refrigerator?
Once the unit displays 4.0°C (39°F), the unit is ready to start loading. If loading with room temperature product, load the refrigerator in small increments to avoid raising the temperature above the controlled temperature zone. Be sure to follow applicable protocols for your workplace.
What is the difference between an air sensor and a glycol sensor?
The air sensor is located along the back panel and represents the open air temperature. A glycol sensor is the vial of liquid with a thermocouple inserted in the liquid. The glycol sensor is most representative of the typical product stored in the refrigerator. It will take the glycol sensor longer to reach the desired set point temperature and it will remain stable longer than the air sensor. The display is defaulted to read the glycol sensor.
System doesn't recognize USB drive?For best results, insert the USB while the display is reading temperature (default screen). Once a USB is inserted, the USB icon should appear on the icon bar. If it doesn't register after a few attempts, insert a different USB memory stick. Contact Helmer Technical Service if this persists.
System doesn't download data to the USB?
Is there is a USB icon on the icon bar? Is the LED on USB illuminating? Check the USB device to make sure there is space for the data file. Try using a different USB memory stick.
Helmer Scientific 1.8 cu ft Countertop Refrigerator Operation and Service Manual
360209-1/A 32
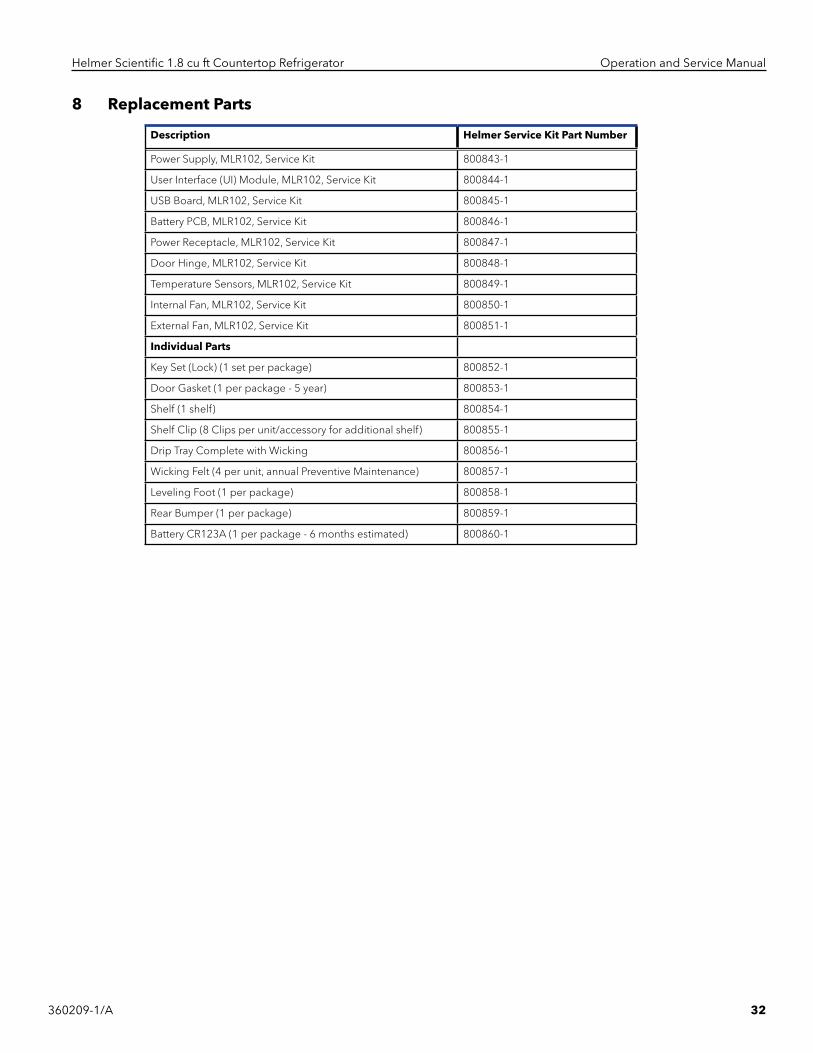
8 Replacement Parts
Description Helmer Service Kit Part Number
Power Supply, MLR102, Service Kit 800843-1
User Interface (UI) Module, MLR102, Service Kit 800844-1
USB Board, MLR102, Service Kit 800845-1
Battery PCB, MLR102, Service Kit 800846-1
Power Receptacle, MLR102, Service Kit 800847-1
Door Hinge, MLR102, Service Kit 800848-1
Temperature Sensors, MLR102, Service Kit 800849-1
Internal Fan, MLR102, Service Kit 800850-1
External Fan, MLR102, Service Kit 800851-1
Individual Parts
Key Set (Lock) (1 set per package) 800852-1
Door Gasket (1 per package - 5 year) 800853-1
Shelf (1 shelf) 800854-1
Shelf Clip (8 Clips per unit/accessory for additional shelf) 800855-1
Drip Tray Complete with Wicking 800856-1
Wicking Felt (4 per unit, annual Preventive Maintenance) 800857-1
Leveling Foot (1 per package) 800858-1
Rear Bumper (1 per package) 800859-1
Battery CR123A (1 per package - 6 months estimated) 800860-1

Helmer Scientific 1.8 cu ft Countertop Refrigerator Operation and Service Manual
360209-1/A 33
9 Wiring DiagramThis Diagram details the front User Interface Pod and USB as well as the components mounted under the back panel. Refer to this diagram for replacement part information and connections diagram.Provided for informational purposes only. For repairs or operating issues, please contact Helmer Technical Services.

Helmer Scientific 1.8 cu ft Countertop Refrigerator Operation and Service Manual
360209-1/A 34
10 Compliance ♦ The Helmer Scientific 1.8 cu ft Countertop Refrigerator has been UL/cUL safety tested. ♦ The sound level is less than 70 dB(A).
Symbol Description
Warning Hazardous voltages are present: To reduce the risk of electric shock and danger to personal health, follow the instructions provided in this manual.
Attention ICES-003 Class B Notice—Avis NMB-003, Class BThis Class B digital apparatus complies with Canadian ICES-003.
Warning Hazardous voltages are present: To reduce the risk of electric shock DO NOT remove the rear cover on this product. There are no user serviceable parts inside. Please refer service to qualified personnel.
10 .1 Product Specification Label

Helmer Scientific 1.8 cu ft Countertop Refrigerator Operation and Service Manual
360209-1/A 35
Appendix A - Preprogrammed Setting, Alert, and Alarm ValuesThe monitoring system is preset to common Federal Drug Administration (FDA) and Center for Disease Control (CDC) industry standards for pharmaceutical drug and vaccine storage conditions. Settings can be customized via the Settings and Alerts menus.
Notes• Temperature Display & Alarm – The display is preset to read the glycol sensor but can be changed to read the air sensor. Temperatures are detected and displayed in Celsius units to one tenth of a degree. For example 4.0°C (39°F). Upper and lower alarm thresholds are driven by the sensor selected for the display. • Temperature units may e changed to Fahrenheit.
Preset Alarms/Alerts
The following alarms/alerts are factory preset:
Alarm Factory Setting
Temperature Range Alarm min 2° C max 8° max
Door Ajar Alarm 1 minute
No Power Alarm > 10 seconds outage
Battery Low Alarm < 30% remaining
Memory Full Alarm < 25% remaining
Preset Values
The following table details the preset values. The table also provides what happens to those values in the event of a reset or power outage.
Setting Default Value or Initial Power-Up
Setting Retained After Pushbutton Reset?
Setting Retained After AC Power Cycle with Battery?
Setting Retained After AC Power Cycle without Battery?
Door Ajar Alarm On/Off ON ON, reverts to default ON, reverts to default ON, reverts to default
Door Ajar Alarm Interval Setting 1 minute N/A N/A N/A
Temperature Set Point 4.0° C Yes Yes Yes
Temperature Upper Alarm Threshold
8.0° C Yes Yes Yes
Temperature Lower Alarm Threshold 2.0° C Yes Yes Yes
Temperature Display Setting ° C Yes Yes Yes
Temperature Resolution Setting 0.1° C Yes Yes Yes
Temperature Display (Control/Glycol)
Glycol Yes Yes Yes
Memory Alarm On/Off ON ON, reverts to default ON, reverts to default ON, reverts to default
Memory Capacity Alarm Setting 25% Yes Yes Yes
Battery Alarm On/Off ON ON, reverts to default ON, reverts to default ON, reverts to default
Battery Alarm % Remaining Setting 30% Yes Yes Yes
Power Out Alarm On/Off ON ON, reverts to default ON, reverts to default ON, reverts to default
Power Out Alarm Delay Setting 10 seconds N/A N/A N/A
Time and Date varies Yes - After manually set
Yes - After manually set Yes - After manually set
Data Log Interval 15 minutes Yes Yes Yes
Glycol Temperature Calibration Value
varies Yes Yes Yes
Control Temperature Calibration Value
varies Yes Yes Yes
First Pumpdown Flag TRUE Yes Yes Yes
Helmer Scientific 1.8 cu ft Countertop Refrigerator Operation and Service Manual
360209-1/A 36
Appendix B – FAQs
How does this refrigeration technology work?
The Helmer Scientific Countertop Refrigerator uses a non-toxic, non-hazardous refrigerant embedded in the walls to absorb and channel heat energy to an internal, solid-state heat pump; the component that replaces the compressor in a typical refrigerator. The heat pump cools the refrigerant material when it channels the heat energy out of the system and into the ambient environment. The only moving parts are the two external fans that help dissipate heat to the surrounding environment, and the internal fan that helps to maintain temperature uniformity inside the cabinet.
How reliable is the system?
Strenuous-life, testing studies were conducted to develop confidence in the construction and system design of this refrigerator.
Is the performance guaranteed?
The thermal management solutions are tested according to the most demanding consumer and industrial product safety and reliability standards. The heat pump meets or exceeds Telecordia and JEDEC electronic performance, testing and certification standards. In addition, the heat pump is a UL recognized component. These products feature no mechanical parts, eliminating obvious points of failure. The solid-state heat pumps have proven to hold any temperature, including freezing, and to date have a failure rate of 0 percent and a life expectancy of >10 years based on life testing studies.
What is the product warranty?
Helmer offers a 2-year product warranty on parts and labor.
Is the power cord healthcare/NEMA approved?
Yes, it is a National Electrical Manufacturers Association (NEMA) approved plug (indicated by a green dot on the cable).
Why is there a battery?
The included internal, standard-sized, non-rechargeable lithium CR123A battery provides continuous power to internal data logging.
How long before I can use the product?
In a normal ambient environment, the refrigerator should pull down to the target set point within a couple of hours. It is common industry practice to monitor the unit over 48 hours to ensure it is holding the set point temperature.
Why is there condensation building up on the walls?
Condensation is completely normal in a cold wall refrigeration system. Condensation occurs when humid air cools when in contact with the cold walls and excess water vapor condenses on the walls as droplets. There is an out-of-sight system that collects and evaporates the excess runoff. There may be excess condensation during the initial cool down period.
Is the unit calibrated? How is it calibrated?
The refrigerator comes pre-calibrated to ISO 17025 standards. As with any temperature control and monitoring device, periodic re-calibration is needed. See the Calibration section for instructions.
What kind of refrigerator maintenance is required?
Check the external fans occasionally for dust build up and clean as necessary. Otherwise there is no maintenance required to keep the solid-state refrigeration system working at peak performance.

Helmer Scientific 1.8 cu ft Countertop Refrigerator Operation and Service Manual
360209-1/A 37
Appendix C – Warranty
Rel .i™ Product Warranty USA and Canada
For technical service needs, please contact Helmer at 800-743-5637 or www.helmerinc.com. Have the model and serial number available when calling.
Rapid Resolution
When a warranty issue arises it is our desire to respond quickly and appropriately. The service department at Helmer is there for you. Helmer will oversee the handling of your warranty service from start to finish. Therefore, Helmer must give advance authorization for all service calls and/or parts needs relating to a warranty issue. Any repeat service calls must also be authorized as well. This allows for proper diagnosis and action. Helmer will not be responsible for charges incurred for service calls made by third parties prior to authorization from Helmer. Helmer retains the right to replace any product in lieu of servicing it in the field.
Parts
For a period of two (2) years, Helmer will supply at no charge, including freight, any part that fails due to defects in material or workmanship under normal use, with the exception of expendable items. Expendable items such as glass, filters, light bulbs, and door gaskets are excluded from this warranty coverage. Inspection of defective parts by Helmer will be final in determining warranty status. Warranty procedures must be followed in all events.
Labor
For a period of two (2) years, Helmer will cover repair labor costs (including travel) and the cost of supplies necessary to perform authorized repairs. Repair service must be performed by an authorized Helmer service agency following the authorization process detailed above. Alternatively, your facility’s staff may work with a Helmer technician to make repairs. Labor costs for repairs made by unauthorized service personnel, or without the assistance of a Helmer technician, will be the responsibility of the end user.
Additional Warranty Information
The time periods set forth above begin two (2) weeks after the original date of shipment from Helmer. Warranty procedures set forth above must be followed in all events.
THERE ARE NO WARRANTIES WHICH EXTEND BEYOND THE DESCRIPTION ON THE FACE HEREOF. THIS WARRANTY IS EXCLUSIVE AND IN LIEU OF ALL OTHER WARRANTIES, EXPRESS OR IMPLIED, INCLUDING WITHOUT LIMITATION ANY WARRANTY OF MERCHANTABILITY OR FITNESS FOR A PARTICULAR PURPOSE. NO WARRANTIES OF MERCHANTABILITY OR FITNESS FOR PARTICULAR PURPOSE SHALL APPLY.
THE LIABILITY, IF ANY, OF HELMER FOR DIRECT DAMAGES WHETHER ARISING FROM A BREACH OF ANY SALES AGREEMENT, BREACH OF WARRANTY, NEGLIGENCE, OR INDEMNITY, STRICT LIABILITY OR OTHER TORT, OR OTHERWISE WITH RESPECT TO THE GOODS OR ANY SERVICES IS LIMITED TO AN AMOUNT NOT TO EXCEED THE PRICE OF THE PARTICULAR GOODS OR SERVICES GIVING RISE TO THE LIABILITY. IN NO EVENT SHALL HELMER BE LIABLE FOR ANY INDIRECT, INCIDENTAL, CONSEQUENTIAL, OR SPECIAL DAMAGES, INCLUDING WITHOUT LIMITATION DAMAGES RELATED TO LOST REVENUES OR PROFITS, OR LOSS OF PRODUCTS.
This warranty does not cover damages caused in transit, during installation by accident, misuse, fire, flood, or acts of God. Further, this warranty will not be valid if Helmer determines that the failure was caused by a lack of performing recommended equipment maintenance (per Helmer manual) or by using the product in a manner other than for its intended use. Installation and calibration are not covered under this warranty agreement.

Helmer Scientific14400 Bergen Boulevard, Noblesville, IN 46060 USA
Copyright © 2016 Helmer, Inc. 360209-1/A


![Welcome [explorethepearl.com]explorethepearl.com/downloads/PDBA_August_2016_Breakfast_Meeting.pdfIntroducing Lora Helmer Lora Helmer is the new Account Executive for the Pearl magazine!](https://static.fdocuments.us/doc/165x107/5f5d0b024df6ff0e6b4f0aba/welcome-introducing-lora-helmer-lora-helmer-is-the-new-account-executive-for.jpg)