
Helium LS & LSE - abletrader.com · Helium LS & LSE User’s Manual. Safety Instructions Transport...
32
User’s Manual Helium LS & LSE Stand-Up Wheelchair
-
Upload
trinhtuong -
Category
Documents
-
view
222 -
download
0
Transcript of Helium LS & LSE - abletrader.com · Helium LS & LSE User’s Manual. Safety Instructions Transport...

User’s Manual
Helium LS & LSEStand-Up Wheelchair


Produced and published by Permobil AB, SwedenEdition no.: 2, 2014-02Order no.: 205252-US-0
How to contact LifeStand
USAPermobil Inc. 300 Duke Drive Lebanon, TN 37090 PH: 800.736.0925 FAX: 800.231.3256 [email protected] [email protected]
CANADAPermobil, Ltd. 75 Mary Street, Unit 4 Aurora, Ontario L4G 1G3 PH: 905.726.9333 FAX: 905.726.9990 [email protected]
AUSTRALIAPermobil Australia Pty. Ltd. Unit 312/14-16 Lexington Dr Norwest Business Park Bella Vista, NSW, 2153 PH: 1300 858 424 Int’l: +61 2 8883 4292 FAX: +61 2 8883 2356 [email protected]


5
Helium LS & LSE User’s Manual.
5
IndexImportant information about this User’s manual ......................................... 6
Technical Support, Spare Parts, Accessories, Warranty ............................ 7
Safety Instructions ................................................................................... 8 - 13
Introduction ................................................................................................... 14
Operating Instructions .................................................................................. 15 1. Positioning - Seated .................................................................................................. 15 Footplate/lower leg length adjustment ..................................................................... 15 Chest straps ............................................................................................................. 15 Arm Supports ........................................................................................................... 16 Seat depth adjustment ............................................................................................. 17 Center of gravity adjustment ................................................................................... 18 Anti-tip tubes ............................................................................................................ 19 Back angle adjustment ............................................................................................ 19 Backrest angle compensation system ..................................................................... 20 Backrest height adjustment ..................................................................................... 21 Wheel locks .............................................................................................................. 22
2. Standing Up ................................................................................................................ 23 Preparing to stand .................................................................................................. 23 The Standing Process ............................................................................................. 23
Transport ........................................................................................................ 28
Maintenance ................................................................................................... 29
Technical Specifications ............................................................................... 30
6
Helium LS & LSE User’s Manual.
6
Important Information about this User’s ManualWe congratulate you on your choice of this LifeStand Stand-Up Wheelchair. Our goal is for you to con-tinue to feel satisfied with your choice of both vendor and wheelchair.Before you begin using your wheelchair, it is important that you read and understand the content of these operating instructions and in particular the Safety Instructions.These operating instructions are primarily intended to acquaint you with the functions and character-istics of the wheelchair and how you can use them in the best manner possible. They also contain important safety and maintenance information, as well as describing possible problems that can arise while operating this wheelchair.Always keep these operating instructions handy, since the need for important information can arise con-cerning its use, safety and maintenance.It is also possible to obtain information concerning our products from our home page on the Internet. You can find us at www.permobil.com.All information, pictures, illustrations and specifications are based upon the product information that was available at the time that these operating instructions were printed. Pictures and illustrations that are found in these operating instructions are representative examples and not intended to be exact depictions of the various parts of the wheelchair.We reserve the right to make changes to the product without prior notice.
Ordering of DocumentationIf you are in need of another copy of the User’s Manual, it can be ordered from Permobil.

7
Helium LS & LSE User’s Manual.
7
In the event of technical problems, you should contact your dealer or Permobil Inc USA at 1-800-736-0925.Always state the chassis serial number when contacting Permobil to ensure that the correct informa-tion is provided.
TECHNICAL SUPPORT
Spare parts and accessories must be ordered through your dealer.
SPARE PARTS & ACCESSORIES
A warranty registration card is attached to each new wheelchair. The Permobil Inc. Product Warranty Information sets forth the conditions of the warranty.Contact your dealer or Permobil Inc USA for information about the warranty period for this wheelchair.
WARRANTY

Helium LS & LSE User’s Manual.
8
Safety InstructionsStand-Up wheelchairs are a specialized device and special care must therefore be taken when it is used. Please read and follow all instructions and warnings in this manual before operating your LifeStand by Permobil Stand-Up wheelchair. Incorrect use may both injure the user and damage the chair. In order to reduce these risks, you should read the User’s Manual carefully, in particular the safety instructions and their warning texts.
Throughout this manual the following symbol will be used to note items that have significant importance to safety concerns:
Permobil is not responsible for personal injuries or property damage resulting from any person’s failure to follow the warnings and instructions in this manual. Permobil is not responsible for injuries or dam-age resulting from failure to exercise good judgment.
The final selection and purchasing decision about the type of wheelchair to be used is the responsibility of the wheelchair user and his or her healthcare professional. Permobil Inc. is not responsible for inap-propriate selections of wheelchair models or features or improper fitting of the wheelchair.
Please use caution where this symbol appears.
m CAUTION!
Please use extreme caution where this warning symbol appears. Failure to observe warnings can lead to personal injury and property damage, including damage to the wheelchair.
m WARNING!
9
Helium LS & LSE User’s Manual.
9
Safety InstructionsYour wheelchair was configured specifically for your needs as prescribed by your healthcare provider. Consult your healthcare provider before changing the seat position or making any other adjustment. Some adjustments may reduce your wheelchair’s performance or safety or may not be appropriate for your needs.It is also of the utmost importance that you devote sufficient time to become acquainted with the stand-up function before you begin using it.Do not undertake to stand up for the first time in the chair without making sure that you have assistance in the immediate vicinity if you should need help.In order to make sure that nothing happened to the wheelchair while it was being shipped to you, you should check the following items before beginning to use it:• that all products ordered are included in the delivery, incuding operating instructions and pos-
sible other documentation. If you suspect that something is missing, then contact your supplier or Permobil for more information as soon as possible.
• that no transport-related or other damages have occurred to the wheelchair and its accessories. If you discover that something has been damaged or in some other manner appears to be incor-rect, then contact your supplier or Permobil for more information as soon as possible before you continue the checks.
Always be sure that tires are inflated properly before driving.If you experience that the wheelchair in any manner is not behaving as expected or if you suspect that something is wrong: get in touch with your service contact or Permobil for more information.

Helium LS & LSE User’s Manual.
10
Safety Instructions
Operation - InclinesWhen propelling up an incline, be sure to drive your wheelchair straight up the incline (perpendicular). Driving at an angle up an incline increases the risk of tipping or falling. Do not drive down or up a hazardous incline, such as a surface covered with snow, ice, or wet leaves or a surface that is uneven. Also avoid driving on ramps that do not have proper edge protection.
m WARNING!
OperationDo not let children operate the wheelchair without supervision. Do not operate the wheelchair on public streets or roadways. Obey all local pedestrian rules and be aware that vehicle drivers may have difficulty seeing you.Do not operate your wheelchair under the influence of alcohol. Consumption of alcohol may impair your ability to operate your wheelchair safely. Some physical limitations or use of medication, either prescribed or over-the-counter, may limit your ability to operate your wheelchair safely. Be sure to consult with your physician about your physical limitations and medications.
m CAUTION!
ModificationsAny unauthorized modifications to the wheelchair may increase the risk of personal injury and prop-erty damage, including damage to the wheelchair. All modifications to the wheelchair must be performed by a qualified service technician authorized by Permobil to perform such service on Permobil products.
Weight LimitationsThe maximum user weight for your LifeStand by Permobil is set forth in the specification section of the supplied User´s Manual for this model. Operation of the wheelchair by users who exceed the maximum allowable user weight can lead to personal injury and damage to the wheelchair, as well as voiding any applicable warranty to the wheelchair.Do not carry passengers on the wheelchair. Doing so can lead to personal injury and damage to the wheelchair.
m WARNING!

11
Helium LS & LSE User’s Manual.
11
Operation - TurningTurning your wheelchair at high speeds can create the possibility of the wheelchair tipping and per-sonal injury. The possibility of tipping can be increased by high turning speed, sharp turns, uneven surfaces, abrupt changes in direction, and driving from an area of low traction (e.g. lawn) to an area of high traction (e.g. sidewalk). To protect against tipping, personal injury and property damage, reduce speed and reduce the sharp-ness of your turn when turning.
Overcoming steps or stairwaysWhatever the obstacle, always approach slowly preferably assisted by a third person.
The front wheels can be elevated off of the ground by (the attendant) stepping on the Anti-Tip tube on the rear of the chair and simultaneously pulling back and down on the Push Handles. While it is not recommended that the chair be tipped back any further (the Anti-Tip wheels hitting the floor), it is pos-sible. This would be done by rotating the Anti-Tip tubes to the up position (see page 19).Make certain to return the Anti-Tips to the operating position when the operation is completed.Going up and down a slopeGoing up, always lean the trunk forward and avoid changing direction abruptly. Going down, always lean backwards. It is also important to keep speed and direction under control.Make certain that the wheelchair is directed straight up or down the slope. Never attempt to traverse or make turns on a slope.
m WARNING
Safety Instructions

Helium LS & LSE User’s Manual.
12
Safety Instructions
PassengersThe wheelchair is not intended to transport passengers, regardless of the age of the passenger. The Maximum User Weight stated in the User’s Manual for your seating includes the user and any personal effects. The Maximum limit should not be exceeded. The wheelchair’s maneuverability and stability can be degraded as a result.
Environmental ConditionsProtect your wheelchair from exposure to any type of moisture, including rain, snow, or wash.Do not operate your wheelchair in icy or slippery conditions. These conditions can lower the perfor-mance and safety of your wheelchair which could lead to an accident, personal injury and property damage, including damage to the wheelchair.
m WARNING
Positioning BeltPermobil positioning belts are designed to position the user only and will not protect you in an acci-dent. You may even receive further injury from the belts.
Transfer into and out of the chair Be sure that the wheel locks are engaged before entering or leaving the wheelchair and before pivoting the arm for transfer.Make certain that the two safety locks (right and left) are engaged preventing the standing mechanism from involuntary actuation (see page 26).When transferring into or out of the wheelchair, every precaution should be taken to reduce the distance between the wheelchair and the place to which the user is transferring. Overextending this distance can cause user to overexert, lose balance, or fall.Permobil recommends that users transfer in the presence of or with the assistance of an attendant.Use caution when bending or reaching. Do not use foot plates or armrests as supports when transferring into or out of the wheelchair. The footplates and armrests are not designed to be weight-bearing structures. Excessive force may cause them to give way, resulting in personal injury or property damage, including damage to the wheelchair.Your doctor or therapist will advise you how to transfer according to your health and every day life.
m WARNING
13
Helium LS & LSE User’s Manual.
13
Safety Instructions
TransportThe wheelchair must be transported in or with transport solutions that have been approved for this purpose.Check that the wheelchair is properly secured. A defectively fastened chair can cause serious injury to persons in the vehicle and serious damage to the vehicle.
Use Prohibited in Motor VehiclesPermobil recommends that users NOT be transported in any kind of vehicle while in their wheelchair. The only safe alternative is that users be transferred into factory vehicle seating for transportation and use safety restraints made available by the auto industry. Permobil does not recommend any wheelchair transportation systems.Never sit in your wheelchair while in a moving vehicle. In an accident or sudden stop you may be thrown from the chair and seriously injured or killed.Permobil positioning belts are designed to position the user only and will not protect you in an acci-dent. You may even receive further injury from the belts.
m WARNING
Maintenance and ServiceCarry out only the service and maintenance which are stated in the User’s Manual. All other service and maintenance must be performed by a qualified service technician authorized by Permobil to per-form such service on Permobil products Do not use parts or accessories not authorized by Permobil. Use of unapproved ”aftermarket” acces-sories and parts may cause changes in the wheelchair, which may make the wheelchair unstable or uncontrollable. Such use may also void the warranty on the wheelchair.
Damages/malfunctions on the wheelchair and its accessoriesIf you experience that the wheelchair in any manner is not behaving as expected or if you suspect that something is wrong: Stop operating as soon as possible and contact your service contact or Permobil for more information.It’s also of greatest importance that Permobil be informed if the wheelchair and its accessories have been subjected to transport damages, damages during driving or damages due to another cause as soon as possible after the event.There exists a risk that the wheelchair and its accessories can no longer be used in a safe manner.
m WARNING

Helium LS & LSE User’s Manual.
14
IntroductionCongratulations on the purchase of your new LifeStand Stand-up Wheelchair by Permobil!You may have confidence in knowing that you have acquired the best in technology from the worldwide leader in mobility products.Before operating your stand-up wheelchair, it is essential to read and carefully follow the below instructions and operating procedures.
Safety and maintenance:
1. Standing environment The stand-up feature of this device must only be used on flat, obstacle free surfaces and away from stairs,
ramps, slopes, uneven surfaces or inclines of any kind.
2. Adjustments Adjustments made to a LifeStand stand-up wheelchair, as described in this document or otherwise, must
be made by an authorized Permobil dealer. Under no circumstance should these adjustments be made by the end user or non-authorized personnel.
3. Maintenance It is recommended that you complete a weekly and monthly inspection of your wheelchair. It is also rec-
ommended that it be serviced annually by an authorized Permobil dealer.
4. Benefits of a Daily Standing Regimen The use of any stand-up device should be done only under the prescription and supervision of a medi-
cal professional. At the outset, it is recommended that your introduction to regular standing be closely monitored by your Physical or Occupational Therapist.
It has been documented that the regular and cyclical activity of going from the seated to the standing position may offer many benefits to those that are no longer able to stand on their own. The benefits are two fold: 1) there is the ability to once again function in daily activities that necessitate standing (reaching file cabinets and equipment in the workplace, accessing cupboards/stoves/shelving at home, as well as the ability to inter-act eye to eye); and, 2) the potential of physical benefits that result from repeated standing (these benefits may include improved; range of motion, bone density, circulation, bowel and bladder function, etc.).
Label:
Compliance of this device to annex I of the EU directive 93/42/EEC is confirmed by this CE label.

15
Helium LS & LSE User’s Manual.
15
Operating Instructions1. Positioning - Seated
1.1 Footplate/lower leg length adjustment.For sitting comfort, and to be properly positioned to obtain a standing posture, the seat to footplate dimension must be set to the appropriate length. When doing so, it is important that the seat cushion that client will be using on a regular basis is used..
When setting the lower leg length, the upper leg position should be parallel to the seat rail, but slightly elevated from the cushion at the front edge. The result is appropriate pressure distribution for the thighs and buttocks when seated and appropriate hip rotation and extension when standing.
This adjustment is done by removing the Footrest Length/Angle Adjusting Screws located on the lower part of the downpost. The vertical adjustment is made in .8 of an inch increments. These same screws are utilized to adjust the footplate angle (to plus or minus 5 degrees).
1.2 Chest strapTo obtain optimum support for the user, especially when standing, the height of the chest strap can be adjusted. The higher the chest strap is moved up the backrest, the greater support it will offer. It is adjusted by simply releasing its Velcro attachments to the back upholstery and relocating. Make certain to weave the backrest straps (which are part of the tension adjustable back system) through the metal retaining rings found on the chest strap.
Please note that additional support straps are available if more support is desired. Please contact customer service with questions.
Left strap Right strapSingle buckle
Double buckle
Backrest tubes
Chest strap
Backrest Tension Strap

16
Helium LS & LSE User’s Manual.
1.3 Arm Supports The Arm Supports (standard on the LSE, optional on the LS model): 1) provide stability in the standing position; 2) elbow/arm support in the seated position; and, 3) pivot out of the way to facilitate transfers. They are also height adjustable.
The arms pivot on two different axis. They will rotate laterally so as to position the angled front end of the arm inward toward the user, they can rotate downward, or, they will rotate upward.
In the standing position, they should be rotated inward toward the user, with the angled ends in front. This provides a resting place for the users arms, providing stablization.
In the seated position, they can be rotated downward, clearing the area in front for activities, and providing support for the clients arms.
When the angled front end is rotated upward, they are then free to pivot up and to the rear clearing, the way for obstacle free transfers.
To adjust the arm support height: 1) loosen and remove the attaching screws; 2) adjust the arms to the desired height; 3) replace and tighten the attaching screws.
17
Helium LS & LSE User’s Manual.
17
Seat Depth (measured from the front of the backpost to to the seat rail plug)
Position Holes Showing (on insert tube at rear
Seat Depth - 16” (40 cm) 0 0Seat Depth - 16.5” (42 cm) 1 1Seat Depth - 17.5” (44 cm) 2 2 std.Seat Depth - 18” (46 cm) 3 3Seat Depth - 19” (48 cm) 4 4Seat Depth - 20” (50 cm) 5 5Seat Depth - 20.5” (52 cm) 6 6Seat Depth - 21” (54 cm) 7 7
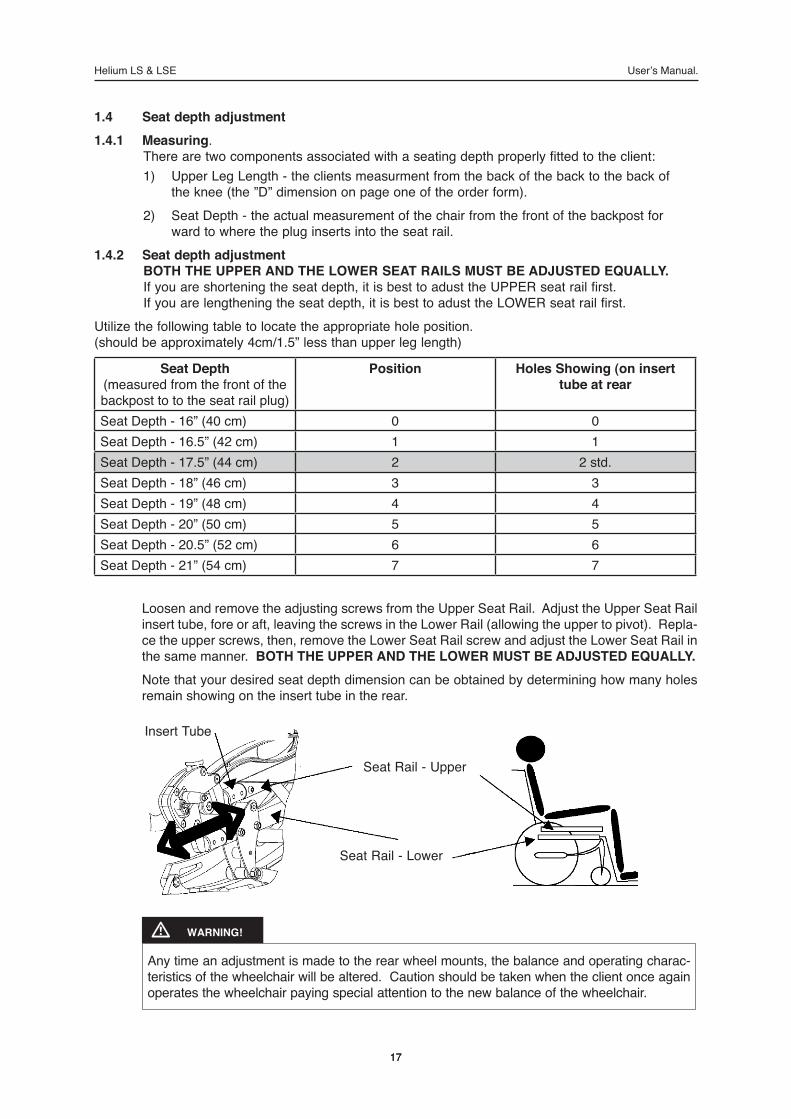
1.4 Seat depth adjustment1.4.1 Measuring.
There are two components associated with a seating depth properly fitted to the client:1) Upper Leg Length - the clients measurment from the back of the back to the back of the knee (the ”D” dimension on page one of the order form).2) Seat Depth - the actual measurement of the chair from the front of the backpost for ward to where the plug inserts into the seat rail.
1.4.2 Seat depth adjustmentBOTH THE UPPER AND THE LOWER SEAT RAILS MUST BE ADJUSTED EQUALLY.If you are shortening the seat depth, it is best to adust the UPPER seat rail first.If you are lengthening the seat depth, it is best to adust the LOWER seat rail first.
Utilize the following table to locate the appropriate hole position.(should be approximately 4cm/1.5” less than upper leg length)
Seat Rail - Upper
Seat Rail - Lower
Any time an adjustment is made to the rear wheel mounts, the balance and operating charac-teristics of the wheelchair will be altered. Caution should be taken when the client once again operates the wheelchair paying special attention to the new balance of the wheelchair.
m WARNING!
Loosen and remove the adjusting screws from the Upper Seat Rail. Adjust the Upper Seat Rail insert tube, fore or aft, leaving the screws in the Lower Rail (allowing the upper to pivot). Repla-ce the upper screws, then, remove the Lower Seat Rail screw and adjust the Lower Seat Rail in the same manner. BOTH THE UPPER AND THE LOWER MUST BE ADJUSTED EQUALLY.Note that your desired seat depth dimension can be obtained by determining how many holes remain showing on the insert tube in the rear.
Insert Tube

Helium LS & LSE User’s Manual.
18
1.4.3 Center of Gravity adjustment
Increasing or decreasing the Seat Depth can relocate the center of mass of the person in rela-tion to the chair, and therefore the overall system’s Center of Gravity. The end result is that the chair may become more or less stable depending on if it has become shorter or longer.
m WARNING!
If the rear wheel mounts and connecting tube are moved forward on the frame, the chair’s Center of Gravity will move toward the rear, making the front end lighter/easier to tip backward.If the rear wheel mounts and tube are moved rearward on the frame, the Center of Gravity will move forward, making the front end more stable.
m CAUTION!
Rear wheelFore-AftAdjustment
After adjusting, it may now be necessary to move the rear wheel mount fore or aft to compen-sate for this change.
To make this adjustment, loosen and remove the two rear wheel mount attaching bolts and nuts (with attached connecting tube) on either side of the wheelchair frame (four bolts total) (See figure below).After the adjustment has been made, replace and retighten the attached bolts and nuts.

19
Helium LS & LSE User’s Manual.
1.5 Anti-tip tubesThe anti-tip tubes are mounted to the lower rear of the wheelchair frame. When used properly, they can prevent the wheelchair from tipping over back-ward. Use of the anti-tips are recommended at all times.
To put the Anti-tips in operating position, press in the Detent Button (unlocking the tube) and rotate the tube around so the wheels are in the downmost position. The Detent Button should then again lock the tube into place.
At times, it may be necessary to disable the anti-tip function. For instance, to raise the front wheels off of the ground in order to get over a curb or other obstacle. In this circumstance, simply reverse the above procedure.
Because it is possible for the chair to tip over backwards when the anti-tips are not in the oper-ating (downmost) position, it is imperative that they are in the operating position any time the wheelchair is in use. Failure to use the anti-tippers may result in the chair tipping over, causing personal injury and damage to the wheelchair.
m WARNING!
1.6 Back angle adjustmentFor improved positioning and user comfort, the backrest is adjustable from between -3° to plus +12°.To adjust the back angle, loosen both Back Angle Adjusting Screws shown in figure below. Adjust the backrest to the desired angle and retighten.
Anti-tipswheels up
Anti-tipswheels down
Detent button
Back Angle Adjusting Screws
FRAME PIVOT MOUNT
Back Angle CompensationScrews

20
Helium LS & LSE User’s Manual.
1.7 Backrest angle compensation system
The “Backrest angle compensation system” allows the backrest to articulate as the chair stands; either more closed or more open (forward or backward) in relation to its angle in the seated position.
This is accomplished as follows:• The Upper Seat Rail, Lower Seat Rail and the Backrest Tube all connect to the back of the
wheelchair frame at the Frame Pivot Mount.• In figure below the hole positions 1, 2, & 3 are shown. • If you prefer that the backrest stay at a constant angle as the chair raises; choose hole position 1 • If you prefer that the backrest articulate open 7 degrees (backward); utilize hole position 2.• If you prefer that the backrest articulate closed 6 degrees (forward); utilize hole position 3.• After setting the adjustment screw to the selected location, make sure that the chair is comfort-
able and safe in both the seated and standing position and readjust if necessary.
When moving from the seated position to the standing position, the chosen back angle may have undesirable results as the chair raises. For instance, it is possible that a more closed back angle that works fine in the seated position could tend to push one excessively forward when standing. Conversely, too much of an open starting angle could, when standing, leave one leaning too far back and unstable.
m CAUTION!
Back Angle Adjusting Screws
FRAME PIVOT MOUNT
Back Angle CompensationScrews

21
Helium LS & LSE User’s Manual.
21
1.8 Backrest height adjustmentNOTE: The backrest height on the LS & LSE is not adjustable.However, the height can be chosen at modifying components at the time of order.

22
Helium LS & LSE User’s Manual.
For safety reasons, it is imperative that the Wheel Locks be engaged whenever transferring into or out of the wheelchair, as well as when the stand-up feature is utilized. Proper pressure must be applied between the wheel lock contact arm and the tire so as to prevent the wheel from rotating.
m CAUTION!
It is necessary to adjust the wheel locks periodically, and mandatory any time a fore/aft adjust-ment is made on the wheel in relation to the frame. The adjustment is made by loosening the wheel lock adjusting screws, moving the wheel lock to the proper position, and re-tightening the screws. The screws are accessed on the inside of the sideframes.
Note that the tire pressure can have a significant affect on the holding ability of the engaged wheel lock. It is therefore necessary to make certain the tires have correct air pressure before attempting to adjust.
1.9 Wheel locks.
To apply, simply push the Wheel Lock Lever forward until it stops. When engaged correctly, it will lock in place. To disengage, pull back to the rear.

23
Helium LS & LSE User’s Manual.
23
2. Standing Up
2.1 Preparing to stand
Make certain the wheelchair is on a flat and level surface free of any obstacles or ground indentations. When preparing to stand, make certain the Wheel Locks are engaged! Failure to do so may cause the wheels to roll, thereby risking personal injury.
m WARNING!
There are numerous moving components interacting with one another as the chair cycles from the seated to the stand-up position and back down. It is therefore possible that at some point in their travel, pinch points (narrowing areas between moving mechanical parts) may occur. It is the responsibility of the occupant and attendant to make certain that our own body parts and/or those of others in the immediate area are not at risk. HELIUM LSIt is advisable to never stand the chair up without an occupant. Doing so can endanger the person releasing the standing mechanisms, and, it is difficult to return the chair to the seated position. If this occurs, it will be necessary to have an able bodied individual secure themselves in the chair to return it to the seated position.HELIUM LSEThe electronic components and standing apparatus of the LSE are designed to operate with the weight of the occupant. It is not advisable to cycle the chair up and down without an occupant. Doing so may damage the equipment and void the warranty.
m CAUTION!
2.2 The Standing Process2.2.1 Fastening the Chest Strap(Please refer to section 1.2 on page 15, Chest strap height adjustment and Chest strap tension adjustment (section 2.2.2 on page 24) before proceeding.
To fasten the chest strap, simply place the insert tab into the slot on the receiver. Press in until it clicks and is locked in place.
To remove, simply depress the red button in the middle of the receiver and remove the insert tab.
Take care that when the chest straps are not in use, they do not get caught in the rear wheel spokes. When not in use, it is best that they be fastened and hang behind the chair backrest.
m CAUTION!
Under no circumstances should the chest strap be used as a restraint device in an automobile. The user should transfer to a regular car seat and separately secure the wheelchair. Failure to do so may result in personal injury and/or damage to the wheelchair.
m WARNING!

Helium LS & LSE User’s Manual.
24
2.2.2 Adjusting the chest strap tension
After the correct height for the chest strap has been chosen, it is now critical that it now be adjusted to the proper tension.
The chest strap can be custom adjusted to each person. It needs to be snug enough to hold the torso in position when standing, but not so tight that it restricts breathing or over restrains upper body movement.
Begin with the client seated in the chair and engage the chest strap as described above.
The tension of the chest strap is simply a function of its overall length. The length is adjusted by weaving the straps through the single and double buckles located (and affixed to) the tension straps of the back upholstery.
It is not possible to stand up in this device without the proper application of the chest strap. Attempting to do so is dangerous and could result in injury. The height of the chest strap must first be adjusted followed by tension adjustment.
m WARNING!
Single buckle Double buckle
25
Helium LS & LSE User’s Manual.
25
2.2.3 Adjusting the Knee BlockThe knee block provides support for the lower body, applying pressure to the upper shin as the wheelchair mechanisms work in concert to raise the body to the standing position.
It is not possible to stand up in this device without a knee block that is properly positioned and fixed in place. Attempting to do so is dangerous and could result in injury.
m WARNING!
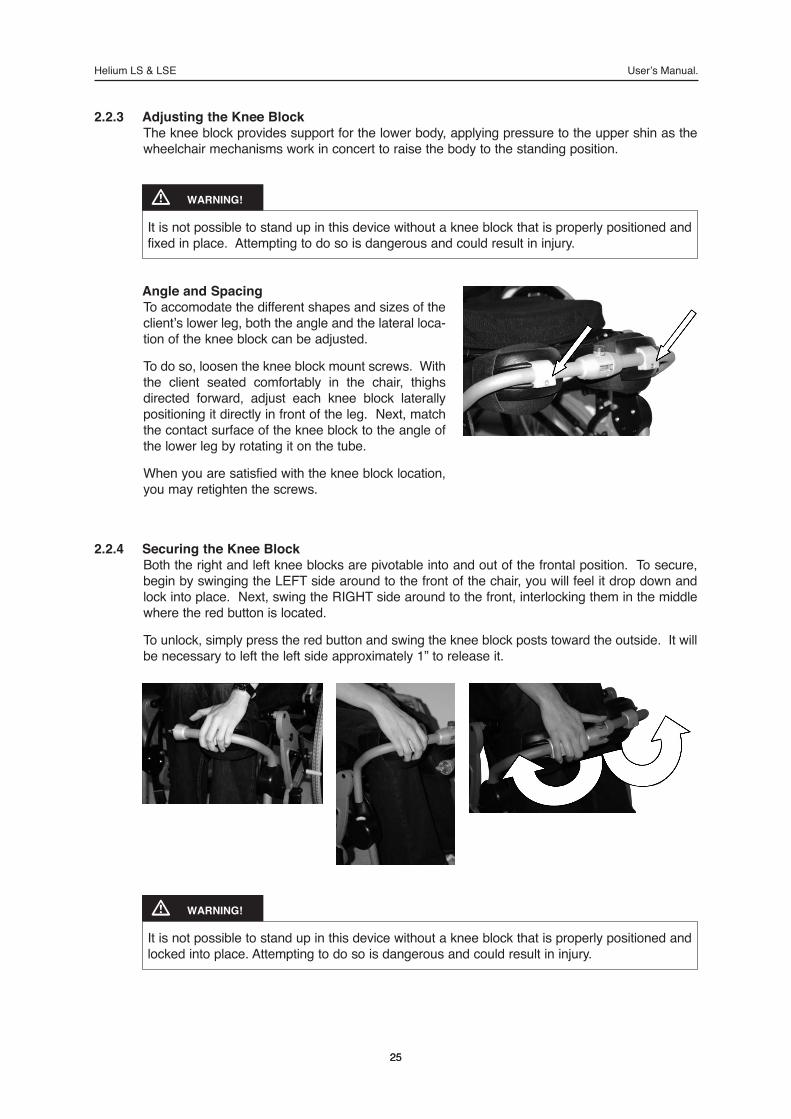
Angle and SpacingTo accomodate the different shapes and sizes of the client’s lower leg, both the angle and the lateral loca-tion of the knee block can be adjusted.
To do so, loosen the knee block mount screws. With the client seated comfortably in the chair, thighs directed forward, adjust each knee block laterally positioning it directly in front of the leg. Next, match the contact surface of the knee block to the angle of the lower leg by rotating it on the tube.
When you are satisfied with the knee block location, you may retighten the screws.
2.2.4 Securing the Knee BlockBoth the right and left knee blocks are pivotable into and out of the frontal position. To secure, begin by swinging the LEFT side around to the front of the chair, you will feel it drop down and lock into place. Next, swing the RIGHT side around to the front, interlocking them in the middle where the red button is located.
To unlock, simply press the red button and swing the knee block posts toward the outside. It will be necessary to left the left side approximately 1” to release it.
It is not possible to stand up in this device without a knee block that is properly positioned and locked into place. Attempting to do so is dangerous and could result in injury.
m WARNING!
26
Helium LS & LSE User’s Manual.
• Grasp the right and left Arm Loops Levers by:1) Positioning the thumbs and the base of the thumb on the top of the tube, the thumb extending forward; 2) Locating the base thumb knuckle approximately even with the backrest tube; 3) Wrapping the fingers around and under the bottom of the tube.
• Pull up - you will feel the Arm Loop lever release from its lock position and begin to rotate. As this happens, the seat will begin its upward travel.
• Continue to rotate the lever up and forward utilizing an arm motion similar to that of propelling a wheel-chair wheel. The seating mechanism will rise to achieve the full standing position as the lever con-tinues to rotate and actually begins to travel down-ward.
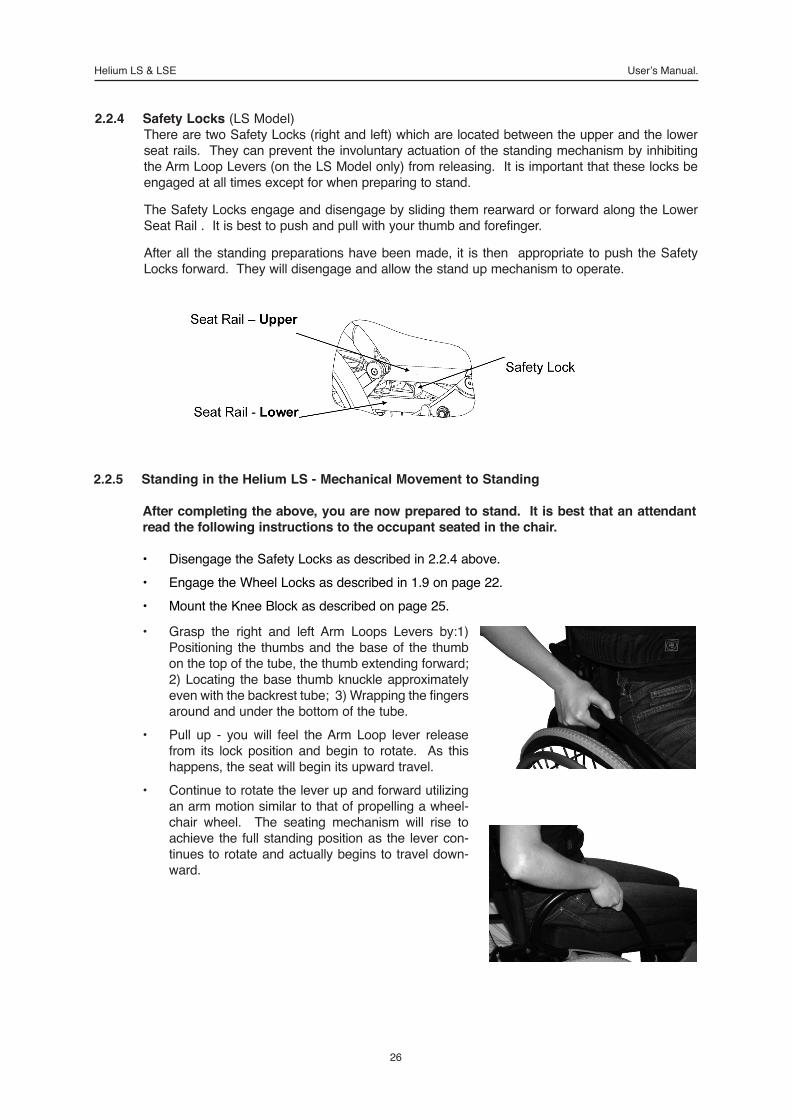
2.2.4 Safety Locks (LS Model)There are two Safety Locks (right and left) which are located between the upper and the lower seat rails. They can prevent the involuntary actuation of the standing mechanism by inhibiting the Arm Loop Levers (on the LS Model only) from releasing. It is important that these locks be engaged at all times except for when preparing to stand.
The Safety Locks engage and disengage by sliding them rearward or forward along the Lower Seat Rail . It is best to push and pull with your thumb and forefinger.
After all the standing preparations have been made, it is then appropriate to push the Safety Locks forward. They will disengage and allow the stand up mechanism to operate.
2.2.5 Standing in the Helium LS - Mechanical Movement to Standing
After completing the above, you are now prepared to stand. It is best that an attendant read the following instructions to the occupant seated in the chair.
• Disengage the Safety Locks as described in 2.2.4 above.• Engage the Wheel Locks as described in 1.9 on page 22.• Mount the Knee Block as described on page 25.

27
Helium LS & LSE User’s Manual.
In order to prevent the involuntary actuation of the standing mechanism, always remember to place the right and left safety locks (2.2.4) (LS model only) in the locked position (slid to the rear of the chair).
m CAUTION!
• NOTE: The standing operation described above represents the optimum; it may take some practice to achieve. To begin, it may be necessary to reposition the hands on the lever in the process of standing. It is important that when ordering the chair, the appropriately charged gas struts for the client’s body weight have been chosen.
• Once fully standing, the levers can now be “locked out”. To do so, simply place your hands on the top of the levers and continue to rotate forward and down. You will feel the Arm Loop Lever lock in position.
• To return to the seated position, reach toward the front (what is actually the top) of the lever, grasp it, pull up and then back as it rotates. Continue until the chair once again achie-ves the fully seated position.
• NOTE: It may be necessary to reposition the hands one or more times, reaching to the front-most part of the lever, in order to ultimately achieve the fully seating position.
• Once fully seated, the levers can now be “locked out” in the lower position. To do so, simply place your hands on the top of the levers and press down. You will feel the Arm Loop Lever lock in position.
• Engage the Safety Locks as described in 2.2.4 on page 26. (LS model only) .
Standing in the Helium LSE - Mechanical Movement to Standing• Engage the Wheel Locks as described in 1.9 on page 22.• Mount the Knee Block as described on page 25.
Helium LSE ONLY – Electrical Power Movement to StandingThe power stand-up Helium LSE is equipped with an Up/Down Hand Control. It is connected by a tether (which passes around the backrest of the chair) to the actuator underneath. It can be located on either the left or the right arm.
Sitting and standing is accomplished by simply pressing the appropriate button. The standing progress/position can be stopped at any time by releasing the button. Once the mechanism reaches the fully standing, or, fully seated position, the system stops automatically.
Note: Contractures or any physical condition that may impede full extension to standing must be taken into consideration when attemp-ting to stand.
The use of any stand-up device should be done only under the pres-cription and supervision of a medical professional. At the outset, it is recommended that your introduction to regular standing be closely monitored by your Physical or Occupational Therapist.
Important : Make certain that the Hand Control tether never gets wound around any moving component of the chair. As the seating rai-ses and lowers, it is possible for it to get pinched and damaged. This also applies to the arm supports.
Damage to the tether by shearing, pinching or cutting is not covered under the warranty.
28
Helium LS & LSE User’s Manual.
Transport
Your wheelchair has neither been designed nor tested to be used as a seat in a moving vehicle. Do not sit in the chair in a moving vehicle, transfer to a regular car seat or a correctly fitted seat adapted for this purpose. Failure to do so may result in personal injury or damage to the wheelchair.
m WARNING!
NOTE: When transporting the chair in a vehicle, the volume of space it requires can be greatly reduced making it easier and more convenient. Please see the following:
• Make certain that the two safety locks (right and left) are engaged preventing the standing mechanism from involuntary actuation. (LS model only).
• Remove the quick release rear wheels
• Remove the quick release front casters
• Fold down the backrest by grasping the pull cord, making a fist and rotating your hand. This will withdraw the two detent pins from there mounts and the back will release to fold down.
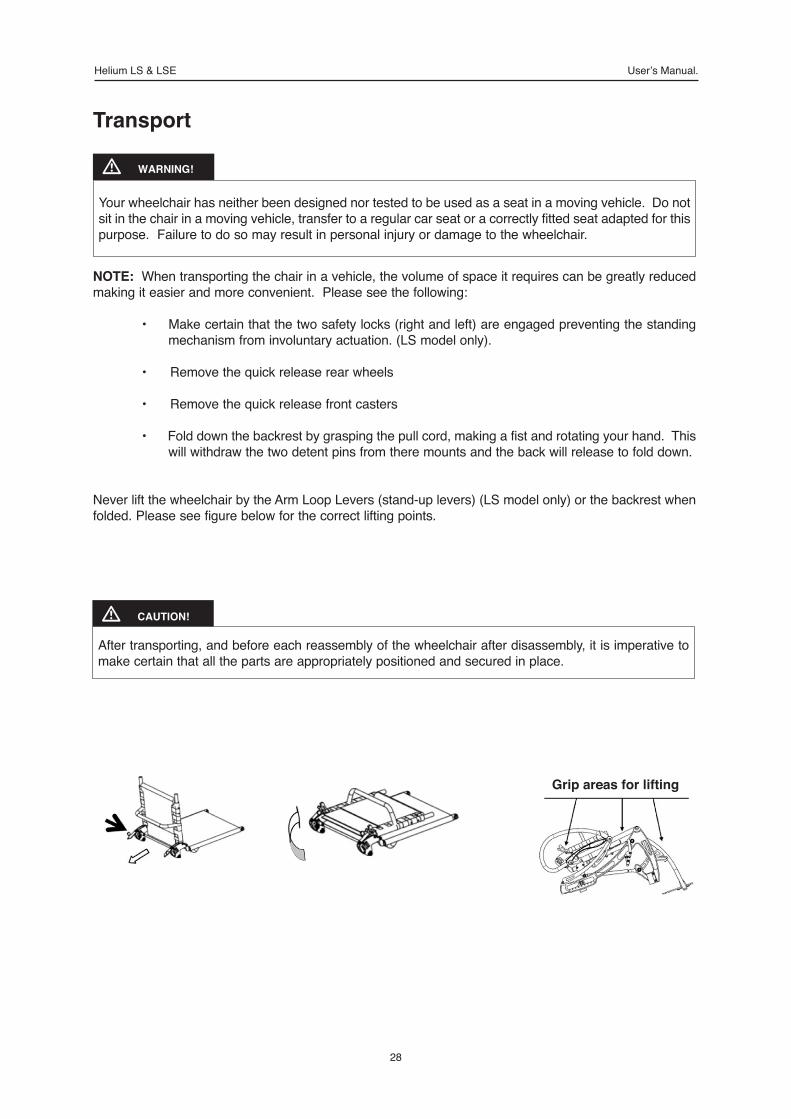
Never lift the wheelchair by the Arm Loop Levers (stand-up levers) (LS model only) or the backrest when folded. Please see figure below for the correct lifting points.
After transporting, and before each reassembly of the wheelchair after disassembly, it is imperative to make certain that all the parts are appropriately positioned and secured in place.
m CAUTION!
Grip areas for lifting

29
Helium LS & LSE User’s Manual.
Maintenance CleaningBefore initial use, you should clean the chair and remove any latent manufacturing or packing materials. Periodically, it is recommended it be cleaned on a regular basis per the following:
Do not use rough or corrosive detergents or any high pressure cleaning devices.
m CAUTION!
• For painted parts: wipe down with slightly soapy water on a clean cloth.• For upholstery: use a soft and moistened cloth.After use in the rain, it is recommended that the wheelchair be dried with a clean cloth.
Sand and seawater can damage the bearings, hardware and paint of the wheelchair.
m CAUTION!
Annually serviceIt is recommended that your wheelchair be serviced annually by an authorized Permobil dealer.
Batteries (HELIUM LSE only)IMPORTANT: Before using the chair for the first time, the batteries need to be fully charged.
This product has been supplied by an environmentally friendly manufacturer and is in com-pliance with the EC directive (WEEE 2002/96/CE) concerning processing of electricity and electronic equipment. This product may contain substances which are harmful to the environment if you dispose of them in places inappropriate according to law.The waste container interdict logo is posted on this product to encourage you to recycle when-ever possible.Safeguard the environment by recycling this product in a recycling center after usefullnes.
m WARNING!
The Helium LSE is equipped with two 2.9 Amp Hour, sealed gel cell bat-teries. Under normal usage, they will allow approximately 120 seat/stand/seat cycles.If the battery should be significanly discharged through use, an audible alarm will sound. When this occurs, it indicates that there is approximately 10 additional cycles left in the system. At that point, it is recommended that the occupant maintain the seated position and recharge the batteries before using this function again. To charge the batteries, plug the transformer end of the charger into a stan-dard 115v wall outlet. Next, plug the other end into the charging port found on the Up/Down Hand Control. An orange light visible on the transformer indicates that the unit is charging. When the batteries are fully charged, a green light will be visible.It will normally take 4 to 5 hours to fully charge the batteries.

30
Helium LS & LSE User’s Manual.
Technical Specifications
Maximum enduser weight ............................................................................ 265 lbs.
Seat width ..................................................................................... 14”/16”/17.5”/19”
Seat depth ..............................................................16”/16.5”/17.5”/18”/19”/20”/20.5”
Frame ............................................................................... Rigid, fold down backrest
Seat ................................................ Depth adjustable, tension adjustable sling seat
Material ........................................................................................... Aluminum, Steel
Backrest .................................. Angle Adjustable, angle compensation (to standing) system, tension adjustable upholstery
Upholstery ................................................. Tension adjustable, polyester, washable Footrests/plates ........................................................... Height and angle adjustable
Wheels ........................................................................... Front diameter - 6” Rear diameter - 24” and 26”
Wheel locks ................................................................................... Manually applied
Propulsion ..................................................................................................... Manual
Standing Mechanism ................................. LS - Manual assisted standing utilizing gas charged struts, changeable accor - ding to the client’s weight. LSE – Battery powered actuator with assistance from gas charged struts.
Rear stabilization ............................................................... Anti-tip wheels (optional)


Order no.: 205252-US-0