HEDEX User Guide_en
79
HEDEX V1.11 User Guide Issue 01 Date 2009–06–30 Huawei Proprietary and Confidential Copyright © Huawei Technologies Co., Ltd.
-
Upload
warji-muslam -
Category
Documents
-
view
51 -
download
1
Transcript of HEDEX User Guide_en

HEDEX
V1.11
User Guide
Issue 01
Date 2009–06–30
Huawei Proprietary and ConfidentialCopyright © Huawei Technologies Co., Ltd.

Huawei Technologies Co., Ltd. provides customers with comprehensive technical support and service. For anyassistance, please contact our local office or company headquarters.
Huawei Technologies Co., Ltd.Address: Huawei Industrial Base
Bantian, LonggangShenzhen 518129People's Republic of China
Website: http://www.huawei.com
Email: [email protected]
Copyright © Huawei Technologies Co., Ltd. 2009. All rights reserved.No part of this document may be reproduced or transmitted in any form or by any means without prior writtenconsent of Huawei Technologies Co., Ltd. Trademarks and Permissions
and other Huawei trademarks are the property of Huawei Technologies Co., Ltd.All other trademarks and trade names mentioned in this document are the property of their respective holders. NoticeThe information in this document is subject to change without notice. Every effort has been made in thepreparation of this document to ensure accuracy of the contents, but the statements, information, andrecommendations in this document do not constitute a warranty of any kind, express or implied.
Huawei Proprietary and ConfidentialCopyright © Huawei Technologies Co., Ltd.

Contents
1 Introduction.................................................................................................................................1-1
2 Installation...................................................................................................................................2-12.1 Installation Modes...........................................................................................................................................2-22.2 Requirements of the Installation Environment................................................................................................2-22.3 Initial Installation............................................................................................................................................2-3
2.3.1 Installation in Local Mode.....................................................................................................................2-32.3.2 Installation in Server Mode....................................................................................................................2-8
2.4 Upgrade Installation......................................................................................................................................2-142.5 Starting or Stopping the HEDEX Service.....................................................................................................2-17
2.5.1 Starting the HEDEX Service................................................................................................................2-172.5.2 Stopping the HEDEX Service..............................................................................................................2-18
2.6 Uninstalling the HEDEX...............................................................................................................................2-19
3 Introducing the HEDEX Interface...........................................................................................3-13.1 Home Page......................................................................................................................................................3-23.2 Contents Page.................................................................................................................................................3-33.3 Favorites Page.................................................................................................................................................3-43.4 Remarks Page.................................................................................................................................................3-43.5 Admin Page....................................................................................................................................................3-4
4 Browsing......................................................................................................................................4-1
5 Searching......................................................................................................................................5-15.1 Basic Search....................................................................................................................................................5-25.2 Advanced Search.............................................................................................................................................5-25.3 Searching in Results........................................................................................................................................5-35.4 Search Syntax..................................................................................................................................................5-4
6 Adding Favorites........................................................................................................................6-16.1 Creating a Favorite..........................................................................................................................................6-26.2 Viewing a Favorite..........................................................................................................................................6-26.3 Editing a Favorite............................................................................................................................................6-26.4 Deleting a Favorite..........................................................................................................................................6-3
7 Adding Remarks.........................................................................................................................7-17.1 Creating a Remark...........................................................................................................................................7-2
HEDEXUser Guide Contents
Issue 01 (2009–06–30) Huawei Proprietary and ConfidentialCopyright © Huawei Technologies Co., Ltd.
i

7.2 Viewing a Remark...........................................................................................................................................7-27.3 Finding a Remark............................................................................................................................................7-37.4 Editing a Remark.............................................................................................................................................7-37.5 Exporting Remarks..........................................................................................................................................7-37.6 Importing Remarks..........................................................................................................................................7-47.7 Deleting a Remark...........................................................................................................................................7-4
8 System Administrator Tasks....................................................................................................8-18.1 Library Management.......................................................................................................................................8-2
8.1.1 Uploading Libraries on the Admin Page...............................................................................................8-28.1.2 Configuring the Library Path Through the HEDEX Tray......................................................................8-38.1.3 Controlling the Display of the Library on the Home Page....................................................................8-58.1.4 Deleting a Library..................................................................................................................................8-5
8.2 User Management...........................................................................................................................................8-58.2.1 Initializing a Password...........................................................................................................................8-68.2.2 Viewing the Number of Online Users....................................................................................................8-68.2.3 Deleting a User.......................................................................................................................................8-7
9 Common Faults and Solutions................................................................................................ 9-19.1 Common Faults in Installation........................................................................................................................9-2
9.1.1 The HEDEX Fails to Be Uninstalled.....................................................................................................9-29.2 Common Faults of Applications.....................................................................................................................9-3
9.2.1 The HEDEX Service Failed to Be Started due to Port Occupation.......................................................9-49.2.2 When You Start the HEDEX Service, the System Prompts "Loading the service failed.".........................................................................................................................................................................9-59.2.3 Failing to Start the HEDEX...................................................................................................................9-69.2.4 When the HEDEX Is Started, the Browser Cannot Be Started and the HEDEX Interface Does not Appear.........................................................................................................................................................................9-79.2.5 Users on the LAN Cannot Access the HEDEX on a Server (Case 1)....................................................9-79.2.6 Users on the LAN Cannot Access the HEDEX on a Server (Case 2)....................................................9-99.2.7 PDF Files Filed to be Viewed on the HEDEX Interface......................................................................9-119.2.8 Pictures Fail to Be Displayed Through the Firefox Browser...............................................................9-129.2.9 When You Access the HEDEX by Using the Firefox, the System Displays a Message Saying "PortRestricted for Security Reasons"...........................................................................................9-13
9.2.10 An Exception Occurs when You Export All the Remarks.................................................................9-149.2.11 An Exception Occurs when You Import Remarks.............................................................................9-15
10 Glossary....................................................................................................................................10-1
ContentsHEDEX
User Guide
ii Huawei Proprietary and ConfidentialCopyright © Huawei Technologies Co., Ltd.
Issue 01 (2009–06–30)

Figures
Figure 2-1 Selecting the installation mode...........................................................................................................2-4Figure 2-2 Selecting the installation path and libraries........................................................................................2-5Figure 2-3 Selecting the installation path.............................................................................................................2-6Figure 2-4 Entering the port number....................................................................................................................2-7Figure 2-5 Installation completion.......................................................................................................................2-8Figure 2-6 Selecting the installation mode...........................................................................................................2-9Figure 2-7 Set the Password of the HEDEX Administrator...............................................................................2-10Figure 2-8 Selecting the installation path and libraries......................................................................................2-11Figure 2-9 Selecting the installation path...........................................................................................................2-12Figure 2-10 Entering the port number................................................................................................................2-13Figure 2-11 Installation completion...................................................................................................................2-14Figure 2-12 HEDEX upgrade interface..............................................................................................................2-15Figure 2-13 HEDEX installation and maintenance interface.............................................................................2-16Figure 2-14 Prompt message for installing the libaries......................................................................................2-16Figure 2-15 Failing to install the HEDEX..........................................................................................................2-17Figure 2-16 Shortcut menu of the HEDEX........................................................................................................2-18Figure 2-17 HEDEX tray interface.....................................................................................................................2-18Figure 2-18 Viewing the library path of the HEDEX .......................................................................................2-19Figure 2-19 dialog box for uninstallation confirmation.....................................................................................2-20Figure 2-20 dialog box for removing libraries...................................................................................................2-20Figure 3-1 Home page..........................................................................................................................................3-2Figure 3-2 Contents page.....................................................................................................................................3-3Figure 5-1 Search Result......................................................................................................................................5-2Figure 5-2 Search Result......................................................................................................................................5-3Figure 5-3 Search Result......................................................................................................................................5-4Figure 8-1 Configuring library paths....................................................................................................................8-4Figure 8-2 Dialog box on prompting you to restart the HEDEX service.............................................................8-4Figure 9-1 Failing to uninstall the HEDEX..........................................................................................................9-2Figure 9-2 HEDEX installation and maintenance interface.................................................................................9-3Figure 9-3 Dialog box on port occupation...........................................................................................................9-4Figure 9-4 Changing the port number of the HEDEX service.............................................................................9-5Figure 9-5 Failing to load the service...................................................................................................................9-5Figure 9-6 HEDEX installation and maintenance interface.................................................................................9-6
HEDEXUser Guide Figures
Issue 01 (2009–06–30) Huawei Proprietary and ConfidentialCopyright © Huawei Technologies Co., Ltd.
iii

Figure 9-7 Error prompt ......................................................................................................................................9-8Figure 9-8 Configuring the port number for the HEDEX service........................................................................9-9Figure 9-9 Error prompt.....................................................................................................................................9-10Figure 9-10 Setting the proxy server of the LAN..............................................................................................9-11Figure 9-11 Opening or saving a PDF file.........................................................................................................9-12Figure 9-12 Error page for accessing the HEDEX exceptionally......................................................................9-13Figure 9-13 Setting the service interface of the HEDEX...................................................................................9-14Figure 9-14 Remarks failing to be exported.......................................................................................................9-15Figure 9-15 Failing to import remarks...............................................................................................................9-16Figure 9-16 Formatting cells..............................................................................................................................9-17
FiguresHEDEX
User Guide
iv Huawei Proprietary and ConfidentialCopyright © Huawei Technologies Co., Ltd.
Issue 01 (2009–06–30)

Tables
Table 5-1 Field description of advanced search...................................................................................................5-3Table 5-2 Search rules..........................................................................................................................................5-5
HEDEXUser Guide Tables
Issue 01 (2009–06–30) Huawei Proprietary and ConfidentialCopyright © Huawei Technologies Co., Ltd.
v


1 Introduction
The Huawei Electronic Documentation Explorer (HEDEX) is used to browse and searchelectronic documents.
The HEDEX can be used for the Huawei electronic documents of different products and differentversions. It can be installed on a server and shared by multiple users and can also be installedon a PC for one user.
The HEDEX can be used to manage electronic documents and possesses the following functions:
Browsing
Document browse is the basic and important function of the HEDEX. The documents in theHEDEX are saved as libraries with the extension .hdx. The libraries can be browsed only withthe HEDEX.
Searching
The HEDEX provides the following ways to retrieve information: basic search, advanced searchand search in results. You can search information in one library or multiple library. The searchresults can be classified into two groups, Operational Process and Document Type, whichhelp you find information quickly and correctly.
Adding Favorites
When browsing a document with the HEDEX, you can create a favorite for the page that youare interested in or often visit for fast browsing in future.
Adding Remarks
When browsing a document with the HEDEX, you can add remarks on documents about yourideas, doubts, and experience.
System Management
Only the HEDEX administrator has the system management right. System management refersto library management, such as uploading and deleting libraries, and controlling library display.If the HEDEX is installed in server mode, the HEDEX administrator can also perform user
HEDEXUser Guide 1 Introduction
Issue 01 (2009–06–30) Huawei Proprietary and ConfidentialCopyright © Huawei Technologies Co., Ltd.
1-1

management, such as deleting a user, initializing a password, and viewing the number of onlineusers.
1 IntroductionHEDEX
User Guide
1-2 Huawei Proprietary and ConfidentialCopyright © Huawei Technologies Co., Ltd.
Issue 01 (2009–06–30)

2 Installation
About This Chapter
This topic describes the procedures of installing, upgrading and uninstalling the HEDEX inWindows.
2.1 Installation ModesThe HEDEX uses the browser/server (B/S) architecture. There are two installation modes: localmode and server mode.
2.2 Requirements of the Installation EnvironmentFor different installation modes, the HEDEX has different requirements of software andhardware.
2.3 Initial InstallationThis topic describes how to install the HEDEX in different modes.
2.4 Upgrade InstallationThis topic describes how to install the HEDEX after the HEDEX of a previous version has beeninstalled on the same computer.
2.5 Starting or Stopping the HEDEX ServiceThis topic describes how to start or stop the HEDEX service.
2.6 Uninstalling the HEDEXWhen you uninstall the HEDEX, all data (except libraries) such as remarks, favorites, and userinformation is deleted and cannot be restored.
HEDEXUser Guide 2 Installation
Issue 01 (2009–06–30) Huawei Proprietary and ConfidentialCopyright © Huawei Technologies Co., Ltd.
2-1

2.1 Installation ModesThe HEDEX uses the browser/server (B/S) architecture. There are two installation modes: localmode and server mode.
Local ModeYou can install the HEDEX on a local computer and then use the HEDEX directly. In this mode,other users cannot access the HEDEX on your computer.
Server ModeYou can install the HEDEX on a server. All users on the same LAN can access the HEDEX onthe server. When the HEDEX is installed in server mode, multiple users can share the electronicdocuments of Huawei products, thus implementing centralized documentation management.
2.2 Requirements of the Installation EnvironmentFor different installation modes, the HEDEX has different requirements of software andhardware.
Software RequirementsThe HEDEX supports the following browsers:l Microsoft Internet Explorer 6.0
l Microsoft Internet Explorer 7.0
l Firefox 2.0 or later
NOTE
l It is recommended to use the resolution 1024 x 768 to browse the HEDEX.
l The Firefox does not support the WMF pictures. If certain pictures cannot be displayed in the Firefox,it indicates that the pictures are in WMF format. You can use Microsoft Internet Explorer 6.0 or 7.0 tobrowse the library.
The HEDEX may provide documents in the formats of PDF, Word, Excel, and PPT. To viewthese documents properly, you need to install the following software:l Adobe Reader 6.0 or later
l Microsoft Office 2003 or later
Requirements of Software and Hardware in Local ModeWhen the HEDEX is installed in local mode, the PC must meet the following requirements:l OS (either of the following):
– Microsoft Windows 2000
– Microsoft Windows XP Professional
– Microsoft Windows Vista Home Basic, Ultimate, Business, Enterprise
l Hardware configurations:
2 InstallationHEDEX
User Guide
2-2 Huawei Proprietary and ConfidentialCopyright © Huawei Technologies Co., Ltd.
Issue 01 (2009–06–30)
– Memory: 512 MB or above
– CPU: 1.8 GHz or above
– Free disk space: 2 GB or above
Requirements of Software and Hardware in Server ModeWhen the HEDEX is installed in server mode, the server must meet the following requirements:
l OS: Microsoft Windows 2003 Server
NOTEThe HEDEX can also be installed in SUSE Linux Enterprise Server 9 and Solaris 10, but the installationprogram is different from that for Windows. If you need to install the HEDEX in SUSE Linux EnterpriseServer 9 or Solaris 10, contact Huawei technical support engineers to obtain the proper installationprogram.
l Hardware configurations (the following minimum configurations support 40 concurrentusers online):– Memory: 2 GB or above
– CPU: 3.0 GHz or above
2.3 Initial InstallationThis topic describes how to install the HEDEX in different modes.
2.3.1 Installation in Local ModeThis topic describes how to install the HEDEX in local mode.
2.3.2 Installation in Server ModeThis topic describes how to install the HEDEX in server mode.
2.3.1 Installation in Local ModeThis topic describes how to install the HEDEX in local mode.
ContextThe HEDEX software installation package may contain libraries. During installation, theinstallation program automatically detects libraries in the installation package. If the librariesexist, you can install them after installing the software.
Procedure
Step 1 Insert the HEDEX installation CD-ROM into the CD-ROM drive. The computer automaticallydisplays the HEDEX installation interface.
NOTEIf your computer is configured to shield the CD-boost function, you can double-click setup.exe in the HEDEXinstallation CD-ROM to initialize the function.
Step 2 Click Next on the installation introduction interface.
Step 3 After reading the items of copyright in the license agreement, select I accept the items of thelicense agreement and then click Next.
HEDEXUser Guide 2 Installation
Issue 01 (2009–06–30) Huawei Proprietary and ConfidentialCopyright © Huawei Technologies Co., Ltd.
2-3

Step 4 Click Next on the browser version confirmation interface.
Step 5 Specify User Name and Company Name on the customer information interface and then clickNext.
Step 6 Select Local mode on the installation mode interface (as shown in Figure 2-1), and then clickNext.
Figure 2-1 Selecting the installation mode
Step 7 Select the installation path of the HEDEX and determine whether to install the library.
NOTEThe HEDEX installation path must meet the following requirements:
l The path must contain the characters in the same language as the OS and those in English. For example, ifyou install the HEDEX in an English OS, the installation path can contain only English characters.
l Special characters (& | ( ) ; @ ^ >) must be excluded.
The installation program detects automatically whether libraries exist in the installation CD-ROM:
l If libraries exist in the installation CD, the interface as shown in Figure 2-2 is displayed.Determine whether to install libraries and select the installation path, and then clickNext.
2 InstallationHEDEX
User Guide
2-4 Huawei Proprietary and ConfidentialCopyright © Huawei Technologies Co., Ltd.
Issue 01 (2009–06–30)

Figure 2-2 Selecting the installation path and libraries
l If no library exists in the installation CD, the interface as shown in Figure 2-3 is displayed.
After selecting the installation path, click Next.
HEDEXUser Guide 2 Installation
Issue 01 (2009–06–30) Huawei Proprietary and ConfidentialCopyright © Huawei Technologies Co., Ltd.
2-5

Figure 2-3 Selecting the installation path
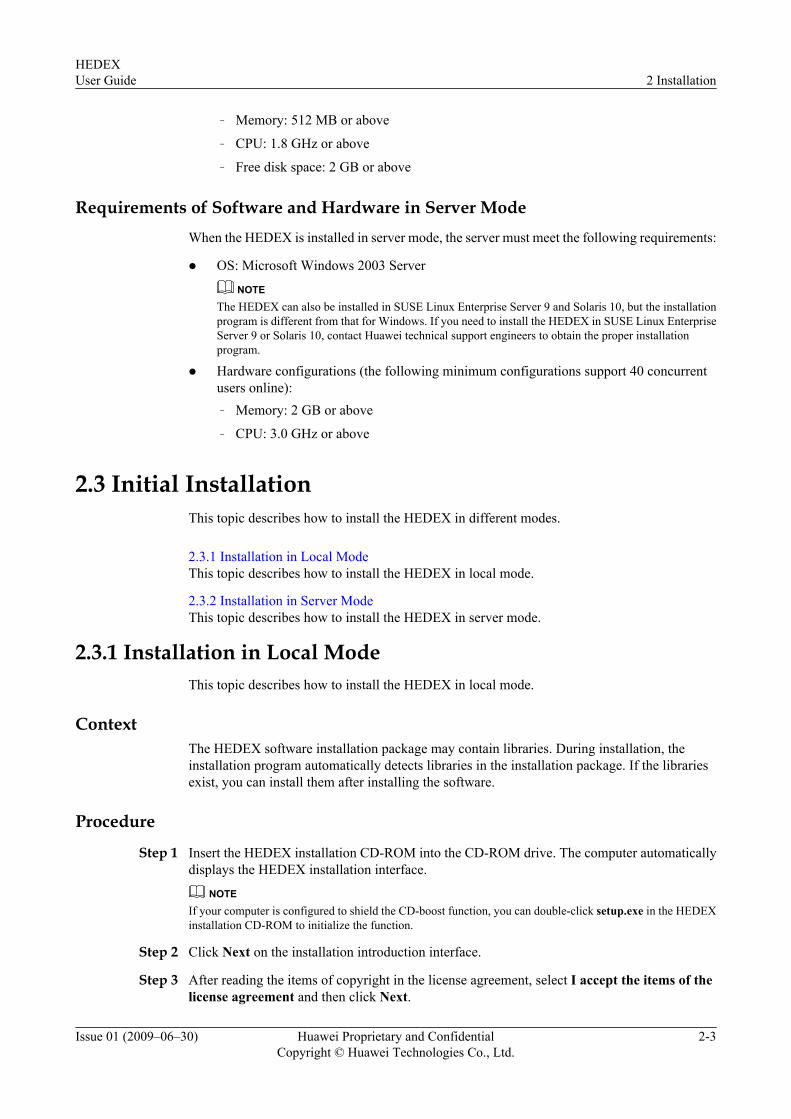
Step 8 On the interface as shown in Figure 2-4, enter the port number (the default value is 52199) ofthe HEDEX service. Then click Next.
NOTE
l The port number must be an integer ranging from 1 to 65535 and the port cannot be occupied by anotherapplication. (The installation program can check whether the port number is available.)
l The Firefox disables certain ports. If the HEDEX service port is a port disabled by the Firefox, you cannotaccess the HEDEX through the Firefox.
The following interfaces are restricted in the Firefox: 1, 7, 9, 11, 13, 15, 17, 19, 20, 21, 22, 23, 25, 37, 42,43, 53, 77, 79, 87, 95, 101, 102, 103, 104, 109, 110, 111, 113, 115, 117, 119, 123, 135, 139, 143, 179, 389,465, 512, 513, 514, 515, 526, 530, 531, 532, 540, 556, 563, 587, 601, 636, 993, 995, 2049, 4045, and 6000.
2 InstallationHEDEX
User Guide
2-6 Huawei Proprietary and ConfidentialCopyright © Huawei Technologies Co., Ltd.
Issue 01 (2009–06–30)
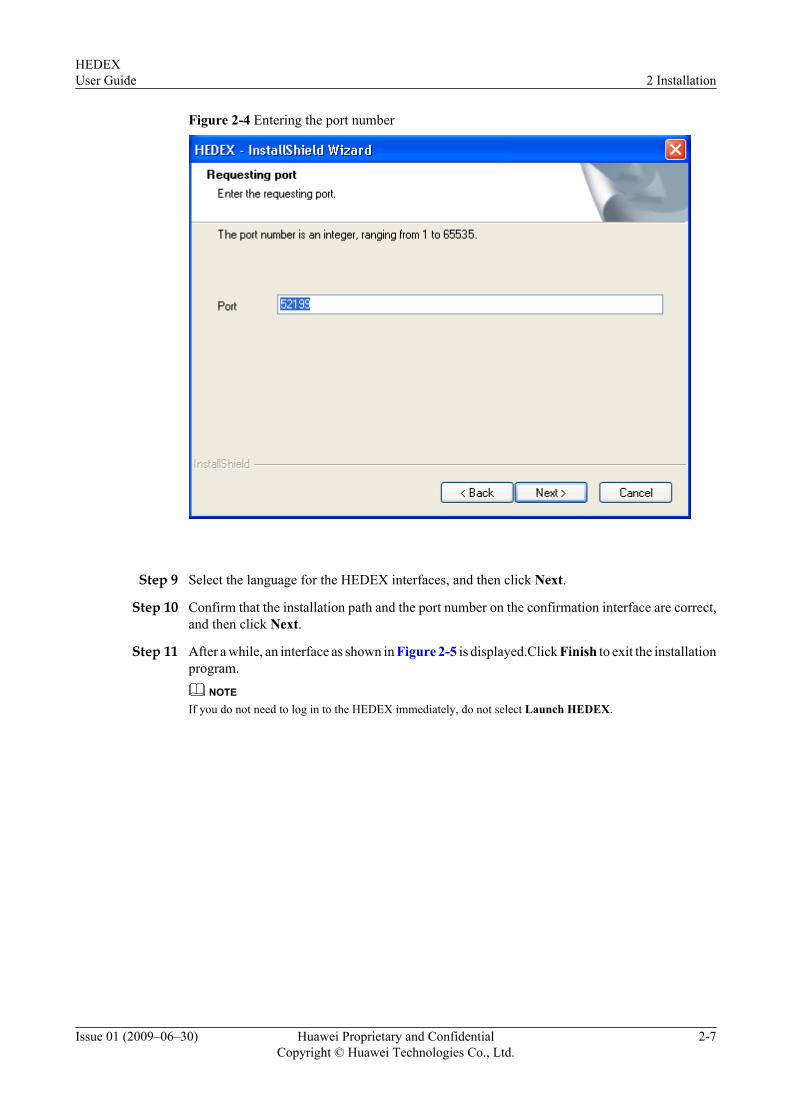
Figure 2-4 Entering the port number
Step 9 Select the language for the HEDEX interfaces, and then click Next.
Step 10 Confirm that the installation path and the port number on the confirmation interface are correct,and then click Next.
Step 11 After a while, an interface as shown in Figure 2-5 is displayed.Click Finish to exit the installationprogram.
NOTEIf you do not need to log in to the HEDEX immediately, do not select Launch HEDEX.
HEDEXUser Guide 2 Installation
Issue 01 (2009–06–30) Huawei Proprietary and ConfidentialCopyright © Huawei Technologies Co., Ltd.
2-7

Figure 2-5 Installation completion
----End
2.3.2 Installation in Server ModeThis topic describes how to install the HEDEX in server mode.
ContextThe HEDEX software installation package may contain libraries. During installation, theinstallation program automatically detects libraries in the installation package. If the librariesexist, you can install them after installing the software.
Procedure
Step 1 Insert the HEDEX installation CD-ROM into the CD-ROM drive. The computer automaticallydisplays the HEDEX installation interface.
NOTEIf your computer is configured to shield the CD-boost function, you can double-click setup.exe in the HEDEXinstallation CD-ROM to initialize the function.
Step 2 Click Next on the installation introduction interface.
Step 3 After reading the items of copyright in the license agreement, select I accept the items of thelicense agreement and then click Next.
Step 4 Click Next on the browser version confirmation interface.
2 InstallationHEDEX
User Guide
2-8 Huawei Proprietary and ConfidentialCopyright © Huawei Technologies Co., Ltd.
Issue 01 (2009–06–30)

Step 5 Specify User Name and Company Name on the customer information interface and then clickNext.
Step 6 Select Server mode in the installation mode interface(as shown in Figure 2-6), and clickNext.
Figure 2-6 Selecting the installation mode
Step 7 In Figure 2-7, enter the HEDEX administrator password and then click Next.NOTEThe password is a character string of 1 to 16 characters, containing letters, numbers, and underscores. It isthe initial password used by the HEDEX administrator (with the account admin) to log in to the HEDEX.You must remember the password; otherwise, you cannot log in to the HEDEX as the administrator.
HEDEXUser Guide 2 Installation
Issue 01 (2009–06–30) Huawei Proprietary and ConfidentialCopyright © Huawei Technologies Co., Ltd.
2-9

Figure 2-7 Set the Password of the HEDEX Administrator
Step 8 Select the installation path of the HEDEX and determine whether to install the library.
NOTEThe HEDEX installation path must meet the following requirements:
l The path must contain the characters in the same language as the OS and those in English. For example, ifyou install the HEDEX in an English OS, the installation path can contain only English characters.
l Special characters (& | ( ) ; @ ^ >) must be excluded.
The installation program detects automatically whether libraries exist in the installation CD-ROM:
l If libraries exist in the installation CD, the interface as shown in Figure 2-8 is displayed.Determine whether to install libraries and select the installation path, and then clickNext.
2 InstallationHEDEX
User Guide
2-10 Huawei Proprietary and ConfidentialCopyright © Huawei Technologies Co., Ltd.
Issue 01 (2009–06–30)

Figure 2-8 Selecting the installation path and libraries
l If no library exists in the installation CD, the interface as shown in Figure 2-9 is displayed.
After selecting the installation path, click Next.
HEDEXUser Guide 2 Installation
Issue 01 (2009–06–30) Huawei Proprietary and ConfidentialCopyright © Huawei Technologies Co., Ltd.
2-11

Figure 2-9 Selecting the installation path
Step 9 On the interface as shown in Figure 2-10, enter the port number (the default value is 52199) ofthe HEDEX service. Then click Next.
NOTE
l The port number must be an integer ranging from 1 to 65535 and the port cannot be occupied by anotherapplication. (The installation program can check whether the port number is available.)
l The Firefox disables certain ports. If the HEDEX service port is a port disabled by the Firefox, you cannotaccess the HEDEX through the Firefox.
The following interfaces are restricted in the Firefox: 1, 7, 9, 11, 13, 15, 17, 19, 20, 21, 22, 23, 25, 37, 42,43, 53, 77, 79, 87, 95, 101, 102, 103, 104, 109, 110, 111, 113, 115, 117, 119, 123, 135, 139, 143, 179, 389,465, 512, 513, 514, 515, 526, 530, 531, 532, 540, 556, 563, 587, 601, 636, 993, 995, 2049, 4045, and 6000.
2 InstallationHEDEX
User Guide
2-12 Huawei Proprietary and ConfidentialCopyright © Huawei Technologies Co., Ltd.
Issue 01 (2009–06–30)

Figure 2-10 Entering the port number
Step 10 Select the language for the HEDEX interfaces, and then click Next.
Step 11 Confirm that the installation path and the port number on the confirmation interface are correct,and then click Next.
Step 12 After a while, an interface as shown in Figure 2-11 is displayed.Click Finish to exit theinstallation program.
NOTEIf you do not need to log in to the HEDEX immediately, do not select Launch HEDEX.
HEDEXUser Guide 2 Installation
Issue 01 (2009–06–30) Huawei Proprietary and ConfidentialCopyright © Huawei Technologies Co., Ltd.
2-13
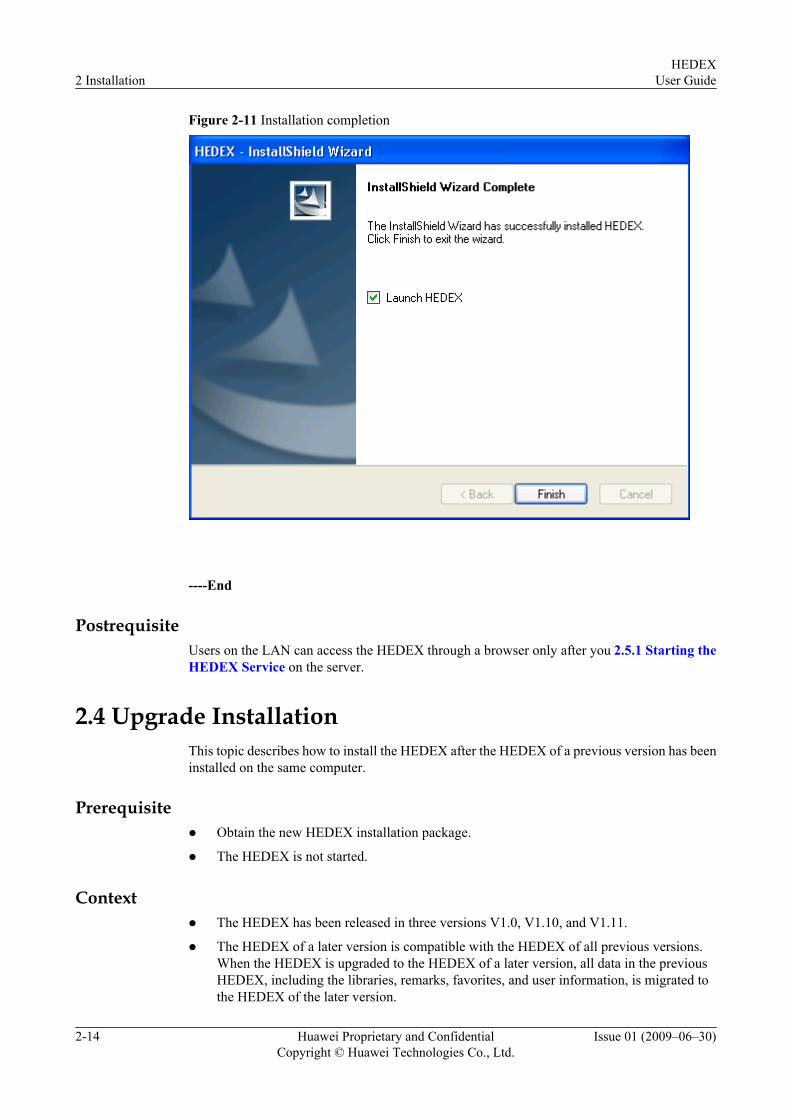
Figure 2-11 Installation completion
----End
PostrequisiteUsers on the LAN can access the HEDEX through a browser only after you 2.5.1 Starting theHEDEX Service on the server.
2.4 Upgrade InstallationThis topic describes how to install the HEDEX after the HEDEX of a previous version has beeninstalled on the same computer.
Prerequisitel Obtain the new HEDEX installation package.
l The HEDEX is not started.
Contextl The HEDEX has been released in three versions V1.0, V1.10, and V1.11.
l The HEDEX of a later version is compatible with the HEDEX of all previous versions.When the HEDEX is upgraded to the HEDEX of a later version, all data in the previousHEDEX, including the libraries, remarks, favorites, and user information, is migrated tothe HEDEX of the later version.
2 InstallationHEDEX
User Guide
2-14 Huawei Proprietary and ConfidentialCopyright © Huawei Technologies Co., Ltd.
Issue 01 (2009–06–30)

l When you perform the upgrade installation, the language, installation mode, installationpath, and the port number of the HEDEX cannot be changed and they are the same as thosebefore the upgrade.
ProcedureStep 1 Insert the HEDEX installation CD-ROM into the CD-ROM drive. The computer automatically
displays the HEDEX installation interface.NOTE
If your computer is configured to shield the CD-boost function, you can double-click setup.exe in the HEDEXinstallation CD-ROM to initialize the function.
Step 2 The installation program automatically detects the version of the HEDEX installed on the serverand responds accordingly.l If an interface as shown in Figure 2-12 is displayed during installation, it indicates that the
version of the current HEDEX is earlier than that of the HEDEX to be installed, and youneed to upgrade the HEDEX to the latest version. Click Next on the interfaces that aredisplayed before the upgrade installation is complete.
NOTEIf the installation package of the new HEDEX contains libraries, you can choose whether to install thenew libraries when upgrading the HEDEX.
Figure 2-12 HEDEX upgrade interface
l If an interface as shown in Figure 2-13 is displayed during installation, it indicates that the
version of the current HEDEX is the same as that of the HEDEX to be installed, and youdo not need to upgrade the HEDEX. You can, however, install the new libraries. ClickNext on the interfaces that are displayed before the maintenance is complete.
HEDEXUser Guide 2 Installation
Issue 01 (2009–06–30) Huawei Proprietary and ConfidentialCopyright © Huawei Technologies Co., Ltd.
2-15
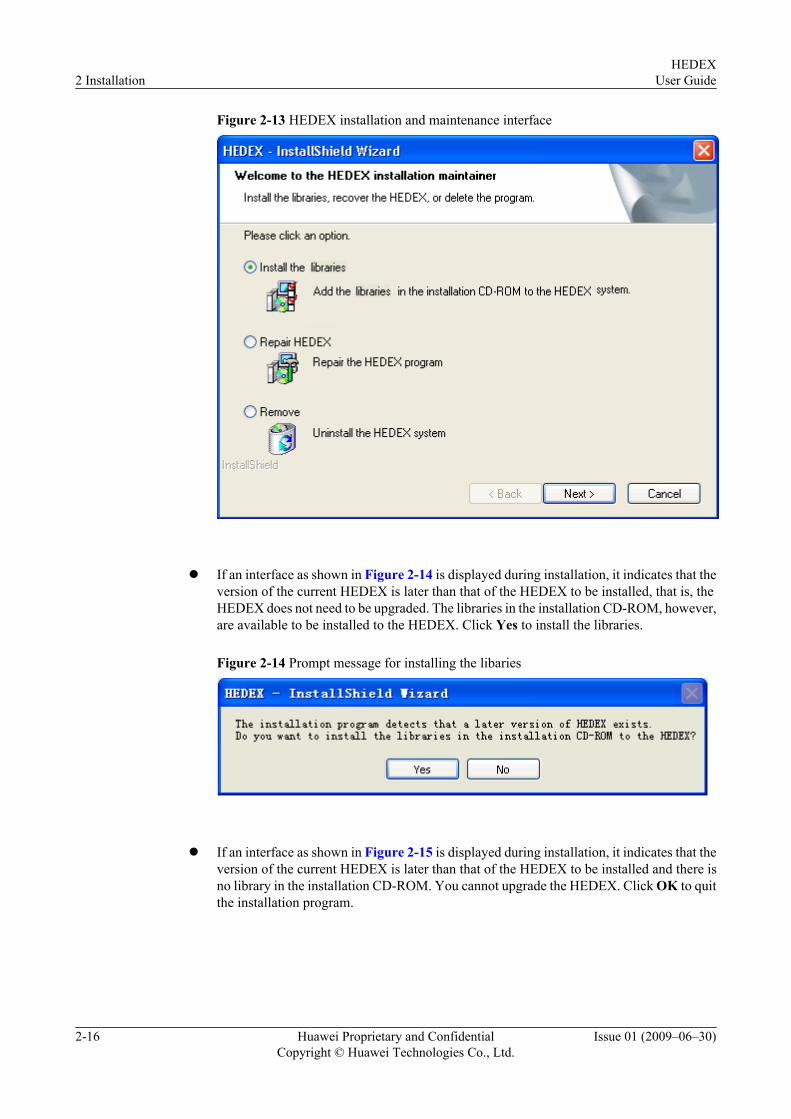
Figure 2-13 HEDEX installation and maintenance interface
l If an interface as shown in Figure 2-14 is displayed during installation, it indicates that the
version of the current HEDEX is later than that of the HEDEX to be installed, that is, theHEDEX does not need to be upgraded. The libraries in the installation CD-ROM, however,are available to be installed to the HEDEX. Click Yes to install the libraries.
Figure 2-14 Prompt message for installing the libaries
l If an interface as shown in Figure 2-15 is displayed during installation, it indicates that the
version of the current HEDEX is later than that of the HEDEX to be installed and there isno library in the installation CD-ROM. You cannot upgrade the HEDEX. Click OK to quitthe installation program.
2 InstallationHEDEX
User Guide
2-16 Huawei Proprietary and ConfidentialCopyright © Huawei Technologies Co., Ltd.
Issue 01 (2009–06–30)

Figure 2-15 Failing to install the HEDEX
----End
2.5 Starting or Stopping the HEDEX ServiceThis topic describes how to start or stop the HEDEX service.
2.5.1 Starting the HEDEX ServiceAfter starting the HEDEX service, you can access the HEDEX through a browser.
2.5.2 Stopping the HEDEX ServiceAfter stopping the HEDEX service, you cannot access the HEDEX through the browser. Whenyou close the HEDEX interface, the HEDEX service is not stopped.
2.5.1 Starting the HEDEX ServiceAfter starting the HEDEX service, you can access the HEDEX through a browser.
ContextIf the HEDEX is installed in server mode, users on the LAN can access the HEDEX only afterthe HEDEX service is started on the server.
Procedure
Step 1 Double-click on the desktop.NOTE
To start the HEDEX in Microsoft Windows Vista Ultimate, you must have the OS administrator rights.
----End
ResultAfter the HEDEX service is started, the HEDEX interface is displayed in the browser. At the
same time, the HEDEX tray is displayed in the notification area.
The description of the HEDEX tray is as follows:
l The HEDEX tray supports the right-click operation. Figure 2-16 shows the shortcutmenu.
HEDEXUser Guide 2 Installation
Issue 01 (2009–06–30) Huawei Proprietary and ConfidentialCopyright © Huawei Technologies Co., Ltd.
2-17
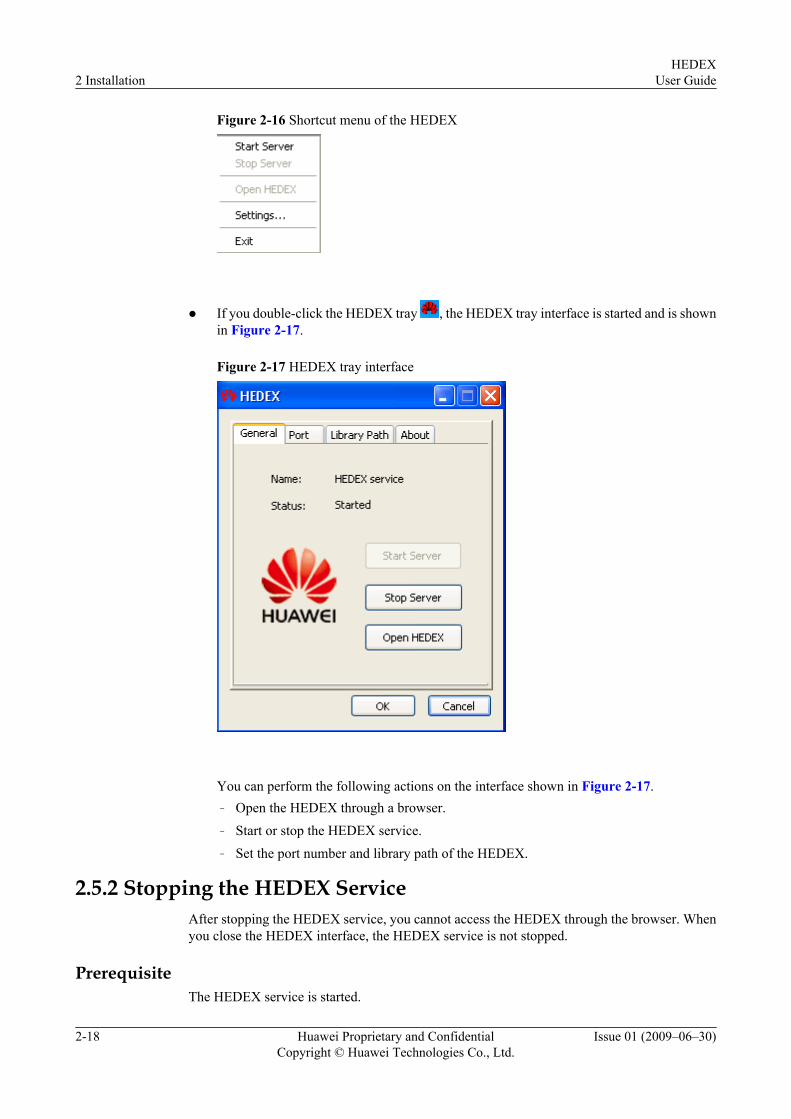
Figure 2-16 Shortcut menu of the HEDEX
l If you double-click the HEDEX tray , the HEDEX tray interface is started and is shownin Figure 2-17.
Figure 2-17 HEDEX tray interface
You can perform the following actions on the interface shown in Figure 2-17.– Open the HEDEX through a browser.– Start or stop the HEDEX service.– Set the port number and library path of the HEDEX.
2.5.2 Stopping the HEDEX ServiceAfter stopping the HEDEX service, you cannot access the HEDEX through the browser. Whenyou close the HEDEX interface, the HEDEX service is not stopped.
PrerequisiteThe HEDEX service is started.
2 InstallationHEDEX
User Guide
2-18 Huawei Proprietary and ConfidentialCopyright © Huawei Technologies Co., Ltd.
Issue 01 (2009–06–30)
ContextIf the HEDEX is installed in server mode, when you stop the HEDEX service on the server,users on the LAN cannot access the HEDEX.
Procedure
Step 1 Right-click in the notification area.
Step 2 On the shortcut menu, click Stop Server.
----End
ResultAfter the service is stopped, the HEDEX tray icon is displayed as .
2.6 Uninstalling the HEDEXWhen you uninstall the HEDEX, all data (except libraries) such as remarks, favorites, and userinformation is deleted and cannot be restored.
PrerequisiteThe HEDEX is not started.
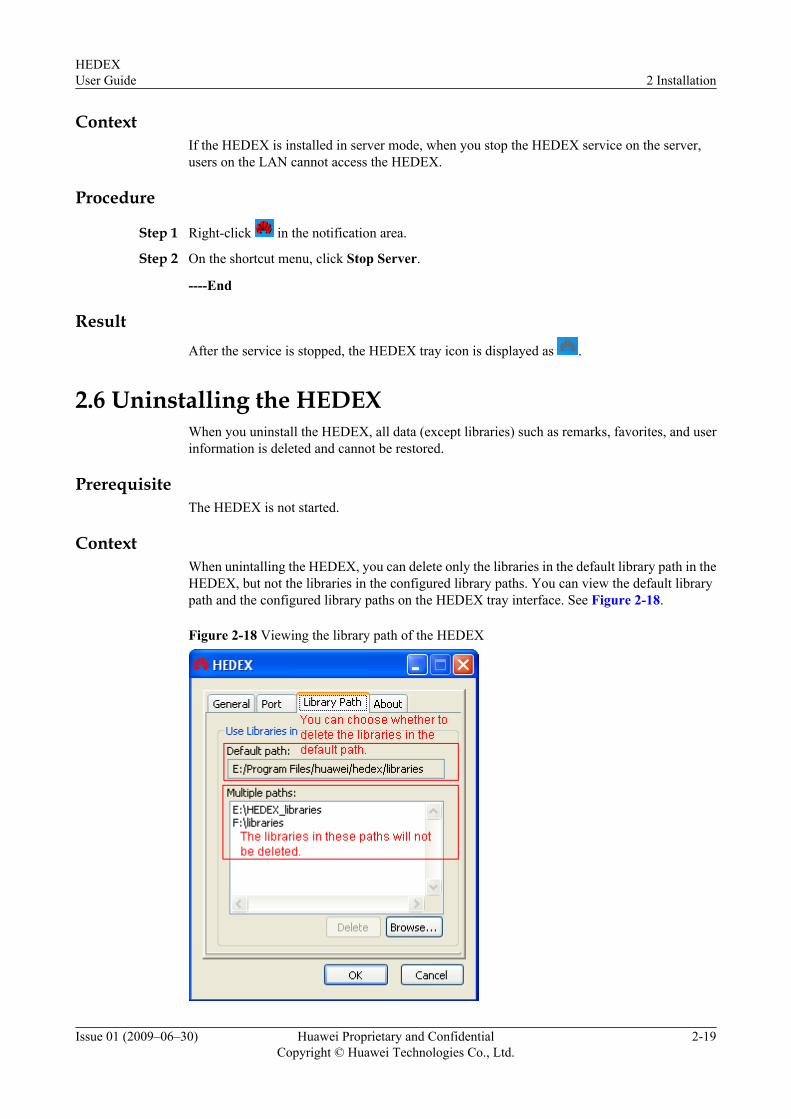
ContextWhen unintalling the HEDEX, you can delete only the libraries in the default library path in theHEDEX, but not the libraries in the configured library paths. You can view the default librarypath and the configured library paths on the HEDEX tray interface. See Figure 2-18.
Figure 2-18 Viewing the library path of the HEDEX
HEDEXUser Guide 2 Installation
Issue 01 (2009–06–30) Huawei Proprietary and ConfidentialCopyright © Huawei Technologies Co., Ltd.
2-19

Procedure
Step 1 Uninstall the HEDEX through Start > Program > HEDEX > Uninstall. An interface as shownin Figure 2-19 is displayed.
Figure 2-19 dialog box for uninstallation confirmation
Step 2 Click Yes. A dialog box as shown in Figure 2-20 is displayed.
Figure 2-20 dialog box for removing libraries
Step 3 If you need to remove the libraries in the default library path as shown in Figure 2-18, clickYes; otherwise, click No.
NOTE
When you uninstall the HEDEX in an English OS, the uninstallation program cannot automatically deletethe libraries whose file names contain Chinese characters; therefore, you need to delete the librariesmanually.
Step 4 Wait till the uninstallation is complete, and then click Finish on the completion interface.
----End
2 InstallationHEDEX
User Guide
2-20 Huawei Proprietary and ConfidentialCopyright © Huawei Technologies Co., Ltd.
Issue 01 (2009–06–30)

3 Introducing the HEDEX Interface
About This Chapter
The HEDEX consists of five pages: Home, Contents, Favorites, Remarks, and Admin.
NOTEYou can press F11 on the keyboard to hide the menu bar and address bar of the browser and display the HEDEXinterface in full screen. Press F11 again to restore.
3.1 Home PageThe Home page lists basic information about the libraries that you can view.
3.2 Contents PageAfter the HEDEX is started, you can open the Contents page by clicking a library name on theHome page. The Contents page shows the contents of the library. Yon can browse only onelibrary at a time.
3.3 Favorites PageThe Favorites page shows the favorites in the HEDEX.
3.4 Remarks PageRemarks page shows all the remarks in HEDEX.
3.5 Admin PageOn the Admin page, you can manage libraries. When the HEDEX is installed in server mode,the HEDEX administrator can perform user management on the page.
HEDEXUser Guide 3 Introducing the HEDEX Interface
Issue 01 (2009–06–30) Huawei Proprietary and ConfidentialCopyright © Huawei Technologies Co., Ltd.
3-1

3.1 Home PageThe Home page lists basic information about the libraries that you can view.
After the HEDEX is started, The Home page is displayed as shown in Figure 3-1.
Figure 3-1 Home page
The Home page consists of three parts:
l HEDEX head: Indicates the HEDEX name. You can perform the following actions at thehead:– Register an account and log in to or log out of the HEDEX.
– Switch the language displayed on the interface of the HEDEX between Chinese andEnglish.
– Change the password by clicking . (The icon is displayed after login.)
– Obtain the Online Help of the HEDEX by clicking .
– Click to start the default email client and create an email that is sent [email protected].
All the HEDEX pages contain the same HEDEX head. Thus, this part is not described inother pages.
l Search bar: Allows you to Implement basic search or advanced search.
NOTE
Search bars also exist in the Contents, Favorites, Remarks, and Admin pages, but they are locatedin the HEDEX heads. On the Contents page, you can search only a single library displayed on theContents page. On other pages, you can search all the libraries listed in the Home page.
l Library list: Shows basic information about all the libraries that you can view on theHEDEX interface. You can perform the following actions on the library list:
3 Introducing the HEDEX InterfaceHEDEX
User Guide
3-2 Huawei Proprietary and ConfidentialCopyright © Huawei Technologies Co., Ltd.
Issue 01 (2009–06–30)

– Click Details to view more information about the library.
– Click the column title to sort libraries.
– Click the name of a library to access the 3.2 Contents Page.
3.2 Contents PageAfter the HEDEX is started, you can open the Contents page by clicking a library name on theHome page. The Contents page shows the contents of the library. Yon can browse only onelibrary at a time.
On the Home page, click the name of a library to open the Contents page, as shown in theFigure 3-2.
Figure 3-2 Contents page
Besides the HEDEX head, the Contents page consists of the following two parts:
l Navigation area: Displays topics of the library. You can perform the following actions inthe navigation area:
– Click a node on the TOC tab to view the corresponding contents in the browse area.
– Put the pointer on the boundary between the navigation area and the browse area. Whenthe pointer turns to the horizontal adjustment state , you can adjust the width of thenavigation area.
– Click to hide the navigation area and to display the navigation area.
l Browse area: Displays contents of libraries. You can perform the following actions in thebrowse area:
HEDEXUser Guide 3 Introducing the HEDEX Interface
Issue 01 (2009–06–30) Huawei Proprietary and ConfidentialCopyright © Huawei Technologies Co., Ltd.
3-3

– On the upper right corner, you can add remarks and favorites, and print the current page.
If the library contains any remark, is displayed on the upper right
corner of the current page. Click to view the remark.– The position of the current page located in the library is displayed on the upper right
corner.
3.3 Favorites PageThe Favorites page shows the favorites in the HEDEX.
On the Favorites page, you can view, edit, or delete favorites. For details, see 6 AddingFavorites.
3.4 Remarks PageRemarks page shows all the remarks in HEDEX.
On the Remarks page, you can view all the remarks in the HEDEX, and you can also edit, delete,export, and import a remark. For details, see 7 Adding Remarks.
3.5 Admin PageOn the Admin page, you can manage libraries. When the HEDEX is installed in server mode,the HEDEX administrator can perform user management on the page.
Library management consists of uploading and removing libraries and controlling the displayof the libraries on the Home page. For details, see 8.1 Library Management.
When the HEDEX is installed in server mode, only the HEDEX administrator can access thepage. The HEDEX administrator can perform user management on this page, such as deletinga user, initializing a password, and viewing the number of online users. For details, see 8.2 UserManagement.
3 Introducing the HEDEX InterfaceHEDEX
User Guide
3-4 Huawei Proprietary and ConfidentialCopyright © Huawei Technologies Co., Ltd.
Issue 01 (2009–06–30)
4 Browsing
On the Home page of the HEDEX, you can browse basic information about libraries. On theContents page, you can browse the contents of a single library.
Procedure
Step 1 Open the HEDEX with a browser, do as follows:
l If the HEDEX is installed in local mode, double-click to start the HEDEX service andthe HEDEX interface is displayed on the browser automatically.
l If the HEDEX is installed in server mode, you need to enter the address of theHEDEX in thebrowser of a PC to access the HEDEX. This method is similar to Web access.
NOTE
You can obtain the access address of the HEDEX from the HEDEX administrator.
Step 2 On the Home page, you can browse the basic information about all libraries in the HEDEX.Click Details to view more information about the library.
Step 3 In the library list, click the name of a library to access the Contents page to browse librarycontents.
----End
HEDEXUser Guide 4 Browsing
Issue 01 (2009–06–30) Huawei Proprietary and ConfidentialCopyright © Huawei Technologies Co., Ltd.
4-1


5 Searching
About This Chapter
The HEDEX provides three methods of searching information: basic search, advanced searchand search within results.
5.1 Basic SearchOn the Contents page, you can search the opened library for required information. On theHome, Favorites, Remarks, and Admin pages, you can search all the libraries on the Homepage.
5.2 Advanced SearchOn the Contents page, you can search the opened library for required information. On theHome, Favorites, Remarks, and Admin pages, you can search all the libraries on the Homepage (you can also specify the search scope.)
5.3 Searching in ResultsIf there are too many results and it is difficult to locate the exact information, you can search inthe results.
5.4 Search SyntaxThis topic describes the rules of searching in the HEDEX.
HEDEXUser Guide 5 Searching
Issue 01 (2009–06–30) Huawei Proprietary and ConfidentialCopyright © Huawei Technologies Co., Ltd.
5-1

5.1 Basic SearchOn the Contents page, you can search the opened library for required information. On theHome, Favorites, Remarks, and Admin pages, you can search all the libraries on the Homepage.
Procedure
Step 1 On the Home page, enter keywords in
and clickSearch.
Or on the Contents, Favorites, Remarks, or Admin page, enter keywords in
and click Search.
For details about the search syntax of the HEDEX, see 5.4 Search Syntax.
Step 2 Click a title in the search results. You can check the details in a new window. The keywords arehighlighted in different colors.
The number of search results is displayed and the results are listed in descending order accordingto the match ratio. Figure 5-1 is a search result example.
You can also click the links under Operational Process or Document Type to display the resultscorresponding to an operational procedure or a file type.
Figure 5-1 Search Result
----End
5.2 Advanced SearchOn the Contents page, you can search the opened library for required information. On theHome, Favorites, Remarks, and Admin pages, you can search all the libraries on the Homepage (you can also specify the search scope.)
Procedure
Step 1 On any HEDEX page, click Advanced Search to open the Advanced Search dialogue box.
Step 2 Set the search conditions.Table 5-1 describes the parameters.
5 SearchingHEDEX
User Guide
5-2 Huawei Proprietary and ConfidentialCopyright © Huawei Technologies Co., Ltd.
Issue 01 (2009–06–30)

Table 5-1 Field description of advanced search
Option Description Option
Description
All thesewords
Indicates that there are multiplekeywords.
Keywordsin
The search scope is in thedocument title only or inAnywhere .
This exactword orphrase
Indicates that the keywords areintegrated as one part.
DocumentType
The search scope is the library ofa certain type.
At list oneof thesewords
Indicates that containing onekeyword also meets the rule.
OperationalProcess
The search scope is the libraryincluding a certain operationalprocess.
Search in Specify the library that you want to search. When you use advanced search onHome, Favorites, Remarks, and Admin pages, this option is displayed. Whenyou search the Contents page, the search scope is a single library, and thisoption does not exist.
Step 3 Click Search.
Step 4 Click a title in the search results. You can check the details in a new window. The keywords arehighlighted in different colors.
The number of search results is displayed and the results are listed in descending order accordingto the match ratio. Figure 5-2 is a search result example.
You can also click the links under Operational Process or Document Type to display the resultscorresponding to an operational procedure or a file type.
Figure 5-2 Search Result
----End
5.3 Searching in ResultsIf there are too many results and it is difficult to locate the exact information, you can search inthe results.
PrerequisiteYou have searched some libraries and obtained at least one result.
HEDEXUser Guide 5 Searching
Issue 01 (2009–06–30) Huawei Proprietary and ConfidentialCopyright © Huawei Technologies Co., Ltd.
5-3

Procedure
Step 1 Click Search in results on the upper left corner of the search result page.
Step 2 Enter keywords in the search bar.
For details about the search syntax of the HEDEX, see 5.4 Search Syntax.
Step 3 Click Search.
Step 4 Click a title in the search results. You can check the details in a new window. The keywords arehighlighted in different colors.
The number of search results is displayed and the results are listed in descending order accordingto the match ratio. Figure 5-3 is a search result example.
You can also click the links under Operational Process or Document Type to display the resultscorresponding to an operational procedure or a file type.
Figure 5-3 Search Result
----End
5.4 Search SyntaxThis topic describes the rules of searching in the HEDEX.
Special Charactersl The HEDEX considers the four characters (. - _ %) as the connection characters. For
example, when you search for "layer-1," the HEDEX considers layer-1 as a word. Only theitems fully matched can be found.
l The HEDEX ignores the four characters (& $ # !) when you are searching for items.
Search RulesTable 5-2 describes the search rules.
5 SearchingHEDEX
User Guide
5-4 Huawei Proprietary and ConfidentialCopyright © Huawei Technologies Co., Ltd.
Issue 01 (2009–06–30)
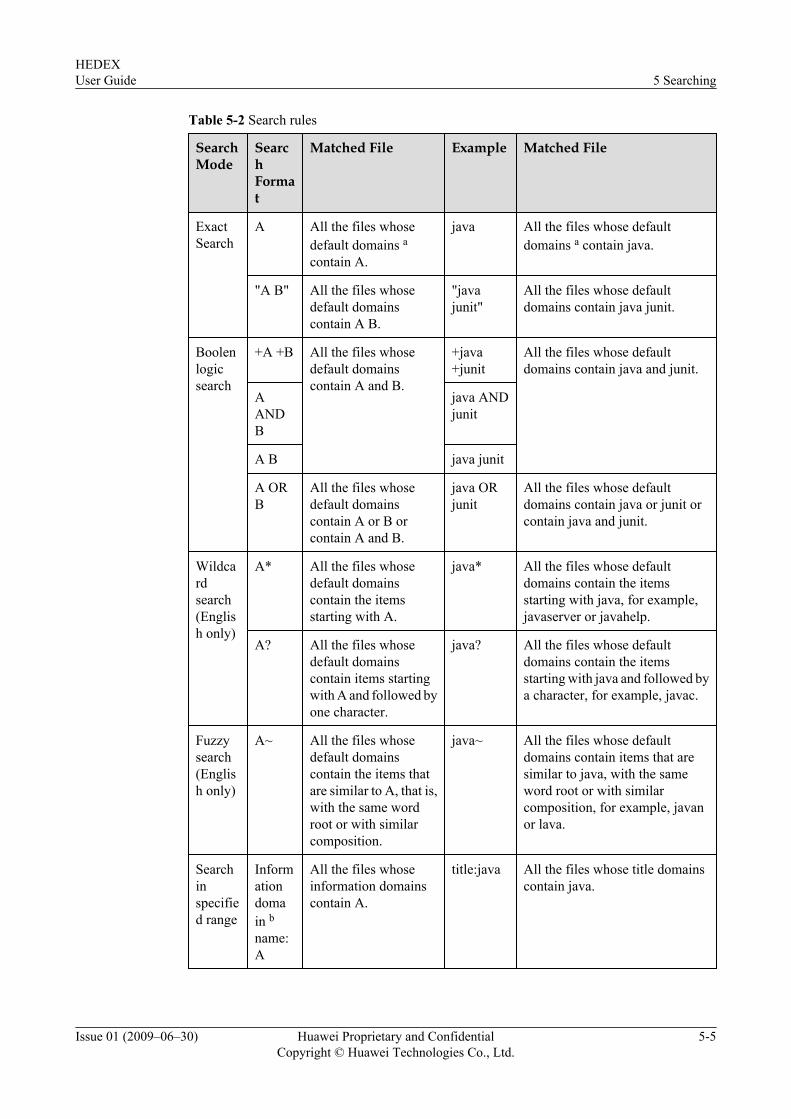
Table 5-2 Search rules
SearchMode
SearchFormat
Matched File Example Matched File
ExactSearch
A All the files whosedefault domains acontain A.
java All the files whose defaultdomains a contain java.
"A B" All the files whosedefault domainscontain A B.
"javajunit"
All the files whose defaultdomains contain java junit.
Boolenlogicsearch
+A +B All the files whosedefault domainscontain A and B.
+java+junit
All the files whose defaultdomains contain java and junit.
AANDB
java ANDjunit
A B java junit
A ORB
All the files whosedefault domainscontain A or B orcontain A and B.
java ORjunit
All the files whose defaultdomains contain java or junit orcontain java and junit.
Wildcardsearch(English only)
A* All the files whosedefault domainscontain the itemsstarting with A.
java* All the files whose defaultdomains contain the itemsstarting with java, for example,javaserver or javahelp.
A? All the files whosedefault domainscontain items startingwith A and followed byone character.
java? All the files whose defaultdomains contain the itemsstarting with java and followed bya character, for example, javac.
Fuzzysearch(English only)
A~ All the files whosedefault domainscontain the items thatare similar to A, that is,with the same wordroot or with similarcomposition.
java~ All the files whose defaultdomains contain items that aresimilar to java, with the sameword root or with similarcomposition, for example, javanor lava.
Searchinspecified range
Informationdomain bname:A
All the files whoseinformation domainscontain A.
title:java All the files whose title domainscontain java.
HEDEXUser Guide 5 Searching
Issue 01 (2009–06–30) Huawei Proprietary and ConfidentialCopyright © Huawei Technologies Co., Ltd.
5-5

a: default domain: The domain indicates the search scope. In the HEDEX, the default searchscope consists of title, keyword and contents.
b: information domain: The contents can be divided into several types based on certain rules andeach type is an information domain. HEDEX information domains consist of title, keyword,summary, and contents.
5 SearchingHEDEX
User Guide
5-6 Huawei Proprietary and ConfidentialCopyright © Huawei Technologies Co., Ltd.
Issue 01 (2009–06–30)

6 Adding Favorites
About This Chapter
You can create, view, edit, and delete a favorite in the HEDEX.
6.1 Creating a FavoriteYou can set a page of a document that you are interested in or often browse to a favorite forconvenience reference in the future.
6.2 Viewing a FavoriteOn the Favorites page, you can view all the favorites created in the HEDEX.
6.3 Editing a FavoriteOn the Favorites page, you can edit the favorites that you create.
6.4 Deleting a FavoriteOn the Favorites page, you can delete the favorites that you create.
HEDEXUser Guide 6 Adding Favorites
Issue 01 (2009–06–30) Huawei Proprietary and ConfidentialCopyright © Huawei Technologies Co., Ltd.
6-1

6.1 Creating a FavoriteYou can set a page of a document that you are interested in or often browse to a favorite forconvenience reference in the future.
PrerequisiteIf the HEDEX that you access is installed in server mode, you must be a registered user whologs in to the HEDEX with an account and a password.
Procedure
Step 1 On the Home page, click the name of a library to open the Contents page.
Step 2 On the Contents page where you want to add a favorite, click Add Favorite.
Step 3 Enter a favorite title (document title by default, containing up to 100 characters) in the EditFavorite dialog box and click Save.
----End
ResultThe new favorite is saved into the Favorites page.
6.2 Viewing a FavoriteOn the Favorites page, you can view all the favorites created in the HEDEX.
Procedure
Step 1 Enter the Favorites page.
Step 2 On the Favorites page, you can view all the favorites created with the HEDEX.
You can click a favorite title to open the page where the favorite is. If a favorite title isunavailable, it indicates that the library corresponding to the favorite does not exist on theHome page.
NOTE
In the favorite list, the HEDEX displays the favorites created by yourself on the top, and other favoritesare listed according to the last modified time. To sort the favorites in the favorites list, click the columntitle.
----End
6.3 Editing a FavoriteOn the Favorites page, you can edit the favorites that you create.
6 Adding FavoritesHEDEX
User Guide
6-2 Huawei Proprietary and ConfidentialCopyright © Huawei Technologies Co., Ltd.
Issue 01 (2009–06–30)

PrerequisiteIf the HEDEX that you access is installed in server mode, you must be a registered user whologs in to the HEDEX with an account and a password.
Procedure
Step 1 Enter the Favorites page.
Step 2 Find the line where the favorite exists from the favorite list and click Edit.If Edit is unavailable, it means that you do not have permission to edit the favorite.
Step 3 After changing the Title of the favorite in the favorite edit box, click Save.
----End
6.4 Deleting a FavoriteOn the Favorites page, you can delete the favorites that you create.
PrerequisiteIf the HEDEX that you access is installed in server mode, you must be a registered user whologs in to the HEDEX with an account and a password.
Procedure
Step 1 Enter the Favorites page.
Step 2 Find the line where the favorite to be deleted in the favorite list and click Delete in the Actioncolumn.
You can also select checkboxes in front of the favorites to be deleted, and click Delete belowthe list to delete multiple favorites.
To delete all favorites, tick Select all and then click Delete. If Delete is unavailable, it meansthat you do not have permission to delete the favorite.
----End
HEDEXUser Guide 6 Adding Favorites
Issue 01 (2009–06–30) Huawei Proprietary and ConfidentialCopyright © Huawei Technologies Co., Ltd.
6-3


7 Adding Remarks
About This Chapter
When browsing a document, add remarks on the document about your ideas, doubts, andexperience. On the HEDEX, you can create, edit, query, delete, export, and import a remark.
7.1 Creating a RemarkYou can create a remark on a document when you find out useful information or have thoughtsin reading the document. In the HEDEX, up to 30,000 remarks can be created.
7.2 Viewing a RemarkYou can view all the remarks of the HEDEX on the Remarks page, or the remarks on each pagethrough the Contents page.
7.3 Finding a RemarkWhen many remarks exist in the HEDEX, you can query a remark according to Author, Title,Content, and Date.
7.4 Editing a RemarkYou can edit only the remarks that you create.
7.5 Exporting RemarksYou can export only the remarks that you create.
7.6 Importing RemarksYou can import the remarks exported from the HEDEX.
7.7 Deleting a RemarkYou can delete only the remarks that you create.
HEDEXUser Guide 7 Adding Remarks
Issue 01 (2009–06–30) Huawei Proprietary and ConfidentialCopyright © Huawei Technologies Co., Ltd.
7-1

7.1 Creating a RemarkYou can create a remark on a document when you find out useful information or have thoughtsin reading the document. In the HEDEX, up to 30,000 remarks can be created.
PrerequisiteIf the HEDEX that you access is installed in server mode, you must be a registered user whologs in to the HEDEX with an account and a password.
Procedure
Step 1 On the Home page, click the name of a library to open the Contents page.
Step 2 On the upper right corner of the Contents page which you want to create a remark on, click
.
Step 3 Specify Title (document title by default, containing up to 100 characters) and Content (thatcontains up to 1000 characters) in the Edit Remark dialogue box and click Save.
----End
Result
After you create a remark on the Contents page, is displayed on the upper
right corner of the browse area. You can click to view all the remarks ofthe current document. The newly-created remark is displayed on the Remarks page.
7.2 Viewing a RemarkYou can view all the remarks of the HEDEX on the Remarks page, or the remarks on each pagethrough the Contents page.
Procedure
Step 1 Enter the Remarks page.
Step 2 On the Remarks page, you can view all the remarks created with the HEDEX. You can click aremark title to open the page where the remark is added to. If a remark title is unavailable, itmeans that the library corresponding to the remark does not exist on the Home page.
NOTE
In the remarks list, the HEDEX displays the remarks created by yourself at the top, and other remarks arelisted according to the last modified time. To sort the remarks in the remarks list, click the column title.
If the document contains any remark, is displayed on the upper right corner of the
Contents page. You can click to view the remarks.
----End
7 Adding RemarksHEDEX
User Guide
7-2 Huawei Proprietary and ConfidentialCopyright © Huawei Technologies Co., Ltd.
Issue 01 (2009–06–30)
7.3 Finding a RemarkWhen many remarks exist in the HEDEX, you can query a remark according to Author, Title,Content, and Date.
Procedure
Step 1 Enter the Remarks page.
Step 2 Click Query.
Step 3 Specify any of Author, Title, Content, Start date, and End date. Click Submit.NOTE
The HEDEX finds remarks in exact search mode based on Author and in fuzzy search mode based onTitle and Content.
----End
7.4 Editing a RemarkYou can edit only the remarks that you create.
PrerequisiteIf the HEDEX that you access is installed in server mode, you must be a registered user whologs in to the HEDEX with an account and a password.
Procedure
Step 1 Enter the Remarks page.
Step 2 Find the line where the remark exists from the remarks list and click Edit. If Edit is unavailable,it means that you do not have permission to edit the remark.
You can click a remark title to open the page where the remark is added to. All remarks on thepage are displayed in the upper browse area. You can also edit a remark by clicking Edit in theback of each remark.
Step 3 After changing Title (that contains up to 100 characters) or Content (that contains up to 1000characters) of the remark in the Edit Remark dialog box, click Save.
----End
7.5 Exporting RemarksYou can export only the remarks that you create.
PrerequisiteIf the HEDEX that you access is installed in server mode, you must be a registered user whologs in to the HEDEX with an account and a password.
HEDEXUser Guide 7 Adding Remarks
Issue 01 (2009–06–30) Huawei Proprietary and ConfidentialCopyright © Huawei Technologies Co., Ltd.
7-3

Procedure
Step 1 Enter the Remarks page.
Step 2 In the remarks list, select the checkboxes of the remarks that you intend to export.
Tick Select All to export all remarks. If the checkbox is unavailable, it means that you do nothave permission to export the remarks.
Step 3 Click Export to export the selected remarks. The exported remarks are saved in a file that is inthe format of .csv.
At the top of the remarks list, click Export All to export all remarks.
----End
7.6 Importing RemarksYou can import the remarks exported from the HEDEX.
Prerequisitel Export the remark file (the file is in the format of .csv) from the HEDEX.
l If the HEDEX that you access is installed in server mode, you must be a registered userwho logs in to the HEDEX with an account and a password. For details, see Logging in tothe HEDEX.
Procedure
Step 1 Enter the Remarks page.
Step 2 Click Import.
Step 3 Click Browse in the displayed dialogue box. After selecting the remark file, click Import.
NOTE
After the import, if the title of the imported remark is unavailable and cannot be linked to a document page,it means that the corresponding library does not exist on the Home page.
----End
7.7 Deleting a RemarkYou can delete only the remarks that you create.
PrerequisiteIf the HEDEX that you access is installed in server mode, you must be a registered user whologs in to the HEDEX with an account and a password.
Procedure
Step 1 Enter the Remarks page.
7 Adding RemarksHEDEX
User Guide
7-4 Huawei Proprietary and ConfidentialCopyright © Huawei Technologies Co., Ltd.
Issue 01 (2009–06–30)

Step 2 Find the line where the remark to be deleted exists from the remarks list and click Delete.
Select checkboxes before the remarks to be deleted, and click Delete at the bottom to deletemultiple remarks.
Tick Select All to delete all remarks. If Delete is unavailable, it means that you do not havepermission to delete the remark.
You can click a remark title to open the page where the remark is added to. All remarks on thepage are displayed in the upper browse area. You can also delete a remark by clicking Deletein the back of each remark.
----End
HEDEXUser Guide 7 Adding Remarks
Issue 01 (2009–06–30) Huawei Proprietary and ConfidentialCopyright © Huawei Technologies Co., Ltd.
7-5


8 System Administrator Tasks
About This Chapter
Only the HEDEX administrator has the system management right. System management mainlyrefers to library management. When the HEDEX is installed in server mode, the HEDEXadministrator can perform user management.
Contextl If the HEDEX is installed in local mode, the local user is the HEDEX administrator.
l When the HEDEX is installed in server mode, the HEDEX administrator account isadmin, and the initial password is the administrator password configured when you installthe HEDEX.
8.1 Library ManagementOn the HEDEX, the HEDEX administrator can upload or delete a library directly, and can alsocontrol the display of a library on the Home page.
8.2 User ManagementWhen the HEDEX is installed in server mode, the administrator can perform user management.
HEDEXUser Guide 8 System Administrator Tasks
Issue 01 (2009–06–30) Huawei Proprietary and ConfidentialCopyright © Huawei Technologies Co., Ltd.
8-1

8.1 Library ManagementOn the HEDEX, the HEDEX administrator can upload or delete a library directly, and can alsocontrol the display of a library on the Home page.
8.1.1 Uploading Libraries on the Admin PageOn the Admin page, you can upload only one library at a time.
8.1.2 Configuring the Library Path Through the HEDEX TrayYou can upload several libraries at a time by configuring the path (such as a path on a disk of alocal computer or on the network) in the HEDEX tray.
8.1.3 Controlling the Display of the Library on the Home PageYou can control whether the library uploaded on the Admin page is displayed on the Homepage. If a library is not displayed on the Home page, you cannot perform actions on the library.
8.1.4 Deleting a LibraryAfter you delete a library from the Admin page, the library is deleted from the hard disk andcannot be restored.
8.1.1 Uploading Libraries on the Admin PageOn the Admin page, you can upload only one library at a time.
Prerequisitel You are the administrator of the HEDEX.
l You have the libraries provided by Huawei.
ContextHuawei provides two types of libraries:
l basic libraryl extended library
NOTE
If you install the HEDEX in local mode, it is recommended that the library is not larger than 1 GB; otherwise,the speed of browsing or searching libraries is affected.
Procedure
Step 1 Enter the Admin page.
Step 2 Click Browse in the Library Management tab to select the library to be uploaded.
Step 3 Click Upload.
----End
ResultIn the HEDEXAdmin page, click the Library Management tab. All the uploaded library typesand storage paths that can be copied are displayed.
8 System Administrator TasksHEDEX
User Guide
8-2 Huawei Proprietary and ConfidentialCopyright © Huawei Technologies Co., Ltd.
Issue 01 (2009–06–30)

For the library of different types, the HEDEX uses different methods.
l If the uploaded library is a basic library, the check box in the Visible column on theAdmin page is selected by default. On the Home page, the library is displayed.
l If the uploaded library is an extended library, the Home page does not display the libraryby default. If the HEDEX contains the corresponding main library, extended librarycontents are added to the main library.
NOTE
The library uploaded in this mode is stored in the default library path (that can be viewed in the Pathcolumn). When uninstalling the HEDEX, you can delete the library in the path at the same time.
8.1.2 Configuring the Library Path Through the HEDEX TrayYou can upload several libraries at a time by configuring the path (such as a path on a disk of alocal computer or on the network) in the HEDEX tray.
Prerequisitel HEDEX is installed in Windows.
l You are the administrator of the HEDEX.
ContextTen library paths can be configured at most.
Procedure
Step 1 Start the HEDEX service on the computer installed with the HEDEX. The HEDEX tray isdisplayed in the notification area.
Step 2 Double-click . On the displayed Library path tab shown in Figure 8-1, click Browse tochoose the library paths.
NOTE
Up to 10 paths can be configured. The path can be a path on a disk of a local computer or on the network.
HEDEXUser Guide 8 System Administrator Tasks
Issue 01 (2009–06–30) Huawei Proprietary and ConfidentialCopyright © Huawei Technologies Co., Ltd.
8-3

Figure 8-1 Configuring library paths
Step 3 Click OK. A dialog box is displayed, as shown in Figure 8-2.
Figure 8-2 Dialog box on prompting you to restart the HEDEX service
Step 4 If you need to upload a library in a specified path to the HEDEX, click Yes to restart the HEDEXservice; otherwise, click No.
CAUTIONIf the HEDEX is installed in server mode, other users cannot access the HEDEX when theHEDEX is restarting.
Step 5 If you want to display the library in a specified path on the Home page, you need to select thecheck box in the Visible column on the Admin page of the HEDEX.
8 System Administrator TasksHEDEX
User Guide
8-4 Huawei Proprietary and ConfidentialCopyright © Huawei Technologies Co., Ltd.
Issue 01 (2009–06–30)

If you add a library in the configured library path, click Reload on the Admin page.
----End
8.1.3 Controlling the Display of the Library on the Home PageYou can control whether the library uploaded on the Admin page is displayed on the Homepage. If a library is not displayed on the Home page, you cannot perform actions on the library.
PrerequisiteYou are the administrator of the HEDEX.
Procedure
Step 1 Enter the Admin page.
Step 2 If you need to display a library on the Home page, select the checkbox in the Visible column inthe library list.
----End
8.1.4 Deleting a LibraryAfter you delete a library from the Admin page, the library is deleted from the hard disk andcannot be restored.
PrerequisiteYou are the administrator of the HEDEX.
Procedure
Step 1 Enter the Admin page.
Step 2 In the library list, find the line where the library to be deleted exists, and then click Delete. Thenthe library is deleted from the disk.
----End
8.2 User ManagementWhen the HEDEX is installed in server mode, the administrator can perform user management.
ContextIf the HEDEX is installed in server mode, HEDEX users are classified into three types: theunregistered user, registered user, and administrator. The right of each user type is described asfollows:
l Unregistered user: Such a users can access the HEDEX directly to browse libraries, searchinformation, and view remarks and favorites.
l Registered user: Such a user can register with the HEDEX and log in to the HEDEX withaccounts and passwords. Besides the right of the unregistered user, the registered user can
HEDEXUser Guide 8 System Administrator Tasks
Issue 01 (2009–06–30) Huawei Proprietary and ConfidentialCopyright © Huawei Technologies Co., Ltd.
8-5

create, edit, delete, export, and import remarks, and create, edit, and delete favorites (theycan perform actions on only the remarks and favorites created by themselves).
l Administrator: Besides the right of the registered user, the administrator can managelibraries and users and can manage all the remarks and favorites of the HEDEX.
The HEDEX supports up to 1000 users and only registered users can be managed.
8.2.1 Initializing a PasswordIf a user forgets the login password, the HEDEX administrator can initialize the password to11111111 without entering the former password.
8.2.2 Viewing the Number of Online UsersThe HEDEX administrator can view the number of online users. The system supports up to 1000users.
8.2.3 Deleting a UserOnly the HEDEX administrator can delete a registered user.
8.2.1 Initializing a PasswordIf a user forgets the login password, the HEDEX administrator can initialize the password to11111111 without entering the former password.
PrerequisiteYou are the administrator of the HEDEX.
Procedure
Step 1 Enter the Admin page.
Step 2 Click User Management.
Step 3 In the user information list, find the user name whose password is to be initialized, and thenclick Initialize Password.
----End
ResultAfter the initialization, the new password is 11111111.
8.2.2 Viewing the Number of Online UsersThe HEDEX administrator can view the number of online users. The system supports up to 1000users.
PrerequisiteYou are the administrator of the HEDEX.
Procedure
Step 1 Enter the Admin page.
Step 2 Click User Management.
8 System Administrator TasksHEDEX
User Guide
8-6 Huawei Proprietary and ConfidentialCopyright © Huawei Technologies Co., Ltd.
Issue 01 (2009–06–30)

Step 3 You can view the number of online users above the user information list.
----End
8.2.3 Deleting a UserOnly the HEDEX administrator can delete a registered user.
PrerequisiteYou are the administrator of the HEDEX.
Procedure
Step 1 Enter the Admin page.
Step 2 Click User Management.
Step 3 In the user information list, find the user name to be deleted, and then click Delete.
----End
HEDEXUser Guide 8 System Administrator Tasks
Issue 01 (2009–06–30) Huawei Proprietary and ConfidentialCopyright © Huawei Technologies Co., Ltd.
8-7


9 Common Faults and Solutions
About This Chapter
This topic describes how to remove common faults when you install and use the HEDEX.
9.1 Common Faults in InstallationThis topic describes how to remove common faults when you install the HEDEX in Windows.
9.2 Common Faults of ApplicationsThis topic describes how to remove common faults when you use the HEDEX.
HEDEXUser Guide 9 Common Faults and Solutions
Issue 01 (2009–06–30) Huawei Proprietary and ConfidentialCopyright © Huawei Technologies Co., Ltd.
9-1
9.1 Common Faults in InstallationThis topic describes how to remove common faults when you install the HEDEX in Windows.
9.1.1 The HEDEX Fails to Be Uninstalled
9.1.1 The HEDEX Fails to Be Uninstalled
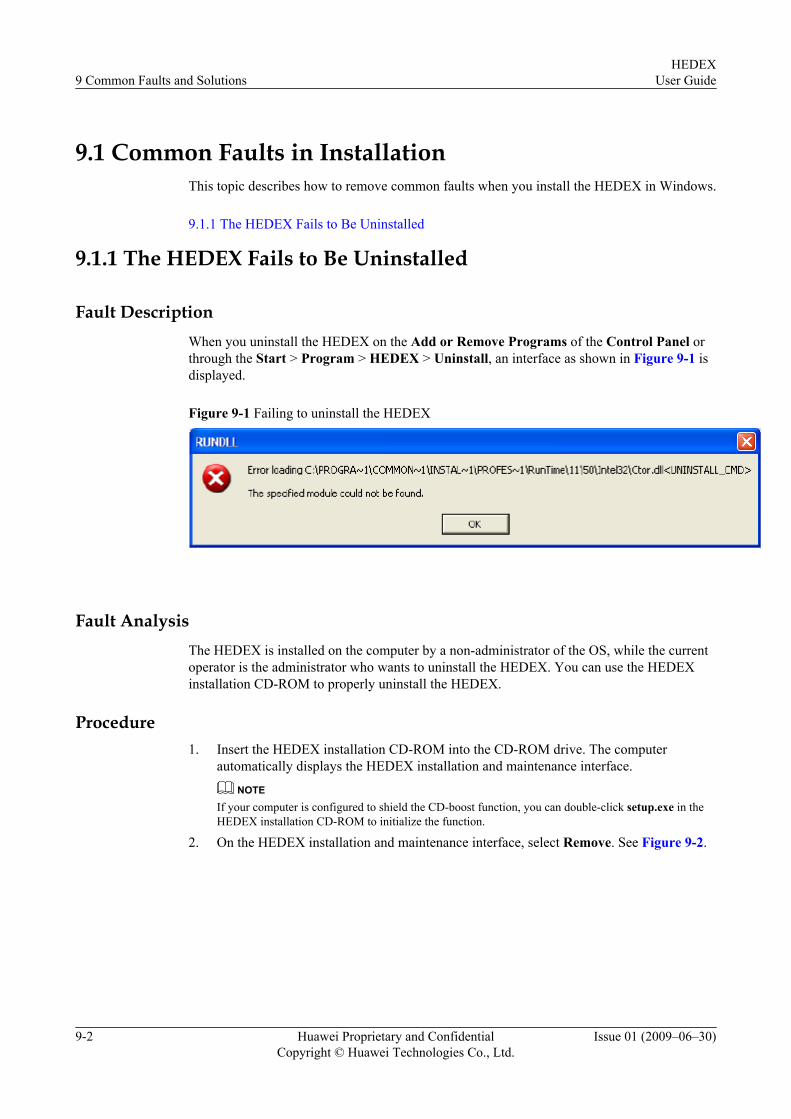
Fault DescriptionWhen you uninstall the HEDEX on the Add or Remove Programs of the Control Panel orthrough the Start > Program > HEDEX > Uninstall, an interface as shown in Figure 9-1 isdisplayed.
Figure 9-1 Failing to uninstall the HEDEX
Fault AnalysisThe HEDEX is installed on the computer by a non-administrator of the OS, while the currentoperator is the administrator who wants to uninstall the HEDEX. You can use the HEDEXinstallation CD-ROM to properly uninstall the HEDEX.
Procedure1. Insert the HEDEX installation CD-ROM into the CD-ROM drive. The computer
automatically displays the HEDEX installation and maintenance interface.
NOTEIf your computer is configured to shield the CD-boost function, you can double-click setup.exe in theHEDEX installation CD-ROM to initialize the function.
2. On the HEDEX installation and maintenance interface, select Remove. See Figure 9-2.
9 Common Faults and SolutionsHEDEX
User Guide
9-2 Huawei Proprietary and ConfidentialCopyright © Huawei Technologies Co., Ltd.
Issue 01 (2009–06–30)
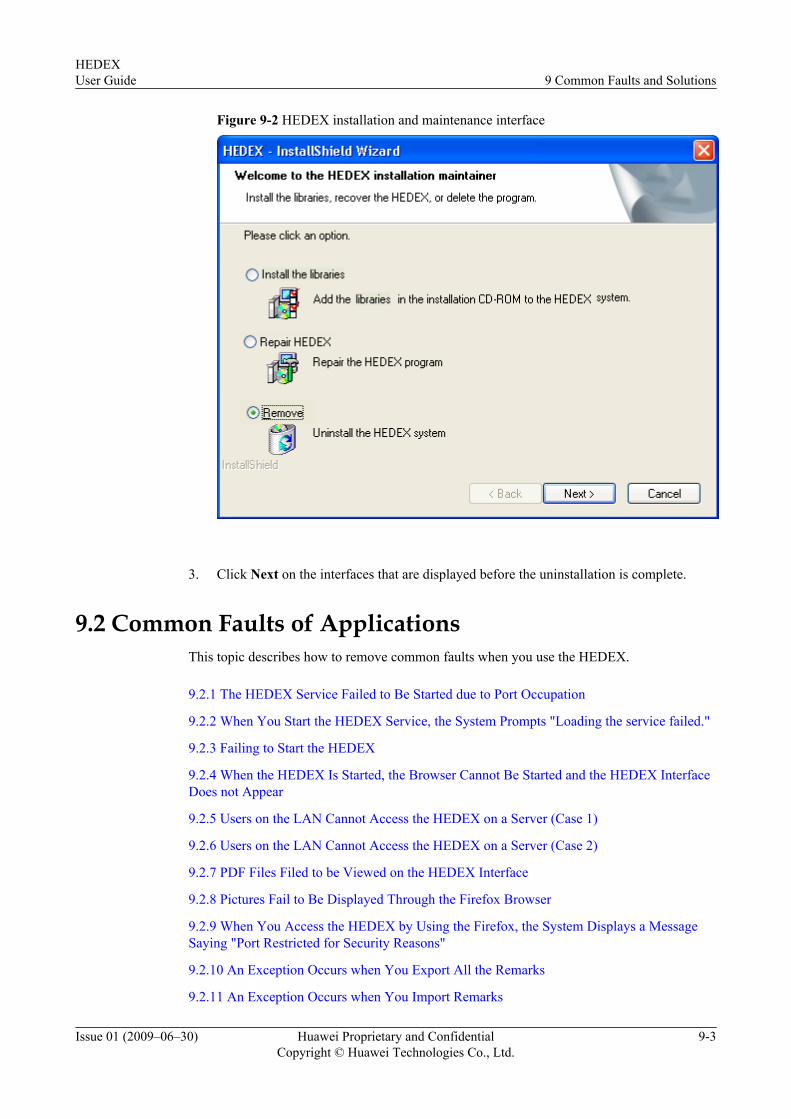
Figure 9-2 HEDEX installation and maintenance interface
3. Click Next on the interfaces that are displayed before the uninstallation is complete.
9.2 Common Faults of ApplicationsThis topic describes how to remove common faults when you use the HEDEX.
9.2.1 The HEDEX Service Failed to Be Started due to Port Occupation
9.2.2 When You Start the HEDEX Service, the System Prompts "Loading the service failed."
9.2.3 Failing to Start the HEDEX
9.2.4 When the HEDEX Is Started, the Browser Cannot Be Started and the HEDEX InterfaceDoes not Appear
9.2.5 Users on the LAN Cannot Access the HEDEX on a Server (Case 1)
9.2.6 Users on the LAN Cannot Access the HEDEX on a Server (Case 2)
9.2.7 PDF Files Filed to be Viewed on the HEDEX Interface
9.2.8 Pictures Fail to Be Displayed Through the Firefox Browser
9.2.9 When You Access the HEDEX by Using the Firefox, the System Displays a MessageSaying "Port Restricted for Security Reasons"
9.2.10 An Exception Occurs when You Export All the Remarks
9.2.11 An Exception Occurs when You Import Remarks
HEDEXUser Guide 9 Common Faults and Solutions
Issue 01 (2009–06–30) Huawei Proprietary and ConfidentialCopyright © Huawei Technologies Co., Ltd.
9-3
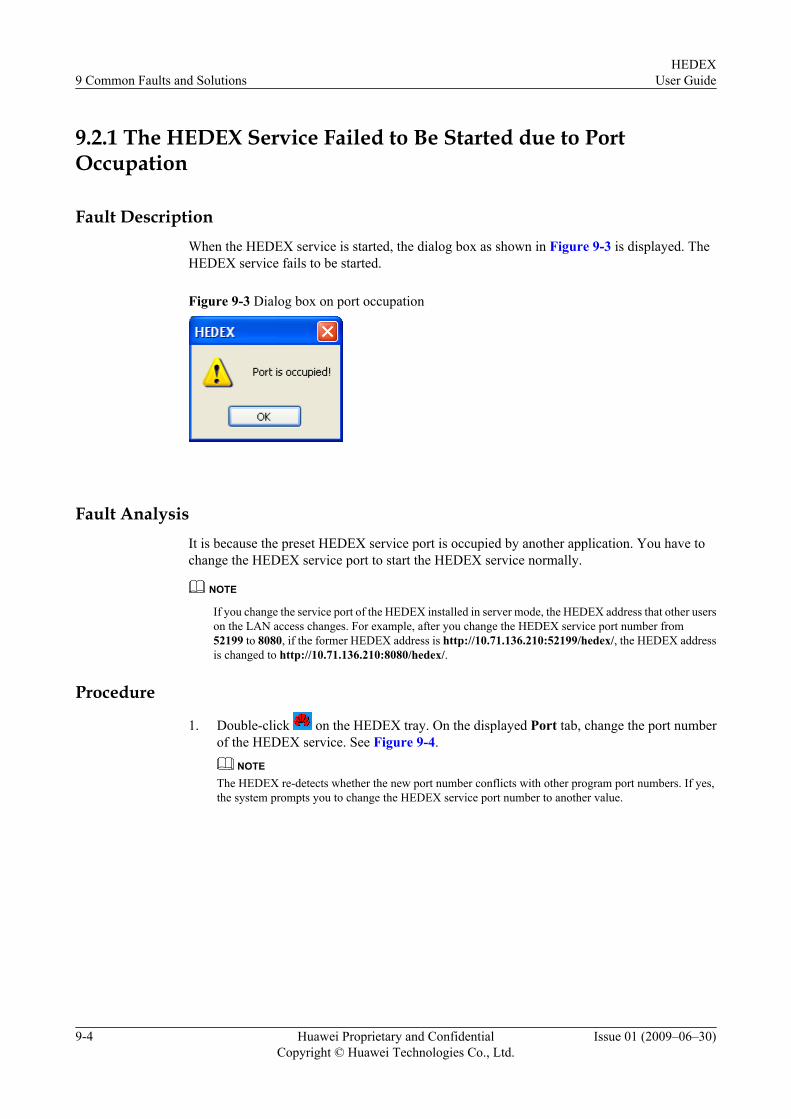
9.2.1 The HEDEX Service Failed to Be Started due to PortOccupation
Fault DescriptionWhen the HEDEX service is started, the dialog box as shown in Figure 9-3 is displayed. TheHEDEX service fails to be started.
Figure 9-3 Dialog box on port occupation
Fault AnalysisIt is because the preset HEDEX service port is occupied by another application. You have tochange the HEDEX service port to start the HEDEX service normally.
NOTE
If you change the service port of the HEDEX installed in server mode, the HEDEX address that other userson the LAN access changes. For example, after you change the HEDEX service port number from52199 to 8080, if the former HEDEX address is http://10.71.136.210:52199/hedex/, the HEDEX addressis changed to http://10.71.136.210:8080/hedex/.
Procedure
1. Double-click on the HEDEX tray. On the displayed Port tab, change the port numberof the HEDEX service. See Figure 9-4.
NOTEThe HEDEX re-detects whether the new port number conflicts with other program port numbers. If yes,the system prompts you to change the HEDEX service port number to another value.
9 Common Faults and SolutionsHEDEX
User Guide
9-4 Huawei Proprietary and ConfidentialCopyright © Huawei Technologies Co., Ltd.
Issue 01 (2009–06–30)
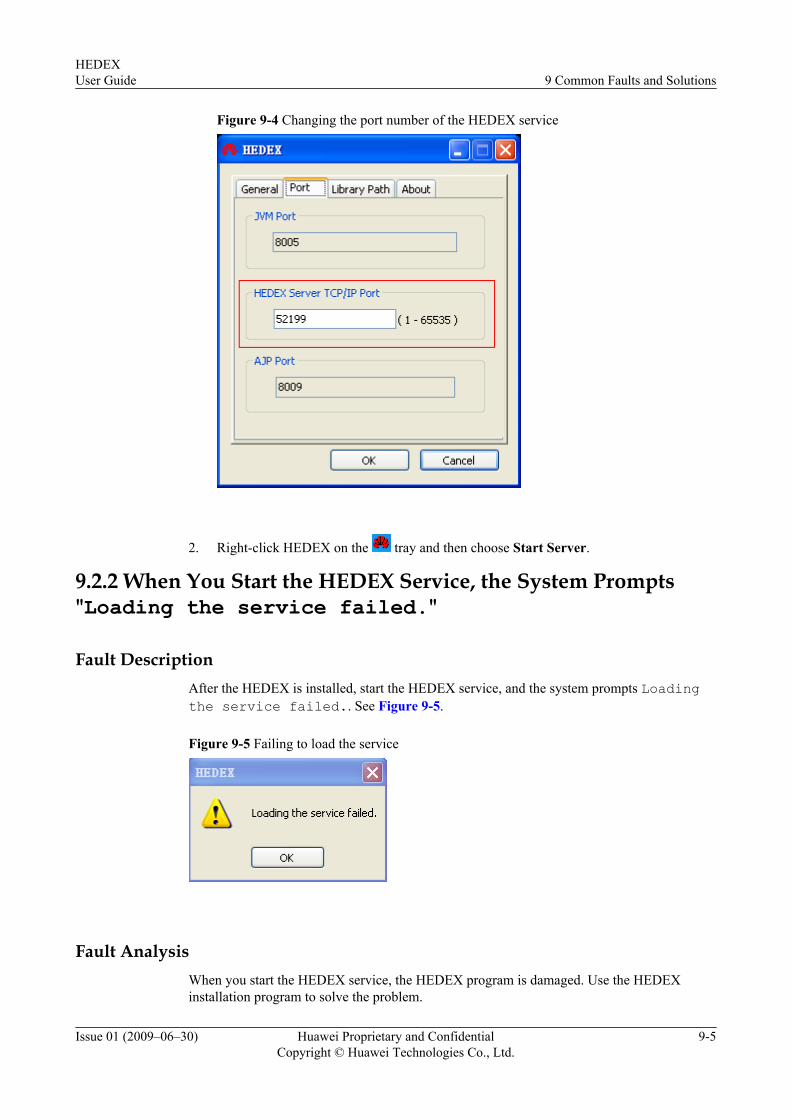
Figure 9-4 Changing the port number of the HEDEX service
2. Right-click HEDEX on the tray and then choose Start Server.
9.2.2 When You Start the HEDEX Service, the System Prompts"Loading the service failed."
Fault DescriptionAfter the HEDEX is installed, start the HEDEX service, and the system prompts Loadingthe service failed.. See Figure 9-5.
Figure 9-5 Failing to load the service
Fault AnalysisWhen you start the HEDEX service, the HEDEX program is damaged. Use the HEDEXinstallation program to solve the problem.
HEDEXUser Guide 9 Common Faults and Solutions
Issue 01 (2009–06–30) Huawei Proprietary and ConfidentialCopyright © Huawei Technologies Co., Ltd.
9-5

Procedure1. Insert the HEDEX installation CD-ROM into the CD-ROM drive. The computer
automatically displays the HEDEX installation and maintenance interface.NOTE
If your computer is configured to shield the CD-boost function, you can double-click setup.exe in theHEDEX installation CD-ROM to initialize the function.
2. On the HEDEX installation and maintenance interface, select Repair HEDEX (see Figure9-6), and then click Next. Wait till the fault is rectified.
Figure 9-6 HEDEX installation and maintenance interface
9.2.3 Failing to Start the HEDEX
Fault DescriptionWhen you start the HEDEX in Microsoft Windows XP Professional, the HEDEX does notrespond and it cannot be started.
Fault AnalysisThe file system of the computer might be NTFS and the HEDEX is installed by the administratorof the operating system, but the current user is a common user.
NOTEOn a NTFS computer, a common user cannot properly use the files created by the administrator unless theadministrator authorizes the user.
9 Common Faults and SolutionsHEDEX
User Guide
9-6 Huawei Proprietary and ConfidentialCopyright © Huawei Technologies Co., Ltd.
Issue 01 (2009–06–30)

Procedure1. Log out of the current common user.
2. Log in to the operating system as the administrator. Assign the full control permission ofthe hedex folder in the HEDEX installation path to the common user. Do as follows:
(1) Right-click the hedex folder in the HEDEX installation path and then chooseProperties.
(2) In the hedex Properties dialog box, click the Security tab. In the Group or UserName group area, click Add to add the common user and then assign the full controlpermission to the user.
3. Log in to the operating system as the common user. The HEDEX is properly started.
9.2.4 When the HEDEX Is Started, the Browser Cannot Be Startedand the HEDEX Interface Does not Appear
Fault Descriptionl After the HEDEX is started, the browser is not automatically started.
l On the HEDEX tray interface, click Open HEDEX. The browser still fails to be started,and the HEDEX interface does not appear.
Fault Analysis
There are two possible causes:
l The HEDEX does not support the default browser installed on the computer.
l The default browser is not configured on the computer.
Procedure1. Click Start > Set Program Access and Defaults.
2. On the displayed interface, click the icon next to Custom.
3. In the Choose a default Web browser group area, select the Internet Explorer parameterand then click OK.
9.2.5 Users on the LAN Cannot Access the HEDEX on a Server (Case1)
Fault Description
After the HEDEX is installed on a server, a computer on the LAN cannot access the HEDEXthrough a browser, and the interface as shown in Figure 9-7 is displayed. (The computer isproperly connected to the server.)
HEDEXUser Guide 9 Common Faults and Solutions
Issue 01 (2009–06–30) Huawei Proprietary and ConfidentialCopyright © Huawei Technologies Co., Ltd.
9-7

Figure 9-7 Error prompt
Fault AnalysisThe firewall of the server may prevent other computers from accessing the service port of theHEDEX.
Procedure1. Check whether the HEDEX service is started on the server. If the service is not started,
start the HEDEX service on the server. If the problem persists, go to 2.2. Check whether the HEDEX service port of the firewall on a server is started. The procedure
is as follows:
(1) On the server, choose Start > Settings > Control Panel > Windows Firewall. TheWindows Firewall dialog box is displayed. Click the Advanced tab. In the NetworkConnection Settings field, select Local Area Connection. Then click Settings. TheAdvanced Settings dialog box is displayed.
(2) In Advanced Settings, click the Services tab. Then click Add. The ServicesSettings dialog box is displayed. In Services Settings, enter proper information inrelated text boxes and then click OK. See Figure 9-8.The external port number and internal port number for this service are the service portnumber set when the HEDEX is installed, for example, 52199.
9 Common Faults and SolutionsHEDEX
User Guide
9-8 Huawei Proprietary and ConfidentialCopyright © Huawei Technologies Co., Ltd.
Issue 01 (2009–06–30)
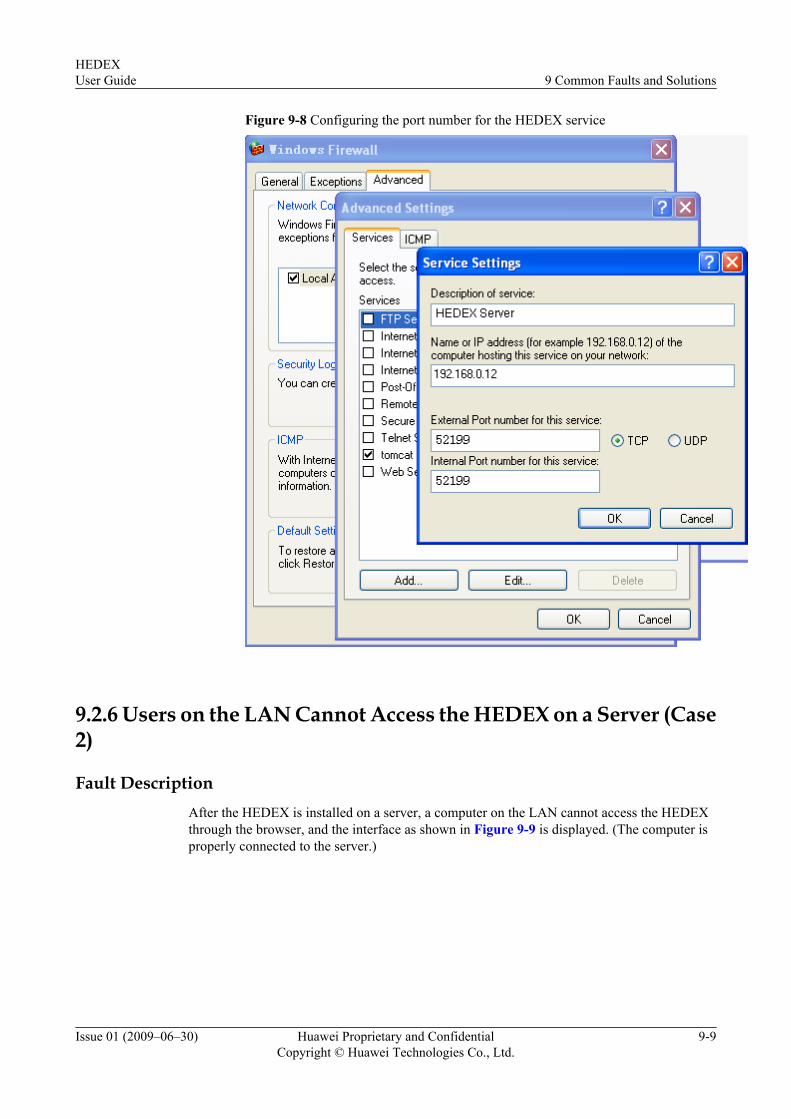
Figure 9-8 Configuring the port number for the HEDEX service
9.2.6 Users on the LAN Cannot Access the HEDEX on a Server (Case2)
Fault DescriptionAfter the HEDEX is installed on a server, a computer on the LAN cannot access the HEDEXthrough the browser, and the interface as shown in Figure 9-9 is displayed. (The computer isproperly connected to the server.)
HEDEXUser Guide 9 Common Faults and Solutions
Issue 01 (2009–06–30) Huawei Proprietary and ConfidentialCopyright © Huawei Technologies Co., Ltd.
9-9

Figure 9-9 Error prompt
Fault AnalysisThe gateway of the computer on the LAN cannot access the server.
Procedure1. Check whether the HEDEX service is started on the server. If the service is not started,
start the HEDEX service on the server. If the problem persists, go to 2.2. To modify the LAN proxy in the browser of the computer on a LAN, do as follows:
(1) On the browser interface, choose Tools > Internet Options. The Internet Optionsdialog box is displayed.
(2) In Internet Options, click the Connections tab. Then click LAN Settings. The LocalArea Network (LAN) Settings dialog box is displayed.
(3) In Local Area Network (LAN) Settings, click Advanced. The Proxy Settings dialogbox is displayed. Under Exceptions, enter the IP address of the server. See Figure9-10.
9 Common Faults and SolutionsHEDEX
User Guide
9-10 Huawei Proprietary and ConfidentialCopyright © Huawei Technologies Co., Ltd.
Issue 01 (2009–06–30)

Figure 9-10 Setting the proxy server of the LAN
9.2.7 PDF Files Filed to be Viewed on the HEDEX Interface
Fault DescriptionWhen you view a PDF file in the HEDEX, the contents of the PDF file are not displayed in thebrowse area, and an interface as shown in Figure 9-11 is displayed.
HEDEXUser Guide 9 Common Faults and Solutions
Issue 01 (2009–06–30) Huawei Proprietary and ConfidentialCopyright © Huawei Technologies Co., Ltd.
9-11

Figure 9-11 Opening or saving a PDF file
Fault AnalysisThe Adobe Reader is not properly connected to the browser. Uninstall the Adobe Reader andthen reinstall it.
Procedure1. Uninstall the Adobe Reader on your computer.2. Reinstall the Adobe Reader.
NOTEThe HEDEX supports Adobe Reader 6.0 or later. You need to install Adobe Reader 6.0 or later.
9.2.8 Pictures Fail to Be Displayed Through the Firefox Browser
Fault DescriptionCertain pictures, excluding the picture frames, cannot be properly displayed through the Firefoxbrowser.
Fault AnalysisThe possible causes are described as follows:
l The current picture is in WMF format. The Firefox browser does not support the WMFformat. You can use Microsoft Internet Explorer 6.0 or 7.0 to browse the library.
l The pictures are damaged or do not exit in the library. You need to replace the library.
Procedure1. You can use Microsoft Internet Explorer 6.0 or 7.0 to browse the library.
9 Common Faults and SolutionsHEDEX
User Guide
9-12 Huawei Proprietary and ConfidentialCopyright © Huawei Technologies Co., Ltd.
Issue 01 (2009–06–30)

9.2.9 When You Access the HEDEX by Using the Firefox, the SystemDisplays a Message Saying "Port Restricted for SecurityReasons"
Fault Description
When you access the HEDEX by using the Firefox, an interface as shown in Figure 9-12 appears.
Figure 9-12 Error page for accessing the HEDEX exceptionally
Fault Analysis
The HEDEX service interface is restricted in the Firefox.
The following interfaces are restricted in the Firefox: 1, 7, 9, 11, 13, 15, 17, 19, 20, 21, 22, 23,25, 37, 42, 43, 53, 77, 79, 87, 95, 101, 102, 103, 104, 109, 110, 111, 113, 115, 117, 119, 123,135, 139, 143, 179, 389, 465, 512, 513, 514, 515, 526, 530, 531, 532, 540, 556, 563, 587, 601,636, 993, 995, 2049, 4045, and 6000.
Procedure1. Use Microsoft Internet Explorer 6.0 or 7.0 to access the HEDEX.
2. If you want to use the Firefox to access the HEDEX, set the service interface of the HEDEXto a non-restricted interface in the Firefox. Do as follows:
(1) On the computer that is installed with the HEDEX, enable the HEDEX service.
(2) In the lower right corner, double-click on the HEDEX tray. On the displayedPort tab, set the service interface of the HEDEX to a non-restricted interface in theFirefox (see the area circled in red in Figure 9-13), and then click OK.
HEDEXUser Guide 9 Common Faults and Solutions
Issue 01 (2009–06–30) Huawei Proprietary and ConfidentialCopyright © Huawei Technologies Co., Ltd.
9-13

Figure 9-13 Setting the service interface of the HEDEX
(3) Right-click HEDEX on the tray and then choose Start Server.(4) Access the HEDEX by using the Firefox again.
NOTEAfter the service interface of the HEDEX is changed, the address for accessing the HEDEX alsochanges. For example, if the original address for accessing the HEDEX is http://10.71.136.209:1/hedex/, after you change the service interface of the HEDEX from 1 to 52199, the address foraccessing the HEDEX is changed to http://10.71.136.209:52199/hedex/.
9.2.10 An Exception Occurs when You Export All the Remarks
Fault DescriptionOn the Remarks tab of the HEDEX, click Export All to export all the remarks. If an interfaceas shown in Figure 9-14 is displayed, it indicates that the remarks cannot be exported.
9 Common Faults and SolutionsHEDEX
User Guide
9-14 Huawei Proprietary and ConfidentialCopyright © Huawei Technologies Co., Ltd.
Issue 01 (2009–06–30)

Figure 9-14 Remarks failing to be exported
Procedure1. Run the Internet Explorer, and then choose Tools > Internet Options to open the Internet
Options interface.2. On the Internet Options interface, click the Security tab, and then click Custom Level
to open the Security Settings interface.3. On the Security Settings tab, configure the parameter Automatic prompting for ActiveX
controls of ActiveX controls and plug-ins and the parameter Automatic prompting forfile downloads of Downloadsto Enable.
4. On the Remarks tab, click Export All. All the remarks can be exported.
9.2.11 An Exception Occurs when You Import Remarks
Fault DescriptionOpen the exported CVS file of remarks by using Microsoft Office Excel and save it again. Thefile is failed to be imported into the HEDEX. An interface shown in Figure 9-15 is displayed.
HEDEXUser Guide 9 Common Faults and Solutions
Issue 01 (2009–06–30) Huawei Proprietary and ConfidentialCopyright © Huawei Technologies Co., Ltd.
9-15
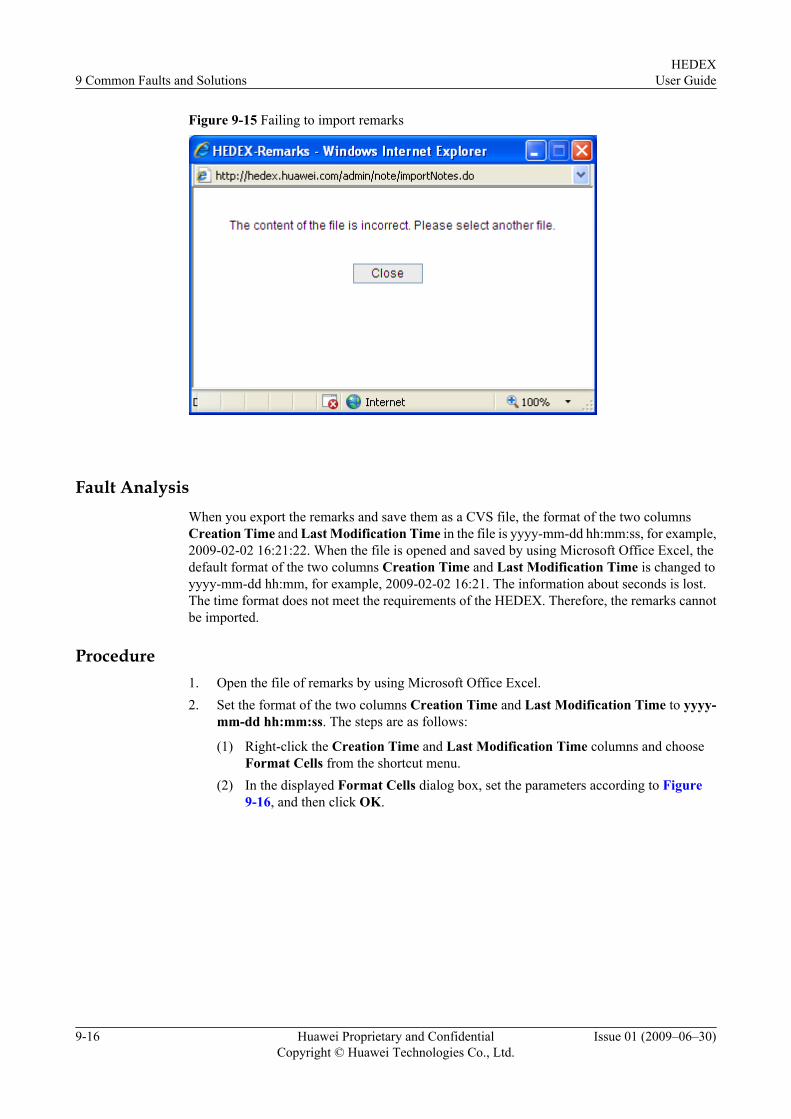
Figure 9-15 Failing to import remarks
Fault AnalysisWhen you export the remarks and save them as a CVS file, the format of the two columnsCreation Time and Last Modification Time in the file is yyyy-mm-dd hh:mm:ss, for example,2009-02-02 16:21:22. When the file is opened and saved by using Microsoft Office Excel, thedefault format of the two columns Creation Time and Last Modification Time is changed toyyyy-mm-dd hh:mm, for example, 2009-02-02 16:21. The information about seconds is lost.The time format does not meet the requirements of the HEDEX. Therefore, the remarks cannotbe imported.
Procedure1. Open the file of remarks by using Microsoft Office Excel.2. Set the format of the two columns Creation Time and Last Modification Time to yyyy-
mm-dd hh:mm:ss. The steps are as follows:
(1) Right-click the Creation Time and Last Modification Time columns and chooseFormat Cells from the shortcut menu.
(2) In the displayed Format Cells dialog box, set the parameters according to Figure9-16, and then click OK.
9 Common Faults and SolutionsHEDEX
User Guide
9-16 Huawei Proprietary and ConfidentialCopyright © Huawei Technologies Co., Ltd.
Issue 01 (2009–06–30)

Figure 9-16 Formatting cells
3. Save the file and then import the remarks again.
HEDEXUser Guide 9 Common Faults and Solutions
Issue 01 (2009–06–30) Huawei Proprietary and ConfidentialCopyright © Huawei Technologies Co., Ltd.
9-17

10 Glossary
HEDEX Huawei Electronic Documentation Explorer. It is used to browse or retrieve the contentsof Huawei electronic documents.
HEDEX service HEDEX daemon server. After starting the HEDEX service, you can access the HEDEXthrough a browser.
B/S An architecture that defines the roles of the browser and server, where the browser is theservice request party and the server is the service provision party.
favorite Bookmark.
library The special format of Huawei electronic documents. The extension is .hdx and the formatcan only be read with the HEDEX.
basic library A logically intact library that can be directly uploaded to the HEDEX and can bedisplayed separately on the Home page.
extended library If the contents of library A can be mounted to a navigation tree node of library B, libraryB is a main library and library A is an extended library. The extended library can bedisplayed separately as the basic library on the Home page.
HEDEXUser Guide 10 Glossary
Issue 01 (2009–06–30) Huawei Proprietary and ConfidentialCopyright © Huawei Technologies Co., Ltd.
10-1