HEARTLAND ELECTRIC STOVE HEATER · 2018-03-27 · 42” FLAT PANEL BUILD IN ELECTRIC FIREPLACE...
14
42” FLAT PANEL BUILD IN ELECTRIC FIREPLACE Model Numbers:1708 OWNER’S MANUAL WARNING Read and understand this entire owner’s manual, including all safety information, before plugging in or using this product. Failure to do so could result in fire, electric shock, or serious personal injury. CAUTION Keep this owner’s manual for future reference. If you sell or give this product away, make sure this manual accompanies this product.
Transcript of HEARTLAND ELECTRIC STOVE HEATER · 2018-03-27 · 42” FLAT PANEL BUILD IN ELECTRIC FIREPLACE...

42” FLAT PANEL BUILD IN ELECTRIC FIREPLACEModel Numbers:1708
OWNER’S MANUAL
WARNINGRead and understand this entire owner’s manual, including all safetyinformation, before plugging in or using this product. Failure to do so couldresult in fire, electric shock, or serious personal injury.
CAUTION Keep this owner’s manual for future reference. If you sell or give thisproduct away, make sure this manual accompanies this product.

2
IMPORTANT SAFETY INFORMATION!WARNING
Read all instructions before using this heater! This heater is hot when in use. To avoid burns, DO NOT let bare skin touch hot surfaces. If
provided, use handles when moving this heater. Keep combustible materials, such asfurniture, pillows, bedding, papers, clothes, and curtains at least 3 feet (0.9m) from the front ofthe heater, and keep them away from the sides and rear.
Extreme caution is necessary when any heater is used by or near children or invalids andwhenever the heater is left operating and unattended.
DO NOT operate any heater with a damaged cord or plug or after the heater malfunctions,has been dropped or damaged in any manner. Discard heater, or return to authorized servicefacility for examination and/or repair.
DO NOT run power cord under carpeting. DO NOT cover power cord with throw rugs, runners,or similar coverings. DO NOT route power cord under furniture or appliances. Arrange powercord away from traffic area, and where it will not be tripped over.
Connect to properly grounded outlets ONLY. DO NOT insert or allow foreign objects to enter any ventilation or exhaust opening, as
this may cause electric shock or fire, or damage the heater. To prevent a possible fire, DO NOT block air intakes or exhaust in any manner. Doing so could
cause a fire. DO NOT use on soft surfaces, like a bed, where openings may become blocked. A heater has hot and arcing or sparking parts inside. DO NOT use it in areas where
gasoline, paint, or flammable liquids are used or stored. Use this heater only as described in this manual. Any other use not recommended by
the manufacturer may cause fire, electric shock, or injury to persons. ALWAYS plug heaters directly into a wall outlet/receptacle. NEVER use with an
extension cord or relocatable power tap (outlet/power strip). DO NOT place the heater near a bed because objects such as pillows or blankets can fall off
the bed and be ignited by the heater. NEVER use this heater in bathrooms, laundry rooms, or any other location where the heater
could fall into a bathtub or pool, become damp, or come in contact with water. AVOID FIRE! Regularly inspect all air vents to make sure they are free from dust, lint, or other
blockage. Unplug the unit and clean with a vacuum ONLY. DO NOT rinse or get wet. NEVER hang this unit on a wall directly below an electrical outlet. NEVER permanently install in a recessed area of the wall. This may result in blocked air
flow, overheating, or fire. ALWAYS mount to wall bracket before use. DO NOT set on the floor, or other surface, to use. NEVER use a wall mount bracket from another manufacturer.

3
WARNING For residential use only! NOT for commercial use! Any commercial or public use of this
heater voids all warranties, and could cause injury. This product is not intended to be a primary heat source. It is for supplemental heat only. INDOOR use only! NEVER use this heater outdoors! Doing so may result in electric shock! Risk of electric shock! DO NOT OPEN! No user-serviceable parts inside! NEVER modify this heater. Doing so could result in personal injury or property damage.
Modification of this fireplace completely voids all warranties. ALWAYS turn this heater off before unplugging it from the outlet. ALWAYS disconnect this unit from the power supply before performing any assembly or
cleaning, or before relocating the electric fireplace. NEVER leave this heater unattended. ALWAYS unplug this heater when not in use. ALWAYS store this heater in a dry location. NEVER use the fireplace if it has become wet. ONLY use this heater on a 110-120V AC 15-Amp grounded circuit. NEVER overload the
circuit. If this heater trips the circuit breaker, unplug all other appliances on the same circuitbefore the next use. Avoid plugging other appliances into the same circuit as this heater.
NEVER plug this heater into an outlet that is old, cracked, or has any loose wires orconnections. Plugging this heater into a faulty outlet could result in electric arcing within theoutlet that could cause the outlet to overheat or catch fire.
ALWAYS check your heater cord and plug connections with each use!i) MAKE SURE the plug fits tight in the outlet! Faulty wall outlet connections or loose plugs
can cause the outlet to overheat.
ii) Heaters draw more current than small appliances. Overheating may occur even if it hasnot occurred with the use of other appliances.
iii) During use check frequently to see if the plug outlet or faceplate is HOT!
iv) If the outlet or faceplate is HOT, discontinue use immediately and have a qualifiedelectrician inspect and/or replace the faulty outlets.
PreparationThis product includes a GLASS panel! Always use extreme caution when handlingglass. Failure to do so could result in personal injury or property damage.
Remove all parts and hardware from the carton and place them on a clean, soft, dry surface. Partsand assembly steps are grouped for free-standing or wall-hanging use. Check the parts list to makesure nothing is missing. Dispose of packaging materials properly. Please recycle whenever possible.You will need the following tools (not included): Phillips screwdriver; stud finder; level; tapemeasure; electric drill; 1/4” wood drill bit, hammer.

4
Parts and Hardware
A – Fireplace ( 1 )
B-Wood Screws(7) C-Drywall anchors(7)
D Fixed part(1) RC – Remote Control (1)
F - Decorative pebbles/Crystals G-Plastic Tray(1)
(Fixed on the designed slot)
Installation and Assembly
Wall Mounted Installation
Rear View of Fireplace Step 1. Find a safe location.Minimum clearance on each side:19.7” (50 cm).Minimum clearance below:19.7” (50 cm).Minimum clearance above:39.4” (100 cm).Minimum clearance from the frontand sides: 3 feet (90 cm).Choose a location near an outlet soan extension cord is not required.DO NOT position the unit directlybelow a power outlet.See Safety Information on pages2 and 3 for warnings about safeplacement, safe installation, andproper use of this product.
Minimum 24”(61 cm)
19.7”(50 cm)
19.7”(50 cm)
Minimum 39.4”(100 cm)
Minimum 19.7”(50cm)
5
NOTICEThe wall mount fasteners included with this fireplace are for use ONLY with awood-framed wall covered in drywall (sheet rock). For concrete walls, cinderblocks, or other wall types, consult a professional for the best attachment methods.
ALWAYS unplug this fireplace heater before assembly or cleaning, or beforerelocating. Failure to do so could result in electric shock, fire, or personal injury.
STEP 2. A. Locate the wall studs using an electronic stud-finder. Mark the hole locations with apencil. The holes should be 8” (20.3 cm) apart, and level. The minimum height from the surfacebelow must be 19.7” (50 cm). B. Three screws should be screwed directly into wall studs. Then,four drywall anchors are needed.
AVOID INJURY and DAMAGE! Three screws should be screwed directly into wallstuds. and additional screws must also be screwed into the drywall anchors.
Due to the many different materials used on different walls, it is highly recommendedthat you consult your local builder before you install this appliance on the wall.A.Select a location that is not prone to moisture and is located at least 36" (914mm)away from combustible materials such as curtain drapes, furniture, bedding, paper, etc.B.Have two people hold the appliance against the wall to determine the final location.C.Place unit face down on a soft, non abrasive surface. Remove the bracket from theback of the unit by removing the screws, refer to Figure 1.D.Mark out location, then mount the bracket(s) onto the wall using the supplied screws.This bracket MUST have the hooks facing upward and be level.NOTE: It is strongly recommended that the mounting bracket be Screwed intothe wall studsWhere possible. If the wallStuds cannot be used, ensure
Drywall
Studs
CCC
CC
CC
6
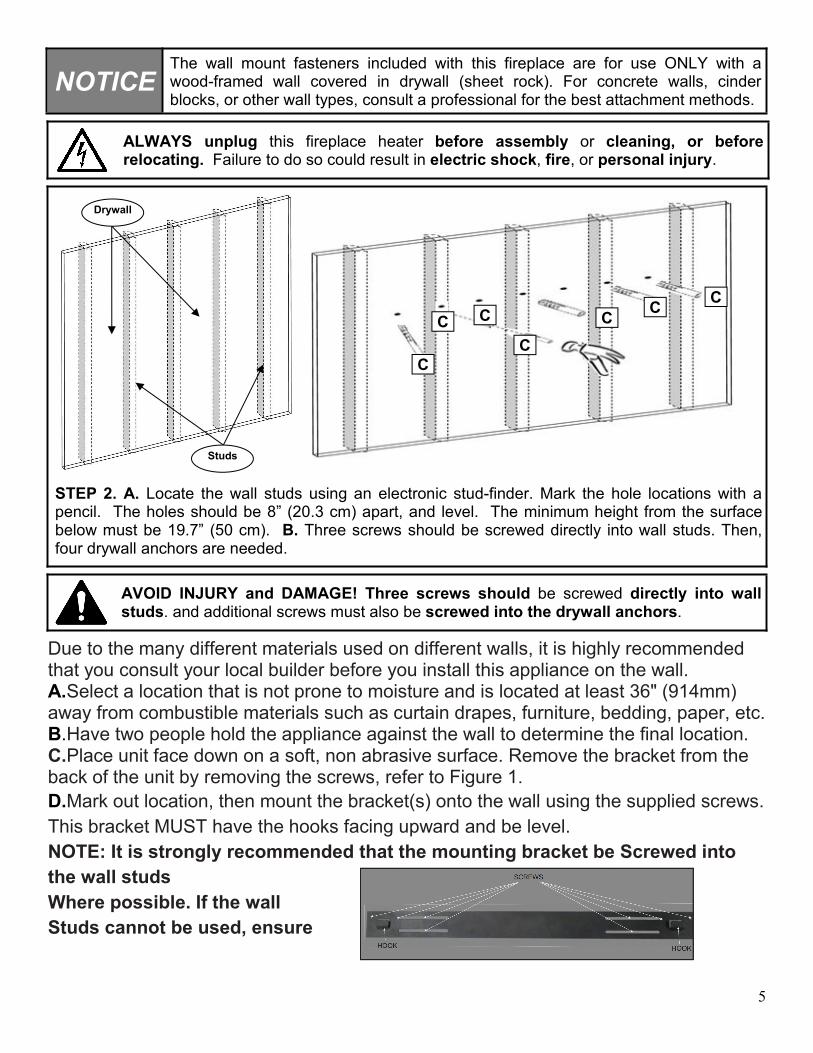
That the supplied plastic anchors are used to affix the bracket to the wall and thebracket is adequately secured.E. With the wall mounting bracket installed have two people lift the appliance up andinsert the two hooks on the bracket into the two slots on the back of the appliance.F. Check the appliance for stability ensuring that the bracket will not pull free from thewall.
wall
Take off the two whitescrews on thebottom,then use thewhite screws to lock thefixed part D
7
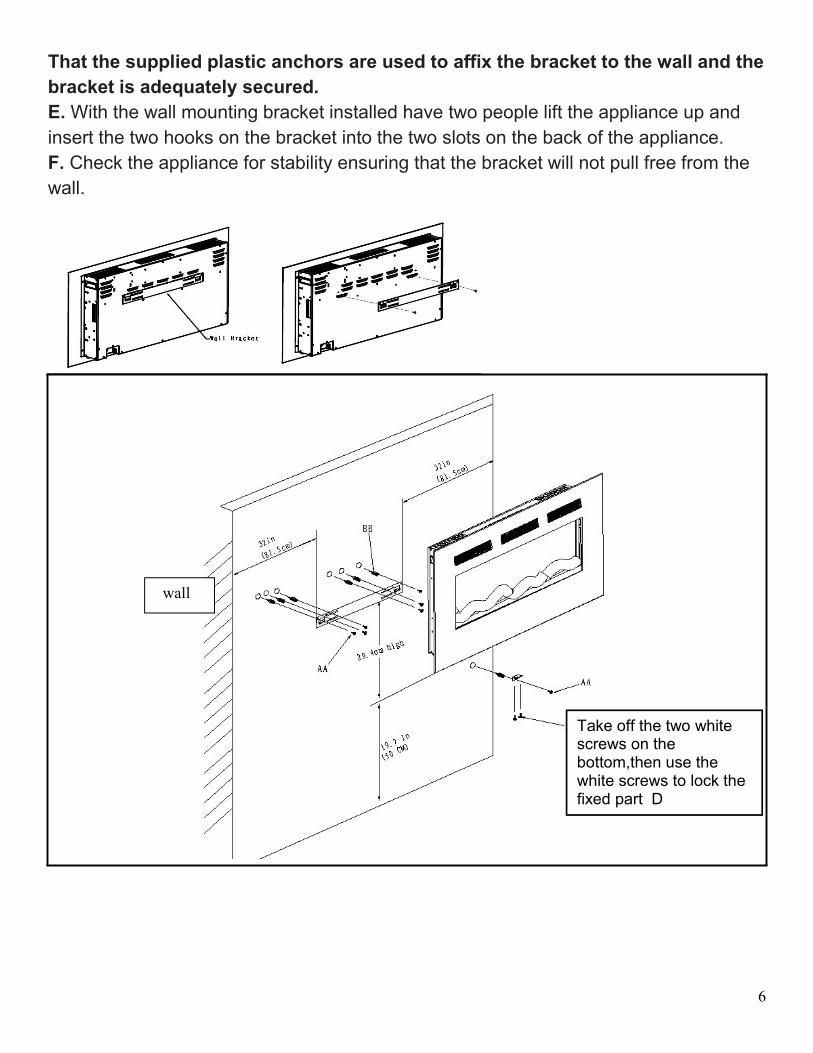
Build in Installation1.Selection a dry wall to open a hole for fireplace box. Size of hole as below chartFigure ( A )
AModel Number W H
1708(BEF-42BI) 33.11” 19”
2.Fix the two wall anchors in each side of the fireplace box according to the dimensionsshowed on the drawing. Figure (B)
B

8
3.Have two person to take the glass panel out of the fireplace box. Place it to a soft andclean place. Figure ( C) and (D)
C
D
2.Take off theglass upward
1.Take off thescrews
1.Take off thescrews
9
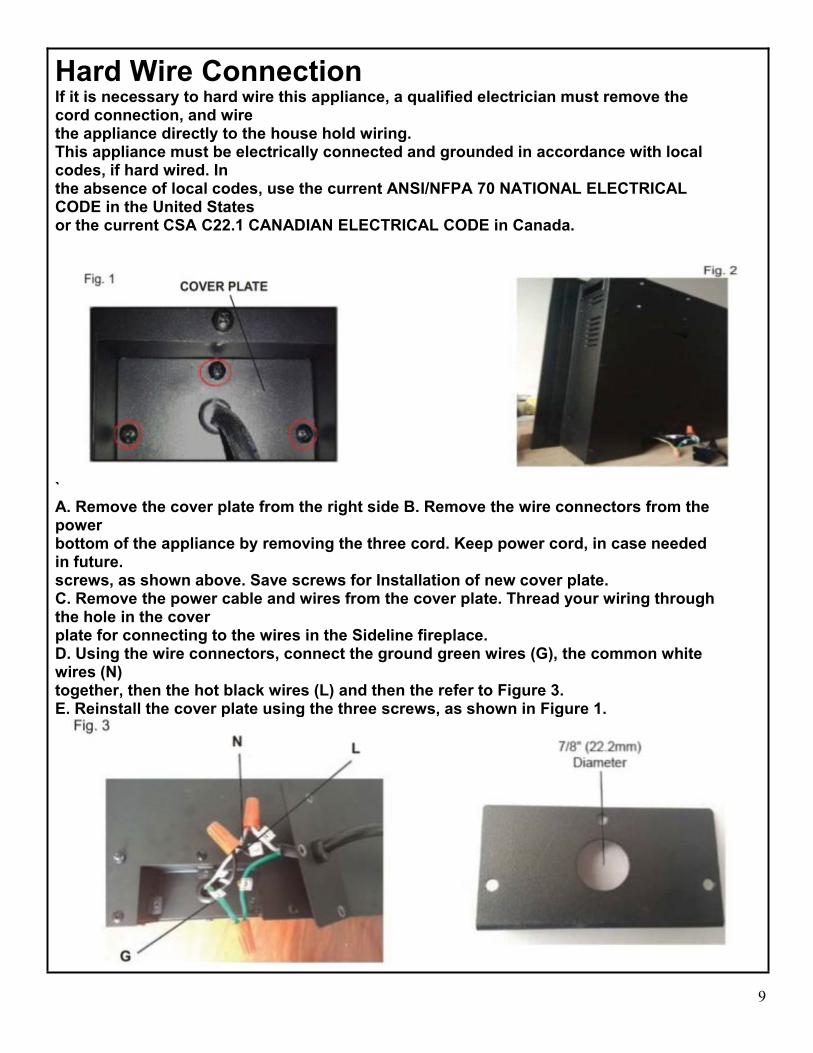
Hard Wire ConnectionIf it is necessary to hard wire this appliance, a qualified electrician must remove thecord connection, and wirethe appliance directly to the house hold wiring.This appliance must be electrically connected and grounded in accordance with localcodes, if hard wired. Inthe absence of local codes, use the current ANSI/NFPA 70 NATIONAL ELECTRICALCODE in the United Statesor the current CSA C22.1 CANADIAN ELECTRICAL CODE in Canada.
`A. Remove the cover plate from the right side B. Remove the wire connectors from thepowerbottom of the appliance by removing the three cord. Keep power cord, in case neededin future.screws, as shown above. Save screws for Installation of new cover plate.C. Remove the power cable and wires from the cover plate. Thread your wiring throughthe hole in the coverplate for connecting to the wires in the Sideline fireplace.D. Using the wire connectors, connect the ground green wires (G), the common whitewires (N)together, then the hot black wires (L) and then the refer to Figure 3.E. Reinstall the cover plate using the three screws, as shown in Figure 1.

10
Crystal / Pebble Ember InstallationGlass front must be removed (refer to figure C) and the appliance must be mounted in its finallocation before the crystal / pebble embers are installed.
A. Using the Screw driver to take off the two screws inboth sides of the fireplace box, then take out the log set.B. Place the plastic tray to the designed slot.C. CLEAN CRYSTAL or PEBBLE MEDIA: Crystal or pebbles mediamay have a fine oil residue that needs to be cleaned prior toinstallation. Clean the them with mild dish soap, drain, rinsethoroughly and dry before placing into the tray.D. Carefully place crystal or pebbles embers into the bottom trayon the front of the appliance as illustrated. Apply an even layer from side to side.
ALWAYS keep the decorative glass OUT OF REACH OF CHILDREN! Leave no glasswhere children can find them. Failure to do so could cause a choking hazard.
Read and understand this entire owner’s manual, including all safety information,before plugging in or using this product. Failure to do so could result in electric shock,fire, serious injury, or death.
Replace to pebblesor crystal glass(F)
Plastictray(G)

11
OperationRead and understand this entire owner’s manual, including all safety information,before plugging in or using this product. Failure to do so could result in electric shock,fire, serious injury, or death.
Methods of OperationBefore operating, please review the IMPORTANT SAFETY INFORMATION on Pages 2 and 3, andheed all warnings.
Front View Top View
Rear View Left Side View
OPERATING INSTRUCTIONS
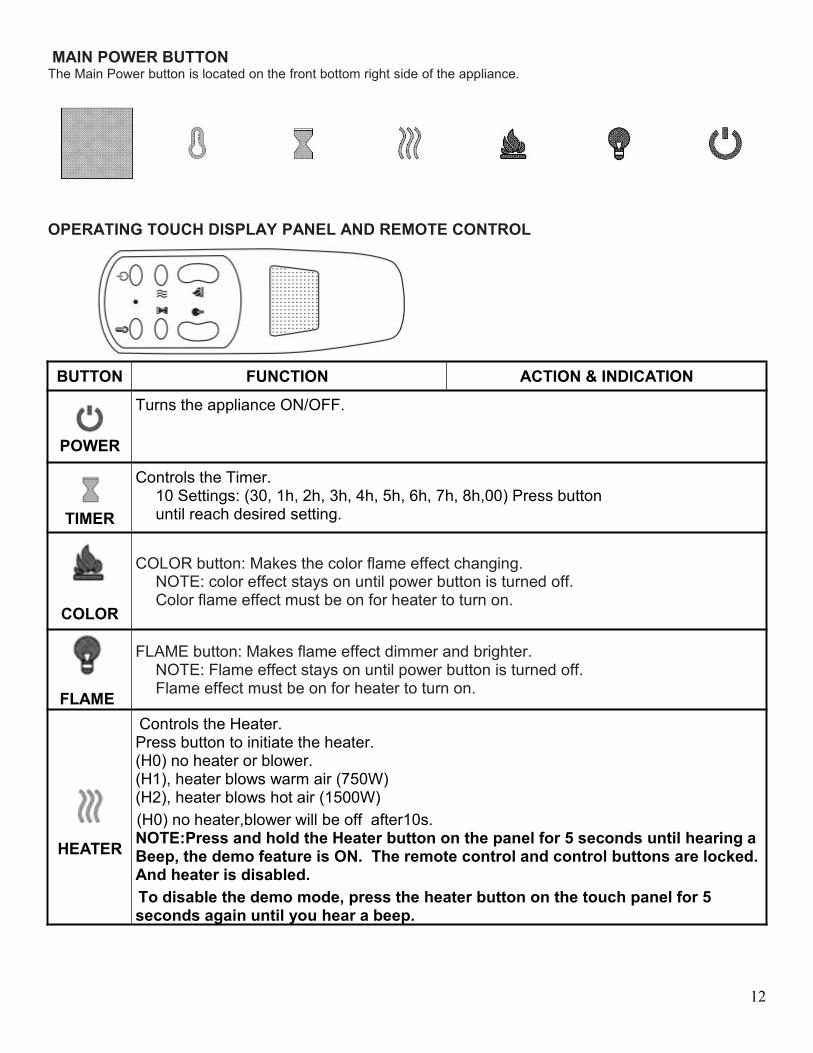
Once the appliance has been plugged into a grounded electrical outlet, it is ready to operate.NOTE: Ensure the house circuit breakers for the power supply are turned on. In the event of a powerfailure, the appliance will lose its memory function and will reset to factory mode when the powerreturns.The Main Power button is located on the front bottom right side of the appliance.
12
MAIN POWER BUTTONThe Main Power button is located on the front bottom right side of the appliance.
OPERATING TOUCH DISPLAY PANEL AND REMOTE CONTROL
BUTTON FUNCTION ACTION & INDICATION
POWER
Turns the appliance ON/OFF.
TIMER
Controls the Timer.10 Settings: (30, 1h, 2h, 3h, 4h, 5h, 6h, 7h, 8h,00) Press buttonuntil reach desired setting.
COLOR
COLOR button: Makes the color flame effect changing.NOTE: color effect stays on until power button is turned off.Color flame effect must be on for heater to turn on.
FLAME
FLAME button: Makes flame effect dimmer and brighter.NOTE: Flame effect stays on until power button is turned off.Flame effect must be on for heater to turn on.
HEATER
Co Controls the Heater.Press button to initiate the heater.(H0) no heater or blower.(H1), heater blows warm air (750W)(H2), heater blows hot air (1500W)
(H (H0) no heater,blower will be off after10s.NOTE:Press and hold the Heater button on the panel for 5 seconds until hearing aBeep, the demo feature is ON. The remote control and control buttons are locked.And heater is disabled.
T To disable the demo mode, press the heater button on the touch panel for 5seconds again until you hear a beep.

13
TEMPERATURE
1. Press once: Touch panel indicator becomes active.2. Press again until desired setting is reached. Digital displayshows setting circles as below.Displayvalue
0 1 2 3 4 5 6 7 8 9 10
Temperature
℃ 20 21 22 23 24 25 26 27 28 29 30℉ 68 70 72 74 76 78 80 82 84 86 88
NOTE: Press the button for 5 seconds, the temperaturesetting will switch from °F to °C . Same way from °C to °F .
WARNING: Do not move or remove the glass panel, when the appliance is plugged in andoperating.This will cause the remote control and touch panel to no longer function.
NOTICE When the heater is first turned on, a slight odor may be present. This is normal andshould not occur again unless the heater is not used for a long period of time.
NOTICE To improve operation, aim the remote control at the front of the fireplace. DO NOTpress the buttons too quickly. Give the unit time to respond to each command.
Remote Control Battery Information This remote control uses two batteries (not included). Instructions for battery installation are on the Remote Control battery compartment.
NEVER dispose of batteries in fire. Failure to observe this precaution may result in anexplosion. Dispose of batteries at your local hazardous material processing center.
Temperature Limiting ControlThis heater is equipped with a Temperature Limiting Control. Should the heater reach an unsafetemperature, the heater will automatically turn OFF. To reset:
1. Unplug the power cord from the outlet.2. Turn the power switch on the touch display PANEL to off, Wait 5 minutes.3. Inspect the fireplace to make sure no vents are blocked, or clogged with dust or lint. If they are,
use a vacuum to clean the vent areas.4. With the POWER switch in the OFF position, plug the power cord back into the outlet.5. If the problem continues, have your outlet and wiring inspected by a professional.
Care and MaintenanceCleaning
ALWAYS turn the heater OFF and unplug the power cord from the outlet beforecleaning, performing maintenance, or moving this fireplace. Failure to do so could result inelectric shock, fire, or personal injury.NEVER immerse in water or spray with water. Doing so could result in electric shock,fire, or personal injury.
Metal:
14
Buff using a soft cloth, slightly dampened with a citrus oil-based product. DO NOT use brass polish or household cleaners as these products will damage the metal trim.
Glass: Use a good quality glass cleaner sprayed onto the cloth or towel. Dry thoroughly with a paper
towel or lint-free cloth. NEVER use abrasive cleansers, liquid sprays, or any cleaner that could scratch the surface.
Vents: Use a vacuum or duster to remove dust and dirt from the heater and vent areas.
Plastic: Wipe gently with a slightly damp cloth and a mild solution of dish soap and warm water. NEVER use abrasive cleansers, liquid sprays, or any cleaner that could scratch the surface.
Maintenance
Risk of electric shock! DO NOT OPEN any panels other than the bulb replacementplate! No user-serviceable parts inside!
ALWAYS turn the heater OFF and unplug the power cord from the outlet beforecleaning, performing maintenance, or moving this fireplace. Failure to do so could result inelectric shock, fire, or personal injury.
Electrical and Moving Parts: The fan motors are lubricated at the factory and will not require lubrication. Electrical components are integrated in the fireplace and are not serviceable by the consumer.
Storage:Store heater in a clean dry place when not in use.
WARNING! Other than replacing the light bulb, NO SERVICING of the internal orelectrical parts should be performed by the consumer. Do not service the unit yourself.