Headset Installation Instructions - J&M® Motorcycle Audio€¦ · · 2014-10-22Installation into...
5
Installation into a 3/4 (Open-Face) Style Helmet 1. Begin by examining the ear pocket area inside your helmet to insure that there is sufficient room to mount the speakers, so that they do not come in contact with your ears. See Figure 1. It is important to have the helmet fit and feel the same after the speakers are installed as it did prior to headset installation. If a small amount of styrene material needs to be removed to stop the speakers from pressing against your ears, make sure to remove ONLY the minimum amount, (no more than ¼”) so as to preserve the protective characteristics of your helmet. 2. Clean the bottom of each ear pocket with a cloth dampened with alcohol. Peel the backing from the supplied Velcro® pads and press them into the bottom of each ear pocket. 3. Position the boom microphone clamp assembly on the left side of the helmet so that the microphone lines up with the wearer’s mouth & mark this position. See Figure 2. Tighten the clamp to the helmet with the rubber friction spacer in place & plug-in the microphone to the corresponding plug from the clamp. See Figure 5. 4. Position the speakers into their proper place in the ear pockets and press them firmly onto the Velcro® pads. Then plug each one into their corresponding plug from the clamp assembly. 5. Pull the small, medium or large sized wind sock (which-ever you prefer) over the micro- phone. 6. Using the enclosed wooden tool, carefully push the speaker wires into the gap between the helmet liner and shell. See Figure 6. Notes: When using your intercom system, regardless of headset brand or type, it is impor- tant to turn the intercom volume level high enough for comfortable conversation, but not any higher. Unnecessarily high intercom volume levels will only increase the unwanted wind and background noise you may experience. © 2014 J&M Corporation. All rights reserved. 10/14 1 Figure 2 Figure 5 Figure 6 Figure WARNING! Helmet speakers may not be legal in all jurisdictions. Check your local laws BEFORE using this product. J & M Corporation cannot control the circumstances surrounding the sale of this equip- ment, the quality of installation, or the specific helmet into which this equipment is installed. Accordingly, J & M Corporation makes no warranties, expressed or implied, related thereto. A helmet with this equipment installed may not protect the user from injury. The user assumes all liability in conjunction with accidents, injuries or losses of any kind arising out of the use of this product. Additionally, this product should not be used in any way that would impair the user’s ability to hear traffic or other noises. Accordingly, the volume should be kept low or off, depending upon the circumstances. Headset Installation Instructions
Transcript of Headset Installation Instructions - J&M® Motorcycle Audio€¦ · · 2014-10-22Installation into...
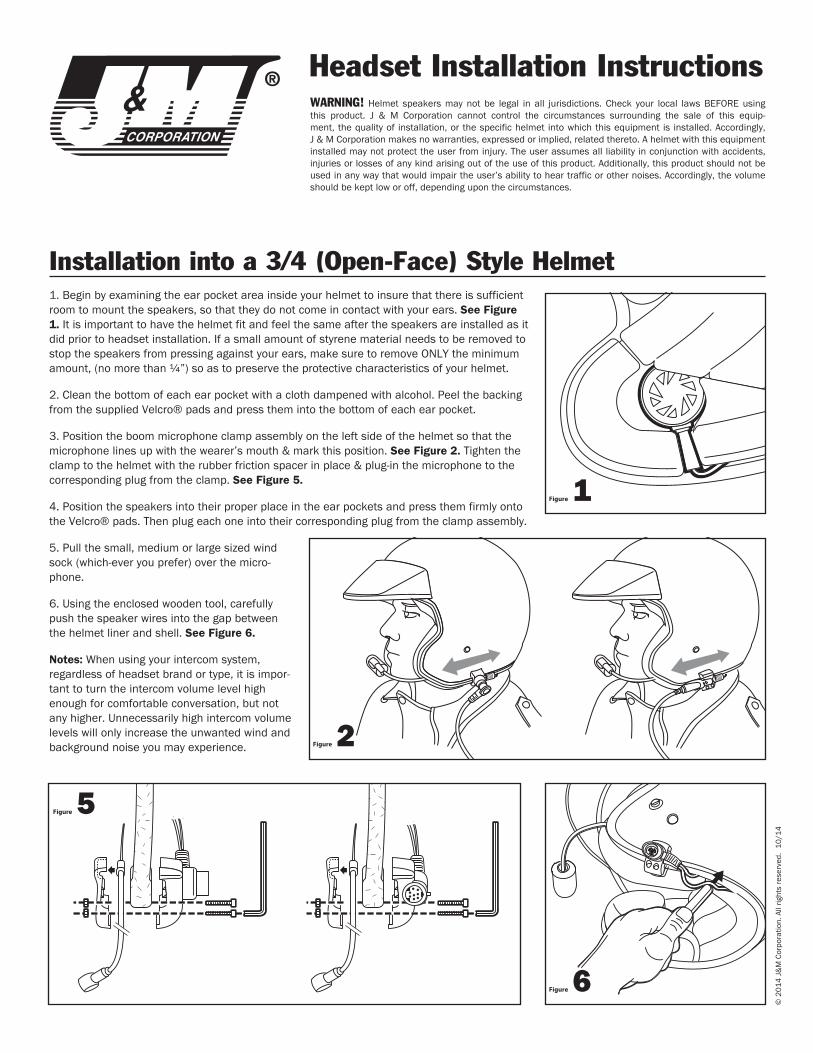
Installation into a 3/4 (Open-Face) Style Helmet1. Begin by examining the ear pocket area inside your helmet to insure that there is sufficient room to mount the speakers, so that they do not come in contact with your ears. See Figure 1. It is important to have the helmet fit and feel the same after the speakers are installed as it did prior to headset installation. If a small amount of styrene material needs to be removed to stop the speakers from pressing against your ears, make sure to remove ONLY the minimum amount, (no more than ¼”) so as to preserve the protective characteristics of your helmet.
2. Clean the bottom of each ear pocket with a cloth dampened with alcohol. Peel the backing from the supplied Velcro® pads and press them into the bottom of each ear pocket.
3. Position the boom microphone clamp assembly on the left side of the helmet so that the microphone lines up with the wearer’s mouth & mark this position. See Figure 2. Tighten the clamp to the helmet with the rubber friction spacer in place & plug-in the microphone to the corresponding plug from the clamp. See Figure 5.
4. Position the speakers into their proper place in the ear pockets and press them firmly onto the Velcro® pads. Then plug each one into their corresponding plug from the clamp assembly.
5. Pull the small, medium or large sized wind sock (which-ever you prefer) over the micro-phone.
6. Using the enclosed wooden tool, carefully push the speaker wires into the gap between the helmet liner and shell. See Figure 6.
Notes: When using your intercom system, regardless of headset brand or type, it is impor-tant to turn the intercom volume level high enough for comfortable conversation, but not any higher. Unnecessarily high intercom volume levels will only increase the unwanted wind and background noise you may experience.
© 2
014
J&M
Cor
pora
tion.
All
right
s re
serv
ed.
10/1
4
1Figure
2Figure
5Figure
6Figure
WARNING! Helmet speakers may not be legal in all jurisdictions. Check your local laws BEFORE using this product. J & M Corporation cannot control the circumstances surrounding the sale of this equip-ment, the quality of installation, or the specific helmet into which this equipment is installed. Accordingly, J & M Corporation makes no warranties, expressed or implied, related thereto. A helmet with this equipment installed may not protect the user from injury. The user assumes all liability in conjunction with accidents, injuries or losses of any kind arising out of the use of this product. Additionally, this product should not be used in any way that would impair the user’s ability to hear traffic or other noises. Accordingly, the volume should be kept low or off, depending upon the circumstances.
Headset Installation Instructions
When plugging in the right angle hook-up cord that comes with some headset models, it may be necessary, especially the first time, to press a little harder than usual to make sure that the connection is fully made. This will keep the cord from accidentally becoming unplugged while riding. When plugging in the straight line hook-up cord that comes with some headset models, be sure to use the rubber strap. This will keep the cord from accidentally becoming unplugged while riding.
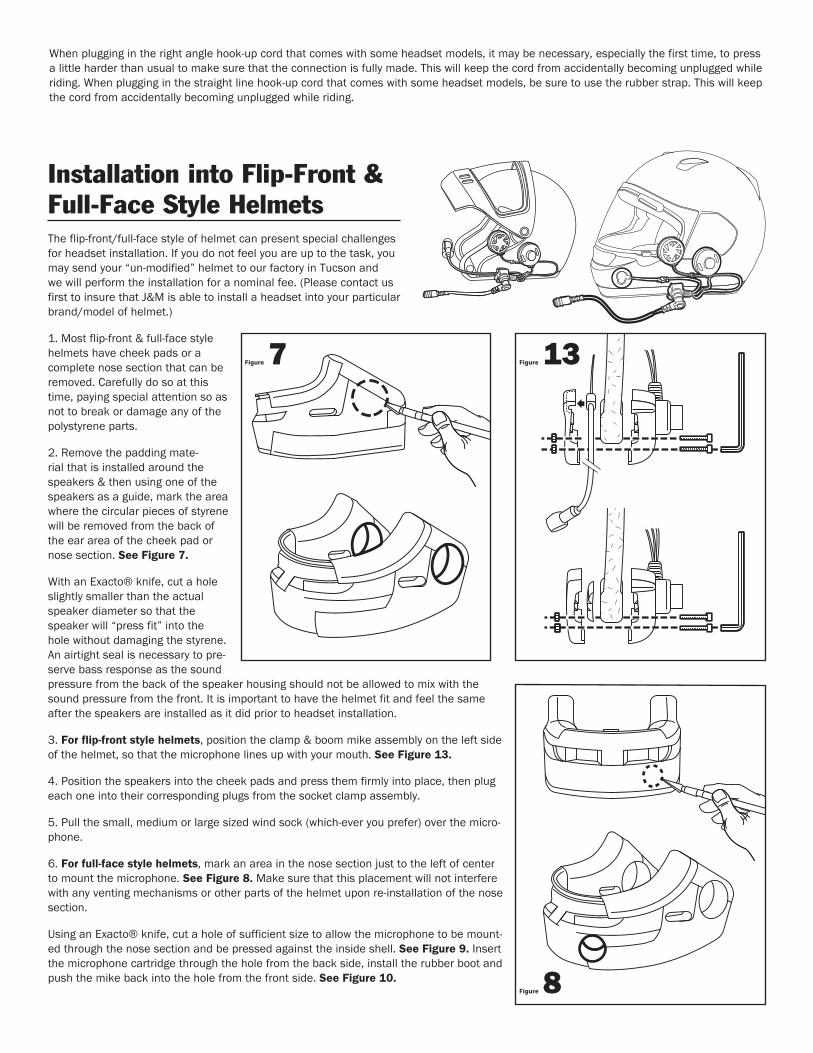
Installation into Flip-Front & Full-Face Style HelmetsThe flip-front/full-face style of helmet can present special challenges for headset installation. If you do not feel you are up to the task, you may send your “un-modified” helmet to our factory in Tucson and we will perform the installation for a nominal fee. (Please contact us first to insure that J&M is able to install a headset into your particular brand/model of helmet.)
1. Most flip-front & full-face style helmets have cheek pads or a complete nose section that can be removed. Carefully do so at this time, paying special attention so as not to break or damage any of the polystyrene parts.
2. Remove the padding mate-rial that is installed around the speakers & then using one of the speakers as a guide, mark the area where the circular pieces of styrene will be removed from the back of the ear area of the cheek pad or nose section. See Figure 7.
With an Exacto® knife, cut a hole slightly smaller than the actual speaker diameter so that the speaker will “press fit” into the hole without damaging the styrene. An airtight seal is necessary to pre-serve bass response as the sound pressure from the back of the speaker housing should not be allowed to mix with the sound pressure from the front. It is important to have the helmet fit and feel the same after the speakers are installed as it did prior to headset installation.
3. For flip-front style helmets, position the clamp & boom mike assembly on the left side of the helmet, so that the microphone lines up with your mouth. See Figure 13.
4. Position the speakers into the cheek pads and press them firmly into place, then plug each one into their corresponding plugs from the socket clamp assembly.
5. Pull the small, medium or large sized wind sock (which-ever you prefer) over the micro-phone.
6. For full-face style helmets, mark an area in the nose section just to the left of center to mount the microphone. See Figure 8. Make sure that this placement will not interfere with any venting mechanisms or other parts of the helmet upon re-installation of the nose section.
Using an Exacto® knife, cut a hole of sufficient size to allow the microphone to be mount-ed through the nose section and be pressed against the inside shell. See Figure 9. Insert the microphone cartridge through the hole from the back side, install the rubber boot and push the mike back into the hole from the front side. See Figure 10.
7Figure 13Figure
8Figure

7. Position the speakers into the cheek pads and press them firmly into place. See Figure 11.
8. Clean the inside of the helmet shell where the speakers and microphone will be positioned with a cloth dampened with alcohol. Peel the backing from each supplied Velcro pad and press it into the proper position for the speakers and microphone to contact when the helmet is re-assembled.
9. Reinstall the nose section and/or cheek pads & push the speakers and microphone firmly against the Velcro® pads.
10. Mount the clamp in the proper position on the left bottom edge of the helmet and tighten the clamp with the rubber friction spacer in place. See Figure 13.
11. Plug both speakers and the microphone into their corresponding plugs from the socket clamp assembly.
12. Using the included wooden tool, be careful to push the wires into the gap between the helmet liner and shell. See Figure 14.
Notes: When using your intercom system, regardless of headset brand or type, it is important to turn the intercom volume level high enough for comfortable conversation, but not any higher. Unnecessarily high intercom vol-ume levels will only increase the unwanted wind and background noise you may experience.
When plugging in the right angle hook-up cord that comes with some headset models, it may be necessary, especially the first time, to press a little harder than usual to make sure that the connection is fully made. This will keep the cord from accidentally becom-ing unplugged while riding. When plugging in the straight line hook-up cord that comes with some headset models, be sure to use the rubber strap. This will keep the cord from accidentally becoming unplugged while riding.
9Figure
10Figure 11Figure
14Figure13Figure
WARRANTY REGISTRATION FORM Please fill out this card completely and mail it immediately after purchase. Please be sure that your zip code and serial number (if applicable) are legible. This will help us to serve you better.
(PLEASE PRINT)
Name ______________________________________________________________________________________________________________________________________________________
Address _____________________________________________________________________________________________________________________________________________________
City _______________________________ _________________________________State __________________________ Zip _____________________________________________________
Motorcycle m Other m E-mail ________________________________________________________________________________________________
Make ___________________________________________ Model ______________________________________ Year __________________
Product part number ______________________________________________________________________
Serial number (if applicable)________________________________________________________________
Date of purchase _________________________________________________
Name of dealer it was purchased from ____________________________________________________________________________________
Mail to: J&M Corporation 1415 S. Cherry Avenue Tucson, AZ 85713 U.S.A.
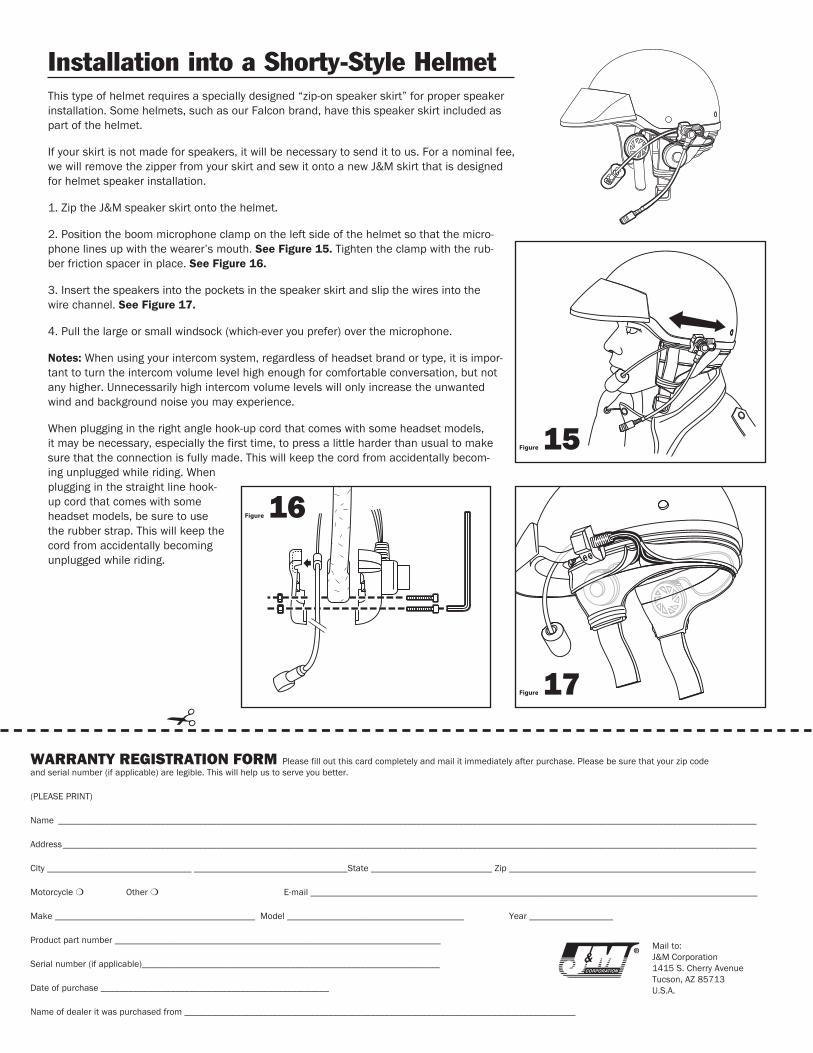
Installation into a Shorty-Style HelmetThis type of helmet requires a specially designed “zip-on speaker skirt” for proper speaker installation. Some helmets, such as our Falcon brand, have this speaker skirt included as part of the helmet.
If your skirt is not made for speakers, it will be necessary to send it to us. For a nominal fee, we will remove the zipper from your skirt and sew it onto a new J&M skirt that is designed for helmet speaker installation.
1. Zip the J&M speaker skirt onto the helmet.
2. Position the boom microphone clamp on the left side of the helmet so that the micro-phone lines up with the wearer’s mouth. See Figure 15. Tighten the clamp with the rub-ber friction spacer in place. See Figure 16.
3. Insert the speakers into the pockets in the speaker skirt and slip the wires into the wire channel. See Figure 17.
4. Pull the large or small windsock (which-ever you prefer) over the microphone.
Notes: When using your intercom system, regardless of headset brand or type, it is impor-tant to turn the intercom volume level high enough for comfortable conversation, but not any higher. Unnecessarily high intercom volume levels will only increase the unwanted wind and background noise you may experience.
When plugging in the right angle hook-up cord that comes with some headset models, it may be necessary, especially the first time, to press a little harder than usual to make sure that the connection is fully made. This will keep the cord from accidentally becom-ing unplugged while riding. When plugging in the straight line hook-up cord that comes with some headset models, be sure to use the rubber strap. This will keep the cord from accidentally becoming unplugged while riding.
15Figure
16Figure
17Figure
WARRANTY AND REPAIR INFORMATION
TWO YEAR LIMITED WARRANTY In order to facilitate the servicing of this warranty, the Warranty Registration Form should be filled out and returned within 10 days of the date of purchase. However, return of the Warranty Registration Form is not a precondition of this warranty, and this Warranty will be observed by J&M CORPORATION whether or not the Warranty Registration Form is returned, on the condition that other satisfactory evidence of the date of the original purchase is provided to J&M CORPORATION.
WHO PROVIDES THE WARRANTY? This warranty is provided by J&M CORPORATION.
WHO IS PROTECTED? This warranty is extended only to the original owner of this J&M CORPORATION product and may not be transferred or assigned.
WHAT IS COVERED AND HOW LONG? This warranty covers all defects in material or workmanship of our product for a period of 2 years from date of original retail purchase. At its option, J&M CORPORATION will repair or replace any defective part(s) or equipment.
The provisions of the warranty shall not apply to any unit which has been subjected to misuse, neglect, incorrect mechanical or electrical installation, unauthorized modifications, accident, nor to units which have been repaired or altered outside of our factory.
PROCEDURE FOR OBTAINING PERFORMANCE OF WARRANTY In the event that the product does not conform to this warranty, the product should be shipped prepaid to the J&M CORPORATION service facility. Transportation charges, insurance fees, and labor costs for shipment, removal, or reinstallation of our product are not covered by this warranty. Loss or damage in shipment is the sole responsibility of the freight carrier.
FOR YOUR INFORMATION Repair as provided under this warranty is the exclusive remedy of the consumer. J&M CORPORATION shall not be liable for any incidental or consequential damages or for breach of any express or implied warranty on this product. Except to the extent prohibited by applicable law, any implied warranty of merchantability or fitness for a particular purpose on this product is limited in duration to the duration of the warranty. Some states do not allow the exclusion or limitation of incidental or consequential damages, or allow limitations on how long an implied warranty lasts, so the above limitations or exclusion may not apply to you. This warranty gives you specific legal rights which vary from state to state.
J&M CORPORATION reserves the right to make changes in design and to make improvements in its products without the obligation to incorporate the changes or improvements in any of its previously manufactured products.
J&M CORPORATION has not authorized anyone to make representations or warranties other than the warranty contained herein.
The above warranty is effective for all products manufactured after 10/01/86.
NON-WARRANTY REPAIR RATES J&M CORPORATION reserves the right to change the labor repair rates without prior notice. At the time of this printing the out-of- war-ranty repair is $40 per hour for labor only. However, the customer is advised to verify the current rate when he/she calls customer service to obtain the return authorization number.
FACTORY SERVICE ADDRESS J&M Corporation, 1415 S. Cherry Avenue, Tucson, Arizona, 85713, U.S.A. Tel: 1-800-358-0881 [email protected] www.jmcorp.com
CUSTOMER SERVICE NUMBER 1-800-358-0881
Please complete WARRANTY REGISTRATION FORM
on the reverse side and send to J&M Corporation
Thank you for the confidence you have shown in J & M by purchasing one of our innovative products. It will give you many hours of riding pleasure. If you have any questions during installation or require more information about this product, you may call our Customer service Department (English only, please) at 1-800-358-0881, Monday through Friday, 8:00 a.m. to 5:00 p.m. Mountain Standard Time, U.S.A.
J&M CorporationTucson, Arizona, U.S.A. Tel. [email protected]