
HARD COPY REPORT CDAC
19
PROJECT REPORT ON INSTALLATION AND PARALLEL IMPLEMENTATION OF APPLICATIONS ON HIGH PERFORMANCE COMPUTERS NITS Supercomputing Facility NATIONAL INSTITUTE OF TECHNOLOGY SILCHAR Submitted By – SARTHAK DUBEY VISHAL KUMAR 12-1-5-022 12-1-4-044 Computer Science and Engg. Electronic and Communictation Engg Under the guidance of Dr. Trupti Ranjan Lenka Assistant Professor, Dept. of ECE
-
Upload
sarthak-dubey -
Category
Documents
-
view
135 -
download
0
Transcript of HARD COPY REPORT CDAC

PROJECT REPORT
ON
INSTALLATION AND PARALLEL IMPLEMENTATION OF
APPLICATIONS ON HIGH PERFORMANCE COMPUTERS
NITS Supercomputing Facility
NATIONAL INSTITUTE OF TECHNOLOGY SILCHAR
Submitted By –
SARTHAK DUBEY VISHAL KUMAR
12-1-5-022 12-1-4-044
Computer Science and Engg. Electronic and Communictation Engg
Under the guidance of
Dr. Trupti Ranjan Lenka
Assistant Professor, Dept. of ECE

NATIONAL INSTITUTE OF TECHNOLOGY
SILCHAR
CERTIFICATE
This is to certify that the project report entitled “INSTALLATION AND PARALLEL
IMPLEMENTATION OF APPLICATIONS ON HIGH PERFORMANCE COMPUTERS”
submitted by the following students belonging to 5th semester, B.Tech during the
academic session 2014-2015 under the guidance of Dr. Trupti Ranjan Lenka,
Assistant Professor, Department of Electronics and Communication Engineering,
NIT Silchar is a bonafide record of the work done by them.
Sarthak Dubey (12-1-5-022)
Vishal Kumar (12-1-4-044)
Dr. Trupti Ranjan Lenka
Project Supervisor
Department of ECE
NIT Silchar

ACKNOWLEDGEMENT
We would like to express our sincere gratitude and avail this opportunity to
express our indebtedness to our supervisor Dr. Trupti Ranjan Lenka, Assistant
Professor, Department of Electronics and Communication Engineering, National
Institute of Technology Silchar, for his valuable guidance, constant
encouragement and kind help at various stages for the execution of this work. His
enthusiasm has always encouraged us to seek for knowledge in all forms of
source.
We would also like to thank our guides Mr. Souvik Paul, Project Engineer,
CDAC Pune and Mr. Kiran Sonavane, Project Engineer, CDAC Pune for thoroughly
teaching us the required theory and guiding us throughout the practical sessions.
Place: NIT Silchar Sarthak Dubey (12-1-5-022)
Date: 25-7-2014 Vishal Kumar (12-1-4-044)
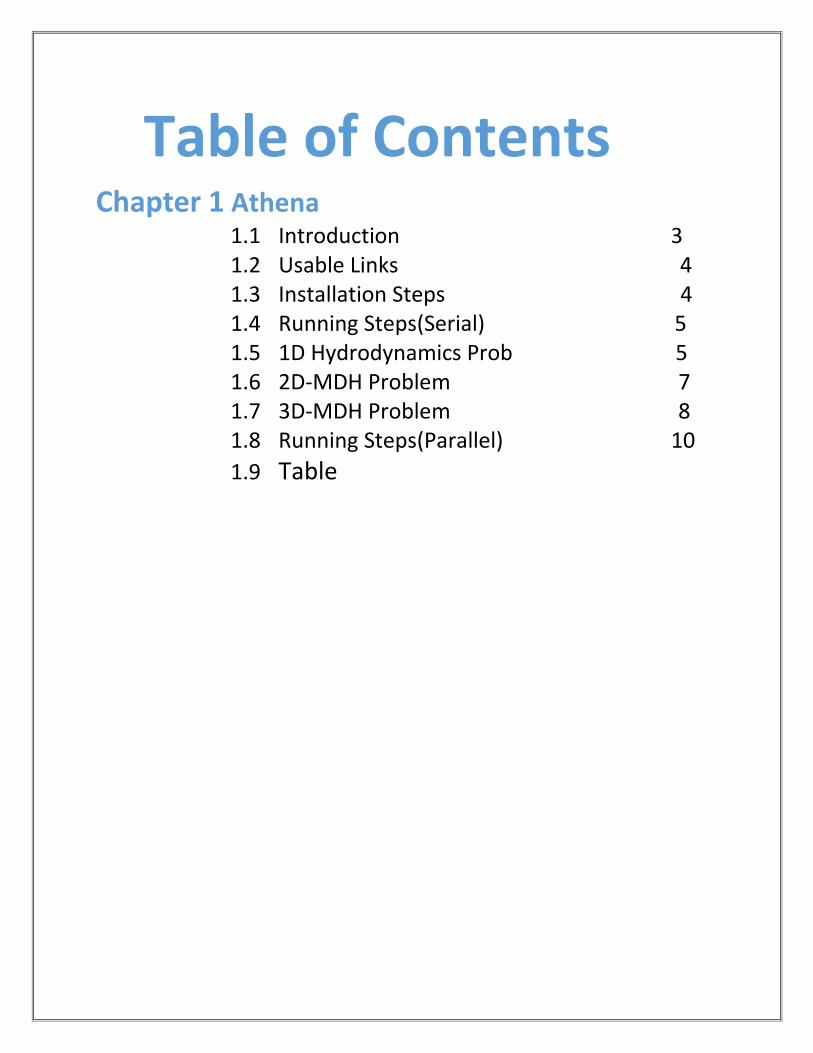
Table of Contents Chapter 1 Athena
1.1 Introduction 3 1.2 Usable Links 4 1.3 Installation Steps 4 1.4 Running Steps(Serial) 5 1.5 1D Hydrodynamics Prob 5 1.6 2D-MDH Problem 7 1.7 3D-MDH Problem 8 1.8 Running Steps(Parallel) 10
1.9 Table
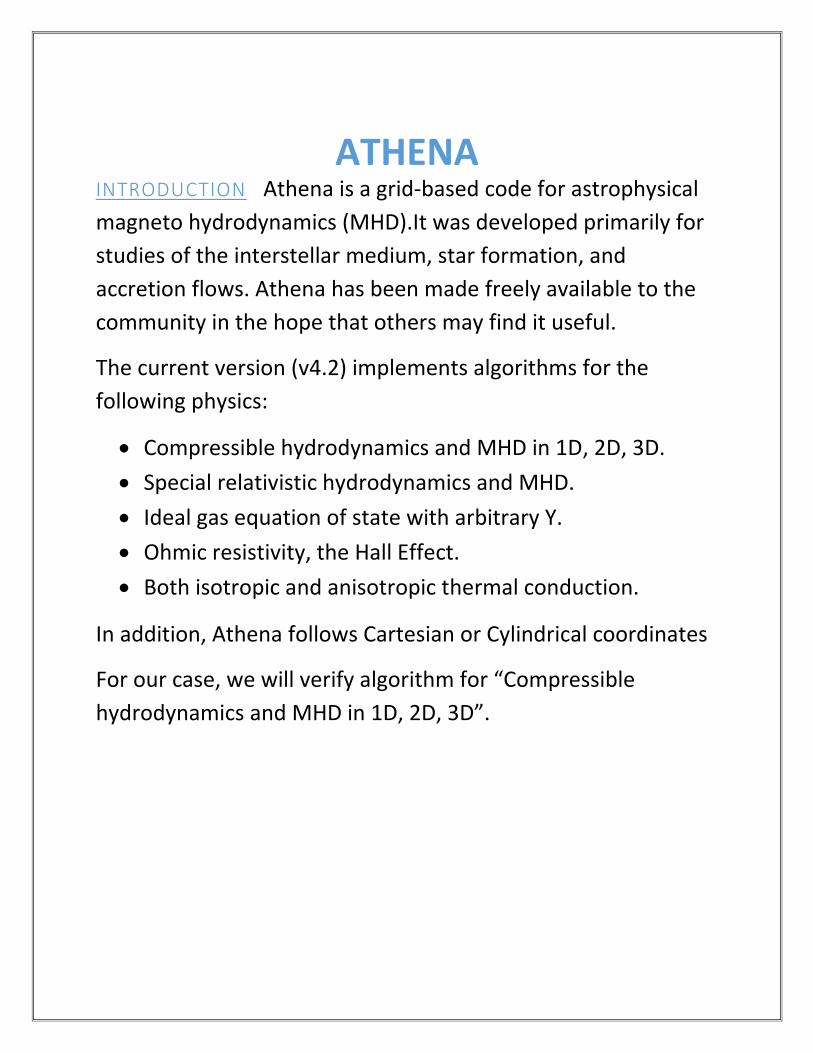
ATHENA INTRODUCTION Athena is a grid-based code for astrophysical
magneto hydrodynamics (MHD).It was developed primarily for
studies of the interstellar medium, star formation, and
accretion flows. Athena has been made freely available to the
community in the hope that others may find it useful. The current version (v4.2) implements algorithms for the
following physics:
Compressible hydrodynamics and MHD in 1D, 2D, 3D.
Special relativistic hydrodynamics and MHD.
Ideal gas equation of state with arbitrary Y.
Ohmic resistivity, the Hall Effect.
Both isotropic and anisotropic thermal conduction.
In addition, Athena follows Cartesian or Cylindrical coordinates
For our case, we will verify algorithm for “Compressible
hydrodynamics and MHD in 1D, 2D, 3D”.

USABLE LINKS: https://trac.princeton.edu/Athena/wiki/AthenaDocsDownLd
INSTALLATION STEPS: 1. After having downloaded the file, we transfer it from the
windows to the MobaXterm through WinSCP.
2. The file is in the “.gz.tar” format. So; it is first made untar
and gunzipped from the command given below.
gunzip athena4.2.tar.gz
tar xf athena4.2.tar.gz
3. Then ,the configure script is created by running autoconfig in
the ./athena directory using the command:
cd athena 4.2
autoconf
4. Now, test the configure by running :
Configure
make all
make test
5. The above steps will have executable in a new directory
./athena/bin. It contains the “athinput.new” file too.
cd bin

Running steps (serial)
1D hydrodynamics problem
The Sod shock tube
To run a simple 1D hydrodynamic problem, following steps are followed:
1. Enter the athena4.2 directory.
cd athena4.2
2. Clean up any old files from the last compilation.
make clean
3. Configure the code for hydrodynamics and the shock tube problem
generator:
configure --with-gas=hydro --with-problem=shkset1d
4. Compile. This will create the /bin directory, if it does not already
exist.
make all
5. Run the code using the default input file for the Sod shock tube.
cd bin
athena -i../tst/1D-hydro/athinput.sod
6. The code should have produced a series of .tab files, and a history
file:
Athena Sod.0005.tab Sod.0011.tab Sod.0017.tab Sod.0023.tab Sod.0000.tab Sod.0006.tab Sod.0012.tab Sod.0018.tab Sod.0024.tab Sod.0001.tab Sod.0007.tab Sod.0013.tab Sod.0019.tab Sod.0025.tab Sod.0002.tab Sod.0008.tab Sod.0014.tab Sod.0020.tab Sod.hst Sod.0003.tab Sod.0009.tab Sod.0015.tab Sod.0021.tab Sod.0004.tab Sod.0010.tab Sod.0016.tab
7. After the above step, the screen below gets appeared.
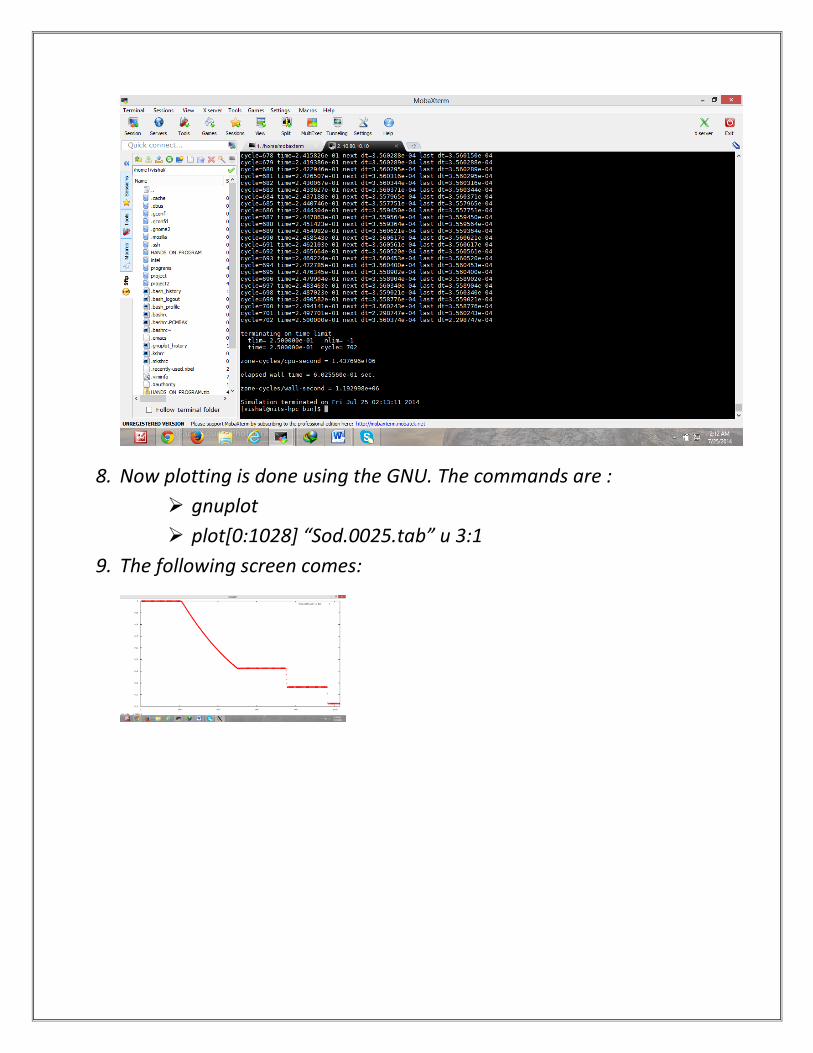
8. Now plotting is done using the GNU. The commands are :
gnuplot
plot[0:1028] “Sod.0025.tab” u 3:1
9. The following screen comes:

2D-MHD problem: The Orszag-Tang Vortex To run an example 2D MHD problem, follow these steps:
1. Clean up any old files from the last compilation, configure, and
compile
make clean
configure --with-problem=orszag-tang --with-order=3
make all
2. Run the code using the default input file for the Orszag-Tang
vortex
cd bin
athena -i../tst/2D-mhd/athinput.orszag-tang
3. The following screen appears:
4. Now ,the animation of the file is done by the command given with
the output:
animate *.d.ppm

3D MHD Problem: The Rayleigh-Taylor Instability To run an example 3D MHD problem, follow these steps.
1. Clean up any old files from the last compilation, configure, and
compile.
make clean
configure --with-problem=rt --with-order=3
make all
2. Run the code using the default input file. Because 3D problems are
very expensive, it is wise to reduce the grid resolution if we are
running on a single processor. This can be done using the
command line.
cd bin
athena -i../tst/3D-mhd/athinput.rt domain1/Nx1=32
domain1/Nx2=32 domain1/Nx3=64 time/tlim=3.0
Even at this reduced resolution, the run will take close to an hour to
complete. Doubling the resolution in each dimension increases the
run time in 3D by 24=16 (a factor of 2 for each dimension, plus a
factor of 2 for the smaller time step), so if the default grid resolution
specified in the input file is used, this

test will take upwards of 12 hours to run (these numbers depend on
the processor you are using of course). At low resolution, the bubbles
(fingers) tend to rise (sink) faster, so the run is terminated at t=3 before
they hit the top and bottom of the domain.
3. If any editing is required, that can be done in /bin/athinput.new
using command:
vim /bin/athinput.new
4. Run the code using:
athena –i athinput.new
5. Animate the following as;
animate *.d.ppm

Running Steps (PARALLEL)
Why Parallelizing? In the case of 3D-MHD,it takes hours to run the file if only single processor is used. Therefore to overcome the problem, parallelizing of the program is done in which multiple processors are utilized to run the program which results in the drastic contraction of time .So the concept of MPI comes into picture.
Running Athena with MPI Virtually all new laptops and PCs have at least dual or quad core processors. This means we can get up to a 2x or 4 x speed-ups by using all the cores at once. If we can get access to a workstation or cluster with multiple processors, we can get much larger speed-ups. Athena has been run on clusters with up to 25,000 cores. However, running Athena with MPI requires an external MPI library (OpenMPI, for example) be installed on the system.
As an example, to run the 3D MHD RT instability problem with MPI, follow these steps.
1. Clean up any old files from the last compilation, and enable MPI during configure.
make clean
configure --with-problem=rt --with-order=3 --enable-mpi
2. A dependency “fftw-3.3.4” is required which can be downloaded
from the link: http://www.fftw.org/download.html
3. Now the file is transferred to the Mobaxterm from windows
through WinSCP.
4. Untar the file using the command:
tar xf fftw-3.3.4.tar
5. Enter into the fftw-3.3.4 directory, and configure it using the
commands.
cd fftw-3.3.4
vi README
./configure –prefix=/home1/vishal/project/fftw-3.3.4
make all
make install
6. The above steps will enable the fftw-3.3.4 directory to possess
bin, include and lib file.
7. Now, follow the commands:
cd project
vi Makeoptions
8. Edit the Makeoptions file by giving the path to it as;
CC = /opt/intel/impi/4.1.3.048/intel64/bin/mpicc
LDR = /opt/intel/impi/4.1.3.048/intel64/bin/mpicc
OPT = -O3
CUSTLIBS =
MPIINC =-I/opt/intel/impi/4.1.3.048/intel64/include
MPILIB =-L/opt/intel/impi/4.1.3.048/intel64/lib -lmpi
FFTWLIB =-L/home1/vishal/project/fftw-3.3.4/lib -lfftw3
FFTWINC =-I/home1/vishal/project/fftw-3.3.4/include
BLOCKINC =
BLOCKLIB =
CUSTLIBS = -ldl –lm
ifeq (NO_FFT,FFT_ENABLED)
BLOCKINC = -I fftsrc
FFTWLIB = -L/home1/vishal/project/fftw-3.3.4/lib -lfftw3
FFTWINC = -I/home1/vishal/project/fftw-3.3.4/include
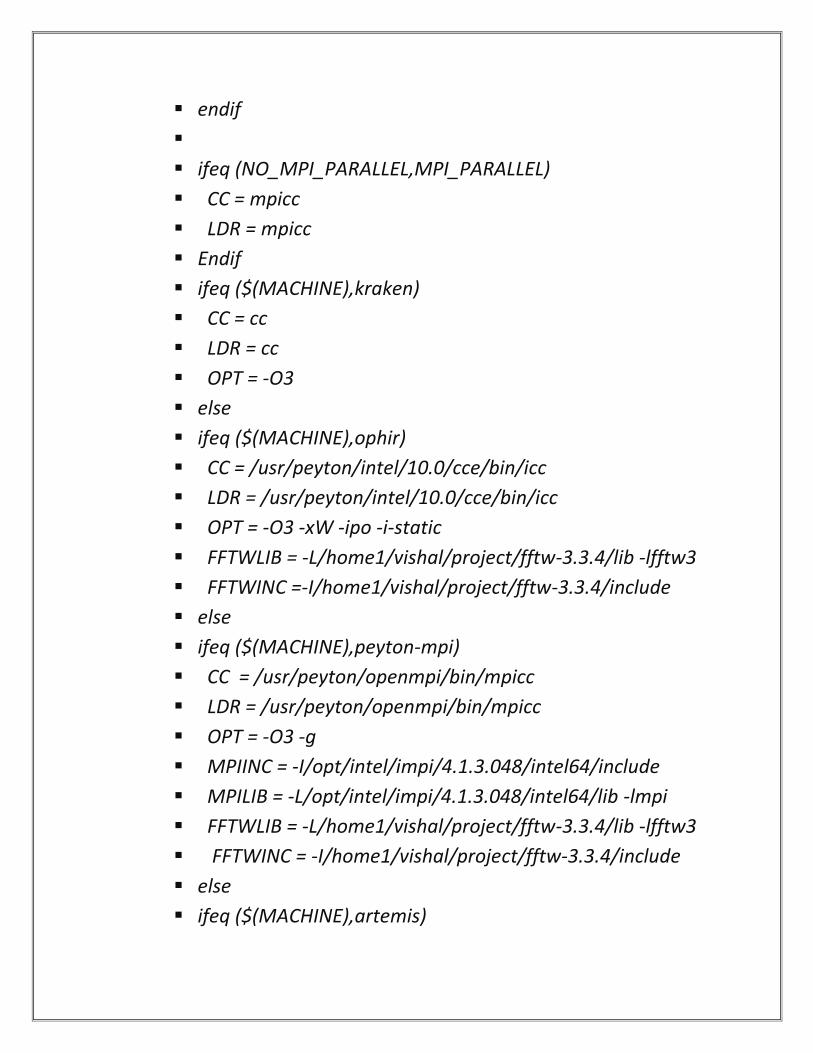
endif
ifeq (NO_MPI_PARALLEL,MPI_PARALLEL)
CC = mpicc
LDR = mpicc
Endif
ifeq ($(MACHINE),kraken)
CC = cc
LDR = cc
OPT = -O3
else
ifeq ($(MACHINE),ophir)
CC = /usr/peyton/intel/10.0/cce/bin/icc
LDR = /usr/peyton/intel/10.0/cce/bin/icc
OPT = -O3 -xW -ipo -i-static
FFTWLIB = -L/home1/vishal/project/fftw-3.3.4/lib -lfftw3
FFTWINC =-I/home1/vishal/project/fftw-3.3.4/include
else
ifeq ($(MACHINE),peyton-mpi)
CC = /usr/peyton/openmpi/bin/mpicc
LDR = /usr/peyton/openmpi/bin/mpicc
OPT = -O3 -g
MPIINC = -I/opt/intel/impi/4.1.3.048/intel64/include
MPILIB = -L/opt/intel/impi/4.1.3.048/intel64/lib -lmpi
FFTWLIB = -L/home1/vishal/project/fftw-3.3.4/lib -lfftw3
FFTWINC = -I/home1/vishal/project/fftw-3.3.4/include
else
ifeq ($(MACHINE),artemis)

CC = mpicc
LDR = mpicc
OPT = -O3 -xW -ipo -i-static
MPIINC =
MPILIB = -lmpi
FFTWLIB = -L/home1/vishal/project/fftw-3.3.4/lib -lfftw3
FFTWINC = -I/home1/vishal/project/fftw-3.3.4/include
else
ifeq ($(MACHINE),aether)
CC = mpicc
LDR = mpicc
OPT = -O3
MPIINC = -I~/lam-7.1.4/include
MPILIB = -L~/lam-7.1.4/lib
Else
ifeq ($(MACHINE),zenith)
CC = mpicc
LDR = mpicc
OPT = -O3
MPIINC = -I/opt/intel/impi/4.1.3.048/intel64/include
MPILIB = -L/opt/intel/impi/4.1.3.048/intel64/lib -lmpi
FFTWLIB = -L/home1/vishal/project/fftw-3.3.4/lib -lfftw3
FFTWINC = -I/home1/vishal/project/fftw-3.3.4/include
else
ifeq ($(MACHINE),macosx)
CC = gcc
LDR = gcc
OPT = -O3
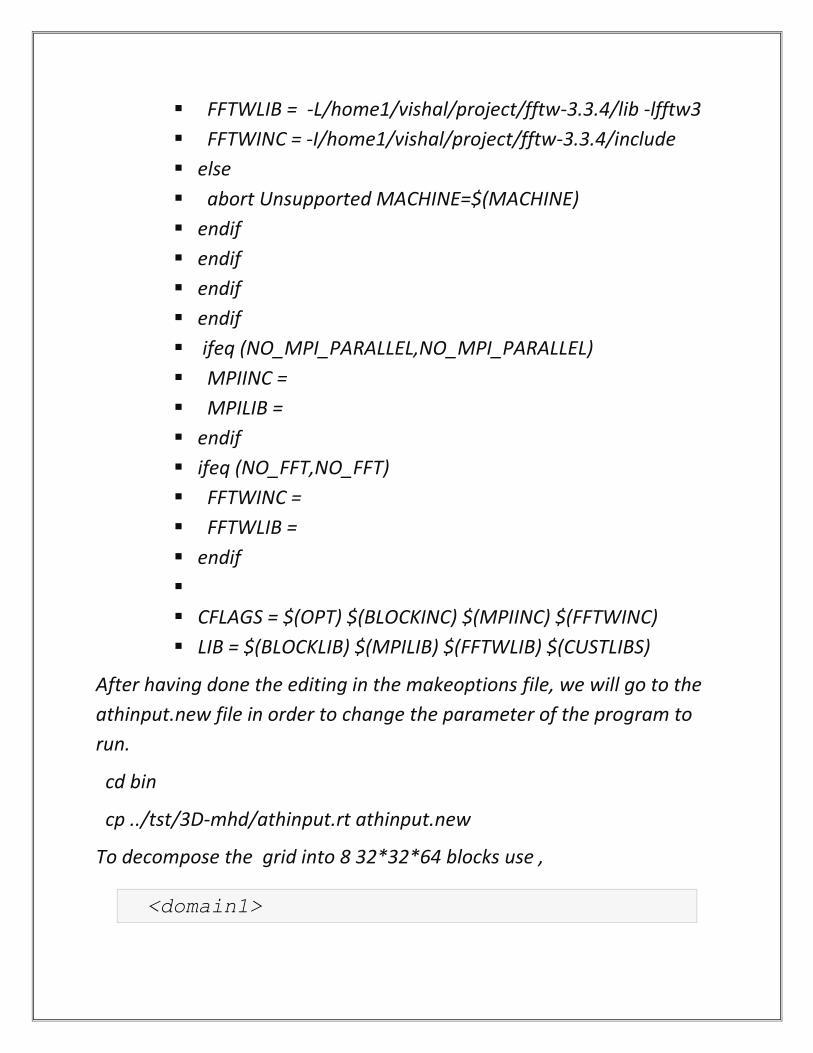
FFTWLIB = -L/home1/vishal/project/fftw-3.3.4/lib -lfftw3
FFTWINC = -I/home1/vishal/project/fftw-3.3.4/include
else
abort Unsupported MACHINE=$(MACHINE)
endif
endif
endif
endif
ifeq (NO_MPI_PARALLEL,NO_MPI_PARALLEL)
MPIINC =
MPILIB =
endif
ifeq (NO_FFT,NO_FFT)
FFTWINC =
FFTWLIB =
endif
CFLAGS = $(OPT) $(BLOCKINC) $(MPIINC) $(FFTWINC)
LIB = $(BLOCKLIB) $(MPILIB) $(FFTWLIB) $(CUSTLIBS)
After having done the editing in the makeoptions file, we will go to the
athinput.new file in order to change the parameter of the program to
run.
cd bin
cp ../tst/3D-mhd/athinput.rt athinput.new
To decompose the grid into 8 32*32*64 blocks use ,
<domain1>
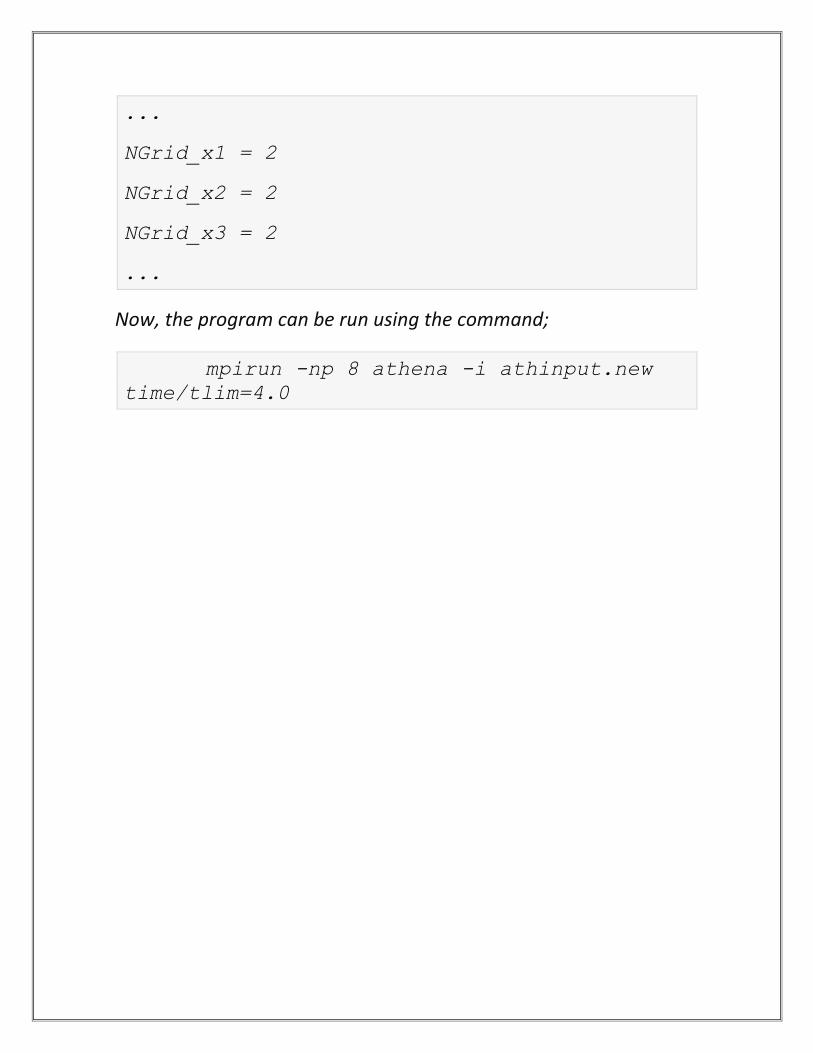
...
NGrid_x1 = 2
NGrid_x2 = 2
NGrid_x3 = 2
...
Now, the program can be run using the command;
mpirun -np 8 athena -i athinput.new time/tlim=4.0

The following output will come via the cycle running as follows:
The number of processors running is shown here:


