Haploview Doc
34
Haploview Documentation
-
Upload
glaucia-maria-fernandes -
Category
Documents
-
view
76 -
download
2
Transcript of Haploview Doc

Haploview Documentation

Haploview Documentation


iv
Table of Contents1. Using Haploview ............................................................................................................................ 1
Loading a Dataset ....................................................................................................................... 1Data Quality Checks ................................................................................................................... 2LD Display ............................................................................................................................... 3Blocks and Haplotypes ................................................................................................................ 5Tagger ...................................................................................................................................... 6Association Tests ....................................................................................................................... 8Permutation Testing .................................................................................................................... 8PLINK ...................................................................................................................................... 9
2. Files ............................................................................................................................................ 11Input File Formats .................................................................................................................... 11Output Files ............................................................................................................................. 14Export Options ......................................................................................................................... 17Auxiliary Input Files ................................................................................................................. 18
3. Command Line Options ................................................................................................................. 20General Options ....................................................................................................................... 20Input Options ........................................................................................................................... 20Data Check Options .................................................................................................................. 21Block Output Options ................................................................................................................ 22Other Output Options ................................................................................................................ 22Association Output Options ........................................................................................................ 23Tagging Output Options ............................................................................................................. 23
4. About Haploview .......................................................................................................................... 24System Requirements ................................................................................................................ 24Known Issues ........................................................................................................................... 25Updates ................................................................................................................................... 25Change Log ............................................................................................................................. 25

1
Chapter 1. Using Haploview
Loading a DatasetData can be loaded in six formats. Ped and Haps files can also load an optional marker info file and PLINKfiles normally require an accompanying map or binary map file. Further options are presented on the loadscreen:
• Haploview saves time by only computing pairwise LD statistics for markers within a certain distanceof each other. The default is 500KB. Enter a value of zero to force all pairwise computations.
• Haploview excludes individuals with less than 50% complete genotypes. This threshold can be adjustedin the load dialog. Additional details about excluded individuals are available from the marker checktab.
• When loading a file dumped from the HapMap project website, it is possible to automatically displaySNP and gene tracks from the HapMap above the data by checking the "Download and show HapMapinfo track" box. More information is available with the LD Display help. [hapmap file only]
• If you wish to perform association tests, you must inform the program now and select either familytrios or case/controls. For family datasets a standard TDT or parenTDT are available. More details areavailable under association. [pedfile only]
• If your data is from the X chromosome in the linkage formats, tick the box so that Haploview willcorrectly process your data. In other formats, select the X chromosome in the dropdown menu. Xchromosome data is not supported by the phased haplotype format. All functionality now works withthe X chromosome.
• Haploview will maximize the information available from a pedigree for both LD analyses andassociation tests. For the former it creates a maximal set of unrelated individuals, using trio data onlyfor obligate parent/offspring phasing. For TDT association testing, all available transmissions fromparent-offspring will be used. More detailed information about specific situations is available in theFAQ.
• Haploview can be configured to support proxy host settings using the "Proxy Settings" button on theload screen.
Haploview allocates 512MB of memory by default. This is usually sufficient to handle datasets with severalthousand markers. If you are running the program on very large datasets (>20,000 markers) you mayneed to force more memory (presuming your computer has sufficient resources available). This can beaccomplished using the following command:
java -jar Haploview.jar -memory 2000
Where "2000" in this case specifies 2000 megabytes of memory and can be adjusted as necessary. Previousversions of Haploview required a slightly different command to adjust available memory, which stillworks:
java -Xmx2000M -cp Haploview.jar edu/mit/wi/haploview/Haploview

Using Haploview
2
Data Quality Checks
Marker ChecksAfter loading a file, Haploview shows some basic data quality checks for the markers. Markers are filteredout based on some default criteria which can be adjusted as necessary. Markers can be added or removedfrom analyses by hand via the checkboxes. The data in this table can be sorted by clicking on any of thecolumn headers. Compound sorts can be done by clicking on the first column header then CTRL clickingon the next one.
• # is the marker number.
• Name is the marker ID specified (only if an info file is loaded).
• Position is the marker position specified (only if an info file is loaded).
• ObsHET is the marker's observed heterozygosity.
• PredHET is the marker's predicted heterozygosity (i.e. 2*MAF*(1-MAF)).
• HWpval is the Hardy-Weinberg equilibrium p value, which is the probability that its deviation fromH-W equilibrium could be explained by chance.
• %Geno is the percentage of non-missing genotypes for this marker.
• FamTrio is the number of fully genotyped family trios for this marker (0 for datasets with unrelatedindividuals).
• MendErr is the number of observed Mendelian inheritance errors (0 for datasets with unrelatedindividuals).
• MAF is the minor allele frequency (using founders only) for this marker.
• Alleles are the major and minor alleles for this marker.
• Rating is checked if the marker passes all the tests and unchecked if it fails one or more tests(highlighted in red).
You can adjust the filtering thresholds and click "Rescore" to refilter the markers using the new values.These thresholds can be reset to values by clicking "Reset Values". Markers can also be selected/unselectedby hand by clicking the "Rating" checkbox or using the "Select All" and "Deselect All" buttons. Anymarker which fails one of the quality tests will have the relevant field(s) highlighted in red.
Duplicate MarkersIf two markers in an input file have the same chromosomal position, Haploview will ignore the lesscompletely genotyped marker by default and highlight both in yellow on the check markers panel. Whenrunning in nogui mode Haploview always ignores the less completely genotyped version of two markerswith the same position. If you want to use both from the command line, you'll need to adjust one of thepositions.
If two markers in an input file have the same name, Haploview renames the second one in the file byappending ".X" to the filename, where "X" is a running integer count starting with 1. So if you havemarker1, marker1 and marker2, Haploview would adjust this to: marker1, marker1.1 and marker2. Note
Using Haploview
3
that if the markers with the same name have different positions, Haploview won't deselect any of them; ifthey do have identical positions, it will filter all but one out as described above.
Filtered IndividualsThe top of the tab contains information about individuals filtered during the loading of the file. It willshow overview information about the number of singletons and trios used and the number of independentfamilies loaded. Further information can be shown by clicking the "Advanced Views" button. This willpresent a list of up to four buttons depending on the nature of the loaded dataset. The "Individual Summary"button will show genotyping percentage by family and individual. If individuals have been excluded, the"Excluded Individuals" button will present a list of excluded individuals as well as the reason for exclusion.If Mendel errors are present, view detailed Mendel error information by clicking the "Mendel Errors"button. If male heterozygotes are present in x chromosome data, information about them can be viewedby clicking "Male Heterozygotes". All of these advanced views can also be exported using the "Export toFile" button. Details about individual filtering can be found in the FAQ.
LD Display
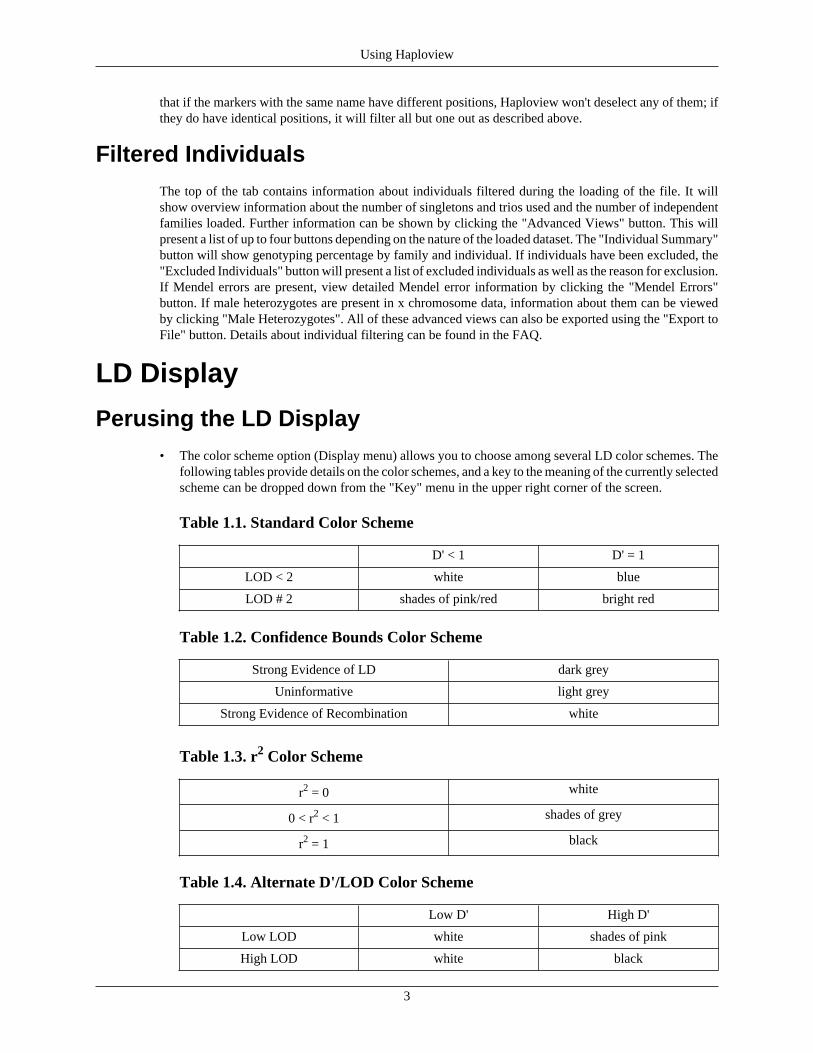
Perusing the LD Display• The color scheme option (Display menu) allows you to choose among several LD color schemes. The
following tables provide details on the color schemes, and a key to the meaning of the currently selectedscheme can be dropped down from the "Key" menu in the upper right corner of the screen.
Table 1.1. Standard Color Scheme
D' < 1 D' = 1
LOD < 2 white blue
LOD # 2 shades of pink/red bright red
Table 1.2. Confidence Bounds Color Scheme
Strong Evidence of LD dark grey
Uninformative light grey
Strong Evidence of Recombination white
Table 1.3. r2 Color Scheme
r2 = 0 white
0 < r2 < 1 shades of grey
r2 = 1 black
Table 1.4. Alternate D'/LOD Color Scheme
Low D' High D'
Low LOD white shades of pink
High LOD white black

Using Haploview
4
(r2 and Alt D'/LOD courtesy of Will Fitzhugh)
Table 1.5. 4 Gamete Color Scheme
4 distinct 2-marker haplotypes white
< 4 distinct 2-marker haplotypes black
• In order to help keep the display uncluttered, D prime values of 1.0 are never shown (the box is empty).These values can be switched on or off with the "Show LD values" option in the Display menu.
• The zoom option (Display menu) allows you to select one of three zoom modes. The two zoomed outversions can be useful for browsing large datasets.
• Large datasets also show a "map" in the lower left corner which gives an overview of the D primedisplay and allows you to navigate quickly. Clicking on an area of the map will cause the main displayto jump to that area. This map also shows the currently defined blocks as small black lines across thetop.
• Markers with additional notes (as loaded from the info file) are highlighted (the names are green inthe zoomed-in view and the lines from the SNP position to the LD chart are green in the zoomed-outview. Details can be viewed by right clicking on the marker number (as mentioned below).
• Right clicking on the marker number (or the equivalent space in the zoomed out views) shows themarker name, minor allele frequency and any additional notes specified in the info file. This can beespecially helpful in the zoomed out views which do not display marker names. The last such pieceof popup information clicked will be shown at the top of the LD plot. This reminder can be dismissedby left clicking anywhere on the LD plot.
• Right clicking on any pairwise LD comparison will show a more detailed summary of the LD betweenthe two markers in question. This information is also shown at the top of the screen as described aboveand can be dismissed by left clicking anywhere on the LD plot.
Additional Data Tracks
Analysis Track
A graph of any variable versus chromosomal location can be added above the LD plot with the "LoadAnalysis Track" option. Simply create a file with two columns: <position> <value> . Haploview will plotthe values in a continuous line along the top of the screen, along with a scale bar on the Y-axis. You canload several analysis tracks which will all be plotted in the same box at the top of the LD plot.
HapMap Gene/SNP Track
The "Download HapMap info track" option (with an internet connection) allows you to connect to theHapMap Project server and download and display a track with HapMap genotyped SNPs and gene names.If an info file is specified, the default boundaries are the positions of the first and last markers (which is onlyvalid if the info file is in genomic coordinates). You must specify the proper chromosome and genomicbuild in the dialog box. If you are using a file downloaded from the HapMap website the program willspecify the correct default chromosome, build and start/end positions. This track display can be configuredwith the "HapMap Info Track Options" item in the "Display" menu. Available tracks include HapMapSNPs, Entrez genes, recombination rate, contigs, and GC content.

Using Haploview
5
Blocks and Haplotypes
BlocksHaploview generates blocks whenever a file is opened, but these blocks can be edited and redefined in anumber of ways. In the Analysis menu, you can clear all the blocks in order to start over, define blocksbased on one of several automated methods or customize the parameters of those algorithms. Additionally,the blocks can be edited by hand.
Confidence Intervals [DEFAULT]
The default algorithm is taken from Gabriel et al, Science, 2002. 95% confidence bounds on D prime aregenerated and each comparison is called "strong LD", "inconclusive" or "strong recombination". A blockis created if 95% of informative (i.e. non-inconclusive) comparisons are "strong LD". This method bydefault ignores markers with MAF < 0.05. The MAF cutoff and the confidence bound cutoffs can be editedby choosing "Customize Block Definitions" (Analysis menu). This definition allows for many overlappingblocks to be valid. The default behavior is to sort the list of all possible blocks and start with the largestand keep adding blocks as long as they don't overlap with an already declared block.
Four Gamete Rule
This is a variant on the algorithm described in Wang et al, Am. J. Hum. Genet., 2002. For each marker pair,the population frequencies of the 4 possible two-marker haplotypes are computed. If all 4 are observed withat least frequency 0.01, a recombination is deemed to have taken place. Blocks are formed by consecutivemarkers where only 3 gametes are observed. The 1% cutoff can be edited to make the definition moreor less stringent.
Solid Spine of LD
This internally developed method searches for a "spine" of strong LD running from one marker to anotheralong the legs of the triangle in the LD chart (this would mean that the first and last markers in a blockare in strong LD with all intermediate markers but that the intermediate markers are not necessarily inLD with each other).
Markers can be removed from blocks by clicking on the marker number (along the top of the D primegraph). Blocks can be defined by hand by clicking and dragging along the marker number row. Any blockwhich overlaps with an existing block will take precedence and delete the existing block.
Haplotypes
Display
View haplotypes for selected blocks by clicking on the "Haplotypes" tab or selecting "Haplotypes" from theDisplay menu. Haplotypes are estimated using an accelerated EM algorithm similar to the partition/ligationmethod described in Qin et al, 2002, Am J Hum Genet. This creates highly accurate population frequencyestimates of the phased haplotypes based on the maximum likelihood as determined from the unphasedinput.
The haplotype display shows each haplotype in a block with its population frequency and connectionsfrom one block to the next. In the crossing areas, a value of multiallelic D' is shown. This represents thelevel of recombination between the two blocks. Note that the value of multiallelic D' is computed for

Using Haploview
6
only the haplotypes ("alleles") currently displayed. This usually does not have a strong effect, as the rarehaplotypes contribute only slightly to the overall value. Above the haplotypes are marker numbers alongwith a tick beneath haplotype tag SNPs (htSNPs).
Display Controls
The display can be edited using the controls at the bottom of the screen to display only more commonhaplotypes or to adjust the connecting lines. By default, alleles are displayed using A,C,G,T along withthe special symbol 'X' which represents a fairly rare situation in which only one allele is unambiguouslyobserved in phased data. The 'X' represents the allele of unknown identity. The display can also be changedto show the alleles numerically from 1-4 with 8 being the equivalent of 'X', or as blue and red boxes, withblue being the major allele and red the minor.
Tag SNPs
Haplotype tag SNPs are no longer displayed by default in the Haplotypes tab. It is recommended that alltagging be done via the Tagger tab. The block-by-block tags can be displayed by ticking the "Show tagsin blocks" option in the Display menu.
Tagger
IntroductionWe have developed a tagging strategy that combines the simplicity of pairwise methods with thepotential efficiency of multimarker approaches. We avoid overfitting and unbounded haplotype tests inthe association phase by (a) using only those multiallelic combinations in which the alleles are themselvesin strong LD, and (b) explicitly recording the allelic hypotheses that are to be tested in the subsequentassociation analysis. Attractive practical features include the ability to force in or exclude sets of tags.
Haploview is based on Paul de Bakker's Tagger. It and more information are available at the Taggerwebsite. There are a number of differences between the implementations, although they are constructedaround the same concept. Tagger currently searches a much broader space of available multi-markertests (up to 6-mers) whereas Haploview allows only 2- or 3-marker tests in the interest of computationalefficiency.
FeaturesHaploview's Tagger operates in either pairwise or aggressive mode. In either case it begins by selecting a
minimal set of markers such that all alleles to be captured are correlated at an r2 greater than a user-editablethreshold with a marker in that set. Certain markers can be forced into the tag list or explicity prohibitedfrom being chosen as tags. You can also specify which markers in the dataset you want to be captured.
Aggressive tagging introduces two additional steps. The first is to try to capture SNPs which could not becaptured in the pairwise step (N.B. these must have been "excluded" since otherwise they would simplybe chosen to capture themselves) using multi-marker tests constructed from the set of markers chosen aspairwise tags. After this, it tries to "peel back" the tag list by replacing certain tags with multi-marker tests.Tagger avoids overfitting by only constructing multi-marker tests from SNPs which are in strong LD witheach other, as measured by a pairwise LOD score. This LOD cutoff can be adjusted to loosen or tightenthis requirement; in general, the default cutoff of 3.0 is appropriate for selecting tags from a HapMap-sizedreference panel of 120 chromosomes.
Much more information about the development of this algorithm is available at the Tagger website.

Using Haploview
7
Tagger Configuration Panel
N.B. Haploview's Tagger requires either an info file or a hapmap style input file, because it references themarker names specified in those files. If you load a pedigree or phased haplotypes input file without aninfo file, the Tagger panels will not be available.
This panel shows all SNPs available for tag selection. SNPs which are deselected in the Check Markerstab will not be in this list. There are three checkboxes for each SNP:
Force Include Checking this box will force this SNP to be chosen as a tag SNP.
Force Exclude Checking this box will prohibit this SNP from being chosen as a tagSNP.
Capture this Allele? If this box is checked, Haploview will include this SNP in the list ofalleles to be captured by the chosen tag set.
N.B. The include and exclude checkboxes are mutually exclusive, and "Capture this Allele" must bechecked in order to either include or exclude a marker.
Directly below the marker list are buttons to quickly manipulate the table above. Use "Include All" tocheck all of the "Force Include" boxes, and "Exclude All" to check all of the "Force Exclude" boxes."Uncapture All" will uncheck the "Capture this Allele?" column for all markers, and "Reset Table" willreturn the table to its initial state. Beneath these buttons are several additional tagging options. You canchoose from among pairwise and two aggressive tagging strategies discussed above. You can also set the
r2 and LOD thresholds as previously mentioned. Additionally, you can specify the maximum number oftags to pick, as well as the minumum distance (in base pairs) between picked tags. You can load a set ofSNPs to include or exclude using the "Load Includes" and "Load Excludes" buttons. These buttons takein a file with a single column of SNPs to include or exclude. The "Alleles to Capture" button also takes ina file with a single column of SNPs to be captured. Design scores can also be loaded in using the "DesignScores" button. Design score files should contain two columns containing the SNP and the design scoreto assign to that SNP. Clicking "Run Tagger" will run the tagging algorithm. When finished it will switchfrom the Configuration to the Results Panel.
Tagger Results Panel
This panel is split into a "Tests" section on the left and a marker-by-marker report on the right. The marker
report lists all SNPs, the test which best captures them, and their r2 with that test. SNPs which wereunchecked from the "Capture this allele?" list on the Configuration panel are greyed out. SNPs whichcould not be successfully tagged are shown in red.
The first list in the "Tests" section shows all the tests (both single marker and multi-marker alleles) chosenby Haploview. Selecting tests in this list will show which alleles are captured by those tests in the secondlist in the panel. Beneath these lists is a summary of the tagging results.
Captured N alleles with mean r2
of X.
This shows how many of the SNPs in the dataset have been
successfully tagged by the set of chosen tests. The mean r2 representsthe mean for only those SNPs successfully captured.
Captured N percent of alleles
with r2 >0.8
This shows what fraction of the alleles captured by the tests have an
r2 >= 0.8. Of course, if your tagging r2 threshold is >= 0.8 this valuewill always be 100%.

Using Haploview
8
Using N SNPs in M tests. This shows that N unique SNPs have been chosen to create M tests,which can either be one of the set of N SNPs or some combinationof those SNPs.
The "Dump Tests File" button exports a file with the list of tests in the format used by Haploview's customassociation test file and Tagger's export. This file contains the list of all tests (single SNPs and multi-markertests) selected by Tagger for subsequent association analysis. In pairwise-only tagging this file will beidentical to the "Tags" file, below.
The "Dump Tags File" button exports a file with the list of Tag SNPs in the format used by Haploview'scustom association test file and Tagger's export. It is the concise list of SNPs selected by Tagger forgenotyping. In pairwise-only tagging this file will be identical to the "Tests" file, above.
The "Export Tab to Text" option in the File menu will export a summary file showing the best tag for eachmarker and the list of tests along with the alleles tagged by each test.
Association TestsIf selected when loading the data, Haploview computes single locus and multi-marker haplotypeassociation tests. For case/control data, the chi square and p-value for the allele frequencies in cases vs.control are shown. For family trios, all probands (affected individual with genotyped parents) are used tocompute TDT values. If the parenTDT option is selected, additional information is gained from parentalphenotypes. More information about this method can be found in the Citations list in the About Haploviewsection.
The haplotype association test is performed on the set of blocks selected on the LD and haplotype tabs.Results are shown only for those haplotypes above the display threshold on the haplotype tab. Counts forboth TDT and case control association tests are obtained by summing the fractional likelihoods of eachindividual for each haplotype. In other words, if a particular individual has been determined by the EMto have a 40% likelihood of haplotype A and 60% likelihood of haplotype B, 0.4 and 0.6 would be addedto the counts for A and B respectively.
Additional information about the way in which pedigrees are filtered for TDT purposes can be found inthe FAQ.
Haploview is not intended to be the only way of testing association results, but to provide a straightforwardway to do simple association tests. It's always a good idea to try out multiple approaches to analyzingyour data.
You can load a set of custom association tests in the format exported by Haploview and Tagger. Thisformat is discussed below.
Permutation TestingHaploview provides a framework for permuting your association results in order to obtain a measure ofsignificance corrected for multiple testing bias. You can choose to permute one of several test sets:
Single Markers Only Permute just association tests to the individual SNPs in your dataset.
Single Markers and Haplotypesin Blocks
Permute the individual SNPs as above, along with all the haplotypesshown in the Haplotypes tab.
Haplotypes in blocks only Permute only the haplotypes in the Haplotypes tab, ignoring the singlemarker results.

Using Haploview
9
Custom Tests from File Permute the set of tests loaded from an external file. Note that thischoice is only available if you provided a tests file when you loadedyour dataset.
Specify how many permutations to do and press the "Do Permutations" button to start the permutations.While the permutations are running, Haploview shows the following:
• A progress bar which tracks the progress of the permutations.
• The highest permuted chi square so far.
• The fraction of permutations whose strongest association exceeds the best observed chi square.
You can stop the permutations at any time with the "Stop" button. Once the permutations are complete,Haploview displays:
• A table listing all tests (single SNP and haplotype) along with their association chi squares andpermuted p-values.
• A histogram of the highest chi square from each of the permutations.
You can save the permutation summary by using the "Export Tab to Text" option in the File menu.
PLINKHaploview can now take in PLINK outputs. These files require a separate map file or binary map filecorresponding to each marker in the output file in order to load. Any output file from PLINK can beloaded provided that it contains a SNP column corresponding to the map file. The map file can containSNPs that are not present in the associated output file and the SNPs need not be in the same order in thetwo files. PLINK output is displayed in a single tab containing a sortable table of results and a variety offiltering options below the table. In SNP-based files, you can also load in additional columns using the"Load Additional Results" button.
Filtering options include chromosome and position. The "Filter1" and "Filter2" dropdown boxes can beused to further filter on any unrecognized columns in the table. All filters are jointly applied (logicallyequivalent to an "AND" operator as opposed to an "OR"). You can also go directly to a specified markername in the table using the "Go" button on the second row, and remove columns from the table by selectinga column from the "Remove Columns:" dropdown menu and using the adjacent "Remove" button. The"Reset" button can be used to revert the table and filters back to their original state (though the sortingstate is retained). Please note that non-SNP based files which can be loaded in without a map file do nothave the chromosomal or marker filters.
You can use the Fisher method for combining p-values in your PLINK results using the "Combine P-Values" button under the fitering options. This will bring up a dialog that allows you to choose between2 and 5 p-value columns for use in the Fisher-combined algorithm. Once you click "Go", a new columndesignated as "P_COMBINED" will appear as the last column in the table.
You can create graphical plots from your results table using the "Plot" button under the filtering options.Use the Plot Options dialog to specify a title for your plot and various plotting options. At the top of thedialog, select an optional title for your plot. Then choose which columns to use on the X and Y axes of theplot as well as the scale for each using the appropriate drop-down boxes. If you have loaded a SNP basedfile with an accompanying map file, selecting "Chromosomes" as the X-Axis will plot your results acrossthe chromosomes and will color code them separately. You can also select "Index" for either axis whichwill simply plot sequential numbers for each result shown in the table for that axis. Additionally, you canspecify up to two thresholds for use in the plot, along with which axis to place them on and which direction

Using Haploview
10
they should be. Threshold 1 or the "Suggestive" threshold for the -log10 scale will create a blue line andThreshold 2 or the "Significant" threshold for the -log10 scale will create a red line. Datapoints which passthe thresholds will be larger in size then the standard datapoints. Directly beneath the thresholds, you canchoose the base datapoint size for results in your plot using the dropdown box. To the right of that, youcan use the optional "Color Key" dropdown menu to select a column to be used as a coloring key in theplot. Please note that this functionality will only work when the chosen color key column has 50 or fewerunique values. On the next line, you can use the "Show Gridlines?" checkbox to select whether to show orhide the gridlines in the plot. To the right of that, you can specify the initial width and height of the plot(in pixels). Finally, on the next line you can use the "Export to SVG" checkbox and browse to a locationto save your plot to a high quality SVG file. Please note that the SVG option generally takes a great dealof processing power and memory and should only be used when very high quality images are required. Inmost cases, you can save the plot images as PNG files using the right click context menu described below.
Once the plot has loaded, you can hover over individual data points to see information about that pointin a tooltip popup. SNP based data will display the corresponding marker name, chromosome, position,and the value that is being plotted. Non SNP-Based data will either display the corresponding FID and IIDvalues if they are available, or simply the X and Y values for that datapoint. You can also click a datapointto be taken back to that result in the results table. For many more plotting options including export options,right click anywhere on the plot.
By highlighting a specific result in the table and clicking "Go to Selected Region", you can bring up adialog to automatically fetch that region from the HapMap website and load it into Haploview. The dialogallows you to specify the size of the region and the HapMap analysis panel that you wish to download. Youcan also optionally choose to annotate the columns from the PLINK tab to annotate in the LD Plot. Oncethe region has been successfully loaded into Haploview, the initially selected marker will be highlighted inblue on the Check Marker and PLINK tabs. SNPs that appear in the PLINK tab are now marked in greenon the LD Plot, and the specific result that you specified is further highlighted in white. You can viewthe annotated data from the PLINK table by right clicking on the marker number in the LD Plot. You canuse the "Force in PLINK SNPs" button in the Tagger panel to force include all the SNPs contained in thePLINK results tab. Please note that using "Go to Selected Region" requires an active internet connection.
The "Export Tab to Text" option in the File menu will export a text file containing the current view of theresults table. This file will preserve any sorting and filtering that you've enabled in the table.

11
Chapter 2. Files
Input File FormatsHaploview currently accepts input data in five formats, standard linkage format, completely or partiallyphased haplotypes, HapMap Project data dumps, PHASE format, and PLINK outputs. The program canalso automatically fetch phased HapMap data off the HapMap website. It also takes in a separate file withmarker position information, as well as several auxiliary input files, described below. The four formatsare explained in depth below.
Linkage Format Linkage data should be in the Linkage Pedigree (pre MAKEPED)format, with columns of family, individual, father, mother, gender,affected status and genotypes. The file should not have a header line(i.e. the first line should be for the first individual, not the names ofthe columns). Please note that Haploview can only interpret biallelicmarkers — markers with greater than two alleles (e.g. microsatellites)will not work correctly. A sample line from such a file might looksomething like:
3 12 8 9 1 2 1 2 3 3 0 0 4 2a b c d e f -----------g------------
(a) pedigree name A unique alphanumeric identifierfor this individual's family.Unrelated individuals should notshare a pedigree name.
(b) individual ID An alphanumeric identifier forthis individual. Should be uniquewithin his family (see above).
(c) father's ID Identifier corresponding tofather's individual ID or "0" ifunknown father. Note that if afather ID is specified, the fathermust also appear in the file.
(d) mother's ID Identifier corresponding tomother's individual ID or "0"if unknown mother Note that ifa mother ID is specified, themother must also appear in thefile.
(e) sex Individual's gender (1=MALE,2=FEMALE).
(f) affection status Affection status to be usedfor association tests(0=UNKNOWN,1=UNAFFECTED,2=AFFECTED).
Files
12
(g) marker genotypes Each marker is represented bytwo columns (one for each allele,separated by a space) and codedeither ACGT or 1-4 where: 1=A,2=C, 3=G, T=4. A 0 in any ofthe marker genotype position (asin the the genotypes for the thirdmarker above) indicates missingdata.
It is also worth noting that this format can be used with non-familybased data. Simply use a dummy value for the pedigree name (1, 2,3...) and fill in zeroes for father and mother ID. It is important thatthe "dummy" value for the ped name be unique for each individual.Affection status can be used to designate cases vs. controls (2 and 1,respectively).
Files should also follow the following guidelines:
• Families should be listed consecutively within the file (i.e. all thelines with the same pedigree ID should be adjacent)
• If an individual has a nonzero parent, the parent should be includedin the file on his own line.
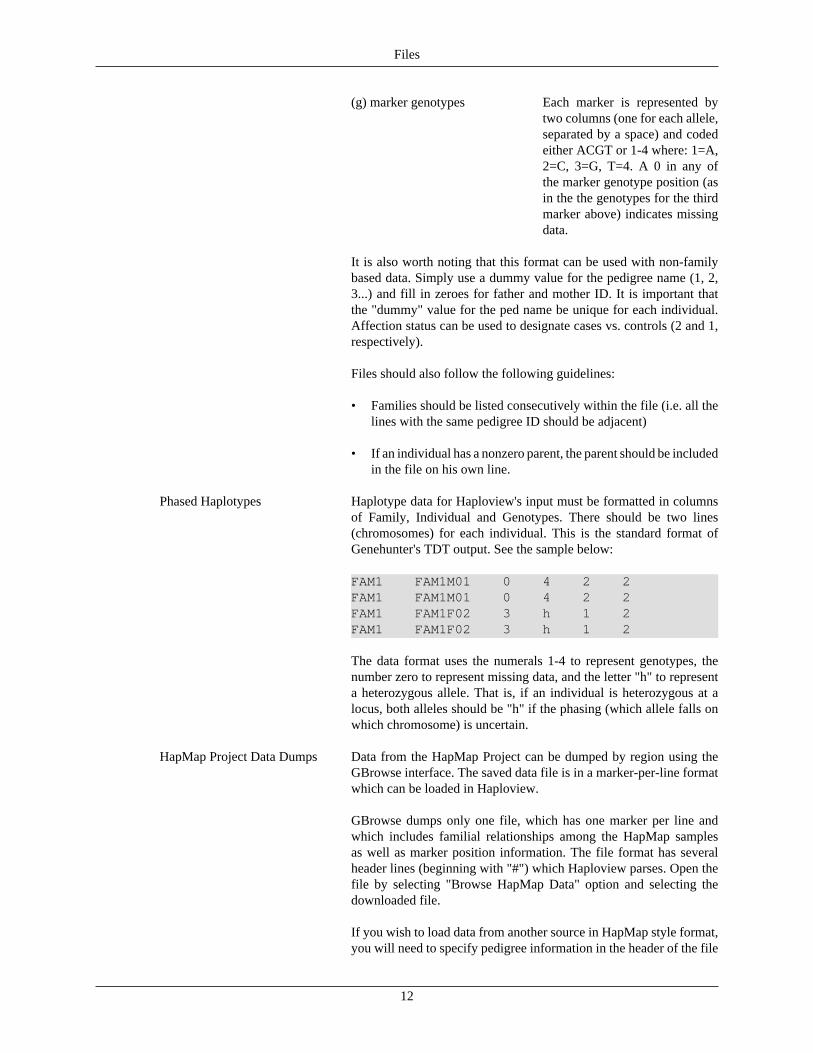
Phased Haplotypes Haplotype data for Haploview's input must be formatted in columnsof Family, Individual and Genotypes. There should be two lines(chromosomes) for each individual. This is the standard format ofGenehunter's TDT output. See the sample below:
FAM1 FAM1M01 0 4 2 2FAM1 FAM1M01 0 4 2 2FAM1 FAM1F02 3 h 1 2FAM1 FAM1F02 3 h 1 2
The data format uses the numerals 1-4 to represent genotypes, thenumber zero to represent missing data, and the letter "h" to representa heterozygous allele. That is, if an individual is heterozygous at alocus, both alleles should be "h" if the phasing (which allele falls onwhich chromosome) is uncertain.
HapMap Project Data Dumps Data from the HapMap Project can be dumped by region using theGBrowse interface. The saved data file is in a marker-per-line formatwhich can be loaded in Haploview.
GBrowse dumps only one file, which has one marker per line andwhich includes familial relationships among the HapMap samplesas well as marker position information. The file format has severalheader lines (beginning with "#") which Haploview parses. Open thefile by selecting "Browse HapMap Data" option and selecting thedownloaded file.
If you wish to load data from another source in HapMap style format,you will need to specify pedigree information in the header of the file

Files
13
you've created. This can be done by creating lines of the followingformat at the top of your file:
#@ FAM01 NA0001 0 0 1 1
This data is the same as the pedfile format discussed above. That is,the fields are family,individual,father,mother,gender,affected status.You would then replace the NAXXXX identifiers in the header rowof the HapMap file with your identifiers, subject to two importantconstraints: they must be unique across the entire dataset, not justwithin a family and they must begin with the characters NA.
PHASE Format Data in the HapMap PHASE format can be loaded into Haploviewusing three separate files. The first is the data file containing binaryallele information. The second is a sample file containing a singlecolumn of the individual IDs used in the dataset. The third is a legendfile containing four columns: marker, position, 0, and 1. Only thelegend file requires a header and is used to decode the information inthe data file. These files can be loaded in as GZIP compressed filesusing the "Files are GZIP compressed" checkbox on the initial loadingscreen.
Marker Information File The marker info file is two columns, marker name and position. Thepositions can be either absolute chromosomal coordinates or relativepositions. It might look something like this:
marker01 190299marker02 190950marker03 191287
An optional third column can be included in the info file to makeadditional notes for specific SNPs. SNPs with additional informationare highlighted in green on the LD display. For instance, you couldmake note that the first SNP is a coding variant as follows:
marker01 190299 CODING_SNPmarker02 190950marker03 191287
PLINK Format Output files from PLINK can be loaded into Haploview using thePLINK tab on the initial loading screen. PLINK files must containa header and at least one column header must be titled "SNP" andcontain the marker IDs for the results in the file. PLINK loading alsorequires a standard PLINK map or binary map file corresponding tothe markers in the output file. The map file can be either three orfour headerless columns (the Morgan distance column is optional).The map file can also be embedded in the results file as the first fewcolumns of the file using the "Integrated Map Info" checkbox. Youcan load in non-SNP based files as well by checking the "Non-SNP"box. These files do not require a map file. You can choose to only loadin one chromosome from your results file using the "Only load resultsfrom Chromosome" checkbox and selecting a chromosome from thedropdown list. You can also select which columns to load from yourresults file by checking the "Select Columns" checkbox. For a great

Files
14
deal more information on PLINK outputs, please see Shaun Purcell'sPLINK website
Batch Load File The "-batch" flag on the command line allows you to run Haploviewautomatically (in nogui mode) on several files. Batch input filesshould have one genotype file per line, along with an info file(if desired) separated by a space. Filenames must conform to thefollowing rules:
• Pedfile names must end in ".ped"
• Phased haplotype file names must end in ".haps"
• HapMap file names must end in ".hmp"
• Info file names must end in ".info"
The following example shows 2 pedfiles (with info files) and ahapmap file:
sample1.ped sample1.infosample2.ped sample2.infosample3.hmp
Output FilesFor any given tab the information in the display can be saved. For the data check and association test tabs,a simple tab-delimited text file is generated from the tables. For the LD and Haplotype tabs, data can eitherbe dumped to text files or the image can be saved to a PNG.
LD Text Output File LD text output is a tab delimited set of columns containing the variousmeasures of LD used by the program. Details for each column areshown below:
• L1 and L2 are the two loci in question, referenced by their numberor name (if marker info file is provided)
• D' is the value of D prime between the two loci.
• LOD is the log of the likelihood odds ratio, a measure of confidencein the value of D'
• r2 is the correlation coefficient between the two loci
• CIlow is 95% confidence lower bound on D'
• CIhi is the 95% confidence upper bound on D'
• Dist is the distance (in bases) between the loci, and is onlydisplayed if a marker info file has been loaded
• T-int is a statistic used by the HapMap Project to measure thecompleteness of information represented by a set of markers in aregion
Files
15
Details about additional options for this output type can be foundbelow in the Export Options section.
LD PNG Output When saving the LD table to a PNG, Haploview saves an image usingthe current display settings. This includes color scheme, zoom andproportional spacing. Thus, in order to save a less detailed image to aPNG, first zoom out, then export the tab. Note that Haploview cannotsave large datasets at the higher zoom levels. For more informationsee the Export Options section below.
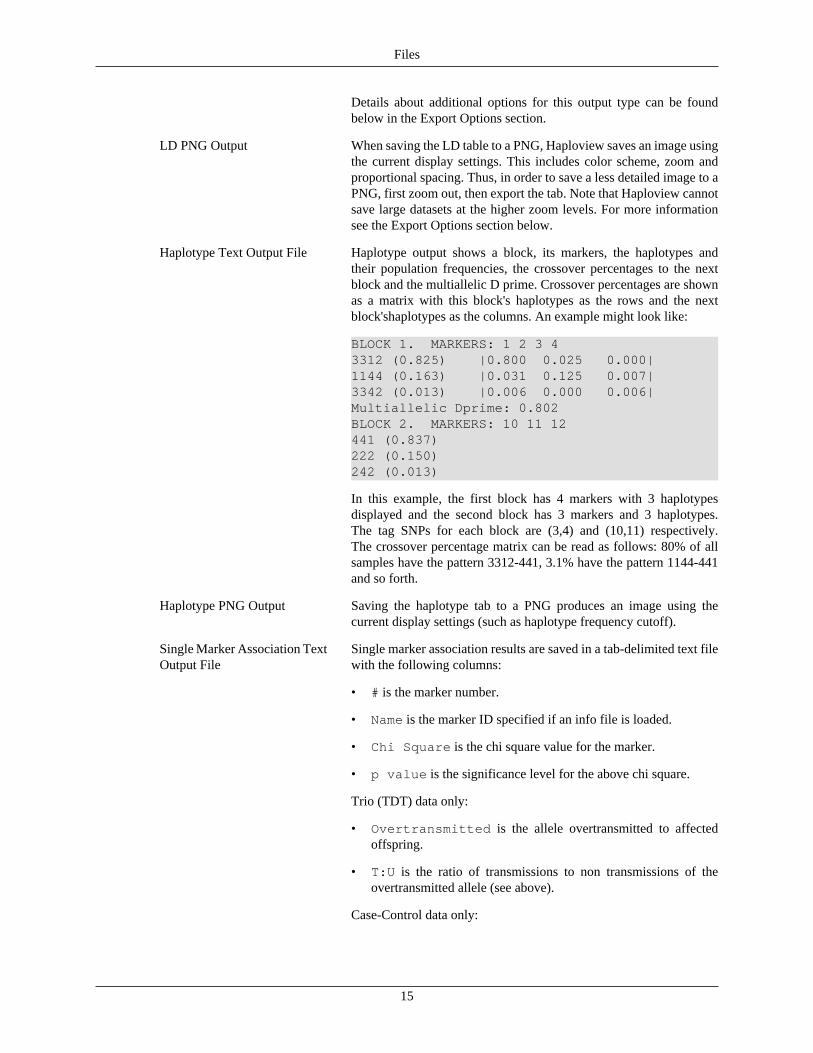
Haplotype Text Output File Haplotype output shows a block, its markers, the haplotypes andtheir population frequencies, the crossover percentages to the nextblock and the multiallelic D prime. Crossover percentages are shownas a matrix with this block's haplotypes as the rows and the nextblock'shaplotypes as the columns. An example might look like:
BLOCK 1. MARKERS: 1 2 3 43312 (0.825) |0.800 0.025 0.000|1144 (0.163) |0.031 0.125 0.007|3342 (0.013) |0.006 0.000 0.006|Multiallelic Dprime: 0.802BLOCK 2. MARKERS: 10 11 12441 (0.837)222 (0.150)242 (0.013)
In this example, the first block has 4 markers with 3 haplotypesdisplayed and the second block has 3 markers and 3 haplotypes.The tag SNPs for each block are (3,4) and (10,11) respectively.The crossover percentage matrix can be read as follows: 80% of allsamples have the pattern 3312-441, 3.1% have the pattern 1144-441and so forth.
Haplotype PNG Output Saving the haplotype tab to a PNG produces an image using thecurrent display settings (such as haplotype frequency cutoff).
Single Marker Association TextOutput File
Single marker association results are saved in a tab-delimited text filewith the following columns:
• # is the marker number.
• Name is the marker ID specified if an info file is loaded.
• Chi Square is the chi square value for the marker.
• p value is the significance level for the above chi square.
Trio (TDT) data only:
• Overtransmitted is the allele overtransmitted to affectedoffspring.
• T:U is the ratio of transmissions to non transmissions of theovertransmitted allele (see above).
Case-Control data only:

Files
16
• Major Alleles are the major alleles in the case and controlpopulations respectively.
• Case Control Ratios are the ratios (shown as either countsor quotients, depending on selected options) for the case andcontrol populations, respectively.
Haplotype Association TextOutput
Haplotype association text output is a tab-delimited file, broken intosections by block. The columns are:
• Haplotype is the sequence of alleles for this haplotype in thisblock.
• Frequency is the population frequency for this haplotype.
• Chi Square is the chi square value for the haplotype.
• p value is the significance level for the above chi square.
Trio (TDT) data only:
• T:U is the ratio of transmissions to non transmissions of thehaplotype to affected offspring.
Case-Control data only:
• Case Control Ratios are the ratios (shown as either countsor quotients, depending on selected options) for the case andcontrol populations, respectively.
Permutation Text Output File The output from the permutations tab shwos the number ofpermutations performed and then a tab-delimited table with one rowper permuted test and the following columns:
• Name is the test name, which is either a marker name or a commaseparated list of marker names then a tab then a comma separatedset of alleles for those markers.
• Chi Square is the observed association chi square for that test.
• Permutation p-value shows the significance of the testamong the permutation tests.
Tagger Text Output File The Tagger text output begins with several pieces of summaryinformation. More details on this can be found in the Tagger section.The rest of the output is divided into two sections. The first lists eachmarker, with the following rows:
• Marker is the marker name.
• Best Test is the test with the highest r2 to this marker.
• r^2 w/test is the r2 between this marker and its test.
The second part consists of a list of the tests and the alleles theycapture best.

Files
17
Tagger Tests Dump This file is the same format used by Haploview for custom associationtests and exported by Tagger. It is discussed below in the auxiliaryfiles section.
Tagger Tags Dump This file is the same format used by Haploview for custom associationtests and exported by Tagger. It is discussed below in the auxiliaryfiles section.
Marker Check Text Output File The marker check data is a tab-delimited file with the followingcolumns:
• # is the marker number.
• Name is the marker ID specified (only if an info file is loaded).
• Position is the marker position specified (only if an info fileis loaded).
• ObsHET is the marker's observed heterozygosity.
• PredHET is the marker's predicted heterozygosity (i.e.2*MAF*(1-MAF)).
• HWpval is the Hardy-Weinberg equilibrium p value, which isthe probability that its deviation from H-W equilibrium could beexplained by chance.
• %Geno is the percentage of non-missing genotypes for thismarker.
• FamTrio is the number of fully genotyped family trios for thismarker (0 for datasets with unrelated individuals).
• MendErr is the number of observed Mendelian inheritance errors(0 for datasets with unrelated individuals).
• MAF is the minor allele frequency (using founders only) for thismarker.
• Alleles are the major and minor alleles for this marker.
• Rating is "BAD" if the marker failed any of the above tests andblank otherwise.
PLINK Table Text Output File The PLINK text output is a tab-delimited file of the current view ofthe data in the PLINK tab. Please note that while the filtering state ispreserved in this output, the sorting state is not.
Export OptionsThe "Export Options" item in the File Menu allows adjustment of several parameters and allows the userto save any tab without having to switch to it. Specifically, the LD tab allow the markers to be filteredto output only some of the markers:
All The default setting (and only one available for most tabs) is to use allthe markers.

Files
18
Marker Range Generates the LD text or PNG file for only a specific range of markers.
Adjacent Markers Generates the LD text file for only adjacent markers. This can beuseful to view the T-int stat, which measures LD information contentin the gaps between markers.
There is also an option to generate a "compressed" LD PNG, which is useful for very large datasets. Theimage is shrunk to an arbitrary zoom level which allows Haploview to save the PNG with minimal memoryusage.
Auxiliary Input FilesBlocks File You can specify a set of blocks by loading a blocks file. Each line is a
space separated list of markers with one block per line. For example:
1 2 3 49 10 11 12 13 14 15
Would create one block from markers 1-4 and another from 9-15. Thefirst marker in the file is number 1 (not 0).
Analysis Track File You can add an analysis track along the top of the LD display byloading a file with two columns, <position> <value>. Haploviewwill plot the values continuously with respect to the positions of themarkers, so the positions should use the same coordinates as themarker info file. For example:
1000 0.32000 1.73000 11.04000 2.35000 4.6
Would plot a line from position 1000 to 5000. The values can be ofany units or magnitude, as the Haploview scales the analysis track tothe bounds of the values.
Custom Association Tests File You can specify a set of custom association tests for Haploviewto perform. The format takes both single marker tests and multi-marker tests (which require you to specify alleles for those markers).The format is one test per line with each line containing one of thefollowing: a single marker name or several comma separated names,then a tab, then comma separated alleles for each marker. This formatis exported by Haploview using the "Dump Tests" button in the TaggerResults panel and by Paul deBakker's Tagger webpage.
For instance, the following example would create 5 tests: markers 1,2 and 3 individually, all the alleles (haplotypes) of the block 4,5,6 andthe CAA haplotype of the block 12,13,14:
marker1marker2marker3marker12,marker13,marker14 2,1,1

Files
19
N.B. Using a Custom Association Tests File requires a marker infofile, since the tests file reads the marker names as specified in the infofile.
Tagger Marker Include/Exclude File
You can specifiy a list of markers for Tagger to include or excludefrom those markers available for selection as tag SNPs. In either casethe format is the same: one marker name per line. The following filecould be used to either include or exclude markers 1,7 and 9:
marker1marker7marker9
N.B. Using a Tagger Include/Exclude File requires a marker info file,since it reads the marker names as specified in the info file.

20
Chapter 3. Command Line OptionsHaploview can be run from the command line without the display in order to do processing of multipledatasets or quick computation on very large datasets. In order to run Haploview without the display, add the"-nogui" flag. The "-help" flag shows a condensed explanation of all the command line options explainedbelow. Haploview can be run from the command line using:
java -jar Haploview.jar
General Options-h, -help Print help information.
-n, -nogui Command line mode—does not launch display.
-q, -quiet Quiet mode—minimizes output to command line.
-log <filename> Outputs logfile information to specified filename (defaults tohaploview.log if no name specified)
-memory <memsize> Allocate <memsize> megabytes of memory to the Haploview process(default is 512MB).
Input Options-pedfile <filename> Specify a genotype input file (or http:// location) in pedigree format.
This option works in GUI mode.
-hapmap <filename> Specify a HapMap format input file (or http:// location). This optionworks in GUI mode.
-phasedhmpdata <filename> Specify a PHASE format data input file (or http:// location). Thisoption works in GUI mode.
-phasedhmpsample <filename> Specify a PHASE format sample input file (or http:// location). Thisoption works in GUI mode.
-phasedhmplegend <filename> Specify a PHASE format legend input file (or http:// location). Thisoption works in GUI mode.
-hapmapDownload Specify a phased HapMap download. This option works in GUI mode.
-haps <filename> Specify a phased input file (or http:// location). This option works inGUI mode.
-info <filename> Specify a marker information file (or http:// location). This optionworks in GUI mode.
-plink <filename> Specify a PLINK or other results file (or http:// location). This optiononly works in GUI mode.
-map <filename> Specify a map or binary map file (or http:// location). This option onlyworks in GUI mode.

Command Line Options
21
-batch <filename> Specify a batch load file.
-blocks <filename> Specify a block definition file (or http:// location). This willautomatically use this block definition for haplotype output.
-track <filename> Specify an analysis track file (or http:// location)
-chromosome <1-22,X,Y> Specify which chromosome these data come from. This is especiallycritical when analyzing data from the X chromosome or directHapMap downloads.
-panel <CEU,YRI,CHB+JPT> Specify which analysis panel to use for phased HapMap downloads.
-startpos <integer> Specify the start position in kb for phased HapMap downloads.
-endpos <integer> Specify the end position in kb for phased HapMap downloads.
-release <16a,21> Specify the HapMap release version for phased HapMap downloads(defaults to 21).
-gzip Specify PHASE format inputs using GZIP compression
-nonSNP Specify that the accompanying PLINK file is non-SNP based output.This option only works in GUI mode.
-selectCols Activate the preloading column filter for PLINK loads. This optiononly works in GUI mode.
Data Check Options-skipcheck Skip all the genotype data quality checks and uses all markers for all
analyses.
-minMAF <threshold> Exclude all markers with minor allele frequency below <threshold>,which must be between 0 and 0.5. Default of 0. This option works inGUI mode.
-maxMendel <integer> Exclude markers with greater than <integer> Mendelian inheritanceerrors. Default of 1. This option works in GUI mode.
-minGeno <threshold> Exclude markers with less than <threshold> fraction of nonzerogenotypes. <threshold> must be between 0 and 1 with a default of 0.5.This option works in GUI mode.
-hwcutoff <threshold> Exclude markers with a Hardy Weinberg p-value less than<threshold>, which ranges from 0 to 1 with a default of 0.001 Thisoption works in GUI mode.
-maxDistance <distance> Maximum intermarker distance for LD comparisons (in kilobases).Default is 500. This option works in GUI mode.
-missingCutoff <threshold> Exclude individuals with more than <threshold> fraction missing data,where <threshold> is a value between 0 and 1 with a default of 0.5.This option works in GUI mode.

Command Line Options
22
Block Output Options-blockoutput <type> Generate haplotypes and population frequencies for blocks of <type>,
which can be GAB (Gabriel et al), GAM (4 gamete blocks), SPI (solidspine blocks) or ALL (each of the previous 3). The default block typeis Gabriel. More information can be found with the blocks help.
-blockCutHighCI <thresh> Gabriel 'Strong LD' high confidence interval D' cutoff.
-blockCutLowCI <thresh> Gabriel 'Strong LD' low confidence interval D' cutoff.
-blockMAFThresh <thresh> Gabriel MAF threshold. Markers below this allele frequency will beskipped in building Gabriel blocks.
-blockRecHighCI <thresh> Gabriel recombination high confidence interval D' cutoff.
-blockInformFrac <thresh> Gabriel fraction of informative markers required to be in strong LD.
-block4GamCut <thresh> 4 Gamete block cutoff for frequency of 4th pairwise haplotype.
-blockSpineDP <thresh> Solid Spine blocks D' cutoff for 'Strong LD'.
Other Output Options-check Output marker quality checks to <inputfile>.CHECK
-mendel Output Mendel error information to <inputfile>.MENDEL
-malehets Output chromosome X male heterozygote information to<inputfile>.MALEHETS
-dprime Output pairwise LD text table to <inputfile>.LD. Note that -dprimeand -check default to no haplotype output unless the -blockoutput flagis also specified.
-png Output PNG image file of LD display to <inputfile>.LD.PNG
-compressedpng Output low-resolution (smaller file) PNG image of LD display to<inputfile>.LD.PNG
-infoTrack Include HapMap info track in PNG image outputs
-spacing <threshold> Use proportional spacing for dumped LD pngs. <threshold> rangesfrom 0 (no spacing) to 1 (max spacing) with a default of 0.
-ldcolorscheme <type> Use a particular color scheme for dumped LD pngs. <type> can beDEFAULT, RSQ, DPALT, GAB or GAM. More information can befound with the LD display help
-hapthresh <threshold> Only output haplotypes with frequency # <threshold>. Note thatmultiallelic D' and htSNPs are computed using only displayedhaplotypes.
-excludeMarkers <markers> Exclude markers in a comma separated list with ranges specified asstart..end. So, to exclude markers 3, 5 and 10 through 15 you'd use"-excludeMarkers 3,5,10..15"

Command Line Options
23
Association Output Options-assocCC Output case/control association results. Saves single marker
results to <inputfile>.ASSOC and haplotype results to<inputfile>.HAPASSOC. Haplotype association results are notgenerated if block type is set to ALL.
-assocTDT Output TDT association results. Saves single markerresults to <inputfile>.ASSOC and haplotype results to<inputfile>.HAPASSOC. Haplotype association results not generatedif block type is set to ALL.
-customAssoc <file> Loads a set of custom tests for association.
-permtests <numtests> Performs <numtests> permutations on default association tests (orcustom tests if a custom association file is specified) and writes to<inputfile>.PERMUT
Tagging Output Options-pairwiseTagging Generates pairwise tagging information in <inputfile>.TAGS and
.TESTS
-aggressiveTagging As above but generates 2-marker haplotype tags unless specifiedotherwise by -aggressiveNumMarkers
-tagrsqcounts Generates conditional haplotype probabilities from tagger in<inputfile>.CHAPS
-aggressiveNumMarkers <2,3> Specifies whether to use 2-marker haplotype tags or 2 and 3-markerhaplotype tags.
-maxNumTags <n> Only selects <n> best tags.
-includeTags <markers> Forces in a comma separated list of marker names as tags.
-includeTagsFile <file> Forces in a file (or http:// location) of one marker name per line as tags.
-excludeTags <markers> Excludes a comma separated list of marker names from being usedas tags.
-excludeTagsFile <file> Excludes a file (or http:// location) of one marker name per line frombeing used as tags.
-captureAlleles <file> Capture only the alleles contained in a file (or http:// location) of onemarker name per line.
-designScores <file> Specify design scores in a file (or http:// location) of one marker nameand one score per line.
-mintagdistance <distance> Specify a minimum distance in bases between picked tags.
-taglodcutoff <thresh> Tagger LOD cutoff for creating multimarker tag haplotypes.
-tagrsqcutoff <thresh> Tagger r^2 cutoff.

24
Chapter 4. About HaploviewHaploview was developed in and is maintained by Mark Daly's lab at the Broad Institute byJeffrey Barrett, Julian Maller and David Bender. Questions and comments should be addressed to:[email protected]
• The design of the LD and haplotype interfaces is the work of Ben Fry at the MIT Media Lab.
• Thanks to Andrew Kirby and Hin-Tak Leung for code contributions.
• Thanks to Itsik Pe'er and Paul de Bakker for their extensive contributions to methods developmentand testing.
• Hardy-Weinberg calculation code courtesy of Goncalo Abecasis and Jan Wigginton at the Universityof Michigan Center for Statistical Genetics
• The r2 and alternative D' color schemes are the work of Will Fitzhugh.
• The interface to the HapMap GBrowse track is courtesy of Simon Twigger.
• PLINK is the work of Shaun Purcell at the Center for Human Genetic Research of MassachusettsGeneral Hospital
Source Code
Haploview is an open source project hosted by SourceForge. The source can be downloaded at theSourceForge project site.
Citations
Haploview can be cited with the following paper:
Barrett JC, Fry B, Maller J, Daly MJ. Haploview: analysis and visualization of LD and haplotype maps.Bioinformatics. 2005 Jan 15 [PubMed ID: 15297300]
Information about the exact test for HW can be found in the following paper:
Wigginton JE, Cutler DJ, Abecasis GR. A note on exact tests of Hardy-Weinberg equilibrium. Am J HumGenet. 2005 May;76(5):887-93.
Information about parenTDT can be found in the following paper:
Purcell S, Sham P, Daly MJ. Parental phenotypes in family-based association analysis. Am J Hum Genet.2005 Feb;76(2):249-59.
Questions, complaints and suggestion should be directed to [email protected].
System RequirementsIt is recommended that Haploview be run on a machine with at least 128M of memory. The Haploviewjarfile should now automatically allocate extra memory when starting up, so the -Xmx flag is no longerrequired when running the program from the command line.
Haploview requires Java JRE 1.3 or later, but 1.4 is strongly recommended. It is worthwhile in any caseto download the most recent Java release.

About Haploview
25
Known IssuesWe are working to correct a rare issue with Spineblock outputs for certain datasets.
Saving PNG files from the command line (the -png and -compressedpng flags) requires Java version 1.4or later.
There appears to be an issue with the Windows JDK version 1.4.1_03. Note that all other versions (bothearlier and later versions of 1.4.1 included) seem to work fine. If you find this to be your current Javaversion (type java -version at the command prompt), please install the latest version.
UpdatesIf you have an internet connection, Haploview will automatically check for an update upon startup. If anew version is available, it will show a message in the lower right corner of the screen for a few seconds.Details can be found by using the "Check for Updates" button in the File menu.
Change Log
Version 4.0, 21 August 2007• added support for HapMap PHASE format data
• added support for phased HapMap downloads
• added support for PLINK output files including plotting functionality
• added a number of Tagger features to coincide with the Tagger website functionality
• added 2-marker aggressive tagging from the command line
• added log file functionality to command line mode
• added proxy support
• added table sorting to Tagger configuration
• added numerous minor display and interface tweaks
• added export options for Mendel errors and male heterozygotes on x chromosome
• added command line HapMap info track download
• added case control frequencies to command line association output
• added ld values selection to command line image export
• added citation information to the "About" dialog
• added "Uncapture All" button to Tagger
• added build 36 option to HapMap info track downloads
• added http:// loading for files on the command line and initial load screen
• changed some labelling in Tagger and made pairwise the default option

About Haploview
26
• changed obsHet calculation to use founders only
• changed HW and het calculations to show as "NA" in X data with too few individuals
• enhanced GUI design with tabbed pane for initial loading dialog
• fixed bug with haplotype associations for extended trios and x chromosome
• fixed bug with case control counts for certain zeroed out markers
• fixed Mendel error reporting bug on x chromosome
• fixed Tagger bug affecting maximum number of tags input
• fixed bug when left-clicking on the LD plot
• fixed bug when changing tabs after multiple file loads
• fixed bug when changing tabs after running tagger and changing check marker thresholds
• fixed bug when loading custom association test file with multi-marker tests but no alleles
• fixed bug with long windows filenames in command line mode
• fixed bug with display when resizing the window to a very small size
• fixed bug with 'h' alleles in haps files not being properly calculated
• fixed bug with check panel export not accounting for user threshold adjustments
• fixed bug with LD display where some r^2 values were invisible against the background
• fixed bug with integer overflow when loading files with tens of thousands of individuals
• fixed bug where HapMap info track would turn black if it was too wide
• fixed bug with null pointer exception on failed hapmap info track downloads
• fixed bug with null pointer exception when using Export Options Dialog
• fixed bug with LD Plot now showing the correct markers when changing marker ratings and usingtable sorting in the check panel
• fixed tagger results reporting of % captured when specifying alleles to capture
• fixed bug with marriage loops in pedigree files causing StackOverflow errors
• fixed bug with exception being thrown for certain input files with no markers
• fixed bug with multimarker tags showing in the tagger results even though they don't capture anything
• fixed bug with command line error handling
• fixed bug with loading improperly formatted info files from "Load marker data"
Version 3.32, 21 June 2006• fixed bugs in check markers display when using table sorting
• fixed line number output on error messages

About Haploview
27
• grammar corrections
Version 3.31, 2 June 2006• fixed bug where chromosomes were created in reverse
Version 3.3, 26 May 2006• support for X chromosome
• major memory usage improvements
• allow multiple analysis tracks and label Y axis
• added user defined hapmap sample option
• added haplotypes only permutation option
• added option to show different LD measures or hide them
• added -memory switch and changed default to 512M
• added minor allele to check panel
• added progress bar for data loading
• support for alphabetical (ACGT) input format
• added individual information dialog
• added check panel for phased haps files
• added dump tags button
• last popup dialog is shown at top of display
• added GOLD style color scheme
• can sort tables by clicking on headers
• changed case control allele order
• fixed grey screen with no text bug
• fixed tagger bugs for maxnumtags and forceinclude
• fixed batch mode for hapmap files
• fixed Tagger bug where some SNPs were tagged by more than one tag.
• fixed export options bug with association tab
• fixed generateHaplotyeps bug for matching alleles
Version 3.2, 13 April 2005• added Tagger interface

About Haploview
28
• added custom association test input
• added permutation testing of association results
• improved memory efficiency for EM haplotype reconstruction
• added Perlegen sample IDs
• fixed bug in PNG export cutting off final marker
Version 3.11, 04 February 2005• improved parsing of families with unrelated members
• fixed bug with singletons with large amounts of missing data
• fixed bug with java path differences from cmd line
• fixed export issues for LD display
• fixed bug with block output for files without blocks
Version 3.1, 27 January 2005• Additional HapMap info track display options.
• Improved parsing of complex pedigrees.
• Fixed bug with loading of haps style input files.
• Fixed bug with correctly parsing out-of-order info files.
• Fixed problem with association tests on datasets with no blocks.
• Fixed bug with exporting range of markers to LD PNG.
Version 3.0, 7 October 2004• bugfixes for block size display, checkdata tab, allele sorting, EM missing data.
• Added compressed PNG output mode.
• Lots of new command line options.
• Changed batch mode input format.
• Re-sort out of order info files.
• Substantial improvement in speed and memory usage in EM.
• New color schemes.
• Added additional sample information for 2nd and 3rd HapMap plate.
• Fixed handling of complex pedigrees.
• Added proportional spacing to LD display.

About Haploview
29
• Added HapMap GBrowse track.
• Filter individuals with lots of missing genotypes.
• Haplotype association tests.
• Update checker.
Version 2.05, 27 April 2004• Fixed problem with EM for long blocks
• Added "Export options" to allow exporting subsets of data and LD values for only adjacent markerpairs.
• Numerous minor bugfixes
• Added block labels to haplotype display
• Added block size to LD display
• Added saved block definition input file
• Added analysis track input option
• Enabled direct click from HapMap webpage to Haploview
Version 2.04, 21 January 2004• All color schemes now allowed with all block definitions, including hand-defined blocks.
• Enabled loading input file from command line while still opening GUI.
• Added command line HapMap Project input option.
• Added colored box haplotype display.
• Tweaked command line flags.
• Added command line checkdata only output.
• More accurate Hardy-Weinberg code implemented (courtesy of G. Abecasis & J. Wigginton).
• Correctly deals with genotype inputs with poorly genotyped markers.
Version 2.03, 18 December 2003• Correctly handles new HapMap Project dump format.
• Added minor allele frequency filter to data check tab.
Version 2.02, 05 December 2003• fixed confidence bounds coloring scheme bug
• fixed text output bug where marker numbers were incorrect

About Haploview
30
• added marker spacing map to top of HapMap datasets
• added T-int statistic to text dump of LD chart
Version 2.01, 31 October 2003• fixed bug involving European style decimal format (e.g. 0,45 vs. 0.45)
• when exporting data, default file name is now blank
• marker info file now works in either forward or reverse direction
• activated loading of HapMap Project dumped data