Hands on Introduction to V.NET Programming for...
16
1 Hands-on Introducon to VB.NET Programming for AutoCAD® Jerry Winters – VB CAD, Inc. CP5787-L Class Description (use edited version off the AU Website) [Arial 10] Learning Objectives At the end of this class, you will be able to: Create a new VB.NET project from scratch Define new AutoCAD Commands in VB.NET Extract block and attribute information from AutoCAD files Distribute VB.ENT programs to others About the Speaker Jerry Winters has taught thousands at Autodesk University, mixing real-world praccal examples with engaging humor. His “I’m just a draſter” approach to API topics make his classes as enjoyable as they are applicable. [email protected]
Transcript of Hands on Introduction to V.NET Programming for...

1
Hands-on Introduction to VB.NET Programming for AutoCAD® Jerry Winters – VB CAD, Inc.
CP5787-L Class Description (use edited version off the AU Website) [Arial 10]
Learning Objectives
At the end of this class, you will be able to:
Create a new VB.NET project from scratch
Define new AutoCAD Commands in VB.NET
Extract block and attribute information from AutoCAD files
Distribute VB.ENT programs to others
About the Speaker
Jerry Winters has taught thousands at Autodesk University, mixing real-world practical examples with engaging
humor. His “I’m just a drafter” approach to API topics make his classes as enjoyable as they are applicable.
2
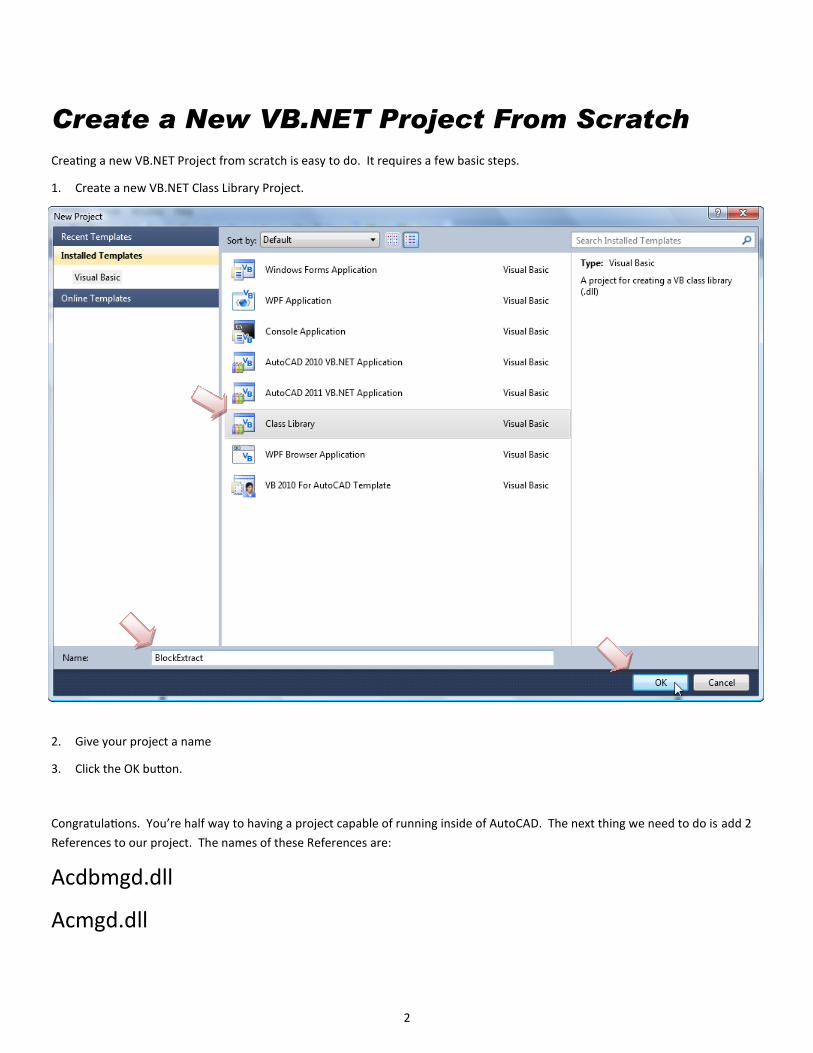
Create a New VB.NET Project From Scratch
Creating a new VB.NET Project from scratch is easy to do. It requires a few basic steps.
1. Create a new VB.NET Class Library Project.
2. Give your project a name
3. Click the OK button.
Congratulations. You’re half way to having a project capable of running inside of AutoCAD. The next thing we need to do is add 2
References to our project. The names of these References are:
Acdbmgd.dll
Acmgd.dll
3
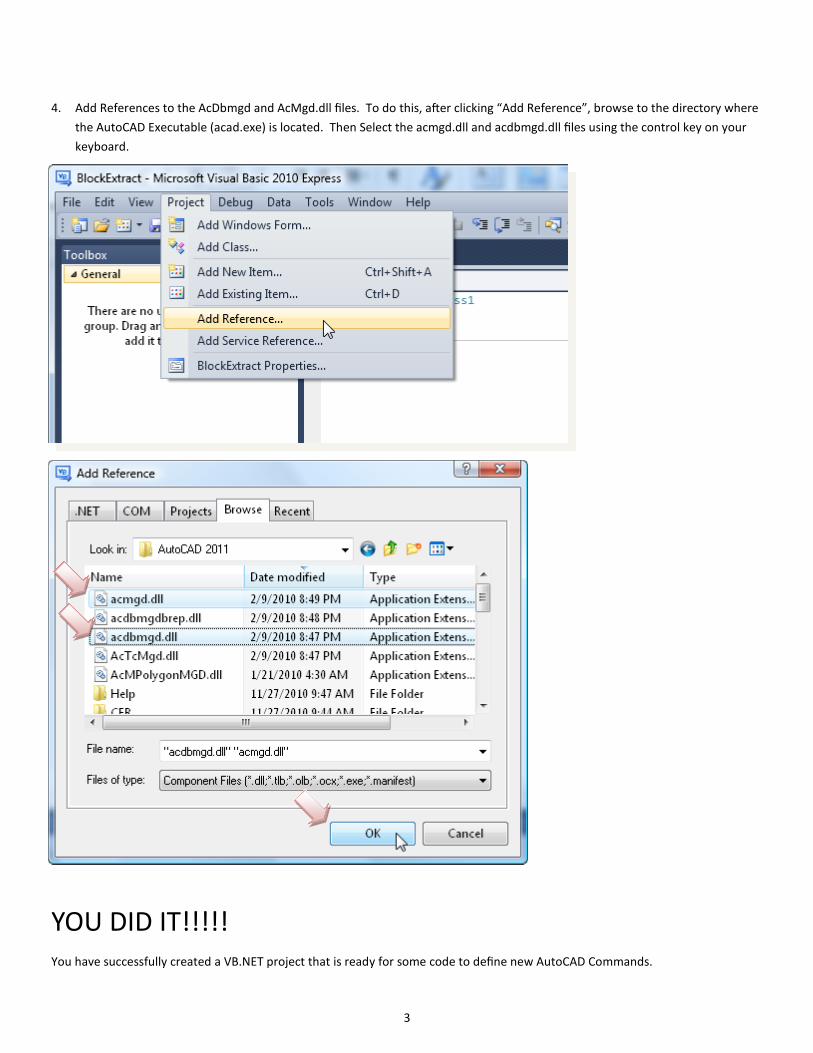
4. Add References to the AcDbmgd and AcMgd.dll files. To do this, after clicking “Add Reference”, browse to the directory where
the AutoCAD Executable (acad.exe) is located. Then Select the acmgd.dll and acdbmgd.dll files using the control key on your
keyboard.
YOU DID IT!!!!! You have successfully created a VB.NET project that is ready for some code to define new AutoCAD Commands.

4
Define New AutoCAD Commands in .NET
Creating a new .NET project for AutoCAD is like placing a new, empty canvas on an easel. The possibilities are endless. But it is up
to us to fill this new project with meaningful code. Let’s begin by creating a new AutoCAD Command.
A new Command is created by using CommandMethod and specifying the name of the Command you want to create followed by a
Public Sub statement defining the VB.NET Procedure name. These can be the same or they can be different. It’s up to you. I
prefer to have them be the same.
YOU DID IT!!!!!
You have now created a new AutoCAD Command. If this project is compiled and loaded, and the user types “CommandA” at the
command line in AutoCAD, this Command will be executed. Exciting. Right? What will happen? At this point, nothing. There’s no
code between the Sub and the End Sub.
Let’s add a little code to our Command, “CommandA”. This will take a few minutes. As you type the code, watch how Visual
Studio reacts and tries to help you along the way.
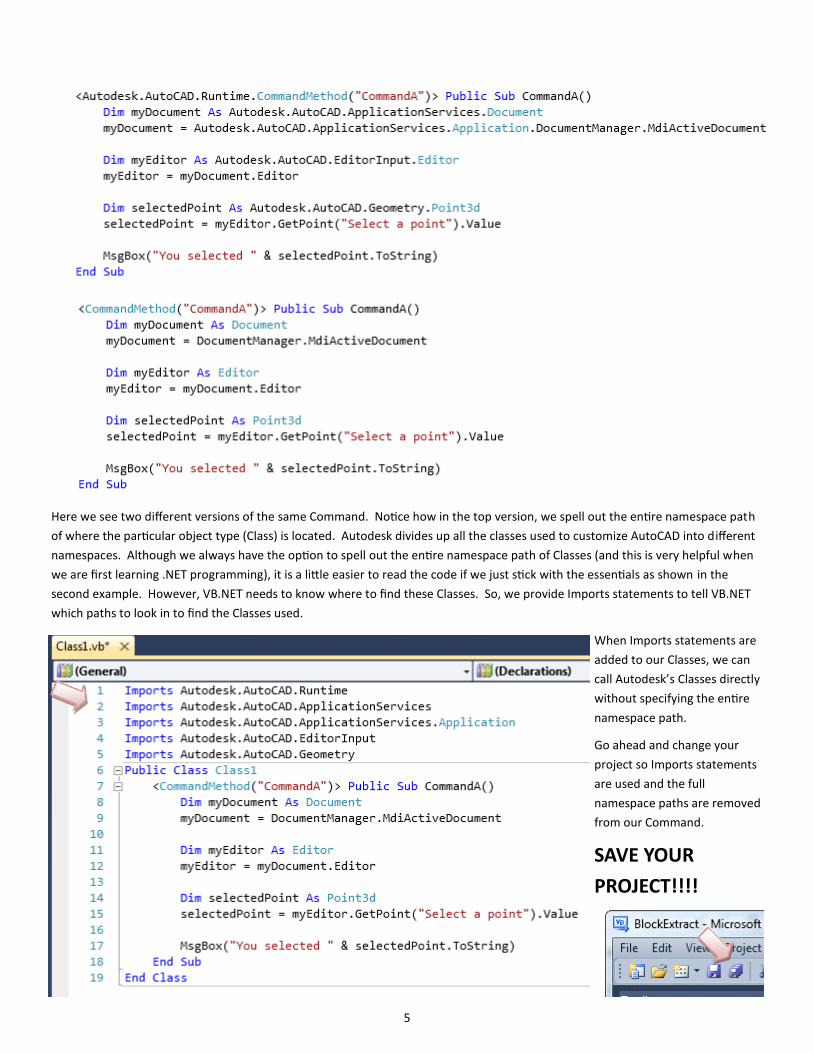
Lines 3 to 4: Declare a variable named myDocument as a Document. Get the MdiActiveDocument and put it in the variable.
Lines 6 to 7: Declare a variable named myEditor as an Editor. Get the Editor of the active document and put it in the variable.
Lines 9 to 10: Declare a variable named selectedPoint as a Point3d. Through the Editor, ask the user to select a point.
Line 12: Show the coordinates of the selected point in a Message Box.
5
Here we see two different versions of the same Command. Notice how in the top version, we spell out the entire namespace path
of where the particular object type (Class) is located. Autodesk divides up all the classes used to customize AutoCAD into different
namespaces. Although we always have the option to spell out the entire namespace path of Classes (and this is very helpful when
we are first learning .NET programming), it is a little easier to read the code if we just stick with the essentials as shown in the
second example. However, VB.NET needs to know where to find these Classes. So, we provide Imports statements to tell VB.NET
which paths to look in to find the Classes used.
When Imports statements are
added to our Classes, we can
call Autodesk’s Classes directly
without specifying the entire
namespace path.
Go ahead and change your
project so Imports statements
are used and the full
namespace paths are removed
from our Command.
SAVE YOUR
PROJECT!!!!

6
Who wants to run this command? I sure do!
1. Start debugging your project.
2. Notice at the bottom of VB.NET how we are told
“Build Successful”.
3. Notice how we are then told we can not start a
project that is a Class Library.
What just happened? Is there something wrong with our code? Did we miss a step? No, and No. We just tricked Visual Studio
into compiling our project for us. For now, we can ignore the ‘error’ dialog box. The important thing is we are told “Build
Successful”.
4. Start AutoCAD.
5. Use the Netload command.
6. Browse for the DLL that was just created and click the “Open” button.
C:\Users\
Jerry\
Documents\
Visual Studio 2010\
Projects\
BlockExtract\
BlockExtract\
Bin\
Debug\
BlockExtract.dll
7. Type commanda at the Command Line.

7
Once we start the CommandA Command, we should see the
sequence of events we specified in our code.
This is a good sign. Our code is working just as we wanted it to. We ask the user to select a point and we show that value in a
Message Box.
*** CLOSE AUTOCAD ***
***REPEAT—CREATE A NEW PROJECT AND ENTER THE SAME CODE AGAIN.***
Extract block and attribute information from AutoCAD files
Allowing the user to select a point is something many programs need to do. As we can see already, it can be accomplished with
only a line or two of code.
Extracting Block and Attribute information from AutoCAD files is something many people need to do. So, let’s start writing code to
accomplish this task right now. Shall we?
The first thing we want to do is create a new Class that will be used to hold our Block and Attribute Information.
**** THIS GOES BENEATH
THE EXISTING CLASS ****
Of course, you can add more Properties if you wish, but we are going to start with these.

8
Next, we need some code that will be used to get Block and attribute information. This will be in two Functions. You can type the
code in as you see it here but it is easier to insert it from a .txt file.
A file named “ExtractBlocks and
Attributes.txt” is on your machine. Open it
in Notepad. Next, select all text in the file
and copy it to the Windows Clipboard.
Next, paste it into your code

9
Here’s the command that uses the two Functions just added to our project. Notice how this uses Message Boxes. This means if we
open a large AutoCAD file, we will be clicking OK buttons for a long, long time.

10
Time to insert the file “GetBlocks_B.txt”
Now, instead of showing endless message boxes, an ASCII text
file is created storing the data from the selected Blocks.
OK. What changes did we make to the Functions ExtractBlocks
and GetBlockAtts? NONE. When we create a Function, we
should do so with the end in mind. What is the end? The end
is using the same Function multiple times in multiple places
without needing to modify the Function. Let’s see what else
we can do.

11
Let’s write out our Block Information to
Excel now. This code is in the
GetBlocks_C.txt file.
12
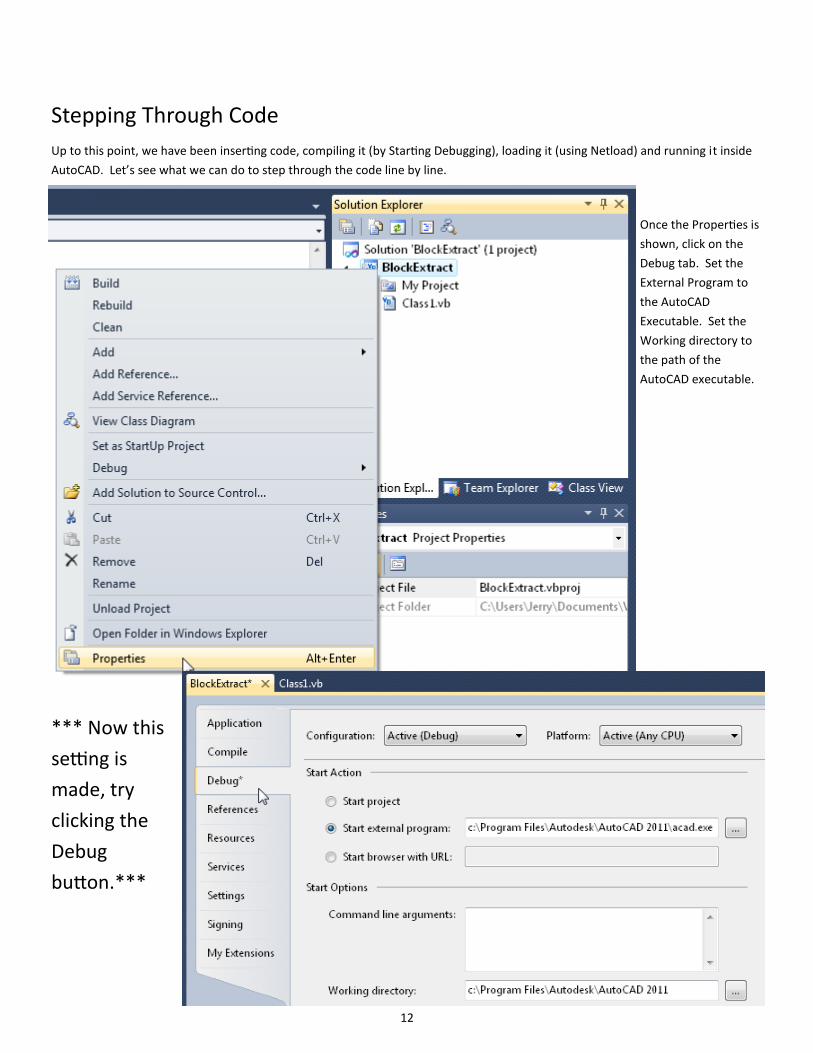
Stepping Through Code
Up to this point, we have been inserting code, compiling it (by Starting Debugging), loading it (using Netload) and running it inside
AutoCAD. Let’s see what we can do to step through the code line by line.
Once the Properties is
shown, click on the
Debug tab. Set the
External Program to
the AutoCAD
Executable. Set the
Working directory to
the path of the
AutoCAD executable.
*** Now this
setting is
made, try
clicking the
Debug
button.***

13
Now, when we begin the debugging process, AutoCAD is started for us. We can Netload our application and run the code similar
to how we did before with one exception.
When we click in the gray column on the left hand side of our code, we add a Breakpoint. Now, try running the command
“GetBlocks_C”. Notice how the code stops running at the Breakpoint.
Hitting the F8 or F11 button will step through the code line by line.
14
Distributing Our Programs
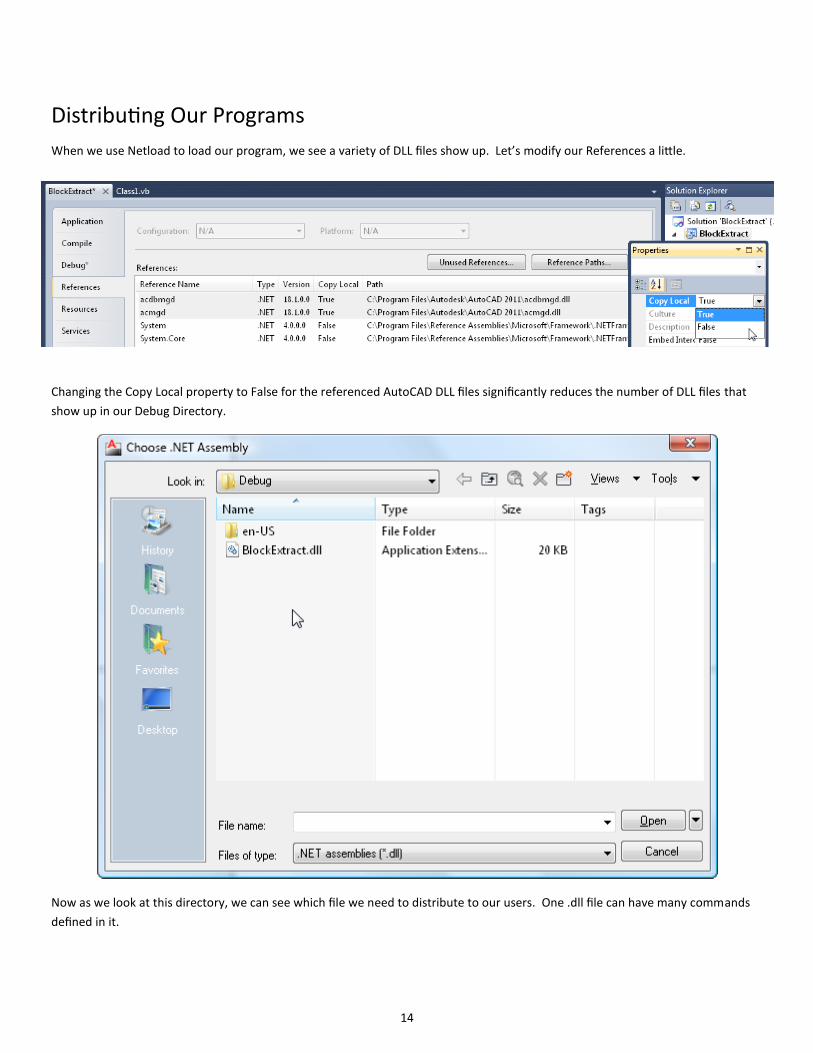
When we use Netload to load our program, we see a variety of DLL files show up. Let’s modify our References a little.
Changing the Copy Local property to False for the referenced AutoCAD DLL files significantly reduces the number of DLL files that
show up in our Debug Directory.
Now as we look at this directory, we can see which file we need to distribute to our users. One .dll file can have many commands
defined in it.

15
There are several ways we can have our program be automatically loaded when we start AutoCAD. One way is to modify the
Registry. If we browse in the Registry Editor as shown below, we can see how Autodesk loads its add-ins. If we right-click on that is
a DLL file, we can export the selected branch to a .REG file.
Once we save the file, we can open it in Notepad and edit it. Notice how the only thing we need is the top entries.
Double-clicking on the .reg file results in this dialog box. Clicking “Yes” adds the entries to the Registry.
Once the Registry is correctly modified, our DLL will be loaded automatically when AutoCAD starts. We can now add tool bars and
other User Interface elements to execute our Commands.

16
REVIEW
Creating AutoCAD Add-ins using VB.NET is easy to do. We have learned how to create a new Add-in from scratch, create new
commands, and step through our code. We also know what it takes to automatically load our DLLs when AutoCAD starts. I hope
this class has been helpful and that you will continue your learning by attending Autodesk University classes in the future.
Thank you for your time.
Jerry Winters ([email protected])
![eunji Joanne Kim · Vectorworks Google Sketchup Form 3 odeling Autodesk ertified [Reivt Vasari] Autoad ... residential and the industrial zone is identified by locating a turning](https://static.fdocuments.us/doc/165x107/60cc88990d18d66bca7fcc60/eunji-joanne-vectorworks-google-sketchup-form-3-odeling-autodesk-ertified-reivt.jpg)