Handbook of Clinical Skill Training Cardiovascular System€¦ · · 2012-08-29Handbook of...
46
1 Handbook of Clinical Skill Training Cardiovascular System Undergraduate Program Faculty of Medicine Universitas Padjadjaran 2012 – 2013
-
Upload
nguyenkhanh -
Category
Documents
-
view
214 -
download
2
Transcript of Handbook of Clinical Skill Training Cardiovascular System€¦ · · 2012-08-29Handbook of...

1
Handbook of Clinical Skill Training
Cardiovascular System
Undergraduate Program
Faculty of Medicine Universitas Padjadjaran
2012 – 2013

i
Table of Contents
TABLE OF CONTENTS................................................................................................................... i
PEDIATRIC CARDIOPULMONARY RESUSCITATION ..................................................................... 2
HISTORY TAKING FOR ADULT CARDIAC PATIENT ...................................................................... 7
PHYSICAL EXAMINATION FOR ADULT CARDIAC PATIENT .......... Error! Bookmark not defined.
NORMAL ELECTROCARDIOGRAPH READING ........................................................................... 17
ABNORMAL ELECTROCARDIOGRAPH READING (HYPERTROPHY, VES, VT, AND AF) ............... 23
ABNORMAL ELECTROCARDIOGRAPH READING(ACUTE MYOCARD INFARCT) ........................ 30
HISTORY TAKING FOR PEDIATRIC CARDIAC PATIENT .............................................................. 37
PHYSICAL EXAMINATION OF PERIPHERAL VASCULAR DISEASE ............................................... 42

2
PEDIATRIC CARDIOPULMONARY RESUSCITATION
1. Rational / Synopsis
Basic life support (BLS) is the level of medical care which is used for patients with life-threatening illnesses or injuries until the patient can be given full medical care at a hospital. BLS is generally used in the pre-hospital setting, and can be provided without medical equipment.
2. Intended Competency 4A (The student should be able to perform the skill independently)
3. Number of SCU
4 SCU
4. General learning outcome
After completing skill practice of cardiopulmonary resuscitation, the students will be able to perform cardiopulmonary resuscitation correctly.
5. Specific skills learned
Week Skill Specific learning outcome Department
1 week Pediatric Resuscitation
At the end of skill practice, the student will be able to identify the responsiveness and manage airway, breathing, circulation in critically ill pediatric patients during the initial hours when critical care expertise may not be available.
Pediatric
6. Learning Method
a. Introduction (20’) b. Demonstration (10’) c. Individual training (each student 10’ = 100’) d. Point nodal evaluation (each student 10’) e. Student self-practice(10’)

3
7. Laboratory Facilities
a. Bag Valve Mask (BVM) for baby and children
b. Child mannequin for CPR
8. Manual skill training
Specific Learning Outcome:
1. Students perform correct evaluation of pediatric patient’s condition. 2. Students perform correct pediatric cardiopulmonary resuscitation.
9. Reference
1. American Heart Association Guideline Resuscitation (CPR) and Emergency
Cardiovascular Care (ECC) of Pediatric and Neonatal Patients: Pediatric
Basic Life Support. Pediatrics 2006;117;989-1004
2. Biarent D, Bingham R, Richmond S, Maconochie I, Wyllie J, Simpson S,
dkk. European Resuscitation Council Guidelines for Resuscitation 2005.
Section 6. Paediatric life support. Resuscitation (2005) 67S1, S97—S133
3. The International Liaison Committee on Resuscitation (ILCOR) Consensus
on Science With Treatment Recommendations for Pediatric and Neonatal
Patients: Pediatric Basic and Advanced Life
Support. Pediatrics 2006;117;955-977.
4. Mathers LW, Frankel LR. Pediatric emergencies and resuscitation. Dalam:
Behrman RE, Kliegman RM, Jenson HB, penyunting. Nelson textbook of
pediatrics. Edisi ke-18. Philadelphia: WB Saunders; 2007. H. 387-405.
5. Primm PA, Reamy RR. Cardiopulmonary Resuscitation. Dalam: Strange
GR, Ahrens WR, Lelyveld S, Schafermeyer RW, penyunting. Pediatric
emergency medicine. Edisi ke-2. New York: McGraw-Hill; 2002. h. 18-27.
6. Berg MD, Schexnayder SM, Chameides L, Terry M, Donoghue A, Hickey
RW, dkk. Pediatric Basic Life Support: 2010 American Heart Association
Guidelines for Cardiopulmonary Resuscitation and Emergency
Cardiovascular Care: Pediatric Basic Life Support.Circulation. 2010;122:
862–75.

4
No Step to be done Performance scale
0 1 2
1. Check for response, whether the victim is conscious or not:
Call the victim with a loud and clear voice.
Give mechanic stimulation by shaking the victim’s shoulder.
2. If the victim is not responding, he is unconscious.
Call for help immediately.
3. Place the victim on a flat and hard surface in supine (face-up) position.
4. Open the airway:
Perform the head tilt and chin lift maneuver to keep the airway open.
When cervical trauma is suspected, the jaw thrust maneuver can be used to open the airway while maintaining the neck in neutral position.
Open the victim’s mouth by performing the cross finger maneuver to check any obstruction.
Use finger sweep to remove any foreign subjects found in the victim’s mouth.
If the foreign subject can’t be seen, remove the subjects by performing the back blow or chest thrust; Heimlich maneuver or abdominal thrust (either one).
5. Breathing
Check whether the victim is breathing or not. Take no more than 10 seconds.
Put your cheek in front of the victim’s nose and mouth, and perform the triple maneuver:
Look for chest wall movement
Listen to the victim’s expiration
Feel the exhaled air on your cheek
If the victim is not breathing or periodic gasping/ agonal gasps (infrequent, irregular breaths).
Give 5 initial rescue breaths to achieve two effective ventilations.

5
Use mouth to mouth, mouth to nose or mouth to mouth and nose technique (either one).
6. Circulation
Check the circulation by feeling the pulsation of carotid, femoral, or brachial artery (either one). Take no more than 10 seconds.
If you can’t feel any pulsation or pulse < 60 beats per minute and poor perfusion (pallor, cyanosis), start chest compression. Identify the correct position of chest compression.
a. Infants ( Less than 1 year of age)
Draw an imaginary line between the nipples, the correct position is one finger breadth below the imaginary line.
Begin chest compression with two finger technique or two thumb technique (either one).
b. Child (More than 1 year of age)
Compress the lower half of the sternum but do not compress over the xiphoid.
Put the heel of 1 your hand on the compression site or the heel of 1 your hand, other hand on top, on the compression site and begin chest compression (either one).
The ratio of chest compression and ventilation should be 30 : 2 (1 rescuer); 15 : 2 (2 rescuers).
The depth of compression should be 1/3 – ½ anteroposterior diameter of thoracic cage.
7 Evaluation

6
After 2 minutes or after 5 cycles of cardiopulmonary resuscitation, evaluate the victim’s condition.
Pulse
Breath
Color
Consciousness
Pupil
8. If no pulse or pulse less than 60 bpm: Continue CPR
If the pulse is > 60 bpm but there is no spontaneous breathing or inadequate breathing:give rescue breathsat a rate 12 to 20 breaths per minute (1 breath every 3–5 seconds) until spontaneous breathing resumes.
Note: 0 = not doing at all 1 = do the step partially 2 = do the step completely
Maximum score : 40
Performance score :Total score X 100 %
40
Pass : Score > 80%
Fail : Score < 80%
Global scoring Pass Borderline Fail
9. Evaluation: OSCE

7
HISTORY TAKING FOR ADULT CARDIAC PATIENT
1. Rational / Synopsis
Cardiovascular disease is the number one killer disease in the world. Early detection of cardiovascular disease is important to manage further development of the diseases. Goodand pointed history taking technic is a very important tool to detect cardiovascular diseases. Therefore general practitioner should be able to perform good history taking in order to find the cardiac problems of the patient.
2. Intended Competency 4A (The student should be able to perform the skill independently)
3. Number of SCU : 3 SCU
4. General learning outcome
After completing skill practice of History Taking for Adult Cardiac Patient, the students will be able to perform good history taking in adult cardiac patients.
5. Specific skills learned
Week Skill Specific learning outcome Department
1 week History taking
At the end of skill practice, the student will able to perform good and pointed history taking
Cardiology
6. Learning Method
a. Introduction (20’) b. Demonstration (10’) c. Individual training (each student 10’ = 100’) d. Point nodal evaluation (each student 10’) e. Student self-practice (10’)
7. Laboratory Facilities a. Presentation by trainers b. Students learning guide c. References d. Standardized patients
8. Reference: Braunwald Heart Disease Chapter History Taking

8
9. Manual skill training
HISTORY TAKING FOR ADULT CARDIAC PATIENT
Specific Learning Outcome:
The students will able to perform good and pointed history taking
Procedure for History Taking
No Steps/ Task 0 1 2
A.CLIENT ASSESSMENT
1. Greet client respectfully and with kindness
2. The patient should be given adequate explanation about history taking and the goal or expected result of history taking
3. Identifying patient’s data ( described elsewhere)
B. HISTORY TAKING. Take a medical history considering:
1 Chief complaint
- Dyspnea & Excessive fatigue - Chest pain - Syncope/ collapse - Palpitation - Edema
2. Present illness (depends on the chief complaint)
- Onset and chronology of chief complaint - Location - Quality and intensity - Factors that precipitate, aggravate or alleviate - Timing ( onset, duration, frequency) - Setting in which the symptoms occur - Any associated manifestation(s) - History of previous treatment and its responses (name, dose, frequency of the drug(s)
3. General medical history - Past history History of Rheumatic fever History of COPD - Family history - Occupational history - Nutritional history

9
4. History of the major risk factors for coronary artery disease (CAD)
- Cigarette smoking - Hypertension - Hypercholesterolemia - Diabetes mellitus
- Family history of premature CAD
Note: 0 = not doing at all 1 = do the step partially 2 = do the step completely
Maximum score :

10
PHYSICAL EXAMINATION FOR ADULT CARDIAC PATIENT
1. Rational / Synopsis
Cardiovascular disease is the number one killer disease in the world. Early detection of cardiovascular disease is important to manage further development of the diseases. The ability to early discover the symptoms in order to diagnose the cardiovascular disease is important for the prognosis of the patient. Therefore general practitioner should be able to do physical examination for adult cardiac patient.
2. Intended Competency 4A (The students should be able to perform the skill independently)
3. Number of SCU : 3 SCU
4. General learning outcome
After completing skill practice of physical examination for adult cardiac patient, the students will be able to perform a correct physical examination independently.
5. Specific skills learned
Week Skill Specific learning outcome Department
1 week Physical Examination for Adult Cardiac Patient
1. Students perform correct evaluation of patient’s condition.
2. Students perform correct physical examination for pediatric patient with heart diseases
Internal Medicine
6. Learning Method
a. Introduction (20’) b. Demonstration (10’) c. Individual training (each student 10’ = 100’) d. Point nodal evaluation (each student 10’) e. Student self-practice (10’)
7. Laboratory Facilities a. Presentation by trainers

11
b. Students learning guide c. References d. Stethoscope e. Standardize patients
8. Reference: Braunwald Heart Disease Chapter Physical Examination
9. Manual skill training
PHYSICAL EXAMINATION FOR ADULT CARDIAC PATIENT
Specific Learning Outcome:
1. Students perform correct evaluation of patient’s condition. 2. Students perform correct physical examination for pediatric patient
with heart diseases
No Step/Task 0 1 2
1 Tell the patient what is going to be done
2 Help the patient to lay down on the examination table
3 Wash hands thoroughly with soap and water and dry with a clean dry cloth or hand drier
4 The examiner should stand at the patient’s right side
5 General physical examination (described elsewhere)
NECK
6 Jugular Venous pressure - Make the patient comfortable - Raise the head slightly on a pillow to relax the
sternomastoid muscles - Raise the head of the bed or table to about 300 and
turn the patient’s head slightly away from the side you are inspecting
- Identify the internal*/ external jugular vein and the highest point of pulsation in the right internal*/ external jugular vein point in the lower half of the neck *) if the internal vein is impossible to see, the external can be used
- Extend a long rectangular object or card horizontally from this point and a centimeter ruler vertically from the sternal angle
- Measure the vertical distance in centimeter above the sternal angle where the horizontal object across the ruler.

12
- The sternal angle is roughly 5 cm above the right atrium. Pressure measured is recorded as 5+ ….. cmH2O
- The distance is the JVP
7 The carotid pulse - Assess amplitude and contour
The patient lying down with the head of the bed still elevated (300-450)
Inspect the neck for carotid pulsation
Place your left index and middle fingers (or left thumb) on the right carotid artery on the lower third of the neck, press posteriorly and feel the pulsation
For the left carotid use your right fingers or thumb.
Increase pressure until you feel a maximal pulsation and contour.
NEVER press both carotid artery at the same time
- Thrills and bruits
During palpation, detect the presence or absence of humming vibration or thrills
Listen over both carotid arteries with the DIAPHRAGM of your stethoscope for a bruit
- Put the diaphragm of your stethoscope on the carotid area
- Ask the patient to hold breathing
ARM
8 The brachial artery - The patient’s arm should rest with elbow extended, palm
up - Flex the elbow to a varying degree to get optimal muscle
relaxation - Cup your hand under the patient’s elbow. - Use the index and middle finger to feel the pulse (medial to bisceps tendon)
THORAX
9 Point of maximal impulse (PMI) INSPECTION - Supposed to be done in a well illuminate room - Determine the location of PMI; Normally in Mid clavicula line, Intercostal space V)

13
PALPATION - Use your finger pads to palpate the impulse - Ventricular impulse may heave/lift your finger - Check for thrill by pressing the ball of your hand firmly
on the chest. PMI at left ventricular area
Try to assess the PMI with the supine position If you fail to assess the PMI try: Left lateral decubitus position Ask the patient to exhale fully and stop breathing for a second
When examining a woman, displace the left breast upward or laterally.
Assess the location: Normally on the interspaces 4th or 5th
Assess the diameter In supine position, it usually less than 2,5cm and occupies one interspace.
Assess the amplitude Usually small and feels brisk and tapping
Assess the duration Normally it lasts through the 1st two third of systole
PMI at Right Ventricular area
Patient should rest supine at 300
Place the tips of your curved fingers in the 3rd, 4th, and 5th interspace.
Feel the systolic impulse of right ventricular PERCUSSION
Careful percussion will usually reveal whether the heart is normal in size or whether it is definitely markedly enlarged. One should use the lightest percussion possible and, with experience, rely more and more upon the vibratory sense To determine the left border of the heart, percussion should begin at the lateral side and percuss toward the sternum. The dullness

14
usually reveal along mid clavicular line To determine the left border of the heart percuss from left lateral toward medial. Normally, the left border is in the anterior axillary line. The right border is in the right sternal line and the upper border (base of theheart) in the 2nd left interspace
10 The 1st, 2nd, 3rd, and 4th heart sound
S1 - Listen to entire precordium with the patient supine. - The 1st heart sound occurs with the onset of the apex
impulse and corresponds to the beginning of ventricular systole. It has 2 components. One due to mitral valve closure and the other due to tricuspid closure. Normally we are unable to distinguish between these components. First heart sound (S1) is deeper and longer than second heart sound (S2)
- The carotid pulse is a reliable timing device as it occurs immediately following the S1
S2 - The S2 has also 2 components. One due to aortic closure
and the other due to pulmonic valve,.Aortic component precedes the pulmonic component
- The mitral valve area is located in 5th left intercostals space at the midclavicular line.
- The pulmonary valve area is in the 2nd left intercostals space at the parasternal line.
- The aortic valve area is above the right 2nd rib and the right 2nd intercostals space at the parasternal line.
- The tricuspidvalve area is over the sternum at the junction of the corpus sternum with the xiph
oid process.
11 The presence or absence of any cardiac murmur.
When a heart murmur is heard, identify and describe its: - Timing * Decide the murmur (systolic or diastolic) * Systolic murmur falling between S1 and S2. * Diastolic murmur falling between S2 and S1

15
* Palpating the carotid pulse as you listen to the murmur. Murmur that coincide with the carotid upstroke are systolic - Location of maximal intensity Find the location by exploring the area where you hear the murmur
Describe where you hear it best in terms of the interspace and its relation to the sternum, apex, midsternal,midclavicular or axillary line
- Radiation or transmission from the PMI Explore the area around a murmur Describe where you hear it best. - Intensity The systolic murmur has 6 grades. Try to grade murmurs using the 6 point scale as follow:
Grade 1: Very faint. May not be heard in all Position Grade 2: Quiet. Heard immediately after placing the stethoscope Grade 3: Moderately loud Grade 4: Loud, with palpable thrill Grade 5: Very loud. May be heard when the stethoscope is partly off the chest Grade 6: Very loud with thrill. May be heard with stethoscope entirely off the chest
The diastolic murmur has only 4 grades.
- Pitch
This is categorized as high, medium or low - Quality This is described in terms such as blowing, rumbling and musical - Use two important position to listen for mitral
stenosis and aortic regurgitation 1. Ask the patient to rollpartly on to the left side into the left lateral decubitus position

16
Place the bell of your stethoscope lightly on the apical impulse. 2. Sit up, lean forward,exhale completely and stop
breathing in expiration
Pressing your stethoscope, listen along the left sternal border and at the apex.
Note: 0 = not doing at all 1 = do the step partially 2 = do the step completely

17
NORMAL ELECTROCARDIOGRAPH READING
1. Rational / Synopsis
Cardiovascular disease is the number one killer disease in the world. Early detection of cardiovascular disease is important to manage further development of the diseases. ECG as a cheap non-invasive method is a very important tool to detect cardiovascular diseases. Therefore general practitioner should be able to read ECG result, especially for the normal condition.
2. Intended Competency 4A (The students should be able to perform the skill independently)
3. Number of SCU : 3 SCU
4. General learning outcome
After completing skill practice of normal electrocardiograph (ECG) reading, the students will able to read and assess normal ECG correctly
5. Specific skills learned
Week Skill Specific learning outcome Department
1 week Reading normal ECG
At the end of skill practice, the student will able to perform correct reading and analyzing the normal ECG record
Physiology
6. Learning Method
1. Introduction (20’) 2. Demonstration (10’) 3. Individual training (each student 10’ = 100’) 4. Point nodal evaluation (each student 10’) 5. Student self-practice (10’)
7. Laboratory Facilities a. Presentation by trainers b. Students learning guide c. References d. Normal ECG record samples

18
8. Reference: Braunwald Heart Disease Chapter Electrocardiography (ECG)
9. Manual skill training
Specific Learning Outcome:
1. Students perform correct reading and analyzing normal ECG
No Procedure Performance Scale
Comment
0 1 2
1 Placement of precordial leads
2 Reading of standard calibration
3 Reading of standard paper speed
4 Measurement of heart rate
5 Assessment of regularity
6 Assessment of sinus rhythm
7 Assessment of P-wave - Contour - Morphology - Duration - Amplitude
8 Measurement of PR-interval
9 Assessment of morphology of Q-wave
10 Assessment of morphology of R-wave
11 Assessment of morphology of S-wave
12 Measurement of R/S amplitude in V1 or V2
13 Measurement of QRS-duration
14 Assessment of amplitude of QRS-complexes
15 Measurement and assessment of axis of QRS- complexes
16 Assessment of morphology of ST-segment
17 Assessment of morphology of T-wave
18 Assessment of morphology of U-wave
19 Measurement of QTc-interval
Note: 0 = not doing at all 1 = do the step partially 2 = do the step completely

19
ECG 1

20
ECG 2

21
ECG 3

22
ECG 4

23
ABNORMAL ELECTROCARDIOGRAPH READING (Hypertrophy, VES,
VT, and AF)
1. Rational / Synopsis
Cardiovascular disease is the number one killer disease in the world. Early detection of cardiovascular disease is important to manage further development of the diseases. ECG as a cheap non-invasive method is a very important tool to detect cardiovascular diseases. Therefore general practitioner should be able to read ECG result, including the abnormal one.
2. Intended Competency 4A (The students should be able to perform the skill independently)
3. Number of SCU: 3 SCU
4. General learning outcome
After completing skill practice of abnormal electrocardiograph (ECG) reading, the students will able to assess abnormal ECG (cases of Hypertrophy, VES, VT, and AF) correctly
.
5. Specific skills learned
Week Skill Specific learning outcome Department
1 week Reading abnormal ECG
At the end of skill practice, the student will able to: 1. Describe wave on the ECG
when an atrium enlarges or a ventricle hypertrophies
2. Interpret the meaning of electrical axis and its importance in diagnosing hypertrophy and enlargement
3. Interpret the criteria for the ECG diagnosis of right and left atrial enlargement
4. Interpret the criteria for the ECG diagnosis of right and left ventricular hypertrophy
5. Interpret the criteria for the
Internal Medicine

24
ECG diagnosis of VES 6. Interpret the criteria for the
ECG diagnosis of Ventricular Tachycardia (VT)
7. Identify Supraventrivular Tachycardia (SVT) and bundle branch block on the ECG
6. Learning Method
a. Introduction (20’) b. Demonstration (10’) c. Individual training (each student 10’ = 100’) d. Point nodal evaluation (each student 10’) e. Student self-practice (10’)
7. Laboratory Facilities a. Presentation by trainers b. Students learning guide c. References d. Abnormal ECG samples (cases of Hypertrophy, VES, VT, and AF)
8. Reference: Braunwald Heart Disease chapter Electrocardiography (ECG)
9. Manual skill training
ABNORMAL ELECTROCARDIOGRAPH READING (HYPERTHROPHY, VES, VT, AF)
Specific Learning Outcome:
1. Describe wave on the ECG when an atrium enlarges or a ventricle hypertrophies
2. Interpret the meaning of electrical axis and its importance in diagnosing hypertrophy and enlargement
3. Interpret the criteria for the ECG diagnosis of right and left atrial enlargement
4. Interpret the criteria for the ECG diagnosis of right and left ventricular hypertrophy
5. Interpret the criteria for the ECG diagnosis of VES 6. Interpret the criteria for the ECG diagnosis of Ventricular Tachycardia (VT) 7. Identify Supraventrivular Tachycardia (SVT) and bundle branch block on
the ECG

25
Interpretation of ECG
No Content Result Comment
0 1 2
1 Identification
2 Reading of standard paper speed
3 Reading of standard
4 Measurement of heart rate, regularity
5 Assessment rhythm
6
Assessment of P-wave
- contour
- morphology
- duration
- amplitude
7 Measurement of PR-interval
8 Assessment of morphology of Q-wave
9 Assessment of morphology of R-wave
10 Assessment of morphology of S-wave
11 Measurement of R/S amplitude in V1 or V2
12 Measurement of QRS-duration
13 Measurement and assessment of axis of QRS- complexes
14 Assessment of morphology of ST-segment
15 Assessment of morphology of T-wave
16 Measurement of QTc-interval
17 Conclusion
Note: 0 = not doing at all 1 = do the step partially 2 = do the step completely
Maximum score :
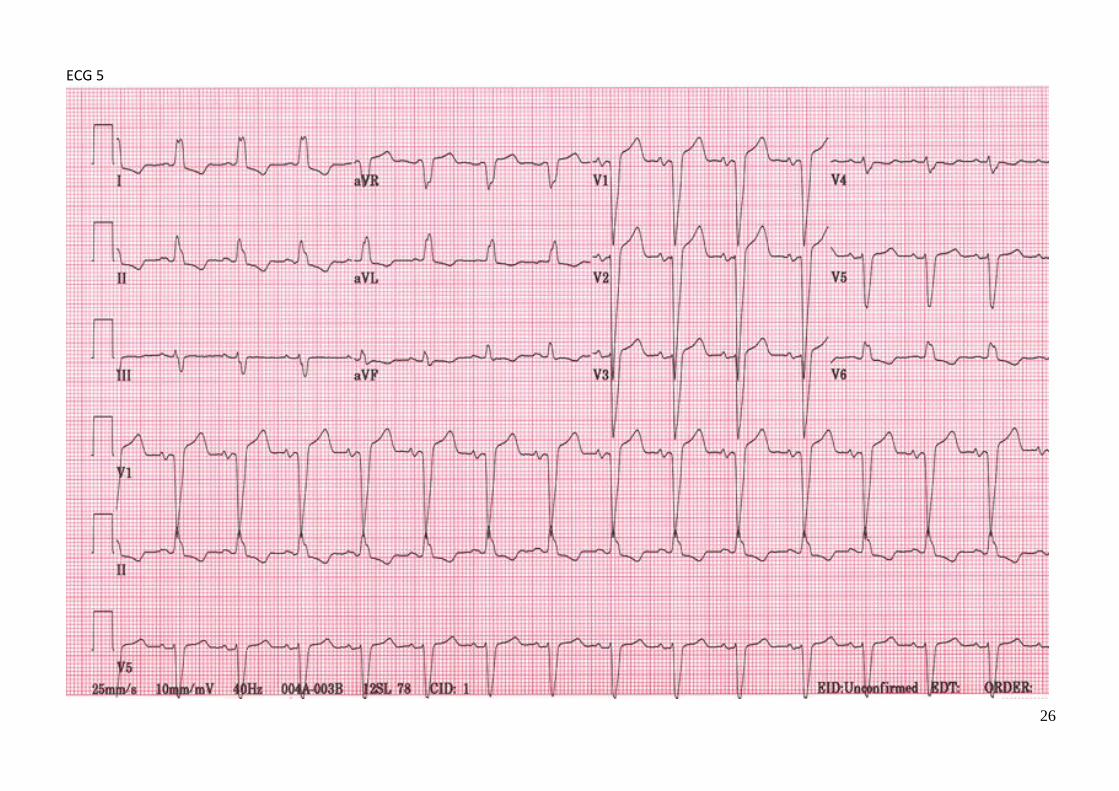
26
ECG 5

27
ECG 6

28
ECG 7

29
ECG 8

30
ABNORMAL ELECTROCARDIOGRAPH READING
(ACUTE MYOCARD INFARCT)
1. Rational / Synopsis
Cardiovascular disease is the number one killer disease in the world. Early detection of cardiovascular disease is important to manage further development of the diseases. ECG as a cheap non-invasive method is a very important tool to detect cardiovascular diseases. Therefore general practitioner should be able to read ECG result, especially for the common abnormal condition.
2. Intended Competency 4A (The student should be able to perform the skill independently)
3. Number of SCU : 3 SCU
4. General learning outcome After completing skill practice of abnormal electrocardiograph (ECG) reading, the students will able to assess abnormal ECG correctly.
5. Specific skills learned
Week Skill Specific learning outcome Department
1 week Reading Abnormal ECG– MI
At the end of skill practice, the student will able to measure and analyze the abnormal ECG record for AMI patient
Cardiology
6. Learning Method 1. Introduction (20’) 2. Demonstration (10’) 3. Individual training (each student 10’ = 100’) 4. Point nodal evaluation (each student 10’) 5. Student self-practice(10’)
7. Laboratory Facilities
a. Presentation by trainers b. Students learning guide c. References d. Normal ECG samples, VT ECG sample, VES ECG sample, MI ECG sample
8. Reference: Braunwald Heart Disease
9. Manual skill training

31
ABNORMAL ELECTROCARDIOGRAPH READING (ACUTE MYOCARD INFARCT)
Specific Learning Outcome:
1. The student will able to measure and analyze the abnormal ECG record for AMI patient.
2. Students able to recall the ability to measure and analze the past ECG record reading.
Interpretation of ECG
No Content Result
Comment 0 1 2
1 Identification
2 Reading of standard paper speed
3 Reading of standard
4 Measurement of heart rate,regularity
5 Assessment rhythm
6
Assessment of P-wave
- contour
- morphology
- duration
- amplitude
7 Measurement of PR-interval
8 Assessment of morphology of Q-wave
9 Assessment of morphology of R-wave
10 Assessment of morphology of S-wave
11 Measurement of R/S amplitude in V1 or V2
12 Measurement of QRS-duration
13 Measurement and assessment of axis of QRS- complexes
14 Assessment of morphology of ST-segment
15 Assessment of morphology of T-wave
16 Measurement of QTc-interval
17 Conclusion
Note: 0 = not doing at all 1 = do the step partially 2 = do the step completely
Maximum score :

32
ECG 9

33
ECG 10

34
ECG 11

35
ECG 12

36
ECG 13

37
HISTORY TAKING FOR PEDIATRIC CARDIAC PATIENT
1. Rational / Synopsis
Cardiovascular disease is the number one killer disease in the world. Early detection of cardiovascular disease is important to manage further development of the diseases. Good and pointed history taking technic is a very important tool to detect cardiovascular diseases. Therefore general practitioner should be able to perform good history taking in order to find the cardiac problems of the patient.
2. Intended Competency 4A (The student should be able to perform the skill independently)
3. Number of SCU : 3 SCU
4. General learning outcome After completing skill practice of History Taking for Pediatric Cardiac Patient, the students will be able to perform good history taking in pediatric cardiac patients.
5. Specific skills learned
Week Skill Specific learning outcome Department
1 week History Taking for Pediatric Cardiac Patient
At the end of skill practice, the student will able to perform good and pointed history taking to pediatric cardiac patient
pediatric
6. Learning Method
8. Introduction (20’) 9. Demonstration (10’) 10. Individual training (each student 10’ = 100’) 11. Point nodal evaluation (each student 10’) 12. Student self-practice (10’)
7. Laboratory Facilities a. Presentation by trainers b. Students learning guide c. References d. Standardized patient
8. Manual skill training

38
HISTORY TAKING FOR PEDIATRIC PATIENT WITH HEART DISEASES
Specific Learning Outcome:
1. Students perform correct evaluation of patient’s condition. 2. Students perform correct hystory taking for pediatric patient with heart
diseases
CYANOTIC CONGENITAL HEART DISEASE 0 1 2
History Taking
Introduction & Greeting, Taking General information, establish a relationship with the patients and parents
Greet the patient and introduce yourself, develop a warm and trustful relation
Politely ask : Patient identity and complete the general information: Name Age Sex
Chief complaint
Ask the reason why the patient come to the clinic
Present History
Cyanosis (Bluish coloration on fingertip, lips and tongue) When did it begin? Did it occur in the nursery? Shortly after coming home? Did it happen suddenly or gradually ? Did it happen spontaneously or after some specific event ? Is there permanent or paroxysmal nature? What make it worse or better ? Is it becomes worse after feeding or crying? Has she ever had uncontrollable crying, followed by rapid breathing, and then deepening of bluish coloration? When its appearance, in the morning on awakening or after feeding? How many times duration of the spell? How often does she have spell? Is she breathing fast and deep during the spell (cyanotic spell) or e holding their breath (breath holding spell)? Does she usually squat after running or walking when tired? Or she has a favorite position such as knee chest position when tired?
Take a post history addressing
Does she look fatigue ? Does she need to take frequent rest breaks while play with friends? Does she have fast breathing during rest or exercise ? Does she have a rapid heartbeat ?

39
Does she have visible swelling of the legs, ankles, eyelids, face, and abdomen ? Does she have difficulty to increase her body weight? Does she have growth and weight gain slower than expected ? Is she given bottle fed or breast fed? If she given bottle fed, how many cc of milk formula can she drink? How often does she drink? If she given breast fed, can she do it well? After breast fed, does she sleep or cry? Does she have lack of appetite ? How is her development? How many flights of stairs can she climb without fatigue? Can she stand, walk ,run, or say some word ? Does she often have fever with coughing and wheezing ? How often does it occur? Does she have excessive sweating ? Does she take any medicines at the moment ?
Does she have an episode of seizures ?
Take a gestational and natal history considering
Have you ever had infections during your pregnancy? Have you ever had rash with fever during your pregnancy? Do you have a pet in your house? Have you ever taken some medication during your pregnancy? Do you work? Where do you work? Have you ever had x ray examination during your pregnancy? Are you a diabetic? How old are you? How old is her father? How many kilograms was your baby birth weight ?
Take a family history Do you have a congenital heart disease in your family ?
ACUTE RHEUMATIC FEVER 0 1 2
History Taking
Chief complaint
Greet the patient and introduce yourself, develop a warm and trustful relation
Politely ask : Patient identity and complete the general information: Name Age Sex
Ask the reason why the patient come to the clinic
Ask for the followings: fever and joint pain and swelling,
When did it begin ? Does the joint pain characterized by swelling, redness, warmth,

40
and tenderness of the joints.? Does it migratory to other joints? What make it worse or better ? Does he can walk? Does he take aspirin ? Does he ever have sore throat history before ?
Carditis Does he have shortness of breathing? Does he have rapid heartbeat? Does he look fatigue ? Does he need to take frequent rest break while play with friends Does he have visible swelling of the legs, ankles, eyelids, face, and stomach ?
Erythema marginatum Does he have red rashes eruption which are non-itchy and nonpainful, on the trunk, leg or arm ?
Sydenham’s chorea Does he have uncoordinated involuntary purposeless movements with emotional lability?, Does he have muscular weakness?
Subcutaneous nodules Does he have nodule which are hard, painless, non-itchy, freely movable, swelling on elbows, knees, wrists, ankles, over the Achilles tendon, and occiput or spinous process of the vertebrae?.
Family history Is there someone in your family have a rheumatic heart disease?
INFECTIVE ENDOCARDITIS 0 1 2
History Taking
Chief complaint
Greet the patient and introduce yourself, develop a warm and trustful relation
Politely ask : Patient identity and complete the general information: Name Age Sex
Ask the reason why the patient come to the clinic
Ask for the followings: Fever
When did it begin ? Did it happen suddenly or gradually? Does he have history of congenital heart disease? Does he have history of rheumatic heart disease? Does he have history of any dental work, operations or infections? Does he have history of intravenous drug abuse?
Immunologic phenomena Does he have painful, red, nodular lesions commonly found on fingers (Osler nodes)?

41
Does he have small red rashes (erythematous), nontender areas of the palms and soles ( Janeway lesions) Does he have retinal hemorrhages with central clearing (Roth spots)?. Does he have linear hemorrhages beneath the nail (splinter hemorrhages)?
Embolic phenomena Does he have blood in urine (resulting renal infarcts) Does he have left flank pain (resulting splenic infarcts) Does he have stroke-like symptoms (resulting from cerebral emboli). Does he have chest pain and shortness of breath (due to pulmonary embolism).
Note: 0 = not doing at all 1 = do the step partially 2 = do the step completely
Maximum score :

42
PHYSICAL EXAMINATION OF PERIPHERAL VASCULAR DISEASE
1. Rational / Synopsis
Peripheral vascular disease is one of the common vascular disease in the world. Early detection of vascular disease is important to manage further development of the diseases. Good phisical examination technic is a very important tool to detect vascular diseases. Therefore general practitioner should be able to perform good phisical examination in order to find the vascular problems of the patient.
2. Intended Competency 4A (The student should be able to perform the skill independently)
3. Number of SCU : 3 SCU
4. General learning outcome After completing skill practice of Phisical Examination of Pheripheral Vascular Disease, the students will be able to perform good phisical examination technic in peripheral vascular disease patients.
5. Specific skills learned
Week Skill Specific learning outcome Department
1 week PE of Peripheral Vascular Disease
At the end of skill practice, the student will be able to perform physical examination of artery and vein
Vascular surgery
6. Learning Method
f. Introduction (20’) g. Demonstration (10’) h. Individual training (each student 10’ = 100’) i. Point nodal evaluation (each student 10’) j. Student self-practice (10’)
7. Laboratory Facilities a. Presentation by trainers b. Students learning guide c. References d. Standardized patient

43
8. Manual skill training
Specific Learning Outcome:
1. Students perform correct evaluation of patient’s condition. 2. Students perform correct physical examination of artery and vein.
No.
Procedures Performance Scale
0 1 2
Procedures
History Taking of Arterial Disease
Complaint
1 Ask the chief complaint ;
Location: exact location of the symptom
Onset: suddenly, or gradually o If there is an ulcer, is it induced by trauma /
injury or appear gradually
Frequency: o If there is pain, is it persist, never relief, or
sometimes relief, or influence by dependency / elevation, and whether the symptom influence daily activity (such as sleeping, working)
o If there is an ulcer, is it heal, or getting worse
Influencing factors: whether the pain is aggravate by walking (intermitten claudication), coldness, or emotion.
Past History
2 Ask history of: operation, diabetic, cardiac disease, hypertension, stroke, alcohol consumption
3 Personal habit: Tobacco-smoking
Arterial Survey The student MUST compare both extremities!
Inspection
Ask the patient to lie down on the examination bed
4 Skin inspection:
Discoloration; note any changes of color, is it: pallor, rubbor (redness), cyanosis (bluish), or gangrene (black)
Hair growth
Nail growth
Muscle atrophy
Swelling
Ulcer or gangrene; describe the: location, dry or wet, is there pus

44
Palpation
5 Feel the temperature. Is it warm or cold
Capillary filling; include skin capillary filling
Swelling / Edema (pitting or non-pitting)
Tenderness
Arterial palpation
6 Dorsal pedis and Posterior tibial artery
7 Popliteal artery
8 Femoral artery
9 Abdominal Aorta
10 Radial, Ulnar, and Brachial artery
11 Carotid artery
History Taking of Venous Disease
Complaint
12 Ask the chief complaint;
Location: exact location of the symptom
Symptom: any swelling, varicosities, pain cramps, itching, skin changes, ulcer
o Swelling: acute or chronic onset o Varicosities which is prominent in standing
position o If there is pain or cramps, is it never relief,
sometimes relief, relief by elevation and getting worse during standing
o If there is an ulcer, is it heal, or getting worse
Past History
13 Ask history of: operation, family history, diabetic, malignancy, stroke, pregnancy, use of hormonal contraceptive agent, occupation (usually which involve standing position in long time)
Venous Survey The student MUST compare both extremities!
Inspection
12 Ask the patient to stand up with both lower extremity straight.
Inspect for any telangiectasi, long saphenous or short saphenous varicosities, stray varicosities, blowout.
Inspect for skin color changes: are there any redness, bluish, hyperpigmentation
Inspect for ulcer, location, and size
Note any swelling / edema
Palpation

45
13 Ask the patient to lie down; feel for the skin temperature; is it warmer than usual; any swelling, pitting or non-pitting, any pain or tenderness, Perform Homan’s test: note any tenderness
14 Brodie-Trendelenburg Test This test is to determine any incompetency of perforating vein or saphenous vein.
While the patient lie down, elevate the patient lower extremity untill all the vein collapse. Put a torniquet at the proximal femur.
Ask the patient to stand up; note for any minor superficial veins filling. If it appear for less than 30 second, perforating veins incompetency are present. While the patient still standing, release the torniquet. Note the superficial veins filling; if the varicosities rapidly exist (or less than 30 second), incompetency of saphenous vein is present
Updated: 2010 May 14 – TMD-Surg
Note: 0 = not doing at all 1 = do the step partially 2 = do the step completely
Maximum score :