Hand Fracture System - Acumed · Low-profile plates and screws and a rounded-edge plate cutter are...
52
Hand Fracture System Surgical Technique
Transcript of Hand Fracture System - Acumed · Low-profile plates and screws and a rounded-edge plate cutter are...

Hand Fracture System
Surgical Technique

Acumed® is a global leader of innovative orthopaedic and medical solutions.
We are dedicated to developing products, service methods, and approaches that improve patient care.
Acumed Hand Fracture SystemThe Acumed Hand Fracture System is designed to provide both standard and fracture-specific fixation for metacarpal and phalangeal fractures, as well as fixation for fusions and osteotomies. This comprehensive system contains plates for fractures of the metacarpal neck, fractures of the base of the first metacarpal, avulsion fractures, and rotational malunions. Additionally, the system contains standard-shaped, cut-to-length and bend-to-fit plates and hexalobe lag screws for less complicated fractures.
Low-profile plates and screws and a rounded-edge plate cutter are designed to minimize soft tissue irritation. Versatile screws, customizable plates, and dedicated instrumentation offer a comprehensive system to streamline the surgical experience.
Acumed Hand Fracture System Solutions: ⊲ Specialty and standard plates ⊲ Hexalobe MultiScrews and Hexalobe Lag Screws ⊲ Threaded titanium K-wires ⊲ Small Bone Fixator ⊲ Small Bone Distractor
Indications for Use
The Acumed Hand Fracture System is designed for the management of fractures, fusions, and osteotomies of the distal, middle, and proximal phalanges and metacarpals and other bones of appropriate size for the devices.

Table of Contents
System Features . . . . . . . . . . . . . . . . . . . . . . . . . . . . . . . . . . . . . . . . . . . . . . . . . . . . . . . . . . . . . . . . 2
Instrument Overview . . . . . . . . . . . . . . . . . . . . . . . . . . . . . . . . . . . . . . . . . . . . . . . . . . . . . . . . . . . 10
Surgical Technique and Instructions Overview . . . . . . . . . . . . . . . . . . . . . . . . . . . . . . . . . . . . . 12
Instrument Instructions . . . . . . . . . . . . . . . . . . . . . . . . . . . . . . . . . . . . . . . . . . . . . . . . . . . . . . . . . . 18
SaveLock Compression Sleeve . . . . . . . . . . . . . . . . . . . . . . . . . . . . . . . . . . . . . . . . . . . . . . . 18
Plate Cutting . . . . . . . . . . . . . . . . . . . . . . . . . . . . . . . . . . . . . . . . . . . . . . . . . . . . . . . . . . . . . . .20
Plate Bending . . . . . . . . . . . . . . . . . . . . . . . . . . . . . . . . . . . . . . . . . . . . . . . . . . . . . . . . . . . . . . 21
Surgical Techniques . . . . . . . . . . . . . . . . . . . . . . . . . . . . . . . . . . . . . . . . . . . . . . . . . . . . . . . . . . . .22
Standard Plate . . . . . . . . . . . . . . . . . . . . . . . . . . . . . . . . . . . . . . . . . . . . . . . . . . . . . . . . . . . . . .22
Metacarpophalangeal Joint Fusion . . . . . . . . . . . . . . . . . . . . . . . . . . . . . . . . . . . . . . . . . . . .25
1 .3 mm Metacarpal Neck Plate . . . . . . . . . . . . . . . . . . . . . . . . . . . . . . . . . . . . . . . . . . . . . . . .29
1 .3 mm Rotational Correction Plate . . . . . . . . . . . . . . . . . . . . . . . . . . . . . . . . . . . . . . . . . . . . 32
1 .3 mm Rolando Fracture Hook Plate . . . . . . . . . . . . . . . . . . . . . . . . . . . . . . . . . . . . . . . . . . 35
0 .8 mm Avulsion Hook Plate . . . . . . . . . . . . . . . . . . . . . . . . . . . . . . . . . . . . . . . . . . . . . . . . . . 38
1 .5 mm and 2 .3 mm Hexalobe Lag Screw . . . . . . . . . . . . . . . . . . . . . . . . . . . . . . . . . . . . . .40
Ordering Information . . . . . . . . . . . . . . . . . . . . . . . . . . . . . . . . . . . . . . . . . . . . . . . . . . . . . . . . . . . 42
Acumed® Hand Fracture System Surgical Technique

Acumed® Hand Fracture System Surgical Technique
2
System FeaturesPlates, Screws, and External Fixation System
1.3 mm Metacarpal Neck Plate, Right1.3 mm Metacarpal
Neck Plate, Left1.3 mm Rolando Fracture Hook Plate
1.3 mm Straight Plate
0.8 mm T-Plate
0.8 mm Compression Plate
0.8 mm Curved Medial/Lateral Plate
1.3 mm Rotational Correction Plate
0.8 mm Offset Plate0.8 mm Straight Plate
0.8 mm Avulsion Fracture Plate
1.3 mm Compression Plate
1.3 mm T-Plate
Small Bone Fixator
Small Bone Distractor
Partially threaded Hexalobe Lag Screws
Locking variable angle Hexalobe MultiScrews

Acumed® Hand Fracture System Surgical Technique
3
System Features [continued]Customizable Standard Plates
0.8 mm T-plate (7005-08003)
1.3 mm Straight Plate, 10 Hole (7005-13010)
0.8 mm Curved Medial/Lateral Plate(7005-08007)
0.8 mm Curved Medial/Lateral Plate(7005-08007)
0.8 mm Offset Plate(7005-08004)
The Acumed Hand Fracture System offers plates in 0.8 mm and 1.3 mm thicknesses. Plates can be cut to length and bent to fit to better treat a wide variety of fracture patterns. A custom plate cutter is included in the system and is designed to create a smooth, rounded edge on all Acumed Hand Fracture System plates except the Avulsion Plate. These plates feature divots that aid in provisional fixation when used with the system’s forceps and clamps.
Diaphyseal Fractures Distal Phalangeal Fractures Comminuted Fractures
Numerous Plate Configurations Are Possible
Multiple Choices, Multiple Options
Note: Not all plate configurations and options are shown.

1. Bindra RR, Burke FD. Metacarpal osteotomy for correction of acquired phalangeal rotational deformity. J Hand Surg Am. 2009;34A:1895–1899.
Acumed® Hand Fracture System Surgical Technique
4
System Features [continued]Specialty Plates
Avulsion FracturePeriarticular fracture where the fragment contains a soft tissue insertion (typically a ligament or tendon).
The 0.8 mm Avulsion Hook Plate is designed to provide more stability than a K-wire when a fragment is too small for a single screw.
Rotational Malunion Osteotomy Osteotomy to treat rotational malunion of the phalanx or metacarpal. The osteotomy typically is performed on the metacarpal, even if correcting a phalangeal malunion.1
The 1.3 mm Rotational Correction Plate is designed to be used with an osteotomy for correcting rotational malunions. The system includes a Rotational Osteotomy Cutting Guide (80-1828) designed to facilitate placement and orientation of the cut for rotational osteotomies of the metacarpals.
Metacarpal Neck FractureTransverse fracture of the neck of the metacarpal.
The 1.3 mm Metacarpal Neck Plate is designed to provide fixation for metacarpal neck fractures and has three distally pointing converging screws to provide metacarpal head fixation.
Rolando FractureA three-part, intra-articular comminuted fracture of the base of the first metacarpal.
The 1.3 mm Rolando Fracture Hook Plate is designed for a Y- or T-shaped fracture pattern at the base of the first metacarpal. The prongs should contact the dorsal surface of the abductor pollicis longus (APL) tendon and support comminution of the base of the first metacarpal. These prongs are not intended to compress the APL tendon.

15°
Acumed® Hand Fracture System Surgical Technique
5
System Features [continued]Hexalobe MultiScrew Technology
Designed to be used with any plate in Acumed’s Hand Fracture System, 1.5 mm and 2.3 mm Hexalobe MultiScrews act as both nonlocking and variable angle locking screws in one. Hexalobe MultiScrews are made of titanium alloy, ASTM F136. Cutting flutes on the screw are engineered to limit the need for a bone tap.
Locking Variable Angle Hexalobe MultiScrews act as nonlocking screws when inserted into unthreaded slots and locking variable angle screws when inserted into threaded holes.
The Hexalobe MultiScrew design allows for variable angle screw insertion up to 15 degrees in any direction for a total of 30 degrees.
Any Size Hexalobe MultiScrew in Any HoleThe 1.5 mm and 2.3 mm Hexalobe MultiScrews can be used in either the 0.8 mm or 1.3 mm plate thickness.
The SaveLock Compression Sleeve (see page 8) is designed to aid with plate reduction and allows the 1.5 mm and 2.3 mm Hexalobe MultiScrews to function as both locking and nonlocking screws.
1.5 mm Hexalobe MultiScrew, 5–20 mm lengths(3004-150XX)
2.3 mm Hexalobe MultiScrew, 5–20 mm lengths(3004-230XX)

Acumed® Hand Fracture System Surgical Technique
6
System Features [continued]Hexalobe Lag Screw Technology
Designed to be used as an adjunct to plate fixation or for fractures that can be treated with lag screws alone, Acumed’s 1.5 mm and 2.3 mm Hexalobe Lag Screws do not require overdrilling of the near cortex. Hexalobe Lag Screws are intended to be used independently of plates or through slotted plate holes only. When using lag screws as nonlocking screws in plates, ensure the screw engages the far cortex, since lag screws are partially threaded and unable to engage the near cortex. It is recommended to use no more than two lag screws per plate if they are being used as nonlocking screws.
No Overdrilling RequiredUnlike other bones, the metacarpals and phalanges do not have much cancellous bone and are primarily composed of thick cortical bone. With little cancellous bone, there is nothing for the threads that cross the fracture line to engage with. The only bony engagement with the Hexalobe Lag Screw occurs in the near and far cortices.
The MultiScrew Countersink (80-1807) can be used to manually create a countersink in the near cortex to recess the lag screw head.
Straightforward InstallationThe 1.1 mm/2.0 mm Percutaneous Bone Clamp (80-0684) is a double-barreled drill guide that aids in provisional fixation and drilling. One barrel can be used to insert a K-wire across the fracture while the other barrel guides the drill.
1.5 mm Hexalobe Lag Screw, 5–20 mm lengths
(3012-150XX)
2.3 mm Hexalobe Lag Screw, 5–20 mm lengths
(3012-230XX)

Acumed® Hand Fracture System Surgical Technique
7
System Features [continued]Instrumentation
Acumed’s Hand Fracture System offers specialized instrumentation to aid in fracture reduction, plate placement, and rotational osteotomies.
Rotational Osteotomy Cutting Guide (80-1828)Designed to facilitate placement and orientation of cuts for rotational osteotomies of the metacarpals.
1.1 mm/2.0 mm Percutaneous Bone Clamp (80-0684)Reduction clamp with cannulations for 1.1 mm and 2.0 mm drills to aid in maintaining fracture reduction while drilling for lag screws.
0.8 mm/1.3 mm Plate Positioner (80-1958)Plate positioner helps remove plates from plate caddy, transfer them to the fracture site, and aid in provisional plate placement.
Single Pointed Reduction Forceps, 5.25" (80-1811)Forceps hold the plate onto the bone during plate placement and fracture reduction. Sharp end points engage the divots featured between screw holes on the plate to hold the plate securely to the bone.
Divots interface with reduction forceps
Squeeze to insert
Positioner engages plate

Acumed® Hand Fracture System Surgical Technique
8
System Features [continued]Screw Instrumentation ⊲ Color-coded screw caddies and screw installation instruments facilitate selection of appropriate drill, drill guide,
and depth gauge ⊲ Only nonlocking drill guides are needed for insertion of Hexalobe MultiScrews, due to the variable angle screw head design ⊲ SaveLock Compression Sleeve (80-1955) aids in securing Hexalobe MultiScrews to the driver and provides compression
between the plate and the bone
1.5 mm Screw InstrumentsInstruments to install the 1.5 mm Hexalobe MultiScrews and Hexalobe Lag Screws are banded in fuchsia.
2.3 mm Screw InstrumentsInstruments to install the 2.3 mm Hexalobe MultiScrews and Hexalobe Lag Screws are banded in yellow.
1.5 mm Hexalobe MultiScrew, 5–20 mm length(3004-150XX)
SaveLock Compression Sleeve(80-1955)
T6 Stick Fit Driver Tip(80-1756)
1.1 mm x 3.5" Quick Release Drill(80-1794)
1.1 mm MultiScrew Drill Guide, 5–20 mm(80-1805)
1.5 mm MultiScrew Depth Gauge(80-1801)
2.3 mm Hexalobe MultiScrew, 5–20 mm length(3004-230XX)
SaveLock Compression Sleeve(80-1955)
T6 Stick Fit Driver Tip(80-1756)
2.0 mm x 3.5" Quick Release Drill(80-1796)
2.0 mm MultiScrew Drill Guide, 5–20 mm(80-1809)
2.3 mm MultiScrew Depth Gauge(80-1954)

Acumed® Hand Fracture System Surgical Technique
9
System Features [continued]Small Bone External Fixation System
Acumed’s Small Bone External Fixation System is designed for temporary stabilization of the metacarpals, metatarsals, and phalanges. The Small Bone Fixator aids in reduction and compression to help correct fragment alignment for various fractures and osteotomies. The Small Bone Distractor is used in conjunction with guide pins to maintain distraction forces during fracture healing and is designed to aid with temporary stabilization. For more information about this system, please see the Small Bone External Fixation Surgical Technique (HNW10-08).
Straightforward ApplicationApplication of the Small Bone Fixator is achieved by clamping the blue housing assemblies on two or more sets of parallel K-wires and connecting with assemblies via carbon fiber or threaded stainless steel. The modular design enables pins to be located in multi-planar arrangements, allowing the frame to be built around the fractures.
Accurate LengtheningFor corrective or fracture care, this lightweight, low-profile fixator can be adjusted to the amount of distraction/compression desired by the surgeon.

Acumed® Hand Fracture System Surgical Technique
10
Instrument Overview
0.8/1.3 mm Plate Positioner(80-1958)
Small Bone Distractor (BD1-400)
Hex Wrench (AT-7004)
Outrigger Assembly(SM-5200)
Small Bone Fixator Knob(SM-5015)
Small Bone Housing Assembly(SM-5100)
2.4 mm Bone Distractor Hex(BD1-410)
Pin Guide Assembly(SM-5080)
90 mm Small Bone Fixator Shaft (Threaded Rod)(SMT-5090)
90 mm Small Bone Fixator Shaft (Carbon Fiber Rod) (SMC-5090)
1.5 mm x 4" Threaded Single Trocar Guide Wire(WS-1504STT)
60 mm Small Bone Fixator Shaft (Threaded Rod)(SMT-5060)
SaveLock Compression Sleeve(80-1955)
1.1 mm MultiScrew Drill Guide,5–20 mm(80-1805)
1.1 mm x 3.5" Quick ReleaseDrill(80-1794)
1.5 mm MultiScrew Depth Gauge(80-1801)
1.1 mm x 3.5" Mini-AO Drill(80-1795)
1.1 mm x 3.5" J-Latch Drill(80-1804)
T6 Stick Fit Driver Tip(80-1756)
2.0 mm MultiScrew Drill Guide, 5–20 mm(80-1809)
2.0 mm x 3.5" Mini-AO Drill(80-1797)
2.0 mm x 3.5" Quick Release Drill(80-1796)
2.0 mm x 3.5" J-Latch Drill(80-1816)
60 mm Small Bone Fixator Shaft (Carbon Fiber Rod)(SMC-5060)

Acumed® Hand Fracture System Surgical Technique
11
Instrument Overview [continued]
2.3 mm MultiScrew Depth Gauge(80-1954)
0.8/1.3 mm Plate Cutter(80-0683)
0.8/1.3 mm Plate Bending Pliers(80-1757)
Bone Reduction Forceps, 5.25" (80-1810)
1.1/2.0 Percutaneous Bone Clamp(80-0684)
Single Pointed Reduction Forceps, 5.25"(80-1811)
7.25" Periosteal Elevator(MS-46211)
8 mm Hohmann Retractor(PL-CL05)
Sharp Hook(PL-CL06)
Rotational Osteotomy Cutting Guide(80-1828)
0.040" (1.02 mm) Plate Tack(80-1759)
Heiss Retractor, 8 mm Wide, 6 mm Deep(80-1812)
MultiScrew Countersink(80-1807)
.045" x 5.75" Threaded Single Trocar Guide Wire(35-0011)
.035" x 5.75" Single Trocar Guide Wire(WS-0906ST)
Cruciform Driver Handle(MS-2210)
.062" x 6" Single Trocar Guide Wire(WS-1607ST)
.062" x 5.75" Threaded Single Trocar Guide Wire(WT-1606STT)
.035" x 5.75" Threaded Single Trocar Guide Wire(WT-0906STT)
.045" x 6" Single Trocar Guide Wire(WS-1106ST)

Acumed® Hand Fracture System Surgical Technique
12
Surgical Technique and Instructions Overview
Plates May Be Bent With Pliers
SaveLock Compression Sleeve
Plate Cutting
Plate Bending
Place Plate With Marking Side Up
Bend Plates Between Screw Holes
Assembly
Plates May Be Cut to Length
Remove Hexalobe Multiscrew from Caddy

Acumed® Hand Fracture System Surgical Technique
13
Squeeze Handle of Cutter
Plate Cutter Leaves a Rounded Edge
Do Not Bend Across Screw Holes
Do Not Bend Repeatedly (Can Weaken Plate)
Lock Hexalobe Multiscrew into Plate
Hexalobe Multiscrew Insertion

Acumed® Hand Fracture System Surgical Technique
Surgical Technique and Instructions Overview [continued]
Plate PlacementProximal Screw Insertion
Exposure and Fracture Reduction
Standard Plate
Metacarpophalangeal Joint Fusion
1.3 mm Metacarpal Neck Plate
Plate Selection and Placement
Plate Selection Plate Placement
Drilling Screw Holes
Exposure and Fracture Reduction
Exposure
14

Acumed® Hand Fracture System Surgical Technique
15
Proximal Screw Insertion
Lag Screw Insertion
Determining Screw Length
Distal Cluster Screw Preparation
Distal Screw Insertion
Screw Insertion
Screw Insertion
Closure and Postoperative Protocol
Closure and Postoperative Protocol
Closure and Postoperative Protocol

Acumed® Hand Fracture System Surgical Technique
Surgical Technique and Instructions Overview [continued]
Exposure and Fracture Reduction
1.3 mm Rotational Correction Plate
1.5 mm and 2.3 mm Hexalobe Lag Screw
Osteotomy CutDistal Screw InsertionExposure
1.3 mm Rolando Fracture Hook Plate
Fracture Reduction and Plate Placement
Screw Placement
Drilling Distal Screw Hole
Determining Screw LengthExposure
0.8 mm Avulsion Hook Plate
Exposure and Fracture Reduction
Plate Placement and Rotational Correction
Plate Placement
Drilling and Determing Screw Length
16

Acumed® Hand Fracture System Surgical Technique
17
Screw InsertionProximal Screw Insertion
Drilling Proximal Holes
Final Screw Insertion
Screw Insertion
Closure and Postoperative Protocol
Screw Insertion
Osteotomy Compression
Proximal Screw Insertion
Closure and Postoperative Protocol
Closure and Postoperative Protocol

Acumed® Hand Fracture System Surgical Technique
18
SaveLock Compression Sleeve Instructions
The SaveLock Compression Sleeve is used with the T6 Stick Fit Driver Tip and serves two functions: to keep the 2.3 mm Hexalobe MultiScrew on the driver tip and to compress the plate to the bone when inserting the screw. The sleeve is threaded over the screw head only and prevents these threads from engaging the plate when inserting the screw shaft into the bone.
Note: The 1.5 mm Hexalobe MultiScrew may also be used with the SaveLock Compression Sleeve and uses the same instrumentation as described below.
1 AssemblyAssemble the T6 Stick Fit Driver Tip (80-1756) and
the Cruciform Driver Handle (MS-2210). Slide the SaveLock Compression Sleeve (80-1955) over the T6 Stick Fit Driver Tip.
2 Remove 2.3 mm Hexalobe Multiscrew from Caddy
A: With the SaveLock Compression Sleeve (80-1955) installed, insert the T6 Stick Fit Driver Tip (80-1756) into the head of the 2.3 mm Hexalobe MultiScrew (3004-230XX).
B: Thread the SaveLock Compression Sleeve around the 2.3 mm Hexalobe MultiScrew head and then remove the screw from the caddy.
Note: The SaveLock Compression Sleeve must be positioned vertically during this step.
A B
T6 Stick Fit Driver Tip
Screw Caddy
SaveLock Compression Sleeve
Screw
Acumed® Hand Fracture System Surgical Technique
19
SaveLock Compression Sleeve Instructions [continued]
3 2.3 mm Hexalobe Multiscrew Insertion
A: With the SaveLock Compression Sleeve (80-1955)engaged, insert the 2.3 mm Hexalobe MultiScrew (3004-230XX) into the bone until the bottom surface of the SaveLock Compression Sleeve contacts the plate.
B: Continue insertion of the 2.3 mm Hexalobe MultiScrew with the SaveLock Compression Sleeve engaged until the plate is compressed to the bone.
4 Lock 2.3 mm Hexalobe Multiscrew into Plate
A: Holding the T6 Stick Fit Driver Tip (80-1756) in place, unthread the SaveLock Compression Sleeve (80-1955) from the 2.3 mm Hexalobe MultiScrew (3004-230XX) head.
B: Continue inserting the 2.3 mm Hexalobe MultiScrew until locked into the plate.
Note: When the SaveLock Compression Sleeve is released, the screw will have already locked into the bone and begun to engage with the plate. This maintains compression between the plate and bone.
A B
A B
Plate
Gap
Bone

Acumed® Hand Fracture System Surgical Technique
20
Plate Cutting Instructions
Before
After
1 If required, plates may be cut to length using the 0.8 mm/1.3 mm Plate Cutter (80-0683).
2 Place the plate with the marking side up into the plate cutter with the last screw hole you want to keep
aligned with the alignment peg in the cutter.
3 Squeeze the handle of the cutter.
Note: The spring holds the cut portion of the plate in place until the handle is released.
4 The plate cutter leaves a rounded edge.

Acumed® Hand Fracture System Surgical Technique
21
Plate Bending Instructions
1 If required, plates can be bent using the 0.8 mm/1.3 mm Plate Bending Pliers (80-1757).
2 Bend plates between adjacent screw holes.
3 Do not bend plates across screw holes.
4 Warning: Repeated bending of the plate in opposite directions may cause the plate to become weaker
or break. Do not bend, unbend, and re-bend more than once.
Acumed® Hand Fracture System Surgical Technique
22
1 Exposure and Fracture ReductionThe patient’s forearm is positioned to expose the
surgical site. Make the appropriate incision; retract tendons and take care to protect nerve fibers and blood vessels.
Reduce the fracture using standard reduction techniques. Provisional stability can be achieved with K-wires and evaluated under fluoroscopy.
2 Plate Selection and PlacementAfter reduction and stabilization, select the
appropriate plate size and shape. Bend and/or cut the plate as necessary. (Refer to page 21 for Plate Bending Instructions.) The plate is positioned dorsally (or medially or laterally for the 0.8 mm Curved Medial/Lateral Plate (7005-08007) on the metacarpal or phalanx with .040" (1.02 mm) Plate Tacks (80-1759), the Single Pointed Reduction Forceps, 5.25" (80-1811), or K-wires.
Note: Plate divots interface with Single Pointed Reduction Forceps, 5.25" and Bone Reduction Forceps, 5.25" (80-1810).
Standard Plate Surgical Technique
Bone Reduction Forceps, 5.25"(80-1810)
0.8 mm Curved Medial/Lateral Plate (7005-08007)
Single Pointed Reduction Forceps, 5.25" (80-1811)
0.040" (1.02 mm) Plate Tack(80-1759)
Figure 1
Figure 2
Figure 3

2.0 mm x 3.5" Quick Release Drill (80-1796)
2.3 mm MultiScrew Depth Gauge (80-1954)
Acumed® Hand Fracture System Surgical Technique
23
Standard Plate Surgical Technique [continued]
3 Drilling Screw HolesDrill with the 1.1 mm x 3.5" Quick Release Drill
(80-1794) or 2.0 mm x 3.5" Quick Release Drill (80-1796) through the appropriate drill guide.
Note: Surgical technique highlights the Standard AO drills. The 1.1 mm and 2.0 mm drills are available in three different connection options as shown below. The Mini-AO and J-Latch are optional parts available upon request. Please contact your local authorized Acumed distributor for further information.
1.1 mm and 2.0 mm Drill Connections
Standard AO
1.1 mm x 3.5" Quick Release Drill (80-1794)
2.0 mm x 3.5" Quick Release Drill (80-1796)
1.1 mm and 2.0 mm Drill Connections (Optional Instruments Available Upon Request)
Mini-AO1.1 mm x 3.5" Mini-AO Drill (80-1795)
2.0 mm x 3.5" Mini-AO Drill (80-1797)
J-Latch1.1 mm x 3.5" J-Latch Drill (80-1804)
2.0 mm x 3.5" J-Latch Drill (80-1816)
4 Determining Screw LengthMeasure screw length using the corresponding
1.5 mm or 2.3 mm MultiScrew Depth Gauge (80-1801 or 80-1954).
Note: The 1.1 mm MultiScrew Drill Guide, 5–20 mm (80-1805) or the 2.0 mm MultiScrew Drill Guide, 5–20 mm (80-1809) can also be used to measure the screw lengths.
1.1 mm x 3.5" Mini AO Drill (80-1795)
1.1 mm x 3.5" J-Latch Drill (80-1804}
2.0 mm MultiScrew Drill Guide, 5–20 mm (80-1809)
1.1 mm x 3.5" Quick Release Drill(80-1794)
1.5 mm MultiScrew Depth Gauge (80-1801)
1.1 mm MultiScrew Drill Guide, 5–20 mm (80-1805)
Figure 4
Figure 5
J-Latch
Mini-AO
Standard AO
Figure 6

Acumed® Hand Fracture System Surgical Technique
24
5 Screw InsertionUsing the T6 Stick Fit Driver Tip (80-1756), secure
the plate to the bone with 1.5 mm Hexalobe Lag Screws (3012-150XX) or 2.3 mm Hexalobe Lag Screws (3012-230XX) through the slots. Finish securing the plate to the bone with 1.5 mm Hexalobe MultiScrews (3004-150XX) or 2.3 mm Hexalobe MultiScrews (3004-230XX) through the remaining threaded holes. If desired, the SaveLock Compression Sleeve (80-1955) may be used to aid in compressing the plate to the bone.
Note: Hexalobe MultiScrews should be inserted using only the Cruciform Driver Handle (MS-2210) provided in the system and locked to “three-finger tight.” This is generated by using only the thumb, index, and middle fingers. Unlike traditional nonlocking screws, there is no “hard stop” feature when Hexalobe MultiScrews are used as nonlocking screws in an oblong slot, so they should be inserted only until they are “three-finger tight.”
6 Closure and Postoperative ProtocolPostoperative care is at the discretion of the surgeon.
The following protocol is provided as an example.
Perform a thorough radiographic evaluation to check fragment reduction, alignment, and screw placement. Verify that there is no gap between the bone and the plate in the lateral view. Close the wound and support the wrist according to bone quality and stability. Allow for early functional use of the hand and start immediate finger range of motion and forearm rotation postoperatively.
7 Optional: Implant Removal Instructions
To extract a plate, use the T6 Stick Fit Driver Tip (80-1756) and Cruciform Driver Handle (MS-2210) to remove all the screws in the plate. Referencing the Screw Removal Brochure (SPF10-00) may aid in implant extraction if difficulty is experienced.
Standard Plate Surgical Technique [continued]
SaveLock Compression Sleeve(80-1955)
2.3 mm Hexalobe MultiScrew (3004-230XX)
T6 Stick Fit Driver Tip (80-1756)
1.5 mm Hexalobe MultiScrew (3004-150XX)
2.3 mm Hexalobe Lag Screw(3012-230XX)
Figure 7
Figure 8
1.5 mm Hexalobe Lag Screw(3012-150XX)
Cruciform Driver Handle(MS-2210)

Acumed® Hand Fracture System Surgical Technique
25
1 ExposureThe patient’s forearm is positioned to expose the
dorsum of the hand. Make the appropriate skin incision; incise the extensor hood and the joint capsule. Release the collateral ligaments on either side of the joint to facilitate exposure of the articular surface.
2 Bone PreparationExcise the metacarpal head with an oscillating
saw. The angle of fusion is determined by the angle of the metacarpal head osteotomy. The base of the proximal phalanx is excised perpendicular to its long axis.
Alternatively, cup and cone reamers found in the Acumed Modular Hand System can be used to remove cartilage from the metacarpal head and base of the phalanx to prepare the joint surfaces for fusion.
Provisional stability of the fusion can be achieved with a longitudinal K-wire passed through the metacarpal head into the proximal phalanx. The position of the joint is evaluated under fluoroscopy.
Part Number Part Description
MTP-F014 14 mm Concave MTP Reamer
MTP-F016 16 mm Concave MTP Reamer
MTP-M014 14 mm Convex MTP Reamer
MTP-M016 16 mm Convex MTP Reamer
Metacarpophalangeal Joint Fusion Surgical Technique
Figure 9
16 mm Concave MTP Reamer(MTP-F016)
16 mm Convex MTP Reamer (MTP-M016)
14 mm Concave MTP Reamer(MTP-F014)
14 mm Convex MTP Reamer (MTP-M014)

Acumed® Hand Fracture System Surgical Technique
26
Metacarpophalangeal Joint Fusion Surgical Technique [continued]
3 Plate SelectionSelect the appropriate 1.3 mm thick plate. If it is
determined that the plate needs to be cut for the procedure, ensure the plate length is cut down to no fewer than five holes and that at least one of the holes is an oblong slot.
Bend the plate between the holes on either side of the joint line. (Refer to page 21 for Plate Bending Instructions.) The plate is recommended to be over-bent by 5° to prevent gapping of the far cortex.
The objective is to secure at least four cortices on either side of the fusion as well as an additional lag screw through the fusion site for compression.
Note: This technique shows the 1.3 mm Compression Plate, 6-hole (7005-13006) being utilized, but other 1.3 mm thick plates can be used as appropriate.
4 Plate PlacementPosition the plate dorsally, bridging the
metacarpophalangeal joint with .040" (1.02 mm) Plate Tacks (80-1759), the Single Pointed Reduction Forceps (80-1811), or K-wires.
If the plate has been cut down to five holes, position the plate with three holes on the metacarpal and two on the phalanx.
The first hole on the phalanx (hole 4) should preferably be a compression slot. Ensure that the rotational alignment of the finger is correct by passively closing all digits into a fist.
0.040" (1.02 mm) Plate Tack(80-1759)
Single Pointed Reduction Forceps, 5.25"(80-1811)
1.3 mm Compression Plate, 6-hole (7005-13006)
1.3 mm T-plate(7005-13002)
1.3 mm Compression Plate, 6-hole(7005-13006)
1.3 mm Straight Plate, 10-hole(7005-13010)
Figure 10
Figure 11

Acumed® Hand Fracture System Surgical Technique
27
Metacarpophalangeal Joint Fusion Surgical Technique [continued]
5 Proximal Screw InsertionBeginning in the most proximal hole, drill with
the 2.0 mm x 3.5" Quick Release Drill (80-1796) and 2.0 mm MultiScrew Drill Guide, 5–20 mm (80-1809).
Measure screw length using the corresponding 2.3 mm MultiScrew Depth Gauge (80-1954).
Using the SaveLock Compression Sleeve (80-1955) and the T6 Stick Fit Driver Tip (80-1756), secure the plate to the bone with 2.3 mm Hexalobe MultiScrews (3004-230XX).
Note: With the exception of first metacarpal joint fusions or larger anatomy, it is recommended to use 1.5 mm screws in the phalanx and 2.3 mm screws in the metacarpal.
Note: Hexalobe MultiScrews should be inserted using only the Cruciform Driver Handle (MS-2210) provided in the system and locked to “three-finger tight.” This is generated by using only the thumb, index, and middle fingers. Unlike traditional nonlocking screws, there is no “hard stop” feature when Hexalobe MultiScrews are used as nonlocking screws in an oblong slot, so they should be inserted only until they are “three-finger tight.”
6 Lag Screw InsertionAdditional compression and stability of the fusion are
achieved with the insertion of an oblique lag screw across the fusion.
Drill with the 2.0 mm x 3.5" Quick Release Drill and the 2.0 mm MultiScrew Drill Guide, 5–20 mm, obliquely across the fusion site through the metacarpal head through the slot closest to the fusion.
Measure screw length using the corresponding 2.3 mm MultiScrew Depth Gauge.
Using the T6 Stick Fit Driver Tip, install the 2.3 mm Hexalobe Lag Screw (3012-230XX).
2.0 mm x 3.5" Quick Release Drill(80-1796)
Cruciform Driver Handle(MS-2210)
2.3 mm Hexalobe Lag Screw(3012-230XX)
SaveLock Compression Sleeve(80-1955)
2.3 mm MultiScrew Depth Gauge(80-1954)
2.0 mm MultiScrew Drill Guide, 5–20 mm (80-1809)
2.3 mm Hexalobe MultiScrew (3004-230XX)
T6 Stick Fit Driver Tip (80-1756)
Figure 12
Figure 13

Acumed® Hand Fracture System Surgical Technique
28
7 Distal Screw InsertionEnsure that the plate is aligned longitudinally with the
phalanx and that the fusion is compressed.
Insert the remaining 1.5 mm Hexalobe MultiScrews (3004-150XX) into the plate to complete fixation. Bone grafting is not routinely necessary if compression has been achieved at the joint line. If there is a gap or bone loss, cancellous autograft may be used.
Note: With the exception of first metacarpal joint fusions orlarger anatomy, it is recommended to use 1.5 mm screws inthe phalanx and 2.3 mm screws in the metacarpal.
8 Closure and Postoperative ProtocolPostoperative care is at the discretion of the surgeon.
The following protocol is provided as an example.
Perform a thorough radiographic evaluation to check joint compression, bone alignment, and screw placement. Verify that there is adequate compression of the fusion and that there is no gap between the bone and the plate in the lateral view.
Repair the extensor mechanism, close the wound, and support the wrist and hand according to bone quality and stability.
Allow for early range of motion of adjacent joints postoperatively and encourage functional use of the hand as tolerated.
9 Optional: Implant Removal Instructions
To extract a plate, use the T6 Stick Fit Driver Tip (80-1756) and Cruciform Drive Handle (MS-2210) to remove all the screws in the plate. Referencing the Screw Removal Brochure (SPF10-00) may aid in implant extraction if difficulty is experienced.
Metacarpophalangeal Joint Fusion Surgical Technique [continued]
Figure 14
Figure 15
T6 Stick Fit Driver Tip (80-1756)
Cruciform Driver Handle(MS-2210)
1.5 mm HexalobeMultiScrew(3004-150XX)
Acumed® Hand Fracture System Surgical Technique
29
1.3 mm Metacarpal Neck Plate Surgical Technique
1 Exposure and Fracture ReductionThe patient’s forearm is pronated and positioned to
expose the surgical site. Make the appropriate incision; retract tendons, taking care to protect nerve fibers and blood vessels.
Reduce the fracture using manual techniques. Provisional stability can be achieved with K-wires and evaluated under fluoroscopy.
2 Plate PlacementAfter reduction and stabilization, the appropriate
1.3 mm Metacarpal Neck Plate (7005-1303L or 7005-1303R) is positioned dorso-laterally just proximal to the ligamentous attachments on the metacarpal head with .040" (1.02 mm) Plate Tacks (80-1759), the Single Pointed Reduction Forceps, 5.25" (80-1811), or K-wires.
Note: Plate divots interface with Single Pointed Reduction Forceps, 5.25" and Bone Reduction Forceps, 5.25" (80-1810).
Note: If a medial placement is preferred, the plate opposite to the hand can be used, ie, use the Right 1.3 mm Metacarpal Neck Plate (7005-1303R) on the left hand.
3 Proximal Screw InsertionDrill with the 2.0 mm x 3.5" Quick Release Drill
(80-1796) and 2.0 mm MultiScrew Drill Guide, 5–20 mm (80-1809) through the slot. Measure screw length using the 2.3 mm MultiScrew Depth Gauge (80-1954). Using the T6 Stick Fit Driver Tip (80-1756), secure the plate to the bone with a 2.3 mm Hexalobe Lag Screw (3012-230XX).
1.3 mm Metacarpal Neck Plate (7005-1303L or 7005-1303R)
2.3 mm MultiScrew Depth Gauge (80-1954)
T6 Stick Fit Driver Tip (80-1756)
2.3 mm Hexalobe Lag Screw(3012-230XX)
Bone Reduction Forceps, 5.25"(80-1810)
Single Pointed Reduction Forceps, 5.25"(80-1811)
0.040" (1.02 mm) Plate Tack (80-1759)
2.0 mm MultiScrew Drill Guide, 5–20 mm (80-1809)
2.0 mm x 3.5" Quick Release Drill(80-1796)
Figure 16
Figure 17
Figure 18

Acumed® Hand Fracture System Surgical Technique
30
1.3 mm Metacarpal Neck Plate Surgical Technique [continued]
4 Distal Cluster Screw PreparationDrill the distal holes with the 1.1 mm x 3.5" Quick
Release Drill (80-1794) and 1.1 mm MultiScrew Drill Guide, 5–20 mm (80-1805). Measure screw length using the 1.5 mm MultiScrew Depth Gauge (80-1801).
5 Screw InsertionUsing the SaveLock Compression Sleeve (80-1955)
and the T6 Stick Fit Driver Tip (80-1756), insert the 1.5 mm Hexalobe MultiScrews (3004-150XX) in the distal oblique holes. For maximum stabilization, the use of all of the distal oblique holes is recommended. Finish drilling, measuring, and installing the remaining proximal shaft holes with 2.3 mm Hexalobe MultiScrews (3004-230XX).
Note: Hexalobe MultiScrews should be inserted using only the Cruciform Driver Handle (MS-2210) provided in the system and locked to “three-finger tight.” This is generated by using only the thumb, index, and middle fingers. Unlike traditional nonlocking screws, there is no “hard stop” feature when Hexalobe MultiScrews are used as nonlocking screws in an oblong slot, so they should be inserted only until they are “three-finger tight.”
1.1 mm x 3.5" Quick Release Drill(80-1794)
Cruciform Driver Handle(MS-2210)
SaveLock Compression Sleeve(80-1955)
1.5 mm MultiScrew Depth Gauge(80-1801)
1.1 mm MultiScrew Drill Guide, 5–20 mm (80-1805)
1.5 mm Hexalobe MultiScrew (3004-150XX)
T6 Stick Fit Driver Tip (80-1756)
Figure 19
Figure 20
2.3 mm Hexalobe MultiScrew (3004-230XX)

Acumed® Hand Fracture System Surgical Technique
31
1.3 mm Metacarpal Neck Plate Surgical Technique [continued]
6 Closure and Postoperative ProtocolPostoperative care is at the discretion of the surgeon.
The following protocol is provided as an example.
Perform a thorough radiographic evaluation checking fragment reduction, alignment, and screw placement. Verify that there is no gap between the bone and the plate in the lateral view. Close the wound and support the wrist according to bone quality and stability. Allow for early functional use of the hand and start immediate finger range of motion and forearm rotation postoperatively.
7 Optional: Implant Removal Instructions
To extract a Metacarpal Neck Plate, use the T6 Stick Fit Driver Tip (80-1756) and Cruciform Drive Handle (MS-2210) to remove all the screws in the plate. Referencing the Screw Removal Brochure (SPF10-00) may aid in implant extraction if difficulty is experienced.
Figure 21
Cruciform Driver Handle(MS-2210)
T6 Stick Fit Driver Tip (80-1756)

Acumed® Hand Fracture System Surgical Technique
32
1.3 mm Rotational Correction Plate Surgical Technique
1 ExposureThe patient’s forearm is pronated and positioned to
expose the surgical site. Make the appropriate incision; retract tendons, taking care to protect nerve fibers and blood vessels.
2 Osteotomy CutPlace the Rotational Osteotomy Cutting
Guide (80-1828) on the base of the metacarpal requiring the osteotomy. Use two .045" (1.14 mm) x 6" ST K-wires (WS-1106ST) for the proximal side and one .062" (1.58 mm) x 6" K-wire (WS-1607ST) for the distal side to secure the cutting guide to the bone. Bend or cut the two proximal K-wires to minimize interference with the saw blade. Perform the cut under thorough irrigation. Remove the two proximal K-wires, then slide the guide off the distal .062" K-wire.
Note: The distal .062" K-wire will be used for rotational correction.
Recommended Saw Blade Parameters
Width No greater than 7 mm
Length Approximately 30 mm
Thickness No greater than 0.5 mm
Note: Saw blade not included in the Acumed Hand Fracture System.
.062" (1.58 mm) x 6" Guide Wire (WS-1607ST)Also used as a K-wire
.045" (1.14 mm) x 6" ST Guide Wire (WS-1106ST)Also used as a K-wire
Rotational Osteotomy Cutting Guide (80-1828)
Figure 22
Figure 23
Figure 24

Acumed® Hand Fracture System Surgical Technique
33
3 Plate Placement and Rotational Correction
Position the 1.3 mm Rotational Correction Plate (7005-13005) by sliding it over the guide wire. Perform rotational correction using the .062" (1.58 mm) x 6" Guide Wire (WS-1607ST) as a joystick.
4 Distal Screw InsertionDrill, measure, and insert the three 2.3 mm Hexalobe
MultiScrews (3004-230XX) in the distal end of the plate (Figure 26) with the 2.0 mm x 3.5" Quick Release Drill (80-1796).
Remove the .062" (1.58 mm) x 6" Guide Wire and open up the hole left with the 2.0 mm x 3.5" Quick Release Drill and 2.0 mm MultiScrew Drill Guide, 5–20 mm (80-1809). Measure for and insert either a 2.3 mm Hexalobe Lag Screw (3012-230XX) or 2.3 mm Hexalobe MultiScrew into this slot (Figure 27).
Note: Hexalobe MultiScrews should be inserted using only the Cruciform Driver Handle (MS-2210) provided in the system and locked to “three-finger tight.” This is generated by using only the thumb, index, and middle fingers. Unlike traditional nonlocking screws, there is no “hard stop” feature when Hexalobe MultiScrews are used as nonlocking screws in an oblong slot, so they should be inserted only until they are “three-finger tight.”
1.3 mm Rotational Correction Plate Surgical Technique [continued]
1.3 mm Rotational Correction Plate (7005-13005)
2.3 mm Hexalobe Lag Screw (3012-230XX)
Cruciform Driver Handle(MS-2210)
2.3 mm Hexalobe MultiScrew (3004-230XX)
.062" (1.58 mm) x 6" Guide Wire (WS-1607ST)
2.0 mm MultiScrew Drill Guide, 5–20 mm (80-1809)
Figure 25
Figure 26
Figure 27
2.0 mm x 3.5" Quick Release Drill(80-1796)

2.3 mm Hexalobe Lag Screw (3012-230XX)
Acumed® Hand Fracture System Surgical Technique
34
5 Osteotomy CompressionManually compress the osteotomy site.
6 Proximal Screw InsertionDrill with the 2.0 mm x 3.5" Quick Release
Drill (80-1796) and 2.0 mm MultiScrew Drill Guide, 5–20 mm (80-1809). Measure and insert either two 2.3 mm Hexalobe Lag Screws (3012-230XX) or 2.3 mm Hexalobe MultiScrews (3004-230XX) into the holes, using a T6 Stick Fit Driver Tip (80-1756) and 2.3 mm MultiScrew Depth Gauge (80-1954).
7 Closure and Postoperative ProtocolPostoperative care is at the discretion of the surgeon.
The following protocol is provided as an example.
Perform a thorough radiographic evaluation to check fragment reduction, alignment, and screw placement. Verify that there is no gap between the bone and the plate in the lateral view. Close the wound and support the wrist according to bone quality and stability. Allow for early functional use of the hand and start immediate finger range of motion and forearm rotation postoperatively.
8 Optional: Implant Removal Instructions
To extract a Rotational Correction Plate, use the T6 Stick Fit Driver Tip (80-1756) and Cruciform Drive Handle (MS-2210) to remove all the screws in the plate. Referencing the Screw Removal Brochure (SPF10-00) may aid in implant extraction if difficulty is experienced.
1.3 mm Rotational Correction Plate Surgical Technique [continued]
T6 Stick Fit Driver Tip (80-1756)
2.0 mm MultiScrew Drill Guide, 5–20 mm (80-1809)
2.0 mm x 3.5" Quick Release Drill(80-1796)
Figure 28
Figure 29
Figure 30
2.3 mm HexalobeMultiScrew(3004-230XX)
2.3 mm MultiScrew Depth Gauge (80-1954)
Cruciform Driver Handle(MS-2210)

Acumed® Hand Fracture System Surgical Technique
35
1.3 mm Rolando Fracture Hook Plate Surgical Technique
1 ExposureThe patient’s forearm is pronated and positioned to
expose the surgical site. Make the appropriate incision; retract tendons, taking care to protect nerve fibers and blood vessels.
2 Fracture Reduction and Plate Placement
Reduce the fracture using manual techniques; provisional stability can be achieved with K-wires and evaluated under fluoroscopy.
After reduction and stabilization, the 1.3 mm Rolando Fracture Hook Plate (7005-13004) is positioned dorsally on the first metacarpal just distal to the ligamentous attachments on the metacarpal base with .040" (1.02 mm) Plate Tacks (80-1759), the Single Pointed Reduction Forceps, 5.25" (80-1811), or guide wires.
Note: Plate divots interface with Single Pointed Reduction Forceps, 5.25" and Bone Reduction Forceps, 5.25" (80-1810).
3 Drilling Distal Screw HoleBegin by drilling for the distal screw slot by using
the 2.0 mm x 3.5" Quick Release Drill (80-1796) and 2.0 mm MultiScrew Drill Guide, 5–20 mm (80-1809).
Note: The prongs on the proximal end of the 1.3 mm Rolando Fracture Hook Plate should contact the dorsal surface of the abductor pollicis longus (APL) tendon and support comminution of the base of the first metacarpal. These prongs are not intended to compress the APL tendon down to the bone and a gap may be visible between the plate prongs and the bone on X-ray.
1.3 mm Rolando Fracture Hook Plate(7005-13004)
2.0 mm MultiScrew Drill Guide, 5–20 mm(80-1809)
Single Pointed Reduction Forceps, 5.25" (80-1811)
.040" (1.02 mm) Plate Tack(80-1759)
2.0 x 3.5" Quick Release Drill(80-1796)
Bone Reduction Forceps, 5.25" (80-1810)
Figure 31
Figure 32
Figure 33

Acumed® Hand Fracture System Surgical Technique
36
1.3 mm Rolando Fracture Hook Plate Surgical Technique [continued]
4 Determining Screw LengthMeasure screw length using the 2.3 mm MultiScrew
Depth Gauge (80-1954).
5 Screw InsertionUsing the T6 Stick Fit Driver Tip (80-1756),
secure the plate to the bone with a 2.3 mm Hexalobe Lag Screw (3012-230XX).
6 Drilling Proximal HolesDrill the proximal holes with the 1.1 mm x 3.5" Quick
Release Drill (80-1794) and 1.1 mm MultiScrew Drill Guide, 5–20 mm (80-1805) and measure the screw length.
2.3 mm MultiScrew Depth Gauge(80-1954)
1.1 mm MultiScrew Drill Guide, 5–20 mm(80-1805)
2.3 mm Hexalobe Lag Screw (3012-230XX)
T6 Stick Fit Driver Tip (80-1756)
1.1 mm x 3.5" Quick Release Drill(80-1794)
Figure 34
Figure 35
Figure 36
Acumed® Hand Fracture System Surgical Technique
37
1.3 mm Rolando Fracture Hook Plate Surgical Technique [continued]
1.5 mm Hexalobe MultiScrew (3004-150XX)
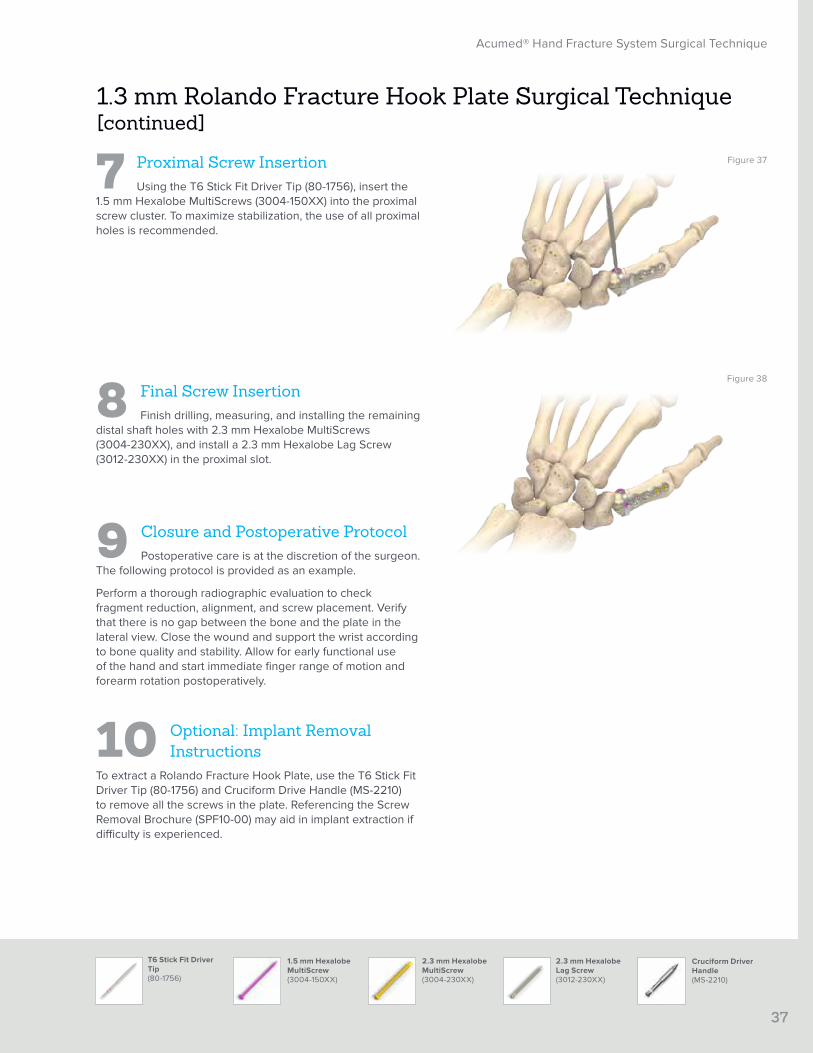
7 Proximal Screw InsertionUsing the T6 Stick Fit Driver Tip (80-1756), insert the
1.5 mm Hexalobe MultiScrews (3004-150XX) into the proximal screw cluster. To maximize stabilization, the use of all proximal holes is recommended.
8 Final Screw InsertionFinish drilling, measuring, and installing the remaining
distal shaft holes with 2.3 mm Hexalobe MultiScrews (3004-230XX), and install a 2.3 mm Hexalobe Lag Screw (3012-230XX) in the proximal slot.
9 Closure and Postoperative ProtocolPostoperative care is at the discretion of the surgeon.
The following protocol is provided as an example.
Perform a thorough radiographic evaluation to check fragment reduction, alignment, and screw placement. Verify that there is no gap between the bone and the plate in the lateral view. Close the wound and support the wrist according to bone quality and stability. Allow for early functional use of the hand and start immediate finger range of motion and forearm rotation postoperatively.
10 Optional: Implant Removal Instructions
To extract a Rolando Fracture Hook Plate, use the T6 Stick Fit Driver Tip (80-1756) and Cruciform Drive Handle (MS-2210) to remove all the screws in the plate. Referencing the Screw Removal Brochure (SPF10-00) may aid in implant extraction if difficulty is experienced.
Figure 37
Figure 38
T6 Stick Fit Driver Tip (80-1756)
Cruciform Driver Handle(MS-2210)
2.3 mm Hexalobe MultiScrew (3004-230XX)
2.3 mm Hexalobe Lag Screw (3012-230XX)

2.0 mm MultiScrew Drill Guide, 5–20 mm (80-1809)
Acumed® Hand Fracture System Surgical Technique
38
0.8 mm Avulsion Hook Plate Surgical Technique
1 Exposure and Fracture ReductionThe patient’s forearm is pronated and positioned
to expose the surgical site. Make the appropriate incision; retract tendons, taking care to protect nerve fibers and blood vessels.
Reduce the fracture using manual techniques; provisional stability can be achieved with K-wires and evaluated under fluoroscopy.
2 Plate PlacementAfter reduction and stabilization, the 0.8 mm Avulsion
Hook Plate (7005-08001) is positioned dorsally, medially, or laterally using the Single Point Reduction Forceps (80-1810). Determine if a 1.5 mm or 2.3 mm Hexalobe MultiScrew (3004-150XX or 3004-230XX) is desired.
3 Drilling and Determining Screw Length
Drill with the 1.1 mm x 3.5" Quick Release Drill (80-1794) or 2.0 mm x 3.5" Quick Release Drill (80-1796) and corresponding MultiScrew Drill Guide (80-1805 or 80-1809) through the screw hole. Measure screw length using the appropriate 1.5 mm or 2.3 mm MultiScrew Depth Gauge (80-1801 or 80-1954).
2.0 mm x 3.5" Quick Release Drill (80-1796)
1.5 mm MultiScrew Depth Gauge(80-1801)
2.3 mm MultiScrew Depth Gauge(80-1954)
1.1 mm x 3.5" Quick Release Drill(80-1794)
0.8 mm Avulsion Hook Plate (7005-08001)
Figure 39
Figure 40
Figure 41
2.3 mm Hexalobe MultiScrew (3004-230XX)
1.5 mm Hexalobe MultiScrew (3004-150XX)
Single Point Reduction Forceps (80-1810)
1.1 mm MultiScrew Drill Guide, 5–20 mm (80-1805)

Acumed® Hand Fracture System Surgical Technique
39
4 Screw InsertionUsing the SaveLock Compression Sleeve (80-1955)
and the T6 Stick Fit Driver Tip (80-1756), secure the plate to the bone with a 1.5 mm or 2.3 mm Hexalobe MultiScrew (3004-150XX or 3004-230XX).
5 Closure and Postoperative ProtocolPostoperative care is at the discretion of the surgeon.
The following protocol is provided as an example.
Perform a thorough radiographic evaluation to check fragment reduction, alignment, and screw placement. Verify that there is no gap between the bone and the plate in the lateral view. Close the wound and support the wrist according to bone quality and stability. Allow for early functional use of the hand and start immediate finger range of motion and forearm rotation postoperatively.
6 Optional: Implant Removal Instructions
To extract an Avulsion Hook Plate, use the T6 Stick Fit Driver Tip (80-1756) and Cruciform Drive Handle (MS-2210) to remove all the screws in the plate. Referencing the Screw Removal Brochure (SPF10-00) may aid in implant extraction if difficulty is experienced.
0.8 mm Avulsion Hook Plate Surgical Technique [continued]
T6 Stick Fit Driver Tip (80-1756)
1.5 mm HexalobeMultiScrew (3004-150XX)
Cruciform Driver Handle(MS-2210)
SaveLock Compression Sleeve(80-1955)
Figure 42
Figure 43
2.3 mm Hexalobe MultiScrew (3004-230XX)

2.0 mm x 3.5" Quick Release Drill(80-1796)
Acumed® Hand Fracture System Surgical Technique
40
1.5 mm and 2.3 mm Hexalobe Lag Screw Surgical Technique
1 Exposure and Fracture ReductionThe patient’s forearm is pronated and positioned to
expose the surgical site. Make the appropriate incision; retract tendons, taking care to protect nerve fibers and blood vessels.
Reduce the fracture using manual techniques; provisional stability can be achieved with K-wires and evaluated under fluoroscopy.
2 Screw PlacementAfter reduction and stabilization with the
1.1 mm/2.0 mm Percutaneous Bone Clamp (80-0684), drill perpendicular to the fracture through the integrated drill guide with the 1.1 mm or 2.0 mm x 3.5" Quick Release Drill (80-1794 or 80-1796).
Note: One barrel can be used to insert a K-wire across the fracture, while the other barrel guides the drill.
Optional: The MultiScrew Countersink (80-1807) can be used to manually create a countersink in the near cortex to recess the lag screw head.
1.1 mm x 3.5" Quick Release Drill(80-1794)
OPTIONAL:MultiScrew Countersink (80-1807)
1.1 mm/2.0 mm Percutaneous Bone Clamp (80-0684)
Figure 44
Figure 45
Figure 46 Figure 47

Acumed® Hand Fracture System Surgical Technique
41
3 Screw InsertionMeasure screw length using the appropriate depth
gauge. Using the T6 Stick Fit Driver Tip (80-1756), insert the 1.5 mm or 2.3 mm Hexalobe Lag Screw (3012-150XX or 3012-230XX).
Note: Unlike other bones, the metacarpals and phalanges do not have much cancellous bone and are primarily composed of thick cortical bone. With little cancellous bone, there is nothing for the threads that cross the fracture line to engage; the only bony engagement with the Hexalobe Lag Screw occurs in the near and far cortices.
4 Closure and Postoperative ProtocolPostoperative care is at the discretion of the surgeon.
The following protocol is provided as an example.
Perform a thorough radiographic evaluation to check fragment reduction, alignment, and screw placement. Close the wound and support the wrist according to bone quality and stability. Allow for early functional use of the hand and start immediate finger range of motion and forearm rotation postoperatively.
5 Optional: Implant Removal Instructions
To extract a Hexalobe Lag screw, use the T6 Stick Fit Driver Tip (80-1756) and Cruciform Drive Handle (MS-2210). Referencing the Screw Removal Brochure (SPF10-00) may aid in implant extraction if difficulty is experienced.
1.5 mm and 2.3 mm Hexalobe Lag Screw Surgical Technique [continued]
1.5 mm HexalobeLag Screw (3012-150XX)
T6 Stick Fit Driver Tip (80-1756)
Figure 48
Figure 49
2.3 mm HexalobeLag Screw (3012-230XX)
OPTIONAL:Cruciform Driver Handle(MS-2210)
Acumed® Hand Fracture System Surgical Technique
42
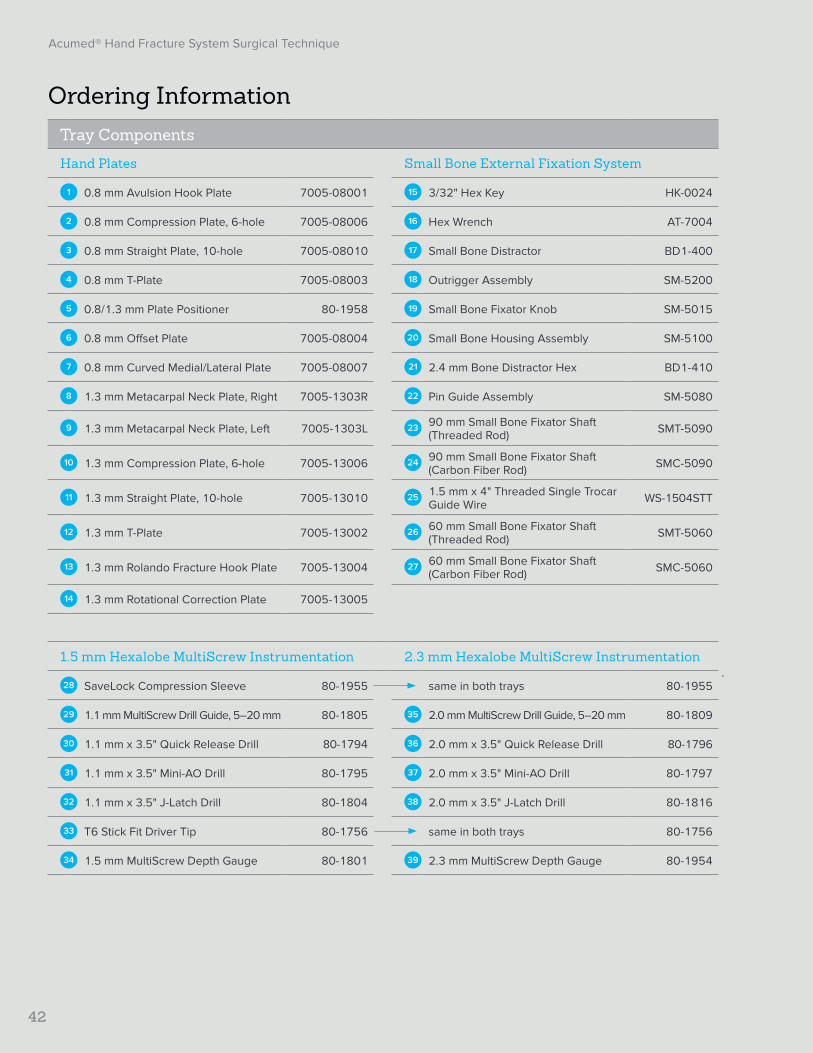
Ordering InformationTray Components
Hand Plates Small Bone External Fixation System
1 0.8 mm Avulsion Hook Plate 7005-08001 15 3/32" Hex Key HK-0024
2 0.8 mm Compression Plate, 6-hole 7005-08006 16 Hex Wrench AT-7004
3 0.8 mm Straight Plate, 10-hole 7005-08010 17 Small Bone Distractor BD1-400
4 0.8 mm T-Plate 7005-08003 18 Outrigger Assembly SM-5200
5 0.8/1.3 mm Plate Positioner 80-1958 19 Small Bone Fixator Knob SM-5015
6 0.8 mm Offset Plate 7005-08004 20 Small Bone Housing Assembly SM-5100
7 0.8 mm Curved Medial/Lateral Plate 7005-08007 21 2.4 mm Bone Distractor Hex BD1-410
8 1.3 mm Metacarpal Neck Plate, Right 7005-1303R 22 Pin Guide Assembly SM-5080
9 1.3 mm Metacarpal Neck Plate, Left 7005-1303L 23 90 mm Small Bone Fixator Shaft (Threaded Rod) SMT-5090
10 1.3 mm Compression Plate, 6-hole 7005-13006 24 90 mm Small Bone Fixator Shaft (Carbon Fiber Rod) SMC-5090
11 1.3 mm Straight Plate, 10-hole 7005-13010 25 1.5 mm x 4" Threaded Single Trocar Guide Wire WS-1504STT
12 1.3 mm T-Plate 7005-13002 26 60 mm Small Bone Fixator Shaft (Threaded Rod) SMT-5060
13 1.3 mm Rolando Fracture Hook Plate 7005-13004 27 60 mm Small Bone Fixator Shaft (Carbon Fiber Rod) SMC-5060
14 1.3 mm Rotational Correction Plate 7005-13005
1.5 mm Hexalobe MultiScrew Instrumentation 2.3 mm Hexalobe MultiScrew Instrumentation
28 SaveLock Compression Sleeve 80-1955 same in both trays 80-1955
29 1.1 mm MultiScrew Drill Guide, 5–20 mm 80-1805 35 2.0 mm MultiScrew Drill Guide, 5–20 mm 80-1809
30 1.1 mm x 3.5" Quick Release Drill 80-1794 36 2.0 mm x 3.5" Quick Release Drill 80-1796
31 1.1 mm x 3.5" Mini-AO Drill 80-1795 37 2.0 mm x 3.5" Mini-AO Drill 80-1797
32 1.1 mm x 3.5" J-Latch Drill 80-1804 38 2.0 mm x 3.5" J-Latch Drill 80-1816
33 T6 Stick Fit Driver Tip 80-1756 same in both trays 80-1756
34 1.5 mm MultiScrew Depth Gauge 80-1801 39 2.3 mm MultiScrew Depth Gauge 80-1954

Acumed® Hand Fracture System Surgical Technique
43
1
23
45
6
13
8
14
1517
16
18
20
21
22
23
26
24
27
2828
3529
3630
3832
3934
3333
3731
25
19
9
10 11 12
7
Screw Caddy Platter
Plates and External Fixation Platter

*Also used as a K-wire
Acumed® Hand Fracture System Surgical Technique
44
Ordering Information [continued]
To learn more about the full line of Acumed innovative surgical solutions, please contact your local Acumed authorized distributor, call 888.627.9957, or visit www.acumed.net.
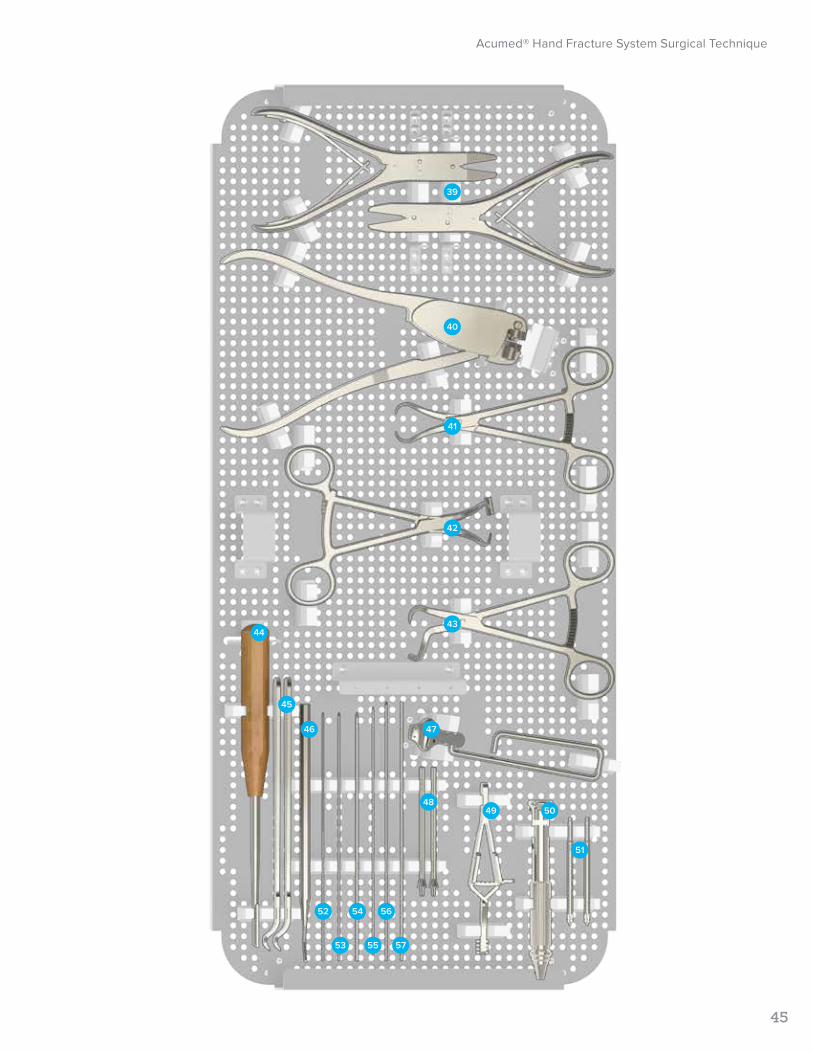
Tray Components
Plate Instrumentation
39 0.8/1.3 mm Plate Bending Pliers 80-1757
40 0.8/1.3 mm Plate Cutter 80-0683
41 Bone Reduction Forceps, 5.25", Fine Adjustment 80-1810
42 1.1/2.0 mm Percutaneous Bone Clamp 80-0684
43 Single Pointed Reduction Forceps, 5.25" 80-1811
44 7.25" Periosteal Elevator MS-46211
45 8 mm Hohmann Retractor PL-CL05
46 Sharp Hook PL-CL06
47 Rotational Osteotomy Cutting Guide 80-1828
48 0.040" (1.02 mm) Plate Tack 80-1759
49 Heiss Retractor, 8 mm W, 6 mm D 80-1812
50 Cruciform Driver Handle MS-2210
51 MultiScrew Countersink 80-1807
Threaded Titanium K-wires
52 .035" x 5.75" STT Guide Wire* WT-0906STT
53 .045" x 5.75" STT Guide Wire* 35-0011
54 .062" x 5.75" STT Guide Wire* WT-1606STT
Unthreaded Stainless Steel K-wires
55 .035" x 5.75" ST Guide Wire* WS-0906ST
56 .045" x 6" ST Guide Wire* WS-1106ST
57 .062" x 6" ST Guide Wire* WS-1607ST
Acumed® Hand Fracture System Surgical Technique
45
39
40
41
4344
45
46 47
48
56
49
51
53 55
50
52 54
57
42
Acumed® Hand Fracture System Surgical Technique
46
Ordering Information [continued]
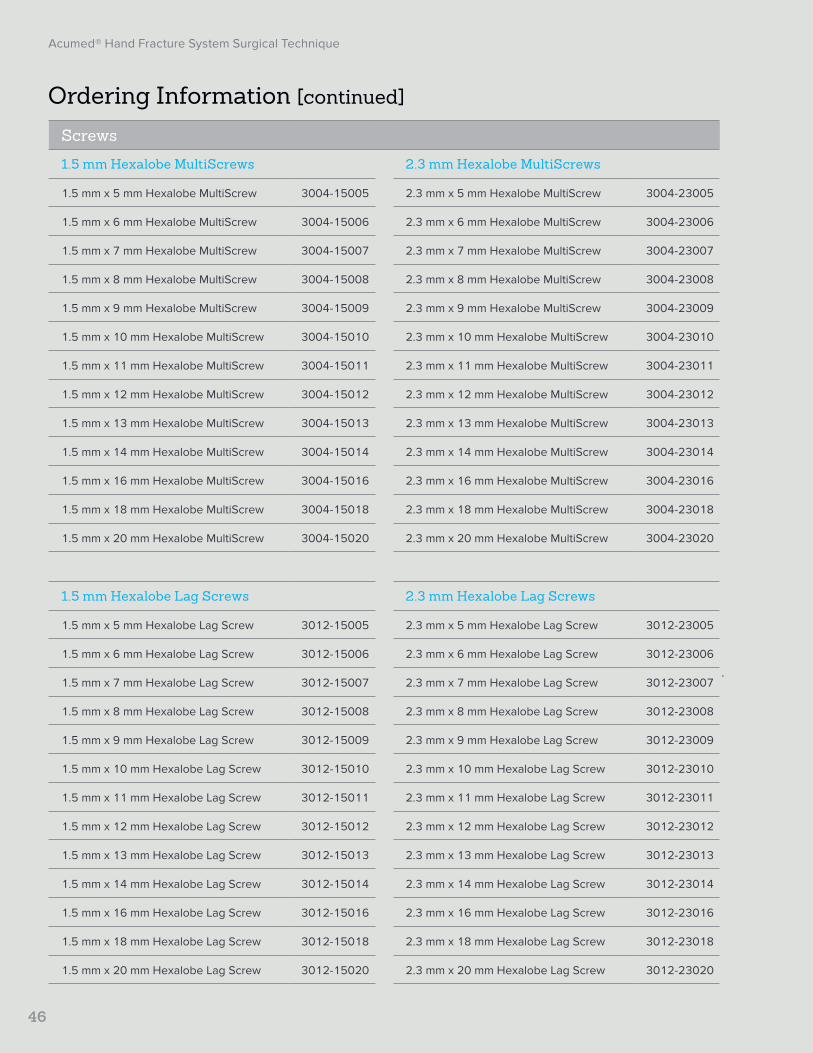
Screws
1.5 mm Hexalobe MultiScrews 2.3 mm Hexalobe MultiScrews
1.5 mm x 5 mm Hexalobe MultiScrew 3004-15005 2.3 mm x 5 mm Hexalobe MultiScrew 3004-23005
1.5 mm x 6 mm Hexalobe MultiScrew 3004-15006 2.3 mm x 6 mm Hexalobe MultiScrew 3004-23006
1.5 mm x 7 mm Hexalobe MultiScrew 3004-15007 2.3 mm x 7 mm Hexalobe MultiScrew 3004-23007
1.5 mm x 8 mm Hexalobe MultiScrew 3004-15008 2.3 mm x 8 mm Hexalobe MultiScrew 3004-23008
1.5 mm x 9 mm Hexalobe MultiScrew 3004-15009 2.3 mm x 9 mm Hexalobe MultiScrew 3004-23009
1.5 mm x 10 mm Hexalobe MultiScrew 3004-15010 2.3 mm x 10 mm Hexalobe MultiScrew 3004-23010
1.5 mm x 11 mm Hexalobe MultiScrew 3004-15011 2.3 mm x 11 mm Hexalobe MultiScrew 3004-23011
1.5 mm x 12 mm Hexalobe MultiScrew 3004-15012 2.3 mm x 12 mm Hexalobe MultiScrew 3004-23012
1.5 mm x 13 mm Hexalobe MultiScrew 3004-15013 2.3 mm x 13 mm Hexalobe MultiScrew 3004-23013
1.5 mm x 14 mm Hexalobe MultiScrew 3004-15014 2.3 mm x 14 mm Hexalobe MultiScrew 3004-23014
1.5 mm x 16 mm Hexalobe MultiScrew 3004-15016 2.3 mm x 16 mm Hexalobe MultiScrew 3004-23016
1.5 mm x 18 mm Hexalobe MultiScrew 3004-15018 2.3 mm x 18 mm Hexalobe MultiScrew 3004-23018
1.5 mm x 20 mm Hexalobe MultiScrew 3004-15020 2.3 mm x 20 mm Hexalobe MultiScrew 3004-23020
1.5 mm Hexalobe Lag Screws 2.3 mm Hexalobe Lag Screws
1.5 mm x 5 mm Hexalobe Lag Screw 3012-15005 2.3 mm x 5 mm Hexalobe Lag Screw 3012-23005
1.5 mm x 6 mm Hexalobe Lag Screw 3012-15006 2.3 mm x 6 mm Hexalobe Lag Screw 3012-23006
1.5 mm x 7 mm Hexalobe Lag Screw 3012-15007 2.3 mm x 7 mm Hexalobe Lag Screw 3012-23007
1.5 mm x 8 mm Hexalobe Lag Screw 3012-15008 2.3 mm x 8 mm Hexalobe Lag Screw 3012-23008
1.5 mm x 9 mm Hexalobe Lag Screw 3012-15009 2.3 mm x 9 mm Hexalobe Lag Screw 3012-23009
1.5 mm x 10 mm Hexalobe Lag Screw 3012-15010 2.3 mm x 10 mm Hexalobe Lag Screw 3012-23010
1.5 mm x 11 mm Hexalobe Lag Screw 3012-15011 2.3 mm x 11 mm Hexalobe Lag Screw 3012-23011
1.5 mm x 12 mm Hexalobe Lag Screw 3012-15012 2.3 mm x 12 mm Hexalobe Lag Screw 3012-23012
1.5 mm x 13 mm Hexalobe Lag Screw 3012-15013 2.3 mm x 13 mm Hexalobe Lag Screw 3012-23013
1.5 mm x 14 mm Hexalobe Lag Screw 3012-15014 2.3 mm x 14 mm Hexalobe Lag Screw 3012-23014
1.5 mm x 16 mm Hexalobe Lag Screw 3012-15016 2.3 mm x 16 mm Hexalobe Lag Screw 3012-23016
1.5 mm x 18 mm Hexalobe Lag Screw 3012-15018 2.3 mm x 18 mm Hexalobe Lag Screw 3012-23018
1.5 mm x 20 mm Hexalobe Lag Screw 3012-15020 2.3 mm x 20 mm Hexalobe Lag Screw 3012-23020

Acumed® Hand Fracture System Surgical Technique
47
Notes:

Acumed® Hand Fracture System Surgical Technique
48
Notes:

Acumed® Hand Fracture System Surgical Technique
49
Notes:

Acumed Headquarters5885 NW Cornelius Pass RoadHillsboro, OR 97124 Office: +1.888.627.9957Office: +1.503.627.9957 Fax: +1.503.520.9618 www.acumed.net
These materials contain information about products that may or may not be available in any particular country or may be available under different trademarks in different countries. The products may be approved or cleared by governmental regulatory organizations for sale or use with different indications or restrictions in different countries. Products may not be approved for use in all countries. Nothing contained on these materials should be construed as a promotion or solicitation for any product or for the use of any product in a particular way which is not authorized under the laws and regulations of the country where the reader is located. Specific questions physicians may have about the availability and use of the products described on these materials should be directed to their particular authorized Acumed distributor. Specific questions patients may have about the use of the products described in these materials or the appropriateness for their own conditions should be directed to their own physician.
Acumed® is a registered trademark of Acumed LLC
HNW10-07-H | Effective: 2017/11 | © 2017 Acumed® LLC