
Hand Blender Set - Bekodownload.beko.com/Download.UsageManualsBeko/SR/en_US... · 4 / 69 EN Hand...
81
HBA6700W Hand Blender Set User Manual 01M-8832833200-5015-01 EN DE FR TR ES PL RO
Transcript of Hand Blender Set - Bekodownload.beko.com/Download.UsageManualsBeko/SR/en_US... · 4 / 69 EN Hand...
HBA6700W
Hand Blender SetUser Manual
01M-8832833200-5015-01
EN DE FR TR ES PL RO
Please read this user manual first!Dear Customers,Thank you for selecting an Beko product. We hope that you get the best results from your product which has been manufactured with high quality and state-of-the-art technology. Therefore, please read this entire user manual and all other accompanying documents carefully before using the product and keep it as a reference for future use. If you handover the product to someone else, give the user manual as well. Follow all warnings and information in the user manual.
Meanings of the symbolsFollowing symbols are used in the various section of this manual:
C Important information and useful hints about usage.
AWARNING: Warnings for dangerous situations concerning the safety of life and property.
Materials are intended to be in contact with food.
Do not immerse the appliance, power cord or power plug in water or in other liquids.
Potection class against electric shock
This product has been produced in environmentally-friendly, state-of-the-art facilities.
Complies with the WEEE Directive. It does not contain PCB.Made in P.R.C.
3 / 69 ENHand Blender Set / User Manual
CONTENTS
1 Important instructions for safety and environment 4
1.1 General safety . . . . . . . . . . . . . . . . . . . . . . . . . . . . . . 41.2 Compliance with the WEEE Directive and
disposal of waste products . . . . . . . . . . . . . . . . . 51.3 Package information . . . . . . . . . . . . . . . . . . . . . . . 51.4 Things to do for energy saving . . . . . . . . . . . . . 5
2 Hand Blender Set 62.1 Overview . . . . . . . . . . . . . . . . . . . . . . . . . . . . . . . . . . . 62.2 Technical data . . . . . . . . . . . . . . . . . . . . . . . . . . . . . . 6
3 Operation 73.1 Preparation . . . . . . . . . . . . . . . . . . . . . . . . . . . . . . . . .73.2 Maximum quantities and processing time . .73.3 Blending. . . . . . . . . . . . . . . . . . . . . . . . . . . . . . . . . . . . .73.4 Chopping . . . . . . . . . . . . . . . . . . . . . . . . . . . . . . . . . . . 83.5 Whisking . . . . . . . . . . . . . . . . . . . . . . . . . . . . . . . . . . . 9
4 Information 104.1 Cleaning and care . . . . . . . . . . . . . . . . . . . . . . . . . 104.2 Storage. . . . . . . . . . . . . . . . . . . . . . . . . . . . . . . . . . . . 104.3 Handling and transportation . . . . . . . . . . . . . . 10

4 / 69 EN Hand Blender Set / User Manual
This section contains safety instructions that will help protect from risk of personal injury or property damage. Failure to follow these instructions invalidates the granted warranty. 1.1 General safety• This appliance complies with the
international safety standards. • This appliance may be used
by children and the people whose physical, perceptive or mental skills are impaired or who are inexperienced or not knowledgeable about the appliance as long as they are supervised or informed and made understood the safe use of the appliance and the encountered dangers. Children should not play with the appliance.
• This appliance shall not be used by children.
• Keep the appliance and its cord out of the reach of children.
• Do not use it if the power cable, blades or the appliance itself is damaged. Contact an authorised service.
• Only use the original parts or parts recommended by the manufacturer.
• Do not attempt to dismantle the appliance.
• Your mains power supply should comply with the information supplied on the rating plate of the appliance.
• Do not use the appliance with an extension cord.
• Do not pull the power cable when unplugging the appliance.
• Wait for moving accessories to stop and unplug the appliance when left attended, while installing/removing accessories or before cleaning.
• Do not touch the plug of the appliance with damp or wet hands.
• Do not use the device for hot food.• To prevent overheating, do not
use the appliance continuously for more than10 seconds. Leave to cool for 1 minute in between each 10 seconds of operation.
• Use the appliance only with the supplied rubber base and glass container.
1 Important instructions for safety and environment
5 / 69 ENHand Blender Set / User Manual
• Do not operate the appliance without the ingredients in the bowl.
• Remove bones and stones from food to prevent the blades and the appliance from getting damaged.
• This appliance is not suitable for dry or hard foods as this will quickly cause the blades to become dull.
• Follow all warnings to prevent injuries due to incorrect use.
• When emptying the container, during cleaning and grabbing chopping blades with bare hands serious injuries could result due to incorrect use. Use the plastic section trying to hold the chopping blade.
• After cleaning, dry the appliance and all parts before connecting it to mains supply and before attaching the parts.
• Do not immerse the appliance, power cable, or power plug in water or any other liquids.
• Do not operate or place any part of this appliance or its parts on or near hot surfaces.
• If you keep the packaging materials, store them out of the reach of children.
1.2 Compliance with the WEEE Directive and disposal of waste products
This product does not include harmful and prohibited materials specified in the “Regulation for Supervision of the Waste Electric and Electronic Appliances” issued by the Ministry of Environment and
Urban Planning. Complies with the WEEE Regulation. This appliance has been manufactured with high quality parts and materials which can be reused and are suitable for recycling. Therefore, do not dispose the appliance with normal domestic waste at the end of its service life. Take it to a collection point for the recycling of electrical and electronic equipment. Ask the local authority in your area for these collection points. Help protect the environment and natural resources by recycling used products.
1.3 Package informationPackage of the product is made of recyclable materials in accordance with our national legislation. Do not dispose of the packaging materials together
with the domestic or other wastes. Take them to the packaging material collection points designated by the local authorities.
1.4 Things to do for energy savingFollow the times recommended in the manual during use. Unplug the appliance after use.
1 Important instructions for safety and environment
6 / 69 EN Hand Blender Set / User Manual
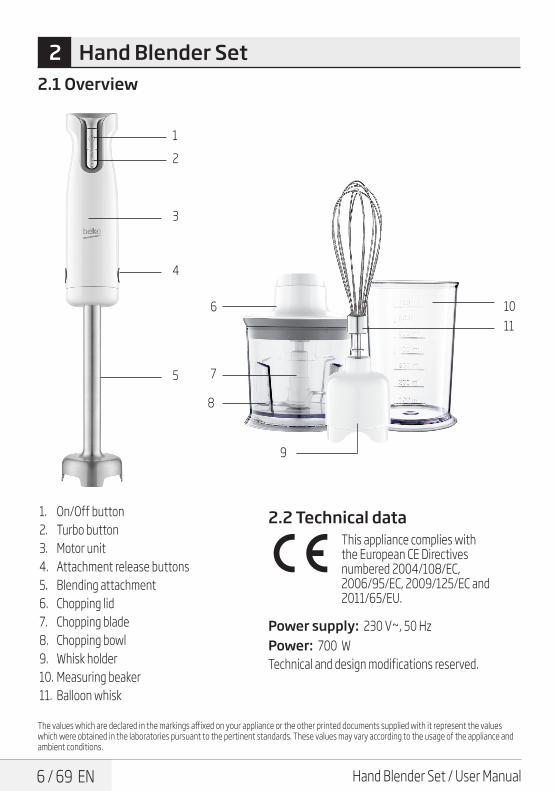
2 Hand Blender Set2.1 Overview
The values which are declared in the markings affixed on your appliance or the other printed documents supplied with it represent the values which were obtained in the laboratories pursuant to the pertinent standards. These values may vary according to the usage of the appliance and ambient conditions.
1. On/Off button2. Turbo button3. Motor unit4. Attachment release buttons5. Blending attachment6. Chopping lid 7. Chopping blade 8. Chopping bowl 9. Whisk holder 10. Measuring beaker11. Balloon whisk
2.2 Technical dataThis appliance complies with the European CE Directives numbered 2004/108/EC, 2006/95/EC, 2009/125/EC and 2011/65/EU.
Power supply: 230 V~, 50 HzPower: 700 WTechnical and design modifications reserved.
10
8
6
7
12
3
4
5
11
9

7 / 69 ENHand Blender Set / User Manual
3 Operation
3.1 Preparation 1. Remove all packaging and sticker materials
and dispose of them according to the applicable legal regulations.
2. Before using the appliance for the first time, clean parts which come into contact with food (see the “Cleaning and care” section).
3. Cut the food into small pieces before processing with the appliance.
3.2 Maximum quantities and processing time
Ingredients Maximumquantities
Processing time
Meat/Fish 200g 10-15 secondsHerbs 20g 20 secondsNuts 200g 15 secondsCheese 150g 15 secondsBread 1 slice 20 secondsEggs (hard-boiled) 2 eggs 5 seconds
Onions (cut in 8 pieces) 100 g 10 seconds
3.3 Blending1. Put the food that you would like to puree or
mix in the measuring beaker (10) or a similar bowl.
2. Attach the blending attachment (5) to the motor unit (3) by pushing the attachment to the motor until it locks. Make sure the blending attachment is properly attached to the motor unit.
3. Insert the plug into the wall socket.4. Immerse the blending attachment (5) in the
measuring beaker (10), that contains the ingredients to be blended.
CTo prevent the ingredients from splashing, do not press the On/Off button (1) or turbo button (2) until the blending attachment has been immersed in the ingredients.
5. Press and hold down the On/Off button (1). – The appliance starts operating.
6. Use the speed control to select a speed or press and hold the turbo button (2).– The speed indicator LED illuminates
according to the desired speed 1-6.
CWhen you use the turbo button the appliance operates at maximum speed. In this case you cannot adjust the speed with the speed control.
C While using the turbo button (2), all speed indicator LEDs illuminate.
7. Move the appliance slowly up and down and in circles to blend the ingredients.
CAlways switch off the appliance before taking out the processed food.
8. Release the On/Off button (1) or turbo button (2) when you are finished and disconnect the power plug from the wall socket. Remove the mixture from the measuring beaker (10).
9. Disassemble the blending attachment (5) only by pushing the attachment release buttons (4) at the sides of the appliance and pulling it off from the motor unit.
CTo prevent overheating do not operate the appliance continuously for more than 10 seconds.
CNever switch on the appliance for longer than necessary for processing the food.
8 / 69 EN Hand Blender Set / User Manual
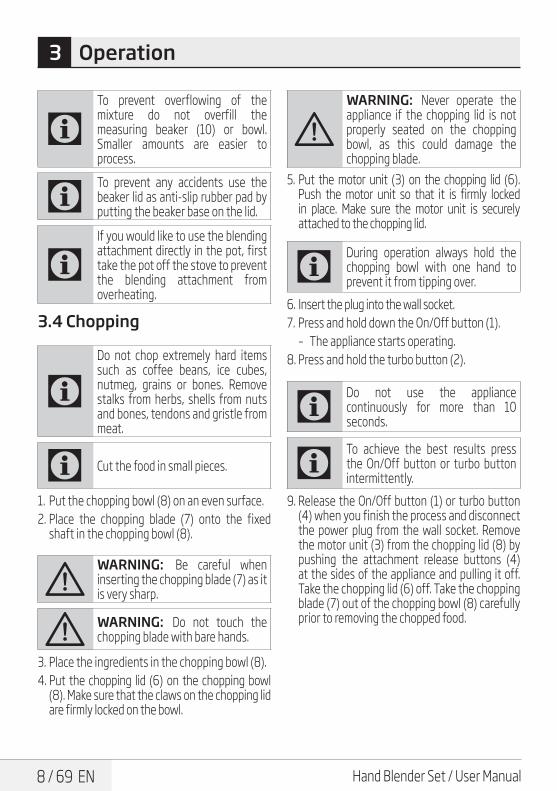
CTo prevent overflowing of the mixture do not overfill the measuring beaker (10) or bowl. Smaller amounts are easier to process.
CTo prevent any accidents use the beaker lid as anti-slip rubber pad by putting the beaker base on the lid.
CIf you would like to use the blending attachment directly in the pot, first take the pot off the stove to prevent the blending attachment from overheating.
3.4 Chopping
CDo not chop extremely hard items such as coffee beans, ice cubes, nutmeg, grains or bones. Remove stalks from herbs, shells from nuts and bones, tendons and gristle from meat.
C Cut the food in small pieces.
1. Put the chopping bowl (8) on an even surface.2. Place the chopping blade (7) onto the fixed
shaft in the chopping bowl (8).
AWARNING: Be careful when inserting the chopping blade (7) as it is very sharp.
A WARNING: Do not touch the chopping blade with bare hands.
3. Place the ingredients in the chopping bowl (8).4. Put the chopping lid (6) on the chopping bowl
(8). Make sure that the claws on the chopping lid are firmly locked on the bowl.
AWARNING: Never operate the appliance if the chopping lid is not properly seated on the chopping bowl, as this could damage the chopping blade.
5. Put the motor unit (3) on the chopping lid (6). Push the motor unit so that it is firmly locked in place. Make sure the motor unit is securely attached to the chopping lid.
CDuring operation always hold the chopping bowl with one hand to prevent it from tipping over.
6. Insert the plug into the wall socket.7. Press and hold down the On/Off button (1).
– The appliance starts operating.8. Press and hold the turbo button (2).
CDo not use the appliance continuously for more than 10 seconds.
CTo achieve the best results press the On/Off button or turbo button intermittently.
9. Release the On/Off button (1) or turbo button (4) when you finish the process and disconnect the power plug from the wall socket. Remove the motor unit (3) from the chopping lid (8) by pushing the attachment release buttons (4) at the sides of the appliance and pulling it off. Take the chopping lid (6) off. Take the chopping blade (7) out of the chopping bowl (8) carefully prior to removing the chopped food.
3 Operation
9 / 69 ENHand Blender Set / User Manual
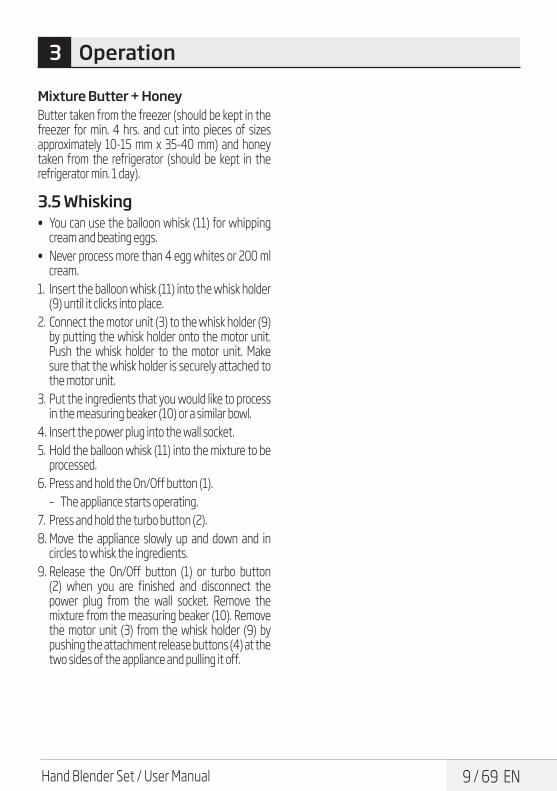
Mixture Butter + HoneyButter taken from the freezer (should be kept in the freezer for min. 4 hrs. and cut into pieces of sizes approximately 10-15 mm x 35-40 mm) and honey taken from the refrigerator (should be kept in the refrigerator min. 1 day).
3.5 Whisking • You can use the balloon whisk (11) for whipping
cream and beating eggs. • Never process more than 4 egg whites or 200 ml
cream.1. Insert the balloon whisk (11) into the whisk holder
(9) until it clicks into place.2. Connect the motor unit (3) to the whisk holder (9)
by putting the whisk holder onto the motor unit. Push the whisk holder to the motor unit. Make sure that the whisk holder is securely attached to the motor unit.
3. Put the ingredients that you would like to process in the measuring beaker (10) or a similar bowl.
4. Insert the power plug into the wall socket.5. Hold the balloon whisk (11) into the mixture to be
processed.6. Press and hold the On/Off button (1).
– The appliance starts operating.7. Press and hold the turbo button (2).8. Move the appliance slowly up and down and in
circles to whisk the ingredients.9. Release the On/Off button (1) or turbo button
(2) when you are finished and disconnect the power plug from the wall socket. Remove the mixture from the measuring beaker (10). Remove the motor unit (3) from the whisk holder (9) by pushing the attachment release buttons (4) at the two sides of the appliance and pulling it off.
3 Operation

10 / 69 EN Hand Blender Set / User Manual
4 Information
4.1 Cleaning and care
AWARNING: Never use petrol solvents, abrasive cleaners, metal objects or hard brushes to clean the appliance.
AWARNING: Do not touch the chopping blades with your bare hands. The blades are very sharp. Use a brush!
AWARNING: Never put the motor unit (3) or power cord in water or any other liquids and never hold them under running water.
1. Turn the appliance off and disconnect it from the wall socket.
2. Let the appliance cool down completely.3. Use a damp soft cloth to clean the motor unit
(3).4. Immediately after using, clean the blending
attachment (5) and measuring beaker (10) with warm, soapy water and dry them thoroughly. Never wash them in dishwasher.
CBefore using or storing the appliance after cleaning, dry all parts carefully using a soft cloth.
4.2 Storage • If you do not plan to use the appliance for a long
period of time, please store it carefully. Make sure the appliance is unplugged and completely dry.
• Store the appliance in a cool, dry place. Make sure the appliance is kept out of the reach of children.
4.3 Handling and transportation
• During handling and transportation, carry the appliance in its original packaging. The packaging of the appliance protects it against physical damages.
• Do not place heavy loads on the appliance or the packaging. The appliance may be damaged.
• Dropping the appliance will render it non-operational or cause permanent damage.

Bitte lesen Sie zuerst diese Anleitung!Sehr geehrte Kundin, sehr geehrter Kunde,Vielen Dank, dass Sie sich für ein Beko-Produkt entschieden haben. Wir hoffen, dass Sie mit diesem Produkt, das mit den höchsten Qualitätsanforderungen und der modernsten Technologie hergestellt wurde, beste Ergebnisse erzielen. Bitte lesen Sie die gesamte Bedienungsanleitung und alle anderen Begleitdokumente aufmerksam, bevor Sie das Produkt verwenden; bewahren Sie sie zum künftigen Nachschlagen sicher auf. Wenn Sie das Produkt an einen Dritten weitergeben, händigen Sie bitte auch diese Anleitung aus. Befolgen Sie alle Warnhinweise und Informationen in dieser Anleitung.
SymboleFolgende Symbole werden in den verschiedenen Abschnitten dieser Anleitung verwendet:
CWichtige Informationen und nützliche Tipps in Bezug auf die Verwendung.
AWARNUNG: Warnhinweise zu gefährlichen Situationen im Hinblick auf die Sicherheit von Leib, Leben und Eigentum.
Für den Kontakt mit Lebensmitteln geeignet.
Gerät, Netzkabel sowie Netzstecker nicht in Wasser oder andere Flüssigkeiten tauchen.
Schutzklasse gegen Stromschlag
Dieses Produkt wurde in umweltfreundlichen, hochmodernen Einrichtungen hergestellt
Das Gerät erfüllt die Vorgaben der WEEE-Richtlinie.
Es enthält kein PCB.Hergestellt in: P.R.C.
12 / 69 DE Stabmixer-Set / Bedienungsanleitung
INHALT
1 Wichtige Anweisungen zu Sicherheit und Umwelt 13
1.1 Allgemeine Sicherheit . . . . . . . . . . . . . . . . . . . . . 131.2 Konformität mit der WEEE-Richtlinie und
Entsorgung von Altprodukten . . . . . . . . . . . . 151.3 Informationen zur Verpackung . . . . . . . . . . . . 151.4 Hinweise zum Energiesparen . . . . . . . . . . . . . 15
2 Stabmixer-Set 162.1 Übersicht . . . . . . . . . . . . . . . . . . . . . . . . . . . . . . . . . . 162.2 Technische Daten . . . . . . . . . . . . . . . . . . . . . . . . . 16
3 Betrieb 173.1 Vorbereitung . . . . . . . . . . . . . . . . . . . . . . . . . . . . . . 173.2 Maximalmengen und Verarbeitungszeit . . 173.3 Mixen . . . . . . . . . . . . . . . . . . . . . . . . . . . . . . . . . . . . . . 173.3 Zerkleinern . . . . . . . . . . . . . . . . . . . . . . . . . . . . . . . . 183.5 Quirlen . . . . . . . . . . . . . . . . . . . . . . . . . . . . . . . . . . . . 19
4 Informationen 204.1 Reinigung und Pflege . . . . . . . . . . . . . . . . . . . . . 204.2 Lagerung. . . . . . . . . . . . . . . . . . . . . . . . . . . . . . . . . . 204.3 Handhabung und Transport. . . . . . . . . . . . . . . 20

13 / 69 DEStabmixer-Set / Bedienungsanleitung
Dieser Abschnitt erklärt Sicherheitsanweisungen, die beim Schutz vor Personen- und Sachschäden helfen. Bei Nichtbeachtung dieser Anweisungen erlischt die gewährte Garantie.
1.1 Allgemeine Sicherheit• Dieses Gerät erfüllt die internatio-
nalen Sicherheitsstandards. • Dieses Gerät kann von Personen
mit eingeschränkten körperlichen, sensoriellen oder mentalen Fähigkeiten oder ohne spezielles Wissen oder Erfahrung verwendet werden, sofern sie beaufsichtigt werden oder die Anweisungen zum sicheren Umgang mit dem Produkt und dessen potenzielle Gefahren verstehen. Kinder dürfen nicht mit dem Gerät spielen.
• Das Gerät darf von Kindern nicht benutzt werden.
• Gerät und Netzkabel immer von Kindern fernhalten.
• Verwenden Sie das Produkt nicht, falls Netzkabel, Klingen oder Gerät selbst beschädigt sind. Wenden Sie sich dann an einen autorisierten Serviceanbieter.
• Nur Originalteile und vom Hersteller empfohlene Teile verwenden.
• Nicht versuchen, das Gerät zu demontieren.
• Die Stromversorgung muss mit den Angaben am Typenschild des Gerätes übereinstimmen.
• Das Gerät nicht mit einem Verlängerungskabel verwenden.
• Beim Trennen des Gerätes nicht am Netzkabel selbst ziehen.
• Warten Sie, bis bewegliches Zubehör zu einem vollständigen Stillstand gekommen ist, und ziehen Sie den Netzstecker, bevor Sie Zubehör installieren/e nt fe r n e n , d a s P ro d u k t reinigen oder unbeaufsichtigt zurücklassen.
• Berühren Sie Stecker und Gerät nicht mit feuchten oder nassen Händen.
• Das Gerät nicht mit heißen Lebensmitteln benutzen.
1 Wichtige Anweisungen zu Sicherheit und Umwelt

14 / 69 DE Stabmixer-Set / Bedienungsanleitung
• Das Gerät zur Vermeidung einer Überhitzung nicht länger als 10 Sekunden in Folge benutzen. Z w i s c h e n 1 0 - s e kü n d i g e n Einsätzen 1 Minute abkühlen lassen.
• Verwenden Sie das Gerät nur mit der mitgelieferten Gummibasis und dem Glasbehälter.
• Das Gerät nicht ohne Zutaten in der Schüssel betätigen.
• Knochen und Steine zur Vermeidung von Schäden an Klingen und Gerät aus Lebensmitteln entfernen.
• Dieses Gerät eignet sich nicht für trockene oder harte Lebensmittel, da diese die Klingen schnell stumpf werden lassen können.
• Zur Vermeidung von Verletzungen a u fg r u n d u n s a c h g e m ä ß e r Benutzung alle Warnungen befolgen.
• Beim Leeren des Behälters, während der Reinigung und bei der Handhabung der Klingen mit bloßen Händen können in Folge unsachgemäßer Benutzung e r n s t h a f te Ve r l et z u n g e n auftreten. Halten Sie die Klinge am Kunststoffteil.
• Das Gerät und sämtliche Zubehörteile nach der Reinigung gründlich trocknen, bevor es mit der Stromversorgung verbunden wird und bevor Teile abgenommen oder angebracht werden.
• G e rät , N et z ka b e l s ow i e Netzstecker nicht in Wasser oder andere Flüssigkeiten tauchen.
• Das Gerät und dessen Zubehör nicht auf oder in der Nähe von heißen Oberflächen betreiben oder platzieren.
• Falls Sie die Verpackungsmaterialien aufheben möchten, bewahren Sie sie außerhalb der Reichweite von Kindern auf.
1 Wichtige Anweisungen zu Sicherheit und Umwelt

15 / 69 DEStabmixer-Set / Bedienungsanleitung
1.2 Konformität mit der WEEE-Richtlinie und Entsorgung von Altprodukten
Dieses Produkt enthält keine der in der vom Ministerium für Umwelt und Städteplanung ausgestellten „Regulierung zur Überwachung von elektrischen und elektronischen
Altgeräten“ angegebenen gefährlichen bzw. verbotenen Materialien. Das Gerät erfüllt die Vorgaben der WEEE-Richtlinie. Dieses Gerät wurde aus hochwertigen Teilen und Materialien hergestellt, die wiederverwendet werden können und zum Recycling geeignet sind. Deshalb darf das Gerät am Ende seiner Einsatzzeit nicht mit dem normalen Hausmüll entsorgt werden. Geben Sie das Gerät bei einer Sammelstelle ab, die für das Recycling von elektrischen und elektronischen Geräten zuständig ist. Erkundigen Sie sich bei der örtlichen Behörde in Ihrer Region nach diesen Sammelstellen. Durch das Recycling von Altgeräten tragen Sie zum Schutz der Umwelt und der natürlichen Rohstoffe bei.
1.3 Informationen zur Verpackung
Die Verpackung des Produkts wurde gemäß unserer nationalen Gesetzgebung aus wiederverwertbaren Materialien hergestellt. Entsorgen Sie
die Verpackungsmaterialien nicht mit dem Hausmüll oder anderem Müll. Bringen Sie sie zu einer von der Stadtverwaltung bereitgestellten Sammelstelle für Verpackungsmaterial.
1.4 Hinweise zum EnergiesparenBefolgen Sie während der Benutzung die in der Anleitung empfohlenen Zeiten. Nach der Benutzung den Netzstecker ziehen.
1 Wichtige Anweisungen zu Sicherheit und Umwelt
16 / 69 DE Stabmixer-Set / Bedienungsanleitung
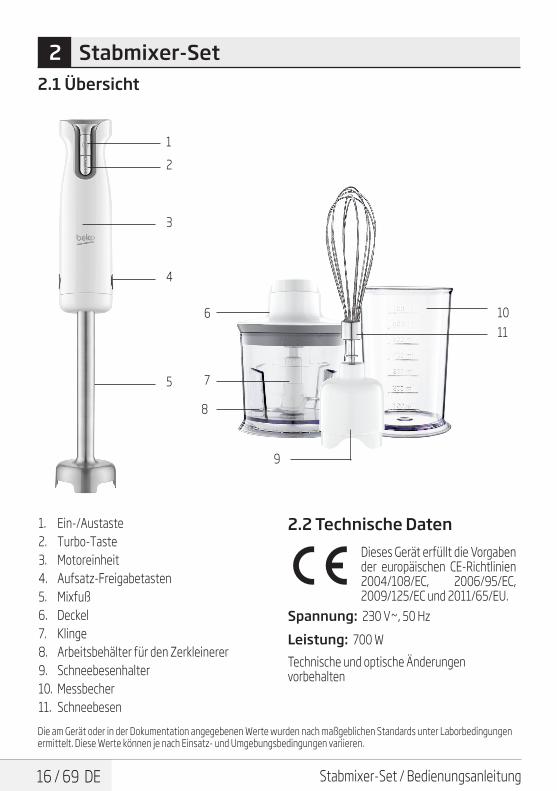
2 Stabmixer-Set2.1 Übersicht
Die am Gerät oder in der Dokumentation angegebenen Werte wurden nach maßgeblichen Standards unter Laborbedingungen ermittelt. Diese Werte können je nach Einsatz- und Umgebungsbedingungen variieren.
1. Ein-/Austaste2. Turbo-Taste3. Motoreinheit4. Aufsatz-Freigabetasten 5. Mixfuß6. Deckel 7. Klinge 8. Arbeitsbehälter für den Zerkleinerer 9. Schneebesenhalter 10. Messbecher11. Schneebesen
2.2 Technische DatenDieses Gerät erfüllt die Vorgaben der europäischen CE-Richtlinien 2004/108/EC, 2006/95/EC, 2009/125/EC und 2011/65/EU.
Spannung: 230 V~, 50 HzLeistung: 700 WTechnische und optische Änderungen vorbehalten
10
8
6
7
12
3
4
5
11
9

17 / 69 DEStabmixer-Set / Bedienungsanleitung
3 Betrieb
3.1 Vorbereitung 1. Alle Verpackungsmaterialien und Aufkleber
entfernen und diese entsprechend den gesetzlichen Vorschriften entsorgen.
2. Vor dem Gebrauch sorgfältig alle Teile, die mit Lebensmitteln in Kontakt kommen, reinigen (siehe Abschnitt „Reinigung und Pflege“).
3. Lebensmittel vor der Verarbeitung mit dem Gerät, in kleine Stücke schneiden.
3.2 Maximalmengen und Verarbeitungszeit
Zutaten Maximal-menge Verarbeitungszeit
Fleisch/Fisch 200 g 10 – 15 SekundenKräuter 20 g 20 SekundenNüsse 200 g 15 SekundenKäse 150 g 15 Sekunden
Brot 1 Scheibe 20 Sekunden
Eier (hartgekocht) 2 Eier 5 Sekunden
Zwiebeln (geachtelt) 100 g 10 Sekunden
3.3 Mixen1. Zu pürierende oder zerkleinernde
Lebensmittel in den Messbecher (10) oder eine vergleichbare Schüssel geben.
2. Mixfuß (5) an der Motoreinheit (3) anbringen; dabei den Aufsatz bis zum Einrasten in die Motoreinheit drücken. Sicherstellen, dass der Mixfuß richtig an der Motoreinheit angebracht ist.
3. Netzstecker in die Steckdose stecken.4. Mixfuß (5) in den Messbecher (10) tauchen,
der die zu vermischenden Zutaten enthält.
CDamit Zutaten nicht herausspritzen: Ein-/Austaste (1) oder Turbo-Taste (4) erst drücken, wenn Mixfuß in die Zutaten eingetaucht wurde.
5. Ein-/Austaste (1) gedrückt halten. - Das Gerät startet den Betrieb.
6. Geschwindigkeitsregler zur Auswahl einer Geschwindigkeit verwenden bzw. Turbo-Taste (4) gedrückt halten.- Die Geschwindigkeitsanzeige-LED
leuchtet entsprechend der gewünschten Geschwindigkeitsstufe 1 – 6.
CBeim Einsatz der Turbo-Taste arbeitet das Gerät bei maximaler Geschwindigkeit. In diesem Fall kann die Geschwindigkeit nicht über den Geschwindigkeitsregler angepasst werden.
CBei Einsatz der Turbo-Taste (2) leuchten alle LEDs der Geschwindigkeitsanzeige.
7. Gerät zum Vermischen der Zutaten langsam in Kreisen auf- und abwärts bewegen.
CBei Einsatz der Turbo-Taste (2) leuchten alle LEDs der Geschwindigkeitsanzeige.
8. Hierfür Ein-/Austaste (1) oder Turbo-Taste (2) loslassen, Netzstecker aus der Steckdose ziehen. Verarbeitete Lebensmittel aus dem Messbecher (10) entfernen.
9. Mixfuß (5) durch Drücken der Aufsatz-Freigabetasten (6) an den Geräteseiten lösen und von der Basis abziehen.
CGerät zur Vermeidung von Überhitzung nicht länger als 10 Sekunden in Folge benutzen.

18 / 69 DE Stabmixer-Set / Bedienungsanleitung
CGerät niemals länger eingeschaltet lassen als zur Zubereitung der Lebensmittel erforderlich.
CMessbecher (10) oder Schüssel nicht überfüllen, damit die Mischung nicht überläuft. Kleinere Mengen sind einfacher zu verarbeiten.
CBecherdeckel zur Vermeidung von Unfällen, als rutschsichere Gummiunterlage verwenden; Messbecher (10) auf Deckel stellen.
CWenn der Mixfuß direkt im Topf verwendet werden soll, den Topf zuerst vom Herd nehmen, damit der Mixfuß nicht überhitzt.
3.3 Zerkleinern
CKeine extrem harten Lebensmittel, wie Kaffeebohnen, Eiswürfel, Muskatnuss, Getreide oder Knochen zerkleinern. Kräuter von Stängeln, Nüsse von Schale und Fleisch von Knochen, Sehnen und Knorpel befreien.
C Lebensmittel in kleine Stücke schneiden.
1. Arbeitsbehälter (8) auf einen ebenen Untergrund stellen.
2. Klinge (7) an den Schaft in der Schüssel anbringen.
AWARNUNG: Beim Einsetzen der Klinge (9) sehr vorsichtig sein; sie ist sehr scharf.
A WARNUNG: Klinge nicht mit bloßen Händen berühren.
3. Zutaten in den Arbeitsbehälter (8) geben.
4. Deckel (6) am Arbeitsbehälter (8) anbringen. Sicherstellen, dass der Deckel sicher an der Schüssel befestigt sind.
AWARNUNG: Gerät niemals verwenden, wenn der Deckel nicht richtig auf der Schüssel sitzt; andernfalls kann die Klinge beschädigt werden.
AWARNUNG: Motoreinheit (3) auf den Deckel (6) drücken, bis sie einrastet. Sicherstellen, dass die Motoreinheit sicher am Deckel befestigt ist.
5. Motoreinheit (3) auf den Deckel (6) drücken, bis sie einrastet. Sicherstellen, dass die Motoreinheit sicher am Deckel befestigt ist.
CSchüssel während des Betriebs immer mit einer Hand halten, damit sie nicht umkippt.
6. Netzstecker in die Steckdose stecken.7. Ein-/Austaste (1) gedrückt halten.
- Das Gerät startet den Betrieb.8. Turbo-Taste (2) gedrückt halten.
C Gerät nicht länger als 10 Sekunden in Folge benutzen.
CEin-/Austaste oder Turbo-Taste zur Erzielung optimaler Ergebnisse stoßweise drücken.
9. Nach der Verarbeitung die Ein-/Austaste (1)oder Turbo-Taste (2) loslassen, Netzstecker aus der Steckdose ziehen. Motoreinheit (3)vom Deckel (6) entfernen; dazu die Aufsatz-Freigabetasten (4) an den Geräteseiten drücken und den Aufsatz abziehen. Deckel (6) abnehmen. Vor dem Entnehmen der zerkleinerten Lebensmittel die Klinge (7)vorsichtig aus der Schüssel (10) entfernen.
3 Betrieb
19 / 69 DEStabmixer-Set / Bedienungsanleitung
Rezeptidee: Mischung Butter + Honig Butter aus dem Gefrierschrank (sollte mindestens 4 Stunden im Gefrierschrank aufbewahrt und in Stücke von ca. 10 – 15 mm x 35 - 40 mm geschnitten werden) und Honig aus dem Kühlschrank (sollte mindestens 1 Tag im Kühlschrank aufbewahrt werden).
3.5 Quirlen • Mit dem Schneebesen (11) können Schlagsahne
zubereitet und Eier schaumig geschlagen werden.
• Niemals mehr als 4 Eiweiß bzw. 200 ml Sahne verarbeiten.
1. Schneebesen (11) in den Schneebesenhalter (9) einstecken, bis er einrastet.
2. Motoreinheit (3) mit dem Schneebesenhalter (9) verbinden; dazu den Schneebesenhalter an die Motoreinheit drücken bis er einrastet. Sicherstellen, dass der Schneebesenhalter sicher an der Basis befestigt ist.
3. Zu verarbeitende Zutaten in den Messbecher (10) oder eine vergleichbare Schüssel geben.
4. Netzstecker in die Steckdose stecken.5. Schneebesen (11) in die zu verarbeitenden
Lebensmittel halten.6. Ein-/Austaste (1) gedrückt halten.
- Das Gerät startet den Betrieb.7. Turbo-Taste (2) gedrückt halten.8. Gerät zum Verquirlen der Zutaten langsam in
Kreisen auf- und abwärts bewegen.9. Anschließend Ein-/Austaste (1) oder Turbo-
Taste (2) loslassen, Netzstecker aus der Steckdose ziehen. Verarbeitete Lebensmittel aus dem Messbecher (10) entfernen. Basis (5)vom Schneebesenhalter (9) entfernen; dazu die Aufsatz-Freigabetasten (4) an den Geräteseiten drücken, und den Aufsatz abziehen.
3 Betrieb
20 / 69 DE Stabmixer-Set / Bedienungsanleitung
4 Informationen
4.1 Reinigung und Pflege
AWARNUNG: Zur Reinigung des Gerätes niemals Benzin, Lösungsmittel, Scheuermittel oder harte Bürsten verwenden.
AWARNUNG: Klingen nicht mit bloßen Händen berühren. Die Klingen sind sehr scharf. Bürste verwenden!
AWARNUNG: Motoreinheit (3) sowie Netzkabel niemals in Wasser oder andere Flüssigkeiten tauchen, niemals unter fließendes Wasser halten.
1. Gerät ausschalten und Netzstecker aus der Steckdose ziehen.
2. Das Gerät vollständig abkühlen lassen.3. Motoreinheit (3) mit einem feuchten, weichen
Tuch abwischen.4. Mixfuß (5) und Messbecher (6) direkt nach dem
Einsatz mit warmem Seifenwasser reinigen und anschließend gründlich trocknen. Niemals im Geschirrspüler reinigen.
CNach der Reinigung und vor der Benutzung oder Lagerung des Gerätes alle Teile sorgfältig mit einem weichen Tuch trocknen.
4.2 Lagerung • Wenn das Gerät längere Zeit nicht benutzt wird,
sollte es sorgfältig aufbewahrt werden. Darauf achten, dass der Netzstecker gezogen wird und das Gerät komplett trocken ist.
• Das Gerät an einem kühlen, trockenen Ort lagern. Das Gerät sollte sich immer außerhalb der Reichweite von Kindern befinden.
4.3 Handhabung und Transport
• Transportieren Sie das Gerät in seiner Originalverpackung. Die Verpackung schützt das Gerät vor Sachschäden.
• Legen Sie keine schweren Gegenstände auf dem Gerät oder der Verpackung ab. Andernfalls könnte das Gerät beschädigt werden.
• Falls das Gerät herunterfällt, ist es möglicherweise nicht mehr funktionsfähig oder weist dauerhafte Schäden auf.

Avant toute chose, veuillez lire ce manuel d’utilisation !Chers clients,Merci d’avoir choisi les produits Beko. Nous espérons que ce produit, fabriqué dans des installations modernes et soumis à un processus de contrôle qualité rigoureux, vous offre les meilleures performances possibles. C’est pourquoi nous vous recommandons, avant d’utiliser ce produit, de lire attentivement ce manuel et tous les autres documents fournis et de les conserver soigneusement pour toute consultation future. Si vous confiez le produit à quelqu’un d’autre, n’oubliez pas de lui remettre également le manuel d’utilisation. Veillez à bien respecter les consignes et les instructions figurant dans le manuel d’utilisation.
Signification des symbolesLes symboles suivants sont repris tout au long de ce manuel :
CInformations importantes et conseils utiles sur l’utilisation de l’appareil.
AATTENTION : Avertissement sur les situations dangereuses concernant la sécurité des biens et des personnes.
Ces substances sont supposées entrer en contact avec les aliments.
N’immergez pas l’appareil, le câble d’alimentation ou la fiche d’alimentation électrique dans de l’eau ou tout autre liquide.
Classe de protection contre les chocs électriques
Ce produit a été fabriqué dans des usines écologiques et modernes.
Conforme à la Directive DEEE. Ne contient pas de PCB.Fabriqué en: P.R.C.
22 / 69 FR Pied Mixeur Multifonction / Manuel d’utilisation
TABLE DES MATIÈRES
1 Instructions importantes pour la sécurité et l’environnement 23
1.1 Consignes générales de sécurité . . . . . . . . . . . . .231.2 Conformité avec la directive DEEE et mise au
rebut des produits usagés . . . . . . . . . . . . . . . . . . .251.3 Information sur l›emballage . . . . . . . . . . . . . . . . . .251.4 Astuces pour faire des économies d›énergie 25
2 Pied Mixeur Multifonction 262.1 Vue d'ensemble. . . . . . . . . . . . . . . . . . . . . . . . . . . . . . .262.2 Données techniques . . . . . . . . . . . . . . . . . . . . . . . . .26
3 Fonctionnement 273.1 Préparation . . . . . . . . . . . . . . . . . . . . . . . . . . . . . . . . . . 273.2 Quantités maximales et temps d’utilisation . 273.3 Mixage . . . . . . . . . . . . . . . . . . . . . . . . . . . . . . . . . . . . . . . 273.4 Hachage. . . . . . . . . . . . . . . . . . . . . . . . . . . . . . . . . . . . . .283.5 Batteur . . . . . . . . . . . . . . . . . . . . . . . . . . . . . . . . . . . . . . .29
4 Informations 304.1 Nettoyage et entretien. . . . . . . . . . . . . . . . . . . . . . .304.2 Rangement. . . . . . . . . . . . . . . . . . . . . . . . . . . . . . . . . . .304.3 Manipulation et transport. . . . . . . . . . . . . . . . . . . .30

23 / 69 FRPied Mixeur Multifonction / Manuel d’utilisation
Cette section contient les consignes de sécurité qui aident à se prémunir contre les risques de dommages corporels ou de dégâts matériels. Le non-respect de ces consignes annule la garantie.
1.1 Consignes générales de sécurité• Cet appareil est conçu selon
les normes internationales de sécurité.
• Cet appareil peut être utilisé par les personnes à capacités physiques, sensorielles ou mentales réduites ou qui manquent d’expérience et de connaissances concernant l’appareil, à condition qu’elles soient supervisées ou qu’elles aient reçues les consignes concernant l’utilisation sûre de l’appareil et assimilées les dangers encourus. Les enfants ne doivent pas jouer avec l’appareil.
• Cet appareil ne peut pas être utilisé par des enfants.
• Veuil lez toujours garder l’appareil ainsi que son cordon d’alimentation hors de portée des enfants.
• Ne l’utilisez pas si le câble d’alimentation, les lames ou l’appareil lui-même sont endommagés. Contactez un service agréé.
• Utilisez uniquement des pièces d’origine ou pièces recommandées par le fabricant.
• N’essayez pas de démonter l’appareil.
• Assurez-vous que votre source d’alimentation électrique soit conforme aux informations spécifiées sur la plaque signalétique de votre appareil.
• N’utilisez pas de cordon prolongateur avec l’appareil.
• Ne tirez pas sur le câble d’alimentation de l’appareil pour le débrancher de l’alimentation.
• Attendez que les éléments en mouvements s’arrêtent et débranchez l’appareil lorsqu’il est laissé sans surveillance, lorsque vous installez/retirez les accessoires ou avant de nettoyer l’appareil.
• Ne touchez jamais la prise électrique avec les mains humides ou mouillées.
1 Instructions importantes pour la sécurité et l’environnement
24 / 69 FR Pied Mixeur Multifonction / Manuel d’utilisation
• N’utilisez pas l’appareil pour traiter des aliments chauds.
• Pour éviter toute surchauffe, ne faites pas fonctionner l’appareil de manière continue pendant plus de 10 secondes. Laissez-le refroidir pendant 1 minute entre chaque utilisation de 10 secondes.
• Utilisez l’appareil uniquement avec le socle en caoutchouc et le broc en verre.
• Ne faites pas fonctionner l’appareil sans ingrédients dans le bol.
• Retirez les os et les cailloux des aliments pour éviter d’endommager les lames et l’appareil.
• Cet appareil n’est pas adapté pour hacher des aliments secs ou durs qui endommageraient rapidement les lames.
• Suivez toutes les instructions afin d’éviter des blessures dues à un mauvais usage de l’appareil.
• Lorsque vous videz le réservoir, de sérieuses blessures résultant d’un mauvais usage peuvent survenir pendant le nettoyage si vous attrapez les lames du hachoir à mains nues. Utilisez la partie en plastique lorsque vous essayez de tenir la lame du hachoir.
• Après le nettoyage, séchez l’appareil et tous ses composants avant de les brancher sur le secteur et d’y ajouter les accessoires.
• Ne plongez pas l’appareil, le câble d’alimentation ou la prise d’alimentation électrique dans l’eau ou tout autre liquide.
• Ne faites jamais fonctionner, ni n’installez aucun composant de cet appareil au-dessus ou à proximité de surfaces chaudes.
• Si vous conservez le matériel d’emballage, tenez-le hors de la portée des enfants.
1 Instructions importantes pour la sécurité et l’environnement
25 / 69 FRPied Mixeur Multifonction / Manuel d’utilisation
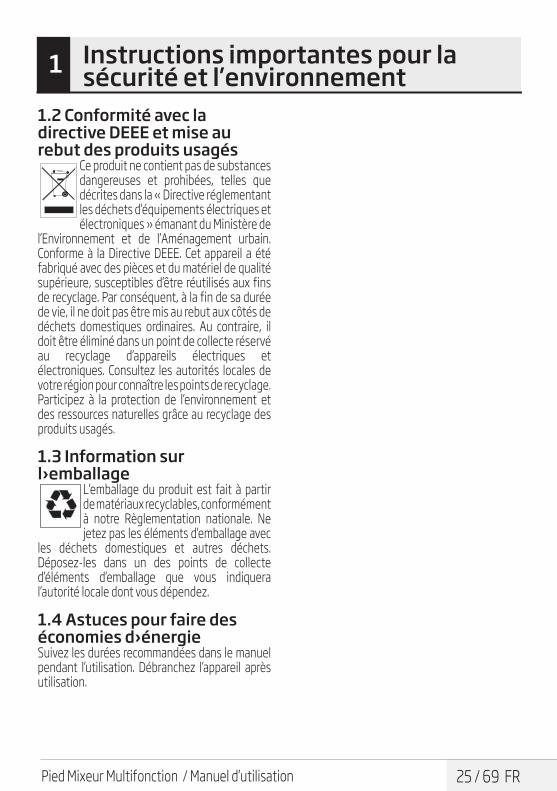
1.2 Conformité avec la directive DEEE et mise au rebut des produits usagés
Ce produit ne contient pas de substances dangereuses et prohibées, telles que décrites dans la « Directive réglementant les déchets d’équipements électriques et électroniques » émanant du Ministère de
l’Environnement et de l’Aménagement urbain. Conforme à la Directive DEEE. Cet appareil a été fabriqué avec des pièces et du matériel de qualité supérieure, susceptibles d’être réutilisés aux fins de recyclage. Par conséquent, à la fin de sa durée de vie, il ne doit pas être mis au rebut aux côtés de déchets domestiques ordinaires. Au contraire, il doit être éliminé dans un point de collecte réservé au recyclage d’appareils électriques et électroniques. Consultez les autorités locales de votre région pour connaître les points de recyclage. Participez à la protection de l’environnement et des ressources naturelles grâce au recyclage des produits usagés.
1.3 Information sur l›emballage
L’emballage du produit est fait à partir de matériaux recyclables, conformément à notre Règlementation nationale. Ne jetez pas les éléments d’emballage avec
les déchets domestiques et autres déchets. Déposez-les dans un des points de collecte d’éléments d’emballage que vous indiquera l’autorité locale dont vous dépendez.
1.4 Astuces pour faire des économies d›énergieSuivez les durées recommandées dans le manuel pendant l’utilisation. Débranchez l’appareil après utilisation.
1 Instructions importantes pour la sécurité et l’environnement
26 / 69 FR Pied Mixeur Multifonction / Manuel d’utilisation
2 Pied Mixeur Multifonction
Les valeurs indiquées sur les inscriptions apposées sur votre appareil ou les autres documents fournis avec le produit sont des valeurs obtenues en conditions de laboratoire, conformément aux normes en vigueur. Ces valeurs peuvent varier selon l’utilisation de l’appareil et les conditions environnantes.
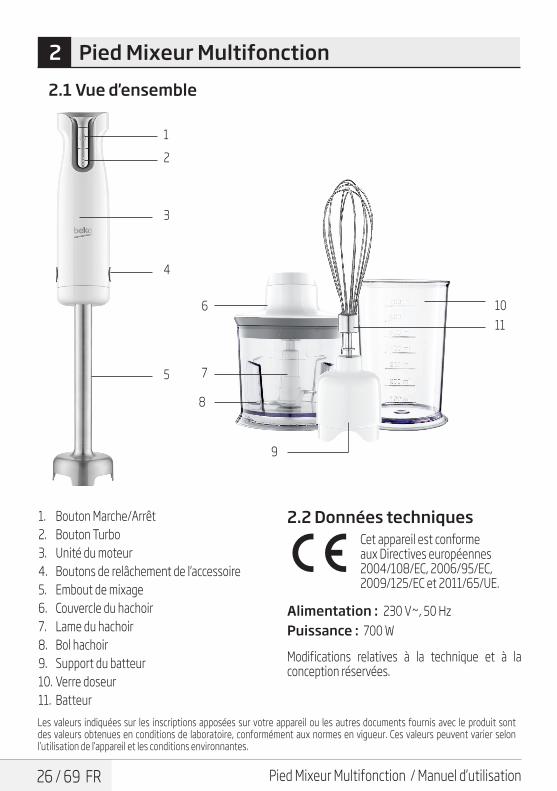
1. Bouton Marche/Arrêt2. Bouton Turbo3. Unité du moteur4. Boutons de relâchement de l‘accessoire5. Embout de mixage6. Couvercle du hachoir7. Lame du hachoir8. Bol hachoir9. Support du batteur10. Verre doseur 11. Batteur
2.2 Données techniquesCet appareil est conforme aux Directives européennes 2004/108/EC, 2006/95/EC, 2009/125/EC et 2011/65/UE.
Alimentation : 230 V~, 50 HzPuissance : 700 W
Modifications relatives à la technique et à la conception réservées.
2.1 Vue d'ensemble
10
8
6
7
12
3
4
5
11
9

27 / 69 FRPied Mixeur Multifonction / Manuel d’utilisation
3 Fonctionnement
3.1 Préparation 1. Retirez les emballages et autocollants avant
de les jeter selon les lois en vigueur.2. Avant la première utilisation de l’appareil,
nettoyez les éléments qui seront en contact avec les aliments (reportez-vous à la rubrique « Nettoyage et entretien »).
3. Coupez les aliments en petits morceaux avant d’utiliser l’appareil.
3.2 Quantités maximales et temps d’utilisation
Ingrédients Quantitémaximales
Temps de traitement
Viande/Poisson 200g 10-15
secondesHerbes 20g 20 secondesNoix 200g 15 secondesFromage 150g 15 secondesPain 1 tranche 20 secondesŒufs (œufs durs) 2 œufs 5 secondes
Oignons(épluchés et coupés en 8 morceaux)
100 g 10 secondes
3.3 Mixage1. Placez les aliments à réduire en purée ou
à mixer dans le verre doseur (10) ou un bol similaire.
2. Fixez l’embout de mixage (5) au unité du moteur (3) en poussant celui-ci dans le unité du moteur jusqu’à ce qui se mette en place. Assurez-vous que l’embout de mixage est correctement fixé au unité du moteur.
3. Branchez la prise à la prise murale.4. Plongez l’embout de mixage (5) dans le verre
doseur (10) où se trouvent les ingrédients à mixer.
CPour éviter les projections, n’appuyez sur le bouton Marche/Arrêt (1) ou sur le bouton turbo (2) que lorsque l’embout de mixage est entièrement plongé dans les ingrédients.
5. Appuyez sur le bouton Marche/Arrêt et maintenez-le enfoncé (1). – L’appareil se met en marche.
6. Utilisez la commande de vitesse pour sélectionner une vitesse ou appuyez sur le bouton Turbo et maintenez-le enfoncé (2).– L’indicateur de vitesse à LED s’allume en
fonction de la vitesse souhaitée comprise entre 1 et 6.
CLorsque vous utilisez le bouton turbo, l‘appareil fonctionne à la vitesse maximale. En pareille circonstance, vous ne pouvez régler la vitesse à l‘aide de la commande de vitesse.
CLorsque vous appuyez sur le bouton Turbo (2), tous les indicateurs de vitesse à LED s’allument.
7. Déplacez l’appareil lentement de haut en bas et en décrivant des cercles pour mixer les ingrédients.
C Éteignez toujours l‘appareil avant d‘extraire les aliments.
8. Lâchez le bouton Marche/Arrêt (1) ou le bouton turbo (2) lorsque vous avez terminé et débranchez la prise de la prise murale. Enlevez le mélange du verre doseur (10).

28 / 69 FR Pied Mixeur Multifonction / Manuel d’utilisation
9. Désassemblez l’embout de mixage (5)uniquement en appuyant sur les boutons de relâchement de l’accessoire (4) se trouvant sur les côtés de l’appareil, puis en l’extrayant du unité du moteur.
CPour éviter toute surchauffe, ne faites pas fonctionner l‘appareil de manière continue pendant plus de 10 secondes.
CN‘allumez jamais l‘appareil plus longtemps que nécessaire pour le traitement des aliments.
CPour éviter que le mélange ne déborde, ne remplissez par le verre doseur (10) ou le bol à ras bord. Il est plus facile de battre de petites quantités.
CPour éviter tout accident, utilisez le couvercle comme pied antidérapant en caoutchouc en plaçant le unité du moteur sur le couvercle.
CSi vous souhaitez utiliser l‘embout de mixage directement dans la casserole, ôtez la casserole de la cuisinière pour éviter toute surchauffe de l‘embout de mixage.
3.4 Hachage
CNe hachez pas d‘aliments trop durs tels que des grains de café, glaçons, noix de muscade, grains ou os. Retirez la tige des herbes, la coque des noix et les os, les tendons et le cartilage de la viande.
C Coupez les aliments en petits morceaux.
1. Placez le bol hachoir (8) sur une surface régulière.
2. Placez la lame du hachoir (7) sur l’axe fixe du bol hachoir (8).
AATTENTION : Faites attention en insérant la lame du hachoir (7) car elle est très coupante.
A ATTENTION : Évitez de la toucher avec vos mains nues.
3. Placez les ingrédients dans le bol hachoir (8).4. Placez le couvercle du hachoir (6) sur le bol
hachoir (8). Assurez-vous que les pattes du couvercle du hachoir sont correctement verrouillées sur la bol hachoir.
AATTENTION : Ne faites jamais fonctionner l‘appareil si le couvercle du hachoir n‘est pas correctement fixé sur le bol hachoir, cela pourrait endommager la lame.
5. Placez le unité du moteur (3) sur le couvercle du hachoir (6). Tournez la base dans le sens horaire afin de la verrouiller correctement. Assurez-vous que le unité du moteur est correctement fixé au couvercle du hachoir.
CTenez toujours fermement le bol hachoir d‘une main pour éviter qu‘il ne se renverse pendant le fonctionnement.
6. Branchez la prise à la prise murale.7. Appuyez sur le bouton Marche/Arrêt et
maintenez-le enfoncé (1).– L’appareil se met en marche.
8. Appuyez sur le bouton Turbo et maintenez-le enfoncé (2).
CN’utilisez pas l’appareil de manière continue pendant plus de 10 secondes.
3 Fonctionnement
29 / 69 FRPied Mixeur Multifonction / Manuel d’utilisation
CPour de meilleurs résultats, appuyez sur le bouton Marche/Arrêt ou le bouton Turbo de manière intermittente.
9. Lâchez le bouton Marche/arrêt (1) ou le bouton turbo (2) lorsque vous avez terminé et débranchez la prise de la prise murale. Retirez le unité du moteur (3) du couvercle du hachoir (6) en appuyant sur les boutons de relâchement de l’accessoire (4) situés sur les côtés de l’appareil, puis tirez. Retirez le couvercle du hachoir (6). Retirez la lame du hachoir (7) du bol (8) soigneusement avant de retirer les aliments hachés.
Idées de recettes : Mélange beurre + mielBeurre retiré du congélateur (doit être conservé dans le congélateur pendant au moins 4 heures et coupé en morceaux de 10-15 mm x 35-40 mm environ) et miel retiré du réfrigérateur (doit être conservé dans le réfrigérateur pendant 24 heures au minimun).
3.5 Batteur • Vous pouvez utiliser le batteur (11) pour
fouetter de la crème et battre des œufs. • Ne battez jamais plus de 4 blancs d’œufs ou 200
ml de crème.1. Insérez le batteur (11) dans son support (9)
jusqu’à ce que vous entendiez un clic.2. Assemblez le unité du moteur (3) au batteur (9)
en plaçant le support du batteur sur le unité du moteur. Poussez le support du batteur dans le unité du moteur. Assurez-vous que le support du batteur est correctement fixé au unité du moteur.
3. Placez les ingrédients que vous aimeriez battre dans le verre doseur (10) ou un bol similaire.
4. Branchez la prise à la prise murale.5. Plongez le batteur (11) dans le mélange à battre.6. Appuyez sur le bouton Marche/Arrêt et
maintenez-le enfoncé (1).– L’appareil se met en marche.
7. Appuyez sur le bouton Turbo et maintenez-le enfoncé.
8. Déplacez l’appareil lentement de haut en bas et en décrivant des cercles pour mixer les ingrédients.
9. Lâchez le bouton Marche/Arrêt (1) ou le bouton turbo (2) lorsque vous avez terminé et débranchez la prise de la prise murale. Enlevez le mélange du verre doseur (10). Retirez le unité du moteur (3) du support du batteur (9) en appuyant sur les boutons de relâchement des accessoires (4) situés sur les côtés de l’appareil, puis tirez.
3 Fonctionnement
30 / 69 FR Pied Mixeur Multifonction / Manuel d’utilisation
4 Informations
4.1 Nettoyage et entretien
AATTENTION : Ne jamais utiliser d‘essence, de solvants ou de nettoyants abrasifs, d‘objets métalliques ou de brosses dures pour nettoyer l‘appareil.
AATTENTION : Évitez de toucher les lames du hachoir avec vos mains nues. Les lames sont très coupantes. Utilisez une brosse !
AATTENTION : N‘immergez jamais le unité du moteur (3) ou le câble d‘alimentation dans l‘eau ou d‘autres liquides et ne les rincez jamais sous l‘eau non plus.
1. Éteignez l’appareil et débranchez le câble d’alimentation de la prise murale.
2. Laissez l’appareil refroidir totalement.3. Servez-vous d’un chiffon doux et mouillé pour
nettoyer le unité du moteur (3).4. Nettoyez l’embout de mixage (5) et le verre
doseur (10) à l’eau tiède avec du savon et essuyez-les immédiatement après usage. Ne les placez jamais dans votre lave-vaisselle.
CAvant d‘utiliser ou de ranger l‘appareil après le nettoyage, séchez soigneusement toutes ses parties à l‘aide d‘une serviette douce.
4.2 Rangement • Veuillez conserver soigneusement votre
appareil si vous ne comptez pas l’utiliser pendant une période prolongée. Veillez également à ce qu’il soit débranché et entièrement sec.
• Conservez-le dans un lieu frais et sec. Assurez-vous de tenir l’appareil hors de portée des enfants.
4.3 Manipulation et transport • Pendant la manipulation et le transport,
portez toujours l’appareil dans son emballage d’origine. L’emballage de l’appareil le protège des dommages physiques.
• Ne placez pas de charge lourde sur l’appareil ou sur l’emballage. Cela pourrait l’endommager.
• Toute chute de l’appareil peut le rendre non opérationnel ou l’endommager de façon permanente.

Lütfen önce bu kılavuzu okuyun!Değerli Müşterimiz,Beko ürününü tercih ettiğiniz için teşekkür ederiz. Yüksek kalite ve teknoloji ile üretilmiş olan ürününüzün size en iyi verimi sunmasını istiyoruz. Bunun için, bu kılavuzun tamamını ve verilen diğer belgeleri ürünü kullanmadan önce dikkatle okuyun ve bir başvuru kaynağı olarak saklayın. Ürünü başka birisine verirseniz, kullanma kılavuzunu da birlikte verin. Kullanma kılavuzunda belirtilen tüm bilgi ve uyarıları dikkate alarak talimatlara uyun.
Sembollerin anlamlarıBu kullanma kılavuzunun çeşitli kısımlarında aşağıdaki semboller kullanılmıştır:
C Cihazın kullanımıyla ilgili önemli bilgiler ve faydalı tavsiyeler.
AUYARI: Can ve mal güvenliğiyle ilgili tehlikeli durumlar konusunda uyarılar.
Gıda ile temasa uygundur.
Cihazı, elektrik kablosunu veya elektrik fişini suya ya da diğer sıvılara batırmayın.
Elektrik çarpmasına karşı koruma sınıfı.
Bu ürün, çevreye saygılı modern tesislerde doğaya zarar vermeden üretilmiştir.
AEEE Yönetmeliğine Uygundur. PCB içermez.Menşei: P.R.C.
32 / 69 TR El Blender Seti / Kullanma Kılavuzu
İÇİNDEKİLER
1 Önemli güvenlik ve çevre talimatları 33
1.1 Genel güvenlik . . . . . . . . . . . . . . . . . . . . . . . . . . . . . 331.2 AEEE yönetmeliğine uyum ve atık ürünün
elden çıkarılması . . . . . . . . . . . . . . . . . . . . . . . . . . 341.3 Ambalaj bilgisi . . . . . . . . . . . . . . . . . . . . . . . . . . . . . 341.4 Enerji tasarrufu için yapılması gerekenler 34
2 El blender seti 352.1 Genel bakış . . . . . . . . . . . . . . . . . . . . . . . . . . . . . . . . 352.2 Teknik veriler . . . . . . . . . . . . . . . . . . . . . . . . . . . . . . 35
3 Kullanım 363.1 Hazırlık . . . . . . . . . . . . . . . . . . . . . . . . . . . . . . . . . . . . 363.2 Maksimum miktarlar ve işlem süresi. . . . . . . 363.3 Karıştırma . . . . . . . . . . . . . . . . . . . . . . . . . . . . . . . . . 363.4 Parçalama . . . . . . . . . . . . . . . . . . . . . . . . . . . . . . . . . 373.5 Çırpma . . . . . . . . . . . . . . . . . . . . . . . . . . . . . . . . . . . . . 38
4 Bilgiler 394.1 Temizleme ve bakım. . . . . . . . . . . . . . . . . . . . . . . 394.2 Saklama . . . . . . . . . . . . . . . . . . . . . . . . . . . . . . . . . . . 394.3 Taşıma ve nakliye . . . . . . . . . . . . . . . . . . . . . . . . . 39
33 / 69 TREl Blender Seti / Kullanma Kılavuzu
Bu bölümde, yaralanma ya da maddi hasar tehlikelerini önlemeye yardımcı olacak güvenlik talimatları yer almaktadır. Bu talimatlara uyulmaması halinde her türlü garanti geçersiz hale gelir.
1.1 Genel güvenlik• Bu cihaz, uluslararası güvenlik
standartlarına uygundur. • Cihaz, fiziksel, algısal ve zihinsel
yetenekleri azalmış veya tecrübe ve bilgi eksikliği olan kişiler tarafından gözetim altında veya cihazın güvenli bir şekilde kullanımına ve karşılaşılan ilgili tehlikelerin anlaşılmasına dair talimat verilirse kullanılabilir. Çocuklar cihazla oynamamalıdır.
• Bu cihaz çocuklar tarafından kullanılamaz.
• Cihazı ve elektrik kablosunu, çocukların ulaşamayacağı bir yerde muhafaza edin.
• Elektrik kablosu, cihaz veya cihazın bıçağı hasarlıysa kullanmayın. Yetkili servise başvurun.
• Sadece orijinal parçaları veya üretici tarafından tavsiye edilen parçaları kullanın.
• Cihazı parçalarına ayırmayın. • Şebeke güç kaynağınız cihazın
tip etiketinde belirtilen bilgilere uygun olmalıdır.
• Cihazı uzatma kablosuyla kullanmayın.
• Cihazın fişini çıkartırken kablosundan çekmeyin.
• Gözetimsiz bırakı ldığında, a k s e s u a r t a k m a / ç ı k a r m a işleminde veya temizlikten önce hareket eden parçaların durmasını bekleyin ve cihazın fişini prizden çekin.
• Elleriniz nemli veya ıslakken cihazın fişine dokunmayın.
• Sıcak yiyecekler için cihazı kullanmayın.
• Aşırı ısınmayı önlemek için cihazı sürekli olarak 10 saniyeden uzun süre kullanmayın. Her 10 saniyelik çalıştırma arasında cihazı 1 dakika için soğumaya bırakın.
• Cihazı sadece birlikte verilen lastik altlığı ve cam kasesi ile kullanın.
• Cihazı, kasesi boş şekilde çalıştırmayın.
• Bıçakların ve cihazın zarar görmesini önlemek için gıdalardan kemikleri ve çekirdekleri çıkarın.
1 Önemli güvenlik ve çevre talimatları
34 / 69 TR El Blender Seti / Kullanma Kılavuzu
• Cihaz, bıçakların kısa sürede körelmesine neden olabilecek kuru veya sert gıdalar için uygun değildir.
• Hatalı kullanımdan ötürü yaralanmaları önlemek için tüm uyarılara uyun.
• Kabı boşaltırken, temizlik esnasında ve parçalama bıçağına çıplak el ile dokunurken hatalı kullanımdan ötürü ciddii yaralanmalar meydana gelebilir. Parçalama bıçağını sadece plastik kısmından tutmaya çalışarak dikkatli tutun.
• Temizlik sonrasında, elektriğe bağlamadan ve parçalarını takmadan önce cihazı ve tüm parçalarını kurutun.
• Cihazı, elektrik kablosunu veya elektrik fişini suya ya da diğer sıvılara batırmayın.
• Cihazı veya parçalarını sıcak yüzeylerin üzerinde veya yanında çalıştırmayın ya da bu yüzeylerin üstüne koymayın.
• Ambalaj malzemelerini saklıyorsanız çocukların ulaşamayacağı bir yerde muhafaza edin.
1.2 AEEE yönetmeliğine uyum ve atık ürünün elden çıkarılması
Bu ürün, T.C. Çevre ve Şehircilik Bakanlığı tarafından yayımlanan “Atık Elektrikli ve Elektronik Eşyaların Kontrolü Yönetmeliği”nde belirtilen zararlı ve yasaklı maddeleri içermez. AEEE
Yönetmeliğine uygundur. Bu ürün, geri dönüşümlü ve tekrar kullanılabilir nitelikteki yüksek kaliteli parça ve malzemelerden üretilmiştir. Bu nedenle, ürünü, hizmet ömrünün sonunda evsel veya diğer atıklarla birlikte atmayın. Elektrikli ve elektronik cihazların geri dönüşümü için bir toplama noktasına götürün. Bu toplama noktalarını bölgenizdeki yerel yönetime sorun. Kullanılmış ürünleri geri kazanıma vererek çevrenin ve doğal kaynakların korunmasına yardımcı olun.
1.3 Ambalaj bilgisiÜrünün ambalajı, Ulusal Mevzuatımız gereği geri dönüştürülebilir malzemelerden üretilmiştir. Ambalaj atığını evsel veya diğer atıklarla birlikte
atmayın, yerel otoritenin belirttiği ambalaj toplama noktalarına atın.
1.4 Enerji tasarrufu için yapılması gerekenlerKullanım sırasında kılavuzda tavsiye edilen sürelere uyun. Kullanımdan sonra cihazın fişini prizden çıkarın.
1 Önemli güvenlik ve çevre talimatları

35 / 69 TREl Blender Seti / Kullanma Kılavuzu
2 El blender seti2.1 Genel bakış
Ürününüz üzerinde bulunan işaretlemelerde veya ürünle birlikte verilen diğer basılı dökümanlarda beyan edilen değerler, ilgili standartlara göre laboratuvar ortamında elde edilen değerlerdir. Bu değerler, ürünün kullanım ve ortam şartlarına göre değişebilir.
1. Açma/Kapama düğmesi2. Turbo düğmesi3. Motor ünitesi4. Aksesuar çıkarma düğmeleri5. Karıştırma aksesuarı6. Parçalama kapağı7. Parçalama bıçağı8. Parçalama kasesi9. Çırpma teli tutucusu10. Ölçüm kabı11. Çırpma teli
2.2 Teknik verilerBu ürün, 2004/108/EC, 2006/95/EC, 2009/125/EC ve 2011/65/EU sayılı Avrupa CE Direktiflerine uygundur.
Gerilim: 230 V~, 50 HzGüç tüketimi: 700 WTeknik ve tasarım değişiklikleri yapma hakkı saklıdır.
10
8
6
7
12
3
4
5
11
9
36 / 69 TR El Blender Seti / Kullanma Kılavuzu
3 Kullanım
3.1 Hazırlık 1. Tüm ambalaj ve etiket malzemelerini çıkarın ve
yürürlükteki yasal düzenlemeye uygun olarak atın.
2. Cihazı ilk kez kullanmadan önce gıdalarla temas eden tüm parçaları dikkatli şekilde temizleyin (“Temizlik ve bakım” bölümüne bakın).
3. Cihazı kullanmadan önce gıdaları küçük parçalar halinde kesin.
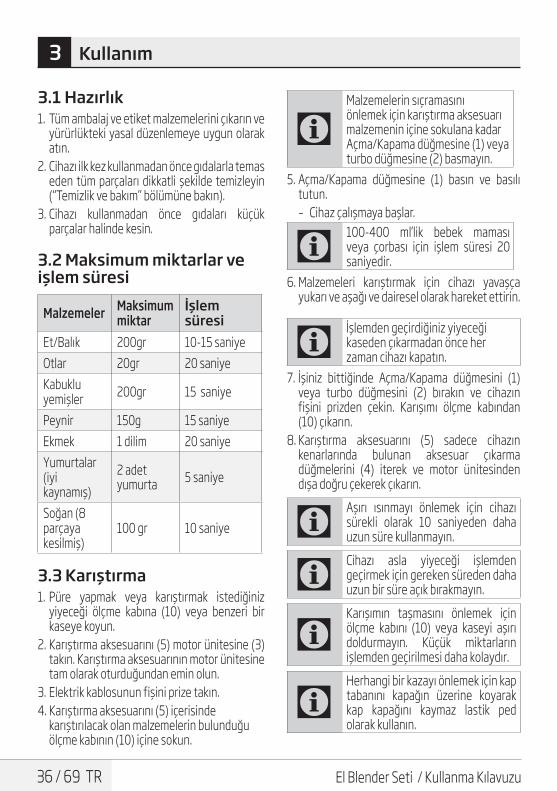
3.2 Maksimum miktarlar ve işlem süresi
Malzemeler Maksimummiktar
İşlemsüresi
Et/Balık 200gr 10-15 saniyeOtlar 20gr 20 saniyeKabukluyemişler 200gr 15 saniye
Peynir 150g 15 saniyeEkmek 1 dilim 20 saniyeYumurtalar(iyi kaynamış)
2 adet yumurta 5 saniye
Soğan (8parçayakesilmiş)
100 gr 10 saniye
3.3 Karıştırma1. Püre yapmak veya karıştırmak istediğiniz
yiyeceği ölçme kabına (10) veya benzeri bir kaseye koyun.
2. Karıştırma aksesuarını (5) motor ünitesine (3)takın. Karıştırma aksesuarının motor ünitesine tam olarak oturduğundan emin olun.
3. Elektrik kablosunun fişini prize takın.4. Karıştırma aksesuarını (5) içerisinde
karıştırılacak olan malzemelerin bulunduğu ölçme kabının (10) içine sokun.
CMalzemelerin sıçramasını önlemek için karıştırma aksesuarı malzemenin içine sokulana kadar Açma/Kapama düğmesine (1) veya turbo düğmesine (2) basmayın.
5. Açma/Kapama düğmesine (1) basın ve basılı tutun. – Cihaz çalışmaya başlar.
C100-400 ml’lik bebek maması veya çorbası için işlem süresi 20 saniyedir.
6. Malzemeleri karıştırmak için cihazı yavaşça yukarı ve aşağı ve dairesel olarak hareket ettirin.
Cİşlemden geçirdiğiniz yiyeceği kaseden çıkarmadan önce her zaman cihazı kapatın.
7. İşiniz bittiğinde Açma/Kapama düğmesini (1)veya turbo düğmesini (2) bırakın ve cihazın fişini prizden çekin. Karışımı ölçme kabından (10) çıkarın.
8. Karıştırma aksesuarını (5) sadece cihazın kenarlarında bulunan aksesuar çıkarma düğmelerini (4) iterek ve motor ünitesinden dışa doğru çekerek çıkarın.
CAşırı ısınmayı önlemek için cihazı sürekli olarak 10 saniyeden daha uzun süre kullanmayın.
CCihazı asla yiyeceği işlemden geçirmek için gereken süreden daha uzun bir süre açık bırakmayın.
CKarışımın taşmasını önlemek için ölçme kabını (10) veya kaseyi aşırı doldurmayın. Küçük miktarların işlemden geçirilmesi daha kolaydır.
CHerhangi bir kazayı önlemek için kap tabanını kapağın üzerine koyarak kap kapağını kaymaz lastik ped olarak kullanın.
37 / 69 TREl Blender Seti / Kullanma Kılavuzu
3 Kullanım
CKarıştırma aksesuarını doğrudan tencerenin içinde kullanmak isterseniz karıştırma aksesuarının aşırı ısınmasını önlemek için ilk önce tencereyi ocağın üzerinden alın.
3.4 Parçalama
CKahve çekirdeği, buz, hindistan cevizi, hububat veya kemik gibi son derece sert malzemeleri parçalamayın. Bitkilerin saplarını, cevizin kabuğunu ve etin kemiğini, sinirini ve kıkırdağını çıkarın.
C Yiyeceği küçük parçalar halinde kesin.
1. Parçalama kasesini (8) düz bir yüzeye koyun.2. Parçalama bıçağını (7) parçalama kasesindeki
(8) sabit mile yerleştirin.
AUYARI: Çok keskin olmasındandolayı parçalama bıçağını (7)takarken dikkatli olun.
A UYARI: Parçalama bıçağına çıplak elle dokunmayın.
3. Malzemeleri parçalama kasesine (8) koyun.4. Parçalama kapağını (6) parçalama kasesinin
(8) üzerine yerleştirin. Parçalama kapağının üzerindeki tırnakların kase üzerine iyice kilitlendiğinden emin olun.
AUYARI: Parçalama bıçağına zarar verebileceğinden dolayı parçalama kapağı parçalama kasesinin üzerine tam olarak oturmamışsa cihazı asla çalıştırmayın.
5. Motor ünitesini (3) parçalama kapağının (6) üzerine yerleştirin. Yerine iyice oturacak şekilde motor ünitesini bastırın. Motor ünitesinin parçalama kapağına tam olarak oturduğundan emin olun.
Cİşlem esnasında devrilmesini önlemek için daima parçalama kabını bir elinizle tutun.
6. Elektrik kablosunun fişini prize takın.7. Açma/Kapama düğmesine (1) basın ve basılı
tutun.- Cihaz çalışmaya başlar.
8. Turbo düğmesine (2) basın ve basılı tutun.
C Cihazı sürekli olarak 10 saniyeden daha uzun süreyle kullanmayın.
CEn iyi sonuçları elde etmek için Açma/Kapama ve turbo düğmesine aralıklı olarak basın.
9. İşiniz bittiğinde Açma/Kapama düğmesini (1) veya turbo düğmesini (2) bırakın ve cihazın fişini prizden çekin. Motor ünitesini (3), cihazın kenarlarında bulunan aksesuar çıkarma düğmelerini (6) iterek ve dışa doğru çekerek parçalama kapağından (6) çıkarın. Parçalama kapağını (6) çıkarın. Parçalanmış yiyeceği çıkarmadan önce parçalama bıçağını (7) parçalama kasesinden (8) dikkatli şekilde çıkarın.
38 / 69 TR El Blender Seti / Kullanma Kılavuzu
Tarif fikirleri: Tereyağ ve Bal KarışımıDerin dondurucuda tutulmuş tereyağı (en az 4 saat dondurucuda tutulmalı ve yaklaşık 10-15 mm x 35-40 mm ebatında parçalara bölünmüş olmalıdır) ve buzdolabında tutulmuş bal (buzdolabında en az1 gün tutulmuş olmalıdır).
3.5 Çırpma • Krema ve yumurta çırpmak için çırpma telini (11)
kullanabilirsiniz. • Tek seferde asla 4 adet yumurta beyazından
veya 200 ml kremadan fazlasını çırpmayın.1. Yerine oturacak şekilde çırpma telini (11) çırpma
teli tutucusuna (9) takın.2. Çırpma teli tutucusunu motor ünitesine
(3) yerleştirerek motor ünitesini çırpma teli tutucusuna (9) takın. Çırpma teli tutucusunu motor ünitesine doğru itin. Çırpma teli tutucusunun motor ünitesine iyice takıldığından emin olun.
3. İşlemden geçirmek istediğiniz malzemeleri ölçme kabına (10) veya benzeri bir kaseye koyun.
4. Elektrik kablosunun fişini prize takın.5. Çırpma telini (11) işlemden geçirilecek olan
karışıma tutun.6. Açma/Kapama düğmesine (1) basın ve basılı
tutun.- Cihaz çalışmaya başlar.
7. Turbo düğmesine (2) basın ve basılı tutun.8. Malzemeleri çırpmak için cihazı yavaşça yukarı
ve aşağı ve dairesel olarak hareket ettirin.9. İşiniz bittiğinde Açma/Kapama düğmesini (3)
veya turbo düğmesini (4) bırakın ve cihazın fişini prizden çekin. Karışımı ölçme kabından (13) çıkarın. Motor ünitesini (3), cihazın kenarlarında bulunan aksesuar çıkarma düğmelerini (11) iterek ve dışa doğru çekerek çırpma teli tutucusundan (6) çıkarın.
3 Kullanım
39 / 69 TREl Blender Seti / Kullanma Kılavuzu
4 Bilgiler
4.1 Temizleme ve bakım
AUYARI: Cihazı temizlemek için kesinlikle benzin, solventler ya da aşındırıcı temizleyiciler, metal nesneler veya sert fırçalar kullanmayın.
AUYARI: Parçalama bıçaklarına çıplak elle dokunmayın. Bıçaklar oldukça keskindir. Bir fırça kullanın!
AUYARI: Motor ünitesini (3) veya elektrik kablosunu suya ya da diğer sıvıların içine sokmayın ve asla akan suyun altına tutmayın.
1. Cihazı kapatın ve elektrik fişini takılı olduğu prizinden çıkartın.
2. Cihazın tamamen soğumasını bekleyin.3. Motor ünitesini (3) temizlemek için nemli ve
yumuşak bir bez kullanın.4. Cihazı kullandıktan hemen sonra karıştırma
aksesuarını (5) ve ölçü kabını (10) ılık, sabunlu suyla temizleyin ve iyice kurulayın. Bu parçaları asla bulaşık makinesinde yıkamayın.
CTemizlik sonrasında cihazı kullanmadan veya saklamadan önce yumuşak bir bez ile tüm parçalarını kurulayın.
4.2 Saklama • Cihazı uzun süre kullanmayı düşünmüyorsanız,
lütfen dikkatli bir şekilde saklayın. Cihazın fişinin çıkarıldığından ve tamamen kuru olduğundan emin olun.
• Cihazı serin ve kuru bir yerde saklayın. Cihazın, çocukların ulaşamayacağı bir yerde muhafaza edildiğinden emin olun.
4.3 Taşıma ve nakliye • Taşıma ve nakliye sırasında cihazı orijinal
ambalajı ile birlikte taşıyın. Cihazın ambalajı, cihazı fiziksel hasarlara karşı koruyacaktır.
• Cihazın veya ambalajının üzerine ağır cisimler koymayın. Cihaz zarar görebilir.
• Cihazın düşürülmesi durumunda cihaz çalışmayabilir veya kalıcı hasar oluşabilir.

Por favor, ¡lea este manual de usuario primero!Estimados clientes,Gracias por escoger un producto Beko. Esperamos que obtenga los mejores resultados de nuestro producto, que ha sido fabricado con gran calidad y con tecnología de vanguardia. Por tanto, le aconsejamos que lea este manual de usuario con atención y todos los demás documentos adjuntos antes de utilizar el aparato y que lo guarde para futuras consultas. Si va a entregar este aparato a otra persona, proporciónele también el manual del usuario. Siga todas las advertencias e instrucciones incluidas en este manual de usuario.
Significado de los símbolosLos símbolos siguientes se usan en las diversas secciones del presente manual:
C Información importante y consejos útiles sobre su uso.
AATENCIÓN: Advertencias de situaciones peligrosas sobre la seguridad de las personas y la propiedad.
Los materiales están diseñados para estar en contacto con la comida.
No sumerja el aparato, el cable eléctrico o el enchufe en agua ni en ningún otro líquido.
Cristal de protección contra descargas eléctricas.
Este aparato ha sido fabricado en unas instalaciones respetuosas con el medio ambiente y en instalaciones de vanguardia.
Cumple con la Directiva RAEE. No contiene policlorobifenilos (PCV).País de origen: P.R.C.

41 / 69 ESSet de Batidora de Mano / Manual de usuario
CONTENIDO
1 Instrucciones importantes para la seguridad y el medio ambiente 42
1.1 Seguridad general . . . . . . . . . . . . . . . . . . . . . . . . . 421.2 Cumple con de la Directiva RAEE y
eliminación de residuos. . . . . . . . . . . . . . . . . . . 441.3 Información de embalaje . . . . . . . . . . . . . . . . . . 441.4 Acciones a llevar a cabo para el ahorro de
energía . . . . . . . . . . . . . . . . . . . . . . . . . . . . . . . . . . . . 44
2 Batidora de Mano 452.1 Información general . . . . . . . . . . . . . . . . . . . . . . . 452.2 Datos técnicos. . . . . . . . . . . . . . . . . . . . . . . . . . . . . 45
3 Funcionamiento 463.1 Preparación . . . . . . . . . . . . . . . . . . . . . . . . . . . . . . . 463.2 Cantidades máximas y tiempo de
preparación . . . . . . . . . . . . . . . . . . . . . . . . . . . . . . . 463.3 Batido . . . . . . . . . . . . . . . . . . . . . . . . . . . . . . . . . . . . . 463.4 Picado . . . . . . . . . . . . . . . . . . . . . . . . . . . . . . . . . . . . . 473.5 Batido . . . . . . . . . . . . . . . . . . . . . . . . . . . . . . . . . . . . . 48
4 Información 494.1 Limpieza y cuidados . . . . . . . . . . . . . . . . . . . . . . . 494.2 Almacenaje. . . . . . . . . . . . . . . . . . . . . . . . . . . . . . . . 494.3 Manejo y transporte. . . . . . . . . . . . . . . . . . . . . . . 49
42 / 69 ES Set de Batidora de Mano / Manual de usuario
Esta sección contiene instrucciones de seguridad que ayudarán a la protección contra los riesgos de lesiones personales o daño a la propiedad. El incumplimiento de estas instrucciones causará la pérdida de la garantía.
1.1 Seguridad general• Este aparato cumple con los
estándares internacionales sobre seguridad.
• Las personas cuyas facultades físicas, sensoriales o mentales estén mermadas o que carezcan de la experiencia o conocimientos necesarios sobre el aparato pueden usar el aparato, siempre y cuando lo hagan bajo supervisión o reciban la información pertinente sobre su uso seguro y los peligros asociados.
• Los niños no deben usar este aparato.
• M a n t e n g a s i e m p r e e l electrodoméstico y el cable fuera del alcance de los menores.
• No use el aparato si el cable de alimentación o el aparato mismo están dañados. Contacte con un servicio de atención al cliente autorizado.
• Sólo use las piezas originales o las piezas recomendadas por el fabricante.
• No trate de desmontar el aparato. • Su fuente de alimentación debe
ser conforme a la información que se indica en la placa de datos del aparato.
• No utilice este aparato con un cable alargador.
• No tire del cable de alimentación cuando desenchufe el aparato.
• Espere a que los accesorios se detengan y desenchufe el aparato cuando lo deje desatendido, mientras coloque/retire los accesorios o antes de limpiarlo.
• No toque el cable o el aparato con las manos mojadas o húmedas.
• No utilice el aparato para comida caliente.
1 Instrucciones importantes para la seguridad y el medio ambiente

43 / 69 ESSet de Batidora de Mano / Manual de usuario
• No use el aparato de forma continua durante más de 10 segundos con el fin de evitar que se sobrecaliente. Déjelo enfriar durante 1 minutos entre cada 10 segundos de utilización.
• Utilice el aparato únicamente con la base de goma y el recipiente de vidrio suministrados.
• No utilice el aparato sin haber depositado ingredientes en el vaso de mezcla.
• Retire las pipas y los huesos de los alimentos para evitar dañar las cuchillas y el propio aparato.
• Este aparato no es apto para triturar alimentos secos o duros, ya que las cuchillas se desafilarían con rapidez.
• Siga todas las advertencias para evitar lesiones debido a un uso incorrecto.
• Cuando vacíe el recipiente, podría sufrir graves heridas debido al uso incorrecto de coger las cuchillas de picado con las manos sin protección durante la limpieza. Use la sección de plástico para aguantar la cuchilla de picado.
• Después de limpiarlo, seque el aparato y todas las piezas antes de conectarlo a la red de alimentación y antes de acoplarle las piezas.
• No sumerja el aparato, el cable eléctrico o el enchufe en agua ni en ningún otro líquido.
• No utilice el aparato ni coloque ninguna parte de él o ninguno de sus componentes en superficies calientes o cerca de de ellas.
• Si guarda el material de embalaje, manténgalo fuera del alcance de los niños.
1 Instrucciones importantes para la seguridad y el medio ambiente
44 / 69 ES Set de Batidora de Mano / Manual de usuario
1.2 Cumple con de la Directiva RAEE y eliminación de residuos.
Este producto no incluye los materiales nocivos y prohibidos especificados en la normativa para la supervisión de los residuos de aparatos eléctricos y electrónicos de desecho (RAEE),
promulgada por el Ministerio de Medio Ambiente y Planificación Urbanística. Cumple con la Directiva RAEE. En la fabricación de este producto se han empleado piezas y materiales de alta calidad, que pueden reutilizarse y reciclarse. Por lo tanto, no arroje este producto a la basura junto con sus residuos domésticos normales al final de su vida útil. Llévelo a un punto de recogida para el reciclado de sus componentes eléctricos y electrónicos. Diríjase a la autoridad local de su zona para obtener la dirección de dichos puntos de recogida. Ayude a proteger el medio ambiente reciclando los productos usados.
1.3 Información de embalajeEl embalaje del producto está fabricado con material reciclable de acuerdo con las normativas nacionales sobre medio ambiente. No se deshaga del material de
embalaje ni de los desechos domésticos o de otro tipo. Llévelos a los puntos de recogida de material de embalaje designados por las autoridades locales.1.4 Acciones a llevar a cabo para el ahorro de energíaSiga los tiempos recomendados en el manual durante el uso. Desenchufe el aparato tras su uso.
1 Instrucciones importantes para la seguridad y el medio ambiente
45 / 69 ESSet de Batidora de Mano / Manual de usuario
2 Batidora de Mano2.1 Información general
Los valores declarados en las etiquetas adosadas al aparato o indicados en los demás documentos impresos suministrados junto con él representan los valores obtenidos en los laboratorios de acuerdo con los estándares pertinentes. Estos valores pueden variar según el uso que se haga del aparato y de las condiciones ambientales.
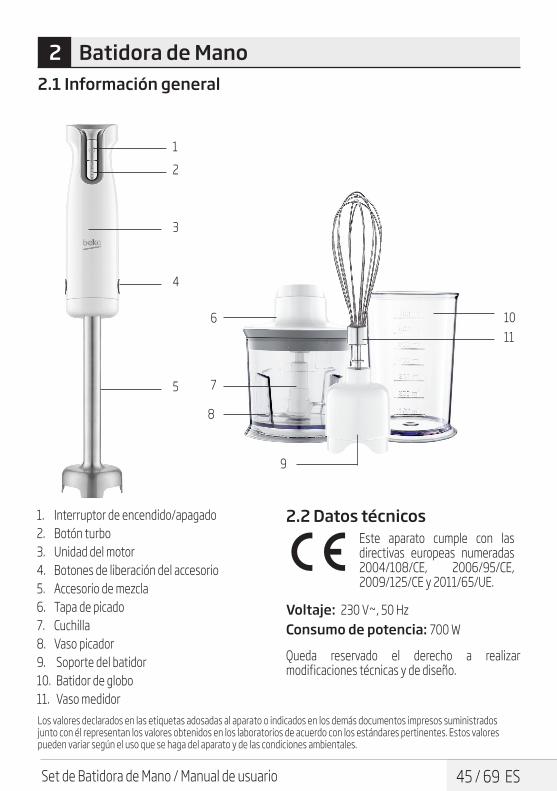
1. Interruptor de encendido/apagado2. Botón turbo3. Unidad del motor4. Botones de liberación del accesorio5. Accesorio de mezcla6. Tapa de picado7. Cuchilla8. Vaso picador9. Soporte del batidor10. Batidor de globo11. Vaso medidor
2.2 Datos técnicosEste aparato cumple con las directivas europeas numeradas 2004/108/CE, 2006/95/CE, 2009/125/CE y 2011/65/UE.
Voltaje: 230 V~, 50 HzConsumo de potencia: 700 W
Queda reservado el derecho a realizar modificaciones técnicas y de diseño.
10
8
6
7
12
3
4
5
11
9

46 / 69 ES Set de Batidora de Mano / Manual de usuario
3 Funcionamiento
3.1 Preparación 1. Retire todos los materiales de embalaje y las
etiquetas adhesivas, y deshágase de ellos según la legislación vigente al respecto.
2. Antes de utilizar el aparato por primera vez, limpie las piezas que entran en contacto con los alimentos (vea la sección “Limpieza y cuidados”).
3. Corte los alimentos en trozos pequeños antes de procesarlos con el aparato.
3.2 Cantidades máximas y tiempo de preparación
Ingredientes Cantidades máximas
Tiempo de preparación
Carne/pescado 200 g 10-15
segundosHierbas 20 g 20 segundosFrutos secos 200 g 15 segundosQueso 150 g 15 segundosPan 1 rebanada 20 segundosHuevos (duros) 2 huevos 5 segundos
Cebolla (cortar en 8 trozos)
100 g 10 segundos
3.3 Batido1. Deposite los alimentos que desee triturar o
mezclar en el vaso medidor (11) o recipiente similar.
2. Coloque el accesorio de mezcla (5) sobre la unidad del motor (3) y empújelo hasta que encaje en ella. Asegúrese de que el accesorio de mezcla esté correctamente asentado en la unidad del motor.
3. Inserte el enchufe en la toma de pared.
4. Sumerja el accesorio de mezcla (5) en el vaso medidor (13) que contiene los ingredientes que desee mezclar.
CPara evitar salpicaduras, no pulse el botón de encendido/apagado (1)ni el botón turbo (2) hasta que el accesorio de mezcla esté sumergido en los ingredientes.
5. Pulse el botón de encendido/apagado (1) y manténgalo en esa posición. – El aparato se pone en marcha.
6. Use el control de velocidad para seleccionar una velocidad o mantenga pulsado el botón turbo (2).– El indicador de velocidad LED se ilumina
según la velocidad deseada 1-6.
CAl usar el botón turbo, el aparato opera a la máxima velocidad. En este caso, no es posible ajustar la velocidad con el control de velocidad.
CMientras se use el botón, todos los indicadores de velocidad LED permanecerán encendidos.
7. Mueva el aparato lentamente hacia arriba y hacia abajo y en círculos para mezclar los ingredientes.
C Apague siempre el aparato antes de retirar los alimentos preparados.
8. Suelte el botón de encendido/apagado (1) o el botón turbo (2) cuando haya finalizado y desconecte el enchufe de la toma de corriente de la pared. Retire la mezcla del vaso medidor (11).
9. Desacople el accesorio de mezcla (5) únicamente pulsando los botones de liberación del accesorio (6) ubicados a los lados del aparato y retirando este de la unidad del motor.
47 / 69 ESSet de Batidora de Mano / Manual de usuario
3 Funcionamiento
CNo use el aparato de forma continua durante más de 10 segundos con el fin de evitar que se sobrecaliente.
CNunca haga funcionar el aparato durante más tiempo del necesario para la preparación de los alimentos.
CNo llene demasiado el vaso medidor (11) o el vaso mezclador para evitar que la mezcla se derrame. Resulta más fácil preparar cantidades pequeñas.
CPara evitar accidentes, use la tapa del vaso como alfombrilla antideslizante colocando la base del vaso sobre la tapa.
CSi desea utilizar el accesorio de mezcla directamente en la cazuela, retírela antes del fuego para evitar que el accesorio de mezcla se caliente demasiado.
3.4 Picado
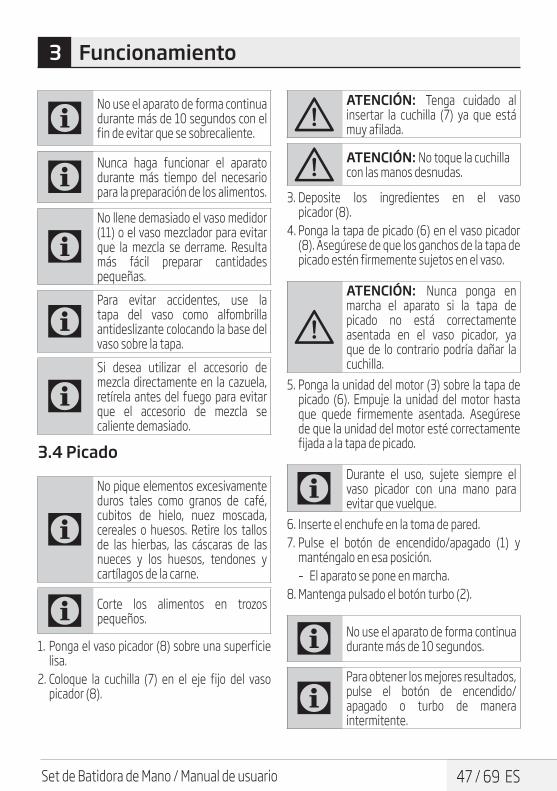
CNo pique elementos excesivamente duros tales como granos de café, cubitos de hielo, nuez moscada, cereales o huesos. Retire los tallos de las hierbas, las cáscaras de las nueces y los huesos, tendones y cartílagos de la carne.
C Corte los alimentos en trozos pequeños.
1. Ponga el vaso picador (8) sobre una superficie lisa.
2. Coloque la cuchilla (7) en el eje fijo del vaso picador (8).
AATENCIÓN: Tenga cuidado al insertar la cuchilla (7) ya que está muy afilada.
A ATENCIÓN: No toque la cuchilla con las manos desnudas.
3. Deposite los ingredientes en el vaso picador (8).
4. Ponga la tapa de picado (6) en el vaso picador (8). Asegúrese de que los ganchos de la tapa de picado estén firmemente sujetos en el vaso.
AATENCIÓN: Nunca ponga en marcha el aparato si la tapa de picado no está correctamente asentada en el vaso picador, ya que de lo contrario podría dañar la cuchilla.
5. Ponga la unidad del motor (3) sobre la tapa de picado (6). Empuje la unidad del motor hasta que quede firmemente asentada. Asegúrese de que la unidad del motor esté correctamente fijada a la tapa de picado.
CDurante el uso, sujete siempre el vaso picador con una mano para evitar que vuelque.
6. Inserte el enchufe en la toma de pared.7. Pulse el botón de encendido/apagado (1) y
manténgalo en esa posición.– El aparato se pone en marcha.
8. Mantenga pulsado el botón turbo (2).
C No use el aparato de forma continua durante más de 10 segundos.
CPara obtener los mejores resultados, pulse el botón de encendido/apagado o turbo de manera intermitente.
48 / 69 ES Set de Batidora de Mano / Manual de usuario
9. Suelte el botón de encendido/apagado (1) o el botón turbo (2) cuando haya finalizado y desconecte el enchufe de la toma de corriente de la pared. Retire la unidad del motor (3) de la tapa de picado (6) únicamente pulsando los botones de liberación del accesorio (4) ubicados a los lados del aparato y tirando de ella. Retire la tapa de picado (6). Retire con cuidado la cuchilla (7) del vaso picador (8) antes de retirar sus contenidos.
Receta de ejemplo: Mezcla mantequilla + mielLa mantequilla sacada del congelador (debe mantenerse en el congelador un mínimo de 4 h y cortarse en trozos de aproximadamente 10-15 mm x 35-40 mm) y la miel sacada del refrigerador (debe guardarse en el refrigerador un mínimo de 1 día).
3.5 Batido • Puede usar el batidor de globo (10) para montar
nata y batir huevos. • Nunca añada más de 4 claras de huevo o 200
ml de nata.1. Inserte el batidor de globo (10) en el soporte del
batidor (11) hasta que encaje haciendo clic.2. Acople la unidad del motor (3) al soporte del
batidor (9) colocando este encima de la unidad del motor. Introduzca el soporte del batidor en la unidad del motor. Asegúrese de que el soporte del batidor esté correctamente asentado en la unidad del motor.
3. Deposite los ingredientes que desee preparar en el vaso medidor (11) o recipiente similar.
4. Inserte el enchufe en la toma de pared.5. Introduzca el batidor de globo (10) en la mezcla
de ingredientes que desee preparar.6. Pulse el botón de encendido/apagado (1) y
manténgalo en esa posición.– El aparato se pone en marcha.
7. Mantenga pulsado el botón turbo (2).8. Mueva el aparato lentamente hacia arriba
y hacia abajo y en círculos para mezclar los ingredientes.
9. Suelte el botón de encendido/apagado (1) o el botón turbo (2) cuando haya finalizado y desconecte el enchufe de la toma de corriente de la pared. Retire la mezcla del vaso medidor (11). Retire la unidad del motor (3) del soporte del batidor (9) únicamente pulsando los botones de liberación del accesorio (4) ubicados a los lados del aparato y tirando de ella.
3 Funcionamiento

49 / 69 ESSet de Batidora de Mano / Manual de usuario
4 Información
4.1 Limpieza y cuidados
AATENCIÓN: No utilice petróleo, disolventes, limpiadores abrasivos, objetos metálicos ni cepillos duros para limpiar el aparato.
AATENCIÓN: No toque las cuchillas con las manos desnudas, ya que están muy afiladas. Límpielas con un cepillo.
AATENCIÓN: Nunca sumerja en agua ni en ningún otro líquido la unidad del motor (3) o el cable de corriente, ni siquiera bajo el chorro de agua corriente.
1. Apague el aparato y desconéctelo de la toma de corriente de la pared.
2. Deje que el aparato se enfríe completamente.3. Utilice un trapo húmedo para limpiar la
unidad del motor (3).4. Tras el uso, limpie inmediatamente el accesorio
de mezcla (5) y el recipiente medidor (11) en agua tibia jabonosa, y séquelos bien. Nunca lave dichos accesorios en el lavavajillas.
CAntes de usar o guardar el aparato tras una limpieza, seque con cuidado todas las piezas con un paño suave.
4.2 Almacenaje • Si no va a utilizar el aparato durante un
periodo prolongado de tiempo, guárdelo cuidadosamente. Asegúrese de que el aparato esté desenchufado y completamente seco.
• Guarde el aparato en un lugar fresco y seco. Mantenga el aparato fuera del alcance de los niños.
4.3 Manejo y transporte • Durante el manejo y el transporte, lleve el
aparato en su embalaje original. El embalaje del aparato lo protege de daños físicos.
• No coloque cargas pesadas en el aparato o en el embalaje. El aparato podría dañarse.
• Dejar caer el aparato causará que éste no funcione o causará un daño permanente.
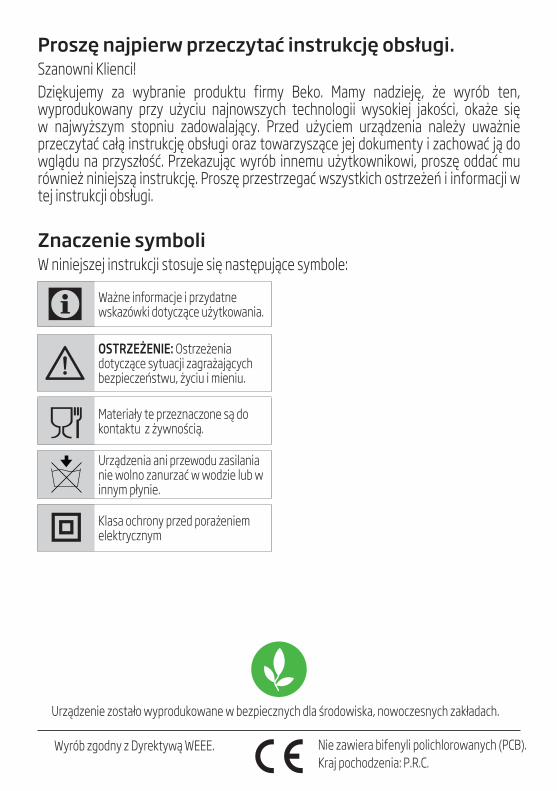
Proszę najpierw przeczytać instrukcję obsługi.Szanowni Klienci!Dziękujemy za wybranie produktu firmy Beko. Mamy nadzieję, że wyrób ten, wyprodukowany przy użyciu najnowszych technologii wysokiej jakości, okaże się w najwyższym stopniu zadowalający. Przed użyciem urządzenia należy uważnie przeczytać całą instrukcję obsługi oraz towarzyszące jej dokumenty i zachować ją do wglądu na przyszłość. Przekazując wyrób innemu użytkownikowi, proszę oddać mu również niniejszą instrukcję. Proszę przestrzegać wszystkich ostrzeżeń i informacji w tej instrukcji obsługi.
Znaczenie symboliW niniejszej instrukcji stosuje się następujące symbole:
C Ważne informacje i przydatne wskazówki dotyczące użytkowania.
AOSTRZEŻENIE: Ostrzeżenia dotyczące sytuacji zagrażających bezpieczeństwu, życiu i mieniu.
Materiały te przeznaczone są do kontaktu z żywnością.
Urządzenia ani przewodu zasilania nie wolno zanurzać w wodzie lub w innym płynie.
Klasa ochrony przed porażeniem elektrycznym
Urządzenie zostało wyprodukowane w bezpiecznych dla środowiska, nowoczesnych zakładach.
Wyrób zgodny z Dyrektywą WEEE. Nie zawiera bifenyli polichlorowanych (PCB).Kraj pochodzenia: P.R.C.

51 / 69 PLBlendera Ręcznego / Instrukcja obsługi
SPIS TREŚCI
1 Ważne instrukcje zachowania bezpieczeństwa i ochrony środowiska naturalnego 52
1.1 Ogólne zasady zachowania bezpieczeństwa 521.2 Zgodność z dyrektywą WEEE i pozbywanie się
zużytych wyrobów . . . . . . . . . . . . . . . . . . . . . . . . 541.3 Informacje o opakowaniu. . . . . . . . . . . . . . . . . . 541.4 Oszczędzanie energii . . . . . . . . . . . . . . . . . . . . . . 54
2 Blendera Ręcznego 552.1 Opis ogólny . . . . . . . . . . . . . . . . . . . . . . . . . . . . . . . . 552.2 Dane techniczne . . . . . . . . . . . . . . . . . . . . . . . . . . 55
3 Obsługa 563.1 Przygotowanie . . . . . . . . . . . . . . . . . . . . . . . . . . . . 563.2 Maksymalne ilości i czasy przyrządzania . . 563.3 Blendowanie . . . . . . . . . . . . . . . . . . . . . . . . . . . . . . 563.4 Siekanie . . . . . . . . . . . . . . . . . . . . . . . . . . . . . . . . . . . 573.5 Ubijanie . . . . . . . . . . . . . . . . . . . . . . . . . . . . . . . . . . . 58
4 Informacja 594.1 Czyszczenie i konserwacja . . . . . . . . . . . . . . . . 594.2 Przechowywanie. . . . . . . . . . . . . . . . . . . . . . . . . . 594.3 Przenoszenie i transport . . . . . . . . . . . . . . . . . . 59

52 / 69 PL Blendera Ręcznego / Instrukcja obsługi
Rozdział ten zawiera instrukcje dotyczące bezpieczeństwa, które pomogą chronić się przed groźbą obrażeń ciała i szkód dla mienia. Nieprzestrzeganie tych instrukcji powoduje unieważnienie udzielonej gwarancji.
1.1 Ogólne zasady zachowania bezpieczeństwa• Urządzenie jest zgodne z
międzynarodowymi normami bezpieczeństwa.
• Urządzenie może być używane przez osoby niepełnosprawne fizycznie, psychicznie lub umysłowo, a także osoby bez doświadczenia lub wiedzy w zakresie obsługi urządzenia, o ile znajdują się one pod nadzorem lub zostały szczegółowo poinstruowane o bezpiecznym korzystaniu z urządzenia i potencjalnych zagrożeniach.
• To urządzenie nie powinno być używane przez dzieci.
• Urządzenie to i jego przewód należy trzymać z dala od dzieci.
• Nie należy używać uszkodzonego urządzenia lub urządzenia z uszkodzonym przewodem zasilającym. Należy skontaktować się z autoryzowanym punktem serwisowym.
• Należy stosować wyłącznie oryginalne lub zalecane przez producenta części zamienne.
• Nie należy próbować rozkładać tego urządzenia na części.
• Zasilanie z domowej sieci elektrycznej powinno być zgodne z informacjami podanymi na tabliczce znamionowej tego urządzenia.
• Nie należy używać przedłużaczy razem z tym urządzeniem.
• Nie należy wyjmować wtyczki z gniazdka, ciągnąc za przewód zasilający.
• Przed czyszczeniem, zmianą akcesoriów lub przed odłożeniem urządzenia należy odczekać, aż ruchome elementy przestaną się obracać, a następnie odłączyć zasilanie.
• Nie wolno dotykać wtyczki urządzenia mokrymi lub wilgotnymi dłońmi.
1 Ważne instrukcje zachowania bezpieczeństwa i ochrony środowiska naturalnego

53 / 69 PLBlendera Ręcznego / Instrukcja obsługi
• Nie wolno używać urządzenia do gorących potraw.
• Aby uniknąć przegrzania, nie należy nieprzerwanie używać urządzenia dłużej niż przez 10 sekund. Pozostawiaj je, aby ostygło, na 1 minutę po każdych 10 sekundach pracy.
• Urządzenia należy używać wyłącznie z elementami dołączonymi do zestawu: gumową podstawą i szklanym pojemnikiem.
• Urządzenia nie należy używać bez składników w misce siekania.
• Z owoców należy wyjmować twarde części i pestki, aby nie uszkodzić ostrzy lub urządzenia.
• W urządzeniu nie można kruszyć lodu ani używać do suchych i twardych produktów s p o ż y w c z y c h , p o n i e w a ż spowoduje to szybkie stępienie ostrzy.
• A b y u n i k n ą ć o b r a ż e ń spowodowanych nieprawidłowym u ż y t k o w a n i e m , n a l e ż y p o s t ę p owa ć zg o d n i e z instrukcjami.
• Podczas opróżniania zbiornika, czyszczenia lub chwytania ostrzy należy zachować ostrożność, aby uniknąć obrażeń. Element z ostrzem należy chwytać za plastikową część.
• Po czyszczeniu, a przed podłączeniem tego urządzenia do zasilania i założeniem akcesoriów, należy osuszyć wszystkie elementy.
• U r z ą d z e n i a , p r z e w o d u zasilającego ani wtyczki nie wolno zanurzać w wodzie ani w innym płynie.
• Nie należy używać tego urządzenia ani umieszczać żadnej jego części na gorących powierzchniach, ani w ich pobliżu.
• Opakowanie urządzenia należy przechowywać poza zasięgiem dzieci.
1 Ważne instrukcje zachowania bezpieczeństwa i ochrony środowiska naturalnego
54 / 69 PL Blendera Ręcznego / Instrukcja obsługi
1.2 Zgodność z dyrektywą WEEE i pozbywanie się zużytych wyrobów
Wyrób ten nie zawiera materiałów szkodliwych ani zabronionych określonych w „Rozporządzeniu dot. nadzorowania odpadów urządzeń elektrycznych i elektronicznych”
wydanym przez Ministerstwo Środowiska i Urbanistyki. Wyrób zgodny z Rozporządzeniem WEEE. Urządzenie wykonano z części i materiałów wysokiej jakości, które mogą być odzyskane i użyte jako surowce wtórne. W związku z tym po zakończeniu użytkowania nie należy pozbywać się go razem z innymi odpadami domowymi. Należy przekazać wyrób do punktu zbiórki urządzeń elektrycznych i elektronicznych na surowce wtórne. Informacje o lokalizacji takich punktów zbiórki można uzyskać od władz miejscowych. Odzyskując surowce z używanych wyrobów, pomagamy chronić środowisko naturalne.
1.3 Informacje o opakowaniuOpakowanie urządzenia wykonano z materiałów nadających się do recyklingu zgodnie z przepisami krajowymi. Nie wyrzucaj materiałów opakowaniowych
do śmieci wraz z innymi odpadkami domowymi. Oddaj je w jednym z wyznaczonych przez władze lokalne punktów zbiórki materiałów opakowaniowych.
1.4 Oszczędzanie energiiNależy przestrzegać zalecanego czasu pracy urządzenia określonego w instrukcji obsługi. Po użyciu wyjąć wtyczkę z gniazdka.
1 Ważne instrukcje zachowania bezpieczeństwa i ochrony środowiska naturalnego
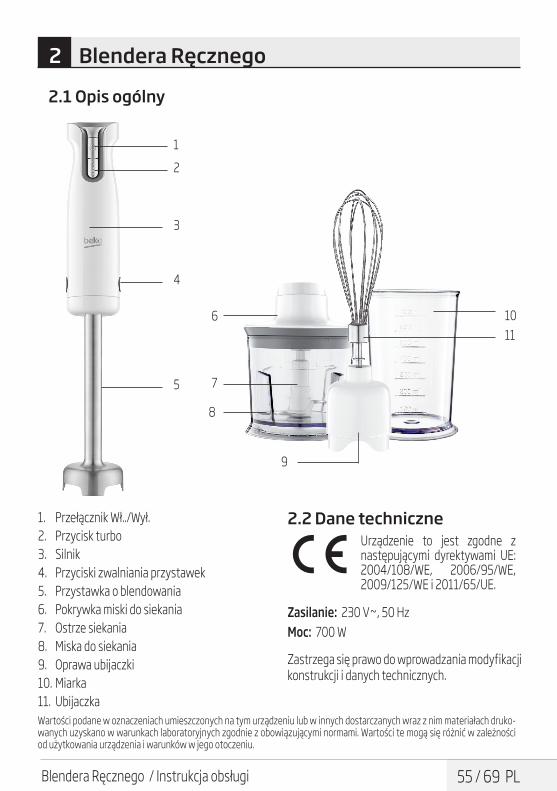
55 / 69 PLBlendera Ręcznego / Instrukcja obsługi
2 Blendera Ręcznego
Wartości podane w oznaczeniach umieszczonych na tym urządzeniu lub w innych dostarczanych wraz z nim materiałach druko-wanych uzyskano w warunkach laboratoryjnych zgodnie z obowiązującymi normami. Wartości te mogą się różnić w zależności od użytkowania urządzenia i warunków w jego otoczeniu.
1. Przełącznik Wł../Wył.2. Przycisk turbo3. Silnik4. Przyciski zwalniania przystawek5. Przystawka o blendowania6. Pokrywka miski do siekania7. Ostrze siekania8. Miska do siekania9. Oprawa ubijaczki10. Miarka11. Ubijaczka
2.2 Dane techniczneUrządzenie to jest zgodne z następującymi dyrektywami UE: 2004/108/WE, 2006/95/WE, 2009/125/WE i 2011/65/UE.
Zasilanie: 230 V~, 50 HzMoc: 700 W
Zastrzega się prawo do wprowadzania modyfikacji konstrukcji i danych technicznych.
2.1 Opis ogólny
10
8
6
7
12
3
4
5
11
9
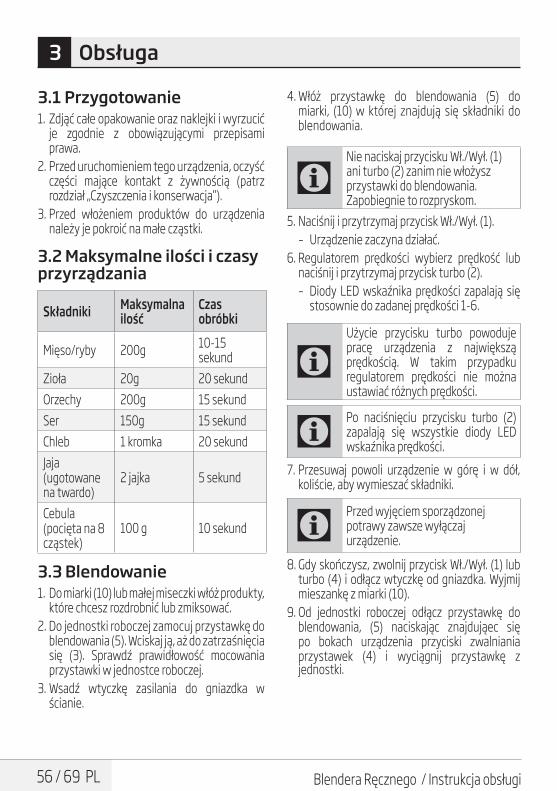
56 / 69 PL Blendera Ręcznego / Instrukcja obsługi
3 Obsługa
3.1 Przygotowanie 1. Zdjąć całe opakowanie oraz naklejki i wyrzucić
je zgodnie z obowiązującymi przepisami prawa.
2. Przed uruchomieniem tego urządzenia, oczyść części mające kontakt z żywnością (patrz rozdział „Czyszczenia i konserwacja”).
3. Przed włożeniem produktów do urządzenia należy je pokroić na małe cząstki.
3.2 Maksymalne ilości i czasy przyrządzania
Składniki Maksymalna ilość
Czas obróbki
Mięso/ryby 200g 10-15 sekund
Zioła 20g 20 sekundOrzechy 200g 15 sekundSer 150g 15 sekundChleb 1 kromka 20 sekundJaja (ugotowane na twardo)
2 jajka 5 sekund
Cebula (pocięta na 8 cząstek)
100 g 10 sekund
3.3 Blendowanie1. Do miarki (10) lub małej miseczki włóż produkty,
które chcesz rozdrobnić lub zmiksować. 2. Do jednostki roboczej zamocuj przystawkę do
blendowania (5). Wciskaj ją, aż do zatrzaśnięcia się (3). Sprawdź prawidłowość mocowania przystawki w jednostce roboczej.
3. Wsadź wtyczkę zasilania do gniazdka w ścianie.
4. Włóż przystawkę do blendowania (5) do miarki, (10) w której znajdują się składniki do blendowania.
CNie naciskaj przycisku Wł./Wył. (1)ani turbo (2) zanim nie włożysz przystawki do blendowania. Zapobiegnie to rozpryskom.
5. Naciśnij i przytrzymaj przycisk Wł./Wył. (1). – Urządzenie zaczyna działać.
6. Regulatorem prędkości wybierz prędkość lub naciśnij i przytrzymaj przycisk turbo (2).– Diody LED wskaźnika prędkości zapalają się
stosownie do zadanej prędkości 1-6.
CUżycie przycisku turbo powoduje pracę urządzenia z największą prędkością. W takim przypadku regulatorem prędkości nie można ustawiać różnych prędkości.
CPo naciśnięciu przycisku turbo (2)zapalają się wszystkie diody LED wskaźnika prędkości.
7. Przesuwaj powoli urządzenie w górę i w dół, koliście, aby wymieszać składniki.
CPrzed wyjęciem sporządzonej potrawy zawsze wyłączaj urządzenie.
8. Gdy skończysz, zwolnij przycisk Wł./Wył. (1) lub turbo (4) i odłącz wtyczkę od gniazdka. Wyjmij mieszankę z miarki (10).
9. Od jednostki roboczej odłącz przystawkę do blendowania, (5) naciskając znajdująec się po bokach urządzenia przyciski zwalniania przystawek (4) i wyciągnij przystawkę z jednostki.

57 / 69 PLBlendera Ręcznego / Instrukcja obsługi
3 Obsługa
CNie używaj tego urządzenia nieprzerwanie przez ponad 10 sekund, ponieważ dłuższe używanie może spowodować jego przegrzanie.
CUrządzenie nigdy nie może być włączone na dłużej niż to jest niezbędne do sporządzenia potrawy.
CAby zapobiec przelewaniu się mieszanki nie przepełniaj marki (10)ani miski. Łatwiej jest przetwarzać mniejsze ilości.
CUżywaj pokrywki miarki jako podkładki antypoślizgowej, zabezpieczającej podstawę. Zapobiegnie to wszelkim wypadkom.
CJeśli chcesz używać przystawkę blendowania bezpośrednio w garnku, najpierw zdejmij garnek z kuchenki, aby nie doszło do przegrzania przystawki.
3.4 Siekanie
CNie siekaj bardzo twardych składników, np. ziaren kawy, kostek lodu, gałki muszkatołowej, zboża ani kości. Zioła obierz z łodyg, wyjmij orzechy ze skorupek, mięso obierz z kości, ścięgien i chrząstek.
C Składnik pokrój na małe cząstki.
1. Załóż Postaw miskę do siekania (6) na miskę równej powierzchni.
2. Nałóż ostrze siekania (7) na stały trzpień w misce do siekania (6).
AOSTRZEŻENIE: Uważaj na palce podczas zakładania ostrza, (7)ponieważ jest ono bardzo ostre.
A OSTRZEŻENIE: Nie dotykaj ich gołymi dłońmi.
3. Włóż składniki do miski do siekania (8).4. Załóż pokrywkę (6) na miskę do siekania (8).
Przed włączeniem urządzenia upewnij się, czy zaczepy pokrywki są dobrze zablokowane na misce.
AOSTRZEŻENIE: Nie wolno używać tego urządzenia gdy pokrywka nie jest prawidłowo założona na miskę, ponieważ może to spowodować uszkodzenie ostrza siekania.
5. Załóż jednostkę roboczą (3) na pokrywkę miski siekania (6). Obróć jednostkę roboczą w prawo, aby ją dobrze zablokować. Sprawdź prawidłowość mocowania jednostki roboczej do pokrywki miski do siekania.
6. Wsadź wtyczkę zasilania do gniazdka w ścianie.7. Naciśnij i przytrzymaj przycisk Wł./Wył. (1).
– Urządzenie zaczyna działać.8. Naciśnij i przytrzymaj przycisk turbo (2).
AOSTRZEŻENIE: Nie używaj tego urządzenia nieprzerwanie przez ponad 10 sekund.
AOSTRZEŻENIE: Aby uzyskać najlepsze wyniki naciskaj na chwilę przycisk Wł./Wył. i turbo.
9. Gdy skończysz, zwolnij przycisk Wł./Wył. (1) lub turbo (2) i odłącz wtyczkę od gniazdka. Odłącz silnik (3) od pokrywki miski (6) naciskając znajdujące się po bokach urządzenia przyciski zwalniania przystawek (4) i wyciągnij przystawkę z jednostki. Zdejmij pokrywkę (6). Wyjmij ostrze siekania (7) z miski siekania (8) i dopiero wtedy wyjmij posiekane składniki.
58 / 69 PL Blendera Ręcznego / Instrukcja obsługi
Przepis: Mieszanka Masło + MiódMasło wyjęte z zamrażarki (powinno być przechowywane w zamrażarce przez co najmniej 4 godz. i pokrojone na kawałki o wielkości około 10-15 mm x 35-40 mm) i miód wyjęty z lodówki (powinien być przechowywany w lodówce przez co najmniej 1 dzień).
3.5 Ubijanie • Ubijaczką możesz ubić śmietanę lub jajka. • Nigdy nie ubijaj więcej niż 4 białka jajek lub 200
ml śmietany.1. Włóż ubijaczkę (11) w oprawę (9), aż zaskoczy.2. Połącz silnik (3) z oprawą ubijaczki (9), wkładając
oprawę do jednostki roboczej. Push the whisk holder to the base unit. Sprawdź prawidłowość mocowania oprawy ubijaczki w jednostce roboczej.
3. Włóż potrzebne składniki do miarki (10) lub podobnego naczynia.
4. Wsadź wtyczkę zasilania do gniazdka w ścianie.5. Przytrzymaj ubijaczkę (11) w mieszance do
ubijania.6. Naciśnij i przytrzymaj przycisk Wł./Wył.(1).
– Urządzenie zaczyna działać.7. Naciśnij i przytrzymaj przycisk turbo (2).8. Przesuwaj powoli urządzenie w górę i w dół,
koliście, aby wymieszać składniki.9. Gdy skończysz, zwolnij przycisk Wł./Wył. (1) lub
turbo (2) i odłącz wtyczkę od gniazdka. Wyjmij mieszankę z miarki (10). Odłącz silnik (3) od uchwytu ubijaczki (9) naciskając znajdujące się po bokach urządzenia przyciski zwalniania przystawek (4) i wyciągnij przystawkę z jednostki.
3 Obsługa

59 / 69 PLBlendera Ręcznego / Instrukcja obsługi
4 Informacja
4.1 Czyszczenie i konserwacja
AOSTRZEŻENIE: Do czyszczenia urządzenia nigdy nie wolno używać benzyny, rozpuszczalników ani szorstkich proszków do czyszczenia, przedmiotów metalowych ani twardych szczotek.
AOSTRZEŻENIE: Nie dotykaj ostrzy gołymi dłońmi. Ostrza są bardzo ostre! Użyj szczoteczki!
AOSTRZEŻENIE: Nigdy nie wkładaj jednostki roboczej (3) ani przewodu zasilania do płynów i nigdy nie myj ich pod bieżącą wodą.
1. Wyłącz urzązdenie i wyjmij wtyczkę z gniazdka.2. Pozostawić czajnik do całkowitego ostygnięcia.3. Do czyszczenia jednostki roboczej używaj
miękkiej wilgotnej ściereczki (3).4. Natychmiast po użyciu umyj przystawkę do
blendowania (5) i miarkę (10) ciepłą wody z mydłem i dokładnie osusz. Nigdy nie wkładaj ich do zmywarki.
CPrzed użyciem tak oczyszczonego urządzenia dokładnie wytrzyj do sucha wszystkie jego części miękkim ręcznikiem.
4.2 Przechowywanie • Jeśli jest planowane nieużywanie tego
urządzenia przez dłuższy czas, należy starannie je przechować. Upewnić się, czy urządzenie jest odłączone od zasilania i zupełnie suche.
• Przechowuj toster w chłodnym i suchym miejscu. Urządzenie to należy chronić przed dostępem dzieci.
4.3 Przenoszenie i transport • Urządzenie należy przenosić i transportować
w oryginalnym opakowaniu. Zabezpiecza ono urządzenie przed fizycznymi uszkodzeniami.
• Nie wolno umieszczać ciężkich ładunków na urządzeniu lub opakowaniu. Może to spowodować uszkodzenie żelazka parowego.
• Upuszczenie żelazka może spowodować jego awarię lub trwałe uszkodzenie.

Vă rugăm să citiţi mai întâi acest manual de utilizare!Stimate client,Vă mulţumim pentru că aţi ales un produs Beko. Sperăm să obţineţi cele mai bune rezultate de la produsul dumneavoastră, care a fost fabricat la o calitate înaltă şi cu tehnologii performante. În acest scop, vă rugăm să citiţi cu grijă şi în întregime acest manual de utilizare şi toate celelalte documente însoţitoare înainte de a utiliza produsul şi să le păstraţi pentru consultări ulterioare. Dacă transmiteţi produsul altei persoane, oferiţi-i şi manualul de utilizare. Respectaţi toate avertismentele şi informaţiile din manualul de utilizare.Semnificaţia simbolurilorUrmătoarele simboluri sunt utilizate în diverse părţi ale acestui manual de utilizare:
C Informaţii importante sau sfaturi utile privind utilizarea.
AAVERTISMENT: Avertismente pentru situaţii periculoase cu privire la siguranţa vieţii şi a proprietăţii.
Potrivit pentru contactul cu alimentele.
Nu imersaţi produsul, cablul de alimentare sau ştecherul în apă sau alte lichide.
Clasă de protecție pentru şoc electric.
Acest produs a fost produs în unităţi moderne care sunt prietenoase cu mediu înconjurător.
Acest produs este conform cu reglementarea WEEE.
Nu conţine PCB.Fabricate în P.R.C
61 / 69 ROBlender de mână / Manual de utilizare
CONŢINUT
1 Instrucțiuni importante de siguranță și mediu înconjurător 62
1.1 Siguranţă generală . . . . . . . . . . . . . . . . . . . . . . . . 621.2 Conform Directivei WEEE şi de eliminare a
produselor reziduale . . . . . . . . . . . . . . . . . . . . . . 641.3 Informaţii despre ambalaj . . . . . . . . . . . . . . . . . 641.4 Lucruri de făcut pentru reducerea de
energie . . . . . . . . . . . . . . . . . . . . . . . . . . . . . . . . . . . . 64
2 Blenderul dumneavoastră de mână 65
2.1 Prezentare generală. . . . . . . . . . . . . . . . . . . . . . . 652.2 Date tehnice. . . . . . . . . . . . . . . . . . . . . . . . . . . . . . . 65
3 Utilizarea 663.1 Utilizare iniţială . . . . . . . . . . . . . . . . . . . . . . . . . . . . 663.2 Cantitățile maxime şi timpii de preparare 663.3 Amestecarea şi tăierea cu arborele de
amestecare . . . . . . . . . . . . . . . . . . . . . . . . . . . . . . . 663.4 Tăierea . . . . . . . . . . . . . . . . . . . . . . . . . . . . . . . . . . . . 673.5 Baterea . . . . . . . . . . . . . . . . . . . . . . . . . . . . . . . . . . . 67
4 Curățarea și întreținerea 694.1 Curăţarea . . . . . . . . . . . . . . . . . . . . . . . . . . . . . . . . . . 694.2 Depozitarea . . . . . . . . . . . . . . . . . . . . . . . . . . . . . . . 694.3 Manevrarea şi transportul. . . . . . . . . . . . . . . . . 69

62 / 69 RO Blender de mână / Manual de utilizare
Această secţiune conţine instrucţiuni privind siguranţa, care au rolul de a preveni vătămările corporale şi pagubele materiale. Nerespectarea acestor instrucţiuni invalidează garanţia furnizată.
1.1 Siguranţă generală• Acest produs este conform cu
standardele internaţionale de siguranţă.
• Acest produs poate fi utilizat de către persoanele ale căror capacități fizice, perceptive sau mentale sunt diminuate sau de persoanele care sunt neexperimentate sau nu cunosc informații despre produs atâta timp cât aceştia sunt supravegheați sau instruiți cu privire la utilizarea în siguranță a produsului şi la pericolelor care le întâlnesc.
• Acest produs nu trebuie să fie utilizat de către copii.
• Mențineți produsul şi cablul său de alimentare departe de copii.
• Nu utilizaţi produsul atunci când cablul de alimentare, lamele sau produsul este avariat. Contactaţi un service autorizat.
• Utilizaţi doar componente originale sau componente recomandate de către producător.
• Nu încercaţi să demontaţi produsul. • Tensiunea de alimentare ale
prizelor trebuie să corespundă cu informaţiile furnizate pe eticheta produsului.
• Nu utilizaţi produsul cu un prelungitor.
• În momentul când scoateţi din priză, nu trageţi de cablu.
• Aşteptați ca accesoriile în mişcare să se oprească şi deconectați produsul în momentul când acesta este lăsat nesupravegheat, în momentul instalării/scoaterii accesoriilor sau înaintea curățării.
• Nu atingeţi ştecherul aparatului cu mâinile umede.
• Nu utilizați acest produs pentru alimentele fierbinți.
• Pentru prevenirea supraîncălzirii, nu utilizați amestecarea cu spirale continuu pentru mai mult de 10 secunde. La fiecare 10 secunde de funcționare, permiteți-i aparatului să se răcească pentru 1 minut.
1 Instrucțiuni importante de siguranță și mediu înconjurător

63 / 69 ROBlender de mână / Manual de utilizare
• Utilizați produsul doar cu baza cauciucată furnizată şi recipientul din sticlă.
• Nu folosiţi aparatul fără ingrediente în vas.
• Scoateți oasele şi pietrele din alimente pentru a preveni avarierea aparatului şi a lamelor.
• Acest produs nu este potrivit pentru alimentele uscate sau dure deoarece acest lucru va cauza ca lamelele să se tocească.
• Respectați toate avertismentele pentru a preveni vătămările datorită utilizării incorecte.
• În momentul când descărcați recipientul, în timpul curățării şi prinderii lamelelor de tocare cu mâinile goale pot rezulta vătămări grave datorită unei utilizări incorecte. În momentul când doriți să țineți lamele de tocare, utilizați secțiunea din plastic.
• După curățare, uscați produsul şi toate componentele înainte de a-l conecta la priza principală şi înainte de a ataşa componentele.
• Nu imersaţi produsul, cablul de alimentare sau ştecherul în apă sau alte lichide.
• Nu utilizați sau plasați orice componentă al acestui produs sau componentele sale pe sau lângă suprafețe fierbinți.
• Dacă menţineţi materialele de ambalare, depozitaţi-le departe de copii.
1 Instrucțiuni importante de siguranță și mediu înconjurător
64 / 69 RO Blender de mână / Manual de utilizare
1.2 Conform Directivei WEEE şi de eliminare a produselor reziduale
Acest produs nu conţine materiale periculoase sau interzise specificate în ”Regulamentul pentru Supervizare a Produselor Electrice şi Electronice Reziduale” eliberat de către Ministerul
Mediului şi Planificării Urbane. Conform Directivei WEEE. Acest produs a fost fabricat folosind componente şi materiale de înaltă calitate, care pot fi refolosite şi reciclate. Aşadar, la sfârşitul perioadei sale de utilizare, nu aruncaţi produsul împreună cu gunoiul menajer. Duceţi-l la un centru de colectare pentru reciclarea echipamentelor electrice şi electronice. Adresaţi-vă autorităţii locale din zona dumneavoastră pentru aceste puncte de colectare. Contribuiţi la protejarea mediului şi a resurselor naturale prin reciclarea produselor uzate.
1.3 Informaţii despre ambalajAmbalajul produsului este fabricat din materiale reciclabile conform Legislaţiei Naţionale. Ambalajele nu trebuie aruncate împreună cu gunoiul menajer
sau alt tip. Duceţi-le la punctele de colectare destinate ambalajelor amenajate de către autorităţile locale.
1.4 Lucruri de făcut pentru reducerea de energieRespectați timpii recomandați în manual în timpul utilizării. Deconectați produsul după utilizare.
1 Instrucțiuni importante de siguranță și mediu înconjurător
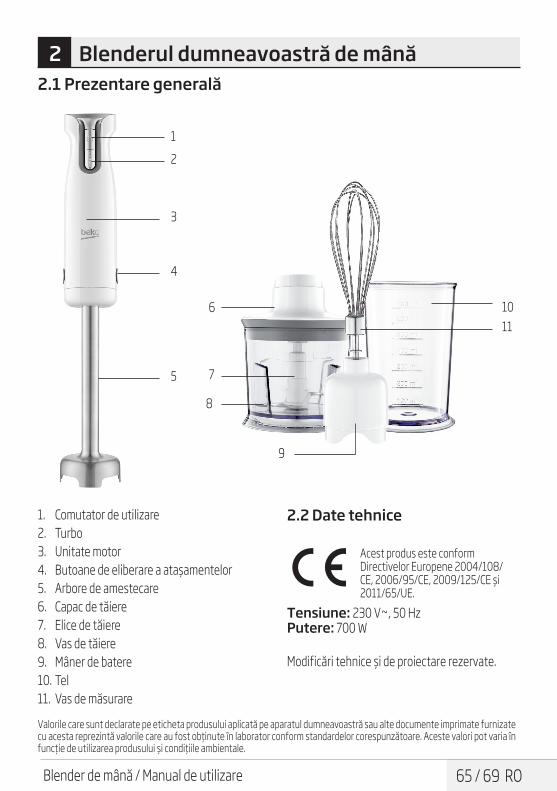
65 / 69 ROBlender de mână / Manual de utilizare
2 Blenderul dumneavoastră de mână 2.1 Prezentare generală
Valorile care sunt declarate pe eticheta produsului aplicată pe aparatul dumneavoastră sau alte documente imprimate furnizate cu acesta reprezintă valorile care au fost obţinute în laborator conform standardelor corespunzătoare. Aceste valori pot varia în funcţie de utilizarea produsului şi condiţiile ambientale.
2.2 Date tehnice
Acest produs este conform Directivelor Europene 2004/108/CE, 2006/95/CE, 2009/125/CE şi 2011/65/UE.
Tensiune: 230 V~, 50 HzPutere: 700 W
Modificări tehnice şi de proiectare rezervate.
1. Comutator de utilizare2. Turbo3. Unitate motor4. Butoane de eliberare a ataşamentelor5. Arbore de amestecare 6. Capac de tăiere7. Elice de tăiere 8. Vas de tăiere 9. Mâner de batere 10. Tel 11. Vas de măsurare
10
8
6
7
12
3
4
5
11
9

66 / 69 RO Blender de mână / Manual de utilizare
3 Utilizarea
3.1 Utilizare iniţială1. Curățați componentele produsului înainte de
utilizarea inițială.2. Asiguraţi-vă că produsul este drept pe o
suprafață echilibrată, dreaptă, curată, uscată şi aderentă.
3. Nu utilizați produsul continuu pentru mai mult de 10 secunde. Opriți dispozitivul atunci când îl utilizați timp de mai mult de 10 secunde şi aşteptați timp de 1 min. înainte de utilizarea acestuia din nou.
3.2 Cantitățile maxime și timpii de preparare
Ingredients Maximumquantities
Processing time
Carne/Peşte 200g 10-15 secondsIerburi 20g 20 secondsAlune 200g 15 secondsBrânză 150g 15 secondsPâine 1 felie 20 secondsOuă ( fiert tare) 2 ouă 5 seconds
Cepe (tăiate în 8 bucăți)
100 g 10 seconds
CÎn momentul când dumneavoastră nu depăşiți 10 secunde în utilizări intermitente, dumneavoastră puteți utiliza produsul până la finalizarea procesului prin aşteptarea câtorva secunde.
3.3 Amestecarea și tăierea cu arborele de amestecare1. Introduceți arborele de amestecare (5) în
recipient.2. Ataşați accesoriul de amestecare (7) la unitatea
motoare (3) prin y pushing the attachment to the motor until it locks. Asigurați-vă că accesoriul de batere este ataşat corespunzător la unitatea motoare
3. Conectați produsul. 4. Utilizați produsul prin apăsarea butonului de
utilizare (1).5. Utilizați controlul de viteză pentru a selecta
viteza sau apăsați şi mențineți butonul turbo (2).
6. Indicatorul de viteză LED iluminează conform vitezei selectate 1- 6.
C Rotiți butonul de reglare al vitezei pentru a creşte gradual viteza.
CÎncepeți amestecarea la o viteză scăzută în timpul amestecării ingre-dientelor. Ingredientele se pot îm-prăştia atunci când dumneavoastră începeți cu o viteză ridicată.
CÎn timpul procesării, dumneavoastră puteți obține rezultate mai bune dacă efectuați mişcări circulare cu produsul.
7. Eliberați butonul de utilizare în momentul când utilizarea este finalizată. Decuplați produsul şi aşteptați ca acesta să se oprească complet.
8. Dezasamblați accesoriul de amestecare (5) doar prin apăsarea pe butoanele de eliberare ale accesoriului (4) montate pe părțile laterale ale produsului şi tragerea din unitatea motoare
67 / 69 ROBlender de mână / Manual de utilizare
3 Utilizarea
A AVERTISMENT: Nu atingeți lamele cu mâinile goale.
3.4 Tăierea
CNu tăiați alimente foarte dure cum ar fi granulele de cafea, cuburile de gheață, nucşoară, cereale sau oase. Scoateți tulpinile ierburilor, cojile din alune şi oasele, tendoanele, şi cartilagiile din carne.
C Tăiați alimentele în bucăți mici
1. Plasați bolul de tăiere (8) pe o suprafață dreaptă.
2. Introduceți elicea de tăiere (7) pe tija fixată în vasul de tăiere (8).
A AVERTISMENT: Nu atingeți elicea de tăiere cu mâinile goale.
3. Plasați ingredientele în vasul de tăiere (8). 4. Plasați capacul de tăiere (6) pe vasul de tăiere
(8). Asigurați-vă că clemele de prindere aflate pe vasul de tăiere sunt strâns blocate.
5. Plasați unitatea motoare (3) pe capacul de tăiere (6). Apăsați pe unitatea motoare pentru a se fixa strâns în locaşul acesteia.
CAsigurați-vă că unitatea motoare este ataşată în mod sigur la capacul de tăiere.
6. Introduceți ştecherul în priza de perete.7. Apăsați şi mențineți butonul Pornit/Oprit (1).
– Produsul începe să funcționeze.8. Apăsați şi mențineți butonul turbo (2).
9. Eliberați butonul Pornit/Oprit (1) sau butonul turbo (2) în momentul când dumneavoastră finalizați procesul şi deconectați ştecherul de la priza de perete. Scoateți unitatea motoare (3) din capacul de tăiere (6) prin apăsarea butoanelor de eliberare ale accesoriilor (4) montate pe părțile laterale ale produsului şi tragerea de acestea. Deconectați capacul de tăiere (6). Scoateți elicea de tăiere (7) din vasul de tăiere (8) cu grijă înainte de scoaterea alimentelor tăiate.
3.5 Baterea • Dumneavoastră puteți utiliza telul (11) pentru
baterea smântânei şi baterea ouălelor. • Nu procesați niciodată mai mult de 4 albuşuri de
ouă sau 200 ml de smântână. 1. Introduceți telul (11) în vasul de batere (9) până
când se fixează în locaşul acestuia. 2. Conectați unitatea motoare (3) pe mânerul
de batere (9) prin introducerea mânerului de batere pe unitatea motoare. Împingeți mânerul de batere în unitatea motoare. Asigurați-vă că mânerul de batere este strâns în mod sigur pe unitatea motoare.
3. Introduceți ingredientele pe care le doriți să le procesați în vasul de măsurare (10) sau într-un vas similar.
4. Conectați ştecherul de alimentare la priza de perete.
5. Mențineți telul (11) în amestecul care urmează a fi procesat.
6. Mențineți şi apăsați butonul Pornit/Oprit (1). – Produsul începe să funcționeze.
7. Apăsați şi mențineți butonul turbo(2). 8. Mişcați produsul uşor în sus şi în jos şi în cercuri
pentru a bate ingredientele.
68 / 69 RO Blender de mână / Manual de utilizare
9. Eliberați butonul Pornit/Oprit (1) sau butonul turbo (2) în momentul când ați finalizat şi deconectați ştecherul de la priza de perete/ Scoateți amestecul din vasul de amestecare (5). Scoateți unitatea motoare (3) din mânerul de batere (9) prin apăsarea pe butoanele de eliberare ale accesoriior (4) montate pe cele două părți laterale ale produsului şi trageți-le în jos.
3 Utilizarea
69 / 69 ROBlender de mână / Manual de utilizare
4 Curățarea și întreținerea
4.1 Curăţarea
AAVERTISMENT: Nu utilizaţi niciodată benzină, solvent, agenţi de curăţare abrazivi, obiecte metalice sau raclete dure pentru curăţarea aparatului.
1. Înainte de curăţare decuplaţi produsul. 2. Asigurați-vă că produsul este oprit complet şi
scoateți arborele de amestecare.3. Ștergeți unitatea motorului (3) cu un material
textil moale.4. Lama de tocare poate fi spălată utilizând un
burete şi detergent de vase. 5. După curățare, uscați toate componentele
produsului.
AAVERTISMENT: Nu spălați arborele de amestecare în maşina de spălat vase.
AAVERTISMENT: Nu imersați niciodată unitatea motorului sau cablul de alimentare în apă sau în alt lichid.
4.2 Depozitarea • Dacă nu doriţi să utilizaţi produsul pentru o
perioadă lungă de timp, depozitaţi-l cu grijă. • Înainte de depozitarea produsului, decuplați-l. • Depozitaţi produsul într-o loc uscat şi răcoros. • Mențineți aparatul şi cablul de alimentare
departe de copii.
4.3 Manevrarea și transportul. • În timpul manevrării şi transportului,
transportați produsul în ambalajul său original. Ambalajul produsului îl protejează împotriva avariilor fizice.
• Nu plasați sarcini grele pe aparat sau pe ambalaj. Produsul poate fi avariat.
• Aruncarea produsul îl poate face inoperațional sau cauza avarii permanente.


www.beko.com
9 / 9 AR خالط يدوي/ دليل المستخدم
التنظيف والعناية 4
4.1 التنظيف
Aتحذير: يحظر تماما استخدام البنزين أو المذيبات أو الفرش أو المعدنية األجسام أو الكاشطة المنظفات
الصلبة في تنظيف الجهاز.
انزع قابس الجهاز قبل التنظيف. . 1تأكد من أن الجهاز متوقف تماما واخلع عمود الخلط.. 2امسح وحدة الموتور )4( بقطعة قماش مبللة.. 3باستخدام إسفنجة ومستحضر غسل . 4 الفرم يتم غسل شفرة يمكن أن
األطباق. جفف كل أجزاء الجهاز بعد التنظيف. . 5
A.تحذير: ال تغسل عمود الخلط في غسالة األطباق
Aالخلط عمود من الداخلي الجزء تغمر ال تحذير: أي أو المياه في الطاقة كابل أو الموتور وحدة أو
سائل آخر.
4.2 التخزينإذا لم تخطط الستخدام الجهاز لفترة طويلة من الوقت، يرجى تخزينه •
بعناية. انزع قابس الجهاز قبل رفعه. •عليك تخزين الجهاز في مكان بارد وجاف. •حافظ على الجهاز والكابل بعيدا عن متناول أيدي األطفال. •
4.3 التعامل والنقلعبوة • األصلية. عبوتها في الجهاز بحمل فقم والنقل التعامل أثناء
الجهاز تحميه من التعرض ألضرار فيزيائية.ال تضع أحمال ثقيلة على الجهاز أو العبوة. يمكن أن يكون الجهاز •
متضررا.يتسبب في • أو التشغيل قادر على الجهاز سوف يجعله غير إسقاط
إلحاق أضرار دائمة.
8 / 9 ARخالط يدوي/ دليل المستخدم
استخدم التحكم في السرعة )2( الختيار السرعة أو اضغط مطوال . 8تنتهي . 9 عندما )4( السرعة زر أو )3( التشغيل/اإليقاف زر اترك
وافصل قابس الطاقة من المقبس الحائطي. قم بفصل وحدة المحرك )5( من غطاء الفرم )8( بالضغط على مفاتيح تحرير الملحق )6(
الموجود على جانب الجهاز مع سحبه بعيدا عن وحدة الموتور. ارفع غطاء)8( الفرم . ضع شفرة الفرم )9( خارج وعاء الفرم )10( مسبقا
برفق.إلزالة الطعام المفروم.
3.5 الخفقمكنك استخدام مضرب الخفق )12( لخفق الكريم و البيض.
ال تقم أبدا بخفق 4 بيضات معا أو 200 ملل من الكريم. الخفق)11( حتى تسمع تكة . 1 الخفق )12( في حامل أدخل مضرب
في مكانه. قم بتوصيل وحدة المحرك )5( بحامل الخفق )11( عبر وضع حامل . 2
الخفق في وحدة المحرك. اضغط حامل الخفق نحو وحدة المحرك. تأكد من تثبيت حامل الخلط على النحو المناسب في وحدة الموتور.
ضع المقادير الذي ترغب في ع خفقها أو هرسها في كأس القياس . 3)13( أو إناء مشابه.
قم بتوصيل القابس بمقبس الحائط. . 4ضع مضرب الخفق )12(فوق الخليط المراد خفقه. . 5اضغط مطوال على مفتاح التشغيل / اإليقاف )1(. . 6
– سيبدأ الجهاز في العمل. استخدم التحكم في السرعة )2( الختيار السرعة أو اضغط مطوال . 7حرك الجهاز ألعلى وأسفل برفق في دوائر لخفق المكونات. . 8
اترك زر التشغيل/اإليقاف )3( أو زر السرعة )4( عندما تنتهي وافصل قابس الطاقة من المقبس الحائطي. ينبغي إزالة الخليط من كأس القياس )13(. قم بفصل وحدة المحرك )5( من حامل الخفق )11( عبر الضغط على مفتاح تحرير الملحق )6( فقط، والموجود على جانب الجهاز مع
سحبه بعيدا عن وحدة الموتور.
التشغيل 3

7 / 9 AR خالط يدوي/ دليل المستخدم
التشغيل 3
3.1 االستخدام المرغوب ليس . 1 و ذلك، شابه ما أو المنزلي لالستخدام فقط الجهاز صمم
لالستخدام المهني. الجهاز مخصص لفرم الكميات الصغيرة من الطعام الصلب فقط.. 2
3.2 االستخدام المبدئي
المكونات المقدار األقصى زمن المعالجة
لحم/سمك 200 جم 10 – 15 ثانيةأعشاب 20 جم 20 ثانيةالبندق 200 جم 15 ثانيةجبن 150 جم 15 ثانيةخبز 1 شريحة 20 ثانية
بيض )المسلوق( 2 بيض 5 ثانية
بصل )مقطع إلى 8( 100 جم 10 ثانية
نظف أجزاء الجهاز قبل االستخدام األول. . 1ونظيف، . 2 مستو، سطح على عمودي وضع في الجهاز استخدم
وجاف، وغير منزلق.الجهاز . 3 أطفئ ثوان. 10 من ألكثر باستمرار الجهاز تستخدم ال
إعادة قبل دقيقة مدة وانتظر ثوان 10 من ألكثر استخدامه عند تشغيل الجهاز.
Cاالستخدامات في ثوان 10 فترة تتجاوز لم إذ الجهاز تشغيل في االستمرار فيمكنك المتوسطة حتى نهاية العملية من خالل االنتظار بضع ثوان.
3.3 الخلط والفرم بعمود الخلطاغمر عمود الخلط )1( في الحاوية.. 1الملحق . 2 بدفع )5( الموتور بوحدة )7( الخلط ملحق تثبيت عليك
تجاه وحدة الموتور حتى تسمع تكة. تأكد من تثبيت مرفق الخلط على النحو المناسب في وحدة الموتور.
ضع قابس الجهاز. . 3قم بتشغيل الجهاز من خالل الضغط على زر التشغيل )3(.. 4استخدم التحكم في السرعة )2( الختيار السرعة أو اضغط مطوال . 5
على زر التربو)4(. السرعة حسب )1( للسرعة الضوئي المؤشر إضاءة – تتم
المرغوبة 1-6.
C السرعة لزيادة )2( السرعة ضبط زر أدر المرغوبة بالتدريج.
Cخلط أثناء منخفضة بسرعة الخلط في ابدأ بدء عند المكونات تتناثر أن يمكن المكونات.
العمل بسرعة عالية.
C قمت ما إذا أفضل نتائج على الحصول يمكنك بحركات دائرية أثناء المعالجة.
الجهاز . 6 قابس انزع التشغيل. االنتهاء من التشغيل عند حرر مفتاح وانتظر إلى أن يتوقف تماما.
A.تحذير: ال تلمسها باأليدي العارية
تحرير . 7 مفتاح على الضغط عبر )7( الخلط ملحق بفصل 1.قم الملحق )6( فقط، والموجود على جانب الجهاز مع سحبه بعيدا عن
وحدة الموتور.
3.4 الفرم
Cالبن، حبوب مثل الصلبة العناصر بفرم تقم ال العظام. أو الحبوب الهند، جوز الثلج، مكعبات و الجوز قشر و األعشاب، سيقان إزالة ينبغي
العظام، و تنقية اللحم. ينبغي تقطيع الطعام إلى أجزاء صغيرة.
ضع وعاء الفرم )10( فوق سطح مستوي. . 1ضع شفرة الفرم )9( على العمود الثابت في وعاء الفرم )10(. . 2
تحذير: ال تلمس شفرة الفرم باأليدي العارية. ضع المكونات في وعاء الفرم )10(. . 3ضع غطاء الفرم )8( فوق وعاء الفرم )10(. تحقق من أن مشابك . 4
غطاء الفرم مركبة بشكل مناسب على الوعاء. وحدة . 5 اضغط الفرم)8(. مع غطاء )5( المحرك وحدة بتركيب قم
المحرك لتتحقق من تركيبه بشكل مناسب في مكانه. تحقق من تثبيت غطاء الفرم على النحو المناسب في وحدة الموتور.
أدخل القابس في مقبس الحائط.. 6اضغط مطوال على مفتاح التشغيل / اإليقاف )1(.. 7
– سيبدأ الجهاز في العمل.

6 / 9 ARخالط يدوي/ دليل المستخدم
الخالط اليدوي الخاص بك 2
2.1 نظرة عامة
اقفو تاربتخملا يف اهيلع لوصحلا مت يتلا ميقلا لثمت هعم ةرفوتملا ةعوبطملا ىرخالا تادنتسملا وأ جتنملا ىلع ةتبثملا تامالعلا يف اهيلإ راشملا ميقلا اقفو ميقلا هذه فلتخت دق .ةلصلا تاذ ريياعملل مادختسال .ةطيحملا فورظلاو زاهجلا
مفتاح التشغيل. 1توربو. 2وحدة الموتور. 3مفتاح تحرير الملحق. 4عمود الخلط . 5غطاء الفرم. 6شفرة الفرم. 7وعاء الفرم . 8حامل الخفق. 9
كأس القياس. 10مضرب الخفق. 11
2.2 البيانات الفنية
األوروبية التوجيهات مع الجهاز هذا يتوافق و ،2006/95/EC و ،2004/108/EC
.2011/65/EU 2009/125، و/EC
الجهد: 230 فولت ~، 50هيرتزالطاقة: 700 واط
تم االحتفاظ بالتعديالت الفنية وتعديالت التصميم.
10
8
6
7
1
2
3
4
5
11
9
5 / 9 AR خالط يدوي/ دليل المستخدم
1 تعليمات هامة للسالمة والبيئة
WEEE 1.2 متوافق مع تشريعاتوتشريعات التخلص من المنتجات الفاسدة.
هذا المنتج ال يشمل مواد مؤذية أو محظورة من تلك المشار الكهربائية النفايات على اإلشراف “تشريعات في إليها واألجهزة اإللكترونية” المصدرة من وزارة البيئة والتخطيط العمراني. متوافق مع تشريعات WEEE. تم تصنيع هذا إعادة يمكن الجودة عالية ومواد أجزاء من الجهاز استخدامها وهي مناسبة إلعادة التدوير. ولذلك، ال تتخلص من الجهاز في النفايات المنزلية العادية بعد انتهاء فترة خدمته. بل عليك أخذه إلى اسأل واإللكترونية. الكهربائية األجهزة تدوير إلعادة التجميع نقطة السلطات المحلية في منطقتك عن نقاط التجميع. ساعد على حماية البيئة
والموارد الطبيعية بإعادة تدوير المنتجات المستخدمة.
1.3 معلومات التعبئةالتدوير قابلة إلعادة مواد من المنتج تعبئة مواد صنعت مع التعبئة مواد من تتخلص ال الوطنية. للقوانين وفقا النفايات المنزلية أو النفايات األخرى. خذها إلى نقاط جمع
مواد التعبئة المخصصة لذلك من السلطات المحلية.
1.4 أشياء تقوم بها لتوفير الطاقةاحرص على االلتزام باألوقات الموصى بها في الدليل أثناء االستخدام.
انزع قابس الجهاز بعد االستخدام.

4 / 9 ARخالط يدوي/ دليل المستخدم
التي السالمة تعليمات على القسم هذا يحتوي أو األفراد إصابة خطر تجنب على ستساعدك
اإلضرار بالممتلكات. عدم اتباع هذه التعليمات يؤدي إلى إبطال الضمان
الممنوح.
1.1 السالمة العامةيخضع هذا الجهاز مع المعايير الدولية للسالمة. •يمكن استخدام هذا الجهاز من طرف األشخاص •
ذهنية، أو حسية، أو بدنية، إعاقة لديهم الذين أنهم أو معرفة طالما لديهم خبرة ليس الذين أو يخضعوا لرقابة فيما يتعلق بسالمة استخدام المنتج مخاطر يفهمون أو لذلك وفقا توجيههم يتم أو
استخدام المنتج.حافظ على الجهاز بعيدا عن متناول أيدي األطفال •ال تستخدم الجهاز إذا كان كابل الطاقة أو الشفرات •
الخدمة بمركز اتصل عطب. به الجهاز أو المعتمد.
توصي • التي األصلية األجزاء تستخدم سوى ال بها جهة التصنيع.
ال تحاول أبدا فك الجهاز. •ينبغي أن تتوافق امدادات الطاقة الخاصة بك مع •
المعلومات المقدمة على لوحة تصنيف الجهاز. ال تستخدم الجهاز على كابل تمديد خارجي. •التسحب كابل الكهرباء عند فصل الجهاز. •المتحركة • اإلكسسوارت تتوقف أن إلى انتظر
حراسة، دون يترك حين الجهاز قابس وانزع أثناء التركيب/فك اإلكسسوارات أو قبل التنظيف.
ال تلمس الجهاز أبدا ويداك مبتلتان أو رطبتان. •ال تستخدم الجهاز لتسخين الطعام. •
تزيد • لمدة باستمرار الجهاز تشغيل عدم عليك بعد كل دقيقة لمدة يبرد اتركه ثوان. 10 على
10 ثوان تشغيل. عليك تشغيل الجهاز مع القاعدة المطاطية الموردة •
والحاوية الزجاجية فقط. في • مكونات بدون وجود الجهاز بتشغيل تقم ال
اإلناء. قم بإزالة العظام واألحجار من الطعام لمنع تلف •
وحدة الشفرات أو الجهاز. هذا الجهاز غير مناسب لمعالجة األطعمة المجففة •
أو الصلبة، حيث إنها سوف تتسبب سريعا في أن تثلم الشفرات.
ال يجب استعمال هذا الجهاز من طرف األطفال. •متناول • عن بعيدا والحبل األجهزة على حافظ
األطفال.لوقوع • منعا التحذيرات كل اتباع على احرص
إصابات راجعة إلى سوء االستخدام. عند القيام بتفريغ الوعاء وأثناء التنظيف واإلمساك •
بشفرات الفرم باأليدي المجردة فيمكن أن تتعرض بشكل االستخدام عد عن ناتجة بالغة إلصابات سليم. استخدم الجزء البالستيكي لمحاولة اإلمساك
بشفرة الفرم. وجميع • الجهاز جفف التنظيف من االنتهاء بعد
األجزاء قبل توصيله بالتيار وقبل تثبيت األجزاء. ال تغمر الجهاز أو كابل الطاقة أو قابس الطاقة في •
المياه أو في أي سوائل أخرى. هذا • من جزء أي وضع أو بتشغيل أبدا تقم ال
الجهاز على أو بالقرب من األسطح الساخنة. حافظ على مواد التغليف بعيدا عن متناول أيدي •
األطفال.
1 تعليمات هامة للسالمة والبيئة

3 / 9 AR خالط يدوي/ دليل المستخدم
المحتويات
4 1 تعليمات هامة للسالمة والبيئة 4 .................................... 1.1 السالمة العامة
1.2 متوافق مع تشريعات WEEE وتشريعات5 ....................... التخلص من المنتجات الفاسدة. 5 .................................. 1.3 معلومات التعبئة1.4 أشياء تقوم بها لتوفير الطاقة..................... 56 الخالط اليدوي الخاص بك 22.1 نظرة عامة........................................ 62.2 البيانات الفنية..................................... 67 التشغيل 33.1 االستخدام المرغوب ............................. 7
3.2 االستخدام المبدئي3.3 الخلط والفرم بعمود الخلط....................... 77 .............................................. 3.4 الفرم8 ............................................. 3.5 الخفق9 التنظيف والعناية 44.1 التنظيف........................................... 94.2 التخزين........................................... 99 .................................... 4.3 التعامل والنقل

يرجى قراءة دليل المستخدم هذا أوال!عزيزي العميل،
شكرا لك على شرائك لمنتجات Beko. نأمل أن تحصل على افضل النتائج من جهازك والذي قد تم تصنيعه بأعلى جودة وبأحدث التقنيات. وعلى ذلك، يرجى قراءة كامل دليل المستخدم هذا وجميع المستندات المصاحبة له بعناية قبل استخدام المنتج واالحتفاظ به كمرجع لالستخدام المستقبلي. إذا
قمت بتسليم الجهاز لشخص آخر، أعطه دليل المستخدم أيضا. اتبع التحذيرات والمعلومات في دليل المستخدم.معاني الرموز
تستخدم الرموز التالية في أجزاء متعددة من دليل المستخدم هذا:
C.معلومات هامة و تنويهات مفيدة عن االستخدام
A تحذير: تحذيرات بشأن مواقف خطيرة تتعلق بسالمةالحياة والمنشآت.
.ماعطال ةسمالمل بسانم
في الطاقة قابس أو الطاقة كابل أو الجهاز تغمر ال المياه أو في أي سوائل أخرى.
فئة الحماية من الصعقة الكهربائية.
تم إعداد هذا المنتج في مرافق حديثة وصديقة للبيئة.
.WEEE يتوافق هذا الجهاز مع تشريعات .PCB ال يحتوي على
صنع في جمهورية الصين الشعبية

www.beko.com
HBA6700W
يودي طالخدليل المستخدم
AR01M-8832833200-5015-01