Haltech IQ3 Street Dash Guide HT... · complete IQ3S User Manual found on the included USB stick....
8
Haltech Engine Management Systems (A division of Lockin P/L, A.B.N. 68 061 744 303) HEAD OFFICE: 3 Centre Place, Wetherill Park NSW 2164 Australia t. +61 2 9729 0999 f. +61 2 9729 0900 Haltech IQ3 Street Dash Guide Thank you for purchasing a Haltech IQ3 Street dash. This guide provides information on the installation and basic use of your dash. Your dash is preconfigured by Haltech with some default values which you can customize at any time. For information on advanced dash functions, please see the documentation located on the USB stick included with your dash. Rev 01
Transcript of Haltech IQ3 Street Dash Guide HT... · complete IQ3S User Manual found on the included USB stick....

Haltech Engine Management Systems (A division of Lockin P/L, A.B.N. 68 061 744 303)
HEAD OFFICE: 3 Centre Place, Wetherill Park NSW 2164 Australia t. +61 2 9729 0999 f. +61 2 9729 0900
Haltech IQ3 Street Dash Guide
Thank you for purchasing a Haltech IQ3 Street dash. This guide provides information on the installation and basic use of your dash. Your dash is preconfigured by Haltech with some default values which you can customize at any time. For information on advanced dash functions, please see the documentation located on the USB stick included with your dash.
Rev 01

Haltech Engine Management Systems (A division of Lockin P/L, A.B.N. 68 061 744 303)
HEAD OFFICE: 3 Centre Place, Wetherill Park NSW 2164 Australia t. +61 2 9729 0999 f. +61 2 9729 0900
Installation & Wiring Your Haltech IQ3 Street dash is compatible with many aftermarket and factory engine management systems on the market. The dash is preconfigured to work with a modern Haltech ECU such as the Elite Series and Platinum Series, and as such this guide is based around the installation process specifically for Haltech ECUs.
For installation and configuration instructions for other supported ECUs, please contact the relevant ECU manufacturer. Adaptor cables are listed on the final page of this document.
For installation and configuration as a standalone dash with no ECU connectivity, please see the complete IQ3S User Manual found on the included USB stick.
The rear of your IQ3 dash has 3 main connections. At a minimum, you are required to wire Switched 12v, Ground, and CAN High/Low (if connecting to an ECU) in order for it to operate correctly.
Port A is for expansion using Racepak VNET modules and sensors.
Port B is the main 34 pin connector for power, inputs and outputs, and CAN communication. Port C is the Mini-USB programming port.
An appropriate cable is available from Haltech to make the CAN connection to your Haltech ECU Plug’n’Play. For installations with a CAN Hub or connecting directly to a Platinum ECU – HT060200 DTM2 to 8-pin TYCO For connecting directly to an Elite ECU with no CAN Hub – HT060201 DTM2 to DTM4 For other manufacturer CAN cables, please see the final page of this document.
12v
GND
CAN High
CAN Low
Haltech Engine Management Systems (A division of Lockin P/L, A.B.N. 68 061 744 303)
HEAD OFFICE: 3 Centre Place, Wetherill Park NSW 2164 Australia t. +61 2 9729 0999 f. +61 2 9729 0900
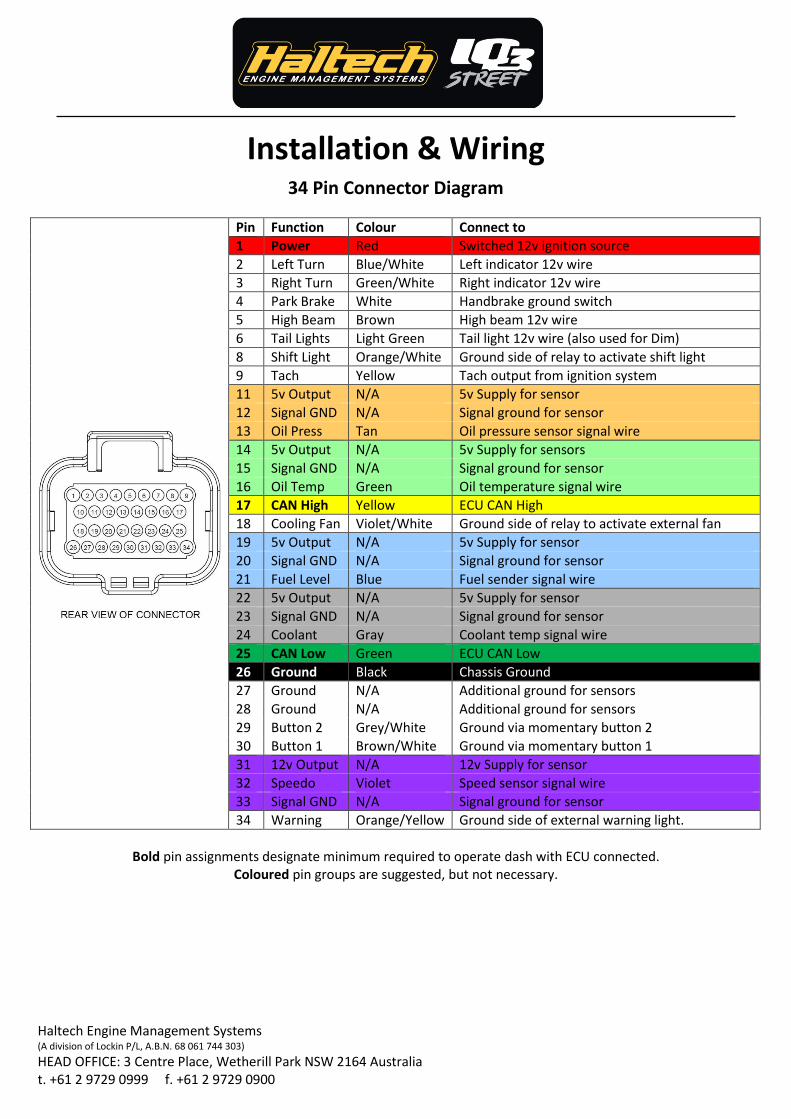
Installation & Wiring 34 Pin Connector Diagram
Pin Function Colour Connect to
1 Power Red Switched 12v ignition source
2 Left Turn Blue/White Left indicator 12v wire
3 Right Turn Green/White Right indicator 12v wire
4 Park Brake White Handbrake ground switch
5 High Beam Brown High beam 12v wire
6 Tail Lights Light Green Tail light 12v wire (also used for Dim)
8 Shift Light Orange/White Ground side of relay to activate shift light
9 Tach Yellow Tach output from ignition system
11 5v Output N/A 5v Supply for sensor
12 Signal GND N/A Signal ground for sensor
13 Oil Press Tan Oil pressure sensor signal wire
14 5v Output N/A 5v Supply for sensors
15 Signal GND N/A Signal ground for sensor
16 Oil Temp Green Oil temperature signal wire
17 CAN High Yellow ECU CAN High
18 Cooling Fan Violet/White Ground side of relay to activate external fan
19 5v Output N/A 5v Supply for sensor
20 Signal GND N/A Signal ground for sensor
21 Fuel Level Blue Fuel sender signal wire
22 5v Output N/A 5v Supply for sensor
23 Signal GND N/A Signal ground for sensor
24 Coolant Gray Coolant temp signal wire
25 CAN Low Green ECU CAN Low
26 Ground Black Chassis Ground
27 Ground N/A Additional ground for sensors
28 Ground N/A Additional ground for sensors
29 Button 2 Grey/White Ground via momentary button 2
30 Button 1 Brown/White Ground via momentary button 1
31 12v Output N/A 12v Supply for sensor
32 Speedo Violet Speed sensor signal wire
33 Signal GND N/A Signal ground for sensor
34 Warning Orange/Yellow Ground side of external warning light.
Bold pin assignments designate minimum required to operate dash with ECU connected.
Coloured pin groups are suggested, but not necessary.

Haltech Engine Management Systems (A division of Lockin P/L, A.B.N. 68 061 744 303)
HEAD OFFICE: 3 Centre Place, Wetherill Park NSW 2164 Australia t. +61 2 9729 0999 f. +61 2 9729 0900
Dash Programming
It is important you follow these steps to download the dash configuration file so you can begin editing it.
1) Connect the IQ3 dash as per the wiring instructions above and power it up. 2) Open the RacePak Datalink II Software after downloading and installing the latest version from the RacePak
website: http://www.racepak.com/pages/downloads/ 3) Connect the IQ3 dash to your PC via the included USB to Mini-USB Cable 4) Open the File menu, choose ‘Open Car Configuration’ and select: ‘IQ3_Config_Street_Haltech’
NOTE: If you do not see this option, re-install the DataLink software. During installation you will be asked what products you are using the software with. Ensure ‘IQ3 Configuration For Haltech Street’ is selected.
5) From the Settings menu, choose ‘Scan COM Ports’. The software will scan for the dash. When Successful, click ‘OK’. NOTE: If unsuccessful, please check all connections and repeat steps 1 – 5.
6) Click ‘Read’ from the left Toolbar. You may receive a notification about configuration files, choose the first option to make default and continue.
7) In the information box that may appear, click ‘Yes to ALL’ to continue. 8) Once successful, save the configuration by choosing File, then ‘Save As’. Name your configuration file so you can
easily find it later. 9) Make this configuration file your default by clicking the File menu then ‘Default Configuration’.
You can now configure the dash to display parameters from the ECU.
Choosing your EFI CAN Mode If using a Haltech ECU with Version 2 CAN mode, you can skip these steps.
For a full list of supported ECUs, see the final page of this document.
By default your Haltech IQ3 Street dash is set to receive v2 CAN data from a Haltech ECU, however this can be changed to a large range of other modern ECU CAN streams or OBD2 compliant vehicles manufactured after 2008 by following these steps
1. Right click on the ‘IQ3 Haltech’ channel, and choose the ‘Dash Info’ tab. 2. In the ‘Custom Programming Options’ section, choose ‘ECU Type’ 3. From the drop-down list that appears on the right side of the screen, choose your ECU Type 4. Once selected, press the ‘SEND Configuration’ button, click OK when successful. 5. Click OK to close the screen. 6. From the EDIT menu, choose ‘Read VNET Configuration (all channels)’ 7. Press ‘Yes to ALL’ in the window that appears.
Haltech Engine Management Systems (A division of Lockin P/L, A.B.N. 68 061 744 303)
HEAD OFFICE: 3 Centre Place, Wetherill Park NSW 2164 Australia t. +61 2 9729 0999 f. +61 2 9729 0900
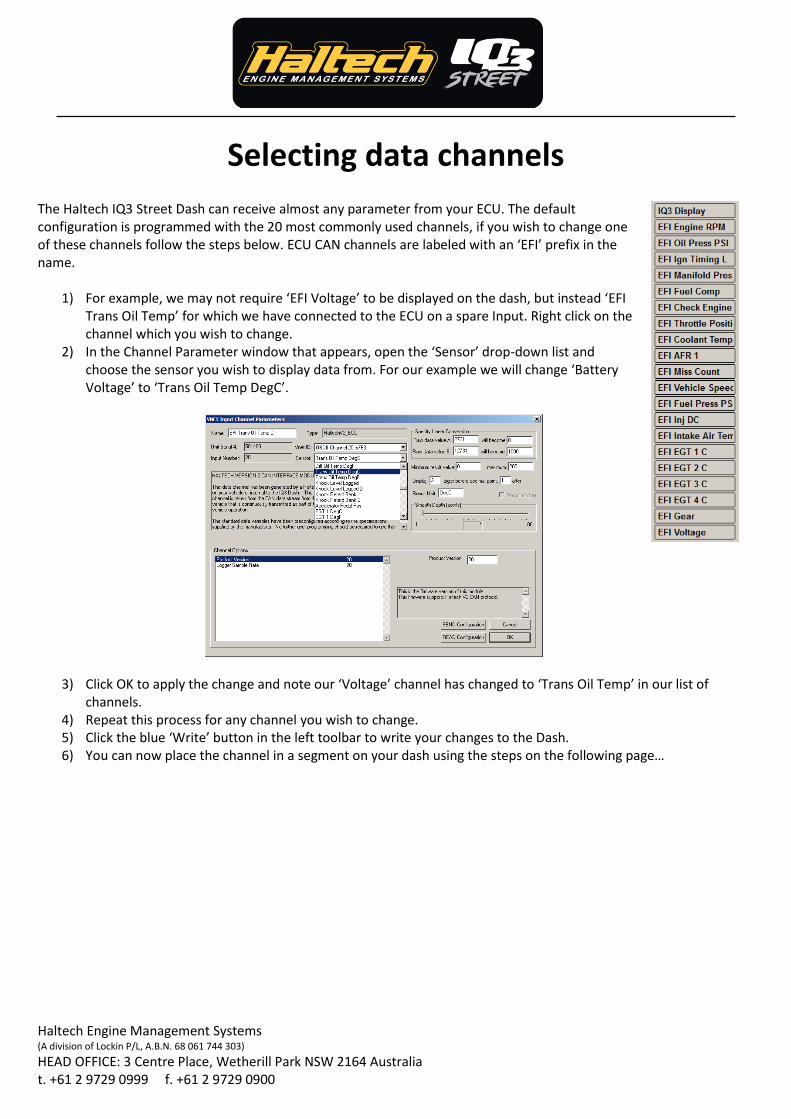
Selecting data channels The Haltech IQ3 Street Dash can receive almost any parameter from your ECU. The default configuration is programmed with the 20 most commonly used channels, if you wish to change one of these channels follow the steps below. ECU CAN channels are labeled with an ‘EFI’ prefix in the name.
1) For example, we may not require ‘EFI Voltage’ to be displayed on the dash, but instead ‘EFI Trans Oil Temp’ for which we have connected to the ECU on a spare Input. Right click on the channel which you wish to change.
2) In the Channel Parameter window that appears, open the ‘Sensor’ drop-down list and choose the sensor you wish to display data from. For our example we will change ‘Battery Voltage’ to ‘Trans Oil Temp DegC’.
3) Click OK to apply the change and note our ‘Voltage’ channel has changed to ‘Trans Oil Temp’ in our list of channels.
4) Repeat this process for any channel you wish to change. 5) Click the blue ‘Write’ button in the left toolbar to write your changes to the Dash. 6) You can now place the channel in a segment on your dash using the steps on the following page…

Haltech Engine Management Systems (A division of Lockin P/L, A.B.N. 68 061 744 303)
HEAD OFFICE: 3 Centre Place, Wetherill Park NSW 2164 Australia t. +61 2 9729 0999 f. +61 2 9729 0900
Configuring Dash Layout Now we have our channels selected we can then configure our dash layout.
1) Right click the ‘IQ3 Street’ channel in the DataLink software. 2) Here you can choose the channels to be displayed on each segment of the Dash by clicking the buttons that
correspond to the segment you wish to change.
3) Each segment can be configured with different filtering, decimal places and text values.
4) Your IQ3 Street dash has a single warning LED which is configured from the ‘Warnings’ tab. Click the warning conditions set you wish to configure and the Warning Light configuration window appears. Here you can choose the warning channel, channel limits, warning text and conditions for the warning to trigger. If multiple warnings are flagged at once, the dash will cycle through the active warnings.
5) The internal shift lights are configured from the ‘Shift Light’ tab. Your IQ3 is preconfigured for a 7500rpm shift with lights staged at 150rpm intervals from 6750rpm. Per gear limits can be configured here also.

Haltech Engine Management Systems (A division of Lockin P/L, A.B.N. 68 061 744 303)
HEAD OFFICE: 3 Centre Place, Wetherill Park NSW 2164 Australia t. +61 2 9729 0999 f. +61 2 9729 0900
Configuring Haltech Elite CAN Output Follow these steps to configure the Haltech Elite ECU to broadcast the CAN stream to the dash.
1) Go Online with your ECU with the ESP software. 2) Choose Setup > Main Setup 3) Choose the ‘Devices’ section and tick the option labelled ‘Haltech CAN Supported Dash’
4) Click ‘OK’ to save the setting. 5) Reboot your ECU by choosing Tools > Reboot ECU.

Haltech Engine Management Systems (A division of Lockin P/L, A.B.N. 68 061 744 303)
HEAD OFFICE: 3 Centre Place, Wetherill Park NSW 2164 Australia t. +61 2 9729 0999 f. +61 2 9729 0900
Non-Haltech CAN Connections Your Haltech IQ3 Street dash is compatible with these modern ECUs via CAN connection:
AEM V2/EMS-4/Infinity
Atomic LS
Atomic TBI (Plug’n’Play cable 280-CA-EFIATBI)
Big Stuff 3 (Plug’n’Play cable 280-CA-EFIBS3)
Electromotive TECGT
EMS EM-Tech
Emtron
FAST XFI
FuelTech FT250, FT300, FT350, FT400, FT500, FT500 V2, FT600 V2 (Plug’n’Play cable 280-CA-EFIFUEL)
Holley EFI (Plug’n’Play cable 280-CA-EFIHOL)
InjePro
Life Racing F88
Link G4+ (Plug’n’Play cable 280-CA-EFILINK)
MaxxECU
MEFI4B (Plug’n’Play cable 280-CA-EFIMEFI)
Megasquirt
MicroTech
Motec
Generic OBD2 (2008+ Vehicles Only) (Plug’n’Play cable 280-CA-EFIOBDII)
ProEFI
Custom User Configured (280-CA-EFICAN)