
Hal Hipot and DC IR Tester · 2014-11-27 · Clare Hal Hi-Pot Tester Manufactured by: Clare...
92
Hal Hipot and DC IR Tester Revision 1.0 Software Instruction Manual July 2001 © 2001 Clare Instruments Ltd. Issue 1
Transcript of Hal Hipot and DC IR Tester · 2014-11-27 · Clare Hal Hi-Pot Tester Manufactured by: Clare...
Hal
Hipot and DC IR Tester
Revision 1.0 Software
Instruction Manual
July 2001
© 2001 Clare Instruments Ltd.
Issue 1

ii
Limited Warranty & Limitation of Liability
Clare Instruments Limited, guarantees this product for a period of oneyear. The period of warranty will be effective at the day of delivery.
© Copyright 2001
All rights reserved. Nothing from this edition may be multiplied, or madepublic in any form or manner, either electronically, mechanically, byphotocopying, recording, or in any manner, without prior written consentfrom Clare Instruments Limited. This also applies to accompanyingdrawings and diagrams.
Due to a policy of continuous development Clare Instruments Limitedreserves the right to alter the equipment specification and descriptionoutlined in this publication without prior notice and no part of thispublication shall be deemed to be part of any contract for the equipmentunless specifically referred to as an inclusion within such contract.

iii
Table of ContentsDeclaration of Conformity ..........................................................1
Before Starting ...........................................................................2
Safety .........................................................................................3
CHAPTER 1 INTRODUCING THE TESTER ................. 5
Introduction ................................................................................5
Your Hipot Tester .......................................................................6
The Front Fascia........................................................................7
The Rear Panel ..........................................................................8
Definitions ..................................................................................9
Quick Reference ........................................................................9
CHAPTER 2 CONNECTING THE TESTER................. 12
Connecting the tester ...............................................................12
CHAPTER 3 USING THE TESTER ............................. 13
Introduction ..............................................................................13
How to............................................................................14
How to perform Automatic Tests .............................................15
Test Settings..................................................................17
Default Sequence ..........................................................18
Use Testcodes...............................................................19
Add Comments..............................................................20
Options after Test ..........................................................20
Abort Actions .................................................................23
How to use the Meter Display ..................................................25
How to view Test Results.........................................................27
Product Number.............................................................27
Site Name......................................................................28

iv
Location Name...............................................................29
User Name.....................................................................30
Test Status.....................................................................30
Storage Status ...............................................................30
Date From......................................................................31
Date To ..........................................................................31
Search ...........................................................................32
Search Result ................................................................32
Product Test Results .....................................................33
How to perform Manual Tests..................................................33
Entering Manual Mode...................................................33
Performing a Manual Test .............................................36
How to download Data .............................................................38
Download Format ..........................................................38
Product Number.............................................................40
Site Name......................................................................41
Location Name..............................................................42
User Name.....................................................................43
Test Status.....................................................................43
Storage Status ...............................................................43
Date From......................................................................44
Date To ..........................................................................44
Search ...........................................................................45
How to print Barcode Labels and Testcodes ...........................46
To print barcode testcodes ......................................................46
To Print Barcode Pass/Fail Labels...........................................46
How to use Setup.....................................................................47
Edit Test Settings...........................................................48
Edit User List / Options ..................................................52
Edit Site List ...................................................................55

v
Edit Location List ...........................................................56
Change Time/Date.........................................................58
System Configuration ....................................................59
Change Password .........................................................60
Set Brightness ...............................................................60
Factory Settings .............................................................60
How to use the Memory ...........................................................60
View Memory Used........................................................61
Perform Memory Test....................................................62
Delete Single Product ....................................................62
How to upload test details to your Hal......................................63
Clear Results Memory ...................................................63
Clear Upload Memory....................................................64
How to change the User...........................................................64
How to use Help.......................................................................65
Help Provided to the User..............................................65
The effect of User Levels during Test Sequences ........66
CHAPTER 4 TIPS & TROUBLESHOOTING............... 67
Power -On Self tests: ...............................................................67
Temperature monitoring...........................................................67
Barcodes..................................................................................68
Interfacing ................................................................................68
Downloading to Computer Software ........................................69
CHAPTER 5 MAINTAINING THE TESTER................. 72
Cleaning the Tester..................................................................72
User Maintenance....................................................................72
CHAPTER 6 ACCESSORIES...................................... 74
vi
Standard Accessories ..............................................................74
Optional Accessories ...............................................................74
CHAPTER 7 SPECIFICATIONS.................................. 75
Insulation Test..........................................................................75
AC HiPot Test ..........................................................................75
Leakage .........................................................................75
DC HiPot Test ..........................................................................75
Leakage .........................................................................76
Arc Detection............................................................................76
Mechanical ...............................................................................76
Environmental ..........................................................................76
APPENDIX A PURPOSE OF TESTS .......................... 77
Insulation Test..........................................................................77
Flash Test ................................................................................77
APPENDIX B REFERENCE ........................................ 78
FACTORY-SET TEST SEQUENCES ........................... 78
TESTCODE TABLES .................................................... 79
Your Hipot tester
1
Declaration of Conformityfor the
Clare Hal Hi-Pot Tester
Manufactured by:
Clare Instruments Ltd., Woods Way, Goring-by-Sea, Worthing. WestSussex. BN12 4QY, England
Millennium Statement
This product is Millennium compliant, and conforms fully to thedocument BSI DISC PD2000-1.
Statement of Conformity
Based on test results using appropriate standards, the product is inconformity with Electromagnetic Compatibility Directive 89/336/EEC and
Low Voltage Directive 73/23/EEC
Standards used:
EN 61010-1 (1993) Safety Requirements for Electrical Equipment forMeasurement, Control, and Laboratory Use
EN 50081-1 (1992) Electromagnetic Compatibility. Generic EmissionStandard: EN55022 Class B
EN 50082-1 (1992) Electromagnetic Compatibility. Generic ImmunityStandard: IEC1000-4-2, -4-3, -4-4, -4-5
The tests have been performed in a typical configuration.
This Conformity is indicated by the symbol , i.e. “ConformitéEuropéenne
Your Hipot tester
2
Before StartingUpon receipt of your Hipot Tester: -
1. Check that all the component parts are present:-
• Hipot Tester
• Supply lead
• Instruction Manual
2. Read the operating instructions fully before conducting anytests.
3. Contact Clare Instruments if you need information ontraining for Portable Product Testing. Courses can bearranged at Clare, or at customer premises.
4. Data may be lost or altered in virtually any electronicmemory under certain circumstances. Therefore ClareInstruments assumes no responsibility for financial losses orclaims due to data lost or otherwise rendered unusablewhether as a result of abuse, improper use, defects,disregard of operating instructions or procedures, or anyother allied causes.
5. Clare Instruments reserve the right to update the software ininstruments returned to them for repair or otherwise, withoutnotifying the customer previously.
Clare Instruments Limited can be contacted at:
Woods WayGoring-by-SeaWorthingWest SussexBN12 4QYTel : +44 (0)1903 502551Fax: +44 (0)1903 [email protected]
Your Hipot tester
3
Safety
Note
Please read the following Safety Instructions before use!
Safety Precautions
The manual contains specific warning and caution statements wherethey apply.
A Warning will identify the conditions and actions that posehazard(s) to the user.
A caution will identify the conditions and actions that may damagethe Tester.
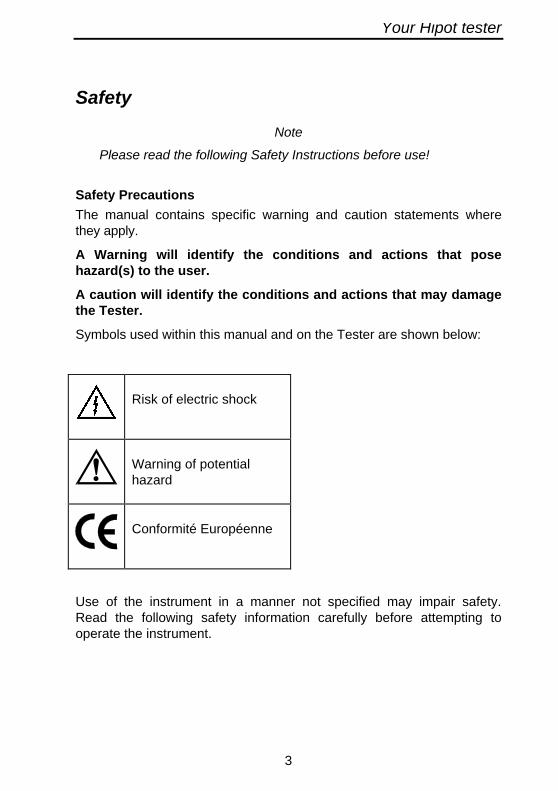
Symbols used within this manual and on the Tester are shown below:
Risk of electric shock
Warning of potentialhazard
Conformité Européenne
Use of the instrument in a manner not specified may impair safety.Read the following safety information carefully before attempting tooperate the instrument.
Your Hipot tester
4
Warning
Due to the potential hazards associated with any electricalcircuit it is important that the user is familiar with theinstructions covering the capabilities and operation of thisinstrument. The user should ensure that all reasonablesafety precautions are followed and if any doubt existsshould seek advice before proceeding.
This product is designed for use by suitably trainedcompetent personnel and should be operated strictly inaccordance with the instructions supplied.
Failure to comply with these instructions may expose the user toelectrical hazard
This Tester performs a number of electrical tests, which involve highvoltages and high currents. Never touch the Product being tested, or thetest leads, whilst a test is in progress.
Always check all test leads for signs of damage prior to use. Never usedamaged or defective leads.
Always ensure the mains supply to the Tester provides an adequateearth.
This manual contains information and warnings, which must be heededto ensure user safety during operation. It is essential that this manual beread fully before proceeding with any tests.
Should the Tester behave abnormally do not continue with the testing.Disconnect immediately and contact Clare Instruments for servicing (seeChapter 5 - Maintaining the Tester).

Your Hipot tester
5
Chapter 1 Introducing the Tester
IntroductionThe Clare Hal Hipot Tester is a powerful tool to assist in the analysis ofthe safety of electrical and electronic equipment. A range of tests areprovided, with innovative features to aid difficult test situations, whichallow testing of a wide variety of equipment.
The Tester is designed to be easy to use, and also includes the followinginnovative features: -
• Multi-voltage tester
• Stores up to 5000 results including Products, location, site, date andtime in non-volatile flash memory
• Highly accurate leakage and DC IR measurements.
• Full graphics display, Real-time clock
• Connects to PC, Barcode reader and printer
• Compatible with Clare’s PATs Plus and other leading softwarepackages (including Clare’s PATSwin software package)
• Software adjusts the user interface to differing levels of expertise
• Auto testcode generation
• Fast Start-up
• Fully isolated test outputs, to comply with EN50191.
Your Hipot tester
6
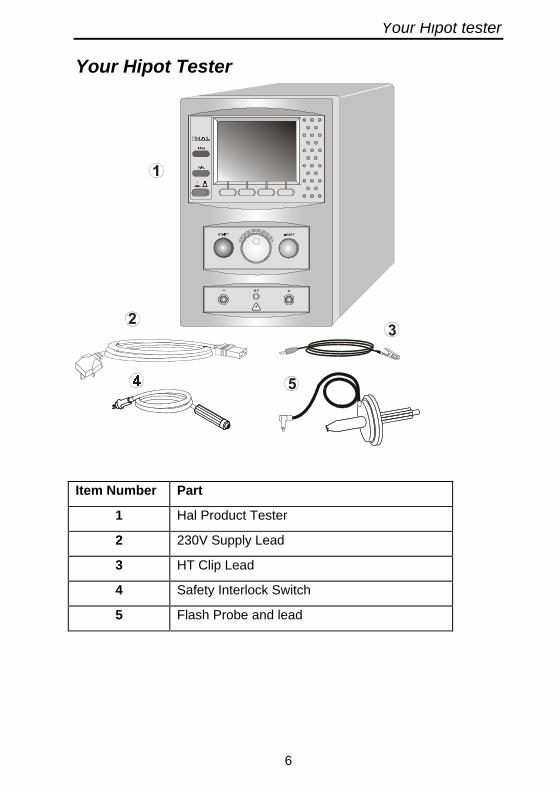
Your Hipot Tester
Item Number Part
1 Hal Product Tester
2 230V Supply Lead
3 HT Clip Lead
4 Safety Interlock Switch
5 Flash Probe and lead
Your Hipot tester
7
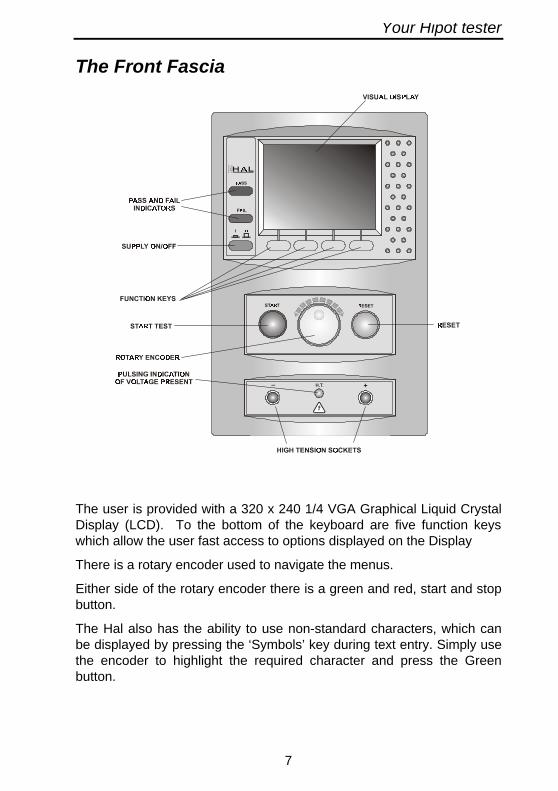
The Front Fascia
The user is provided with a 320 x 240 1/4 VGA Graphical Liquid CrystalDisplay (LCD). To the bottom of the keyboard are five function keyswhich allow the user fast access to options displayed on the Display
There is a rotary encoder used to navigate the menus.
Either side of the rotary encoder there is a green and red, start and stopbutton.
The Hal also has the ability to use non-standard characters, which canbe displayed by pressing the ‘Symbols’ key during text entry. Simply usethe encoder to highlight the required character and press the Greenbutton.
Your Hipot tester
8
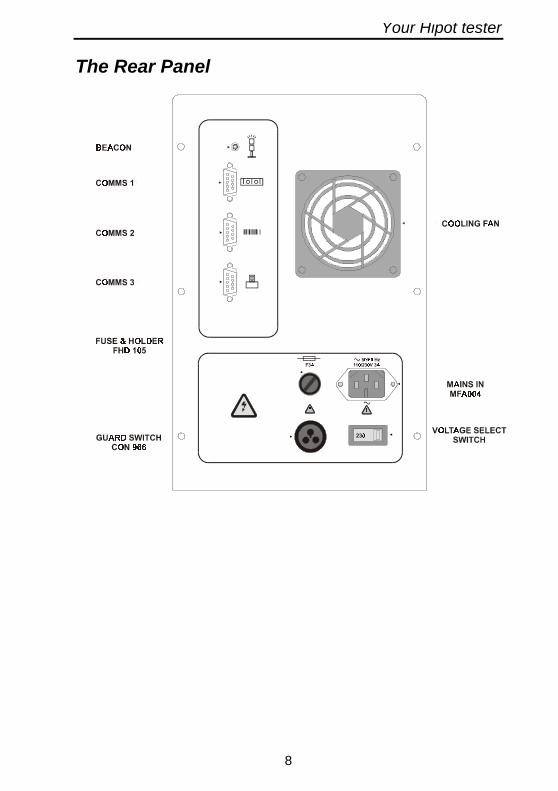
The Rear Panel
Your Hipot tester
9
DefinitionsEquipment Under Test The electrical / electronic apparatus (EUT)
which is the subject of testing.
Powered Tests - The EUT is supplied with mains voltage, with measurements being taken of power consumption, leakage currents etc.
Fast keys - The keys with symbols to the left of thekeyboard. These are used to select menu options displayed on the screen.
Tester - The Clare Hal Hipot tester.
Un-powered Tests - The EUT is the subject of electrical tests using stimuli generated within the Tester. The EUT is not provided with mains power.
User - The test technician using the Tester to perform tests on an EUT
Quick ReferenceEditing the date in all modes
On delivery of the Hal it is necessary to ensure that the correct time anda date are stored. Once stored the time/date is retained in memory anddoes not need to be entered again. To edit the date: from the MAINMENU select SETUP, select, CHANGE TIME/DATE, use the cursorkeys to highlight the digit to be changed. To store the changed time/datesetting return to the MAIN MENU. The unit will then display the messageSTORING SYSTEM DATA.
Entering a User Name
On delivery of Hal it is necessary to ensure that a user name(s) isstored. To edit the user list: from the MAIN MENU select SETUP, selectEDIT USER LIST / OPTIONS, use the encoder and select a name, ascreen will appear "EDIT USER SETTINGS", press Green button, usethe encoder to enter in the desired name and press GREEN BUTTON toreturn to the previous menu.
Your Hipot tester
10
Storing Product Test Results in Automatic mode
The Product Test Results will not be stored until you leave theCOMMENTS MENU, upon leaving this menu the unit will display themessages STORING RESULTS then SAVED OK. Your results havenow been stored.
Storing Product Test Results in Manual mode
The Product Test Results will not be stored until a Manual ProductSequence has been completed. To do this, firstly press A, this willprompt you for a Product number, enter this and press GREENBUTTON twice. Perform the tests required then press C, this willprompt you to enter comments, select SAVE COMMENTS/RESULTSand press GREEN BUTTON. The unit will then display the messagesSTORING RESULTS then SAVED OK. Your results have now beenstored.
Storing System Data
System Data consists of everything changed from within the SETUPMENU. To store the System Data return to the MAIN MENU from theSETUP MENU. The unit will then display the message STORINGSYSTEM DATA. This will only be done if changes have been made; if nochanges have been made then the system data will not be updated.
Waiting for a Yes/No response
When you are prompted to respond with YES or NO you must use theFast keys under the display.
Using Symbols in Text Fields
Although there is an option to use non-ASCII symbols as Productnumbers, Site & Location descriptions, User names and comments doesnot guarantee that your computer software will support them. If you areunsure avoid using symbols.

Your Hipot tester
11
10 Digit Restriction
When you first receive your Hal the Product and Comments will be set to‘10 Digit Restriction’. If you are using compatible software then thisoption can be set to ‘Full Length’. When set to ‘Full Length’ themaximum Product length is extended to 15 characters while themaximum line for the comments is extended to 20 characters per line.
Your Hipot tester
12
Chapter 2 Connecting the Tester
Connecting the testerThe Tester may be powered by either a 230V or a 110V supply.
The supply must include an earth connection (e.g. via a 3-pin plug).
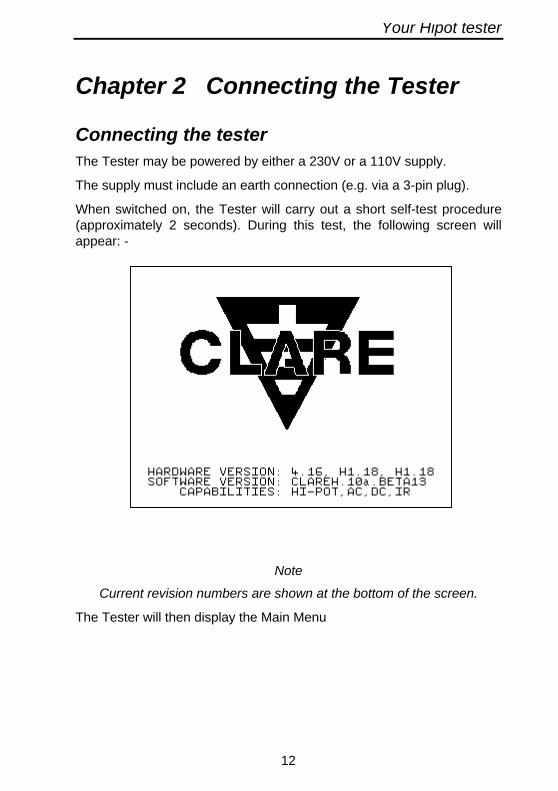
When switched on, the Tester will carry out a short self-test procedure(approximately 2 seconds). During this test, the following screen willappear: -
Note
Current revision numbers are shown at the bottom of the screen.
The Tester will then display the Main Menu
Your Hipot tester
13
Chapter 3 Using the Tester
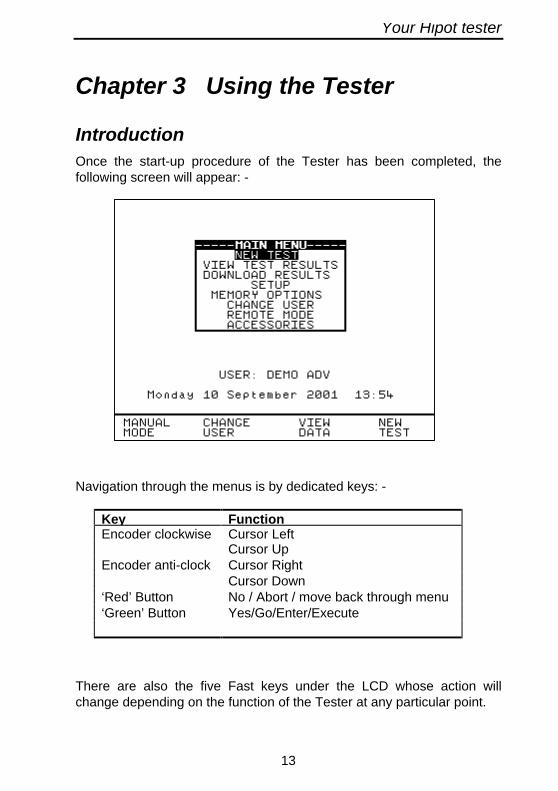
IntroductionOnce the start-up procedure of the Tester has been completed, thefollowing screen will appear: -
Navigation through the menus is by dedicated keys: -
Key FunctionEncoder clockwise Cursor Left
Cursor UpEncoder anti-clock Cursor Right
Cursor Down‘Red’ Button No / Abort / move back through menu‘Green’ Button Yes/Go/Enter/Execute
There are also the five Fast keys under the LCD whose action willchange depending on the function of the Tester at any particular point.
Your Hipot tester
14
To select an option from the Main Menu, use the encoder. The selectedoption will be highlighted by a light-coloured bar. The highlightedselection is actioned by pressing the Green button.
How to....
The remainder of this chapter has been sub-divided into sectionsdescribes the Tester in terms of the essential functions to be performed.A summary is shown below: -
• How to perform Automatic tests• How to use the Meter display• How to view test results• How to perform Manual tests• How to download test results• How to use Set-up• How to use the memory• How to change the user• How to use Help• How to use a Barcode Scanner
Your Hipot tester
15
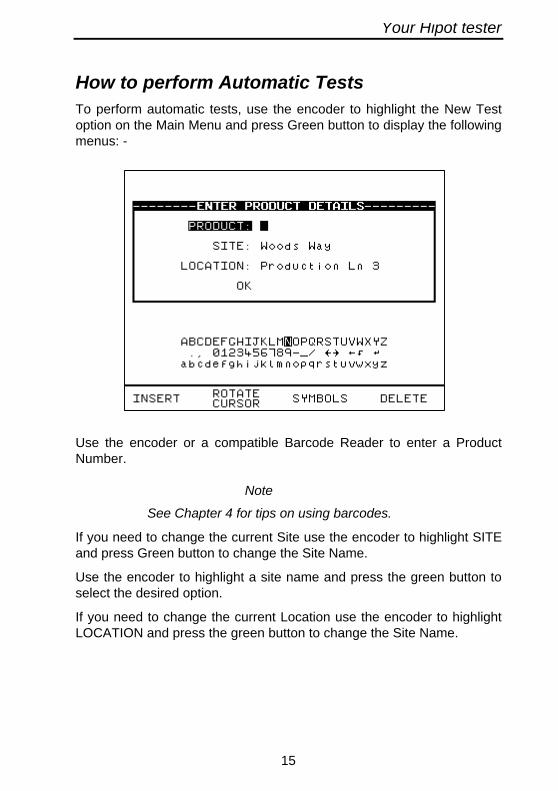
How to perform Automatic TestsTo perform automatic tests, use the encoder to highlight the New Testoption on the Main Menu and press Green button to display the followingmenus: -
Use the encoder or a compatible Barcode Reader to enter a ProductNumber.
Note
See Chapter 4 for tips on using barcodes.
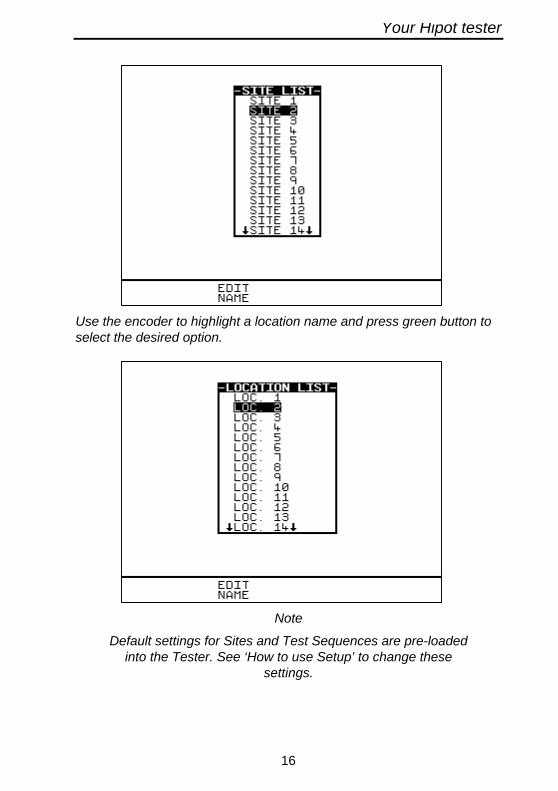
If you need to change the current Site use the encoder to highlight SITEand press Green button to change the Site Name.
Use the encoder to highlight a site name and press the green button toselect the desired option.
If you need to change the current Location use the encoder to highlightLOCATION and press the green button to change the Site Name.
Your Hipot tester
16
Use the encoder to highlight a location name and press green button toselect the desired option.
Note
Default settings for Sites and Test Sequences are pre-loadedinto the Tester. See ‘How to use Setup’ to change these
settings.
Your Hipot tester
17
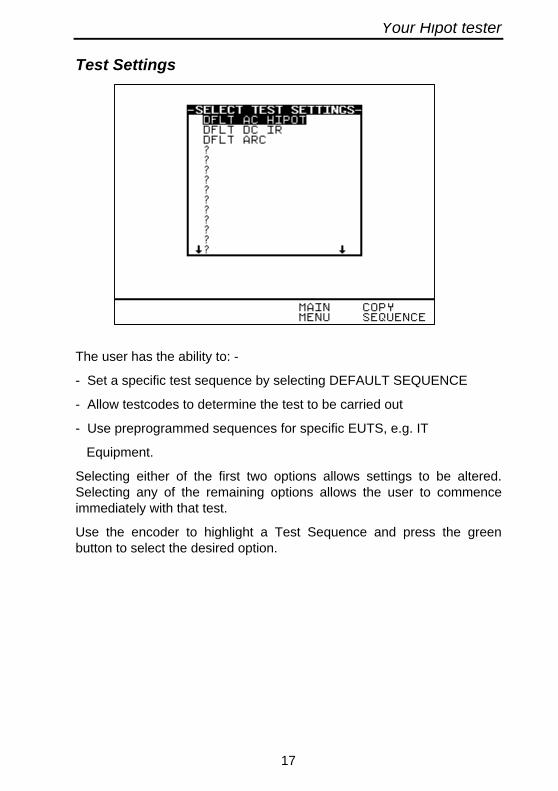
Test Settings
The user has the ability to: -
- Set a specific test sequence by selecting DEFAULT SEQUENCE
- Allow testcodes to determine the test to be carried out
- Use preprogrammed sequences for specific EUTS, e.g. IT
Equipment.
Selecting either of the first two options allows settings to be altered.Selecting any of the remaining options allows the user to commenceimmediately with that test.
Use the encoder to highlight a Test Sequence and press the greenbutton to select the desired option.
Your Hipot tester
18
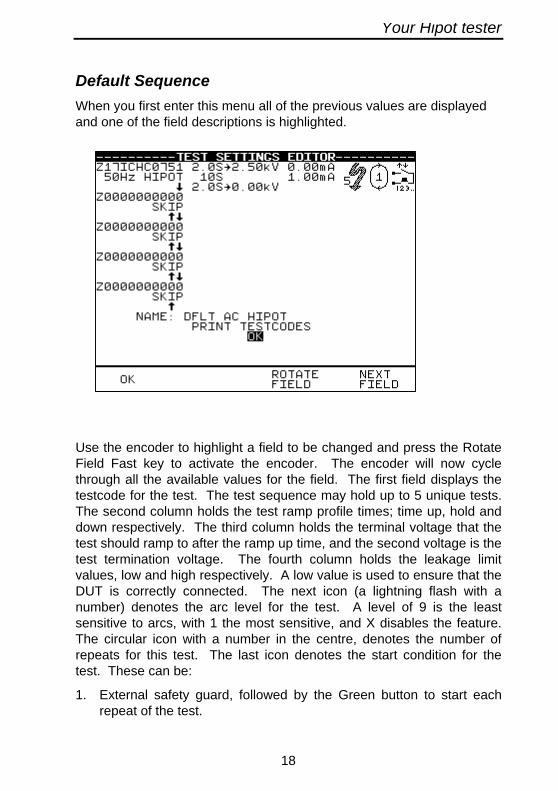
Default Sequence
When you first enter this menu all of the previous values are displayedand one of the field descriptions is highlighted.
Use the encoder to highlight a field to be changed and press the RotateField Fast key to activate the encoder. The encoder will now cyclethrough all the available values for the field. The first field displays thetestcode for the test. The test sequence may hold up to 5 unique tests.The second column holds the test ramp profile times; time up, hold anddown respectively. The third column holds the terminal voltage that thetest should ramp to after the ramp up time, and the second voltage is thetest termination voltage. The fourth column holds the leakage limitvalues, low and high respectively. A low value is used to ensure that theDUT is correctly connected. The next icon (a lightning flash with anumber) denotes the arc level for the test. A level of 9 is the leastsensitive to arcs, with 1 the most sensitive, and X disables the feature.The circular icon with a number in the centre, denotes the number ofrepeats for this test. The last icon denotes the start condition for thetest. These can be:
1. External safety guard, followed by the Green button to start eachrepeat of the test.

Your Hipot tester
19
2. External safety guard, followed by the Green button to start the test.The Green button does not have to be depressed each time arepeat is required.
3. External safety guard to start each cycle of the test.
4. External safety guard to start the test cycle. Repeats willautomatically be performed, whilst the safety guard is closed.
5. No start stimulus required, as the test follows on from a previoustest.
Use Testcodes
This option bypasses the need to edit a specific test sequence, allowingdirect entry of a Testcode through the barcode scanner.
Use the encoder to highlight the Testcode to be changed.
Use a barcode scanner to enter a Testcode.
Use the encoder to highlight the PERFORM TEST option and pressGreen button to commence the test sequence.
Press the Red button to return to the previous menu.
Perform Test
Use the encoder to highlight the OK field and press Green button toperform the test. Pressing the Red Button will return to the previousmenu.
The screen will change to the Meter Display (see separate section - Howto use the Meter Display for an explanation).
Note
Help screens may be displayed depending on the User Levelset. It is possible to stop these appearing by altering the User
Level. See EDIT USER LIST OPTIONS. Help can be displayedduring any test by pressing the appropriately marked fast key.
All test results are automatically stored.
Your Hipot tester
20
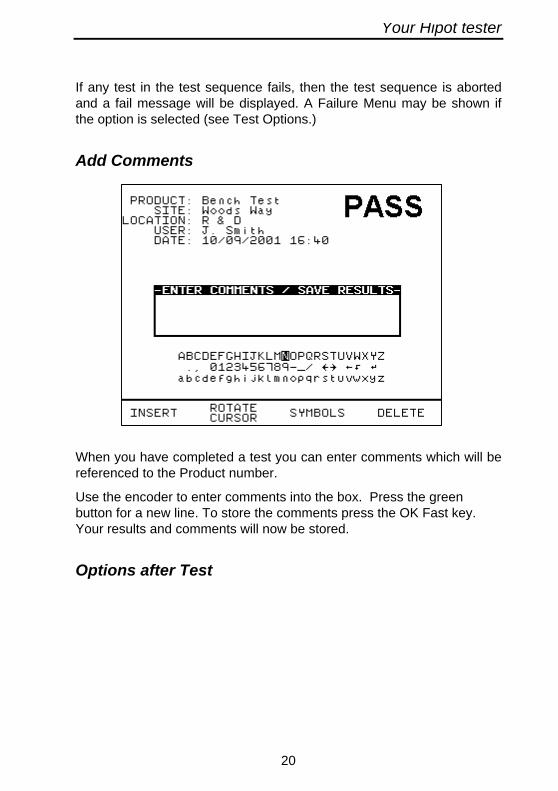
If any test in the test sequence fails, then the test sequence is abortedand a fail message will be displayed. A Failure Menu may be shown ifthe option is selected (see Test Options.)
Add Comments
When you have completed a test you can enter comments which will bereferenced to the Product number.
Use the encoder to enter comments into the box. Press the greenbutton for a new line. To store the comments press the OK Fast key.Your results and comments will now be stored.
Options after Test

Your Hipot tester
21
The options menu is displayed when an Automatic sequence has beencompleted.
Use the cursor keys to highlight an option after test and press the Greenbutton to select the desired option.
New Test
Perform a new test.
Your Hipot tester
22
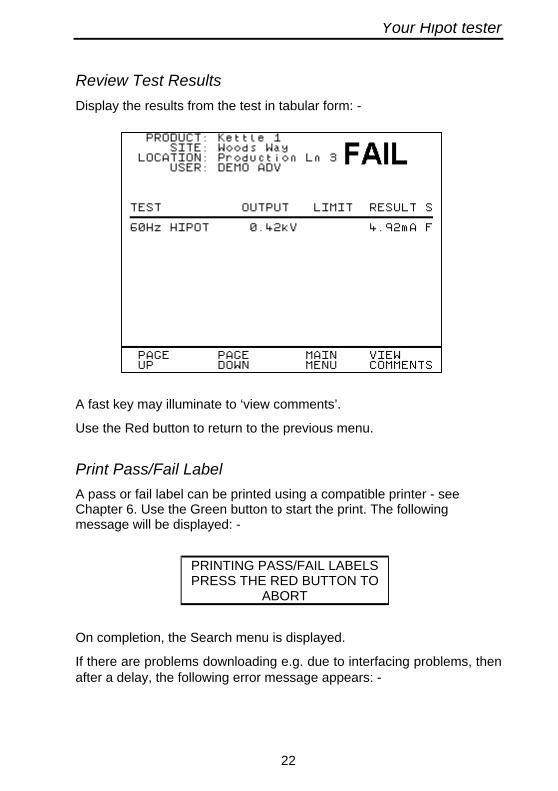
Review Test Results
Display the results from the test in tabular form: -
A fast key may illuminate to ‘view comments’.
Use the Red button to return to the previous menu.
Print Pass/Fail Label
A pass or fail label can be printed using a compatible printer - seeChapter 6. Use the Green button to start the print. The followingmessage will be displayed: -
PRINTING PASS/FAIL LABELSPRESS THE RED BUTTON TO
ABORT
On completion, the Search menu is displayed.
If there are problems downloading e.g. due to interfacing problems, thenafter a delay, the following error message appears: -
Your Hipot tester
23
----------WARNING-----------DOWNLOAD FAILED
CHECK CONNECTIONSAND TRY AGAIN
Press the Red Button to return to the previous menu.
Main Menu
Return to the Main Menu.
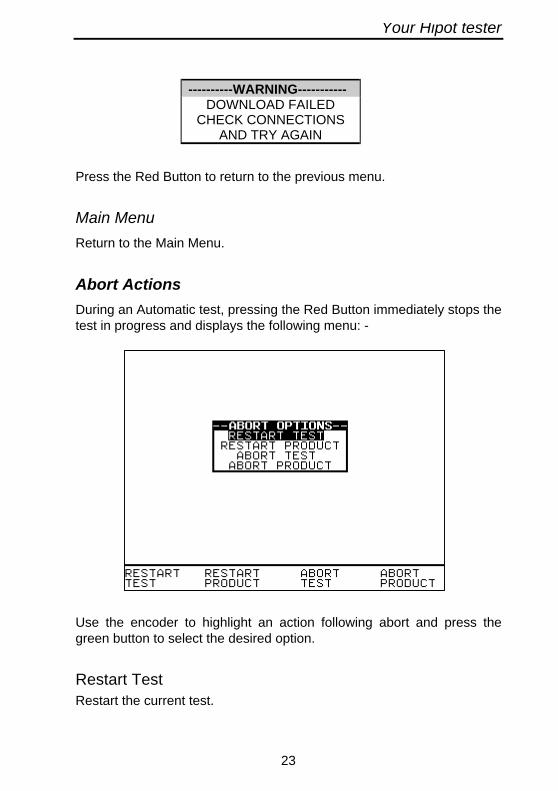
Abort Actions
During an Automatic test, pressing the Red Button immediately stops thetest in progress and displays the following menu: -
Use the encoder to highlight an action following abort and press thegreen button to select the desired option.
Restart TestRestart the current test.

Your Hipot tester
24
Restart ProductRestart the first test in the test sequence for the current Product.
Abort TestAbort the test without storing a test result and select the next test.
Abort ProductAbort the test sequence and select a new Product.
Your Hipot tester
25
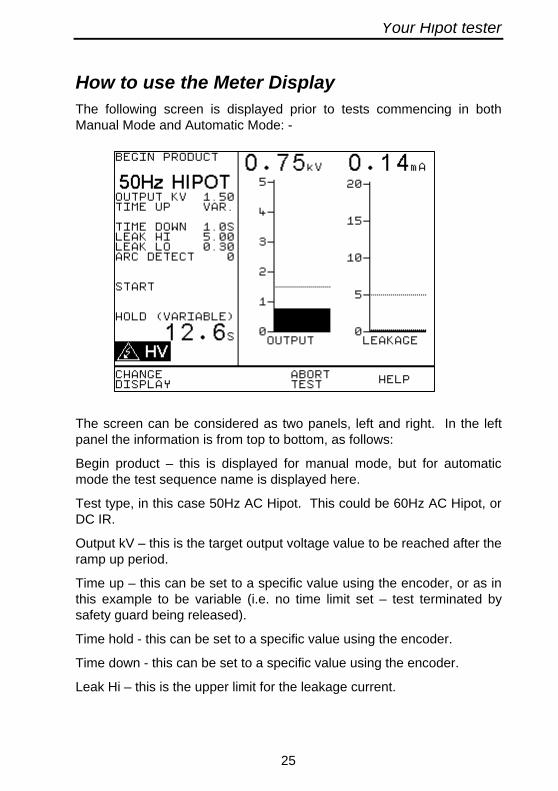
How to use the Meter DisplayThe following screen is displayed prior to tests commencing in bothManual Mode and Automatic Mode: -
The screen can be considered as two panels, left and right. In the leftpanel the information is from top to bottom, as follows:
Begin product – this is displayed for manual mode, but for automaticmode the test sequence name is displayed here.
Test type, in this case 50Hz AC Hipot. This could be 60Hz AC Hipot, orDC IR.
Output kV – this is the target output voltage value to be reached after theramp up period.
Time up – this can be set to a specific value using the encoder, or as inthis example to be variable (i.e. no time limit set – test terminated bysafety guard being released).
Time hold - this can be set to a specific value using the encoder.
Time down - this can be set to a specific value using the encoder.
Leak Hi – this is the upper limit for the leakage current.
Your Hipot tester
26
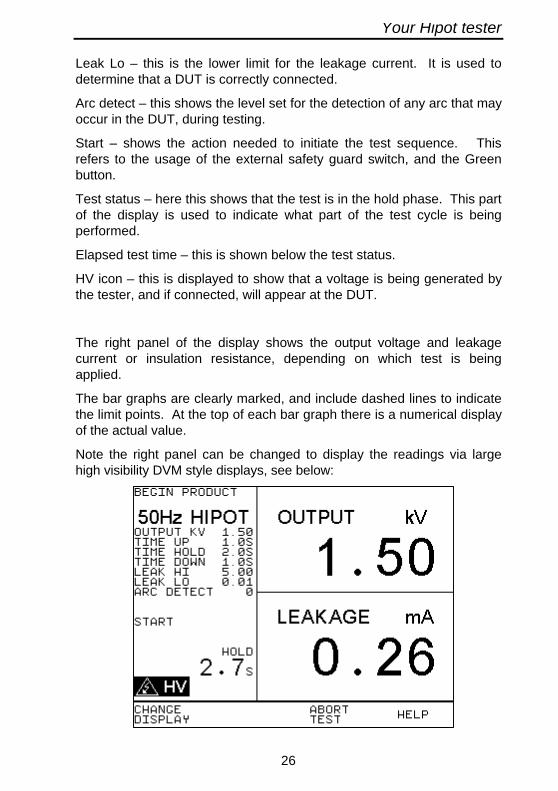
Leak Lo – this is the lower limit for the leakage current. It is used todetermine that a DUT is correctly connected.
Arc detect – this shows the level set for the detection of any arc that mayoccur in the DUT, during testing.
Start – shows the action needed to initiate the test sequence. Thisrefers to the usage of the external safety guard switch, and the Greenbutton.
Test status – here this shows that the test is in the hold phase. This partof the display is used to indicate what part of the test cycle is beingperformed.
Elapsed test time – this is shown below the test status.
HV icon – this is displayed to show that a voltage is being generated bythe tester, and if connected, will appear at the DUT.
The right panel of the display shows the output voltage and leakagecurrent or insulation resistance, depending on which test is beingapplied.
The bar graphs are clearly marked, and include dashed lines to indicatethe limit points. At the top of each bar graph there is a numerical displayof the actual value.
Note the right panel can be changed to display the readings via largehigh visibility DVM style displays, see below:
Your Hipot tester
27
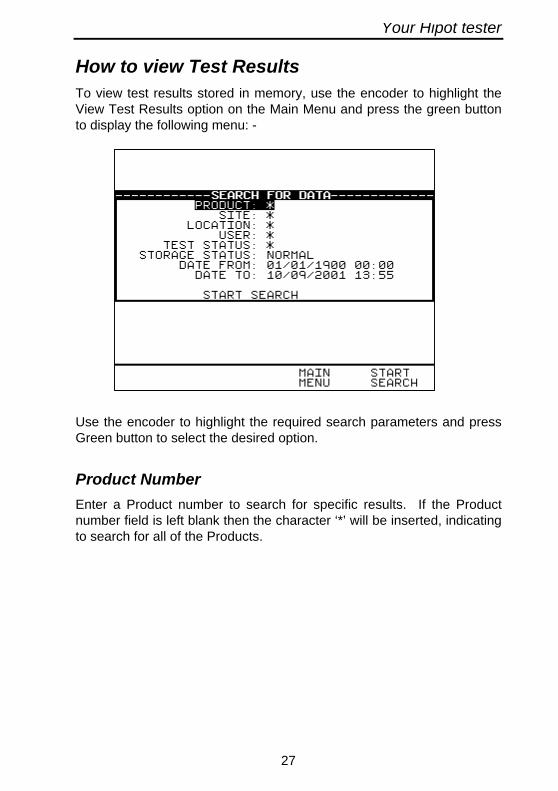
How to view Test ResultsTo view test results stored in memory, use the encoder to highlight theView Test Results option on the Main Menu and press the green buttonto display the following menu: -
Use the encoder to highlight the required search parameters and pressGreen button to select the desired option.
Product Number
Enter a Product number to search for specific results. If the Productnumber field is left blank then the character ‘*’ will be inserted, indicatingto search for all of the Products.
Your Hipot tester
28
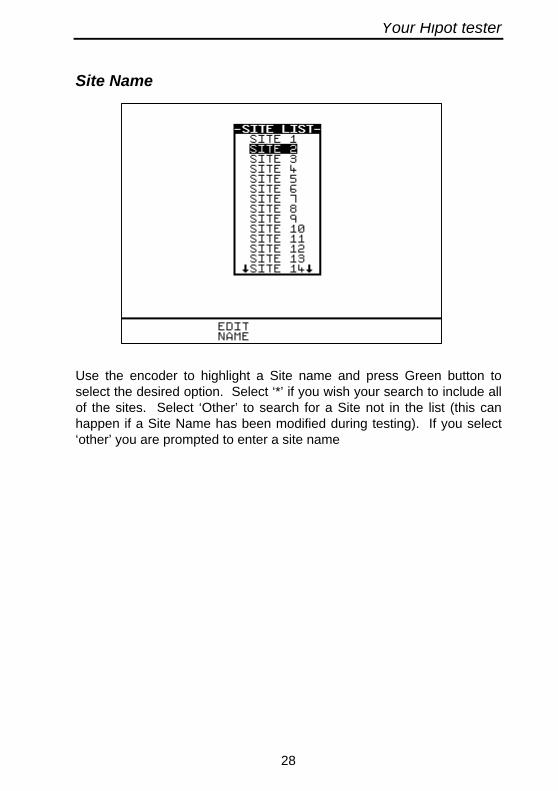
Site Name
Use the encoder to highlight a Site name and press Green button toselect the desired option. Select ‘*’ if you wish your search to include allof the sites. Select ‘Other’ to search for a Site not in the list (this canhappen if a Site Name has been modified during testing). If you select‘other’ you are prompted to enter a site name
Your Hipot tester
29
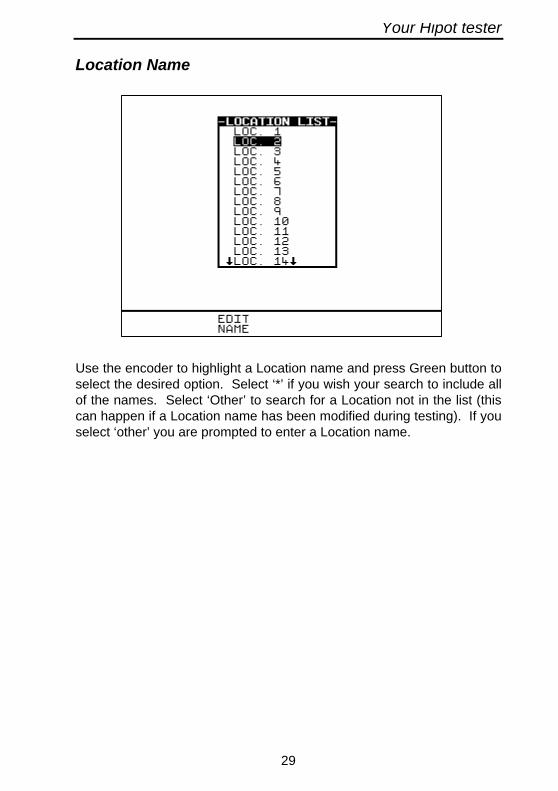
Location Name
Use the encoder to highlight a Location name and press Green button toselect the desired option. Select ‘*’ if you wish your search to include allof the names. Select ‘Other’ to search for a Location not in the list (thiscan happen if a Location name has been modified during testing). If youselect ‘other’ you are prompted to enter a Location name.
Your Hipot tester
30
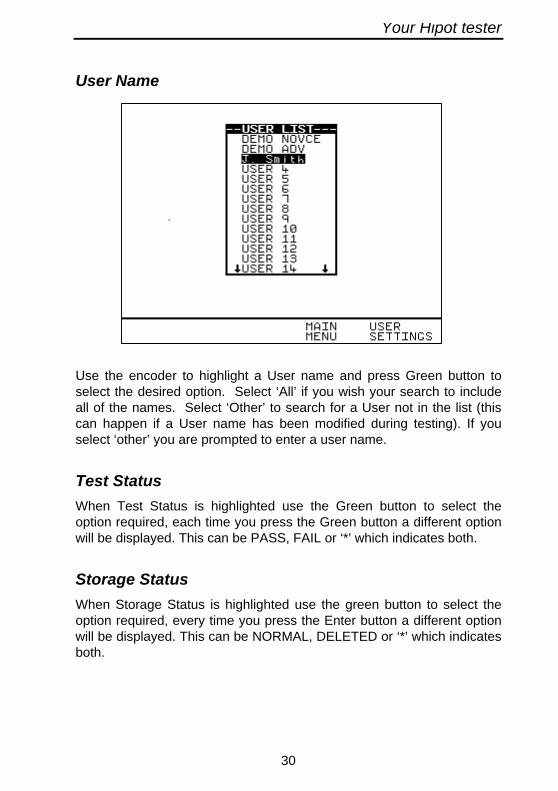
User Name
Use the encoder to highlight a User name and press Green button toselect the desired option. Select ‘All’ if you wish your search to includeall of the names. Select ‘Other’ to search for a User not in the list (thiscan happen if a User name has been modified during testing). If youselect ‘other’ you are prompted to enter a user name.
Test Status
When Test Status is highlighted use the Green button to select theoption required, each time you press the Green button a different optionwill be displayed. This can be PASS, FAIL or ‘*’ which indicates both.
Storage Status
When Storage Status is highlighted use the green button to select theoption required, every time you press the Enter button a different optionwill be displayed. This can be NORMAL, DELETED or ‘*’ which indicatesboth.

Your Hipot tester
31
Date From
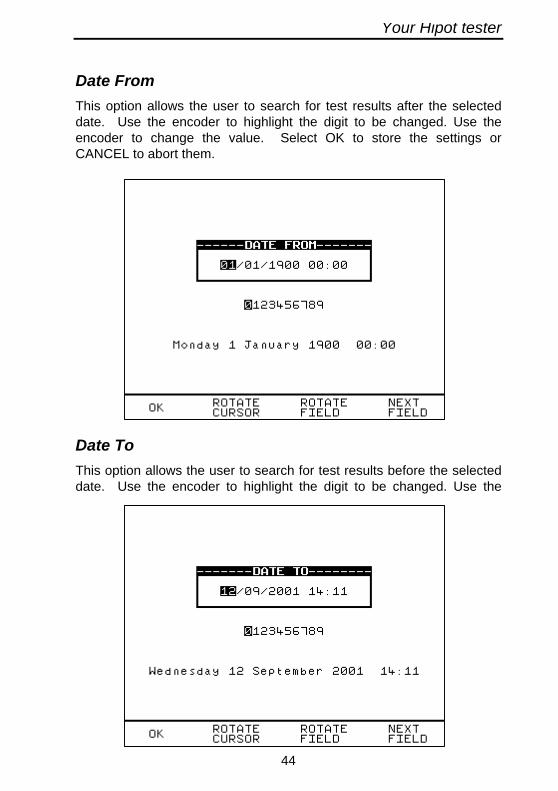
This option allows the user to search for test results after the selecteddate. Use the cursor keys to highlight the digit to be changed. Use theencoder to change the value. Select OK to store the settings or CANCELto abort them.
Date To
Your Hipot tester
32
This option allows the user to search for test results before the selecteddate. Use the encoder to highlight the digit to be changed. Use theencoder to change the value. Select OK to store the settings orCANCEL to abort them.
Search
After all the search parameters have been set, highlight STARTSEARCH & press the GREEN BUTTON to search.
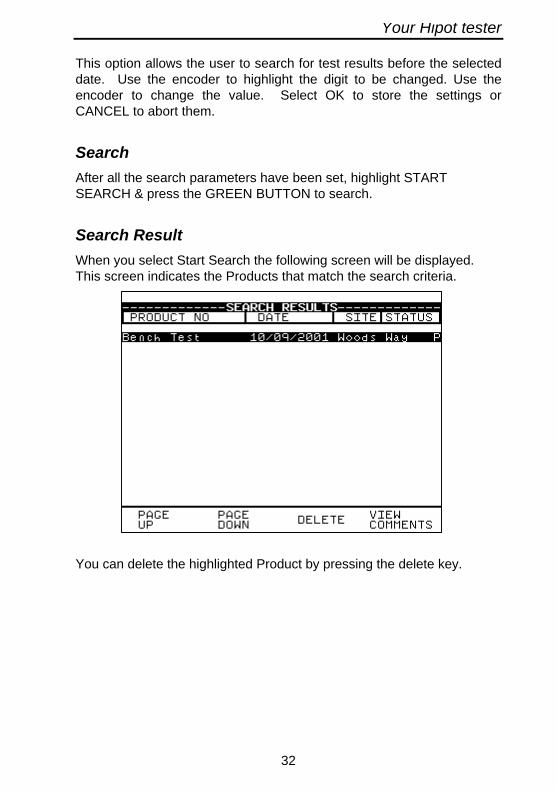
Search Result
When you select Start Search the following screen will be displayed.This screen indicates the Products that match the search criteria.
You can delete the highlighted Product by pressing the delete key.

Your Hipot tester
33
Product Test Results
It is possible to view the results obtained for a certain Product byhighlighting the Product number and pressing the Green button.
A fast key may illuminate to ‘view comments’
Use the Red button to return to the previous menu.
How to perform Manual TestsManual mode provides the user with direct access to the tests. In thismode individual tests can be selected and performed. Product numbers,sites, users and testcodes can still be assigned to Products if required;though this is not essential.
Entering Manual Mode
Use the fast key to select Manual Mode from the Main Menu.
The system will then display the meter screen and allow direct use of thedefault, or last selected test that was setup. The user may setup 10unique configurations, and save these for later use. To operate the testthe operator must follow the on screen instruction; closure of the safetyguard switch, followed by depressing the Green button. The test may be

Your Hipot tester
34
terminated at any time, either by depressing the Red button, or openingthe safety guard.
Manual mode is primarily intended for use in evaluating DUTs in alaboratory environment, or for performing production line re-testing.
Note
To store tests in memory from Manual mode you must firstselect Create Product No., perform the tests required from theEUT. When you have completed the required tests select EnterComments/Save Results, upon leaving this option the Hal willnow store the results. Note that the Enter Comments option isnot displayed until there is something to store. Tests carried outwithout Product details being entered will not be stored
Create Product Number
This allows all manual tests performed to be stored against the Productnumber until the Product number is changed.
Use the encoder or a compatible Barcode Reader to enter a ProductNumber. Use the encoder to select the ‘BEGIN PRODUCT’ field, thenyou will be presented with the following screen:
Your Hipot tester
35
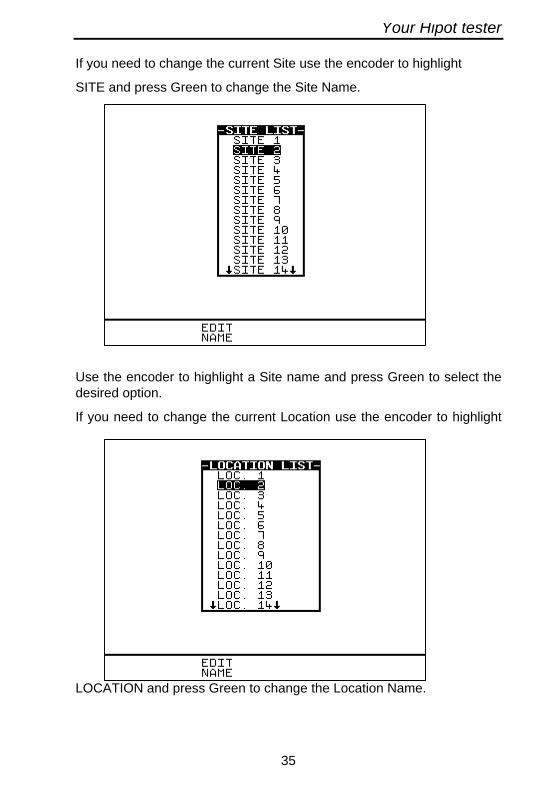
If you need to change the current Site use the encoder to highlight
SITE and press Green to change the Site Name.
Use the encoder to highlight a Site name and press Green to select thedesired option.
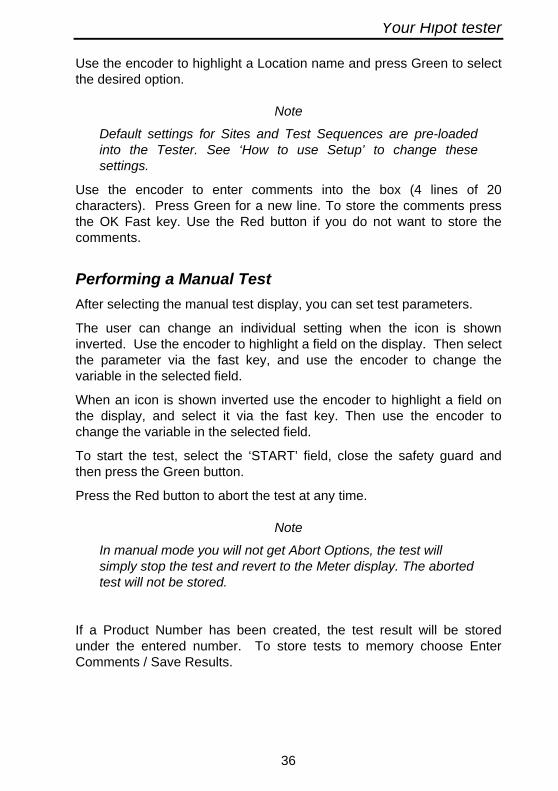
If you need to change the current Location use the encoder to highlight
LOCATION and press Green to change the Location Name.
Your Hipot tester
36
Use the encoder to highlight a Location name and press Green to selectthe desired option.
Note
Default settings for Sites and Test Sequences are pre-loadedinto the Tester. See ‘How to use Setup’ to change thesesettings.
Use the encoder to enter comments into the box (4 lines of 20characters). Press Green for a new line. To store the comments pressthe OK Fast key. Use the Red button if you do not want to store thecomments.
Performing a Manual Test
After selecting the manual test display, you can set test parameters.
The user can change an individual setting when the icon is showninverted. Use the encoder to highlight a field on the display. Then selectthe parameter via the fast key, and use the encoder to change thevariable in the selected field.
When an icon is shown inverted use the encoder to highlight a field onthe display, and select it via the fast key. Then use the encoder tochange the variable in the selected field.
To start the test, select the ‘START’ field, close the safety guard andthen press the Green button.
Press the Red button to abort the test at any time.
Note
In manual mode you will not get Abort Options, the test willsimply stop the test and revert to the Meter display. The abortedtest will not be stored.
If a Product Number has been created, the test result will be storedunder the entered number. To store tests to memory choose EnterComments / Save Results.
Your Hipot tester
37
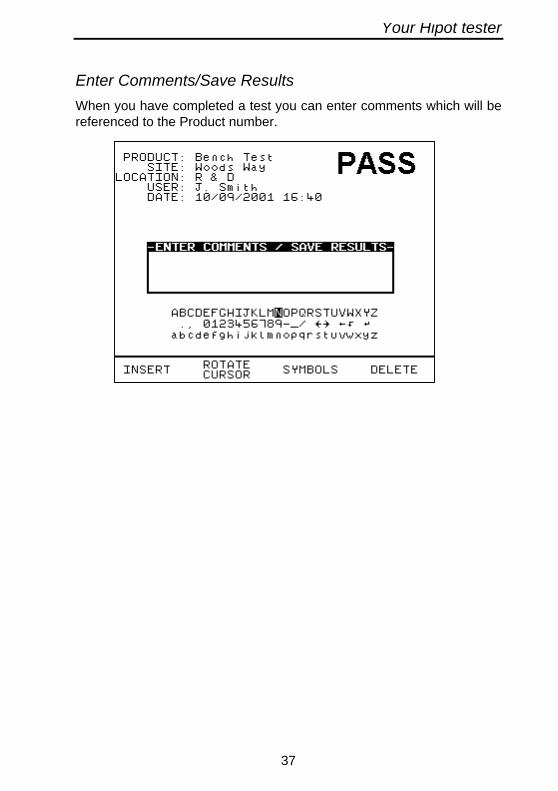
Enter Comments/Save Results
When you have completed a test you can enter comments which will bereferenced to the Product number.
Your Hipot tester
38
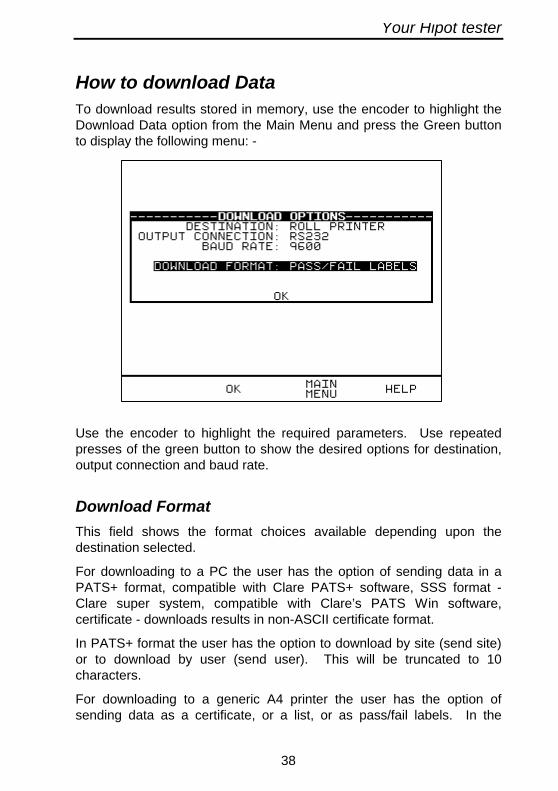
How to download DataTo download results stored in memory, use the encoder to highlight theDownload Data option from the Main Menu and press the Green buttonto display the following menu: -
Use the encoder to highlight the required parameters. Use repeatedpresses of the green button to show the desired options for destination,output connection and baud rate.
Download Format
This field shows the format choices available depending upon thedestination selected.
For downloading to a PC the user has the option of sending data in aPATS+ format, compatible with Clare PATS+ software, SSS format -Clare super system, compatible with Clare’s PATS Win software,certificate - downloads results in non-ASCII certificate format.
In PATS+ format the user has the option to download by site (send site)or to download by user (send user). This will be truncated to 10characters.
For downloading to a generic A4 printer the user has the option ofsending data as a certificate, or a list, or as pass/fail labels. In the
Your Hipot tester
39
certificate format the user has the option to produce one certificate perpage or to produce continuous printouts.
For downloading to a roll printer, including ‘till roll’ and thermal printersthe user has the option of sending data as a continuous list or aspass/fail labels. When using a compatible thermal roll printer thepass/fail labels will produce Product number and in a number andbarcode format. However, the restrictions of paper width means thatProduct numbers representing more than 12 digits cannot be printedand a numbered label will print instead. Testcodes over 12 and up to 15digits can be accommodated since these are displayed as two lines.
Use repeated presses of the green button to show desired settings fordownload format. If appropriate the option field will illuminate. Userepeated presses of the green button to show desired settings.
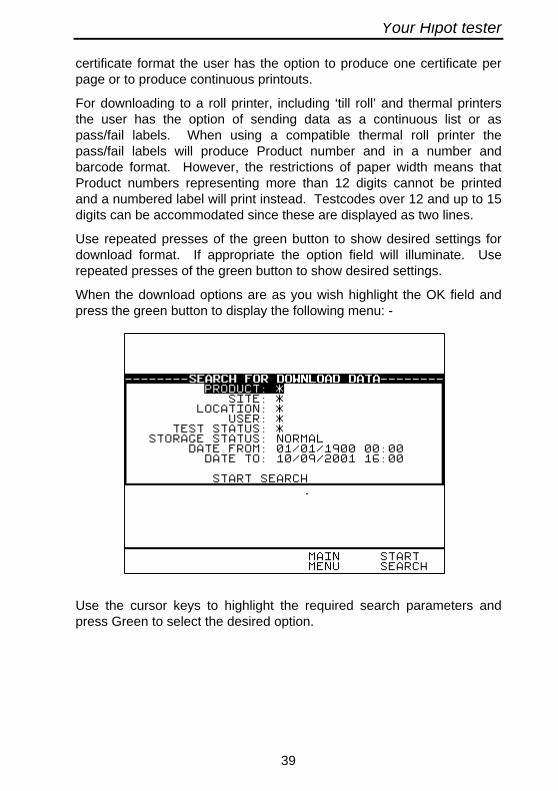
When the download options are as you wish highlight the OK field andpress the green button to display the following menu: -
Use the cursor keys to highlight the required search parameters andpress Green to select the desired option.

Your Hipot tester
40
Product Number
Enter a Product number to search for specific results. If the Productnumber field is left blank then the character ‘*’ will be inserted, indicatingto search for all of the Products.
Your Hipot tester
41
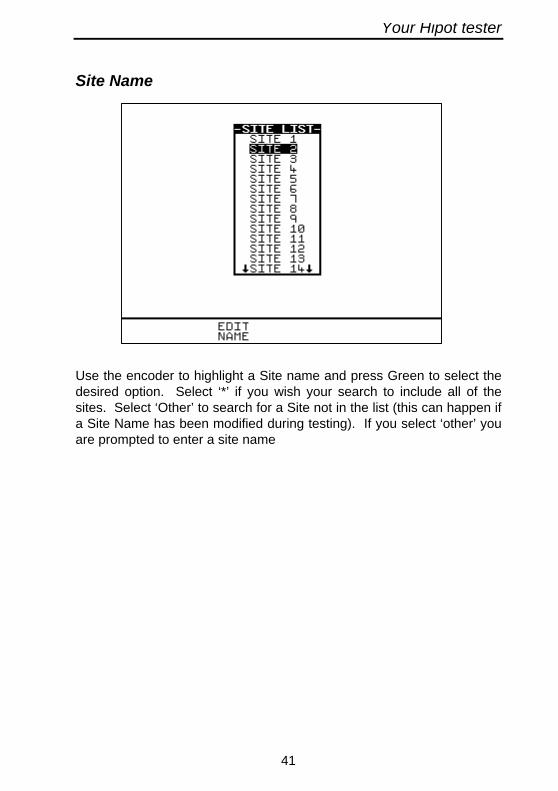
Site Name
Use the encoder to highlight a Site name and press Green to select thedesired option. Select ‘*’ if you wish your search to include all of thesites. Select ‘Other’ to search for a Site not in the list (this can happen ifa Site Name has been modified during testing). If you select ‘other’ youare prompted to enter a site name
Your Hipot tester
42
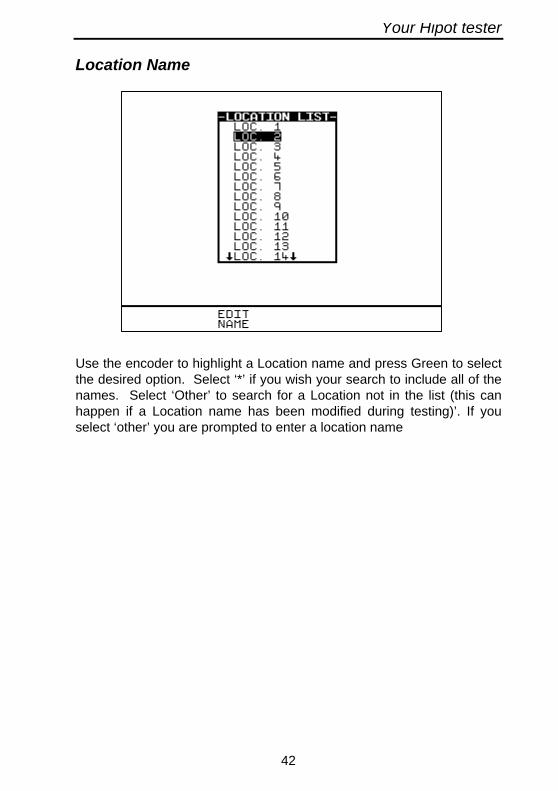
Location Name
Use the encoder to highlight a Location name and press Green to selectthe desired option. Select ‘*’ if you wish your search to include all of thenames. Select ‘Other’ to search for a Location not in the list (this canhappen if a Location name has been modified during testing)’. If youselect ‘other’ you are prompted to enter a location name
Your Hipot tester
43
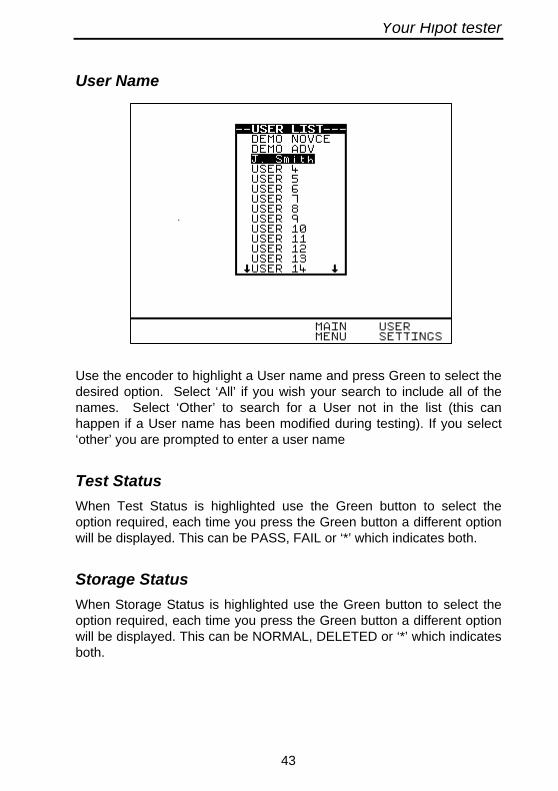
User Name
Use the encoder to highlight a User name and press Green to select thedesired option. Select ‘All’ if you wish your search to include all of thenames. Select ‘Other’ to search for a User not in the list (this canhappen if a User name has been modified during testing). If you select‘other’ you are prompted to enter a user name
Test Status
When Test Status is highlighted use the Green button to select theoption required, each time you press the Green button a different optionwill be displayed. This can be PASS, FAIL or ‘*’ which indicates both.
Storage Status
When Storage Status is highlighted use the Green button to select theoption required, each time you press the Green button a different optionwill be displayed. This can be NORMAL, DELETED or ‘*’ which indicatesboth.
Your Hipot tester
44
Date From
This option allows the user to search for test results after the selecteddate. Use the encoder to highlight the digit to be changed. Use theencoder to change the value. Select OK to store the settings orCANCEL to abort them.
Date To
This option allows the user to search for test results before the selecteddate. Use the encoder to highlight the digit to be changed. Use the
Your Hipot tester
45
encoder to change the value. Select OK to store the settings orCANCEL to abort them.
Search
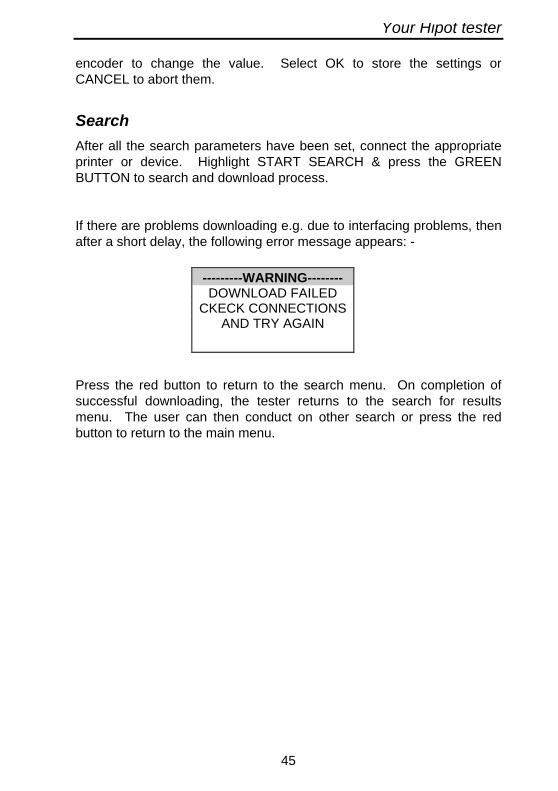
After all the search parameters have been set, connect the appropriateprinter or device. Highlight START SEARCH & press the GREENBUTTON to search and download process.
If there are problems downloading e.g. due to interfacing problems, thenafter a short delay, the following error message appears: -
Press the red button to return to the search menu. On completion ofsuccessful downloading, the tester returns to the search for resultsmenu. The user can then conduct on other search or press the redbutton to return to the main menu.
---------WARNING--------DOWNLOAD FAILED
CKECK CONNECTIONSAND TRY AGAIN
Your Hipot tester
46
How to print Barcode Labels and TestcodesThe Hal is capable of printing barcode labels in conjunction with acompatible thermal printer (see chapter 6).
To print barcode testcodesTo print barcode test codes select setup from the main menu and selecttest settings from the setup menu. From the select test settings menuchose the desired test e.g. HOUSEHOLD CLASS 1. Attach thecompatible printer to the port and from the test settings editor highlightthe PRINT TESTCODE option and press enter.
To Print Barcode Pass/Fail LabelsTo print barcode pass/fail labels it is necessary to carry out an actualtest. (see how to perform automatic tests.) After a test is complete andthe results stored in memory it is possible to download results to athermal printer (see how to download results) and print pass/fail labels.
Note
Restrictions of paper width means that representing more than 12 digitscannot be printed and a numbered label will print instead.
The print format options available are dependent upon the specificprinter chosen.
Your Hipot tester
47
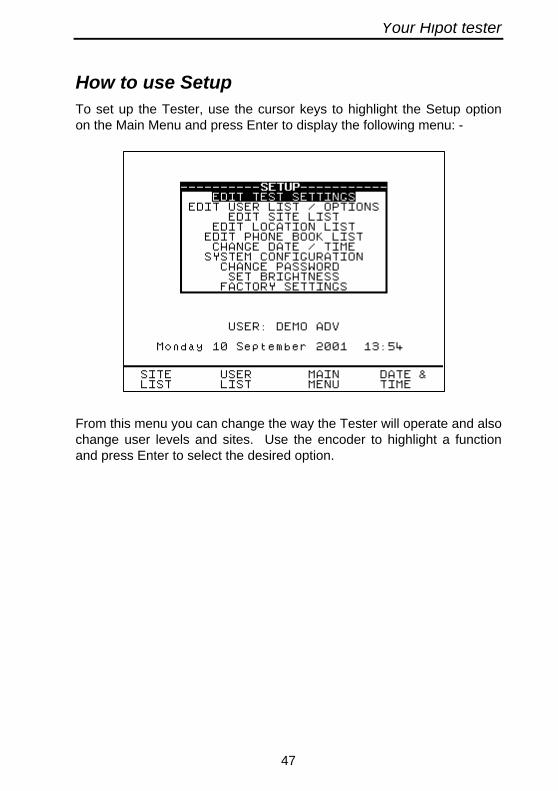
How to use SetupTo set up the Tester, use the cursor keys to highlight the Setup optionon the Main Menu and press Enter to display the following menu: -
From this menu you can change the way the Tester will operate and alsochange user levels and sites. Use the encoder to highlight a functionand press Enter to select the desired option.

Your Hipot tester
48
Edit Test Settings
This allows the user to add, modify, remove or confirm test settings thatcan then be selected during automatic testing.
Also see Change Password.
Use the encoder to highlight a Test Setting and press Green to enter theTest Settings Editor: -
Your Hipot tester
49
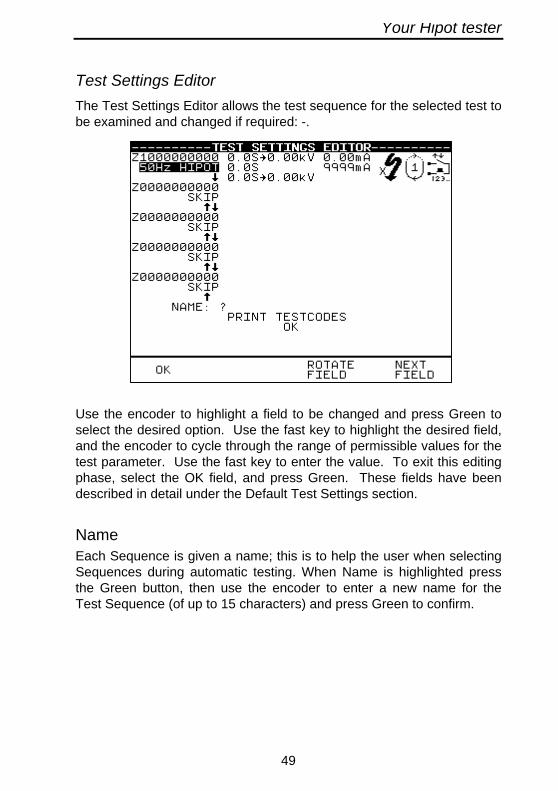
Test Settings Editor
The Test Settings Editor allows the test sequence for the selected test tobe examined and changed if required: -.
Use the encoder to highlight a field to be changed and press Green toselect the desired option. Use the fast key to highlight the desired field,and the encoder to cycle through the range of permissible values for thetest parameter. Use the fast key to enter the value. To exit this editingphase, select the OK field, and press Green. These fields have beendescribed in detail under the Default Test Settings section.
NameEach Sequence is given a name; this is to help the user when selectingSequences during automatic testing. When Name is highlighted pressthe Green button, then use the encoder to enter a new name for theTest Sequence (of up to 15 characters) and press Green to confirm.

Your Hipot tester
50
Test Parameter FieldsBy selecting one of the test parameter fields from the Test SettingsEditor, the encoder will cycle through all the available values for the testparameter.
Use the Green button to save the settings and return to the Test SettingsEditor. Press the Red button to abort changes made to the settings andreturn to the Test Settings Editor.
Testcodes
Use the encoder and Green to select one of the Testcode fields.
A Testcode can be entered manually or through a compatible barcodescanner, reader or wand (see How to use a Barcode Scanner).
Store Settings
Use the encoder to highlight the OK field and press Green to save thesettings and return to the previous menu. Pressing the Red Button willabort all of the changes made and return to the previous menu.
Print Testcodes
The testcodes can be printed (using a compatible printer - see Chapter6).
Use the Green button to start the print. The following message will bedisplayed: -
PRINTING TESTCODESPRESS THE RED BUTTON TO
ABORT
On completion of downloading, the Test Settings Editor menu isdisplayed.
If there are problems downloading e.g. due to interfacing problems, thenafter a delay, the following error message appears: -

Your Hipot tester
51
----------WARNING-----------DOWNLOAD FAILED
CHECK CONNECTIONSAND TRY AGAIN
Press the Red Button to return to the Test Settings Editor menu.

Your Hipot tester
52
Edit User List / Options
Use the encoder to highlight a User name and press Green to select thedesired option: -

Your Hipot tester
53
Note
If you change the name of the user during testing all of theprevious tests will still be referenced to the old user name; thisgives unlimited amounts of users within memory.
To change the user name, highlight Name and press the Green button.
Use the encoder to highlight options that can be customised for eachuser and press Green to select the desired option.
User Level
Use the cursor keys to highlight a user level and press Enter to selectthe desired option.
Novice User
Selects the user level as a regular user. This provides an average levelof help information and additional warnings and prompts
Advanced User
Selects the user level as an advanced user. This provides a minimumlevel of help information and additional warnings and prompts
Startup Mode
Use the encoder to highlight a test mode on startup and press Green toselect the desired option.
Automatic Mode
The Tester will start up in Automatic Mode, with the Tester displaying theMain Menu.
Manual Mode
The Tester will start up in Manual Mode, with the Tester displaying theManual Test Selection Menu.
Your Hipot tester
54
Beep on Key Press
Use the encoder to highlight a buzzer option and press Green to selectthe desired option. This option will beep each time a key is pressed.
Beep on Tests
Use the encoder to highlight a buzzer option and press Green to selectthe desired option. This option will beep whenever the High Voltage Testin Progress icon is displayed or a test has failed.
Beep on Barcodes
Use the encoder to highlight a buzzer option and press Green to selectthe desired option. This option will beep whenever a barcode has beenreceived.
Saving User Settings
In the Edit user settings menu, highlight OK and press the Green button.The user settings will then be saved.
Your Hipot tester
55
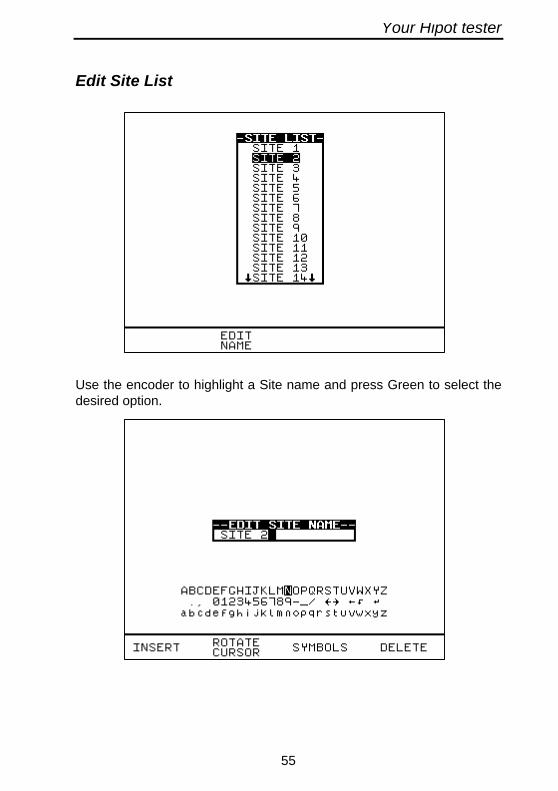
Edit Site List
Use the encoder to highlight a Site name and press Green to select thedesired option.
Your Hipot tester
56
Note
If you change the name of the site during testing all of theprevious tests will still be referenced to the old site name; thisgives unlimited amounts of sites within memory.
If you chose to edit an existing site the name of the site will be shown inthe box. If you chose to edit an empty box (signified by a ?), the box willbe empty. Use the encoder to enter the name of the site and pressGreen to return to the previous menu.
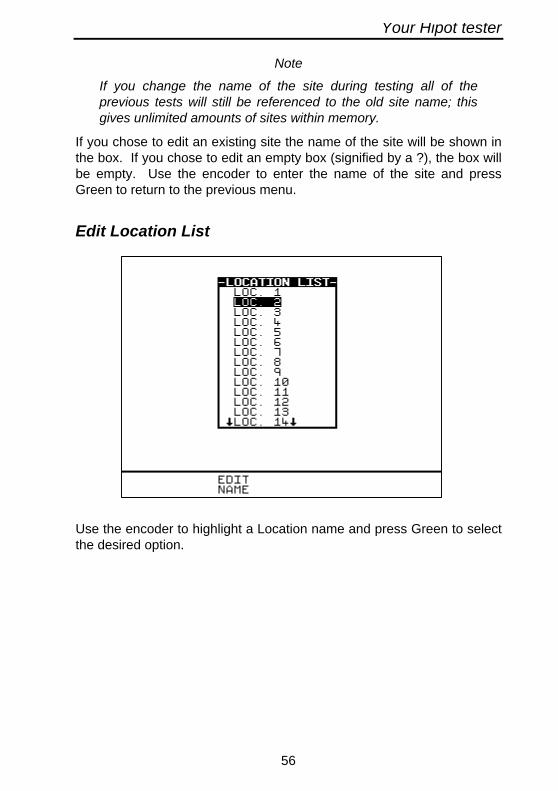
Edit Location List
Use the encoder to highlight a Location name and press Green to selectthe desired option.
Your Hipot tester
57
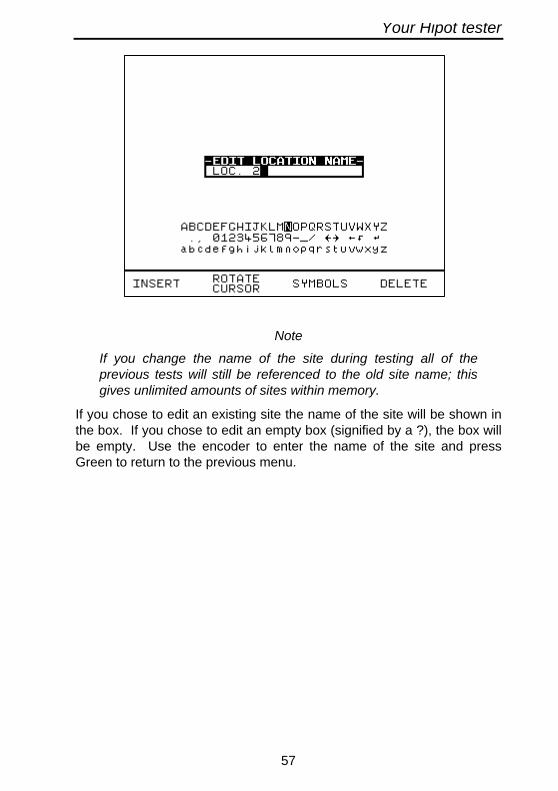
Note
If you change the name of the site during testing all of theprevious tests will still be referenced to the old site name; thisgives unlimited amounts of sites within memory.
If you chose to edit an existing site the name of the site will be shown inthe box. If you chose to edit an empty box (signified by a ?), the box willbe empty. Use the encoder to enter the name of the site and pressGreen to return to the previous menu.
Your Hipot tester
58
Change Time/Date
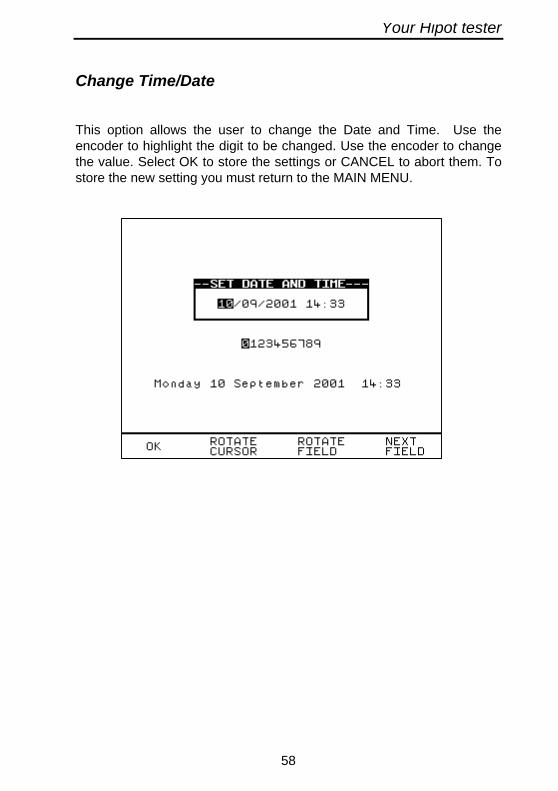
This option allows the user to change the Date and Time. Use theencoder to highlight the digit to be changed. Use the encoder to changethe value. Select OK to store the settings or CANCEL to abort them. Tostore the new setting you must return to the MAIN MENU.
Your Hipot tester
59
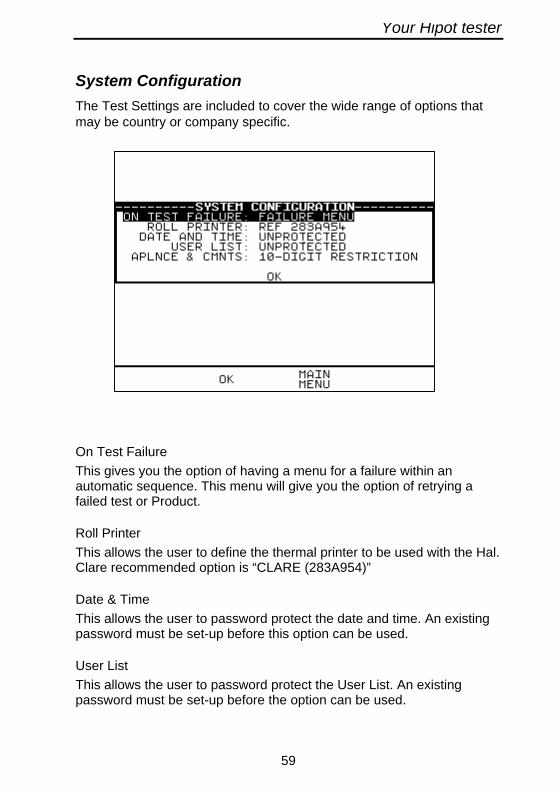
System Configuration
The Test Settings are included to cover the wide range of options thatmay be country or company specific.
On Test Failure
This gives you the option of having a menu for a failure within anautomatic sequence. This menu will give you the option of retrying afailed test or Product.
Roll Printer
This allows the user to define the thermal printer to be used with the Hal.Clare recommended option is “CLARE (283A954)”
Date & Time
This allows the user to password protect the date and time. An existingpassword must be set-up before this option can be used.
User List
This allows the user to password protect the User List. An existingpassword must be set-up before the option can be used.

Your Hipot tester
60
Aplnce & Cmnts
This allows the user to limit the Product number and Comment lines to10 digits. When limited to 10 digits the Hal can be downloaded to a widerrange of software.
Change Password
It is possible to Password protect the Test Sequence Editor and theCountry Settings.
If you currently do not have password protection you will be asked toenter a new password twice, once for confirmation.
If you currently do have password protection then you will be asked forthe old password before entering a new one, again you will be asked forthe new password twice.
To clear the password protection simply press Enter when asked for thenew password. A warning will show that no password is in place.
Set Brightness
You can now set the Brightness of the display. Use the encoder tochange the Brightness, once the Brightness is set press the Greenbutton to accept the changes. Press the Red button to abort anychanges made.
Factory Settings
It is possible to reset the Hal to the settings that were configured fromnew. This option will first ask you if you are sure, select Yes to reset orNo to abort.
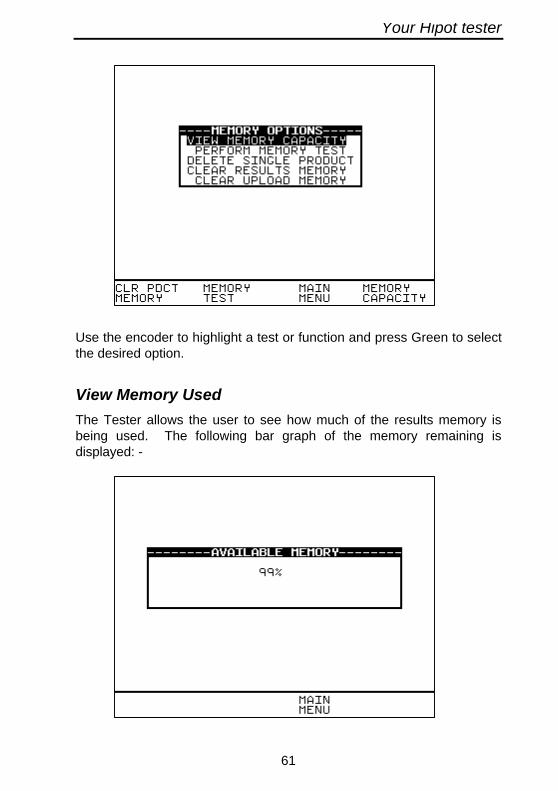
How to use the MemoryTo use the memory tests and functions, use the encoder to highlight theMemory Options option on the Main Menu and press Green to displaythe following menu: -
Your Hipot tester
61
Use the encoder to highlight a test or function and press Green to selectthe desired option.
View Memory Used
The Tester allows the user to see how much of the results memory isbeing used. The following bar graph of the memory remaining isdisplayed: -

Your Hipot tester
62
Perform Memory Test
Once the 'Perform memory test' option is highlighted press the greenbutton.
The memory test checks all of the Product results against theirchecksums. If the test result is a pass then no action is taken. If anytests fail then the Memory checksum requires updating. Use theencoder and press Green to choose an action if corrupted tests arefound.
Note
The memory checksum is the sum of all of the memoryexcluding display data, registers and deleted tests.
Delete Single Product
Enter the Product number to delete a single Product and press Green.
A warning ‘Are You Sure?’ prompt will appear. Press the No fast key toreturn to the previous menu or press the Yes fast key to perform thedelete operation and return to the previous menu.
Your Hipot tester
63
Note:
Deleting Products in this way will delete all of the matchedProducts across all of the Sites and Locations.
When a single Product is deleted it is not removed from memorybut hidden from the user. This test is still resident in memoryand is taking up memory space, this test can be reviewed /downloaded at a later date. Since the test is still resident inmemory the View Memory Capacity figure may seem false. I.e.whilst you may think you have no results stored and the ViewMemory Capacity indicates there are results stored, previouslydeleted Products are resident in memory. In this situation toremove all resident tests select clear results memory.
How to upload test details to your HalTo upload test details to the Hal memory first connect the serial port ofthe Hal to the appropriate port on your PC using a serial-download lead(9-9way or 9-25 Way). Please see the optional accessories section ofthis manual for part numbers.
From the main menu on the tester use the cursor keys to selectREMOTE MODE, the tester is now ready to accept download data.Follow the instructions supplied with your results recording software tocommunicate with the tester. Once the communication is in process thetester will show a count of tests being transferred. The software and Halwill display a message to say that the transfer is complete. Oncecomplete press the ABORT key and return to the MAIN MENU.Disconnect the serial download lead and the Hal can be used as normal.
Clear Results Memory
This option will delete all of the Products currently stored in memory andshould be used carefully!
A warning ‘Are You Sure?’ prompt will appear. Press the No fast key toreturn to the previous menu or press the Yes fast key to perform thedelete operation and return to the previous menu.
Your Hipot tester
64
Clear Upload Memory
This option will delete all of the Product codes that have been uploadedfrom an external computer and should be used carefully!
Note
Users will be asked whether they are sure about performing thisaction.
A warning ‘Are You Sure?’ prompt will appear. Press the No fast key toreturn to the previous menu or press the Yes fast key to perform thedelete operation and return to the previous menu.
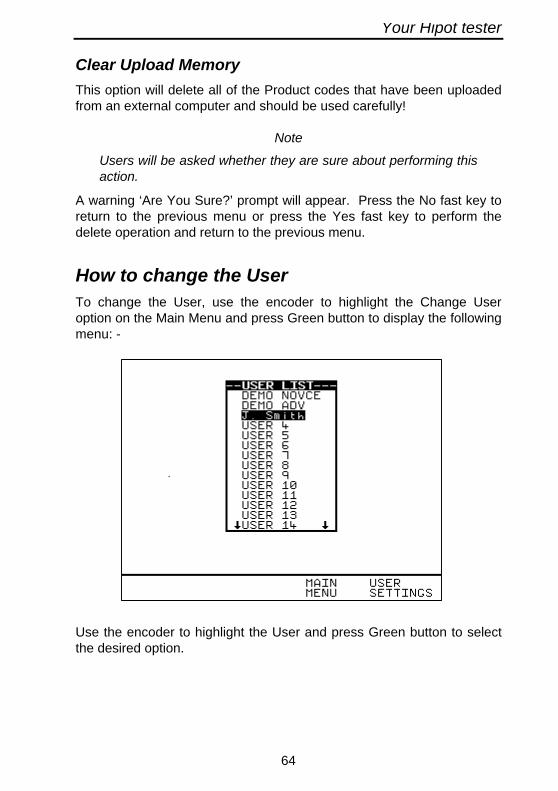
How to change the UserTo change the User, use the encoder to highlight the Change Useroption on the Main Menu and press Green button to display the followingmenu: -
Use the encoder to highlight the User and press Green button to selectthe desired option.
Your Hipot tester
65
How to use HelpThe Tester is provided with an on-line help function, which can be calledup at during the test screens by pressing the Help fast key.
Each test will have three or four help pages depending on connectioninformation.
Help provided to the User
The Help function provides the following information: -
Description of Test
The first help page shown contains information on the particular test,including its icon and a description of the purpose of the test.
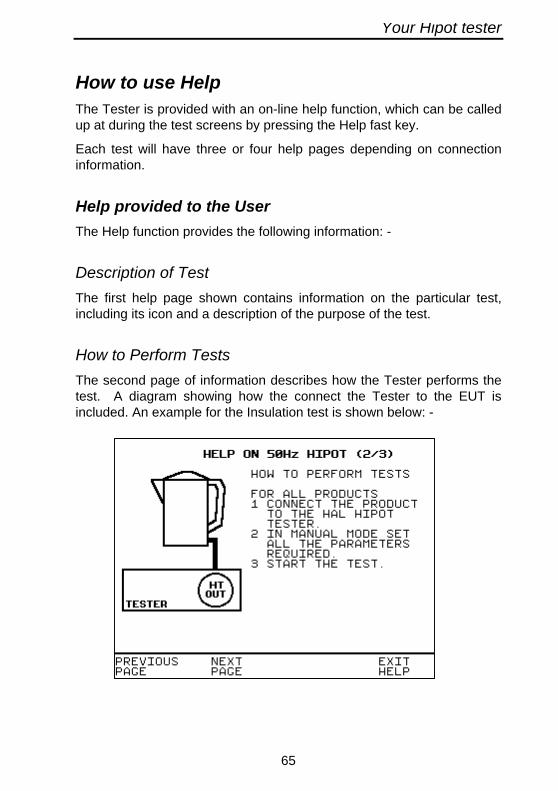
How to Perform Tests
The second page of information describes how the Tester performs thetest. A diagram showing how the connect the Tester to the EUT isincluded. An example for the Insulation test is shown below: -
Your Hipot tester
66
A description of how to connect the test leads and perform the test isprovided in a step-by-step format.
Note:
This topic will cover one or two pages depending on theconnection options available (Insulation and Flash can be Class1 or Class 2). Each connection option will have a new page ofinformation.
Why tests fail
The final page of information provides guidance on why a test may faile.g. connection problems. This includes a step by step checklist toensure all of the connections are correct and secure.
The effect of User Levels during Test Sequences
There are two possible user levels: Novice, and Advanced.
Note
The user level for a new user is set to Novice.
Novice User LevelWhen the user level is set to Novice Level, the help information isdisplayed before every new test
Press the Green button key to continue the sequence.
Advanced User LevelWhen the user level is set to Advanced Level, no help information will beshown before a test. Use the Help/Information key for help information ifrequired at any time.
Your Hipot tester
67
Chapter 4 Tips & Troubleshooting
Power -On Self tests:When the tester is powered on, a number of messages can possiblyappear as the tester performs safety tests on itself and the mains powersupply.
Temperature monitoringThe tester is provided with temperature monitoring facilities to ensurethat prolonged tests do not overheat sensitive components. If, duringtesting a ‘Over temperature’ warning is displayed, switch off any EUT,and allow the tester to cool. This is provided to allow the EUT to beswitched off in a controlled way.
Your Hipot tester
68
Barcodes
Barcode Scanner Specification
The Hal Tester can be used with barcodes and barcode scanners,readers or wands. These connect to the serial (RS232) connector. Therequired configuration is as follows: -
Baud Rate: 9600Start Bits: 2Data Bits 8Stop Bits: 2Parity: NoneInter-character Delay: 20ms
When to use a Barcode Scanner
Barcodes can be scanned at the following points: -
• Entering a Testcode as part of an Automatic Test
- Test Setting Editor
- Use Testcodes
• Entering an Product number
InterfacingThe Tester provides two interfacing ports: -
Serial Port - for connection to a PC, printer or Barcode Reader
To avoid any problems during download, ensure that leads areundamaged and correctly wired.
The Connector pin-outs for Serial ports are shown below: -
Parallel - The Hal features a serial port. However a serial to paralleladapter is available to allow interface with parallel ports. Seeaccessories in Chapter 6.
Your Hipot tester
69
Downloading to Computer SoftwareThe Hal can be setup to be backward compatible with various softwarepackages. The APLNCE & CNMTS option can be found in SYSTEMCONFIGURATION in the SETUP menu.
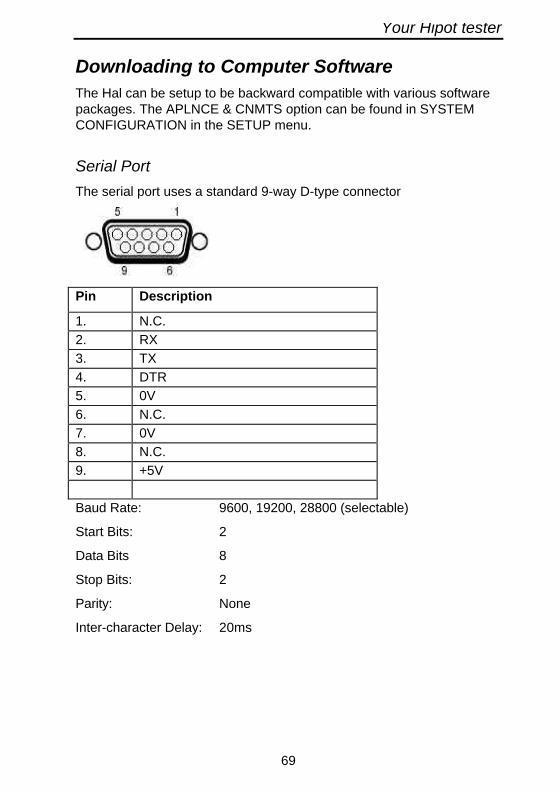
Serial Port
The serial port uses a standard 9-way D-type connector
Pin Description
1. N.C.
2. RX
3. TX
4. DTR
5. 0V
6. N.C.
7. 0V
8. N.C.
9. +5V
Baud Rate: 9600, 19200, 28800 (selectable)
Start Bits: 2
Data Bits 8
Stop Bits: 2
Parity: None
Inter-character Delay: 20ms

Your Hipot tester
70
Quick Reference
Editing the date in all modes
On delivery of the Hal it is necessary to ensure that the correct time anda date are stored. Once stored the time/date is retained in memory anddoes not need to be entered again. To edit the date: from the MAINMENU select SETUP, select, CHANGE TIME/DATE, use the cursorkeys to highlight the digit to be changed. Press GREEN BUTTON toconfirm the change. To store the changed time/date setting return to theMAIN MENU. The unit will then display the message STORINGSYSTEM DATA.
Entering a User Name
On delivery of Hal it is necessary to ensure that a user name(s) isstored. To edit the user list: from the MAIN MENU select SETUP, selectEDIT USER LIST, use the cursor keys and select USER 1, a screen willappear "EDIT USER NAME" use the keyboard to type in the desiredname and press GREEN BUTTON to return to the previous menu.
Editing User Level and Novice Mode
The Hal is delivered with a default setting of novice user level. Tochange this setting: from the MAIN MENU select SETUP, select USEROPTIONS, select USER LEVEL, select the desired level by selectingeither REGULAR or ADVANCED. To store the changed user levelsetting return to the MAIN MENU. The unit will then display themessage STORING SYSTEM DATA.
Storing Product Test Results in Automatic mode
The Product Test Results will not be stored until you leave the OPTIONSMENU, upon leaving this menu the unit will display the messagesSTORING RESULTS then SAVED OK. Your results have now beenstored.
Storing Product Test Results in Manual mode
The Product Test Results will not be stored in this mode. Use Automatictest mode to store results.
Your Hipot tester
71
Storing System Data
System Data consists of everything changed from within the SETUPMENU. To store the System Data return to the MAIN MENU from theSETUP MENU. The unit will then display the message STORINGSYSTEM DATA. This will only be done if changes have been made; if nochanges have been made then the system data will not be updated.
Waiting for a Yes/No response
When you are prompted to respond with YES or NO you must use theFast keys under the display.
Using Symbols in Text Fields
Although there is an option to use non-ASCII symbols as Productnumbers, Site & Location descriptions, User names and comments doesnot guarantee that your computer software will support them. If you areunsure avoid using symbols.
10 Digit Restriction
When you first receive your Hal the Product and Comments will be set to‘10 Digit Restriction’. If you are using compatible software then thisoption can be set to ‘Full Length’. When set to ‘Full Length’ themaximum Product length is extended to 15 characters while themaximum line for the comments is extended to 20 characters per line.
Your Hipot tester
72
Chapter 5 Maintaining the Tester
Cleaning the TesterThe Tester case can be cleaned with a damp cloth, with if necessary, asmall amount of mild detergent. Prevent excessive moisture around thesocket panel or in the lead storage area.
Do not allow liquid inside the Tester, or near the socket panel. Do notuse abrasives, solvents, or alcohol.
If any liquid is spilt into the Tester case, the Tester should be returnedfor repair, stating the cause of the defect.
User MaintenanceThe Tester is a rugged quality instrument. However, care should alwaysbe taken when using, transporting and storing this type of equipment.Failure to treat the product with care will reduce both the life of theinstrument its reliability.
If the Tester is subject to condensation, allow the Tester too completelydry before use.
• Always check the Tester and all test leads for signs of damage andwear before use.
• Do not open the Tester under any circumstances.
• Keep the instrument clean and dry.
• Avoid testing in conditions of high electrostatic or electromagneticfields.
• Maintenance should only be performed by authorised personnel.
• There are no user replaceable parts in the Tester.
• The unit should be regularly calibrated (at least annually).

Your Hipot tester
73
For repair or calibration, please return the instrument to: -
Clare Instruments Limited.Goring-by-SeaWorthingWest SussexUKBN12 4QYTel: +44 (0)1903 502551Fax: +44 (0)1903 [email protected]
Your Hipot tester
74
Chapter 6 Accessories
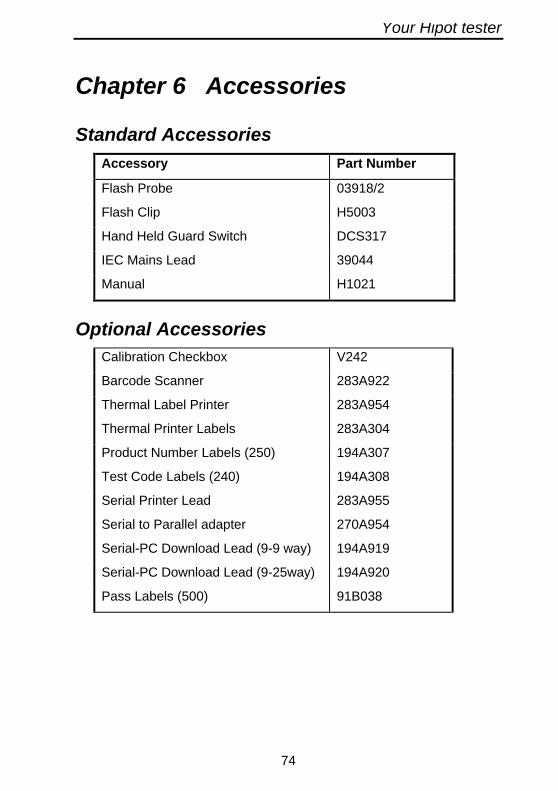
Standard Accessories
Accessory Part Number
Flash Probe 03918/2
Flash Clip H5003
Hand Held Guard Switch DCS317
IEC Mains Lead 39044
Manual H1021
Optional AccessoriesCalibration Checkbox V242
Barcode Scanner 283A922
Thermal Label Printer
Thermal Printer Labels
283A954
283A304
Product Number Labels (250) 194A307
Test Code Labels (240) 194A308
Serial Printer Lead 283A955
Serial to Parallel adapter 270A954
Serial-PC Download Lead (9-9 way) 194A919
Serial-PC Download Lead (9-25way) 194A920
Pass Labels (500) 91B038
Your Hipot tester
75
Chapter 7 Specifications
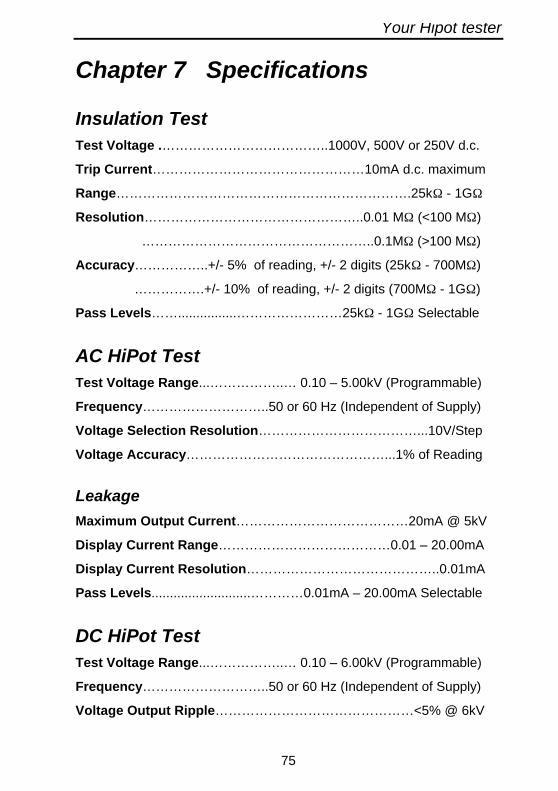
Insulation TestTest Voltage .………………………………..1000V, 500V or 250V d.c.
Trip Current…………………………………………10mA d.c. maximum
Range………………………………………………………….25kΩ - 1GΩ
Resolution…………………………………………..0.01 MΩ (<100 MΩ)
……………………………………………..0.1MΩ (>100 MΩ)
Accuracy……………..+/- 5% of reading, +/- 2 digits (25kΩ - 700MΩ)
…………….+/- 10% of reading, +/- 2 digits (700MΩ - 1GΩ)
Pass Levels……................……………………25kΩ - 1GΩ Selectable
AC HiPot TestTest Voltage Range...……………..… 0.10 – 5.00kV (Programmable)
Frequency………………………..50 or 60 Hz (Independent of Supply)
Voltage Selection Resolution………………………………...10V/Step
Voltage Accuracy………………………………………...1% of Reading
Leakage
Maximum Output Current…………………………………20mA @ 5kV
Display Current Range…………………………………0.01 – 20.00mA
Display Current Resolution……………………………………..0.01mA
Pass Levels...........................…………0.01mA – 20.00mA Selectable
DC HiPot TestTest Voltage Range...……………..… 0.10 – 6.00kV (Programmable)
Frequency………………………..50 or 60 Hz (Independent of Supply)
Voltage Output Ripple………………………………………<5% @ 6kV
Your Hipot tester
76
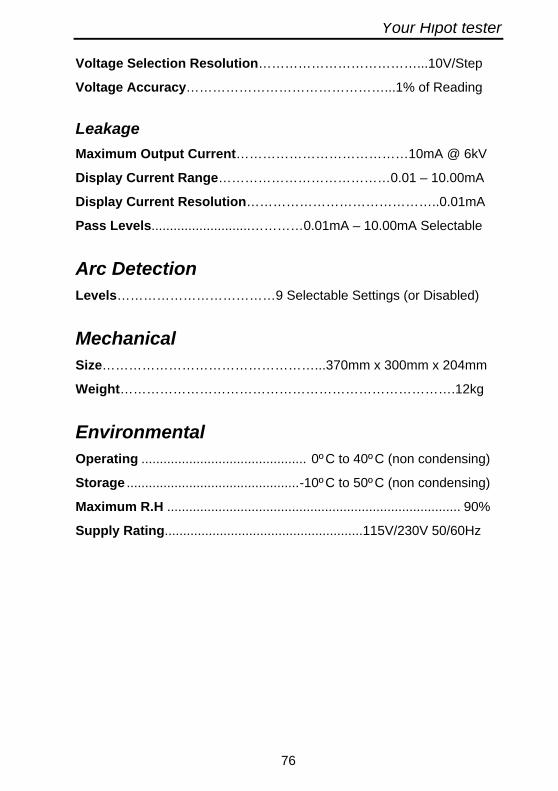
Voltage Selection Resolution………………………………...10V/Step
Voltage Accuracy………………………………………...1% of Reading
Leakage
Maximum Output Current…………………………………10mA @ 6kV
Display Current Range…………………………………0.01 – 10.00mA
Display Current Resolution……………………………………..0.01mA
Pass Levels...........................…………0.01mA – 10.00mA Selectable
Arc DetectionLevels………………………………9 Selectable Settings (or Disabled)
MechanicalSize…………………………………………...370mm x 300mm x 204mm
Weight………………………………………………………………….12kg
EnvironmentalOperating ............................................. 0ºC to 40ºC (non condensing)
Storage ...............................................-10ºC to 50ºC (non condensing)
Maximum R.H ................................................................................ 90%
Supply Rating......................................................115V/230V 50/60Hz
Your Hipot tester
77
Appendix A Purpose of Tests
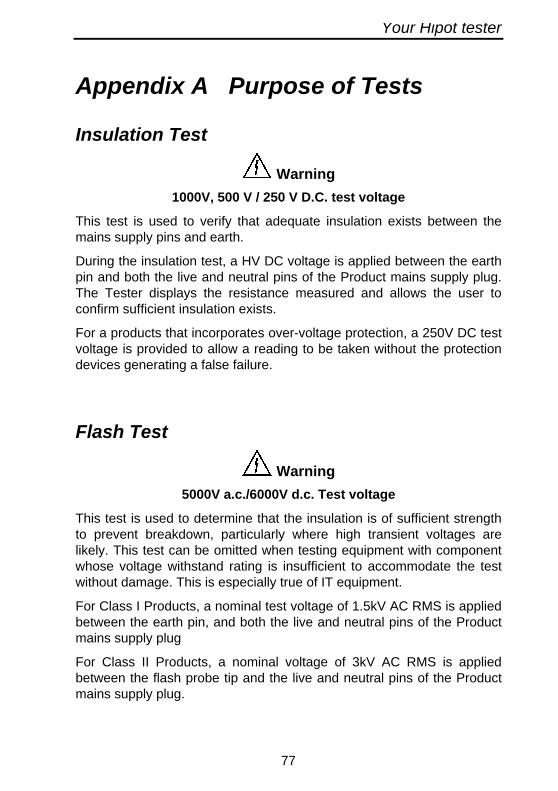
Insulation Test
Warning
1000V, 500 V / 250 V D.C. test voltage
This test is used to verify that adequate insulation exists between themains supply pins and earth.
During the insulation test, a HV DC voltage is applied between the earthpin and both the live and neutral pins of the Product mains supply plug.The Tester displays the resistance measured and allows the user toconfirm sufficient insulation exists.
For a products that incorporates over-voltage protection, a 250V DC testvoltage is provided to allow a reading to be taken without the protectiondevices generating a false failure.
Flash Test
Warning
5000V a.c./6000V d.c. Test voltage
This test is used to determine that the insulation is of sufficient strengthto prevent breakdown, particularly where high transient voltages arelikely. This test can be omitted when testing equipment with componentwhose voltage withstand rating is insufficient to accommodate the testwithout damage. This is especially true of IT equipment.
For Class I Products, a nominal test voltage of 1.5kV AC RMS is appliedbetween the earth pin, and both the live and neutral pins of the Productmains supply plug
For Class II Products, a nominal voltage of 3kV AC RMS is appliedbetween the flash probe tip and the live and neutral pins of the Productmains supply plug.
Your Hipot tester
78
Appendix B Reference
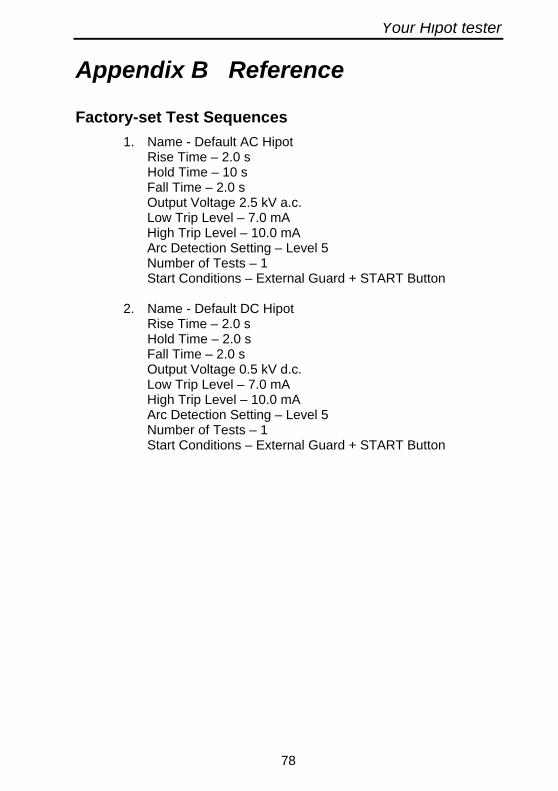
Factory-set Test Sequences
1. Name - Default AC HipotRise Time – 2.0 sHold Time – 10 sFall Time – 2.0 sOutput Voltage 2.5 kV a.c.Low Trip Level – 7.0 mAHigh Trip Level – 10.0 mAArc Detection Setting – Level 5Number of Tests – 1Start Conditions – External Guard + START Button
2. Name - Default DC HipotRise Time – 2.0 sHold Time – 2.0 sFall Time – 2.0 sOutput Voltage 0.5 kV d.c.Low Trip Level – 7.0 mAHigh Trip Level – 10.0 mAArc Detection Setting – Level 5Number of Tests – 1Start Conditions – External Guard + START Button

Your Hipot tester
79
Testcode TablesClare Testcodes are an 11-character string where each character is inthe ASCII range ‘0’ to ‘9’ and ‘A’ to ‘Z’
Digit 1 – Testcode TypeDigit 1 associates the testcode with Clare Instruments Ltd. Equipment
Digit 1 : Testcode Type
‘Z’ Clare Instruments Ltd. Testcode
Digit 2 – Test TypeDigit 2 represents the type of test to be performed
Digit 2 : Test Type
‘0’ Skip Test‘1’ AC Hipot‘2’ DC Hipot‘3’ DC Insulation Resistance‘4’ – ‘9’ Not Used‘A’ – ‘Z’ Not Used
Digit 3 – Start Conditions & Base Target VoltageDigit 3 is a combination of the start conditions for the test and the basetarget voltage (to which the value encoded in digit 4 is added).
Note that because of the ‘spare’ start conditions some characters areinvalid. Barcodes that specify these conditions will be rejected.
Digit 3
Start Conditions Target‘0’ Guard Switch 0.00kV‘1’ START Button 0.00kV‘2’ Guard Switch → START Button 0.00kV‘3’ Not Used‘4’ Not Used‘5’ Not Used
Your Hipot tester
80
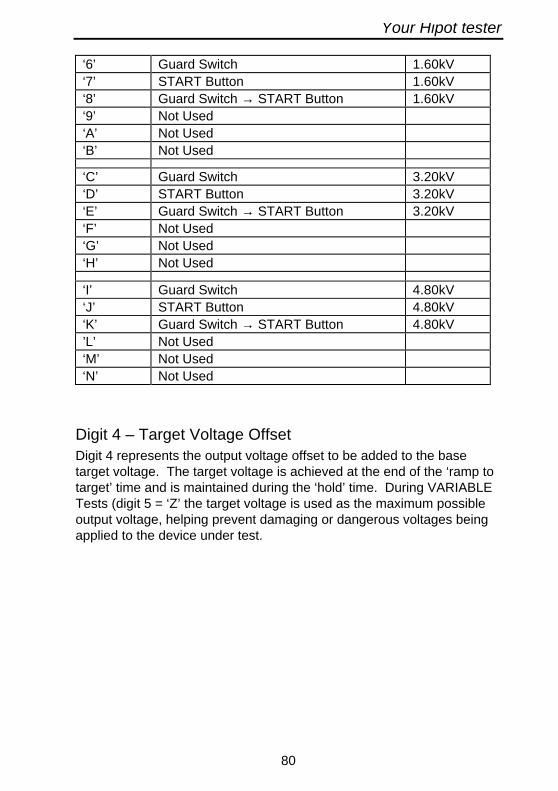
‘6’ Guard Switch 1.60kV‘7’ START Button 1.60kV‘8’ Guard Switch → START Button 1.60kV‘9’ Not Used‘A’ Not Used‘B’ Not Used
‘C’ Guard Switch 3.20kV‘D’ START Button 3.20kV‘E’ Guard Switch → START Button 3.20kV‘F’ Not Used‘G’ Not Used‘H’ Not Used
‘I’ Guard Switch 4.80kV‘J’ START Button 4.80kV‘K’ Guard Switch → START Button 4.80kV’L’ Not Used‘M’ Not Used‘N’ Not Used
Digit 4 – Target Voltage OffsetDigit 4 represents the output voltage offset to be added to the basetarget voltage. The target voltage is achieved at the end of the ‘ramp totarget’ time and is maintained during the ‘hold’ time. During VARIABLETests (digit 5 = ‘Z’ the target voltage is used as the maximum possibleoutput voltage, helping prevent damaging or dangerous voltages beingapplied to the device under test.

Your Hipot tester
81
Digit 4 : Target Voltage Offset
‘0’ 0.00kV‘1’ 0.05kV‘2’ 0.10kV‘3’ 0.15kV‘4’ 0.20kV‘5’ 0.25kV‘6’ 0.30kV‘7’ 0.35kV‘8’ 0.40kV‘9’ 0.45kV‘A’ 0.50kV‘B’ 0.55kV‘C’ 0.60kV‘D’ 0.65kV‘E’ 0.70kV‘F’ 0.75kV‘G’ 0.80kV‘H’ 0.85kV‘I’ 0.90kV‘J’ 0.95kV‘K’ 1.00kV‘L’ 1.05kV‘M’ 1.10kV‘N’ 1.15kV‘O’ 1.20kV‘P’ 1.25kV‘Q’ 1.30kV‘R’ 1.35kV‘S’ 1.40kV‘T’ 1.45kV‘U’ 1.50kV‘V’ 1.55kV
Note that not all combinations of ‘Base Target Voltage’ and ‘TargetOffset Voltage’ are Valid. AC Hipot Tests are subject to a 5.00kV limit,while DC Hipot tests have a 6.00kV limit and DC IR Tests are limited to
Your Hipot tester
82
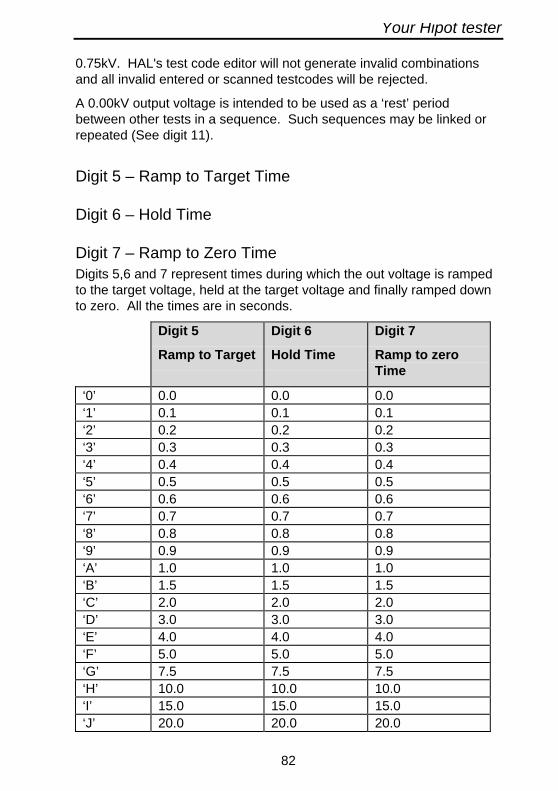
0.75kV. HAL's test code editor will not generate invalid combinationsand all invalid entered or scanned testcodes will be rejected.
A 0.00kV output voltage is intended to be used as a ‘rest’ periodbetween other tests in a sequence. Such sequences may be linked orrepeated (See digit 11).
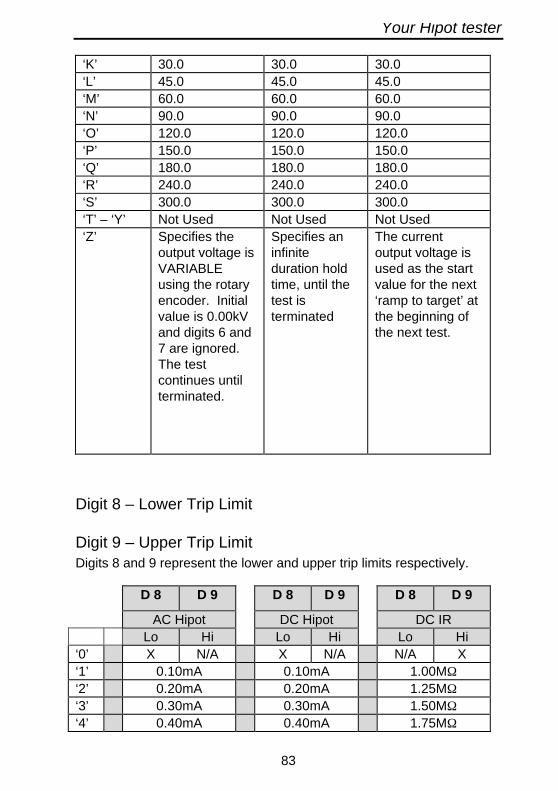
Digit 5 – Ramp to Target Time
Digit 6 – Hold Time
Digit 7 – Ramp to Zero TimeDigits 5,6 and 7 represent times during which the out voltage is rampedto the target voltage, held at the target voltage and finally ramped downto zero. All the times are in seconds.
Digit 5
Ramp to Target
Digit 6
Hold Time
Digit 7
Ramp to zeroTime
‘0’ 0.0 0.0 0.0‘1’ 0.1 0.1 0.1‘2’ 0.2 0.2 0.2‘3’ 0.3 0.3 0.3‘4’ 0.4 0.4 0.4‘5’ 0.5 0.5 0.5‘6’ 0.6 0.6 0.6‘7’ 0.7 0.7 0.7‘8’ 0.8 0.8 0.8‘9’ 0.9 0.9 0.9‘A’ 1.0 1.0 1.0‘B’ 1.5 1.5 1.5‘C’ 2.0 2.0 2.0‘D’ 3.0 3.0 3.0‘E’ 4.0 4.0 4.0‘F’ 5.0 5.0 5.0‘G’ 7.5 7.5 7.5‘H’ 10.0 10.0 10.0‘I’ 15.0 15.0 15.0‘J’ 20.0 20.0 20.0
Your Hipot tester
83
‘K’ 30.0 30.0 30.0‘L’ 45.0 45.0 45.0‘M’ 60.0 60.0 60.0‘N’ 90.0 90.0 90.0‘O’ 120.0 120.0 120.0‘P’ 150.0 150.0 150.0‘Q’ 180.0 180.0 180.0‘R’ 240.0 240.0 240.0‘S’ 300.0 300.0 300.0‘T’ – ‘Y’ Not Used Not Used Not Used‘Z’ Specifies the
output voltage isVARIABLEusing the rotaryencoder. Initialvalue is 0.00kVand digits 6 and7 are ignored.The testcontinues untilterminated.
Specifies aninfiniteduration holdtime, until thetest isterminated
The currentoutput voltage isused as the startvalue for the next‘ramp to target’ atthe beginning ofthe next test.
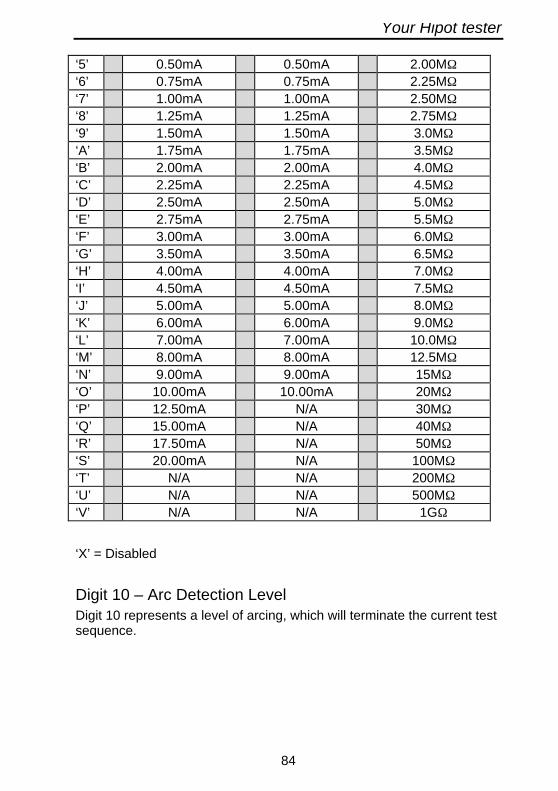
Digit 8 – Lower Trip Limit
Digit 9 – Upper Trip LimitDigits 8 and 9 represent the lower and upper trip limits respectively.
D 8 D 9 D 8 D 9 D 8 D 9
AC Hipot DC Hipot DC IRLo Hi Lo Hi Lo Hi
‘0’ X N/A X N/A N/A X‘1’ 0.10mA 0.10mA 1.00MΩ‘2’ 0.20mA 0.20mA 1.25MΩ‘3’ 0.30mA 0.30mA 1.50MΩ‘4’ 0.40mA 0.40mA 1.75MΩ
Your Hipot tester
84
‘5’ 0.50mA 0.50mA 2.00MΩ‘6’ 0.75mA 0.75mA 2.25MΩ‘7’ 1.00mA 1.00mA 2.50MΩ‘8’ 1.25mA 1.25mA 2.75MΩ‘9’ 1.50mA 1.50mA 3.0MΩ‘A’ 1.75mA 1.75mA 3.5MΩ‘B’ 2.00mA 2.00mA 4.0MΩ‘C’ 2.25mA 2.25mA 4.5MΩ‘D’ 2.50mA 2.50mA 5.0MΩ‘E’ 2.75mA 2.75mA 5.5MΩ‘F’ 3.00mA 3.00mA 6.0MΩ‘G’ 3.50mA 3.50mA 6.5MΩ‘H’ 4.00mA 4.00mA 7.0MΩ‘I’ 4.50mA 4.50mA 7.5MΩ‘J’ 5.00mA 5.00mA 8.0MΩ‘K’ 6.00mA 6.00mA 9.0MΩ‘L’ 7.00mA 7.00mA 10.0MΩ‘M’ 8.00mA 8.00mA 12.5MΩ‘N’ 9.00mA 9.00mA 15MΩ‘O’ 10.00mA 10.00mA 20MΩ‘P’ 12.50mA N/A 30MΩ‘Q’ 15.00mA N/A 40MΩ‘R’ 17.50mA N/A 50MΩ‘S’ 20.00mA N/A 100MΩ‘T’ N/A N/A 200MΩ‘U’ N/A N/A 500MΩ‘V’ N/A N/A 1GΩ
‘X’ = Disabled
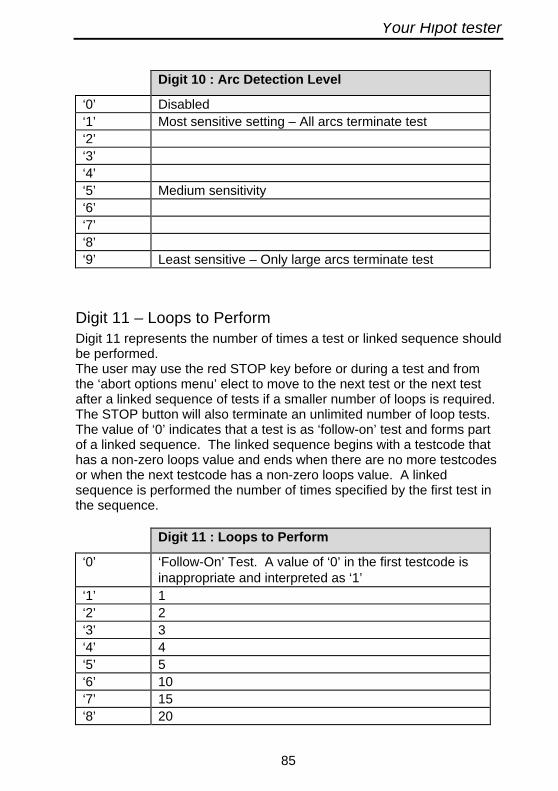
Digit 10 – Arc Detection LevelDigit 10 represents a level of arcing, which will terminate the current testsequence.
Your Hipot tester
85
Digit 10 : Arc Detection Level
‘0’ Disabled‘1’ Most sensitive setting – All arcs terminate test‘2’‘3’‘4’‘5’ Medium sensitivity‘6’‘7’‘8’‘9’ Least sensitive – Only large arcs terminate test
Digit 11 – Loops to PerformDigit 11 represents the number of times a test or linked sequence shouldbe performed.The user may use the red STOP key before or during a test and fromthe ‘abort options menu’ elect to move to the next test or the next testafter a linked sequence of tests if a smaller number of loops is required.The STOP button will also terminate an unlimited number of loop tests.The value of ‘0’ indicates that a test is as ‘follow-on’ test and forms partof a linked sequence. The linked sequence begins with a testcode thathas a non-zero loops value and ends when there are no more testcodesor when the next testcode has a non-zero loops value. A linkedsequence is performed the number of times specified by the first test inthe sequence.
Digit 11 : Loops to Perform
‘0’ ‘Follow-On’ Test. A value of ‘0’ in the first testcode isinappropriate and interpreted as ‘1’
‘1’ 1‘2’ 2‘3’ 3‘4’ 4‘5’ 5‘6’ 10‘7’ 15‘8’ 20

Your Hipot tester
86
‘9’ Unlimited