IN-WALL RACKS ON-WALL RACKS FREE-STANDING RACKS RACK FURNITURE
\ :iJl*r i!/'¿'i iq: ¡
AN RIGAN RIFLEMAN REPRINT Rl2
Gun CabinetS, Racks,Cases & Pistol Boxes
I
T
II_!
.åt
v
:
if
I,'
Photographs, drawings and plans for construction.
Also, information on how to make a holster, bench rest, and loading bench
I{
THE AMERICAN RIFLEMAN is the oftcialjournalAmericaand esseinterest
of public-spirited citizens. Its purposes are toeducate and train citizens of good rePute in the
of firearms; to fosterand the ability to useof law enforcement
agencies and the armed services, and all othercitizens who would be subject to service in theevent of war; to promote social welfare and pub-lic safety, law and order, and the national de-fense. Membership in the NRA is available toany reputable c nited States uponnomination by ber. Membershipdues are $5 a y years, $12.50 forthree years, $20 for frve years. Life Membershipis $100.For Íurther ìnformolion, write !he NRA'otló00 Rhode lslond Ave., N' W., Woshinglon, D. C' 20036
75 Ç-ENTS

(3rd Printins)
DISPLAYING
FIREARMS
TO ADVANTAGEA few of the ways used to show collections of interesting arms
þtnEenlrs can be displayed in a variety of ways, de-I.'pending on the types and quantities of arms and onthe available space. Anyone planning a display shouldgive careful consideration to an over-all layout. Measure-ments should be taken, space should be allocated, and
materials should be selected before proceeding with theactual physical layout. Planning can mean the differencebetween guns hung on the wall and an advantageousdisplay of arms. Examples of effective displays are shownon these 2 pages,
This ¡oom display represents a variety of arrangements of guninterests. The display case above the desk and the one at theright are wood framed with glass fronts and pegboard backpanels. The guns are mounted on the pegboa¡d with hooks spe-cially bent from coat hanger wire which are covered in plastictubing to prevent damage to finishes. The advantage of such amounting is that the display can be changed with relative easeby simply moving the hooks.
The bulk of a collection can be kept in a metal cabinet, such asthe one at the left. For protection of arms, the drawers of thecabinet are lined with red felt. On top of the metal cabinet aRevolutionary period Kentucky flintlock pistol is displayedmounted on wooden blocks and enclosed in Plexiglass. ThePlexiglass cover keeps off dust and curious hands, yet still allowsthe gun to be seen from all sides.
On the table at right is a group of 3 jewelry store cases, withvelvet-lined bottoms, mirror backs, and glass sides and tops.-Dn. G. W. HucK¡¡A
A large number of long guns can be displayed in a limited space.The key feature is a notched bracket, made from 3/+" plywood.It is attached to the back panel, and also is supported fromabove by a brass welding rod. Each bracket will accommodate6 guns. Carpeting on the floor of the case will hold gun butts inposition without slipping. A display of 7 brackets, or 42 guns,occupies 72" of wall space. A staggered arrangement of thenotches allows a good view of each gun.-Peur C. Mrrcnerr-
A simple, attractive shelf display of handguns can be achievedwith blocks of wood. The top of the block can be shaped to fita particular portion of the underside of the handgun in such a\¡/ay that it will not allow the piece to twist or fall. The heightof the block can be determined and the base leveled so that thegun butt is flat on the table or shelf. When the correct size hasbeen obtained, the block can be stained and varnished to blendwith other woodwork.-Prur C. MrrcHsu,
2

A buitt-in wall case can be constrtrcted of prefinished mahoganyplywood panels, backed with or lumber toprovide a firm base for screw equipped withiliding plate glass doors and lighting. Ade-quate illumination is importan essive shadows
and reflections, so the display can be seen clearly.
To display long arms, metal shelf-support strips for bracketinserts are attached to the back paneling; flat wire forms ofspring-tempered brass are riveted to the bracket faces and are
hand bent to positions which will hold guns firmly in place.
Short arms are mounted on L-shaped screw hooks of brass.
Metal forms may be covered with plastic tubing to prevent
damage to finishes.
The floor of the caso provides space for displaying powder
horns, flasks, and various other accouterments.-H. B. GnEpNB
A glass-fronted case on a tilting stand displays handguns foreasy viewing. This stand is 15" long, lO/2" wide, and 5/2"high. The guns are attached to the back of the case with thinwires (around the cylinder spindles or loading levers) and smallL-shaped brass holders (in muzzles of the barrels). Because thesemeans of attachment are almost imperceptible, this makes anattractive display.-M. ClrFEonp YouNc 1À -r otnd stripping.-ANoY P¡runn
E
walls. Guns are mounted on both sides of 2 swinging panels'
Concealed behind the 4 lower doors are 4 sections of 6 drawerseach. Each individual drawer is made large enough and deep
enough to contain 2 or more cased guns.-Hlnnv C' KNooB
3
A gun disptay that can be closed off to casual visitors or lockedsecurely while the owner is away, and yet be opened for in-terested friends, is advantageous. The 2 upper doors are con-structed to fold back on themselves and then against the

A tlall Ilisplay Case
The next step is to roughly cut thebackboard, from 7/e" plyrüooä, within1/76" of the actual dimension. It mustthen be hand-fitted by using a roughgrain sandpaper so that it will fit snuglyinside the case on all four surfaces. Aithis point, _folur Vz"-square retainingR1e99s lre glued or fastèned by meaniof j/+" bv #7 woodscrews ldetáil "D")just insiäe the rear of thè case. Thl)
tlte case ( detail "8" ) , t/o' from thefront edge. Thesc serve as retainers forthe door to prevent it swinging too farinward, and also as a dust seal.
drawings on page 5 is by far the easiestand most attractive because of its sim-plicity. Finishing, especially varnishing,should be done in a room that is as dultfree as possible. A bathroom is ideal.
The guns may be hung on hooks offl-at brals stock,'formed a"nd padded asshown below. While I arrangeã my gunsbutt-upward, the hooks can-be instãlleclto hold guns at any angle.
The door can then be hung and theiob is finished. The case is held on thewall with two b¡ass strips, each l" byVr" by Va", with a Veì hole in eachend. These are first screwed to the caseand then to the wall.
(See drawings on next page)
For your Hondguns . .
By Thomos E. Wessel
fì vERy fine handgun collection, largeF or small, deserües to be displayeä.A case provides an excellent means ofdoing this, and also enhances the beautyof the guns. This one is a simple wallcase of early colonial style.
A height of 20" seems to beoptimum, but the width may vary be-tween 20" and )2" without the caselosing attractive proportions. This is
hean
theum
Cut and plane the top, bottom, andside pieces to l" in thickness and \Vz"in width. Secure them by using asimple butt joint (detail "4" in sketõheson page 5 ). The wood screws are setr/+" below the surface of the wood, thentopped with 5/16" walnut dowels togive the appearance of 'pegged' con-struction. An eftective substitute forwalnut can be had by soaking small sec-tions of pine dowel in walnut oil stainfor a few days.
that the woodbe thoroughlytne finish.e fashioned, al-
lowing a clearance of. 3/64" betweendoor frame and case all around. Plain)" by I" brass hinges are used, but
Y4" must be removed from the right-hand leaf of each so that it will be flushwith the rear surface of the door (de-tail "F" ) . The hinges of course mustbe inset, both in the door frame andthe side of the case. This is best doneby rasping e 3" spacesin the doo right-1randleaf of the tlie frame.The depth side of the
plate glass fitted to it. It is best to takethe frame to the concern from which
needed to replace it. The door is notpermanently installed until the 6nalpainting and varnishing are complete.
FËLT sTP,IP3/16'WtDË.l/t6"lHtCYr
r9t9\
IN
NOTE:THE, CLIPS MAYB¿ÞUFFED ANDTHENCLEAR LAQUE"RLD}F DLSIRLD.
Nt
o
4
BACKBOAR,D

sEE OET"
DE,Î"F"
DÊT"A" SEE DÉT "B
A PortøbleGun Cøbinet
weight. Sides and ends are made in onesection with joints dovetailed, and thenthe section is sawed apart diagonally.This diagonal cut gives greater depthat the bottom of one side for protectionof stocks, and affords maximum sPace
at top of the other s'ide for ammunitionstorage. The 2 sections are joined by4 concealed hinges along one side. Twotrunk fasteners are on the other side'Sponge rubber can be cemented onedges of one section to exclude dust.The Vs" Masonite front and back arefastened with brass screws, and cornersare covered with brass corner protec-tors. Notches in boards holding guns
are lined with felt.The compartment at toP is large
enough to hold amPle ammunition,cleaning kit, first-aid kit, hand warm-ers, calls, etc.
Two folding brass handles are on thesides of the cabinet near the bottomand one is on the top end, and theY areplaced so that guns are on the bottomwhen cabinet is moved. Doors of theammunition compartment remain shutholding the ammunition in place. Hand-guns and field glasses have to bewedged in with a quilt during moves.
-8. M. Sr¡e¡,¡-Bn
Ê DET.'Ê"
.FRONT.VIF,W.DET, "D"
TOP.VILW.SIIOWN, ìTITFI.TOP' MLMBIR. REMOV LD,
FINISHING
Outside wood-l coqt wood filler followed
by 3 coots spor vornish. Polish w¡lh #0000steel wool.
lnside wood-l cool fìot white followed
by 2 cools neulrql color enomel using I port
dork oronge to 5 ports white.Bross hinges-bufied ond cleor locquered.
I
.DETAIL"A,. 9AND
,DLTAIL:B1(sÊcTroN)
å"pr-¡r¿ cLAss
DINC
6LASS
DOOR. FRAMMOULDI}JG
9lDS
.DETAIL.D'l(sEcllON)
DETAIL "E-.(SECTIONì
5
.DETAIL'C'.
INsET r{tAPÞR.OX
.DF,TAIL'F"(sEcTtoñ)

SomethÍng New Ín
GUN CABINETS
¡. T^vE you ever seen e gun cabinet thatI was more than a mere storage closet?
Its function should be more than storage-it should show the guns off too. Someshooters with this in mind have put on glass
doors and some have installed lights.This new cabinet represents the best fea-
tures of all the cabinets I've seen, and has a
couple of new ideas besides.My Dad and I decided on walnut paneled
doors. You can never let a real gun crankout of your house unless you show him yourguns anyhow, and glass doors only makethe interior an anti-climax when they'repulled open. We also figured that on open-ing the doors it was best to have the riflesand_shotguns arranged so the tops and sidesof t'he guns would be seen, instead of a rowof trigger guards and slings. Therefore ourcabinet holds rifles and shotguns so theirtops and sides are toward the front. Wemanaged this by cutting butt slots at a 30-degree angle in a heavy walnut plank fittedto the floor of the càbinet, I\,Iuzzles areheld by another board on the back of thecabinet grooved for the barrels, and set 37
inches up. The cabinet holds five rifles andthree otguns. Guns arespace o a bolt handle willclear and guns can betaken ping. Five inchesseems about the right spacing.
Pistols are held in the upper part of thecabinet by sliding the barrels over polishecl
Gun butts lìt into llott ot o 3O-degree ongle,disploying lops ond tides of guns
steel pins made of drill rod. For .22 caliberpistols we nsed a 13/64-inch rod, for .38'san lll32-inch rod, and for .44's and .45's, al3112-inch rod. The corne¡s were roundedoff and the other end knurled on an enginelathe. The knu¡led ends were pressed intoholes in boards fastened to the back of the
SYz-inch walnut board. Hidden behind itis a long fluorescent light-a fluorescentstrip, electricians call it-that illuminatesboth parts of the cabinet. Because theglass shelf is etched on one side, the fluores-cent tube is invisible, yet diftusecl lightcomes through it to light the top sectionnlcely.
felt
i:;tain rods made from 3/l6.inch steel.
cur-
We put Alnico magnets in the top andbottom of the door frame and fastenedshort steel plates on the door, for magneticdoor latches. The right door closes ovèr theleft when shut so steel plates are necessaryonly on the right door. 'Of course, if chiÍ-dren are to be kept out, a lock should beinstalled.
In the cabinet itself solid walnut was used,with walnut-faced /¿-inch plywood panelsin the doors, sides, and back.
The drawing shows basic dimensions fromwhich you can design a cabinet to suit yourown collection. Not too much walnutlumber is necessary since paneling is used.If you build your own, it will take a monthor two of spare time, depending on howfast you work. O O O
By Henry [. Woltmqn
43" 6
This cqbinet, of wolnut ond wolnut-foced ply-wood, meosures only ló" x 43" x 71" yet holds
12 pislols ond eight ¡ifìes or shotguns
Fluo¡escent líghl behínd corlrídge colleclion illuminqtes the interíor
6
6
_{
ñ

I Lay pattern near base of 26" PieceI so itrãt bottom of hook, where stockwill rest, will be 5V+" from bottom. Drawaround pattern to form first hook, thenraise it to next place above and drawnext hook, etc, Top design may be drawnfree-hand or with French curve. Curvemust reach end of board so that both sidesretain original length. Note that by turn-ing right side end-for-end, the bottom ,ofbairel-hook will be some 7Vz" from the
bottom
¡¡r The 2 sides are marked 'S'Z for stock and 'B' for barrel.With 3 cuts both come out re-quir¡ng edge sanding only. Thepattern may be extended on aIonger board to increase number ofhooks: 26", 3 hooks; 32", 4 hooks;38",5 hooks. Add 6" for each addi-tional space. Shaded at'ea abovethe 'S' lndicates an oPtional cutfor very heavy rifles. For the ini-tial cut follow the line on 'B' sideto have both sides come out evenlY
fl¡EREfl notsaw andbuilt in I
3 braccs.To prcparc a Piece
of thin papcr e tintedhook pättern is thentransferred to slng car'bon ÞaÞer and pencil' Cut the patternout ôf ihe cardËoard so that it can be
used over and over again. Note that a
sinsle cut provides 6oth sides of therr"Ë. Th" Iiook curve is the same forboth sides. However, certain nleasure-ments do differ, because to lie horizon-tal, the barrels must ¡est about 2" higherthan the stocks. Thus the top designs
are not the same size.Check 1'our rifles to deteimine space
needed b'etween rack sides. IVly 20-5", so I
fftt:::dressed
wcre set into the back of the sides.I reconrmend countcr-sunk l7/+'
scrcws on brace ends to fasten thcm intheir notches. A final sanding con-r-
pletes the woodwork; staining or -waxìng
nray follow. Be sure to placc tìte lowor stock side to thc lcft- when assem-
bling-if reversed the rifle bolts will beto the wall.
Felt strips glucd into barrcl slotsare a refinement. The rack n-ray be dec-orated rvith urolding cuts, sìrielcl designsin the braces, or by carving.-r
Build in one hour . . .
ATII AITRACI|VE
GUN RACKBy George Crossette
t Side pieces are superimposed to demon-+ ittut. ditr"t.nt levèls necessary to makesuns lie level' Notches for inserting braces" have been indicated
F This is the rack after it is assembled, stained, andC waxed-l hour working time after first cttt
3 The 2 sides aftersawing. 1-h¡ee-corneled pieces attop and bottom
are waste

Making A P¡stol Box¡ Nv 'do-it-yourselfer' can, with the
fl aid of a few basic home workshophand and power tools, build a 3-gunpistol box at a total cost of about$10.00. The box can be made from 7a"hardwood veneered plywood, or ordi-nary fir and hardwood plywood may beused if box is to be covered withartificial leather.
Cul pieces corefullyFirst, cut the 8 rectangles that form
the box. Use the rip fence in sawingthe reotangles, setting it to saw the exactdimension. Saw a piece from scrap ply-wood and measure carefully to deter-mine it is exactly the size desired. Whenstarting each reotangle, place a straightedge of the piece against the rip fence.Cut all pieces of the same dimensionbefore changing the saw setting.
Next make the cut across the 12"dimension of each end of front andback pieces. Check the drawing to in-sure that cuts are made on co¡reotedges.
END PC.
FRONI PC.
By Horry Reeves
Next make the cut at bottom edge offront, back, and 2 end pieces to formgroove of dado joint to receive bottompiece. Check drawing before makingcut.
Now make cut in top edge of front,back, and 2 end pieces to form grooveof dado joint to receive top.
Now make cut all the way aroundbottom piece to form male dado jointfor bottom piece.
Saw a hole in the t43/¿" x 67s"hardwood top piece to form handle re-cess. Size of opening will be deter-
mined by size of handle; however, di-mensions shown in drawing should takecare of even a large-size handle, Dressrecess edges with rasp or sandpaper.then glue Io 15" x 6Te" hardwood toppiece to give a r/a" overlap all the wayaround. To prevent slippage of piecesduring gluing, use a few brads, thenclamp or weight until glue has set.
The box is now ready for assembly.If all cuts have been made to dimen-sions given, box should go togethersnugly and perfectly by fitting top,front, back, and bottom pieces to-
PC 3i8"
t-1'I
5/s'.T2y."I
F- ó' ___-l
/8"
CUT SPACES ,-IO FIT YOUR GUNS
T
t6" þ- ök"-1
7" 7X"
PC.
ty'
3/8" ÍRAY
foP rc. #rTOP PC. #2
|(y, -__-____---¡l
s/s"
ENDU
ts2o
BACKPC
T''r tú"
8
BItt OF MATERIAISQvonl¡U lløm Po¡l
Front ond bockBollomEnd ¡TroyTop plccc flTop plccc #2Gun holdcrlroy glidc¡
pioccrpiocoplcccrplcccplocoplcccplccopitccs
doz.con
Fir plywood s/¿' x I 517' x 12'Flr plywood /t" x 15" x 67nFlr plywood t/¿" x 12ù x 7nFir plywood t¡"n 71lt/að x 6\bHordwood plywood /s" x l1/t" x 6/¡'Ho¡dwood plywood /1r x 15' x ôVt"Sugor plnc lJ/a" x 5i x 6ê/a'or l" olumínum onglo ó" longDrow.bolt typo lotchPlono hlngc l5l2'longfrunk hondle, recerrod typc. wlth hordworcLoothor or mclol lrunk co.nôr p¡ol.clorrT¡' #5 Ão¡ hcod, brosr, wood ¡c¡ow¡Wcldwood gluc {25c rlzc)Artlfclol lcothcr, 5¡l' wldthRubbcr bo¡c'cloth lo wood'ccmcnl
I vd.Yz pL
3 tó/_END PC.
3 tó"-
POWER
BOlroM PC
POWERSAW.CUT
KEYHO¡.EsAw-cut
ó" MINIMU,!\ GUN CI.EAR.
AI-UMINUM ANGI.ES
6
TOP PC #tTOP PC, #2
SECURE WIIHGLUE ond l" x # l0wooDscREws
| /8" PC l/a'r/1'

gether and then setting 2 end pieces inplace. When all pieces fit properly, as-
semble by gluing each joint in turn andallow box to set overnight for glue todry. Use bar clamps or weights to holdbox in position. Lay the box on frontor back and weight top surface. A few3/+" brads may help at this point, butare not a necessity.
Now lid must be cut out of thisbox. The drawing shows where andhow to make lid cuts with Power saw'The top cut is 3/¿ " deeP; front cut 7s "deep. Use a fine tooth (#10 or #11)keyhole or saber saw to cut lid frombox by sawing through end pieces. Ifall rectangles were cut true and allpieces are warp free, the lid will comeoff in one piece with no internal stresses
to cause warping or twisting.Blunt edges and corners of box with
wood rasp or sandpaper so that cornerprotectors will fit neatly.
To cover boxIf box is to be covered, laY out a
pattern on heavy wrapping paper. Placebox on the paper, top down, then tracethe top. Now roll box on back andtrace the back. Next roll it carefullyonto one end and trace. Now roll itback and trace the other end. Last rollit onto the bottom and trace, allowingsufficient to cover lockrail on front ofbox. Follow same general proccdure fortracing lid pattern. Allow about 1" be-yond pattern edge for lapping over open-ing at sides, top, and bottom. When pat-terns are right, use them for cuttingmaterial selected for covering box. Thinartificial leather is good since it iswaterproof and has a strong fabricbacking. Genuine leather is more diffi-cult to use since it requires expert thin-ning at edges to make a good fit' Somefabric-reinforced plastics are quitethick for this purpose.
Fit hinge next, with hinge-pin aboutl/16" above top surface to insure thatlid will set slightly back off the verticalfor secure scope setting. Use #5 wood-screws for installing hinge, after drillingcorrect-size pilot holes. Slit each cor-ner of covering over handle recess, thencut a piece to cover recess,
Use small brass or chromed bolts orrivets to secure handle hardware. Wood-screws will pull out and thus shouldnot be used.
Attach aluminum angle tray guideswith woodscrews or small bolts. Con-struct gun tray and gun holder. Cutslots in holder to fit individual gunssnugly so they will not spill out anddamage sights should box be tippedover. Interior of box can be finished byapplying felt flocking of the color de-sired. This material is available at mosthobby shops and is easily applied.-r
CORNER GUN RACKffenp, is an inexpensive gun rackI I that needs no attachment to thewall. It fits in any unused corner andwill not tip. The guns are easy toreach, yet out of the way. It holds 12guns and provides storage for cleaningrods and ammunition.
One half sheet (4 ft. x 4 ft.) of.3/4"plywood is required. To cover theback you will also need 2 pieces ofMasonite ot /q" plywood 3OVz" x243/¿".The back cover is not neces-
Çhange slot dimensions shown to fitindividual guns. Allow sufficient sideclearance and remember that the topprojects over the e¡ds 3/q".
Make straight cuts with a handsaw, and use a coping saw or sabersaw for curves.
After all parts are cut out, bevelback edges of the shelf supports at45". The parts are then both gluedand screwed together.
I used dark walnut stain and var-nish for the frnish. After finish is dry,cut the foam rubber so that it fits flaton the bottom and glue in place withDuco cement. This cushions the gunbutts and keeps them from slipping.Glue weather stripping in the slots tocushion upper points of contact.
You can drill holes in the top, nearthe back, for cleaning rods. A lockingset-up for the rack can be made using4 ft. of ,\s" to Ys" steel cable, rubberor plastic tubing to cover it, 2 largescrew-eyes, and a small padlock. Wrapone end of the cable around a shortmetal rod (an 8-penny nail with endscut off) and solder it securely. Slipthe cable through the 1/c" hole in endof the rack with nail on the outsideand then slip covering material overthe cable, Form a loop for the pad-lock shank in the other end and solderit securely. To lock the guns in therack pass the cable through the trig-ger guards or lever loops and thescrew eyes on the shelf brackets. Theend is passed out through the /2"hole and secured by the padlock.
The rack shown in the photographis a modification of this design. Thestraight end sections were cut off tomake a 10-gun rack to fit a Particu-lar corner.-J. K. Porrs
E" 0nÍfln
sary for strength, so could be omitted.Other items needed are 30 #8 flat-head wood screws, l0 ft. of feltweather stripping, a piece of spongertbber /2" x24" x 24", wood glue,and a tube of Duco cement,
After drawing the curves on theplywood sheet, lay out the slot cuts sothat their sides are parallel to linesdrawn from center of the curvethrough middle of the slots, Note thatthe 3 slots on the 2 outside edges arel3/q" wide and the 6 slots 2" wide.
9

H(lt$TER
YOU
can make a
By Ellis L. Stockfleth
}t-
I f ow often have you wanted a holstcrI I made 'just so'? You can makcyour own in a couple of hours andwith small cxpense. These pictures showeach of the steps from pattern tocompleted holster.
Many shooters have learned to dogood leather work. It takes few toolsand little skill, it gocs rapidly, andthe completed project provides rnanyhours of usefulness and pleasure.
A foot-square piece of eight-or ten-ounce cowhide is suflìcient for twosmall holsters. The holster shown herecost $1.35. Rubber cement and threadcan be had at almost any shoe shop.Tools used, except for two stamps andthe needles, are available around thehouse. Leather and leather-workingtools may be obtained at a leathercraftor hobby store,
I FirstI papervery weas the his made
t The paper pattern is placed on rhe3 shiny side of the leathei and or¡tlinedwith a ball-point pen or pencil. Make andmark pattern carefully, as it determines
finished size
E A second line is traced abolt V+" inv from the stitching guide line. This willbe the edge of the border for the basketstamping. A diagonal line is lightly drawnfrom border to border to serve as a guidê
for the basket stamping
I Holster is 'roughed out' with knife tor' follow the outline. The rough blankis then dampened by immersing ln cleanwarm \ryater for about 10 seconds. Excessmoisture may be dried with a clean towel
A The basket stamp is placed carefullytv on the guide line and struck with themallet. A few practice strokes on a pieceof scrap will tell you how hard to hit thestamp to get impression of uniform and
proper depth
l\'
^ Blank is now wrapped around the't well-oiled gun. It is'þressed with rhó
fingers to impress form of gun in theleather. The thumbnail can be used totrace the outline of the gun. This mark
will serve as stitching guide
l0
'3.
aa
a The design is made by interlocking/ each stamp with the alternate, as illus-trated. Leather^shoulcl be lested on a pieceof marble, smooth concrete, or hard wood
during the stamPing oPeration
ô Sunburst borderinc tool works around(D the edge of thc hãlster face to closethc rotrgh èclges of the basket stan-rping
a¡ Holes in belt loop for stitching are, located about 5 pei inch and puñchedwith a sharp awl, to permit needles loadedwith waxed linen thread to pass freely.
For neatness, locate holes carefully
I 2 Stitching is done by putting a needlelrJ on each end of the thread and ptrll-ins one through the hole to the center ofthã threacl. BoIh neeclles are passed throtrgh
the next hole, in opposite direction
tI The bclt loop is stitched secrtrely toI I thc buck of the holster trsing the "snd-
cller's stitch"
I t A line is now drawn abortt 3/o" out-I¡t nide the stitch line. Holster is care-fullv trimmed to this finish line in first step' of finishing oPeration
I a¡ Inside edees of the holster are nowI Z coated wih rubber cement and al-lowed to dry for 2 ot 3 minutes. ,Fdgesare then pressed together with the fingersto insure lhey stay in place while holes are
punched along the stitching line
I E Sharp edges can be trimmed with thet J knife or gentlY sanded to removehailline trimmings preparatory to burnish-
ing with hard tool
a
-3
*
I CD After finish is on, still-damp holsterI CD should be formed over gun' Then re-move gun and pcrmit holster to dry. Hol-ster will harden and sh,ink slightly. Form-ing will aid in holding gun, yet a qurckdraw snaps the gun loose-l
t7 ff å8.pend "NeatLac" I colorand waxcswill darken the leather a certain amount
ît
1l

Looking for adequate storage room for your guncollection? Here are directions for building . . .
S" Hi^"",åî'.'j'ì.:lå't i:i'l:i :ii:grown the four-gun rack I had on thewall of my den. I needed one cabinet
not enough.After checking the plans and making
any needed alterations, take a trip tõyour lumber dealer and o¡der the fol-lowing:
rl" \Y \trs or Po¡¡oBnosr PrNn:
A Gabinet for your GunsBy Donold R. Jones
tf" srocK, Wsrrr on Pot¡¿nosr prNe:(1)1pc,-%"x1111"x12'(2)1pq-%"xll/2"x15'(3)1pc,-%"xl¡il"x6'(4)1pq-%"x5/2"x10'(5)1pc.-%"x1tl"x17'(6)1oq-%"x3i'x12'(7)Ipc-%"x3"x12'
%" srocK, Wurre on Porpsnosl P¡xB:(l) 1 pc,-)/q" x 5rl" x 15'(2)1oc'-V¿"x3"x8'(3) 1 .pc.-)4" x 3" x l0' wirh edge rabbet
%" wide, %" deee(4) 2 .pcs,-.%". x 3" x 8' with edge nbbet t/a"wroe',/2 deep
fi" Ftt Pwwooo:2 pcs.-4'x 6'for drawer bottotns and cabinet
back
Hr¡pwrne :
% lb,-l%" finishing nailsI lb.-Weldwood glue5-cabinet locks with keys arrcl screws4-drawer pulls3-door pulls4 pr.-cabinet hinges with screws4-2" flat-head screwsl-cabinet door catch
You may wânt to builcl of 7/+,, lunt-
(l)(2) 2)(3)
(4)(s)
(6)(7)
)2%"
ce
ll" Wxtm on Ponopnosr Prnn:(1) 2 pcs.-S' long; pcs. (Ol) & (O2) five of
each. 1 pc.-5' long; pc. (P, not illustraled)(2) 2 pcs.-4' long; pcs. (N)(3) 2 pcs,-54" longf pcs. (À{)(.1) 4 l)cs.-4' Iong; pcs. (L)
h-- |
f2
úe
Nol.:
Poll cul ¡cm!
rlza o! ¡o robbala
fl.-16
I,
,2
Y"'!
T
--
Lr
¡¡ot.' portr@@'@O ond @ rtroichl p¡cc.s cul lo lil vour cob¡n.l
Nolal mull bc tlon.d oll lop
pth -:
Drowar Conrlruclion 0aloila
Ê4il-{F-tL2!----4
h-'R.q. II7o1¡rrrrær?r' rrrrrr-ç-r|r'
Dimongrons..
2 Rôq'
@ @
@
@
2 R.q.
I
2 Rcq.
CulÍor
lod lino
@'..0'
O z n.c.
li' etyvooa
o o
4 R.q.
12
lí+
{Assembly . . .
lop oooa oornaaJo¡nl D.toil

Before starting construction, checkvour tools. I'nr a hand tool artist, main-iy because I can't'afforci porver tools. Iúsed the following: a hãndsaw (eom-bination cross-rip), a stiff backsaw andmiter box, a screwd¡iver, a breast drill,drill bits, a square, a hamme4 a Yz"chisel, a plane, a brace, and 7/+' bit'Of course, if you happen to have power
measurements on your cabinet, Besure that the ends nieet (El ) and (EZ)or a gap will result that will be un-sishtlv in the finished cabinet. Simi-la'rlv'be sure (G) is cut to fit, andfasten with its top eclge flush with thetop of (C2).
Parts (Kl) and (KZ) are the lowercabinet doors, cut from piece (J). '/r'stock. Set these in place to checkthefit.
exactly, The corners are mitered as
shown. You will note that the (M)cente¡ miters will m¿rke ã "Y", the apexof which will point down on the bottompiece ancl up on the top piece. Remem-ber to leave pieces (M) whole untilthe door is finishecl. Remernber to keep
joints and either remove later or driveincompletelv, clip off, and rivet flush'The whole door may now be set in thecabinet ancl fitted exactly. Only nowshould the doo¡s be cut apart.
In the rifle rests, drill holes in thebar¡el and stock notches in pieces (O)before they id splirting. The to the3/+t x 7', halfJapjoints. Wh rack becareful to alternate pieces (O) so thatthe ba¡rel notches are opposite ancl overstock notches in each case.
A e macle with a
5" x edge on (C2),with spaced for pis-tols uP and trigger
wool and wax when perfectly slllooth.If desired the cabinef ma1' Ée stainecl
before application of the shellac,
The glass shoulcl now be purchaseclto fit tlre upper doors, ancl installed.Cut the back- from lhe /+" PlYwood,and be sure to have the joint behindlC2). Finish the inside surface as youài¿ itte rest of the cabinet and thenattach. Attach the drawer and doorpulls at this time and hang the doors.^
Shelves may be placed as desired inthe lower compartnients, or on-e Tay Þeused as a reloáding center with detach-
I'
Finished producl
tools the work is half done.On rabbeted
ancl (C) pairs,the poorer sidebetter side willcabinet. Make the cross cuts with thestiff backsaw, being careful not to cuttoo deep or you will weaken the boardtoo much. Then take the chisel (itshould fit the slot exactly) and chiselout the material between the saw cuts.
When rabbets in (A) and (B) havebeen completed, assemble (A), (B),and (C) 'irith glue and nails. Lay thefranre on the back and check the cor-
be ureferred.liou will note that the (D) pair fit
into the rabbets of the (C) pair, so
measure their length from the complet-ed frame (a difierence of /+" will cause
no end of trouble) using my measure-ments onlv as a suide,
Note tlíat the"bottom edge of the
(
ß
I{RA FIREARMS & AMMUÌ{ITIOI{
Fact Efook
$-
The newly published 352-Pagepocket-size NRA Firearms & Am'munítion Fact Book is the most com-prehensive and comPlete generalbasic reference on firearms, ammu-nition, and related subjects Yetassembled.
Articles, questions and answers,definitions, charts, tables, drawings,and photographs present a wealth ofaccurate and useful information.
Much of the material aPPeared inoriginal form in Tur AvEnlclNRrrLrrnr,,rN; however, any gaps in thecomprehensiveness and completenessof information have been filled bYnewly written mâterial.
contents include:Why Americans Own, Shoot, and Col-
lect Guns; The Development of FirearmsiImportant Dates in Firearms History;How A Firearm Fires; How Far Will AGun Shoot?; Fundamentals of InternalBallisticst Small-Arms Ammunition; Evo-lution of Priming Systems; Grip Marks onAmerican Handguns; Proof Marks;Foreign Firearms Mark¡ngs; Recoil Tâbles;Modern Sporting Rifle Bullets; Knock-down Efiect; Bore Measuringi AutomaticTypesi Should I Reload?; Muzzle-LoaderData; Cartridge Ballistics; Shotgun ShellBallistics; Comparing Cartridge Perfor-mance; Air and CO" Gun Velocities;Shoulder Arms Currently Used in U.S'Services; Common Military Handgun Cârt-ridges; Common Military Handeuns; Com-rnon Military Rifle Cartridges; CommonMilitary Rifles¡ British Comnìercial Cart-ridges; Cartridge Measurementsi and 106questions and answers,9 charts and tables,and 9 definitions.
The 7V+"x4/q" size allows thebook to be frtted conveniently into apocket-to provide ready answers inalrnost any discussion of firearmsand ammunition.
-|he Fsct Boo& should be a mustfor everyone interested in firearmsand ammunition.
$1.75 postpa¡d to NRA Members,$2 to non-members.
NATIONAL R I FLE ASSOCIATION1600 Rhode lsland Ave., N.W.
Washington, D.C. 20036
I ¡r¡¡¡¡,-1¡rJ1 ¡,\Mi\ttrNllt()\r \( r ßooKl{RA
able work table.-
t3

MAKINGA RIFLE
CASEBy E, L. STACKFLETH
tl
,-ì
¿l g_ood gun should have a good case.I \ Many states require a gun to be casedwhile en route to or from hunting or targetshooting. Making a case is not difficult, andmost shooters have the necessary ability tomake a case for themselves, realizing a cashsaving while doing so. Here are instructionson making a leather rifle case.
'l The design chosen dictates the tools required. Those shown¡ were all used in making this case. Other designs may re-quire more or less tools. Tools and other materials needed maybe purchased from most leather stores. The tools shown are:(1.-r.) round beveler, tracing tool and spoon beveler, pear.shader, basket stamp, sunburst tool, stippling tool, edge beveler,large sunburst, and swivel knife.
? Leather dealers can be of assistance in choosing proper\, leather. Heavy leathers will make stiff cases. plaðe ihepaper pattern on the flesh side ted. Tape it atintervals and trace the pattern th a baìl-pointpen. Use the swivel knife for t he traced line.This leaves a groove for a sh follow. Whencutting the leather, hold the knife perpendicular so the cutedges will be square.
t To make the pâttern, lay the ¡ifle on a sheet of heavy1 paper, fold it over, and trim the paper to the size andshape desired. Leave the pattern generous in size; after theleather is cut, any surpltrs can be trimmed away.
ìrir
I
"l)1t.l,.,t
li-'. ,
i::;,rl
llì-.1..,:uavø þ'
I
I
t4
aI

4'fhc case can be left plain.Howcvet. clccolation cn-
hanccs the appcarance altcl valttc.Flolal pnttcrns üncl gante sccncs:rlc rrflcn t¡scd. ßlrskcl stlttttpiltgis orre ol thc simplcl designs antìis attraclive. ll yotr clo not wishIo rnlkc yotlr own rlcsigrt, lt
nurntrer of printed plans arcavail¿rblc flonr lcathel clcalers.'l he dcsign should bc on ¿t stt'ortgpapcr not casily softcned byclänrpncss. 'l'he dcsign pattr: ì'nstroultl be srralll¡r thitn the cascto lcavc ¡'oom for ¿i bortlcr.
Whcn lc¿rthcl is cttt, sttbmct'geit in watel and loll into a towcl.Lcathel n.lust bc clantp, bt¡t trotdripping, for tooling. L¿ìy pâtternovcr the lcathcr ancl tlacc thclincs t;f thc tlcsign willt tlrrcirr¡:tool. -fracc cornpletc clcsign ontolcather befole lernoving pattern.
6 I-eather tools bcst whenslightly damp. As wot'k Pro-
gresscs, the leathel will cl|y and
leqtìiì'e (lanrPetìing.Following swivel knifc cuts, thc
nrallet and stamping tools can be
enrployecl. Thc lcather will takethc stamping bettcr if it is laicl on¿r slab of m¿rrblc or other vel'Yhalcl, flat stlt'face. To lcatn howeach tool wolks, practice on somcpieces of sclap leather'.
Place the cdge bcvcler on thecr¡t line with the sharp edge nextto the object to be raisecl. T'ap thetool lightly with the mallet, slid-ing the tool along the edgc. Workslowly ancl decide which featurcsshould stancl out and whichshould be dept'essed to givepropcl reliel'.
5 The swivel knife is usecl togive relicf to the clcsign. Por-
tions of the tlcsign which are tost¡nd out at'c given a shallowct¡t with thc swivel knil'c. Whereone pctal overlaps another oL anirnimal is outlined against u back-ground, thc cut will give the ap-pcal'ancc of adclccl depth,
r* iÀ-
I
r -7 The peat' shrttlet ancl/ .ponn bcvclct ltl ctusecl fol lotrncling aldadclitional detail with inthc clesign. F-ir-re tlctails,such as vcins jn lc¿rvcs,
are nrade \üith light cutsLrsing the swivel knifc.
After the stamping is completed, usethe snnburst tool at'ottncl the bol'clel'
case to cover the eclges where thestamp miu'k ends. The design is theneclgccl with the bcvclel to give a l'aisedrppcíìrirnce to the boltler.
'Ì
Þ{-,t\\
'-ù{
.¿
B'l'he stippling tool is usecl last on the
b:rckglound of the case after the de-
sign has been tooled. The stippling pt'o-vidcs cont¡'ast which c¿rn be inct'easedfurthcl by applying leather dyc to thestippled arcas of thc case.
9 Basket starnping can be ttsed for com-plctc covet'age or one side of the case.
Draw a diagonal line act'oss the alea to bcstampecl. Use it as the guide line fol thcfil'st low of impressions. Cat'e mttst be cx-erciscd to keep rows straight.
0the
1of
I \
l5

CIRCULARRIFLE RACK
A space-saving rifle rack wasdesigned by the Alhambra,
Calif., Police & Civilian Rifle andPistol Club for its smallbore riflerange. Circular in shape, the gunrack has proven to be a useful fix-ture. It provides quick and easyidentification of guns.
A 36" circle cut ol 3/c" ex-terior-grade Formica-covered ply-wood is the base. Outside edgesare smooth and covered with a2"-wide band of rubber. This pre-vents thç rifle stocks being nickedduring racking. Adhesive tape 2"wide with a rough outer texture isattached to the circular base 2"from outer rim. The butt of therifle stock, resting on this adhesivetape, does not slip.
Three wood blocks, 8"x31/z"xlYz", screwed on the underside ofthe base, serve as feet.
The 14"-diameter top is thesame thickness as the base,Around the edge of the top pieceare notches. A rack of this sizecan handle from 12 to 16 gtrns, de-pending on the number of notchesused. Each notch is 1" wide andlYz" deep.
A 32" length of 1" plumberspipe is attached by means of two3/2" pipe flanges, Four screwshold one flange to underside oftop piece and one flange to thebase.-ANN Fnrcrvtu
'l 'l The rifle is shown in a completed case. The case was formed by dampening theI I leather and folding it down the center lengthwise. Edges should meet at all points.Lay the folded case on a towel and allow to dry thoroughly.
Proper handles may be purchased or made. To make, fold tengthwise a piece ofdampened leather 3" x 10". When dry, glue and stitch the center, leaving lVz" un-stitched on either end. These flat ends, shaped as desired, are stitched or riveted, one toeach half of the case. To locate handles, lay the rifle in the case and find the centerof gravity; place handles there.
Case should be lined with soft material such as pile or cotton outing flannel. This isglued to the inside of the case with rubber cement or other flexible adhesive. Startgluing in the middle fold and work out wrinkles toward the edges. Either fold liningedges under or let protrude past case edge and sew in final edge stitching.
12 *r"':1ïi,,f,iì,å!ni'"'.I? iï,i J )Make it 3" wide and 2" longer than theedge of the case. Use a heavy-duty zipper.
Cut the leather gusset in half length-wise and stitch one half on each side ofthe top of the zipper. The zipper shouldbe the same length as the case openingand the gusset will extend beyond thezipper on each end. The gusset may besewn to the zipper with an ordinary sew-ing machine. The gusset is ready to beglued to the inner edges of the case open-ing. Place it so that the ends of the zippercome to the exact middle fold at each endof the case. Start at one end and workdown both sides progressively. Full lengthgluing of one side and then the other maycause unevenness. Punch a hole aboutevery 10" along the edge and tack thegusset in place with a single stitch. Usea sharp-edged awl to punch the holes forthe stitching, Punch the holes on a pieceof wood from the outside of the casetoward the gusset. Holes should be largeenough to pass big leather needles easily.
To saddle stitch, thread a leather needleon each end of a piece of heavy linenthread about 25" long. Thread should bewaxed by pulling through a cake of bees-wax. Holding a needle in each hand, runone needle through the first hole to themiddle of the thread. Then each needle ispassed through each consecutive hole inthe opposite direction. Pull the threadtight after each stitch. Stitch the ends ofthe case last so the gusset fits exactly,
I Q When stitching is completed, rubr :., the case edges with beeswax and alignum vitae wood creaser. This gives aneat, rounded edge. Finally, apply a coatof Neat Lac to the leather for water-proofing and preserving, I
ìó

BUILT.INGUNRACK
¡t built-in gun rack saves space and
-¡f\money. I made one for a hallwaYwall (it should not be Put in a load-bearing wall). The first step was cuttingan area out of the plaster and rocklath34" wide by 60" high, The 2"x4" studsat sides of the opening guided the key-hole saw. Horizontal guide lines weremade for top and bottom cuts.
Several holes were drilled throughce¡tet 2"x4" stud at toP and bottom ofopening, and the stud section wasbroken off by twisting with a largemonkey wrench. This had to be doneas gently as possible to prevent damageto plaster on opposite wall. Nails pro-truding from rocklath were cut off withcutting pliers, and remaining portionsof the stud were trimmed flush with topand bottom of opening.
Pieces of /s" Masonite were fastenedto top, sides, and back of the openingwith a non-drying cement made bY
Minnesota Mining and Mfg. Co. TheMasonite piece across the top was ce-
mented to boards nailed to cleats onthe studs. Japanese grass cloth wall-paper was cemented to the Masonite'
Wormy chestnut was used for woodenparts of the rack. The frame aroundouter front has mitered joints, and wasfastened to studs with wood screws.Screw holes were deeply counterbored,and screw heads were covered with 3/a"
dowels, The board for bottom of rackwas fastened to cleats on the 2"x4"
stnds, Narrow pieces of wood werefastened around top edge of bottomboard to enclose the gun butts. Buttspacers were also fastened to the bot'tom board. Front and rear barrel sup-ports rest on cleats fastened to the2"x4" studs, The rear support wasnotôhed for the barrels, and the frontsupport was also notched where neces-sary to provide clearance for a largediameter barrel or tubular magazine.The front support should be looselyfitted as it must be lifted out for re-moval of guns. A walnut oil stain wasused to finish the wood.
To illuminate the gun rack, the halllight fixture was replaced with a fix-ture containing a spotlight-type bulb.-Gr,oncB O. YouNc
MATER¡ALS
1 Masonite, t/a"x34"x60" (back)
I " /¿"x5V2"x34" (loP)2 rfformy chestnut, s/4ttx4ttx4ztt (frame
top and bottom)2 Wormy chestnut, (frame
sides)1 Wormy chestnut, 3/+'tx7'tx34't (bottom
board)4 Wormy chestnut, 3/q"xl/2"x34" (bot'
tom board edging and barrel supports)2 Wormy chestnut, 3/4'txly2"x7tt (bottom
board edging at sides)Wallpaper, cleats, gun butt spacers, ce-
ment, screws, îaíIs, 3/att doweling, andstain
Atamper-proof...
Gun Rack'Tluls tamper-proof 4-gun rack costsI. less than $6 and is made of 1"
white pine throughout, The rack floor ismade of two ll" x 20" pieces, nailed to-gether, one of which has 4 oval slots tosnugly frt the buttstocks. The slots arepositioned so that the gun barrels aretipped back slightly. The barrel sup-port is made of one 4" x 20" piece withbarrel holes drilled frrst, after whichpiece is cut Aolvn the center bisectingthe holes. Rear half is screwed to side
piece and the front half hinged at theleft side. A corner support attached tothe front half provides area for a sturdyhinge, and a matching piece is attachedto the left side piece as a support. Thepadlock hasp is attached on the rightside. Height and depth of rack willdepend upon space available. All strain-bearing members should be assembledwith blued round-head wood screws. Acoat of maple stain followed by shel'lac or satin-finish varnish completesthe job.-RIYMoND A. S¡Nrlnocco
17

¡/c'PtPE_
E
Here's How I Did ltSpare magazinescan be stored inthe pistol box usingclamps made forholding screens inwindow frames,Clamps should bemounted on ablock of woodof same thicknessas the magazine.-C. E. JoN¡s
ßlocl
It annoyed me that the eyepiece ofmy internal-adjustment spotting scopedid not extend beyond edge of the pistolbox cover, so I improvised the slidingmount shown. The base was formedfrom heavy gauge soft aluminum withedges crimped to fit scope-ring bracket.Flathead screws were used to attachbase to pistol box cover and 2 roundhead screws act as stops. Cover can beclosed when scope is pushed forwardagainst stop screw,-JonN W. G¡n¡Nen
This pisfol cose corryíng device. mode oft" webbing, hos proved very procticol. ltdrops out of the woy when the cose isopened, and con be rolled up ond put in-side if desíred,-Lt, Col. John L. George,
SECÎIO¡¡ ÎHRU CENTER
LAZYSUZAN
GUNGABINET
þ-3a,'______-l
GLASS
IJ'U'
J(t
e
FRONT ELEVAÎIOII
111ilililililil1ililililil1ilililililililililililililil1ilil
f f )zrrs space at a premium in to-|| aay's modern home, the owner
of more than a few rifles or shotguns isoften confronted with a serious displayor storage problem. The conventionaltiered cabinet or wall rack frequentlyrepresents a poor solution due to lim-ited capacity coupled with excessive en-croachment on living area and low es-thetic appeal. I solved this problem bybuilding a combination l8-gun-capacitygun rack and storage cabinet whichtakes up very little floor space. Thesecret is the'lazy susan' gun rack ro-tated by hand or a small electric motor,Any ingenious mechanic can improvisethe turn table mechanism from pipe fit-tings available from the local hardwarestore. I made my cabinet from walnutbut other woods are quite satisfactory.The cabinet design is flexible and can bemade smaller or larger according to re-quirements, Storage drawers and guncabinet door were fitted with locks as asecurity measure. An interior lightingfixture allows illumination of the gunsand acts as a dehumidiûer.-KurnSrsclLL.
EARRELSUPPORT
2t
TNÀ
.30"
r8
ÏURI{ TABLE

A GUN CASET T ERE is a gun case thât carr be
l] decor:rtive as well as uscful. Itis made of. 7/+" thick knotty pine.
has driecl, rouncl tìrc corncrs with a
small block planc.
Ncrt attach the hinges. Aftersancling, the fit between case andlid wiìl be tiglrt,
To finish, countersink the nailsancl fill the nail holes with woodputty. Saucl the case smooth withineditun grit s:rncìpaper ancl finishrvith fine sanclpirper or stecl wool.'l'hen apply 2 or 3 coats of varnish,sanding lightly after each uuclercoat.Don't sand the final coat.
Cut grecn felt to fit inside the topancl bottorn of the case. Glue feltin place. Sponge rubber shouldbe ¿rttachecl to the inside of the topto hold the gun in pìace rvhcn tlrecase is closed. The felt liner shouldbe cut away fronr thosc pJaccs wherethe sponge rubber is to be fastened.
-Jouw l.-. Cr.lnx.
2
t x12x36I REQ
TRACE OUTLINE OF WEAPONA CUT Ot,T WITH JIG SAW, CHISEL OUT POCKETS SO THAT
THICKER PARTS OF WEAPON IYILLFIT CORRECTLY
xt2x36I REQ.
1r'xzlix2 REQ
x2!rta L'x
l",l
2 REO
2 REQ
t¡-
f'x e f'x ',1.'
36
A Porta,bleGun Røck
fneNxs to its horizontal carryingI handles, this light yet rugged gun
rack is readily 2-man loaded in stationwagon or truck for transport to therange. Base portion of rack can befitted with storage boxes to hold tar-gets, ammunition, stapler, etc. Cleaningrods are stored along inside of legs.With hinged cover locked in place,contents of rack are secured againsttampering. Fitted outer cover of water-proof canvas is recommended to pro-tect arms against dust and elements.Although designed for Remington 521-Trifles, it can be readily adapted toother models. With heavier rifles, re-duce capacity of rack to not more8. Total cost for materials was $12;construction time 4 hours using handtools.-R. J. LATSHAw, San Angelo, Tex.
t9

A
PORTABIE
BENCH
RTST
I recently decided to build a portablebench rest that I could easily carry inmy car and set up anywhere in a jiffy.
The top was made of. 3/q" watetproofplyboard, reinforced on the under sideby three wood strips screwed and gluedto the plyboard top. Sections of 1 "iron pipe were used for the three legsbecause they could be secured more'wiggle-proof to the top than couldwqod legs, These pipe legs are threadedat one end to scre\il into pipe flanges,which are screwed to the reinforcingstrips on the bottom of the bench topas shown in the sketch. These flangesare fastened to the strips at such anangle that the two front legs splay for-ward and sideways, and the rear legbackward, 8" from perpendicular. Eachirdn pipe leg has a hole drilled throughit, and a 3/e" iron rod inserted serves asa spanner to screw it tight into theflange. The top was then varnished,
This proved to be quite steady. Butit was decided to make the rest steadierstill by adding a fourth leg at the rearend, on the side away from the shooter,jammed between the top and the groundat a greater slope. This was made of a3/c" iron pipe with a ball point at theupper end, adjustable with a jack screw,The ball point is inserted in an iron
socket on the bottom of the bench as
shown, the lower end of the leg isjammed into the ground, and the jackscrewed out to thoroughly tighten thisfourth leg.
An adjustable iron pedestal, or simi-lar rifle rest, is placed on top of thebench and adjusted properly for therifle and for the shooter. Instead ofthis pedestal, wood blocks can be usedto support the front sandbag at the rightheight and location as was done in thee,arlier days of bench-rest shooting. Therear sandbag is laid on the bench topin the usual manner, and the spottingscope with its tripod is placed at the leftof the pedestal.
Any ordinary chair, stool, or ammu-nition box can be used for a seat.
The entire oùtfit and all equipmentpacks easily in the back seat or luggagecompartment of one's car. It is not tooheavy to carry easily, say 100 yds., fromcar to firing point, and there it can beset up ready for use in less than threeminutes. I have been using it for thepast six months with entire satisfaction.Groups fired from it have averaged justas small as from the standard benchrest,-Cor.. Townsexo Wurr,rN, USA(Rer'o)
SOCKET PLATE FOR 4Ih LEG
t6
SET AT CORRECT ANGLETO SPLAY LEGS 8.,
I.. PIPE FLANGE
27
2l t'
RIF E RESTNOTCHES
47"
NRA Publications-T1"" National Rifle AssociationI makes available to its mem-
bers useful and valuable informa-tion on firearms and ammunitionand their use.
NRA Firearms & AmmunitionFact Book
A 352-Þage pocket-size book that is themost öomÞrêhensive and complete gen-eral bas¡c reference on f¡rearms, ammu'nition, and related subjects yet assembled.
$1.75 to NRA members,$2 to non-members
NRA lllustrated HandbooksSelections of the best RIFLEMAN mate-rial that has appeared ¡n article form.Firearms Assembly Vol. I $2.50*Firearms Assembly Vol. II $2.50*Firearms Handling $1.25*Gun Collectors $1.50*Hunters $2.00*International Shooting $t.SO*Questions And Answers $1.50*Reloading $3.50*Shooters Guide $2.00*Shooting $3.50*Shotgun $2.00** Price to NRA members, postpa¡d fromNRA Headquarters. Non-members add 11,
"Rifleman" ReprintsBooklets w¡th a wealth of informat¡on onspecific arms or sub¡ects.
Civil War Small Arms 509Deer Hunting $1.00Duck Hunting 509The .45 Automatic 50çThe M 1903 Springfield Rifle 50øThe Ml Rifle 50øMetallic Sights 50çMilitary Rifles 50ÊRemodeling The 0343 50øRemodeling The .303 Lce-
Enfield Rifle 50ÉRemodeling The U. S.
Model 19 17 Rifle 50øSighting-ln Rifles & Shotguns -50ÉTelescope Sights 50ÉThe U. S. Cal. .30 Carbine 50ç
Range PlansUseful range ¡nformat¡on based on suc-cessful'¡n-use' installations.Bench Rest Construction lOøConstruction Of Indoor Rifle
And Pistol Ranges $ 1.0050-Ft. Summer Camp Range lO9High Power Rifle Range 75øOutdoor Pistol Range 509Outdoor Smallbore Rifle Range 50PPart-Time Shooting Ranges 25øRange Construction - Part-
Time And Special $ l.OORange Location And
Landscaping lOøRapid-Fire (Silhouette) &
Portable Booth 20ÊSafety Ranges And Inter-
national-Type Ranges $ 1.00Universal Outdoor Smallbore
Rifle Target Frame lOøYou Can Have A Place
To Shoot 25çAvailable from NRA, 1600 Rhode IslandAve., N,W., Washington, D. C. 20036.
20

A Budget Handgun Cabinet
T fitted my handgun cabinet into aI wall recess made for a long doorchime, after installing a short 7"chime in place of the original, Theback piece was made of 3/q" plywoodcovered with Japanese grasscloth wall-paper using wallpaper cement. Tothis I screw-attached the top pieceand the base piece, both of wormychestnut, the screws coming in fromback side of the plywood. After stain-ing the chestnut, the assembly wascemented to back of the recess with anon-drying cement (floor tile cementwill work as the load is supported onthe bottom of the recess), The sidepieces were made of /e " Masonitecovered \ryith the grasscloth wallpaperand cemented in place.
The guns are supported on a verti-cal wood member pivoted at top andbottom, The pivots are 3/e" rotndbrass rods long enough to engageabout 2" into the wood and alsocontact the brass flanges at top andbottom which support the uprightmember. The upright wood piece isdrilled with a series of 7a" holes (atan angle of 45') which are fittedwith brass rods to support the guns.Ends of the rods are turned down fora length of from 3" to 4" to give a
sliding fit in the gun bores. It is bestto lay out the guns prior to drillingto insure proper spacing of the holes,A fixture was used in drilling to makeall holes the same depth and angle.
The vertical member was mountedin the cabinet as far to the left aspossible and centered on the width ofthe sills. A /e" crosspin fitted to thebottom pivot rod engages notches cutinto the bottom flange. The rearnotch positions the gun rack parallelto but not touching the background.The front notch holds the rack at 45"position when guns are being removedor replaced.
The exterior frame of chestnut hasmitered corners and is fitted withrecessed brass hinges. Single-strengthwindow glass is held in the framewith /e" square brass stock drilledand attached with small brads, Theeight Va" round brass rods fitted in45" pattern in front of the glass aresnapped into holes drilled before theglass is fitted,
The frame is mounted to the wallwith patent plaster fittings to ac€om-modate the hinge screws, A frictioncatch keeps frame flush with wall.
All brass fittings are lacquered toprevent corrosion.-Geonce Youxc
Here's How I D¡d lt
,s -4
I\N
Êoôì
JÀ-
\to
!
@
a
,,2/19
A gun rack for the car trunk or rearseat is easily made from plywood.Carpet-covered notches prevent mar-ring of guns and scopes.-Ep Strwenr
eoo¡
An attractive walldisplay gun framecan be madefrom 14" ply-wood a¡d 2/2"or 3Vz" moldingsold by suppliersof picture frames.In cutting mold-ir^g allow /2"'overlap for brad-ding it to ply-wood panel, Cutwood cradle s
fuom t/2" whilepine to fit gunand drill screwholes for cradlesin panel. Lay feltover panel andcut to outsideedge, then glue inplace, Brad mold-ing to panel, in-stall cradles, andinært screw eyesfor hangingframe. A nameplate can be usedif desired.-EoSrnw¡nr
21
-v
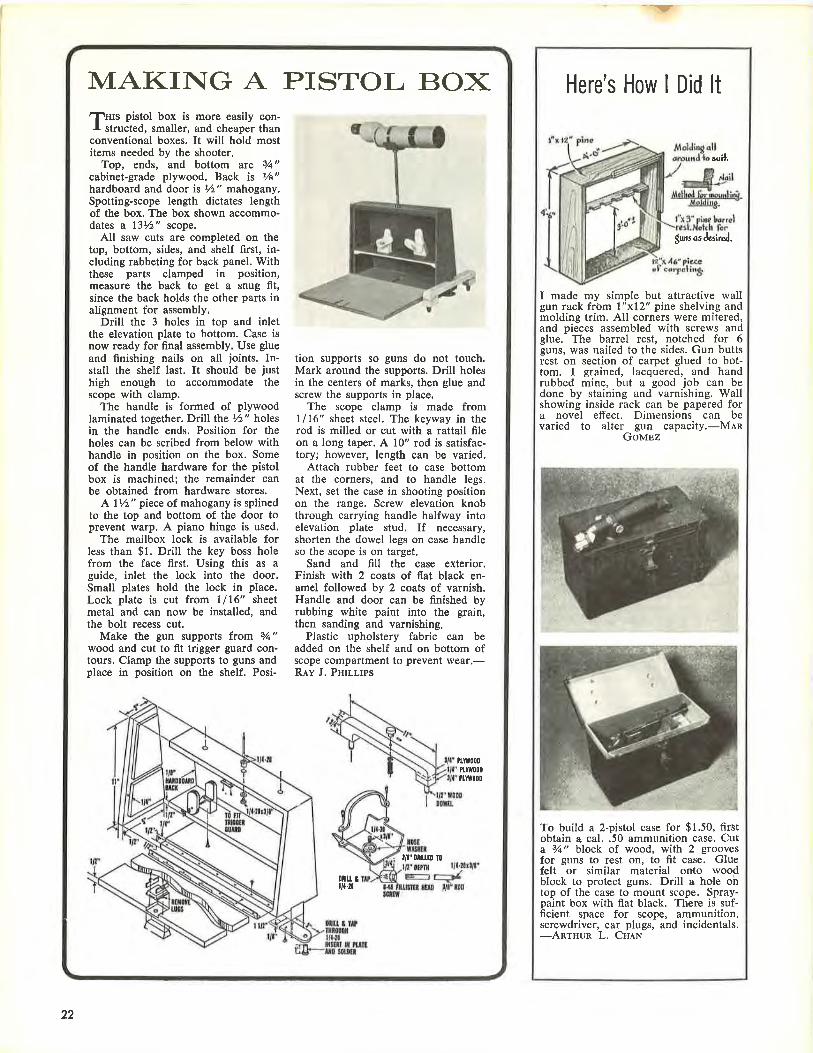
MAKING A PISTOL BOXfHrs pistol box is more easily con-I structed, smaller, and cheaper thanconventional boxes. It will hold mostitems needed by the shooter,
Top, ends, and bottom ale 3/+"
cabinet-grade plywood, Back is t/e"hardboard and door is Yz" mahogany,Spotting-scope length dictates lengthof the box. The box shown accommo-dates a l3Vz" scope,
All saw cuts are completed on thetop, bottom, sides, and shelf first, in-cluding rabbeting for back panel. Withthese parts clamped in position,measure the back to get a snug fit,since the back holds the other parts inalignment for assembly,
Drill the 3 holes in top and inletthe elevation plate to bottom. Case isnow ready for final assembly, Use glueand finishing nails on all joints. In-stall the shelf last. It should be justhigh enough to accommodate thescope with clamp.
The handle is formed of plywoodlaminated together. Drill the /2" holesin the handle ends. Position for theholes can be scribed from below withhandle in position on the box. Someof the handle hardware for the pistolbox is machined; the remainder canbe obtained from hardware stores.
A lVz" piece of mahogany is splinedto the top and bottom of the door toprevent warp. A piano hinge is used.
The mailbox lock is available forless than $1. Drill the key boss holefrom the face first. Using this as aguide, inlet the lock into the door,Small plates hold the lock in place.Lock plate is cut from 1/16" sheetmetal and can now be installed, andthe bolt recess cut,
Make the gun supports from 3/+"
wood and cut to fit trigger guard con-tours, Clamp the supports to guns andplace in position on tbe shelf. Posi-
tion supports so guns do not touch,Mark around the supports. Drill holesin the centers of marks, then glue andscrew the supports in place.
The scope clamp is made froml/16" sheet steel. The keyway in therod is milled or cut with a rattail fileon a long taper. A 10" rod is satisfac-tory; however, length can be varied.
Attach rubber feet to case bottomat the corners, and to handle legs.Next, set the case in shooting positionon the range. Screw elevation knobthrough carrying handle halfway intoelevation plate stud, If necessary,shorten the dowel legs on case handleso the scope is on target,
Sand and fill the case exterior.Finish with 2 coats of flat black en-amel followed by 2 coats of varnish.Handle and door can be finished byrubbing white paint into the grain,then sanding and varnishing.
Plastic upholstery fabric can beadded on the shelf and on bottom ofscope compartment to prevent wear.-Rlv J. Pnr¡,¡.rps
lt Tw000
?Ûï000fl.tu00¡
,/l'0ilur¡ t0
!ilu ¡ur.t¡
Here's How I D¡d lt
siL
To build a 2-pistol case for $1.50, firstobtain a cal. .50 ammunition case, Cuta 3/c" block of wood, with 2 groovesfor guns to rest on, to fit case, Gluefelt or similar material onto woodblock to protect guns. Drill a hole ohtop of the case to mount scope, Spray-paint box with flat black. There is suf-ficient space for scope, ammunition,screwdriver, ear plugs, and incidentals.
-Anrnun L. CnnN
$uns os Je:ire/.
I made my simple but attractive wallgun rack from l"xl2" pine shelving andmolding trim. All corners were mitered,and pieces assembled with screws andglue. The barrel rest, notched for 6guns, was nailed to the sides. Gun buttsrest on section of carpet glued to bot-tom, I grained, lacquered, and handrubbed mine, but a good job can bedone by staining and varnishing. Wallshowing inside rack can be papered fora novel effect. Dimensions can bevaried to alter gun capacity,-Men
Govrsz
22

v-
A Cornpact Loading Bench
new homes or apartments have space.F for a regular reloading bench. Thisportable bench is one answer to thatproblem.
All lumber was ordered cut to finishdimensions. Cost of all materials andhardware, exclusive of sandpaper andstain, was $12.07.
Strength is the design keynote, withcompactness and neatness secondary.Although it may look small, I reform,30-'06 brass to .308 as easily as on afull-size stand-up bench. The operator'sweight anchors it to the floor and finalpressure is applied with a straight armand weight of the upper body. Individ-uals over 6 ft. might have to increasethe length of the seat and legs.
No details are included for cabinetstorage arrangements as this will varyaccording to user's equipment. All itemsshown are easily stored and protected.Equipment includes a C-type press,powder measure, and scales. The cutoutin the base allows ram and handle toextend below, and base of press toreach almost to tbe back. Two small
wood cleats hold down the rear of thepress base inside the cabinet until onewing nut and bolt can be placed toanchor it. The press is angled slightly tothe left inside the cabinet so that thehandle can be secured to the backbonewith a leather strap loop.
All joints were glued with Elmer'sGlue and plentifully relnforced withlr5"-lÙ flathead wood screws. All flatpieces are 3/+" frr plywood, The pres-sure leg can be mounted on a modifiedstrap hinge as shown, or it can be fixedin position.
The offset 2"x4" backbone and seatprovides additional leg and handleroom as well as space for press baseinside the cabinet. The press is angledslightly to the right on toP andas close to the edge as Possibleto provide plenty of knuckle clear-ance at side of the seat. It is securedby four 5/16" bolts and wing nuts. Ahasp and padlock, holding the seatdown to the backbone, will preventtampering as the cabinet doors will notopen if seat is folded.-D. C. WELrs
LEGEND
Size
l2'.x15"xy4"lZ"xl3+5"xY'"12"xlZ"xVt"llv4"xl3rt"xYl"13l7"xl3tvâ"xlt"4xl2"x7¿"3)t"xl2"xY."12xl5V4"xY.Ð6t6t'x9"xY4"lr5"xl+t"xl4Utlr1"x.l+t"xlg,
Dots lndlcate 1%"-10 f,atheadwood screws.
PartABcDEFGHJKLM
QuantityI2I1
1II124II
Here's How I D¡d lt
Components to build this lockingrack are right-angle 3" screw hooks,a piece of rod, and hexagon steelnuts. The hexagon nuts are weldedto the hooks and locking rod.-MlnvrN E. R¡cnBsox
Here is a convenient method of dis-playing shooting medals in the trans-parentlid boxes in which theY aresupplied.-Cepr. Fnrrz A. C,lrr-lss
The walls of my den are too soft tohold hooks, so I solved my gun displayproblem by fastening 4" wide stripsof pegboard to the wall studs with 2"round-head brass screws. The l" holespacing makes possible almost any gunarrangement, and additional 3/16"holes can be drilled for exact leveling.Standard 23/q" hooks are wide andstrong enough for the heaviest gun.-Nosr.B HoccsoN
PLANS AND KITSGun cabinet, rack, and pistol boxplans andlor kits are available fromthe following sources:
American Plywood Ass 9A St., Tacoma 2, V[a
Coladonsto ßros., DePt. l'sr.,
kits)RD
ldg"Portland 2' Oreg. (Plans)
Yield House, Dept. RM.l0-3' NortbConway, N. H. (ktts)
boxss w¡th card, medal,and covor
bottom of
fasten to wall
uB', I
stapl€s or tacks
thin wooden strip
23

'Rolling-Block Gun Rack
-f-rHrs gun rack was made fromI two 7 mm. Remington rolling-
block ¡ifles.The first step is to completely
disassemble the guns. After disas-sembly, wash all parts in solvent.Use a buffing wheel charged withcoarse black buffing rouge on allmetal parts of the guns.
When wood parts have dried,surfaces are sanded. Scraping maybe necessary before sanding. Oncestocks are clean, reassemble themtemporarily to receiver and triggerguard. Cut off rear of buttstocksperpendicular to barrels. Disassem-ble guns again after this operation.
Next, make clamps of I / 16"sheet brass which fasten barrels tocrosspiece on top of gun rack. Bar-rel may be used as a bending form.The brass clamps can be tappedlightly with ball-peen hammer toobtain a pleasing effect.
Crosspiece and base are l "-thickmahogany 30" long, and have bev-eled edges. Handgun holders arenotched for barrels, and their heightis made to suit guns to be held.
All wood parts are finished witha mixture of walnut stain and pastewood filler. When filler attains aglazed look, wipe it off across grainwith burlap or coarse cloth. Afterfiller has hardened, sand partssmooth and give them a coat ofclear sanding sealer.
Now reassemble metal parts. Af-ter assembly, wipe off metal partswith solvent. Clamp assembledparts in a vise, and spray on 3 or4 thin coats of clear plastic.
After assembling guns, hookfront sights over top of crosspieceand, using brass clamps and screws,fasten barrels to crosspiece so thatthey are at right angles to cross-piece and 25" apart (see upperarrow in photo below). With gunbarrels placed parallel to floor,mark buttstock positions on base.Keep toes of stocks 25" apart, and.use a square to keep guns perpen-dicular to base and crosspiece. Drillholes in base, and screw two 3"flat-head wood screws through baseand into stocks.
Copper strips 1/ 1 6" thick andabout an inch wide are used forgun hooks. These are bent to fitthe rolling-block stocks, and thenthe barrels and stocks of your guns(see lower arrow). Hammer thesewith a ball-peen hammer as on tbebarrel clamps. Hooks are then linedwith black felt. One of tbe rolling-block trigger guards will also serve
as a barrel hook. Brass screws areused to fasten hooks to rolling-block stocks. Barrel notches ofwood handgun holders are alsolined with felt, and the holders areglued to the base.
Fixing bayonets to the rolling-block barrels completes the job.The rack can stand free, against awall, on a cabinet base, or it maybe hung on the wall by the cross-piece.-Wrrr-mv A. SrupnrNsoN
Here's How I Did lt
A metal mop holder with 3 spring clipscan be mounted on the car dash tohold guns upright. Machine screws withwing nuts secure unit to the dashboard.Felt glued to ts mar-ring gun barre ountingwill vary accor car. Oñmy Volkswagen pickup I had to fitextension plates to holder as there wasinsufficient clearance between dash andfloor for direct attachment to dash.-
FnEo P. Fllrens¡cr
ABOUT THIS REPRINTThis material is reprinted from
THE AMERICAN RIFLEMAN(published monthly), the officialjournal of The National Rifle As-sociation of America, 1600 RhodeIsland Ave., N. W., Washington,D. C. 20036. Material of interestto shooters, hunters and gun col-lectors appears in every issue ofTHE RIFLEMAN. More than740,000 NRA members profit fromthe publications, services and prolgrams of the NRA.
Produced byEcl itorial-Technical Division
..RIFLEMAN'' INDEXESQlrestions & Answers (Jan.
1954 thru Feb. 1965) 50rProducts & Services (Jan.
l94l thru Dec. 1965) $ 1.00"How-To-Do-It" (Jan. 1940
thru Apr. 1966) $1.00
This leprint is from the March, August1955; Febr.uary 1956; Febr.uary, March,ADril, June 195?; January, July, Septem-ber 1958: February, October 1959; January,Novembe¡ 19ß1; October 1962; January,Octobe¡ 1963; Januar, Feb¡uary, March,April, May, June 1964 and othet issuesof THE AMERICAN RIFLEMAN, ¿ fullycopyrighted publication.
24