
Guideline for it administrators EDC server installation ...
34
Guideline for it administrators EDC server installation guideline Version 4.10 This guide has been created using officeatwork Advanced. 24. September 2020
Transcript of Guideline for it administrators EDC server installation ...
Guideline for it administrators
EDC server installation guideline
Version 4.10
This guide has been created using officeatwork Advanced.
24. September 2020
2 EDC server installation guideline
officeatwork AG has prepared this manual with the greatest possible care so as to ensure that the information
contained herein is easy to understand, accurate and reliable. Nevertheless, officeatwork AG is in no way liable
for any issues which have any connection with this manual, including – and without restriction – its standard
quality and availability for special purposes. From time to time, officeatwork AG will revise the software
described in this manual and reserves the right to do so without prior advice to the customer. Under no
circumstances is officeatwork AG liable for indirect, special or incidental damages resulting from the purchase
or use of this manual or the information contained herein. This guarantee exclusion has no impact on the
statutory rights of the user.
Copyright© 1992–2020 officeatwork AG, Switzerland.
All rights reserved.
officeatwork® is a registered trademark of officeatwork AG.
Microsoft® Word, Microsoft® Office, Windows®, Windows 95™, Windows 98™, Windows NT®, Windows
XP®, Windows Vista, Windows 7, Windows 8, Windows 10 and MS-DOS™ are trademarks of the Microsoft
Corporation.
Other names of companies, products or services may be trademarks or registered trademarks of the respective
owners.
3 EDC server installation guideline
Table of Contents
About this guide 5
For whom is the guide intended .................................................................................................................... 5 What is covered in this guide ........................................................................................................................ 5 Knowledge required ...................................................................................................................................... 5 Typographic conventions .............................................................................................................................. 5
EDC server installation 7
Installation .................................................................................................................................................... 7 Installation requirements ................................................................................................................... 7 Web server installation ...................................................................................................................... 7 EDC Server installation ................................................................................................................... 11 EDC Server installer parameters ..................................................................................................... 14 Quickcheck ...................................................................................................................................... 14
Deploy officeatwork solution 17
Deploy officeatwork repository ....................................................................................................... 17 Activate officeatwork solution ........................................................................................................ 18
EDC server configuration 25
Configuration .............................................................................................................................................. 25 EDC Server Document Service ....................................................................................................... 25 EDC Server Upload Service ............................................................................................................ 27 Logging ........................................................................................................................................... 28
Support 31
Index 32

About this guide
For whom is the guide intended
This book has been written for information technology administrators that install the officeatwork EDC Server.
What is covered in this guide
This manual contains an installation guideline to setup an officeatwork EDC Server.
Knowledge required
You should be familiar with the general use of Microsoft Windows server installations.
Typographic conventions
Before reading this guide, you should be familiar with the typographic conventions used.
The following graphic descriptions highlight sections of text with particular significance.
Formatting Convention Type of Information
Triangle ➢ Step-by-step procedure. You can follow these
instructions to perform a specific task.
Bold Typeface Objects needed for selection, such as menus, buttons,
items in a list or table headers.
CAPITAL LETTERS Key legends on the keyboard. For example SHIFT,
CTRL or ALT.
KEY+KEY Key combinations which must be pressed at the same
time are marked with +. Examples: CTRL+P or
ALT+F4.

C H A P T E R 1
EDC server installation
The following chapter will help you install and setup an officeatwork EDC server based on an existing Microsoft
Windows server installation efficiently.
Installation
This chapter describes the steps to install an officeatwork EDC Server.
The EDC Server Installer installs by default the following components:
▪ EDC Server Document Service
▪ EDC Server Upload Service
▪ officeatwork Sample Data (Contoso repository)
Remark: This document only describes the steps that are important for the installation process. If in a Wizard an
additional dialog appears, click on «Next» without making changes.
Installation requirements The minimum hardware requirements are:
▪ CPU: 1 core
▪ RAM: 1.75 GB
▪ Disk space: 10 GB free disk space after operating system installation
The minimum software requirements:
▪ Operating system: Microsft Windows Server 2008 R2 or higher
Optional:
▪ If the Wizard Web-Services or the ADO-Function is used in the DCML’s the 32-bit Version of the
«Microsoft Access Database Engine 2010» has to be installed on the EDC-Server.
Web server installation Logon to the Microsoft Windows server as user with administrator privileges.
The webserver installation steps depend on your version of Windows Server. Please consult an older Installation
guide for the installation steps on the Windows Server 2008 R2
Windows 2012/2016
➢ To setup an officeatwork EDC server the web server role has been added to the Microsoft Windows Server 2012 or 2016.
Start the «Server Manager» on Microsoft Windows Server.
Click on «Add roles and features».
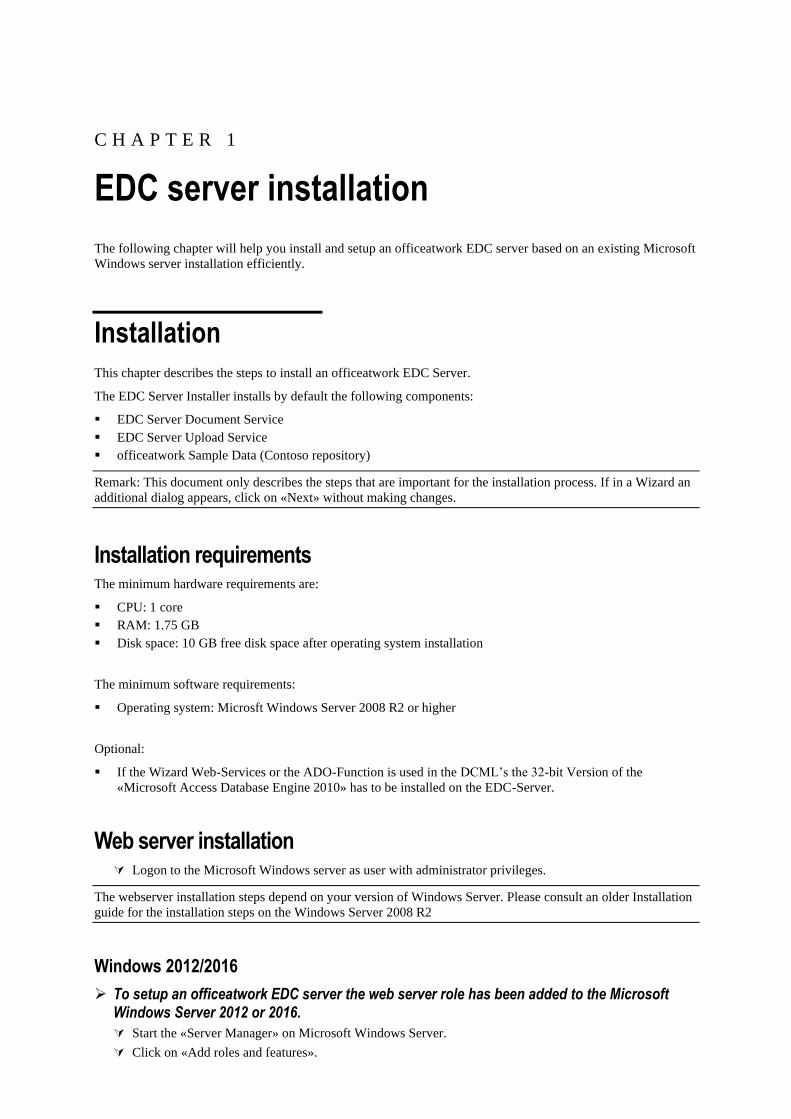
In the «Server Roles» window select the «Web Server (IIS)» role.
In the following window confirm the additional needed roles.
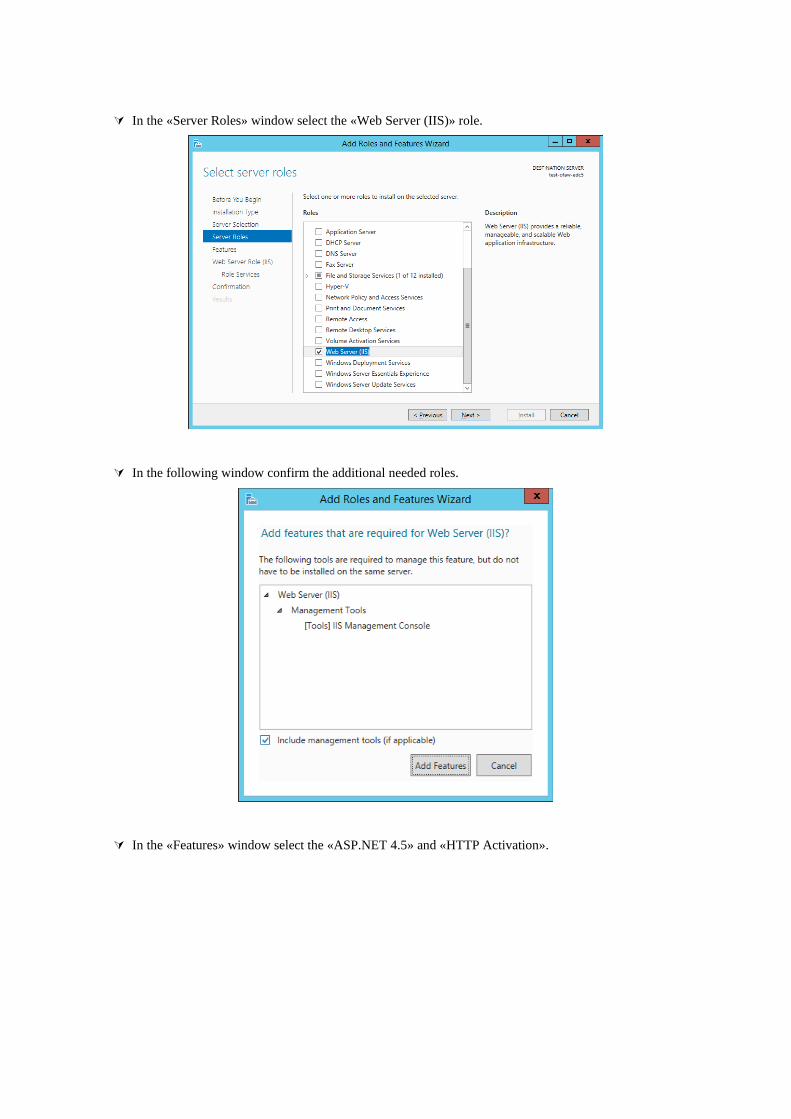
In the «Features» window select the «ASP.NET 4.5» and «HTTP Activation».
Chapter «EDC server installation» 9
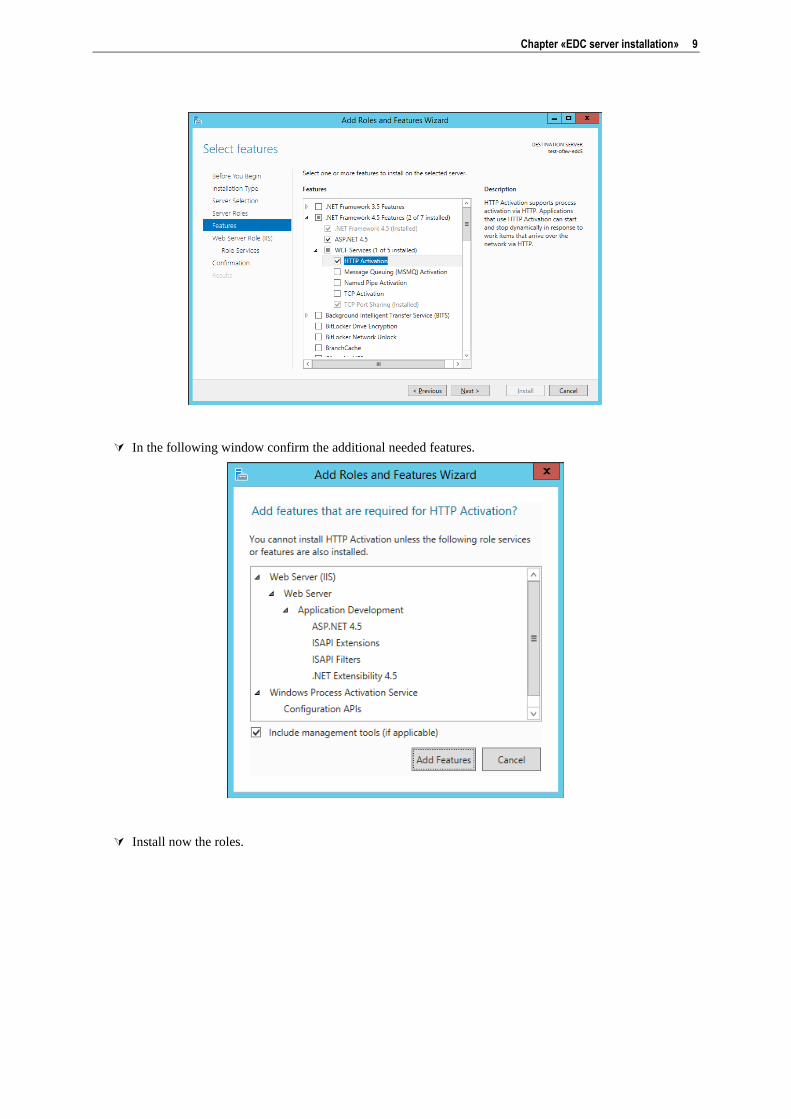
In the following window confirm the additional needed features.
Install now the roles.
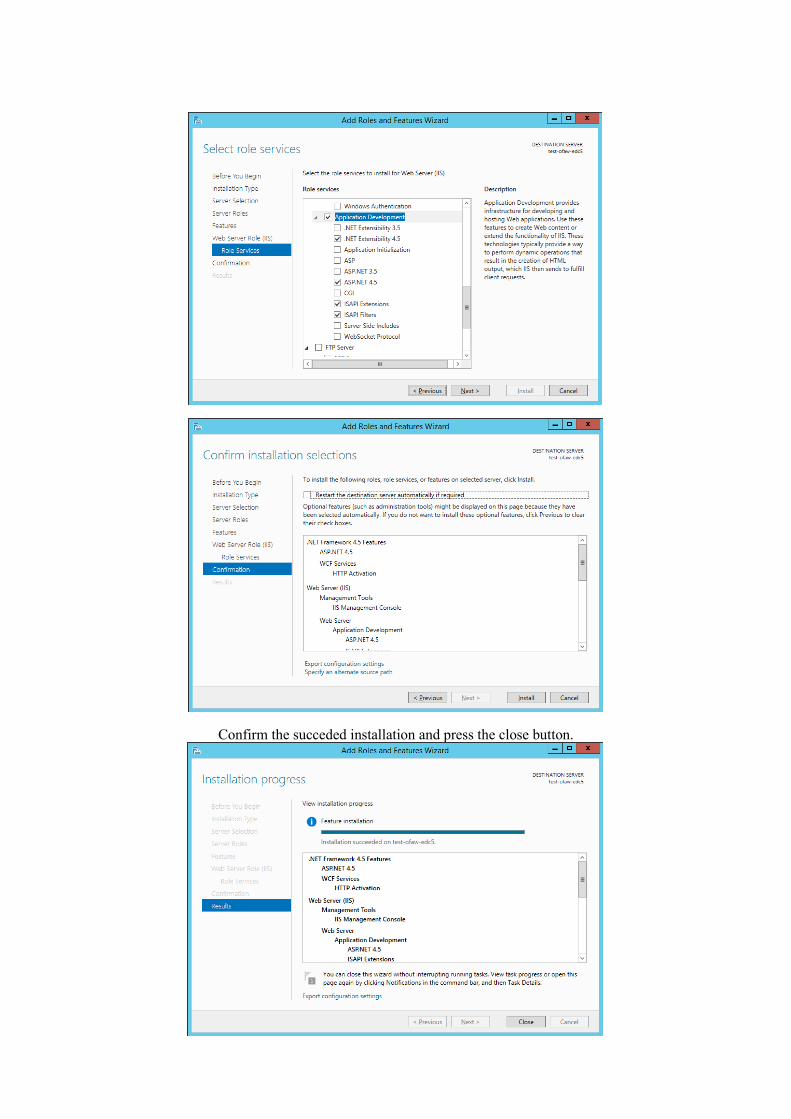
Confirm the succeded installation and press the close button.

Chapter «EDC server installation» 11
EDC Server installation
Important: Uninstall any previous versions of officeatwork EDC Server before installing the newest version.
➢ To install the EDC Server, follow these steps:
Copy the «officeatwork EDC Server Installer.exe» to the local disk of the Microsoft Windows server.
Run the «officeatwork EDC Server Installer.exe» as administrator on local disk.
The installer supports a number of command line parameters for further configuration. See the next chapter for
further information.
The officeatwork EDC server installation starts.
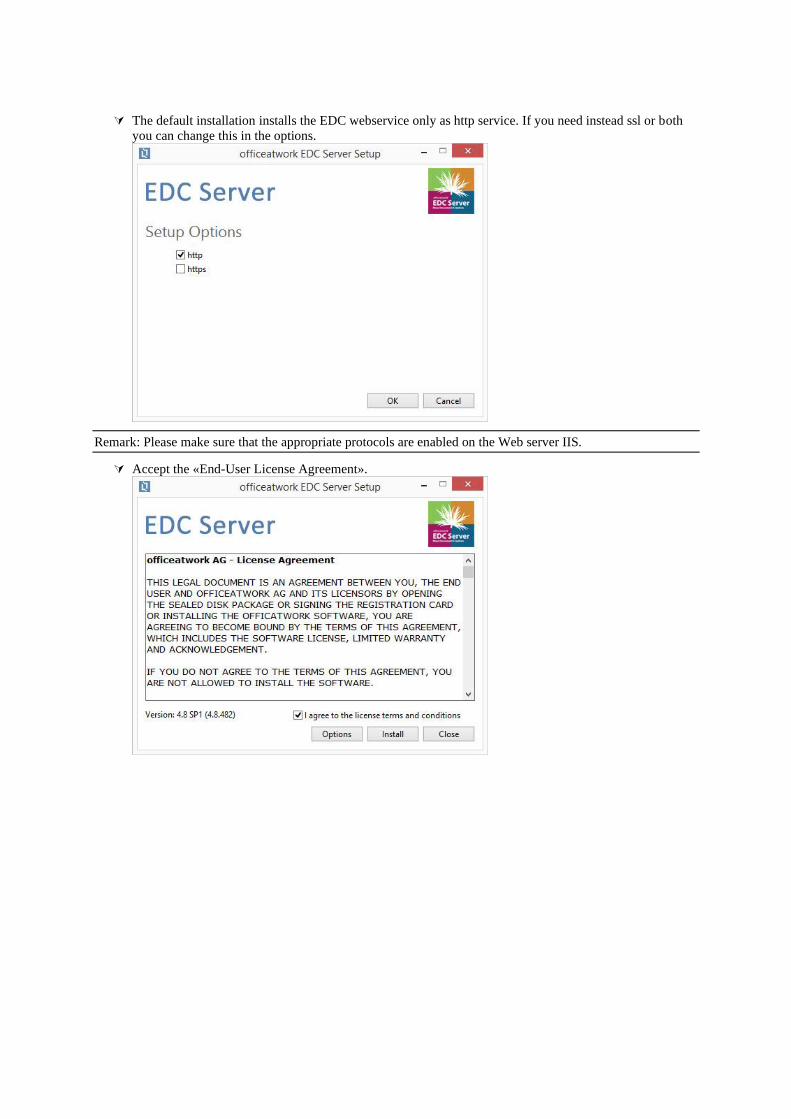
The default installation installs the EDC webservice only as http service. If you need instead ssl or both
you can change this in the options.
Remark: Please make sure that the appropriate protocols are enabled on the Web server IIS.
Accept the «End-User License Agreement».

Chapter «EDC server installation» 13
If you haven’t already installed the prerequsites like Microsoft .Net Framework, they will be installed
now.
Finish the installation.
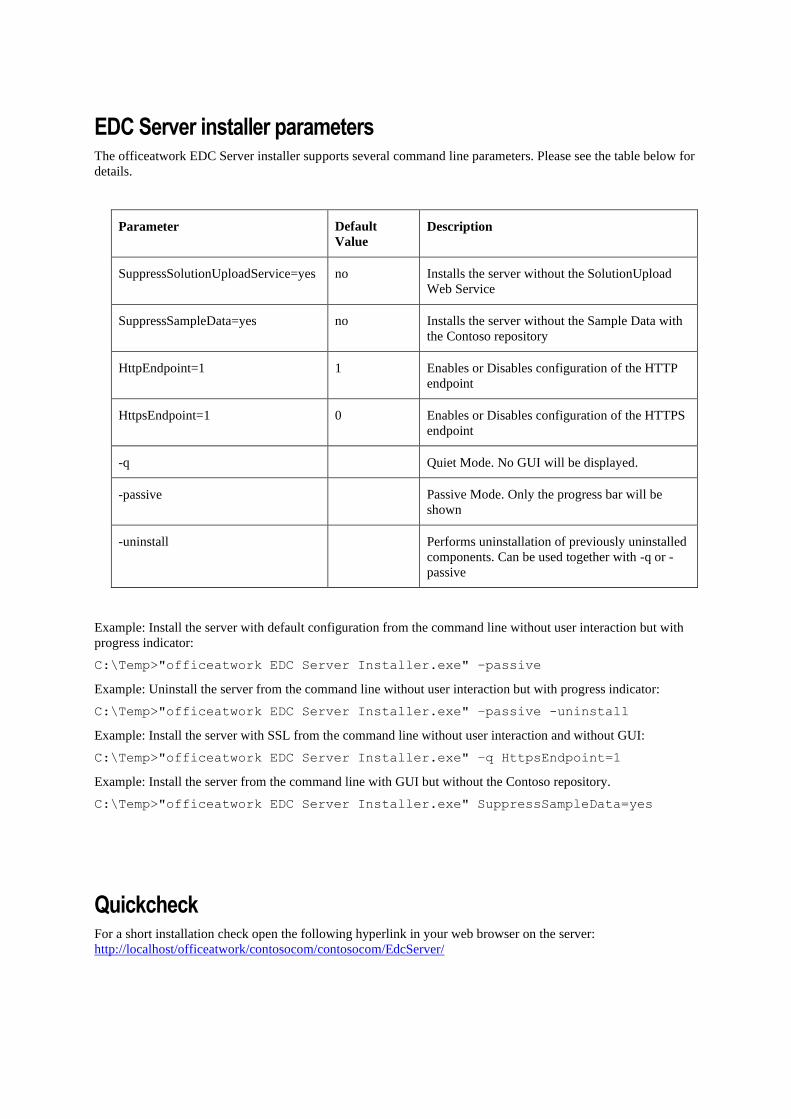
EDC Server installer parameters The officeatwork EDC Server installer supports several command line parameters. Please see the table below for
details.
Parameter Default
Value
Description
SuppressSolutionUploadService=yes no Installs the server without the SolutionUpload
Web Service
SuppressSampleData=yes no Installs the server without the Sample Data with
the Contoso repository
HttpEndpoint=1 1 Enables or Disables configuration of the HTTP
endpoint
HttpsEndpoint=1 0 Enables or Disables configuration of the HTTPS
endpoint
-q Quiet Mode. No GUI will be displayed.
-passive Passive Mode. Only the progress bar will be
shown
-uninstall Performs uninstallation of previously uninstalled
components. Can be used together with -q or -
passive
Example: Install the server with default configuration from the command line without user interaction but with
progress indicator:
C:\Temp>"officeatwork EDC Server Installer.exe" –passive
Example: Uninstall the server from the command line without user interaction but with progress indicator:
C:\Temp>"officeatwork EDC Server Installer.exe" –passive -uninstall
Example: Install the server with SSL from the command line without user interaction and without GUI:
C:\Temp>"officeatwork EDC Server Installer.exe" –q HttpsEndpoint=1
Example: Install the server from the command line with GUI but without the Contoso repository.
C:\Temp>"officeatwork EDC Server Installer.exe" SuppressSampleData=yes
Quickcheck For a short installation check open the following hyperlink in your web browser on the server:
http://localhost/officeatwork/contosocom/contosocom/EdcServer/
Chapter «EDC server installation» 15
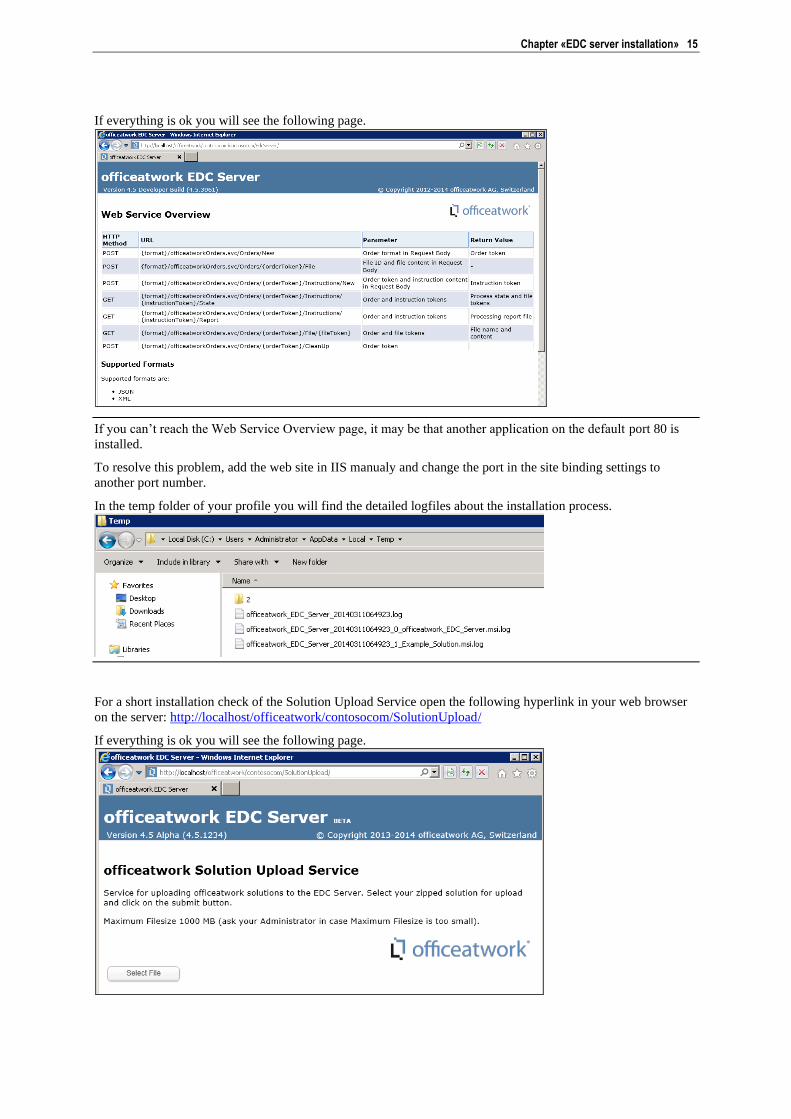
If everything is ok you will see the following page.
If you can’t reach the Web Service Overview page, it may be that another application on the default port 80 is
installed.
To resolve this problem, add the web site in IIS manualy and change the port in the site binding settings to
another port number.
In the temp folder of your profile you will find the detailed logfiles about the installation process.
For a short installation check of the Solution Upload Service open the following hyperlink in your web browser
on the server: http://localhost/officeatwork/contosocom/SolutionUpload/
If everything is ok you will see the following page.

C H A P T E R 2
Deploy officeatwork solution
The following chapter will help you to deploy and use officeatwork solutions.
The EDC Server is multitenant. If you need more tenants or flavours you can configure them as described in this
chapter.
By default the officeatwork EDC Server will be deployed and configured with an officeatwork repository named
contosocom.
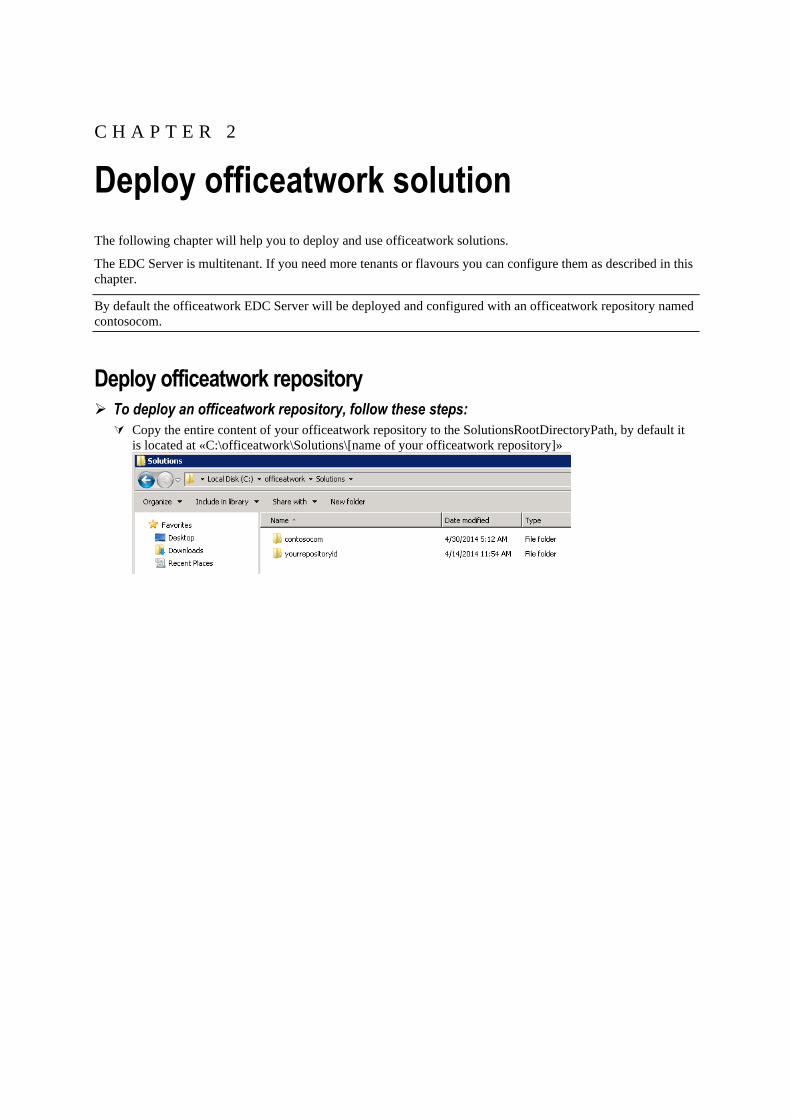
Deploy officeatwork repository ➢ To deploy an officeatwork repository, follow these steps:
Copy the entire content of your officeatwork repository to the SolutionsRootDirectoryPath, by default it
is located at «C:\officeatwork\Solutions\[name of your officeatwork repository]»
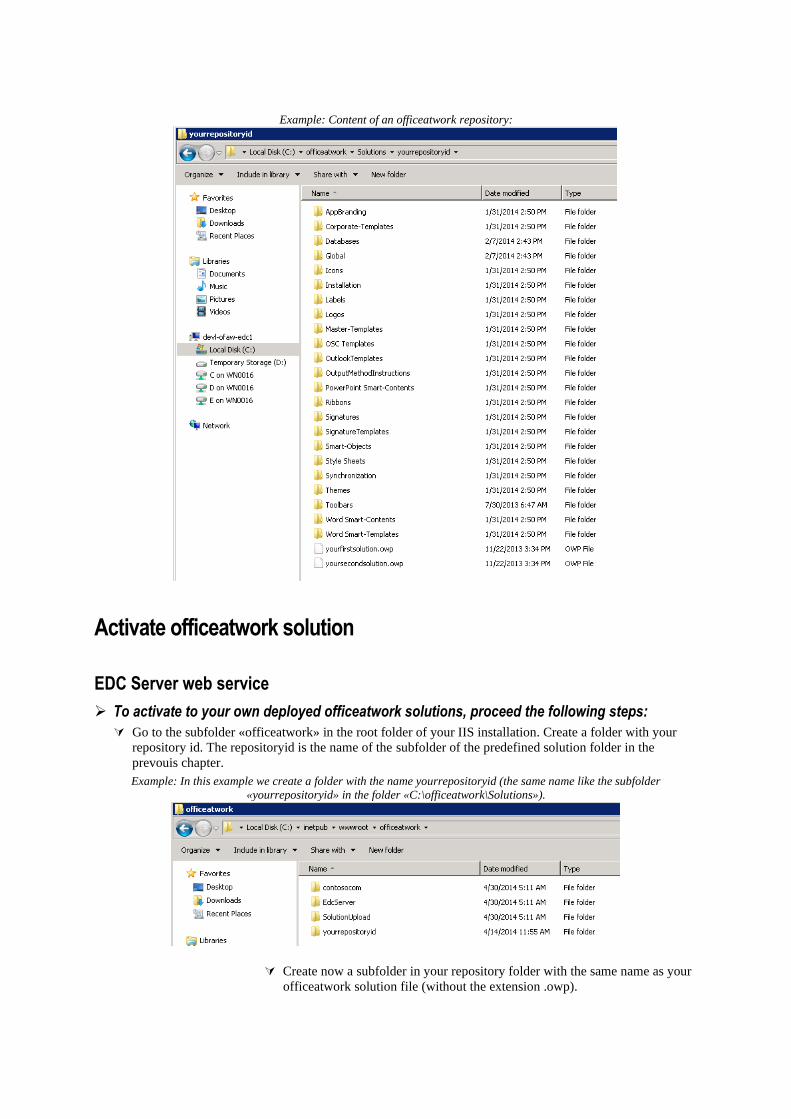
Example: Content of an officeatwork repository:
Activate officeatwork solution
EDC Server web service
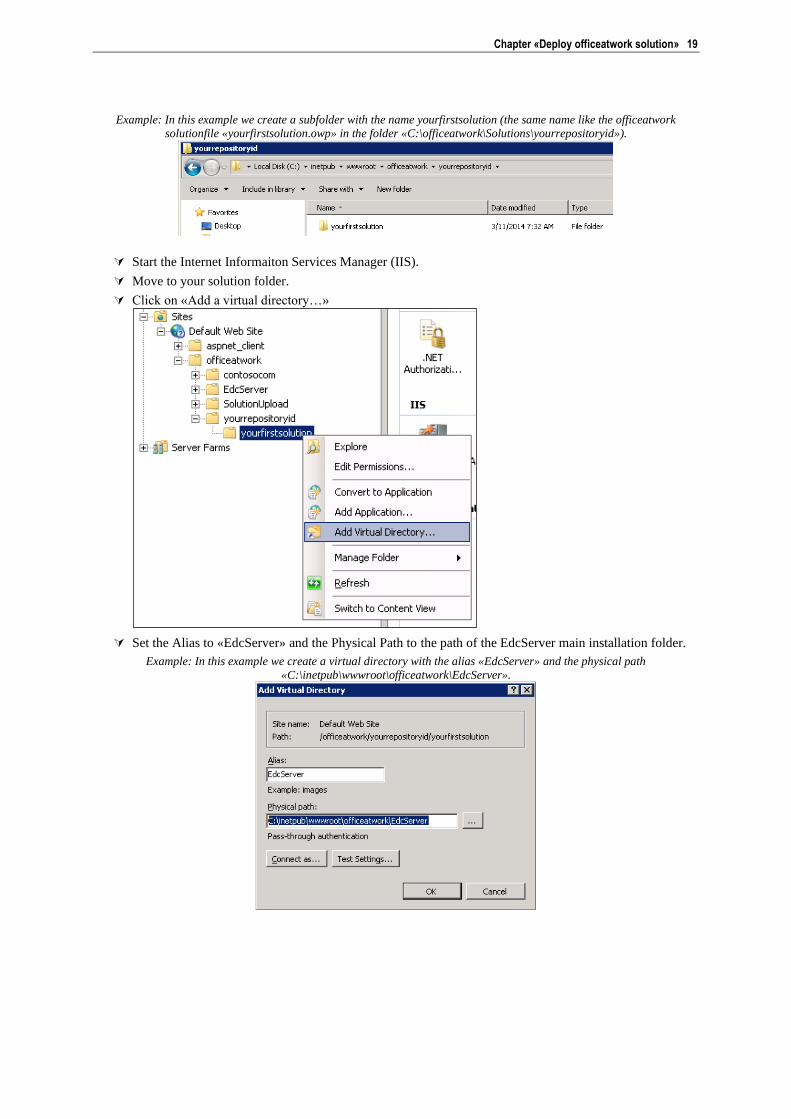
➢ To activate to your own deployed officeatwork solutions, proceed the following steps:
Go to the subfolder «officeatwork» in the root folder of your IIS installation. Create a folder with your
repository id. The repositoryid is the name of the subfolder of the predefined solution folder in the
prevouis chapter.
Example: In this example we create a folder with the name yourrepositoryid (the same name like the subfolder
«yourrepositoryid» in the folder «C:\officeatwork\Solutions»).
Create now a subfolder in your repository folder with the same name as your
officeatwork solution file (without the extension .owp).
Chapter «Deploy officeatwork solution» 19
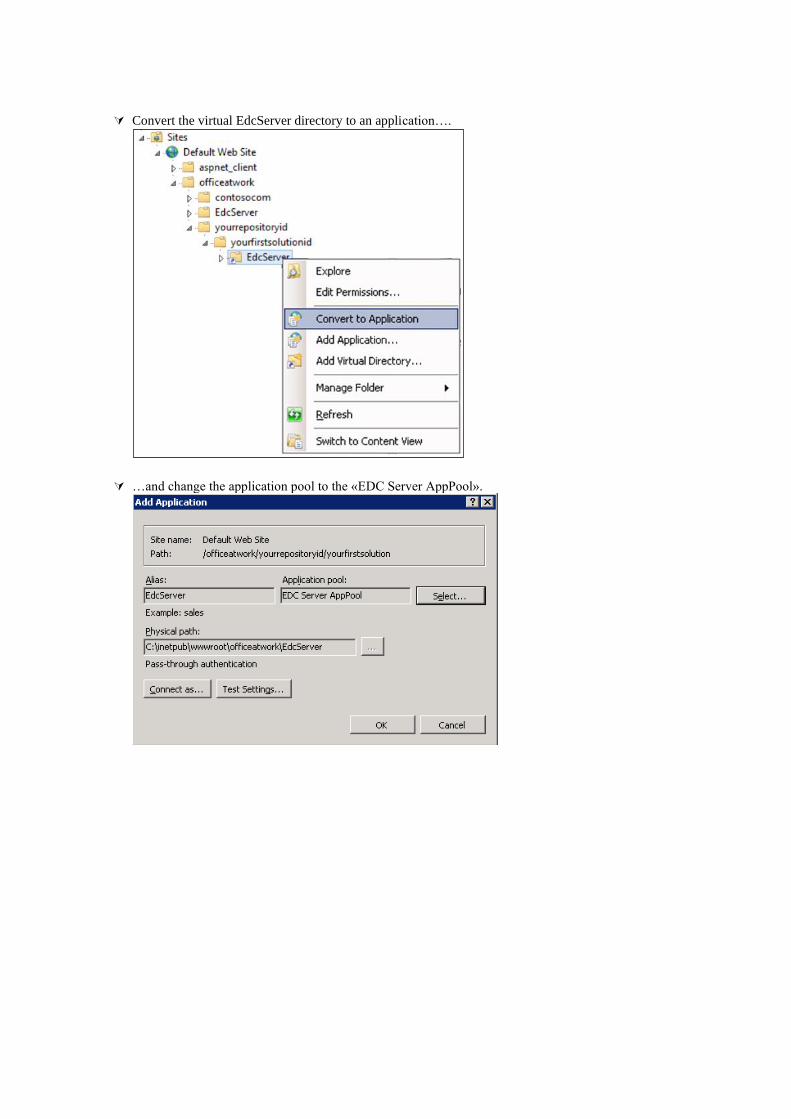
Example: In this example we create a subfolder with the name yourfirstsolution (the same name like the officeatwork
solutionfile «yourfirstsolution.owp» in the folder «C:\officeatwork\Solutions\yourrepositoryid»).
Start the Internet Informaiton Services Manager (IIS).
Move to your solution folder.
Click on «Add a virtual directory…»
Set the Alias to «EdcServer» and the Physical Path to the path of the EdcServer main installation folder.
Example: In this example we create a virtual directory with the alias «EdcServer» and the physical path
«C:\inetpub\wwwroot\officeatwork\EdcServer».
Convert the virtual EdcServer directory to an application….
…and change the application pool to the «EDC Server AppPool».

Chapter «Deploy officeatwork solution» 21
Quickcheck
For a short installation check open the following hyperlink in your web browser on the server:
http://localhost/officeatwork/yourrepositoryid/yourfirstsolution/EdcServer/
If everything is ok you will see the following page.
SolutionUpload web service
➢ To configure the SolutionUpload web service to your own repository, configure the virtual directory:
Start the Internet Informaiton Services Manager (IIS).
Move to your repository folder.
Click on «Add a virtual directory…»
Set the Alias to «SolutionUpload» and the physical path to the path of the SolutionUpload main
installation folder.

Example: In this example we create a virtual directory with the alias «SolutionUpload» and the physical path
«C:\inetpub\wwwroot\officeatwork\SolutionUpload».
Convert the directory to an application….
Chapter «Deploy officeatwork solution» 23
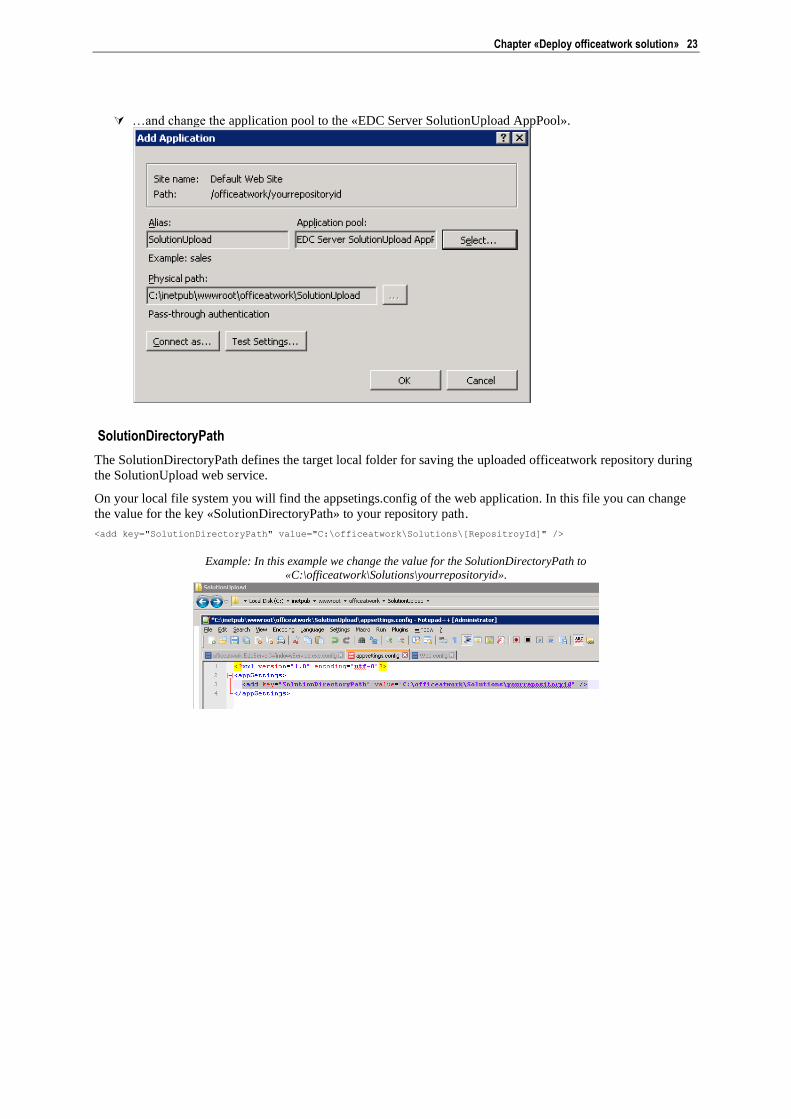
…and change the application pool to the «EDC Server SolutionUpload AppPool».
SolutionDirectoryPath
The SolutionDirectoryPath defines the target local folder for saving the uploaded officeatwork repository during
the SolutionUpload web service.
On your local file system you will find the appsetings.config of the web application. In this file you can change
the value for the key «SolutionDirectoryPath» to your repository path.
<add key="SolutionDirectoryPath" value="C:\officeatwork\Solutions\[RepositroyId]" />
Example: In this example we change the value for the SolutionDirectoryPath to
«C:\officeatwork\Solutions\yourrepositoryid».
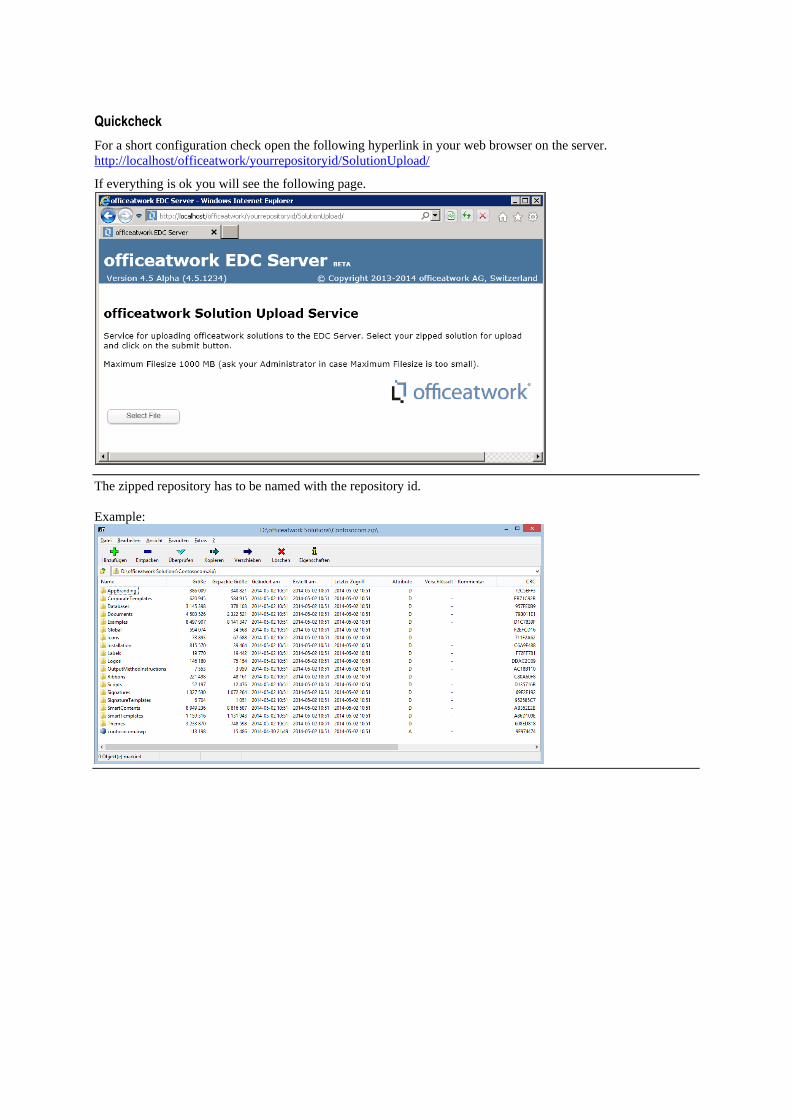
Quickcheck
For a short configuration check open the following hyperlink in your web browser on the server.
http://localhost/officeatwork/yourrepositoryid/SolutionUpload/
If everything is ok you will see the following page.
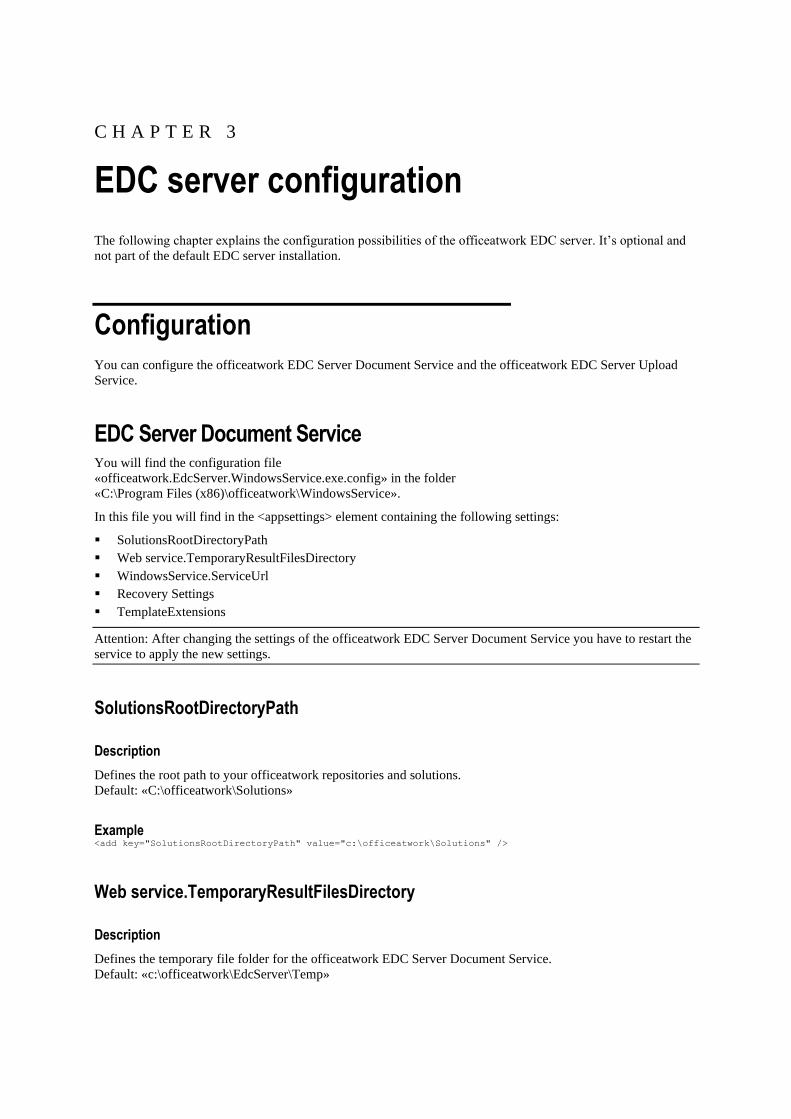
The zipped repository has to be named with the repository id.
Example:
C H A P T E R 3
EDC server configuration
The following chapter explains the configuration possibilities of the officeatwork EDC server. It’s optional and
not part of the default EDC server installation.
Configuration
You can configure the officeatwork EDC Server Document Service and the officeatwork EDC Server Upload
Service.
EDC Server Document Service You will find the configuration file
«officeatwork.EdcServer.WindowsService.exe.config» in the folder
«C:\Program Files (x86)\officeatwork\WindowsService».
In this file you will find in the <appsettings> element containing the following settings:
▪ SolutionsRootDirectoryPath
▪ Web service.TemporaryResultFilesDirectory
▪ WindowsService.ServiceUrl
▪ Recovery Settings
▪ TemplateExtensions
Attention: After changing the settings of the officeatwork EDC Server Document Service you have to restart the
service to apply the new settings.
SolutionsRootDirectoryPath
Description
Defines the root path to your officeatwork repositories and solutions.
Default: «C:\officeatwork\Solutions»
Example <add key="SolutionsRootDirectoryPath" value="c:\officeatwork\Solutions" />
Web service.TemporaryResultFilesDirectory
Description
Defines the temporary file folder for the officeatwork EDC Server Document Service.
Default: «c:\officeatwork\EdcServer\Temp»

Example <add key="Web service.TemporaryResultFilesDirectory" value="c:\officeatwork\EdcServer\Temp" />
Web.config
You will find the «Web.config» files in the folder «C:\inetpub\wwwroot\officeatwork\EdcServer».
Description
The maximum default file size of 28.6 MB for uploads can be expanded by setting the value for the attribute
“maxAllowedContentLength” in the xml element requestLimits.
Example <requestFiltering>
<requestLimits maxAllowedContentLength="2147483648" />
</requestFiltering>
WindowsService.ServiceUrl
Description
Defines the local url for the officeatwork EDC Server Document Service.
Default: «http://localhost:8887/EdcServerWindowsService»
Example <add key="Web service.TemporaryResultFilesDirectory" value=" http://localhost:8887/EdcServerWindowsService"
/>
WindowsService.TemplateExtensions
Description
Defines the file formats which are shown in the templates list.
Default: «.owt|.ows|.docx|.dotx|.docm|.dotm»
Example <add key="WindowsService.TemplateExtensions" value=".owt|.ows|.docx|.dotx|.docm|.dotm" />
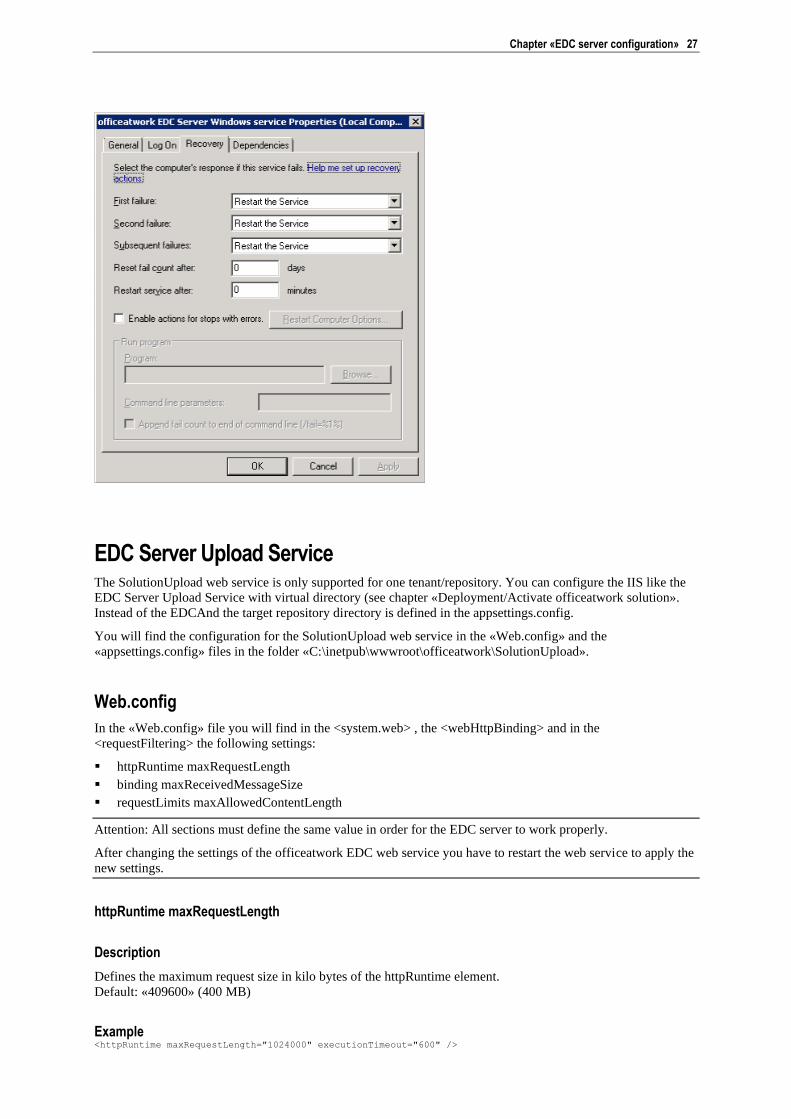
Recovery settings
Description
In the recovery settings of the EDC Server Document Service you can define which action has to be proceed
when the service fails.
The default installation of the EDC Server sets the values (as shown in the following print screen) in order to
achieve an automatic restart of the EDC Server Document Service.
Chapter «EDC server configuration» 27
EDC Server Upload Service The SolutionUpload web service is only supported for one tenant/repository. You can configure the IIS like the
EDC Server Upload Service with virtual directory (see chapter «Deployment/Activate officeatwork solution».
Instead of the EDCAnd the target repository directory is defined in the appsettings.config.
You will find the configuration for the SolutionUpload web service in the «Web.config» and the
«appsettings.config» files in the folder «C:\inetpub\wwwroot\officeatwork\SolutionUpload».
Web.config
In the «Web.config» file you will find in the <system.web> , the <webHttpBinding> and in the
<requestFiltering> the following settings:
▪ httpRuntime maxRequestLength
▪ binding maxReceivedMessageSize
▪ requestLimits maxAllowedContentLength
Attention: All sections must define the same value in order for the EDC server to work properly.
After changing the settings of the officeatwork EDC web service you have to restart the web service to apply the
new settings.
httpRuntime maxRequestLength
Description
Defines the maximum request size in kilo bytes of the httpRuntime element.
Default: «409600» (400 MB)
Example <httpRuntime maxRequestLength="1024000" executionTimeout="600" />
binding maxReceivedMessageSize
Description
Defines the maximum receving message size in bytes of the webHttpBinding element.
Default: «419430400» (400 MB)
Example <binding maxReceivedMessageSize="1048576000" />
requestLimits maxAllowedContentLength
Description
Defines the maximum length of content in a request, in bytes of the request filtering.
Default: «419430400» (400 MB)
Example <requestLimits maxAllowedContentLength ="1048576000" />
Appsetings.config
In the «appsettings.config» file you will find in the key «SolutionDirectoryPath».
SolutionDirectoryPath
Description
The SolutionDirectoryPath defines the path where the uploaded repository will be saved.
By default this path is to the root directory of the Contoso repository.
Example <add key="SolutionDirectoryPath" value="c:\officeatwork\Solutions\contosocom" />
Logging The logging of information is done by NLog (http://nlog-project.org/).
You will find the Logging Config file «NLog.config» in the same directory as the application.
▪ officeatwork Windows-Service
C:\Program Files (x86)\officeatwork\WindowsService\NLog.config
Attention: After changing the settings of the officeatwork EDC web service you have to restart the web service
to apply the new settings.
In the NLog.config file you find the following sections:
▪ <Targets>
▪ <Rules>

Chapter «EDC server configuration» 29
Targets
Description
Targets are used to display, store, or pass log messages to another destination. There are two kinds of target;
those that receive and handle the messages, and those that buffer or route the messages to another target.
Parameters
The description of the most important parameters.
archiveAboveSize Defines the maximum size of a single logfile.
maxArchiveFiles Defines the maximum number of archived logfiles.
fileName Defines the filename (including the path) of the logfile.
Example <target name="file" archiveAboveSize="500000" maxArchiveFiles="2" xsi:type="File"
fileName="${tempdir}officeatwork/officeatwork_net.log" layout="${date:format=yyyy.MM.dd | HH\:mm\:ss} |
${level} | ${logger} | ${message} | ${exception:format=tostring}" />
Rules
Description
Rules are used to display, store, or pass log messages to another destination. There are two kinds of target; those
that receive and handle the messages, and those that buffer or route the messages to another target.
Parameters
The description of the most important parameters.
minlevel Defines the logging level.
Possible values:
Trace - very detailed logs, which may include high-volume information such as
protocol payloads. This log level is typically only enabled during development
Debug - debugging information, less detailed than trace, typically not enabled in
production environment.
Info - information messages, which are normally enabled in production environment
Warn - warning messages, typically for non-critical issues, which can be recovered
or which are temporary failures
Error - error messages
Fatal - very serious errors
Default: Info
Example <logger name="*" minlevel="Info" writeTo="file" />

C H A P T E R 4
Support
Get access to a wide range of support resources on officeatwork Connect (connect.officeatwork.com) such as:
▪ Knowledge Base
▪ Q & A
▪ Download Center
▪ Installers
▪ Manuals
▪ Video guides
▪ Forum
▪ Glossary
▪ etc.
To access officeatwork Connect you need to register your Microsoft-Account at www.officeatwork.com →
Connect
All support options and resources can be found on the website www.officeatwork.com → Support
More services offered by officeatwork such as Education and Consulting can be found on the website
www.officeatwork.com → Services

Index
—C—
Configuration, 25
EDC Server Document Service, 25 Recovery settings, 26
SolutionsRootDirectoryPath, 25
Web service.TemporaryResultFilesDirectory,
25
Web.config, 26
WindowsService.ServiceUrl, 26
EDC Server Upload Service Web.config
binding maxReceivedMessageSize, 28
EDC Server Upload Service, 27 Web.config, 27
httpRuntime maxRequestLength, 27
EDC Server Upload Service Web.config
requestLimits
maxAllowedContentLength, 28
EDC Server Upload Service Appsettings.config, 28
EDC Server Upload Service Appsettings.config
SolutionDirectoryPath, 28
Logging, 28 Rules, 29
Targets, 29
—D—
Deploy officeatwork solution, 17
Deployment
Activate officeatwork solution, 18 EDC Server web service, 18
Quickcheck, 21 SolutionUpload web service, 21
Configure the virtual directory, 21
Quickcheck, 24
SolutionDirectoryPath, 23
Deploy officeatwork repository, 17
—E—
EDC server configuration, 25
EDC server installation, 7
—I—
Installation, 7
EDC server installation, 14
EDC Server installation, 11
Installation requirements, 7
Quickcheck, 14
Web server installation, 7 Windows 2012/2016, 7
—T—
Typographic codes & conventions, 5


officeatwork AG
Bundesplatz 12
6300 Zug, Switzerland
T +41 41 544 7100
www.officeatwork.com


![[May2012] edc](https://static.fdocuments.us/doc/165x107/55cf881955034664618d5a8b/may2012-edc.jpg)