Guided Practice 9A Navigating the Deduction Report Editor
48
For additional information and troubleshooting, please contact your district’s assigned ESU Representative or [email protected] © 2017 Massachusetts Teachers’ Retirement System Guided Practice 9A Navigating the Deduction Report Editor April 24, 2017 In this guided practice you will learn how to: Run and export the exception report Sort the deduction report Use the tool bar functions Add a comment to the report Run the error summary report Submit the deduction report This guided practice assumes you already know how to: Log in to MyTRS Import the monthly deduction report text file
Transcript of Guided Practice 9A Navigating the Deduction Report Editor

For additional information and troubleshooting, please contact your district’s assigned ESU Representative or [email protected]
© 2017 Massachusetts Teachers’ Retirement System
Guided Practice 9A
Navigating the Deduction Report Editor April 24, 2017
In this guided practice you will learn how to:
Run and export the exception report
Sort the deduction report
Use the tool bar functions
Add a comment to the report
Run the error summary report
Submit the deduction report
This guided practice assumes you already know how to:
Log in to MyTRS
Import the monthly deduction report text file

Guided Practice 9A: Navigating the Deduction Report Editor (04/24/2017) 2
Run the Exception Report
The exception report lists members whose records are showing errors or exceptions within the deduction report.
1. Log in to MyTRS.
2. Select “Deduction Reports and Payments” from the home page or from the “Go To”
drop down list at the top of the page.
3. Select the report you need to work on. The Reporting Period field tells you the month and year of the deductions.
4. Click the Edit Deduction Report button to open the deduction report.
2
3
4

Guided Practice 9A: Navigating the Deduction Report Editor (04/24/2017) 3
5. Click the Apply button once the deduction report opens.
6. Click the Except Report button.
The exception report will open in a separate window.
7. To print the exception report, click the Printer icon in the top right corner.
5
6
7
Guided Practice 9A: Navigating the Deduction Report Editor (04/24/2017) 4
8. To export the exception report, click the Export link in the top right corner.
9. The exception report can be exported to PDF, Excel, or CSV (Comma Separated Value). Choose your preferred format and follow the prompts to complete the
export process. MTRS recommends exporting to a CSV file as that will then open in
Excel.
10. Once the data has been exported click Close in the top right of the screen.
8
8
9
10

Guided Practice 9A: Navigating the Deduction Report Editor (04/24/2017) 5
Sort the Deduction Report
The deduction report can be sorted by any of the column labels, but we recommend sorting it by the “Name” field.
1. To sort the report by one of the column headers simply click on the actual text of the
label. In this case, click on “Name.”
a. A green triangle will be displayed indicating that the report is sorted by the column selected.
b. To sort the report in reverse order, simply click the column label again.
2. To sort the report by one of the other fields, click on the column label of the field of your choice. In this example, we chose to sort by SSN.
1
1a
1b
2

Guided Practice 9A: Navigating the Deduction Report Editor (04/24/2017) 6
The Toolbar: Add / Delete / Copy a Record
The toolbar within the Deduction Report Editor consists of buttons that allow you to do a multitude of functions:
Add a record
Delete a record
Copy a record
Filter for a member or group of members
Modify data for a group of members
Rearrange or hide columns
View one row of data without scrolling
Change the number of records displayed per page
Print the deduction report
Export the deduction report
Add a Record
It is rare that you would need to add a record to the deduction report manually, but it is sometimes necessary if a member was not included in the text file from your payroll system.
Before adding a record to a deduction report, please be sure that you do not have the report filtered by a single member. You should see a full page of members before starting this process.
1. Click the Add button in the toolbar.
2. In the blank row that appears, enter the member’s SSN (without the dashes) and then hit Enter on your keyboard.
1
2
Guided Practice 9A: Navigating the Deduction Report Editor (04/24/2017) 7
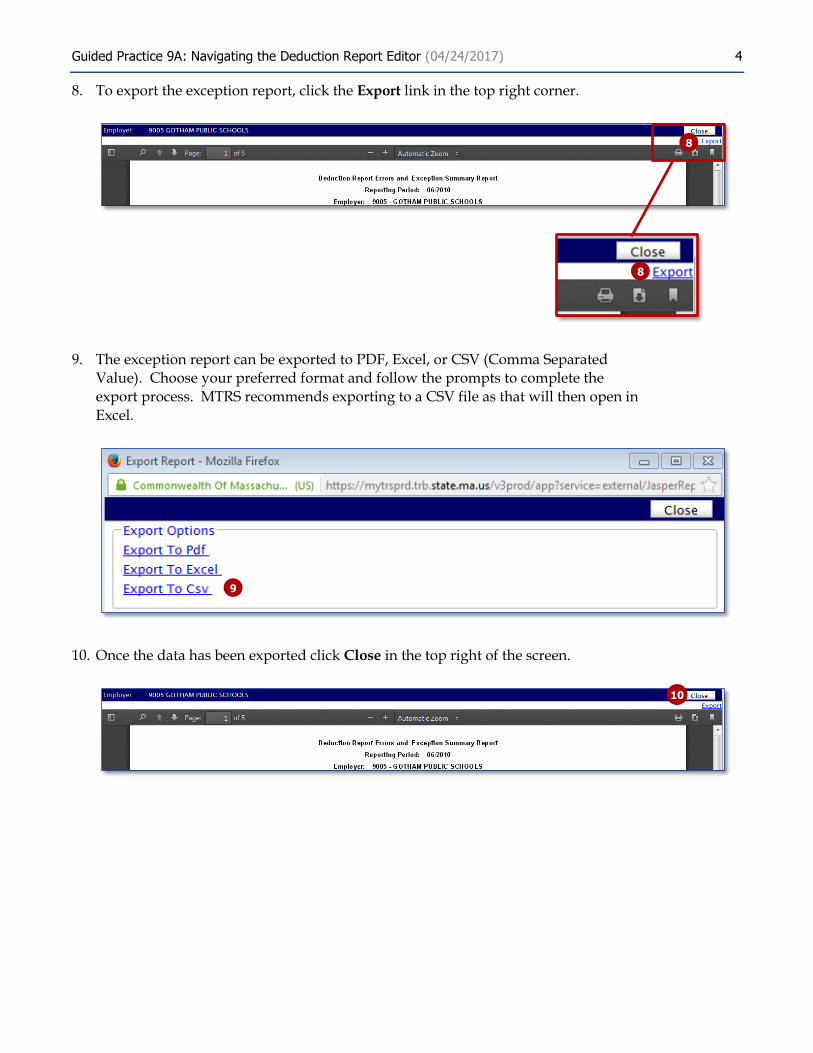
3. The member’s name should populate in the “Name” field.
If the name is not displayed after hitting the Enter key, please click the Apply button in the top right of the screen. Do not proceed until the member’s name is populated in the “Name” field.
4. You do not need to type in the Reported Last Name, Reported First Name, Reported Middle Name or the Reported Suffix fields, unless there is a reported name change.
5. Leave the “Rec Type” field set to “Normal” unless you are creating an Adjustment or Retro record.
6. Enter the appropriate pay date for the record in the “Pay Date” field.
7. The “Period Date” field should auto-populate with the appropriate value (you will need to change this if you are creating an adjustment record).
The Period Date should always be the first day of the month and year you are working on.
3
4
6
7
5

Guided Practice 9A: Navigating the Deduction Report Editor (04/24/2017) 8
8. Do not enter any data in the “Rate” field. It will auto-populate when you click the Apply button at the end of this process.
9. Enter the regular deduction that was taken from the member’s paycheck in the “Regular Deduction” field.
10. If applicable, enter the 2% deduction taken from the member’s paycheck in the “2% Deduction” field.
11. The “Installment” field should be left blank.
12. If applicable, select the appropriate code from the “Service Correct Code” drop down list.
13. Enter the gross eligible earnings the member was paid in the “Base” earnings field.
8
9
12
13
10
11
Guided Practice 9A: Navigating the Deduction Report Editor (04/24/2017) 9
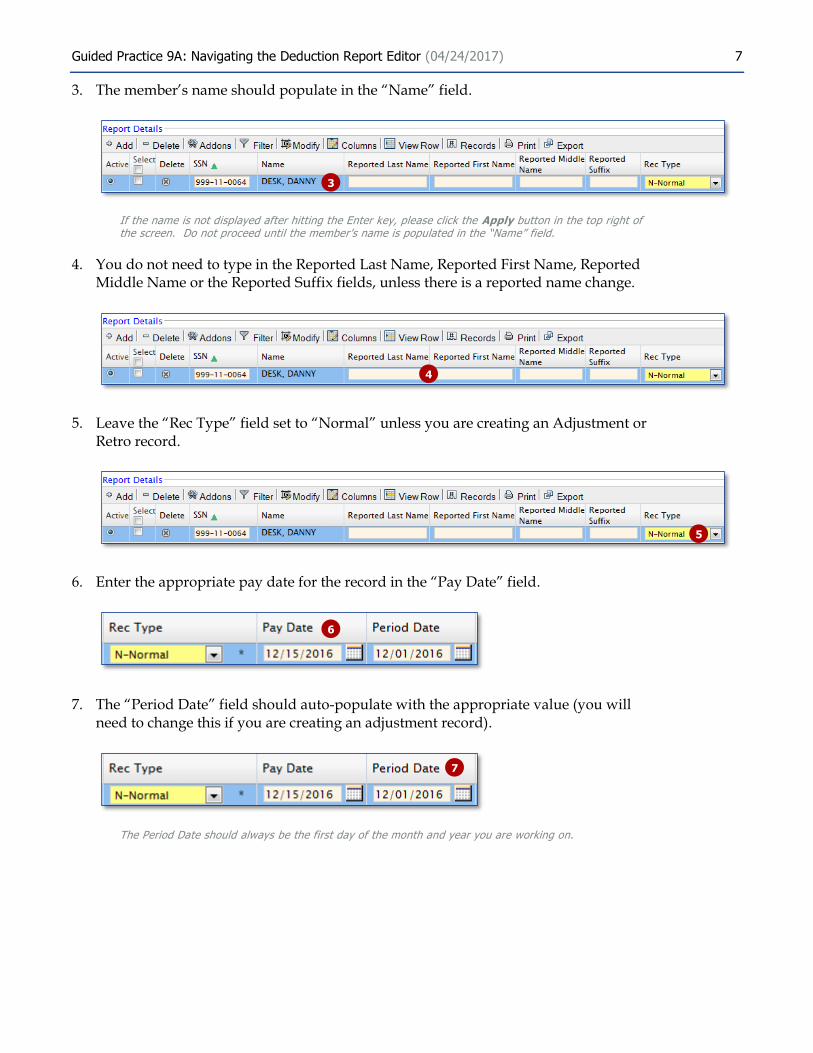
14. If applicable, enter any pay the member received for athletic coaching in the “Coach” earnings field. If the member was not paid for coaching, enter “0.”
15. If applicable, enter any retro pay the member received in the “Retro” earnings field. If the member did not receive any retro earnings, enter “0.”
16. If applicable, enter any eligible longevity payment the member received in the “Long” earnings field. If the member did not receive any longevity earnings, enter
“0.”
17. If applicable, enter any eligible stipend payments the member received in the
“Stipend” earnings field. If the member did not receive any longevity earnings,
please enter “0”.
18. Enter “0” in the “Premium” field.
14
15
16
17
18
Guided Practice 9A: Navigating the Deduction Report Editor (04/24/2017) 10
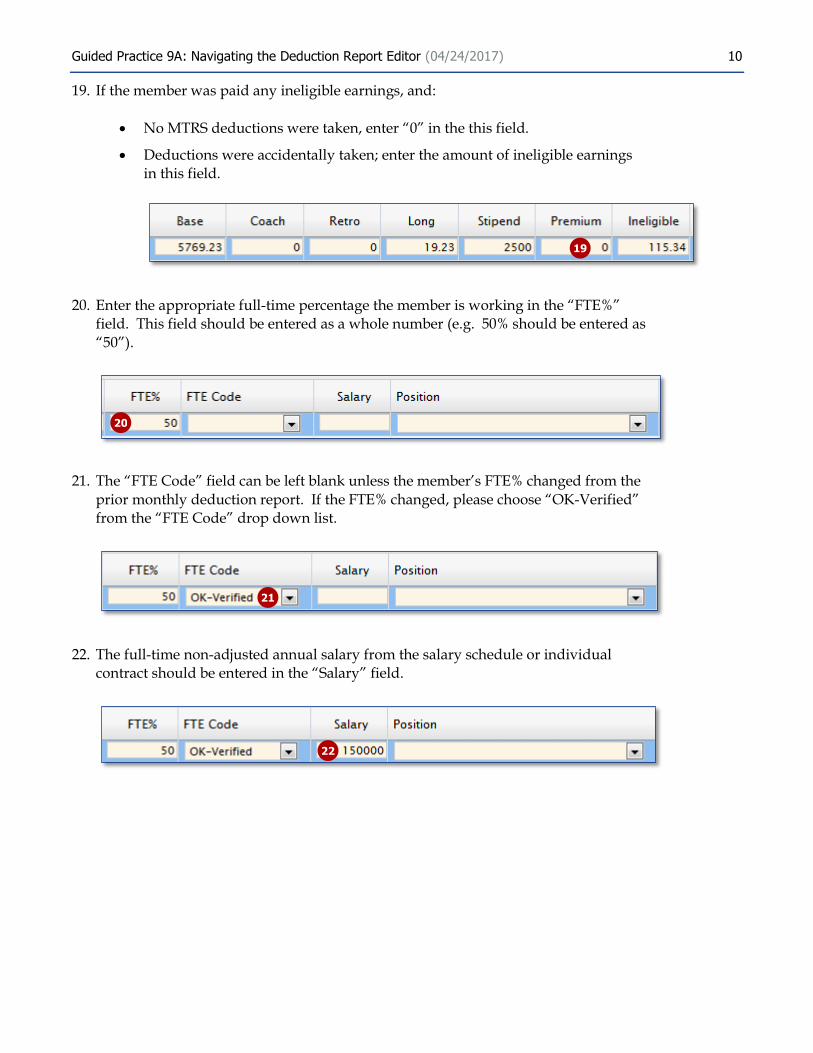
19. If the member was paid any ineligible earnings, and:
No MTRS deductions were taken, enter “0” in the this field.
Deductions were accidentally taken; enter the amount of ineligible earnings in this field.
20. Enter the appropriate full-time percentage the member is working in the “FTE%” field. This field should be entered as a whole number (e.g. 50% should be entered as
“50”).
21. The “FTE Code” field can be left blank unless the member’s FTE% changed from the
prior monthly deduction report. If the FTE% changed, please choose “OK-Verified” from the “FTE Code” drop down list.
22. The full-time non-adjusted annual salary from the salary schedule or individual contract should be entered in the “Salary” field.
19
20
21
22
Guided Practice 9A: Navigating the Deduction Report Editor (04/24/2017) 11
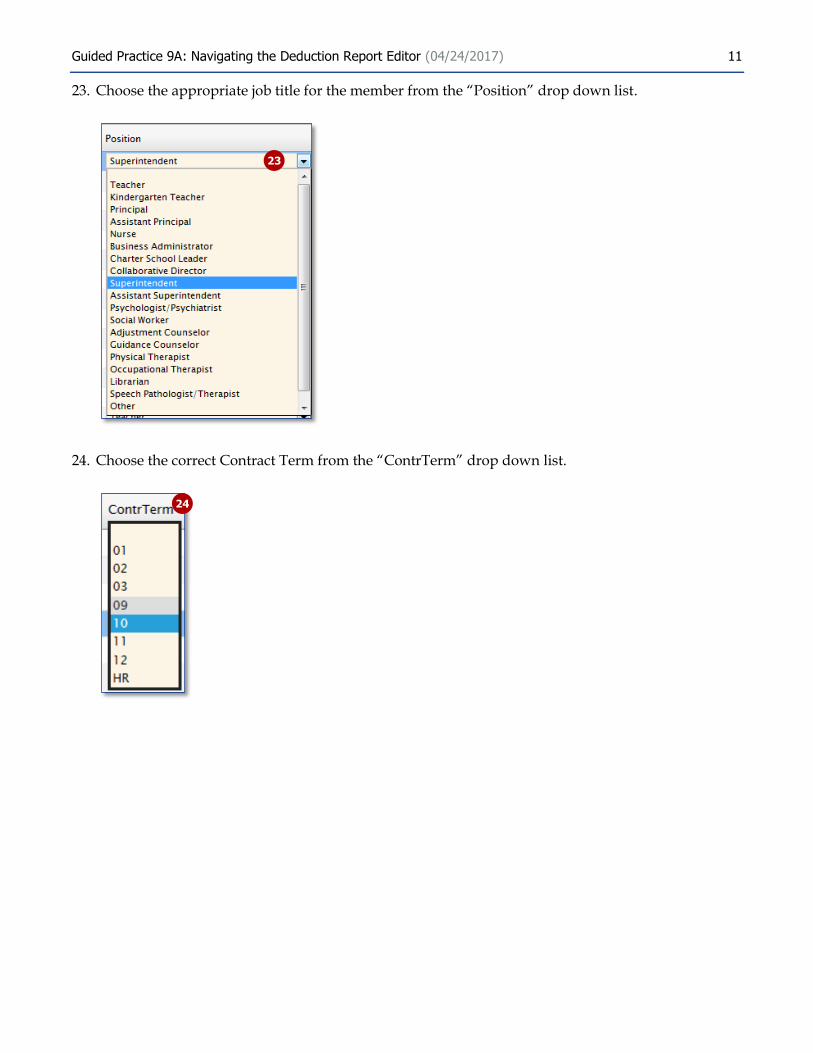
23. Choose the appropriate job title for the member from the “Position” drop down list.
24. Choose the correct Contract Term from the “ContrTerm” drop down list.
24
23

Guided Practice 9A: Navigating the Deduction Report Editor (04/24/2017) 12
25. Choose the correct Pay Frequency from the “Pay Freq” drop down list.
26. Choose the correct Pay Duration from the “Pay Dur” drop down list.
25
26
Guided Practice 9A: Navigating the Deduction Report Editor (04/24/2017) 13
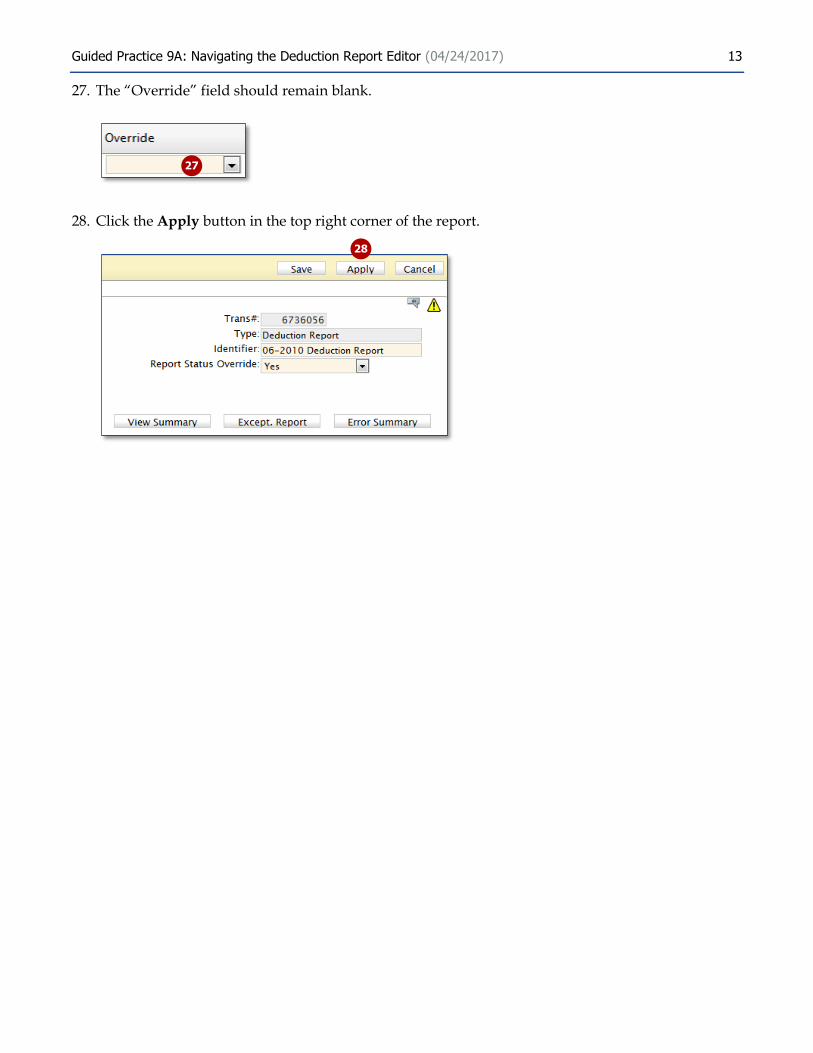
27. The “Override” field should remain blank.
28. Click the Apply button in the top right corner of the report.
28
27
28
Guided Practice 9A: Navigating the Deduction Report Editor (04/24/2017) 14
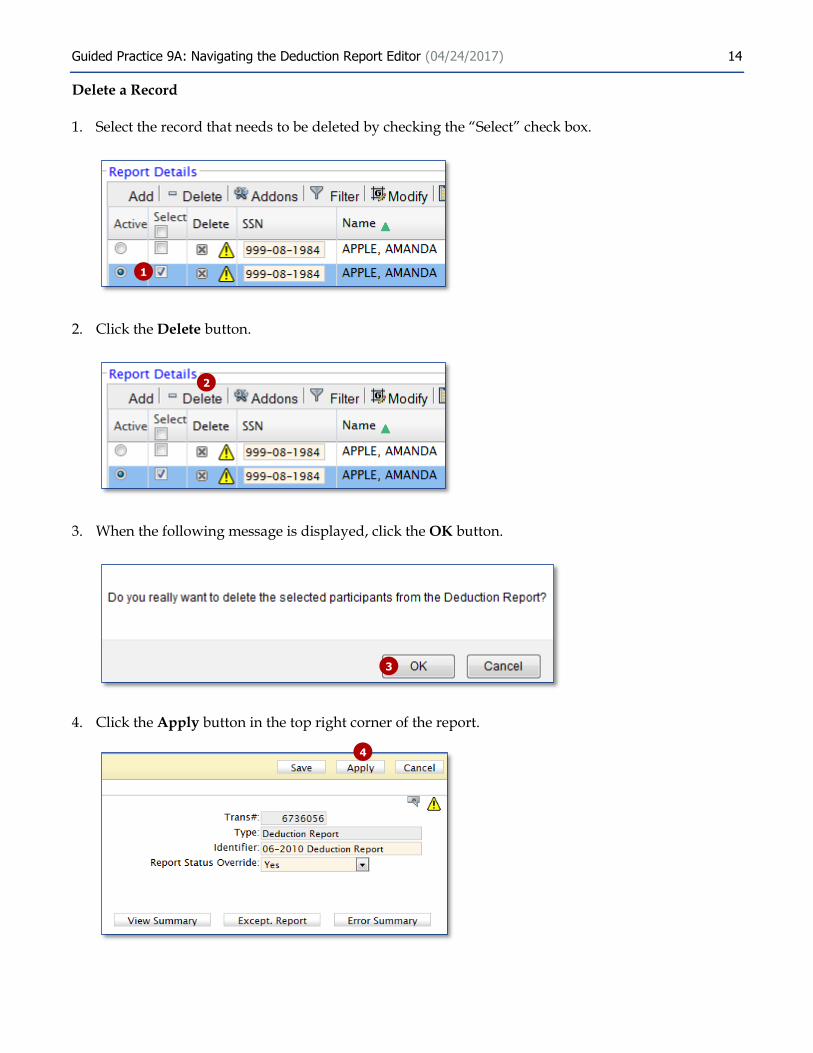
Delete a Record
1. Select the record that needs to be deleted by checking the “Select” check box.
2. Click the Delete button.
3. When the following message is displayed, click the OK button.
4. Click the Apply button in the top right corner of the report.
1
2
3
4

Guided Practice 9A: Navigating the Deduction Report Editor (04/24/2017) 15
Copy a Record
The Copy button is most often used when you need to create an adjustment record, but it can also be used when you have to manually add more than one record for a member. You can create the first record from scratch and then use the Copy button to create the second and third records as needed (you will need to change the Pay Date on the additional records).
1. Select the record you want to copy by checking the “Select” check box.
2. Click the Addons button.
3. Click the Copy button.
This will create an exact copy of the record you selected. You will then need to update some of the fields on the new record (e.g., Pay Date and possibly the earnings and deductions)
4. Click the Apply button in the top right corner of the report.
1
2
3
4

Guided Practice 9A: Navigating the Deduction Report Editor (04/24/2017) 16
The Filter
The Filter button allows you to search the deduction report based any of the offered fields or combination of the fields.
1. Click the Filter button.
2. Enter your search criteria in the yellow search row. In this example, we’re searching the report for a member whose name contains “biology.”
3. Click the Wheel icon next to the Filter button.
4. This will return all of the records that contain the text you entered in the filter row.
1
2
3
4

Guided Practice 9A: Navigating the Deduction Report Editor (04/24/2017) 17
5. To clear the filter and return to the entire list of employees or to filter by new criteria:
a. Click the Eraser icon.
b. Click the Wheel icon.
6. To search based on multiple criteria; enter the criteria you are looking for in the yellow filter line. In this example, we are looking for all the records with a Rec Type = “Normal” with a Pay Date = “12/08/2016.”
7. Click the Wheel icon.
5b
5a
6
6
7
Guided Practice 9A: Navigating the Deduction Report Editor (04/24/2017) 18
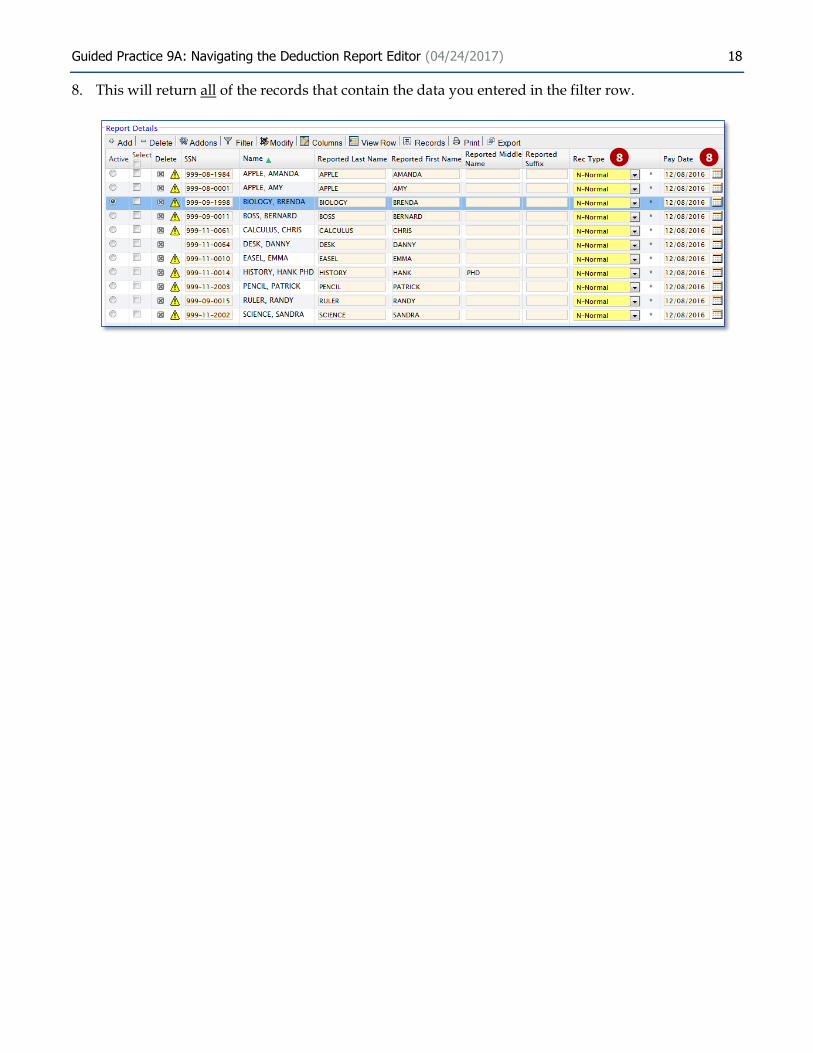
8. This will return all of the records that contain the data you entered in the filter row.
8
8
Guided Practice 9A: Navigating the Deduction Report Editor (04/24/2017) 19
Modify a Group of Records
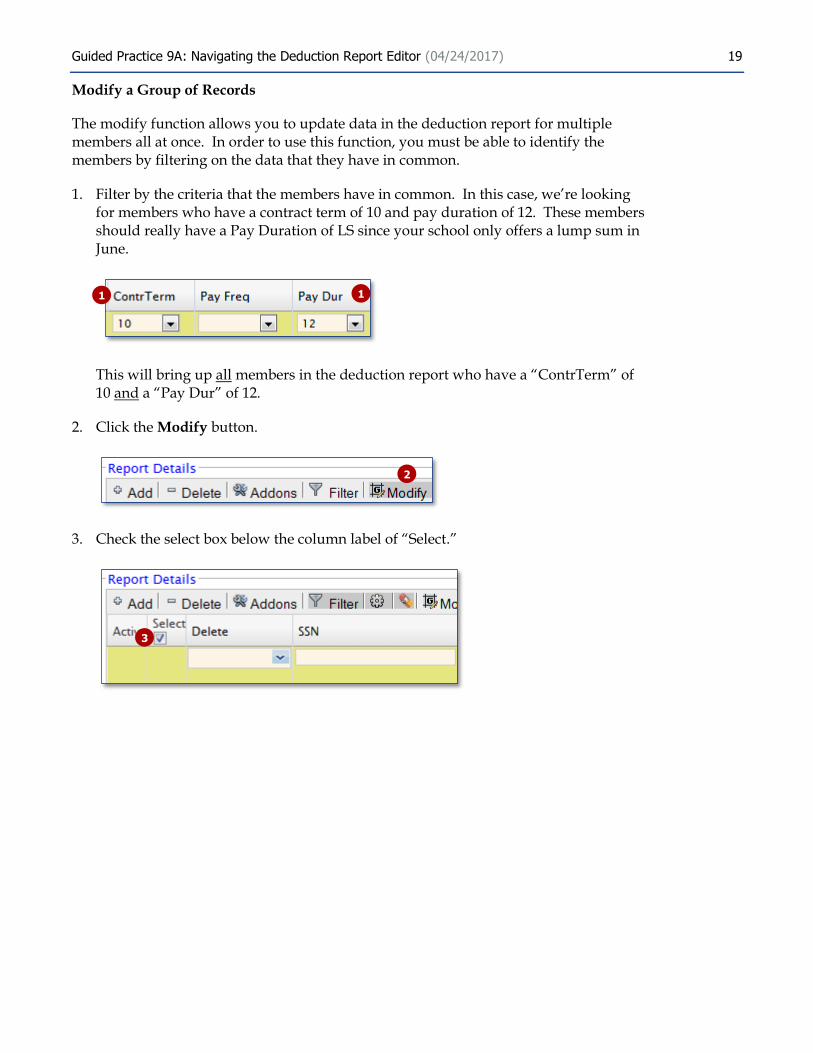
The modify function allows you to update data in the deduction report for multiple members all at once. In order to use this function, you must be able to identify the members by filtering on the data that they have in common.
1. Filter by the criteria that the members have in common. In this case, we’re looking for members who have a contract term of 10 and pay duration of 12. These members should really have a Pay Duration of LS since your school only offers a lump sum in June.
This will bring up all members in the deduction report who have a “ContrTerm” of 10 and a “Pay Dur” of 12.
2. Click the Modify button.
3. Check the select box below the column label of “Select.”
1
2
3
1
Guided Practice 9A: Navigating the Deduction Report Editor (04/24/2017) 20
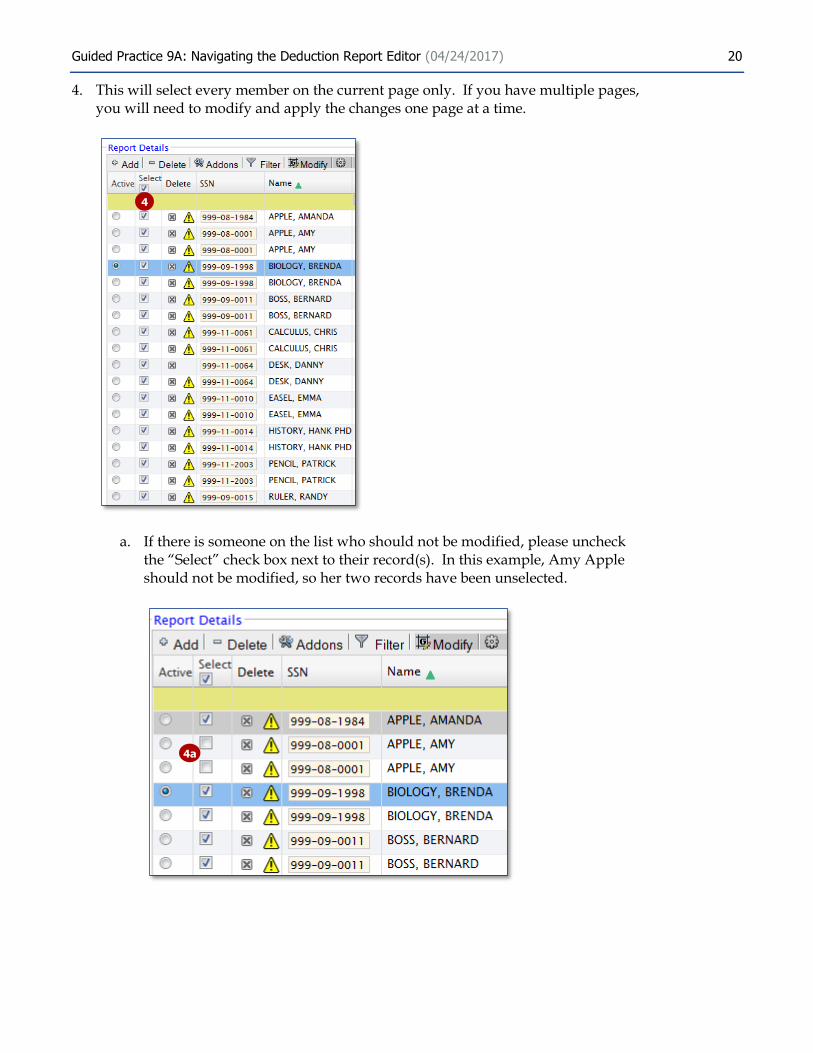
4. This will select every member on the current page only. If you have multiple pages, you will need to modify and apply the changes one page at a time.
a. If there is someone on the list who should not be modified, please uncheck the “Select” check box next to their record(s). In this example, Amy Apple should not be modified, so her two records have been unselected.
4
4a

Guided Practice 9A: Navigating the Deduction Report Editor (04/24/2017) 21
5. Go to the field that needs to be updated. In this example, we are updating the “Pay Dur” field.
a. Check the box to the LEFT of the field you are modifying.
b. Enter the value that you would like to change the field to. In this example, we are changing the Pay Duration field to “LS” for lump sum.
6. Click the Wheel icon.
7. Click OK when the following message is displayed: “This action will modify the
selected Records with the specified values. Do you want to continue?”.
5a
5b
6
7
Guided Practice 9A: Navigating the Deduction Report Editor (04/24/2017) 22
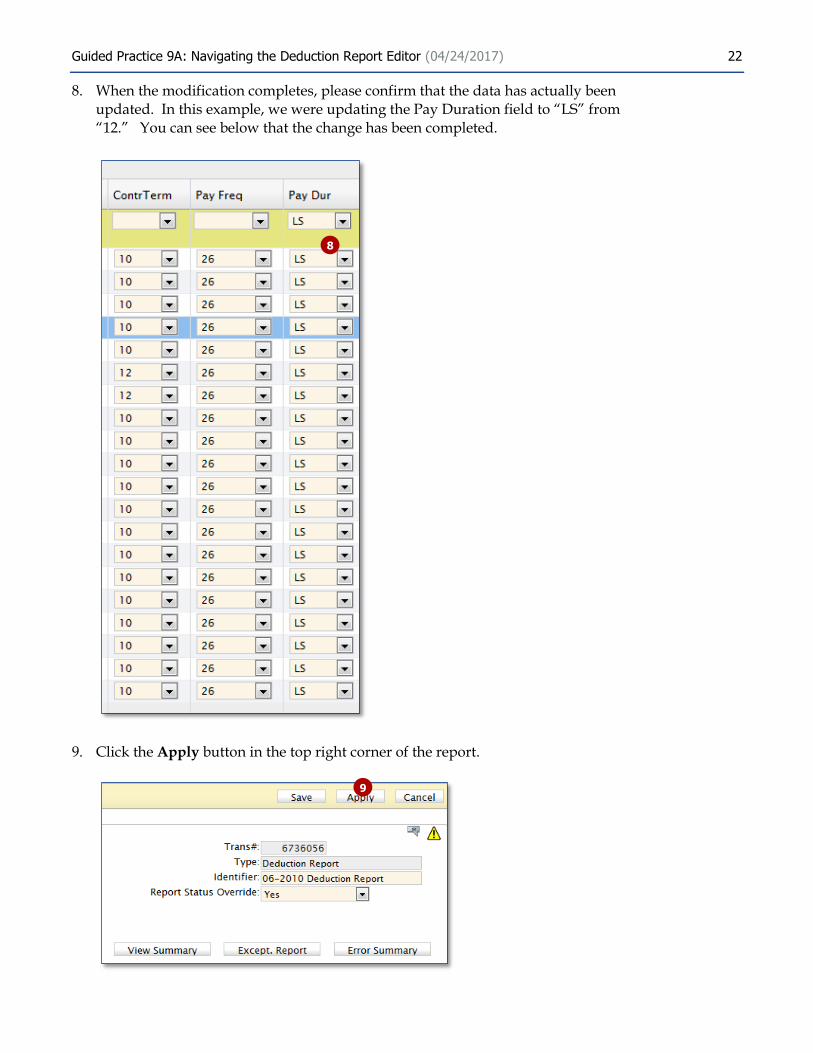
8. When the modification completes, please confirm that the data has actually been updated. In this example, we were updating the Pay Duration field to “LS” from
“12.” You can see below that the change has been completed.
9. Click the Apply button in the top right corner of the report.
8
9

Guided Practice 9A: Navigating the Deduction Report Editor (04/24/2017) 23
Rearrange Columns
The columns in the deduction report are set to a default order but can be moved around as needed. This is most helpful if you need to update data for a large group of people.
1. Click the Columns button.
2. This will open the list of columns displayed in the deduction report in the default order.
1

Guided Practice 9A: Navigating the Deduction Report Editor (04/24/2017) 24
3. Click on the first column name you would like to move. In this example, we are going to move the “Salary,” “FTE%” and “Position” fields up in the list so they will
appear after the “Name” field. Each column will need to be moved separately.
a. Click and drag the “Salary” field to be below the “Name” field.
b. Click and drag the “FTE%” field to be below the “Salary” field.
3a
3b

Guided Practice 9A: Navigating the Deduction Report Editor (04/24/2017) 25
c. Click and drag the “Position” field to be below the “FTE%” field.
4. Click the Wheel icon once you have moved the necessary fields.
3c
4

Guided Practice 9A: Navigating the Deduction Report Editor (04/24/2017) 26
5. You will now see the member’s “Salary,” “FTE%,” and “Position” fields are right next to the “Name” field.
6. To return the columns back to the default order, click the Columns button.
a. Click the Blue Arrow icon to reset the columns back to the default order.
5
5
5
6
6a
28
Guided Practice 9A: Navigating the Deduction Report Editor (04/24/2017) 27
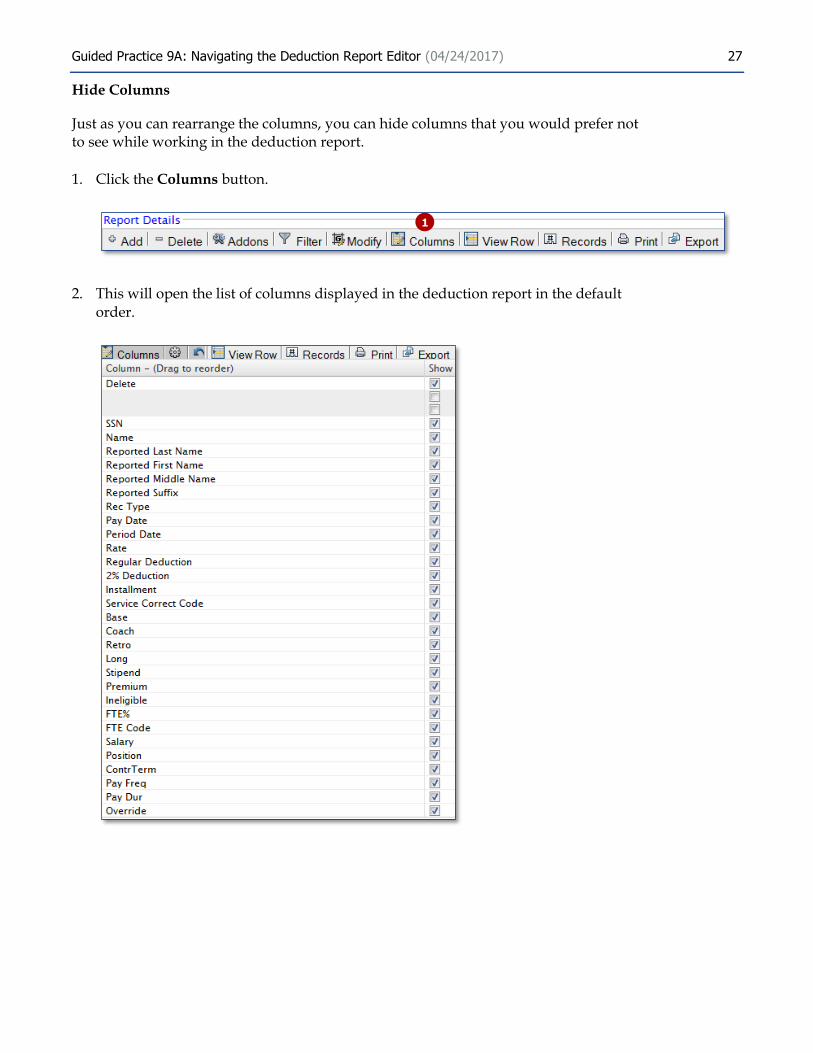
Hide Columns
Just as you can rearrange the columns, you can hide columns that you would prefer not to see while working in the deduction report.
1. Click the Columns button.
2. This will open the list of columns displayed in the deduction report in the default order.
1
Guided Practice 9A: Navigating the Deduction Report Editor (04/24/2017) 28
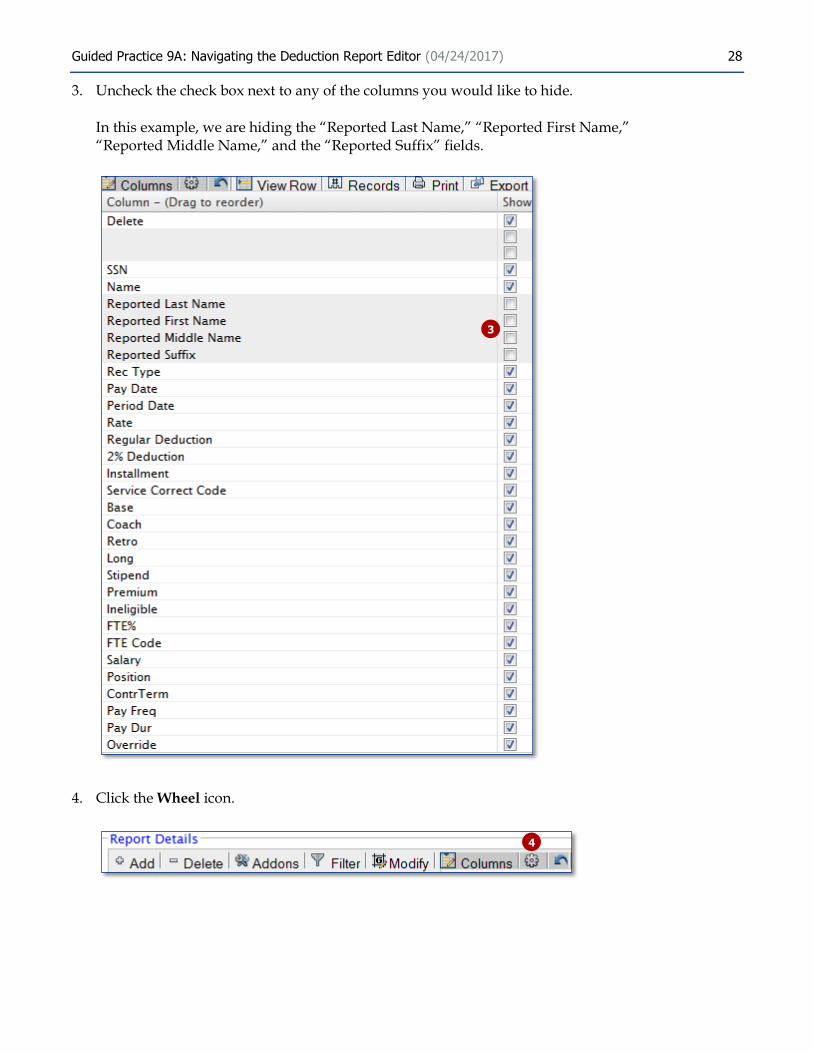
3. Uncheck the check box next to any of the columns you would like to hide.
In this example, we are hiding the “Reported Last Name,” “Reported First Name,” “Reported Middle Name,” and the “Reported Suffix” fields.
4. Click the Wheel icon.
3
4
Guided Practice 9A: Navigating the Deduction Report Editor (04/24/2017) 29
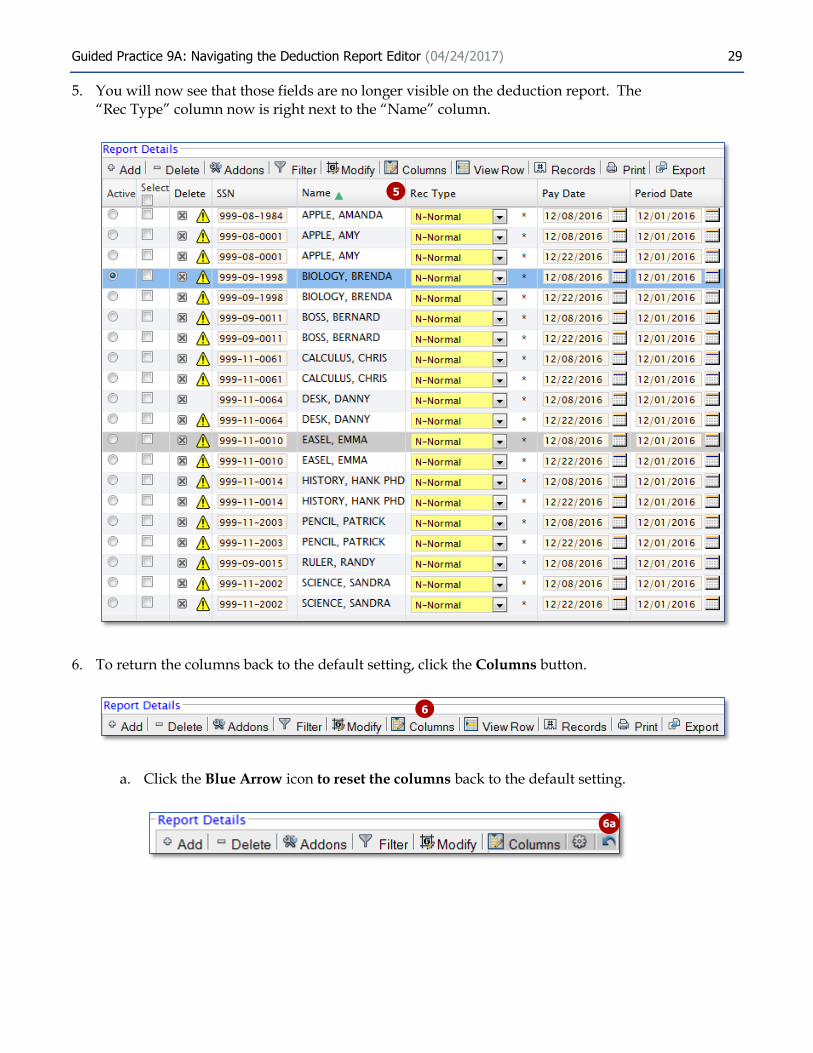
5. You will now see that those fields are no longer visible on the deduction report. The “Rec Type” column now is right next to the “Name” column.
6. To return the columns back to the default setting, click the Columns button.
a. Click the Blue Arrow icon to reset the columns back to the default setting.
5
6
6a
28
Guided Practice 9A: Navigating the Deduction Report Editor (04/24/2017) 30
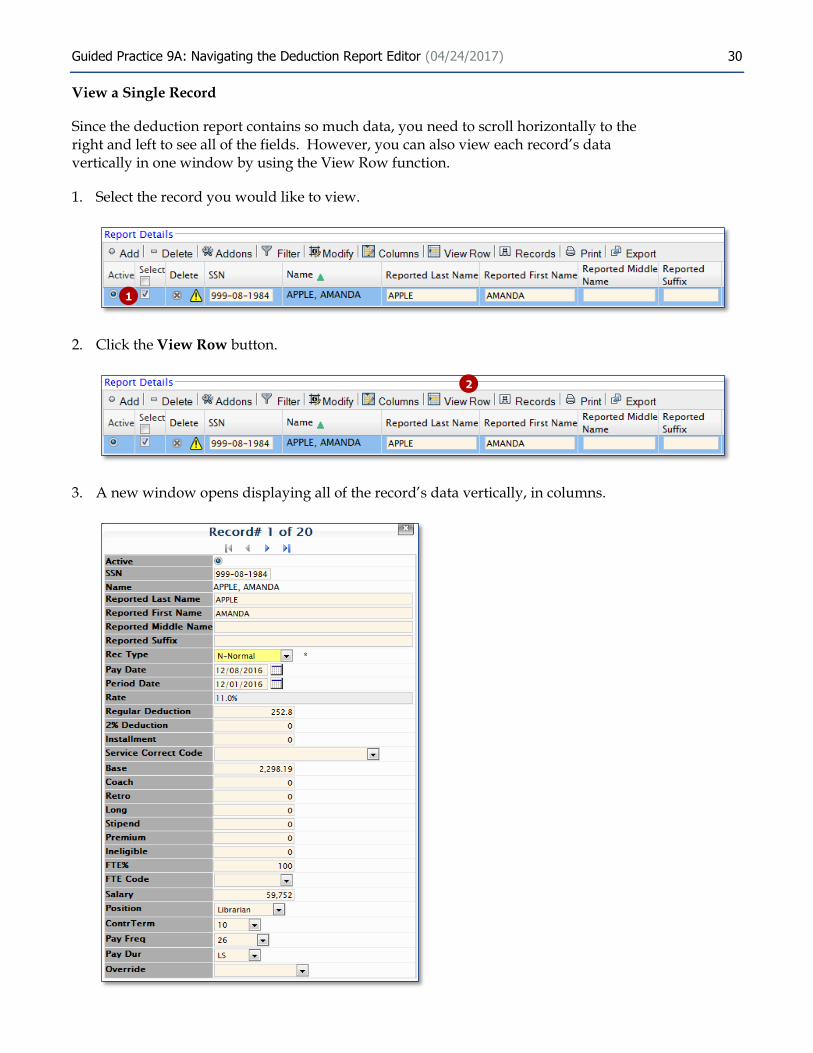
View a Single Record
Since the deduction report contains so much data, you need to scroll horizontally to the right and left to see all of the fields. However, you can also view each record’s data vertically in one window by using the View Row function.
1. Select the record you would like to view.
2. Click the View Row button.
3. A new window opens displaying all of the record’s data vertically, in columns.
1
2
Guided Practice 9A: Navigating the Deduction Report Editor (04/24/2017) 31
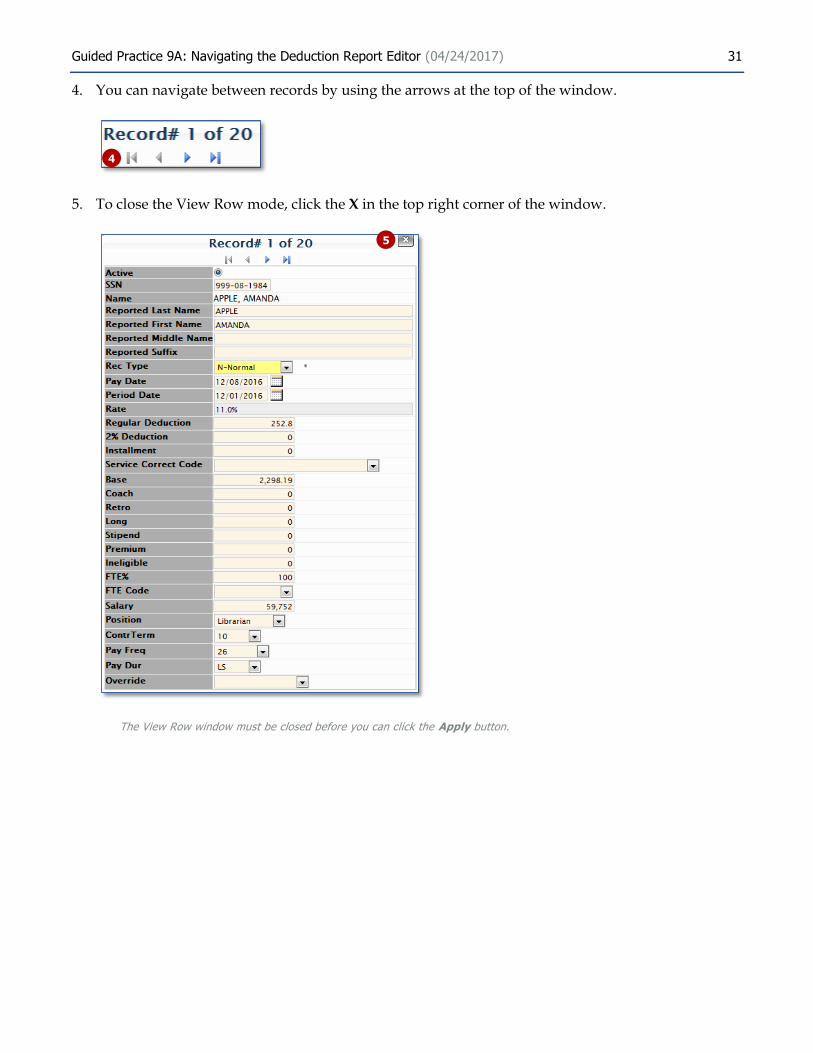
4. You can navigate between records by using the arrows at the top of the window.
5. To close the View Row mode, click the X in the top right corner of the window.
The View Row window must be closed before you can click the Apply button.
4
5

Guided Practice 9A: Navigating the Deduction Report Editor (04/24/2017) 32
Change the Number of Records per Page
The default number of records displayed per page in the deduction report is 25, but sometimes changing that number can be beneficial on a temporary basis. Please note that the system will become slower when you increase the number of records per page, so we do not recommend increasing the number unless it is on a temporary basis. The count should never exceed 100.
1. Click the Records button.
2. In the field provided, enter the number of records you would like displayed per page in the deduction report.
3. Click the Wheel icon next to the text box to increase the number of records.
4. To reset the number of records back to the default of 25, click the Records button
5. Click the Blue Arrow icon. The system will revert back to 25 records per page.
1
2
3
4
5

Guided Practice 9A: Navigating the Deduction Report Editor (04/24/2017) 33
Print the Deduction Report
1. Click the Print button.
1
Guided Practice 9A: Navigating the Deduction Report Editor (04/24/2017) 34
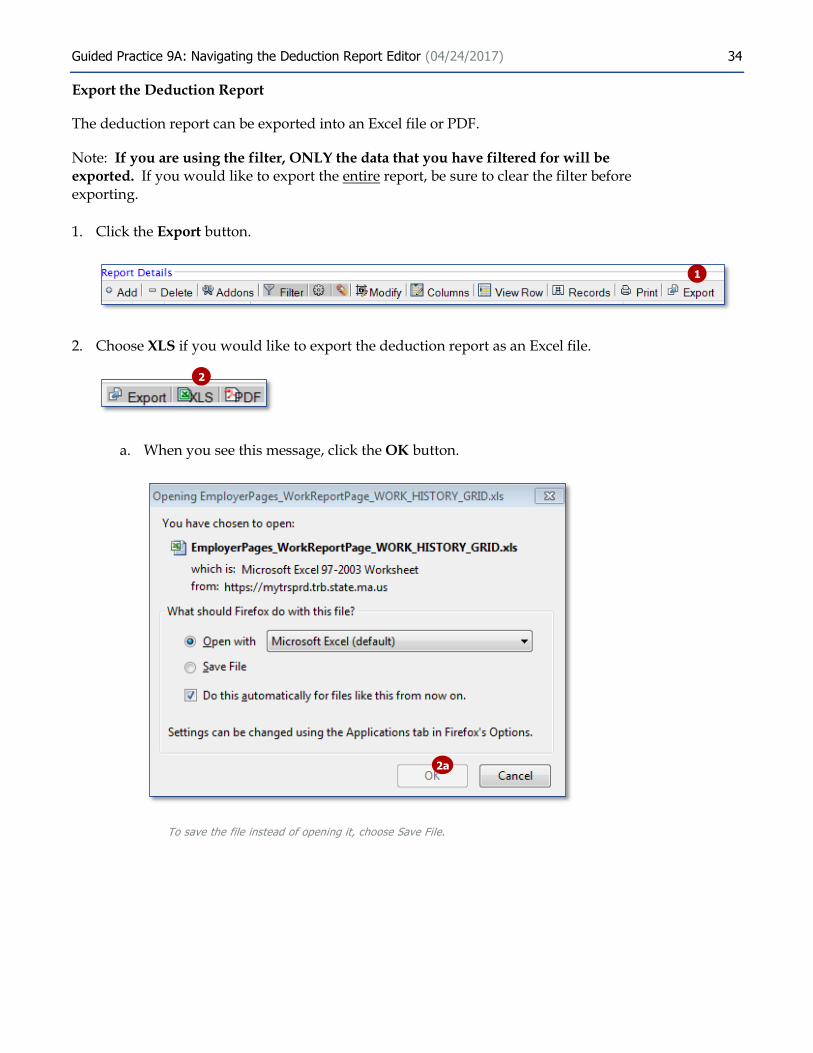
Export the Deduction Report
The deduction report can be exported into an Excel file or PDF.
Note: If you are using the filter, ONLY the data that you have filtered for will be
exported. If you would like to export the entire report, be sure to clear the filter before exporting.
1. Click the Export button.
2. Choose XLS if you would like to export the deduction report as an Excel file.
a. When you see this message, click the OK button.
To save the file instead of opening it, choose Save File.
2
1
2a
Guided Practice 9A: Navigating the Deduction Report Editor (04/24/2017) 35
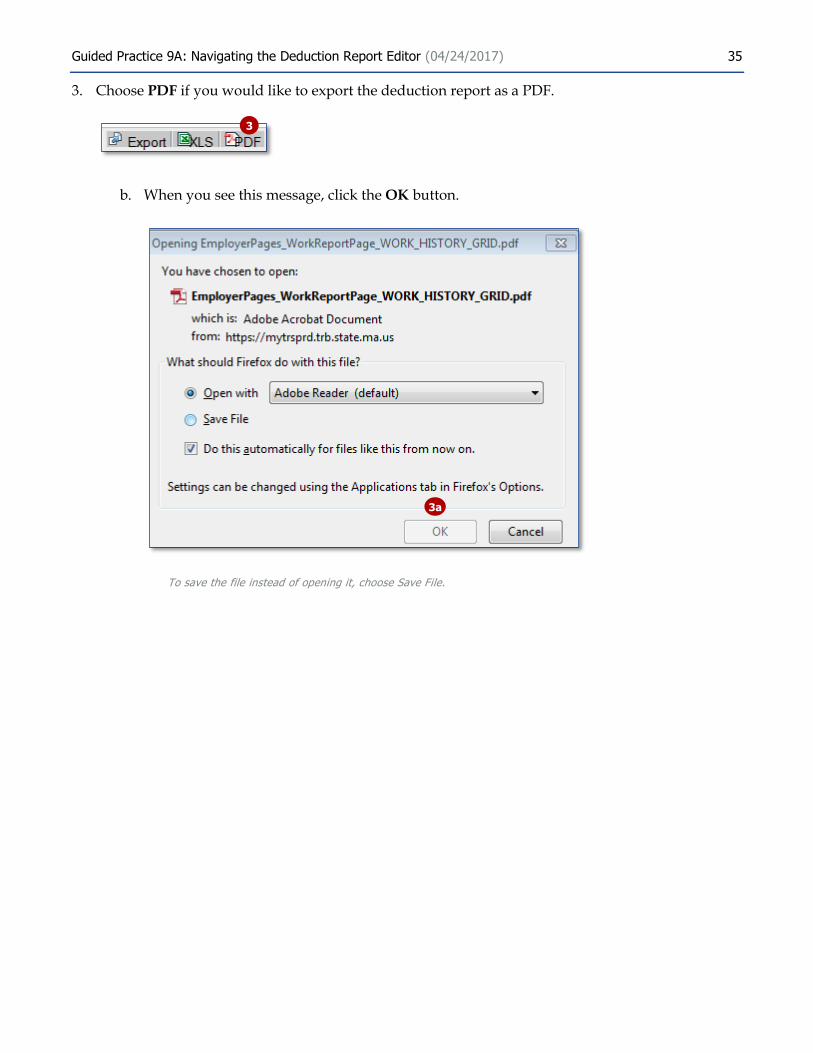
3. Choose PDF if you would like to export the deduction report as a PDF.
b. When you see this message, click the OK button.
To save the file instead of opening it, choose Save File.
3
3a

Guided Practice 9A: Navigating the Deduction Report Editor (04/24/2017) 36
Add a Comment to the Deduction Report
It is required to add a comment when adding an adjustment record or using a service correction code. Additionally, it is also important that you add comments to the deduction report to explain a particular member’s situation (change in FT%, why they missed a day’s pay, etc).
1. Click on the Comment icon ( ) in the top right corner of the deduction report.
2. Click the Edit button.
3. Click the Add button.
1
2
3
Guided Practice 9A: Navigating the Deduction Report Editor (04/24/2017) 37
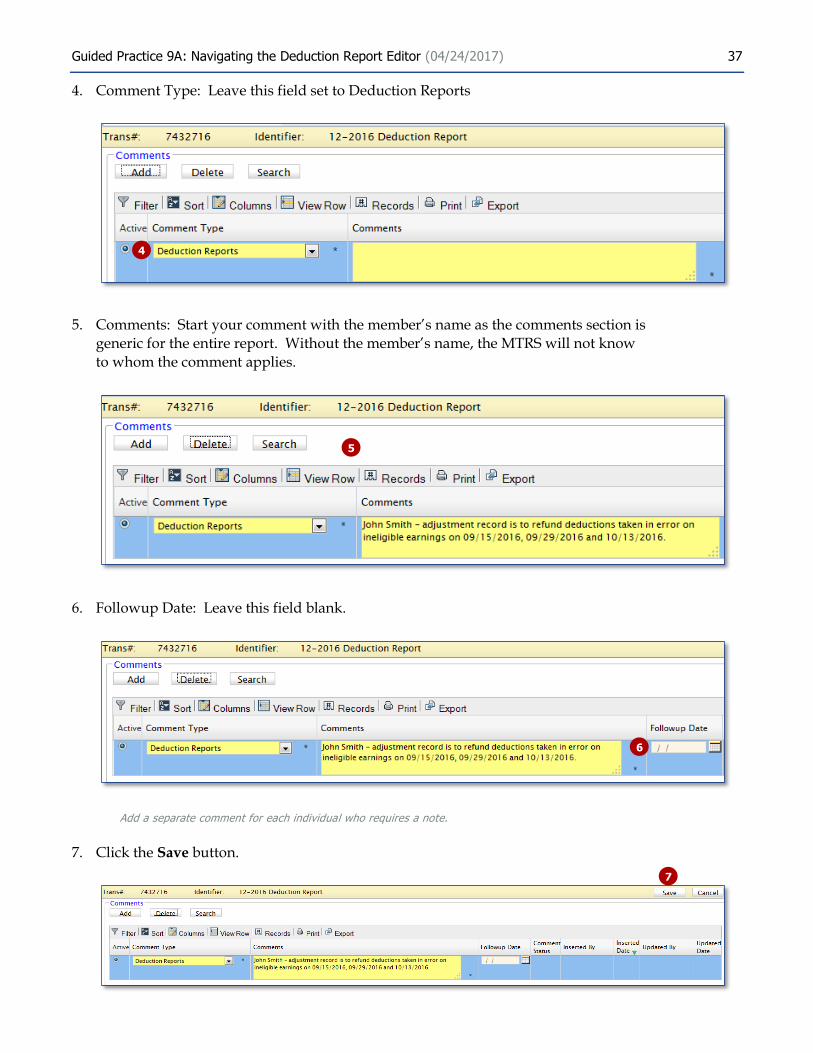
4. Comment Type: Leave this field set to Deduction Reports
5. Comments: Start your comment with the member’s name as the comments section is
generic for the entire report. Without the member’s name, the MTRS will not know
to whom the comment applies.
6. Followup Date: Leave this field blank.
Add a separate comment for each individual who requires a note.
7. Click the Save button.
4
5
6
7
Guided Practice 9A: Navigating the Deduction Report Editor (04/24/2017) 38
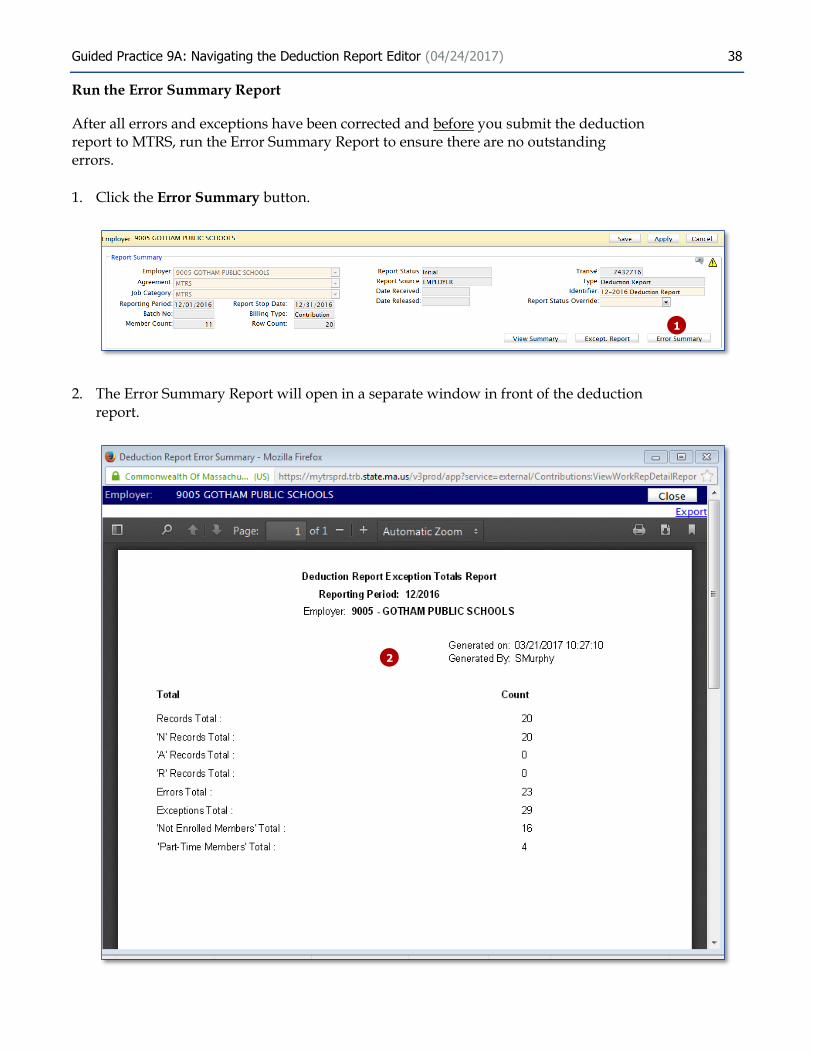
Run the Error Summary Report
After all errors and exceptions have been corrected and before you submit the deduction report to MTRS, run the Error Summary Report to ensure there are no outstanding errors.
1. Click the Error Summary button.
2. The Error Summary Report will open in a separate window in front of the deduction report.
1
2
Guided Practice 9A: Navigating the Deduction Report Editor (04/24/2017) 39
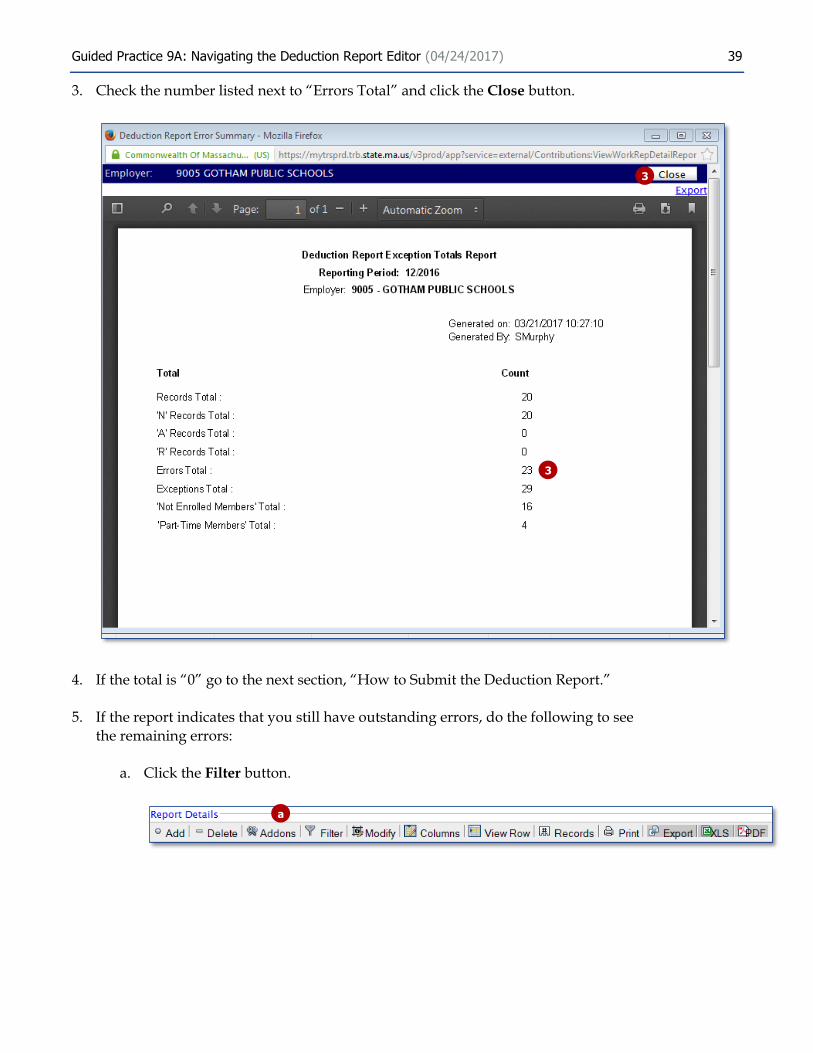
3. Check the number listed next to “Errors Total” and click the Close button.
4. If the total is “0” go to the next section, “How to Submit the Deduction Report.”
5. If the report indicates that you still have outstanding errors, do the following to see
the remaining errors:
a. Click the Filter button.
3
a
3

Guided Practice 9A: Navigating the Deduction Report Editor (04/24/2017) 40
b. Click on the drop down list under the column label “Delete.”
c. Choose the first message that starts with “ERROR:”
d. Click the Wheel icon next to the Filter button.
e. The member(s) with this error will be displayed.
b8
c
d
e

Guided Practice 9A: Navigating the Deduction Report Editor (04/24/2017) 41
f. To read the full error message, click on the Caution icon ( ) for that record.
A separate window will open and will display all of the errors that apply to this particular record.
g. Click the Close button.
f
g
Guided Practice 9A: Navigating the Deduction Report Editor (04/24/2017) 42
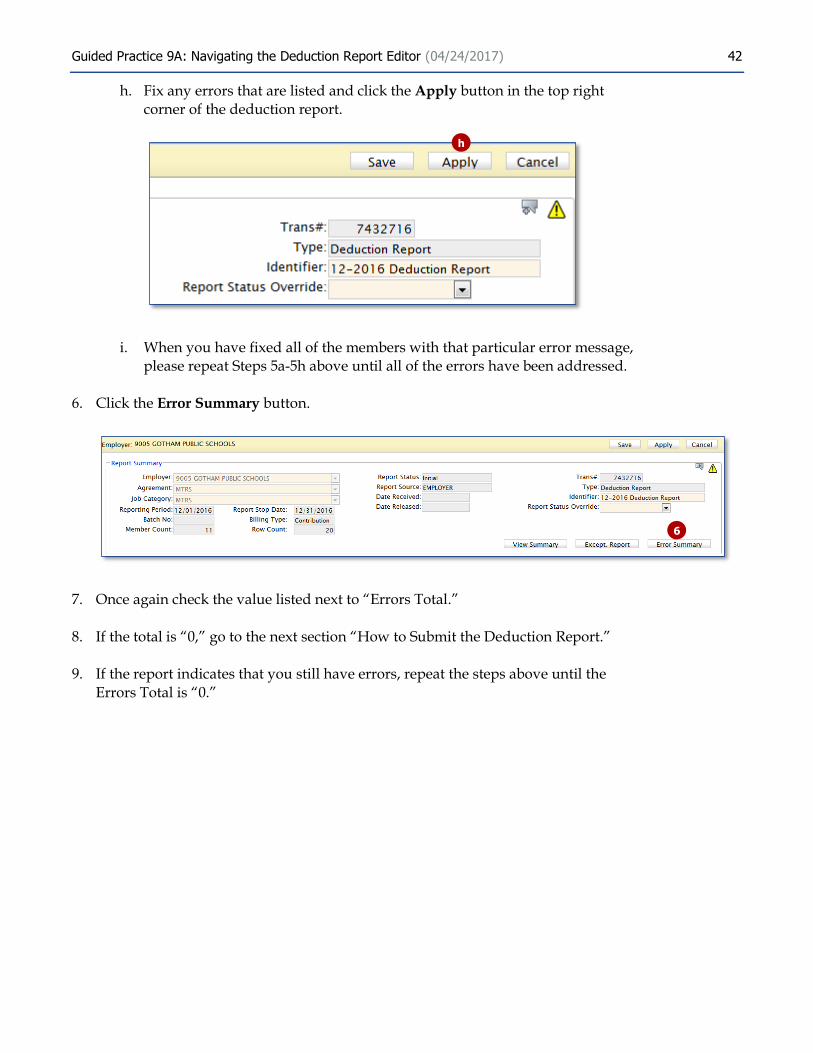
h. Fix any errors that are listed and click the Apply button in the top right corner of the deduction report.
i. When you have fixed all of the members with that particular error message, please repeat Steps 5a-5h above until all of the errors have been addressed.
6. Click the Error Summary button.
7. Once again check the value listed next to “Errors Total.”
8. If the total is “0,” go to the next section “How to Submit the Deduction Report.”
9. If the report indicates that you still have errors, repeat the steps above until the
Errors Total is “0.”
h
6

Guided Practice 9A: Navigating the Deduction Report Editor (04/24/2017) 43
Submit the Deduction Report
Once all of the errors and exceptions from the Exception report have been addressed and the Error Summary report shows 0 errors, it is time to submit the deduction report to the MTRS.
1. Change the Report Status Override field to “Yes.”
2. Click the Save button in the top right corner of the deduction report.
3. Click the Close button.
1
2
1
3

Guided Practice 9A: Navigating the Deduction Report Editor (04/24/2017) 44
4. Confirm that the report total and the payment total match. The report Total Due can be seen on the main deduction report page. If the payment does not match the report Total Due, rectify the variance before submitting the report to MTRS.
Please be sure to compare the Total Due to the actual payment you sent in and not the Total Balance field.
5. Click the Submit button.
4
55

Guided Practice 9A: Navigating the Deduction Report Editor (04/24/2017) 45
6. If the report has successfully been added to the submission queue, you will see the message “This deduction report has been queued for submission. Please check back later to ensure that the report has been submitted successfully.”
7. If the report has not been successfully queued for submission, you will see this message:
a. If you see this error, click the OK button.
6
7
7a
28

Guided Practice 9A: Navigating the Deduction Report Editor (04/24/2017) 46
b. Highlight the report you are working on and click the Edit Deduction Report button to open the deduction report.
c. If the Report Status Override field does not show “Yes,” change it to “Yes.”
i. Click the Save button in the top right corner of the deduction report.
7b
28
7c
28
i
Guided Practice 9A: Navigating the Deduction Report Editor (04/24/2017) 47
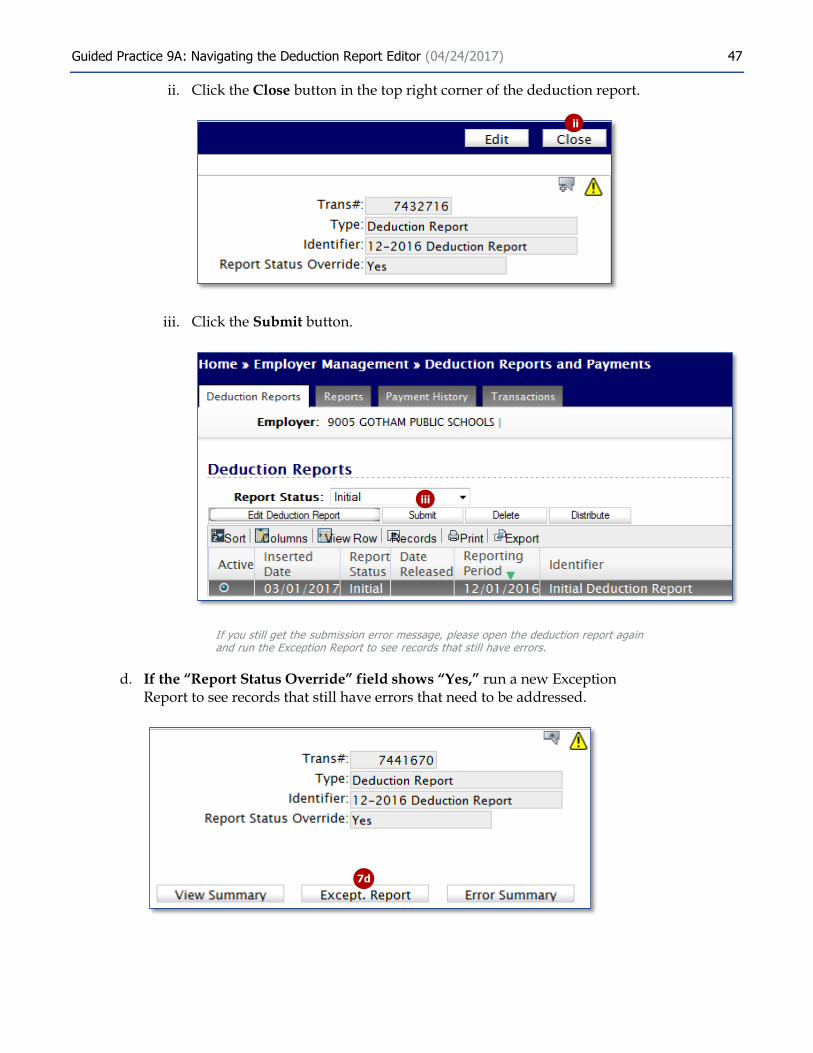
ii. Click the Close button in the top right corner of the deduction report.
iii. Click the Submit button.
If you still get the submission error message, please open the deduction report again and run the Exception Report to see records that still have errors.
d. If the “Report Status Override” field shows “Yes,” run a new Exception Report to see records that still have errors that need to be addressed.
7d
28
iii
ii

Guided Practice 9A: Navigating the Deduction Report Editor (04/24/2017) 48
i. Fix any errors that need to be corrected and click the Save button.
ii. Click the Close button in the top right corner of the deduction report.
iii. Click the Submit button.
i
28
ii
iii


![Title 9A RCW - Washingtonleg.wa.gov/CodeReviser/RCWSelectedTitles/Documents/2016/9A.pdf · 9A.04.040 Title 9A RCW: Washington Criminal Code [Title 9A RCW—page 2] (2016 Ed.) (3)](https://static.fdocuments.us/doc/165x107/5f10764b7e708231d4493a23/title-9a-rcw-9a04040-title-9a-rcw-washington-criminal-code-title-9a-rcwapage.jpg)