Guide to Efiling Sealed Docs 2-8-2016 · OVERVIEW OF E‐FILING PROCEDURES Application for Leave to...
47
This document outlines the procedures for attorneys to follow when electronically filing SEALED documents in otherwise PUBLIC/NON‐SEALED civil cases. REVISED: February 2016 Guide to Electronically Filing Under-Seal Documents in Civil Cases U.S. District Court for the Central District of California
Transcript of Guide to Efiling Sealed Docs 2-8-2016 · OVERVIEW OF E‐FILING PROCEDURES Application for Leave to...
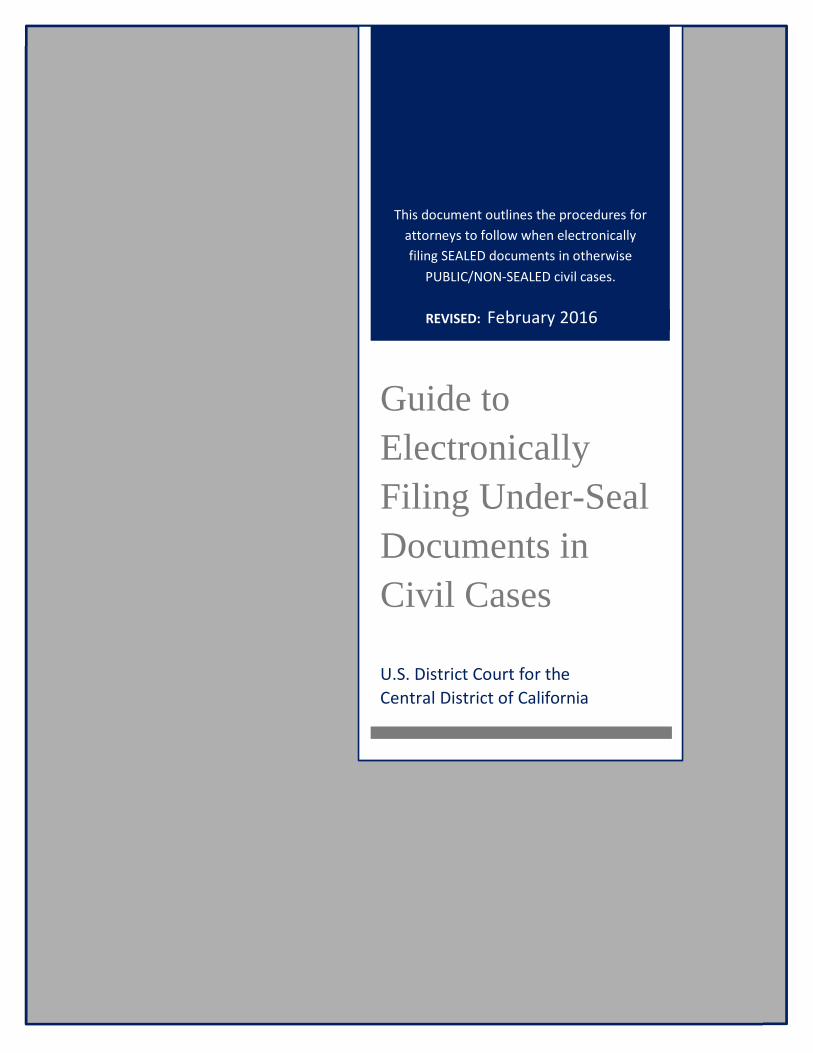
This document outlines the procedures for
attorneys to follow when electronically
filing SEALED documents in otherwise PUBLIC/NON‐SEALED civil cases.
REVISED: February 2016
Guide to Electronically Filing Under-Seal Documents in Civil Cases
U.S. District Court for the
Central District of California
SEALED CIVIL DOCUMENTS 2016
i
TableofContents
E-FILING SEALED DOCUMENTS IN PUBLIC/NON-SEALED CIVIL CASES ..................... 1
OVERVIEW OF E-FILING PROCEDURES ............................................................................... 2
Application for Leave to File Under Seal .................................................................................. 2
E-Filing Sealed Documents ........................................................................................................ 2
Service of Sealed Documents ..................................................................................................... 2
Public Access ............................................................................................................................. 3
Available Events ......................................................................................................................... 3
Clearly Label All Sealed Documents ......................................................................................... 3
Use Caution in Drafting Docket Entry Text .............................................................................. 3
Mandatory Chambers Copies & Proposed Orders ..................................................................... 3
Filing a Redacted Document ...................................................................................................... 4
Problems Filing a Sealed Document .......................................................................................... 4
Red Screens ................................................................................................................................ 4
APPLICATION FOR LEAVE TO FILE UNDER SEAL: SCREEN-BY-SCREEN INSTRUCTIONS ....................................................................................................................... 5
Leave to File Document Under Seal .......................................................................................... 5
Sealed Declaration in Support .................................................................................................. 10
SEALED DOCUMENT: SCREEN-BY-SCREEN INSTRUCTIONS ....................................... 15
SEALED MOTION (GENERIC SEALED MOTION-TYPE EVENT): SCREEN-BY- SCREEN INSTRUCTIONS ..................................................................................................... 22
SEALED OPPOSITION: SCREEN-BY-SCREEN INSTRUCTIONS ...................................... 29
SEALED REPLY: SCREEN-BY-SCREEN INSTRUCTIONS ................................................. 35
APPLICATION FOR LEAVE FOR IN CAMERA REVIEW: SCREEN-BY-SCREEN INSTRUCTIONS ..................................................................................................................... 41
SEALED CIVIL DOCUMENTS 2016
1
Central District of California – Guide to Electronically Filing Under-Seal Documents in Civil Cases
UNITED STATES DISTRICT COURT FOR THE CENTRAL DISTRICT OF CALIFORNIA
E‐FILINGSEALEDDOCUMENTSINPUBLIC/NON‐SEALEDCIVILCASES
Effective December 1, 2015, the United States District Court for the Central District of California amended its local rules to require attorneys to electronically file sealed documents in otherwise PUBLIC/NON-SEALED CIVIL CASES using the Court’s CM/ECF system. Additional changes to the Local Rules effective the same day changed the way leave to file documents under seal must be requested, especially for documents subject to a protective order, and provide guidance for seeking in camera review of documents. A redline of all changes to the Local Rules effective December 1, 2015, is available here: http://www.cacd.uscourts.gov/ news/new-and-amended-local-rules-effective-december-1-2015. Please review these changes before filing or seeking leave to file any documents under seal on or after December 1, 2015.
Note that the new rules require electronic filing only in PUBLIC/NON-SEALED CIVIL CASES. For now, continue to file sealed documents in criminal cases in paper, or as otherwise directed by your assigned judge’s standing orders. Likewise, continue to file all documents in paper in any case in which the entire case is under seal. And note that pro se parties who have been granted permission to file documents electronically must nonetheless continue to file sealed documents in paper; the CM/ECF system does not allow pro se parties to e-file sealed documents.
This Guide to Electronically Filing Under-Seal Documents in Civil Cases sets forth step-by-step instructions for electronically filing sealed documents, Applications for Leave to File Under Seal, and Applications for Leave for In Camera Review. Please review these instructions carefully – failure to follow these instructions could result in the inadvertent filing of a document you wish to keep under seal as a public document.
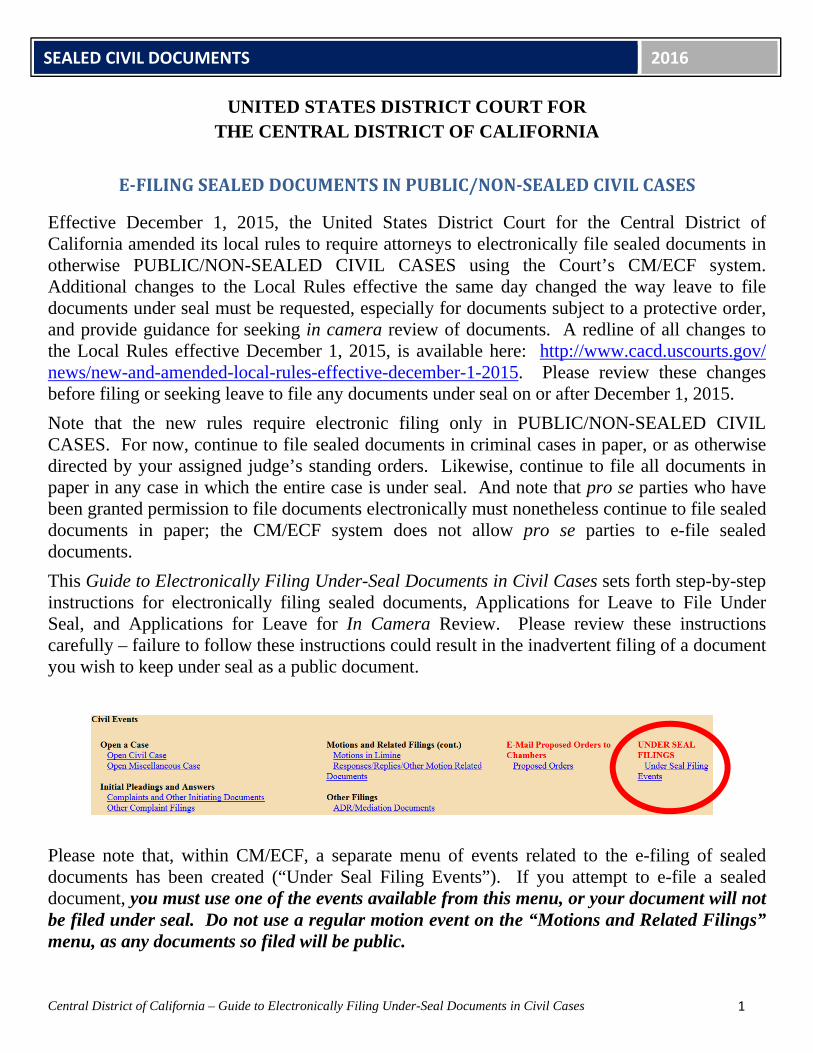
Please note that, within CM/ECF, a separate menu of events related to the e-filing of sealed documents has been created (“Under Seal Filing Events”). If you attempt to e-file a sealed document, you must use one of the events available from this menu, or your document will not be filed under seal. Do not use a regular motion event on the “Motions and Related Filings” menu, as any documents so filed will be public.
SEALED CIVIL DOCUMENTS 2016
2
Central District of California – Guide to Electronically Filing Under-Seal Documents in Civil Cases
OVERVIEWOFE‐FILINGPROCEDURES
ApplicationforLeavetoFileUnderSeal
Before filing any sealed document, you must have leave of court. Even if a statute or rule authorizes the filing of a particular document under seal, you must obtain a court order in the case in which you plan to file that document. Accordingly, you must first electronically file an Application for Leave to File Under Seal, following the instructions set forth below at page 5. Your Application must be accompanied by: (1) a declaration; (2) a proposed order; (3) a redacted version of any documents of which only a portion is proposed to be filed under seal; and (4) an unredacted version of the documents proposed to be filed under seal. L.R. 79-5.2.2(a)-(b) (eff. 12/1/15). The Application, the proposed order, any redacted documents, and the text of the docket entry itself will be visible to the public, so be sure to draft them accordingly. The declaration and the document(s) proposed to be filed under seal will not be publicly viewable. A Notice of Electronic Filing (“NEF”) will be sent, and recipients will be able to click on the link in the NEF to view the Application, the proposed order, and the redacted documents. However, only court staff and attorneys of record for the party filing the documents will be able to view the declaration and the documents proposed to be filed under seal.
Note that, if you are the party that has designated a document confidential pursuant to a protective order, L.R. 79-5.2.2(b)(i) requires you to file a Declaration explaining why the documents should be filed under seal. You should use the “Sealed Declaration in Support” event to file this declaration.
E‐FilingSealedDocuments
Once leave to file a document under seal has been granted, the party that requested leave to file under seal must proceed to file the document. Clerk’s Office staff will not do this for you. If you obtain leave to file a document under seal, you must follow through and file it under seal, or you will not be able to rely on the document in the case. For instance, if you obtain leave to file a motion to dismiss under seal, you must then file your motion to dismiss, using the “Sealed Motion” event under the “Under Seal Filing Events” menu, following the instructions set forth below at page 22. Likewise, if you obtain leave to file an exhibit to a summary judgment motion under seal, you must then proceed to file your summary judgment motion using a regular motion event, then file the sealed exhibit using the “Sealed Document” event on the “Under Seal Filing” menu, and link it to your summary judgment motion, following the instructions set forth below at page 15. Any document filed under seal must also be linked to the court order granting permission to so file. See L.R. 79-5.2.2 (c) (eff. 12/1/15).
ServiceofSealedDocuments
Documents electronically filed under seal will not be accessible through the Notice of Electronic Filing (“NEF”). The filing party is therefore responsible for serving all sealed documents and attachments on opposing counsel by other means. A certificate of service must
SEALED CIVIL DOCUMENTS 2016
3
Central District of California – Guide to Electronically Filing Under-Seal Documents in Civil Cases
be included with every sealed filing and a copy of the NEF should be served with the sealed document. See L.R. 79-5.3 (eff. 12/1/15).
PublicAccess
A sealed document filed in CM/ECF cannot be viewed remotely on PACER or on the Clerk’s Office public terminals by anyone other than Court personnel and attorneys of record for the filing party.
AvailableEvents
Only documents properly filed using specific sealed docket entries are SEALED upon submission. The events are located on the “Under Seal Filing Events” menu found under the “Under Seal Filings” heading on the CIVIL docketing menu. The following sealed civil events are available for your use:
Leave for In Camera Review Leave to File Document Under Seal Sealed Declaration in Support Sealed Document Sealed Motion (Generic sealed motion type event) Sealed Opposition Sealed Reply
Additional information and step-by-step filing instructions for each of these events is set forth below. When you file a document using the events listed above, you will have the ability to link or relate your motion, opposition, reply, or other sealed document to a previous docket entry.
ClearlyLabelAllSealedDocuments
All sealed documents should be clearly marked as “FILED UNDER SEAL PURSUANT TO ORDER OF THE COURT DATED ______.” L.R. 79-5.2.2(c).
UseCautioninDraftingDocketEntryText
When electronically filing a sealed document, remember, the DOCKET ENTRY can be viewed by the public, even though the attached DOCUMENT will be sealed.
MandatoryChambersCopies&ProposedOrders
A Word Perfect or Microsoft Word version of the proposed order must be emailed to chambers as required by L.R. 5-4.4.2, and mandatory chambers copies of e-filed sealed documents must be provided to chambers pursuant to L.R. 5-4.5, just as with any e-filed documents. However, mandatory chambers copies must be provided in sealed envelopes, with a copy of the title page attached to the front of each envelope. L.R. 79-5.2.2(a).
SEALED CIVIL DOCUMENTS 2016
4
Central District of California – Guide to Electronically Filing Under-Seal Documents in Civil Cases
FilingaRedactedDocument
If you are required to file a redacted version of a document, only the portions of the document that are confidential should be redacted. Be sure to add the word REDACTED in the caption of the document and in the docket text of the entry.
ProblemsFilingaSealedDocument
If you cannot file a sealed document electronically due to a technical failure of CM/ECF, you must file it in paper pursuant to L.R. 5-4.6.2. The original and the judge’s copy of all such documents must be submitted for filing in separate sealed envelopes, with a copy of the title page attached to the front of each envelope. An additional copy must be provided in PDF format on a CD. L.R. 79-5.2.
RedScreens
During the docketing process for any of the events on the “Under Seal Filing Events” menu, the screen will eventually turn RED. This is the indication that you are using a sealed document event. If the screen does not turn red, STOP immediately. You will need to start your docket entry over to ensure you are using the proper sealed document event.
SEALED CIVIL DOCUMENTS 2016
5
Central District of California – Guide to Electronically Filing Under-Seal Documents in Civil Cases
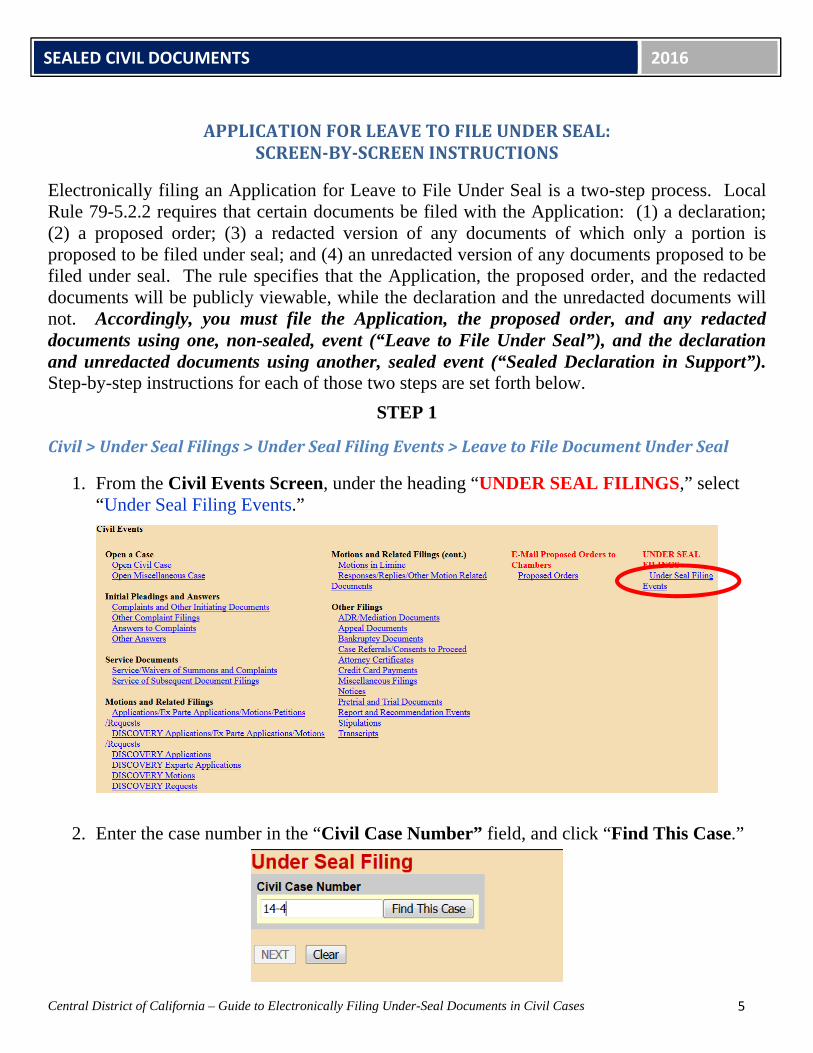
APPLICATIONFORLEAVETOFILEUNDERSEAL:SCREEN‐BY‐SCREENINSTRUCTIONS
Electronically filing an Application for Leave to File Under Seal is a two-step process. Local Rule 79-5.2.2 requires that certain documents be filed with the Application: (1) a declaration; (2) a proposed order; (3) a redacted version of any documents of which only a portion is proposed to be filed under seal; and (4) an unredacted version of any documents proposed to be filed under seal. The rule specifies that the Application, the proposed order, and the redacted documents will be publicly viewable, while the declaration and the unredacted documents will not. Accordingly, you must file the Application, the proposed order, and any redacted documents using one, non-sealed, event (“Leave to File Under Seal”), and the declaration and unredacted documents using another, sealed event (“Sealed Declaration in Support”). Step-by-step instructions for each of those two steps are set forth below.
STEP 1
Civil>UnderSealFilings>UnderSealFilingEvents>LeavetoFileDocumentUnderSeal
1. From the Civil Events Screen, under the heading “UNDER SEAL FILINGS,” select “Under Seal Filing Events.”
2. Enter the case number in the “Civil Case Number” field, and click “Find This Case.”
SEALED CIVIL DOCUMENTS 2016
6
Central District of California – Guide to Electronically Filing Under-Seal Documents in Civil Cases
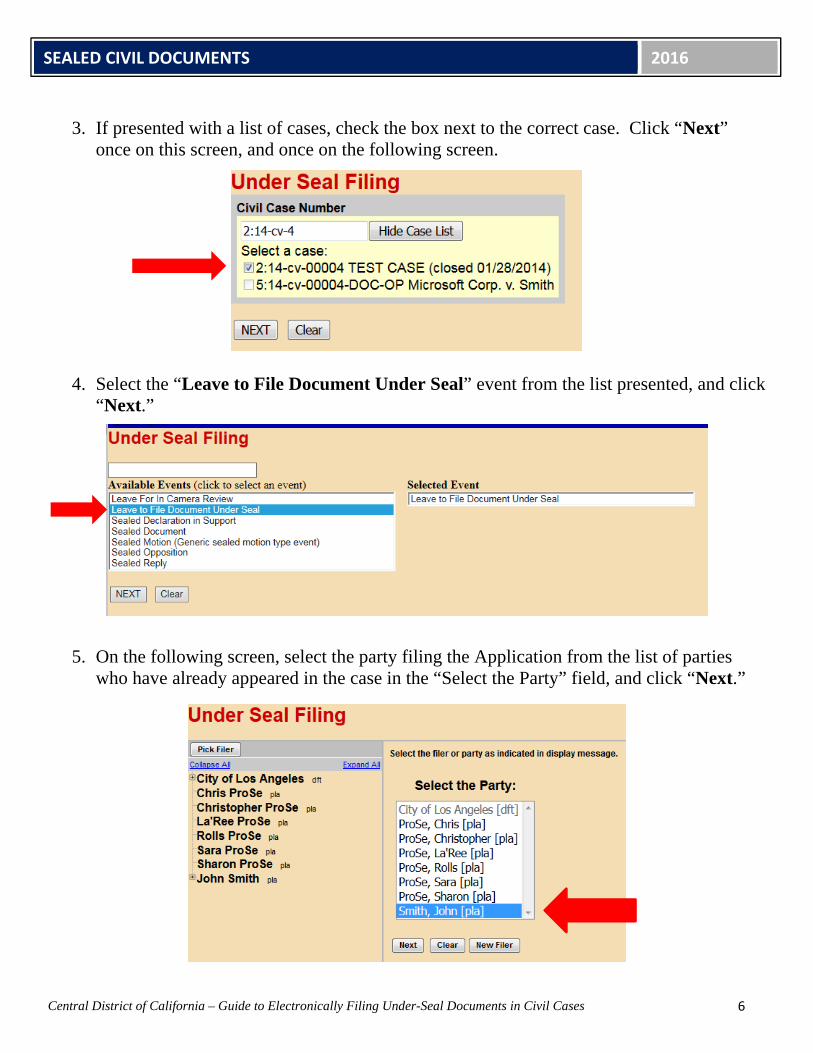
3. If presented with a list of cases, check the box next to the correct case. Click “Next”
once on this screen, and once on the following screen.
4. Select the “Leave to File Document Under Seal” event from the list presented, and click
“Next.”
5. On the following screen, select the party filing the Application from the list of parties who have already appeared in the case in the “Select the Party” field, and click “Next.”

SEALED CIVIL DOCUMENTS 2016
7
Central District of California – Guide to Electronically Filing Under-Seal Documents in Civil Cases
6. You will upload your PDF documents on the next screen. Under “Main Document,” click the “Browse” button, and a file upload box will appear. Navigate to your “Application for Leave to File Under Seal” and select the file, then click “Open.”
7. Under “Attachments,” click the “Browse” button, and a file upload screen will appear.
Individually navigate to where your “Redacted Document” and “Proposed Order” are saved, and select “Open.” In each corresponding “Category” field, select the name from the drop down list that correctly identifies each document. Click “Next.”
8. Select “Application” for your moving document, and click “Next.”
SEALED CIVIL DOCUMENTS 2016
8
Central District of California – Guide to Electronically Filing Under-Seal Documents in Civil Cases
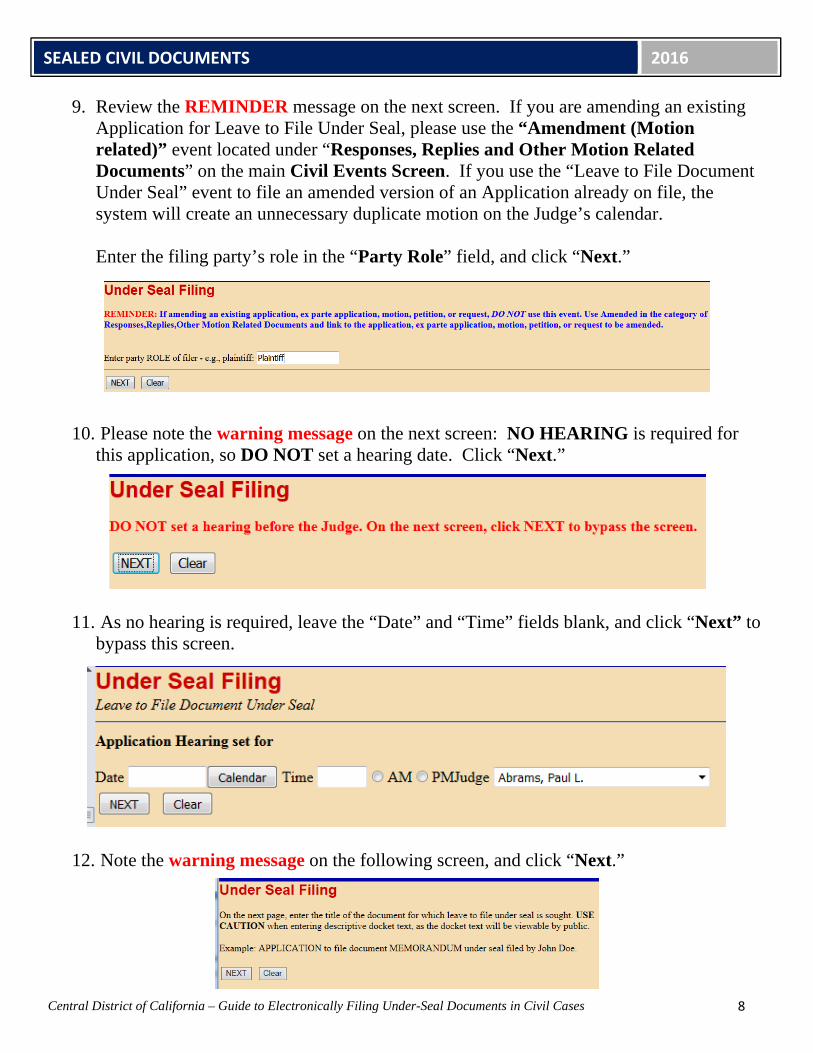
9. Review the REMINDER message on the next screen. If you are amending an existing Application for Leave to File Under Seal, please use the “Amendment (Motion related)” event located under “Responses, Replies and Other Motion Related Documents” on the main Civil Events Screen. If you use the “Leave to File Document Under Seal” event to file an amended version of an Application already on file, the system will create an unnecessary duplicate motion on the Judge’s calendar. Enter the filing party’s role in the “Party Role” field, and click “Next.”
10. Please note the warning message on the next screen: NO HEARING is required for this application, so DO NOT set a hearing date. Click “Next.”
11. As no hearing is required, leave the “Date” and “Time” fields blank, and click “Next” to
bypass this screen.
12. Note the warning message on the following screen, and click “Next.”
SEALED CIVIL DOCUMENTS 2016
9
Central District of California – Guide to Electronically Filing Under-Seal Documents in Civil Cases
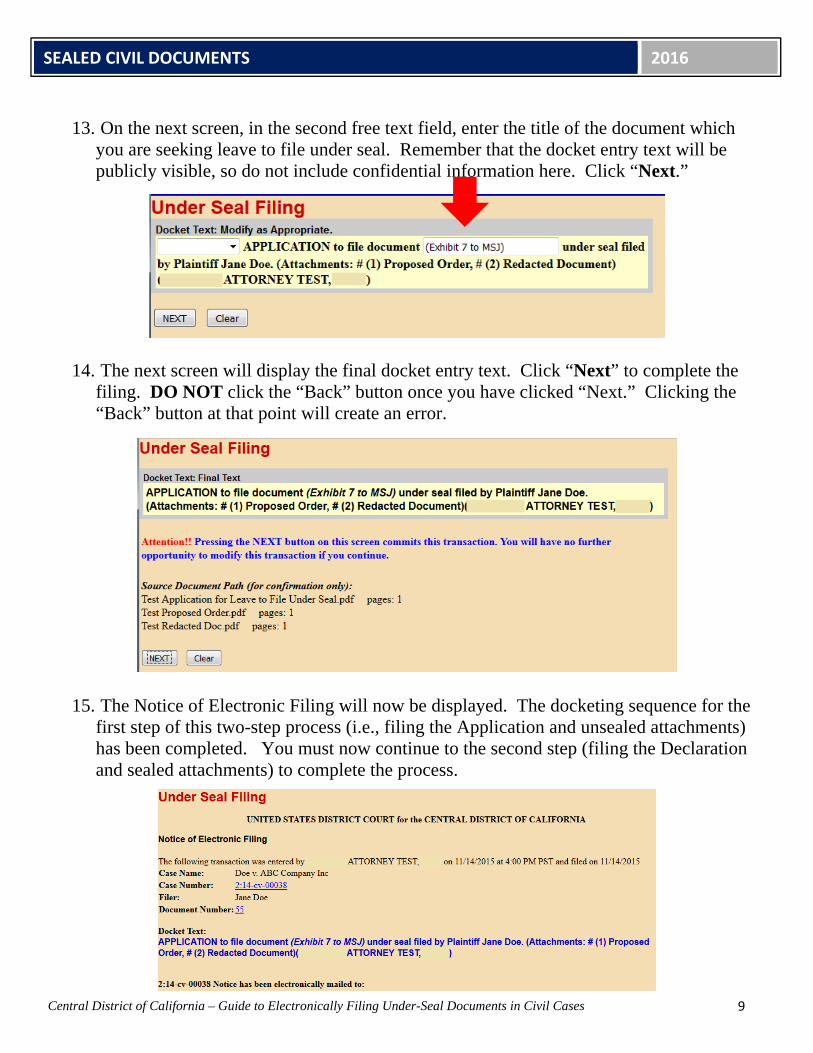
13. On the next screen, in the second free text field, enter the title of the document which
you are seeking leave to file under seal. Remember that the docket entry text will be publicly visible, so do not include confidential information here. Click “Next.”
14. The next screen will display the final docket entry text. Click “Next” to complete the
filing. DO NOT click the “Back” button once you have clicked “Next.” Clicking the “Back” button at that point will create an error.
15. The Notice of Electronic Filing will now be displayed. The docketing sequence for the
first step of this two-step process (i.e., filing the Application and unsealed attachments) has been completed. You must now continue to the second step (filing the Declaration and sealed attachments) to complete the process.
SEALED CIVIL DOCUMENTS 2016
10
Central District of California – Guide to Electronically Filing Under-Seal Documents in Civil Cases
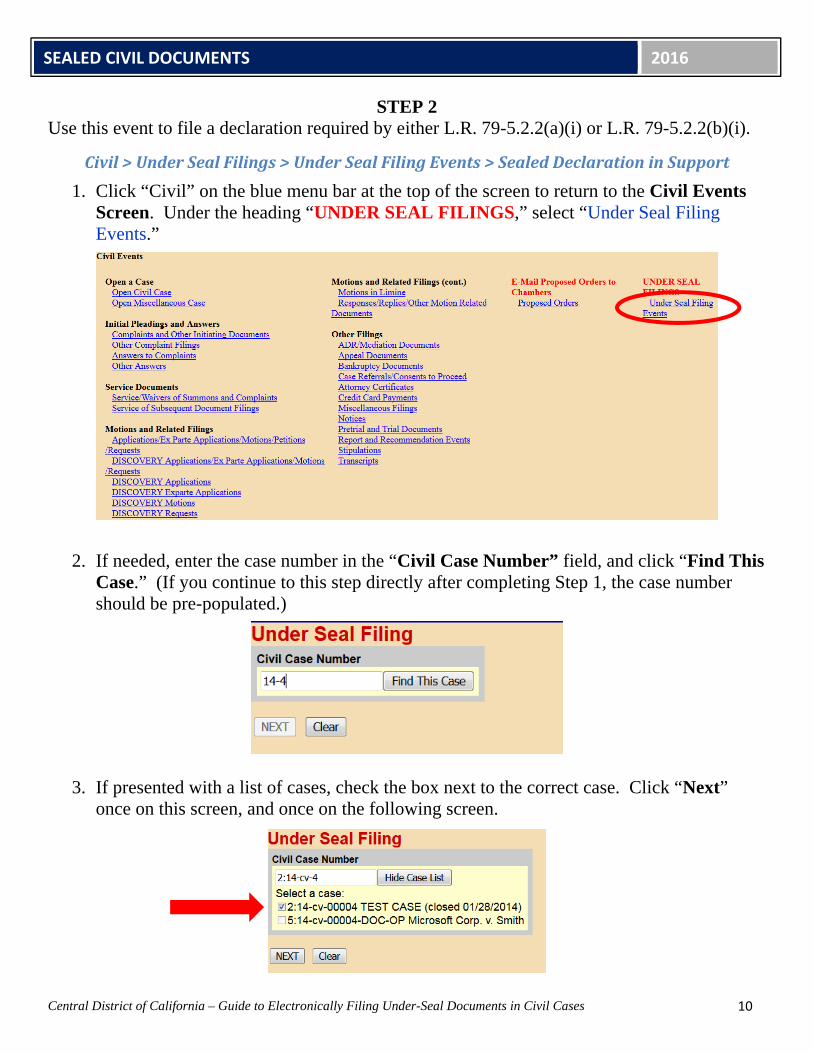
STEP 2 Use this event to file a declaration required by either L.R. 79-5.2.2(a)(i) or L.R. 79-5.2.2(b)(i).
Civil>UnderSealFilings>UnderSealFilingEvents>SealedDeclarationinSupport
1. Click “Civil” on the blue menu bar at the top of the screen to return to the Civil Events Screen. Under the heading “UNDER SEAL FILINGS,” select “Under Seal Filing Events.”
2. If needed, enter the case number in the “Civil Case Number” field, and click “Find This Case.” (If you continue to this step directly after completing Step 1, the case number should be pre-populated.)
3. If presented with a list of cases, check the box next to the correct case. Click “Next”
once on this screen, and once on the following screen.
SEALED CIVIL DOCUMENTS 2016
11
Central District of California – Guide to Electronically Filing Under-Seal Documents in Civil Cases
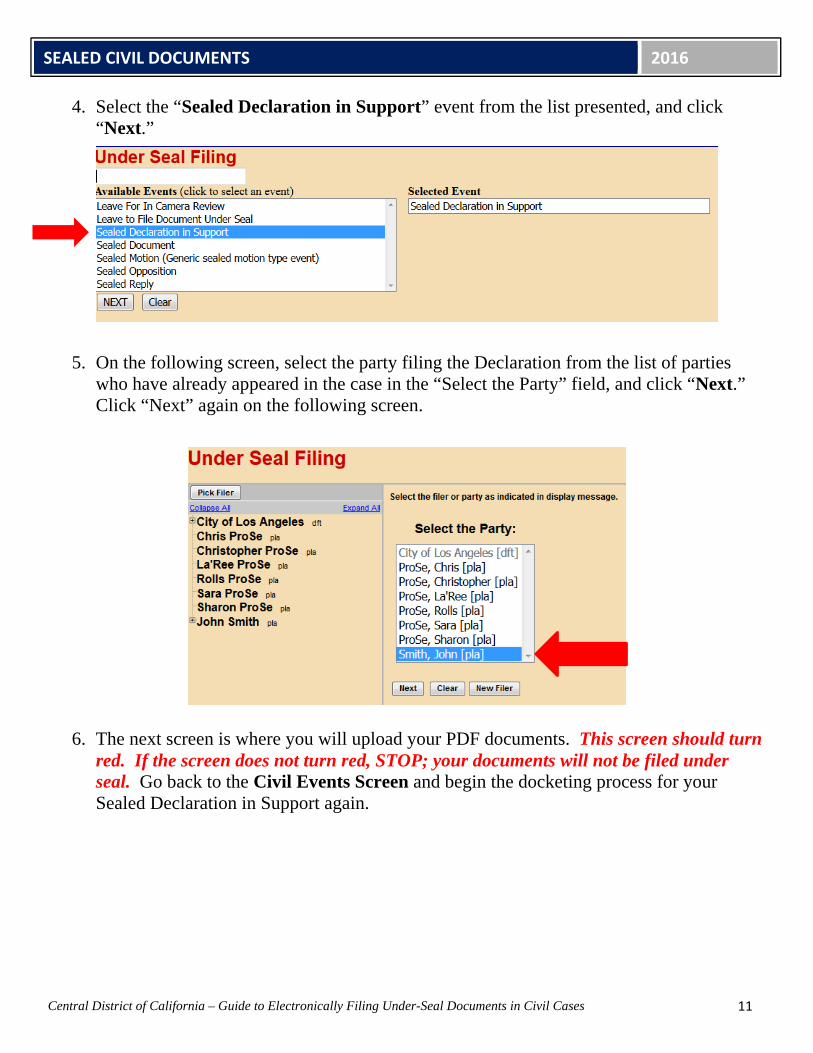
4. Select the “Sealed Declaration in Support” event from the list presented, and click “Next.”
5. On the following screen, select the party filing the Declaration from the list of parties who have already appeared in the case in the “Select the Party” field, and click “Next.” Click “Next” again on the following screen.
6. The next screen is where you will upload your PDF documents. This screen should turn
red. If the screen does not turn red, STOP; your documents will not be filed under seal. Go back to the Civil Events Screen and begin the docketing process for your Sealed Declaration in Support again.
SEALED CIVIL DOCUMENTS 2016
12
Central District of California – Guide to Electronically Filing Under-Seal Documents in Civil Cases
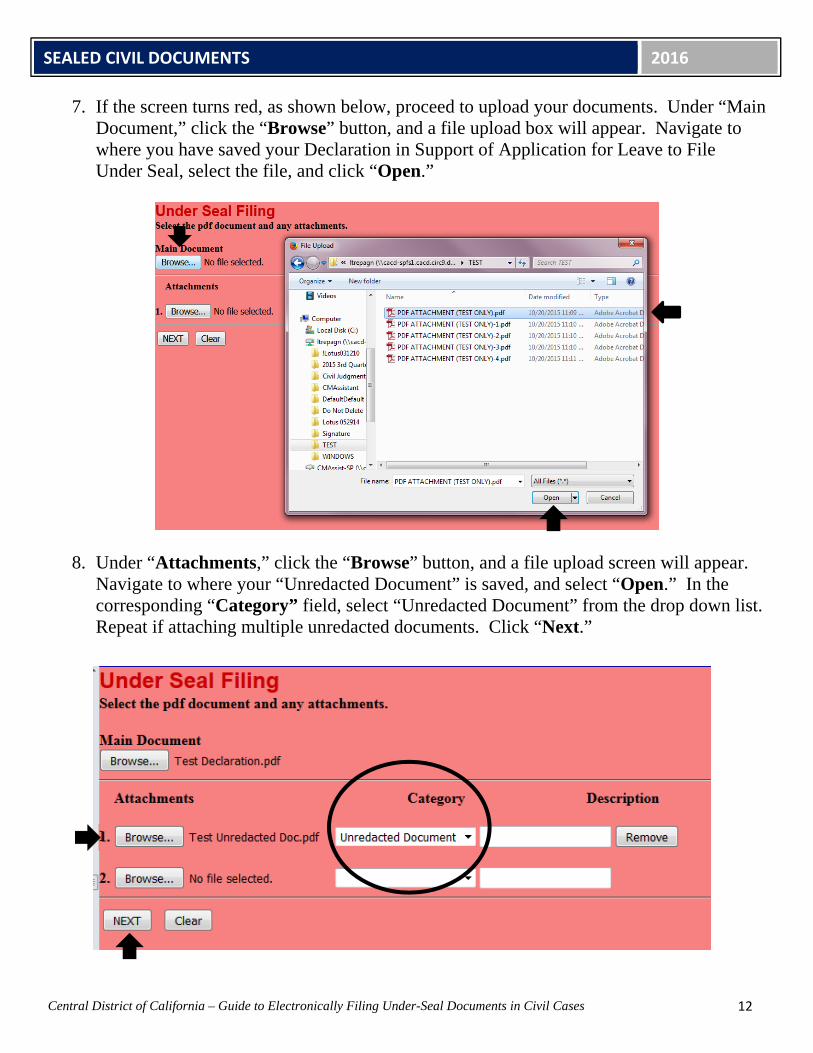
7. If the screen turns red, as shown below, proceed to upload your documents. Under “Main Document,” click the “Browse” button, and a file upload box will appear. Navigate to where you have saved your Declaration in Support of Application for Leave to File Under Seal, select the file, and click “Open.”
8. Under “Attachments,” click the “Browse” button, and a file upload screen will appear.
Navigate to where your “Unredacted Document” is saved, and select “Open.” In the corresponding “Category” field, select “Unredacted Document” from the drop down list. Repeat if attaching multiple unredacted documents. Click “Next.”
SEALED CIVIL DOCUMENTS 2016
13
Central District of California – Guide to Electronically Filing Under-Seal Documents in Civil Cases
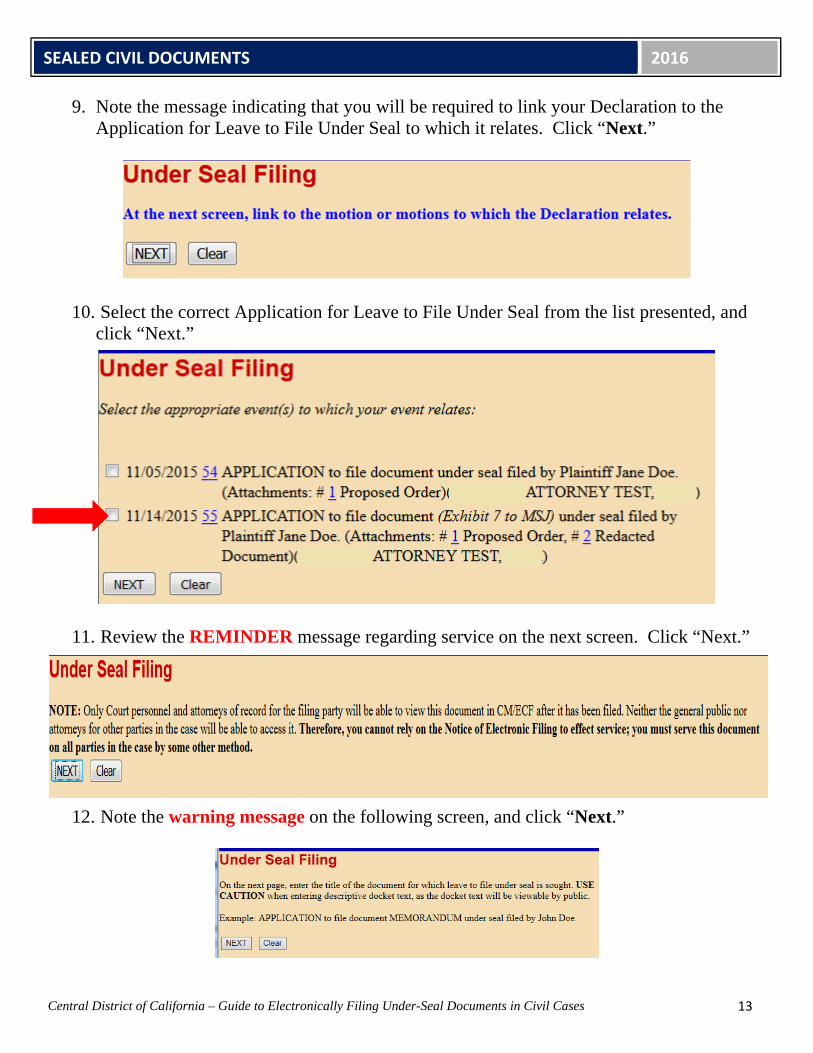
9. Note the message indicating that you will be required to link your Declaration to the Application for Leave to File Under Seal to which it relates. Click “Next.”
10. Select the correct Application for Leave to File Under Seal from the list presented, and
click “Next.”
11. Review the REMINDER message regarding service on the next screen. Click “Next.”
12. Note the warning message on the following screen, and click “Next.”
SEALED CIVIL DOCUMENTS 2016
14
Central District of California – Guide to Electronically Filing Under-Seal Documents in Civil Cases
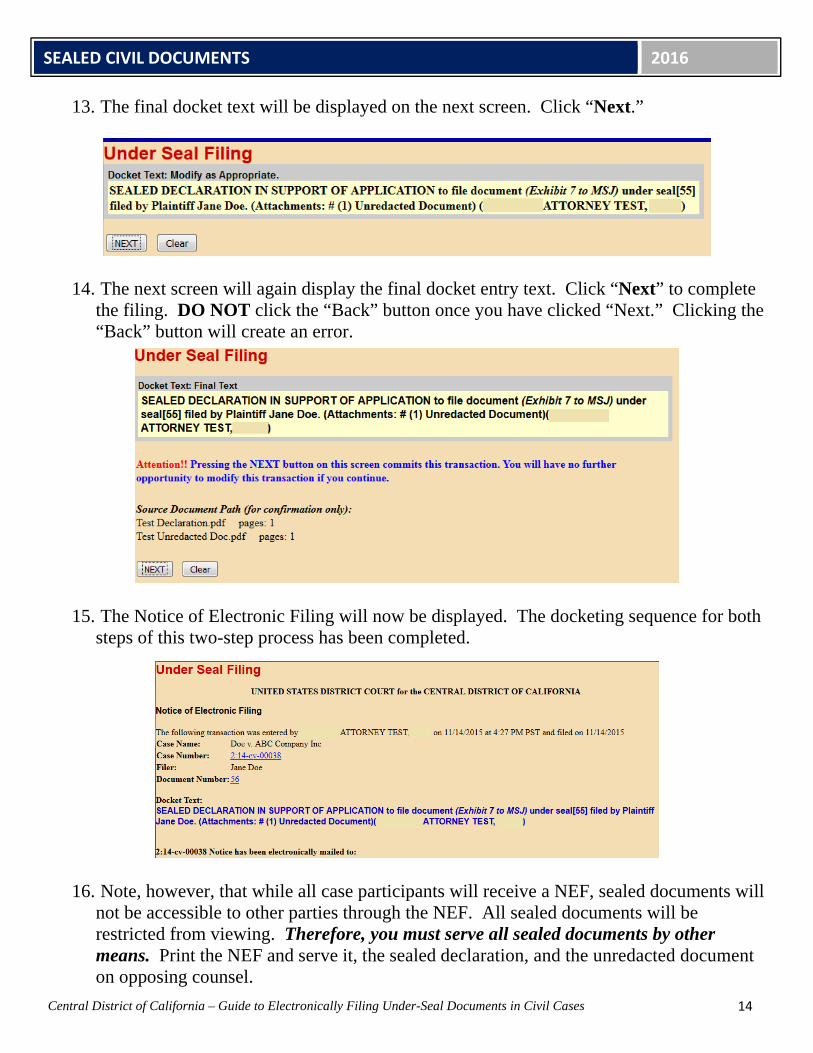
13. The final docket text will be displayed on the next screen. Click “Next.”
14. The next screen will again display the final docket entry text. Click “Next” to complete
the filing. DO NOT click the “Back” button once you have clicked “Next.” Clicking the “Back” button will create an error.
15. The Notice of Electronic Filing will now be displayed. The docketing sequence for both
steps of this two-step process has been completed.
16. Note, however, that while all case participants will receive a NEF, sealed documents will
not be accessible to other parties through the NEF. All sealed documents will be restricted from viewing. Therefore, you must serve all sealed documents by other means. Print the NEF and serve it, the sealed declaration, and the unredacted document on opposing counsel.
SEALED CIVIL DOCUMENTS 2016
15
Central District of California – Guide to Electronically Filing Under-Seal Documents in Civil Cases
SEALEDDOCUMENT:SCREEN‐BY‐SCREENINSTRUCTIONS
Please note that this event can only be used to e-file a sealed document if you have already obtained a court order granting leave to file that document under seal. If you have not obtained such an order, you will not be able to complete the e-filing process.
Civil>UnderSealFilings>UnderSealFilingEvents>SealedDocument
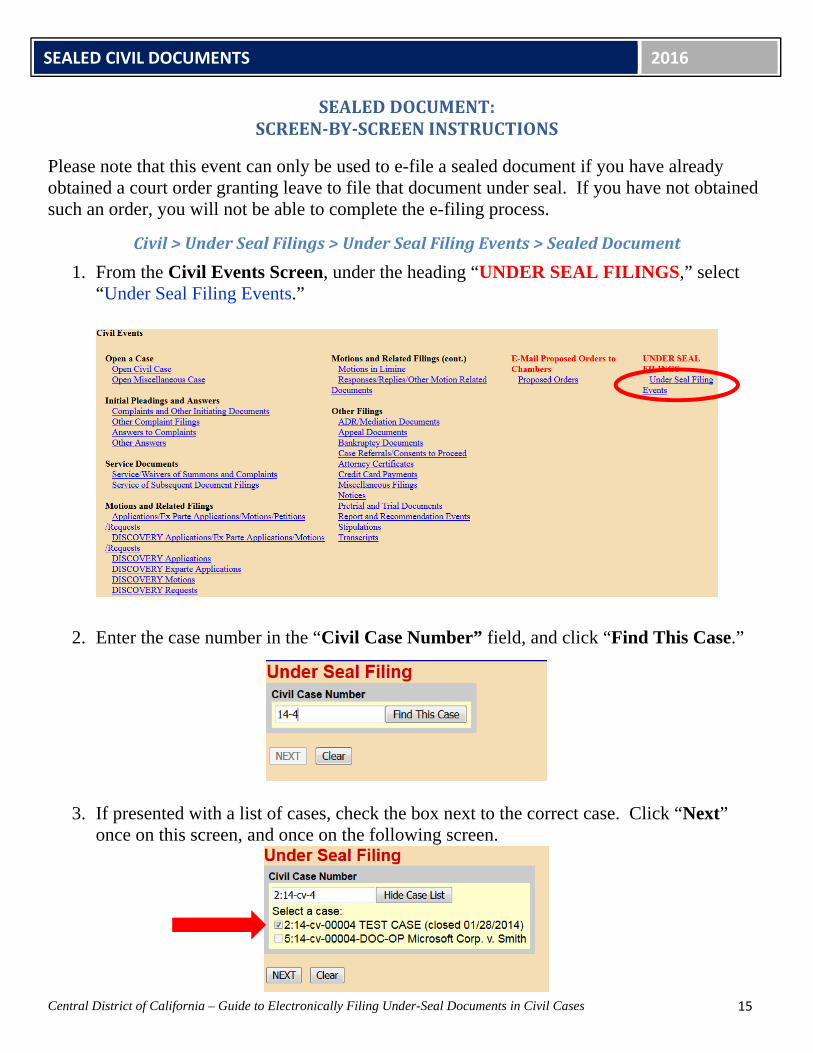
1. From the Civil Events Screen, under the heading “UNDER SEAL FILINGS,” select “Under Seal Filing Events.”
2. Enter the case number in the “Civil Case Number” field, and click “Find This Case.”
3. If presented with a list of cases, check the box next to the correct case. Click “Next”
once on this screen, and once on the following screen.
SEALED CIVIL DOCUMENTS 2016
16
Central District of California – Guide to Electronically Filing Under-Seal Documents in Civil Cases
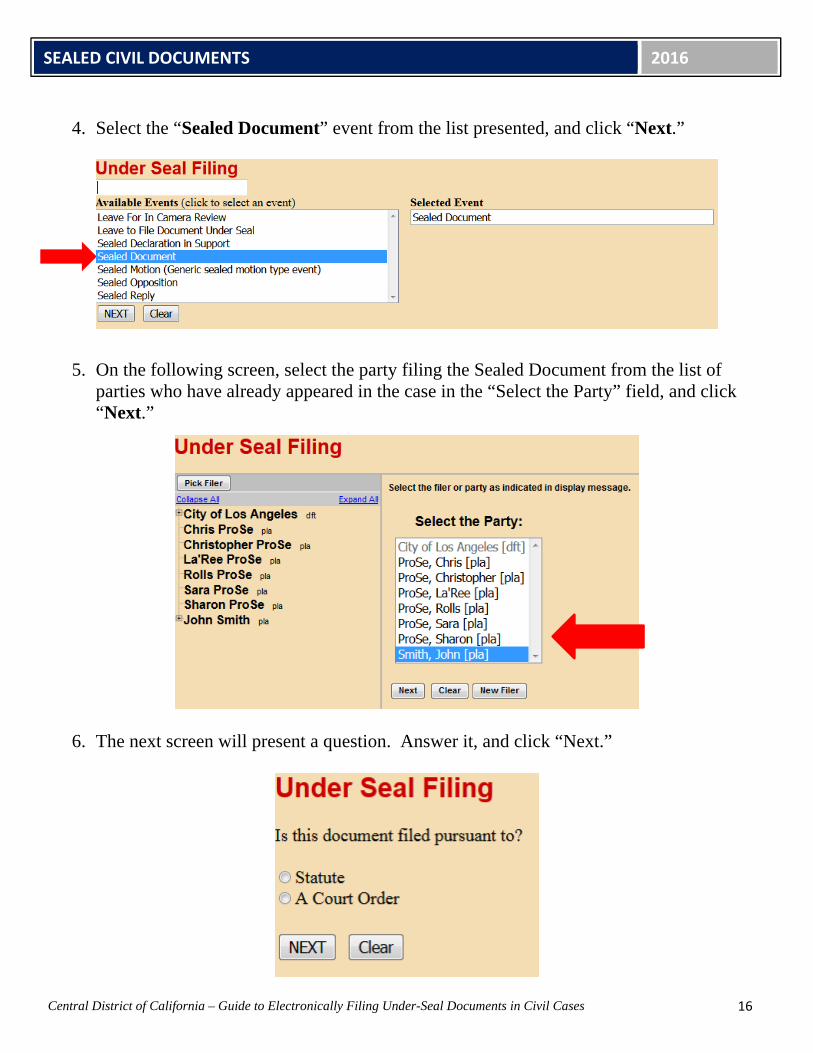
4. Select the “Sealed Document” event from the list presented, and click “Next.”
5. On the following screen, select the party filing the Sealed Document from the list of parties who have already appeared in the case in the “Select the Party” field, and click “Next.”
6. The next screen will present a question. Answer it, and click “Next.”
SEALED CIVIL DOCUMENTS 2016
17
Central District of California – Guide to Electronically Filing Under-Seal Documents in Civil Cases
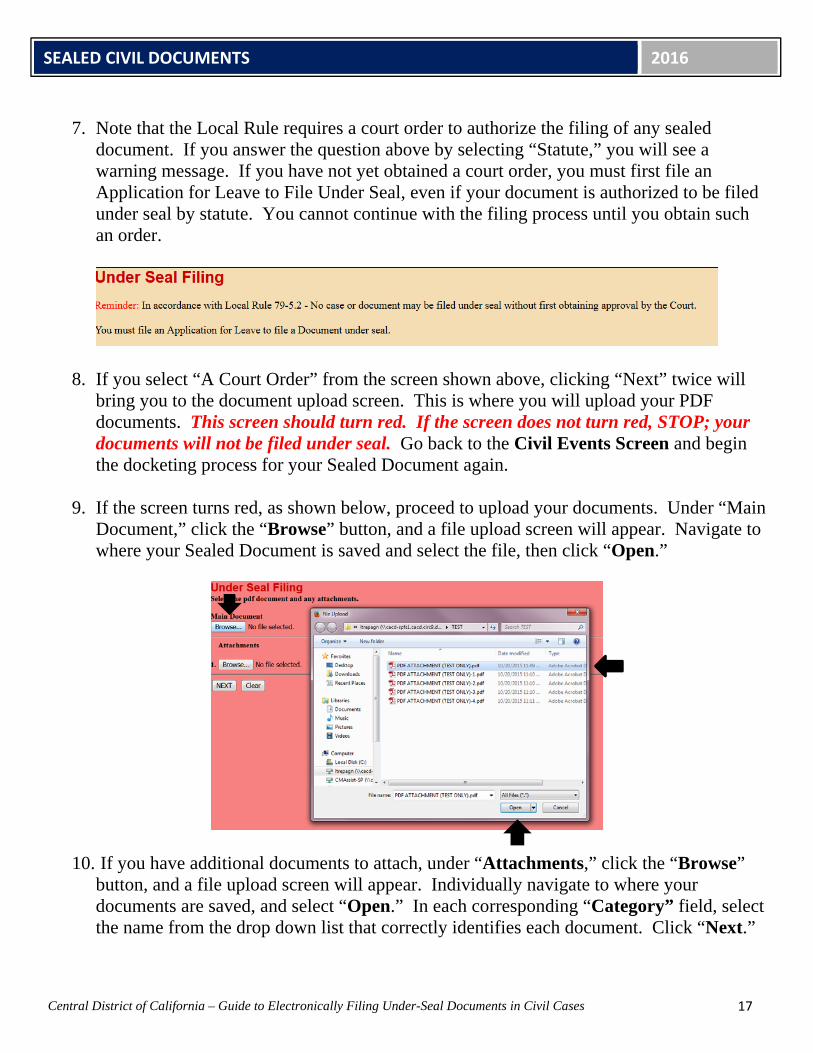
7. Note that the Local Rule requires a court order to authorize the filing of any sealed
document. If you answer the question above by selecting “Statute,” you will see a warning message. If you have not yet obtained a court order, you must first file an Application for Leave to File Under Seal, even if your document is authorized to be filed under seal by statute. You cannot continue with the filing process until you obtain such an order.
8. If you select “A Court Order” from the screen shown above, clicking “Next” twice will bring you to the document upload screen. This is where you will upload your PDF documents. This screen should turn red. If the screen does not turn red, STOP; your documents will not be filed under seal. Go back to the Civil Events Screen and begin the docketing process for your Sealed Document again.
9. If the screen turns red, as shown below, proceed to upload your documents. Under “Main Document,” click the “Browse” button, and a file upload screen will appear. Navigate to where your Sealed Document is saved and select the file, then click “Open.”
10. If you have additional documents to attach, under “Attachments,” click the “Browse”
button, and a file upload screen will appear. Individually navigate to where your documents are saved, and select “Open.” In each corresponding “Category” field, select the name from the drop down list that correctly identifies each document. Click “Next.”
SEALED CIVIL DOCUMENTS 2016
18
Central District of California – Guide to Electronically Filing Under-Seal Documents in Civil Cases
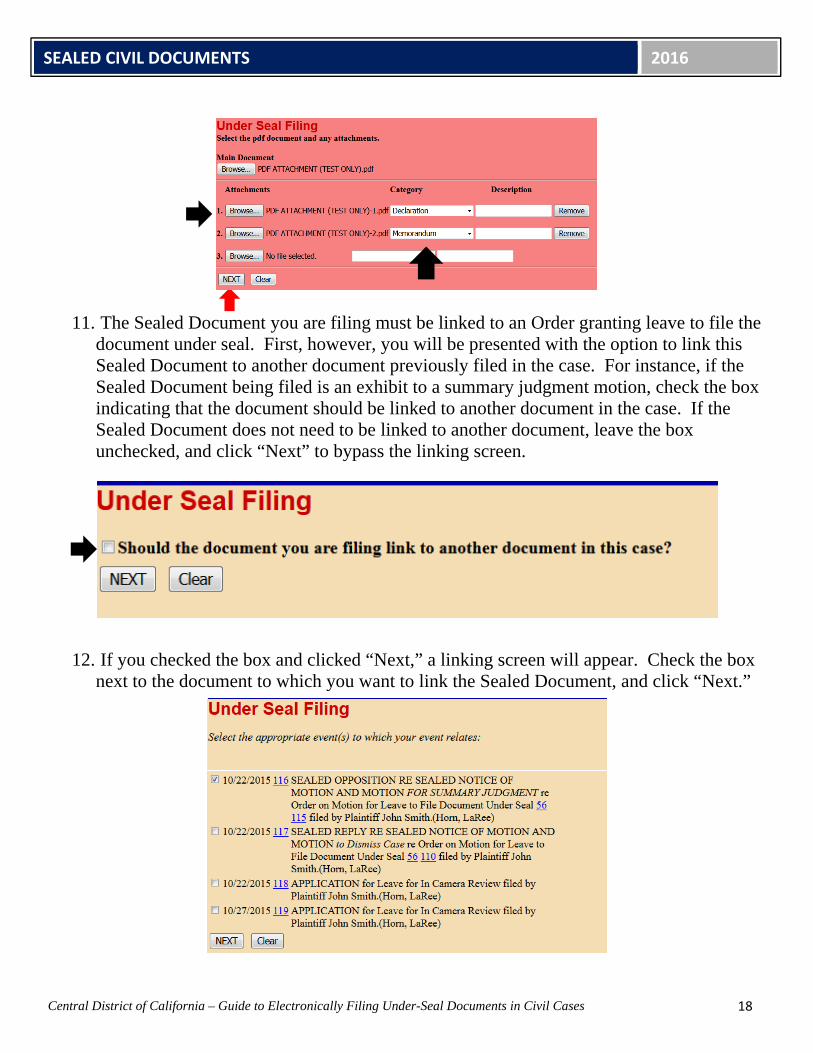
11. The Sealed Document you are filing must be linked to an Order granting leave to file the
document under seal. First, however, you will be presented with the option to link this Sealed Document to another document previously filed in the case. For instance, if the Sealed Document being filed is an exhibit to a summary judgment motion, check the box indicating that the document should be linked to another document in the case. If the Sealed Document does not need to be linked to another document, leave the box unchecked, and click “Next” to bypass the linking screen.
12. If you checked the box and clicked “Next,” a linking screen will appear. Check the box next to the document to which you want to link the Sealed Document, and click “Next.”
SEALED CIVIL DOCUMENTS 2016
19
Central District of California – Guide to Electronically Filing Under-Seal Documents in Civil Cases
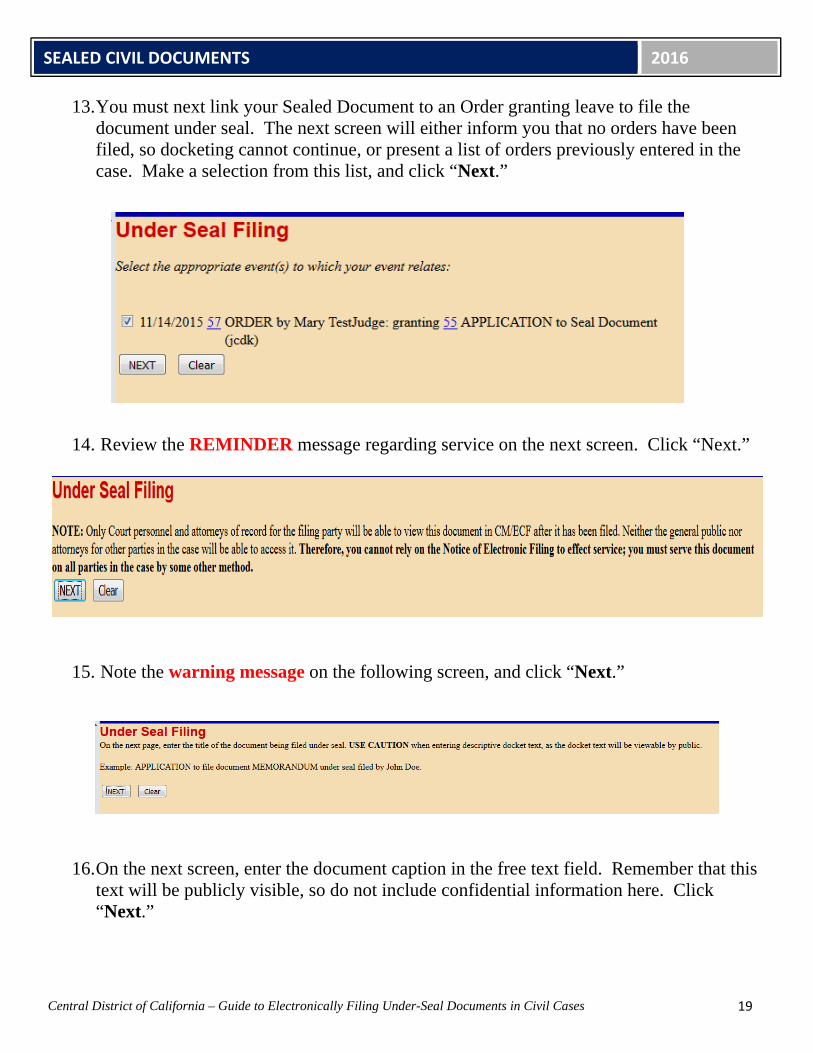
13. You must next link your Sealed Document to an Order granting leave to file the document under seal. The next screen will either inform you that no orders have been filed, so docketing cannot continue, or present a list of orders previously entered in the case. Make a selection from this list, and click “Next.”
14. Review the REMINDER message regarding service on the next screen. Click “Next.”
15. Note the warning message on the following screen, and click “Next.”
16. On the next screen, enter the document caption in the free text field. Remember that this text will be publicly visible, so do not include confidential information here. Click “Next.”
SEALED CIVIL DOCUMENTS 2016
20
Central District of California – Guide to Electronically Filing Under-Seal Documents in Civil Cases
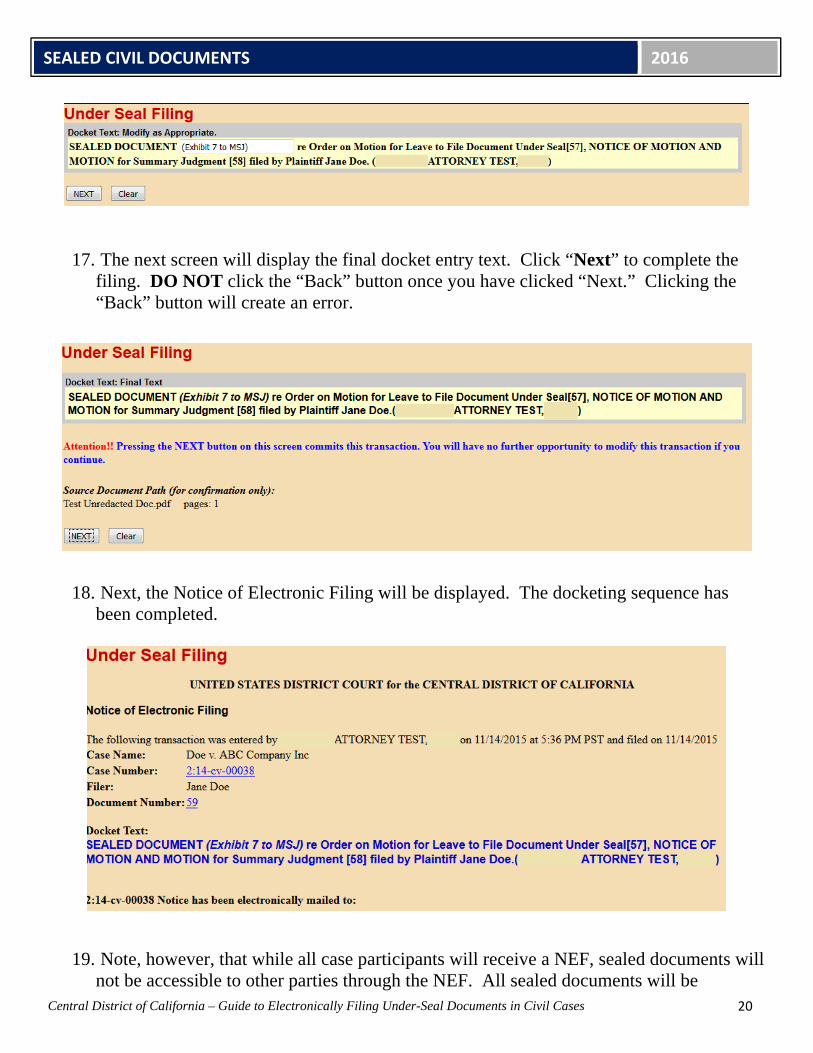
17. The next screen will display the final docket entry text. Click “Next” to complete the filing. DO NOT click the “Back” button once you have clicked “Next.” Clicking the “Back” button will create an error.
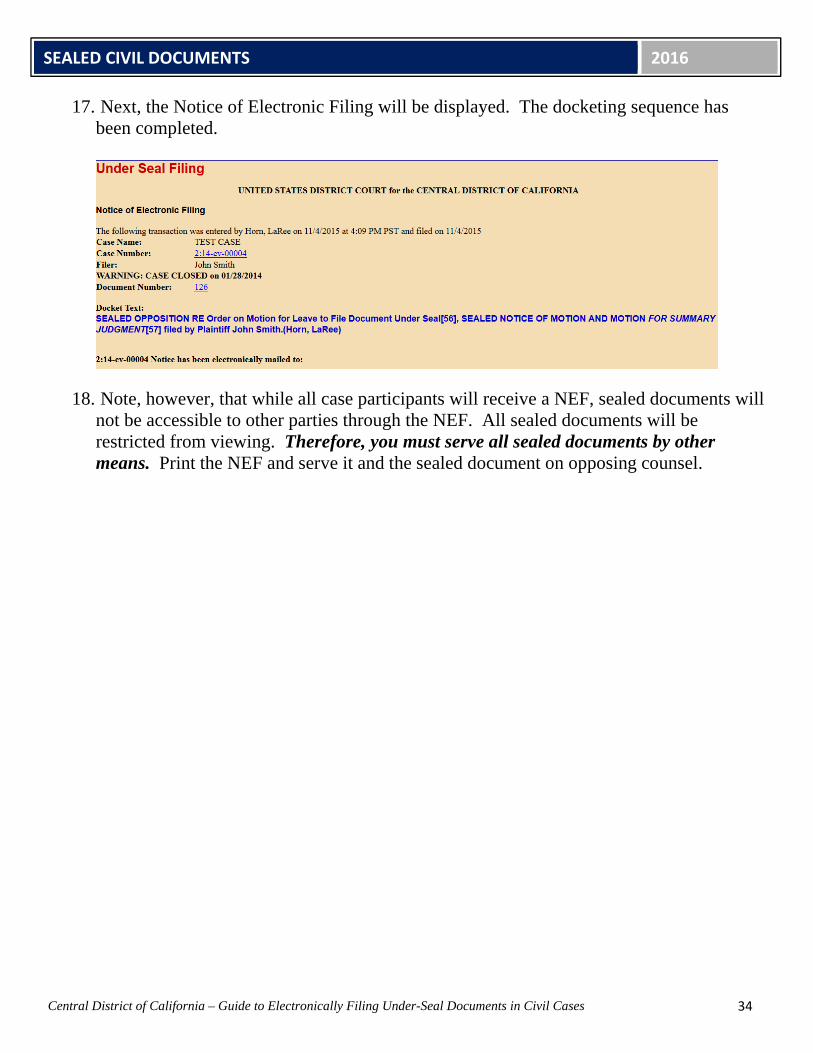
18. Next, the Notice of Electronic Filing will be displayed. The docketing sequence has been completed.
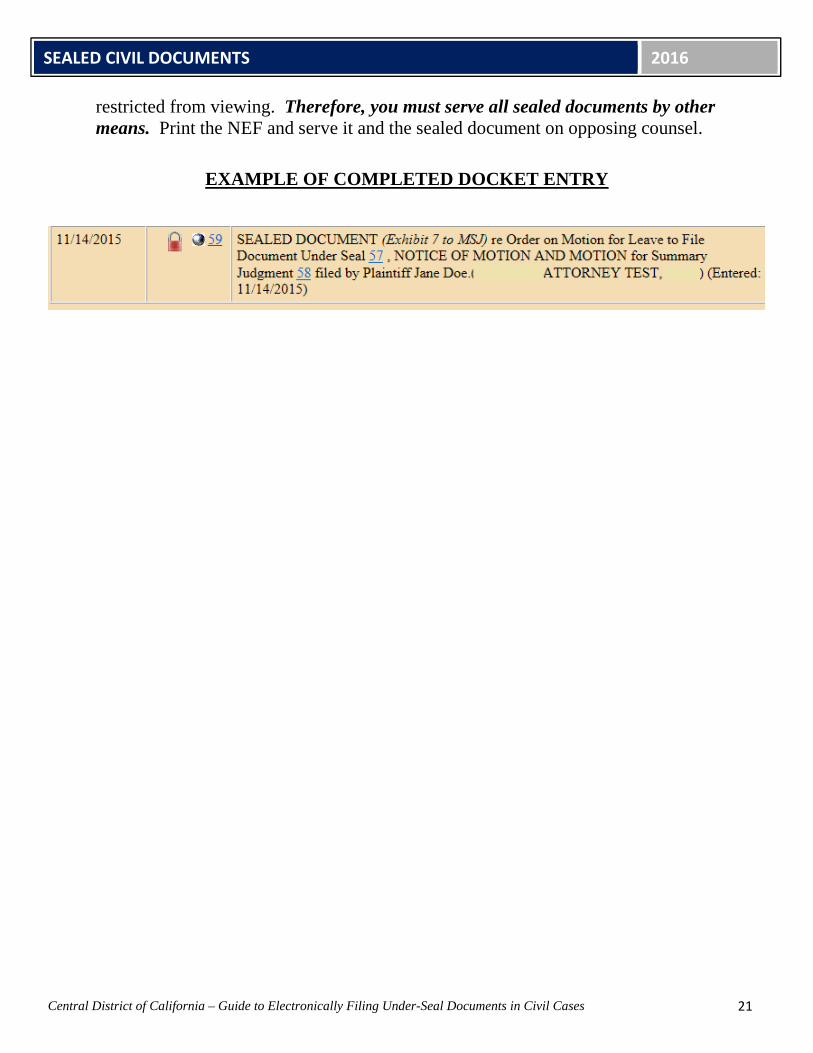
19. Note, however, that while all case participants will receive a NEF, sealed documents will not be accessible to other parties through the NEF. All sealed documents will be
SEALED CIVIL DOCUMENTS 2016
21
Central District of California – Guide to Electronically Filing Under-Seal Documents in Civil Cases
restricted from viewing. Therefore, you must serve all sealed documents by other means. Print the NEF and serve it and the sealed document on opposing counsel.
EXAMPLE OF COMPLETED DOCKET ENTRY
SEALED CIVIL DOCUMENTS 2016
22
Central District of California – Guide to Electronically Filing Under-Seal Documents in Civil Cases
SEALEDMOTION(GENERICSEALEDMOTION‐TYPEEVENT):SCREEN‐BY‐SCREENINSTRUCTIONS
Please note that this event can only be used to e-file a motion under seal if you have already obtained a court order granting leave to file that motion under seal. If you have not obtained such an order, you will not be able to complete the e-filing process.
Civil>UnderSealFilings>UnderSealFilingEvents>SealedMotion(Genericsealedmotiontypeevent)
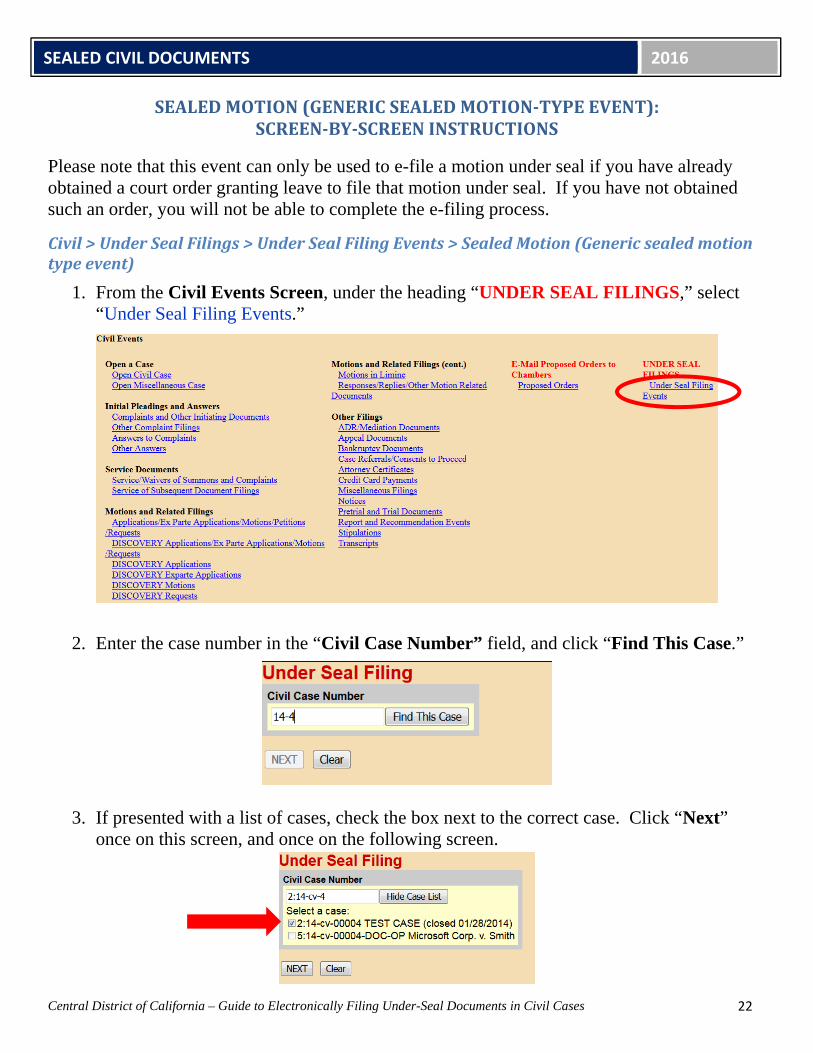
1. From the Civil Events Screen, under the heading “UNDER SEAL FILINGS,” select “Under Seal Filing Events.”
2. Enter the case number in the “Civil Case Number” field, and click “Find This Case.”
3. If presented with a list of cases, check the box next to the correct case. Click “Next”
once on this screen, and once on the following screen.
SEALED CIVIL DOCUMENTS 2016
23
Central District of California – Guide to Electronically Filing Under-Seal Documents in Civil Cases
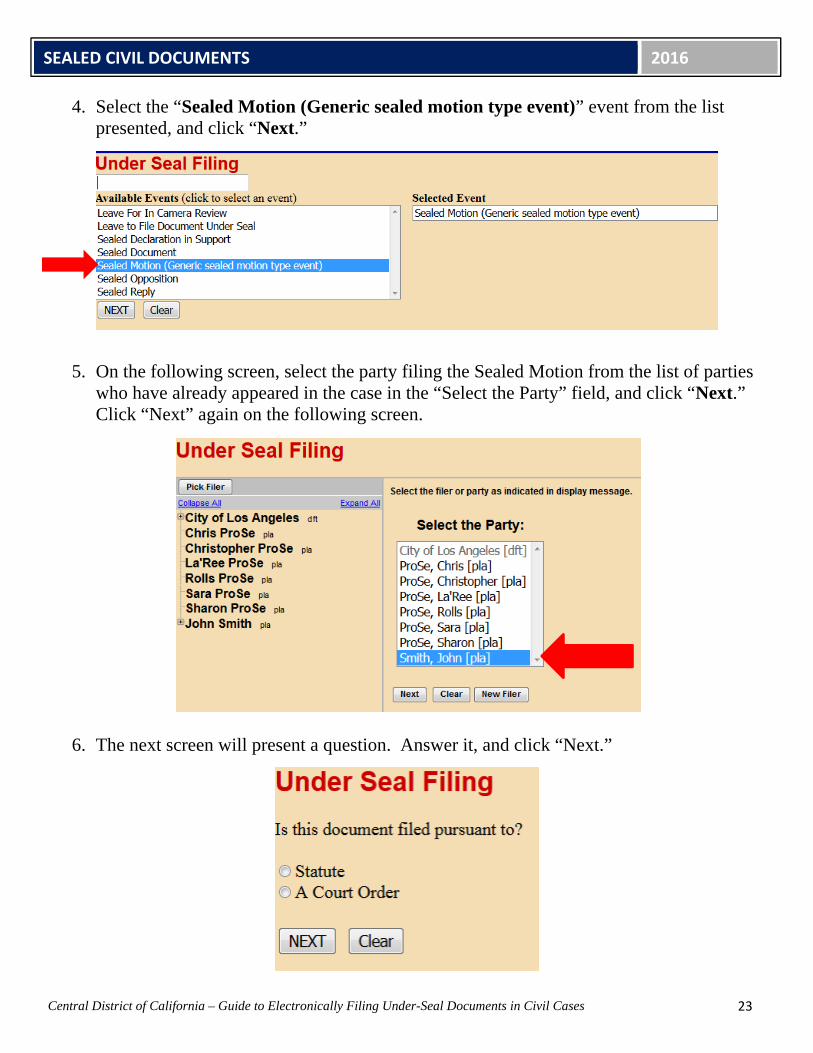
4. Select the “Sealed Motion (Generic sealed motion type event)” event from the list presented, and click “Next.”
5. On the following screen, select the party filing the Sealed Motion from the list of parties who have already appeared in the case in the “Select the Party” field, and click “Next.” Click “Next” again on the following screen.
6. The next screen will present a question. Answer it, and click “Next.”

SEALED CIVIL DOCUMENTS 2016
24
Central District of California – Guide to Electronically Filing Under-Seal Documents in Civil Cases
7. Note that the Local Rule requires a court order to authorize the filing of any sealed
document. If you answer the question above by selecting “Statute,” you will see a warning message. If you have not yet obtained a court order, you must first file an Application for Leave to File Under Seal, even if your document is authorized to be filed under seal by statute. You cannot continue with the filing process until you obtain such an order.
8. If you select “A Court Order” from the screen shown above, clicking “Next” twice will bring you to the document upload screen. This is where you will upload your PDF documents. This screen should turn red. If the screen does not turn red, STOP; your documents will not be filed under seal. Go back to the Civil Events Screen and begin the docketing process for your Sealed Motion again.
9. If the screen turns red, as shown below, proceed to upload your documents. Under “Main Document,” click the “Browse” button, and a file upload screen will appear. Navigate to where your Sealed Motion is saved and select the file, then click “Open.”
10. If you have additional documents to attach, under “Attachments,” click the “Browse”
button, and a file upload screen will appear. Individually navigate to where your documents are saved, and select “Open.” In each corresponding “Category” field, select the name from the drop down list that correctly identifies each document. Click “Next.”
SEALED CIVIL DOCUMENTS 2016
25
Central District of California – Guide to Electronically Filing Under-Seal Documents in Civil Cases
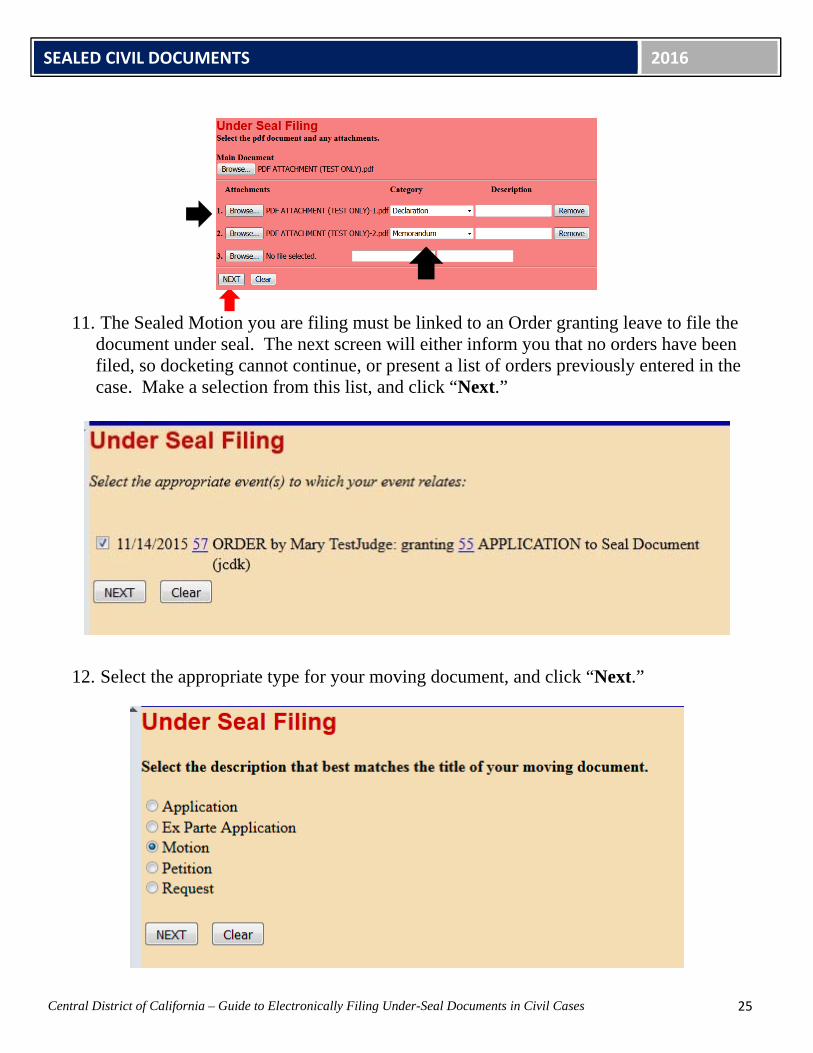
11. The Sealed Motion you are filing must be linked to an Order granting leave to file the
document under seal. The next screen will either inform you that no orders have been filed, so docketing cannot continue, or present a list of orders previously entered in the case. Make a selection from this list, and click “Next.”
12. Select the appropriate type for your moving document, and click “Next.”
SEALED CIVIL DOCUMENTS 2016
26
Central District of California – Guide to Electronically Filing Under-Seal Documents in Civil Cases
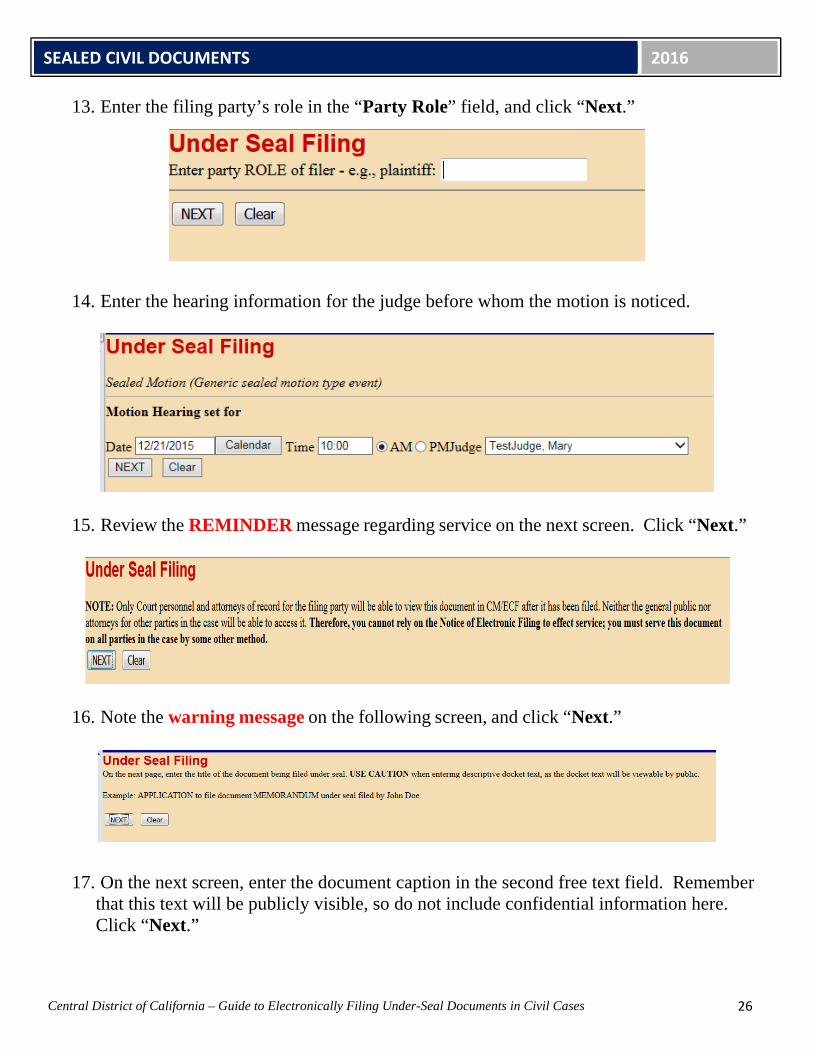
13. Enter the filing party’s role in the “Party Role” field, and click “Next.”
14. Enter the hearing information for the judge before whom the motion is noticed.
15. Review the REMINDER message regarding service on the next screen. Click “Next.”
16. Note the warning message on the following screen, and click “Next.”
17. On the next screen, enter the document caption in the second free text field. Remember that this text will be publicly visible, so do not include confidential information here. Click “Next.”
SEALED CIVIL DOCUMENTS 2016
27
Central District of California – Guide to Electronically Filing Under-Seal Documents in Civil Cases
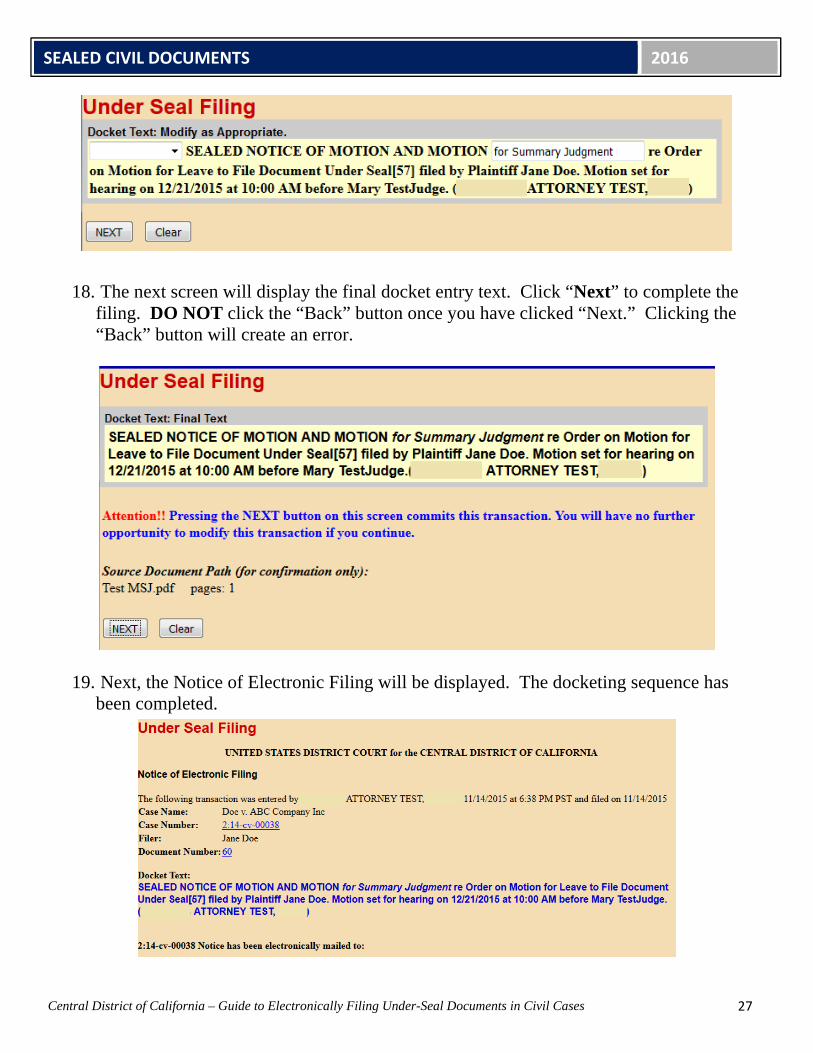
18. The next screen will display the final docket entry text. Click “Next” to complete the filing. DO NOT click the “Back” button once you have clicked “Next.” Clicking the “Back” button will create an error.
19. Next, the Notice of Electronic Filing will be displayed. The docketing sequence has
been completed.
SEALED CIVIL DOCUMENTS 2016
28
Central District of California – Guide to Electronically Filing Under-Seal Documents in Civil Cases
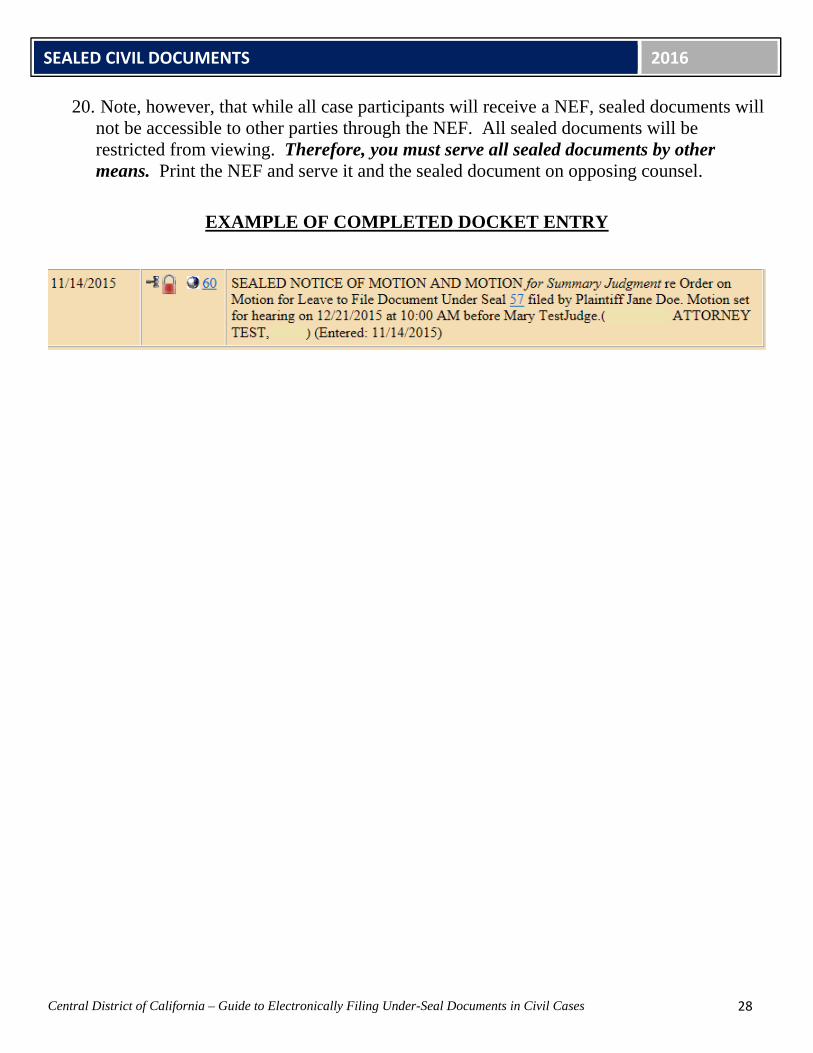
20. Note, however, that while all case participants will receive a NEF, sealed documents will not be accessible to other parties through the NEF. All sealed documents will be restricted from viewing. Therefore, you must serve all sealed documents by other means. Print the NEF and serve it and the sealed document on opposing counsel.
EXAMPLE OF COMPLETED DOCKET ENTRY
SEALED CIVIL DOCUMENTS 2016
29
Central District of California – Guide to Electronically Filing Under-Seal Documents in Civil Cases
SEALEDOPPOSITION:SCREEN‐BY‐SCREENINSTRUCTIONS
Please note that this event can only be used to e-file a sealed document if you have already obtained a court order granting leave to file that document under seal. If you have not obtained such an order, you will not be able to complete the e-filing process.
Civil>UnderSealFilings>UnderSealFilingEvents>SealedOpposition
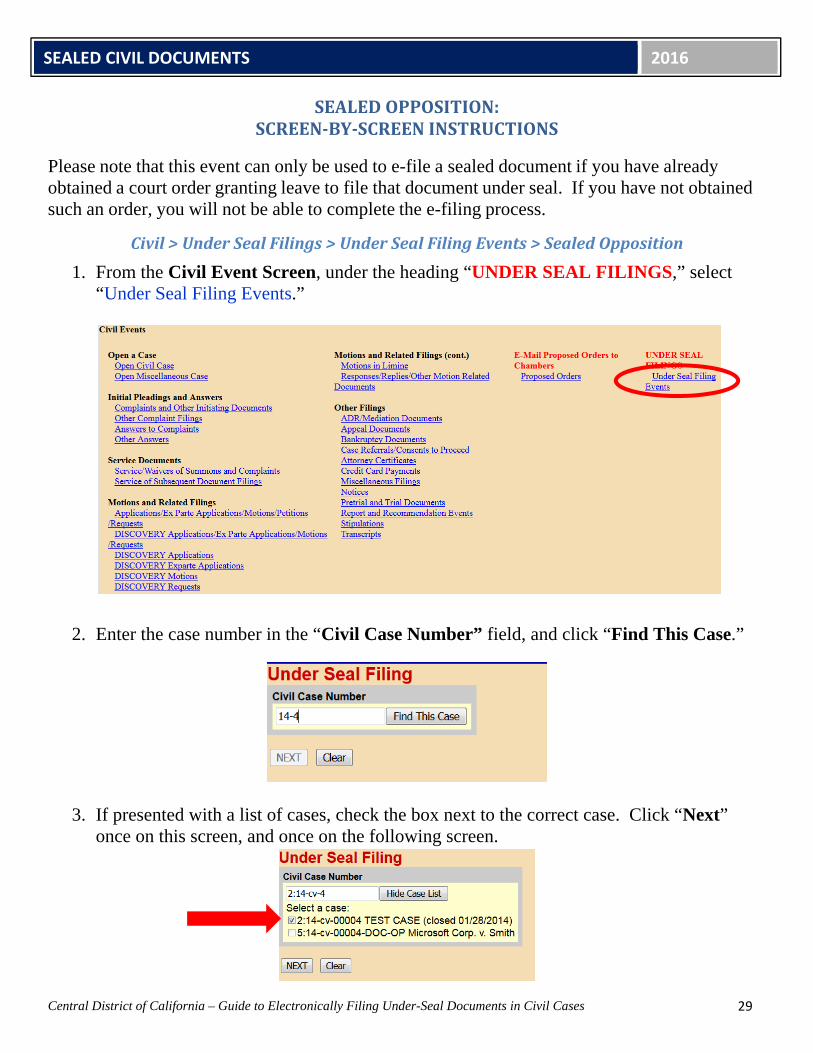
1. From the Civil Event Screen, under the heading “UNDER SEAL FILINGS,” select “Under Seal Filing Events.”
2. Enter the case number in the “Civil Case Number” field, and click “Find This Case.”
3. If presented with a list of cases, check the box next to the correct case. Click “Next”
once on this screen, and once on the following screen.
SEALED CIVIL DOCUMENTS 2016
30
Central District of California – Guide to Electronically Filing Under-Seal Documents in Civil Cases
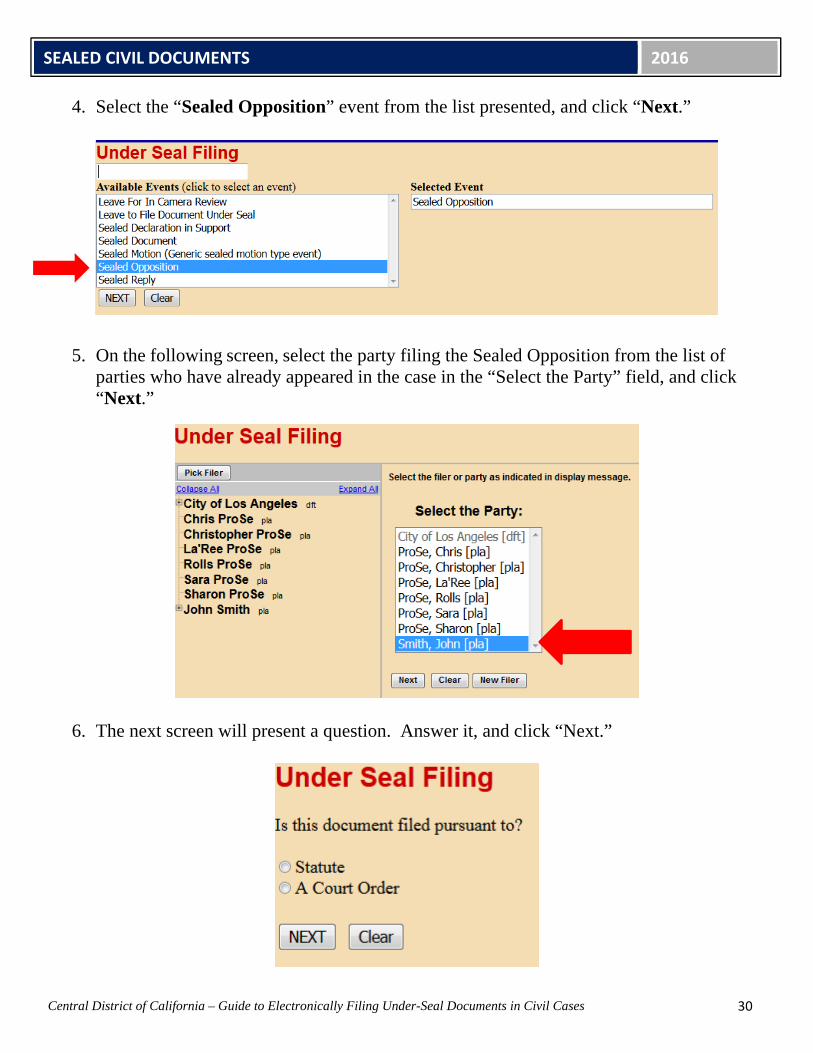
4. Select the “Sealed Opposition” event from the list presented, and click “Next.”
5. On the following screen, select the party filing the Sealed Opposition from the list of parties who have already appeared in the case in the “Select the Party” field, and click “Next.”
6. The next screen will present a question. Answer it, and click “Next.”
SEALED CIVIL DOCUMENTS 2016
31
Central District of California – Guide to Electronically Filing Under-Seal Documents in Civil Cases
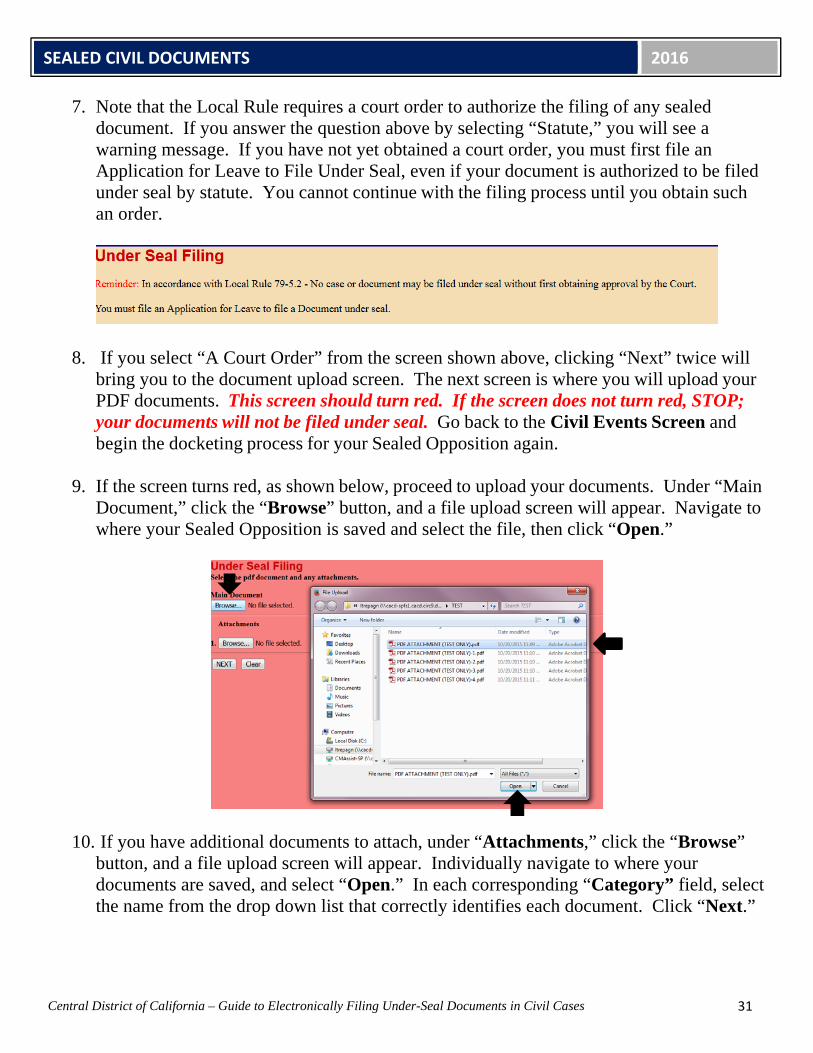
7. Note that the Local Rule requires a court order to authorize the filing of any sealed document. If you answer the question above by selecting “Statute,” you will see a warning message. If you have not yet obtained a court order, you must first file an Application for Leave to File Under Seal, even if your document is authorized to be filed under seal by statute. You cannot continue with the filing process until you obtain such an order.
8. If you select “A Court Order” from the screen shown above, clicking “Next” twice will bring you to the document upload screen. The next screen is where you will upload your PDF documents. This screen should turn red. If the screen does not turn red, STOP; your documents will not be filed under seal. Go back to the Civil Events Screen and begin the docketing process for your Sealed Opposition again.
9. If the screen turns red, as shown below, proceed to upload your documents. Under “Main Document,” click the “Browse” button, and a file upload screen will appear. Navigate to where your Sealed Opposition is saved and select the file, then click “Open.”
10. If you have additional documents to attach, under “Attachments,” click the “Browse”
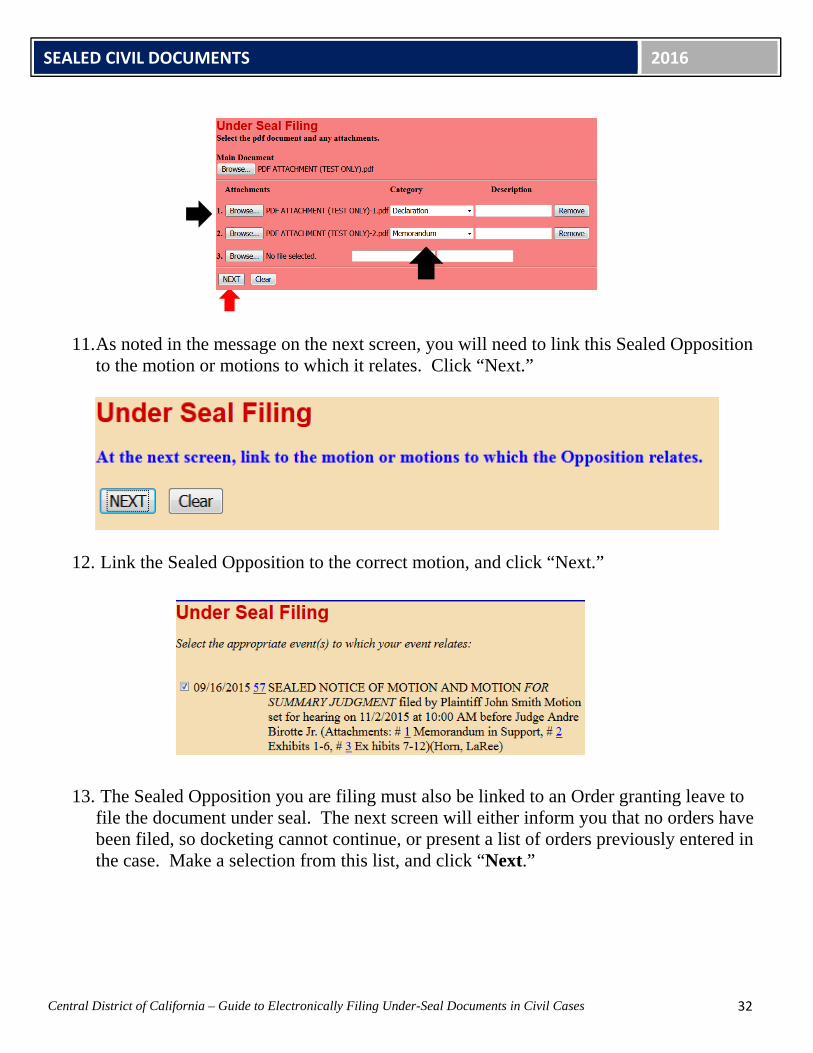
button, and a file upload screen will appear. Individually navigate to where your documents are saved, and select “Open.” In each corresponding “Category” field, select the name from the drop down list that correctly identifies each document. Click “Next.”
SEALED CIVIL DOCUMENTS 2016
32
Central District of California – Guide to Electronically Filing Under-Seal Documents in Civil Cases
11. As noted in the message on the next screen, you will need to link this Sealed Opposition to the motion or motions to which it relates. Click “Next.”
12. Link the Sealed Opposition to the correct motion, and click “Next.”
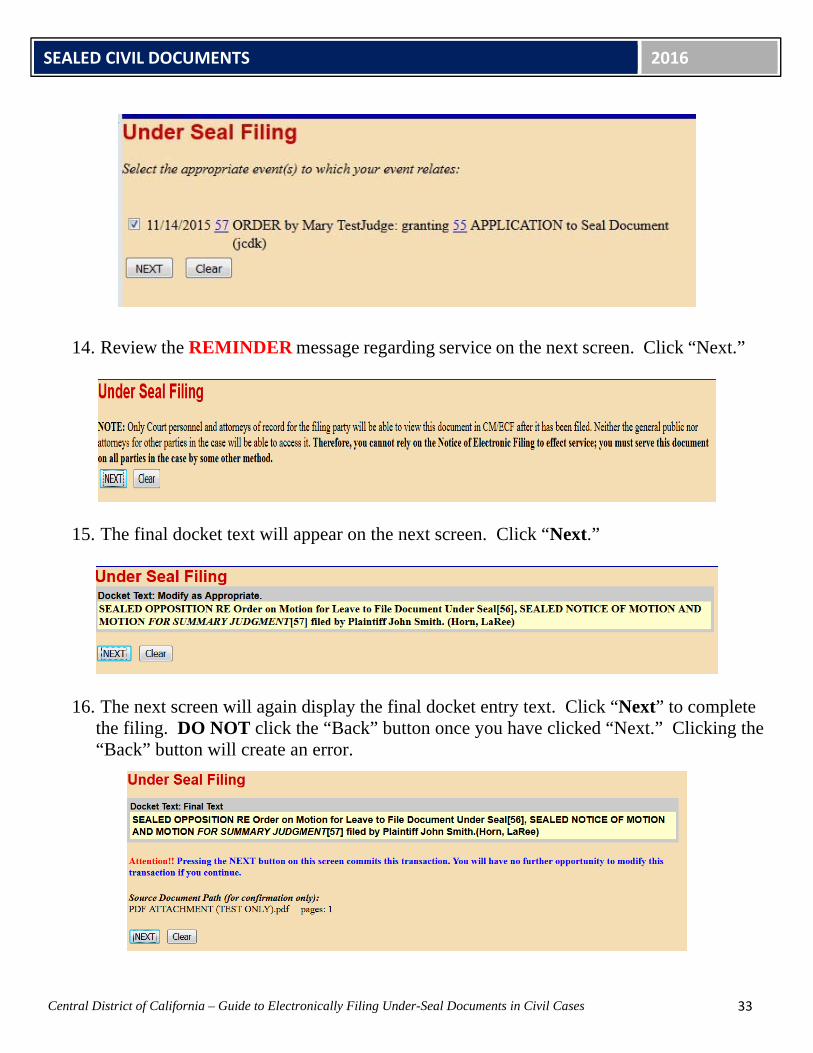
13. The Sealed Opposition you are filing must also be linked to an Order granting leave to file the document under seal. The next screen will either inform you that no orders have been filed, so docketing cannot continue, or present a list of orders previously entered in the case. Make a selection from this list, and click “Next.”
SEALED CIVIL DOCUMENTS 2016
33
Central District of California – Guide to Electronically Filing Under-Seal Documents in Civil Cases
14. Review the REMINDER message regarding service on the next screen. Click “Next.”
15. The final docket text will appear on the next screen. Click “Next.”
16. The next screen will again display the final docket entry text. Click “Next” to complete the filing. DO NOT click the “Back” button once you have clicked “Next.” Clicking the “Back” button will create an error.
SEALED CIVIL DOCUMENTS 2016
34
Central District of California – Guide to Electronically Filing Under-Seal Documents in Civil Cases
17. Next, the Notice of Electronic Filing will be displayed. The docketing sequence has been completed.
18. Note, however, that while all case participants will receive a NEF, sealed documents will not be accessible to other parties through the NEF. All sealed documents will be restricted from viewing. Therefore, you must serve all sealed documents by other means. Print the NEF and serve it and the sealed document on opposing counsel.
SEALED CIVIL DOCUMENTS 2016
35
Central District of California – Guide to Electronically Filing Under-Seal Documents in Civil Cases
SEALEDREPLY:SCREEN‐BY‐SCREENINSTRUCTIONS
Please note that this event can only be used to e-file a sealed document if you have already obtained a court order granting leave to file that document under seal. If you have not obtained such an order, you will not be able to complete the e-filing process.
Civil>UnderSealFilings>UnderSealFilingEvents>SealedReply
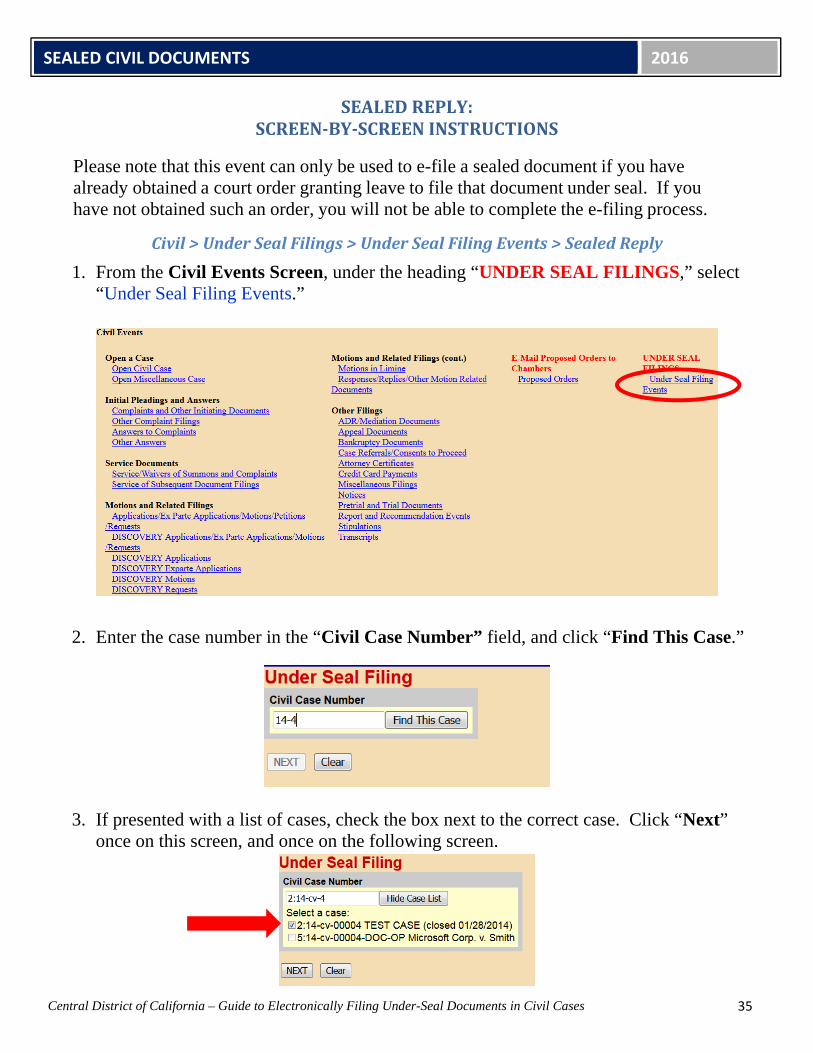
1. From the Civil Events Screen, under the heading “UNDER SEAL FILINGS,” select “Under Seal Filing Events.”
2. Enter the case number in the “Civil Case Number” field, and click “Find This Case.”
3. If presented with a list of cases, check the box next to the correct case. Click “Next”
once on this screen, and once on the following screen.
SEALED CIVIL DOCUMENTS 2016
36
Central District of California – Guide to Electronically Filing Under-Seal Documents in Civil Cases
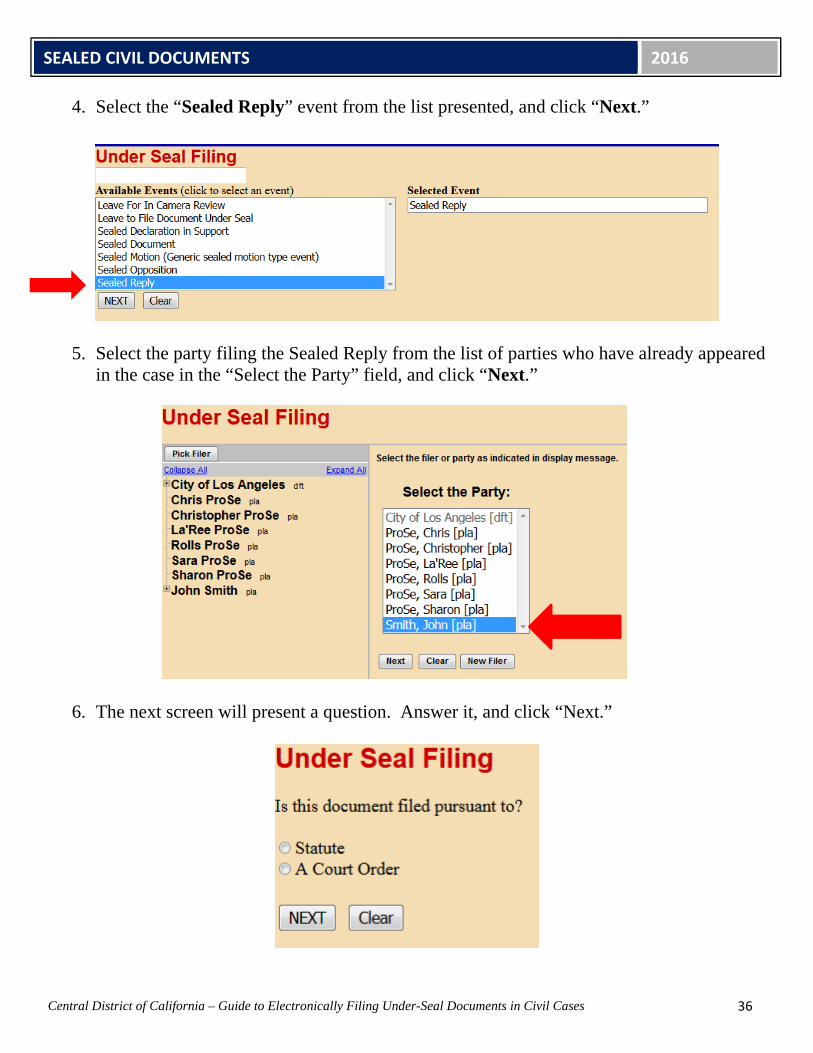
4. Select the “Sealed Reply” event from the list presented, and click “Next.”
5. Select the party filing the Sealed Reply from the list of parties who have already appeared
in the case in the “Select the Party” field, and click “Next.”
6. The next screen will present a question. Answer it, and click “Next.”
SEALED CIVIL DOCUMENTS 2016
37
Central District of California – Guide to Electronically Filing Under-Seal Documents in Civil Cases
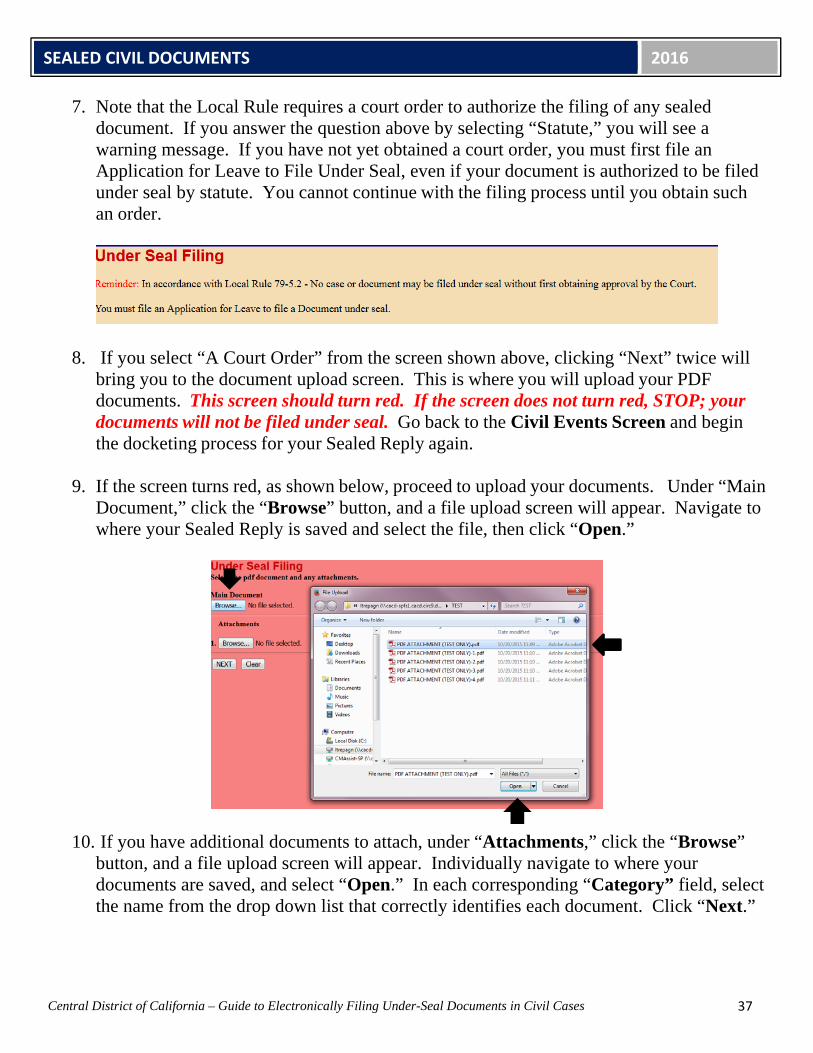
7. Note that the Local Rule requires a court order to authorize the filing of any sealed document. If you answer the question above by selecting “Statute,” you will see a warning message. If you have not yet obtained a court order, you must first file an Application for Leave to File Under Seal, even if your document is authorized to be filed under seal by statute. You cannot continue with the filing process until you obtain such an order.
8. If you select “A Court Order” from the screen shown above, clicking “Next” twice will bring you to the document upload screen. This is where you will upload your PDF documents. This screen should turn red. If the screen does not turn red, STOP; your documents will not be filed under seal. Go back to the Civil Events Screen and begin the docketing process for your Sealed Reply again.
9. If the screen turns red, as shown below, proceed to upload your documents. Under “Main Document,” click the “Browse” button, and a file upload screen will appear. Navigate to where your Sealed Reply is saved and select the file, then click “Open.”
10. If you have additional documents to attach, under “Attachments,” click the “Browse”
button, and a file upload screen will appear. Individually navigate to where your documents are saved, and select “Open.” In each corresponding “Category” field, select the name from the drop down list that correctly identifies each document. Click “Next.”
SEALED CIVIL DOCUMENTS 2016
38
Central District of California – Guide to Electronically Filing Under-Seal Documents in Civil Cases
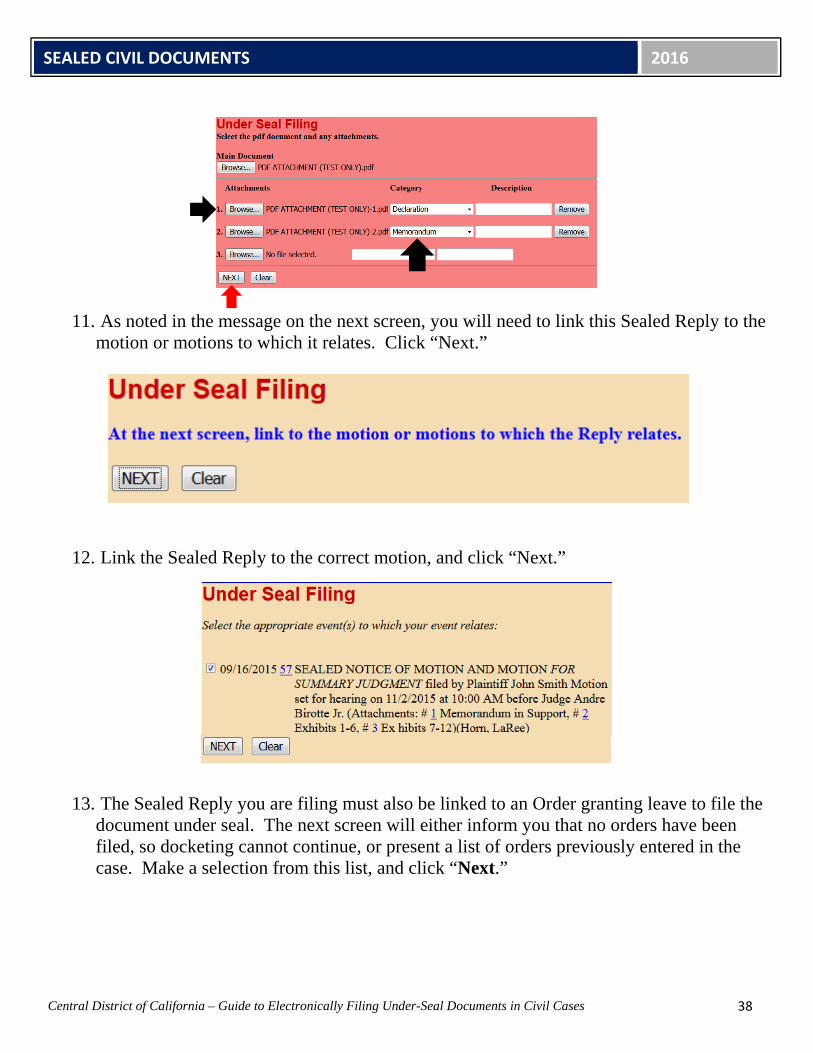
11. As noted in the message on the next screen, you will need to link this Sealed Reply to the
motion or motions to which it relates. Click “Next.”
12. Link the Sealed Reply to the correct motion, and click “Next.”
13. The Sealed Reply you are filing must also be linked to an Order granting leave to file the document under seal. The next screen will either inform you that no orders have been filed, so docketing cannot continue, or present a list of orders previously entered in the case. Make a selection from this list, and click “Next.”
SEALED CIVIL DOCUMENTS 2016
39
Central District of California – Guide to Electronically Filing Under-Seal Documents in Civil Cases
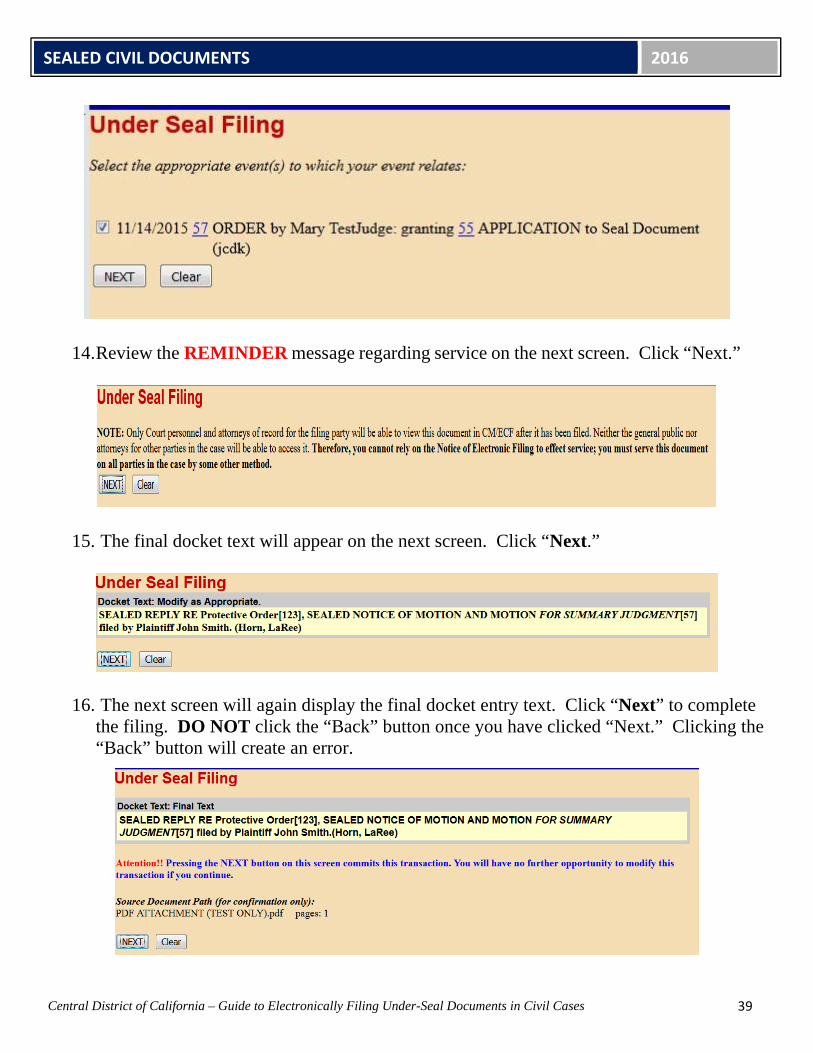
14. Review the REMINDER message regarding service on the next screen. Click “Next.”
15. The final docket text will appear on the next screen. Click “Next.”
16. The next screen will again display the final docket entry text. Click “Next” to complete the filing. DO NOT click the “Back” button once you have clicked “Next.” Clicking the “Back” button will create an error.
SEALED CIVIL DOCUMENTS 2016
40
Central District of California – Guide to Electronically Filing Under-Seal Documents in Civil Cases
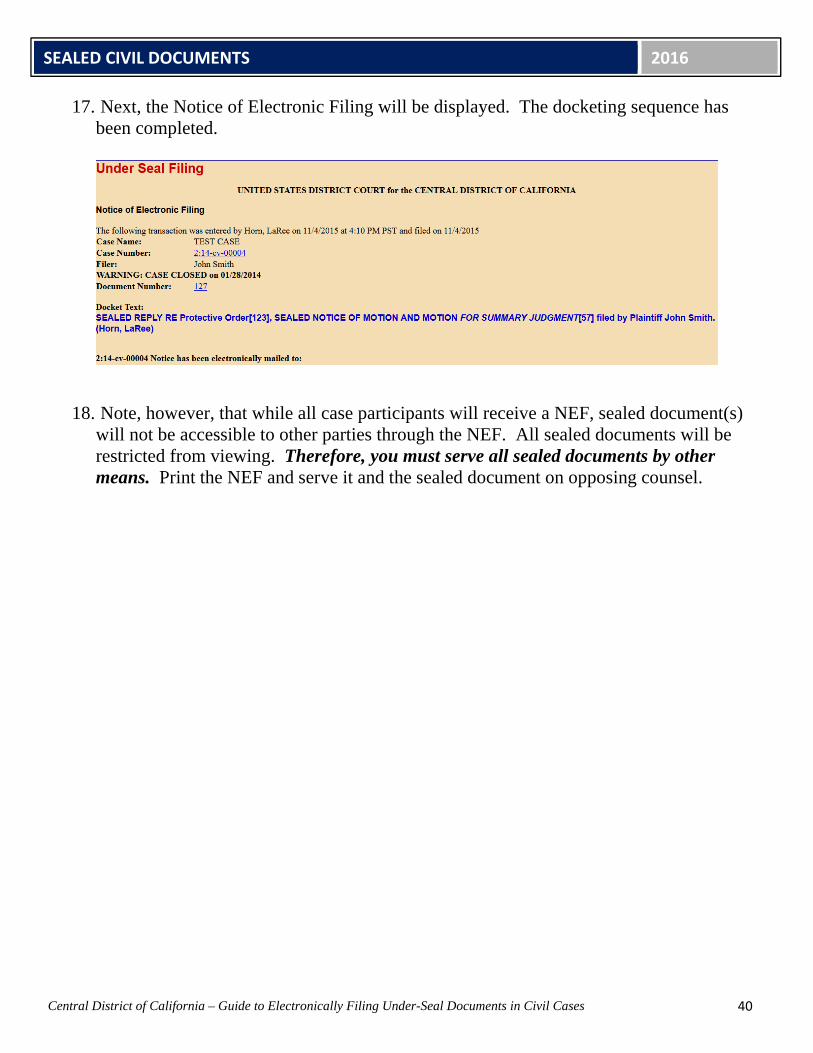
17. Next, the Notice of Electronic Filing will be displayed. The docketing sequence has been completed.
18. Note, however, that while all case participants will receive a NEF, sealed document(s) will not be accessible to other parties through the NEF. All sealed documents will be restricted from viewing. Therefore, you must serve all sealed documents by other means. Print the NEF and serve it and the sealed document on opposing counsel.
SEALED CIVIL DOCUMENTS 2016
41
Central District of California – Guide to Electronically Filing Under-Seal Documents in Civil Cases
APPLICATIONFORLEAVEFORINCAMERAREVIEW:SCREEN‐BY‐SCREENINSTRUCTIONS
Remember that this event is NOT restricted. Your Application for Leave for In Camera Review will be publicly visible, so do not include confidential information, and do not attach the documents you wish the Court to review in camera. If your Application is granted, you will be responsible for delivering copies of the documents directly to the judge’s chambers, in accordance with the judge’s procedures.
Civil>UnderSealFilings>UnderSealFilingEvents>LeaveForInCameraReview
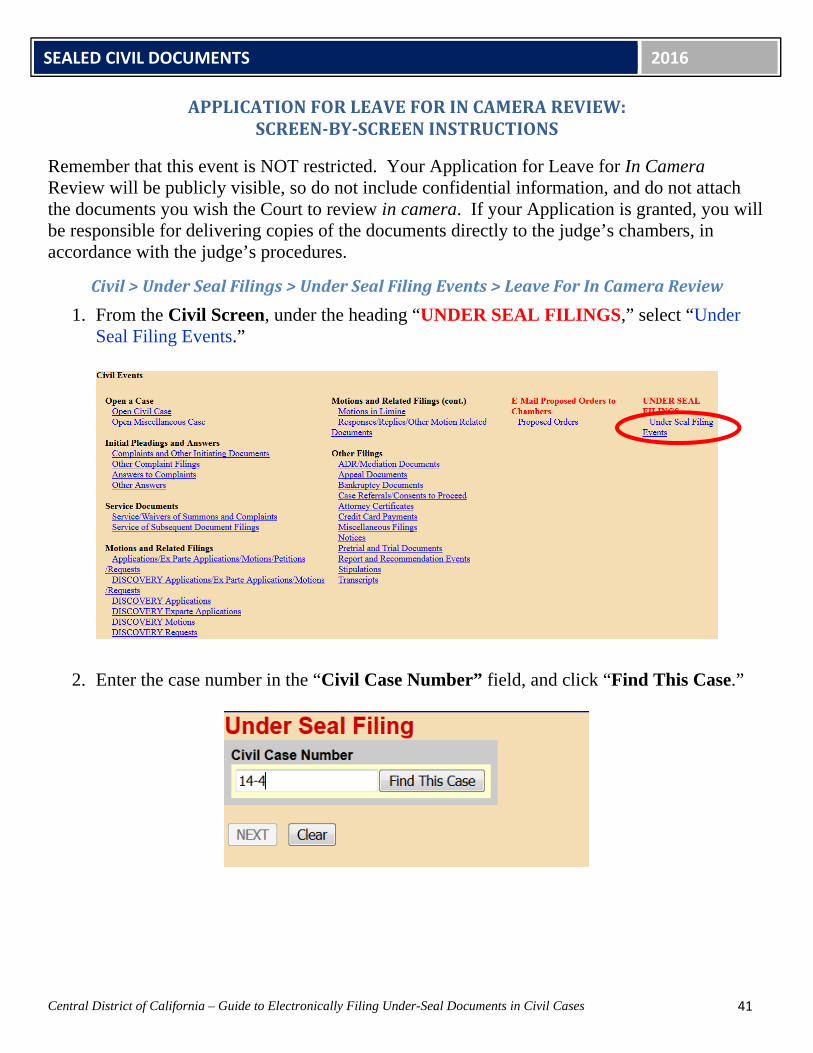
1. From the Civil Screen, under the heading “UNDER SEAL FILINGS,” select “Under Seal Filing Events.”
2. Enter the case number in the “Civil Case Number” field, and click “Find This Case.”
SEALED CIVIL DOCUMENTS 2016
42
Central District of California – Guide to Electronically Filing Under-Seal Documents in Civil Cases
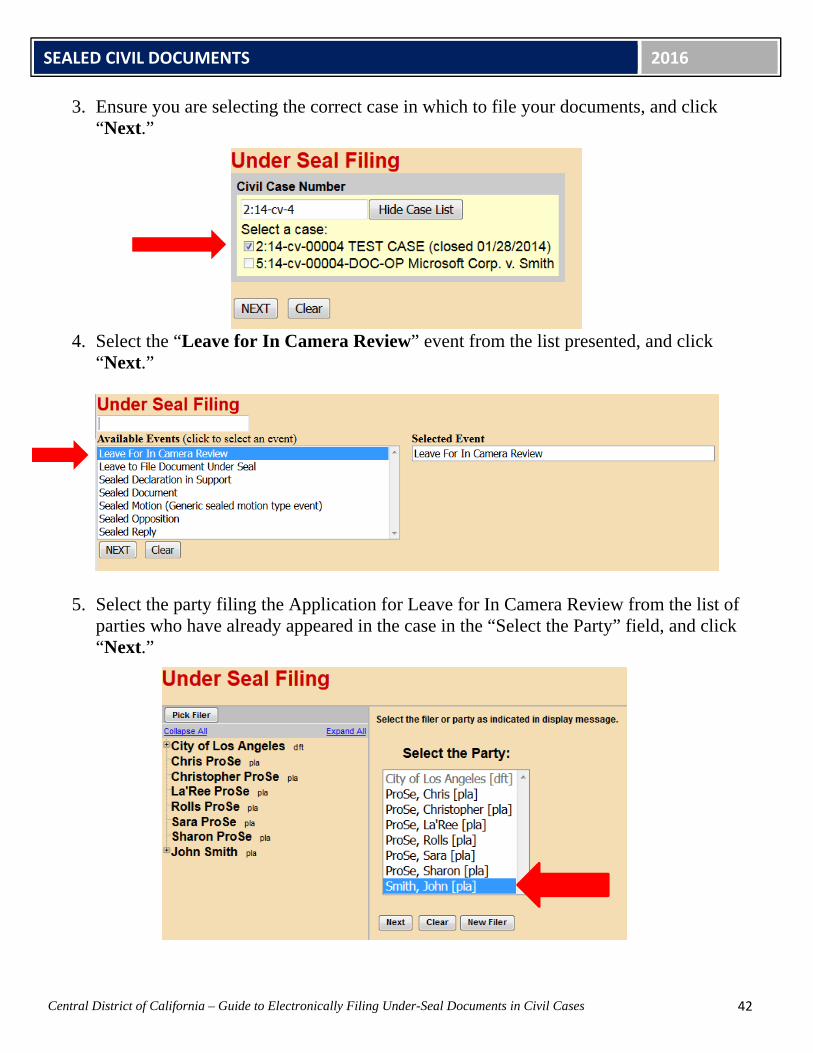
3. Ensure you are selecting the correct case in which to file your documents, and click “Next.”
4. Select the “Leave for In Camera Review” event from the list presented, and click “Next.”
5. Select the party filing the Application for Leave for In Camera Review from the list of
parties who have already appeared in the case in the “Select the Party” field, and click “Next.”
SEALED CIVIL DOCUMENTS 2016
43
Central District of California – Guide to Electronically Filing Under-Seal Documents in Civil Cases
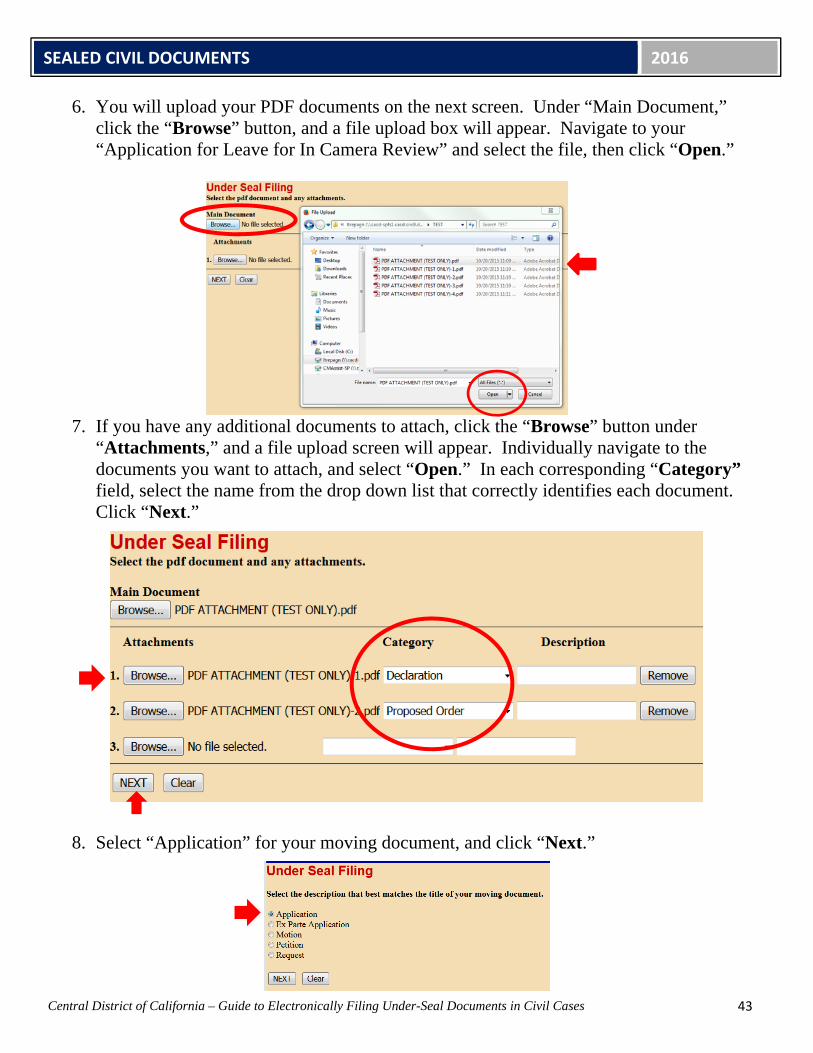
6. You will upload your PDF documents on the next screen. Under “Main Document,” click the “Browse” button, and a file upload box will appear. Navigate to your “Application for Leave for In Camera Review” and select the file, then click “Open.”
7. If you have any additional documents to attach, click the “Browse” button under “Attachments,” and a file upload screen will appear. Individually navigate to the documents you want to attach, and select “Open.” In each corresponding “Category” field, select the name from the drop down list that correctly identifies each document. Click “Next.”
8. Select “Application” for your moving document, and click “Next.”
SEALED CIVIL DOCUMENTS 2016
44
Central District of California – Guide to Electronically Filing Under-Seal Documents in Civil Cases
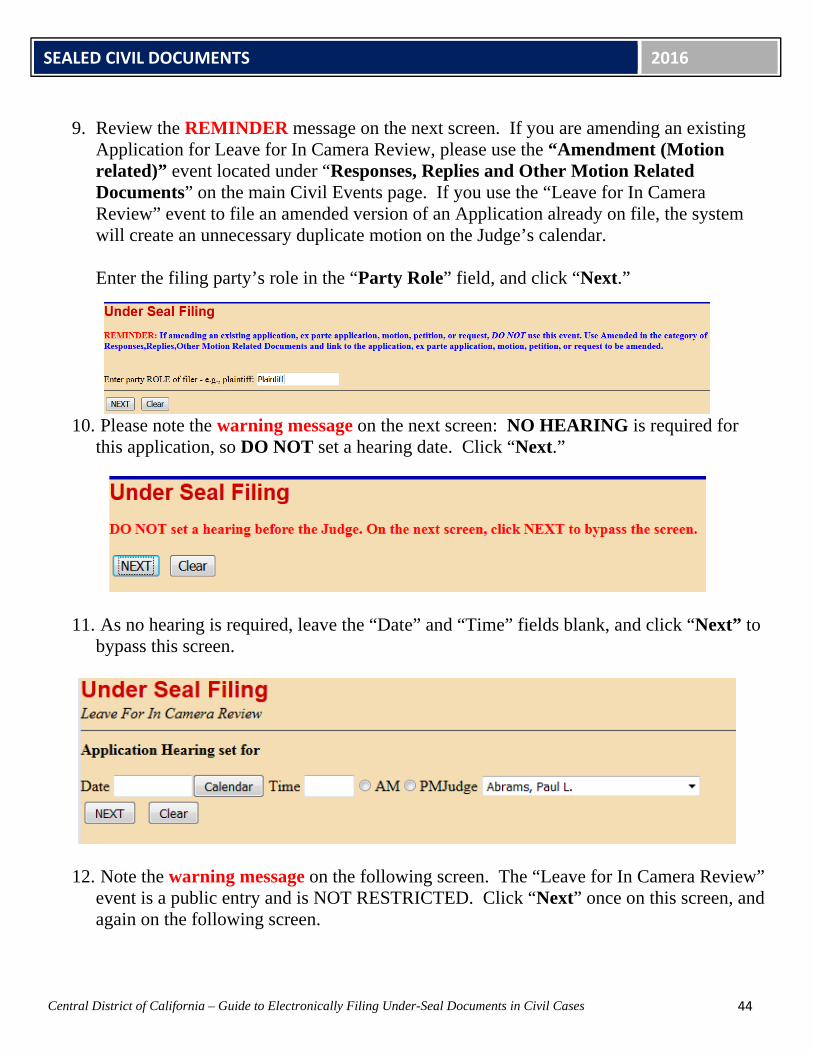
9. Review the REMINDER message on the next screen. If you are amending an existing
Application for Leave for In Camera Review, please use the “Amendment (Motion related)” event located under “Responses, Replies and Other Motion Related Documents” on the main Civil Events page. If you use the “Leave for In Camera Review” event to file an amended version of an Application already on file, the system will create an unnecessary duplicate motion on the Judge’s calendar. Enter the filing party’s role in the “Party Role” field, and click “Next.”
10. Please note the warning message on the next screen: NO HEARING is required for this application, so DO NOT set a hearing date. Click “Next.”
11. As no hearing is required, leave the “Date” and “Time” fields blank, and click “Next” to
bypass this screen.
12. Note the warning message on the following screen. The “Leave for In Camera Review”
event is a public entry and is NOT RESTRICTED. Click “Next” once on this screen, and again on the following screen.
SEALED CIVIL DOCUMENTS 2016
45
Central District of California – Guide to Electronically Filing Under-Seal Documents in Civil Cases
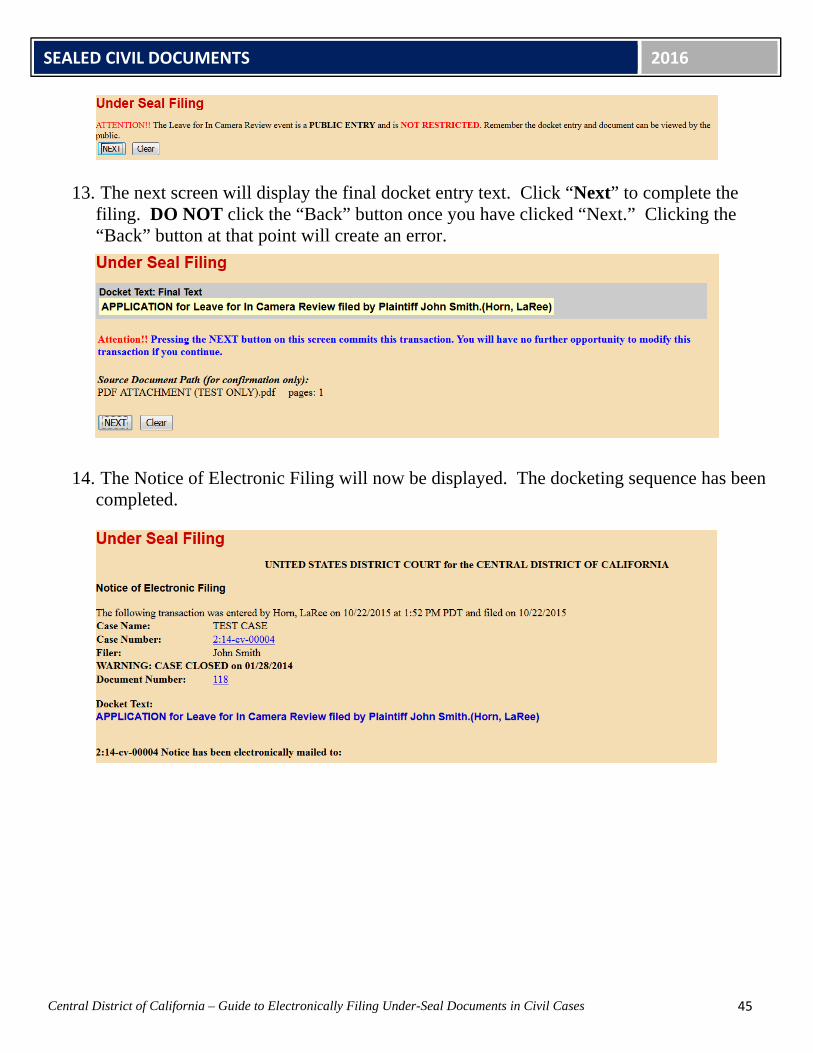
13. The next screen will display the final docket entry text. Click “Next” to complete the filing. DO NOT click the “Back” button once you have clicked “Next.” Clicking the “Back” button at that point will create an error.
14. The Notice of Electronic Filing will now be displayed. The docketing sequence has been completed.