Guide on how to run the BMW Repair Manual on a computer ... · Guide on how to run the BMW Repair...
19
Guide on how to run the BMW Repair Manual on a computer with more than 512MB RAM using VMWare Server 2.x VERY IMPORTANT: You can not hold me responsible for any errors or data loss which might occur on your system in combination with changes mentioned in this guide. All installations and changes are done at your own risk Questions can be sent to: [email protected] Version of this document: 1.03 Used version of VMWare: VMWare Server 2.0.1 Version Changes V1.01 Initial version V1.02 Added information about version of guide-document and used version of VMWare. Added version change information Chapter 1.3: Added information about using same CD key for the OS as the host system V1.03 Added information about how to run the BMW rep appl. later without the CD. See chapter 1.9.2
Transcript of Guide on how to run the BMW Repair Manual on a computer ... · Guide on how to run the BMW Repair...

Guide on how to run the BMW Repair Manual on a computer with more than
512MB RAM using VMWare Server 2.x
VERY IMPORTANT: You can not hold me responsible for any errors or data loss which might occur on
your system in combination with changes mentioned in this guide.
All installations and changes are done at your own risk
Questions can be sent to:
Version of this document: 1.03 Used version of VMWare: VMWare Server 2.0.1
Version Changes V1.01 Initial version V1.02 Added information about version of guide-document and used
version of VMWare. Added version change information Chapter 1.3: Added information about using same CD key for the
OS as the host system V1.03 Added information about how to run the BMW rep appl. later without
the CD. See chapter 1.9.2

Content of this document:
1 INSTALL BMW REPAIR-MANUAL WITH VMWARE SERVER ............................................. 3
1.1 GATHER NEEDED SW: .................................................................................................................. 4 1.2 INSTALL VMWARE SERVER ON YOUR SYSTEM ............................................................................. 4 1.3 SET UP THE VM MACHINE ............................................................................................................ 7 1.4 START YOUR VM FOR THE FIRST TIME 1 ......................................................................................13 1.5 START YOUR VM FOR THE FIRST TIME 2 ......................................................................................13 1.6 INSTALL WINDOWS ON YOUR VM ...............................................................................................14 1.7 INSTALL THE BMW REPAIR MANUAL SW ON YOUR VM MACHINE .............................................15 1.8 NOW START AND ENJOY YOUR BMW REPAIR MANUAL SW ........................................................16 1.9 TIPS AND TRICKS .........................................................................................................................18
1.9.1 General usage of VMWare server application ......................................................................18 1.9.2 Installation where you do not need to have the CD inserted to run BMW appl. later ...........19
1.10 HOW TO ACCESS A FOLDER ON YOUR HOST COMPUTER FROM THE VM .......................................19

1 Install BMW Repair-manual with VMWare server
First some information about the VMWare software: VMWare server installs a Virtual system onto your computer. Think about it this way. You have a PC running Windows XP. You can then install a Virtual system onto your system running Windows 2000. When you start the ‘virtual computer’ using VMWare Server you have a second system which you can configure in a way independent of the physical machine it is running on. For example: Physical machine: 2.13Ghz, 2GB ram Virtual machine: 1Ghz, 512MB ram This option suits us perfect when trying to set up the BMW system.
Please note that when the virtual machine is running. This allocated system requirements will be cut from the Physical machine. In the example above, the physical machine will then have 1.13Ghz and 1,5GB ram instead due to the power allocated for the virtual machine. This however is only the case when the VM is running. In this picture you can se how another operating system is running inside this ‘window’. This second system can have different features than the host system.

(This picture shows VMWare server in a Apple environment. It looks similar with Windows and is only an example) More information about VMs and how they work: http://en.wikipedia.org/wiki/Virtual_machine In German language: http://de.wikipedia.org/wiki/Virtual_Mahine
1.1 Gather needed SW:
1. Go to www.vmware.com and download the latest version of the free version VMWare server.
o You must create an account. You can enter Donald Duck information here but notice. The ‘name’ and ‘company’ must be used exactly the same during the installation phase of the SW.
o Download the Binaries/[Your operating system]/[Current version] ‘Your operating system’ = Windows or Linux ‘Current version’ = Currently VMWare Server 2 (Version 2.0.1)
o Reply to the email to access your SW key (This is needed for the installation)
1.2 Install VMWare server on your system
Click on the installation exe file you just downloaded and pass the following steps:

This one below is clear I think?
Here you can change the virtual machine storage path. This is where VMWare will store the VM-Machines which you set up. The files can be pretty large (1-3 GB) so don’t put them somewhere where you don’t have enough space. Note: It is perfectly possible to use an external HD as storage for the VMs
This one below is also clear I guess?

This one below as well.
Now, you will have to sit back and wait for a while. VMWare Server needs a couple of minutes to install itself onto your system. If the window below appears: Just click ‘Continue to this website’ and a new window with a log in screen will appear.

You will then see this login screen:
On the login screen, just use the normal windows login data and you will be fine.
1.3 Set up the VM machine
Now you must set up the client system where you want to install the BMW SW. A: First, click: Commands/Create Virtual Machine B: Name and location. Here just click ‘next’ C: Guest operating system: Here you must choose ‘Windows operating systems’ and then exact the one you want to use from the drop down. (See screen shot below) Note i: You will need the complete installation CD plus SW key for the client system. If you don’t have an old XP or W2K system you can use, try the same you have on the machine now. However, I have never tried this. If you decide to use the same KEY as the Host system, it might wise not to register the system with MS as you might run in to licensing problems.

Note ii: The BMW SW works best on an old W2K or XP system.
D: Memory and processors: Here you should set the RAM etc. which will be allocated for the VM. This should not be more than 512MB as The BMW program system cannot handle more. Set processors to ‘1’. (See screen shot below)

E: Hard Disk: Click “Create a New Virtual Disk” (in the right window)
E: Properties: This should be at least 3 GB (Windows XP needs 13xxMB to run) and leave everything else the same.
F: Properties 2: Should be on ‘bridged’ if you would like the possibility to access folders on your host machine. This can be helpful if you want to save print-outs locally on your

normal computer.
G: CD/DVD drive: -> ‘Use a physical drive’: You will need this to install the BMW program.

H: Properties: VMWare will choose the only CD/DVD drive if there is only one. Otherwise you must mark which one to use.
I: Floppy drive: If you need one? I marked ‘don’t add a floppy drive’ as don’t even have one.

J: USB Controller: Mark ‘Add a USB controller’ as you might need this.
K: Here you get an overview over the complete settings.
L: Now mark “Power on your new virtual machine now” and click “Finish”
1.4 Start your VM for the first time 1
A: Click ‘Inventory / Virtual machine’ (in the left window) B: click ‘Console’ in the middle window. This message will appear. Click “install plug-in”. Follow the install instructions. It’s a straight ahead thing.
C: Click ‘Log out’ up right (Always exit this way, to prevent data-loss in the VM) D: Restart your computer now.
1.5 Start your VM for the first time 2
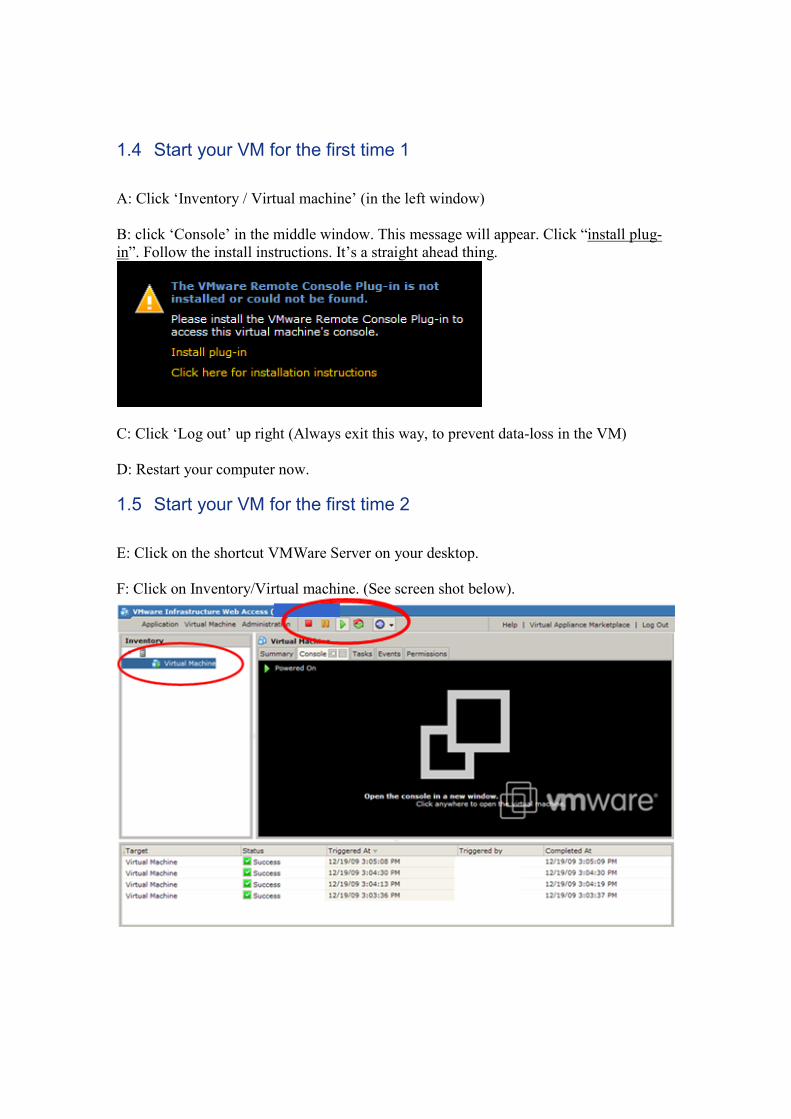
E: Click on the shortcut VMWare Server on your desktop. F: Click on Inventory/Virtual machine. (See screen shot below).

G: Then click on the green “Play” icon on the top. (See screen shot above). Now wait a second as the virtual machine will start up: Wait until it says “Powered on”, top left in the black window. H: Now double click on the black window and the VM will open in a new window. Note: Remember to have a bit of patience. Everything runs a bit slower as 2 systems are now sharing the same processor and ram memory.
I. The host (your normal system) II. Client (the VM you just created)
This is the bios screen for the new VM.
1.6 Install windows on your VM
Now you must install your Operating system. A: This step is very important: Click on the in the black in side the window to transfer the control to the VM (Or click “Ctrl+G”) and then first insert the CD you want to use. If it is a normal Bootable Windows installation CD it will start the installation automatically inside the VM. IMPORTANT: See to that the installation is running inside the window and not outside (on the ‘host’=your normal system). You should always see the normal desktop in the background. Abort if you are not sure, as this could damage your system.

Then eject the CD and check that you have followed the steps above in 1.5-A. Now insert the CD again and let the installation start again. It should look like this: If not, something is wrong.
B: When you get to the format C: part: Don’t worry about the format during the installation. It will only format the partition inside the VM. This will not affect the normal environment. It says that it is formatting C:\ but this is C:\ within the VM. NOT the normal one. C: Continue to install Windows like normal. Please note that the VM now pretty bad performance during the installation due to the lower settings. It is now sharing the total performance of your normal computer.
1.7 Install the BMW Repair manual SW on your VM machine
Note that the first steps here are the same as you started the VM in the first place. See: “1.5 Start your VM for the first time 2” A: Start the VM and wait until it says: “Powered on”, top left in the black window. B: Now double click on the black window and the VM will open in a new window. You will now see the new Windows system running inside the VM: Something like this:

C: Now insert the BMW Rep CD and install the program like you would do normally. This section is pretty self explaining. After this you can run the BMW Repair CD inside the VM using only 512MB RAM and everything will work. The correct Acrobat Reader version (5.0) will install with the BMW Repair manual.
1.8 Now start and enjoy your BMW Repair manual SW
Note: The screen shots below are only the VM window.


1.9 Tips and tricks
1.9.1 General usage of VMWare server application
Switch between host system and client system: a. Switch to control the VM: CTRL-G b. Switch back to Host: CTRL-ALT (or just click outside the window on
your normal desktop) Switch between console view and full screen mode:
1. To switch to full screen: Just double click on the top bar of the VM. 2. To switch back to normal view: Click: Ctrl+Alt
Use printer inside the VM. 1. Do not try to install a printer inside the VM. It is better to copy the files to
your normal computer and print them from there. (See: 1.10 How to access a folder on your host computer from the VM)
Space. Do not install unnecessary SW on the VM to save on space. If you set it only to 2GB during the installation you will have about 300GB free space on the VM C:\ drive. This is enough to run the BMW Repair manual but not much more.

1.9.2 Installation where you do not need to have the CD inserted to run BMW appl. later
If you copy the BMW installation files to a folder on the file system of the VM before you start the installation program you will not need to have the installation CD inserted later For example you copy all the files located on the BMW installation CD to lets say: C:\BMW-Repair-CD Note: You can also put this folder in the Shared folder (described in chapter 1.10)
1.10 How to access a folder on your host computer from the VM
If you followed the steps during installation, the VM will be in the same network as your host computer. This is very handy if you want to connect to a shared network folder on your host system. For example to transfer files for printing etc. You only need to create a standard shared folder on your host machine and connect to it from your VM. Using: My network places/Tools/Map network drive Please note that you will need to use the user name and password of the host system to log on to the shared folder.