FIDELITY INVESTMENTS Fidelity Viewpoints® Webcast: April 22, 2013

GUIDE FOR PARTNERS/DIRECTORS/SOLE
PRACTITIONERS:
Using the Attorneys Fidelity Fund On-Line
Portal for the Issue of a Fidelity Fund
Certificate

1 | P a g e
LOGGING IN .......................................................... CLICK HERE
CERTIFICATION .................................................... CLICK HERE
SELECT YOUR FIRM .............................................. CLICK HERE
FINANCIAL INFORMATION: ................................... CLICK HERE
Section 78(1) tab ...................................................................... CLICK HERE
Section 78(2)(a) tab ................................................................. CLICK HERE
Section 78(2A) tab ................................................................... CLICK HERE
Investments ............................................................................. CLICK HERE
Estates ................................................................................... CLICK HERE
Property .................................................................................. CLICK HERE
SELECT A MEMBER ............................................... CLICK HERE
MEMBER APPLICATION ........................................ CLICK HERE
ISSUE CERTIFICATE ............................................. CLICK HERE
2 | P a g e
A mock firm has been created for the purposes of this Guide, which is a step by step and includes
screen shots to further aid in the use of the automated FFC application process.
The login credentials and new password reflected hereunder ARE MERELY FOR DEMONSTRATION
purposes only and SHOULD not be used.
1.1 In order to log into the system, you would have by now received an email from [email protected]
containing the relevant login credentials.
1.2 The email will stipulate User Name, User Code & Password and will request that you navigate to
https://ffc.fidfund.co.za for purposes of resetting the password and then logging on.
1.3 Upon receipt of the email, navigate to https://ffc.fidfund.co.za. You may log onto the aforementioned
website either by clicking directly onto the link or by copying the link into your web browser (i.e Google
Chrome or Internet Explorer or Firefox or Safari etc)
1.4 The FFC website works optimally on Google Chrome, however all other web browsers may be used. If using
Internet Explorer, please ensure that Version 9 or above is used.
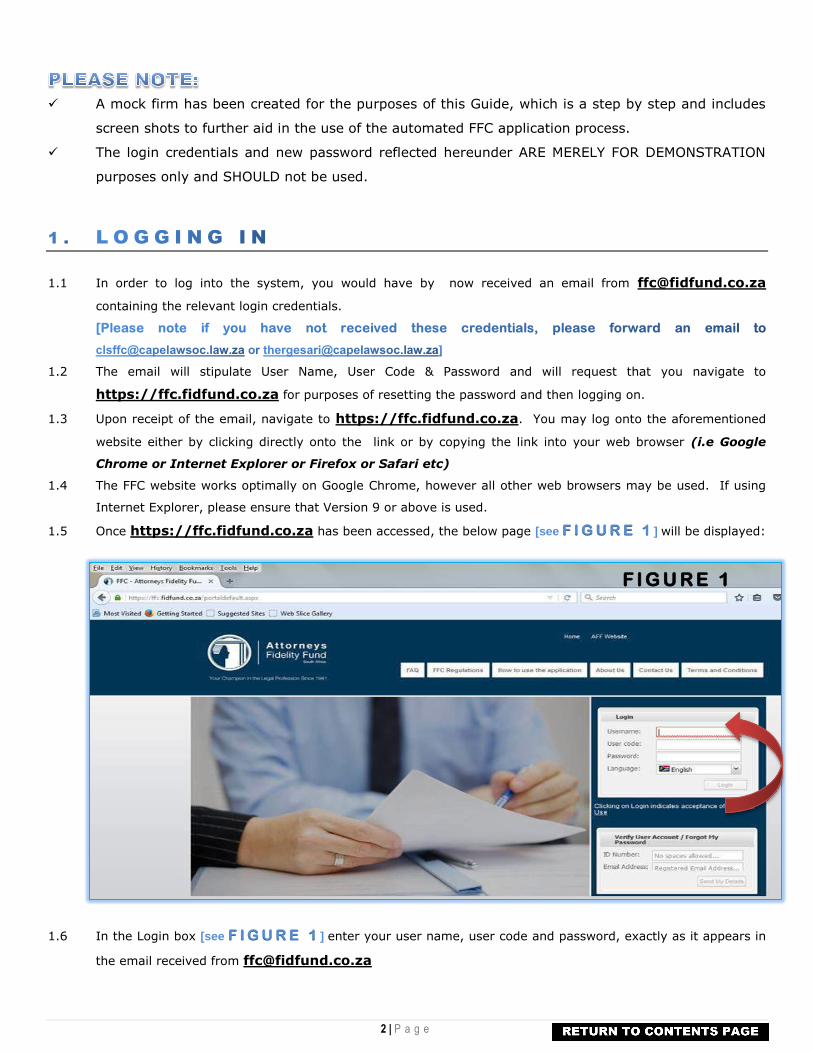
1.5 Once https://ffc.fidfund.co.za has been accessed, the below page [see ] will be displayed: F I G U R E 1
F I G U R E 1 1.6 In the Login box [see ] enter your user name, user code and password, exactly as it appears in F I G U R E 1
the email received from [email protected]

3 | P a g e
1.7 You may copy and paste the user name and user code directly from email into the Login box, however do
not copy and paste the password from the email into the Login box, as this will LOCK the account.
Please retype the password.
1.8 Once all credentials have been entered, click on the Login button.
1.9 The Change Password box will pop up. [see ] F I G U R E 2
F I G U R E 2
1.10 Old Password refers to the password as per the email received from [email protected],
1.11 New Password is a password you are to create. Your password should have a minimum length of 6
characters, it should contain at least 1 of the following special characters ( ! @ # $ % ^ &
* + _-) and should contain at least 1 upper case character (capital letter).
[an example of a password that meets all the password criteria as per (k) above is Marli@Guide]
1.12 At Confirm Password, enter the password you have just created (as in Step 1.11 above) click on “Change”,
upon which the Guidelines . [see ] screen will pop up Once you have read these Guidelines, F I G U R E 3
either minimize or close this Guideline popup.
F I G U R E 3
Please note that from
hereon end, when
logging in, you will use
the User Name and User
Code furnished by the
Fund, together with the
NEW PASSWORD you
have just created.
4 | P a g e
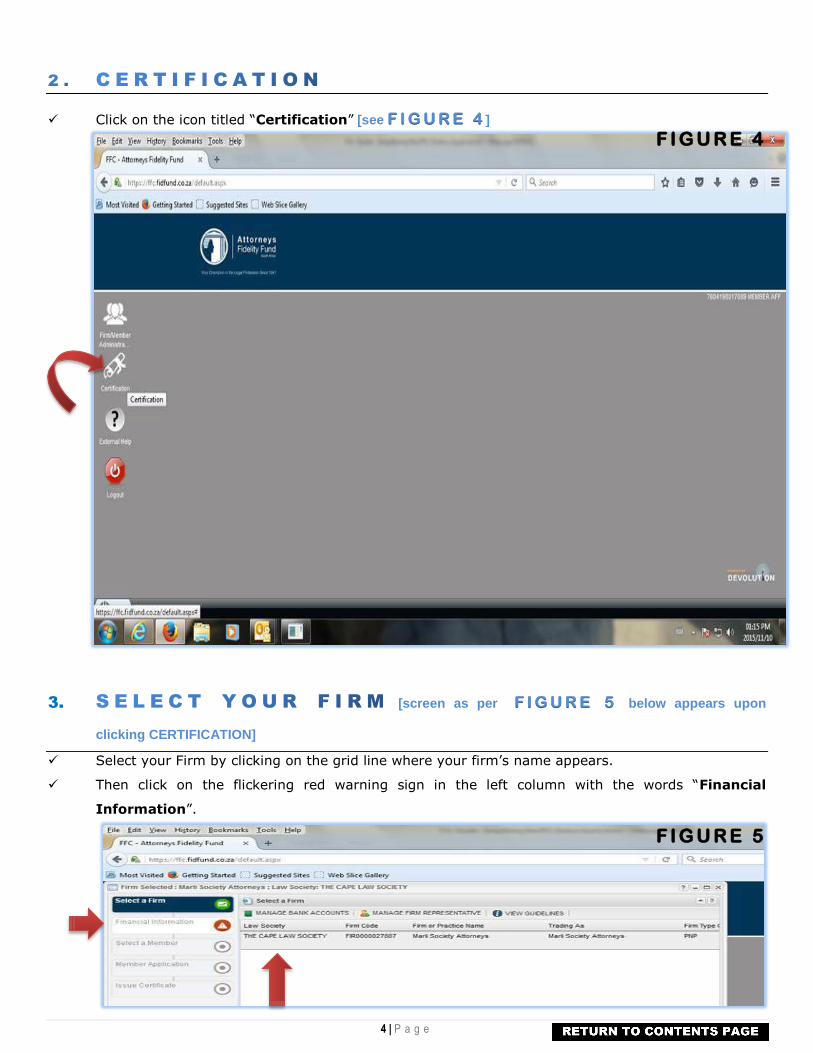
Click on the icon titled “Certification” [see ] F I G U R E 4
F I G U R E 4
3. [screen as per F I G U R E 5 below appears upon
clicking CERTIFICATION]
Select your Firm by clicking on the grid line where your firm’s name appears.
Then click on the flickering red warning sign in the left column with the words “Financial
Information”.
F I G U R E 5
5 | P a g e
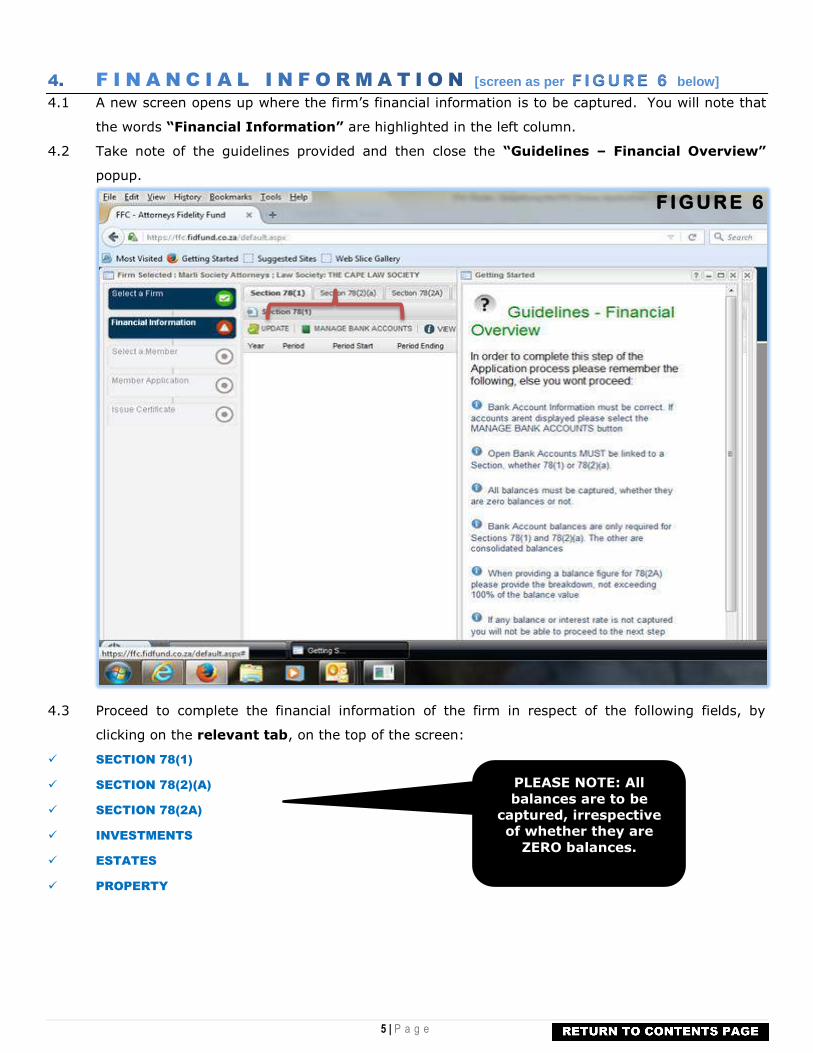
[screen as per F I G U R E 6 below] 4.1 A new screen opens up where the firm’s financial information is to be captured. You will note that
the words “Financial Information” are highlighted in the left column.
4.2 Take note of the guidelines provided and then close the “Guidelines – Financial Overview”
popup.
F I G U R E 6 4.3 Proceed to complete the financial information of the firm in respect of the following fields, by
clicking on the relevant tab, on the top of the screen:
SECTION 78(1)
SECTION 78(2)(A)
SECTION 78(2A)
INVESTMENTS
ESTATES
PROPERTY
PLEASE NOTE: All
balances are to be
captured, irrespective
of whether they are
ZERO balances.

6 | P a g e
4.3.1 Section 78(1) Tab:
F I G U R E 7
F I G U R E 8
In order to populate your firm’s trust
accounts to this tab, click on “Manage
Bank Accounts”. to enable you to
capture the relevant interest rates and
balances.
The “Maintain Banking
Details”, as per FIGURE 8
appears.
You will note that your firm’s
section 78(1) trust accounts are
displayed in the grid at the bottom
of the screen.
7 | P a g e
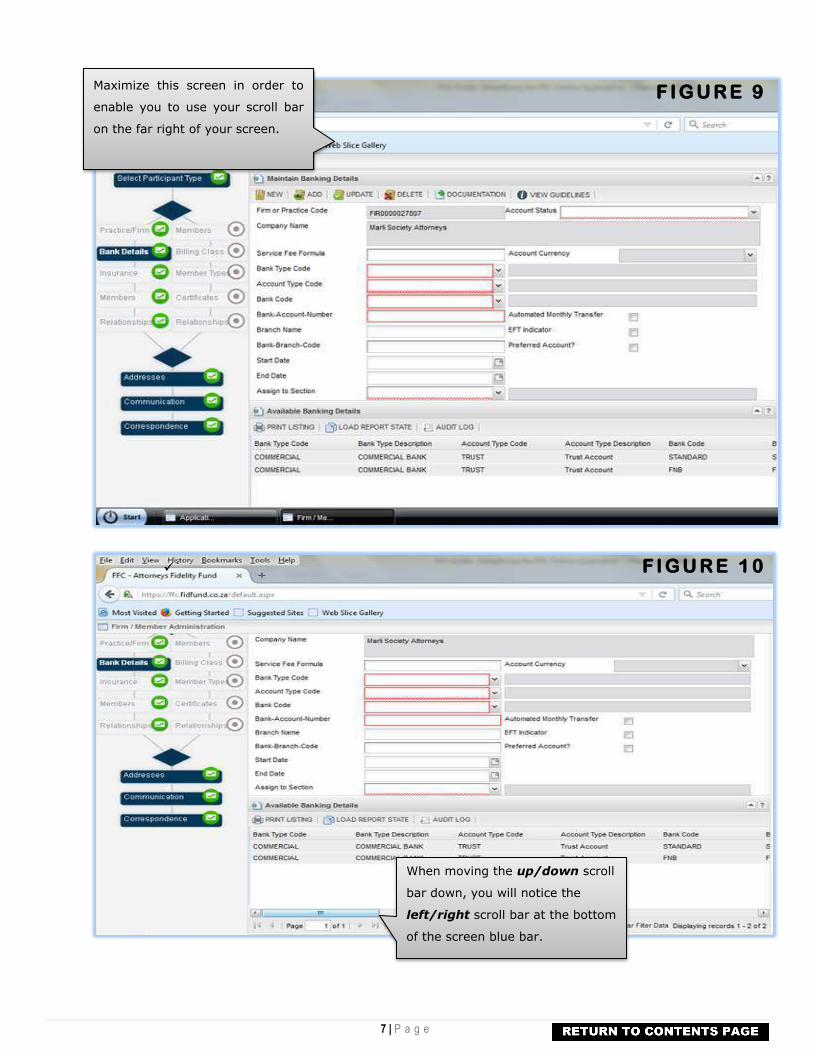
F I G U R E 9
F I G U R E 1 0
Maximize this screen in order to
enable you to use your scroll bar
on the far right of your screen.
When moving the up/down scroll
bar down, you will notice the
left/right scroll bar at the bottom
of the screen blue bar.

8 | P a g e
F I G U R E 1 1
F I G U R E 1 2
When moving the scroll bar to the right, you
will be able to view all the details in respect of
your firm’s trust accounts that are reflected on
the Society’s database.
Now, in order to update these trust accounts
displaying in the bottom grid to the Section
78(1) tab, click on the account in the grid.

9 | P a g e
F I G U R E 1 3
F I G U R E 1 4
PLEASE NOTE THAT THE SERVICE FEE FORMULAE SHOULD BE OBTAINED FROM THE BANK WHERE YOUR TRUST ACCOUNT IS
HELD, TOGETHER WITH A TIER IN RESPECT OF THE RELEVANT INTEREST RATES APPLICABLE TO THIS TRUST ACCOUNT.
if the bank gives you a service fee of a flat rate, e.g R45.10, it should be captured as 45.10/45.10/45.10
The details of the trust account on which you
have clicked, will now be reflected in the top
section of the screen, with the fields for “Service
Fee Formula” and “Assign to Section”
underlined in RED.
Enter the SERVICE FEE
FORMULA of this trust account.
10 | P a g e
F I G U R E 1 5
F I G U R E 1 6
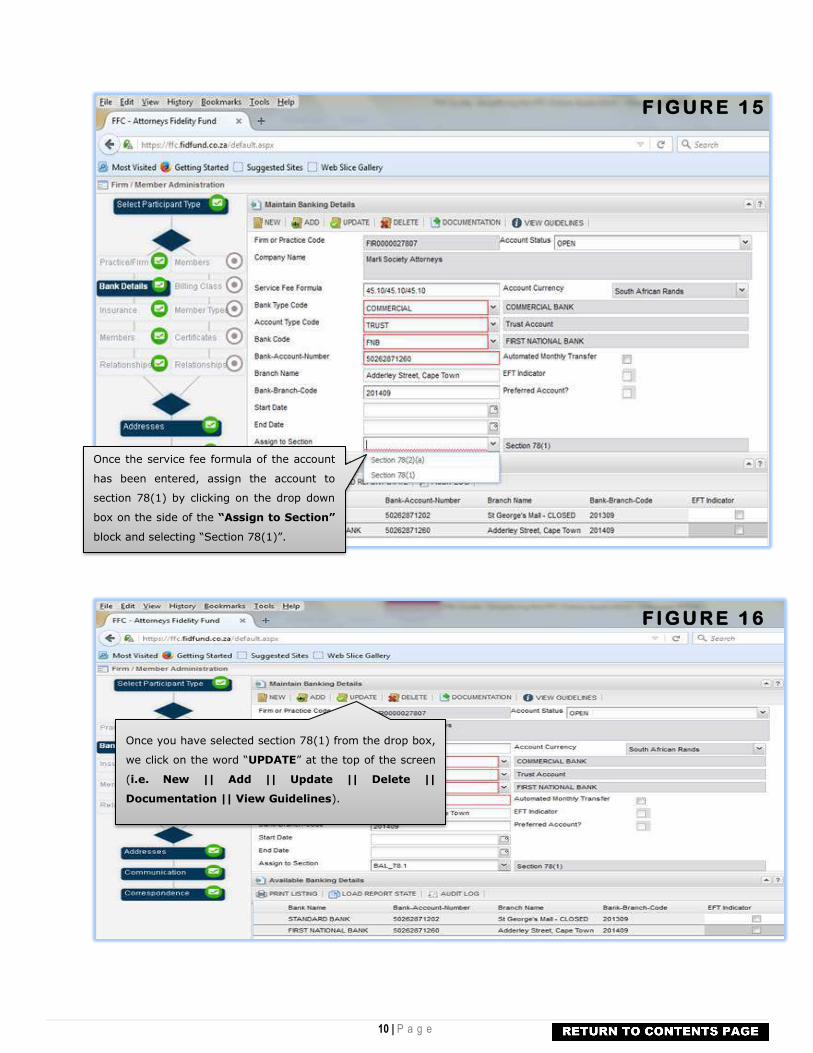
Once the service fee formula of the account
has been entered, assign the account to
section 78(1) by clicking on the drop down
box on the side of the “Assign to Section”
block and selecting “Section 78(1)”.
Once you have selected section 78(1) from the drop box,
we click on the word “UPDATE” at the top of the screen
(i.e. New || Add || Update || Delete ||
Documentation || View Guidelines).
11 | P a g e
Upon clicking on UPDATE, a popup appears advising that what has been captured has been saved
as per below. F I G U R E 1 7
In order to capture the relevant information in respect of each of the firm’s Section 78(1) Trust
Accounts, click on the relevant account in the grid falling under “Available Banking Details” and
follow the steps as per F I G U R E S 1 2 T O 1 6
F I G U R E 1 7 UPDATING a Section 78(1) trust account that is reflected as “Closed” in the grid or where
you have multiple trust accounts and have closed one or more of them
Click on the account as it appears in the grid
When it displays in the top section, we enter a blank service fee formula
(i.e. 000/000/000)
Now assign it to section 78(1) in the drop box
Select the option CLOSED from the drop box, next to “Account Status”
that shows OPEN below
Finally, click on the block where the word “- CLOSED” appears
(see below - in the block next to “Branch Name”) F I G U R E 1 8
and delete the word “- CLOSED”
Once selections have been made, click the UPDATE button - F I G U R E 1 9
REMEMBER: In terms of
Section 78(1) of the
Attorneys Act 53 of
1979, as amended, it is
peremptory to open
and maintain a trust
account.

12 | P a g e
F I G U R E 1 8
F I G U R E 1 9 F I G U R E 2 0
NOTE: Account
status now
reflected as
CLOSED.
13 | P a g e
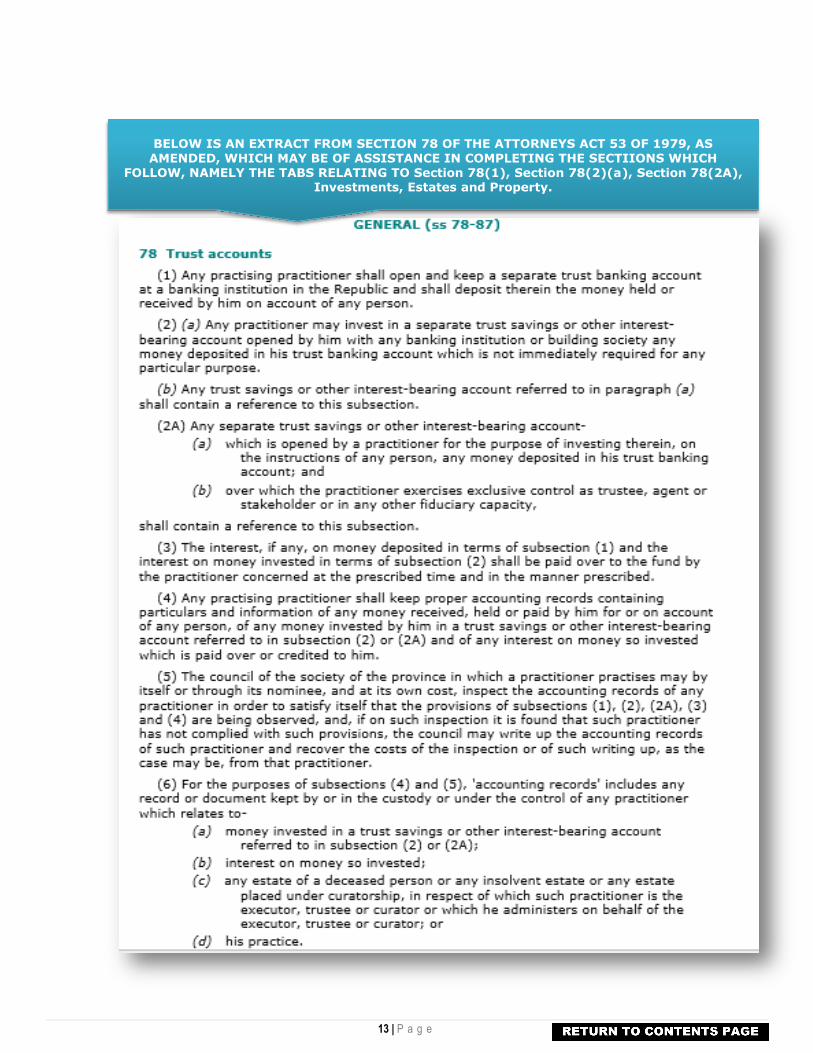
BELOW IS AN EXTRACT FROM SECTION 78 OF THE ATTORNEYS ACT 53 OF 1979, AS AMENDED, WHICH MAY BE OF ASSISTANCE IN COMPLETING THE SECTIIONS WHICH
FOLLOW, NAMELY THE TABS RELATING TO Section 78(1), Section 78(2)(a), Section 78(2A), Investments, Estates and Property.
14 | P a g e
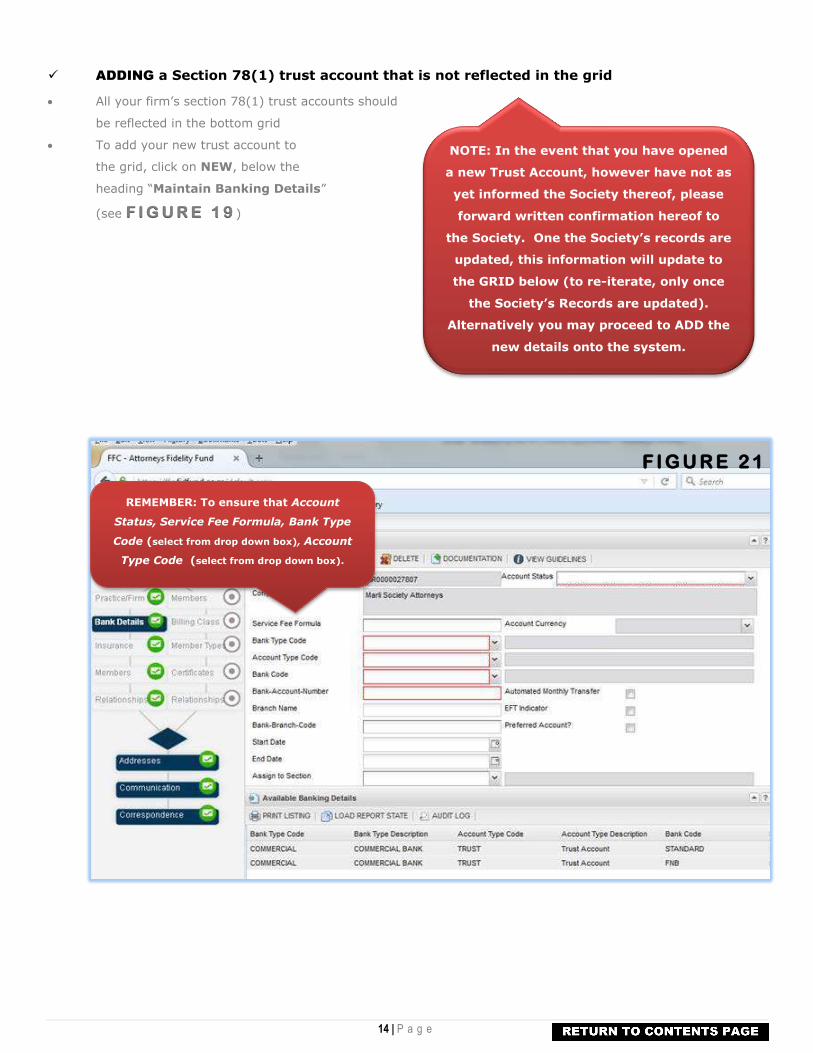
ADDING a Section 78(1) trust account that is not reflected in the grid
All your firm’s section 78(1) trust accounts should
be reflected in the bottom grid
To add your new trust account to
the grid, click on NEW, below the
heading “Maintain Banking Details”
(see ) F I G U R E 1 9
F I G U R E 2 1
NOTE: In the event that you have opened
a new Trust Account, however have not as
yet informed the Society thereof, please
forward written confirmation hereof to
the Society. One the Society’s records are
updated, this information will update to
the GRID below (to re-iterate, only once
the Society’s Records are updated).
Alternatively you may proceed to ADD the
new details onto the system.
REMEMBER: To ensure that Account
Status, Service Fee Formula, Bank Type
Code (select from drop down box), Account
Type Code (select from drop down box).

15 | P a g e
F I G U R E 2 2
F I G U R E 2 2
BANK CODE: This is the name
of the banking institution to
be selected from the drop
down.
Please note that if you move
your scroll bar on the right of
this Select Bank popup, down,
you will notice that the bank
names are listed over 4 pages
Click on the arrows on the left
hand corner of the popup, to
move from page to page, to
select your bank and then
double click on your bank’s
Should the relevant
bank not be reflected on
the first page, click on
the arrow to
move to the next page
and the next until you
find the relevant bank.
16 | P a g e
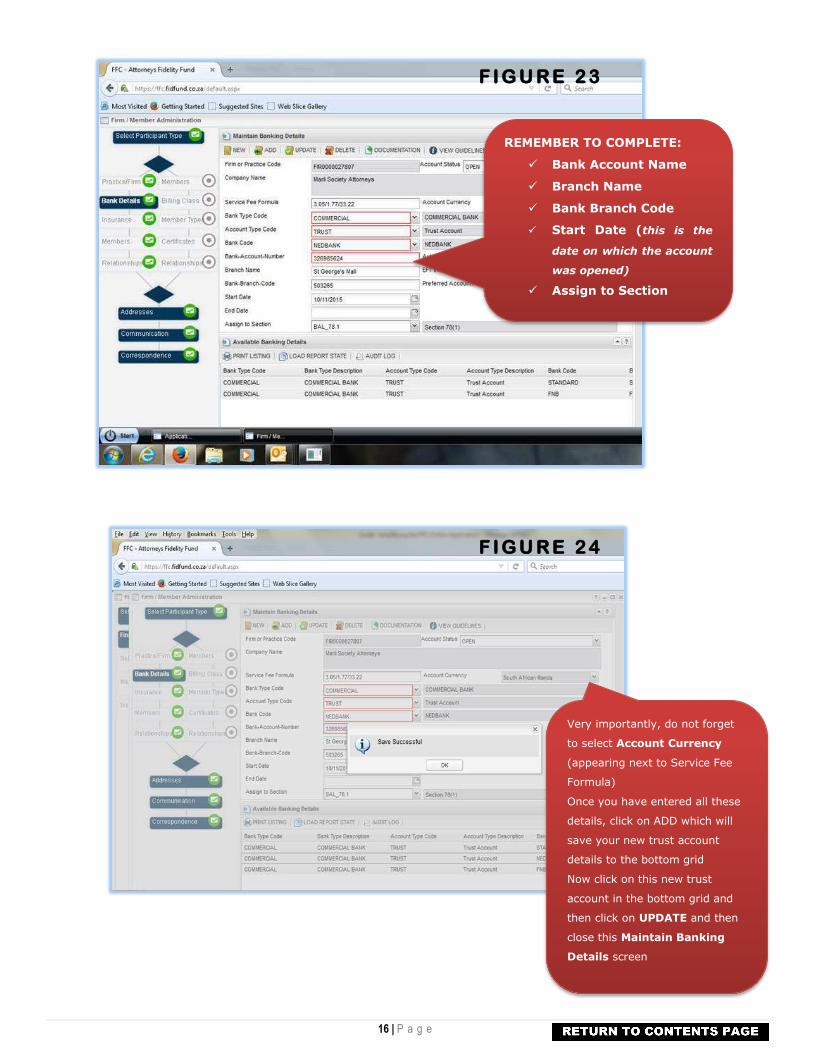
F I G U R E 2 3
F I G U R E 2 4
REMEMBER TO COMPLETE:
Bank Account Name
Branch Name
Bank Branch Code
Start Date (this is the
date on which the account
was opened)
Assign to Section
Very importantly, do not forget
to select Account Currency
(appearing next to Service Fee
Formula)
Once you have entered all these
details, click on ADD which will
save your new trust account
details to the bottom grid
Now click on this new trust
account in the bottom grid and
then click on UPDATE and then
close this Maintain Banking
Details screen
17 | P a g e
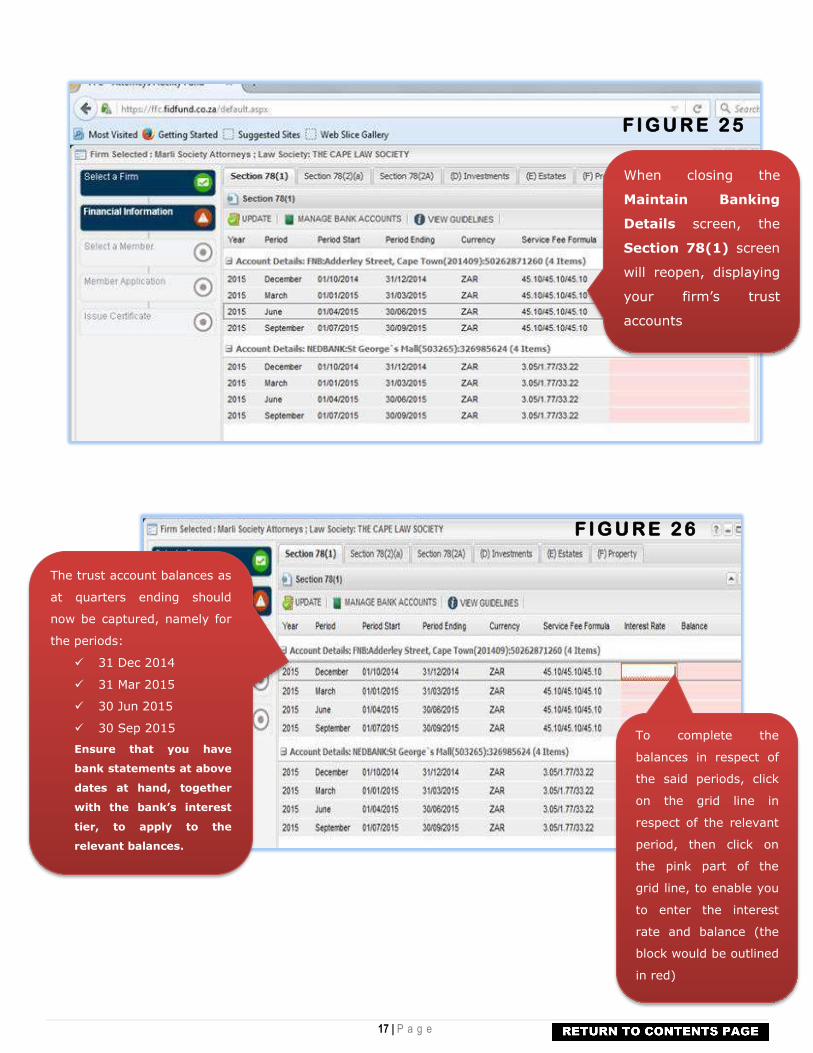
F I G U R E 2 5
F I G U R E 2 6
When closing the
Maintain Banking
Details screen, the
Section 78(1) screen
will reopen, displaying
your firm’s trust
accounts
The trust account balances as
at quarters ending should
now be captured, namely for
the periods:
31 Dec 2014
31 Mar 2015
30 Jun 2015
30 Sep 2015
Ensure that you have
bank statements at above
dates at hand, together
with the bank’s interest
tier, to apply to the
relevant balances.
To complete the
balances in respect of
the said periods, click
on the grid line in
respect of the relevant
period, then click on
the pink part of the
grid line, to enable you
to enter the interest
rate and balance (the
block would be outlined
in red)
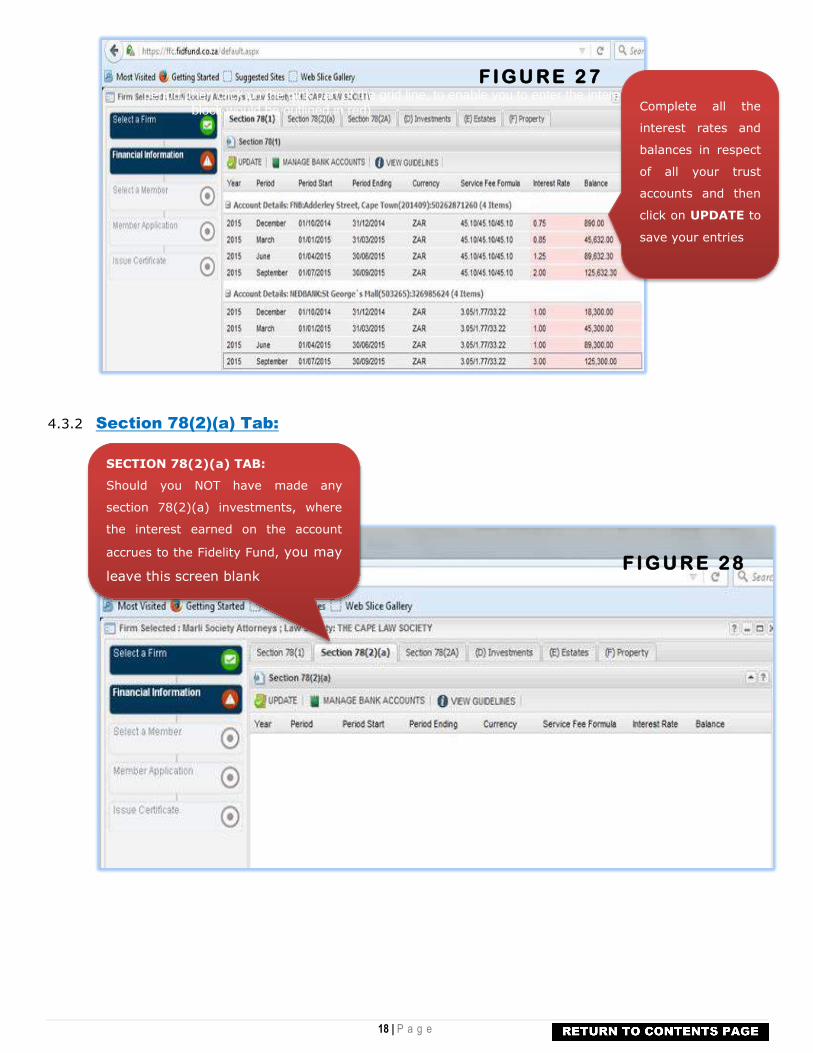
18 | P a g e
F I G U R E 2 7period, then click on the pink part of the grid line, to enable you to enter the interest rate and balance (the
block would be outlined in red)
4.3.2 Section 78(2)(a) Tab:
F I G U R E 2 8
Complete all the
interest rates and
balances in respect
of all your trust
accounts and then
click on UPDATE to
save your entries
SECTION 78(2)(a) TAB:
Should you NOT have made any
section 78(2)(a) investments, where
the interest earned on the account
accrues to the Fidelity Fund, you may
leave this screen blank
19 | P a g e
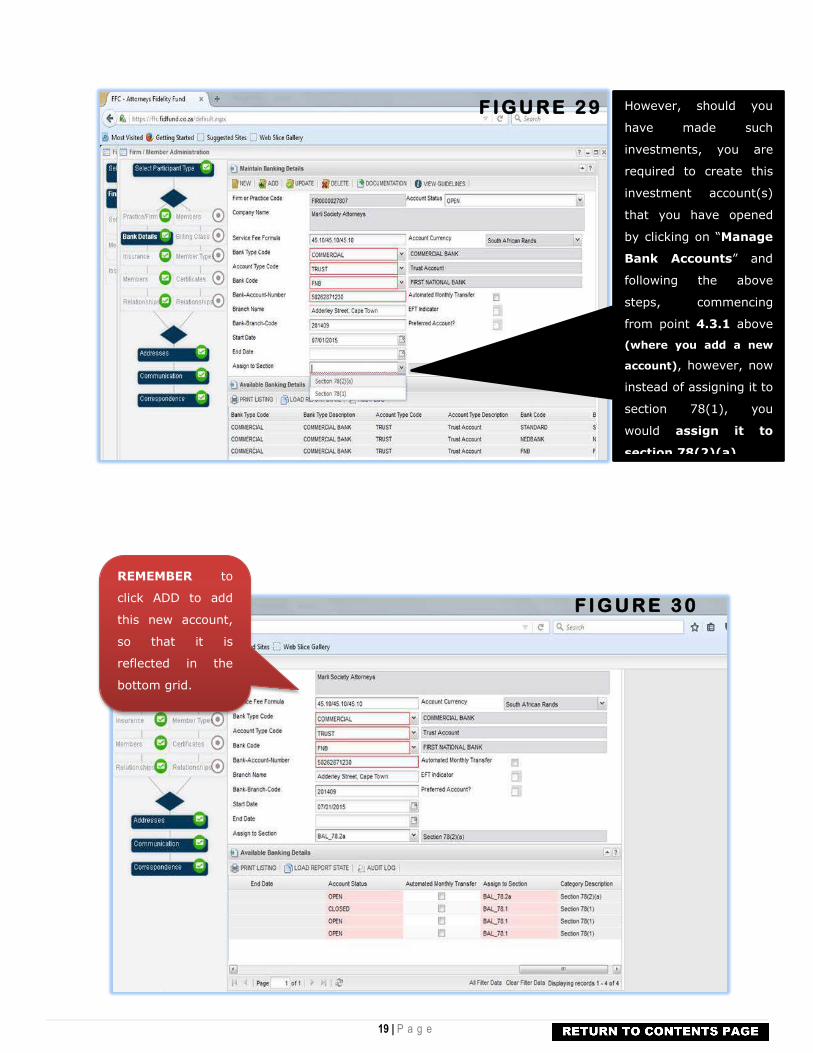
F I G U R E 2 9
F I G U R E 3 0
However, should you
have made such
investments, you are
required to create this
investment account(s)
that you have opened
by clicking on “Manage
Bank Accounts” and
following the above
steps, commencing
from point 4.3.1 above
(where you add a new
account), however, now
instead of assigning it to
section 78(1), you
would assign it to
section 78(2)(a).
REMEMBER to
click ADD to add
this new account,
so that it is
reflected in the
bottom grid.

20 | P a g e
F I G U R E 3 1
F I G U R E 3 2
The new
account created
now reflects in
the bottom grid.
Click on your section 78(2)(a)
account in the bottom grid and
then click on UPDATE and then
close the Maintain Banking
Details page

21 | P a g e
F I G U R E 3 3
F I G U R E 3 4
The section 78(2)(a) account
that you have just added,
would now appear in the
Section 78(2)(a) tab and
you can proceed to capture
the relevant interest rates and
balances
After completing the
relevant interest rates
and balances of your
section 78(2)(a)
investments, remember
to click on UPDATE to
save and proceed to your
next tab being Section
78(2A)

22 | P a g e
4.3.3 Section 78(2A) Tab:
F I G U R E 3 5
F I G U R E 3 6
Please note that you are required to provide the consolidated amounts, in respect of all investment accountsopened, upon the written mandate of a
client(s), with the interest earned accruing to the relevant client(s), in respect of each of the
relevant banking institutions where you have opened such
accounts
Click on the grid lines of the
relevant periods, select the
banking institution where
you have opened the
investment account from the
drop box and proceed to
enter the consolidated
balance in respect of all
investment accounts held at
the selected bank

23 | P a g e
F I G U R E 3 7
F I G U R E 3 7
Where you hold
investments at more than
one banking institution,
select the bank, enter the
balance in respect of
the first bank and click on
UPDATE.
To add the further
banking institution, click
on the grid line in respect
of the period where you
have just entered the
first banking institution
and updated and click on
ADDITIONAL
INSTITUTION
BALANCE

24 | P a g e
F I G U R E 3 8
F I G U R E 3 9
When clicking on ADDITIONAL INSTITUTION
BALANCE, the below box pops up.
Now:
select the name
of the further
banking
institution from
the drop box
select currency
from the drop
box
enter the
consolidated
balance in
respect of the
banking
institution
click on ADD
click on UPDATE

25 | P a g e
F I G U R E 4 0
F I G U R E 4 1
You will see that another line has been
entered into the grid in respect of the period
March where I have added the further
institution
Once you have
entered all the
consolidated balances
in respect of the
different institutions
for the relevant
periods, click
UPDATE
The next step is to
complete the
breakdown(s) in
respect of every grid
line where we have
entered investments
Click on the grid line
at the top of the
screen. You will see
that it prepopulates a
breakdown in respect
of the value you have
entered in the top grid
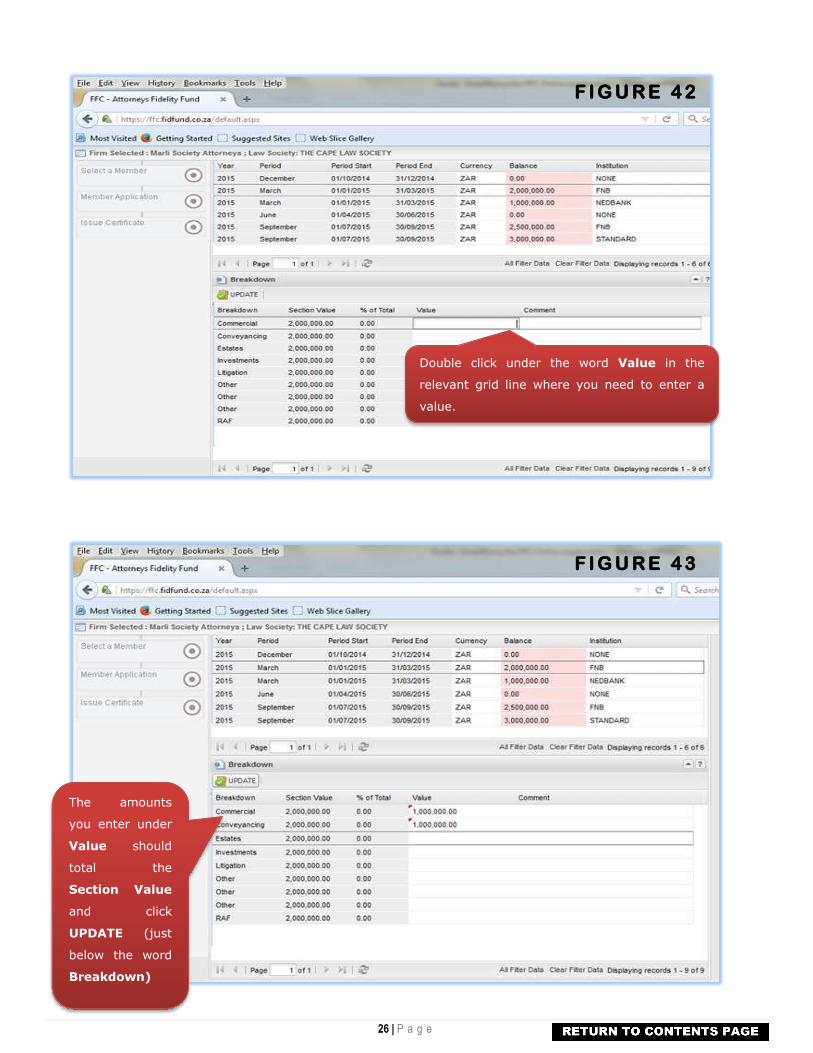
26 | P a g e
F I G U R E 4 2
F I G U R E 4 3
Double click under the word Value in the
relevant grid line where you need to enter a
value.
The amounts
you enter under
Value should
total the
Section Value
and click
UPDATE (just
below the word
Breakdown)

27 | P a g e
F I G U R E 4 4
F I G U R E 4 5
You will notice that the system calculates
the % of Total once you click UPDATE
A REMINDER that the
Breakdown in respect of
EACH grid line where you
have entered a balance in the
top grid, should be completed
and updated, failing which it
will block you from
progressing later in the
application process
Once you have completed
and saved all the breakdown
values, move to your next
tab, i.e. (D) Investments
28 | P a g e
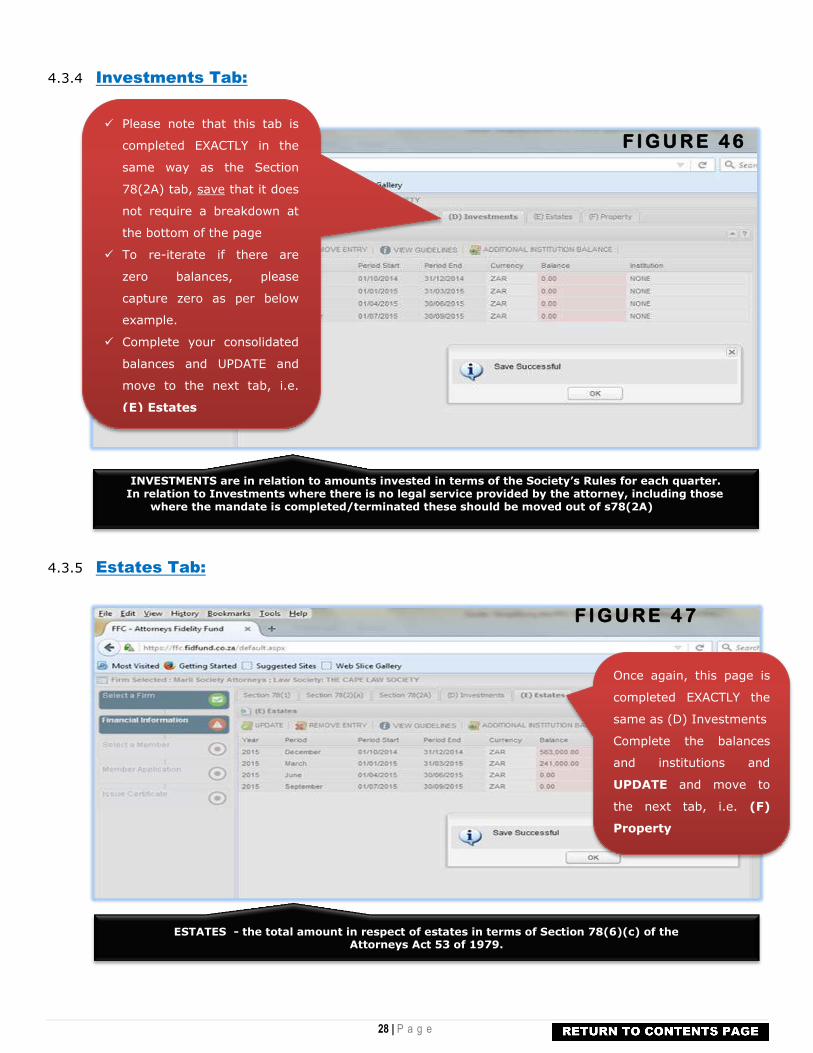
4.3.4 Investments Tab:
F I G U R E 4 6
4.3.5 Estates Tab:
F I G U R E 4 7
Please note that this tab is
completed EXACTLY in the
same way as the Section
78(2A) tab, save that it does
not require a breakdown at
the bottom of the page
To re-iterate if there are
zero balances, please
capture zero as per below
example.
Complete your consolidated
balances and UPDATE and
move to the next tab, i.e.
(E) Estates
INVESTMENTS are in relation to amounts invested in terms of the Society’s Rules for each quarter. In relation to Investments where there is no legal service provided by the attorney, including those
where the mandate is completed/terminated these should be moved out of s78(2A)
Once again, this page is
completed EXACTLY the
same as (D) Investments
Complete the balances
and institutions and
UPDATE and move to
the next tab, i.e. (F)
Property
ESTATES - the total amount in respect of estates in terms of Section 78(6)(c) of the Attorneys Act 53 of 1979.

29 | P a g e
4.3.6 Property Tab:
F I G U R E 4 8
Enter the value in
respect of property held
for clients and UPDATE.
PROPERTY – any entrusted Property as referred to in Section 26 of the Attorneys Act 53 of 1979.
EXTRACT of Section 26
of the Attorneys Act 53 of 1979, as
amended.

30 | P a g e
F I G U R E 5 0
F I G U R E 5 1
You may now click on the block Select a
Member in the left column, which will
highlight the block
Click on the grid line with your name, on
the right, then click on Member Application
in the left column
Once you have clicked
on the grid line with
your name, on the
right, and clicked on
Member Application in
the left column (as per
FIGURE 50)
You will note that a
green tick appears next
to Select a Member and
Member Application is
highlighted with a red
warning sign flickering
Your prepopulated
application form opens
up
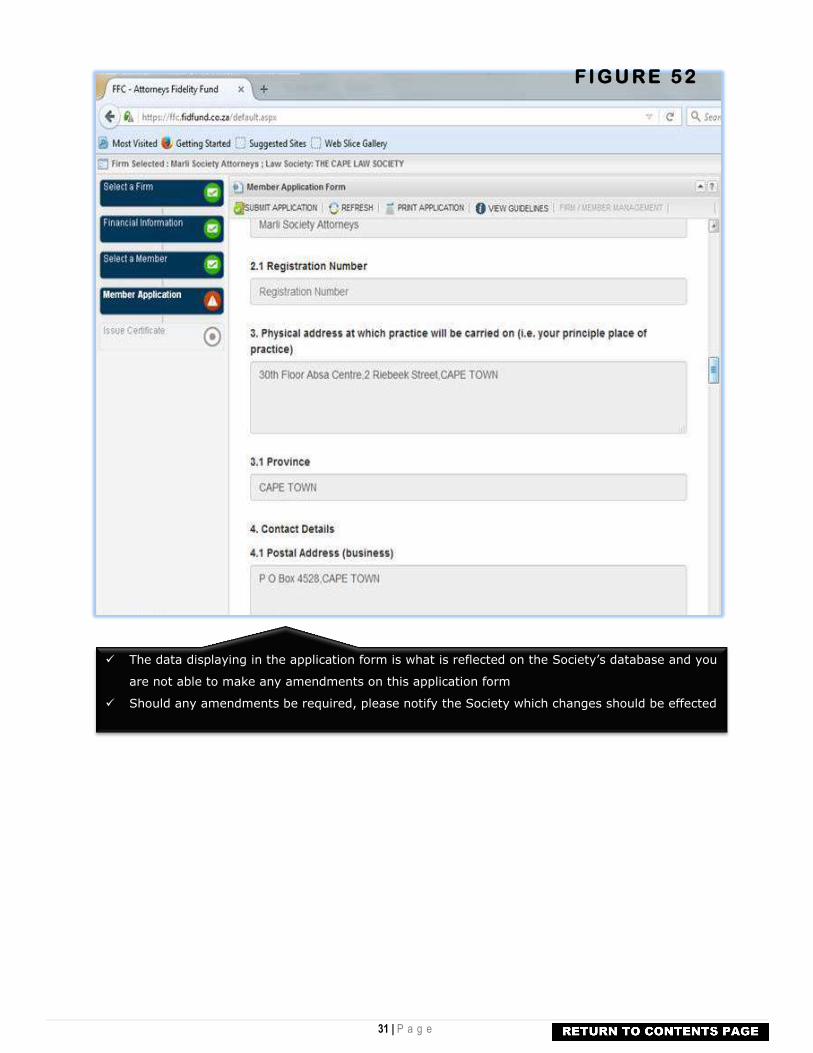
31 | P a g e
F I G U R E 5 2
The data displaying in the application form is what is reflected on the Society’s database and you
are not able to make any amendments on this application form
Should any amendments be required, please notify the Society which changes should be effected

32 | P a g e
F I G U R E 5 3
F I G U R E 5 4
Once you have verified
the information
contained in your
application form, select
from the drop box either
YES or NO in respect of
the 11 (eleven)
questions appearing
below
ACKNOWLEDGEMENTS
Once you have
answered the last
question on the
application form,
use your scroll
bar to move back
to the top of the
application form.

33 | P a g e
F I G U R E 5 5
Click on SUBMIT APPLICATION
You will note, in the left column, that a green tick appears next to Member Application and Issue
Certificate flickers with a red warning sign (as per Figure 56 below)
Click on Issue Certificate
Please note that, if you are unable to progress to issue certificate and member application remains red
after submission of your application, you have failed to properly complete the financial information of
your firm or else you have not submitted an audit report or have submitted an audit report however
qualified and these qualifications have not been dealt with or you have not yet furnished proof of
successful completion of the practice management training course (where applicable).

34 | P a g e
F I G U R E 5 6
F I G U R E 5 7
Click on your name
on the right.

35 | P a g e
F I G U R E 5 8
F I G U R E 5 9
At the bottom of
the page, click on
REQUEST
CERTIFICATE
CONGRATULATIONS,
your Certificate has
been issued.
36 | P a g e
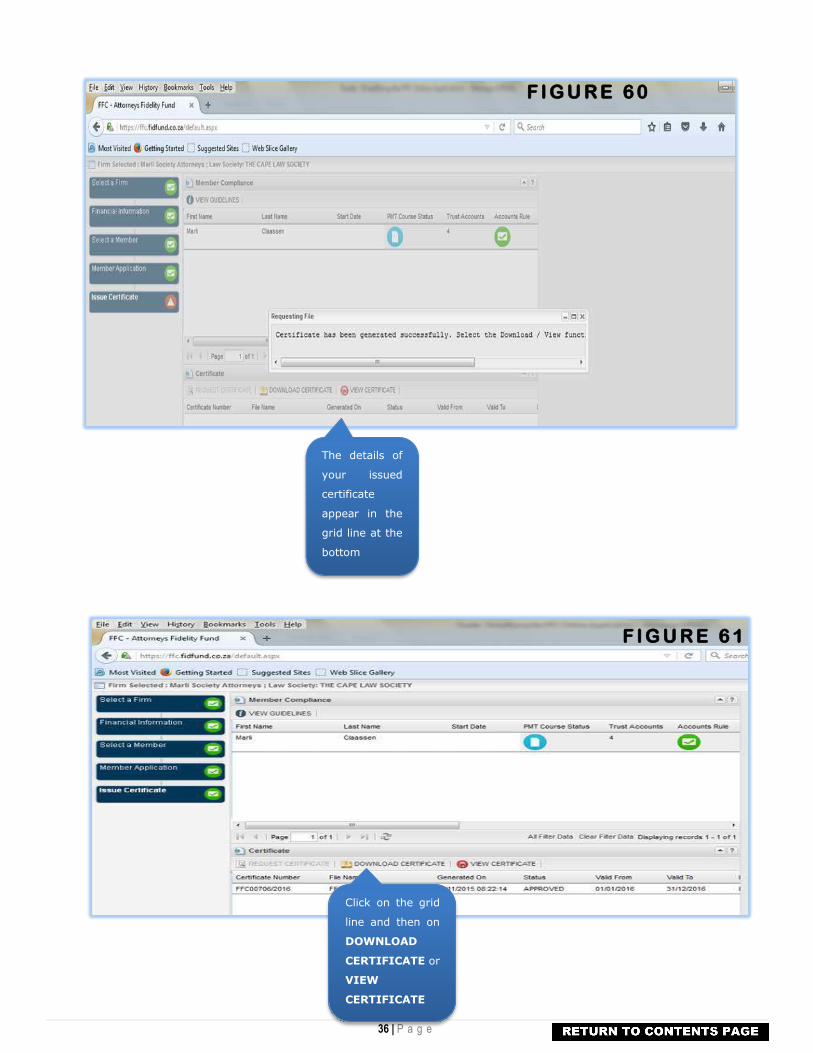
F I G U R E 6 0
F I G U R E 6 1
The details of
your issued
certificate
appear in the
grid line at the
bottom
Click on the grid
line and then on
DOWNLOAD
CERTIFICATE or
VIEW
CERTIFICATE
37 | P a g e
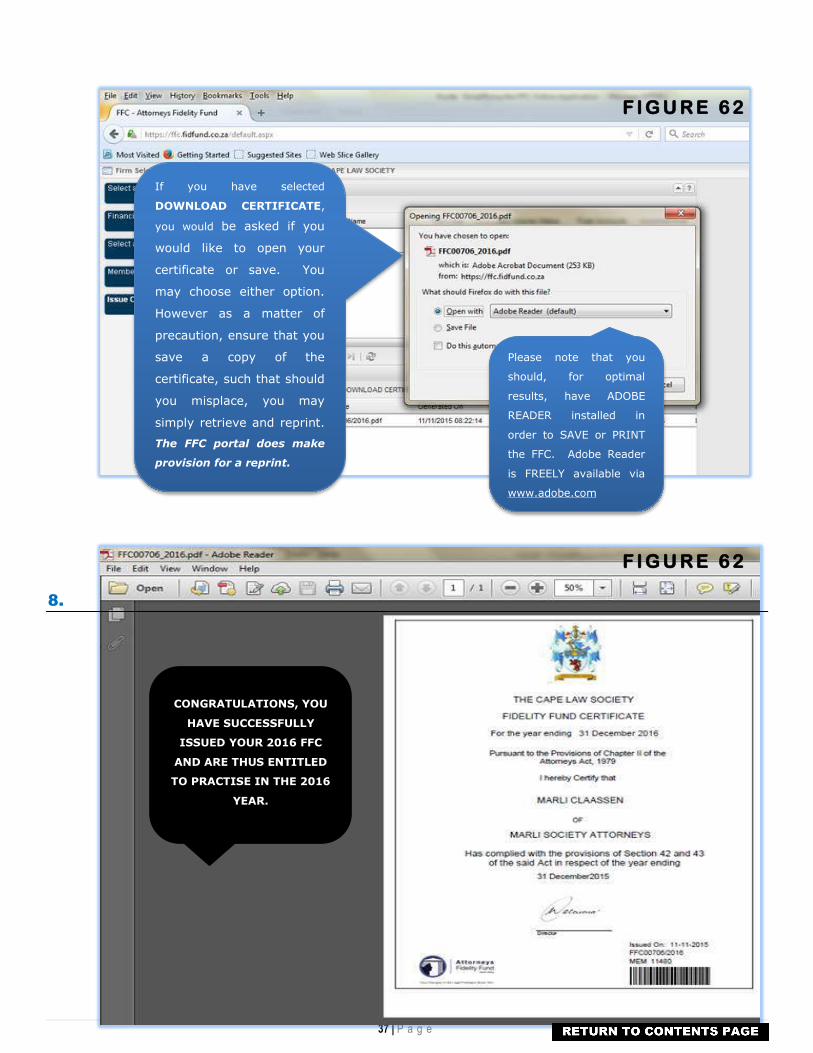
F I G U R E 6 2
F I G U R E 6 2
8.
If you have selected
DOWNLOAD CERTIFICATE,
you would be asked if you
would like to open your
certificate or save. You
may choose either option.
However as a matter of
precaution, ensure that you
save a copy of the
certificate, such that should
you misplace, you may
simply retrieve and reprint.
The FFC portal does make
provision for a reprint.
Please note that you
should, for optimal
results, have ADOBE
READER installed in
order to SAVE or PRINT
the FFC. Adobe Reader
is FREELY available via
www.adobe.com
CONGRATULATIONS, YOU
HAVE SUCCESSFULLY
ISSUED YOUR 2016 FFC
AND ARE THUS ENTITLED
TO PRACTISE IN THE 2016
YEAR.