Guia para el renderizado con Unreal Engine.
18
This is a public community guide to using Unreal Engine 4 for architectural visualization. Last updated : April 6th 2015 We will keep adding content to the guide and check for suggestions from you, so feel free to comment and suggest changes. This document is public, so share the knowledge and play nice! To comment, select a piece of text or a pic, right click, and click comment. Text with comments will be highlighted. To suggest changes or add new content simply edit the document. The font for suggestions is green. When editing, please provide links when mentioning external sources like videos or documentation. You can use the chat feature if you log in with your google account.
-
Upload
eduardo-mendoza -
Category
Documents
-
view
38 -
download
2
description
Con este documento podremos aprender caracteristicas basicas aserca de este motor de videojuegos. Tanto basico mo avanzado. Teniendo en cuenta el lenguaje de programacion y bluprint
Transcript of Guia para el renderizado con Unreal Engine.

This is a public community guide to using Unreal Engine 4 for architectural visualization. Last updated : April 6th 2015 We will keep adding content to the guide and check for suggestions from you, so feel free to comment and suggest changes. This document is public, so share the knowledge and play nice! To comment, select a piece of text or a pic, right click, and click comment. Text with comments will be highlighted. To suggest changes or add new content simply edit the document. The font for suggestions is green. When editing, please provide links when mentioning external sources like videos or documentation.
You can use the chat feature if you log in with your google account.

Below is the table of contents. Right click then click on the link to jump to a specific chapter. Please don't edit this section.
Preparing content for UE4 Models - 3ds MAX
3d Meshes Polygon optimization Migrating from Vray UV Mapping Light Mapping Collision LOD FBX export Blender workflow
Vegetation - SpeedTree Landscape Generation
Natural Urban
Esri CityEngine Ghost Town 3ds Max Script
3d People … (What other software do you use?)
UE4 Fbx Importing Materials
General Painting Map Generators - crazybump, Shadermap 2, Bitmap2material, Genetica Substance Quixel Suite
Vegetation Importing SpeedTree Grass
Lighting - static Lighting - dynamic Matinee and Recording Interactivity
Lights Other subjects??
Collaborative Workflow

I. Preparing content for UE4
A. Models - 3ds MAX
1. 3d Meshes Unreal’s default unit is 1 cm, so match 3ds Max units to that. Use meshes with a relatively low polycount, but not as low as in video games since the goal is high quality archviz. High poly meshes can kill your framerate. Organize meshes in 2 groups:
● The architectural meshes, used only once throughout the scene (the architectural assets, the landscape and the streets etc), all have their pivot at the same location, at 0,0,0 world coordinates for faster importing and positioning. You can divide some of the meshes up in multiple elements for better light build results. (ex. the walls consist of separate meshes on each side of the building)
● The props (candles, books, pillows, benches etc) - used more than once, each have a local pivot, at their lowest point on the z axis.

Pivot can also be set up using the options of one of the batch exporters - see 9. FBX Export
2. Polygon optimization Reducing poly count is essential for UE. It is also important when working with your 3d library that is produced for the standard rendering industry. 3ds Max has 3 basic modifiers for this: Multires, Optimize, ProOptimizer This process can be tricky for more complex objects such as a car where some objects are more detailed than others. In this case you will need to take individual parts and optimise them. Do not forget to check ‘protect UV’ option when optimizing.

3. Migrating from Vray This topic seeks to offer tips and tricks on how to make this process fast and easy. The main idea is that you have to open a vray object, convert all materials to standard materials with all textures in place, and optimize the mesh without ripping the UVs. Bellow is a test using this scene convert script: AK-VRmtl to standard.ms As you can see the script maintained only the diffuse maps. You will have to place all the other maps manually in UE4.

4. UV Mapping UV mapping on channel 1. We used custom UV only on important meshes such as the main walls and floors, where the final output needed to match the original building precisely. On all other meshes we applied a standard UVW mapping of 100x100x100cm. We recommend doing UVW on all objects, you may never know when a map will be applied in UE. On objects with more materials use Default 3ds max Multi/Sub Object. For a good fbx export, all materials should be standard 3ds Max (no vray, etc.). UE will also recognise if you use a diffuse map.

5. Light Mapping This process is really time consuming. It is required for Light Baking in UE4. We really hope that in the future the engine will be fully dynamic and light baking will be a thing of the past. The current fully dynamic feature, LPV (light propagation volumes) yields mediocre results. On texture channel 2 of each object make a new uv mapping in which all polygons are placed within the one unit square of the uv space. For quicker results use Unwrap UVW modifier with default flatten mapping (This is not the “best result” method)
*UE docs: More details on Lightmapping A great video tutorial for an initial understanding of this concept can be seen here.
6. Collision All meshes used in games must have collision geometry, otherwise you could walk through walls. Same goes for archviz navigation. *UE4 docs: Collision documentation Unreal can generate few types of collision geometry based on the mesh geometry. However, if the 3d meshes are very complex this can add up and cost you a lot of resources which translate to lower frame rates. It’s best to have most of the collision made of simple boxes in 3dsMax. And remember, “objectA” must have a collision mesh with the name “UCX_objectA” with the pivot point in the same place.

7. LOD In video games this is very important. LOD defines how detailed objects are rendered at certain distances, so that the GPU makes better use of resources. We skipped LOD creation for now, and this may have lowered our final frame rate. We’ll experiment more with LODs in the future, in the meantime help us expand this section! *UE4 docs: More on LODs
8. FBX export Try one of these scripts to help you export your assets FBX to UE4 Batch Exporter 1.1 TS_UE4FbxExporter Let us know if you use other scripts and tell us about the workflow!
9. Blender workflow There is a guide detailing the Blender - UE4 pipeline here on the unreal wiki.
B. Vegetation - SpeedTree Up to now SpeedTree has the best integration for vegetation in UE4. Keep in mind that all trees have Lightmaps, Wind and Ambient Occlusion. Unfortunately you cannot use the standard SpeedTree library because those models don't have with light maps for UE4. Try to learn from Maico Girardi, he has great tutorials. Also see Maico Girardi’s ST grass. (for UE4 grass please check the UE vegetation section below)

C. Landscape Generation 1. Natural 2. Urban
a) Esri CityEngine b) Ghost Town 3ds Max Script
D. 3d People E. … (What other software do you use?)
II. UE4 A. Fbx Importing
Once you are done exporting, run UE4 and start setting up. Start a new project and pick the blueprint first person template. For optimal quality and starter content, settings should be like in the pic below. Dont forget to specify the location, otherwise it will be stored on your windows partition, and projects can pile up pretty fast and eat up your HDD storage space which is annoying if you are using a SSD.
The Unreal YouTube Channel has lots of good tutorials here, watch as many as you can ! It’s important to read all the pop-ups related to the UI to get your bearing. One important
thing to remember, your project can have multiple maps, and the content browser to the left displays the assets shared by all the maps in the current project. If you delete an asset in the content browser it will be removed from all of your maps, so careful with that! We found out the hard way…
FBX importing is as simple as dragging and dropping the FBX files in the content browser with standard settings, except the combine meshes option. Keep that off.

Lightmap UVs should be generated externally, auto-generation is still not good enough.
Maybe they will improve on this in future updates. Collision will use mesh geometry if checked; not a good choice for high poly meshes. Importing materials can be useful if you dont want to bother replacing them (not recommended, UE4’s physically based shaders are great), or if you want to replace them and identify them more easily on a mesh with a lot of material ids. This is what i did for vehicles.
Next step is to drag and drop meshes from the content browser, into the scene (map). They are added to the scene outliner on the top right as you do that, and you can edit details in the lower right pane. This is where the location coordinates can be edited. As i mentioned earlier, we set the pivot point at 0,0,0 coordinates in MAX, then set the same coordinates here in UE4. This is how we imported and positioned all the architectural assets in one move.
Props are imported pretty much the same way, except you have to position them manually,
one by one.
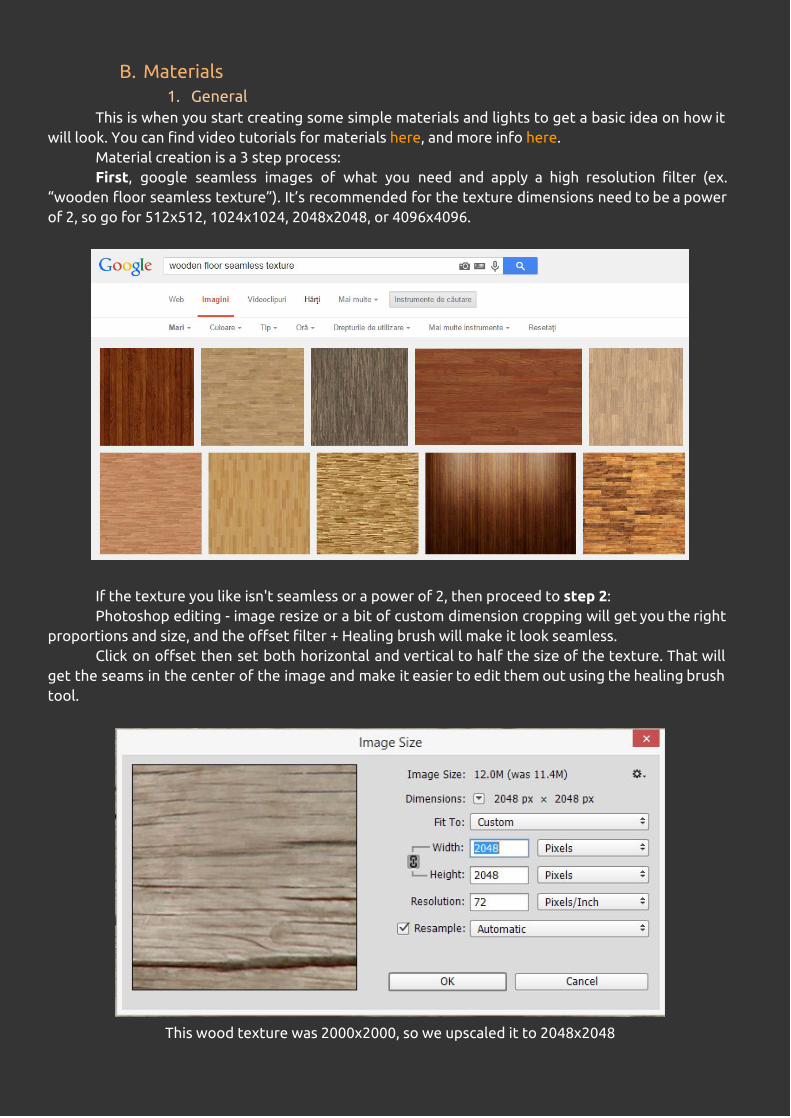
B. Materials 1. General
This is when you start creating some simple materials and lights to get a basic idea on how it will look. You can find video tutorials for materials here, and more info here.
Material creation is a 3 step process: First, google seamless images of what you need and apply a high resolution filter (ex.
“wooden floor seamless texture”). It’s recommended for the texture dimensions need to be a power of 2, so go for 512x512, 1024x1024, 2048x2048, or 4096x4096.
If the texture you like isn't seamless or a power of 2, then proceed to step 2: Photoshop editing - image resize or a bit of custom dimension cropping will get you the right
proportions and size, and the offset filter + Healing brush will make it look seamless. Click on offset then set both horizontal and vertical to half the size of the texture. That will
get the seams in the center of the image and make it easier to edit them out using the healing brush tool.
This wood texture was 2000x2000, so we upscaled it to 2048x2048

2. Painting
3. Map Generators - crazybump, Shadermap 2, Bitmap2material, Genetica Step 3 is creating the other texture maps using the original texture. We only created normal
maps and a few specular maps for this project. There are several tools available for map creation, we tested CrazyBump and Shadermap 2,
they are both great. On the next project we are planning on testing out Allegorithmic’s Bitmap2Material, AwesomeBump (github link), which is PBS ready, and Quixel Suite’s NDO. Shadermap can export all maps with one click. Genetica is a great tool for creating tileable textures based on photos but even better for generating procedural maps (biggest amount of noise types of any program i know of). Equalize Texture is a photoshop script that make texture flat from wrong light.

After you are done with map creation get them in the content browser (UE4 only accepts only certain file types) and create a basic material. Connect the new texture maps to their respective material parameters (diffuse map to base color, normal map to normal, specular map to specular). Alter other material parameters like roughness and opacity to suit your needs and you have your basic material ready. For more advanced materials use epic’s tutorials.
A basic material only needs diffuse and normal maps and looks like this:

Quick shortcuts: ● click while holding t : creates a texture node at that location using the currently selected
texture in the content browser. If you don't have a texture selected in the content browser when doing this, you will get an error message at the bottom of the node like in the pic above. link
● click while holding 1 : creates a constant at that location. link ● click while holding u : creates a Texture Coordinate expression at that location. link ● click while holding m : creates a Multiply expression at that location. link
4. Substance Here are some videos on how to make a material in Substance Designer for use in Unreal 4. link, link2
5. Quixel Suite 6. About PBR Materials
If you want to read a little bit more about how PBR (Physically Based Rendering) materials work, here is one great article by Joe “EarthQuake” Wilson in Marmoset's website. link Also, Allegorithmic has two free for download books entitled "The comprehensive PBR guide" with great explanations and tricks made by Wes McDermott. link And finally, a guide that Brian Yu (3py0n) has made with several articles about making PBR Materials. link.
C. Vegetation 1. Grass
Here is a great grass asset made by Aaron Neal. In the video comments you can find all the details for making this grass and also the project with grass ready to use.
D. Lighting - static First of all read this, it’s the documentation on global illumination. and also this. After you are done with imports and materials you can start experimenting with lighting. Drag and
drop a directional light from the modes area into the scene.

In our case, while the church needed strong lighting (50 intensity, 15 indirect contribution), the school needed a directional light with low intensity (7.5) and a high indirect contribution factor (30). This is because Tadao allowed just a touch of light to penetrate the church walls for that dramatic crossshaped light effect, while the school receives a bit more light. The pics below show just that (high exposure, the real thing is darker).

Altering the direction of the light could have resulted in a very different look but we preferred something a bit more realistic.
More info on directional lights can be found here. Since there is no formula for the perfect setup and each scene has different lighting requirements, you’ll have to play around with the parameters and find what suits your needs.

Modified settings are marked with yellow arrows, everything else is standard. When we were done setting up the lighting we built the light by pushing the “build” button. You
should keep it on preview for a faster workflow until the scene is done then build it on high or production quality. (you can find these options in the dropdown menu of the build button.)
After the light build was complete, we were looking to tweak the look of the scene even further, so we used the post process volumes in the Modes/Place/Visual tab. We dragged and dropped them into the scene, set the scale to encompass the room/ scene we were looking to adjust, and started experimenting with the parameters. In my opinion, the ones with the biggest impact are GI and Depth of field. Consider

that using some of the post process effects can make your scene look better from an artistic standpoint, but they can drive you away from photorealism.
The parameters we tweaked are contrast, a bit of vignette, bloom, GI, screenspace reflections, and DOF. There are no formulas here, so try them out!
We left everything on the world settings tab on default, as post process volumes gave us better local control.
E. Lighting - dynamic F. Matinee and Recording
You can find everything you need to know about matinee in the documentation provided by EPIC here: user guide, how to, and an example breakdown.
After you are done with the creation phase , you can record it using matinee’s tools, or you can do it using external software like fraps.
In order to have a high frame rate you should record image sequences and then complete the video in adobe after effects, add sound and other effects. If you want quick results then just use the movie recorder in the engine. Recording the video with the engine’s tools can sometimes make the video a bit laggy. you can see that in most UE4 videos online. I’ve had better results using fraps. Just make sure the viewport is fullscreen and you set the taskbar on autohide.
G. Interactivity
Lights Here’s a quick video uploaded by David Boura on how you can turn lights on and off by using a keyboard key.
H. Other subjects??
III. Collaborative Workflow One of our goals was to use UE4 as a collaborative tool, so we experimented with Perforce,
Google Drive, and Dropbox. Perforce is ok, it saves multiple versions of the project, so that you have access to the revision
history if you mess up. It offers plenty of control, but it’s hard to set up. It also uses a ton of HDD space to store revisions. You can’t use it to make real time changes and every time you want to work on your project you have to go through a process of “checking out” and then “checking in”. It’s time consuming and it’s not worth it, unless you have a large team and need more control.
I found that the best way to work in small teams is to use a cloud storage tool like Google Drive / Dropbox etc. Dropbox didn't offer enough storage space unless we bought a premium package, so we went for GDrive. You simply share your project folder with your team and every time anyone makes a change (and saves), the project is updated in the cloud. If you only want to add assets to the content browser, you don’t even need to close the engine, it updates in realtime.
UE4 archviz guide Since version 4 of the engine is not even a year old and updates and new features are rolling out
regularly, I thought it would be a good idea to create a public UE4 archviz guide that everyone can contribute to, so we can keep up with the updates and share the knowledge. The guide is a google document that can be updated in real time, and that anyone can comment on, so help us fill the empty sections and tell us about your experience using UE4 for archviz!