GS tote layout Final - Robert Kaufman
6
www.GirlScouts.org
Transcript of GS tote layout Final - Robert Kaufman

www.GirlScouts.org
Page 1 of 5
Step 1 -- Making the Tube
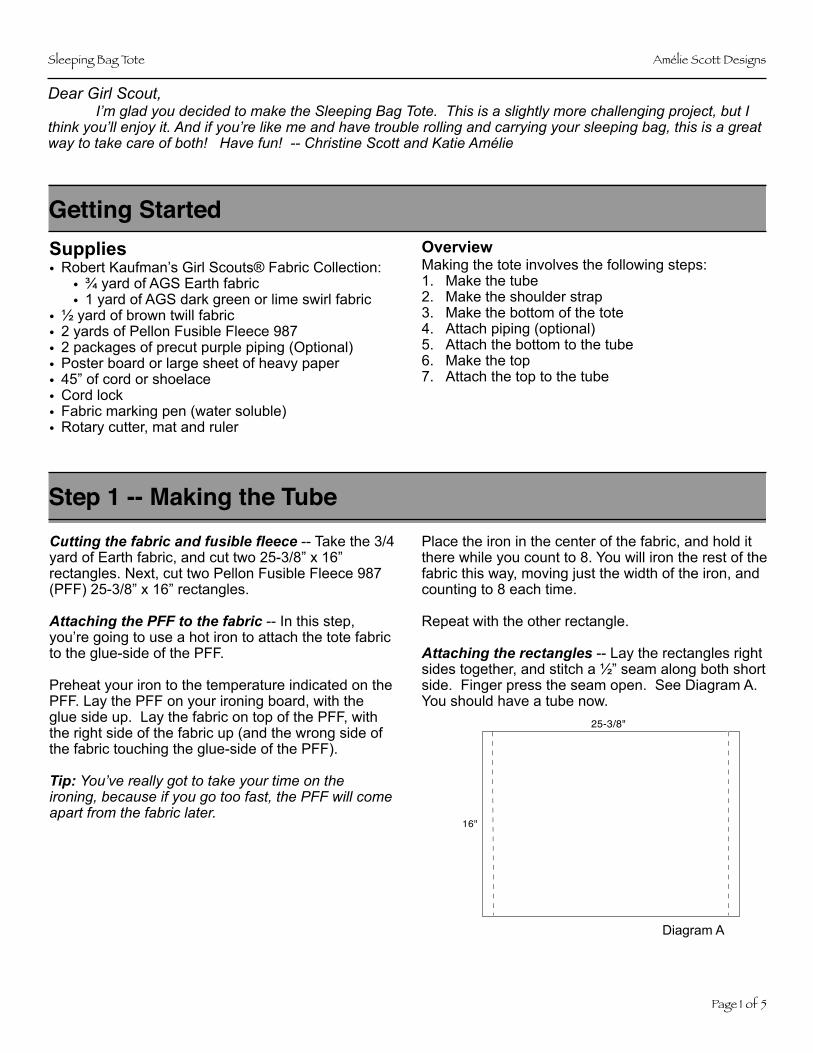
Dear Girl Scout, I’m glad you decided to make the Sleeping Bag Tote. This is a slightly more challenging project, but I think you’ll enjoy it. And if you’re like me and have trouble rolling and carrying your sleeping bag, this is a great way to take care of both! Have fun! -- Christine Scott and Katie Amélie
Cutting the fabric and fusible fleece -- Take the 3/4 yard of Earth fabric, and cut two 25-3/8” x 16” rectangles. Next, cut two Pellon Fusible Fleece 987 (PFF) 25-3/8” x 16” rectangles.
Attaching the PFF to the fabric -- In this step, you’re going to use a hot iron to attach the tote fabric to the glue-side of the PFF.
Preheat your iron to the temperature indicated on the PFF. Lay the PFF on your ironing board, with the glue side up. Lay the fabric on top of the PFF, with the right side of the fabric up (and the wrong side of the fabric touching the glue-side of the PFF).
Tip: You’ve really got to take your time on the ironing, because if you go too fast, the PFF will come apart from the fabric later.
Place the iron in the center of the fabric, and hold it there while you count to 8. You will iron the rest of the fabric this way, moving just the width of the iron, and counting to 8 each time.
Repeat with the other rectangle.
Attaching the rectangles -- Lay the rectangles right sides together, and stitch a ½” seam along both short side. Finger press the seam open. See Diagram A. You should have a tube now.
Diagram A
Sleeping Bag Tote Amélie Scott Designs
Getting StartedSupplies• Robert Kaufman’s Girl Scouts® Fabric Collection:
• ¾ yard of AGS Earth fabric• 1 yard of AGS dark green or lime swirl fabric
• ½ yard of brown twill fabric• 2 yards of Pellon Fusible Fleece 987• 2 packages of precut purple piping (Optional)• Poster board or large sheet of heavy paper• 45” of cord or shoelace• Cord lock• Fabric marking pen (water soluble)• Rotary cutter, mat and ruler
OverviewMaking the tote involves the following steps: 1. Make the tube2. Make the shoulder strap3. Make the bottom of the tote4. Attach piping (optional)5. Attach the bottom to the tube6. Make the top7. Attach the top to the tube
25-3/8"
16"

Page 2 of 5
Attaching the strap to the tube -- Make sure that the tube is right side out.
Take one end of the strap and lay it on the tube. Make sure that the raw edges line up, and that the right side of the strap is beside one of the seams in the tube. Pin in place.
Sew the end of the handle to the tube, using a 1/2” seam. You will want to go back and forth a few times to make sure it is very secure. It’s okay to stitch a
bit past the handle. (See Diagram D.)
Repeat with the other end of the handle.
Friendship Quilt
Take the pie-shaped pattern piece, and trace it 8 times, to make a large circle. (See Diagram E.) You do not have to trace the 1/2” seam allowance on the pattern piece. Cut out the circle pattern.
Now, lay the circle pattern on top of the twill fabric and trace around the circle. Trace another circle on the PFF. Cut out both circles, but cut the PFF slightly smaller.
Using a ruler and a fabric marking pen, mark the 1/2” seam allowance around the fabric circle, marking on the right side of the fabric.
Press the PFF onto the wrong side of the fabric circle. The PFF will make the bottom more durable. The PFF will also make it much easier to attach the bottom and the middle section.
Step 3 -- Making the Bottom of the Tote
Tip: For this step, you will need a piece of poster board or large sheet of paper to make a circle pattern.
Sleeping Bag Tote Amélie Scott Designs
Step 2 -- Making and attaching the shoulder strapCutting the fabric and PFF -- Cut a strip 8” by width of fabric (WOF). Trim to 40” in length. Cut a 1-3/4” x 40” strip of PFF.
Attaching the PFF to the fabric -- Fold the fabric strip in half lengthwise, and press. Open the strip again. Fold each edge to the middle crease, and press again. These creases form strip sections A, B, C, and D. (See Diagram B.)
Open the strip and lay the PFF in the middle of section B, with the glue side up. (See Diagram C.)
Fold section A over top of the PFF, and press. Remember to move slowly like you did before.
Fold section D over section C strap and press.
Finally, fold the two halves over each other and press. The handle should now be a 2” x 40” rectangle.
Stitch along both long edges, about 1/8” from the side.
Diagram B Diagram C
PFF
A
BC
D
40"
8"
Creases
A
BC
D
Diagram D
Seam
Seam
Diagram E

Page 3 of 5
Step 5 -- Attaching the Bottom to the Tube
Friendship Quilt
Take the tube (which now has the shoulder strap attached), and turn it so the right side of the fabric and the strap are on the inside of the tube.
Take the bottom circle, and stitch it to the right side of the bottom of the tube with a 1/2” seam. Make sure right sides are together! Keep your zipper foot on if you have piping.
Tip: It helps to lay some masking tape on the throat plate of your machine to help you see where the 1/2” seam allowance will be. It’s a little weird sewing a circle to a tube, so go slow.
When you are finished, turn the tote right side out.
Sleeping Bag Tote Amélie Scott Designs
The piping is exactly 1/2” wide. Unfortunately, you need the piping to lay slightly past the 1/2” seam allowance line, so that you will see the piping on the finished tote. This means that the raw edge of the piping and the raw edge of the circle will not be even.
Pin the right side of the piping to the right side of the circle, so that the part with the cord lays just past the 1/2” seam allowance line that you drew on the circle. (See Diagram F.)
Tip: Don’t pin the very edge of the piping to the circle. Having about an inch that’s “loose” at the beginning of the piping circle will make it easy for you to close the circle when you sew the piping down.
Put a zipper foot on your machine. This foot will allow you to stitch very close to the piping without stitching over it.
Attach the piping to the circle, sewing through the 1/2” seam allowance. When you come to the end of the circle, cross the extra piping over the “loose” piping from the beginning of the circle, making an
“X” shape. This gives your piping a finished look when you sew everything together. Trim the “loose” extra piping.
Choose one end of the tube that you created in Step 3 to be the top. Repeat the entire piping process with the top of the tube.
Step 4 -- Optional Piping
Tip: Piping is not really difficult, it just takes a bit of time. But, if you are new to sewing, you might want to skip this step.
PipingCircle
Seam allowance mark
Piping slightly outside seam allowance mark
Diagram F

Page 4 of 5
Step 7 -- Attaching the top to the tube
Friendship Quilt
Slip the top that you just made in Step 6 over the top edge of the tube. Make sure that the right sides of the top and the tube are together, the hole in the casing (which will be facing out) is lined up with the handle, and the unfolded raw edges of the top and tube are even. Pin in place.
Put the zipper foot back on your sewing machine. Sew together with a 1/2” seam. Turn the top right side out.
Inserting the cord -- Take the 45” cord or shoestring, and place a safety pin in one end and attach to the tote bag somewhere near the hole in the casing. This is so you won’t loose the end of the cord when you are pulling it through the casing. On the other end of the cord, attach a large safety pin. Push the large safety pin with cord attached through the hole all the way around until it comes out of the other side of the hole.
Remove the safety pins, and pull the two cords together to gather the top. Put both cord ends through a cord lock. Tie a knot at the ends of the cords.
Now, loosen the cord pull, put your sleeping bag in the tote, and tighten the cord pull so the top is gathered.
We love to see completed projects, so if you care to share, please email a picture of you and your sleeping bag tote to [email protected]. We will put your picture in our online gallery at www.ameliescott.com.
Now, enjoy!©2009, All rights reserved
Amélie Scott Designswww.ameliescott.com
Sleeping Bag Tote Amélie Scott Designs
Cutting the fabric -- Cut two 16” x 25-3/8” strips of fabric. You will not use PFF in the top section. This is so that the top can be gathered.
Making the top and casing -- Switch back to your normal sewing machine foot.
Place the two strips right sides together, and stitch a 1/2” seam along both short (16”) sides. You will have a tube when you are finished. Press seams open.
With the seams facing up, fold the tube in half lengthwise, making sure that the seams line up. The tube is now 8” wide, and the raw edges of the seams are on the inside of the tube. Stitch around the tube, 1” from the folded edge of the tube. This will create a casing for the draw-string cord to go through. (See Diagram G.)
Opening the casing -- You need to create a hole in the casing for the cord to go through. Turn the top to the seam that holds the two halves
of the tube together. Stitch back and forth over the seam, both near the fold and by the 1” stitch line. (See Diagram H.) This reinforces the area where the opening will be.
Take a seam ripper, and gently pull at the seam so you can see the stitches. Use the seam ripper to cut the 5-6 stitches that are in between the two reinforcing seams that you just sewed. Be careful to only cut the stitches on the one outer layer. Now, you have a hole in the casing for the cord. You will put the cord in later.
Step 6 -- Making the Top
Diagram G
Reinforcing seams
1"
Diagram H

Page 5 of 5
Friendship QuiltSleeping Bag Tote Amélie Scott Designs