Grove - Moisture Sensor User Manual
16
1 Grove - Moisture Sensor User Manual Version: 1.0 Release date: 2015/9/22 Wiki: http://seeedstudio.com/wiki/Grove_-_Moisture_Sensor Bazaar: http://www.seeedstudio.com/depot/Grove-Moisture-Sensor- p-955.html?cPath=25_27
Transcript of Grove - Moisture Sensor User Manual

1
Grove - Moisture Sensor
User Manual
Version: 1.0
Release date: 2015/9/22
Wiki: http://seeedstudio.com/wiki/Grove_-_Moisture_Sensor
Bazaar: http://www.seeedstudio.com/depot/Grove-Moisture-Sensor-
p-955.html?cPath=25_27

2
Document Revision History
Revision Date Author Description
1.0 Sep 22, 2015 Jiankai.li Create file

3
Contents
Document Revision History ········································································· 2
1. Introduction ······················································································· 2
2. Features ···························································································· 3
3. Specification ······················································································ 4
4. Application Ideas ················································································· 5
5. Usage ······························································································ 6
With Arduino ····················································································· 6
With TI LaunchPad ················································································· 7
With Raspberry Pi ················································································· 10
6. Resources ························································································· 11
7. Support ··························································································· 12

1
Disclaimer
For physical injuries and possessions loss caused by those reasons which are not related to
product quality, such as operating without following manual guide, natural disasters or force
majeure, we take no responsibility for that.
Under the supervision of Seeed Technology Inc., this manual has been compiled and published
which covered the latest product description and specification. The content of this manual is
subject to change without notice.
Copyright
The design of this product (including software) and its accessories is under tutelage of laws. Any
action to violate relevant right of our product will be penalized through law. Please consciously
observe relevant local laws in the use of this product.

2
1. Introduction
This Moisture Sensor can be used to detect the moisture of soil or judge if there is water around
the sensor, let the plants in your garden reach out for human help. They can be very easy to use,
just insert it into the soil and then read it. With the help of this sensor, it will be realizable to make
the plant remind you : hey, i am thirsty now, please give me some water.

3
2. Features
Soil moisture sensor based on soil resistivity measurement
Easy to use
2.0cmX6.0cm grove module

4
3. Specification
Item Condition Min Typical Max Unit
Voltage - 3.3 / 5 V
Current - 0 / 35 mA
Output Value
Sensor in dry soil 0 ~ 300 /
Sensor in humid soil 300 ~ 700 /
Sensor in water 700 ~ 950 /

5
4. Application Ideas
Botanical gardening
Moisture sensoring
Consistency measurement

6
5. Usage
With Arduino
This is a summary of the moisture sensor which can be used to detect the moisture of the soil.
When the soil moisture deficits, the sensor output value will decrease. You can know whether a
plant needs water or not by observing the results that the sensor outputs. The following sketch
demonstrates a simple application of sensing the moisture of the soil.
Connect this module to one of analog port A0 of Grove - Base Shield with the 4 pin Grove
cable, and then insert the Sensor into the soil or place it anywhere you want.
Plug Grove - Base Shield into the Arduino/Seeeduino and connnect Arduino to PC via a USB
cable.
The hardware installation as shown below:
Note:This sensor isn't hardened against contamination or exposure of the control circuitry to water
and may be prone to electrolytic corrosion across the probes, so it isn't well suited to being left in
place or used outdoors.
Copy and paste code below to a new Arduino sketch.
int sensorPin = A0; // select the input pin for the potentiometer
int sensorValue = 0; // variable to store the value coming from the sensor
7
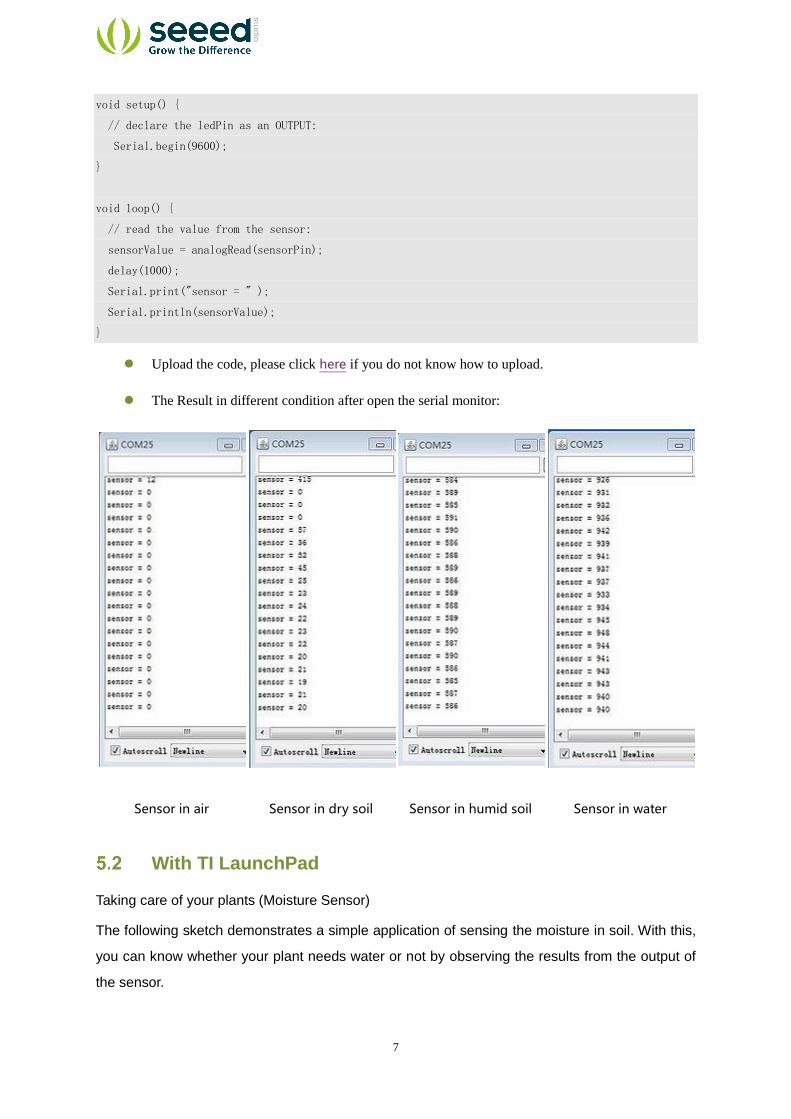
void setup() {
// declare the ledPin as an OUTPUT:
Serial.begin(9600);
}
void loop() {
// read the value from the sensor:
sensorValue = analogRead(sensorPin);
delay(1000);
Serial.print("sensor = " );
Serial.println(sensorValue);
}
Upload the code, please click here if you do not know how to upload.
The Result in different condition after open the serial monitor:
Sensor in air Sensor in dry soil Sensor in humid soil Sensor in water
With TI LaunchPad
Taking care of your plants (Moisture Sensor)
The following sketch demonstrates a simple application of sensing the moisture in soil. With this,
you can know whether your plant needs water or not by observing the results from the output of
the sensor.

8
/*
Moisture-Sensor
The following sketch demonstrates a simple application of sensing
the moisture of the soil. You can know whether a plant needs water
or not by observing the results that the sensor outputs.
The circuit:
* Moisture-Sensor attached to pin 24 (J6 plug on Grove Base BoosterPack)
* one side pin (either one) to ground
* the other side pin to +VCC
* LED anode (long leg) attached to RED_LED
* LED cathode (short leg) attached to ground
* Note:
This example code is in the public domain.
http://seeedstudio.com/wiki/Grove_-_Moisture_Sensor
*/
#include "TM1637.h"
/* Macro Define */
#define CLK 39 /* 4-digital display clock pin */
#define DIO 38 /* 4-digiral display data pin */
#define BLINK_LED RED_LED /* blink led */
#define MOISTURE_PIN 24 /* pin of moisture sensor */
#define THRESHOLD_VALUE 300 /* threshold for watering the flowers */

9
#define ON HIGH /* led on */
#define OFF LOW /* led off */
#define _handle_led(x) digitalWrite(BLINK_LED, x) /* handle led */
/* Global Varibles */
TM1637 tm1637(CLK, DIO); /* 4-digital display object */
int analog_value = 0; /* varible to store the value coming from rotary angle
sensor */
int8_t bits[4] = {0}; /* array to store the single bits of the value */
/* the setup() method runs once, when the sketch starts */
void setup() {
/* Initialize 4-digital display */
tm1637.init();
tm1637.set(BRIGHT_TYPICAL);
/* declare the red_led pin as an OUTPUT */
pinMode(BLINK_LED, OUTPUT);
}
/* the loop() method runs over and over again */
void loop() {
analog_value = analogRead(MOISTURE_PIN); /* read the value from the sensor */
/* if the value is smaller than threshold, turn on led */
if(analog_value < THRESHOLD_VALUE) {
_handle_led(ON);
} else {
_handle_led(OFF);
}
memset(bits, 0, 4); /* reset array when we use it */
for(int i = 3; i >= 0; i--) {
/* get single bits of the analog value */
bits[i] = analog_value % 10;
analog_value = analog_value / 10;
tm1637.display(i, bits[i]); /* display by 4-digital display */
}
delay(200);
}

10
With Raspberry Pi
1. You should have got a raspberry pi and a grovepi or grovepi+.
2. You should have completed configuring the development environment, otherwise
follow here.
3. Connection
Plug the sensor to grovepi socket A0 by using a grove cable.
4.Navigate to the demos' directory:
cd yourpath/GrovePi/Software/Python/
To see the code
nano grove_moisture_sensor.py # "Ctrl+x" to exit #
import time
import grovepi
# Connect the Grove Moisture Sensor to analog port A0
# SIG,NC,VCC,GND
sensor = 0
while True:
try:
print grovepi.analogRead(sensor)
time.sleep(.5)
except KeyboardInterrupt:
break
except IOError:
print "Error"
5.Run the demo.
sudo python grove_moisture_sensor.py

11
6. Resources
Grove-_Moisture_Sensor_Eagle_File

12
7. Support
If you have questions or other better design ideas, you can go to our forum or wish to discuss.

Mouser Electronics
Authorized Distributor
Click to View Pricing, Inventory, Delivery & Lifecycle Information: Seeed Studio:
101020008