GPS NAVIGATOR DGPS NAVIGATOR · Your Local Agent/Dealer 9-52 Ashihara-cho, Nishinomiya, Japan...
81
GPS NAVIGATOR DGPS NAVIGATOR GP-31/GP-36
Transcript of GPS NAVIGATOR DGPS NAVIGATOR · Your Local Agent/Dealer 9-52 Ashihara-cho, Nishinomiya, Japan...
GPS NAVIGATORDGPS NAVIGATOR
GP-31/GP-36

Your Local Agent/DealerYour Local Agent/Dealer
9-52 Ashihara-cho,9-52 Ashihara-cho,Nishinomiya, JapanNishinomiya, Japan
Telephone :Telephone : 0798-65-21110798-65-2111
Telefax :Telefax : 0798-65-42000798-65-4200
FIRST EDITION :FIRST EDITION : MAY.MAY. 19991999Printed in JapanPrinted in JapanAll rights reserved.All rights reserved.
K :K : APR.APR. 26,200226,2002
PUB.No.PUB.No. OME-43990OME-43990*00080877701**00080877701**00080877701**00080877701*(( YOSHYOSH )) GP-31/36GP-31/36
* 0 0 0 8 0 8 7 7 7 0 1 ** 0 0 0 8 0 8 7 7 7 0 1 *
*OME43990K00**OME43990K00**OME43990K00**OME43990K00*
* O M E 4 3 9 9 0 K 0 0 ** O M E 4 3 9 9 0 K 0 0 *

iiiiiiiiiiiii i
SAFETY INSTRUCTIONS
WARNINGDo not open the equipment.
Only qualified personnel should work insidethe equipment.
Do not disassemble or modify theequipment.
Fire, electrical shock or serious injury canresult.
Immediately turn off the power at theswitchboard if the equipment is emittingsmoke or fire.
Continued use of the equipment can causefire or electrical shock. Contact a FURUNOagent for service.
Keep heater away from equipment.
A heater can melt the equipment’s powercord, which can cause fire or electricalshock.
Use the proper fuse.
A 1A fuse is provided in the power/datacable. Use only a 1A fuse—use of a wrongfuse can result in equipment damage.
CAUTIONDo not use the equipment for other thanits intended purpose.
Improper use of the equipment can result inpersonal injury or equipment damage.
No one navigation device should everbe solely replied upon for the navigationof a vessel.
Always confirm position against all avail-able aids to navigation, for safety of vesseland crew.
GPS position and velocity accuraciesare controlled by the U.S. Department ofDefense. Position may be degradedup to 100 meters.
Safety Instructions for the Operator

iiiiiiiiiiiiiiiiiiiiiiiiii ii
WARNINGDo not open the cover unless totallyfamiliar with electrical circuits andservice manual.
Improper handling can result in electricalshock.
Turn off the power at the switchboardbefore beginning the installation.
Fire or electrical shock can result if thepower is left on.
Be sure that the power supply iscompatible with the voltage rating ofthe equipment.
Connection of an incorrect power supplycan cause fire or equipment damage. Thevoltage rating of the equipment appearson the label above the power connector.
DO NOT CUT THE ANTENNA CABLE.
See the instructions on the CAUTIONSHEET and the chapter on installation.
CAUTION
Observe the following compass safedistances to prevent interference to amagnetic compass:
Ground the equipment toprevent mutual interference.
Displayunit
Standard Steeringcompass compass
0.5 m 0.3 m
Safety Instructions for the Installer

iii
TABLE OF CONTENTS
FOREWORD ........................................... ivSYSTEM CONFIGURATION ............... vEQUIPMENT LISTS .............................. vi
1. OPERATIONAL OVERVIEW1.1 Control Description ............................. 1-11.2 Turning On and Off the Power ............ 1-21.3 Adjusting Display Dimmer and Contrast ....................................... 1-21.4 Display Modes .................................... 1-31.5 Basic Menu Operation ........................ 1-71.6 Simulator Display ................................ 1-8
2. PLOTTER DISPLAY OVERVIEW2.1 Enlarging/Shrinking the Display Range..................................... 2-12.2 Shifting the Cursor .............................. 2-12.3 Shifting the Display ............................. 2-22.4 Centering Own Ship’s Position ........... 2-22.5 Changing Track Plotting Interval, Stopping Plotting of Track ................... 2-22.6 Erasing Track ...................................... 2-3
3. WAYPOINTS (MARKS)3.1 Entering Waypoints ............................. 3-13.2 Entering the MOB Mark ...................... 3-33.3 Displaying Waypoint Name ................. 3-43.4 Editing Waypoints on the WPTS/MRKS List ................................ 3-43.5 Deleting Waypoints ............................. 3-5
4. ROUTES4.1 Creating a Route ................................. 4-14.2 Editing Routes..................................... 4-44.3 Deleting a Route ................................. 4-6
5. NAVIGATION5.1 Setting Destination by Cursor ............. 5-15.2 Setting Destination by Waypoint ......... 5-15.3 Setting Route as Destination .............. 5-25.4 Canceling Destination ......................... 5-2
6. ALARMS6.1 Arrival Alarm, Anchor Watch Alarm ..... 6-16.2 XTE (Cross Track Error) Alarm ........... 6-26.3 Speed Alarm ....................................... 6-36.4 DGPS Alarm ........................................ 6-3
6.5 Time Alarm .......................................... 6-36.6 Trip Distance Alarm .............................6-46.7 Buzzer Type Selection ........................ 6-4
7. OTHER FUNCTIONS7.1 Calculating Range, Bearing and TTG .7-17.2 DGPS Setup, DGPS Data .................. 7-27.3 Bearing Reference .............................. 7-57.4 Magnetic Variation .............................. 7-57.5 Geodetic Chart System ....................... 7-67.6 Units of Measurement ......................... 7-67.7 Position Display Format ...................... 7-67.8 Time Difference (using local time) ...... 7-77.9 GPS Setup .......................................... 7-77.10 User Display Setup ........................... 7-97.11 Resetting Trip Distance ................... 7-107.12 Uploading, Downloading Waypoint, Route Data ...................................... 7-107.13 Time Display ................................... 7-14
8. MAINTENANCE & TROUBLESHOOTING8.1 Maintenance ....................................... 8-18.2 Displaying the Message Board ...........8-18.3 Displaying the GPS Satellite Monitor Display ..................... 8-28.4 Diagnostic Test .................................... 8-28.5 When “BATTERY ALARM!” Appears ..8-38.6 Clearing Data ......................................8-4
9. INSTALLATION9.1 Installation of Display Unit .................. 9-19.2 Installation of Antenna Unit ................. 9-19.3 Wiring .................................................. 9-29.4 Initial Settings ......................................9-3
APPENDIXMenu Tree .............................................. AP-1Loran C Chains ...................................... AP-3Decca Chains ......................................... AP-4Geodetic Chart List ................................ AP-5
SPECIFICATIONS ............................ SP-1OUTLINE DRAWING ......................... D-1
INTERCONNECTION DIAGRAM .. S-1
INDEX .............................................. Index-1Declaration of Conformity (GP-31, GP-36)

iv
A Word to GP-31/GP-36Owners
Congratulations on your choice of the GP-31 GPS Navigator, GP-36 DGPS Navigator.We are confident you will see why theFURUNO name has become synonymouswith quality and reliability.
For over 50 years FURUNO Electric Com-pany has enjoyed an enviable reputation forinnovative and dependable marine electron-ics equipment. This dedication to excellenceis furthered by our extensive global networkof agents and dealers.
Your navigator is designed and constructedto meet the rigorous demands of the marineenvironment. However, no machine can per-form its intended function unless installed,operated and maintained properly. Pleasecarefully read and follow the recommendedprocedures for installation, operation, andmaintenance.
We would appreciate hearing from you, theend-user, about whether we are achieving ourpurposes.
Thank you for considering and purchasingFURUNO equipment.
FOREWORD
Features
The GP-31/GP-36 is a totally integrated GPSreceiver and video plotter, and consists of adisplay unit and an antenna unit.
The GP-36 additionally has a DGPS beaconreceiver built in its display unit. The high sen-sitivity GPS receiver tracks up to twelve sat-ellites simultaneously. An 8-state Kalman filterensures optimum accuracy in determinationof vessel position, course and speed.
The main features of the GP-31/GP-36 are
• A DGPS beacon receiver (external) maybe connected to the GP-31 to add DGPSfunction.
• Comprehensive navigation data displays
• Storage for 950 waypoints and 50 routes
• Alarms: Arrival, Anchor Watch, XTE(Cross-track Error), Trip, Time, DGPS, andSpeed.
• Man overboard feature records latitudeand longitude or TD (Loran C or Decca)coordinates at time of man overboard andprovides continuous updates of range andbearing when navigating to the MOB po-sition.
• Menu-driven operation
• Bright 95 x 60 mm LCD with adjustablecontrast and brilliance
• Autopilot (option) may be connected, andsteering data output to the autopilot.
• Unique “Highway” display provides agraphic presentation of ship’s progresstoward a waypoint.
• Own ship’s position may be shown in lati-tude and longitude or TD (Loran C orDecca).
• Waypoint and route data can be uploadedfrom a PC or downloaded to a PC.

v
SYSTEM CONFIGURATION
GP-36 System configuration
GP-31 System configuration

vi
EQUIPMENT LISTS
Standard supply
emaN epyT ytQ skrameR
tinUyalpsiD 63-PG1
detaroprocnidraobNOCAEB regnahgnidulcnIstlobbonkdna
13-PG draobNOCAEBoN
tinUannetnA 710-APG
1
elbacm01htiw,13-PGroF
810-APG m01/w,annetnaSPGD)pihw(dleif-E,63-PGroFelbac
910-APG m01/w,annetnaSPGD)pool(dleif-H,63-PGroFelbac
noitallatsnIslairetaM
tes1 ,020-5000FPS7A-JM:epyT(elbacataD/rewoP•)483-931-000:.oNedoC
foannetnapihwrof,.cp1(rehsawgnirpS•)162-468-000:.oNedoC,01M:epyT,810-APG,tinuyalpsidgnixifrof,.scp4(wercsgnippaT•
180-208-000:.oNedoC,02X5:epyT
straPerapS tes1 ,A1GMGF:epyT,.scp2(esuF)508-411-000:.oNedoC
seirosseccA tes1 ,1901-610-02:epyT(revocdraH)230-792-001:.oNedoC
Optional equipment
emaN epyT .oNedoC skrameR
elgnAthgiResaBannetnA
033AQ-31.oN 932-308-000 annetnaroFtinu
annetnAepyt-LesaB
013AQ-31.oN 042-308-000
annetnAliardnaHesaB
0615CR-31.oN 411-608-000
tiKtnuoMtsaM 11110-02PC 087-563-400
.yssAelbaC 020-5000FPS7A-JM 483-931-000
StiKtnuoMhsulF 71-02-PO 027-040-000 yalpsidehtgnitnuomhsulfroFtinu
FtiKtnuoMhsulF 92-02-PO 504-140-000

1-1
1.1 Control Description
Press once: Zoom, centering,or escapes from current opera-tion, depending on display inuse.Press twice: Opens menu.
Selects display mode.
Long press: Turns poweroff.Touch and release: Turnspower on. Opens the displayfor adjustment of dimmerand contrast.
Inscribes mark, MOB markon the display.
Sets/cancels destination.
Registers items on menus.
Cursor Pad Shifts cursor and display. Selects items on menus.
MENU
DIMPWR
MARKMOB
ENT
DISP GOTO
Figure 1-1 Control panel
Removing the hard cover
To remove the hard cover, squeeze it at its top and bottom right (or left) corners and pull ittoward you.
Pressure
Pressure
1. OPERATIONAL OVERVIEW

1-2
1.2 Turning On and Off the Power
Turning on the power
Press the [DIM/PWR] key. The unit beepsand then starts up with the last-used dis-play mode.
Your equipment takes about two minutesto find its position when turned on for thevery first time.
The equipment shows receiver status indi-cations at the top left-hand corner in all dis-play modes. Table 1-1 shows theseindications and their meanings.
Table 1-1 Receiver status indications
noitacidnI gninaeM
D2 xifnoitisopSPGD2lamroN
PODPODhtiwxifnoitisopSPG
ro)xifnoitisopD2(4nahterom)xifnoitisopD3(6
D3 xifnoitisopSPGD3lamroN
D2D SPGlaitnereffidlamroNxifnoitisop
D3D SPGlaitnereffidD3lamroNxifnoitisop
MIS .edomnoitalumiS
:POD rofxedniehT.noisicerPfonoituliDehtrehgihehT.ycaruccagnixif-noitisop
ehtfoycaruccaehtrehgihehtrebmun.xifnoitisop
:etoN nosdnepedoslaycaruccanoitisoP.noitisopetilletas
Turning off the power
Press and hold down the [DIM/PWR] keyuntil the screen goes blank, approx. threeseconds. The time remaining until poweroff is counted down on the display.
1.3 Adjusting Display Dimmer and Contrast
1. Press the [DIM/PWR] key with a touch-and-release action. The display shownin Figure 1-2 appears.
DIM M ER ( 1~8 )
CO NT RAST ( 0~63 )st
▲▼ 4
41
EXIT : [ENT]
Figure 1-2 Screen for adjustment ofdisplay dimmer and contrast
2. To adjust the dimmer, press ▲ or ▼. Cur-rent setting is shown to the right of “▲”.
3. To adjust the contrast, press t or s.Current setting is shown to the right of“s”.
4. Press the [ENT] key to finish.
Note: If you turn off the power withminimum contrast,nothing appears on thedisplay when you turn on the poweragain.Adjust the contrast as describedabove.

1-3
1.4 Display Modes
Your unit has five display modes: Plotter Display, Highway Display, Steering Display, NavData Display and User Display (digital data or speedometer). Press the [DISP] key toselect a display mode. Each time the key is pressed, the display mode changes in thesequence shown below.
Figure 1-3 Display modes
Note: Position data can be shown in latitude and longitude or TDs (Loran C or Decca).

1-4
Plotter display
The plotter display traces own ship’s track, and shows position, course, speed, and hori-zontal display range setting.
Figure 1-4 Plotter display
Highway display
The highway display provides a 3-D view of own ship’s progress toward destination. Navdata is also shown.
Figure 1-5 Highway display

1-5
Steering display
The steering display provides steering information such as ship’s speed, course; range,bearing, ETA and TTG (Time-To-Go) to destination.
Figure 1-6 Steering display
Nav data display
The nav data display shows position in latitude and longitude (or TDs), course, speed,date and time.
Figure 1-7 Nav data display
1-6
User displays
Two user displays are available, digital and speedometer, and the operator may selectwhich to display. The default display is the digital display.
Digital display
The digital display shows digital navigation data. The user may choose what data to dis-play in the three cells below the receiver status, date and time indications. The choices ofdata are speed, course, range, bearing, time-to-go, estimated time of arrival, trip distanceand power source voltage.
Figure 1-8 Digital display
Speedometer display
The speedometer display provides both digital and analog speed readouts. Additionally itprovides three cells of data (below the receiver status and time indication) which the usermay choose. The choices are the same as those for the digital display.
Figure 1-9 Speedometer display

1-7
1.5 Basic Menu Operation
Most operations of the your unit are car-ried out through the menu. Below is a quickintroduction to how to select a menu andchange menu settings. If you get lost in op-eration, press the [MENU] key to return tothe MAIN menu. A complete menu treeappears in the Appendix.
1. Press the [MENU] key once or twice todisplay the menu.
Figure 1-10 Menu
Once: At the steering display, navdata display, user display.Twice: At the plotter display, highwaydisplay.
2. Operate the cursor pad to select a menuand press the [ENT] key. For example,select PLOTTER and press the [ENT]key.
Figure 1-11 PLOTTER SETUP menu
3. Press ▲ or ▼ to select menu item. Forexample, select the TRACK REC field.
4. Press the [ENT] key. A window showingoptions appears. (The figure belowshows the options available for TRACKREC.)
Figure 1-12 Options of TRACK REC
5. Press ▲ or ▼ to select option desired.
6. Press the [ENT] key.
7. Press the [MENU] key twice to finish.
How to enter alphanumeric data
In some instances it is necessary to enteralphanumeric or character data. The ex-ample below shows how to enter a time dif-ference of –6:30, to use local time insteadof UTC time.
1. Press the [MENU] key once or twice todisplay the menu.
2. Select SYS SETUP and press the [ENT]key.
Figure 1-13 SYS SETUP menu
3. Press ▼ to select the TIME DIFF field.
4. Press the [ENT] key. A cursor circum-scribes “+”. This cursor appears when-ever selected data can be changed withthe cursor pad.
Figure 1-14 SYSTEM SETUP menu,TIME DIFF field selected

1-8
5. Press ▲ to display “–”.
6. Press to send the cursor to the nextdigit.
7. Press ▲ or ▼ to display 0.
8. Press to send the cursor to the nextdigit.
9. Press ▲ or ▼ to display 6.
10.Press to send the cursor to the nextdigit.
11.Press ▲ or ▼ to display 3.
12.Press to send the cursor to the lastdigit.
13.Press ▲ or ▼ to display 0.
14.Press the [ENT] key.
15.Press the [MENU] key twice to finish.
1.6 Simulator Display
The simulator display provides simulatedoperation of this unit. You may set the speedmanually and the course manually or auto-matically. All controls are operative – youmay enter marks, set destination, etc.
1. Press the [MENU] key twice to displaythe menu.
2. Select SYS SETUP and press the [ENT]key.
Figure 1-15 SYSTEM SETUP menu
3. Select “SIMULATOR?” and press the[ENT] key.
Figure 1-16 SIMULATOR menu
4. Press the [ENT] key. A window appearswhich shows the choices ON or OFF.
5. Select ON and press the [ENT] key.
6. Press the [ENT] key, enter speed to usefor the simulation with the cursor pad,and press the [ENT] key.
7. Press the [ENT] key.
8. Select course entry method (AUTO orMANU) and press the [ENT] key. Formanual entry of course, press the [ENT]key again, enter course with the cursorpad, and press the [ENT] key again.(The AUTO course tracks a circularcourse.)
9. Press the [ENT] key, enter latitude (usu-ally current latitude) with the cursor pad,and press the [ENT] key.
10.Press the [ENT] key, enter longitude(usually current longitude), and pressthe [ENT] key.
11.Press the [MENU] key twice.
12.Select the PLOTTER display with the[DISP] key. SIM appears at the upperleft-hand corner when the simulator dis-play is active.
Figure 1-17 Simulator display,auto course selected

1-9
13.To turn off the simulator display, selectOFF at step 5 in this procedure, pressthe [ENT] key, and press the [MENU]key twice to finish.
Note: If the power is reset while the simu-lator display is in use, the indication SIMU-LATION MODE appears at the top of thescreen at the next power up, in addition tothe indication SIM. SIMULATION MODEdisappears when any key is pressed.

This page is intentionally left blank.

2-1
2. PLOTTER DISPLAY OVERVIEW
2.1 Enlarging/Shrinking the Display Range
You may increase or decrease the displayrange on the plotter and highway displays.The horizontal range in the plotter displayis available among .02 (40 yd), .05 (101 yd),0.1 (202 yd), 0.2 (405 yd), 0.5, 1, 2, 5, 10,20, 40, 80, 160 and 320 nautical miles.(Nautical mile is the default unit of displayrange. Display range may also be shownin kilometers or miles. Ranges shorter thanthe value 0.5 are also shown in yards ormeters.) The horizontal range in the high-way display is available among 0.2, 0.4, 0.8,1, 2, 4, 8 and 16 nautical miles.
1. Press the [MENU] key. The zoom, shipcentering window appears.
Figure 2-1 Zoom, ship centering window
Note: The prompt “SHIP TO CENTER?”does not appear when the highwaydisplay mode is active.
2. Press the [ENT] key. The zoom windowappears.
Figure 2-2 Zoom window
3. Press ▲ (increase) or ▼ (decrease) toselect range desired.
4. Press the [ENT] key to finish.
2.2 Shifting the Cursor
Use the cursor pad to shift the cursor. Thecursor moves in the direction of the arrowor diagonal pressed on the cursor pad.
Cursor state and data
Cursor state determines what data is shownon the display.
Cursor turned on
Cursor position is displayed in latitude andlongitude or TDs (depending on menu set-ting) at the bottom of the plotter displaywhen the cursor is on. The range and bear-ing from own ship to the cursor appear atthe left-hand side of the display.
Figure 2-3 Data displayed on the plotterdisplay when the cursor in on
Cursor turned off
The cursor is erased when there is no cur-sor pad operation for about six seconds.Ship’s position, speed and course appearat the left side of the plotter display whenthe cursor is off.

2-2
Figure 2-4 Data displayed on the plotterdisplay when the cursor is turned off
2.3 Shifting the Display
The display can be shifted on the plotterdisplay. Operate the cursor pad to place thecursor at an edge of the screen. The dis-play shifts in the direction opposite to cur-sor pad operation.
2.4 Centering Own Ship’s Position
When own ship tracks off the display theown ship mark is automatically returned tothe screen center. You can also return itmanually as follows:
1. Press the [MENU] key.
2. Select SHIP TO CENTER?.
3. Press the [ENT] key.
2.5 Changing Track Plotting Interval, Stopping Plotting of Track
To trace the ship’s track, the ship’s positionis stored into the memory at an interval ofdistance or automatic recording (memorycapacity: 1,000 points). For distance, ashorter interval provides better reconstruc-tion of the track, but the storage time of thetrack is reduced. When the track memorybecomes full, the oldest track is erased tomake room for the latest.
1. Press the [MENU] key once or twice todisplay the menu.
Figure 2-5 Menu
2. Select PLOTTER.
3. Press the [ENT] key.
Figure 2-6 PLOTTER SETUP menu
4. The cursor should be on the TRACKREC field. Press the [ENT] key. Thetrack recording method selection win-dow appears.

2-3
Figure 2-7 Track recordingmethod selection window
5. Select OFF, DISTANCE or AUTO andthen press the [ENT] key.OFF: Track is neither recorded or plot-ted. This setting is useful when you donot need to record track, for example,when returning to port.DISTANCE: Track is recorded and plot-ted at the distance interval set.AUTO: Plotting and recording intervalchanges with chart scale selected.
If you selected DISTANCE, enter the re-cording interval as follows:
a) Press the [ENT] key.b) Press or to select digit to
change.c) Press ▲ or ▼ to change value.d) Press the [ENT] key after setting.
6. Press the [MENU] key twice to finish.
2.6 Erasing Track
All track can be erased. Track cannot berestored once erased, therefore be abso-lutely sure you want to erase all track.
1. Press the [MENU] key once or twice todisplay the menu.
2. Select ERASE and press the [ENT] keyto display the ERASE menu.
Figure 2-8 ERASE menu
3. Select “TRACK?” and press the [ENT]key. The message shown in Figure 2-9appears.
Figure 2-9 Prompt for erasure of track
4. Press the [ENT] key to erase all track.
5. Press the [MENU] key twice to finish.

This page is intentionally left blank.

3-1
3. WAYPOINTS (MARKS)
3.1 Entering Waypoints
In navigation terminology a waypoint is aparticular location on a voyage whether itbe a starting, intermediate or destinationwaypoint. Your unit can store 950waypoints. Waypoints can be entered onthe plotter display four ways: at cursor po-sition, at own ship’s position, through themenu (manual input of L/L or TD), and byMOB position.
Entering a waypoint by the cursor
1. On the plotter display, use the cursorpad to place the cursor on the locationyou want to make a waypoint.
2. Press the [ENT] key. The following win-dow appears.
Figure 3-1 Waypoint name entry window
3. The cursor is on the second line of thedisplay. This is where you may enterwaypoint name, which may consist ofsix characters. (The number shown isthe youngest empty waypoint number.If you would rather have the unit regis-ter the waypoint under that number, andyou do not need to change mark shapeor enter a comment, press the [ENT] keytwice to register the waypoint and fin-ish.) To enter KOBE as the waypointname, for example, do the following:
a) Press ▲ or ▼ to display K.b) Press to move the cursor to the
next column and press ▲ or ▼ to dis-play O.
c) Press to move the cursor to thenext column and press ▲ or ▼ to dis-play B.
d) Press to move the cursor to thenext column and press ▲ or ▼ to dis-play E.
e) Press the [ENT] key. The followingwindow appears.
Figure 3-2 Waypoint position,comment entry window
4. This window is where you can selectmark shape, enter a comment, and logthe waypoint to a route. (If you do notneed to change mark shape, enter acomment, or save waypoint to a route,select “Exit?” and press the [ENT] keyto finish.) How to log waypoints to aroute will be discussed in the chapteron routes.
a) Use the cursor pad to place the cur-sor under MARK.
b) Press the [ENT] key.c) Select mark desired with ▲ or ▼.
Figure 3-3 Mark selection sequence
d) Press the [ENT] key.

3-2
e) The cursor is on the date/time field.Press the [ENT] key.
f) Enter a comment (max. 16 charac-ters) with the cursor pad (the sameas you did when entering waypointname) and press the [ENT] key. Tocreate a space, select “blank” char-acter. To remove all characters whichfollow the cursor, select the underline.
g) The cursor is on “Exit?.” Press the[ENT] key.
h) Press the [ENT] key again to finish.
Note: “LOG RT?” function is explained inthe chapter on routes.
Entering a waypoint at own ship’sposition
1. Press the [MARK/MOB] key on any dis-play. The following window appears.
Figure 3-4 Own ship’s position window
2. If you want to register the waypoint un-der the number shown, and you do notneed to change mark shape, enter acomment, or log the waypoint to a route,press the [ENT] key to finish.
3. To change name, select the NAME field,press the [ENT] key, select name withthe cursor pad, and press the [ENT] key.
4. To change mark shape, place the cur-sor under MARK. Press the [ENT] key,select mark shape with the cursor pad,and press the [ENT] key again.
5. The cursor is on the date/time field. Tochange the date to a comment, pressthe [ENT] key, enter a comment with thecursor pad, and press the [ENT] keyagain.
6. Place the cursor on “Exit?.” Press the[ENT] key to finish.
Entering a waypoint through thewaypoint list
1. Press the [MENU] key once or twice todisplay the menu.
2. Select WAYPOINTS.
3. Press the [ENT] key. The following win-dow appears. Select LIST. (NEARESTdisplays waypoints from nearest to fur-thest; however, waypoints cannot beentered from this display.)
Figure 3-5 Waypoint list selection window
4. Press the [ENT] key. The WPTS/MRKSlist appears.
Figure 3-6 WPTS/MRKS list
CURSOR: Cursor position whendestination is set with cursor.MOB: Man overboard position.START: Starting point when destina-tion is selected.
5. The cursor is on NEW. Press the [ENT]key.

3-3
Figure 3-7 Screen for enteringwaypoint name
6. Enter name (if desired) with the cursorpad and press the [ENT] key.
Figure 3-8 Screen for enteringwaypoint latitude and longitude
7. Use the cursor pad to place the cursoron the second line (latitude or TD) andpress the [ENT] key. Enter latitude (TD)and press the [ENT] key.
8. Press the [ENT] key, enter longitude(TD) in similar fashion as you did withlatitude and press the [ENT] key.
Note: To enter position by TDs, seeparagraph 7.7 “Displaying Position inTDs.”
9. To change mark shape, select markshape currently shown and press the[ENT] key. Select mark desired with thecursor pad and press the [ENT] key.
10.To change date and time to the com-ment of your choice, press the [ENT]key, enter comment, and press the[ENT] key again.
11.Place the cursor on “Exit?.” Press the[ENT] key.
12.Press the [MENU] key twice to finish.
3.2 Entering the MOB Mark
The MOB mark denotes man overboard po-sition. Only one MOB mark may be entered.Each time the MOB mark is entered the pre-vious MOB mark and its position data arewritten over.
1. Press the [MARK/MOB] key.
Figure 3-9 MOB window
2. Press to select “MOB?.”
Note: Pressing the [ENT] key insteadof at step 2 saves the position as awaypoint. “LOG RT?” function isexplained in the chapter on routes.
3. Press the [ENT] key.
Figure 3-10 MOB window-2
4. To set MOB position as destination,press the [ENT] key. Then, the plotterdisplay marks MOB position as shownin Figure 3-11.
Note: Selecting “NO” and pressing the[ENT] key at step 4 saves the positionas a waypoint.
3-4
Figure 3-11 Screen appearance whenMOB is set as destination
3.3 Displaying Waypoint Name
You may display on the plotter display allwaypoint names or only the GOTOwaypoint name as follows:
1. Press the [MENU] key once or twice todisplay the menu.
2. Select PLOTTER and press the [ENT]key.
3. Place the cursor on the WYPT NAMEfield and press the [ENT] key. The fol-lowing window appears.
Figure 3-12 DSP GOTO, DSP ALLselection window
4. Select DSP GOTO or DSP ALL as ap-propriate and press the [ENT] key.
5. Press the [MENU] key twice to finish.
3.4 Editing Waypoints on the WPTS/MRKS List
Waypoint position, waypoint name, markshape and comment can be edited on theWPTS/MRKS List.
1. Press the [MENU] key once or twice todisplay the menu.
2. Select WAYPOINTS and press the[ENT] key.
3. Select LIST or NEAREST and press the[ENT] key.
4. Select waypoint to edit and press the[ENT] key.
Note: CURSOR, MOB or START areautomatically updated according todestination setting or MOBsetting.Therefore,editing these itemshas no meaning.
5. Select the NAME field and press the[ENT] key.
6. Change name with the cursor pad andpress the [ENT] key. You are then askedif you want to create or rename thewaypoint, or quit (escape) this display.
Figure 3-13 CREATE, RENAME prompt
7. Select objective and press the [ENT]key.
8. Change position, mark shape, commentas desired.
9. Select “Exit?” and press the [ENT] key.
10.Press the [MENU] key twice to finish.

3-5
3.5 Deleting Waypoints
1. Press the [MENU] key once or twice todisplay the menu.
2. Select ERASE and press the [ENT] key.
Figure 3-14 ERASE menu
3. The cursor is on the “WAYPOINTS/MARKS?” field. Press the [ENT] key.
Figure 3-15 ERASE WP/MRK display
4. Select the waypoint you want to erase.
Note: You cannot erase CURSOR,MOB or START.
5. Press the [ENT] key. A screen showingposition and other particulars of thewaypoint selected appears.
Figure 3-16 ERASE prompt
6. Select “ERASE?” and press the [ENT]key.
7. Press the [MENU] key twice to finish.

This page is intentionally left blank.

4-1
In many cases a trip from one place to an-other involves several course changes, re-quiring a series of waypoints which younavigate to, one after another. The se-quence of waypoints leading to the ultimatedestination is called a route. Your unit canautomatically advance to the next waypointon a route, so you do not have to changethe destination waypoint repeatedly.
4.1 Creating a Route
You can store up to 50 routes (numbered01 to 50) and one LOG route, and eachroute may contain up to 30 waypoints. Aroute may be constructed four ways: by thecursor, through the waypoints list, currentposition (track-based route) and through theroute menu.
Note: Be sure to record all important routesin a separate log. This unit is not a fail-saferecord keeping device.
Figure 4-1 Sample route
Creating a route with cursorpositions
This is probably the easiest method bywhich to create a route.
1. Use the cursor pad to place the cursoron position desired. (Cursor position isshown at the bottom of the screen.)
2. Press the [ENT] key. The following win-dow appears.
Figure 4-2 Waypoint name entry window
The cursor is on the second line of thedisplay. This is where you may enterwaypoint name. The number shown isthe youngest empty waypoint number.If you would rather have the unitregister the waypoint under that num-ber, and you do not need to changemark shape or enter a comment,press the [ENT] key to register thewaypoint and proceed to step 5.
3. If desired, change the waypointname.(See page 3-1 for how to enterwaypoint name.) Press the [ENT] key.
Figure 4-3 Waypoint position,comment entry window
4. If necessary, change waypoint, position,mark shape, and comment (date andtime).
5. Select the item “LOG RT?” and pressthe [ENT] key.
6. Repeat steps 1 through 5 to completethe route.
7. When you have entered all the waypointpositions desired, press the [MENU] keytwice, select ROUTES and press the[ENT] key.
4. ROUTES

4-2
Figure 4-4 ROUTES menu
8. The LOG field shows the first and lastwaypoints entered for the log route youare currently creating. Select the LOGfield and press the [ENT] key. The EDIT/MOVE window appears.
Figure 4-5 EDIT/MOVE window
9. Select “MOVE?” and press the [ENT]key. The route is moved from the LOGfield and is registered under the next se-quential route number.
Creating a route with preregisteredwaypoints from the route menu
The procedure which follows describes howto create a route from two preregisteredwaypoints, KOBE and OSAKA, on theROUTE screen.
1. Press the [MENU] key once or twice todisplay the menu.
2. Select ROUTES.
3. Press the [ENT] key. The screen shownin Figure 4-6 appears.
Figure 4-6 ROUTES list
4. Select “NEW?” and press the [ENT] key.The screen shown in Figure 4-7 ap-pears.
Figure 4-7 Screen for entering route
5. Press ▲ and the [ENT] key to changeroute name, if desired. (If no name isentered the name of the first and lastwaypoints in the route will become theroute name, although you may changethe name at a later time.) Enter routename and press the [ENT] key.The cur-sor is on line 01 and press the [ENT]key.
6. Press [ENT] key and press ▲ or ▼ todisplay waypoint name. (In the example,KOBE.)
7. Press the [ENT] key. The cursor movesto the next line.
8. Repeat steps 6 and 7 until you have en-tered all waypoints desired.
Note: If you enter a waypoint which hasnot been registered, the display will looksomething like the one below. SelectYES to create a new waypoint; NO toreturn to the route entry screen.
Figure 4-8 New waypoint name screen
When you select YES followed by [ENT]key,following screen appears.Edit thewaypoint,select Exit and press the[ENT] key.

4-3
Figure 4-9Waypoint data screen
9. Select “Exit?.”
10.Press the [ENT] key to register the route.
Then, ROUTES list shows the name ofthe first and last waypoints, next to routenumber.
Figure 4-10 ROUTES list
11.Press the [MENU] key twice to finish.
Creating a route with preregisteredwaypoints from the waypoint list
1. Press the [MENU] key once or twice todisplay the menu.
2. Select WAYPOINTS and press the[ENT] key.
3. Select LIST or NEAREST and press the[ENT] key.
Figure 4-11 Waypoints/marks (list)
4. Select a waypoint and press the [ENT]key. Your screen should look somethinglike the one in Figure 4-11.
Figure 4-12 Waypoint data screen
5. Select “LOG RT?” and press the [ENT]key.
6. Repeat steps 4 and 5 to complete theroute.
7. Press the [MENU] key once.
8. Select ROUTES and press the [ENT]key. Your screen should now look some-thing like the one shown in Figure 4-12.
Figure 4-13 ROUTES list
9. Select the LOG field and press the [ENT]key. The EDIT/MOVE window appears.
Figure 4-14 EDIT/MOVE window
10.Select “MOVE?” and press the [ENT]key. The route is moved from the LOGfield and assigned the next sequentialroute number.

4-4
Creating a track-based route
This method stores current position at ap-propriate intervals. It is useful for retracingprevious ship’s track.
1. Press the [MARK/MOB] key.
Figure 4-15 MOB window
2. Change name, comment, mark shapeif desired. Select “LOG RT?” and pressthe [ENT] key.
3. Repeat steps 1 and 2 at appropriate in-tervals.
4. When you have entered all the waypointpositions desired, press the [MENU] keytwice, select ROUTES and press the[ENT] key.
Figure 4-16 ROUTES menu
5. Select the LOG field and press the [ENT]key. The EDIT/MOVE window appears.
Figure 4-17 EDIT/MOVE window
6. Select “MOVE?” and press the [ENT]key. The route is moved from the LOGfield and is registered under the next se-quential route number.
Note: You can create a route using a com-bination of current positions and waypointpositions (including cursor position). Theroute can be started from a waypoint posi-tion or current position. The former methodallows you to select the route name before-hand.
4.2 Editing Routes
Replacing waypoints in a route
1. Press the [MENU] key once or twice todisplay the menu.
2. Select ROUTES and press the [ENT]key.
3. Select the route to edit.
4. Press the [ENT] key.
5. Place the cursor on the waypoint to re-place.
6. Press the [ENT] key. The following win-dow appears.
Figure 4-18 Route editing methodselection window
7. “CHANGE?” is selected; press the[ENT] key.
Figure 4-19 Waypoint screen
8. Press the [ENT] key. Use the cursor padto select waypoint.
9. Press the [ENT] key.
4-5
Note: If the name selected at step 8has not been used, the window shownin Figure 4-19 appears. Select“CREATE?” or “RENAME?” asappropriate and press the [ENT] key.
Figure 4-20 CREATE, RENAME prompt
10.Select “Exit?.”
11.Press the [ENT] key.
12.Press the [MENU] key twice to finish.
Permanently deleting a waypointfrom a route
1. Press the [MENU] key or twice to dis-play the menu.
2. Select ROUTES and press the [ENT]key.
3. Select the route from the ROUTES list.
4. Press the [ENT] key.
5. Select the waypoint you want to delete.
6. Press the [ENT] key.
7. Select “REMOVE?.”
8. Press the [ENT] key.
9. Press the [MENU] key twice to finish.
Inserting a waypoint in a route
To insert a waypoint in a route, do the fol-lowing:
1. Press the [MENU] key once or twice todisplay the menu.
2. Select ROUTES and press the [ENT]key.
3. Select the route from the ROUTES list.
4. Press the [ENT] key.
5. Select the waypoint which will come af-ter the waypoint to be inserted. In Fig-ure 4-20, for example, if you want toinsert a waypoint between KOBE and001, select 001.
Figure 4-21 ROUTE screen
6. Press the [ENT] key.
7. Select “INSERT?.”
8. Press the [ENT] key.
9. Use the cursor pad to select waypoint.
10.Press the [ENT] key.
11.Press the [MENU] key twice to finish.
Temporarily deselecting a waypointin a route
You can temporarily deselect an unneces-sary waypoint from a route. Using the routecreated in Figure 4-21 as an example, de-select the 2nd intermediate waypoint.
Figure 4-22 Sample route
If you reconstruct the route without the 2ndintermediate point it would look like Figure4-22.
Figure 4-23 Route in Figure 4-21reconstructed without 2nd
intermediate waypoint

4-6
1. Press the [MENU] key once or twice todisplay the menu.
2. Select ROUTES and press the [ENT]key.
3. Select a route from the ROUTES list,and press the [ENT] key.
4. Place the cursor on the waypoint to skip.
5. Press the [ENT] key.
6. Select “SKIP?” and press the [ENT] key.X appears to the left of the waypoint.
Figure 4-24 ROUTE screen
7. Press the [MENU] key twice to finish.
To restore a waypoint to a route, select“SKPoFF ?”at step 6 and press the [ENT]key.
Changing route comment (name)
When a waypoint- or track-based route issaved, it is done under the next sequentialroute number and the comment (name)under the starting and final destinationwaypoints. You can change the commentas below. Up to 16 characters may be used.
1. Press the [MENU] key or twice to dis-play the menu.
2. Select ROUTES and press the [ENT]key.
3. Select route number and press the[ENT] key.
4. Select the CMNT field and press the
[ENT] key.
5. Enter comment with the cursor pad andpress the [ENT] key.
6. Press the [MENU] key twice to finish.
4.3 Deleting a Route
1. Press the [MENU] key or twice to dis-play the menu.
2. Select ERASE and press the [ENT] key.
3. Select “ROUTES?” and press the [ENT]key.
4. Select the route you want delete. If youwant to delete all routes, select “ALL?.”
5. Press the [ENT] key. You are asked ifyou are sure to delete the route.
Figure 4-25 ERASE ROUTE prompt
6. Press the [ENT] key again.
7. Press the [MENU] key twice to finish.

5-1
5. NAVIGATION
Destination can be set four ways: by cur-sor, by waypoint, by route, and by MOB po-sition. Previous destination is cancelledwhenever a destination is newly set.
5.1 Setting Destination by Cursor
1. Press the [GOTO] key to display theGOTO window.
GOTO
WPT-LIST?WPT-NEAR??ROUTE?CURSOR?OFF?
Figure 5-1 GOTO window
2. Select “CURSOR?.”
3. Press the [ENT] key. The plotter displayappears with “?” shown to the right ofthe cursor.
2D
[ 40 ]nm
72°
54.5 nm
34°44.000N 135°21.000E
?
Cursor appears with "?".
BRG: +
RNG: +
+GOTO?
Figure 5-2 Cursor appearancewhen setting destination by cursor
4. Place the cursor on the location desiredfor destination.
5. Press the [ENT] key.
A dashed line connects own ship and thedestination, which is marked with CURSORand an X, as shown in Figure 5-3.
xCURSOR
Figure 5-3 Destination set by cursor
5.2 Setting Destination by Waypoint
1. Press the [GOTO] key.
2. Select “WPT-LIST” or “WPT-NEAR?”.
3. Press the [ENT] key. The SELECTGOTO WYPT list appears.
SELECT GOTO WYPT
[NEW?] 001 002003 004 005006 007 008CURSOR KOBE MOB OSAKA START ------- -------- ------- ------- -------- ------- -------
SELECT GOTO WYPT
WPT-LIST
WPT-NEAR
OSAKA : 1.90 nm 335START : 2.97 nm 68006 : 3.53 nm 15005 : 4.79 nm 11004 : 4.86 nm 15008 : 5.21 nm 345CURSOR : 6.41 nm 356
Figure 5-4 SELECT GOTO WYPT screens

5-2
4. Select a waypoint.
5. Press the [ENT] key.
Own ship’s position becomes starting pointand a dashed line runs between it and thewaypoint selected, which is shown in re-verse video.
5.3 Setting Route as Destination
1. Press the [GOTO] key.
2. Select ROUTE?.
3. Press the [ENT] key.
SELECT GOTO ROUTE
NO [NEW?] LOG EMPTY ROUTE01 017→21 017 02 OSAKA→KOBE03 EIMI→KIMIO4 BOSTON05 SEATTLE→HONOLULU
Figure 5-5 GOTO ROUTE list
4. Select a route.
5. Press the [ENT] key. The following win-dow appears.
FORWARD?REVERSE?
Figure 5-6 FORWARD, REVERSEprompt
6. Select “FORWARD?” or “REVERSE?”,the order in which to traverse the routewaypoints, and press the [ENT] key.
Intermediate Point 2(WPT 002)
[ROUTE 01]
KOBE(Starting point)
Intermediate Point 1(WPT 001)
Intermediate Point 1(WPT 003)
OSAKA(Arrival point)
FORWARD REVERSE
Figure 5-7 Meaning of forwardand reverse
Current position becomes the starting point.A dotted line runs between the starting pointand all route waypoints. Next destinationwaypoint is shown in reverse video.The destination waypoint is automaticallyswitched when the boat enters the arrivalalarm range or the boat passes an imagi-nary perpendicular line passing through thecenter of the destination waypoint. For howto set the arrival alarm, see page 6-1.
WPT 1
WPT 2
Perpendicular
Waypoint switchedat this point.
WPT 1
WPT 2
Waypoint switchedat this point.
Arrival Alarm Circle
5.4 Canceling Destination
You can cancel destination as follows:
1. Press the [GOTO] key.
2. Select OFF?.
3. Press the [ENT] key.

6-1
There are seven alarm conditions whichgenerate both aural and visual alarms: Ar-rival alarm, Anchor watch alarm, XTE(Cross-Track Error) alarm, Speed alarm,DGPS alarm, Time alarm, and Trip alarm.
When an alarm setting is violated, thebuzzer sounds, and the name of the offend-ing alarm and the alarm icon appear on thedisplay. You can silence the buzzer andremove the alarm name indication by press-ing any key; the alarm icon remains on thescreen until the reason for the alarm iscleared.
You can see which alarm(s) is sounding bydisplaying the message board by the fol-lowing keying sequence: [MENU] (once ortwice) MESSAGE, [ENT]. The messageboard is discussed in paragraph 8.2 “Dis-playing the Message Board.”
Figure 6-1 Location of alarmmessage and icon
6.1 Arrival Alarm, Anchor Watch Alarm
You may activate the arrival alarm or theanchor watch alarm; they cannot be acti-vated together.
Arrival alarm
The arrival alarm informs you that own shipis approaching a destination waypoint. Thearea that defines an arrival zone is that ofa circle which you approach from the out-side of the circle. The alarm will be releasedif own ship enters the circle.
Figure 6-2 How the arrival alarm works
1. Press the [MENU] key once or twice toopen the menu.
2. Select ALARMS.
3. Press the [ENT] key. The ALARMSmenu appears.
Figure 6-3 ALARMS menu
6. ALARMS
6-2
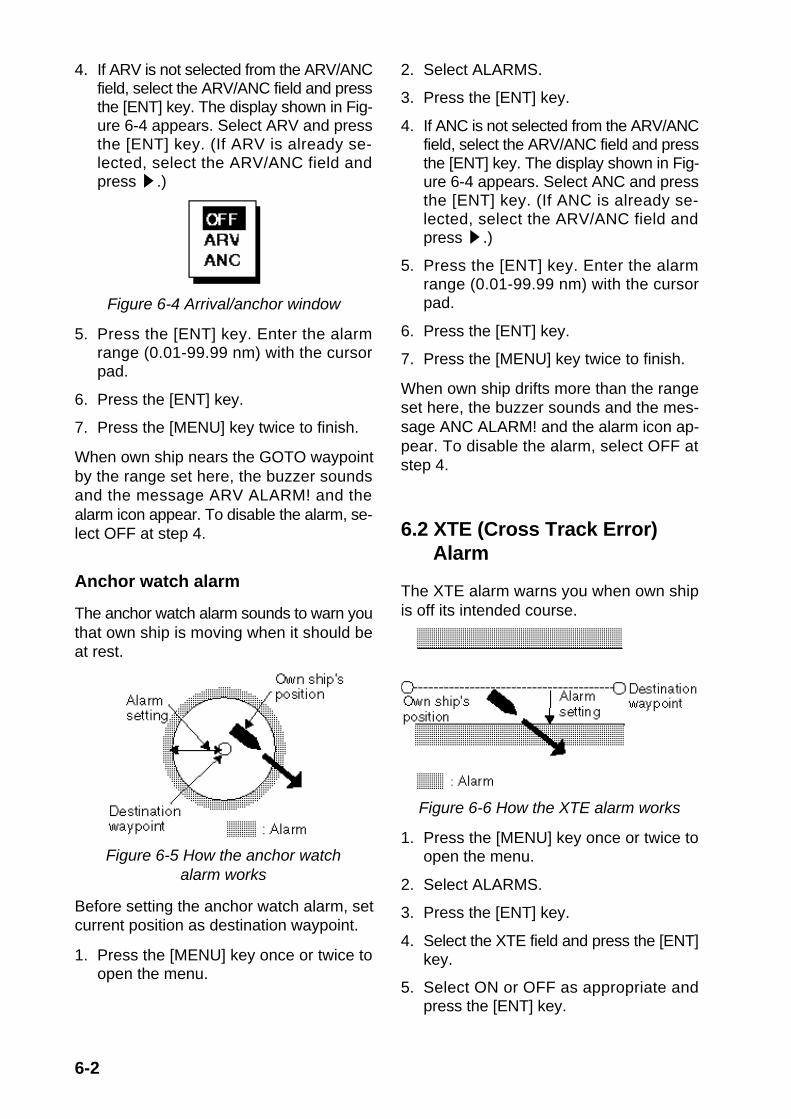
4. If ARV is not selected from the ARV/ANCfield, select the ARV/ANC field and pressthe [ENT] key. The display shown in Fig-ure 6-4 appears. Select ARV and pressthe [ENT] key. (If ARV is already se-lected, select the ARV/ANC field andpress .)
Figure 6-4 Arrival/anchor window
5. Press the [ENT] key. Enter the alarmrange (0.01-99.99 nm) with the cursorpad.
6. Press the [ENT] key.
7. Press the [MENU] key twice to finish.
When own ship nears the GOTO waypointby the range set here, the buzzer soundsand the message ARV ALARM! and thealarm icon appear. To disable the alarm, se-lect OFF at step 4.
Anchor watch alarm
The anchor watch alarm sounds to warn youthat own ship is moving when it should beat rest.
Figure 6-5 How the anchor watchalarm works
Before setting the anchor watch alarm, setcurrent position as destination waypoint.
1. Press the [MENU] key once or twice toopen the menu.
2. Select ALARMS.
3. Press the [ENT] key.
4. If ANC is not selected from the ARV/ANCfield, select the ARV/ANC field and pressthe [ENT] key. The display shown in Fig-ure 6-4 appears. Select ANC and pressthe [ENT] key. (If ANC is already se-lected, select the ARV/ANC field andpress .)
5. Press the [ENT] key. Enter the alarmrange (0.01-99.99 nm) with the cursorpad.
6. Press the [ENT] key.
7. Press the [MENU] key twice to finish.
When own ship drifts more than the rangeset here, the buzzer sounds and the mes-sage ANC ALARM! and the alarm icon ap-pear. To disable the alarm, select OFF atstep 4.
6.2 XTE (Cross Track Error) Alarm
The XTE alarm warns you when own shipis off its intended course.
Figure 6-6 How the XTE alarm works
1. Press the [MENU] key once or twice toopen the menu.
2. Select ALARMS.
3. Press the [ENT] key.
4. Select the XTE field and press the [ENT]key.
5. Select ON or OFF as appropriate andpress the [ENT] key.

6-3
6. For ON, press the [ENT] key again.
7. Enter alarm range (range: 0.01-99.99nm) with the cursor pad.
8. Press the [ENT] key.
9. Press the [MENU] key twice to finish.
When own ship strays from the intendedtrack by the range set here, the buzzersounds and message XTE ERROR! andthe alarm icon appear. To disable the alarm,select OFF at step 5.
6.3 Speed Alarm
The speed alarm sounds when ship’s speedis higher (or lower) the alarm range set.
1. Press the [MENU] key once or twice toopen the menu.
2. Select ALARMS.
3. Press the [ENT] key.
4. Select the SPEED field and press the[ENT] key.
5. Select OFF, LO or HI as appropriate.OFF: Disables the speed alarm.LO: Alarm sounds when speed islower than speed set.HI: Alarm sounds when speed ishigher than speed set.
6. For LO or HI, Press the [ENT] key twice.
7. Enter speed (range: 0.1-999.9 kt) withthe cursor pad.
8. Press the [ENT] key.
9. Press the [MENU] key twice to finish.
When the speed alarm setting is violated,the buzzer sounds and the message SPDALARM! and the alarm icon appear. To dis-able the alarm, select OFF at step 5.
6.4 DGPS Alarm
This alarm alerts you by aural and visualalarms when the DGPS beacon signal islost.
1. Press the [MENU] key once or twice toopen the menu.
2. Select ALARMS.
3. Press the [ENT] key.
4. Select the DGPS field and press the[ENT] key.
5. Select ON or OFF as appropriate.
6. Press the [ENT] key.
7. Press the [MENU] key twice to finish.
When the DGPS alarm setting is violated,the buzzer sounds and the message DGPSALARM! and the alarm icon appear. To dis-able the DGPS alarm select OFF at step 5.
6.5 Time Alarm
This alarm alerts you by aural and visualalarms when the time entered has come.
1. Press the [MENU] key once or twice toopen the menu.
2. Select ALARMS.
3. Press the [ENT] key.
4. Select the TIME field and press the[ENT] key.
5. Select ON or OFF as appropriate andpress the [ENT] key.
6. For ON, press the [ENT] key again.
7. Enter time desired with the cursor pad.
8. Press the [ENT] key.
9. Press the [MENU] key twice to finish.
When the time entered has come, thebuzzer sounds and the message TIMEALARM! and the alarm icon appear. To dis-able the timer alarm select OFF at step 5.

6-4
6.6 Trip Distance Alarm
This alarm alerts you by aural and visualalarms when your boat has traveled agreater distance than the preset trip alarmdistance.
1. Press the [MENU] key once or twice toopen the menu.
2. Select ALARMS.
3. Press the [ENT] key.
4. Select the TRIP field and press the[ENT] key.
5. Select ON or OFF as appropriate andpress the [ENT] key.
6. For ON, press the [ENT] key again.
7. Enter distance desired (range: 1-999nm) with the cursor pad.
8. Press the [ENT] key.
9. Press the [MENU] key twice to finish.
When the boat has traveled further than thepreset trip distance, the buzzer sounds andthe message TRIP ALARM! and the alarmicon appear. To disable the trip alarm se-lect OFF at step 5.
6.7 Buzzer Type Selection
The buzzer sounds whenever an alarmsetting is violated. You can select the typeof buzzer to use as follows:
1. Press the [MENU] key once or twice toopen the menu.
2. Select ALARMS.
3. Press the [ENT] key.
4. Select the BUZZER field and press the[ENT] key. The following display ap-pears.
Figure 6-7 Buzzer type selection window
5. Select buzzer type desired and pressthe [ENT] key.
SHORT: Two short beepsLONG: Three long beepsCONSTANT: Continuous beeps
6. Press the [MENU] key twice to finish.
7-1
7. OTHER FUNCTIONS
7.1 Calculating Range, Bearing and TTG
Range and bearing between twowaypoints
1. Press the [MENU] key once or twice toopen the menu.
2. Select CALCULATE.
3. Press the [ENT] key.
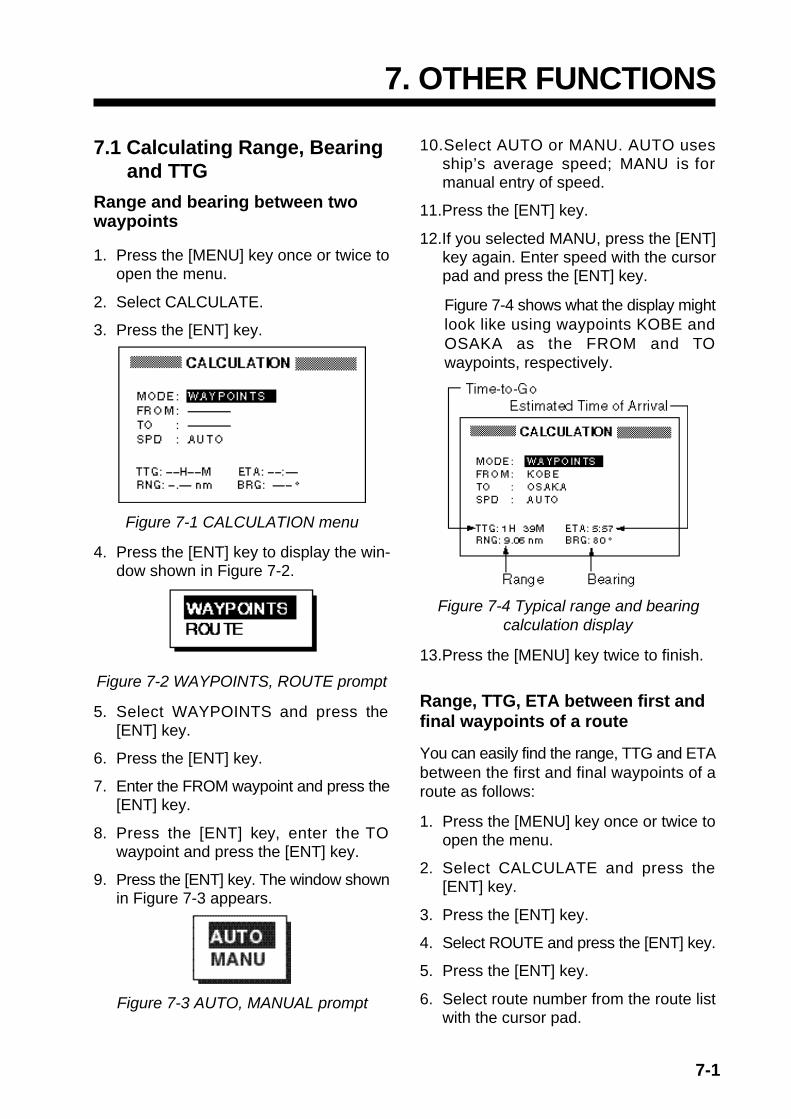
Figure 7-1 CALCULATION menu
4. Press the [ENT] key to display the win-dow shown in Figure 7-2.
Figure 7-2 WAYPOINTS, ROUTE prompt
5. Select WAYPOINTS and press the[ENT] key.
6. Press the [ENT] key.
7. Enter the FROM waypoint and press the[ENT] key.
8. Press the [ENT] key, enter the TOwaypoint and press the [ENT] key.
9. Press the [ENT] key. The window shownin Figure 7-3 appears.
Figure 7-3 AUTO, MANUAL prompt
10.Select AUTO or MANU. AUTO usesship’s average speed; MANU is formanual entry of speed.
11.Press the [ENT] key.
12.If you selected MANU, press the [ENT]key again. Enter speed with the cursorpad and press the [ENT] key.
Figure 7-4 shows what the display mightlook like using waypoints KOBE andOSAKA as the FROM and TOwaypoints, respectively.
Figure 7-4 Typical range and bearingcalculation display
13.Press the [MENU] key twice to finish.
Range, TTG, ETA between first andfinal waypoints of a route
You can easily find the range, TTG and ETAbetween the first and final waypoints of aroute as follows:
1. Press the [MENU] key once or twice toopen the menu.
2. Select CALCULATE and press the[ENT] key.
3. Press the [ENT] key.
4. Select ROUTE and press the [ENT] key.
5. Press the [ENT] key.
6. Select route number from the route listwith the cursor pad.

7-2
7. Press the [ENT] key to display the win-dow shown in Figure 7-3.
8. Select AUTO or MANU. AUTO usesship’s average speed to calculate time-to-go; MANU is for manual entry ofspeed.
9. Press the [ENT] key. If you selectedAUTO no further operation is necessary.For MANU, press the [ENT] key again.Enter speed with the cursor pad andpress the [ENT] key.
Figure 7-5 shows what the display mightlook like using Route-01 as an example.
Figure 7-5 Typical calculationdisplay (route)
7.2 DGPS Setup, DGPS Data
The GP-36 is equipped with a DGPS bea-con receiver, and is set at the factory forautomatic beacon receiver operation. Tomanually adjust the GP-36’s beacon re-ceiver, or set up the GP-36 or GP-31 to usean external DPGS beacon receiver, do thefollowing:
1. Press the [MENU] key once or twice toopen the menu.
2. Select D-GPS and press the [ENT] key.
Figure 7-6 DGPS SETUP menu
3. The cursor is on the BEACON field.Press the [ENT] key.
4. A window showing the choices INT, EXTand OFF appears. Select one of thoseitems and press the [ENT] key.
Figure 7-7 Beacon receiverselection window
INT: For internal DGPS beaconreceiver (GP-36 only)EXT: For external DGPS beaconreceiverOFF: Disables DGPS function. Whenthe DGPS function turns off,it takesabout 1 minute to fix GPS position.

7-3
Note: When connecting a FURUNOexternal DGPS beacon receiver (suchas GR-80) to the GP-31, turn the GR-80’s remote function on to set up thebeacon receiver with data set on theGP-31.
5. The cursor is on the STATION field.Press the [ENT] key.
6. Choose DGPS beacon station selectionmethod: AUTO, MANUAL or LIST.
AUTO: Automatically searches forbest of five nearest DGPS beaconstation. It first searches DGPS beaconstations from closest to furthest. Ifunsuccessful it searches stations bysignal strength. This procedure isrepeated until a suitable station isfound.MANUAL: Manually enter DGPSbeacon station specifications in theRATE and FREQ fields, referring to aDGPS beacon station list.LIST: Lists 5 of the closest DGPSbeacon stations, including user-pro-grammed stations.
7. Press the [ENT] key. If you selectedAUTO no further operation is required;press the [ENT] key to finish. ForMANUAL or LIST do one of the follow-ing:
MANUAL
a) The cursor is now on the RATEfield. Press the [ENT] key.
b) Select the transmission rate of theDGPS beacon station to be used,among 50, 100 or 200 bps. Pressthe [ENT] key.
c) The cursor is now on the FREQfield. Press the [ENT] key.
d) Enter the transmission frequencyof the DGPS beacon station to beused and press the [ENT] key.
LIST
a) The following display appears afterpressing the [ENT] key at step 7.
Figure 7-8 DGPS beacon station list
b) Select desired station with theCursor Pad.
c) Press the [ENT] key.
11.Press the [MENU] key twice to finish.Note that the STATION field in the DGPSmenu now shows MANUAL.
Programming user channels(stations)
The user may program 20 DGPS beaconstations from which to use in DGPS bea-con station selection. Whenever a new sta-tion is constructed you include it in the list.
1. Press the [MENU] key twice to open themenu.
2. Select DGPS and press the [ENT] key.
3. Select STATION and press the [ENT]key.
4. Select LIST and press the [ENT] key.The display shown in Figure 7-8 ap-pears.
5. Select USER and press the [ENT] key.The following display appears.
7-4
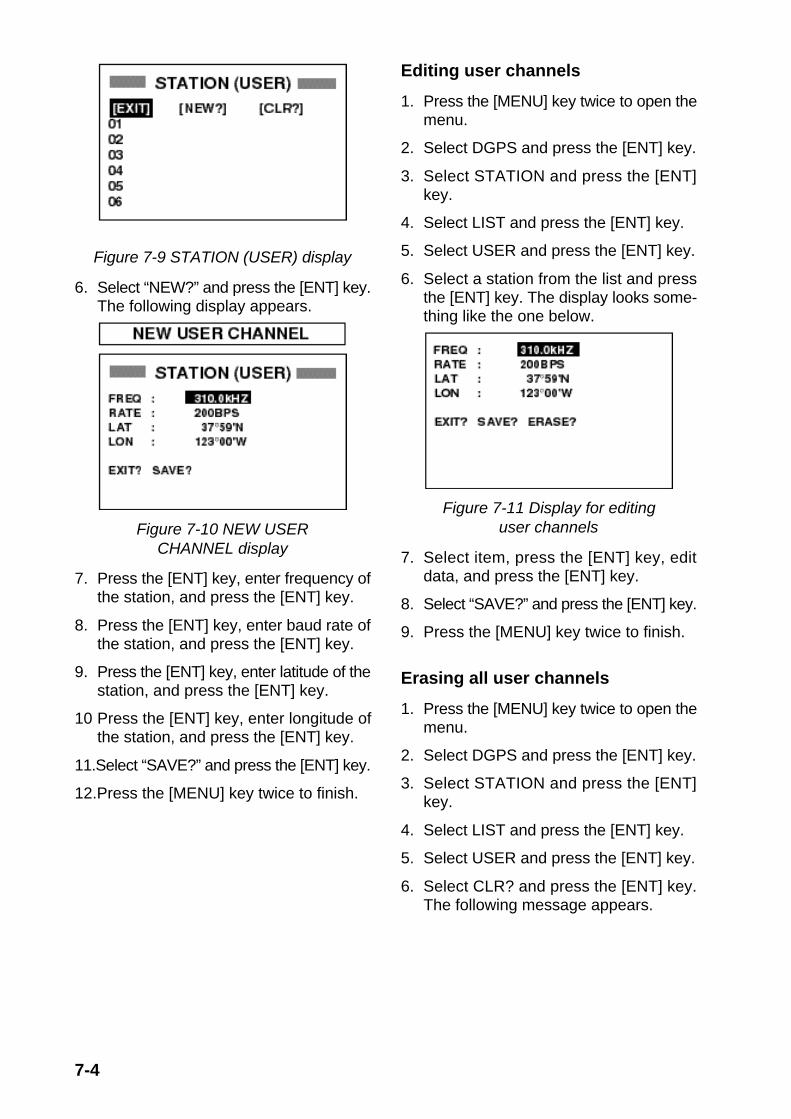
Figure 7-9 STATION (USER) display
6. Select “NEW?” and press the [ENT] key.The following display appears.
Figure 7-10 NEW USERCHANNEL display
7. Press the [ENT] key, enter frequency ofthe station, and press the [ENT] key.
8. Press the [ENT] key, enter baud rate ofthe station, and press the [ENT] key.
9. Press the [ENT] key, enter latitude of thestation, and press the [ENT] key.
10 Press the [ENT] key, enter longitude ofthe station, and press the [ENT] key.
11.Select “SAVE?” and press the [ENT] key.
12.Press the [MENU] key twice to finish.
Editing user channels
1. Press the [MENU] key twice to open themenu.
2. Select DGPS and press the [ENT] key.
3. Select STATION and press the [ENT]key.
4. Select LIST and press the [ENT] key.
5. Select USER and press the [ENT] key.
6. Select a station from the list and pressthe [ENT] key. The display looks some-thing like the one below.
Figure 7-11 Display for editinguser channels
7. Select item, press the [ENT] key, editdata, and press the [ENT] key.
8. Select “SAVE?” and press the [ENT] key.
9. Press the [MENU] key twice to finish.
Erasing all user channels
1. Press the [MENU] key twice to open themenu.
2. Select DGPS and press the [ENT] key.
3. Select STATION and press the [ENT]key.
4. Select LIST and press the [ENT] key.
5. Select USER and press the [ENT] key.
6. Select CLR? and press the [ENT] key.The following message appears.

7-5
Figure 7-12 Prompt for erasure of all userchannels
7. Press the [ENT] key to erase all userchannels.
Erasing individual user channels
1. Press the [MENU] key twice to open themenu.
2. Select D-GPS and press the [ENT] key.
3. Select STATION and press the [ENT]key.
4. Select LIST and press the [ENT] key.
5. Select USER and press the [ENT] key.
6. Select a channel from the list and pressthe [ENT] key.
7. Select “ERASE?”.
8. Press the [ENT] key to erase channelselected.
7.3 Bearing Reference
Ship's course and bearing to a waypointmay be displayed in true or magnetic bear-ing. Magnetic bearing is true bearing plus(or minus) earth’s magnetic deviation. Usethe bearing reference according to com-pass interfaced: magnetic for magneticcompass, true for gyrocompass.
The default setting displays magnetic bear-ings.
1. Press the [MENU] key once or twice toopen the menu.
2. Select PLOTTER.
3. Press the [ENT] key.
Figure 7-8 PLOTTER SETUP menu
4. Select the BRG. REF. field.
5. Press the [ENT] key. The following win-dow appears.
Figure 7-9 Bearing referenceselection window
6. Select MAG or TRUE.
7. Press the [ENT] key.
8. Press the [MENU] key twice to finish.
7.4 Magnetic Variation
The location of the magnetic north pole isdifferent from the geographical north pole.This causes a difference between the trueand magnetic north direction. This differ-ence is called magnetic variation, and var-ies with respect to the observation point onearth. Your unit is preprogrammed with allthe earth's magnetic variation. However,you may wish to enter variation manuallyto refine accuracy. When the option MAGis selected on the item BRG REF., usemagnetic variation.
1. Press the [MENU] key once or twice toopen the menu.
2. Select PLOTTER and press the [ENT]key.
3. Select the MAG. VAR. field.
4. Press the [ENT] key.

7-6
5. Select AUTO or MANU and press the[ENT] key. For automatic magneticvariation, current magnetic variationappears to the right of AUTO.
6. If you selected AUTO, no further opera-tion is necessary; press the [MENU] keytwice to finish. For MANU, press the[ENT] key and enter magnetic variationas follows:a) If necessary, change coordinate from
east to west or vice versa by press-ing ▲ or ▼.
b) Enter variation in two digits with thecursor pad, referring to a nauticalchart.
c) Press the [ENT] key.d) Press the [MENU] key twice to fin-
ish.
7.5 Geodetic Chart System
Your unit is preprogrammed to recognizemost of the major chart systems of theworld. Although the WGS-84 system, theGPS standard, is now widely used othercategories of charts still exist. Select thechart system used, not the area where yourboat is sailing. The default chart system isWGS-84.
1. Press the [MENU] key once or twice toopen the menu.
2. Select SYS SETUP and press the [ENT]key.
Figure 7-10 SYSTEM SETUP menu
3. Press the [ENT] key.
4. Select WGS84, (GPS standard) WGS72or OTHER as appropriate and press the[ENT] key.
5. If you selected WGS72 or WGS84,press the [MENU] key twice to finish. ForOTHER, do the following:a) Press the [ENT] key.b) Select chart number referring to the
geodetic chart list on page A-5.c) Press the [ENT] key.d) Press the [MENU] key twice to fin-
ish.
7.6 Units of Measurement
Distance/speed can be displayed in nauti-cal miles/knots, kilometers/kilometers perhour, or miles/miles per hour.
1. Press the [MENU] key once or twice toopen the menu.
2. Select SYS SETUP and press the [ENT]key.
3. Select UNITS.
4. Press the [ENT] key.
5. Choose combination desired; nm, kt;nm, km/h; mi, mi/h.
6. Press the [ENT] key.
7. Press the [MENU] key twice to finish.
7.7 Position Display Format
Position may shown in Lat./Long., TDs (Lo-ran C or Decca) as follows. Decca and Lo-ran C chain data is preprogrammed.
1. Press the [MENU] key once or twice toopen the menu.
2. Select TD SETUP and press the [ENT]key.
Figure 7-11 TD SETUP menu

7-7
3. The cursor is on the first line. Press the[ENT] key. The following window ap-pears.
XX.XXX'XX'XX.X"LC TDDE TD
Figure 7-12 LAT/LON, LC TD,DE TD selection window
4. Select XX.XXX’, XX’XX.X”, LC TD (Lo-ran C) or DE TD (Decca).
XX.XXX’: Shows position with no sec-onds.XX’XX.X”: Displays position with sec-onds.
5. Press the [ENT] key. If you selected lati-tude and longitude go to step 7.
6. For Loran C or Decca, do one of the fol-lowing:
For Loran C TD;
a) The cursor is on the LORAN C field.Press the [ENT] key.
b) Use the cursor pad to choose GRIcode and secondary codes, referringto the Loran C chain list on page A-3.
c) Press the [ENT] key.d) If necessary enter TD offsets in ap-
propriate TD field(s) to refine positionaccuracy.
For Decca TD;
a) Select the DECCA field and press the[ENT] key.
b) Use the cursor pad to choose Deccachain number and lane pair (R, Red,G, Green, P, Purple), referring to theDecca chain list on page A-4.
c) Press the [ENT] key.d) If necessary enter TD offsets in ap-
propriate TD field(s) to refine positionaccuracy.
7. Press the [MENU] key twice to finish.
7.8 Time Difference (using local time)
GPS uses UTC time. If you would ratheruse local time, enter the time difference(range: -13:30 to +13:30) between localtime and UTC time.
1. Press the [MENU] key once or twice toopen the menu.
2. Select SYS SETUP and press the [ENT]key.
3. Press ▼ to select the TIME DIFF fieldand press the [ENT] key.
4. Press ▲ or ▼ to display + or –.
5. Enter time difference with the cursorpad.
6. Press the [ENT] key.
7. Press the [MENU] key twice to finish.
7.9 GPS Setup
The GPS SETUP menu smooths positionand course, averages speed, applies posi-tion offset, and deactivates unhealthy sat-ellites.
1. Press the [MENU] key once or twice toopen the menu.
2. Select GPS SETUP and press the [ENT]key.
GPS SETUP
SMOOTH POS : 0 SECSMOOTH S/C : 5 SECAVR. SPEED : 1 MINLAT OFFSET : 0.000'NLON OFFSET : 0.000'EDISABLE SV : – – – –FIX MODE : 2/3D
Figure 7-13 GPS SETUP menu
3. Select item and press the [ENT] key.
4. Change setting with the cursor pad andpress the [ENT] key.
5. Press the [MENU] key twice to finish.
7-8
GPS SETUP menu description
SMOOTH POS (Smoothing position)
When the DOP (Dilution of Precision, theindex for position-fixing accuracy) or receiv-ing condition is unfavorable, the GPS fixmay change greatly, even if the vessel isdead in water. This change can be reducedby smoothing the raw GPS fixes. The set-ting range is from 0 (no smoothing) to 999seconds. The higher the setting the moresmoothed the raw data, however too higha setting slows response time to change inlatitude and longitude. This is especially no-ticeable at high ship’s speeds. “0” is the nor-mal setting; increase the setting if the GPSfix changes greatly.
SMOOTH S/C (Smoothing speed/course)
During position fixing, ship’s velocity (speedand course) is directly measured by receiv-ing GPS satellite signals. The raw velocitydata may changes randomly depending onreceiving conditions and other factors. Youcan reduce this random variation by in-creasing the smoothing. Like with latitudeand longitude smoothing, the higher thespeed and course smoothing the moresmoothed the raw data. If the setting is toohigh, however, the response to speed andcourse change slows. The setting range isfrom 0 (no smoothing) to 999 seconds.
AVR. SPEED (Speed averaging)
Calculation of ETA and TTG, etc. is basedon average ship's speed over a given pe-riod. If the period is too long or too shortcalculation error will result. Change thissetting if calculation error occurs. The de-fault setting is one minute. The setting rangeis from 0 (no averaging) to 99 minutes.
LAT/LON OFFSET (L/L position offset)
You may apply an offset to latitude and lon-gitude position generated by the GPS re-ceiver, to increase position accuracy.
DISABLE SV (Disable satellite)
Every GPS satellite is broadcasting abnor-mal satellite number(s) in its Almanac,which contains general orbital data aboutall GPS satellites. Using this information,the GPS receiver automatically eliminatesany malfunctioning satellite from the GPSsatellite schedule. However, the Almanacsometimes may not contain this informa-tion. You can disable an inoperative satel-lite manually. Enter satellite number in twodigits and press the [ENT] key. To restore asatellite enter “00”.
FIX MODE
Selects position fixing method; 2D or 2/3D.2D requires three satellites in view of theGPS receiver; 2/3D requires three or foursatellites in view of the GPS receiver, which-ever is available. When the 2D mode isselected, enter the antenna height abovethe waterline, to obtain accurate positiondata. The default setting is 5 m. The tableprovides common feet equivalents.
Meters Feet
Default 5 meters 16.4 feet
3 meters 10 feet
0.3 meters 1 feet

7-9
7.10 User Display Setup
The user display, which appears when the[DISP] key is pressed several times, maybe either digital data (default display) or thespeedometer display.
Figure 7-14 User displays
The user may choose three items of navi-gation data to display on each user display.The default items are battery power, speedand course.
1. Press the [MENU] key once or twice toopen the menu.
2. Select USER DISP and press the [ENT]key. The following display appears.
Figure 7-15 USER DISPLAY menu
3. Press the [ENT] key. The following dis-play appears.
Figure 7-16 User displayselection window
4. Select OFF (no user display), DIGITALor SPDOMETER as appropriate andpress the [ENT] key.
5. The cursor is now on the LARGE/TOPfield. LARGE means the center indica-tion on the digital display; TOP is theindication below receiver status and timeon the speedometer display. Press the[ENT] key. The following display ap-pears.
Figure 7-17 User display choices
6. Select item desired to display and pressthe [ENT] key. (SPD: Speed, TTG: Time-to-go to destination, CSE: Course, ETA:Estimated Time of Arrival at destination;RNG: Range to destination, TRIP: Tripdistance, BRG: Bearing to destination,PWR: Power source voltage)
7. Select the items LEFT/MIDDLE andRIGHT/LOWER and set their optionslike you did for LARGE/TOP, referringto Figure 7-18 for location of indications.
Figure 7-18 Location of user-selectableindications on user displays
9. Press the [MENU] key twice to finish.

7-10
7.11 Resetting Trip Distance
1. Press the [MENU] key once or twice toopen the menu.
2. Select PLOTTER and press the [ENT]key.
3. Select the RESET TRIP? field and pressthe [ENT] key. The following displayappears.
Figure 7-19 Reset trip window
4. Press the [ENT] key to reset trip dis-tance.
5. Press the [MENU] key twice to finish.
7.12 Uploading, DownloadingWaypoint, Route Data
Waypoint and route data may be down-loaded to a PC or uploaded from a PC toyour unit.
Wiring
Your equipment provides a wiring diagramwhich shows how to connect to a PC usinga DSUB 9-pin connector (EIA-574). Youmay display it as follows.
1. Press the [MENU] key once or twice toopen the menu.
2. Select I/O SETUP and press the [ENT]key.
3. Select WIRING INFO and press the[ENT] key to display the wiring diagram
Figure 7-20 Connection of GP-36/GP-31to PC using a DSUB 9-pin connector
A DSUB 25-pin (EIA-232) may also be usedto make the connection. In this case thewiring diagram is as follows.
Figure 7-21 Connection of GP-36/GP-31to PC using a DSUB 25-pin connector
Setting for communication softwareon PC
Baud Rate: 4800 bpsCharacter Length: 8 bitStop Bit: 1 bitParity: NoneX Control: XON/OFF
Downloading/Uploading betweenPC and GP-36/GP-31
The following data can be downloaded/up-loaded between a personal computer andthe GP-36/GP-31:
• Waypoint data (In alphanumerical order)
• Route data ( In order of route number)Note 1: There are two kinds of data for routedata: route data and route comment data.

7-11
Note 2: DPGS position fix is not availablewhen uploading or downloading data.
Downloading data to a PC
1. Press the [MENU] key once or twice toopen the menu, select I/O SETUP andpress the [ENT] key.
Figure 7-22 I/O SETUP menu
2. Select SAVE WP/RTE → PC?.
3. Press the [ENT] key.
Figure 7-23 SAVE WP/RTE display
4. Press the [ENT] key.
Figure 7-24 SAVING START? prompt
5. Setup the computer to receive data.
6. Press the [ENT] key.
Figure 7-25 Displays whendownloading data
7. Press any key to escape.
Uploading data from a PC
Note that all waypoint and route data storedin GP-36/GP-31 will be deleted when datais uploaded.
1. Press the [MENU] key once or twice toopen the menu, select I/O SETUP andpress the [ENT] key.
2. Select LOAD WP/RTE ← PC?.
3. Press the [ENT] key.
Figure 7-26 LOAD WP/RTE display
4. Press the [ENT] key.
Figure 7-27 LOADING START? prompt
5. Set up the computer to output data.

7-12
6. Press the [ENT] key.
Note: The waypoint and route data aredeleted when the [ENT] key is pressed.
Figure 7-28 Display when datais being loaded
7. When the loading is completed, the fol-lowing message appears.
Figure 7-29 Display when datais loaded successfully
8. Press any key to escape.
Loading data from a YEOMAN
Waypoint data from a YEOMAN has thesame format as does the NMEA 0183 datasentences WPL.
1. Press the [MENU] key twice, select I/OSETUP and press the [ENT] key.
2. Select LOAD WP ← YEOMAN?.
3. Press the [ENT] key.
Figure 7-30 LOAD WP/RTE display
4. Press the [ENT] key.
Figure 7-31 LOADING START? prompt
5. Set up the YEOMAN to output data.
6. Press the [ENT] key.
Figure 7-32 Display when datais being loaded
7. Press the [ENT] key to start the load-ing. Data is loaded to empty location andthe buzzer sounds twice to signify suc-cessful loading. If there is not enoughmemory free to store the waypoints themessage below appears.
Figure 7-33 Display when waypointscould not be loaded
Waypoint data format
Figure 7-34 Waypoint data format
1: Waypoint latitude
2: N/S
3: Waypoint longitude
4: E/W
5: Waypoint name (Number of charactersis fixed to 6 and space code is placed
7-13
when the number of characters are lessthan 6.)
6: Waypoint color (This field is always keptNULL.)
7: Waypoint comment (2 byte for markcode + 16 characters of comment.)
1st byte of mark code: Fixed to '@'.2nd byte of mark code:Internal markcode + 'a' (0 x 61). See Note 1.Number of characters for comment isless than 16 (variable length). SeeNote 2.
8: Flag making waypoint. Always set to“A”.
“A”: Displayed“V”: Not displayed
9: UTC (Always NULL)
10: Day (Always NULL)
11: Month (Always NULL)
12: Year (Always NULL)
Note 1: Internal mark code is 0 x 10 through0 x 18. 0 x 71 through 0 x 79 are alwaysplaced at 2nd byte of mark code.
Note 2: Following characters can be usedfor comments:
Figure 7-35 Characters available forcomments
Route data format
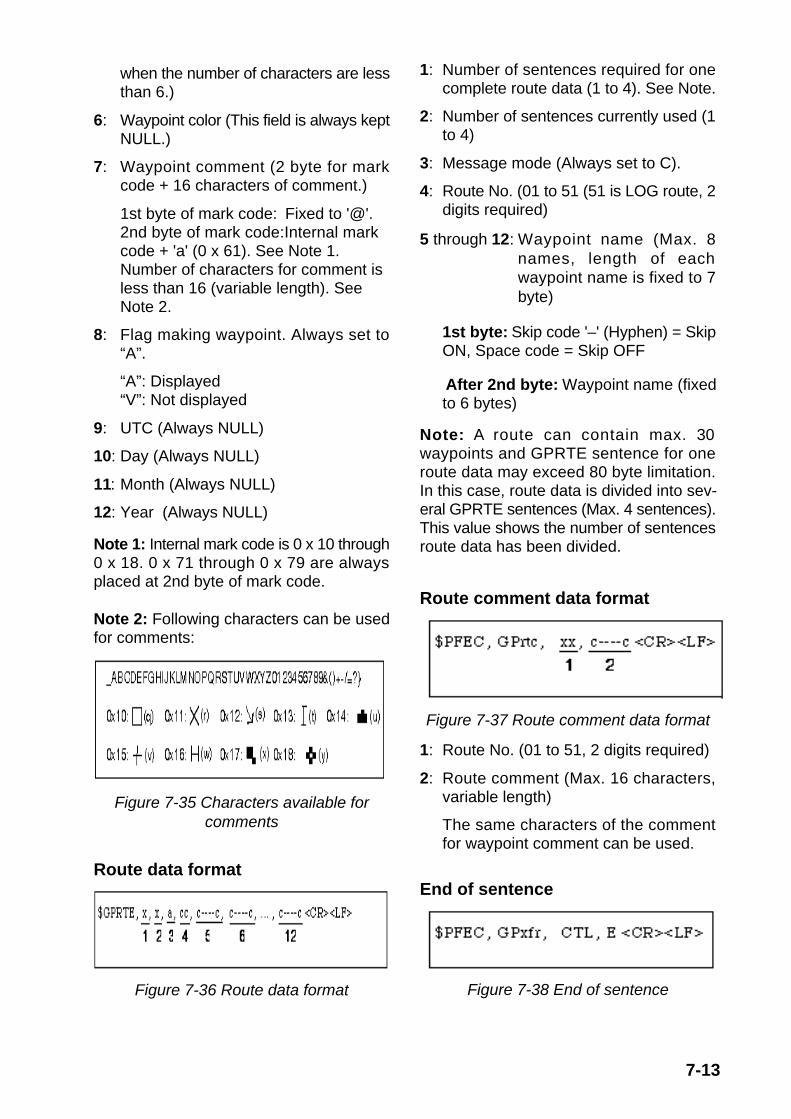
Figure 7-36 Route data format
1: Number of sentences required for onecomplete route data (1 to 4). See Note.
2: Number of sentences currently used (1to 4)
3: Message mode (Always set to C).
4: Route No. (01 to 51 (51 is LOG route, 2digits required)
5 through 12: Waypoint name (Max. 8names, length of eachwaypoint name is fixed to 7byte)
1st byte: Skip code '–' (Hyphen) = SkipON, Space code = Skip OFF
After 2nd byte: Waypoint name (fixedto 6 bytes)
Note: A route can contain max. 30waypoints and GPRTE sentence for oneroute data may exceed 80 byte limitation.In this case, route data is divided into sev-eral GPRTE sentences (Max. 4 sentences).This value shows the number of sentencesroute data has been divided.
Route comment data format
Figure 7-37 Route comment data format
1: Route No. (01 to 51, 2 digits required)
2: Route comment (Max. 16 characters,variable length)
The same characters of the commentfor waypoint comment can be used.
End of sentence
Figure 7-38 End of sentence

7-14
7.13 Time Display
You may display the time in 12-hour or 24-hour notation, and the default setting is 24-hour notation. AM or PM is shown when12-hour notation is selected.
1. Press the [MENU] key once or twice toopen the menu.
2. Select SYS SETUP and press the [ENT]key.
3. Select TIME DISP and press the [ENT]key.
4. Select 12HOUR or 24HOUR as appro-priate.
5. Press the [ENT] key followed by the[MENU] key.

8-1
8.1 Maintenance
Check the following points regularly tomaintain performance:
• Check that connectors on the rear panelare firmly tightened and free of rust.
• Check that the ground system is free ofrust and the ground wire is tightly fas-tened.
• Check that battery terminals are cleanand free of rust.
• Check the antenna for damage. Replaceif damaged.
• Dust and dirt on the keyboard and dis-play screen may be removed with a softcloth. Do not use chemical cleaners toclean the equipment; they may removepaint and markings.
8.2 Displaying the Message Board
The message board displays error mes-sages and alerts. You can display it as fol-lows:
1. Press the [MENU] key once or twice toopen the menu.
2. Select MESSAGES.
8. MAINTENANCE & TROUBLESHOOTING
3. Press the [ENT] key.
Figure 8-1 MESSAGE board
4. Press the [MENU] key twice to quit themessage board.
Messages
Table 8-1 Messages and their meanings
Message Meaning, Remedy
ANCHOR WATCHALARM!
Anchor watch alarmsetting violated.
ARRIVAL ALARM! Arrival alarmsetting violated.
BACKUP DATAERROR!
RAM data corrupted.Try to clear backupdata. See page 8-4.
BATTERY ALARM! Voltage of internalbattery is low.Request replacement.
DGPS ERROR! No DGPS signal, orout of service area.
GPS NO FIX! No GPS signal. Checkantenna cable.
HIGH VOLTAGE! Power source voltagetoo high.
LOW VOLTAGE! Power source voltagetoo low.
RAM ERROR! Request service.
ROM ERROR! Request service.
RTC ERROR! Request service.
SPEED ALARM! Speed alarm settingviolated.
TIME ALARM! Timer alarm violated.
TRIP ALARM! Trip distance alarmviolated.
XTE ALARM! XTE alarm settingviolated.

8-2
8.3 Displaying the GPS Satellite Monitor Display
The GPS satellite monitor display showsinformation about GPS satellites.
1. Press the [MENU] key once or twice toopen the menu.
2. Select SATELLITE.
3. Press the [ENT] key.
Number, bearing and elevation angle ofall satellites in view of the GPS receiverappear. Satellites being used in fixingposition are displayed in reverse video;satellites not being used are shown innormal video.
Figure 8-2 GPS satellite monitor display
4. Press the [MENU] key twice to quit theSATELLITE display.
8.4 Diagnostic Test
The diagnostic test checks ROM, RAM,data port, beacon receiver, battery, RTC,keyboard and LCD for proper operation.
1. Press the [MENU] key once or twice toopen the menu.
2. Select SYS SETUP and press the [ENT]key.
3. Select “TEST?” and press the [ENT] key.You are asked if you are ready to startthe test.
Figure 8-3 TEST START screen
4. Press the [ENT] key to start the test.
5. The equipment tests ROM, RAM, dataport, beacon receiver, internal batteryand RTC. The results are individuallydisplayed as OK or NG (No Good).
Note 1: NONE appears next to BEA-CON when no beacon receiver is con-nected to the GP-31.Note 2: DATA2 requires a special con-nector to check. 03 appears as the re-sult when no connector is connected.Note 3: No program number shown forBEACON in case of the GP-31.Note 4: CNT is the number of times testhas been consecutively executed.
Figure 8-4 TEST display (GP-36)

8-3
6. After the equipment has checked theitems shown in Figure 8-4, a beepsounds and the message PUSH KEYappears at the top right-hand corner.
7. Press each key one by one. The nameof the key pressed momentarily appearsat the top right-hand corner if the key isfunctioning properly.
Note: If no key is pressed within approx.five seconds, the equipment automati-cally proceeds to step 8.
8. The equipment displays the followingmessage to inform you that it is now go-ing to check the LCD:
Figure 8-5 LCD CHECK screen
9. The LCD is checked as shown in themessage in Figure 8-5. Then, the testrepeats. To stop the test, turn off thepower.
8.5 When “BATTERY ALARM!” Appears
A lithium battery (type: TZ6580553A, codeno.: 000-139-951) is installed on the circuitboard inside the display unit, and it pre-serves data when the power is turned off.The life of the battery is about 3-5 years.When its voltage is low “BATTERYALARM!” appears on the display to alertyou. When this happens, do the followingto prevent loss of data, and contact yourdealer to request replacement of the bat-tery.
1. Press the [MENU] key once or twice toopen the menu.
2 Select SYS SETUP and press the [ENT]key.
Figure 8-6 SYSTEM SETUP menu
3. Select “EXCHANGE BATTERY?” andpress the [ENT] key. The display showsthe following:
Figure 8-7 Exchange battery window
4. Press the [ENT] key. Then, the follow-ing display appears.
Figure 8-8 Battery exchangeconfirmation window
5. Press any key to automatically turn offthe unit.
Then, important items in the RAM area aretransferred to a temporary area in the flashmemory to prevent loss of data.
Note : When it is expected that theGP-31/36 will not be used for a long time,execute the above procedure beforeturning the power off,to prevent loss of data.

8-4
8.6 Clearing Data
You may clear GPS data, menu settingsand all backup data to start afresh.
1. Press the [MENU] key once or twice toopen the menu.
2. Select ERASE and press the [ENT] key.
3. Select GPS DATA?, MENU SETTINGS,or ALL BACKUP DATA as appropriateand press the [ENT] key. One of the fol-lowing messages appears.
Figure 8-9 Prompt for erasure of GPSdata, menu settings, backup data
4. Press the [ENT] key. The following dis-play appears.
Figure 8-7 Prompt for restarting
5. Hit any key to erase item selected. Abeep sounds while the selected item isbeing erased, and then the plotter dis-play appears.

9-1
9. INSTALLATION
9.2 Installation of Antenna Unit
Mounting considerations
Install the antenna unit referring to the an-tenna installation diagram at the end of thismanual. When selecting a mounting loca-tion for the antenna unit, keep in mind thefollowing points:
• Do not shorten the antenna cable.
• Select a location out of the radar beam.The radar beam will obstruct or preventreception of the GPS signal.
• The location should be well away from aVHF/UHF antenna. A GPS receiver is in-terfered by a harmonic wave of a VHF/UHF antenna.
• There should be no interfering objectwithin the line-of-sight to the satellites.Objects within line-of-sight to a satellite,for example, a mast, may block recep-tion or prolong acquisition time.
• Mount the antenna unit as high as pos-sible. Mounting the antenna unit as highas possible keeps it free of interferingobjects and water spray, which can in-terrupt reception of GPS satellite signalif the water freezes.
• The length of the whip antenna for theGPA-018 (for GP-36) should be nolonger than 1.2 meter to prevent antennadamage. Do not use a 2.5 meter whipantenna.
• If the antenna cable is to be passedthrough a hole which is not large enoughto pass the connector, you may unfas-ten the connector with a needle nosepliers and 3/8-inch open-end wrench.Refasten it as shown in Figure 9-2, afterrunning the cable through the hole.
Center pin (soldered)Clamp nut
Connector shell
Gasket (reddish brown)WasherShield
Figure 9-2 How to assemble the connector
9.1 Installation of Display Unit
Mounting considerations
The display unit can be installed on a table-top, on the overhead, or in a panel (optionalflush mounting kit required). Refer to theoutline drawings at the end of this manualfor installation instructions. When selectinga mounting location, keep in mind the fol-lowing points:
• Locate the unit away from exhaust pipesand vents.
• The mounting location should be wellventilated.
• Mount the unit where shock and vibra-tion are minimal.
• Locate the unit away from equipmentwhich generates electromagnetic fieldssuch as a motor or generator.
• Allow sufficient maintenance space atthe sides and rear of the unit and leavesufficient slack in cables, to facilitatemaintenance and servicing.
• Observe the following compass safe dis-tances to prevent deviation of a magneticcompass. Standard compass, 0.5 m,Steering compass, 0.3 m.
Tabletop and overhead mounting
Tabletop Overhead
Figure 9-1 Tabletop and overhead mounting methods
Flush mounting
There are two types of flush mounting kits.For details, see the outline drawings at theend of this manual for details.

9-2
Grounding
The display unit contains a CPU. While it isoperating, it radiates noise, which can in-terfere with radio equipment. Ground theunit as follows to prevent interference:
• The ground wire should be 1.25sq orlarger.
• The ground wire should be as short aspossible.
• The signal ground and frame ground areseparated, however the power line is notisolated. Therefore, do not connect thesignal ground to the frame ground whenconnecting other equipment to a posi-tive ground battery.
• The antenna unit GPA-018 (for GP-36)must be grounded. Connect a groundwire of 1.25sq or larger (local supply)between the ground terminal on the an-tenna unit and a stainless steel screwfastened to the mast. Coat the groundterminal, stainless steel screw and crimp-on lug on the ground wire with siliconesealant.
• The power of this equipment is not iso-lated, thus the earth lamp may light whenthe antenna unit GPA-018 is grounded.If it lights, attach two capacitors (1mF,0.1mF) in parallel to the antenna earthline.
External equipment
The power supply port is commonly usedfor connection of external equipment suchas navigation equipment or a PC. Refer tothe interconnection diagram on page S-1or S-2 for connection.
9.3 Wiring
The figure below shows where to connectcables on the rear of the display unit. Pleasereview the WARNING SHEET at the frontof this manual before wiring the equipment.
Black Red
POWER(10.8-31.2 VDC)
Ground
1A FUSE(+ Line)
ANTENNA UNIT(Shown: GPA-018)
GPS ANT
DISPLAYUNIT
+-
Ground the equipment toprevent mutual interference.
CAUTION
Figure 9-3 Wiring
Note: The fuse holder contains a springwhich fixes the fuse. To prevent detachmentof the spring, which would cause loss ofpower, tie the line as shown in Figure 9-4.
Fuse holder
+ line (red)
Tie here.
Figure 9-4 How to fix spring in fuse holder

9-3
9.4 Initial Settings
This equipment can output navigation datato external equipment, in NMEA 0183 for-mat. For example, it can output positiondata to a radar or echo sounder for displayon its display screen.
Output data format, data sentences
NMEA 0183 version 1.5 or 2.0 can be se-lected through the menu.
DATA1: Current loop data
tniopyaWoN
PA 1-MER 2-MER
LLGGTVADZMAABPADOBCWBETX
.ces1()lavretni
LLGAGGGTVADZCMRBMR
.ces1()lavretni
LLGAGGGTVADZ
*AMR*DTG
CMRBMRCWB
.ces2()lavretni
siDTCLnehwtuptuO*.deyalpsid
ylno0.2.reV:AMRylno5.1.reV:DTG
tolipotuA:PA.cte,rednuosohce,radaR:2-MER,1-MER
DATA2: RS-232C level
tniopyaWhtiW
PA MER
LLGGTVADZMAABPADOBCWBETX
.ces1()lavretni
LLGAGGGTVADZ
*AMR*DTG
CMRBMRCWB
.ces1()lavretni
CLnehwtuptuO*.deyalpsidsiDTylno0.2.reV:AMRylno5.1.reV:DTG
DATA2
nocaeBlanretxEgnitteSrevieceR
nocaeBlanretnIgnitteSrevieceR
tuptuOAGGKSM
tupnIfoatadnoitcerroC
nocaeblanretxereviecer
lanretnifotuptuOs'reviecernocaeb
atadnoitcerrocdnaatadnoitcerroc(
)SSMRC$
SPGDnoNOCAEBottesunemPUTES
TXE
SPGDnoNOCAEBottesunemPUTES
TNI
Data sentence descriptionAAM: Arrival alarmAPB: Autopilot data (XTE and bearing to
waypoint)BOD: Bearing from own ship to destinationBWC: Range and bearing to waypoint
(great circle navigation)GGA: GPS position fixing condition (time
of fix, latitude, longitude, receivingcondition, number of satellites used,DOP)
GLL: Latitude and longitudeGTD: Loran-C time differenceRMA: Generic navigational information
(latitude, longitude, Loran-C time dif-ferences, ground speed, true course
RMB: Generic navigational information(cross track error, steering direction,starting waypoint no., destinationwaypoint no., latitude and longitudeof starting waypoint, latitude and lon-gitude of destination waypoint, rangeand bearing to waypoint, range andbearing from present position to des-tination waypoint, velocity to desti-nation, arrival alarm)
RMC: Generic navigational information(UTC time, latitude, longitude,ground speed, true course, day,month, year)
VTG: Actual track and ground speedsXTE: Course error amount and direction
to steerZDA: UTC time (day, month, year)

9-4
Output setting
1. Press [MENU] once or twice to open themenu.
2. Operate the cursor pad to select I/OSETUP.
3. Press the [ENT] key.
I/O SETUP
DATA1 : NMEA-REM1DATA2 : NMEA-REMNMEA VER : VER2.0SAVE WP/RTE → PC?LOAD WP/RTE ← PC?LOAD WP← YEOMAN?WIRING INFO?
Figure 9-5 I/O SETUP menu
4. To change setting, press ▼ to selectDATA1, DATA2 or NMEA VER as ap-propriate.
5. Press the [ENT] key. One of the follow-ing screens appears depending on theitem selected at step 4.
NMEA REM1NMEA REM2NMEA AP
For DATA1
NMEA REMNMEA APRTCM-OUT
For DATA2*
VER 1.5VER 2.0
For NMEAVersion
* BEACON displayed whenDGPS setting is EXT.
Figure 9-6 Screens for setup of dataoutput and selection of NMEA version
6. Select desired option with ▲ or ▼.
NMEA-REM1, 2: Output data to radar,echo sounder, etc.NMEA-AP: Output data to an autopilot.RTCM-OUT: Select when equipped withinternal DPGS beacon receiver.VER 1.5, 2.0: Select NMEA version ofexternal equipment. If you are unsureof NMEA version no., try both and se-lect the one which successfully outputsdata.
7. Press the [ENT] key.
8. Press the [MENU] key to finish.

AP-1
Menu Tree
Default settings shown in boldface italic.

AP-2

AP-3
Loran C Chains
Chain GRI S1 S2 S3 S4 S5
Central Pacific 4990 11 29 – – –
Canadian East Coast 5930 11 25 38 – –
Commando Lion (Korea) 5970 11 31 42 – –
Canadian West Coast 5990 11 27 41 – –
South Saudi Arabia 7170 11 26 39 52 –
Labrador Sea 7930 11 26 – – –
Eastern Russia 7950 11 30 46 61 –
Gulf of Alaska 7960 11 26 44 – –
Norwegian Sea 7970 11 26 46 60 –
Southeast USA 7980 11 23 43 59 –
Mediterranean Sea 7990 11 29 47 – –
Western Russia 8000 10 25 50 65 –
North Central USA 8290 11 27 42 – –
North Saudi Arabia 8990 11 25 40 56 69
Great Lakes 8970 11 28 44 59 –
South Central USA 9610 11 25 40 52 65
West Coast USA 9940 11 27 40 – –
Northeast USA 9960 11 25 39 54 –
Northeast Pacific (old) 9970 11 30 55 81 –
Icelandic 9980 11 30 – – –
North Pacific 9990 11 29 43 – –
Suez 4991 10 24
England, France 8940 12 30
Northwest Pacific 8930 11 30 50 70
Newfoundland East Coast 7270 11 25
Lessay 6731 10 39
BØ 7001 11 27
Sylt 7499 11 26
Ejde 9007 10 23 38
Saudia Arabia North 8830 11 25 39 56
Saudia Arabia South 7030 11 25 37 55

AP-4
Decca Chains
ChainNo.
Chain Chaincode
Location ChainNo.
Chain Chaincode
Location
01 South Baltic 0A Europe 25 Skagerrak 10B "
02 Vestlandet 0E " 26 North Persian Gulf 5C Persian Gulf &India
03 Southwest British 1B " 27 South Persian Gulf 1C "
04 Northumbrian 2A " 28 Bombay 7B "
05 Holland 2E " 29 Calcutta 8B "
06 North British 3B " 30 Bangladesh 6C "
07 Lofoten 3E " 31 Saliyah 2F "
08 3F " 32 Hokkaido 9C Japan
09 North Baltic 4B " 33 Tohoku 6C "
10 North West 4C " 34 Kanto 8C Japan
11 Trondelag 4E " 35 Shikoku 4C "
12 English 5B " 36 Hokuriku 2C "
13 North Bothnian 5F " 37 Kita Kyushu 7C "
14 Southern Spanish 6A " 38 Namaqualand 4A Southern Africa
15 North Scottish 6C " 39 Cape 6A "
16 Gulf of Finland 6E " 40 Eastern Province 8A "
17 Danish 7B " 41 South West Africa 9C "
18 Irish 7D " 42 Natal 10C "
19 Finnmark 7E " 43 Dampier 8E Australia
20 French 8B " 44 Port Headland 4A "
21 South Bothnian 8C " 45 Anticosti 9C Northern America
22 Hebridean 8E " 46 East Newfoundland 2C "
23 Frisian Islands 9B " 47 Cabot Strait 6B "
24 Helgeland 9E " 48 Nova Scotia 7C "

AP-5
Geodetic Chart List
001: WGS84002: WGS72003: TOKYO :Mean Value (Japan, Korea &
Okinawa)004: NORTH AMERICAN 1927 :Mean Value (CONUS)005: EUROPEAN 1950 :Mean Value006: AUSTRALIAN GEODETIC 1984 :Australia & Tasmania007: ADINDAN :Mean Value (Ethiopia & Sudan)008: :Ethiopia009: :Mali010: :Senegal011 :Sudan012: AFG :Somalia013: AIN EL ABD 1970 :Bahrain Is.014: ANNA 1 ASTRO 1965 :Cocos Is.015: ARC 1950 :Mean Value016: :Botswana017: :Lesotho018: :Malawi019: :Swaziland020: :Zaire021: :Zambia022: :Zimbabwe023: ARC 1960 :Mean Value (Kenya & Tanzania)024: :Kenya025: :Tanzania026: ASCENSION IS. 1958 :Ascension Is.027: ASTRO BEACON “E” : Iwo Jima Is.028: ASTRO B4 SOR. ATOLL :Tern Is.029: ASTRO POS 71/4 :St. Helena Is.030: ASTRONOMIC STATION 1952 :Marcus Is.031: AUSTRALIAN GEODETIC 1966 :Australia & Tasmania032: BELLEVUE (IGN) :Efate & Erromango Islands033: BERMUDA 1957 :Bermuda Islands034: BOGOTA OBSERVATORY :Columbia035: GAUPO INCHAUSPE :Argentina036: CANTON IS. 1966 :Phoenix Islands037: CAPE :South Africa038: CAPE CANAVERAL :Mean Value (Florida & Bahama
Islands)039: CARTHAGE :Tunisia040: CHATHAM 1971 :Chatham Is. (New Zealand)041: CHUA ASTRO :Paraguay042: CORREGO ALEGRE :Brazil043: DJAKARTA (BATAVIA) :Sumatra Is. (Indonesia)044: DOS 1968 :Gizo Is. (New Georgia Is.)045: EASTER IS. 1967 :Easter Is.046: EUROPEAN 1950 (Cont’d) :Western Europe047: :Cyprus048: :Egypt049: :England, Scotland, Channel &
Shetland Islands050: :England, Ireland, Scotland, &
Shetland Islands051: :Greece052 : Iran053: : Italy, Sardinia054: : Italy, Sicily055: :Norway & Finland056: :Portugal & Spain057: EUROPEAN 1979 :Mean Value058: GANDAJIKA BASE :Republic of Maldives059: GEODETIC DATUM 1949 :New Zealand060: GUAM 1963 :Guam Is.061: GUX 1 ASTRO :Guadalcanal Is.062: HJORSEY 1955 : Iceland063: HONG KONG 1363 :Hong Kong064: INDIAN :Thailand & Vietnam065: :Bangladesh, India & Nepal066: IRELAND 1965 : Ireland067: ISTS 073 ASTRO 1969 :Diego Garcia068: JOHNSTON IS. 1961 :Johnston Is.069: KANDAWALA :Sri Lanka070: KERGUELEN IS. :Kerguelen Is.071: KERTAU 1948 :West Malaysia & Singapore072: LA REUNION :Mascarene Is.073: L. C. 5 ASTRO :Cayman Brac Is.074: LIBERIA 1964 :Liberia075: LUZON :Philippines (excl. Mindanao Is.)076: :Mindanao Is.077: MAHE 1971 :Mahe Is.078: MARCO ASTRO :Salvage Islands079: MASSAWA :Eritrea (Ethiopia)080: MERCHICH :Morocco081: MIDWAY ASTRO 1961 :Midway Is.082: MINNA :Nigeria083: NAHRWAN :Masirah Is. (0man)084: :United Arab Emirates085: :Saudi Arabia086: NAMIBIA :Namibia
087: MAPARIMA, BWI : Trinidad & Tobago088: NORTH AMERICAN 1927 : Western United States089: : Eastern United States090: : Alaska091: : Bahamas (excl. San Salvador Is.)092: : Bahamas, San Salvador Is.093: : Canada (incl. Newfoundland Is.)094: : Alberta & British Columbia095: : East Canada096: : Manitoba & Ontario097: : Northwest Territories &
Saskatchewan098: : Yukon099: : Canal Zone100: : Caribbean101: : Central America102: : Cuba103: : Greenland104: : Mexico105: NORTH AMERICAN 1983 : Alaska106: : Canada107: : CONUS108: : Mexico, Central America109: OBSERVATORIO 1966 : Corvo & Flores Islands (Azores)110: OLD EGYPTIAN 1930 : Egypt111: OLD HAWAIIAN : Mean Value112: : Hawaii113: : Kauai114: : Maui115: : Oahu116: OMAN : Oman117: ORDNANCE SURVEY OF GREAT BRITAIN 1936: Mean Value118: : England119: : England, Isle of Man & Wales120: : Scotland, & Shetland Islands121: : Wales122: PICO DE LAS NIVIES : Canary Islands123: PITCAIRN ASTRO 1967 : Pitcairn Is.124: PROVISIONS SOUTH CHILEAN 1963: South Chile (near 53˚ S)125: PROVISIONAL SOUTH AMERICAN 1956: Mean Value126: : Bolivia127: : Chile-Northern Chile (near 19˚S)128: : Chile-Southern Chile (near 43˚S)129: : Columbia130: : Ecuador131: : Guyana132: : Peru133: : Venezuela134: PUERTO RICO : Puerto Rico & Virgin Islands135: QATAR NATIONAL : Qatar136: QORNOQ : South Greenland137: ROME 1940 : Sardinia Islands138: SANTA BRAZ : Sao Maguel, Santa Maria
Islands (Azores)139: SANTO (DOS) : Espirito Santo Is.140: SAPPER HILL 1943 : East Falkland Is.141: SOUTH AMERICAN 1969 : Mean Value142: : Argentina143: : Bolivia144: : Brazil145: : Chile146: : Columbia147: : Ecuador148: : Guyana149: : Paraguay150: : Peru151: : Trinidad & Tobago152: : Venezuela153: SOUTH ASIA : Singapore154: SOUTHEAST BASE : Porto Santo & Madeira Islands155: SOUTHWEST BASE : Faial, Graciosa, Pico, Sao
Jorge, & Terceira Is.156: TIMBALAI 1948 : Brunei & East Malaysia
(Sarawak & Sadah)157: TOKYO : Japan158: : Korea159: : Okinawa160: TRISTAN ASTRO 1968 : Tristan da Cunha161: VITI LEVU 1916 : Viti Levu Is. (Fiji Islands)162: WAKE-ENIWETOK 1960 : Marshall Islands163: ZANDERIJ : Surinam164: BUKIT RIMPAH : Bangka & Belitung Islands
(Indonesia)165: CAMP AREA ASTRO : Camp Mcmurdo Area, Antarctica166: G. SEGARA : Kalimantan Is. (Indonesia)167: HERAT NORTH : Afghanistan168: HU-TZU-SHAN : Taiwan169: TANANARIVE OBSERVATORY 1925 : Madagascar170: YACARE : Uruguay171: RT-90 : Sweden172: Pulkovo 1942 : Russia173: FINNISH KKJ : Finland

SP - 1 E4399S02B
SPECIFICATIONS OF GPS NAVIGATOR GP-31/36
1. ANTENNA UNIT
(1) GP-31 GPA-017 (GPS antenna)
(2) GP-36 GPA-019 (GPS antenna with H-field Beacon ANT)
GPA-018 (GPS antenna with E-field Beacon ANT)
selectable
2. GPS RECEIVER
(1) Receiving System 12 channels parallel, 12 satellite tracking
(2) Rx Frequency 1575.42 kHz
(3) Rx code C/A code
(4) Position Fixing System All in view, 8-state Kalman filter
(5) Position Accuracy Approx. 50 m (GPS), or approx. 5 m (DGPS), 95% of the time,
horizontal dilution of position (HDOP) ≤4
Note: All GPS receiver are subject to degradation of position and
velocity accuracy under the U.S. Department of Defense.
Position may be degraded.
(6) Tracking velocity 999 kts
(7) Position-fixing time Warm start: 12 seconds, Cold start: 90 seconds
(8) Position Update Interval 1 second
(9) Beacon Receiver (GP-36) Frequency range: 283.5 to 325.0 kHz
MSK rate: 50, 100, 200 bps (auto or manual, selectable)
3. DISPLAY SECTION
(1) Display 95 x 60 mm (120 x 64 dot matrix)
(2) Display Mode Plotter, Steering, Highway, NAV data, User display (Digital data or
Speedometer)
(3) Display Mercator projection
Position indication (L/L, Loran C LOP or Decca LOP)
(4) Memory Capacity Track: 1000 pts, Waypoint: 950 pts with comment (16 charactor)
(5) Storage Capacity 50 routes with 30 waypoints each
(6) Alarms Arrival and anchor watch, Cross track error,
Ship’s speed in and out alarms, DGPS alarm, Time alarm, Trip alarm
(7) Display Scale
Plotter display: 0.02, 0.05, 0.1, 0.2, 0.5, 1, 2, 5, 10, 20, 40, 80, 160, 320 nm
Highway display: 0.2, 0.4, 0.8, 1, 2, 4, 8, 16 nm

SP - 2 E4399S02B
4. INPUT/OUTPUT DATA
(1) Data 1 Current Loop
Output Data: NMEA0183 Ver 1.5/2.0 selected
NMEA-REM1: GLL, GGA, VTG, ZDA, RMC, RMB
NMEA-REM2: GLL, GGA, VTG, ZDA, RMC, RMB, BWC,
RMA (Ver2.0), GTD (Ver1.5) when TD indication selected
NMEA-AP: GLL, VTG, ZDA, AAM, APB, BOD, BWC, XTE
(2) Data 2 RS-232C
Output Data: NMEA0183 Ver 1.5/2.0 selected
NMEA-REM: GLL, GGA, VTG, ZDA, RMC, RMB, BWC,
RMA (Ver2.0), GTD (Ver1.5) when TD indication selected
NMEA-AP: GLL, VTG, ZDA, AAM, APB, BOD, BWC, XTE
DGPS RTCM SC-104 (GP-36 only)
Downloading to PC (WP/ Route Data)
Input Data: DGPS RTCM SC-104 Ver 2.1
Uploading from PC (WP/ Route Data)
NMEA WPL (WP Data)
5. POWER SUPPLY
(1) GP-31 12-24 VDC: 0.12-0.06 A (at max. level dimmer)
(2) GP-36 12-24 VDC: 0.23-0.12 A (at max. level dimmer)
6. ENVIRONMENTAL CONDITION
(1) Ambient Temperature Antenna Unit: -25°C to +70°C
Display Unit: -15°C to +55°C
(2) Relative Humidity 95% at 40°C
(3) Water proofing Antenna Unit: IEC60529 IPX6
Display Unit: IEC60529 IPX5 (USCG CFR-46)
(4) Vibration ±1 mm ±10%, 2(5) to 13.2 Hz,
Maximum acceleration 7 m/s2, 13.2 to 100 Hz (IEC 60945)
7. COATING COLOR
(1) Display Unit Cover: Munsell 2.5GY5/1.5, Panel: N3.0
(2) Antenna Unit N9.5
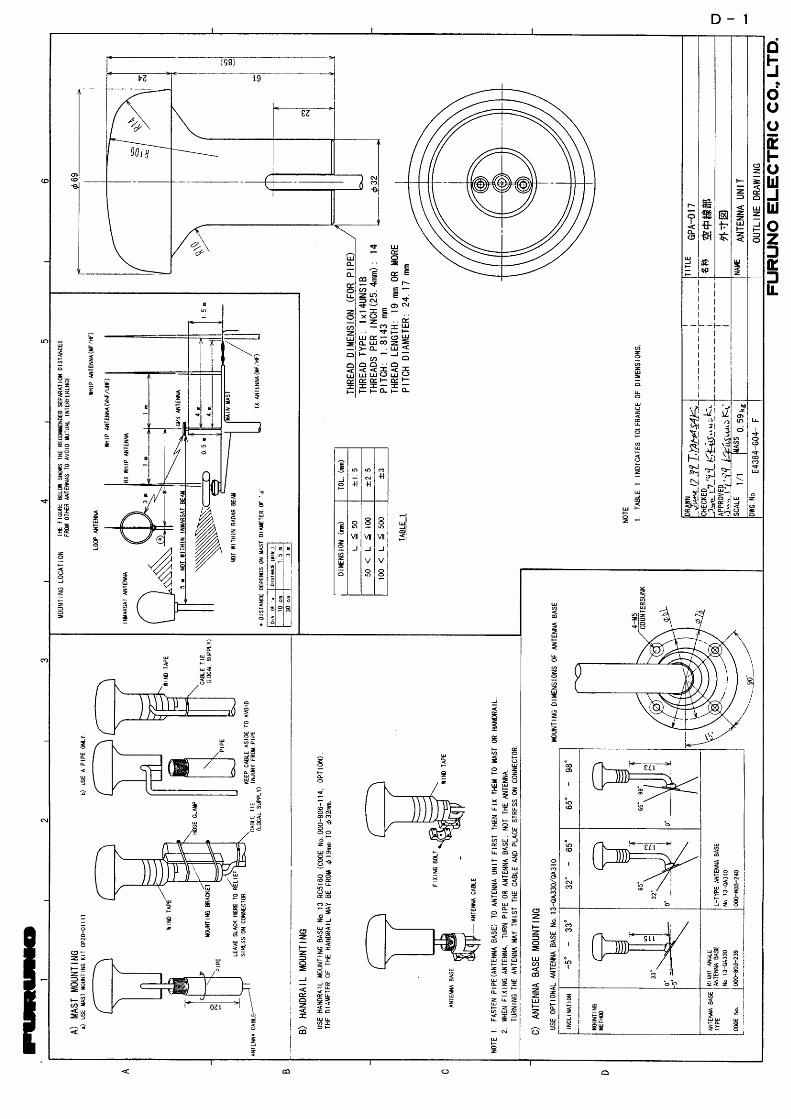

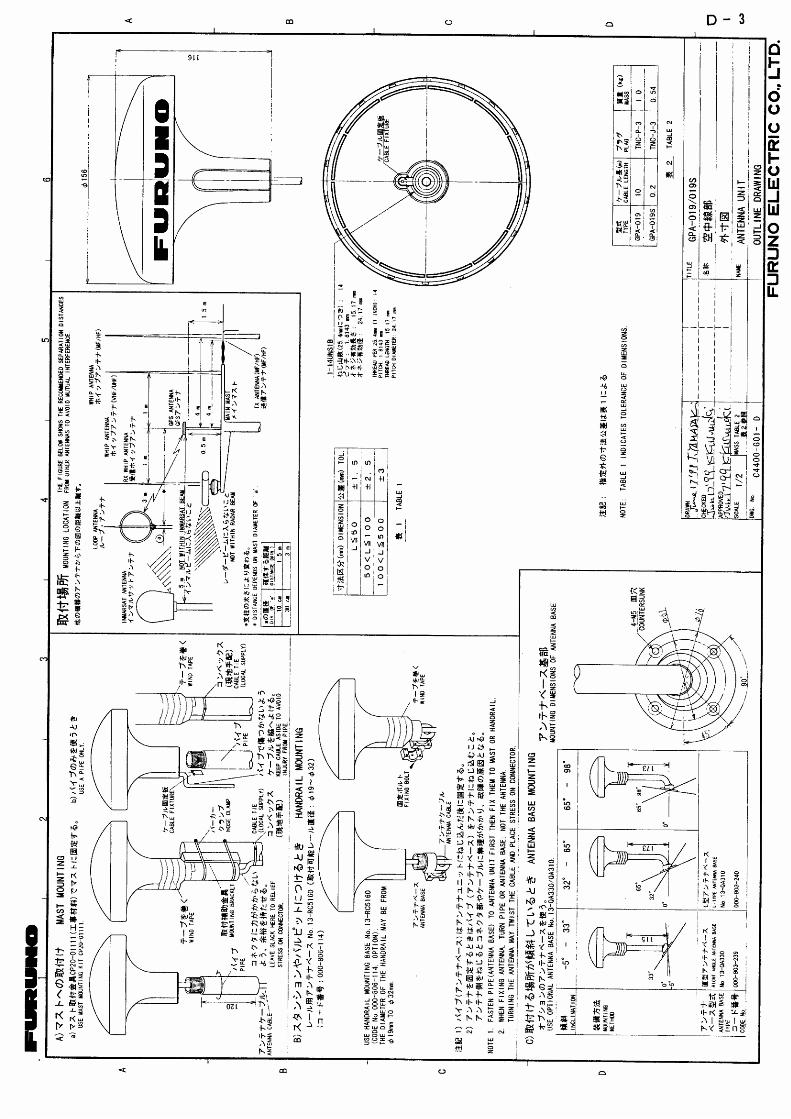
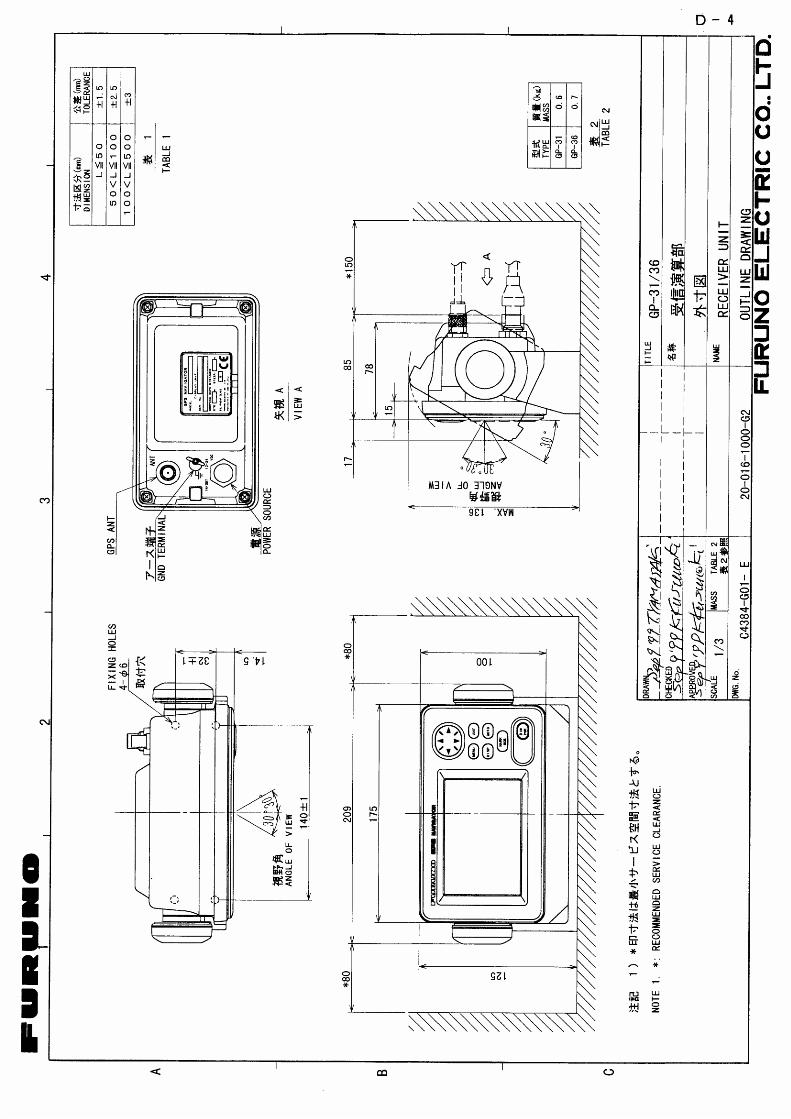


Index-1
INDEX
A
Alarmsanchor watch 6-2arrival 6-1DGPS 6-3speed 6-3time 6-3trip 6-4XTE 6-2
Anchor watch alarm 6-2Arrival alarm 6-1
B
Battery replacement (technicians only) 8-3Bearing reference 7-5Buzzer type 6-4
C
Centering own ship's position 2-2Contrast 1-2Control description 1-1Cursor 2-1–2-2
D
Data clear 8-4Decca chains AP-4Decca TDs 7-6Destination
cancelling 5-2setting route as 5-2setting with cursor 5-1
DGPSalarm 6-3setup 7-2station (channel) editing 7-4station (channel) erasure (all) 7-4station (channel) erasure (individual) 7-5station (channel) registration 7-3
Diagnostic test 8-2Digital display 1-6DIM/PWR key 1-2Dimmer 1-2Display modes 1-3–1-6Display shift 2-2
G
Geodetic chart list AP-5Geodetic chart system 7-6GPS satellite monitor display 8-2
H
Highway display 1-4
I
Installation 9-1–9-4
L
Loran C chains AP-3Loran C TDs 7-6
M
Magnetic bearing 7-5Magnetic variation 7-5Main menu 1-7Maintenance 8-1Menu tree AP-1Message board 8-1MOB mark 3-3
N
Nav data display 1-5
P
Plotter display 1-4Position offset 7-8Position-fixing mode 7-8Power on/off 1-2
R
Range and bearing calculation 7-1–7-2Routes
changing route comments 4-6creating from route menu 4-2creating from waypoint list 4-3creating track-based route 4-3creating with the cursor 4-1deleting 4-6deleting waypoints from 4-5inserting waypoints 4-5replacing waypoints in 4-4setting as destination 5-2temporarily deselecting waypoints 4-5

Index-2
S
Satellitesdisabling 7-8GPS satellite monitor display 8-2
Simulation mode 1-8Smoothing 7-8Speed alarm 6-3Speed averaging 7-8Speedometer display 1-6Steering display 1-5
T
TDs (Loran C or Decca) setup 7-6Time alarm 6-3Time difference 7-7Time display 7-14Track
erasing 2-3plotting interval 2-2starting/stopping plotting 2-2
Trip alarm 6-4Trip distance reset 7-10True bearing 7-5
U
Units of measurement 7-6Uploading/downloading data 7-10User display
examples 1-6setup 7-9
W
Waypointsdeleting 3-5editing 3-4entry at own ship's position 3-2entry through the waypoint list 3-2entry with the cursor 3-1name display 3-4
Wiring info display 7-10
X
XTE alarm 6-2
Z
Zoom in/out 2-1