GPRS Phone - gscs-b2c.lge.com
185
P/N : MMBB0098410 ISSUE 1.0 PRINTED IN KOREA USER’S MANUAL MODEL: G7100 G • P • R • S • P • H • O • N • E GPRS Phone USER’S MANUAL MODEL: G7100 Please read this manual carefully before operating your mobile phone. Retain it for future reference.
Transcript of GPRS Phone - gscs-b2c.lge.com

P/N : MMBB0098410ISSUE 1.0
PRINTED IN KOREA
US
ER
’SM
AN
UA
LM
OD
EL
:G
7100
G • P • R • S • P • H • O • N • E
GPRS PhoneUSER’S MANUAL
MODEL: G7100
Please read this manual carefully before operating your mobile phone.Retain it for future reference.

ENGLISH
GPRS PhoneUSER’S MANUAL
MODEL: G7100
Please read this manual carefully before operating your mobile phone.Retain it for future reference.


3
For Your Safety
All radio transmitters carry risks of interference with electronics inclose proximity.
Mobile Phones must be switched off at all times in anaircraft.
Do not use your phone near petrol stations, fuel depots,chemical plants or blasting operations.
Switch off the phone in any area where required byspecial regulations. For example, do not use your phonein hospitals or it may affect sensitive medical equipment.
Minor interference may affect TVs, radios, PCs, etc.
Do not hold the phone in your hand while driving.
Do not dismantle the phone or battery.
Keep the phone in a safe place out of children’s reach. It includes small parts which if detached may cause achoking hazard.
Do not touch the charger or phone with wet hands.

For Your Safety
4
Please note:
Batteries should be disposed of in accordance withrelevant legislation.
Only use ORIGINAL accessories to avoid damage toyour phone.
Emergency call may not be available under all cellularnetworks. Therefore, you should never depend solely onthe phone for emergency calls.
LCD indicator can be damaged if you turn a flipexcessively. For details, please see P.12.
Important Information
This user’s guide contains important information on the use andoperation of this phone. Please read all the information carefullyfor optimal performance and to prevent any damage to or misuseof the phone. Any changes or modifications not expresslyapproved in this user’s guide could void your warranty for thisequipment.
For your safety, use ONLY specified ORIGINAL batteries and chargers.

SAFETY
It should be noted that compliance with the radiation safety standarddoes not of itself confer immunity from legal obligations andrequirements imposed by national health or safety authorities.IDA may at its discretion, withdraw the type approval, which itgrants, if IDA is satisfied, that the continued uses of the equipmentwill likely cause safety or health hazards to users.IDA requires that the safety provisions contained in Appendix 1 isprominently reflected in the user instructions supplied with GSMmobile equipment.
AMENDMENT AND DECISION
IDA may change the specification without prior notice in order tokeep pace with the continuous improvement in standarddevelopment.In cases of doubt with regard to the interpretation of type approvalspecification, the method of carrying out the tests and the validity ofthe statements made by the manufacturers of the equipment, thedecision of IDA shall be final.
SUMMARY OF USER AND THIRD PARTY SAFETY
REQUIREMENTS
GSM MoU doc. :TP.03 provides advisory and cautionary instructions to users ofGSM mobile equipment regarding their own and third party safety.IDA requires the following instructions or its equivalent to beincluded in all user handbooks for GSM mobile equipment.
5

Electrical Safety
Where provision is made for the connection of any class of mobileequipment to power supply units or battery chargers using voltagesin excess of 50Vac or 75Vdc, user handbooks for mobile equipmentshall specify the power supply unit(s) or battery charger(s) approvedfor use with the mobile station and shall include the followingstatement :“This apparatus is intended for use when supplied with power from(identification of battery charger(s) and/ or power supply unit(s).Other usage will invalidate any approval given to this apparatus andmay be dangerous”.
Aircraft Safety
User handbooks for transportable and handportable equipment shallinclude the following :Switch off your cellular telephone when in an aircraft. The use of cellular telephones in an aircraft may be dangerous tothe operation of the aircraft, disrupt the cellular network and isillegal.Failure to observe this instruction may lead to suspension or denialof cellular telephone services to the offender, or legal action or both.
6
For Your Safety

Explosive Atmospheres
User handbooks for all classes of mobile equipment shall includethe following:
• Users are advised not to use the equipment when at a refuellingpoint.
• Users are reminded of the need to observe restrictions on theuse of radio equipment in fuel depots, chemical plants or whereblasting operations are in progress.
Road Safety
Mobile equipment may not use an ‘Alert’ device to cause a vehiclehorn to sound or lights to flash on receipt of a call on public roads.
• No installation instructions may show how to make such aconnection and the use of terms such as ‘horn relay’ are notaccepted. Reference may be made to a port enabling otherapparatus to be controlled.
• User handbooks offering an ‘Alert’ facility are required to containthe following text :“The use of the Alert device to operate a vehicle’s lights or hornon public roads is not permitted”.
It is advised that hand-held microphone or telephone handsetshould not be used by the driver while the vehicle is moving, exceptin an emergency.Speak only into a fixed, neck slung or clippedon microphone when itwould not distract your attention from the road.
7

Non-Ionising Radiation
User handbooks for mobile equipment shall draw attention to thefollowing, in the case of Class 1 transmitted output power (1W) forGSM 1800 or Class 2 transmitted output power (8W) for GSM 900equipment:As with other mobile radio transmitting equipment, users areadvised that for satisfactory operation of the equipment and for thesafety of personnel, it is recommended that no part of the humanbody be allowed to come too close to the antenna during operationof the equipment.Installation instructions for vehicle mounted equipment shall include,for Class 1 transmitted output power (1W) for GSM 1800 and Class2 transmitted output power (8W) for GSM 900 equipment:
• The radio equipment shall be connected to the antenna via anon-radiating cable (e.g. coaxial cables).
• The antenna shall be mounted in a position such that no part ofthe human body will normally rest too close to any part of theantenna unless there is an intervening metallic screen, forexample, the metallic roof.
8
For Your Safety

Radio wave exposure and Specific Absorption
Rate (SAR) information
This mobile phone model has been designed to comply withapplicable safety requirement for exposure to radio waves. Theserequirements are based on scientific guidelines that include safetymargins designed to assure this safety of all persons, regardless ofage and health.
• The radio wave exposure guidelines employ a unit ofmeasurement known as the Specific Absorption Rate, or SAR.Tests for SAR are conducted using standardized methods withthe phone transmitting at its highest certified power level in allused frequency bands.
• While there may be differences between the SAR levels ofvarious phone models, they are all designed to meet the relevantguidelines for exposure to radio waves.
• SAR data information for residents in countries/regions that haveadopted the SAR limit recommended by the internationalCommission on Non-Ionizing Radiation Protection (ICNIRP),which is 2W/kg averaged over ten (10) gram of tissue (forexample European Union, Japan, Brazil and New Zealand):
• The highest SAR value for this model phone for use at the ear is0.3230 W/kg (10g).
• SAR data information for residents in countries/regions that haveadopted the SAR limit recommended by the Institute of Electricaland Electronics Engineers (IEEE), which is 1.6 W/kg averagedover one (1) gram of tissue (for example USA, Canada, Australiaand Taiwan).
9

10
Overview
Part of the Phone .................................................................... 14• Main body of the Phone ........................................................ 14• Outside of the Phone ............................................................ 16
Key Description ....................................................................... 17• Side of the Key ..................................................................... 18• Letter Keys ............................................................................ 19
Display Information
Display Information ................................................................ 20• On-Screen Icons ................................................................... 20
Getting Started
Installation ............................................................................... 21• Inserting the SIM Card .......................................................... 21• Removing the SIM Card ........................................................ 21• Installing the Battery ............................................................. 22• Charging the Battery ............................................................. 22• Disconnecting the charger .................................................... 23
Making and Answering Calls ................................................. 24• Making a call ......................................................................... 24• International Calls ................................................................. 24• Making a call using the Phonebook ...................................... 24
Additional Functions
In call Menu ............................................................................. 25• 1 During a call ...................................................................... 25• 2 Multiparty or Conference Calls .......................................... 27
Contents

11
Access Codes ......................................................................... 30
• PIN code (4 to 8 digits) ......................................................... 30• PIN2 code (4 to 8 digits) ....................................................... 30• PUK code (4 to 8 digits) ........................................................ 30• PUK2 code (4 to 8 digits) ...................................................... 30• Security code (4 to 8 digits) .................................................. 30
Accessing the Menu
Menu Tree ................................................................................ 31
Messages [Menu 1] ................................................................. 33
• Write short message [Menu 1-1] ........................................... 33• Write multimedia message [Menu 1-2] ................................. 36• Inbox [Menu 1-3] ................................................................... 40• Outbox [Menu 1-4] ................................................................ 41• Voice mail [Menu 1-5] ........................................................... 43• Info service [Menu 1-6] ......................................................... 43• Templates [Menu 1-7] ........................................................... 45• Settings [Menu 1-8] ............................................................... 46
Call register [Menu 2] ............................................................. 48
• Missed calls [Menu 2-1] ........................................................ 48• Received calls [Menu 2-2] ..................................................... 48• Dialled calls [Menu 2-3] ......................................................... 48• Delete recent calls [Menu 2-4] ...............................................48• Call charges [Menu 2-5] ........................................................ 48• GPRS information [Menu 2-6] ............................................... 51

Contents
12
Profiles [Menu 3] ..................................................................... 52
• Vibrate only [Menu 3-1] ......................................................... 52• Quiet [Menu 3-2] ................................................................... 52• General [Menu 3-3] ............................................................... 52• Loud [Menu 3-4] .................................................................... 52• Headset [Menu 3-5] .............................................................. 52• Car [Menu 3-6] ...................................................................... 52
Camera [Menu 4] ..................................................................... 55
• Take picture [Menu 4-1] ........................................................ 55• Take in modes [Menu 4-2] .................................................... 56• Take continuously [Menu 4-3] ............................................... 56• My album [Menu 4-4] ............................................................ 57• Settings [Menu 4-5] ............................................................... 57
Settings [Menu 5] .................................................................... 58
• Alarm clock [Menu 5-1]] ........................................................ 58• Date & Time [Menu 5-2] ........................................................ 58• Phone settings [Menu 5-3] .................................................... 59• Call settings [Menu 5-4] ........................................................ 60• Security settings [Menu 5-5] ................................................. 65• Network settings [Menu 5-6] ................................................. 67• Reset settings [Menu 5-7] ..................................................... 68
Organiser [Menu 6] ................................................................. 69
• Scheduler [Menu 6-1] ............................................................ 69• Phonebook [Menu 6-2] ......................................................... 71
Fun & Tools [Menu 7] ............................................................. 78
• Games [Menu 7-1] ................................................................ 78• Calculator [Menu 7-2] ............................................................ 78• My folder [Menu 7-3] ............................................................. 79

13
• Melody composer [Menu 7-4] ............................................... 80• Unit converter [Menu 7-5] ..................................................... 80• World time [Menu 7-6] ........................................................... 80• Voice recorder [Menu 7-7] .................................................... 81• Activate IrDA [Menu 7-8] ....................................................... 81
Internet [Menu 8] ..................................................................... 82
• Home [Menu 8-1] .................................................................. 82• Bookmarks [Menu 8-2] .......................................................... 82• Push messages [Menu 8-3] .................................................. 82• Profiles [Menu 8-4] ................................................................ 83• Go to URL [Menu 8-5] ........................................................... 86• Cache settings [Menu 8-6] .................................................... 86• Security certification [Menu 8-7] ............................................ 86• Reset profiles [Menu 8-8] ...................................................... 86• Browser version [Menu 8-9] .................................................. 86
On browsing menu ................................................................. 87
Java [Menu 9] .......................................................................... 88
• Applications [Menu 9-1] ........................................................ 88• Download [Menu 9-2] ............................................................ 88• Memory status [Menu 9-3] .................................................... 88
Favorites [Menu 10] ................................................................ 89
Accessories ............................................................................. 90
Care and Maintenance ............................................................ 92
Technical Data ......................................................................... 94

Main body of the Phone
Earpiece
Display Screen
Soft Left Key
Confirm Key
Send Key
Vibration Key
Star Key
Microphone
Soft Right Key
End/Power Key
Clear/Cancel Key
Numeric Keys
Hash Key
Message key
Navigation Keys
Overview
14
Part of the Phone

Overview
15
You can rotate LCD clockwise an angle of 90 degrees and counter-clockwise an angle of 180 degrees. However, if you turn it by force,it can cause serious damage.

Overview
16
Part of the Phone
Outside of the Phone
Battery
SIM Card Socket
Battery Terminals
Battery Lock
Handstrap Hole
Cable Connector/
Battery Charging Connector/
Hands-Free Car kit Connector

Overview
17
Key Description
The following shows key components of the phone.
Keypad Description
Key Description
Soft Left Key / Soft Right Key
< > Each of these keys performs the function indicated by the text on the display immediately above it.Vibration key
You can activate the vibration directly by holding downthis key.Message key
You can go to Message menu (Inbox, Memory status,Scheduler or Alarm) directly.Navigation Keys
Used to scroll through name, phone numbers, menusor setting options. When you press down key, you canview Favorites menu list.WAP Hot key (=Confirm key)
If you press this key for a while, you can connect toWAP directly.Send Key
SYou can dial a phone number and answer a call. Ifyou press this key without entering a number, yourphone shows the most recently dialled, received andmissed numbers.Numeric Keys
0These keys are used mainly to dial in standby mode and enter numbers or characters in editing mode. When you press these keys for a long time.
9 • Used to call your voicemail box by 1.• Used to call for international call by 0.• Used to call Speed dials by from 2 to 9.END/PWR Key
E Used to end or reject a call. This key is also used asPower Key by pressing this key for a few seconds.

Overview
18
Key Description
Key Description
Up/Down Side Key
On closing a flip, when you press this key sequently,time, date, my display, and greeting note isdisplayed respectively. If you press this key once,time is displayed. It will show up depending onsetting “Show time”.Camera key
This key is used to take a picture and save it.
Key Description
C
You can delete the characters, go back the menu. In addition, you can view voice memo list when youpress this key shortly in a standby mode. If youpress a key for a long time, you can record thevoice.
* If you press this key for a long time, you can activatevoice recognition.
Side of the Key

Overview
19
Letter Keys
Each key can be used for several symbols. There are shown below.
Key Description
1 . , / ? ! - : ' " 1
2 A B C 2 Ä À Á Â Ã Å Æ Ç a b c ä à á â ã å ç
3 D E F 3 Ë È É Ê d e f ë è é ê
4 G H I 4 Ï Ì Í Î ˝ g h i ï ì í î ©
5 J K L 5 j k l
6 M N O 6 Ñ Ö Ø Ò Ó Ô Õ Œ m n o ñ ö ø ò ó ô õ œ
7 P Q R S 7 ß ™ p q r s ß ∫
8 T U V 8 Ü Ù Ú Û t u v ü ù ú û
9 W X Y Z 9 w x y z
0 [space] 0
Disp
lay In
fo
rm
atio
n
20
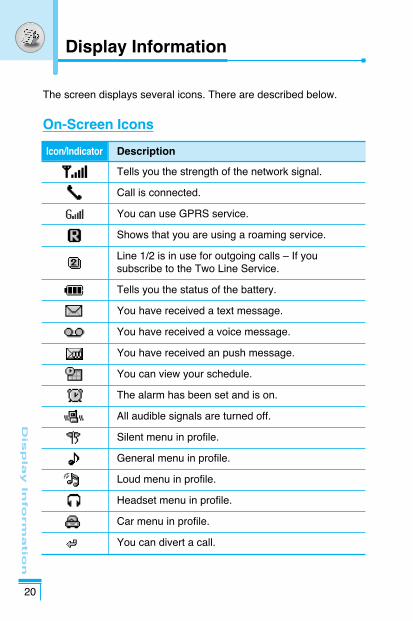
Display Information
The screen displays several icons. There are described below.
On-Screen Icons
Icon/Indicator Description
Tells you the strength of the network signal.
Call is connected.
You can use GPRS service.
Shows that you are using a roaming service.
Line 1/2 is in use for outgoing calls – If yousubscribe to the Two Line Service.
Tells you the status of the battery.
You have received a text message.
You have received a voice message.
You have received an push message.
You can view your schedule.
The alarm has been set and is on.
All audible signals are turned off.
Silent menu in profile.
General menu in profile.
Loud menu in profile.
Headset menu in profile.
Car menu in profile.
You can divert a call.

Gettin
g S
tarted
21
Installation
1. Inserting the SIM Card
Locate the SIM card socket in the backof the phone. Follow the steps below toinstall the SIM card.1. Remove the battery if attached.2. Slide the SIM card into the slot,
under the silvery holders, with thegolden connectors facing down andthe cut corner to the right.
2. Removing the SIM Card
Follow the steps below to Remove theSIM card.1. Remove the battery if attached.2. Take out the SIM card from the slot.
Notice
• Removing the battery from the phone whilst it isswitched on may cause it to malfunction.
• The metal contact of the SIM card can be easilydamaged by scratches. Pay special attention to the SIMcard when you handle and install. Follow theinstructions supplied with the SIM card.

Gettin
g S
tarted
22
Installation
3. Installing the Battery
1. Position the lugs on the bottom ofthe battery into the retaining holder.
2. Then push to the half of the batteryinto position.
4. Charging the Battery
To connect the travel adapter to the phone, you must have installedthe battery.
1. With the arrow facing you as shownin the diagram push the plug on thebattery adapter into the socket onthe bottom of the phone until itclicks into place.
2. Connect the other end of the traveladapter to the mains socket.Use only the included packingcharger.

Gettin
g S
tarted
23
5. Disconnecting the charger
Disconnect the travel adapter from thephone by pressing its side buttons asshown in the diagram.
Warning
• Do not force the connector as this may damage thephone and/or the travel adapter.
Note
• Ensure the battery is fully charged before using thephone.
• Do not remove your battery or the SIM card whilecharging.
• The moving bars of battery icon will stop aftercharging is complete.
Note
If the battery does not charge,• switch the phone off.• ensure the battery is correctly fit.

Making and Answering Calls
Gettin
g S
tarted
24
Making a call
1. Key in phone number including the area code. If you want todelete number, press C.
2. Press S to call the number.3. Press E to end the call.
International Calls
1. Press and hold the 0 key for the international prefix. “+” character may replace with the international access code.
2. Enter the country code, area code, and the phone number.3. Press S.
Making a call using the Phonebook
1. In standby mode, press > [Names].2. When the menu is displayed, you select Search by pressing <.3. If you find out the desired item through searching by a name or a
number, press S to call.
Ad
ditio
nal F
un
ctio
ns
25
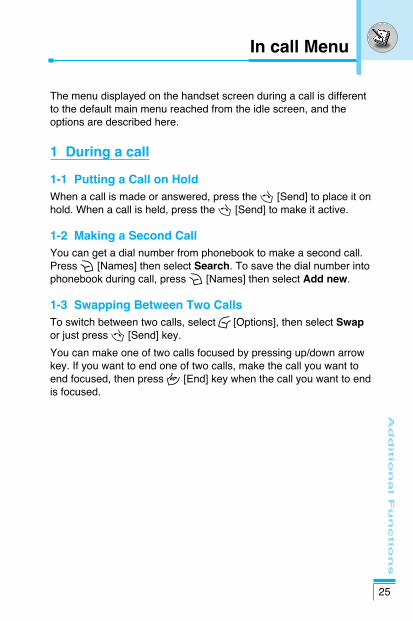
In call Menu
The menu displayed on the handset screen during a call is differentto the default main menu reached from the idle screen, and theoptions are described here.
1 During a call
1-1 Putting a Call on Hold
When a call is made or answered, press the S [Send] to place it onhold. When a call is held, press the S [Send] to make it active.
1-2 Making a Second Call
You can get a dial number from phonebook to make a second call. Press > [Names] then select Search. To save the dial number intophonebook during call, press > [Names] then select Add new.
1-3 Swapping Between Two Calls
To switch between two calls, select < [Options], then select Swap
or just press S [Send] key.You can make one of two calls focused by pressing up/down arrowkey. If you want to end one of two calls, make the call you want toend focused, then press E [End] key when the call you want to endis focused.

Ad
ditio
nal F
un
ctio
ns
26
In call Menu
1-4 Answering an Incoming Call
To answer an incoming call when the handset is ringing, simplypress the S [Send] key.The handset is also able to warn you of an incoming call while youare already in a call. A tone sounds in the earpiece, and the displaywill show that a second call is waiting. This feature, known as CallWaiting, is only available if your network supports it. For details ofhow to activate and deactivate it see Call waiting [Menu 4-4-4].If Call Waiting is on, you can put the first call on hold and answerthe second, by pressing S [Send] or by selecting < [Answer],then Hold & Answer.You can end the current call and answer the waiting call byselecting < [Menu], then End & Answer.
1-5 Rejecting an Incoming Call
When not in a call you can reject an incoming call without answeringit by simply pressing the E [End] or for a long time when the flipis closed.When in a call you can reject an incoming call by pressing the <[Menu] key and selecting Multiparty/Reject or by pressing E [End]key.
1-6 Muting the Microphone
You can mute the microphone during a call by pressing the <[Options] key then selecting Mute. The handset can be unmuted bypressing the < [Unmute].When the handset is muted, the caller cannot hear you, but you canstill hear them.

Ad
ditio
nal F
un
ctio
ns
27
1-7 Switching DTMF Tones on During a Call
To turn DTMF tones on during a call, for example, to allow yourhandset to make use of an automated switchboard, select <[Options], then DTMF On. DTMF tones can be turned off the sameway.
1-8 Calling up Messages and SIM Tool kit main menu
The Messages and SIM Tool kit main menu options can be reachedfrom the in-call menu by selecting < [Options]. SIM Tool kit menuis shown only when SIM in the handset supports SIM Tool kitservice.
2 Multiparty or Conference Calls
The multiparty or conference service provides you with the ability tohave a simultaneous conversation with more than one caller, if yournetwork service provider supports this feature.A multiparty call can only be set up when you have one active calland one call on hold, both calls having been answered. Once amultiparty call is set up, calls may be added, disconnected orseparated (that is, removed from the multiparty call but stillconnected to you) by the person who set up the multiparty call.The maximum callers in a multiparty call is five. Once started, youare in control of the multiparty call, and only you can add calls to themultiparty call.

In call Menu
Ad
ditio
nal F
un
ctio
ns
28
2-1 Making a Second Call
You can make a second call while you are already in a call. To dothis, enter the second number and press S [Send]. When you getsecond call the first call is automatically put on hold. You can swapbetween calls by selecting < [Options] then Swap.
2-2 Setting up a Multiparty Call
You can connect a call on hold to the currently active call to form amultiparty call by selecting < [Options] then Multiparty/Join all.
2-3 Putting the Multiparty Call on Hold
To put a multiparty call on hold, select < [Options] thenMultiparty/Hold all.
2-4 Activate the Multiparty Call on Hold
To make a multiparty call on hold active, select < [Options] thenMultiparty/Join all.
2-5 Adding Calls to the Multiparty Call
To join an active call to the held multiparty call, select < [Options]then Multiparty/Join all.
2-6 Displaying Callers in a Multiparty Call
To scroll though the numbers of the callers who make up amultiparty call on the handset screen, press D and U keys.

Ad
ditio
nal F
un
ctio
ns
29
2-7 Putting a Member of a Multiparty Call on Hold
To place one selected caller (whose number is currently displayedon-screen) of a multiparty call on hold, select < [Options] thenMultiparty/Exclude.
2-8 A Private Call in a Multiparty Call
To have a private call with one caller of a multiparty call, display thenumber of the caller you wish to talk to on the screen, then select< [Options] and Multiparty/Private to put all the other callers onhold.
2-9 Ending a Multiparty Call
The currently displayed caller of a multiparty call can bedisconnected by pressing the E [End] key. To end a multipartycall, press < [Options] then select Multiparty/End multiparty.Selecting < [Options] then Multiparty/End all, will end all theactive and held calls.

Ad
ditio
nal F
un
ctio
ns
30
Access Codes
You can use the access codes described in this section to avoidunauthorized use of your phone. The access codes (except PUKand PUK2 codes) can be changed by using [Menu 4-5-5].
PIN code (4 to 8 digits)
The PIN (Personal Identification Number) code protects your SIMcard against unauthorized use. The PIN code is usually suppliedwith the SIM card. When PIN code is set On, your phone willrequest the PIN code every time it is switched on. On the contrary,when PIN code is set Off, your phone connects to the networkdirectly without the request PIN code.
PIN2 code (4 to 8 digits)
The PIN2 code, supplied with some SIM cards, is required toaccess some functions such as Advice of call charge, Fixed Dialnumber. These functions are only available if supported by your SIMcard.
PUK code (4 to 8 digits)
The PUK (PIN Unblocking Key) code is required to change ablocked PIN code. The PUK code may be supplied with the SIMcard. If not, contact your local service provider for the code. If youlose the code, also contact your service provider.
PUK2 code (4 to 8 digits)
The PUK2 code, supplied with some SIM cards, is required tochange a blocked PIN2 code. If you lose the code, also contact yourservice provider.
Security code (4 to 8 digits)
The security code protects the unauthorized use of your phone. It isusually supplied with the phone. This code is required to delete allphone entries and to activate “Reset settings” menu. The defaultnumber is “0000”.

Accessin
g th
e M
en
u
31
Menu Tree
1 Messages
1 Write short message2 Write multimedia message3 Inbox4 Outbox5 Voice mail6 Info service7 Templates8 Settings
2 Call register
1 Missed calls2 Received calls3 Dialled calls4 Delete recent calls5 Call charges6 GPRS information
3 Profiles
1 Vibrate only2 Quiet3 General4 Loud
5 Headset6 Car
4 Camera
1 Take picture2 Take in modes3 Take continuously4 My album5 Settings
5 Settings
1 Alarm clock2 Date & Time3 Phone settings4 Call settings5 Security settings6 Network settings7 Reset settings
6 Organiser
1 Scheduler2 Phonebook

Accessin
g th
e M
en
u
32
Menu Tree
7 Fun & Tools
1 Games2 Calculator3 My folder4 Melody composer5 Unit converter6 World time7 Voice recorder8 Activate IrDA
8 Internet
1 Home2 Bookmarks3 Push messages4 Profiles5 Go to URL6 Cache settings7 Security certification8 Reset profiles9 Browser version
9 Java
1 Applications2 Download3 Memory status
10 Favorites
11 SIM Service
This menu depends on SIMand the network services.

Accessin
g th
e M
en
u
33
Messages [Menu 1]
This menu includes functions related to SMS (Short MessageService), MMS (Multimedia Message Service),voice mail, as well asthe network’s service messages.
Write short message [Menu 1-1]
You can write and edit text message, checking the number ofmessage pages.1. Enter the Messages menu by pressing < [Select].2. If you want to write a new message, select Write short
message.3. To make text input easier, use T9. For details, see How to use
T9 (Page 38).4. Press [Insert] to attach the followings.5. If you want to set option for your text, or to finish your writing,
press < [Options].
Note
• The phone which supports EMS release 5 is availableto send colour pictures, sounds, text styles, etc.. Theother party may not receive pictures, sounds or textstyles you sent properly if the phone does not supportsuch options.

Accessin
g th
e M
en
u
34
Messages [Menu 1]
Insert
• Symbol
You can add special characters.
• Picture
You can insert the Default pictures or pictures in My folder thatare available for short messages.
• Sound
You can insert sounds that are available for short messages.
• Text templates
You can use Text templates already set in the phone.
• Phonebook
You can add phone numbers or e-mail addresses in Phonebook.
• Business card
You can add your contact information to the message.

Accessin
g th
e M
en
u
35
Options
• Send
Sends text messages.1. Enter numbers of recipient.2. Press D key to add more recipients.3. You can add phone numbers in the phone book.4. Press < after entering numbers.
• Save
Stores messages in Outbox.
• Font
You can select Size and Style of fonts.
• Colour
You can select Colour of foreground and background.
• Alignment
You can make the message contents aligned Right, Centre orLeft.
• Add T9 dictionary
You can add your own word. This menu can be shown only whenedit mode is Predictive (T9Abc/T9abc/T9ABC).
• T9 language
Select a T9 input mode.
• Exit
If you press Exit while writing a message, you can end the writingmessage and back to the Message menu. The message you havewritten is not saved.

Messages [Menu 1]
Accessin
g th
e M
en
u
36
Write multimedia message [Menu 1-2]
You can write and edit multimedia messages, checking messagesize.1. Enter the Messages menu by pressing < [Select].2. If you want to write a new message, select Write multimedia
message.3. You can create a new message or choose one of the multimedia
message templates already made.4. Press Insert to add Symbol, Photo, Picture, Sound, Text
template, Phonebook or Business card.
Options
• Preview
You can preview multimedia messages you wrote.
• Send
You can send multimedia messages to multiple recipients,prioritise your message, and make it sent later as well.
• Save
You can save multimedia messages in the outbox or as templates.
• Add slide
You can add a slide before or after current slide.
• Move to slide
You can move to previous or next slide.
• Delete slide
You can delete current slides.

Accessin
g th
e M
en
u
37
• Set slide format
- Set timer
You can set timer for slide, text, picture and sound.
- Swap picture and text
You can switch the position of picture and text of the message.
• Remove media
You can remove pictures or sounds in the slide. This option can beshown only when any media exists.
• Add T9 dictionary
You can add your own word. This menu can be shown only whenedit mode is Predictive (T9Abc/T9abc/T9ABC).
• T9 language
Select a T9 input mode.
• Exit
You can back to the Message menu.
Note
• If you select the picture (15K) on writing multimediamessage, loading duration will take around 15seconds at least. Furthermore, you can't activate anykey during loading time. After 15 seconds, it isavailable to write multimedia message.
Accessin
g th
e M
en
u
38
Messages [Menu 1]
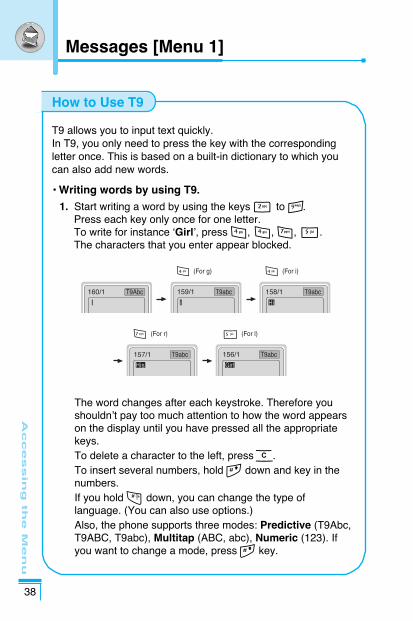
T9 allows you to input text quickly. In T9, you only need to press the key with the correspondingletter once. This is based on a built-in dictionary to which youcan also add new words.
• Writing words by using T9.
1. Start writing a word by using the keys 2 to 9. Press each key only once for one letter.To write for instance ‘Girl’, press 4, 4, 7, 5.The characters that you enter appear blocked.
The word changes after each keystroke. Therefore youshouldn’t pay too much attention to how the word appearson the display until you have pressed all the appropriatekeys.To delete a character to the left, press C.To insert several numbers, hold # down and key in thenumbers.If you hold * down, you can change the type oflanguage. (You can also use options.)Also, the phone supports three modes: Predictive (T9Abc,T9ABC, T9abc), Multitap (ABC, abc), Numeric (123). Ifyou want to change a mode, press # key.
How to Use T9

Accessin
g th
e M
en
u
39
Alternatively : Press * key and select insert symbols.Select the desired character and pressselect.
2. When you have finished writing a word, check whether theword is correct.If the word is correct : Press 0 and write the next word. If the word is not correct : Search by U , D (Previous and
Next word).Alternatively : If there is no word you want you can add your
own word. Press < [Options] in the Predictive editmode. Select Add T9 dictionary Menu. Youcan see the following.
3. To insert a punctuation mark, press 1 repeatedly until thedesired mark appears.
LGGSM
T9 languages
• You can select T9 Languages by selecting Menu.In T9 mode, you can also select T9 Off menu.(Default is T9 On)
Input
your word
➮

Accessin
g th
e M
en
u
40
Messages [Menu 1]
Icon directive
[ ] Multimedia message[ ] Short message[ ] SIM message[ ] Read[ ] Notified multimedia message
Inbox [Menu 1-3]
You will be alerted when you have received messages. They will bestored in Inbox.In Inbox, you can identify each message by icons. For detail, seethe icon directive.
If the phone shows ‘No space for SIM message’, you have to deleteonly SIM messages from Inbox. If the phone displays ‘No space formessage’, you can make space of each repository as deletingmessages, media and applications.
❇ SIM message
SIM message means the message exceptionally stored in SIM card.You can move this message to the phone.
For notified multimedia message, you have to wait for downloadingand processing of the message. For notification setting, see [Menu1-8-2] for detail.
To read a message, select one of the messages by pressing <.
Reply
You can reply to the sender.

Accessin
g th
e M
en
u
41
Forward
You can forward the selected message to another party.
Return call
You can call back to the sender.
Delete
You can delete the current message.
Extract
You can extract picture, sound and text. They will be saved in Myfolder or Phonebook.
View information
You can view information about received messages; Sender'saddress, Subject (only for Multimedia message), Message date &time, Message type, Message size.
Replay (applicable to Multimedia message only)
You can replay multimedia messages.
❇ Receive (In the case of notification message)
If Multimedia message is set to Auto download off, you can getonly Notification. To receive a message, you need to select[Receive].
Outbox [Menu 1-4]
You can see sent and unsent messages here. For sent message,you can see the delivery status. The browsing is same as that for the inbox message.

Accessin
g th
e M
en
u
42
Icon directive
[ ] Sent[ ] Unsent [ ] Delivery confirmed
Messages [Menu 1]
❇ When you already sent the message:
Forward
You can forward the current message to other recipients.
Delete
You can delete the current message.
View information
You can view information about outbox messages; Recipient’saddress, Subject (only for Multimedia message), Message date &time, Message type, Message size.
❇ When you didn't send the message:
Edit
You can edit the messaage.
Send
You can send the message.
Delete
You can delete the current message.
View information
You can view information about outbox messages.

Accessin
g th
e M
en
u
43
Voice mail [Menu 1-5]
Listen to voice mail [Menu 1-5-1]
You can listen to voice mail.
Voice mail centre [Menu 1-5-2]
You can receive the voicemail if this feature is supported by yournetwork service provider. When a new voicemail is arrived, thesymbol will be displayed on the screen. Please check with yournetwork service provider for details of their service in order toconfigure the phone accordingly.1. Hold down 1 key in standby mode.2. You can check the following submenus.
• Home
You can listen to voice mails by selecting Home.
• Roaming
Even when you are in abroad, you can listen to voice mails ifroaming service is supported.
Info service [Menu 1-6]
(Dependent to network and subscription)
Info service messages are text messages delivered by the networkto GSM. They provide general information such as weather reports,traffic news, taxis, pharmacies, and stock prices. Each type ofinformation has the number; therefore, you can contact serviceprovider as long as you have input the certain number for theinformation. When you have received an info service message, youcan see the popup message to show you that you have received amessage or the info service message is directly displayed. To viewthe message again or not in standby mode, follow the sequenceshown below;

Accessin
g th
e M
en
u
44
Messages [Menu 1]
Read [Menu 1-6-1]
1. When you have received an info service message and selectRead to view the message,it will be displayed on the screen. Youcan read another message by scrolling L , R or < [Next].
2. The message will be shown until another message is reached.
Receive [Menu 1-6-2]
• Yes
If you select this menu, your phone will receive Info servicemessages.
• No
If you select this menu, your phone will not receive Info servicemessages any more.
Alert [Menu 1-6-3]
• Yes
Your phone will beep when you have received Info servicemessage numbers.
• No
Your phone will not beep even though you have received infoservice messages.
Languages [Menu 1-6-4]
You can select the language you want by pressing [On/Off]. Then,the info service message will be shown in the language that youselected.

Accessin
g th
e M
en
u
45
Topics (Dependent to network and subscription)
[Menu 1-6-5]
• Add new
You can add Info service message numbers in the Phone memorywith its nickname.
• View list
You can see Info service message numbers which you added. Ifyou press < [Options], you can edit and delete info messagecategory which you added.
• Active list
You can select Info service message numbers in the active list. If you activate an info service number, you can receive messagessent from the number.
Templates [Menu 1-7]
Text [Menu 1-7-1]
You have 11 text templates. You can change the predefinedtemplates into your favorite ones or fill the <empty>s.
Multimedia [Menu 1-7-2]
You can use the following options.Edit : You can edit multimedia templates.Add new : Allows you to add new multimedia templates.Write message : You can write multimedia messages using
multimedia templates.Delete : You can delete multimedia templates.

Accessin
g th
e M
en
u
46
Messages [Menu 1]
Business card [Menu1-7-3]
You can make your business card. Key in Name, Phone number,Fax number and Email.
Settings [Menu 1-8]
Short message [Menu 1-8-1]
• Message types
Text, Voice, Fax, Natl. paging, X.400, E-mail, ERMES
Usually, the type of message is set to Text. You can convert yourtext into alternative formats. Contact your service provider for theavailability of this function.
• Validity period
This network service allows you to set how long your textmessages will be stored at the message centre.
• Delivery report
If you set to Yes, you can check whether your message is sentsuccessfully.
• Reply via same service centre
When a message is sent, it allows the recipients to reply andcharge the cost of the reply to your telephone bill.
• SMS centre
If you want to send the text message, you can receive the addressof SMS centre through this menu.

Accessin
g th
e M
en
u
47
Multimedia message [Menu 1-8-2]
• Validity period
This network service allows you to set how long your textmessages will be stored at the message centre.
• Delivery report
If it is set to Yes in this menu, you can check whether yourmessage is sent successfully.
• Auto download
If you select On, you receive multimedia messages automatically.If you select Off, you receive only notification message in theinbox and then you can check this notification.
• Network settings
If you select multimedia message server, you can set URL formultimedia message server.
• Permitted message types
Personal : Persornal message.Advertisements : Commercial message.Information : Necessary information.
Memory status [Menu 1-8-3]
You can check free space and memory usage of each repository,SIM memory. You can go to each repository menu.

Accessin
g th
e M
en
u
48
Missed calls [Menu 2-1]
This menu shows recently missed numbers. You can call thesenumbers, save and view the date and the time.
Received calls [Menu 2-2]
This menu shows recently received numbers. You can call thesenumbers, save and view the date and the time.
Dialled calls [Menu 2-3]
This menu shows recently dialed numbers. You can call thesenumbers, save and view the date and the time.
Delete recent calls [Menu 2-4]
You can delete recent calls of Missed calls, Received calls,
Dialled calls or All calls.
Call charges [Menu 2-5]
Within these submenus, you can view the duration and the call costof your calls.
Call register [Menu 2]

Accessin
g th
e M
en
u
49
Call duration [Menu 2-5-1]
This function allows you to view the duration of your Last Call, AllCalls, Received calls and Dialled calls in hours, minutes andseconds. You can also reset the call timers.1. Press < [Menu] in standby mode.2. Press 2 for direct access or use L and R to enter Call
register, then select Call charges.3. Scroll to highlight Call duration and Press < [Select].
The following 5 submenus: Last call, All calls, Received calls,
Dialled calls and Reset all.
Call costs [Menu 2-5-2]
This function allows you to check the cost of your last call, all calls,remaining and reset the cost. To reset the cost, you need the PIN2code.1. Press < [Menu] in standby mode.2. Press 2 for direct access or use L and R to enter Call
register, then select Call charges.3. Scroll to highlight Call costs and Press < [Select].
The following 4 submenus: Last call, All calls, Remaining andReset all.
Note
• The actual cost invoiced for calls by your serviceprovider may vary, depending upon network features,rounding-off for billing, tax, and etc.

Accessin
g th
e M
en
u
50
Settings [Menu 2-5-3] [SIM Dependent]
• Set tariff
You can set the currency type and the unit price. Contact yourservice providers to obtain charging unit prices. To select thecurrency or unit in this menu, you need the PIN2 code. If you want to input @, £, $ symbol, clear all currency strings andthen press * key. If you want to change symbol, press * keyagain.
• Set credit
This network service allows you to limit the cost of your calls byselected charging units. If you select Read, the number ofremaining unit is shown. If you select Change, you can changeyour charge limit.
• Auto display
This network service allows you to see automatically the cost ofyour last calls. If set to On, you can see the last cost when the callis released.
Call register [Menu 2]
Note
• When all units have been used, no calls can be madeexcept emergency calls. Depending on the SIM card,you need the PIN2 code to set a call cost limit.

Accessin
g th
e M
en
u
51
GPRS information [Menu 2-6]
You can check the amount of data transferred over the networkthrough GPRS. In addition, you can view how much time you areonline.
Call duration [Menu 2-6-1]
You can check the duration of Last call and All calls. You can alsoreset the call timers.
Data volumes [Menu 2-6-2]
You can check the Sent, Received or All data volumes and resetall.

Accessin
g th
e M
en
u
52
In this menu, you can adjust and customize the phone tones fordifferent events and environments.1. Press < [Menu] in standby mode.2. Press 3 for direct access or use L and R.3. You can also enter this menu directly by pressing L key in
standby mode.4. When you press side key for a long time with closing the flip, you
can use Profile menu.
Vibrate only [Menu 3-1]
You can adjust the profile as Vibrate only if you need vibrationmode. In the mode, all kinds of alert are Vibrate or Silent.
Quiet [Menu 3-2]
You can adjust the profile as Quiet if you are in quiet place.
General [Menu 3-3]
You can adjust the profile as General.
Loud [Menu 3-4]
You can adjust the profile as Loud if you are in a noisyenvironment.
Headset [Menu 3-5]
You can adjust the profile as Headset when you put on a headset.
Car [Menu 3-6]
You can adjust the profile as Car when you activate Handsfree kit.
Profiles [Menu 3]

Accessin
g th
e M
en
u
53
Activate [Menu 3-x-1]
Activates the selected Profile.
Personalise [Menu 3-x-2]
Each has the submenus as shown below except for Vibrate only.
Call alert type
Allows to select alert type such as Ring, Vibrate, etc. for theincoming for adjusting environment.
Ring tone
Allows to set the ring tone for adjusting environment.
Ring volume
Allows to set the ring volume for adjusting environment. The volumeof Power on / off sound and all the alert sounds set according toRing volume.
Message alert type
Allows to alert when receiving a message for adjusting environment.
Message tone
Allows to select the alert tone for message reception.
Keypad volume
Allows to set the keypad volume for adjusting environment.
Note
• Headset and Car profiles can be activated only whenHandsfree kit or Ear microphone put on the handset.However, their properties can be personalised.

Accessin
g th
e M
en
u
54
Keypad tone
Allows to select the keypad tone for adjusting environment.
Flip tone
Allows to set the flip tone for adjusting environment.
Effect sound volume
Allows to set the effect sound volume for adjusting environment.
Power on/off volume
Allows to set the power on/off volume for adjusting environment
Auto answer
This function will be activated only when your phone is connected tothe headset or handsfree kit.• Off : The phone will not answer automatically.• After 5 secs : After 5 seconds, the phone will answer
automatically.• After 10 secs : After 10 seconds, the phone will answer
automatically.
Rename [Menu 3-x-3]
You can change the default profile name except of Vibrate only,Headset, and Car menus.
Profiles [Menu 3]
Note
• If you set the Handsfree kit to the phone, you can’tuse the vibrate mode related with Call alert type orMessage alert menu. In car menu, the followingsubmenus are available;- Call alert type : Ring, Silent- Message alert type : Ring once, Ring periodically,
Silent

Accessin
g th
e M
en
u
55
Camera [Menu 4]
With the camera you can take pictures of people and events whileon the move.
Take picture [Menu 4-1]
1. Select Camera, and then press O. If you want to reach thismenu directly, press Q for a long time.
2. Focus on the subject to capture the image, and then press Oor Q.
3. If you want to save it, press O or Q.
Reference!
• Settings window
You can control the image size, flash, brightness,colour, rotating and zooming by pressing side up keyor L or R.- Resolution : VGA 640*480, QVGA 320*240, QQVGA
160*120, PB : 48*48 , Flash: On, Off- Rotating : Rotate an image 90 degrees
counterclockwise.- Image quality : High, Normal, and Low- Zooming : x1, x2, x4. The default value is x1.- Brightness : –2, –1, Standard, +1, +2.- Colour : True colour, Sepia, Black/ White.

Activating a key
- L R : Move the item which you set. - O : Take and save a picture.- > : Go back to the previous menu or exit from camera
mode.- : In application setting, you can change the default value. You
can also rotate the image by an angle of 90 degrees.- : Move the item which you set.- Q : Take and save a picture
Take in modes [Menu 4-2]
You can take a picture on the various of backgrounds. Furthermore,you can select a frame by pressing U , D.
Take continuously [Menu 4-3]
You can take the maximum of 9 pictures subsequently at the sametime. After taking a picture, you can view it by pressing U , D.You can also save it by pressing O.
Camera [Menu 4]
Accessin
g th
e M
en
u
56
Reference!
• In this mode, you can't change the settings ofresolution.
Reference!
• If you set 640x480 in resolution, you can take only 3pictures. In case of 320x240, it is availabel to 6pictures.

Accessin
g th
e M
en
u
57
My album [Menu 4-4]
You can view and send a picture. In addition, you can set thewindow as a background.
All pictures [Menu 4-4-1]
You can view the maximum of 9 pictures in order.
General pictures [Menu 4-4-2]
You can view all pictures except of frame and phone book ones.
Mode pictures [Menu 4-4-3]
You can view all frame pictures.
Phonebook pictures [Menu 4-4-4]
You can view all phonebook pictures.
• Option
- Multi view : You can view the maximum of 9 thumbnailsin a screen.
- Write multimedia : You can send a picture thru MMS.messages
- Set as wallpaper : You can set a picture as a wallpaper.- Delete : You can delete a picture.- Edit title : You can edit the title of picture.
Settings [Menu 4-5]
Memory status [Menu 4-5-1]
You can check the capacity of total, used, and free memory.
Clear album [Menu 4-5-2]
You can delete all pictures which saved in a memory.

Accessin
g th
e M
en
u
58
You can set the following menus for your convenience andpreferences.1. Press < [Menu] in standby mode.2. Press 5 for direct access to enter Settings.
Alarm clock [Menu 5-1]
You can set up to 5 alarm clocks to go off at a specified time.1. Select On and enter the alarm time you want.2. Select the repeat period : Once, Mon~Fri, Mon~Sat, Everyday.3. Select the alarm tone you want and press < [OK].4. Edit the alarm name and press < [OK].5. If you set Alarm clock to Power off alarm the alarm goes off at
a specified time even though the phone is switched off.
Date & Time [Menu 5-2]
You can set functions relating to the date and time.
Set date [Menu 5-2-1]
You can enter the current date.
Date format [Menu 5-2-2]
You can set the Date format such as DD/MM/YYYY, MM/DD/YYYY,YYYY/MM/DD. (D: Day / M: Month / Y: Year)
Set time [Menu 5-2-3]
You can enter the current time.
Time format [Menu 5-2-4]
Your can set the time format between 24-hour and 12-hour.
Settings [Menu 5]

Accessin
g th
e M
en
u
59
Phone settings [Menu 5-3]
You can set functions relating to the phone.
Display settings [Menu 5-3-1]
• Wallpaper
You can select the background pictures in standby mode.
- Default
You can select a picture or an animation of wallpaper bypressing L or R.
- My folder
You can select a picture or an animation as wallpaper.
• Incoming calls
You can set the animation as getting a call.
• Outgoing calls
You can set the animation as making a call.
• Greeting note
If you select On, you can edit the text which is displayed instandby mode.
• Backlight
You can set the light-up duration of the internal display.
• LCD contrast
You can set the brightness of LCD by pressing L , R.
• Information window
You can preview the current state of the selected menu beforeopen the menu. The state is shown at bottom of the display.

Accessin
g th
e M
en
u
60
• Menu colour
You can select the preferred menu colour among variouscombination.
Sub LCD [Menu 5-3-2]
- My display : You can set the animation when you press side key.- Show time : You can set the duration when you scroll sub LCD. - Brightness : You can set the brightness when you scroll sub
LCD.- Font colour : You can set the font colour which is displayed on
sub LCD.
Language [Menu 5-3-3]
You can change the language for the display texts in your phone.This change will also affect the Language Input mode.
Call settings [Menu 5-4]
You can set the menu relevant to a call by pressing < [Select] inthe Setting menu.
Call divert [Menu 5-4-1]
The Call divert service allows you to divert incoming voice calls, faxcalls, and data calls to another number. For details, contact yourservice provider.
• All voice calls
Diverts voice calls unconditionally.
• If busy
Diverts voice calls when the phone is in use.
• If no reply
Diverts voice calls which you do not answer.
Settings [Menu 5]

Accessin
g th
e M
en
u
61
• If out of reach
Diverts voice calls when the phone is switched off or out ofcoverage.
• All data calls
Diverts to a number with a PC connection unconditionally.
• All fax calls
Diverts to a number with a fax connection unconditionally.
• Cancel all
Cancels all call divert service.
• The submenus
Call divert menus have the submenus shown below.
- Activate
Activate the corresponding service.
To voice mail centre
Forwards to message centre. This function is not shown at Alldata calls and All fax calls menus.
To other number
Inputs the number for diverting.
To favourite number
You can check recent 5 diverted numbers.
- Cancel
Deactivate the corresponding service.
- View status
View the status of the corresponding service.

Accessin
g th
e M
en
u
62
Answer mode [Menu 5-4-2]
• Flip open
If you select this menu, you can receive an incoming call by onlyopening the flip.
• Press any key
If you select this menu, you can receive a call by pressing any keyexcept E [End] key.
• Send only
If you select this menu, you can receive a call by only pressing S [Send] key.
Send my number [Menu 5-4-3]
(network and subscription dependent)
• On
You can send your phone number to another party. Your phonenumber will be shown on the receiver’s phone.
• Off
Your phone number will not be shown.
• Set by network
If you select this, you can send your phone number depending ontwo line service such as line 1 or line 2.
Settings [Menu 5]

Accessin
g th
e M
en
u
63
Call waiting [Menu 5-4-4]
(network dependent)
• Activate
If you select Activate, you can accept a waiting (receiving) call.
• Cancel
If you select Cancel, you cannot recognize the waiting (receiving)call.
• View status
Shows the status of Call waiting.
Minute minder [Menu 5-4-5]
If you select On, you can check the call duration by deep soundevery minute during a call.
Voice dial [Menu 5-4-6]
• Automatic : You can enter the voice dial mode whenever youopen the flip.
• Manual : You can enter the voice dial mode by holding down * key.
Auto redial [Menu 5-4-7]
• On
When this function is activated, the phone will automatically try toredial in the case of failure to connect a call.
• Off
Your phone will not make any attempts to redial when the originalcall has not connected.

Accessin
g th
e M
en
u
64
Select line [Menu 5-4-8]
This function is only used if Two Line Service is supported by theService Provider. If this function is supported by your serviceprovider, the following menu will be displayed.• Line 1
• Line 2
Closed User Group [Menu 5-4-9]
(network dependent)
Restricts usage of the phone with numbers that belong to certainuser groups. When this function is used, every outgoing call isassociated with a group index. If a group index is specified, it isused for all outgoing calls. If no group index is specified, thenetwork will use the preferential index (a specific index that is storedin the network).A. Default : Activate the default group agreed on with the network
operator.B. Set : Setting the selected CUG Index.C. Edit : Editing the CUG name and CUG Index.D. Delete : Deleting the selected CUG.E. Delete all : Deleting All CUG.
Settings [Menu 5]

Accessin
g th
e M
en
u
65
Security settings [Menu 5-5]
PIN code request [Menu 5-5-1]
In this menu, you can set the phone to ask for the PIN code of yourSIM card when the phone is switched on. If this function isactivated, you’ll be requested to enter the PIN code.1. Select PIN code request in the security settings menu, and then
press < [Select].2. Set On/Off.
3. If you want to change the setting, you need to enter PIN codewhen you switch on the phone.
4. If you enter wrong PIN code more than 3 times, the phone willlock out. If the PIN is blocked, you will need to key in PUK code.
5. You can enter your PUK code up to 10 times. If you put wrongPUK code more than 10 times, you can not unlock your phone.You will need to contact your service provider.
Phone lock [Menu 5-5-2]
You can use security code to avoid unauthorized use of the phone.Whenever you switch on the phone, the phone will request securitycode if you set phone lock to On. If you set phone lock toAutomatic, your phone will request security code only when youchange your SIM card.

Accessin
g th
e M
en
u
66
Call barring [Menu 5-5-3]
The Call barring service prevents your phone from making orreceiving certain category of calls. This function requires the callbarring password. You can view the following submenus.
• All outgoing
The barring service for all outgoing calls.
• Outgoing international
The barring service for all outgoing international calls.
• Outgoing international except home country
The barring service for all international outgoing calls except homenetwork.
• All incoming
The barring service for all incoming calls
• Incoming when abroad
The barring service for all incoming calls when roaming
• Cancel all
You can cancel all barring services.
• Change password
You can change the password for Call Barring Service.
Each call barring menu has following submenus:
• Activate
Allows to request the network to set call restriction on.
• Cancel
Set the selected call restriction off.
Settings [Menu 5]

Accessin
g th
e M
en
u
67
• View status
View the status whether the calls are barred or not.
Fixed dial number [Menu 5-5-4] (SIM dependent)
You can restrict your outgoing calls to selected phone numbers. Thenumbers are protected by your PIN2 code.
• Activate
You can restrict your outgoing calls to selected phone numbers.
• Cancel
You can cancel fixed dialling function.
• Number list
You can view the number list saved as Fixed dial number.
Change codes [Menu 5-5-5]
PIN is an abbreviation of Personal Identification Number used toprevent use by only unauthorized person.You can change the access codes: PIN code, PIN2 code, Security
code.1. If you want to change the Security code/PIN/PIN2 code input
your original code, and then press < [OK].2. Input new Security code/PIN/PIN2 code and verify them.
Network settings [Menu 5-6]
You can select a network which will be registered eitherautomatically or manually. Usually, the network selection is set toAutomatic.

Accessin
g th
e M
en
u
68
Automatic [Menu 5-6-1]
If you select Automatic mode, the phone will automatically searchfor and select a network for you. Once you have selected“Automatic”, the phone will be set to “Automatic” even though thepower is off and on.
Manual [Menu 5-6-2]
The phone will find the list of available networks and show youthem. Then you can select the network which you want to use if thisnetwork has a roaming agreement with your home networkoperator. The phone let you select another network if the phone failsto access the selected network.
Preferred [Menu 5-6-3]
You can set a list of preferred networks and the phone attempts toregister with first, before attempting to register to any othernetworks. This list is set from the phone’s predefined list of knownnetworks.
Reset settings [Menu 5-7]
You can initialize all factory defaults. You need Security code toactivate this function.
Settings [Menu 5]

1 3
* #
U D
L R
Accessin
g th
e M
en
u
69
Scheduler [Menu 6-1]
When you enter this menu a Calendar will show up. On top of thescreen there are sections for date. Also on bottom of the screenthere are sections for icons (schedule, memo). Whenever youchange the date, the calendar will be updated according to the date.And square cursor will be used to locate the certain day. If you seeunder bar on the calendar, it means that there is a schedule ormemo that day. This function helps to remind you of your scheduleand memo. The phone will sound an alarm tone if you set this forthe note.To change the day, month, and year.
Key Description Key Description
Yearly
Monthly
Weekly
Daily
Note
• Your phone should be switched on to use this function.
Organiser [Menu 6]

Accessin
g th
e M
en
u
70
Add new [Menu 6-1-1]
You can edit maximum 39 characters (21 characters in Chinese)and take up to 20 notes.
• Schedule
Input the subject, the schedule time, the repeat, the alarm bypressing allowed keys.
• Memo
1. Select Add new by pressing < [Select].2. Press Memo.3. Input the memo and then press < [OK].
View [Menu 6-1-2]
Shows the note for the chosen day. Use U , D to browse throughthe note lists. If you set alarm for the note, Alarm watch is displayed.At that time, if you press < [Select], you can see the note in detail.Press < [Options] to delete, edit the note you selected.
View all [Menu 6-1-3]
Shows the notes that are set for all days. Use U , D to browsethrough the note lists. You can use the same menu as “View” bypressing < [Options].
Delete past [Menu 6-1-4]
You can delete the past schedule that has been already notifiedyou.
Delete all [Menu 6-1-5]
You can delete for the all note(s).
Organiser [Menu 6]

Phonebook [Menu 6-2]
1. To use Phonebook, press > [Names] in standby mode.2. To use Phonebook, press < [Menu] in standby mode and
select Organiser.
Search [Menu 6-2-1]
(Calling from phonebook)
1. In standby mode, press > [Names].2. Search by pressing < [Select].3. Enter the name whose phone numbers or e-mail address you
want to search or Select ‘List’ to view phonebook. 4. Instant searching is available by inputting the initial letter of the
name or number you want to search.5. If you want to edit, delete, copy an entry, or to add the voice to
one, select < [Options]. The following menu will be displayed.• Edit : You can edit the name, number, E-mail and fax
by pressing < [OK].• Write message : After you have found the number you want, you
can send a message to the selected number.• Copy : You can copy an entry from SIM to phone or
from phone to SIM.• Voice : You can add the voice to the entry or change
the voice tag.• Main number : You can select the one out of mobile, home,
office that you often use. The main number willbe displayed first, if you set this.
• Delete : You can delete an entry.
Accessin
g th
e M
en
u
71

Accessin
g th
e M
en
u
72
Add new [Menu 6-2-2]
You can add phonebook entry by using this function. Phone memory capacity is 200 entries. SIM card memory capacitydepends on the cellular service provider. You can also save 20 characters of name in The Phone memory,and save characters in the SIM card. The number of character isSIM dependent feature.1. Open the phonebook first by pressing > [Names] in standby
mode.2. Scroll to highlight Add new, and press < [Select].3. Select the memory you want to save: SIM or Phone. If set to
Phone, you need to select which number you want as Mainnumber.a. Press < [OK] to input a name.b. Press < [OK], then you can input a number.c. Press < [OK].d. You can set a group for the entry by pressing L , R:e. You can set a character and a picture for the entry by pressing
U , D , L , R.f. If you want to add the voice, press < [Yes].
You should speak words within 2 seconds, and the phone asks youto speak it again to ensure the accuracy of voice recognition. Aftervoice recognition has finished, Voice is attached successfully.
Organiser [Menu 6]
Note
• When you save text and picture in a phone book atthe same time, you can view a picture on anycondition.

Accessin
g th
e M
en
u
73
Caller Groups [Menu 6-2-3]
You can list up to 20 members per one group. There are 7 groupsyou can make lists to.1. In standby mode, press > [Names].2. Scroll to Caller groups item then press < [Select], and every
Group list will be displayed.3. Select Group name you want by pressing < [Select].
• Member list
Shows the group members you have selected.
• Group ring tone
Allows you to specify ring tone for the group members' call.
• Group icon
Allows you to select the icon dependent on Group.
• Add member
You can add group members. Each group member souldn’t beexceeded 20.
Note
• The voice can only be attached to the main numberwhich you set. For example, if you change the mainnumber, voice will be automatically attached to thechanged number. This means that you cannot attachvoice to mobile, office, home number simultaneously.
• You can add voice tag to phone number in SIM card.The voice tag can be erased if you remove or changeSIM card.

Accessin
g th
e M
en
u
74
• Remove member
You can remove the member from the Group member list. Butthe name and the number still remain in phonebook.
• Rename
You can change a group name.
Speed dials [Menu 6-2-4]
You can assign any of the keys, 2 to 9 with a Name list entry.You can call directly by pressing this key for 2-3 seconds. 1. Open the phonebook first by pressing > [Names] in standby
mode.2. Scroll to Speed dial, then press < [Select].3. If you want to add Speed dial, select (Empty). Then, you can
search the name in phonebook.4. Select allocated a name by speed dial, and choose Change or
Delete to edit the name.
• Change
You can allocate a new phone number to the dial key.
• Delete
You can remove the allocated phone number from the dial key.
Voice list [Menu 6-2-5]
You can see all phone numbers which contain voice. After selectingphone number by using U and D and press < [Options], youcan see the following submenus.• Play : You can play voice which is attached to phone number.• Change : You can change voice.• Delete : You can delete voice.• Call : You can call by selecting this menu.
Organiser [Menu 6]

Accessin
g th
e M
en
u
75
Settings [Menu 6-2-6]
1. Press > [Names] in standby mode.2. Scroll to Settings, then press < [Select].
• Set memory
Scroll to highlight Set memory, then press < [Select].- If you select Variable, when adding entry, the phone will ask
where to store.- If you select SIM or Phone, the phone will store an entry to
SIM or phone.
• Search by
Scroll to highlight Search by, then press < [Select].- If you select Variable, the phone will ask how to search.- If you select Name or Number, the phone will search an
entry by Name or Number.
• View options
Scroll to highlight View options, then press < [Select]- Name only : Set the phonebook list with displaying only
name.- With pictures : Set the phonebook list with the information of
character and picture.
Copy all [Menu 6-2-7]
You can copy/move entries from SIM card memory to Phonememory and vice versa.1. Open the Phonebook first by pressing > [Names] in standby
mode.2. Scroll to Copy all, then press < [Select] to enter this menu.
• SIM to Phone : You can copy the entry from SIM Card toPhone memory.
• Phone to SIM : You can copy the entry from Phone memoryto SIM Card.
3. You can see the following submenus.
• Keep original : When copying, Original Dial Number is kept.• Delete original : When copying, Original Dial Number will be
erased.
Delete all [Menu 6-2-8]
You can delete all entries in SIM, Phone, and Voice. This functionrequires Security code except for voice.1. Press > [Names] in standby mode and select Delete all, press
< [Select].2. Then select a memory to erase.3. Enter security code and Press < [OK] or > [Back].
Accessin
g th
e M
en
u
76
Organiser [Menu 6]

Information [Menu 6-2-9]
• Service dial number
Use this function to access a particular list of services provided byyour network operator (if supported by the SIM card).1. Open the phonebook first by pressing > [Names] in standby
mode and select Information.2. Scroll to Service dial number, then press < [Select] to enter.3. The names of the available services will be shown.4. Use U and D to select a service. Press S [Send].
• Memory status
This feature allows you to see how many free and in-use are inyour phonebook.1. Open the phonebook first by pressing > [Names] in standby
mode. Select Information by pressing < [Select].2. Scroll to Memory status, then press < [OK].
• Own number (SIM dependent)
You can check your own number in SIM card.
Accessin
g th
e M
en
u
77

Accessin
g th
e M
en
u
78
Games [Menu 7-1]
The phone offers you the games to play with.
Calculator [Menu 7-2]
This contains the standard functions such as +, –, x, ÷ : Addition,
Subtraction, Multiplication, and Division.1. Input the numbers by pressing numeric keys.2. Use a navigation key to select a sign for calculation.3. Then input the numbers.4. Press < [Result] to view the result.5. Press [Reset] or enter numbers to repeat the procedure above.6. Use C key to erase any numbers or signs.7. If you press * key, you can input a minus number. In addition,
If you press # key, you can input a decimal number.8. To end Calculator, press > [Back].
Note
• The control keys are different depending on a game.However, each one has an introduction to explain themain control keys. The rest ones are as follows.[Common Key Function]
< : Game menu,> : BackC : Pause or resume a game
Fun & Tools [Menu 7]

Accessin
g th
e M
en
u
79
My folder [Menu 7-3]
Enables you to view the downloaded pictures and sounds. They canbe set as Wallpaper or Ring tone. You can view, listen, delete orrename downloaded data.
Pictures [Menu 7-3-1]
Sound [Menu 7-3-2]
The Submenus for each main one
• Edit title
You can edit the title for each download contents.
• Write message
You can write Short message/Multimedia message(availabledepending on type of Media) with attachment pictures or sounds.
• Set as Wallpaper/Set as ring tone
You can set downloaded sounds or pictures as wallpaper or Ringtone.
• Delete
You can delete each downloaded content.
• Delete all
You can delete all downloaded contents.

Accessin
g th
e M
en
u
80
Melody composer [Menu 7-4]
You can compose a ring tone melody which you want. When youenter this function, the tones that you composed before are played.To enter a new or edit an existing tone:1. Enter the desired notes.(1 ~ 7 : CDEFGAB)2. To adjust the characters of the note, do as follows:
- Duration : 8 shortens and 9 lengthens the duration ofthe note or rest.
- Rest : 0 inserts a rest of the same duration as the previous note.
- Octave : * sets the octave for new notes.
- Sharp note : # makes the note sharp.
Unit converter [Menu 7-5]
This converts any measurement into a unit you want. There are 4types that can be converted into units: Length, Area, Weight, andVolume.1. You can select one of four unit types by pressing < [Unit] key.2. Select the standard value by using L , R.3. Select the unit you want to convert by pressing U and D.4. You can check the converted value for the unit you want. Also,
you can input a decimal number by pressing #.
World time [Menu 7-6]
You can view clocks of the world’s major cities. 1. Select the city belonged to the time zone by pressing L , R
key.2. You can set the current time to the city time you select by
pressing < [Set].
Fun & Tools [Menu 7]

Accessin
g th
e M
en
u
81
Voice recorder [Menu 7-7]
The voice memo feature you to record up to 10 voice messages andeach memo is up to 20 Seconds.
Record [Menu 7-7-1]
1. You can record voice memo in Voice recorder menu and alsoholding down C in the standby mode.
2. Once recording is started, the message Recording and theremaining time is displayed.
3. If you want to finish recording, press < [Save].4. Key in Voice memo title, press < [OK].
View list [Menu 7-7-2]
The phone shows voice memo list. You can Playback and Deletethe recorded voice memo.
Activate IrDA [Menu 7-8]
If you activate this function, you can use PC-Sync by infrared. Youcan’t use serial port and infrared function at the same time.
PC Sync
PC Sync is a program for data exchange between PC and thephone by data cable. For more information, you can use theguide of PC Sync Help file in CD.

Accessin
g th
e M
en
u
82
The phone supports services based on Wireless ApplicationProtocol (WAP). You can access services supported by yournetwork. The services menu allows you to get the information suchas news, weather reports, and flight times.
Home [Menu 8-1]
Connect to a homepage. The homepage may be the site which isdefined in the activated profile. It will be defined by Service Providerif you don’t make in activated profile.
Bookmarks [Menu 8-2]
Press < [Select] to access available options, or press > [Back] toexit.• Connect : Connect to the selected bookmark.• Add new : Add a new bookmark manually.• Edit : Edit the title and the address of the selected bookmark.• Delete : Delete the selected bookmark from the bookmark list.
Push messages [Menu 8-3]
Inbox [Menu 8-3-1]
You can read or delete push messages.• Information : Show the information of received push messages.• Load : You can connect to a specific site using the
information in the received push message.• Delete : Delete the selected push message.
Receive [Menu 8-3-2]
You can set the option whether you will receive the message or not.
Internet [Menu 8]

Accessin
g th
e M
en
u
83
Profiles [Menu 8-4]
You can make up to 10 profiles and activate only one out of them.Scroll to the desired profile and press < to access availableoptions.
• Activate
You can activate the profile you want.
• Settings
You can edit and change WAP settings of the selected profile.
- Homepage
This setting allows you to enter the address (URL) of a site youwant to use as homepage. You do not need to type “http://” at thefront of each URL as the WAP Browser will automatically add it.
- Bearer
You can set the bearer data service.• Data
• GPRS
- Data settings
Appeares only if you select Data settings as a Bearer\service.
IP address : Enter the IP address of the WAP gateway youwant.
Dial number : Enter the telephone number to dial to accessyour WAP gateway.
User ID : The users identity for your dial-up server (andNOT the WAP gateway).
Password : The password required by your dial-up server(and NOT the WAP gateway) to identify you.
Call type : Select the type of data call: Analogue or Digital(ISDN).

Accessin
g th
e M
en
u
84
Call speed : The speed of your data connection;9600 or14400.
Linger time : You need to enter timeout period.After enteringthat, the WAP navigation service will beunavailable if any data is not input or transfered.
- GPRS settings
The service settings are only available when GPRS is chosen asa bearer service. IP address : Input the IP address of the WAP gateway you
access.APN : Input the APN of the GPRS.User ID : The users identify for your APN server.Password : The password required by your APN server.
- Display image
You can select whether images on WAP cards are displayed ornot.
- Connection type
The options for connection type are Temporary or Continuousand depend on the gateway you are using.
Continuous
A confirmed delivery mechanism but generates more networktraffic.
Temporary
A non-confirmed (connectionless) service.
Internet [Menu 8]

Accessin
g th
e M
en
u
85
- Secure settings
According to the used gateway port, you can choose this optionas On or Off.
• Rename
Edit the Profile Name.
• Delete
Delete the Profile.
• Add new
You can add a new profile manually.
• Email server
- Connect
Connect to the E-mail server that you configured.
- Edit address
Edit the E-mail address.

Accessin
g th
e M
en
u
86
Go to URL [Menu 8-5]
You can directly connect to the site you want. You need to enter aspecific URL.
Cache settings [Menu 8-6]
You can remove the contents of Cache memory or change theCache mode.
Clear cache [Menu 8-6-1]
The contents of Cache memory will be removed.
Check cache [Menu 8-6-2]
You can set the option whether you will check the cache memory ornot.
Security certification [Menu 8-7]
A list of the available certificates is shown.
Reset profiles [Menu 8-8]
You can reset profiles to return to original settings.
Browser version [Menu 8-9]
The WAP Browser version is displayed.
Internet [Menu 8]

If you are on line, you can view the following menus.
� Home
Refer to [Menu 8-1].
� Reload
Reloads the current page.
� Bookmarks
See [Menu 8-2].
� Save as bookmark
You can save a site as bookmark.
� Messages
During Wap connection, you can see the Short messages.
� Push messages
See [Menu 8-3].
� Go to URL
You can move to the site you want. In this menu, you can alsoedit the site address.
� Go to email server
You can move to the E-mail server that you configured.
� Set as email server
You can set the address of current site as E-mail server.
� Clear cache
The contents of cache memory will be removed.
� Save Images
You can save the image which is provided by the WAP.
Accessin
g th
e M
en
u
87
On browsing menu

Applications [Menu 9-1]
Java Menu Options
Scroll to an application and select Options.1. Open : Launches the selected MIDlet.2. Delete : Deletes the selected MIDlet.3. Update : Accesses the server and updates the selected
MIDlet.4. Information : Displays information about the selected MIDlet.5. Phone settings : Allows you to set backlight and sound for java game.
Download [Menu 9-2]
You can edit and set MIDlet server address. Download MIDletsusing WAP Browser and store them in the phone. You can alsoview the list of MIDlets stored on the Applicatons screen.
Memory status [Menu 9-3]
Shows the size of memory available for game and applicationinstallations. You can also see the whole memory status ofHandset.
JAVA™ is a trademark of Sun Microsystems, Inc.
Accessin
g th
e M
en
u
88
(i) (application 1)
(i) (application 2)(i) (application 3)(i) (application 4)...
Applications
Options
1. Open
2. Remove3. Update4. Information5. Phone settings
(application name)
Select
Java [Menu 9]

Accessin
g th
e M
en
u
89
You can set up to 9 menus which you have used often in Favorites.You can connect this menu directly by pressing hot key D.If you want to register the menu in favorites, select <Empty> on alist. If the menu is already registered, the options are displayed asfollows:- Select : Activate the registered menu.- Change : Change the menu.- Delete : Delete the registered menu.- Delete all : Delete all menus which are registered in Favorites.- Information : View the information of registered menu.
Favorites [Menu 10]

90
Accessories
There are various accessories for your mobile phone. You canselect these options according to your personal communicationrequirements.
Standard Battery
Portable Handsfree
This connects to your phone, allowinghandsfree operation.
Travel Adapter
This charger allows you to charge thebattery while away from home or your office.
Neckstrap
Data cable/CD
You can connect your phone to PC toexchange the data between them.

91
Note
• Always use genuine LG accessories. • Failure to do this may invalidate your warranty.• Accessories may be different in different regions;
please check with our regional service company oragent for further enquires.

92
When using this unit, basic safety precautions as below should
be always followed.
• Do not disassemble this unit. (Take it to a qualified servicetechnician when repair work is required.)
• Away from electrical appliance such as a TV, radio or personalcomputer.
• The unit should be situated from heat sources such as radiatorsor cookers.
• Do not drop.• Do not subject this unit to mechanical vibration or shock.• The coating of the phone may be damaged if covered with wrap
or vinyl wrapper.• Use dry cloth to clean the exterior of the unit. (Do not use solvent
such as benzene, thinner or alcohol.)• Do not subject this unit to excessive smoke or dust.• Do not keep the phone next to credit cards or transport tickets; it
can affect the information on the magnetic strips.• Do not tap the screen with a sharp object; otherwise, it may
damage the phone.• Do not expose the phone to liquid or moisture.• Use the accessories like an earphone cautiously. Do not touch
the antenna unnecessarily.
Care and Maintenance

93
❏ Caring for the Battery
• You do not need to completely discharge the battery beforerecharging. Unlike other battery systems, there is no memoryeffect that could compromise the battery’s performance.
• Use only LG batteries and chargers. LG chargers are designedto maximize the battery life.
• Do not disassemble or short-circuit the battery pack.• Keep the metal contacts of the battery pack clean.• Replace the battery when it no longer provides acceptable
performance. The battery pack may be recharged hundreds oftimes until it needs replacing.
• Recharge the battery if it has not been used for a long time tomaximize usability.
• Do not expose the battery charger to direct sunlight or use it inhigh humidity, such as the bathroom.
• Do not leave the battery in hot or cold places, this maydeteriorate the battery performance.

General
Product name : G7100System : GSM 900 / DCS 1800
Ambient Temperatures
Max : +55°CMin : -10°C
94
Technical Data

95

Memo
96

简体中文简体中文简体中文简体中文简体中文
GPRS手机手机手机手机手机用户手册用户手册用户手册用户手册用户手册
型号型号型号型号型号: : : : : G7100请您在操作您的手机前仔细阅读此手册。
并保留它作为将来的参考。


3
所有无线设备在靠近其它电子装备时都会对其造成干扰。
在飞机上,必须关闭GSM手机。
请将手机放在儿童接触不到的安全地方,以防止
它的可拆部件造成窒息危险。
请勿用湿手接触充电器。
在加油站、燃料仓库、化工厂或爆破活动附近请
关机。
在任何有特殊规定的场所请关机。例如,在医院内
请关机,因为手机会对心脏起搏器和助听器等电子
医疗设备造成干扰。
手机可能对电视、收音机、电脑等造成轻微干扰。
开车时请不要手持手机。
切勿拆除手机或电池。
安全措施安全措施安全措施安全措施安全措施

4
注意注意注意注意注意:::::
废旧电池应按相关法规进行适当处理。
重要信息重要信息重要信息重要信息重要信息本用户手册包括重要的手机使用和操作信息。请仔细阅读以使您的手机发挥 佳性能、防止手机损坏和不正当使用。本手册未明确认可的任何更改和修改可使手机的保修失效。
安全措施安全措施安全措施安全措施安全措施
为了您的安全,请只使用原厂电池和充电器。
仅使用原厂附件以防损坏手机。
并非所有蜂窝网络都支持紧急呼叫。因此您不可以只依靠手机作为紧急时刻的通信工具,例如:紧急医疗救护。
手机的显示屏若过分的转动会被损坏。(第12页)

5
安全信息安全信息安全信息安全信息安全信息
应需注意的是仅达到电磁辐射安全标准是不可自行从国家健康安
全管理局实施的法定义务和强制要求中得以豁免。
如果IDA认同继续使用移动设备将可能致使用户的安全及健康产
生危险,则IDA(资讯通信发展管理局)可依据判断收回其所许可
的认证类型。
IDA(资讯通信发展管理局)要求附录1中的安全信息应显著反映于
GSM移动设备手册中。
修订与决策修订与决策修订与决策修订与决策修订与决策
IDA(资讯通信发展管理局)推崇进行标准化的持续性发展,可以
在非预先通知的情况下修订规范。
对于认证类型规范的阐述,进行测试的方法以及原厂商有效性声
明所产生的异议,IDA将作出 终裁决。
用户和第三方安全要求摘要用户和第三方安全要求摘要用户和第三方安全要求摘要用户和第三方安全要求摘要用户和第三方安全要求摘要
GSM 备忘录 文档
(GSM TP.03)文档对于GSM移动设备使用者及第三方的安全提供
了相应建议和警示说明。
电源电源电源电源电源
请勿将任何移动设备连接到超过50伏交流电或75伏直流电供应的
电源或充电器上,移动设备用户手册对于手机充电电源和充电器
有以下的规范描述:“此设备专属使用充电电源和充电器进行供
电,其他用途将导致设备许可无效或发生危险。”

6
民航民航民航民航民航
用户手册对于便携及手持设备有如下说明:
登机前请关闭手机。
在飞机中使用手机将给飞行操作带来危险,干扰无线网络并导致
违法。
对于未履行本说明的违规者将致使停止或延缓对其的无线通信服
务,或诉诸于法律。
易爆区域易爆区域易爆区域易爆区域易爆区域
用户手册对于便携及手持设备有如下说明:
n 建议您不要在加油站使用手机。
n 您应注意到在加油站,化学工厂,爆破区域限制使用手机的标
识。
驾驶驾驶驾驶驾驶驾驶
驾驶时接听电话,手机不可使用汽车喇叭或闪灯的报警装置。
n 请勿在没有安装手册的情况下连接喇叭继电器。可参考使用端
口控制其他的设备。
n 用户手册对于报警装置包含有下列说明:驾驶时禁止使用利用
汽车喇叭或闪灯报警的装置。
除紧急情况外,驾车时请勿使用手机。
请在不影响驾驶注意力的情况下使用固定或夹带式的话筒。
非电离辐射非电离辐射非电离辐射非电离辐射非电离辐射
依据移动设备手册应引起注意的是:GSM1800 CLASS 1的设备发
射功率应小于或等于1瓦特,GSM900 CLASS 2的设备发射功率应
小于或等于8瓦特。
安全措施安全措施安全措施安全措施安全措施

7
为了更好的操作以及更安全的使用移动无线传输设备,建议用户
在使用过程中身体部分不要过于贴近天馈线。
车载设备安装手册包括下列说明: GSM1800 CLASS 1的设备发射
功率应小于或等于1瓦特,GSM900 CLASS 2的设备发射功率应小
于或等于8瓦特。
n 使用非辐射线缆连接天线与移动设备。(比如同轴电缆)
n 在没有金属屏蔽(比如金属屋顶)的情况下,天馈线应尽量安
装在远离人体的地方。
射频暴露和比吸收率射频暴露和比吸收率射频暴露和比吸收率射频暴露和比吸收率射频暴露和比吸收率(((((SAR)))))信息信息信息信息信息
此型号手机设计符合有关无线电波辐射的要求。这些要求是基于
科学的研究后制定的,并且已包含了一定的安全系数,以确保各
个年龄和健康状况的人群的安全。
n 移动电话的辐射标准采用的计量单位被称作比吸收率(SAR)。
在测量比吸收率时均采用标准操作方式,使手机在所有被测频
段上的发射功率均为其 高级别。
n 尽管不同手机在不同位置上的比吸收率值存在差异,但是它们
都满足射频暴露的相关国际规范。
n 一些国家的SAR比吸收率信息采纳了INCRP国际规范,适用于
公众的无线电话吸收比率限制是平均每10克身体组织2.0瓦特/
千克(W/kg)。(例如欧盟,日本,巴西和新西兰)
n 此型号手机的 高SAR值为每10克身体组织0.3230瓦特/千克
(W/kg)。
n 一些国家的SAR比吸收率信息采纳了IEEE国际规范,适用于公
众的无线电话吸收比率限制是平均每10克身体组织1.6瓦特/千
克(W/kg)。(例如美国,加拿大,澳大利亚和台湾)

8
概述概述概述概述概述
手机部件手机部件手机部件手机部件手机部件 ........................................................................................................................................................................................................................................... 99999
手机主体 ................................................ 9
手机背面 ............................................... 11
按键描述按键描述按键描述按键描述按键描述 ...................................................................................................................................................................................................................................... 1212121212
侧按键.................................................. 13
字母数字键 ............................................. 14
显示信息显示信息显示信息显示信息显示信息
显示信息显示信息显示信息显示信息显示信息 ...................................................................................................................................................................................................................................... 1515151515
屏幕上的图标 ........................................... 15
第一次使用前第一次使用前第一次使用前第一次使用前第一次使用前
安装安装安装安装安装 .......................................................................................................................................................................................................................................................... 1616161616
插入SIM卡 .............................................. 16
移除SIM卡 .............................................. 16
安装电池 ............................................... 17
给电池充电 ............................................. 17
断开充电器 ............................................. 18
拨打和接听电话拨打和接听电话拨打和接听电话拨打和接听电话拨打和接听电话 ........................................................................................................................................................................................................ 1919191919
拨打一个电话 ........................................... 19
拨打国际电话 ........................................... 19
使用电话簿拨号 ......................................... 19
通话中功能表通话中功能表通话中功能表通话中功能表通话中功能表 .................................................................................................................................................................................................................. 2020202020
1 通话中 ............................................... 20
2 多方通话或会议通话 ................................... 21
访问密码访问密码访问密码访问密码访问密码 ...................................................................................................................................................................................................................................... 2424242424
PIN码(4至8位数字) ...................................... 24
PIN2码(4至8位数字) ..................................... 24
PUK码(4至8位数字) ...................................... 24
PUK2码(4至8位数字) ..................................... 24
安全密码(4至8位数字) ................................... 24
进入功能表进入功能表进入功能表进入功能表进入功能表
功能表一览功能表一览功能表一览功能表一览功能表一览 ............................................................................................................................................................................................................................ 2525252525
目目目目目 录录录录录

9
信息信息信息信息信息[[[[[功能表功能表功能表功能表功能表1]1]1]1]1] ............................................................................................................................................................................................................. 2727272727
写短信[功能表1-1] ...................................... 27
写多媒体短信[功能表1-2] ................................ 29
收信箱[功能表1-3] ...................................... 35
发信箱[功能表1-4] ...................................... 37
语音邮件[功能表1-5] .................................... 38
小区广播[功能表1-6] .................................... 38
常用短语[功能表1-7] .................................... 40
设定[功能表1-8] ........................................ 41
通话记录通话记录通话记录通话记录通话记录[[[[[功能表功能表功能表功能表功能表2]2]2]2]2] ......................................................................................................................................................................................... 4343434343
未接来电[功能表2-1] .................................... 43
已接来电[功能表2-2] .................................... 43
拨出电话[功能表2-3] .................................... 43
删除 近呼叫[功能表2-4] ................................ 43
通话计费[功能表2-5] .................................... 43
GPRS信息[功能表2-6] .................................... 45
情景模式情景模式情景模式情景模式情景模式[[[[[功能表功能表功能表功能表功能表3]3]3]3]3] ......................................................................................................................................................................................... 4646464646
振动[功能表3-1] ........................................ 46
静音[功能表3-2] ........................................ 46
私人[功能表3-3] ........................................ 46
大声[功能表3-4] ........................................ 46
耳机[功能表3-5] ........................................ 46
汽车[功能表3-6] ........................................ 46
照相照相照相照相照相[[[[[功能表功能表功能表功能表功能表4]4]4]4]4] ............................................................................................................................................................................................................. 4949494949
照相[功能表4-1] ........................................ 49
照在相框中[功能表4-2] .................................. 50
连续拍摄[功能表4-3] .................................... 50
我的相册[功能表4-4] .................................... 51
设定[功能表4-5] ........................................ 52
设定设定设定设定设定[[[[[功能表功能表功能表功能表功能表5]5]5]5]5] ............................................................................................................................................................................................................. 5353535353
闹钟[功能表5-1] ........................................ 53
日期和时间[功能表5-2] .................................. 53
手机设定[功能表5-3] .................................... 54
通话设定[功能表5-4] .................................... 55

10
保密设定[功能表5-5] .................................... 60
网络设定[功能表5-6] .................................... 62
恢复初始设定[功能表5-7] ................................ 63
公文包公文包公文包公文包公文包[[[[[功能表功能表功能表功能表功能表6]6]6]6]6] ................................................................................................................................................................................................... 6464646464
日程表[功能表6-1] ...................................... 64
电话本[功能表6-2] ...................................... 66
附件附件附件附件附件[[[[[功能表功能表功能表功能表功能表7]7]7]7]7] ............................................................................................................................................................................................................. 7272727272
游戏[功能表7-1] ........................................ 72
计算器[功能表7-2] ...................................... 72
我的文件夹[功能表7-3] .................................. 73
作曲家[功能表7-4] ...................................... 74
单位转换器[功能表7-5] .................................. 74
时区设置[功能表7-6] .................................... 74
语音备忘录[功能表7-7] .................................. 75
激活红外线[功能表7-8] .................................. 75
移动冲浪移动冲浪移动冲浪移动冲浪移动冲浪[[[[[功能表功能表功能表功能表功能表8]8]8]8]8] .................................................................................................................................................................................... 7676767676
主页[功能表8-1] ........................................ 76
书签[功能表8-2] ........................................ 76
Push信息[功能表8-3] .................................... 76
上网设定[功能表8-4] .................................... 77
转到URL[功能表8-5] ..................................... 79
缓存[功能表8-6] ........................................ 79
安全设置[功能表8-7] .................................... 79
重新设定[功能表8-8] .................................... 79
浏览器版本[功能表8-9] .................................. 79
在线功能表在线功能表在线功能表在线功能表在线功能表 ....................................................................................................................................................................................................................... 8080808080
Java[[[[[功能表功能表功能表功能表功能表9]9]9]9]9] ........................................................................................................................................................................................................ 8181818181
应用[功能表9-1] ........................................ 81
下载[功能表9-2] ........................................ 81
内存状态[功能表9-3] .................................... 81
收藏夹收藏夹收藏夹收藏夹收藏夹[[[[[功能表功能表功能表功能表功能表10]10]10]10]10] ......................................................................................................................................................................................... 8282828282
附件附件附件附件附件 .......................................................................................................................................................................................................................................................... 8383838383
保养和维护保养和维护保养和维护保养和维护保养和维护 ....................................................................................................................................................................................................................... 8484848484
技术数据技术数据技术数据技术数据技术数据 ................................................................................................................................................................................................................................. 8686868686
目目目目目 录录录录录

11
概述
概述
概述
概述
概述
手机主体手机主体手机主体手机主体手机主体
手机部件手机部件手机部件手机部件手机部件
听筒
显示屏
左软键
确认键
发送键
振动键
*键
导航键
右软键
END/PWR 键
数字键
#键
话筒
信息键
清除/取消键

12
概述
概述
概述
概述
概述
手机部件手机部件手机部件手机部件手机部件
显示屏可以被顺时针旋转90度,逆时针旋转180度。如果强制进
行旋转,将会损坏相关装置。
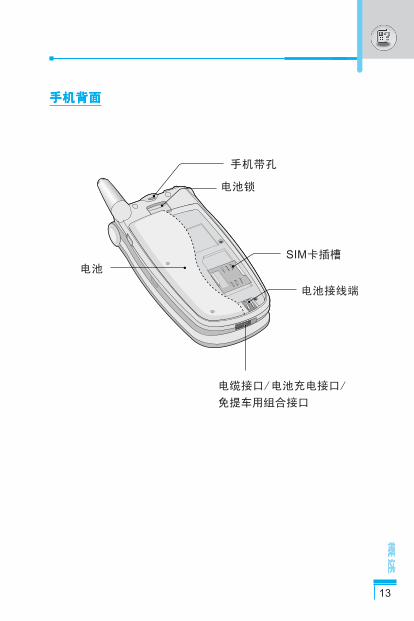
13
概述
概述
概述
概述
概述
手机背面手机背面手机背面手机背面手机背面
手机带孔
SIM卡插槽
电缆接口/电池充电接口/
免提车用组合接口
电池锁
电池接线端
电池

14
概述
概述
概述
概述
概述
以下是手机的主要元件。
键盘描述键盘描述键盘描述键盘描述键盘描述
按按按按按 键键键键键 描描描描描 述述述述述
左软键左软键左软键左软键左软键/////右软键右软键右软键右软键右软键
此软键执行出现在其上方屏幕上所显示的对应功
能。
振动键振动键振动键振动键振动键
您长按该键可以直接激活振动功能。
信息键信息键信息键信息键信息键
您可以直接进入信息功能表(收件箱、内存状态、
日程表或闹钟)。
导航键导航键导航键导航键导航键
可以在姓名、电话号码、功能表或设定选项中
翻阅。当您按下键时,可以浏览收藏夹。
WAP热键(热键(热键(热键(热键(=====确认键)确认键)确认键)确认键)确认键)
长按该键可以直接连接到WAP。
发送键发送键发送键发送键发送键
您可以拨打电话号码及接听来电。如果您直接按
该键而没有输入任何号码,您的手机将显示您
后拨打的号码。
数字键数字键数字键数字键数字键
这些键主要用来在待机模式下拨号以及在编辑模
式下输入数字或字符。如果长按以下各键:
n 长按 1 进入语音信箱
n 长按 0 拨打国际电话
n 长按 2 至 9 可以快速拨号
END/PWR键键键键键
用来结束通话或拒接来电。该键也可以用作开关
键。按住该键几秒钟可开机或关机。
按键描述按键描述按键描述按键描述按键描述
<>
0
9
光标

15
概述
概述
概述
概述
概述
按按按按按 键键键键键 描描描描描 述述述述述
此键可删除字符、返回功能表。另外,你可以在
待机情况下短按此键来浏览语音备忘录。如果您
长按此键,您可以记录一条语音记录。
如果您长按此键,您将激活语音识别功能。
C
*
侧按键侧按键侧按键侧按键侧按键
按按按按按 键键键键键 描描描描描 述述述述述
上上上上上/////下侧键下侧键下侧键下侧键下侧键
当手机翻盖合闭时,当您连续按下此键,将会依
次显示时间、日期、我的显示和问候语。如果您
只按一下此键,将显示时间。它将根据您设置的
“显示时间”的长短显示。
照相键照相键照相键照相键照相键
可以使用此键照相和存储照片。
短按此
语音记

16
概述
概述
概述
概述
概述
字母数字键字母数字键字母数字键字母数字键字母数字键
每个键将代表多个字符。如下显示:
按按按按按 键键键键键
1
2
3
4
5
6
7
8
9
0
描描描描描 述述述述述
[空格键] 0
按键描述按键描述按键描述按键描述按键描述

17
显示
信息
显示
信息
显示
信息
显示
信息
显示
信息
手机屏幕会显示很多图标,具体描述如下:
屏幕上的图标屏幕上的图标屏幕上的图标屏幕上的图标屏幕上的图标
描描描描描 述述述述述
表示网络信号的强度。
通话连接成功。
您可以使用GPRS服务。
您正在使用漫游服务。
您正在使用线路1或2拨打电话-如果您已经申请
了两条服务线路。
显示电池电量
收到文本信息。
收到语音信息。
收到push信息。
查看日程表。
闹铃已设定并启动。
所有音频信号已关闭。
情景模式中的静音功能。
情景模式中的标准功能。
情景模式中的大声功能。
情景模式中的耳机功能。
情景模式中的汽车功能。
转接来电。
图标图标图标图标图标/////指示器指示器指示器指示器指示器
显示信息显示信息显示信息显示信息显示信息

18
第一
次使
用前
第一
次使
用前
第一
次使
用前
第一
次使
用前
第一
次使
用前
1.1.1.1.1.插入插入插入插入插入SIM卡卡卡卡卡
n 安装前请确保手机关机并移除电池。
n SIM卡的金属接触片很容易刮损。操作和安装SIM卡
时需要特别小心。请遵循随SIM卡附上的安装指南。
注意注意注意注意注意
在手机背面查找SIM卡插槽的位置。
遵循以下步骤插入SIM卡。
1. 如果装有电池,则先移除电池。
2. 将SIM卡滑入银色弹夹下的插槽
中,金色连接器向下,切角向
右。
2.2.2.2.2.移除移除移除移除移除SIM卡卡卡卡卡
遵循以下步骤移除SIM卡。
1. 如果装有电池,则先移除电池。
2. 将SIM卡从插槽中小心滑出。
安装安装安装安装安装

19
第一
次使
用前
第一
次使
用前
第一
次使
用前
第一
次使
用前
第一
次使
用前
3.3.3.3.3.安装电池安装电池安装电池安装电池安装电池
4.4.4.4.4.给电池充电给电池充电给电池充电给电池充电给电池充电
要用旅行充电器为手机充电,您必须先装上电池。
1. 将电池置于手机背面。
2. 向内推,直到听见一声卡嗒声。
1. 将旅行充电器的一端插入手机
底部。
2. 将旅行充电器的另一端连接到
墙上的AC电源插座。仅使用原装
充电器。

20
第一
次使
用前
第一
次使
用前
第一
次使
用前
第一
次使
用前
第一
次使
用前
5.5.5.5.5.断开充电器断开充电器断开充电器断开充电器断开充电器
n 不可强行插入充电接口,因为这将损坏手机及旅行
充电器。
警告警告警告警告警告
n 手机原装电池在使用前必须完全充电。
n 充电时切勿取出电池或SIM卡。
n 充电完成后,将闪烁绿色。请注意在这种情况下,在
手机屏幕显示“正在充电”之前可能会需要较长时间
的初始充电时间。
注意注意注意注意注意
如果电池无法充电:
n 关机。
n 检查电池是否安装妥当。
注意注意注意注意注意
如图所示,按充电器适配器两侧的
按钮,将其与手机断开。
安装安装安装安装安装

21
第一
次使
用前
第一
次使
用前
第一
次使
用前
第一
次使
用前
第一
次使
用前
拨打一个电话拨打一个电话拨打一个电话拨打一个电话拨打一个电话
1. 按您想拨叫的电话号码(包括区位号)。如果您想删除一位数
字,请按 C 键。
2. 按 S [发送]键来拨打该号码。
3. 按 E [结束]键来结束通话。
拨打国际电话拨打国际电话拨打国际电话拨打国际电话拨打国际电话
1. 长按 0 得到国际电话前 ,符号“+”在拨叫过程中将被替
代为国际通话接入码。
2. 输入国家代码,区位号以及电话号码。
3. 按 S [发送]键。
使用电话簿拨号使用电话簿拨号使用电话簿拨号使用电话簿拨号使用电话簿拨号
1. 待机状态下按 > 键[电话本]。
2. 电话簿功能表显示后,用 < 键选择“查找”。
3. 通过姓名或号码查找到您想要的电话后,直接按 S [发送]
键拨叫。
拨打和接听电话拨打和接听电话拨打和接听电话拨打和接听电话拨打和接听电话

22
第一
次使
用前
第一
次使
用前
第一
次使
用前
第一
次使
用前
第一
次使
用前
1 1 1 1 1 通话中通话中通话中通话中通话中
1-1 1-1 1-1 1-1 1-1 保持通话保持通话保持通话保持通话保持通话
拨打电话或应答来电后,按 S [发送]键可保持通话。当一个通
话被保持时,按 S [发送]键即可启动它。
1-2 1-2 1-2 1-2 1-2 拨打第二个电话拨打第二个电话拨打第二个电话拨打第二个电话拨打第二个电话
您可以从电话簿中获得一个拨号号码以拨打第二个电话。按 >[电话本]键,然后选择查找。要在通话时将拨号号码保存电话
簿,按 > [电话本]键然后选择添加条目。
1-3 1-3 1-3 1-3 1-3 在两通电话间切换在两通电话间切换在两通电话间切换在两通电话间切换在两通电话间切换
要在两通电话间切换,选择 < [选项]键,然后选择交换或按
S [发送]键。您可以通过按上/下箭头键拨打其中一个通话。如
果您想结束其中一个通话,选择您想结束的通话,然后按 E[结束]键。
1-4 1-4 1-4 1-4 1-4 接听来电接听来电接听来电接听来电接听来电
要在手机发出响铃时接听来电,只需按 S [发送]键即可。
当您在通话过程中有来电,手机也会提醒您。听筒会发出提示
音,显示屏会显示第二个来电正在等待中。该功能被为呼叫等
待,只有在您的网络支持它时才可用。要获取有关如何启动和关
闭呼叫等待的详细信息,请参见呼叫等待[功能表5-4-4]。
如果启动呼叫等待,您可以通过按 S [发送]或选择 < [接听]
键,然后选择保持并接听,保持第一个通话电并接听二个来电。
您可以选择 < [功能表]键,然后选择结束并接听来结束当前来
电并接听待接来电。
通话中功能表通话中功能表通话中功能表通话中功能表通话中功能表

23
第一
次使
用前
第一
次使
用前
第一
次使
用前
第一
次使
用前
第一
次使
用前
1-5 1-5 1-5 1-5 1-5 拒接来电拒接来电拒接来电拒接来电拒接来电
不在通话中时,您只需長按 E [结束]键就可以拒接来电,当手
机翻盖合上时,只需 按 键即可。
在通话中时,您可以按 > [功能表]键并选择多方通话话/拒接
或按 E [结束]键拒接来电。
1-6 1-6 1-6 1-6 1-6 将话筒静音将话筒静音将话筒静音将话筒静音将话筒静音
在通话中,您可以按 < [选项]键然后选择静音将话筒静音。
按 < [取消静音]可以将手机取消静音。
将手机静音后,呼叫者就无法听到您讲话,但您仍可以听到对方
讲话。
1-7 1-7 1-7 1-7 1-7 通话中开启双音多频音通话中开启双音多频音通话中开启双音多频音通话中开启双音多频音通话中开启双音多频音
要在通话中开启双音多频音,例如:要让您的手机利用自动电话
交换台,可以选择 < [选项]键,然后选择开启双音多频。也可
按同样步骤关闭双音多频音。
1-8 1-8 1-8 1-8 1-8 进入主功能表进入主功能表进入主功能表进入主功能表进入主功能表
按 < [选项]键,然后选择主功能表可以从通话中功能表进入
信息和SIM卡工具包主功能选项。只有当手机中的SIM卡支持SIM
卡工具包服务时才显示SIM卡工具包功能表。
2 2 2 2 2 多方通话或会议通话多方通话或会议通话多方通话或会议通话多方通话或会议通话多方通话或会议通话
如果您的网络服务提供商支持多方通话或会议通话,您可以同时
与超过一个呼叫者通话。
只有当您有一通进中的电话并有另一个保持通话,且这两个电话
已经接听时才可设置多方通话。一旦设置多方通话,您就可以添
加、断开或分开来电(即从多方通话中移除,但仍与您连接)。

24
第一
次使
用前
第一
次使
用前
第一
次使
用前
第一
次使
用前
第一
次使
用前
多方通话可容许 多五名成员。启动后,由您控制多方通话,也
只有您可以将来电添加到多方通话。
2-1 2-1 2-1 2-1 2-1 拨打第二个电话拨打第二个电话拨打第二个电话拨打第二个电话拨打第二个电话
在通话中您也可以拨打第二个电话。只要输入第二个电话号码并
按 S [发送]即可。当您拨打第二个电话时,第一个电话会自动
保持。您可以通过选择 < [选项]键,然后选择交换在两通电话
间切换。
2-2 2-2 2-2 2-2 2-2 启动多方通话启动多方通话启动多方通话启动多方通话启动多方通话
您可以选择 < [选项]键,然后选择多方通话/全部加入将保持
中通话与当前通话连接并组成一个多方通话。
2-3 2-3 2-3 2-3 2-3 保持多方通话保持多方通话保持多方通话保持多方通话保持多方通话
要保持多方通话,请选择 < [选项]键,然后选择多方通话/
全部保持。
2-4 2-4 2-4 2-4 2-4 启动保持中的多方通话启动保持中的多方通话启动保持中的多方通话启动保持中的多方通话启动保持中的多方通话
要启动保持中的多方通话,请选择 < [选项]键,然后选择
多方通话/全部加入。
2-5 2-5 2-5 2-5 2-5 将来电添加到多方通话将来电添加到多方通话将来电添加到多方通话将来电添加到多方通话将来电添加到多方通话
要将当前通话添加到保持中的多方通话中,请选择 < [选项]
键,然后选择多方通话话/全部加入。
2-6 2-6 2-6 2-6 2-6 在多方通话中显示呼叫者在多方通话中显示呼叫者在多方通话中显示呼叫者在多方通话中显示呼叫者在多方通话中显示呼叫者
要在手机屏幕上滚动显示组成多方通话的来电号码,请选择 U和 D 键。
通话中功能表通话中功能表通话中功能表通话中功能表通话中功能表

25
第一
次使
用前
第一
次使
用前
第一
次使
用前
第一
次使
用前
第一
次使
用前
2-7 2-7 2-7 2-7 2-7 保持多方通话的成员保持多方通话的成员保持多方通话的成员保持多方通话的成员保持多方通话的成员
要保持多方通话中选择的呼叫者(显示在屏幕上的当前号码),请
选择 < [选项]键,然后选择多方通话/排除。
2-8 2-8 2-8 2-8 2-8 多方通话中的私人通话多方通话中的私人通话多方通话中的私人通话多方通话中的私人通话多方通话中的私人通话
要在多方通话中与其中一个呼叫者进行私人通话,请在屏幕上显
示您想进行对话的呼叫者号码,然后选择 < [选项]键和
多方通话/私人以保持其他呼叫者。
2-9 2-9 2-9 2-9 2-9 结束多方通话结束多方通话结束多方通话结束多方通话结束多方通话
可以按 E[结束]键与当前显示的多方通话呼叫者断开。要结束
多方通话,请按 < [选项]键,然后选择多方通话话/结束多方
通话。
选择 < [选项]键,然后选择多方通话/全部结束,结束全部当
前和保持中通话。

26
第一
次使
用前
第一
次使
用前
第一
次使
用前
第一
次使
用前
第一
次使
用前
您可以使用该节中描述的访问密码来避免他人使用您的手机。
可以利用[功能表4-5-5]来更改访问密码(除PUK1和PUK2码外)。
PIN码码码码码(4(4(4(4(4至至至至至88888位数字位数字位数字位数字位数字)))))
PIN码(个人识别号码)防止他人在未经授权的情况下使用您的SIM
卡。PIN码通常与SIM卡一起提供。当PIN码设定为启动时,您的
手机每次开机时都会要求您输入PIN码。相反,当PIN码设定为
关闭时,您的手机则无需PIN码即可直接连接到网络。
PIN2码码码码码(4(4(4(4(4至至至至至88888位数字位数字位数字位数字位数字)))))
某些SIM卡会提供PIN2码,用于访问一些功能,例如:通话费用
通知、固定拨打号码。这些功能只有在您的SIM卡支持时才可
用。
PUK码码码码码(4(4(4(4(4至至至至至88888位数字位数字位数字位数字位数字)))))
更改锁定的PIN码需要PUK码(私人解锁密码)。PUK码与SIM卡一起
提供。否则,请与您的服务提供商联系以索取密码。如果您丢失
此密码,请同样与您的服务提供商联系。
PUK2码码码码码(4(4(4(4(4至至至至至88888位数字位数字位数字位数字位数字)))))
某些SIM卡会提供PUK2码,用于更改锁定的PIN2码。如果您丢失
了该密码,请同样与您的服务提供商联系。
安全密码安全密码安全密码安全密码安全密码(4(4(4(4(4至至至至至88888位数字位数字位数字位数字位数字)))))
安全密码可防止他人未经授权使用您的手机。通常与手机一起提
供。删除所有电话条目和启动“初始设定”功能表时需要该密
码。安全密码的预设值为“0000”。
访问密码访问密码访问密码访问密码访问密码

27
进入
功能
表进
入功
能表
进入
功能
表进
入功
能表
进入
功能
表
1 信息信息信息信息信息
1 写短信
2 写多媒体短信
3 收信箱
4 发信箱
5 语音邮件
6 小区广播
7 常用短语
8 设定
2 通话记录通话记录通话记录通话记录通话记录
1 未接来电
2 已接来电
3 拨出电话
4 删除 近呼叫
5 通话计费
6 GPRS信息
3 情景模式情景模式情景模式情景模式情景模式
1 振动
2 静音
3 私人
4 照相照相照相照相照相
1 照相
2 照在相框中
3 连续拍摄
4 我的相册
5 设定
功能表一览功能表一览功能表一览功能表一览功能表一览
4 大声
5 耳机
6 汽车
5 设定设定设定设定设定
1 闹钟
2 日期和时间
3 手机设定
4 通话设定
5 保密设定
6 网络设定
7 恢复初始设定
6 公文包公文包公文包公文包公文包
1 日程表
2 电话本

28
进入
功能
表进
入功
能表
进入
功能
表进
入功
能表
进入
功能
表
8 移动冲浪移动冲浪移动冲浪移动冲浪移动冲浪
1 主页
2 书签
3 PUSH信息
4 上网设定
5 转到URL
6 缓存
7 安全设置
8 重新设定
9 浏览器版本
9 Java
1 应用
2 下载
3 内存状态
7 附件附件附件附件附件
1 游戏
2 计算器
3 我的文件夹
4 作曲家
5 单位转换器
6 时区设置
7 语音备忘录
8 激活红外线10 收藏夹收藏夹收藏夹收藏夹收藏夹
11 SIM卡工具包卡工具包卡工具包卡工具包卡工具包
该功能视SIM卡和网络
服务而定。
功能表一览功能表一览功能表一览功能表一览功能表一览

29
进入
功能
表进
入功
能表
进入
功能
表进
入功
能表
进入
功能
表
本功能表涉及的功能包括: SMS(短消息服务),MMS(多媒体信息
服务),语音邮件和网络服务信息。
写短信写短信写短信写短信写短信[[[[[功能表功能表功能表功能表功能表1-1]1-1]1-1]1-1]1-1]
您可写入并编辑文本信息。您也可以查询信息页数。
1. 按 < [选择]进入信息功能表。
2. 如果您想编写新信息,在功能表中选择写短信。
3. 使用T9文本可更容易地输入信息。详细内容请参见T9文本
(第31页)。
4. 选择[添加]来选择添加以下个项。
5. 当您想设置信息选项或已经编辑完信息时,按 < [选项]。
n 支持EMS R5的手机可以发送彩色图片、音乐、文字字
体等等,但其他不支持此功能的手机可能并不能正确
接收您发送的彩色图片、音乐或文字字体。
注意注意注意注意注意
附加附加附加附加附加
nnnnn 符号符号符号符号符号
您可以添加特殊符号。
nnnnn 图片库图片库图片库图片库图片库
您可以添加默认的或我的文件夹中的支持短信的图片。
nnnnn 歌曲歌曲歌曲歌曲歌曲
您可以添加支持短信的歌曲。
nnnnn 常用短语常用短语常用短语常用短语常用短语
您可以使用已在手机中设置过的常用短语。
信息信息信息信息信息[[[[[功能表功能表功能表功能表功能表1]1]1]1]1]

30
进入
功能
表进
入功
能表
进入
功能
表进
入功
能表
进入
功能
表
信息信息信息信息信息[[[[[功能表功能表功能表功能表功能表1]1]1]1]1]
nnnnn 电话本电话本电话本电话本电话本
您可以在电话本中添加电话本中的电话号码或e-mail地址。
nnnnn 名片名片名片名片名片
您可以添加您的个人联系信息到您的名片中。
选项选项选项选项选项
nnnnn 发发发发发送送送送送
发送文本信息。
1. . . . . 输入接收者的号码。
2. . . . . 按 D 键可加入更多的接收者。
3. . . . . 您可加入电话本中已存的号码。
4. . . . . 输入号码后按 < 键。
nnnnn 保存保存保存保存保存
将信息储存在发信箱内。
nnnnn 字体字体字体字体字体
您可以选择文字的大小和字体。
nnnnn 颜色颜色颜色颜色颜色
您可以选择背景和字体的颜色。
nnnnn 对齐对齐对齐对齐对齐
您可以将信息内容调整为右对齐、居中或左对齐。
nnnnn 字典字典字典字典字典
您可以添加您自己的单词。此功能表只有在T9预想式输入模式
(((((T9Abc/T9abc/T9ABC)))))时才会显示。
nnnnn T9语言输入法语言输入法语言输入法语言输入法语言输入法
选择T9输入法。

31
进入
功能
表进
入功
能表
进入
功能
表进
入功
能表
进入
功能
表
nnnnn 退出退出退出退出退出
您可以返回到信息功能表。
写多媒体短信写多媒体短信写多媒体短信写多媒体短信写多媒体短信[[[[[功能表功能表功能表功能表功能表1-2]1-2]1-2]1-2]1-2]
您可以编写多媒体信息,查看信息大小。
1. 选择 < [选择]进入信息功能表。
2. 如果您想要写一条新信息,选择写多媒体短信。
3. 您可以创建一条新信息或者选择已经编制好的多媒体信息模
板。
4. 按添加可以向信息里添加符号,相,图片,歌曲,常用短语,
电话本或者名片。
选项选项选项选项选项
nnnnn 预览预览预览预览预览
您可以预览编写的多媒体信息。
nnnnn 发送发送发送发送发送
您可以发送多媒体信息给多个接收人,并可以设定信息优先级
和设置发送时间。
nnnnn 保存保存保存保存保存
您可以将多媒体信息保存到收信箱或者保存为模板。
nnnnn 增加增加增加增加增加
您可以在当前编辑的片断之前或之后增加一个新片断。
nnnnn 转到转到转到转到转到
您可以移至前一或后一片断。

32
进入
功能
表进
入功
能表
进入
功能
表进
入功
能表
进入
功能
表
信息信息信息信息信息[[[[[功能表功能表功能表功能表功能表1]1]1]1]1]
nnnnn 删除幻灯片删除幻灯片删除幻灯片删除幻灯片删除幻灯片
您可以删除当前的片断。
nnnnn 设置信息格式设置信息格式设置信息格式设置信息格式设置信息格式
----- 设定定时器设定定时器设定定时器设定定时器设定定时器
您可以为多媒体信息片断中的文本,图片和歌曲设置定
时器.
----- 置换文本和图片置换文本和图片置换文本和图片置换文本和图片置换文本和图片
您可以置换信息中图片和文本的位置.
nnnnn 删除媒体删除媒体删除媒体删除媒体删除媒体
您可以删除片断中的图片或者歌曲。这一选项仅在有媒体存在
时才显示。
nnnnn 字典字典字典字典字典
您可以增加自己的单词,此选项仅在编辑模式为联想式输入法
(T9Abc/T9abc/T9ABC) 时才显示。
nnnnn T9 语言输入法语言输入法语言输入法语言输入法语言输入法
选择一种T9输入法。
nnnnn 退出退出退出退出退出
您可以退回到信息功能表中。

33
进入
功能
表进
入功
能表
进入
功能
表进
入功
能表
进入
功能
表
使用T9输入法,您只需按相应字符的按键一次即可。这种输
入法是基于手机中内置的字典实现的,并且您还可以增加新
的单词。
nnnnn 使用使用使用使用使用T9输入法输入单词输入法输入单词输入法输入单词输入法输入单词输入法输入单词
1. 使用按键 2 到 9 开始输入单词。输入一个字符只
需按一次按键。比如要快速输入单词“Girl”依次按
4 ,4 ,7,5,输入的字符会显示为方块状。
如何使用如何使用如何使用如何使用如何使用T9T9T9T9T9输入法输入法输入法输入法输入法
每次按键后单词会改变,因此您不用过于注意屏幕上
显示的单词,只需按完所有正确的键即可。
您可使用 C 键删除一个字符,直到屏幕的 左侧为
止。您可以长按 # 号键插入数字。可以长按 * 号键更换语言类型。(您也可以使用选项完成)
本电话支持三种输入模式:预想式英文输入(T9Abc,
T9ABC, T9abc),英文输入(ABC, abc),数字输入。
可以使用 # 号键更改模式。
提示: 使用 * 键选择插入符号,选取所需的字符后
按选择键。

34
进入
功能
表进
入功
能表
进入
功能
表进
入功
能表
进入
功能
表
信息信息信息信息信息[[[[[功能表功能表功能表功能表功能表1]1]1]1]1]
2. 您可在输入完单词后检查拼写是否正确。
如果正确如果正确如果正确如果正确如果正确 ::::: 按 0 键继续写单词。
如果不正确如果不正确如果不正确如果不正确如果不正确 ::::: 用 U,,,,,D 键搜索正确的单词。
(返回 和下一个单词).
提示提示提示提示提示 ::::: 如果没有您所需的单词,您可以加入
自己的单词。在联想编辑模式下按 <[选项],选择字典,您会看到如下所示。
3. 您可通过连续按 1 键插入所需的标点符号。
n 您可通过选择功能表开启T9输入法,也可
选择关闭T9输入法。(缺省状态为开启)
T9 输入输入输入输入输入
LGGSM输入单词输入单词输入单词输入单词输入单词

35
进入
功能
表进
入功
能表
进入
功能
表进
入功
能表
进入
功能
表
收信箱收信箱收信箱收信箱收信箱[[[[[功能表功能表功能表功能表功能表1-3]1-3]1-3]1-3]1-3]
当收到信息时,手机会给予提示。收到的信息会存储到收信箱
中。
在收信箱中,您可以通过指示图标识别每一条信息。图标的含义
如下图所示。
如果手机显示“SIM卡信息已满”,您将需要从SIM卡的收信箱中
删除信息。如果手机显示“没有空间存储信息”,您可以通过删
除信息、媒体和应用程序释放存储空间。
❈ SIM信息信息信息信息信息
SIM信息是指存储在SIM卡上的特殊信息。您可以把SIM信息转
存到手机中。
对于收到的多媒体信息通知,您可以对信息进行操作或者等待其
自动下载。对于多媒体信息通知,参考[功能表1-8-2]。
若要读取一条信息,通过按 < 选择读取信息.。
[ ] 多媒体短信
[ ] 短信息
[ ] SIM卡短信
[ ] 已读
[ ] 多媒体信息通知
指示图标指示图标指示图标指示图标指示图标

36
进入
功能
表进
入功
能表
进入
功能
表进
入功
能表
进入
功能
表
信息信息信息信息信息[[[[[功能表功能表功能表功能表功能表1]1]1]1]1]
回复短信回复短信回复短信回复短信回复短信
您可以向发送方回复信息。
转发转发转发转发转发
您可以转发信息给另一方。
回复电话回复电话回复电话回复电话回复电话
您可以向发送方回复电话。
删除删除删除删除删除
删除所选信息。
摘要摘要摘要摘要摘要
您可以提取信息中的图片、歌曲和文本。他们将被存储到我的文
件夹或者电话本中。
查看信息查看信息查看信息查看信息查看信息
您可以查看到信息发送方的地址、标题(仅适用于多媒体信
息)、信息接收的日期和时间、信息的类型和信息的大小。
重放重放重放重放重放(((((仅适用于多媒体信息仅适用于多媒体信息仅适用于多媒体信息仅适用于多媒体信息仅适用于多媒体信息)))))
您可以重放多媒体信息。
❈ 接收接收接收接收接收(((((仅适用于多媒体信息通知仅适用于多媒体信息通知仅适用于多媒体信息通知仅适用于多媒体信息通知仅适用于多媒体信息通知)))))
如果多媒体信息被设置为关闭自动下载,您将只会接收到通
知。要接收多媒体信息,需要选择[接收]。

37
进入
功能
表进
入功
能表
进入
功能
表进
入功
能表
进入
功能
表
发信箱发信箱发信箱发信箱发信箱[[[[[功能表功能表功能表功能表功能表1-4]1-4]1-4]1-4]1-4]
您可以看到已经被发送和没有被发送的信息。对于已经发送的
信息,您可以看到发送状态报告。
同在收信箱中一样,您可以通过图标识别信息。
[ ] 已发
[ ] 未发
[ ] 发送已确认
图标指示图标指示图标指示图标指示图标指示
❈ 当您使用已发送信息时当您使用已发送信息时当您使用已发送信息时当您使用已发送信息时当您使用已发送信息时
转发转发转发转发转发
您可以转发当前信息给其他接收方。
删除删除删除删除删除
您可以删除所选信息。
查看信息查看信息查看信息查看信息查看信息
您可以查看收信箱中信息的接收方地址、标题(仅适用于多媒体
信息)、信息接收的日期和时间、信息的类型和信息的大小。
警告警告警告警告警告
n 对于未发信息,您可以编辑、发送和删除该消息。

38
进入
功能
表进
入功
能表
进入
功能
表进
入功
能表
进入
功能
表
信息信息信息信息信息[[[[[功能表功能表功能表功能表功能表1]1]1]1]1]
语音邮件语音邮件语音邮件语音邮件语音邮件[[[[[功能表功能表功能表功能表功能表1-5]1-5]1-5]1-5]1-5]
收听语音邮件收听语音邮件收听语音邮件收听语音邮件收听语音邮件[[[[[功能表功能表功能表功能表功能表1-5-1]1-5-1]1-5-1]1-5-1]1-5-1]
您可以收听语音邮件。
语音邮件中心语音邮件中心语音邮件中心语音邮件中心语音邮件中心[[[[[功能表功能表功能表功能表功能表1-5-2]1-5-2]1-5-2]1-5-2]1-5-2]
您如果您的网络服务提供商支持该功能,您即可获得语音邮件。
当新语音邮件已接收,屏幕上将显示符号。请向您的网络服务提
供商查询服务详情,以便相应地配置手机。
1. 在待机模式下长按 1 键。
2. 您可以查看以下子功能表。
nnnnn 本地中心本地中心本地中心本地中心本地中心
选择本地中心听取语音邮件。
nnnnn 漫游地中心漫游地中心漫游地中心漫游地中心漫游地中心
如果支持漫游服务,您在漫游中可以收取语音邮件。
小区广播小区广播小区广播小区广播小区广播[[[[[功能表功能表功能表功能表功能表1-6]1-6]1-6]1-6]1-6]
(视网络和您所申请的服务而定视网络和您所申请的服务而定视网络和您所申请的服务而定视网络和您所申请的服务而定视网络和您所申请的服务而定)
小区广播信息是网络向GSM手机用户提供的文本信息。它们提供
一般的信息,例如,天气预报、交通、出租车和药房信息以及
股票价格。每种信息类型都有一个号码; 因此只要您已输入对应
信息类型的特定号码,您将可以收到来自服务提供商的信息。
当您收到了一条小区广播信息,您会看到弹出的信息显示您收到
了一条信息或者直接显示小区广播信息。如果要再次浏览信息或
者手机不在待机模式下,按下面的步骤操作。

39
进入
功能
表进
入功
能表
进入
功能
表进
入功
能表
进入
功能
表
读取读取读取读取读取[[[[[功能表功能表功能表功能表功能表1-6-1]1-6-1]1-6-1]1-6-1]1-6-1]
1. 当您接收到小区广播信息时,可以通过选择读取显示信息。
通过 L ,R 或者 < 移动光标读取其他的信息。
2. 收到的信息可以保存到有新信息到达之前。
收小区广播收小区广播收小区广播收小区广播收小区广播[[[[[功能表功能表功能表功能表功能表1-6-2]1-6-2]1-6-2]1-6-2]1-6-2]
nnnnn 是是是是是
如果您选择此选项,您的手机将接收小区广播信息。
nnnnn 否否否否否
如果您选择此选项,您的手机将不再接收小区广播信息。
来电提示来电提示来电提示来电提示来电提示[[[[[功能表功能表功能表功能表功能表1-6-3]1-6-3]1-6-3]1-6-3]1-6-3]
nnnnn 是是是是是
如果您选择该功能,当您收到小区广播信息时,手机将发出提
示音。
nnnnn 否否否否否
如果您选择该功能表,尽管您收到小区广播信息,您的手机不
会发出提示音。
语言语言语言语言语言[[[[[功能表功能表功能表功能表功能表1-6-4]1-6-4]1-6-4]1-6-4]1-6-4]
您可以通过[开/关]选择您想要的语言。然后手机将以您所选的
语言来接收小区广播信息。

40
进入
功能
表进
入功
能表
进入
功能
表进
入功
能表
进入
功能
表
信息信息信息信息信息[[[[[功能表功能表功能表功能表功能表1]1]1]1]1]
栏目栏目栏目栏目栏目[[[[[功能表功能表功能表功能表功能表1-6-5](1-6-5](1-6-5](1-6-5](1-6-5](视网络和您所申请的服务而定视网络和您所申请的服务而定视网络和您所申请的服务而定视网络和您所申请的服务而定视网络和您所申请的服务而定)))))
nnnnn 新增新增新增新增新增
您可以在手机中添加小区广播信息号码并加上标题。
nnnnn 查看列表查看列表查看列表查看列表查看列表
您可以查看添加的小区广播信息栏目。如果您按 < [选项],
您可以修改和删除被添加的小区广播信息栏目。
nnnnn 当前列表当前列表当前列表当前列表当前列表
您可以在启动列表中选择小区广播信息栏目。如果您启动了一
个栏目,您将会接收此栏目的信息。
常用短语常用短语常用短语常用短语常用短语[[[[[功能表功能表功能表功能表功能表1-7]1-7]1-7]1-7]1-7]
文本文本文本文本文本[[[[[功能表功能表功能表功能表功能表1-7-1]1-7-1]1-7-1]1-7-1]1-7-1]
您拥有11个文本模板。您可以预先修改您常用的模板或者填写
<空>。
多媒体多媒体多媒体多媒体多媒体[[[[[功能表功能表功能表功能表功能表1-7-2]1-7-2]1-7-2]1-7-2]1-7-2]
您可以使用以下的功能。
修改修改修改修改修改 : : : : : 您可以编辑多媒体信息模板。
新增新增新增新增新增 : : : : : 允许您添加新的多媒体信息模板。
写信息写信息写信息写信息写信息 ::::: 您可以使用模板写多媒体信息。
删除删除删除删除删除 ::::: 您可以删除多媒体信息模板。
名片名片名片名片名片[[[[[功能表功能表功能表功能表功能表1-7-3]1-7-3]1-7-3]1-7-3]1-7-3]
您可以制作自己的名片,可以键入名字、电话号码、传真号码和
电子邮件地址。

41
进入
功能
表进
入功
能表
进入
功能
表进
入功
能表
进入
功能
表
设定设定设定设定设定[[[[[功能表功能表功能表功能表功能表1-8]1-8]1-8]1-8]1-8]
短信短信短信短信短信[[[[[功能表功能表功能表功能表功能表1-8-1]1-8-1]1-8-1]1-8-1]1-8-1]
nnnnn 信息类型信息类型信息类型信息类型信息类型
文本、语音文本、语音文本、语音文本、语音文本、语音
通常,信息类型设定为文本格式。您可以将文本信息转换为
其它格式,以配合接收信息的设备。要获取有关该功能的信
息,请联系您的服务提供商。
nnnnn 信息有效期信息有效期信息有效期信息有效期信息有效期
该网络服务可让您在发送信息时设定文本信息在信息中心储存
的期限。
nnnnn 状态报告状态报告状态报告状态报告状态报告
如果您在该功能表中设定是,您即可查询您的信息是否已成功
发送。
nnnnn 短信中心回复短信中心回复短信中心回复短信中心回复短信中心回复
发送信息时,可以让接收信息者回复并将回复费用记入您的话
费清单。
nnnnn 短信中心短信中心短信中心短信中心短信中心
如果您想发送文本信息,您可以通过该功能表获得SMS中心地
址。
子邮子邮子邮子邮子邮

42
进入
功能
表进
入功
能表
进入
功能
表进
入功
能表
进入
功能
表
信息信息信息信息信息[[[[[功能表功能表功能表功能表功能表1]1]1]1]1]
多媒体信息多媒体信息多媒体信息多媒体信息多媒体信息[[[[[功能表功能表功能表功能表功能表1-8-2]1-8-2]1-8-2]1-8-2]1-8-2]
nnnnn 信息有效期信息有效期信息有效期信息有效期信息有效期
该网络服务可让您在发送信息时设定文本信息在信息中心储存
的期限。
nnnnn 状态报告状态报告状态报告状态报告状态报告
如果您在该功能表中设定是,您即可查询您的信息是否已成功
发送。
nnnnn 自动下载自动下载自动下载自动下载自动下载
如果您选择开启,您将自动接收多媒体信息。如果您选择
关闭,您将仅能在收件箱中收到通知信息,然后再查阅这些通
知信息。
nnnnn 网络设定网络设定网络设定网络设定网络设定
如果选择多媒体信息中心,您可以设置多媒体信息中心的URL
地址。
nnnnn 允许短信类型允许短信类型允许短信类型允许短信类型允许短信类型
个人个人个人个人个人 ::::: 私人信息。
广告广告广告广告广告 ::::: 商业信息。
信息提示信息提示信息提示信息提示信息提示 ::::: 必要信息。
内存状态内存状态内存状态内存状态内存状态[[[[[功能表功能表功能表功能表功能表1-8-3]1-8-3]1-8-3]1-8-3]1-8-3]
您可以检查剩余空间和每一个存储库或SIM内存的使用状况。您
可以进入任何一个存储库。

43
进入
功能
表进
入功
能表
进入
功能
表进
入功
能表
进入
功能
表
未接来电未接来电未接来电未接来电未接来电[[[[[功能表功能表功能表功能表功能表2-1]2-1]2-1]2-1]2-1]
该功能表显示 近的未接来电。您可以呼叫该号码,可以保存、
查看日期和时间,也可以写信息发送到该号码。
已接来电已接来电已接来电已接来电已接来电[[[[[功能表功能表功能表功能表功能表2-2]2-2]2-2]2-2]2-2]
该功能表显示 近的已接来电。您可以呼叫该号码,可以保存、
查看日期和时间,也可以写信息发送到该号码。
拨出电话拨出电话拨出电话拨出电话拨出电话[[[[[功能表功能表功能表功能表功能表2-3]2-3]2-3]2-3]2-3]
该功能表显示 近拨打的电话。您可以呼叫该号码,可以保存、
查看日期和时间,也可以写信息发送到该号码。
删除最近呼叫删除最近呼叫删除最近呼叫删除最近呼叫删除最近呼叫[[[[[功能表功能表功能表功能表功能表2-4]2-4]2-4]2-4]2-4]
您可以删除 近的通话记录,包括全部的未接来电,
已接来电,拨出电话或者全部通话。
通话计费通话计费通话计费通话计费通话计费[[[[[功能表功能表功能表功能表功能表2-5]2-5]2-5]2-5]2-5]
在这些子功能表中,您可以查看通话计时和通话费用。
通话计时通话计时通话计时通话计时通话计时[[[[[功能表功能表功能表功能表功能表2-5-1]2-5-1]2-5-1]2-5-1]2-5-1]
该功能表可让您查看 后通话、所有通话、已接来电和拨出电话
的确切时间。您也可以将通话计时器复零。
1. 在待机模式下按 < 键进入[功能表]。
2. 按 2 直接进入或使用 L 和 R 进入通话记录。
3. 滚动屏幕以突出显示通话计时,并按左软键 < [选择]。
5个子功能表: 上一呼叫, 全部呼叫, 已接电话, 拨出电话,
全部重置。
通话记录通话记录通话记录通话记录通话记录[[[[[功能表功能表功能表功能表功能表2]2]2]2]2]

44
进入
功能
表进
入功
能表
进入
功能
表进
入功
能表
进入
功能
表
通话记录通话记录通话记录通话记录通话记录[[[[[功能表功能表功能表功能表功能表2]2]2]2]2]
通话费用通话费用通话费用通话费用通话费用[[[[[功能表功能表功能表功能表功能表2-5-2]2-5-2]2-5-2]2-5-2]2-5-2]
该功能表可让您查询 后通话、所有通话的费用,余额并将费用
复零。要将费用复零,您需要PIN2码。
1. 在待机模式下按 <[功能表]。
2. 按 2 直接进入或使用 L 和 R 进入通话记录。
3. 滚动屏幕以突出显示通话计费,然后按 < [选择]进入。
下列4个子功能表: 最后通话、所有通话、余额和全部复零。
n 网络服务商提供的实际话费清单会因为网络的特性,
计费的方式,税收等其他的因素而造成不同。
注意注意注意注意注意
设定设定设定设定设定[[[[[功能表功能表功能表功能表功能表2-5-3](2-5-3](2-5-3](2-5-3](2-5-3](取决于取决于取决于取决于取决于SIM卡卡卡卡卡)))))
nnnnn 通话费率通话费率通话费率通话费率通话费率
您可设置货币类型和计费单价。通话费率的服务提供商联系以
获得计费单价。要在该功能表选择货币或单位,您需要PIN2
码。
如果您想输入 €, £, $,清除全部货币符号,然后按 *键,如果您想更换符号,再次按 * 键。
n 当所有的话费都已被使用,除了紧急电话将不能拨打
任何电话。依据不同的SIM卡,您需要PIN2码来设定
通话费用限制。
注意注意注意注意注意

45
进入
功能
表进
入功
能表
进入
功能
表进
入功
能表
进入
功能
表
nnnnn 设定话费设定话费设定话费设定话费设定话费
该网络服务可让您通过选择计费单位来限制您的通话费用。
如果您选择读取,将显示余额。如果您选择更改,您可以更
改计费限制。
nnnnn 自动显示自动显示自动显示自动显示自动显示
该网络服务可让您自动查看 后通话的费用。如果您在自动显
示功能表中选择开,通话结束时,您即可查看 后通话的用。
GPRS信息信息信息信息信息[[[[[功能表功能表功能表功能表功能表2-6]2-6]2-6]2-6]2-6]
你可以查看通过GPRS在网络上传输的数据量。另外,您还可以查
看您的在线时间。
通话计时通话计时通话计时通话计时通话计时[[[[[功能表功能表功能表功能表功能表2-6-1]2-6-1]2-6-1]2-6-1]2-6-1]
您能查看GPRS的最后通话和所有通话的计时,您也可以将通话计
时器复零。
数据量数据量数据量数据量数据量[[[[[功能表功能表功能表功能表功能表2-6-2]2-6-2]2-6-2]2-6-2]2-6-2]
您可以查看发送、接收或者全部的数据量和全部复零。

46
进入
功能
表进
入功
能表
进入
功能
表进
入功
能表
进入
功能
表
情景模式情景模式情景模式情景模式情景模式[[[[[功能表功能表功能表功能表功能表3]3]3]3]3]
在此功能表中,您可依据不同的事件,环境或呼叫群组来调整和
定制铃声。
1. 在待机模式下按 < [功能表]。
2. 按数字键 3 或使用 L , R 键进入情景模式。
3. 您也可在待机模式下按 L 直接进入情景模式。
4. 在手机翻盖合上时,如果长按侧键您也可以使用情景模式功能
表。
振动振动振动振动振动[[[[[功能表功能表功能表功能表功能表3-1]3-1]3-1]3-1]3-1]
如果您需要振动模式,可以将情景模式调节为振动。
在这种模式下,所有的提示都为振动或者静音。
静音静音静音静音静音[[[[[功能表功能表功能表功能表功能表3-2]3-2]3-2]3-2]3-2]
如果您在安静的场所,可以将情景模式调节为静音。
私人私人私人私人私人[[[[[功能表功能表功能表功能表功能表3-3]3-3]3-3]3-3]3-3]
如果您需要私人模式,可以将情景模式调节为私人。
大声大声大声大声大声[[[[[功能表功能表功能表功能表功能表3-4]3-4]3-4]3-4]3-4]
如果您处于嘈杂的环境中,可以将情景模式调节为大声。
耳机耳机耳机耳机耳机[[[[[功能表功能表功能表功能表功能表3-5]3-5]3-5]3-5]3-5]
当您戴上耳机时,可以将情景模式调节为耳机。
汽车汽车汽车汽车汽车[[[[[功能表功能表功能表功能表功能表3-6]3-6]3-6]3-6]3-6]
当您启动免提车用组合时,可以调节该情景模式为汽车。

47
进入
功能
表进
入功
能表
进入
功能
表进
入功
能表
进入
功能
表
启动启动启动启动启动[[[[[功能表功能表功能表功能表功能表3-x-1]3-x-1]3-x-1]3-x-1]3-x-1]
启动选定的情景模式。
更改更改更改更改更改[[[[[功能表功能表功能表功能表功能表3-x-2]3-x-2]3-x-2]3-x-2]3-x-2]
除了振动,每一个情景模式拥有以下子功能表。
来电提示来电提示来电提示来电提示来电提示
允许您根据不同环境选择来电提示类型比如:铃音,振动等等。
铃声类型铃声类型铃声类型铃声类型铃声类型
根据不同环境设定铃声类型。
铃声音量铃声音量铃声音量铃声音量铃声音量
根据不同环境设定铃声音量。开机音乐的音量和所有提示音乐的
音量都根据铃声音量来设定。
短信提示短信提示短信提示短信提示短信提示
当收到信息时,根据不同环境发出提示警告音。
短信提示音短信提示音短信提示音短信提示音短信提示音
当收到信息时,根据不同环境发出提示铃音。
按键音量按键音量按键音量按键音量按键音量
根据不同环境设定按键音量。
n 若手机连接到诸如耳机和免提之类的配件,您将只能
使用耳机或乘车模式功能表,并可进行设定。
注意注意注意注意注意

48
进入
功能
表进
入功
能表
进入
功能
表进
入功
能表
进入
功能
表
情景模式情景模式情景模式情景模式情景模式[[[[[功能表功能表功能表功能表功能表3]3]3]3]3]
按键音按键音按键音按键音按键音
根据不同环境设定按键声音。
翻盖音翻盖音翻盖音翻盖音翻盖音
根据不同环境设定翻盖音。
确认音音量确认音音量确认音音量确认音音量确认音音量
根据不同环境设定音效音量。
开开开开开/////关机音量关机音量关机音量关机音量关机音量
根据不同环境设定开关机音量。
自动应答自动应答自动应答自动应答自动应答
请注意只有乘车和耳机模式拥有该子功能表。
- 关闭关闭关闭关闭关闭 : 即使您的手机响铃,也不会自动应答。
- 55555秒后秒后秒后秒后秒后 : 在5秒后自动应答。
- 1010101010秒后秒后秒后秒后秒后 : 在10秒后自动应答。
重命名重命名重命名重命名重命名[[[[[功能表功能表功能表功能表功能表3-x-3]3-x-3]3-x-3]3-x-3]3-x-3]
您可以修改默认情景模式的名字,除了振动,耳机和汽车情景模
式。
n 如果您对手机设置了免提功能,您将不能在来电提示
和短信提示中使用振动模式。在汽车情景模式中,有
以下的子功能表:
- 来电提示来电提示来电提示来电提示来电提示 : 铃声,无声
- 短信提示短信提示短信提示短信提示短信提示 : 提醒一次,提醒多次,无声
注意注意注意注意注意
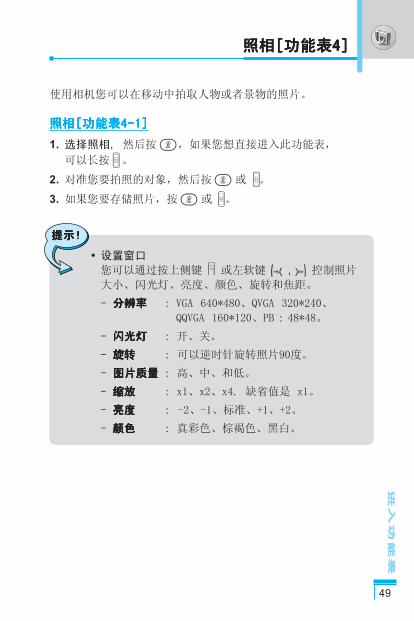
49
进入
功能
表进
入功
能表
进入
功能
表进
入功
能表
进入
功能
表
使用相机您可以在移动中拍取人物或者景物的照片。
照相照相照相照相照相[[[[[功能表功能表功能表功能表功能表4-1]4-1]4-1]4-1]4-1]
1. 选择照相, 然后按 O,如果您想直接进入此功能表,
可以长按 。
2. 对准您要拍照的对象,然后按 O 或 。
3. 如果您要存储照片,按 O 或 。
提示提示提示提示提示!!!!!
n 设置窗口
您可以通过按上侧键 或左软键 L , R 控制照片
大小、闪光灯、亮度、颜色、旋转和焦距。
- 分辨率分辨率分辨率分辨率分辨率 : VGA 640*480、QVGA 320*240、
QQVGA 160*120、PB : 48*48。
- 闪光灯闪光灯闪光灯闪光灯闪光灯 : 开、关。
- 旋转旋转旋转旋转旋转 : 可以逆时针旋转照片90度。
- 图片质量图片质量图片质量图片质量图片质量 : 高、中、和低。
- 缩放缩放缩放缩放缩放 : x1、x2、x4. 缺省值是 x1。
- 亮度亮度亮度亮度亮度 : -2、-1、标准、+1、+2。
- 颜色颜色颜色颜色颜色 : 真彩色、棕褐色、黑白。
照相照相照相照相照相[[[[[功能表功能表功能表功能表功能表4]4]4]4]4]

50
进入
功能
表进
入功
能表
进入
功能
表进
入功
能表
进入
功能
表
照相照相照相照相照相[[[[[功能表功能表功能表功能表功能表4]4]4]4]4]
按键功能按键功能按键功能按键功能按键功能
- L , R : 选择您要设置的选项。
- O : 照相或者存储照片。
- > : 退回到前一功能表或推出照相模式。
- : 在程序设置中,您可以更改缺省值。也可以用来
旋转图片90度。
- : 选择您要设置的选项。
- : 照相或者存储照片。
照在相框中照在相框中照在相框中照在相框中照在相框中[[[[[功能表功能表功能表功能表功能表4-2]4-2]4-2]4-2]4-2]
您可以将照片放在不同的背景中,而且,您可以通过按
U , D 选择一个相框。
n 在这种模式下,您不可以更改分辨率设置。
提示提示提示提示提示!!!!!
连续拍摄连续拍摄连续拍摄连续拍摄连续拍摄[[[[[功能表功能表功能表功能表功能表4-3]4-3]4-3]4-3]4-3]
您可以连续拍摄 多9张照片。照相之后,您可以通过按
U , D 浏览照片,您也可以通过按 O 存储照片。
n 如果您将分辨率设置为640x480,您只能照三张照片。
如果是320x240, 则可以照六张照片。
提示提示提示提示提示!!!!!

51
进入
功能
表进
入功
能表
进入
功能
表进
入功
能表
进入
功能
表
我的相册我的相册我的相册我的相册我的相册[[[[[功能表功能表功能表功能表功能表4-4]4-4]4-4]4-4]4-4]
您可以浏览和发送照片,另外,您可以将照片设置为背景。
全部图片全部图片全部图片全部图片全部图片[[[[[功能表功能表功能表功能表功能表4-4-1]4-4-1]4-4-1]4-4-1]4-4-1]
您可以按顺序 多浏览9张照片。
通用图片通用图片通用图片通用图片通用图片[[[[[功能表功能表功能表功能表功能表4-4-2]4-4-2]4-4-2]4-4-2]4-4-2]
您可以浏览所有的照片,除了相框图片和电话本图片。
相框图片相框图片相框图片相框图片相框图片[[[[[功能表功能表功能表功能表功能表4-4-3]4-4-3]4-4-3]4-4-3]4-4-3]
您可以浏览所有的相框图片。
电话本图片电话本图片电话本图片电话本图片电话本图片[[[[[功能表功能表功能表功能表功能表4-4-4]4-4-4]4-4-4]4-4-4]4-4-4]
您可以浏览所有的电话本照片。
nnnnn 选项选项选项选项选项
- 缩小缩小缩小缩小缩小 : 您可以同时在一个屏幕中 多浏览
9张图片。
- 写多媒体短信写多媒体短信写多媒体短信写多媒体短信写多媒体短信 : 您可以通过多媒体信息服务发送图片。
- 设为墙纸设为墙纸设为墙纸设为墙纸设为墙纸 : 您可以将图片设置为墙纸。
- 删除删除删除删除删除 : 您可以删除照片。
- 编辑标题编辑标题编辑标题编辑标题编辑标题 : 您可以编辑图片的标题。

52
进入
功能
表进
入功
能表
进入
功能
表进
入功
能表
进入
功能
表
照相照相照相照相照相[[[[[功能表功能表功能表功能表功能表4]4]4]4]4]
设定设定设定设定设定[[[[[功能表功能表功能表功能表功能表4-5]4-5]4-5]4-5]4-5]
内存状态内存状态内存状态内存状态内存状态[[[[[功能表功能表功能表功能表功能表4-5-1]4-5-1]4-5-1]4-5-1]4-5-1]
您可以查看总内存容量,已使用内存容量和剩余内存容量。
清空相册清空相册清空相册清空相册清空相册[[[[[功能表功能表功能表功能表功能表4-5-2]4-5-2]4-5-2]4-5-2]4-5-2]
您可以删除内存中所有的图片。

53
进入
功能
表进
入功
能表
进入
功能
表进
入功
能表
进入
功能
表
您可以根据您的需要设置下面的功能表。
1. 在待机模式下按 <[功能表]。
2. 按 5 直接进入设定功能表。
闹钟闹钟闹钟闹钟闹钟[[[[[功能表功能表功能表功能表功能表5-1]5-1]5-1]5-1]5-1]
您 多可以设置五个闹钟。
1. 选择开并输入闹钟的时间。
2. 选择重复周期:一次,周一~周五,周一~周六,每天。
3. 选择闹钟铃声之后按 < [确认]。
4. 编辑闹钟名称之后按 < [确认]。
5. 如果设置闹钟为关机闹钟,即使手机已关机,闹铃仍然会在您
设定的时间进行提示。
日期和时间日期和时间日期和时间日期和时间日期和时间[[[[[功能表功能表功能表功能表功能表5-2]5-2]5-2]5-2]5-2]
您可设置与日期和时间相关的功能。
日期设定日期设定日期设定日期设定日期设定[[[[[功能表功能表功能表功能表功能表5-2-1]5-2-1]5-2-1]5-2-1]5-2-1]
在该功能表中,您可以设定手机日期。
日期格式日期格式日期格式日期格式日期格式[[[[[功能表功能表功能表功能表功能表5-2-2]5-2-2]5-2-2]5-2-2]5-2-2]
在该功能表中,您可以设定日期格式比如:日/月/年,
月/日/年,年/月/日。
时间设定时间设定时间设定时间设定时间设定[[[[[功能表功能表功能表功能表功能表5-2-3]5-2-3]5-2-3]5-2-3]5-2-3]
您可以设定当前手机时间。
时间格式时间格式时间格式时间格式时间格式[[[[[功能表功能表功能表功能表功能表5-2-4]5-2-4]5-2-4]5-2-4]5-2-4]
您可以选择时间格式为12小时制或24小时制。
设定设定设定设定设定[[[[[功能表功能表功能表功能表功能表5]5]5]5]5]
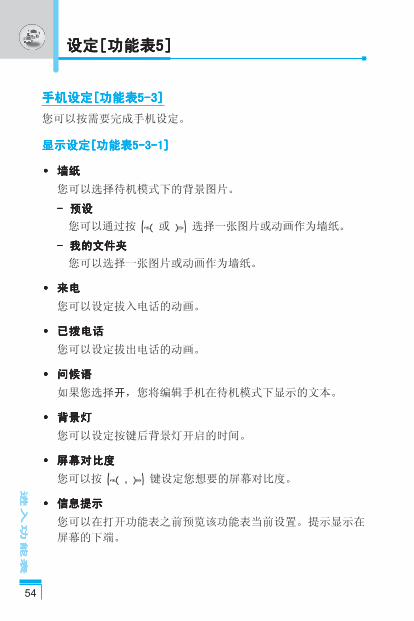
54
进入
功能
表进
入功
能表
进入
功能
表进
入功
能表
进入
功能
表
设定设定设定设定设定[[[[[功能表功能表功能表功能表功能表5]5]5]5]5]
手机设定手机设定手机设定手机设定手机设定[[[[[功能表功能表功能表功能表功能表5-3]5-3]5-3]5-3]5-3]
您可以按需要完成手机设定。
显示设定显示设定显示设定显示设定显示设定[[[[[功能表功能表功能表功能表功能表5-3-1]5-3-1]5-3-1]5-3-1]5-3-1]
nnnnn 墙纸墙纸墙纸墙纸墙纸
您可以选择待机模式下的背景图片。
- - - - - 预设预设预设预设预设
您可以通过按 L 或 R 选择一张图片或动画作为墙纸。
- - - - - 我的文件夹我的文件夹我的文件夹我的文件夹我的文件夹
您可以选择一张图片或动画作为墙纸。
nnnnn 来电来电来电来电来电
您可以设定拔入电话的动画。
nnnnn 已拨电话已拨电话已拨电话已拨电话已拨电话
您可以设定拔出电话的动画。
nnnnn 问候语问候语问候语问候语问候语
如果您选择开,您将编辑手机在待机模式下显示的文本。
nnnnn 背景灯背景灯背景灯背景灯背景灯
您可以设定按键后背景灯开启的时间。
nnnnn 屏幕对比度屏幕对比度屏幕对比度屏幕对比度屏幕对比度
您可以按 L , R 键设定您想要的屏幕对比度。
nnnnn 信息提示信息提示信息提示信息提示信息提示
您可以在打开功能表之前预览该功能表当前设置。提示显示在
屏幕的下端。

55
进入
功能
表进
入功
能表
进入
功能
表进
入功
能表
进入
功能
表
nnnnn 功能表颜色功能表颜色功能表颜色功能表颜色功能表颜色
您可以在几种功能表颜色组合中选择自己喜欢的功能表颜色。
外屏颜色外屏颜色外屏颜色外屏颜色外屏颜色[[[[[功能表功能表功能表功能表功能表5-3-2]5-3-2]5-3-2]5-3-2]5-3-2]
- 我的显示我的显示我的显示我的显示我的显示 : 您可以设置当您按侧键时的外屏动画。
- 显示时间显示时间显示时间显示时间显示时间 : 您可以设置按键后外屏显示的时间。
- 亮度亮度亮度亮度亮度 : 您可以设置按侧键时外屏显示的亮度。
- 字体颜色字体颜色字体颜色字体颜色字体颜色 : 您可以设置外屏文字的颜色。
语言语言语言语言语言[[[[[功能表功能表功能表功能表功能表5-3-3]5-3-3]5-3-3]5-3-3]5-3-3]
您可以选择手机上文本显示的语言。此设定会影响到语言
输入法。
通话设定通话设定通话设定通话设定通话设定[[[[[功能表功能表功能表功能表功能表5-4]5-4]5-4]5-4]5-4]
在设定功能表中,您可以按 < [选择]设定和通话相关的
功能表。
呼叫转接呼叫转接呼叫转接呼叫转接呼叫转接[[[[[功能表功能表功能表功能表功能表5-4-1]5-4-1]5-4-1]5-4-1]5-4-1]
呼叫转移服务可让您将语音来电、传真来电和数据来电转移到其
它号码。要获取更多信息,请联系您的服务提供商。
nnnnn 转接所有语音来电转接所有语音来电转接所有语音来电转接所有语音来电转接所有语音来电
无条件转移语音来电。
nnnnn 正在通话时转接来电正在通话时转接来电正在通话时转接来电正在通话时转接来电正在通话时转接来电
当手机正在使用时转移语音来电。
nnnnn 无人接听时转接来电无人接听时转接来电无人接听时转接来电无人接听时转接来电无人接听时转接来电
转移您没有应答的语音来电。

56
进入
功能
表进
入功
能表
进入
功能
表进
入功
能表
进入
功能
表
设定设定设定设定设定[[[[[功能表功能表功能表功能表功能表5]5]5]5]5]
nnnnn 无网络或关机时转接来电无网络或关机时转接来电无网络或关机时转接来电无网络或关机时转接来电无网络或关机时转接来电
当手机关机或不在服务区时转移语音来电。
nnnnn 转接所有数据来电转接所有数据来电转接所有数据来电转接所有数据来电转接所有数据来电
无条件转移到使用PC连接的号码。
nnnnn 转接所有传真来电转接所有传真来电转接所有传真来电转接所有传真来电转接所有传真来电
无条件转移到使用传真连接的号码。
nnnnn 全部取消全部取消全部取消全部取消全部取消
取消全部呼叫转接。
子功能表子功能表子功能表子功能表子功能表
呼叫转接功能表有以下子功能表。
- - - - - 启动启动启动启动启动
启动相应服务。
语音信箱语音信箱语音信箱语音信箱语音信箱
转发到信息中心。该功能不包括在所有数据来电和所有传真来
电功能表中。
其他号码其他号码其他号码其他号码其他号码
输入接受转移呼叫的电话号码。
常用号码常用号码常用号码常用号码常用号码
您可以查询5个转移号码。
- - - - - 关闭关闭关闭关闭关闭
取消相应服务。
- - - - - 查询状态查询状态查询状态查询状态查询状态
查看相应服务的状态。

57
进入
功能
表进
入功
能表
进入
功能
表进
入功
能表
进入
功能
表
接听模式接听模式接听模式接听模式接听模式[[[[[功能表功能表功能表功能表功能表5-4-2]5-4-2]5-4-2]5-4-2]5-4-2]
nnnnn 翻盖接听翻盖接听翻盖接听翻盖接听翻盖接听
选择此功能表,您可以通过翻盖接听来电。
nnnnn 任意键接听任意键接听任意键接听任意键接听任意键接听
选择此功能表,您可按任意键接听来电,但不包括 E [结束]
键。
nnnnn 按发送键接听按发送键接听按发送键接听按发送键接听按发送键接听
选择此功能表,您只可按 S [接听]键接听来电。
发送号码发送号码发送号码发送号码发送号码[[[[[功能表功能表功能表功能表功能表5-4-3]5-4-3]5-4-3]5-4-3]5-4-3]
(((((视网络和所申请的服务而定视网络和所申请的服务而定视网络和所申请的服务而定视网络和所申请的服务而定视网络和所申请的服务而定)))))
nnnnn 开开开开开
您可以将手机号码发送给对方,在接收方手机上将显示您的手
机号码。
nnnnn 关关关关关
在接收方手机上不会显示您的手机号码。
nnnnn 网络设定网络设定网络设定网络设定网络设定
如果您选择该功能,是否发送您的手机号码将视您两条线路的
服务而定,比如线路一或者线路二。

58
进入
功能
表进
入功
能表
进入
功能
表进
入功
能表
进入
功能
表
设定设定设定设定设定[[[[[功能表功能表功能表功能表功能表5]5]5]5]5]
呼叫等待呼叫等待呼叫等待呼叫等待呼叫等待[[[[[功能表功能表功能表功能表功能表5-4-4]5-4-4]5-4-4]5-4-4]5-4-4]
(((((视网络而定视网络而定视网络而定视网络而定视网络而定)))))
nnnnn 启动启动启动启动启动
如果启用该服务,您可以接收待接来电。
nnnnn 关闭关闭关闭关闭关闭
如果关闭该服务,您将取消此服务。
nnnnn 查看状态查看状态查看状态查看状态查看状态
显示呼叫等待的设置状态。
分钟提示分钟提示分钟提示分钟提示分钟提示[[[[[功能表功能表功能表功能表功能表5-4-5]5-4-5]5-4-5]5-4-5]5-4-5]
如果您选择开启,可以在通话期间通过每分钟的蜂鸣声检查通话
时间。
语音拨号语音拨号语音拨号语音拨号语音拨号[[[[[功能表功能表功能表功能表功能表5-4-6]5-4-6]5-4-6]5-4-6]5-4-6]
n 自动 :您将通过打开翻盖进入语音拨号模式。
n 手动 :您将通过长按 * 键进入语音拨号模式。
自动重拨自动重拨自动重拨自动重拨自动重拨[[[[[功能表功能表功能表功能表功能表5-4-7]5-4-7]5-4-7]5-4-7]5-4-7]
nnnnn 开开开开开
当该功能设定为开启时,您的手机在连接失败后将再进行连接
尝试。
nnnnn 关关关关关
连接失败后,您的手机将不再进行连接尝试。

59
进入
功能
表进
入功
能表
进入
功能
表进
入功
能表
进入
功能
表
线路选择线路选择线路选择线路选择线路选择[[[[[功能表功能表功能表功能表功能表5-4-8]5-4-8]5-4-8]5-4-8]5-4-8]
仅在服务提供商支持选择线路服务时才可以使用该功能。如果您
的服务提供商支持该功能,将显示以下功能表:
nnnnn 线路线路线路线路线路 1 1 1 1 1
nnnnn 线路线路线路线路线路 2 2 2 2 2
封闭用户群组封闭用户群组封闭用户群组封闭用户群组封闭用户群组[[[[[功能表功能表功能表功能表功能表5-4-9]5-4-9]5-4-9]5-4-9]5-4-9]
(((((视网络而定视网络而定视网络而定视网络而定视网络而定)))))
此功能可以限制手机拨打某用户群组列表中的电话号码。当使用
此功能时,每一个呼叫都与一个群组列表相关联。如果已经定义
了一个群组列表,所有的呼叫都将使用此列表。如果未定义群组
列表,将使用网络中预先定义的列表。(有一个列表存储在网络
上)
预设预设预设预设预设 :使用运营商预设用户群组。
选择选择选择选择选择 :使用选择的用户群组。
修改修改修改修改修改 :编辑用户群组的名字和列表。
删除删除删除删除删除 :删除选择的用户群组。
全部清除全部清除全部清除全部清除全部清除 :删除所有用户群组。

60
进入
功能
表进
入功
能表
进入
功能
表进
入功
能表
进入
功能
表
设定设定设定设定设定[[[[[功能表功能表功能表功能表功能表5]5]5]5]5]
保密设定保密设定保密设定保密设定保密设定[[[[[功能表功能表功能表功能表功能表5-5]5-5]5-5]5-5]5-5]
需要需要需要需要需要PIN码码码码码[[[[[功能表功能表功能表功能表功能表5-5-1]5-5-1]5-5-1]5-5-1]5-5-1]
在该功能表中,您可以设定手机在开机时需要SIM卡的PIN码。
如果启动该功能,您将被要求输入PIN码。
1. 进入保密设定功能表, 按 < [选择]选择要求PIN码。
2. 设置“开”或者“关”。
3. 如果选择“开”, 开机时需要您输入PIN码。
4. 如果您连续三次输错PIN码,手机将被锁定,这时您需要输入
PUK码。
5. 您 多可以连续十次输入PUK码,如果您连续十次输错PUK码,
您将无法解锁您的手机。这时,您只能联系服务中心寻求帮
助。
手机锁手机锁手机锁手机锁手机锁[[[[[功能表功能表功能表功能表功能表5-5-2]5-5-2]5-5-2]5-5-2]5-5-2]
您可以使用保密码防止他人未经授权使用您的手机。
如果您将手机锁设定为开,则开机时手机将要求您输入安全密
码。如果您将手机锁设定为自动,则只有当您更换SIM卡时,手
机才要求您输入安全密码。
呼叫限制呼叫限制呼叫限制呼叫限制呼叫限制[[[[[功能表功能表功能表功能表功能表5-5-3]5-5-3]5-5-3]5-5-3]5-5-3]
呼叫限制服务可以防止您的手机拨打或接听某种电话。该功能需
要呼叫限制密码。您可以查看以下子功能表。
nnnnn 所有拨出电话所有拨出电话所有拨出电话所有拨出电话所有拨出电话
您可以限制所有拨出电话。
nnnnn 拨出国际电话拨出国际电话拨出国际电话拨出国际电话拨出国际电话 (((((呼出国际电话呼出国际电话呼出国际电话呼出国际电话呼出国际电话)))))
您可以限制拨出国际长途。

61
进入
功能
表进
入功
能表
进入
功能
表进
入功
能表
进入
功能
表
nnnnn 国际漫游电话国际漫游电话国际漫游电话国际漫游电话国际漫游电话 (((((漫游时的呼出国际电话漫游时的呼出国际电话漫游时的呼出国际电话漫游时的呼出国际电话漫游时的呼出国际电话)))))
您可以限制当您离开本地网时的所有拨出的国际长途电话。
nnnnn 所有来电所有来电所有来电所有来电所有来电
您可以限制所有来电。
nnnnn 国际漫游时国际漫游时国际漫游时国际漫游时国际漫游时
您可以限制国外漫游时来电。
nnnnn 全部取消全部取消全部取消全部取消全部取消
您可以取消所有限制服务。
nnnnn 更换密码更换密码更换密码更换密码更换密码
您可以更改呼叫限制服务的密码。
一组呼叫限制子功能表一组呼叫限制子功能表一组呼叫限制子功能表一组呼叫限制子功能表一组呼叫限制子功能表 : : : : :
nnnnn 启动启动启动启动启动
请求网络启动呼叫限制服务。
nnnnn 关闭关闭关闭关闭关闭
取消所选子功能表呼叫限制服务。
nnnnn 查询状态查询状态查询状态查询状态查询状态
查询呼叫限制服务开启或关闭的状态。

62
进入
功能
表进
入功
能表
进入
功能
表进
入功
能表
进入
功能
表
设定设定设定设定设定[[[[[功能表功能表功能表功能表功能表5]5]5]5]5]
固定拨号固定拨号固定拨号固定拨号固定拨号[[[[[功能表功能表功能表功能表功能表5-5-4](5-5-4](5-5-4](5-5-4](5-5-4](需需需需需SIM卡支持卡支持卡支持卡支持卡支持)))))
您可以限制拨电话号码的拨打。这些号码由PIN2码保护。
nnnnn 开开开开开
您可以限制拨打您所选择的电话号码。
nnnnn 关关关关关
您可以不限制对电话号码的拨打。
nnnnn 成员列表成员列表成员列表成员列表成员列表
您可以查看被保存为FDN的号码列表。
更改密码更改密码更改密码更改密码更改密码[[[[[功能表功能表功能表功能表功能表5-5-5]5-5-5]5-5-5]5-5-5]5-5-5]
PIN是Personal Identification Number(个人识别号码)的缩
写。可用来防止未经授权的人使用您的手机。
您可以更改访问密码: 安全密码, PIN码, PIN2码.
1. 如果您想更改访问密码:安全密码, PIN码, PIN2码,先输入
原密码然后按 < [确认]。
2. 输入新的 安全密码, PIN码,或PIN2码,然后确认。
网络设定网络设定网络设定网络设定网络设定[[[[[功能表功能表功能表功能表功能表5-6]5-6]5-6]5-6]5-6]
您可以选择能够自动或手动注册的网络。通常,手机网络选择设
定为自动。
自动自动自动自动自动[[[[[功能表功能表功能表功能表功能表5-6-1]5-6-1]5-6-1]5-6-1]5-6-1]
如果您选择“自动”, 手机会自动选择在您区域内的可用网络。
一旦您选择“自动”,无论手机在开机状态还是关机状态,都将
保持设置为“自动”。

63
进入
功能
表进
入功
能表
进入
功能
表进
入功
能表
进入
功能
表
手动手动手动手动手动[[[[[功能表功能表功能表功能表功能表5-6-2]5-6-2]5-6-2]5-6-2]5-6-2]
手机会找到可用的网络列表并显示出来。然后您可以选择您想使
用的网络,前提是该网络与您本地网络运营商已签订漫游协议。
如果手机无法接入到您选择的网络中,手机允许您选择另一个网
络。如果您将手机关机。
首选网络首选网络首选网络首选网络首选网络[[[[[功能表功能表功能表功能表功能表5-6-3]5-6-3]5-6-3]5-6-3]5-6-3]
您可以设定手机在注册其它网络前首先注册的首选网络列表。
该列表从手机预设的已知网络列表中创建。
恢复初始设定恢复初始设定恢复初始设定恢复初始设定恢复初始设定[[[[[功能表功能表功能表功能表功能表5-7]5-7]5-7]5-7]5-7]
您可以通过选择该功能表将手机恢复为预设配置。然后,您需要
保密码启动该功能。
自动”

64
进入
功能
表进
入功
能表
进入
功能
表进
入功
能表
进入
功能
表
公文包公文包公文包公文包公文包[[[[[功能表功能表功能表功能表功能表6]6]6]6]6]
日程表日程表日程表日程表日程表[[[[[功能表功能表功能表功能表功能表6-1]6-1]6-1]6-1]6-1]
当您进入这一功能表,会有一个日历显示出来。屏幕顶端是日
期部分,在屏幕底端是图标(日程表和备忘录)。在您更改日期
后,日历会按照该日期更新。方形光标也将标示于该日期上。如
果日历下方有横线,表示当天已设定日程表。该功能可以提醒您
记住您的日程表和备忘录。如果您已设定提示,手机将发出提示
音。
更改日、月、年。
n 只有手机开机时才能使用此功能。
提示提示提示提示提示
按按按按按 键键键键键 描描描描描 述述述述述
1 3 每年
* # 每月
每周
每天
按按按按按 键键键键键 描描描描描 述述述述述
U D
L R

65
进入
功能
表进
入功
能表
进入
功能
表进
入功
能表
进入
功能
表
新增新增新增新增新增[[[[[功能表功能表功能表功能表功能表6-1-1]6-1-1]6-1-1]6-1-1]6-1-1]
您可以编辑 多39个字符的提示(21个中文文字), 多可以设
定20个提示。
nnnnn 日程表日程表日程表日程表日程表
按[选择]输入标题、日程表时间、重复时间、闹铃时间。
nnnnn 备忘录备忘录备忘录备忘录备忘录
1. 选择 增加号码。
2. 选择 备忘录。
3. 输入备忘录,然后按 < [确认].
查看查看查看查看查看[[[[[功能表功能表功能表功能表功能表6-1-2]6-1-2]6-1-2]6-1-2]6-1-2]
显示您所选日期的对应提示。使用 U 、D 浏览提示列表。
如果您已经设定提示闹铃,会显示闹钟提示图标。这时,通过按
< [选择]可以看到提示的细节。按 < [选项]删除或编辑您选
择的提示。
查看全部查看全部查看全部查看全部查看全部[[[[[功能表功能表功能表功能表功能表6-1-3]6-1-3]6-1-3]6-1-3]6-1-3]
显示为所有日子所设定的提示。使用 U 、D 浏览提示列表。
按 < [选项]后,您可以进入与“查看日期”相同的功能表。
删除已过日程删除已过日程删除已过日程删除已过日程删除已过日程[[[[[功能表功能表功能表功能表功能表6-1-4]6-1-4]6-1-4]6-1-4]6-1-4]
您可以删除已经过期的日程。
全部删除全部删除全部删除全部删除全部删除[[[[[功能表功能表功能表功能表功能表6-1-5]6-1-5]6-1-5]6-1-5]6-1-5]
您可以删除所有提示。

66
进入
功能
表进
入功
能表
进入
功能
表进
入功
能表
进入
功能
表
公文包公文包公文包公文包公文包[[[[[功能表功能表功能表功能表功能表6]6]6]6]6]
电话本电话本电话本电话本电话本[[[[[功能表功能表功能表功能表功能表6-2]6-2]6-2]6-2]6-2]
1. 您可在待机模式下按 > [电话本]键进入电话本。
2. 您也可在待机模式下按 < [功能表]键进入功能表并选择公文
包进入电话本。
查找查找查找查找查找[[[[[功能表功能表功能表功能表功能表6-2-1]6-2-1]6-2-1]6-2-1]6-2-1]
(从电话簿呼叫)
1. 首先,在待机模式下按 > [电话本]打开电话簿。
2. 按 < [选择]进入查找。
3. 如果你想要查找某人的电话号码或电子邮件地址,输入该人的
姓名,或者选择“列表”以查看整个电话本。
4. 通过输入所欲查找姓名或号码的首字母可以进行快速查找。
5. 如果您想要编辑、删除、复制对象,或添加语音,选择 <[选项]。将显示以下功能表。
n 修改修改修改修改修改 : 您可以通过按 < [确认]来编辑姓名、号码、电
子邮件和传真。
n 写信息写信息写信息写信息写信息 : 当查找到你需要的号码后,你可以向所选的号码发
送信息。
n 复制复制复制复制复制 : 您可以将条目从SIM卡复制到手机或从手机复制到
SIM卡。
n 语音语音语音语音语音 : 您可以为条目添加语音或更改语音标签。
n 主要号码主要号码主要号码主要号码主要号码 : 您可以从您经常使用的手机、家庭、公司电话中
选择一个号码。如果您设定了该功能,将首先显
示主要号码。
n 删除删除删除删除删除 : 您可以删除条目。

67
进入
功能
表进
入功
能表
进入
功能
表进
入功
能表
进入
功能
表
新增新增新增新增新增[[[[[功能表功能表功能表功能表功能表6-2-2]6-2-2]6-2-2]6-2-2]6-2-2]
您可以使用该功能来添加电话簿条目。
手机内存容量为200个条目。SIM卡内存容量取决于移动电话服务
提供商。
您也可以在手机内存中保存20个字符的姓名。您可以在SIM卡中
保存字符,而字符的数量取决于SIM卡。
1. 首先,在待机模式下按 > [电话本]打开电话簿。
2. 滚动屏幕前突出显示添加条目,按 < [选择]进入。
3. 选择您想使用的内存:SIM卡或手机。如果选择存储在手机内
存中,您还可选择某一个号码作为主号码。
a. 拼写要添加的姓名。
b. 按 < [确认],然后输入号码。
c. 按 < [确认]。
d. 您可以通过按 L , R 键为此条目设置群组。
e. 您可以通过按 U , D , L , R 键为此条目设置个性图
片。
f. 如果您想添加语音,按 < [是]。
n 如果在电话本中同时设置了头像和图片,则在任何位
置都无法浏览到图片。
注意注意注意注意注意
您应在2秒内说出一个字,然后手机将提示您再说一遍以确保语
音识别的精确性。完成语音识别后,语音将被自动附加。

68
进入
功能
表进
入功
能表
进入
功能
表进
入功
能表
进入
功能
表
公文包公文包公文包公文包公文包[[[[[功能表功能表功能表功能表功能表6]6]6]6]6]
群组群组群组群组群组[[[[[功能表功能表功能表功能表功能表6-2-3]6-2-3]6-2-3]6-2-3]6-2-3]
每个群组 多可以列出20个成员。您可以设定7个群组列表。
1. 在待机模式下按 > [电话本]进入电话簿。
2. 滚动到群组对象,然后按 < [选择],将显示每个群组列表。
3. 按 < [选择]选择您想管理的群组名称。
nnnnn 成员列表成员列表成员列表成员列表成员列表
您可以查看您想要的成员。
nnnnn 群组来电铃声设定群组来电铃声设定群组来电铃声设定群组来电铃声设定群组来电铃声设定
您可以根据群组不同设定来电铃声。
nnnnn 群组标志群组标志群组标志群组标志群组标志
您可以根据群组不同设定标志。
nnnnn 添加成员添加成员添加成员添加成员添加成员
- 选择添加成员
- 每个群组不能超过20名成员。
nnnnn 删除成员删除成员删除成员删除成员删除成员
您可以把成员从该群组中删除。
nnnnn 重命名重命名重命名重命名重命名
您可以修改和编辑群组名称。
n 语音只能附加到您设定的主要号码上。例如:如果您
更改主要号码,语音将自动附加到更改的号码上。
n 您可以将语音标签添加到SIM卡中的电话号码上。
移除或更换SIM卡可以将删除语音标签。
注意注意注意注意注意

69
进入
功能
表进
入功
能表
进入
功能
表进
入功
能表
进入
功能
表
快速拨号快速拨号快速拨号快速拨号快速拨号[[[[[功能表功能表功能表功能表功能表6-2-4]6-2-4]6-2-4]6-2-4]6-2-4]
您可以为姓名列表条目指定按键 2 - 9 中的任一键。长按2-
3秒即可直接呼叫。
1. 首先,在待机模式下按 > [电话本]打开电话簿。
2. 滚动到快速拨号,然后按 < [选择]进入该功能表。
3. 如果您想添加快速拨号,选择<空>。然后,您可以在电话簿中
查找姓名。
4. 选择快速拨号指定的姓名,选择更改或撤销快速拨号。
n 更改更改更改更改更改 : 您可以更改指定的快速拨号。
n 删除删除删除删除删除 : 您可以删除指定的快速拨号号码。
语音列表语音列表语音列表语音列表语音列表[[[[[功能表功能表功能表功能表功能表6-2-5]6-2-5]6-2-5]6-2-5]6-2-5]
您可以看到所有包含语音的电话号码。您也可以按[发送]直接呼
叫。使用 U 和 D 选择电话号码后,按 < [选项],您可以
看到下列子功能表:
n 播放播放播放播放播放 : 播放附加在电话号码的语音。
n 更改更改更改更改更改 : 更改附加在电话号码的语音。
n 删除删除删除删除删除 : 删除附加在电话号码的语音。
n 呼叫呼叫呼叫呼叫呼叫 : 您可以选择该功能表以进行呼叫。
设定设定设定设定设定[[[[[功能表功能表功能表功能表功能表6-2-6]6-2-6]6-2-6]6-2-6]6-2-6]
1. 首先,在待机模式下按 > [电话本]打开电话簿。
2. 滚动光标到设定,然后按 < [选择]进入。

70
进入
功能
表进
入功
能表
进入
功能
表进
入功
能表
进入
功能
表
公文包公文包公文包公文包公文包[[[[[功能表功能表功能表功能表功能表6]6]6]6]6]
n 保存至保存至保存至保存至保存至
滚动光标到保存至,然后按 < [选择]进入。
- 如果您选择变量,在添加条目时,手机将提示保存至何
处。
- 如果您选择SIM卡或手机,手机不提示您保存至何处,
直接将条目保存在SIM卡或手机。
n 查找方式查找方式查找方式查找方式查找方式
滚动屏幕光标到查找方式,然后按 < [选择]进入。
- 如果您选择变量,在查找时,手机将提示如何查找。
- 如果您选择姓名或号码,手机不提示您如何查找,直接
按姓名或号码查找条目。
n 查看选项查看选项查看选项查看选项查看选项
滚动屏幕光标到查看选项,然后按 < [选择]进入。
- 只显示姓名只显示姓名只显示姓名只显示姓名只显示姓名 :您可设置电话薄只显示姓名。
- 图片电话本图片电话本图片电话本图片电话本图片电话本 :您可设置电话薄显示个性图片。
全部复制全部复制全部复制全部复制全部复制[[[[[功能表功能表功能表功能表功能表6-2-7]6-2-7]6-2-7]6-2-7]6-2-7]
您可以将条目从SIM卡内存复制/移动到手机内存或从手机内存复
制/移动到SIM卡内存。
1. 首先,在待机模式下按 > [电话本]打开电话簿。
2. 滚动到全部复制,然后按 < [选择]进入该功能表。
n SIM卡转到手机卡转到手机卡转到手机卡转到手机卡转到手机 :将SIM卡中的条目复制到手机内存。
n 手机转到手机转到手机转到手机转到手机转到SIM卡卡卡卡卡 :将手机内存中的条目复制到SIM卡。
3. 您可以看到下列子功能表。
n 保留原号码保留原号码保留原号码保留原号码保留原号码 :复制的同时,原来的电话记录被保留。
n 删除原号码删除原号码删除原号码删除原号码删除原号码 :复制的同时,原来的电话记录被清除。

71
进入
功能
表进
入功
能表
进入
功能
表进
入功
能表
进入
功能
表
全部删除全部删除全部删除全部删除全部删除[[[[[功能表功能表功能表功能表功能表6-2-8]6-2-8]6-2-8]6-2-8]6-2-8]
您可以删除SIM卡、手机和语音中的所有条目。该功能需要安全
密码。
1. 在待机模式下按 > [电话本],然后选择全部删除,按 <[选择]。
2. 然后选择要清除的内存。
3. 按 < [确认]或按 > [返回]取消。
信息提示信息提示信息提示信息提示信息提示[[[[[功能表功能表功能表功能表功能表6-2-9]6-2-9]6-2-9]6-2-9]6-2-9]
nnnnn 特别服务号码特别服务号码特别服务号码特别服务号码特别服务号码
使用该功能访问您的网络运营商提供的特殊服务(如果您的SIM
卡支持)。
1. 首先,在待机模式下按 > [电话本]打开电话簿。
1. 滚动到特别服务号码,然后按 < [确认]进入。
3. 将显示可用的服务名称。
4. 使用 U 键和 D键选择服务。按 S键[发送]。
nnnnn 内存状态内存状态内存状态内存状态内存状态
该功能可让您查看电话簿的已用内存和可用内存。
1. 首先,在待机模式下按 >[电话本]打开电话簿。按 <[选择]选择信息。
1. 滚动到内存状态,然后按 <[确认]进入该功能表。
nnnnn 本手机号码(取决于本手机号码(取决于本手机号码(取决于本手机号码(取决于本手机号码(取决于SIM 卡)卡)卡)卡)卡)
您可以在SIM卡上查询本手机号码。

72
进入
功能
表进
入功
能表
进入
功能
表进
入功
能表
进入
功能
表
附件附件附件附件附件[[[[[功能表功能表功能表功能表功能表7]7]7]7]7]
游戏游戏游戏游戏游戏[[[[[功能表功能表功能表功能表功能表7-1]7-1]7-1]7-1]7-1]
手机为您提供多种有趣的游戏。
计算器计算器计算器计算器计算器[[[[[功能表功能表功能表功能表功能表7-2]7-2]7-2]7-2]7-2]
该功能表包含的标准功能包括+、-、×、÷:加、减、乘、
除。
1. 通过按数字键输入数字。
2. 通过导航键选择一个运算符。
3. 然后输入数字。
4. 您可以按 < [结果]查看计算结果。
5. 按[重设]或继续输入数字,重复上述过程。
6. 您可以按 C 键删除数字或者符号。
7. 您可以通过按 * 键输入负数,同时,也可以通过按 # 键输入小数。
8. 您可按 > 键退出计算器。
n 依游戏不同控制键也会不同。每个游戏会有主要控制
键的说明。其他请参考如下所述:
[通用控制键]
< : 游戏功能表
> : 返回
C : 暂停或返回游戏
提示提示提示提示提示

73
进入
功能
表进
入功
能表
进入
功能
表进
入功
能表
进入
功能
表
我的文件夹我的文件夹我的文件夹我的文件夹我的文件夹[[[[[功能表功能表功能表功能表功能表7-3]7-3]7-3]7-3]7-3]
您可查看下载的铃声和图片,并将其设为墙纸或手机铃声。
同样您也可以查看,聆听,删除或更名下载的数据。
图片库图片库图片库图片库图片库[[[[[功能表功能表功能表功能表功能表7-3-1]7-3-1]7-3-1]7-3-1]7-3-1]
铃声铃声铃声铃声铃声[[[[[功能表功能表功能表功能表功能表7-3-2]7-3-2]7-3-2]7-3-2]7-3-2]
每一项的子功能表每一项的子功能表每一项的子功能表每一项的子功能表每一项的子功能表
nnnnn 编辑名称编辑名称编辑名称编辑名称编辑名称
您可以编辑每一个下载记录的名称。
nnnnn 写信息写信息写信息写信息写信息
您可发送添加图片或声音的短信、彩信(视媒体类型)。
nnnnn 设置墙纸设置墙纸设置墙纸设置墙纸设置墙纸/////设置铃声设置铃声设置铃声设置铃声设置铃声
您可将下载的图片或声音设置为墙纸和铃音。
nnnnn 删除删除删除删除删除
您可以删除某一个下载记录。
nnnnn 全部删除全部删除全部删除全部删除全部删除
您可以删除每一个下载的记录。
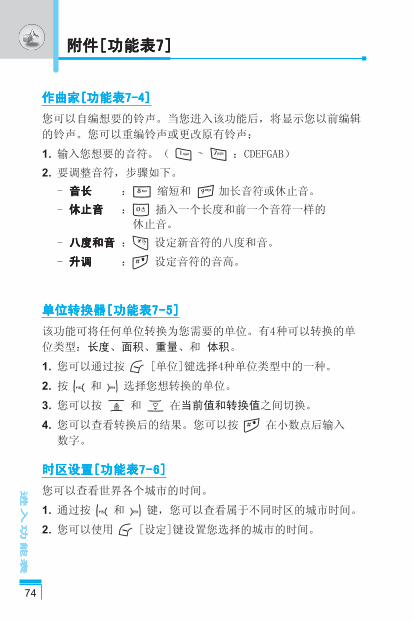
74
进入
功能
表进
入功
能表
进入
功能
表进
入功
能表
进入
功能
表
附件附件附件附件附件[[[[[功能表功能表功能表功能表功能表7]7]7]7]7]
作曲家作曲家作曲家作曲家作曲家[[[[[功能表功能表功能表功能表功能表7-4]7-4]7-4]7-4]7-4]
您可以自编想要的铃声。当您进入该功能后,将显示您以前编辑
的铃声。您可以重编铃声或更改原有铃声:
1. 输入您想要的音符。( 1 ~ 7 :CDEFGAB)
2. 要调整音符,步骤如下。
- 音长音长音长音长音长 :8 缩短和 9 加长音符或休止音。
- 休止音休止音休止音休止音休止音 :0 插入一个长度和前一个音符一样的
休止音。
- 八度和音八度和音八度和音八度和音八度和音 :* 设定新音符的八度和音。
- 升调升调升调升调升调 :# 设定音符的音高。
单位转换器单位转换器单位转换器单位转换器单位转换器[[[[[功能表功能表功能表功能表功能表7-5]7-5]7-5]7-5]7-5]
该功能可将任何单位转换为您需要的单位。有4种可以转换的单
位类型:长度、面积、重量、和 体积。
1. 您可以通过按 < [单位]键选择4种单位类型中的一种。
2. 按 L 和 R 选择您想转换的单位。
3. 您可以按 U 和 D 在当前值和转换值之间切换。
4. 您可以查看转换后的结果。您可以按 # 在小数点后输入
数字。
时区设置时区设置时区设置时区设置时区设置[[[[[功能表功能表功能表功能表功能表7-6]7-6]7-6]7-6]7-6]
您可以查看世界各个城市的时间。
1. 通过按 L 和 R 键,您可以查看属于不同时区的城市时间。
2. 您可以使用 < [设定]键设置您选择的城市的时间。

75
进入
功能
表进
入功
能表
进入
功能
表进
入功
能表
进入
功能
表
PC Sync
PC SYNC 是通过数据线在PC和手机之间实现数据交换的软
件。更多信息,请您在CD中查找帮助说明文件。
语音备忘录语音备忘录语音备忘录语音备忘录语音备忘录[[[[[功能表功能表功能表功能表功能表7-7]7-7]7-7]7-7]7-7]
语音记录功能允许您记录10条20秒长的语音信息。
记录记录记录记录记录[[[[[功能表功能表功能表功能表功能表7-7-1]7-7-1]7-7-1]7-7-1]7-7-1]
1. 您可使用功能表或在待机模式下按 C 外端按键记录语音。
2. 开始记录后,会显示记录时间信息。
3. 按 < 键结束记录。
4. 按 < [确认]键选择语音记录标题。
查看列表查看列表查看列表查看列表查看列表[[[[[功能表功能表功能表功能表功能表7-7-2]7-7-2]7-7-2]7-7-2]7-7-2]
您可查看语音记录列表,并可删除和播放语音记录。
激活红外线激活红外线激活红外线激活红外线激活红外线[[[[[功能表功能表功能表功能表功能表7-8]7-8]7-8]7-8]7-8]
您可使用红外线功能连接PC-SYNC,但须注意的是您不可同时使用
红外线或串口。

76
进入
功能
表进
入功
能表
进入
功能
表进
入功
能表
进入
功能
表
移动冲浪移动冲浪移动冲浪移动冲浪移动冲浪[[[[[功能表功能表功能表功能表功能表8]8]8]8]8]
您的手机支持基于无线应用协议(WAP)的服务。您可以访问
您的网络运营商所支持的服务。该服务功能表可让您获取有关
新闻、天气预报和飞机航班表之类的信息。
主页主页主页主页主页[[[[[功能表功能表功能表功能表功能表8-1]8-1]8-1]8-1]8-1]
回到主页。主页是您在启动的上网设定中所设定的WAP站点。
如果您没有进行设置,将使用运营商预先设定的站点。
书签书签书签书签书签[[[[[功能表功能表功能表功能表功能表8-2]8-2]8-2]8-2]8-2]
您可以按 < [选择]进入该功能表,按 > [返回]退出该功能。
n 连接连接连接连接连接 : 连接到所选书签。
n 添加添加添加添加添加 : 手动新增书签。
n 修改修改修改修改修改 : 更改所选书签的标题和地址。
n 删除书签删除书签删除书签删除书签删除书签 : 从书签列表中删除所选书签。
Push信息信息信息信息信息[[[[[功能表功能表功能表功能表功能表8-3]8-3]8-3]8-3]8-3]
收信箱收信箱收信箱收信箱收信箱[[[[[功能表功能表功能表功能表功能表 8-3-1] 8-3-1] 8-3-1] 8-3-1] 8-3-1]
您可以读取或删除Push信息。
n 进入进入进入进入进入 : 显示接收到的Push信息。
n 读取读取读取读取读取 : 您将连接到所收Push信息中链接的站点。
n 删除删除删除删除删除 : 删除选择的Push信息。
接收接收接收接收接收[[[[[功能表功能表功能表功能表功能表8-3-2]8-3-2]8-3-2]8-3-2]8-3-2]
选择是否接收Push信息。

77
进入
功能
表进
入功
能表
进入
功能
表进
入功
能表
进入
功能
表
上网设定上网设定上网设定上网设定上网设定[[[[[功能表功能表功能表功能表功能表8-4]8-4]8-4]8-4]8-4]
您可以设定 多10个上网设定,但每次只能启动其中一个。
滚动到所要的情景模式并按 < 进入可用的选项。
nnnnn 启动启动启动启动启动
您可以启动所选的上网设定。
nnnnn 设置设置设置设置设置
编辑和更改所选上网设定中的WAP设置。
- - - - - 主页主页主页主页主页
该设定可让您输入您想作为主页使用的网站地址(URL)。
您不需要在每个URL前键入“http://”,因为WAP浏览器会自
动加入。
- - - - - 连接方式连接方式连接方式连接方式连接方式
n 数据(电路交换)数据(电路交换)数据(电路交换)数据(电路交换)数据(电路交换)
n GPRS(通用分组无线业务)(通用分组无线业务)(通用分组无线业务)(通用分组无线业务)(通用分组无线业务)
- - - - - 数据设定数据设定数据设定数据设定数据设定
IP 地址地址地址地址地址 : 输入访问WAP网关的IP地址。
拨出号码拨出号码拨出号码拨出号码拨出号码 : 输入访问WAP网关的拨号号码。
用户名用户名用户名用户名用户名 : 拨号服务器(不是WAP网关)的用户身份。
密码密码密码密码密码 : 拨号服务器(不是WAP网关)识别您身份所需
的密码。
呼叫类型呼叫类型呼叫类型呼叫类型呼叫类型 : 选择数据来电的类型:模拟或ISDN(数码)。
呼叫速度呼叫速度呼叫速度呼叫速度呼叫速度 : 数据连接的速度,9600 或者 14400。
空闲时限空闲时限空闲时限空闲时限空闲时限 : 您可以设定限制时间。超过此时间限制而没有
数据输入或传输时,服务将自动关闭。
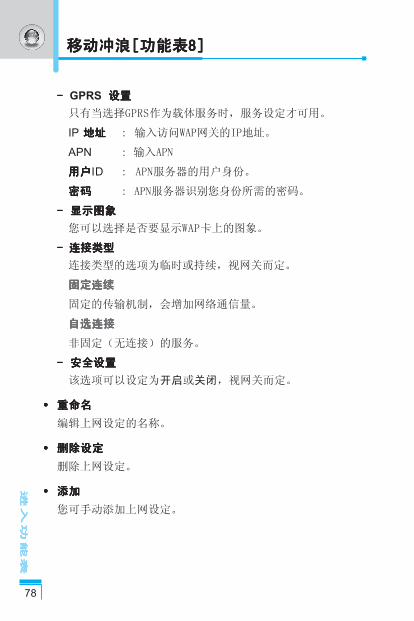
78
进入
功能
表进
入功
能表
进入
功能
表进
入功
能表
进入
功能
表
移动冲浪移动冲浪移动冲浪移动冲浪移动冲浪[[[[[功能表功能表功能表功能表功能表8]8]8]8]8]
- - - - - GPRS 设置设置设置设置设置
只有当选择GPRS作为载体服务时,服务设定才可用。
IP 地址地址地址地址地址 : 输入访问WAP网关的IP地址。
APN : 输入APN
用户用户用户用户用户ID : APN服务器的用户身份。
密码密码密码密码密码 : APN服务器识别您身份所需的密码。
- - - - - 显示图象显示图象显示图象显示图象显示图象
您可以选择是否要显示WAP卡上的图象。
- - - - - 连接类型连接类型连接类型连接类型连接类型
连接类型的选项为临时或持续,视网关而定。
固定连续固定连续固定连续固定连续固定连续
固定的传输机制,会增加网络通信量。
自选连接自选连接自选连接自选连接自选连接
非固定(无连接)的服务。
- - - - - 安全设置安全设置安全设置安全设置安全设置
该选项可以设定为开启或关闭,视网关而定。
nnnnn 重命名重命名重命名重命名重命名
编辑上网设定的名称。
nnnnn 删除设定删除设定删除设定删除设定删除设定
删除上网设定。
nnnnn 添加添加添加添加添加
您可手动添加上网设定。

79
进入
功能
表进
入功
能表
进入
功能
表进
入功
能表
进入
功能
表
nnnnn Email 服务器服务器服务器服务器服务器
- - - - - 电子邮件连接电子邮件连接电子邮件连接电子邮件连接电子邮件连接
连接到您配置的电子邮件服务器。
- - - - - 编辑地址编辑地址编辑地址编辑地址编辑地址
编辑电子邮件服务器的地址。
转到转到转到转到转到URL[[[[[功能表功能表功能表功能表功能表8-5]8-5]8-5]8-5]8-5]
您可以直接连接到想要的站点。您需要输入想直接连接的特定
URL。
缓存缓存缓存缓存缓存[[[[[功能表功能表功能表功能表功能表8-6]8-6]8-6]8-6]8-6]
您可以删除缓存内容,更改缓存模式。
清除缓存清除缓存清除缓存清除缓存清除缓存[[[[[功能表功能表功能表功能表功能表8-6-1]8-6-1]8-6-1]8-6-1]8-6-1]
缓存内容将被清除。
查询缓存查询缓存查询缓存查询缓存查询缓存[[[[[功能表功能表功能表功能表功能表8-6-2]8-6-2]8-6-2]8-6-2]8-6-2]
您可以更改查询缓存的时间。
安全设置安全设置安全设置安全设置安全设置[[[[[功能表功能表功能表功能表功能表8-7]8-7]8-7]8-7]8-7]
显示安全证书的列表。
重新设定重新设定重新设定重新设定重新设定[[[[[功能表功能表功能表功能表功能表8-8]8-8]8-8]8-8]8-8]
您可以将上网设定的所有当前设定复零为初始设定。
浏览器版本浏览器版本浏览器版本浏览器版本浏览器版本[[[[[功能表功能表功能表功能表功能表8-9]8-9]8-9]8-9]8-9]
显示WAP浏览器的版本。

80
进入
功能
表进
入功
能表
进入
功能
表进
入功
能表
进入
功能
表
在线功能表在线功能表在线功能表在线功能表在线功能表
在线时,您可以查看下列功能表。
nnnnn 主页主页主页主页主页
与[功能表8-1]相同。
nnnnn 刷新刷新刷新刷新刷新
下载当前页面。
nnnnn 书签书签书签书签书签
与[功能表8-2]相同。
nnnnn 添加书签添加书签添加书签添加书签添加书签
将当前URL保存为书签。
nnnnn 信息信息信息信息信息
进行Wap链接时显示SMS信息。
nnnnn Push信息信息信息信息信息
查看[功能表8-3].
nnnnn 转到转到转到转到转到URL
您可以直接连接到想要的站点。您需要输入想直接连接的特定
URL。
nnnnn 电子邮件电子邮件电子邮件电子邮件电子邮件
您可以连接到您所设置的邮件服务器。
nnnnn 电子邮件设定电子邮件设定电子邮件设定电子邮件设定电子邮件设定
将当前URL保存为电子邮件服务器。
nnnnn 清除缓存清除缓存清除缓存清除缓存清除缓存
缓存中的内容将被清除。
nnnnn 保存图像保存图像保存图像保存图像保存图像
保存浏览的图像。

81
进入
功能
表进
入功
能表
进入
功能
表进
入功
能表
进入
功能
表
应用应用应用应用应用[[[[[功能表功能表功能表功能表功能表9-1]9-1]9-1]9-1]9-1]
JAVA 功能表选项功能表选项功能表选项功能表选项功能表选项
滚动到某一应用程序并选择选项。
1. 打开打开打开打开打开 :执行所选MIDlet程序。
2. 删除删除删除删除删除 :删除所选的MIDlet程序。
3. 更新更新更新更新更新 :连接服务器更新所选的所选的MIDlet程序。
4. 信息信息信息信息信息 :显示所选的MIDlet程序信息。
5. 设定设定设定设定设定 :您可为JAVA游戏设置背景灯光和声音。
下载下载下载下载下载[[[[[功能表功能表功能表功能表功能表9-2]9-2]9-2]9-2]9-2]
您可编辑下载MIDlet程序服务器的地址,并可将WAP浏览器下载
的程序存储在手机中。您也可在应用程序界面下查看所存储的
MIDlets列表。
内存状态内存状态内存状态内存状态内存状态[[[[[功能表功能表功能表功能表功能表9-3]9-3]9-3]9-3]9-3]
您可查看游戏和应用程序可用的内存大小以及手机全部的内存
状态。
JAVATM 是SUN系统公司的商标。
Java[[[[[功能表功能表功能表功能表功能表9]9]9]9]9]

82
进入
功能
表进
入功
能表
进入
功能
表进
入功
能表
进入
功能
表
收藏夹收藏夹收藏夹收藏夹收藏夹[[[[[功能表功能表功能表功能表功能表10]10]10]10]10]
您可在收藏夹中设定9个常用功能表。您可使用键盘热键 D进入收藏夹。
如果您想在收藏夹设定功能表,选择列表上的<空>栏进入,
对于已经设定的功能表,请参照以下说明:
- 启动启动启动启动启动 : 启动设定的功能表。
- 更改更改更改更改更改 : 更改功能表。
- 删除删除删除删除删除 : 删除设定的功能表。
- 删除全部删除全部删除全部删除全部删除全部 : 删除收藏夹中所设定的全部功能表
- 信息信息信息信息信息 : 查看收藏夹中设定的功能表。

83
附件附件附件附件附件
n 請您務必使用原廠LG配件。
n 仿冒品或替代品及非原廠配件可能會讓您喪失保固權益。
n 所有相關配件可能因地區別不同而有所改變;所以在
您購買或使用前請務必向您所在的地區之LG經銷或代
理商進行確認。
注意注意注意注意注意
我們針對您所使用的行動電話設計了多種款式的配件。您可以依
照您的需求選擇適合您的配件。
標準電池標準電池標準電池標準電池標準電池
簡易型免持聽筒簡易型免持聽筒簡易型免持聽筒簡易型免持聽筒簡易型免持聽筒
使用此項配件將提供您的行動電話免持聽筒
的操作模式。
旅行用充電器旅行用充電器旅行用充電器旅行用充電器旅行用充電器
此充電裝置將能提供您的行動電話電池充電
功能。
項鍊型吊飾項鍊型吊飾項鍊型吊飾項鍊型吊飾項鍊型吊飾
數據傳輸線數據傳輸線數據傳輸線數據傳輸線數據傳輸線/////光碟光碟光碟光碟光碟
您的行動電話可透過此套件輕易的連結電腦
並且進行資料備份或修改。

84
使用手机时,请遵循以下基本安全注意事项。使用手机时,请遵循以下基本安全注意事项。使用手机时,请遵循以下基本安全注意事项。使用手机时,请遵循以下基本安全注意事项。使用手机时,请遵循以下基本安全注意事项。
n 请勿用湿手接触充电器。
n 请勿拆卸手机。(如果需要修理,请找合格的专业技术人员帮
忙。)
n 请远离电子仪器,例如:电视机、收音机或个人计算机。
n 请将手机远离热源,例如:电器或电热烹饪设备。
n 小心轻放。
n 请勿使手机受到机械振动或晃动。
n 如果使用手机套或塑料手机套可能会损坏手机外壳涂层。
n 请用干布擦拭手机外壳。(请勿使用溶解物,如:苯、稀释剂或
酒精。)
n 请勿将手机暴露在过多烟雾或灰尘的环境中。
n 勿将手机放于信用卡或磁卡附近;因而影响磁卡上的信息。
n 切勿用利器敲击屏幕;否则,会损坏手机。
n 不要手机置于液体或潮湿的环境中。
n 小心使用耳机等配件。有必要,不必要时请勿触摸天线。
保养和维护保养和维护保养和维护保养和维护保养和维护

85
� 保管电池保管电池保管电池保管电池保管电池
n 在重新充电前,不必完全放电。与其他电池不同,本电池不会
因电池的记忆功能影响其使用性能。
n 请只使用LG电池和充电器。东方通信充电器可以 大化电池使
用寿命。
n 请勿拆卸或使电池短路。
n 请保持金属触点和电池清洁。
n 请在电池无法满足性能要求时进行更换。电池可以充数百次
电,直到需要更换。
n 如果长时间不用电池,请重新充电,以延长使用时间。
n 请勿将电池充电器暴露在阳光下或在湿度高的地方使用,
如浴室。
n 请勿将电池放置在过热或过冷的地方,这样会影响电池性能。

86
常规常规常规常规常规
产品名称 : G7100
系统 : GSM 900 / DCS 1800
环境温度环境温度环境温度环境温度环境温度
高 : +55 °C
低 : -10 °C
技术数据技术数据技术数据技术数据技术数据

87
备忘录备忘录备忘录备忘录备忘录

88
备忘录备忘录备忘录备忘录备忘录