GoldMine Corporate Edition 6.7 Install Guide
104
Installation Guide CORPORATE EDITION VERSION 6.7 09/04
Transcript of GoldMine Corporate Edition 6.7 Install Guide

Installation Guide
CORPORATE EDITION VERSION 6.7
09/04

ii Copyright
Copyright 2004 FrontRange Solutions USA Inc. All Rights Reserved.
This software includes software developed by the Apache Software Foundation (http://www.apache.org/).
The Sentry Spelling-Checker Engine Copyright © 1999 Wintertree Software Inc.
USE OF THIS SOFTWARE AND ITS RELATED USER DOCUMENTATION IS SUBJECT TO THE TERMS AND CONDITIONS OF THE APPLICABLE END-USER LICENSE AGREEMENT (EULA), A COPY OF WHICH IS FOUND IN THE USER DOCUMENTATION. YOU MUST AGREE TO THE TERMS AND CONDITIONS OF THE EULA IN ORDER TO USE THIS SOFTWARE. IF YOU DO NOT AGREE TO THE TERMS AND CONDITIONS OF THE EULA, PROMPTLY RETURN THE UNUSED SOFTWARE IN ITS UNOPENED CD PACKAGE TO THE PLACE FROM WHICH YOU OBTAINED IT FOR A REFUND.
WARNING: The software described in this manual and its related user documentation are protected by copyright law. In no event, shall any part of the related user documentation be copied, reproduced, distributed, transmitted, stored in a retrieval system, or translated into any language, without the express written permission of FrontRange Solutions USA Inc.
Contact FrontRange Solutions USA Inc. at our Web site: www.frontrange.com
(Jan. 2004)/GM67090104
GoldMine Installation Guide

Copyright iii
Trademark NoticesFrontRange Trademark InformationThe following are trademarks of FrontRange Solutions USA Inc. and/or its affiliates in the United States and/or other countries:
FrontRange Solutions®, GoldMine®, GoldSync®, GoldMine® Answer Wizard™, GoldMine® Management Intelligence™, GoldMine® Manager’s Console™, iGoldMine™, HEAT®, HEAT® Service & Support™, HEAT® PowerDesk™, iHEAT™, HEAT® Self Service™, HEAT® Manager’s Console™, HEAT® Answer Wizard™, HEAT® Quick Start Wizard™, InfoCenter®, Automated Processes™, First Level Support®, GoldMine® CustomerIQ®, HEAT® CustomerIQ®, CustomerIQ® and other FrontRange products and brands.
Other Trademark InformationThe following are trademarks of their respective owners or companies:
TRADEMARK OR REGISTERED TRADEMARK COMPANY
ACT!® CRM Division of Best Software Inc.Adobe®, Acrobat® and Reader® Adobe Systems Inc.Apple®, Mac® OS, and Macintosh® Apple Computer, Inc.Avaya® Avaya, Inc.
Beyond Gold™ Computerese
Borland® Interbase® Borland International Inc.Calyx® Calyx SoftwareCisco® Cisco Technology, Inc.Citrix® Citrix Systems, Inc.Corel® Corel CorporationCrystal Reports® Business Objects S.A.dBASE® dBASE Inc.dbCams+™ Financial Computer Support, Inc.
Genesis® Genesis Telecommunications Laboratories, Inc.
Genesis 2000® Genesis 2000, Inc.GlobalCall® IDT CorporationGoldBox© copyright of Redstone Softbase CompanyGraphOn® and GO-Global® GraphOn CorporationGreat Plains® Great Plains Software Inc.Hewlett Packard® Hewlett Packard CompanyIBM®, Lotus®, and Lotus Organizer® IBM CorporationInaPlex™ and Inaport™ Inaplex LimitedIntel®, Pentium® and Dialogic® Intel CorporationIntuit®, QuickBooks®, and QuickBooks Pro® Intuit Inc.KNOWLIX™ Peregrine Systems Inc.

iv Copyright
Other products and brands are registered trademarks or trademarks of their respective owners/companies.
LANDesk® LANDesk Group Ltd. Linux® Linus TorvaldsMaximizer Enterprise™ Multiactive SoftwareMicrosoft®, Active Directory®, Microsoft® SQL Server™, ActiveX®, Outlook®, Windows®, Windows NT®, .Net™, Visual Fox-Pro®, Microsoft Exchange Server®, and Microsoft®.NET™
Microsoft Corporation
Netcensus® Tally Systems CorporationNetilla® Netilla Networks, Inc.Netscape® and Netscape Navigator® Netscape Communications Corp.NextPage®, Folio®, Folio Views®, Folio Publisher®, Folio Builder®, Folio Integrator®, NXT™, NextPage Triad™, NextPage Contenta™, NextPage Solo™, Rapidapps™, Matrix™, and Live-Publish™
NextPage, Inc.
Novell®, Netware®, and Groupwise® Novell, Inc.
OmniRush™ (formerly FaxRush®) Z-Firm LLCOracle® Oracle CorporationPalm®, MyPalm™, Palm Powered™, Palm.Net®, PalmOS®, and PalmPak® Palm, Inc.
Red Hat® Red Hat, Inc.RightFax® Captaris, Inc.Rolodex® Rolodex Corp.Sage Line™ The Sage Group plcSaleMaker® SaleMaker Corp.Scansoft® and SpeechPearl® Scansoft, Inc.SPARC® SPARC International Inc.Sun®, Java™, and Solaris® Sun Microsystems, Inc.Sybase® Sybase, Inc.Symantec®, pcAnywhere®, and WinFax® Symantec CorporationUNIX® UNIX System Laboratories, Inc.VNC™ AT&T Laboratories CambridgeVoxpoint® Cayo Communications, Inc.Visor® Handspring, Inc.Zetafax® Equisys PLC Company
TRADEMARK OR REGISTERED TRADEMARK COMPANY

Copyright v
FrontRange Solutions Software Product: GoldMine®
(Rev. Sept. 2004)
END-USER LICENSE AGREEMENT (“EULA”)
IMPORTANT – READ CAREFULLY
THIS EULA IS A LEGAL AGREEMENT BETWEEN YOU (“YOU” OR “LICENSEE”) AND FRONTRANGE SOLUTIONS USA INC., A COLORADO CORPORATION (“FRONTRANGE SOLUTIONS”), FOR THE SOFTWARE PRODUCT IDENTIFIED ABOVE WHICH INCLUDES COMPUTER SOFTWARE AND ASSOCIATED MEDIA AND DOCUMENTATION (COLLECTIVELY “LICENSED SOFTWARE”). BY OPENING THE SOFTWARE PACKAGING, COMPLETING THE SERIALIZATION PROCESS, OR DOWNLOADING, INSTALLING, ACCESSING OR UTILIZING THE LICENSED SOFTWARE OR CLICKING THE “I ACCEPT” BUTTON, YOU AGREE TO BE BOUND BY THE TERMS OF THIS EULA. IF YOU DO NOT AGREE WITH THE TERMS OF THIS EULA, PROMPTLY RETURN THE UNUSED LICENSED SOFTWARE TO THE PLACE FROM WHICH YOU OBTAINED IT FOR A REFUND.
1. Protection/Ownership. The Licensed Software may include software owned by third parties (collectively "Third-Party Owners"). The Third-Party Owners are third-party beneficiaries of this EULA and You agree to be bound to them under all the terms and conditions of this EULA, unless and to the extent that a separate license agreement for such software governs. The Licensed Software is protected by copyright and other intellectual property laws. FrontRange Solutions or a Third Party Owner retain ownership of the Licensed Software and the copies of the Licensed Software provided herewith. The Licensed Software is licensed to Licensee for use subject to the terms set forth in this EULA.
2. Grant of License. FrontRange Solutions hereby grants to Licensee and Licensee fully accepts, upon delivery, a nonexclusive, nontransferable and perpetual (unless earlier terminated as provided below) right to use only the executable version (no source code) of the Licensed Software for its own internal business purposes. Installation of the Licensed Software may entail completion of a serialization procedure in which You will be required to enter a serialization code(s) provided to You as a part of the Licensed Software. You agree not to disclose the serialization code(s) provided to You to any third party other than an authorized FrontRange Solutions reseller (“Reseller”). The serialization code indicates to the loaded Licensed Software the number of authorized concurrent users covered by the license.
3. Scope of License. You are allowed only the number of concurrent users of the Licensed Software as shown in the corresponding purchase order or other order confirmation form. The number of authorized concurrent users covered by the license will be visually displayed to You during the serialization procedure. A remote user accessing the Licensed Software (via a web-enabled product) is considered to be utilizing one concurrent user license. Nothing in this paragraph shall limit Licensee from allowing its employees, agents or representatives or the employees, agents or representatives of Licensee’s parent, subsidiaries or affiliates, if any, from accessing or using the Licensed Software for Licensee’s own internal business purposes; provided, however that the total number of concurrent users does not exceed the number of authorized concurrent users covered by the license.
4. Registration/Audit. The installation process may require you to register the Licensed Software with user information and the Licensed Software may contain an automated audit tool whereby FrontRange Solutions will receive notification of Your licensed limits and user information. Any personal information collected (1) will be used solely for registration and license limit auditing purposes for the Licensed Software and to provide You with important information about the Licensed Software, (2) will be stored in computer servers with limited access that are located in controlled facilities and/or under SSL protocol, (3) may be stored and processed in the United States or any other country in which FrontRange or its affiliates, subsidiaries or agents maintain facilities and by using this Licensed Software, you consent to any such transfer of information outside of your country, (4) may be stored indefinitely, (5) will not be shared with any government agency, private organization, or the public, except with your consent or as required by law.

vi Copyright
5. Additional users. If You wish to expand the number of authorized concurrent users covered by the license You may be able to purchase the additional licenses from FrontRange Solutions or a Reseller. Such added licenses will be affected by the provision of additional serialization code(s) by FrontRange Solutions.
6. Transfer. To the maximum extent permitted by applicable law, Licensee may not resell or otherwise transfer for value the Licensed Software. Notwithstanding the foregoing, Licensee may assign all of its licensed rights and duties under this EULA to a third-party that: (a) directly or indirectly controls Licensee; (b) is controlled by or under common control with Licensee; or (c) purchases all or substantially all of Licensee’s assets; provided, however, that (i) Licensee gives written notice to FrontRange Solutions of the transfer or assignment; (ii) the permitted third-party assignee agrees to be bound by all the terms herein and completes and returns a registration card or other requested transfer documentation to FrontRange Solutions; and (iii) in no circumstance shall any transfer or assignment, unless specifically agreed upon in writing, (y) release Licensee from any prior outstanding obligation under this EULA, or (z) allow Licensee or Licensee’s transferee or assignee, collectively, to utilize more licenses than the number of licenses authorized under this EULA. If You transfer the Licensed Software, You must simultaneously transfer possession of all associated media and documentation, and remove all Licensed Software from Your computers.
7. Restrictions. You agree not to copy the Licensed Software except for backup and disaster recovery purposes, or as described in the documentation comprising the Licensed Software. If You make backup copies of the Licensed Software, the original copy of the Licensed Software and all backup copies that You make may not leave your control and are owned by FrontRange Solutions or a Third Party Owner. You agree that this is a license only and that no title passes to You. You agree not to challenge FrontRange Solutions’ rights in or otherwise attempt to assert any rights in the Licensed Software, except those provided under this EULA. You agree not to disclose, modify, decompile, translate, disassemble or reverse engineer the Licensed Software. You agree not to distribute, rent or lease the Licensed Software. You agree not to use the Licensed Software as a commercial hoster or application service provider. You agree to use the Licensed Software only as expressly permitted under this EULA and in accordance with the accompanying documentation and any other written instruction provided. You acknowledge that the Licensed Software contains information deemed confidential or otherwise proprietary to FrontRange Solutions or a Third Party Owner, and You agree to handle the Licensed Software with at least the same degree of care employed with respect to Your own confidential or proprietary information.
8. Links to Third-Party Sites. You may link to third-party sites through the use of the Licensed Software. FrontRange Solutions is providing such links to you as a convenience only. FrontRange Solutions does not generate or control the content of the third-party sites and is not responsible for and does not endorse the policies, practices or contents of any third-party sites.
9. Warranty/Remedy/Limitation of Liability. TO THE MAXIMUM EXTENT PERMITTED BY APPLICABLE LAW, THE WARRANTY AND REMEDY SET FORTH BELOW ARE EXCLUSIVE AND IN LIEU OF ALL OTHER WARRANTIES AND REMEDIES, ORAL OR WRITTEN, EXPRESSED OR IMPLIED. Except as provided for in this EULA, no FrontRange Solutions reseller, dealer, agent or employee is authorized to modify or add to the following warranties and remedies.
FrontRange Solutions warrants that for a period of ninety (90) days following delivery of the Licensed Software (i) the media on which the Licensed Software is furnished shall be free from defects in materials and workmanship under normal use; and (ii) the Licensed Software will perform substantially in accordance with FrontRange Solutions’ user documentation accompanying the Licensed Software. FrontRange Solutions does not warrant that the Licensed Software will meet Your requirements or that the operation of the Licensed Software will be uninterrupted or error free or that all defects will be corrected. This Limited Warranty is void if failure of the Licensed Software has resulted from accident, abuse, modification, or misapplication of the Licensed Software.

Copyright vii
If You believe there is a defect in the Licensed Software such that it does not meet the Limited Warranty provided above, You must notify FrontRange Solutions in writing within the 90-day warranty period. FrontRange Solutions’ entire liability and Your exclusive remedy with regard to the Limited Warranty, shall be, at FrontRange Solutions’ sole discretion, either repair or replacement of the Licensed Software or a refund of the amount paid by You for the Licensed Software (provided in that case that You also return the Licensed Software). Any repaired or replacement Licensed Software shall be warranted for the remainder of the original warranty period.
To the maximum extent permitted by applicable law, except as provided above, FRONTRANGE SOLUTIONS MAKES NO WARRANTY OR REPRESENTATION, EITHER EXPRESSED OR IMPLIED WITH RESPECT TO THE LICENSED SOFTWARE, ITS QUALITY, PERFORMANCE, NON-INFRINGEMENT, MERCHANTABILITY, OR FITNESS FOR A PARTICULAR PURPOSE.
UNLESS BOTH EXPRESSLY REPRESENTED AND AGREED IN WRITING, THE LICENSED SOFTWARE IS NOT DESIGNED, OR INTENDED FOR USE IN ANY MEDICAL, LIFE SAVING OR LIFE SUSTAINING SYSTEMS, TRANSPORTATION SYSTEMS, NUCLEAR SYSTEMS, OR FOR ANY OTHER MISSION CRITICAL APPLICATION IN WHICH THE FAILURE OF THE LICENSED SOFTWARE COULD CREATE A SITUATION WHERE SUBSTANTIAL PROPERTY DAMAGE OR PERSONAL INJURY OR DEATH MAY OCCUR. FRONTRANGE SOLUTIONS AND ANY THIRD-PARTY OWNERS RECOMMEND AGAINST, AND DISCLAIM ANY LIABILITY FOR, USE OF THE LICENSED SOFTWARE IN ANY SUCH APPLICATION.
You understand and acknowledge that FrontRange Solutions will not be liable for network-related problems attributable to the operation of the Licensed Software and that network configuration changes may affect the system's performance.
To the maximum extent permitted by applicable law, and except for liability arising under paragraph 10 below, FrontRange Solutions’ entire liability under this EULA shall be limited to the amount paid by You for the Licensed Software.
IN NO EVENT WILL FRONTRANGE SOLUTIONS BE LIABLE FOR INDIRECT, SPECIAL, INCIDENTAL OR CONSEQUENTIAL DAMAGES ARISING OUT OF THE USE OR INABILITY TO USE THE LICENSED SOFTWARE, even if advised of the possibility of such damages. In particular, and without limitation, FrontRange Solutions shall have no liability for any data stored or processed with the Licensed Software, including the costs of recovering such data.
10. Indemnification. FrontRange Solutions will defend, indemnify and hold Licensee harmless from any third party claim that the Licensed Software infringes any copyright, trademark or trade secret owned or controlled by the third party; provided, however, that (i) FrontRange Solutions shall be notified promptly in writing by Licensee of any such claim; (ii) FrontRange Solutions shall have sole control of the defense of any action on such claim and all negotiations for its settlement or compromise; (iii) Licensee shall cooperate with FrontRange Solutions, at FrontRange Solutions’ expense, in a reasonable way to facilitate the settlement or defense of such claim; (iv) such claim does not arise from Licensee’s modifications not authorized by FrontRange Solutions; and (v) should the Licensed Software become, or in FrontRange Solutions’ opinion likely to become, subject to such claim of infringement, then Licensee shall permit FrontRange Solutions, at FrontRange Solutions’ option and expense, either (a) to procure for Licensee the right to continue using the Licensed Software, or (b) to replace or modify the Licensed Software so that it becomes noninfringing and performs in a substantially similar manner to the original product, or (c) upon failure of (a) or (b), despite the reasonable efforts of FrontRange Solutions, to terminate this EULA and return the license fee paid by Licensee for the Licensed Software.
11. Maintenance and Support. FrontRange Solutions provides maintenance and/or technical support (including upgrades and enhancements) for the Licensed Software only through separate Agreements. Please contact FrontRange Solutions or the place from which You obtained the Licensed Software if You wish to obtain maintenance and/or technical support through the execution of such an agreement.

viii Copyright
12. Compliance; Export Control; Privacy. You must comply with all applicable laws and regulations in Your use of the Licensed Software. You may not export, ship, transmit, or re-export the Licensed Software in violation of any applicable law or regulation, including, without limitation, the Export Administration Regulations issued by the United States Department of Commerce, or any such similar law or regulation issued by such other governmental entity which may have jurisdiction over such export. Further, You agree to abide by all applicable data protection, SPAM, privacy and similar rules, directives and other laws in Your use of the Licensed Software.
13. United States Government Restricted Rights. THIS SECTION APPLIES ONLY TO LICENSING OR USE BY THE FEDERAL GOVERNMENT OF THE UNITED STATES. The Licensed Software is provided with RESTRICTED RIGHTS. Use, duplication, or disclosure by the federal government is subject to restricted rights as set forth in section (c) of The Rights in Technical Data and Computer Software clause at 252.227-7014 for DOD contracts and at FAR (48 CFR 52.227-19) for civilian agency contracts or other comparable agency clauses.
14. Termination. Your right to use the Licensed Software continues until this EULA is terminated. You may terminate this EULA at any time by destroying all of Your copies of the Licensed Software. This EULA will automatically terminate if You fail to comply with the material terms of this EULA. Upon any termination, You agree to remove all Licensed Software from Your computers, destroy all copies of the Licensed Software, and, upon request from FrontRange Solutions, certify in writing Your compliance herewith.
15. Severability. If any of the terms, or portions thereof, of this EULA are invalid or unenforceable under any applicable statute or rule of law, the court shall reform the contract to include an enforceable term as close to the intent of the original term as possible; all other terms shall remain unchanged.
16. Whole Agreement. This EULA and any applicable FrontRange Solutions order form or maintenance and support agreement or like document constitutes the entire agreement between You and FrontRange Solutions relating to the licensed rights for the Licensed Software, and any additions to, or modifications of, this EULA shall be binding upon the parties only if the same shall be in writing and duly executed by You and by a duly authorized representative of FrontRange Solutions. THE TERMS AND CONDITIONS OF ANY CORRESPONDING PURCHASE ORDER OR OTHER ORDER CONFIRMATION FORM RELATING TO THE LICENSED SOFTWARE ARE ONLY BINDING ON FRONTRANGE SOLUTIONS IF SUCH TERMS AND CONDITIONS ARE AGREED TO IN WRITING IN ACCORDANCE WITH THE PRIOR SENTENCE AND IN A DOCUMENT OTHER THAN THE PURCHASE ORDER OR OTHER ORDER CONFIRMATION FORM.
17. Waiver. The waiver or failure of either party to exercise in any respect any right provided for in this EULA shall not be deemed a waiver of any further or future right under this EULA.
18. Assignability. This EULA shall inure to the benefit of, and is freely assignable to, FrontRange Solutions’ successors and assignees of rights in the Licensed Software.
19. Resellers. If Licensee acquired the Licensed Software through a Reseller, Licensee acknowledges that (i) payment and delivery terms for the Licensed Software must be established separately and independently between the Licensee and the Reseller; (ii) this EULA constitutes the entire agreement between the Licensee and FrontRange Solutions regarding the license rights for the Licensed Software as described above and is controlling; (iii) the terms and conditions of any purchase order or any other agreement between the Licensee and the Reseller are not binding on FrontRange Solutions; (iv) the Reseller is not FrontRange Solutions’ agent and is not authorized to alter, amend or modify the terms of this EULA or to otherwise grant any license or other rights relating in any way to the Licensed Software; and (v) Licensee’s nonpayment of any amount due to a Reseller or any other relevant third party relating to its licensed rights under this EULA shall constitute a basis for FrontRange Solutions’ termination of this EULA. Licensee further acknowledges that FrontRange Solutions makes no representation or warranty with regard to any services provided by any Reseller, or any actions or failures to act by any Reseller.

Copyright ix
If Reseller received the Licensed Software as Not-For-Resale (or ‘NFR’) software in connection with a FrontRange Solutions reseller or other channel program, then this Licensed Software may only be used by Reseller, Reseller’s right to use the Licensed Software shall be subject to the terms of such program and applicable reseller agreement, and will terminate upon Reseller’s termination from such program or such earlier time as set forth in applicable reseller agreement.
20. Contact. All questions concerning this EULA shall be directed to:
FrontRange Solutions USA Inc.1125 Kelly Johnson Blvd.Colorado Springs, CO 80920Attention: General CounselPhone: 719.531.5007Fax: 719.799.1042Email: [email protected]

x Copyright

T A B L E O F C O N T E N T S
Contents
IntroductionWelcome to GoldMine 6.7 . . . . . . . . . . . . . . . . . . . . . . . . . . . . . . . . . . . . . . . . . . . xvAbout this Guide . . . . . . . . . . . . . . . . . . . . . . . . . . . . . . . . . . . . . . . . . . . . . . . . . .xvii
Audience and Expertise . . . . . . . . . . . . . . . . . . . . . . . . . . . . . . . . . . . . . . . .xviiDocument Conventions . . . . . . . . . . . . . . . . . . . . . . . . . . . . . . . . . . . . . . . . .xvii
Resources . . . . . . . . . . . . . . . . . . . . . . . . . . . . . . . . . . . . . . . . . . . . . . . . . . . . . . . xviiiContact Us . . . . . . . . . . . . . . . . . . . . . . . . . . . . . . . . . . . . . . . . . . . . . . . . . . . . . . xviii
System RequirementsOverview . . . . . . . . . . . . . . . . . . . . . . . . . . . . . . . . . . . . . . . . . . . . . . . . . . . . . . . . 1-1System Requirements . . . . . . . . . . . . . . . . . . . . . . . . . . . . . . . . . . . . . . . . . . . . . . 1-2
Level of Windows Security . . . . . . . . . . . . . . . . . . . . . . . . . . . . . . . . . . . . . . 1-2Server Requirements . . . . . . . . . . . . . . . . . . . . . . . . . . . . . . . . . . . . . . . . . . . 1-2Shared Workstation Requirements . . . . . . . . . . . . . . . . . . . . . . . . . . . . . . . 1-5Undocked/Single-user Requirements . . . . . . . . . . . . . . . . . . . . . . . . . . . . 1-6Software Requirements . . . . . . . . . . . . . . . . . . . . . . . . . . . . . . . . . . . . . . . . . 1-7
Installing or Upgrading GoldMine 6.7Overview . . . . . . . . . . . . . . . . . . . . . . . . . . . . . . . . . . . . . . . . . . . . . . . . . . . . . . . . 2-1Upgrade Considerations . . . . . . . . . . . . . . . . . . . . . . . . . . . . . . . . . . . . . . . . . . . 2-2Installation Types . . . . . . . . . . . . . . . . . . . . . . . . . . . . . . . . . . . . . . . . . . . . . . . . . 2-3Installation Checklists . . . . . . . . . . . . . . . . . . . . . . . . . . . . . . . . . . . . . . . . . . . . . 2-4
Server Installation Checklist . . . . . . . . . . . . . . . . . . . . . . . . . . . . . . . . . . . . . 2-4Shared Workstation Installation Checklist . . . . . . . . . . . . . . . . . . . . . . . . . 2-5Undocked Computer Installation Checklist . . . . . . . . . . . . . . . . . . . . . . . . 2-6
Running a Server Installation . . . . . . . . . . . . . . . . . . . . . . . . . . . . . . . . . . . . . . . 2-7Installing GoldMine 6.7 on Windows XP . . . . . . . . . . . . . . . . . . . . . . . . . . . . 2-15

xii
Running a Workstation Installation . . . . . . . . . . . . . . . . . . . . . . . . . . . . . . . . . 2-16Sharing the GoldMineFolder on the Server . . . . . . . . . . . . . . . . . . . . . . . . . . . . . . . . . . . . . . . . . . . 2-16Mapping a Drive on the Workstations . . . . . . . . . . . . . . . . . . . . . . . . . . . 2-17Running the Installation . . . . . . . . . . . . . . . . . . . . . . . . . . . . . . . . . . . . . . . 2-18
Running an Undocked Computer Installation . . . . . . . . . . . . . . . . . . . . . . . . 2-20Upgrading Remote Systems . . . . . . . . . . . . . . . . . . . . . . . . . . . . . . . . . . . . . . . 2-22
Licensing and RegistrationOverview . . . . . . . . . . . . . . . . . . . . . . . . . . . . . . . . . . . . . . . . . . . . . . . . . . . . . . . . 3-1General Licensing Information . . . . . . . . . . . . . . . . . . . . . . . . . . . . . . . . . . . . . . 3-2
License Types . . . . . . . . . . . . . . . . . . . . . . . . . . . . . . . . . . . . . . . . . . . . . . . . . 3-2License Manager . . . . . . . . . . . . . . . . . . . . . . . . . . . . . . . . . . . . . . . . . . . . . . . 3-4License Serial Number . . . . . . . . . . . . . . . . . . . . . . . . . . . . . . . . . . . . . . . . . . 3-4Licensing with a Master License . . . . . . . . . . . . . . . . . . . . . . . . . . . . . . . . . 3-5
Licensing Following Installation . . . . . . . . . . . . . . . . . . . . . . . . . . . . . . . . . . . . . . . . . . . . . . . .3-7Creating Sub-licenses . . . . . . . . . . . . . . . . . . . . . . . . . . . . . . . . . . . . . . . . . . . . . 3-11
Creating Sub-licenses for Remote Offices . . . . . . . . . . . . . . . . . . . . . . . . . 3-11Creating Sub-licenses for Undocked Users . . . . . . . . . . . . . . . . . . . . . . . 3-13
Licensing with Sub-licenses . . . . . . . . . . . . . . . . . . . . . . . . . . . . . . . . . . . . . . . 3-15Licensing with a Site License . . . . . . . . . . . . . . . . . . . . . . . . . . . . . . . . . . . 3-15Licensing with an Undocked License . . . . . . . . . . . . . . . . . . . . . . . . . . . . 3-17
Working with the Borland Database EngineOverview . . . . . . . . . . . . . . . . . . . . . . . . . . . . . . . . . . . . . . . . . . . . . . . . . . . . . . . .A-1Finding the BDE in \Setup\BDEShare . . . . . . . . . . . . . . . . . . . . . . . . . . . . . . . . . . . . . . . . . . . . . . . . . . . . . . . .A-2Specifying the Location of the BDE with GM.ini . . . . . . . . . . . . . . . . . . . . . . .A-3Working with the BDE Administrator . . . . . . . . . . . . . . . . . . . . . . . . . . . . . . . .A-4
Copying the BDE Configuration to Workstations . . . . . . . . . . . . . . . . . . .A-4Changing the BDE Settings . . . . . . . . . . . . . . . . . . . . . . . . . . . . . . . . . . . . . .A-5
Changing the dBASE Level in the BDE . . . . . . . . . . . . . . . . . . . . . . . . . . . . . . .A-7
Granting Access Privileges in Windows XPOverview . . . . . . . . . . . . . . . . . . . . . . . . . . . . . . . . . . . . . . . . . . . . . . . . . . . . . . . . B-1Changing GoldMine Ownership in Windows XP . . . . . . . . . . . . . . . . . . . . . . B-2Granting Permission to Use GoldMine in Windows XP . . . . . . . . . . . . . . . . . B-3
GoldMine 6.7

xiii
Installing on a Novell NetWare NetworkOverview . . . . . . . . . . . . . . . . . . . . . . . . . . . . . . . . . . . . . . . . . . . . . . . . . . . . . . . . C-1Creating the GoldMine Group . . . . . . . . . . . . . . . . . . . . . . . . . . . . . . . . . . . . . . C-2
Running GoldMine from a Root Directory . . . . . . . . . . . . . . . . . . . . . . . . C-3Configuring the Workstation Drivers . . . . . . . . . . . . . . . . . . . . . . . . . . . . . . . . C-4
NETX or VLM Drivers . . . . . . . . . . . . . . . . . . . . . . . . . . . . . . . . . . . . . . . . . . C-4Setting Trustee Rights . . . . . . . . . . . . . . . . . . . . . . . . . . . . . . . . . . . . . . . . . . . . . C-4
NetWare v2.x: . . . . . . . . . . . . . . . . . . . . . . . . . . . . . . . . . . . . . . . . . . . . . . . . . C-4NetWare 3.x and 4.x: . . . . . . . . . . . . . . . . . . . . . . . . . . . . . . . . . . . . . . . . . . . C-5
Setting the File Attributes . . . . . . . . . . . . . . . . . . . . . . . . . . . . . . . . . . . . . . . . . . C-5
Installing Microsoft SQL Server 2000Overview . . . . . . . . . . . . . . . . . . . . . . . . . . . . . . . . . . . . . . . . . . . . . . . . . . . . . . . .D-1Installing Microsoft SQLServer 2000 . . . . . . . . . . . . . . . . . . . . . . . . . . . . . . . . . . . . . . . . . . . . . . . . . . . . . . .D-2Registering the SQL Server . . . . . . . . . . . . . . . . . . . . . . . . . . . . . . . . . . . . . . . .D-10Troubleshooting SQL Errors when Installing GoldMine . . . . . . . . . . . . . . .D-13
Index
Installation Guide

xiv
GoldMine 6.7

in this chapter...WelcomeAbout This DocumentGoldMine ResourcesContact Us
I N T R O D U C T I O N
Introduction
Welcome to GoldMine 6.7Welcome to GoldMine 6.7. GoldMine is a business contact management tool with sales force and marketing automation functionality for individuals and teams. GoldMine 6.7 enhanced functionality includes a new Lookup Wizard, advanced security and control features for PDA synchronization, and strengthened logic for data records, with developer enhancements such as an XML wrapper for the API as well as compatibility with .NET development environments.
The new GoldMine Lookup Wizard helps users build SQL query strings to locate specific records and contact information across the GoldMine application. Users can then launch actions and campaigns directly from those results. Query storage features allow users to save and reuse custom query parameters.
Enhanced logic makes it easier for users to work with data records. Users can now perform searches for record types instead of field names, making it easy for users to find information without identifying a particular field name. Logical pick lists display field names for the selected record type. Linked documents can now be assigned by category for quick identification. And an intuitive auto-fill feature allows automated city and state field population when users type in a zip code.

xvi Introduction
GoldMine 6.7 enhances PDA Sync security and control for Palm OS3 and above. Users can now exercise more control when synchronizing between GoldMine and PDAs with the enhanced ability to select from the specific activity types they need. To enhance security, improved features for multi-user environments keep critical contact information from upload, modification, or deletion by unauthorized users or groups. Additional security allows administrators to restrict advanced synchronization options.
For developers, a new wrapper integrates with the existing API, translating it into XML format. GoldMine 6.7 now also includes .NET compatibility for developers using the .NET development environment to integrate with GoldMine.
GoldMine

xvii
About this Guide
Audience and ExpertiseThe information in this manual is written for GoldMine users and system administrators reviewing the new features and enhancements. It assumes the user has a basic understanding of databases and the Microsoft Windows operating system.
Document Conventions
Example Description
File>>Print Menu bar commands (in this example, select File on the menu bar, then select Print in the drop-down menu)
The Select a Data Source dialog box appears.
Dialog boxes and menu items in bold
OK Button names
Note Additional information
CAUTION/WARNING Critical information to prevent functionality or data loss
Reference to another topic or resource
Installation Guide

xviii Introduction
Resources• GoldMine Help (access from the Help menu)
• What’s New in GoldMine
• GoldMine Installation Guide
• Using GoldMine
• Administrating GoldMine
• Manager’s Console/Answer Wizard
IMPORTANT: Manuals are available in PDF format from the Installation CD-ROM or NetUpdate download or from support.frontrange.com for maintenance customers.
Contact UsSupport SiteFrontRange Solutions can answer your technical support questions about HEAT, GoldMine, and FrontRange Service Management. Visit:
support.frontrange.com
Contact InformationFrontRange Solutions Headquarters:6701 Koll Center Parkway, Suite #250Pleasanton, CA 94566-7075TEL: 925.750.1200 and + 925.750.1205Colorado Springs Office:1125 Kelly Johnson Blvd.Colorado Springs, CO 80920TEL: 800.776.7889 and +1 719.531.5007
Offices are also located in Los Angeles, United Kingodm, Germany, Italy, South Africa, Australia, Singapore and China.”
GoldMine

in this chapter...Server RequirementsShared Workstation RequirementsUndocked/Single-user
RequirementsSoftware Requirements
C H A P T E R O N E
1System Requirements
OverviewBefore you install GoldMine on a network server, a client workstation, or an undocked/single-user computer, it is important to make sure your system meets the system requirements.
Minimum and recommended requirements are provided for various environments. Performance considerations are noted to assist you in establishing your business needs.
IMPORTANT: This installation guide provides information for installing either GoldMine Standard 6.7 with a D-License and dBASE database or GoldMine Corporate Edition 6.7 with an E-License and a Microsoft SQL Server 2000 database. Pay particular attention to the system requirements that apply to your license type.

1-2 System Requirements
System RequirementsThis section lists the baseline system requirements for successful installation and operation of GoldMine. Requirements are listed for the following:
• Servers
• Workstations
• Undocked/Single-user Systems
Level of Windows SecurityMembers of the Power Users group can create user accounts, but can modify and delete only those accounts they create. The can create local groups and remove users from local groups they have created. The can also remove users from the Power Users, Users, and Guests groups.
The cannot modify the Administrators or Backup Operators groups, nor can they tak ownership of files, back up or restore directories, load or unload device drivers, or manage the security and auditing logs.
CAUTION: If you are running the following operating systems: Windows XP, Windows 2000 Professional, Windows 2000 Server, or Windows 2003 Server, you must be logged on as a Power User or part of a Power User group.
Note: Consult Microsoft Windows online help for further information.
Server RequirementsThe following recommendations are made for GoldMine servers.
Network Operating SystemsFrontRange Solutions supports the following network operating systems:
GoldMine

System Requirements 1-3
• Microsoft Windows 2000 Server/Advanced Server; Microsoft Windows 2003 Server
Note: Microsoft XP is supported, but not recommended, as a server. See http://support.frontrange.com for more information.
• Novell NetWare 5.0 and 6.0 (only with Microsoft Client for Netware, not Novell intraNetWare Client/Client 32)
CAUTION: Ensure that Microsoft SQL Server is installed to a Windows 2000 Server that is a member of you Novell network. A Windows 2000 or 2003 Server is required for Enterprise and Standard versions of SQL Server 2000.
For more information on Novell NetWare, see Appendix C, "Installing on a Novell NetWare Network."
Network Protocols• TCP/IP (recommended)
• IPX/SPX
• NetBEUI
Server System Requirements• Microsoft Windows 2000 Server/Advanced Server;
Windows 2003 Server
• SCSI or Ultra DMA Enhanced IDE hard drives: RAID Array or mirrored (recommended)
• 100 MBps network connection (recommended)
Installation Guide

1-4 System Requirements
Server Memory Requirements
Server CPU Requirements
Database Size Minimum RAM Allocation
50 MB 128 MB
100 MB 256 MB
500 MB < 2 GB 512 MB
2–5 GB 1 GB
5–12 GB 2 GB
12+ GB 3 GB
Users Minimum Recommended
1–10 Pentium III 300-MHz Pentium III 700-MHz
11–50 Pentium III 300-MHz dual processor
Pentium III 700-MHz dual processor or
P4 1-GHz or 2-GHz
51–149 Pentium III 700-MHz dual processor
Pentium III 700-MHz quad processor or
P4 1-GHz or 2-GHz
GoldMine

System Requirements 1-5
Performance ConsiderationsServer RAM and CPU requirements vary depending upon your database and the following factors:
• Number of Contact Records in the database (1 KB each)
• Number of Detail Records in the database (2 KB each)
• Number of History Records in the database (1 KB each)
• Number of user-defined fields in the database
• Number of simultaneous users on the network
• Database size
Shared Workstation RequirementsThe following recommendations are made for client workstations connected to the GoldMine server.
Operating Systems
FrontRange Solutions supports the following Microsoft operating systems:
• Microsoft Windows 2000 Professional/Server/Advanced Server
• Microsoft Windows XP (Home/Professional)
Note: FrontRange Solutions Technical Support neither supports nor recommends using Windows emulators on Macintosh, Linux, or other operating systems.
System Minimum Recommended for Standard
Recommended for Corporate Edition
CPU Pentium 200 MHz Pentium I/III + Pentium III/4
HDD 65 MB 165 MB + 300 MB
RAM 64 MB 128 MB + 256 MB
Installation Guide

1-6 System Requirements
Undocked/Single-user RequirementsThe following recommendations are made for computers working disconnected from a GoldMine server.
Operating SystemsFrontRange Solutions supports the following Microsoft operating systems:
• Microsoft Windows 2000 and 2003 Professional/Server/Advanced Server
• Microsoft Windows XP (Home/Professional)
Note: FrontRange Solutions Technical Support neither supports nor recommends using Windows emulators on Macintosh, Linux, or other operating systems.
GoldMine

System Requirements 1-7
Performance ConsiderationsYour RAM and CPU requirements vary depending up on your database and the following factors:
• Number of Contact Records in the database (1 K each)
• Number of Detail Records in the database (2 K each)
• Number of History Records in the database (1 K each)
• Number of user-defined fields in the database
• Number of simultaneous users on the network
• Database size
Software Requirements• Microsoft Internet Explorer 6.0
• If Borland Database Engine (BDE) is installed on your target system, a minimum of BDE 5.01 is required. If no BDE is present on the target system, GoldMine installs it automatically.
Installation Guide

1-8 System Requirements
GoldMine

in this chapter...OverviewUpgrade ConsiderationsInstallation TypesInstallation ChecklistsRunning a Server InstallationRunning a Workstation InstallationRunning an Undocked
Computer InstallationUpgrading Remote Systems
C H A P T E R T W O
2Installing or Upgrading GoldMine 6.7
OverviewGoldMine 6.7 is available as a Net-Update option. In most cases, you have an earlier version of GoldMine installed on your server. Using GoldMine Net-Update, you can upgrade your existing version to GoldMine 6.7.
This chapter contains information about upgrading different installation types as well as information for new users to help you determine the type of installation you must run, provides checklists to ensure success, and includes step-by-step installation instructions for each installation type.
GoldMine provides various types of installations. Review the upgrade considerations, determine the type of installation you are running, and use the associated checklist to ensure a successful installation.
IMPORTANT: The instructions in this chapter use the Server installation as a baseline installation and then details the specific actions for different installation types.

2-2 Installing or Upgrading GoldMine 6.7
Upgrade ConsiderationsReview the following upgrade considerations:
IMPORTANT: You can use this upgrade process with GoldMine 5.7 or higher. If you are upgrading a prior version, you must upgrade to 5.7 before upgrading to 6.7. If you are running 5.5 or earlier, contact support at 800.776.7889.
CAUTION: If you are upgrading from a previous version of GoldMine, make a backup of your existing GoldMine database and system before beginning the upgrade.
• In addition to the 65 MB of disk space required for installation, please make sure you have at least two-and-a-half times the size of your largest table in additional free space on your hard disk.
Example: If your largest table is Conthist, which has an 85 MB .dbf and a 15 MB .dbt for 100 MB total, you should have 250 MB free disk space before continuing (2½ x 100 MB).
• A database conversion may be required when upgrading from earlier versions of GoldMine. This conversion should occur automatically when GoldMine is installed into the path of the existing gmw.exe, gmw32.exe, gmw4.exe, or gmw5.exe.
• Undocked users should be on the same version of GoldMine as the site with which they sync. If you are upgrading the server but are not upgrading undocked computers until a later time, disable their sync sites in the GoldSync Administration Center on the server.
Reactivate their site when the undocked computer is upgraded and is running the same version of GoldMine as the server.
• If you have a previous version of GoldMine Link for Microsoft Word, uninstall this version prior to upgrading. The upgrade installs the new GoldMine Link for Office.
GoldMine

Installation Types 2-3
Installation TypesThe Wizard allows you to select an installation type. Various types are available depending upon your needs.
Which one should you use?
If you are: Then run:
Shared Server: A company that needs to support multiple GoldMine users using a shared copy of GoldMine. Users can then connect to the server copy from their local client workstations using shortcuts installed by running a Workstation installation.
Server Setup
Shared Workstation: An individual in an organization with a multi-user environment who needs to connect to a shared copy of GoldMine. Installs shortcuts to the client workstation so the end user can connect to the server copy of GoldMine from his or her individual computer.
Workstation Setup
Undocked: An individual who often works remotely on a computer with an Undocked sub-license; who synchronizes with a GoldMine server to update information. Installs a full copy of GoldMine, with a dBASE database, on a computer working disconnected from a network.
Undocked Setup (with U-License)
Installation Guide

2-4 Installing or Upgrading GoldMine 6.7
Installation ChecklistsReview the following checklists before installing GoldMine. These checklists outline the basic steps for efficiently installing and running GoldMine.
Server Installation ChecklistBack up your database and folders (upgrading customers only). If you are upgrading, back up your GoldMine database. We also recommend backing up your GoldMine folder and any other folders containing files linked to GoldMine before beginning any installation. This prevents the loss of valuable contact information.
Confirm all GoldMine users are logged out of the system (upgrading customers only).
Uninstall GoldMine Link for Word (upgrading customers only).
Exit all programs running on your system. This frees memory and alleviates potential conflicts between the installer and other software on your computer, including third-party utilities that integrate with GoldMine and other GoldMine add-on products. You should also exit the Microsoft Office Shortcut bar and stop all services that integrate with GoldMine or use BDE.
Install Microsoft SQL Server (E-license only). You can install SQL Server on the computer serving as the GoldMine server or on another computer on your network. See Appendix D, "Installing Microsoft SQL Server 2000."
Install GoldMine on the computer serving as your GoldMine server. Select the Server Setup installation and follow the directions described in "Running a Server Installation" on page 2-7. GoldMine should not be installed as a root folder of the drive (for example, C:\GoldMine).
License the server copy of GoldMine. Licensing registers the shared server copy of GoldMine with the appropriate license. Step-by-step instructions for licensing are covered in Chapter 3, "Licensing and Registration." For detailed information on GoldMine Licensing, see the Administrating GoldMine manual.
Verify you can launch GoldMine on your GoldMine server. This ensures the installation is functioning properly before you install any workstations.
GoldMine

Installation Checklists 2-5
Share the GoldMine folder. In order for the client workstations to connect to the shared copy of GoldMine, you must first share the folder in which GoldMine is installed (or will be installed). Users also need “Full Control” privileges to the shared folder. New customers installing GoldMine for the first time must first create a GoldMine folder on the server. Sharing may expose other applications, so do not install GoldMine as a root folder of the drive (for example, C:\GoldMine) or directly to Program Files (for example, C\:Program Files\ GoldMine). We recommend you install GoldMine to C:\Program Files\GoldMine\GoldMine. Be sure to install the server copy of GoldMine to this folder. For detailed steps on sharing the GoldMine folder, see "Sharing the GoldMine Folder on the Server" on page 2-16.
Shared Workstation Installation ChecklistExit all programs running on your system. This frees memory and alleviates potential conflicts between the installer and other software on your computer. You should exit any third-party utilities integrating with GoldMine and other GoldMine add-on products. You should also exit the Microsoft Office Shortcut bar and stop all services that integrate with GoldMine or use BDE.
Create a mapped drive to the shared GoldMine folder on the server. This allows workstations to navigate and connect to the shared copy of GoldMine on server. For detailed steps on mapping a drive, see "Mapping a Drive on the Workstations" on page 2-17.
Install GoldMine on the Client Workstation. This creates the necessary shortcuts to access GoldMine from a client workstation. Follow the steps in "Installing GoldMine 6.7 on Windows XP" on page 2-15.
Verify you can launch GoldMine from the workstation. This ensures the installation is functioning properly.
Installation Guide
2-6 Installing or Upgrading GoldMine 6.7
Undocked Computer Installation ChecklistCreate an Undocked license (U-license) on the server (undocked license users only). This license type is created for users who work with GoldMine primarily at a remote location on a laptop or workstation. To create an Undocked license, Chapter 3, "Licensing and Registration." for steps to follow. For detailed information on GoldMine Licensing, see the Administrating GoldMine manual or GoldMine online Help.
Exit all programs running on your system. This frees memory and alleviates potential conflicts between the installer and other software on your computer. You should exit any third-party utilities integrating with GoldMine and other GoldMine add-on products. You should also exit the Microsoft Office Shortcut bar and stop all services that integrate with GoldMine or use BDE.
Disconnect the laptop from the network. This ensures GoldMine configures the laptop to connect only with the database on the local computer and not with the network.
Install GoldMine to the undocked laptop or home office computer. Follow the directions described in "Running an Undocked Computer Installation" on page 2-20.
License GoldMine. License GoldMine with the appropriate U-license information. See Chapter 3, "Licensing and Registration." for more licensing information.
Verify you can launch GoldMine. This ensures the installation is functioning properly.
GoldMine

Running a Server Installation 2-7
Running a Server InstallationA shared Server Setup installs a full copy of GoldMine to a common location—usually a shared network drive. Workstation-based users can then connect to the server copy from their local computers (after running a Shared Workstation installation).
The following steps provide instructions for using the Installation Wizard to install a new copy of GoldMine or upgrading your existing copy.
To Run a Server Installation
1. Run the gm6setup.exe downloaded to your server installation of GoldMine during the Net-Update process. The file is downloaded to GoldMine\Setup\GoldMine. For example, C:\Program Files\GoldMine\GoldMine\ Setup\GoldMine.
When the setup is ready, the Welcome to the GoldMine Installation Wizard dialog box appears.
2. Click Next.
Installation Guide

2-8 Installing or Upgrading GoldMine 6.7
The Readme dialog box appears.
3. Click Next.
The End-User License Agreement dialog box appears.
4. Review the licensing information carefully, and if you agree to the terms, select I accept the terms In the license agreement.
Note: If you do not agree to the terms of the license agreement, select I do not accept the terms in the license agreement. Click Cancel to terminate the installation.
GoldMine

Running a Server Installation 2-9
5. Accepting the terms of the agreement activates the subsequent check boxes. You must select both check boxes to continue with the installation.
IMPORTANT: Select I am an authorized agent and/or representative of the customer/end-user and I have read the terms and conditions stated above to continue.
6. Click Next.
The Installation Type dialog box appears.
7. Select one of the following installation types:
• New Install: Select this option if GoldMine has never been installed.
• Upgrade: Select this option if you are upgrading from a previous version of GoldMine.
8. Click Next.
Installation Guide

2-10 Installing or Upgrading GoldMine 6.7
The Setup Type dialog box appears.
9. If you are running GoldMine with an E-license on SQL Server, select GoldMine 6.7 Corporate Edition Setup.
10. Select Server Install.
11. Select Install Shared Borland Database Engine to add the Borland Database Engine (BDE) to your GoldMine directory. Click Next.
The Language Type dialog box appears.
12. Select the language of your choice.
GoldMine

Running a Server Installation 2-11
13. If you are installing new and wish to add the demonstration data to the database, select Install Demo Data with GoldMine 6.7.
IMPORTANT: If you are upgrading, do not install the demonstration data.
14. Click Next.
The Existing GoldMine Location dialog box appears.
15. If you are upgrading, click Change to locate your existing GoldMine installation. The Change Current Destination Folder dialog box appears. Type a path or browse to the folder where you want GoldMine installed. To return to the Existing GoldMine Location window, click OK.
Installation Guide

2-12 Installing or Upgrading GoldMine 6.7
If you are installing new and wish to install GoldMine to a different location, click Change. The Change Current Destination Folder dialog box appears. Type a path or browse to the folder where you want GoldMine installed. To return to the Existing GoldMine Location window, click OK.
IMPORTANT: New customers installing GoldMine for the first time must first create a GoldMine folder on the server. Sharing may expose other applications, so do not install GoldMine as a root folder of the drive (for example, C:\GoldMine) or directly to Program Files (for example, C\:Program Files\ GoldMine). We recommend you install GoldMine to C:\Program Files\ GoldMine\ GoldMine. Be sure to install the server copy of GoldMine to this folder.
16. Click Next.
If you are upgrading or installing GoldMine Corporate Edition new, the MS SQL Administrator Login dialog box appears; otherwise, the Ready to Install the Program dialog box appears.
GoldMine

Running a Server Installation 2-13
17. Complete the following SQL Server text boxes:
• MS SQL Server Name: Type or select the name of the computer on your network where SQL Server is installed.
• MS SQL Database Name: GoldMine creates and installs the demo data in a SQL database called GoldMine. If you want your database to have a different name, type it in the text box.
• MS SQL Administrative Username: The default login in SQL is sa. If your SQL user name is different, your SQL administrator must provide the information.
• MS SQL Administrative Password: There is no default password in SQL. If your SQL password is different, your SQL administrator must provide the information.
18. Click Next.
The Ready to Install the Program dialog box appears.
19. Click Install to begin installing GoldMine. The Installing GoldMine dialog box appears.
Installation Guide

2-14 Installing or Upgrading GoldMine 6.7
20. When the installation completes, the Installation Completed dialog box appears.
21. Click Finish.
CONGRATULATIONS! You have successfully installed GoldMine on your computer. If this is a new installation, you now need to license the program. For detailed instructions for licensing, see "Licensing Following Installation" on page 3-7.
GoldMine

Installing GoldMine 6.7 on Windows XP 2-15
Installing GoldMine 6.7 on Windows XP
Some users may encounter issues with the auto-run installation.
• For users of GoldMine 5.0-5.7 who backup GoldMine by copying the GoldMine folder at C:\Program Files, this means they are not copying their data files and must browse to Documents and Settings\All Users\Application Data\GoldMine to find their data folders.
• Customers using a Windows XP system as a server will have problems with the client workstations accessing the data on the network due to the “split”.
Note: Windows XP is not a recommended platform for a server.
• Users may also encounter license errors when performing NetUpdates.
Installation Guide

2-16 Installing or Upgrading GoldMine 6.7
Running a Workstation Installation
A shared workstation setup installs shortcuts on the workstation, enabling workstation users to connect to the shared server copy of GoldMine from their individual computers.
To install a shared version of GoldMine on a workstation, you must first:
1. Share the GoldMine folder on the server.
2. Map the same drive on each workstation to the shared GoldMine folder on the server.
3. Run the workstation installation.
Sharing the GoldMineFolder on the Server
After GoldMine is installed on the server, you must share the GoldMine root directory in order for the workstations to function properly. All GoldMine users must have rights to read, write, modify, and delete files. If users do not have sufficient permissions to the GoldMine folder, GoldMine may not function on the workstations.
IMPORTANT: New customers installing GoldMine for the first time must first create a GoldMine folder on the server. Sharing may expose other applications, so do not install GoldMine as a root folder of the drive (for example, C:\GoldMine) or directly to Program Files (for example, C\:Program Files\GoldMine). We recommend you install GoldMine to C:\Program Files\GoldMine\ GoldMine. Be sure to install the server copy of GoldMine to this folder.
GoldMine

Running a Workstation Installation 2-17
To Share the GoldMine Folder
1. Locate the GoldMine folder on the server (for example, C:\Program Files\GoldMine\GoldMine).
2. Right-click the folder, and then select Sharing. The GoldMine Properties dialog box appears.
3. Click the Sharing tab.
4. Select the Share this folder option.
5. Name the shared folder GoldMine.
6. Set the User Limit to Maximum Allowed.
7. Click Permissions. All GoldMine users must have full control.
8. Click OK to save settings.
Note: These steps were documented on a Windows 2000 operating system. If you are using a different operating system, your steps may vary.
Mapping a Drive on the WorkstationsWe recommend mapping the same network drive on all the workstations accessing the shared GoldMine folder. Using the same network drive letter on all the workstations facilitates GoldMine administration and operations related to linked documents and synchronization.
Note: Users at all workstations must specify the same Drive letter (for example, G:\) on all workstations.
To Map a Drive
1. On the workstation computer, start Windows Explorer and then select Tools>>Map Network Drive.
2. In the Drive text box, select the drive letter you are mapping to the GoldMine folder on the server. This drive letter should be the same on all workstations.
Installation Guide

2-18 Installing or Upgrading GoldMine 6.7
3. In the Path text box, type the path to the shared GoldMine folder in the Shared Directories text box or browse to the server name and shared folder. An example path is: \\GoldMine Server\ GoldMine.
4. Select Reconnect at Logon.
5. Click OK.
6. Repeat this procedure on each computer used as a client workstation.
Running the InstallationThe workstation setup installs as a process that creates a shortcut to the server copy of GoldMine.
The following steps provide instructions for using the Installation Wizard to set up a new GoldMine workstation or upgrade an existing workstation connection.
To Run a Shared Workstation Installation
1. From the workstation computer, locate the gm6setup.exe file and follow steps 1 through 8 for a server installation.
The Setup Type dialog box appears.
2. Select GoldMine 6.7 WorkStation Setup.
GoldMine

Running a Workstation Installation 2-19
3. Click Next.
The GoldMine 6.7 Server Location dialog box appears.
4. In the Network Location text box, type the UNC or network path for the shared GoldMine server installation on your network. You may also click Change and browse the network for your shared GoldMine server.
The Change Current Destination Folder dialog box appears. Type a path or browse to the folder where you want GoldMine installed. To return to the Existing GoldMine Location window, click OK.
5. When the path is correct, click Install. The network shortcuts are installed on your workstation computer.
6. When the installation process is finished, the Installation Completed dialog box appears.
7. Click Finish to exit the Wizard.
CONGRATULATIONS! You have successfully installed the shortcuts to the server copy of GoldMine on your workstation. Repeat this procedure for each workstation accessing GoldMine.
Installation Guide

2-20 Installing or Upgrading GoldMine 6.7
Running an Undocked Computer Installation
An Undocked setup installs a full copy of GoldMine with a dBASE database on a computer working disconnected from a network but synchronizing with the GoldMine server to update information.
The following steps provide instructions for using the Installation Wizard to install a new copy of GoldMine or upgrading your existing copy.
If the undocked computer you are upgrading or installing works remotely, see "Upgrading Remote Systems" on page 2-22.
IMPORTANT: If you are installing an Undocked version of GoldMine while it is in your office, disconnect the laptop from the network so you install a completely independent copy on the computer.
To Run an Undocked User Installation
1. Follow steps 1 through 8 for a server installation.
The Setup Type dialog box appears.
2. Select GoldMine 6.7 Corporate Edition Setup.
3. Select Undocked.
GoldMine

Running an Undocked Computer Installation 2-21
4. If you do not have the Borland Database Engine installed on your computer, select Install Shared Borland Database Engine.
5. Click Next. The Language Type dialog box appears.
6. Select the language of your choice.
7. To install the demonstration data in the database, select Install Demo Data with GoldMine 6.7.
8. Click Next. The Existing GoldMine Location dialog box appears.
9. To install GoldMine to a location other than the path displayed, click Change. The Change Current Destination Folder dialog box appears. Type a path or browse to the folder where you want GoldMine installed. To return to the Existing GoldMine Location window, click OK.
10. Click Next. The Ready to Install the Program dialog box appears.
11. Click Install to begin installing GoldMine. The Installing GoldMine dialog box appears.
12. When the installation completes, the Installation Completed dialog box appears. Click Finish.
CONGRATULATIONS! You have successfully installed GoldMine on your computer. If this is a new installation of GoldMine, you now need to license the program. For detailed instructions for licensing, see "Licensing Following Installation" on page 3-7.
Installation Guide

2-22 Installing or Upgrading GoldMine 6.7
Upgrading Remote SystemsThis type of upgrade is for computers working disconnected from a GoldMine server but synchronizing with the main GoldMine server to update information—a remote Site or an Undocked computer.
If you are upgrading a Site, the Master installation should provide the site administrator with the gm6setup.exe.
Follow the instructions for "Running a Server Installation" on page 2-7.
If you are updating an undocked computer, the Master installation should provide the undocked computer user with the gm6setup.exe.
Follow the instructions for "Running an Undocked Computer Installation" on page 2-20.
IMPORTANT: If you are upgrading the server but are not upgrading a remote system until a later date, disable the site in the GoldSync Administration Center until it is running the same version of GoldMine as the server.
GoldMine

Upgrading Remote Systems 2-23
To Upgrade GoldMine on an Remote Computer
1. Upgrade the Master GoldMine site.
2. Once the Master site is upgraded, you can upgrade remote computers by sending them a gm6setup.exe installation file using one of the following methods:
• One-Button Synchronization
• CD-ROM
• FTP site
• Accessible network drive
3. The remote user should run the installation CD or the gm6setup.exe on his or her computer following the upgrade instructions in this chapter.
4. After the remote user upgrades to the same version of GoldMine as the server, the user can begin synchronizing again.
Installation Guide

2-24 Installing or Upgrading GoldMine 6.7
GoldMine

in this chapter...General Licensing InformationLicensing Following InstallationCreating Sub-licensesLicensing with Sub-licenses
C H A P T E R T H R E E
3Licensing andRegistration
OverviewGoldMine has a fully scalable licensing structure to meet the needs of both individuals and organizations. As your business matures and GoldMine expands, your organization can change the licensing configurations.
This chapter presents general information on licensing and specific instructions on how to license GoldMine following installation.
Additional information on GoldMine licensing can be found in the Administrating GoldMine manual.

3-2 Licensing and Registration
General Licensing InformationThe single, distributed Master License serves as the authentication mechanism for easy and secure synchronization across the entire organization, and the License Manager keeps track of your licensing configurations.
Most organizations, regardless of their requirements, generally buy one license—a Master License with X number of seats. These seats can be then parsed to users in various combinations of sub-licenses. For example, an organization can create Site sub-licenses for their remote office(s) and Undocked sub-licenses for individual remote (mobile) users. One seat should always be set aside for administrators.
License TypesThree categories of license types are available: the Master License, the Sub-license, and those licenses used to increase seat counts.
The Master License is the primary license and is a precursor to executing any sub-licenses or increases which stem from the Master License. Only the Master License can be increased, decreased, or sub-licensed.
To facilitate the use of sub-licenses and/or increases, GoldMine with a Master License can only be installed on an organization’s primary network. This ensures all sub-licenses and/or increases maintain security and are authenticated properly during synchronization.
The “Undocked” license (a special sub-license) is for remote users and can only be licensed for a single user. An Undocked License can be sub-licensed from the main GoldMine system or from a Site sub-license.
GoldMine

General Licensing Information 3-3
This Master License determines what database types are supported by the master site as well as its synchronization capabilities. There are three types of Master Licenses: E, D, and G (see table).
For additional information on License Types, see the Administrating GoldMine manual.
Master License
E Enterprise License Supports SQL and dBASE databases and includes GoldSync
D Standard License Supports dBASE only; GoldSync purchased separately
G GoldSync Master License
GoldSync seats purchased separately and can be added to D- or E-Licenses
O GoldMine Outlook Integration Services License
Outlook integration purchased separately for a D- or E-Licenses
Sub-licenses
U Undocked License Single sub-license for a remote GoldMine user
S Site License Multiple-user sub-license for a remote office
Y GoldSync License GoldSync sub-license for a remote office
Increasing License Counts
J Enterprise License Increase
Increases the number of GoldMine seats and GoldSync sites on an E-License
R Standard License Increase
Increases the number of D-Licenses
N GoldSync License Increase
Increases the number of G-Licenses
Installation Guide

3-4 Licensing and Registration
License ManagerAll GoldMine licensing information and related functions are accessed through the License Manager.
The central window lists all installed licenses and any sub-licenses created from this location.
The first letter of each license determines what type of license it is. Every GoldMine system begins with a Master License.
The database support of the Master License is inherited by the site sub-licenses distributed throughout the organization. GoldSync Synchronization capabilities can be distributed separately to sub-licenses.
IMPORTANT: Licensing information is stored in the license file, License.dbf. This file must exist only in the GoldMine root directory of each GoldMine installation.
License Serial NumberThe following example illustrates what a GoldMine license serial number looks like:
E-0025-12345678-XY1Z23
license type number of users serial number key code
GoldMine

General Licensing Information 3-5
The first character denotes the license type. The first set of numbers indicates the license count or seats available in the license. The license count determines the number of users who can log on to GoldMine at one time but does not limit the total number of named users. The seats available may be increased by adding license counts in the License Manager.
The next set of numbers is an eight-digit serial number uniquely identifying the license for an organization. This eight-digit number is used for registration and support and identifies all sub-licenses as part of the same organization.
When purchasing a license from GoldMine, you receive a key code with it. The key code is a computer-generated check used by GoldMine to verify the license’s validity.
Note: The key code is required during installation. Keep the license number and key code in a safe place in the event it becomes necessary to reinstall the software.
Licensing with a Master LicenseThe Master License serial number for GoldMine begins with the letter D (Example: D-0050-11111111). A GoldMine Corporate Edition Master License begins with the letter E (Example: E-0050-11111111).
The latter is usually a multi-user license for a server installation of GoldMine but may be a single-user license for a stand-alone computer.
You need to provide the serial number and key code when licensing. A D-license does not include GoldSync licenses. The necessary number of GoldSync licenses (G-licenses) can be purchased and added as needed.
An E-license does include a GoldSync license for each purchased GoldMine seat.
Note: It is from the D- and E-license that remote site sub-licenses (S- and Y-licenses) and Undocked sub-licenses (U-licenses) are created.
Installation Guide

3-6 Licensing and Registration
To License GoldMine with a Master LicenseType the D- or E-license number and key code you received when you purchased the software.
IMPORTANT: If you type an E-license serial number into the text boxes, the GoldSync text box area remains unavailable because GoldSync is included. Because GoldSync must be purchased separately with a D-License, if you type a D-license serial number into the text boxes, the GoldSync area becomes available and you can type your G-license information into the text boxes. However, you do not need to type the G-License number to proceed with licensing GoldMine.
To License a D-License GoldMine with GoldSync License
1. Type the complete D-license serial number and key code first. The GoldSync area becomes available.
2. Type the GoldSync G-license and key code you received when you purchased the software (optional purchase).
GoldMine

Licensing Following Installation 3-7
Licensing Following InstallationAfter GoldMine is installed, you must register it using the License and Registration wizard. The License and Registration wizard launches automatically after the installation wizard finishes.
If you did not complete the license and registration information after installation, the licensing wizard launches prior to first use of GoldMine.
Note: General information about GoldMine licensing is presented at the beginning of this chapter.
To License and Register GoldMine
1. Launch the License and Registration Wizard.
The Welcome dialog box appears.
Note: This Welcome dialog box will vary depending upon the Master License you are using.
2. Click Next.
The Enter License Information – Contact dialog box appears.
Installation Guide

3-8 Licensing and Registration
3. Type your contact information in the designated text boxes. You must complete this information to continue. Click Next.
The Enter License Information-Purchase dialog box appears.
4. Complete the purchase information. Click Next.
The Enter GoldMine Serial Number dialog box appears.
GoldMine

Licensing Following Installation 3-9
5. Type your GoldMine serial number and key code. Depending upon what kind of license you purchased or the kind of installation you are conducting, different options appear in this window. The options were discussed at the beginning of this chapter.
6. Click Next.
The Import NT Server User Accounts dialog box appears.
Note: The Import NT Server User Accounts dialog box only appears if the installation is performed on a Microsoft Windows 2000 system.
Installation Guide
3-10 Licensing and Registration
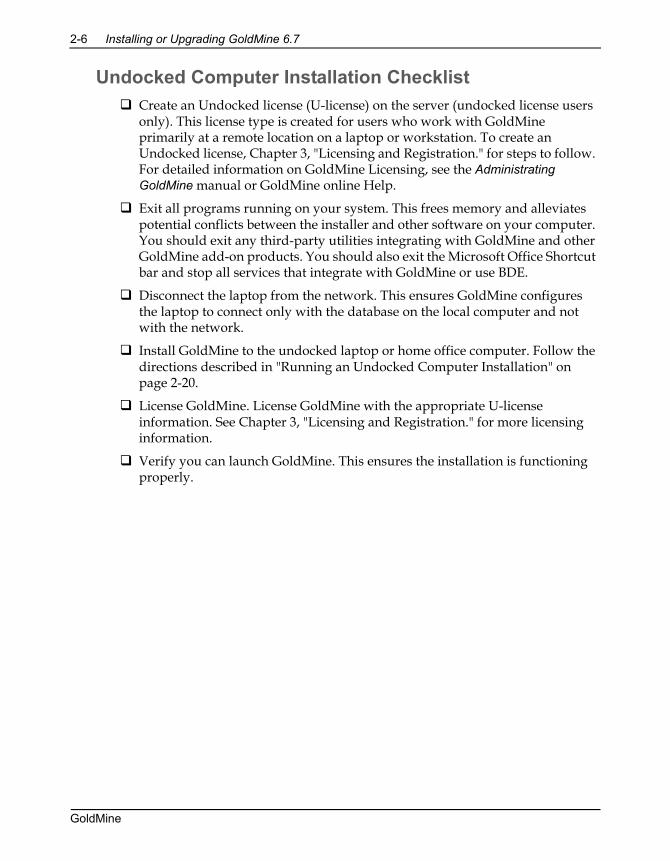
7. Select each user account you want to import into GoldMine. If appropriate, type an optional password for imported names. Click Next.
The Enter Your Username dialog box appears.
8. Type the user name. It should not be more than eight characters. The password is optional. This user has Master Rights in GoldMine. Click Next. The GoldMine Logon window appears.
9. In the GoldMine window, type the user name and password. Click OK to launch GoldMine.
CONGRATULATIONS! GoldMine is licensed and the installation is now complete.
GoldMine

Creating Sub-licenses 3-11
Creating Sub-licensesAfter GoldMine is installed and licensed, you can parse seats to your end users with sub-licenses using the License Manager. You must have a Master License to create sub-licenses.
CAUTION: Plan before creating sub-licenses, keeping in mind that each sub-license transfers seat availability which affects how many users can log in on the network system. For example, on the License tab of the License Manager, if the Total users/dist: shows a total number of seats and the total number of sub-licenses as “50\20,” only 30 seats are available to users. At a minimum, one seat should always be set aside for administrators only.
Creating Sub-licenses for Remote Offices
From a Master License, you can create sub-licenses for remote offices. Remote office sub-licenses can be a Site License (S-license) and/or a GoldSync License (Y-license).
Each “S” and/or “Y” sub-license transfers seat availability from non-remote users. A minimum of one seat must remain available to non-remote users. For example, you must have at least five seats to make GoldMine available to four remote offices. Headquarters retains the fifth seat.
Note: When creating any sub-license, note the entire license number created by GoldMine. The sub-license includes the key code and additional information needed when licensing the remote computer. The information is only displayed in its entirety during the creation process.
Installation Guide

3-12 Licensing and Registration
To Create a Sub-license for a Remote Office
1. From the GoldMine main menu, select File>> Configure>>License Manager. The License Manager appears.
2. Click the Licenses tab, then click New Site.
The Create a Site Sub-License dialog box appears.
3. In the Distributed License Type area, select the site license you want to create—either GoldMine Site License (S-License) for the number of seats the site needs or GoldSync Site License (Y-License) for the number of users who are synchronizing, including at least one for the site.
4. In the Site Sub-License area, type the site name and the number of users.
5. Click Create Site Sub-License. The Site-License for Remote Site dialog box appears.
6. Review the information about the sub-license and then click I Agree. The sub-license number for the site appears in the Sub-license for Remote Site [Name of Site] dialog box.
Tip:Write the sub-license
number down or copy it toWindows Notepad. The sub-license number is needed for
each remote computerinstallation. Send the remote
site license number to theremote user. The remote user
can then type the licensenumber during the GoldMine
installation.
GoldMine

Creating Sub-licenses 3-13
7. If you created a Site license, repeat the above process to create the necessary GoldSync license and select GoldSync Site License.
Note: GoldMine automatically adds the sub-license to the list of licences on the Licenses tab of the License Manager.
Creating Sub-licenses for Undocked Users
GoldMine has a sub-license for an individual user called an Undocked License (U-License). This license type is created for users who work primarily with GoldMine at a remote location on a laptop, notebook, or home office computer but who may also need to log on to the network occasionally. Keep the following considerations in mind:
• Creating an undocked user decreases the available users of the network site (Master License or Site License) by one; however, when an undocked user logs on to the site from which they were sub-licensed, they do not take up an additional seat.
• Every user supported by the GoldMine license can have an Undocked license to work on a remote computer. For example, on a five-user GoldMine system, five Undocked licenses can be created. This is in contrast to creating an “S” sub-license, which requires one seat remain available from the Master License.
• All undocked users, as well as the total number of users that make up the difference in the total number allowed by the Master License, can log on to GoldMine. For example, on a five-user GoldMine system with three undocked users, three undocked users plus two other users can log on to GoldMine.
WARNING: If you undock all users, only those users will be able to login. If you have not assigned master rights to any of those undocked users, administration of GoldMine cannot take place.
Installation Guide

3-14 Licensing and Registration
• When used in combination with GoldSync, administrators can synchronize security settings to undocked users including new passwords, menu items, and preferences, in addition to data.
• To work on an undocked basis, a user must have an Undocked license on his or her laptop. You can create an Undocked license from either the Master License or from a Site license.
To Create a Sub-license for an Undocked User
1. From the GoldMine main menu, select File>> Configure>>License Manager. The License Manager appears.
2. Click the Licenses tab, then click Undock Users.
The Create Undocked User Licenses dialog box appears.
3. Select the check box next to the user for whom you want to create a sub-license, and then click Create Undocked License. The Sub-Licenses dialog box appears.
4. Review the information about the sub-license and then click I Agree. The sub-license number for a remote user or an undocked user appears in the Sub-license for Remote Site [Name of Site]. dialog box.
Tip:Write the sub-license
number down or copy it toWindows Notepad. The sub-
license number is neededfor each remote computer
installation. Send the remotesite license number to theremote user. The remote
user can then type thelicense number during the
GoldMine installation.
GoldMine

Licensing with Sub-licenses 3-15
Licensing with Sub-licensesLicensing with a Site License
A “Site License” is a multiple-user sub-license for a remote office and is designated with the letter “S.” You should have an S-license for each user at the remote site.
A GoldSync License (Y-license) is required only if you are using an S-license and want to synchronize using GoldSync. You should have one Y-license to synchronize with the Master License and additional Y-licenses for Undocked users synchronizing with your site.
Installation Guide

3-16 Licensing and Registration
Note: Y licenses are not entered in the Enter GoldMine Serial Number dialog box. Only S licenses are entered during registration (GoldSync Section remains disabled). Clicking Next displays the following alert if you attempt to enter Y licenses in the Enter GoldMine Serial Number dialog box.
If this installation of GoldMine includes its own GoldSync sites, you may enter the applicable Y-type sub-licenses to properly configure synchronization for this system.
In order to configure the applicable sub-license sites, select File>>Configure>>License Manager to enter your Y-type license.
To License GoldMine with a Site License
1. In the GoldMine Serial Number text boxes, type the S-license, Key Code, and Site Code you created in the License Manager of the main GoldMine system.
2. In the GoldSync Serial Number text boxes, type the Y-license, Key Code, and Site Code you created in the License Manager.
GoldMine

Licensing with Sub-licenses 3-17
Licensing with an Undocked License“Undocked” licenses are sub-licenses created from a Master License or a “Site” license and are designated by the letter “U.” This license type is created for users who work with GoldMine at another location, on a laptop, or on a workstation disconnected from the server copy of GoldMine.
To License GoldMine with an Undocked LicenseType the U-license, Key Code, and Site Code created in the License Manager.
For detailed information on GoldMine licensing, see the Administrating GoldMine manual and the GoldMine online Help.
Installation Guide

3-18 Licensing and Registration
GoldMine

in this appendix...Finding the BDE in \Setup\
BDEShareSpecifying the Location of the
BDE with GM.iniWorking with the BDE
AdministratorChanging the dBASE Level in
the BDE
A P P E N D I X A
aWorking with theBorland Database Engine
OverviewGoldMine uses the Borland Database Engine (BDE) to access the databases. For GoldMine to run properly, each computer must have access to the BDE. Other applications (such as Delphi) written by Borland or with Borland compilers can also use the BDE.
Most of these applications require you to install the BDE on every computer using the application; however, client workstation installations of GoldMine can share the same BDE on the network. If you do not need the BDE on the local computer for other programs, you can use a shared installation allowing for easier management.
If the BDE is already installed on some of your computers, verify that GoldMine works with the installed version. We currently support version 5.0 only.
For more information on BDE, see Document #500, “The Borland Database Engine with GoldMine” available at http://support.frontrange.com/support/goldmine/500_BDEandGoldMine.htm.

A-2 Working with the Borland Database Engine
Finding the BDE in \Setup\BDEShare
In a network environment, GoldMine does not require you to install the BDE to each workstation. Instead, all GoldMine users on a LAN can use a shared installation of the BDE. When GoldMine is installed on the server, the \Setup\BDEShare folder is automatically created in the GoldMine folder.
When launched on a workstation, GoldMine checks the registry for the location of the BDE. If the BDE path is found in the registry, then GoldMine loads the BDE from that location. If the BDE is not found in the registry, GoldMine checks its subdirectory \Setup\BDEShare.
When the BDE is found, GoldMine loads it and then updates the registry to reference that location. If the BDE cannot be found, GoldMine displays a dialog box allowing you to browse to the correct location of the BDE and select the Idapi32.dll (for example, G:\[directory]\Idapi32.dll).
GoldMine

Specifying the Location of the BDE with GM.ini A-3
Specifying the Location of the BDE with GM.ini
If you do not need to install the BDE locally on your workstations for other programs, and you have many workstations to configure, you can “refer” the workstations to the shared IDAPI32.dll. Add the following lines to GM.ini, which is located in the GoldMine folder:
[GoldMine]NetIdapi32dll=g:\apps\GoldMine\Setup\ BDEShared\idapi32.dll
Substitute the path with the location of idapi32.dll you want the workstations to use.
By using this .ini entry, you can avoid having to manually select the directory for idapi32.dll on each workstation.
Registry SettingsGoldMine uses different methods to initially locate the BDE during installation. When the application selects an installation of the BDE to use, the registry is updated with this location. When GoldMine is launched again, it loads the BDE from the path in the registry.
Installation Guide

A-4 Working with the Borland Database Engine
Working with the BDE Administrator
Some situations require changes to the BDE configuration files to enable GoldMine users to access all databases. For instance, you can add a new database or switch SQL to a new server. Both of these actions require you to update the BDE.
The BDE consists of a list of database names, called aliases, to connect to SQL Server. GoldMine accesses the BDE alias to connect with the SQL database.
If all users access the BDE located on the server, they use the same configuration file and therefore have the same list of aliases and settings; however, users may install or use an existing version of BDE (v5.00 or higher) on their workstation to successfully access GoldMine.
Unless other constraints require using the BDE on the workstations, forcing the workstations to use the server’s BDE configuration is the easiest to administer.
Copying the BDE Configuration to Workstations
You can make the configuration file of the server’s BDE the default configuration for the workstation. Using this method, the workstation can access the local BDE but use the server’s configuration file.
To Copy the BDE Configuration to Workstations
1. Close GoldMine and any other applications using the BDE.
2. From the Windows task bar, select Start>> Settings>>Control Panel.
3. Double-click BDE Administrator. The BDE Administrator window appears.
4. Select Object>>Open Configuration. The Open dialog box appears.
GoldMine

Working with the BDE Administrator A-5
5. Browse to the location of the Idapi32.cfg you want to use as the default configuration for this workstation.
Note: In most installations, Idapi32.cfg is located in the server’s GoldMine\Setup\BDEShare\ folder. However, you should verify the path to the Idapi32.cfg on the server before proceeding.
6. Click Open. The BDE Administrator updates to the new configuration.
7. Click X on the title bar to close the BDE Administrator. A dialog box asks if you want to save this setting as your default configuration.
8. Click Yes.
Note: The workstation will now use the new BDE configuration when launching GoldMine.
Changing the BDE SettingsYou may be required to add or change the database alias settings. You can manually add a database BDE alias to the workstation’s BDE or copy the configuration from the server to the workstation.
To Manually Add Aliases to a Workstation BDE
1. On the workstation Windows taskbar, select Start>>Settings>>Control Panel.
2. Double-click BDE Administrator.
3. Click the Databases tab. In the Database pane, right-click and select New.
4. In the New Database Alias dialog box, select MSSQL from the drop-down list. Click OK.
5. Type the alias name you want to use to connect to the SQL database. If you are configuring a workstation BDE to point to the main SQL database, use the same alias used in the BDE on the server. For example, GoldMine.
Installation Guide

A-6 Working with the Borland Database Engine
6. After the database alias is created in the left-hand pane, update the following lines in the Definition pane on the right:
• Blobs to cache: 256
• Database Name: The name of the GoldMine SQL database you are adding.
• Server Name: The name of the server where SQL is installed.
• User Name: The SQL user name on the SQL server. (The default it sa.)
7. From the BDE Administrator menu bar, select Object>>Apply to save the changes.
8. To test the connection, double-click the database alias you added. Type the SQL user name and password, then click OK.
9. A green box appears around the icons beside the database alias. Verify that the definition labels are boldfaced type.
CONGRATULATIONS! You have successfully created a new BDE alias.
GoldMine

Changing the dBASE Level in the BDE A-7
Changing the dBASE Level in the BDE
An incorrect dBASE level setting in the BDE Administrator can generate database errors. If your BDE is installed by another application, verify the dBASE level.
To Change the dBASE Level in the BDE
1. Close GoldMine and any other application(s) using the BDE.
2. From the Windows task bar, select Start>> Settings>>Control Panel.
3. Double-click the BDE Administrator icon.
4. In the BDE Administrator, click the Configuration tab.
5. Expand Configuration, then Drivers, then Native.
6. Select DBASE.
7. Ensure LEVEL is 5.
Note: If the LEVEL setting is not 5, stop this procedure, and perform the following:• Back up all GoldMine files• Complete all the steps in this section• Rebuild all databases in GoldMine
8. Ensure the MDX BLOCK size is at least 1024.
9. Expand Configuration, then System, and then INIT.
10. Ensure LOCAL SHARE is TRUE.
11. Ensure MAXFILEHANDLES is at least 255.
12. Select Object>>Apply.
13. Click X on the title bar to close the BDE Administrator.
Installation Guide

A-8 Working with the Borland Database Engine
GoldMine

in this appendix...Changing GoldMine Ownership
in Windows XPGranting Permission to Use
GoldMine in Windows XP
A P P E N D I X B
bGranting Access Privileges in Windows XP
OverviewMicrosoft Windows XP Professional has enhanced system security restricting access to applications to all users except the installing user. Having a Windows XP logon does not grant access to an application.
Access privileges must be granted to any additional users who want to use an application on the system. To grant access to GoldMine running on Microsoft Windows XP (Professional version), you must:
• Change GoldMine ownership.
• Grant permission to use GoldMine.Note: If you are upgrading from GoldMine 5.7 (Business Contact Manager) installed on Windows XP Professional, consult your GoldMine 5.7 documentation regarding the “realini” setting in the GM.ini file.

B-2 Granting Access Privileges in Windows XP
Changing GoldMine Ownership in Windows XP
Windows XP (Professional version) enhances system security by granting access to installed applications only to the installing user.
If GoldMine was installed on your system using a different Windows XP logon user name and password and you do not know the Windows XP logon that was used, you can change the permission settings with an administrator-level account.
CAUTION: If you are running the following operating systems: Windows XP, Windows 2000 Professional, Windows 2000 Server, or Windows 2003 Server, you must be logged on as a Power User or part of a Power User group. Consult Microsoft Windows online help for further information.
To Change GoldMine Ownership in Windows XP
1. Log on as an administrator or as a user with equivalent rights.
2. Navigate through your system to Program Files\ GoldMine. Right-click to display the local menu, then select Properties.
3. Click the Security tab.
4. Click the Advanced button.
5. Click the Owner tab.
6. In the Change Owner To area, select the user you want to make the owner.
7. Select Replace owner on subcontainers and objects.
8. Click OK.
9. On the GoldMine Properties dialog box, click OK to save and close.
GoldMine

Granting Permission to Use GoldMine in Windows XP B-3
Granting Permission to Use GoldMine in Windows XP
Windows XP’s enhanced security requires the administrator to grant privileges to each additional user who wants to use an application on the system.
CAUTION: If you are running the following operating systems: Window XP, Windows 2000 Professional, Windows 2000 Server, or Windows 2003 Server, you must be logged on as a Power User or part of a Power User group. Consult Microsoft Windows online help for further information.
To Grant Permission to use GoldMine in Windows XP
1. Navigate through your system to Program Files\ GoldMine. Right-click to display the local menu, then select Properties.
2. Click the Sharing tab.
3. Select Share this folder.
4. Click Permissions.
5. On the Share Permissions tab, select Add.
6. Select the user or user group to whom you want to grant access.
7. Click OK to return to the Share Permissions window.
8. Select the data access permissions you want to allow or deny to the selected users or user groups. GoldMine users must have full control. Click OK.
9. Click the Security tab.
10. In the Group or user names area, select the users for whom you want to define access privileges.
11. Select the GoldMine application permissions you want to allow or deny to the user or user group. GoldMine users must have full control.
12. Click OK.
Installation Guide

B-4 Granting Access Privileges in Windows XP
GoldMine

in this appendix...Creating the GoldMine GroupConfiguring the Workstation DriversSetting Trustee RightsSetting the File Attributes
A P P E N D I X C
cInstalling on a Novell NetWare Network
OverviewTo install GoldMine on a Novell NetWare network system, you must modify the network configuration both on the file server and on the workstations that are to access GoldMine; therefore, to install GoldMine on the network, you should be familiar with using the NetWare command line utilities and have a supervisor-equivalent account.
Log on to the network with either the supervisor account or an account having security rights equivalent to a supervisor. On Novell NetWare 386 systems, you can use a group manager account if your system administrator has already set up a GoldMine group.

C-2 Installing on a Novell NetWare Network
Creating the GoldMine GroupTo add a new network group for GoldMine users, use the SYSCON System Configuration Utility.
IMPORTANT: Although you can select any name for this group, in this appendix the group is called GoldMine. Each GoldMine user on the network should be assigned to the GoldMine group.
Selecting the Installation DriveIn a network environment, physical disk volumes (such as SYS:) are redirected, or “mapped,” into a logical drive designator (such as F:). When GoldMine is installed, the logical drive designator containing the program files is recorded so that GoldMine can find these files when the program is running.
For this reason, install GoldMine on a logical drive that all GoldMine users can access. For example, if GoldMine is installed on volume SYS: using drive G:, then all GoldMine users need to map drive G: to volume SYS: on the network.
GoldMine can be executed from any drive designator that is mapped into the volume containing the GoldMine files; however, for GoldMine to operate correctly, you must map the drive designator selected during installation into the volume containing the program files. If the drive designator used during the installation process is mapped differently, GoldMine does not work properly.
GoldMine

Creating the GoldMine Group C-3
Running GoldMine from a Root Directory
You cannot run GoldMine from a root directory or a “mapped root” directory. For example, if GoldMine is in the SYS: APPS\ GOLDMINE directory, you could map GoldMine by MAP ROOT G:=SYS: APPS (you would run GoldMine from G:\ GOLDMINE). You would not, however, MAP ROOT G: =SYS: APPS\GOLDMINE because doing so would map GoldMine to the G:\ root directory.
After you select the drive designator to be used to install GoldMine, make sure users accessing GoldMine map that drive designator to the volume containing GoldMine files. You can map the drive designator by either of the following methods:
• Method 1: Modify the system logon script using the SYSCON system configuration utility. The following sample maps drive G: to the GoldMine directory on volume SYS: whenever a member of the GoldMine group logs on to the network:
IF MEMBER OF “GOLDMINE” THEN BEGINMAP G: =<fileserver>/SYS: GOLDMINEEND
You must modify some users’ private login scripts if another MAP command overrides the initial mapping of drive G: in the system login script. NetWare assigns the drive designator to the volume to which it was last mapped.
• Method 2: Modify the login script for each GoldMine user to contain a MAP command similar to the sample above. This method should be used only if access to the system login script is restricted.
Installation Guide

C-4 Installing on a Novell NetWare Network
Configuring the Workstation Drivers
You can use either Microsoft’s drivers for Novell or the existing ODI driver.
NETX or VLM DriversYou cannot use NETX or VLM drivers. We do not recommend or support using Novell’s Client32 or Intranetware drivers due to inconsistent behavior with GoldMine.
Client32 drivers are not supported; if you must use Client32, please see Technical Document #348 available at http://support.frontrange.com
Contact your system administrator, network consultant, or Microsoft Technical Support for assistance in making these changes. FrontRange Solutions Technical Support cannot provide support in setting up or troubleshooting network settings.
Setting Trustee RightsGoldMine’s installation program copies the GoldMine program and data files to the appropriate directories. To maintain adequate security while allowing maximum flexibility, the following trustee rights should be granted in the \GoldMine\ directory to the GoldMine group using the SYSCON system configuration utility:
NetWare v2.x:• Search for files in the folder (S)
• Open existing files (O)
• Read from files (R)
• Write to files (W)
• Create new files and folders (C)
• Modify (M)
• Delete (D)
GoldMine

Setting the File Attributes C-5
NetWare 3.x and 4.x: • Scan for files in the folder (F)
• Open and read existing files (R)
• Write to files (W)
• Create new files and folders (C)
• Erase existing files (E)
• Modify files and folders (M)
When contact databases are created as subfolders of the GoldMine directory, the new folders automatically inherit the trustee assignments of the parent folder. Otherwise, you must manually assign the above rights to a new folder once the folder is created.
Setting the File AttributesGoldMine program and data files need the attributes listed below. Use the FLAG command to modify the file attributes in the GoldMine folder and all subfolders as indicated below:
• Flag all .dbf and .dbt files as Shareable and Read/Write.
• Flag all .mdx and .ini files as Read/Write.
• Flag all .exe and .dll files as Shared and Read Only.
• Flag all other files as Non-shared and Read/Write.
• Do not flag any GoldMine files as Transactional System. Problems can result from using the Transactional flag, including corrupted indexes and errors.
Installation Guide

C-6 Installing on a Novell NetWare Network
GoldMine

in this appendix...Installing Microsoft SQL
Server 2000Registering the SQL Server Troubleshooting SQL Errors
when Installing GoldMine
A P P E N D I X D
dInstalling Microsoft SQL Server 2000
OverviewThe GoldMine Server Setup requires you to install Microsoft SQL Server 2000 before installing GoldMine.
The Microsoft SQL Server 2000 CD included with your GoldMine Corporate Edition package provides complete installation instructions in the Microsoft online Help.
The following instructions include installation procedures and settings pertinent to GoldMine but should not be considered a SQL Server 2000 administrator’s guide. Only experienced SQL administrators should configure SQL Server with anything other than the settings described in these instructions.

D-2 Installing Microsoft SQL Server 2000
Installing Microsoft SQLServer 2000
The server on which you are installing Microsoft SQL Server 2000 must have Windows NT 4.0 Server (SP5) or Windows 2000 Server or Windows 2003 Server operating system installed prior to installing SQL Server 2000. Windows 2000 Server (any version) is required for some SQL Server 2000 features.
If you are using an NT 4.0 Server as your SQL 2000 Server, you cannot install GoldMine to the same computer. GoldMine requires a Windows 2000 or higher operating system.
Note: SQL Server 2000 on Windows NT 4.0 Terminal Server is not supported by Microsoft.
To Install SQL Server 2000
1. Insert the Microsoft SQL Server 2000 Installation CD into the CD-ROM drive of the computer on which you are installing SQL.
Note: The SQL Server 2000 Installation CD is set up to autorun when inserted into your CD-ROM drive. If autorun is not enabled, select Run from the Start button on the Windows taskbar, and then type x:\autorun.exe (where “x” is the letter of the CD-ROM drive).
The main dialog box appears.
GoldMine

Installing Microsoft SQL Server 2000 D-3
2. Select SQL Server 2000 Components.
The Install Components dialog box appears.
3. Select Install Database Server. The Standard Edition installation window appears with a Welcome dialog box.
4. On the Welcome to Microsoft SQL Server Installation Wizard dialog box, click Next.
The Computer Name dialog box appears.
Installation Guide

D-4 Installing Microsoft SQL Server 2000
5. Select Local Computer. Click Next.
Note: Although the installer permits installation from a workstation to the server, we do not recommend using this procedure. Please install directly on the server.
The Installation Selection dialog box appears.
6. Select Create a new instance of SQL Server, or install Client Tools. Click Next.
The User Information dialog box appears.
GoldMine

Installing Microsoft SQL Server 2000 D-5
7. Type your name and company, and then click Next.
The Software License Agreement dialog box appears.
8. Read the licensing information. Click Yes to agree with the terms of the license agreement or No if you do not agree and wish to cancel the installation process.
If you select Yes, the CD-Key dialog box appears.
Installation Guide

D-6 Installing Microsoft SQL Server 2000
9. Type the SQL license number as it appears on your Delivery Notes and License Certificate, then click Next.
The Installation Definition dialog box appears.
10. Select Server and Client Tools. Click Next.
The Instance Name dialog box appears.
GoldMine

Installing Microsoft SQL Server 2000 D-7
11. Leave Default selected. Click Next.
The Setup Type dialog box appears.
12. Select Typical with no changes to the default destination folders. Click Next.
The Services Accounts dialog box appears.
Installation Guide

D-8 Installing Microsoft SQL Server 2000
13. Select Use the same account for each service. Auto start SQL Server Service and Use the Local System account. Click Next.
The Authentication Mode dialog box appears.
14. Select Mixed Mode. Select Blank Password. Click Next. The Start Copying Files dialog box appears.
15. On the Start Copying Files dialog box, click Next.
The Choose Licensing Mode dialog box appears.
GoldMine

Installing Microsoft SQL Server 2000 D-9
16. Select Per Seat. In the devices text box, type the number of GoldMine licenses you purchased. Click Continue. The SQL Server begins installing.
When the process is finished, the Setup Complete dialog box appears.
17. Select Yes, I want to restart my computer now, and then click Finish.
Installation Guide
D-10 Installing Microsoft SQL Server 2000
Registering the SQL Server Once SQL Server is installed, you may need to register the server. If it is not registered, the GoldMine Installation Wizard cannot locate it and you cannot install GoldMine.
To Register the SQL Server
1. To open SQL Server Enterprise Manager, select Start>>Programs>>Microsoft SQL Server>> Enterprise Manager. The SQL Server Enterprise Manager window appears.
2. In the Tree pane on the left, expand Microsoft SQL Servers and expand SQL Server Group. Right-click SQL Server Group and select New SQL Server Registration.
The Welcome to the Register SQL Server Wizard dialog box appears.
3. Review the information and click Next.
The Select a SQL Server dialog box appears.
GoldMine

Registering the SQL Server D-11
4. Select the server from the Available servers list or type the server name in the text box if it is not listed. Click Add to move the server to the added servers list.
5. Click Next.
The Select Authentication Mode dialog box appears.
6. Select SQL Server login information that was assigned to me by the system administrator [SQL Server Authentication]. Click Next.
Installation Guide

D-12 Installing Microsoft SQL Server 2000
The Select Connection Option dialog box appears.
7. Select Login automatically using my SQL Server account information. Type the default password in the Login name text box. Leave the Password text box blank. Click Next.
The Select SQL Server Group dialog box appears.
8. Select Add the SQL Server(s) to an existing SQL Server group. In the Group name drop-down list, select SQL Server Group. Click Next.
GoldMine

Troubleshooting SQL Errors when Installing GoldMine D-13
9. The Completing The Register SQL Server Wizard dialog box appears. Review the information and then click Finish.
10. The Register SQL Server Messages window appears informing you of successful server registration. Click Close.
CONGRATULATIONS! Microsoft SQL Server 2000 is now installed. You can now install GoldMine Corporate Edition.
Troubleshooting SQL Errors when Installing GoldMine
If you receive an error message such as MSSQL Login Failed during the installation of GoldMine, check the following:
• Is the SQL server running? If not, start SQL Server. Open the MSSQL Enterprise Manager and find SQL Server Enterprise Manager. Expand the servers until you see your server name. Right-click your server name and select Start in the local menu.
• Is the SQL administrative name and password you typed when installing GoldMine different from the name and password in SQL? Are you using sa with no password, or did you change it in SQL?Open the SQL Server Enterprise Manager. Expand Microsoft SQL Server and then expand SQL Server Groups. Right-click your server name and select Edit SQL Server Registration properties. Verify the login name and password.
• When you installed SQL, did you select Mixed Mode for the authentication mode? If you do not know, go to the server name in the MSSQL Enterprise Manager. Expand Microsoft SQL Server and then expand SQL Server Groups. Right-click your server name and select Properties. Select the Security tab. Select SQL
Installation Guide

D-14 Installing Microsoft SQL Server 2000
Server and Windows. Stop and restart SQL Server. The installation continues.
GoldMine

i
I N D E X
Index
AAudience and Expertise, xviiBBDE
about, A-1changing the dBASE level in, A-7copying configurations to
workstations, A-4finding, A-2registry settings, A-3specifying the location of, A-3
Borland Database Engine (BDE)changing settings, A-5
CChanging
dBASE level in the BDE, A-7GoldMine ownership in Windows XP,
B-2
ContactingFrontRange Solutions, xviii
CopyingBDE configurations to workstations,
A-4CPU Requirements
servers, 1-4shared workstations, 1-5
CreatingGoldMine group, C-2sub-licenses for remote offices, 3-11sub-licenses for undocked users, 3-13
DDatabases
backing up, 2-2D-License, 3-3, 3-5, 3-6Document Conventions, xvii
EE-License, 3-3, 3-5

I-2
End-User License Agreementabout, 2-8
FFolder
sharing the GoldMine, 2-16FrontRange Solutions
contact, xviii
GG-License, 3-3, 3-6GoldMine
licensing, 3-7GoldMine Folder
sharing, 2-16GoldMine Link for Microsoft Outlook
requirements, 1-7GoldSync
license, 3-6GoldSync License (Y-License)
about, 3-11creating, 3-11
Grantingpermission to use GoldMine in
Windows XP, B-3
HHelp, xviii
IInstallation Checklists
about, 2-4Shared server, 2-4Shared workstation, 2-5Single-user, 2-6
Installation Typesabout, 2-3
Installation Wizard, 2-3Installing
on a client workstation, 2-15on a server, 2-7on a single-user license computer, 2-20on an undocked computer, 2-20
JJ-License, 3-3
LLicense and Registration Wizard, 3-7License Manager
about, 3-4License Types
about, 3-2License.dbf, 3-4Licenses
about, 3-2creating, 3-4Enterprise (E), 3-3Enterprise License Increase (J), 3-3GoldSync (Y), 3-3GoldSync License Increase (N), 3-3increasing license counts, 3-3license types, 3-2managing, 3-4Master license, 3-2, 3-3, 3-6Site (S), 3-3Standard (D), 3-3Standard License Increase (R), 3-3sub-licenses, 3-2, 3-3types of, 3-3Undocked (U), 3-3, 3-17
Licensingabout, 3-1GoldMine, 3-7serial number, 3-4with a Master License, 3-5with a Site license, 3-15with an Undocked license, 3-17
MManuals, xviiiMapping a Drive, 2-17Master Licenses
about, 3-2licensing with, 3-5
Memory Requirementsservers, 1-4

I-3
shared workstations, 1-5single-user license computer, 1-6
MicrosoftWindows 2000 Server, 1-3, 1-5Windows 2003 Server, 1-3
Microsoft SQL Server 2000registering, D-10troubleshooting, D-13
NNetWare
3.X, C-54.X, C-5
Network Operating Systemsserver requirements, 1-2
Network Protocolsserver requirements, 1-3
N-License, 3-3Novell NetWare, 1-3Novell NetWare Network Installations
configuring workstation drivers, C-4creating the GoldMine group, C-2setting the file attributes, C-5setting trustee rights, C-4
OO-License, 3-3Online Help, xviiiOperating System Requirements
servers, 1-2shared workstation, 1-6single-user license computer, 1-6undocked computers, 1-6
Outlookrequirements, 1-7
PPerformance Considerations
servers, 1-4, 1-5single-user license computer, 1-7undocked computers, 1-7
RRegistration
SQL Server, D-10Registry Settings
BDE, A-3Remote Offices
creating sub-licenses for, 3-11Remote systems, 2-22R-License, 3-3
SSerial number, 3-5, 3-8Server Requirements
about, 1-2CPU, 1-4memory, 1-4network protocols, 1-3operating systems, 1-2performance considerations, 1-4
Shared Server installationschecklist, 2-4
Shared Workstation installationschecklist, 2-5running, 2-18
Shared Workstation Requirementsabout, 1-5CPU, 1-5memory, 1-5operating systems, 1-5, 1-6
Single-user installationschecklist, 2-6running, 2-20
Single-user Requirementsabout, 1-6CPU, 1-6memory, 1-6performance considerations, 1-6
Site License (S-License)about, 3-11creating, 3-11licensing with, 3-15
S-License, 3-3, 3-11, 3-15Software Requirements
single-user license computers, 1-7

I-4
Sub-license, 3-2, 3-5creating, 3-11, 3-12creating for remote offices, 3-11creating for undocked users, 3-13
System Requirementsabout, 1-2server requirements, 1-2shared workstation requirements, 1-5single-user requirements, 1-6
UU-License, 3-13Undocked License (U-License)
about, 3-13creating, 3-13licensing with, 3-17
Undocked userscreating sub-licenses for, 3-13licenses, 3-13
Upgradingconsiderations, 2-2on an undocked computer, 2-22
WWorkstations
copying BDE configurations to, A-4
YY-License, 3-3, 3-11, 3-15


![User Options - Home | GoldMine CRM - Simple, … UserID Password is not case sensitive. For that matter, neither is the UserID Login. Note Figure 3-3 User Options [GoldMine] [GoldMine]](https://static.fdocuments.us/doc/165x107/5b09cf3d7f8b9a51508de2d1/user-options-home-goldmine-crm-simple-userid-password-is-not-case-sensitive.jpg)