A go vicencio-top 10 qs on chapter 2 developing marketing strategies & plans

Go Lesson Plans
©Gordon E. Castanza, Ed. D.
10/19/11 DRAFT
1
Lesson Plans for Go in Schools
By
Gordon E. Castanza, Ed. D.
October 19, 2011
Published By
Rittenberg Consulting Group
7806 108th
St. NW
Gig Harbor, WA 98332
253-853-4831
Go Lesson Plans
©Gordon E. Castanza, Ed. D.
10/19/11 DRAFT
2
Table of Contents
Acknowledgements ......................................................................................................................... 4
Purpose/Rationale ........................................................................................................................... 5
Lesson Plan One ............................................................................................................................. 7
Basic Ideas .................................................................................................................................. 7
Introduction ............................................................................................................................... 11
The Puzzle ................................................................................................................................. 13
Surround to Capture .................................................................................................................. 14
First Capture Go ........................................................................................................................ 16
Lesson Plan Two ........................................................................................................................... 19
Units & Liberties....................................................................................................................... 19
Lesson Plan Three ......................................................................................................................... 24
Capture ...................................................................................................................................... 24
Examples for counting liberties ................................................................................................ 26
Where You Can't Play - Suicide Moves ............................................................................... 28
Recognizing Atari ................................................................................................................. 28
Lesson Plan Four........................................................................................................................... 31
Eyes ........................................................................................................................................... 31
Three-point eye-space ........................................................................................................... 36
Four-point eye space in a line ............................................................................................... 37
Four-point eye-space in a square .......................................................................................... 37
Four-point eye shape in an ―L‖ ............................................................................................. 37
Five-point eye-space ............................................................................................................. 38
Complete six-point eye space ............................................................................................... 38
The unsafe six-point complete eye-space shape (―Rabbit‘s Head‖) ..................................... 38
Unconnected six-point eye-space ......................................................................................... 39
Lesson Plan Five ........................................................................................................................... 40
Seki ........................................................................................................................................... 40
Seki Form 1 ........................................................................................................................... 42
Seki Form 2 ........................................................................................................................... 43
Seki Form 3 ........................................................................................................................... 43
Seki for guided practice ........................................................................................................ 44
Lesson Plan Six ............................................................................................................................. 46
―No Repetition‖ Rule ................................................................................................................ 46
Three forms of ko.................................................................................................................. 48
Don‘t be afraid of ko ............................................................................................................. 50
Ko threats .............................................................................................................................. 53
Lesson Plan Seven ........................................................................................................................ 56
Territory .................................................................................................................................... 56
Lesson Plan Eight ......................................................................................................................... 63
Influence ................................................................................................................................... 63
Lesson Plan Nine .......................................................................................................................... 68
Scoring ...................................................................................................................................... 68
Lesson Plan 10 .............................................................................................................................. 76
Extensions, Connections, Cuts—Part One................................................................................ 76
Lesson Plan 11 .............................................................................................................................. 83

Go Lesson Plans
©Gordon E. Castanza, Ed. D.
10/19/11 DRAFT
3
Lesson Plan 11 .............................................................................................................................. 83
Extensions, Connections, Cuts—Part Two ............................................................................... 83
Lesson Plan 12 .............................................................................................................................. 95
Lesson Plan 12 .............................................................................................................................. 95
Basic Opening Strategy............................................................................................................. 95
Lesson Plan 13 ............................................................................................................................ 108
Endgame ................................................................................................................................. 108
Lesson Plan 14 ............................................................................................................................ 117
Planning .................................................................................................................................. 117
Lesson Plan 15 ............................................................................................................................ 125
Fighting ................................................................................................................................... 125
Lesson Plan 16 ............................................................................................................................ 131
Connecting to the Go World ................................................................................................... 131
References ................................................................................................................................... 137
References ................................................................................................................................... 137
Go Lesson Plans
©Gordon E. Castanza, Ed. D.
10/19/11 DRAFT
4
Acknowledgements
I wish to extend my appreciation to the seminal work of Ralph Tyler (Tyler, 1949) for
providing the foundation for curriculum design in the form of his four fundamental questions
known as the ―Tyler Rationale‖: ―What educational purposes should the school seek to have?
What educational experiences will lead to fulfilling these purposes? How can these educational
experiences be effectively organized? [And] how can we determine whether these purposes are
met‖ (Kridel, May 2000)? Tyler‘s work gave educators the structure for the nascent field of
curriculum development. Allan C. Ornstein and Francis Hunkins (Ornstein, 1993) informed my
understanding of the instructional theories and instructional models of David Berliner, Benjamin
Bloom, Jere Brophy, Walter Doyle, Nate Gage, Thomas Good, Carolyn Evertson, Herb Walberg,
Barak Rosenshine, and Madeline Hunter. For my doctoral training, and my understanding of
Heidi Hayes Jacobs‘ curriculum mapping I am indebted to the exceptional guidance of Dr.
Carolyn Chapman, professor emerita of Educational Leadership at the University of Nevada,
Reno.
Lastly, I wish to acknowledge the perseverance and patience of the Masters in Teaching
students of my Curriculum and Instruction courses at City University in Tacoma, Washington.
As they struggled with the concepts of lesson planning and the improvement of instruction, I
learned from their suggestions for ways to improve the model that I use for the lessons of this
manual.

Go Lesson Plans
©Gordon E. Castanza, Ed. D.
10/19/11 DRAFT
5
Purpose/Rationale
Educators‘ support for the use of lesson plans ranges from the structuralist to the
minimalist. The structuralist develops a lesson plan very much like a cartographer constructs a
map. On the other hand, the minimalist asserts that filling in the small 2‖ x 2‖ box in pamphlets,
that their publishers title ―Planning Book,‖ are sufficient for them. They eschew taking the
structuralist approach because, they say, it takes too much time and work. Besides, they know
what they are doing (even though nobody else could tell).
I chose the structuralist approach because it provided an extensive foundation for solid
lesson planning with essential characteristics that took the guess work out of how to get where
you want to go. Furthermore, I wanted to demonstrate both to educators, and to lay people, that
lesson planning elucidated the act of teaching. Lesson planning reveals to anyone who wants to
know not only the intent of the lesson, but also how the educator will assess performance to
determine whether or not they succeeded in the lesson. Consequently, my use of the structuralist
approach conforms with the educational research findings that emanated from the ―school
effectiveness‖ research of the 1970s and 1980s. I became acquainted with Kathleen Cotton‘s
work when I was the Superintendent of the Chatham School District (CSD) in Alaska. I involved
the CSD in the Northwest Educational Laboratory‘s Onward To Excellence school improvement
process. Cotton (Cotton, 2000) redacted three decades of research. Regarding the development of
a curriculum and teachers‘ use of lesson planning, Cotton found that:
Within [the general topic area of ―Leadership, Planning, and Learning Goals‖] are listed
the classroom . . . practices that research has shown to foster positive student
achievement, attitudes, and social behavior [when]:
1.1.1 Teachers emphasize the importance of learning [to]:
A. Reinforce to students that the things they are learning will be useful throughout their
lives, giving examples of current and future applications.
1.1.2 Teachers use a preplanned curriculum to guide instruction [to]:
A. Develop and prioritize learning goals and objectives based on [classroom] guidelines,
sequence them to facilitate student learning, and organize them into units or lessons.
C. Identify instructional resources and teaching activities, match them to objectives and
student developmental levels, and record them in lesson plans.
E. Review resources and teaching activities for content and appropriateness, and modify
them as needed to increase their effectiveness in helping students learn. (Cotton, 2000, p.
6)
The topic of goals and objectives are central to any discussion of an educational approach
to lesson planning. The tensions between the structuralist and the minimalist approaches raise
again the questions of ―for whom?‖ and for ―what purpose?‖ The structuralist answers that the
goals and objectives are statements of student outcomes for the purpose to improve his/her
achievement. The educational theorist best known for this objective‘s approach is Robert F.
Mager (Mager, 1997). The minimalist answers that goals and objectives are only for the teacher
to know what he/she is supposed to teach, and that they are self-evident from the lesson. In the
following lessons, I have adopted the goals approach that Mager influenced. My rationale for
taking this approach is: A goals objective is a statement that answers two questions for the
teacher: (1) What do I want the learner to know, understand, or appreciate (or some other
educational goal?), (2) How will I know if the student knows, understands, or appreciates? It has
been my experience that prevalent practice among most public school teacher is to dispense with

Go Lesson Plans
©Gordon E. Castanza, Ed. D.
10/19/11 DRAFT
6
objectives in lesson plans even though materials such as curriculum guides and textbooks contain
them. From a teacher‘s perspective, I believe that there are advantages to providing teachers with
objectives and curriculum guides? Parents and students are holding teachers more accountable
for student learning. Just as in the healing professions, in the education profession performance
objectives are increasingly the way of life. The minimalist, on the other hand, says that the
objection to writing goals and objectives is that they take too much work for the minimal pay-off.
In my approach, I hope to provide a model for educators, and for Go teachers, that the extra time
spent writing goals statements have an enormous long-range pay-off. The little extra time that
the teacher takes in the beginning to write goals and objectives, virtually eliminates the need for
teacher to do them again and again in the future. So, it is a one-time task, which focused the act
of teaching toward the improvement of instruction and student achievement. Finally, the research
suggests that student learning is greatly enhanced when teachers:
Develop and prioritize learning goals and objectives . . . sequence them to facilitate
student learning . . . identify instructional resources and teaching activities, match them to
objectives and student development levels, and record them in lesson plans. (Cotton,
2000)
Another purpose I have for presenting these lesson plans is to solicit suggestions from
other teachers of Go. I appreciate that each Go teacher has his/her own approach to teaching the
game. Consequently, I submit these lesson plans in recognition that they are a work in progress
that will greatly improve with the constructive suggestions of others.

Go Lesson Plans
©Gordon E. Castanza, Ed. D.
10/19/11 DRAFT
7
Lesson Plan One
Basic Ideas
PREPARATION
OBJECTIVE/EALR(s) 1. EALRs1: CO 1 1.1, 1.2; 2 2.1, 2.2, 2.4; 3 3.1, 3.2; 4 4.1, 4.2; R 1
1.3; 2 2.3, 2.4; 3 31., 3.2, 3.4; W 1 1.3; 2 2.1, 2.2, 2.3; 3; 4 4.1,
4.2; M 1 1.2, 1.3, 1.5; 2 2.1; 3 3.1; 5 5.2, 5.3; SSG 1 1.1; 2; 3 3.3;
SSIIS 1.1a; 1.1b; SSIGPS 2.1, 2.1a; 2.1b; SSCTS 3.1, 3.1.1a -
3.1.1d
AKCSs2: ELA A 1 – 8; B 1 -3; C 1 – 3, 5; D 1, 2, 4; E 1-4. R A 1-
3; B 1-2; C 1, 4; WL A 1, 4; B 1, 4, 6; C 1, 2, 4; M A 1, 4, 5; B 1,
2, 4, 6, 7; C 1; D 1 – 5; E 1; T A 1 – 3; B 1-2; C 1-3; D 1-3; E 7.
2. The student will be able to arrange (knowledge)3 his/her stones so
that when given a puzzle he/she will make the connection 100% of
the time.
STUDENTS 3. The students are Upper Elementary (gr. 4-6) students attending a
Montessori School that the American Montessori Association has
accredited.
4. This is an introductory lesson to Go. Students may have prior
experiences with the games of checkers, and Pente (which is
similar in layout to a Go board).
CLASSROOM
MANAGEMENT
5. 9 x 9 demo board, class Go sets: bring in 9 x 9 sets (do not leave
in the classroom), and lender sets (that the students can take
home); 50‘ tape measure
6. The teacher will introduce the students to the procedure of
obtaining the Go sets from the storage box and setting up the
boards, tables, and chairs. The teacher will demonstrate to the
students the proper way to greet the instructor and fellow students,
and opponents. The teacher expects that the students will follow
all the behavioral expectations of the school as appropriate for this
lesson. Have each child make a Go folder, and have a Go journal
in which to record their thoughts on what they‘ve learned each
session. Ask the students to make a section in their Go journals for
―Definitions.‖ They will record their daily vocabulary words in
the Go journals along with their reflections on each day‘s lesson,
and the concepts that the teacher introduced. Name tags are
optional.
1 EALRs = Washington State‘s Essential Academic Learning Requirements; CO = Communications; R = Reading;
W = Writing; M = Mathematics; SSG = Social Studies Geography; SSIIS = Social Studies Inquiry and Information
Skills; SSIGPS = Social Studies Interpersonal and Group Process Skills; SSCTS = Social Studies Critical Thinking
Skills 2 AKCSs = Alaska Content Standards; ELA = English/Language Arts; R = Reading; WL = World Languages; T =
Technology 3 Italicized items in the objective statement are the cognitive learning level(s) from Bloom‘s Taxonomy of domains:
cognitive, psychomotor, and affective.

Go Lesson Plans
©Gordon E. Castanza, Ed. D.
10/19/11 DRAFT
8
CLASSROOM
MANAGEMENT
7. Send home a letter (attached on page 17) explaining the game of
Go to parents. Solicit responses from parents about the degree of
their interest/involvement with this child‘s learning about Go.
INTRODUCTION
SET 8. Prior familiarity with Go is not required. The teacher will give a
brief history of the game of Go, how it is played today, and the
opportunities for having fun and meeting new friends because of
their involvement in the game and activities of playing Go (See
attachment that follows).
COMMUNICATION
OF PURPOSE
9. By learning Go you will not only become the newest part of a
4000 year old tradition that started in China, but also you will
begin to play the game for fun and enjoyment. Go is an excellent
way to exercise your mind, just as you exercise your body in gym
class.
BODY OF THE LESSON
PRESENTATION 10. By learning Go you will not only become the newest part of a
4000 year old tradition that started in China, but also you will
begin to play the game for fun and enjoyment. Go is an excellent
way to exercise your mind, just as you exercise your body in gym
class.
PROCESSING 11. The teacher will present some of the history of Go, then
demonstrate the two different colors of stones, the matrix of the
Go board (9 x 9, 13 x 13, and 19 x 19). The teacher will follow the
demonstration with an exercise for the students to solve the
puzzle.
12. The teacher will introduce the game by showing the students how
old the game is using a 50‘ tape measure. One inch is equivalent
to 10 years old. Ask students how old they are, and have them
show the teacher on the tape measure what that would look like.
Then demonstrate the age of the United States, the sailing of
Christopher Columbus (1492), Roman Empire (476 B.C.) Greek
culture (20‘). Continue until the tape is out about 33‘. This
represents about 2000 BCE.
How many can name a famous American sports figure? How
many a famous Go professional/player? In Asia school children
know their names just as you know the names of sports figures in
the U.S.
How many of the students participate in some form of martial
arts? Or have friends that do? What are the benefits? Go is a
―martial art for the mind.‖
The teacher will give instructions, and then follow-up with guided
practice, and then one-on-one independent practice. The teacher
will explain the recognized ―manners‖ of Go: 1. Acknowledge
your opponent a the beginning of the game; 2. place the stones on
the board politely (do not move them around); 3. never comment
on your opponent‘s moves (except to say ―nice move!‖;

Go Lesson Plans
©Gordon E. Castanza, Ed. D.
10/19/11 DRAFT
9
PROCESSING 4. always thank your opponent for the game; 5. accept resignations
with grace (explain that it is always okay to resign).
MONITORING 13. The teacher explains to the students that the basic rule of Go is
―surround to capture (see attachments). The teacher explains the
capture rules. Keep it very simple. Students‘ attention will wander
after 3-4 minutes. Ask the students to visualize that the Go board
is a large glass of orange soda, and each line coming out from a
stone is a straw. Stones need to breathe to stay alive. Show how
opposing stones black the straws, show Atari, then capture, as the
stone dies from lack of air. The show how stones of the same
color can breathe through the buddy system, they can hook their
straws together. The students will pair up, and they will hand out
the Go sets. Have students play the one-stone capture game
(Yasuda, 2002) (see attached description).
14. The teacher will be looking for the students to demonstrate the
three types of Go boards (9 x9 , 13 x 13, and 19 x 19) and explain
the purpose of each. The teacher will observe students make the
proper placement of the stones on the board. The teacher will
demonstrate the set up of the board for The Puzzle activity, and
explain the rules to the students. The teacher will be looking for
students‘ ability to solve a unique problem, and how each one
goes about solving the problem.
15. The teacher will allow the students to set up the puzzle for
themselves and then have their partner solve the puzzle. If there
are students with disabilities in the classroom, the teacher will
make the appropriate accommodations as the situation warrants.
Yasutoshi Yasuda ((Yasuda, 2002) noted, ―Concerned about
social problems in Japanese schools, [he] began introducing the
game to school children and discovered to his surprise that it had
immediate positive effects. Children who were unruly became
calmer and more interested in school generally; children who were
withdrawn began to interact with others; children who were
indifferent became animated. The effects were dramatic time after
time (p. iii). . . Encouraged by these experiences with
schoolchildren, Yasuda expanded his efforts to homes for the
elderly and then to institutions for the mentally and physically
handicapped. In every case, the game had tremendous positive
effects. I [William Cobb] can attest personally to the reality of
these effects because I have accompanied Yasuda to a number of
schools and institutions in Japan on two separate visits and I have
taught the game to hundreds of school children in the US myself.
Currently I am working with a group of mentally handicapped
elderly people. Everything Yasuda says about the power of Go is
true‖ (p. iii).

Go Lesson Plans
©Gordon E. Castanza, Ed. D.
10/19/11 DRAFT
10
CLOSING
CLOSURE 16. Remind students of concepts exposed today, and guide the
students‘ attention to the vocabulary words that the teacher used in
today‘s class (the teacher might want to write them on the board).
Ask students to repeat the concepts and to define them for their
colleagues. Students should start a section in their Go journals for
―Definitions.‖
ASSESSMENT 17. Playing a game of First Capture Go students will demonstrate the
way to capture a stone on the 9 x 9 board.
FOLLOW-UP 18. Vocabulary to learn: Corner, sides, center, the opening, the middle
game, the endgame.
REFLECTION
(after the lesson)
19. What did you do that helped students learn and meet the objective?
20. What would you do differently if you taught this lesson again to make it
more successful for students?
21. SAKT4 1-8; SAKS
5 1-14; AKSCRS
6 Cultural Standards for Students:
B-F; Cultural Standards for Educators: B-E; Cultural Standards for
Curriculum: A, B, D, E; Cultural Standards for Schools: B, C.
22. PA7 1. A—e; 2 A—F; 3 A—D; 4 A—E; 5 A—I; 6 A, E; 7 A—F; 8
A—E; 9 A—E; 10 A—G.
4 SAKT = Standards for Alaska‘s Teachers.
5 SAKS = Standards for Alaska‘s Schools.
6 AKSCRS = Alaska Standards for Culturally-Responsive Schools.
7 PA = Washington State Performance-Based Pedagogy Assessment of Teacher Candidates.

Go Lesson Plans
©Gordon E. Castanza, Ed. D.
10/19/11 DRAFT
11
Introduction
Script:
1. Introduce yourself - last name first. Hi, I'm Dr./Mr./Ms., and I'm so happy to be here today.
Explain that in Asian cultures, people use their last names first, because the family (or group)
you come from is considered as or more important than yourself as an individual (This is a theme
to develop during the program, as it is a direct correlation to the stones on the board - the group
is more important than the individual stone.). In the U.S., we think of the individual as all-
important, Asian cultures look at it differently. This is something you'll see in the game of Go.
2. I'm here to teach you Go, oldest, most popular, and most complex board game in the world.
How old is this game, anyway? Here I take out the tape measure and ask for a volunteer to come
up. I ask the class how old they are - say they are mostly ten years old. OK, we'll count your life
span as one inch on this tape measure. One inch equals 10 years. Think of yourselves as one inch
old.
Now the volunteer will hold the end of the tape measure and we'll walk backwards in time a little.
I'm around 50 years old. that's five inches on the time scale (pull out the tape to 5"). Now our
country, the U.S., is a little over 200 years old. Let's pull out the tape measure to 20", or almost
two feet. Now that's a ways of time, but Go is much older than our country.
Now let's go back even further. How about to when Christopher Columbus discovered the new
world? That was in 1492, or about 500 years ago. Let's pull out the tape measure to 50 inches, or
about 4 feet. Go is still way older than even the discovery of the new world. Let's go back further,
can you imagine about a thousand years? This was before a lot of what we think of as European
culture had even developed. Let's pull out the measure 100" (about 8 feet.) I think we now need a
second volunteer up here to help hold the tape measure (have a second child come up and hold
the measure next to you, as the first child has moved 8 feet away).
Well, go is still way way older. Let's go back to the Roman Empire, the beginning of the
Common Era, that's two thousand years ago - now we can pull the tape measure out 17 feet. I
think we need a third volunteer to help now (as you are doing this, the tape measure is going
down along one side of the classroom and has reached the back). Well, go is still MUCH older.
Let's go back another 400 years, during the height of Greek culture, and Plato. This brings our
measure out to 20 feet - wow. Go is still way older. Continue is in this way till you get to around
2000 BCE, which is how old the game may be. the tape will end out being out around 33 feet.
This usually captivates everyone and gets the class with you.
So, how many of you have heard of Go? raise your hands. (not many)
How many of you can name a basketball, or soccer player or figure skater? How many of you
follow their careers, have pictures of them on your wall? raise your hands (most) In America,
these sports are very popular, players are famous, make lots of money, are household names.

Go Lesson Plans
©Gordon E. Castanza, Ed. D.
10/19/11 DRAFT
12
In Asia, Go players are the same as our basketball players. They are famous, play for big prizes,
everyone knows their names. etc. Big world in Go over there - newspaper columns, televised
tournaments, magazines devoted to the game. In Korea, there is 24 hour Go programming on TV.
But there, perhaps no one has heard much about basketball. About ten percent of the Asian
population plays the game- so there are probably a couple hundred million Go players- making it
the most popular game in the world. So welcome to the big time game world.
3. How many of you study, know about, or have a friends that study martial arts? raise your
hands (many) What are the benefits of studying a martial art? raise your hands (You‘ll get many
replies such as: physical fitness, conflict resolution, fun tournaments, concentration, confidence,
managing conflict, etc.) Go is also a martial art - it is a martial art for the mind, and does for the
mind the same things other martial arts do for the body.
4. Rating system - how many of you know about the belt system in martial arts raise your hands
(many). Go, being a martial art, also has a rating system. Explain 30 kyu - 9 Dan professional.
Explain handicap system.
5. Explain capture rules. Keep it very simple, you have 3-4 minutes before their attention starts
to wander. I have them visualize the go board as being underwater, and each line coming out
from a stone as a snorkel or breathing tube. Stones need to breathe to stay alive. Show how
opposing stones block the breathing tubes, show Atari, then capture, as the stone dies from lack
of air. Then show how stones of the same color can breath through the buddy system, they can
hook their snorkels up together. As you explain, have students start a sheet titled "Go
Definitions" with each week's new words. The words you will probably cover are below. Write
the words on the board.
Then have them pair up, and hand out the sets. They'll be ready to play. Have them play to first
capture. About five minutes before you need to end, clap your hands. Talk about taking care of
the Go sets and how to put them away properly. Explain that the lender sets will be left in the
classroom and they can check them out from the teacher and take them home to play with. (Weir,
2004)

Go Lesson Plans
©Gordon E. Castanza, Ed. D.
10/19/11 DRAFT
13
The Puzzle
―This is the first problem my
grandfather gave me when I started
learning go from him. In a game,
the players alternate placing stones,
but for this problem, the player
with White can place two stones at
a time. Two white stones are
placed first, and then one black
stone is placed. Then two white
stones and one black stone again.
The aim is for White to find a way
to connect this marked white stone
in the middle with one of the four
white stones on the outside that
Black cannot stop. My grandfather
told me that I would be a genius if
I could solve this problem‖
(Yasuda, 2004).

Go Lesson Plans
©Gordon E. Castanza, Ed. D.
10/19/11 DRAFT
14
Surround to Capture
1. Surrounding a stone on the edge or in a corner
Stones in the center of the board must be
surrounded from all four directions, but fewer
stones are needed to surround on the edges or
in the corners. In Diagram 1, the two black
stones are both fully surrounded and captured.
They should be removed from the board.
Diagram 1
2. Capturing a group
When several stones are connected
horizontally and/or vertically, they form a
unit/group and can be captured as a whole.
The three black units/groups in Diagram 2
have all been captured.
Diagram 2

Go Lesson Plans
©Gordon E. Castanza, Ed. D.
10/19/11 DRAFT
15
3. Self-capturing by playing on an already surrounded point.
In Diagram 2, if the four white stones are
already in place and Black plays 0, Black 0
is immediately captured because it is
already surrounded when it is played. This
self-capturing play has the same effect as
White playing so as to capture a black
stone.
What may look like a self-capturing move
will not be if the play actually captures
some stones of the other color. In Diagram
4, Black 0 captures the marked White
stones, which are immediately removed, so
Black 0 is not actually a self-capture. After
Black 0 in Diagram 4, the board will
appear as in Diagram 5.
Diagram 3 4. When playing on an already surrounded point is not a self-capture.
Diagram 4 Diagram 5 (Yasuda, 2002)

Go Lesson Plans
©Gordon E. Castanza, Ed. D.
10/19/11 DRAFT
16
First Capture Go
Cobb (Yasuda, 2002) described the game of First Capture Go,
The game is played on a grid of intersecting lines, 7 or 9 lines is a good size. The playing
pieces are circular and of two contrasting colors, usually black and white, but any colors
will do. They are played on the intersections and, after being placed, do not move. You
can play on any intersection, including on the edges. Here is a 9 line board with four
pieces, called ―stones,‖ on it:
Black goes first, with the players taking
turns. The object is to surround one or
more of the other player‘s stones by
placing a stone on all the empty
intersections it is touching.
In the next illustration, two black
stones have been surrounded in this way.
These stones, marked with triangles, are
removed when their last empty
intersection is covered, making White the
winner because White has captured one of
Black‘s stones first.

Go Lesson Plans
©Gordon E. Castanza, Ed. D.
10/19/11 DRAFT
17
Introductory Letter
DEAR PARENTS:
This year, your child will have the opportunity to learn to play Go; the oldest and most
complex board game in the world.
Go is a strategy game that is played on a grid of intersecting lines. Two players alternate
in placing black and white stones on the board with the aim of surrounding territory. The
intertwining patterns of black and white stones becomes extremely complex and requires study
and concentration to play well. No one has ever become a master of this game who has not
learned it as a child.
The game provides and opportunity to develop a host of useful critical thinking skills. It
has extraordinary potential for practice in problem solving and for developing a flexible and
open-minded attitude. Players are motivated to seek creative plays that will combine attack and
defense for maximum efficiency, thus developing appreciation for the complex and
interconnected consequences of various possibilities. Japanese studies show that Go improves
connected thinking ability in children. Play requires both left brain (analytical) and right brain
(intuitive and artistic) concentration.
Go is a natural addition to the math curriculum. Our fifth grade curriculum requires
understanding pattern recognition and geometric shapes. Learning shape sequences and solving
game problems are ideal in achieving this objective. The game also provides excellent practice in
imagining and recognizing abstract patterns and in learning to engage in precise analysis.
Another part of the math objective is touched as students will learn to recognize a logical
sequence and understand if/then statements of cause and effect. As the class participates in game
analysis on the demo board, they will learn to place points on x-y grid co-ordinates as an
introduction to graphing equations. For these reasons and more, Go is included as a part of
education in many parts of far eastern countries where the game originated and has been valued
for thousands of years.
Go is a significant intercultural experience. In ancient China, Go was one of the Four
Accomplishments that were required of nobility before they could be considered properly
civilized, the other three being poetry, painting, and music. At the point of his death, Confucius
regretted not having spent more time on the game. In China, Korea, and Japan, Go has a respect
and popularity on a par with major sports events here. There are magazines, newspaper columns,
24-hour television programming, and professional tournaments with purses in the hundreds of
thousands of dollars devoted to the game. Professional Go players enjoy prominent celebrity
status. Learning about Go gives one a window of understanding Eastern cultural norms.
One could argue that Americans involved in business and governmental relations with
Far Eastern countries could become more effective by learning to play. As reported in Business
Week, for some years the Darden School of Business at the U. of Virginia required all of its
students in its Masters program to study the game. After an ill-fated trip by President Bush to
Japan, the New York Times (1-6-92) stated that if President Bush had gone thinking in terms of
Go instead of chess, he would have achieved far more. How much Go training is utilized in
economics strategies is illustrated by Miura Yasuyuki, a prominent Japanese business executive,
who recently published his memoirs as " Go: an Asian Paradigm for Business Strategy." In
addition to its value in understanding Eastern mind set, we will be learning many Japanese terms
and expressions used to describe various aspects of the game.

Go Lesson Plans
©Gordon E. Castanza, Ed. D.
10/19/11 DRAFT
18
We will be introducing students to play on the IGS, the Internet Go Server, and other
internet Go sites. Your child will be meeting players from all over the world, and will be taught
lessons in intercultural etiquette. Students will learn to communicate politely and directly with
their opponents respectful of cultural variations. In the past, we visited and played games with
people on every major continent except Antarctica!
Go is an effective tool in developing positive social skills. firstly, etiquette is considered
and essential part of play and will be covered in the classroom. Because of the nature of the
handicapping system in Go, the focus is on the quality of the game more than winning and losing.
Thus, players have an interest in improving each other's play as well as their own, and are in as
position to enjoy new insights that are discovered in a game, even if the new insight results in a
loss. Go encourages the development of patience in players. Not only must one learn to wait
patiently for the other to play, but in order to play well, one must exercise patience and flexibility
in play strategies. Go is a game which rewards balance over aggressions and greed, typified by
negotiated settlements in which both parties experience some gain.
All this is a game that is intriguing and fun. If you find your child (or you) becomes
interested in pursuing the game beyond the classroom, instruction is available with local teachers.
Just like learning to play a musical instrument, becoming a strong player takes systematic work
and study. Also, the Ann Arbor Go Club, which meets weekly on alternating Sunday afternoons
and Thursday evenings at Border's Books, welcomes young players. During the year, the AAGC
puts on tournaments with special sections for kids, and also hosts visiting professional Go
players who will come into our classrooms. For information on instruction or club meetings,
please call or email me. In the summer the AGA Summer Go Camp for Kids is a wonderful
experience. Kids from all over the country come to have a week of camp fun and learn from
professional players. A video about Go Camp is available.
There are computer programs available to play Go against your computer. A free one for
beginners is available that can be downloaded from http://www.smart-games.com/igowin.html.
There is a new interactive web site on which you can learn the game basics through a series of
lessons. It's at http://playgo.to/interactive/welcome.html.
Finally, if you are connected to the Internet, your child can play go online. Go is one of
the games available on msn.games and also yahoo.games. The following site: www.kiseido.com
will provide the software to play on its site and has many players. To play on IGS, you will need
to download client software. It's a bit complicated, but the telnet address is: igs.joyjoy.net.
I look forward to working with your children. Please don't hesitate to call with any
questions or for further information.
Teacher‘s name (phone number and email)

Go Lesson Plans
©Gordon E. Castanza, Ed. D.
10/19/11 DRAFT
19
Lesson Plan Two
Units & Liberties
PREPARATION
OBJECTIVE/EALR(s) 1. EALRs: CO 1 1.1, 1.2; 2 2.1, 2.2, 2.4; 3 3.1, 3.2; 4 4.1, 4.2; R 1
1.3; 2 2.3, 2.4; 3 31., 3.2, 3.4; W 1 1.3; 2 2.1, 2.2, 2.3; 3; 4 4.1,
4.2; M 1 1.2, 1.3, 1.5; 2 2.1; 3 3.1; 5 5.2, 5.3; SSG 1 1.1; 2; 3 3.3;
SSIIS 1.1a; 1.1b; SSIGPS 2.1, 2.1a; 2.1b; SSCTS 3.1, 3.1.1a -
3.1.1d.
AKCSs: ELA A 1 – 8; B 1 -3; C 1 – 3, 5; D 1, 2, 4; E 1-4. R A 1-
3; B 1-2; C 1, 4; WL A 1, 4; B 1, 4, 6; C 1, 2, 4; M A 1, 4, 5; B 1,
2, 4, 6, 7; C 1; D 1 – 5; E 1; T A 1 – 3; B 1-2; C 1-3; D 1-3; E 7.
2. The student will identify (comprehension) units on a board so that
when given four White stones and five Black stones he/she will
correctly name each unit with 100% accuracy.
The student will locate (comprehension) liberties for any unit so
that when given a diagram of a board with three to five units on it,
he/she will correctly indicate the number of liberties for each unit
with 100% accuracy.
The student will be able to recognize (knowledge) the shape
known as the ―empty triangle,‖ such that when given a diagram of
a board he will correctly locate one with 100% accuracy.
STUDENTS 3. The students are Upper Elementary (gr. 4-6) students attending a
Montessori School that the American Montessori Association has
accredited.
4. In the previous lesson, students learned about the stones and
different types of boards used for play. They also learned how to
make a move, the parts of a game, and how to make territory, and
shapes.
CLASSROOM
MANAGEMENT
5. 9 x 9 demo board, class Go sets: bring in 9 x 9 sets (do not leave
in the classroom), and lender sets (that the students can take
home). Students can select the seat they want and the partner they
wish to sit with.
6. The teacher will practice with the students the procedure of
obtaining the Go sets from the storage box and setting up the
boards, tables, and chairs. The teacher will demonstrate to the
students the proper way to greet the instructor and fellow students,
and opponents. The teacher expects that the students will follow
all the behavioral expectations of the school and classroom. Each
student has a Go folder for recording games, vocabulary and
reflection on the lesson.
7. The students will set up their lender set for their parent(s) and
demonstrate to them how to count liberties. The teacher will
encourage parents to play the ―Five Star‖ game (aka ―Gomuku),
and use the ―capture two‖ rule.

Go Lesson Plans
©Gordon E. Castanza, Ed. D.
10/19/11 DRAFT
20
INTRODUCTION
SET 8. .All the stones in a unit live or die together as one. Liberties may
be shared, but count only once for each unit regardless of how
many stones share it.
COMMUNICATION
OF PURPOSE
9. The counting of liberties is basic to the effect of each game of Go.
Whenever opposite groups of stones meet each other liberties are
at stake. Whenever you get into a fight, the side with the most
liberties usually wins the fight.
BODY OF THE LESSON
PRESENTATION 10. The ―Basic Rule of Go‖: Every unit on the board must have at least one
liberty. A unit which has only one liberty is in Atari. Using the demo
board, the teacher will demonstrate unit, and liberty, and shared liberty.
A unit with less than three liberties is said to have a ―shortage of
liberties,‖ and should be defended if yours, attacked if your opponent‘s.
PROCESSING 11. The teacher will present students with examples of recognizing units and
of counting liberties. The teacher will ask students to identify the units
from the examples he/she gives. The teacher will encourage students to
come up to the demo board and set up their own examples of ―units,‖
and how he/she went about counting ―liberties.‖ The teacher will explain
the steps for counting the liberties of any unit: (1) pick any convenient
starting point, (2) go either clockwise or counterclockwise around the
unit, (3) if the unit completely encloses any liberties, they must also be
included in the count.
12. Students will come to the demonstration board and explain how they
counted liberties to the examples that the teacher places on the demo
board. Students may also come up with their own patterns and then
explain how they counted the liberties. (See following page for
examples of counting liberties).
MONITORING 13. The teacher will observe how accurately students identify units, and
he/she will provide corrective feedback.
14. Teacher will ask students to demonstrate on the demo board a unit that
they have constructed. If there are disabled students in the class, the
teacher will make the appropriate accommodation to insure that all
students have an opportunity to grasp the objectives of the lesson.
15. The teacher will ask the students to set up their own diagrams of
units for themselves and then have their partner identify a unit and
count the liberties. If there are students with disabilities in the
classroom, the teacher will make the appropriate accommodations
as the situation warrants.
CLOSING
CLOSURE 16. Remind students of concepts exposed today, and guide the
students‘ attention to the vocabulary words that the teacher used in
today‘s class (the teacher might want to write them on the board).
Ask students to repeat the concepts and to define them for their
Go Lesson Plans
©Gordon E. Castanza, Ed. D.
10/19/11 DRAFT
21
CLOSURE colleagues. Students should start a section in their Go journals for
―Definitions.‖
ASSESSMENT 17. Playing a game of First Capture Go students will demonstrate
after Black has played nine stones that they can identify a unit and
count the number of liberties the 9 x 9 board. Make sample
territories on the demo board.
FOLLOW-UP 18. Vocabulary to learn: Unit, and Liberty (Mei). Students should record
the vocabulary words in their Go journals.
Try to bring in another Go player both to play a demo game with
you (each player should comment on their thinking when they
make a move, about filling dame points, and not playing inside
your own territory, about passing, and when the game is over, and
counting., and to assist in helping students determine when a game
is over, and how to count liberties, etc.
REFLECTION
(after the lesson)
19. What did you do that helped students learn and meet the objective?
20. What would you do differently if you taught this lesson again to make it
more successful for students?
21. SAKT 1-8; SAKS 1-14; AKSCRS Cultural Standards for Students: B-
F; Cultural Standards for Educators: B-E; Cultural Standards for
Curriculum: A, B, D, E; Cultural Standards for Schools: B, C.
22. PA 1. A—e; 2 A—F; 3 A—D; 4 A—E; 5 A—I; 6 A, E; 7 A—F; 8 A—
E; 9 A—E; 10 A—G.
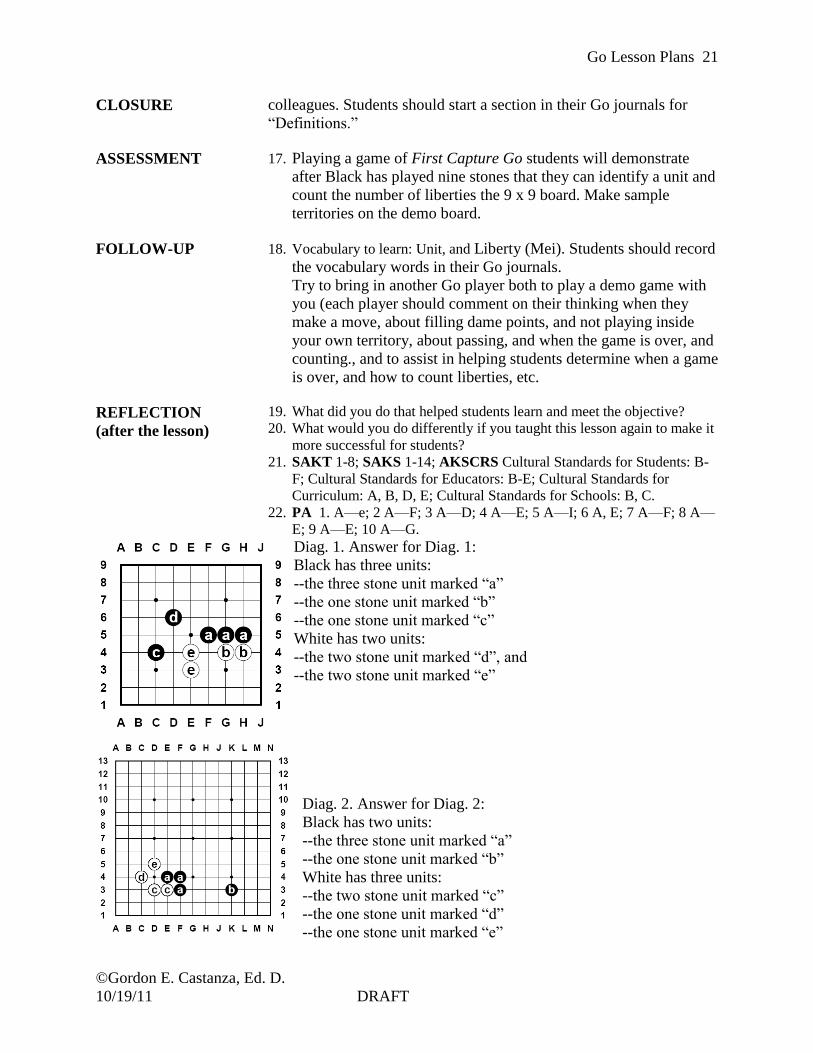
Diag. 1. Answer for Diag. 1:
Black has three units:
--the three stone unit marked ―a‖
--the one stone unit marked ―b‖
--the one stone unit marked ―c‖
White has two units:
--the two stone unit marked ―d‖, and
--the two stone unit marked ―e‖
Diag. 2. Answer for Diag. 2:
Black has two units:
--the three stone unit marked ―a‖
--the one stone unit marked ―b‖
White has three units:
--the two stone unit marked ―c‖
--the one stone unit marked ―d‖
--the one stone unit marked ―e‖

Go Lesson Plans
©Gordon E. Castanza, Ed. D.
10/19/11 DRAFT
22
Diag. 3. The number of liberties for each of the units is
shown:
--the two-stone black unit on the edge marked with
triangles has five liberties.
--the two-stone black unit on the right marked with squares
has six liberties.
--the three-stone white unit at the bottom marked with
triangles has eight liberties,
--the three-stone black unit on the left marked with squares
has seven liberties (this is known as an ―empty triangle‖)
--the unmarked seven-stone white unit at the top has 12
liberties (don‘t forget the one in the middle).
Diag. 4. For each liberty of the units show, determine if it
counts:
--only for white stones
--only for black stones, or
--is shared by both.
Answer:
--Liberties owned only by white stones are marked ―w,‖
--liberties owned only by black stones are marked ―b,‖
--liberties shared by both black and white stones are
marked ―s.‖
Diag. 5. How many liberties does each of the units shown
here have?
The marked two stone unit has four liberties.

Go Lesson Plans
©Gordon E. Castanza, Ed. D.
10/19/11 DRAFT
23
Diag. 6. The marked one stone unit has two liberties
Diag. 7. The marked one stone unit has three
liberties
Diag. 8.
There are seven separate units.
--the four stone unit marked ―a‖ has three
liberties.
--the two stone unit marked ―b‖ has four
liberties.
--the two stone unit marked ―c‖ has four
liberties.
--the one stone unit marked ―d‖ has four
liberties.
--the one stone unit marked ―e‖ has two
liberties.
--the four stone unit marked ―f‖ has five
liberties.
--the three stone unit marked ―g‖ has four
liberties.
These examples show that: there is no
necessary relation between the number of stones in a unit and its liberty count.

Go Lesson Plans
©Gordon E. Castanza, Ed. D.
10/19/11 DRAFT
24
Lesson Plan Three
Capture
PREPARATION
OBJECTIVE 1. EALRs: CO 1 1.1, 1.2; 2 2.1, 2.2, 2.4; 3 3.1, 3.2; 4 4.1, 4.2; R 1
1.3; 2 2.3, 2.4; 3 31., 3.2, 3.4; W 1 1.3; 2 2.1, 2.2, 2.3; 3; 4 4.1,
4.2; M 1 1.2, 1.3, 1.5; 2 2.1; 3 3.1; 5 5.2, 5.3; SSG 1 1.1; 2; 3 3.3;
SSIIS 1.1a; 1.1b; SSIGPS 2.1, 2.1a; 2.1b; SSCTS 3.1, 3.1.1a -
3.1.1d
AKCSs: ELA A 1 – 8; B 1 -3; C 1 – 3, 5; D 1, 2, 4; E 1-4. R A 1-
3; B 1-2; C 1, 4; WL A 1, 4; B 1, 4, 6; C 1, 2, 4; M A 1, 4, 5; B 1,
2, 4, 6, 7; C 1; D 1 – 5; E 1; T A 1 – 3; B 1-2; C 1-3; D 1-3; E 7.
2. The student will be able to recognize (knowledge) and
demonstrate (application) an Atari, a capture, and the end result
(holding a prisoner) so that when given five problems he/she will
have the correct outcome 100% of the time.
The student will be able to demonstrate (application) an illegal
move so that when given three positions he/she will accurately
identify them with 100% accuracy.
STUDENTS 3. The students are Upper Elementary (gr. 4-6) students attending a
Montessori School that the American Montessori Association has
accredited.
4. In the previous lesson, students learned about the concept of
―unit‖ and ―liberties,‖ and ―shared liberties.‖ They also learned
how to make a move, the parts of a game, and how to make
territory, and shapes.
CLASSROOM
MANAGEMENT
5. 9 x 9 demo board, class Go sets: bring in 9 x 9 sets (do not leave
in the classroom), and lender sets (that the students can take
home). Students can select the seat they want and the partner they
wish to sit with.
6. The teacher will practice with the students the procedure of
obtaining the Go sets from the storage box and setting up the
boards, tables, and chairs. The teacher will demonstrate to the
students the proper way to greet the instructor and fellow students,
and opponents. The teacher expects that the students will follow
all the behavioral expectations of the school and classroom. Each
student has a Go folder for recording games, vocabulary and
reflection on the lesson.
7. The students will set up their lender set for their parent(s) and
demonstrate to them how to count liberties. The teacher will
encourage parents to play the capture go game, and use the
―capture two‖ rule.
INTRODUCTION
SET 8. A player is not required to capture a stone in Atari, nor is the other
player required to take steps to remove the threat of Atari.

Go Lesson Plans
©Gordon E. Castanza, Ed. D.
10/19/11 DRAFT
25
COMMUNICATION
OF PURPOSE
9. Most moves in go are legal moves. However, there are some times
when the move is illegal, in other words ―against the rules.‖ The
―suicide move‖ is the only illegal move in go. We are going to
learn the concepts of capturing and when a move that looks like a
capture is really a suicide move. Recognizing when a move is a
suicide and when it is not, will prepare you for more complicated
ways of playing in the future.
BODY OF THE LESSON
PRESENTATION 10. While capturing may sound exciting, if you concentrate on just
capturing your opponent‘s stones, you will lose every game. It is
better to concentrate on making more liberties for the stones that
your opponent attacks. Attempting to surround and capture enemy
stones usually will lead to your undoing. On the other hand, if you
allow your opponent to capture a few stones while you make big
moves elsewhere on the board will have bigger pay-offs.
PROCESSING 11. The teacher will present students with three steps to removing an
opponent‘s stone: (1) Atari, (2) Capture, (3) prisoner. The teacher will
demonstrate the illegal suicide move (see following pages for
examples), and when an apparent ―suicide move‖ really is not. 12. Students will come to the demonstration board and recreate the steps to
a capture (see following page for problems to put on demo board for
students to solve).
MONITORING 13. The teacher will observe how accurately students identify an atari
and an illegal move.
14. Teacher will ask students to demonstrate on the demo board a
capture move and an illegal move. If there are disabled students in
the class, the teacher will make the appropriate accommodations
to insure that all students have the opportunity to grasp the
objectives of the lesson.
15. The teacher will ask the students to set up their own diagrams of
potential capture situations and illegal moves, and then have their
partners identify the potential capture move and the illegal move.
If there are students with disabilities in the classroom, the teacher
will make the appropriate accommodations as the situation
warrants.
CLOSING
CLOSURE 16. Remind students of concepts exposed today, and guide the
students‘ attention to the vocabulary words that the teacher used in
today‘s class. Ask students to repeat the concepts and to define
them for their colleagues.
ASSESSMENT 17. The teacher will ask students to demonstrate the way to capture a
stone on the 9 x 9 board.
FOLLOW-UP 18. Vocabulary to learn: Atari; Capture, prisoner, and suicide move.
Students should be ready to play the ―capture five‖ game. The first
person to capture five stones wins the game.

Go Lesson Plans
©Gordon E. Castanza, Ed. D.
10/19/11 DRAFT
26
REFLECTION
(after the lesson)
19. What did you do that helped students learn and meet the
objective?
20. What would you do differently if you taught this lesson again to
make it more successful for students.
21. SAKT 1-8; SAKS 1 – 14; AKSCRS Cultural Standards for
Students: B – F; Cultural Standards for Educators: B – E; Cultural
Standards for Curriculum: A, B, D, E; Cultural Standards for
Schools: B, C.
22. PA 1. A – E; 2 A – F; 3 A – D; 4 A – E; 5 A – I; 6 A E; 7 A – F; 8
A – E; 9 A – E; 10 A - G
Diag. 1.
A = Atari
B = Capture when white plays at 1.
C = Result (white has one Black
prisoner)
Examples for counting liberties
Problem 1. Black to play. How does Black play to capture a white
stone?
Problem 2. Black to play. How does Black play to capture a white
stone?

Go Lesson Plans
©Gordon E. Castanza, Ed. D.
10/19/11 DRAFT
27
Problem 3. Black to play. How does Black play to capture a white
stone?
Problem 4. Black to play. How can Black capture two white
stones?
Problem 5. Black to play. How can Black capture two white
stones?
Problem 6. Black to play. How can Black capture two white
stones?

Go Lesson Plans
©Gordon E. Castanza, Ed. D.
10/19/11 DRAFT
28
Where You Can't Play - Suicide Moves
Explain there are illegal moves, called suicide moves, which are not allowed. For
example.
CAN'T PLAY IN THE CENTER HERE- because there are no liberties, the stone
cannot breathe
CAN'T PLAY THE SECOND WHITE STONE HERE
You CAN make a suicide move only if you will make an immediate capture.
White to play.
Diag. 2. White‘s two stones are both in Atari. W1 would be an illegal move.
Diag. 3. No Atari on Black. W1 would be an illegal self-capture.
Recognizing Atari
Diag. 4. Black to play. How should Black give atari to
the two white stones on the edge?

Go Lesson Plans
©Gordon E. Castanza, Ed. D.
10/19/11 DRAFT
29
Diag. 5. Black to play. Which way should Black give Atari
to the white stone in the center?
Diag. 6.Black to play. How should Black give Atari to the
three White stones?
Diag. 7. Black to play. How should Black give Atari to
the four white stones?
Diag. 8. Black to play. How should Black give Atari to the lone
white stone?

Go Lesson Plans
©Gordon E. Castanza, Ed. D.
10/19/11 DRAFT
30
Diag. 9. Black to play. How can Black give double Atari?
(double atari—giving atari to two stones at the same time).

Go Lesson Plans
©Gordon E. Castanza, Ed. D.
10/19/11 DRAFT
31
Lesson Plan Four
Eyes
PREPARATION
OBJECTIVE 1. EALRs: CO 1 1.1, 1.2; 2 2.1, 2.2, 2.4; 3 3.1, 3.2; 4 4.1, 4.2; R 1
1.3; 2 2.3, 2.4; 3 31., 3.2, 3.4; W 1 1.3; 2 2.1, 2.2, 2.3; 3; 4 4.1,
4.2; M 1 1.2, 1.3, 1.5; 2 2.1; 3 3.1; 5 5.2, 5.3; SSG 1 1.1; 2; 3 3.3;
SSIIS 1.1a; 1.1b; SSIGPS 2.1, 2.1a; 2.1b; SSCTS 3.1, 3.1.1a -
3.1.1d. AKCSs: ELA A 1 – 8; B 1 -3; C 1 – 3, 5; D 1, 2, 4; E 1-4.
R A 1-3; B 1-2; C 1, 4; WL A 1, 4; B 1, 4, 6; C 1, 2, 4; M A 1, 4,
5; B 1, 2, 4, 6, 7; C 1; D 1 – 5; E 1; T A 1 – 3; B 1-2; C 1-3; D 1-
3; E 7.
2. The student will be able to recognize (knowledge) whether a group
of stones completely enclosed by stones of one color is a ―real‖ or
a ―false‖ eye so that when given four examples of eyes he/she will
identify whether they are ―alive‖ or ―dead‖ with 100% accuracy.
The student will be able to recognize the ―life‖ and ―death‖ of
symmetrical positions, and three-point through seven-point
positions so that when given 10 problems he/she will identify
them with 100% accuracy.
STUDENTS 3. The students are Upper Elementary (gr. 4-6) students attending a
Montessori School that the American Montessori Association has
accredited.
4. In the previous lesson students learned about Atari, capturing
stones, and illegal (suicide) moves. In previous lessons the
students learned the concepts ―unit,‖ ―liberty,‖ ―shared liberties,‖
how to make territory, and shapes.
CLASSROOM
MANAGEMENT
5. 9 x 9 demo board, class Go sets: bring in 9 x 9 sets (do not leave
in the classroom), and lender sets (that the students can take
home).
6. The teacher will have the students practice the procedure of
obtaining the Go sets from the storage box and setting up the
boards, tables, and chairs. The teacher will practice with the
students the proper way to greet the instructor, fellow students,
and opponents. The teacher expects that the students will follow
all the behavioral expectations of the school and classroom as
appropriate for this lesson. Each student has a Go folder for
recording games, vocabulary and reflection on the lesson.
7. The students will set up their lender set for their parent(s) and
demonstrate ―real‖ and ―false‖ eyes for them. Student will also
demonstrate for their parents the key points of a symmetrical
position, and the key points of four-point through seven-point eye-
shapes. The teacher will encourage parents to play the capture Go
game, and use the ―capture five‖ rule.

Go Lesson Plans
©Gordon E. Castanza, Ed. D.
10/19/11 DRAFT
32
INTRODUCTION
SET 8. No matter how many stones it contains, a unit enclosing only one
real eye is not ―alive,‖ and may be subject to capture. To capture a
unit containing an eye, the opponent must fill the last liberty of
that unit. If a group of stones surrounds two ―real‖ eyes, then that
group is ―alive.‖ One exception to this is the ―false‖ eye. A ―false‖
eye is one whose enclosure is incomplete. When your opponent
puts your incomplete group in Atari, you will have to fill in one or
more of the points to connect (See Diag. 1 and following diagrams
on the following pages).
COMMUNICATION
OF PURPOSE
9. Your main purposes should be to sketch territory to prepare to
make eyes if and when necessary, and to try to build ―influence‖
for later fighting. Converting what might be a ―real‖ eye into a
―false‖ eye is a fundamental technique that you can use in
attacking, and in killing, opposing groups. Life-or-death fights
decide the outcome of many Go games, so lots of practice in
trapping, capturing, and escaping is highly desirable.
BODY OF THE LESSON
PRESENTATION 10. Set up a simple pattern on the demo board with one eye (dead),
then two eyes (alive). Explain about ―alive‖ needing two eyes, or
being able to make two eyes if attacked. (See following pages for
examples). Explain to the students the three essential steps in eye-
making: (1) Enclose enough territory (need to have enough space
to place a minimum of six stones); (2) Divide the space; (3)
complete the eyes.
PROCESSING 11. The teacher will demonstrate ―alive,‖ and ―dead‖ units (see Diags.
2-9). He/she will also explain the concept of ―symmetrical
positions (see Diag. 10),‖ and ―key point.‖ He/she will
demonstrate three-point eye-space, four-point eye-space, five-
point eye-space, six-point eye space, and seven-point and more
eye-spaces (see Diags. 10-18). He/she will then follow-up with
guided practice, and then one-on-one independent practice. (See
following pages for diagrams).
12. Students will come to the demonstration board and recreate the steps to
a capture (see following page for problems to put on demo board for
students to solve). The students will pair up, and they will hand out
the Go sets. Have students construct their own ―alive,‖ and ―dead‖
shapes.
MONITORING 13. A unit enclosing a three-point eye-space lives if the defender plays
first, but dies if the opponent plays first. Whether eye-spaces of
four to six points live or die depends on their shape and which side
plays first. Assuming that both sides play correctly, complete eye-
spaces of seven points or more are always safe, except in ko.

Go Lesson Plans
©Gordon E. Castanza, Ed. D.
10/19/11 DRAFT
33
MONITORING 14. The teacher will have students come to the demo board and show
their peers how the eye-space lives or dies.
15. The teacher will ask students to come to the demo board to set up
their own problems involving ―living‖ eye-space and ―false‖ eye
space, and then have their partner identify a ―live,‖ ―dead,‖ or
―false‖ eye-space. If there are students with disabilities in the
classroom, the teacher will make the appropriate accommodations.
CLOSING
CLOSURE 16. Remind students of concepts exposed today, and guide the
students‘ attention to the vocabulary words that the teacher used in
today‘s class. Ask students to repeat the concepts and to define
them for their colleagues.
ASSESSMENT 17. The teacher will instruct the students to play two games. In the
first game, they should try to make life. Play in the opposite
corners from each other, until you think you have a group that is
alive. When you think your group is alive, raise your hand. The
teacher will come and give you a reward when you‘ve made life.
As soon as both of the students are alive, quit the game and start
another game. In the second game, try to play eye-brow to eye-
brow style (don‘t let your opponent make life). Eye-brow to eye-
brow means playing right in each other‘s faces, right in each
other‘s groups, trying to interfere. Play right on top of each other
to prevent your opponent from making two eyes, but being careful
not to be captured yourself. First person to make life wins the
game.
FOLLOW-UP 18. Vocabulary to learn: eye (one or more empty intersections
surrounded by your own color stones on all four sides), alive (has
at least two eyes), dead (has only one or no eyes), real eye (eyes
need 3 of the corners to be occupied by your color stones in the
middle of the board, all corners at the edge of the board, false eye
(can be put in atari), symmetrical position, key point, miai,
territory, and influence. The teacher will give worksheets that
contain eye-shape problems to the students to solve. Students will
come to the demo board and show their peers how they set-up and
solved the eye shape problem (see following diagrams).
REFLECTION
(after the lesson)
19. What did you do that helped students learn and meet the
objective?
20. What would you do differently if you taught this lesson again to
make it more successful for students.
21. SAKT 1-8; SAKS 1 – 14; AKSCRS Cultural Standards for
Students: B – F; Cultural Standards for Educators: B – E; Cultural
Standards for Curriculum: A, B, D, E; Cultural Standards for
Schools: B, C.
22. PA 1. A – E; 2 A – F; 3 A – D; 4 A – E; 5 A – I; 6 A E; 7 A – F; 8
A – E; 9 A – E; 10 A - G
Go Lesson Plans
©Gordon E. Castanza, Ed. D.
10/19/11 DRAFT
34
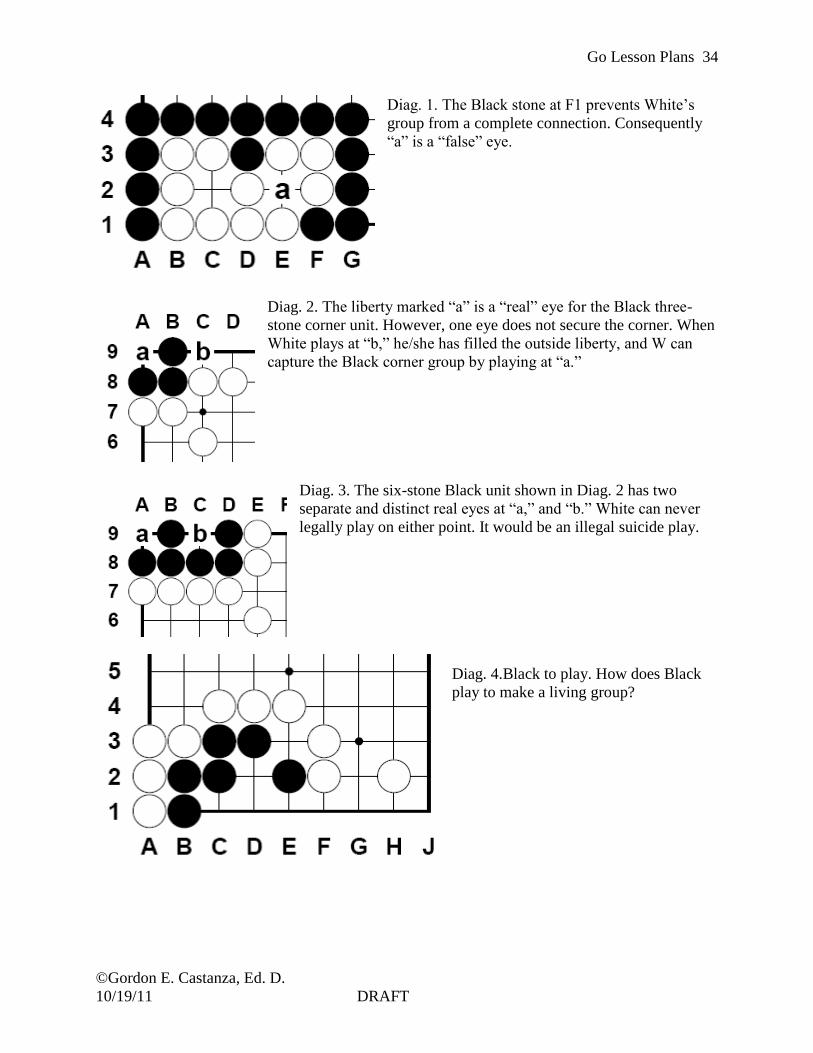
Diag. 1. The Black stone at F1 prevents White‘s
group from a complete connection. Consequently
―a‖ is a ―false‖ eye.
Diag. 2. The liberty marked ―a‖ is a ―real‖ eye for the Black three-
stone corner unit. However, one eye does not secure the corner. When
White plays at ―b,‖ he/she has filled the outside liberty, and W can
capture the Black corner group by playing at ―a.‖
Diag. 3. The six-stone Black unit shown in Diag. 2 has two
separate and distinct real eyes at ―a,‖ and ―b.‖ White can never
legally play on either point. It would be an illegal suicide play.
Diag. 4.Black to play. How does Black
play to make a living group?

Go Lesson Plans
©Gordon E. Castanza, Ed. D.
10/19/11 DRAFT
35
Diag. 5. Black to play. How does Black play to make a living
group?
Diag 6. Black to play and live.
Diag. 7. Black to play and kill White

Go Lesson Plans
©Gordon E. Castanza, Ed. D.
10/19/11 DRAFT
36
Diag. 8. Black to play. How does Black play to kill
the white stones?
Diag. 9. Black to play and live.
Three-point eye-space
Diag. 10. In symmetrical positions, the ―key point‖ is in
the middle. Can Black divide this space to form eyes?
He can if it is his/her turn. If it is White‘s turn, then
he/she can kill this unit by playing on the ―key point‖ in
the middle.
Diag. 11. In this position, the enclosed Black unit also has
three liberties, but in an ―L‖ shape instead of in a line. If it is
Black‘s turn to move, he/she can make two eyes by playing
on the key point in the corner (A9). On the other hand, if it is
White‘s turn, he/she can kill Black‘s unit by playing on the
key point.

Go Lesson Plans
©Gordon E. Castanza, Ed. D.
10/19/11 DRAFT
37
Four-point eye space in a line
Diag. 12. This is a formation that has four point sin a row.
Black has two key points, ―a,‖ and ―b.‖ If he/she plays at
either, Black will have two eyes. If it is White‘s turn to play,
what ever key point white plays, black only needs to play on
the other one to make two eyes.
Four-point eye-space in a square
Diag. 13. Can Black make two eyes in this shape? Here Black
has two pairs of key points, ―a‖ and ―b,‖ or ―c‖ and ―d.‖
As we saw above, for four-points in a row, playing at either key
point made two eyes. However, with four-points in a square,
the defender must play at both of either pair of key points to be
safe.
Four-point eye shape in an “L”
Diag. 14. This shape has two key points, ―a‖ and
―b.‖ If Black plays at either one he/she lives just
like in the four-points in a row.
However, if the marked Black stone is white,
Black must play at ―a‖ to live. If Black plays at
―b,‖ it leaves open the possibility for White to
create a ―ko‖ threat (explained in a later lesson).
Because the Black formation is incomplete, if
Black does not play at ―a‖ it is similar to a three-
point eye-space instead of four.

Go Lesson Plans
©Gordon E. Castanza, Ed. D.
10/19/11 DRAFT
38
Five-point eye-space
Diag. 15. If you add one point to the four-point square,
you end up with this ―axe-head‖ or ―jeep‖ formation
of five stones. This formation, like the three-point
formation, also has one key point, at ―a.‖ If Black
plays first, then he/she can make two eyes by playing
at ―a.‖ If White plays first, then he/she plays on the
key point and Black is dead.
Complete six-point eye space
Diag. 16. There are twelve different forms of six-point
eye-space with complete borders, and all but one of them
are safe. The simplest and most common of these shapes is
―six-points in a rectangle,‖ which has two key points ―a‖
and ―b.‖ If white attacks at either of these two key points,
Black answers by playing on the other (this is called
―miai‖). Black will have two secure eyes. (See also Diag.
12 in Lesson Plan 5
The unsafe six-point complete eye-space shape (“Rabbit’s Head”)
Diag. 17. This shape has only one key point at ―a.‖ If
Black plays at ―a‖ then the shape has three yes and is alive.
However, if White plays at ―a‖, then Black is dead. Why?
Because White can sacrifice other stones to create the
―jeep/axe head‖ formation of the five-point eye-space.

Go Lesson Plans
©Gordon E. Castanza, Ed. D.
10/19/11 DRAFT
39
Unconnected six-point eye-space
Diag. 18. The two marked White stones make Black‘s
shape unconnected. If Black plays first, he/she can live.
The two key points are ―a‖ or ―b‖ just as in the complete
six-point eye-space diagram. If Black makes the move at
―c‖ then White will kill the group when he/she plays at
―d.‖ This is because Black can not make an Atari against
White‘s stones.

Go Lesson Plans
©Gordon E. Castanza, Ed. D.
10/19/11 DRAFT
40
Lesson Plan Five
Seki
PREPARATION
OBJECTIVE 1. EALRs: CO 1 1.1, 1.2; 2 2.1, 2.2, 2.4; 3 3.1, 3.2; 4 4.1, 4.2; R 1
1.3; 2 2.3, 2.4; 3 31., 3.2, 3.4; W 1 1.3; 2 2.1, 2.2, 2.3; 3; 4 4.1,
4.2; M 1 1.2, 1.3, 1.5; 2 2.1; 3 3.1; 5 5.2, 5.3; SSG 1 1.1; 2; 3 3.3;
SSIIS 1.1a; 1.1b; SSIGPS 2.1, 2.1a; 2.1b; SSCTS 3.1, 3.1.1a -
3.1.1d. AKCSs: ELA A 1 – 8; B 1 -3; C 1 – 3, 5; D 1, 2, 4; E 1-4.
R A 1-3; B 1-2; C 1, 4; WL A 1, 4; B 1, 4, 6; C 1, 2, 4; M A 1, 4,
5; B 1, 2, 4, 6, 7; C 1; D 1 – 5; E 1; T A 1 – 3; B 1-2; C 1-3; D 1-
3; E 7.
2. The student will be able to analyze (analysis) a position that
appears to be dead for either/or both of the opposing groups such
that when given the three forms (see Diags. 4, 6, 7, 8, 9, and 10 on
the following pages) of ―Seki‖ he/she will correctly defend
(evaluation) the formation as having dual life with 100%
accuracy..
STUDENTS 3. The students are Upper Elementary (gr. 4-6) students attending a
Montessori School that the American Montessori Association has
accredited.
4. This is the fifth lesson in the series. In the previous lesson,
students learned about eye shapes that are ―dead‖ or ―alive.‖
CLASSROOM
MANAGEMENT
5. 9 x 9 demo board, class Go sets: bring in 9 x 9 sets (do not leave
in the classroom), and lender sets (that the students can take
home).
6. The teacher will ask the students to use the procedure of obtaining
the Go sets from the storage box and setting up the boards, tables,
and chairs. Students will demonstrate to the teacher the proper
way to greet the instructor, fellow students, and opponents. The
teacher expects that the students will follow all the behavioral
expectations of the school as appropriate for this lesson.
7. The students will set up their lender set for their parent(s) and
demonstrate ―dual life‖ positions. Then the student will play the
capture Go game of ―capture five with his/her parent(s)
INTRODUCTION
SET 8. Stones that can not form two separate and discrete eyes are ―dead‖
as is if they can not escape. The exception is a ―stalemate‖ like
position called the ―Seki‖ (see Diags. 1-3 and following diagrams
on the following pages).

Go Lesson Plans
©Gordon E. Castanza, Ed. D.
10/19/11 DRAFT
41
COMMUNICATION
OF PURPOSE
9. Your main purpose in learning about Seki is to recognize that Seki
is only a local stalemate, so even if one or more do occur in a
game there will still be an overall winner and loser. ―This kind of
dual life can occur in real-life games, sometimes for small
reduction (as in Diag. 11-12), and sometimes as big battles that
end when both sides have only one eye and a shared liberty so that
neither side is capable of killing the other‖ (Shotwell, 2003)
BODY OF THE LESSON
PRESENTATION 10. Set up the three forms of Seki (Diags. 4, 6, 7, 8, 9, and 10).
Explain that in each position, it is assumed that the outside stones
are safe, because if they are not the Seki will disintegrate, and
both those stones and the inside stones of the same color will die.
PROCESSING 11. The teacher will demonstrate the three forms of Seki (see Diags. 4,
6, 7, 8, 9, and 10). The teacher will demonstrate what will happen
if one side‘s outside stones aren‘t safe. He/she will then follow-up
with guided practice (see Diags. 13-16), and then one-on-one
independent practice. (See following pages for diagrams).
12. Students will come to the demonstration board and recreate the
three forms of Seki (see following pages for Seki positions to put
on demo board for students to solve). The students will pair up,
hand out the Go sets, and construct their own Seki positions for
each other.
MONITORING 13. The teacher will set up a position such that if one side moves first,
he/she can make two eyes (see Diag. 12), but if the other side
moves first, then the position can turn into Seki. The teacher will
observe if students can determine which player will get the two
eyes and which player will succeed in getting the Seki.
14. The teacher will have students come to the demo board and show
their peers how a Seki succeeds or fails.
15. The teacher will ask students to come to the demo board to set up
their own problems involving Seki, and then have his/her partner
identify when a position is Seki or not. If there are students with
disabilities in the classroom, the teacher will make the appropriate
accommodations.
CLOSING
CLOSURE 16. Remind students of concepts exposed today, and guide the
students‘ attention to the vocabulary words that the teacher used in
today‘s class. Ask students to repeat the concepts and to define
them for their colleagues.

Go Lesson Plans
©Gordon E. Castanza, Ed. D.
10/19/11 DRAFT
42
ASSESSMENT 17. The teacher will instruct the students to play two games in which
they are to get into a Seki-like situation. When they think they
have created a Seki position, raise your hands. The teacher will
come and give you a reward when you‘ve made Seki. As soon as
one of the students has created a Seki position, quite the game and
start another. The first person to create a Seki position wins the
game.
FOLLOW-UP 18. Vocabulary to learn: Seki. The teacher will give worksheet
problems that contain Seki-like situations to the students to solve.
Students will come to the demo board and show their peers how
they set up and solved the Seki problem (see following diagrams).
REFLECTION
(after the lesson)
19. What did you do that helped students learn and meet the
objective?
20. What would you do differently if you taught this lesson again to
make it more successful for students.
21. SAKT 1-8; SAKS 1 – 14; AKSCRS Cultural Standards for
Students: B – F; Cultural Standards for Educators: B – E; Cultural
Standards for Curriculum: A, B, D, E; Cultural Standards for
Schools: B, C.
22. PA 1. A – E; 2 A – F; 3 A – D; 4 A – E; 5 A – I; 6 A E; 7 A – F; 8
A – E; 9 A – E; 10 A - G
Diagram 1 Diagram 2 Diagram 3
Seki Form 1
Diag. 4. Neither side has an eye. The key to this form of
Seki is the two shared liberties, on which neither side can
afford to play. If the outside stones are safe, if Black tries
to capture at 1, this puts him/her in self-atari, and White
will capture with 2.
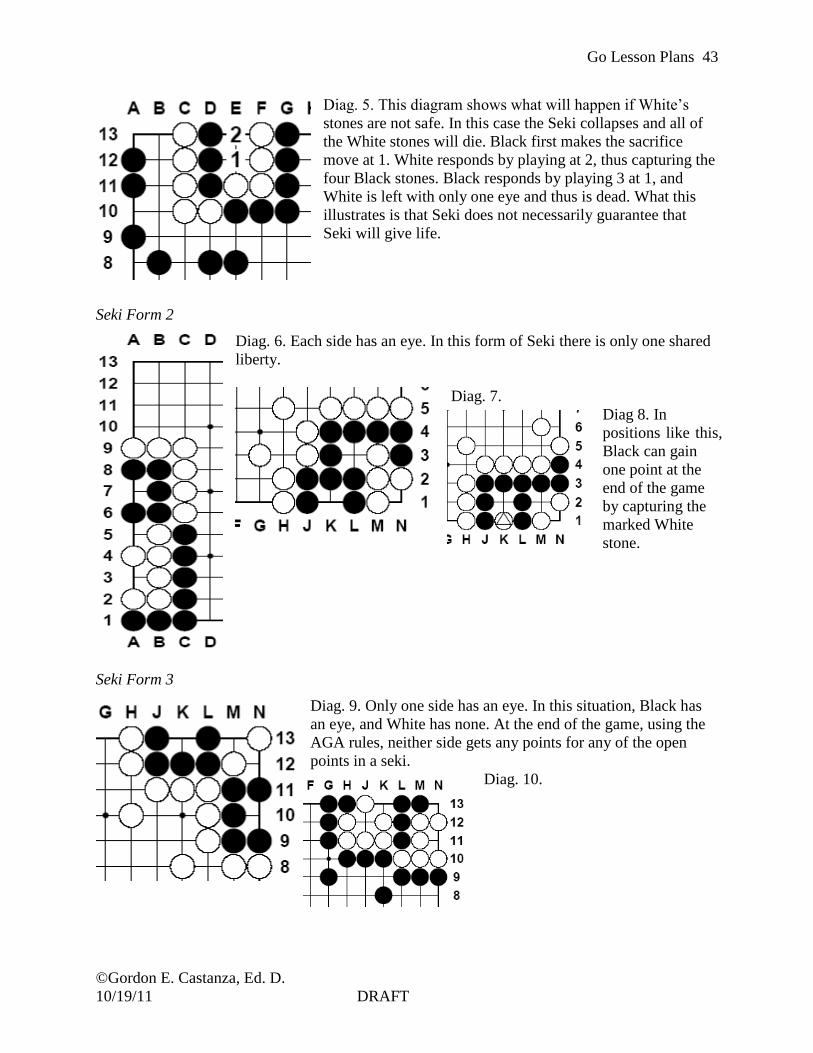
Go Lesson Plans
©Gordon E. Castanza, Ed. D.
10/19/11 DRAFT
43
Diag. 5. This diagram shows what will happen if White‘s
stones are not safe. In this case the Seki collapses and all of
the White stones will die. Black first makes the sacrifice
move at 1. White responds by playing at 2, thus capturing the
four Black stones. Black responds by playing 3 at 1, and
White is left with only one eye and thus is dead. What this
illustrates is that Seki does not necessarily guarantee that
Seki will give life.
Seki Form 2
Diag. 6. Each side has an eye. In this form of Seki there is only one shared
liberty.
Diag. 7.
Diag 8. In
positions like this,
Black can gain
one point at the
end of the game
by capturing the
marked White
stone.
Seki Form 3
Diag. 9. Only one side has an eye. In this situation, Black has
an eye, and White has none. At the end of the game, using the
AGA rules, neither side gets any points for any of the open
points in a seki.
Diag. 10.

Go Lesson Plans
©Gordon E. Castanza, Ed. D.
10/19/11 DRAFT
44
Diag. 11. There are many ways that a Seki can occur. In
this diagram, neither player can move at A without self-
atari.
Diag. 12. If it is White‘s move, he/she can easily make two eyes.
Notice that White has a complete six-point eye-space, which has two
key points. If White plays at one or the other, he/she is safe. However,
if it is Black‘s turn, and he/she plays at 1, White responds by playing at
2, in order to create the one eye-space, but Black responds at 3. Neither
side can play at A, because in doing so he/she would kill themselves.
Thus a Seki results in this corner position. This would be an example of
using a Seki to make a small reduction in points.
Seki for guided practice
Diag. 13.
Diag. 14. Both groups are cut off, but each group has one
eye. Both Black and White are alive, though, because
neither of them can attack at A. If they did, they would put
their own stones in atari.

Go Lesson Plans
©Gordon E. Castanza, Ed. D.
10/19/11 DRAFT
45
Diag. 15. Although Black has two separate eyes, White‘s
two stones separate them. Although White has no eyes,
Black and White have dual life.

Go Lesson Plans
©Gordon E. Castanza, Ed. D.
10/19/11 DRAFT
46
Lesson Plan Six
“No Repetition” Rule
PREPARATION
OBJECTIVE 1. EALRs: CO 1 1.1, 1.2; 2 2.1, 2.2, 2.4; 3 3.1, 3.2; 4 4.1, 4.2; R 1
1.3; 2 2.3, 2.4; 3 31., 3.2, 3.4; W 1 1.3; 2 2.1, 2.2, 2.3; 3; 4 4.1,
4.2; M 1 1.2, 1.3, 1.5; 2 2.1; 3 3.1; 5 5.2, 5.3; SSG 1 1.1; 2; 3 3.3;
SSIIS 1.1a; 1.1b; SSIGPS 2.1, 2.1a; 2.1b; SSCTS 3.1, 3.1.1a -
3.1.1d. AKCSs: ELA A 1 – 8; B 1 -3; C 1 – 3, 5; D 1, 2, 4; E 1-4.
R A 1-3; B 1-2; C 1, 4; WL A 1, 4; B 1, 4, 6; C 1, 2, 4; M A 1, 4,
5; B 1, 2, 4, 6, 7; C 1; D 1 – 5; E 1; T A 1 – 3; B 1-2; C 1-3; D 1-
3; E 7.
2. The student will be able to describe (comprehension) the ―no
repetition‖ rule so that when given the three forms (corner, edge,
center) of a ―ko,‖ he/she will be able to give the reason that the
position cannot be repeated with 100% accuracy..
STUDENTS 3. The students are Upper Elementary (gr. 4-6) students attending a
Montessori School that the American Montessori Association has
accredited.
4. This is the sixth lesson in the series. In previous lessons, students
learned about eye shapes that are ―real,‖ ―false,‖ ―dead‖ or
―alive,‖ and ―seki.‖
CLASSROOM
MANAGEMENT
5. 9 x 9 demo board, class Go sets: bring in 9 x 9 sets (do not leave
in the classroom), and lender sets (that the students can take
home).
6. The teacher will ask the students to use the procedure of obtaining
the Go sets from the storage box and setting up the boards, tables,
and chairs. Students will demonstrate to the teacher the proper
way to greet the instructor, fellow students, and opponents. The
teacher expects that the students will follow all the behavioral
expectations of the school as appropriate for this lesson.
7. The students will set up their lender set for their parent(s) and
demonstrate the ―no repetition‖ rule, and how it is applied in ―ko‖
situations.. Then the student will play the capture Go game of
―capture five with his/her parent(s).
INTRODUCTION
SET 8. The most important repeating local position is called ―ko.‖ One
side or the other captures a single stone. (see Diags. 1-3 and
following diagrams on the following pages).

Go Lesson Plans
©Gordon E. Castanza, Ed. D.
10/19/11 DRAFT
47
COMMUNICATION
OF PURPOSE
9. Your main purpose in learning about the ―non-repetition‖ rule is
because in real-life games, you will encounter a ―ko‖ or want to
use a ―ko‖ to advantage. Sometimes an entire game can depend on
who wins the ko fight. The reason is that a needed eye or
connection (and therefore the life or death of a large number of
stones) may depend upon who wins the ko. See Diag. 6 for an
example of this. The difference between the two outcomes is
about 30 points. This is usually enough to change the result of
most games. Understanding this concept is why ko is one of the
most important and interesting parts of Go.
BODY OF THE LESSON
PRESENTATION 10. Set up the three forms (corner, edge, and center) of ko (Diags. 1).
Explain that in each position an opponent‘s stone is cut off and is
in atari. The ―no repetition rule‖ applies to all three types of ko.
PROCESSING 11. The teacher will demonstrate three forms of ko (see Diag. 1,). The
teacher will explain that if the opponent chooses to ignore the
other side‘s ―ko threat,‖ he/she may fill the ko, or capture one
more of his/her opponent‘s stones so that the ko ceases to exist.
He/she will then follow-up with guided practice (see Diags. 2-3),
and then one-on-one independent practice. (See following pages
for diagrams).
12. Students will come to the demonstration board and recreate the
three forms of ko (see following pages for ko positions to put on
demo board for students to solve). The students will pair up, hand
out the Go sets, and construct their own ko positions for each
other.
MONITORING 13. The teacher will set up a position demonstrating the key concepts
of ko (see Diags. 4-6), and ko threats (see Diags. 15-). The teacher
will observe if students can determine which player will ―win the
ko.‖
14. The teacher will have students come to the demo board and show
their peers how a ko succeeds or fails (see Diag. 7-14).
15. The teacher will ask students to come to the demo board to set up
their own problems involving Seki, and then have his/her partner
identify when a position is Seki or not. If there are students with
disabilities in the classroom, the teacher will make the appropriate
accommodations.
CLOSING
CLOSURE 16. Remind students of concepts exposed today, and guide the
students‘ attention to the vocabulary words that the teacher used in
today‘s class. Ask students to repeat the concepts and to define
them for their colleagues.

Go Lesson Plans
©Gordon E. Castanza, Ed. D.
10/19/11 DRAFT
48
ASSESSMENT 17. The teacher will set up a ko fight situation (see Diags. 15- and ask
the students to form two teams. Each team gives the moves that
they think would be advantageous to their side. When a team
thinks they have created the optimal position for their side, raise
your hands. The teacher will come and give you a reward when
you‘ve made the most points in the ko fight. The teacher will ask
students to pair up, and one side sets up a ko situation. The other
side gets to move first. As soon as one of the students has ―won
the ko‖ position, quit the game and start another. The first person
to ―win the ko‖ wins the game.
FOLLOW-UP 18. Vocabulary to learn: ko, ko threat, aji, joseki, and introduce the
concept of the ―monkey jump.‖ The teacher will give worksheet
problems that contain ko situations to the students to solve.
Students will come to the demo board and show their peers how
they set up and solved the ko problem (see following diagrams).
REFLECTION
(after the lesson)
19. What did you do that helped students learn and meet the
objective?
20. What would you do differently if you taught this lesson again to
make it more successful for students.
21. SAKT 1-8; SAKS 1 – 14; AKSCRS Cultural Standards for
Students: B – F; Cultural Standards for Educators: B – E; Cultural
Standards for Curriculum: A, B, D, E; Cultural Standards for
Schools: B, C.
22. PA 1. A – E; 2 A – F; 3 A – D; 4 A – E; 5 A – I; 6 A E; 7 A – F; 8
A – E; 9 A – E; 10 A - G
Three forms of ko
Diag. 1. A is the basic form of ko in the center of the board. B
is a ko on the edge of the board. C is a ko in the corner. In A
the marked Black stone is in atari. If White plays at 1
capturing the black stone, then the White stone is in atari. The
―no repetition‖ rule states that the side that loses a stone in ko
must first make a move elsewhere on the board before he/she
can go back and re-capture. Consequently, Black would have
to play a stone somewhere else on the board before he/she
would be allowed to re-capture the White stone. Similarly, in
B, the marked Black stone is in atari. If White plays at 2, then
the white stone is in atari. Again, the ―no repetition rule‖
requires that Black play elsewhere on the board before he/she
can go back to capture the White stone. The situation in C is
exactly the same as in A, and B. If White plays at 3, thus
capturing the Black marked stone, then White‘s stone is in
atari, but Black cannot re-capture White‘s stone. First, he/she
must play elsewhere on the board, then he/she can come back
to re-capture the White stone. The move that Black plays
elsewhere is called a ―ko threat.‖

Go Lesson Plans
©Gordon E. Castanza, Ed. D.
10/19/11 DRAFT
49
Diag. 2. If White does not consider Black‘s ―ko threat‖ at 2 to be
very important, then,
Diag. 3. White plays 3 at E2,
putting the marked stone in atari,
and capturing the marked Black
stone by playing at D1 on
his/her next move.
Diag. 4. Black and White are in
the middle of a ko fight. If White plays at one, thus capturing the
Black stone at C4, then the corner becomes White‘s territory for
an approximate gain of 20 points. What happens, though, if it is
Black‘s turn and he/she takes the ko?
Diag. 5. After Black plays 1 taking the White stone
marked with the triangle, White then plays the stone
marked with a square, threatening to re-take Black‘s
stone at D3. However, Black plays 2, taking the White
stone marked with a diamond. Now Black has taken the
corner and dominates the area in the immediate vicinity

Go Lesson Plans
©Gordon E. Castanza, Ed. D.
10/19/11 DRAFT
50
Diag. 6. In this situation, the marked Black stone is the focus of the ko
fight. It has only one liberty at A. The very life-and-death of all of the
Black stones is up for grabs if Black does not win the ko fight. Notice
that the Black stone have only one sure (two-point) real eye on the right.
If White ―wins the ko‖ by capturing at A and then filling in at B4, then
Black‘s ―eye‖ at B is a ―false eye‖. That leaves the 11 stones of Black‘s
group ―dead‖ because it has only one real eye. White hasn‘t captured
them, yet, because Black still has six liberties. However, if it Black‘s turn,
and he/she ―wins the ko‖ by connecting at A, then B becomes a second
―real‖ eye for the entire group, and the Black group is ―alive.‖
Don’t be afraid of ko
Diag. 7. Most beginners try to avoid a ko. However, fighting a ko
can bring great rewards, so one should get more comfortable with
playing ko. Let‘s take a look at the following situation. In this
diagram, White has played 1 to put the Black stone in atari. In
most cases, one would just capture a stone that is on the 2nd
line
and is in atari. However, in this case there is a ko, so the situation
is not that clear. How can Black play from this position?
Diag. 8. Black would take the ko with 1, because White did not
capture yet. Next, if White wants to try to save his/her stone at
E11, he/she can play at 2, and Black then would play at 3, putting
White‘s E11 stone in atari.

Go Lesson Plans
©Gordon E. Castanza, Ed. D.
10/19/11 DRAFT
51
Diag. 9. White then re-takes the ko with 4. If Black is afraid of ko,
then he/she may play at 5, to which White responds with 6. This
leaves a cutting point at A. This is to illustrate what may happen if
one is uncomfortable with ko fighting. If Black does not fight,
White wins the ko by default anyway. Black must play a ko threat.
Diag. 10. If White takes the ko with 4, then Black should use his ko
threat by playing at 5. Black 5 is a very strong move, because it
threatens to penetrate into the White group.
Diag. 11. If White chooses not to respond to the threat of Blacks
penetration, and instead does 6, then Black plays at 7, cutting off
the White corner group from the White group along the side.

Go Lesson Plans
©Gordon E. Castanza, Ed. D.
10/19/11 DRAFT
52
Diag. 12. After Black plays the ko threat at 1, White responds at 2.
Black then goes back and takes the ko with 3. If White plays the ko
threat at 4, then Black plays 5 and captures the White stone at E11.
Diag. 13. After White takes the ko with 6, Black plays 7 as a ko threat.
Black does this to sacrifice the stone to win the ko. After White plays
8, Black takes back the ko with 9.
Diag. 14. White has run out of ko threats, so he/she plays 10.
Since Black need not respond to this move, he/she can go back
and connect the ko at 11. Since Black had more ko threats, Black
won the ko. He/she also won a large territory on the lower left
corner, and White‘s stones along Black‘s wall are almost useless.
This is an example of fighting ko with ko threats. If your
opponent fails to respond to the ko threat, you can still have an
advantage when you carry out the threat. Even if you lose the ko,
you gain compensation in some other part of the board.

Go Lesson Plans
©Gordon E. Castanza, Ed. D.
10/19/11 DRAFT
53
Ko threats
Diag. 15. Ko threats take advantage of ―aji‖ (i. e. ―remaining potential‖) in
positions that are undecided. In order to consider a ko threat successful,
you have to be able to force your opponent to answer it.
In this diagram, White plays at 1 capturing Black‘s stone at B16. Black
responds at 2. Should White respond to this? Since it looks like Black is in
trouble in the upper left corner, White has the upper hand, and does not
need to respond to 2. Even though Black would capture White‘s stone at
B4, White has more to gain by continuing to play in the upper left corner at
3.
Diag. 16. If Black plays 2 at C7 as in this diagram, then white is compelled
to answer. If White does not, then Black will extend to 4, and then will
eventually capture the three marked White stones. Even though Black lost
the ko in the upper right, he/she made up for it by taking a lot of territory
on the lower left, and also threatening to eventually kill the three marked
stones. The key to ko fighting is to find a ko threat that is so compelling to
your opponent that they must answer or risk losing a lot of ground.

Go Lesson Plans
©Gordon E. Castanza, Ed. D.
10/19/11 DRAFT
54
Diag. 17. In this position, suppose that with 1 White captures the
Black stone at A3. Black responds with 2, trying to escape the
ladder. However, White comes back with 3, and then Black re-
takes the ko with 4.
Diag. 18. White then plays 5 as a ko threat, but Black plays 6 in
order to prevent White‘s threat. White, on the other hand, re-takes
the ko with 7, and Black continues to try to escape the ladder with
8.

Go Lesson Plans
©Gordon E. Castanza, Ed. D.
10/19/11 DRAFT
55
Diag. 19. White blocks Black‘s attempt to escape the ladder with
9. Black then re-takes the ko with 10. White responds with a
―monkey jump‖8 ((Shotwell, 2003) move at 11, which forces
Black to play at 12.
A monkey jump (Japanese: saru-
suberi) is a large-knight jump
from the second line to the first
line into the opponent's would-be
territory, reducing it by a
considerable amount. The stone on
the diagram cannot be cut off. If White has a large territory to the
right, the move can't be ignored and has to be replied to. A
monkey jump is proverbially worth 9 points in sente, although the
exact amount depends on the position, and it may very well be
gote. In some cases a small jump to a is reasonable as well. This
is sometimes known as a small monkey jump
Diag. 20. White takes the Black stone at A4. Black responds with
14 to try to escape the ladder, and as a ko threat. It does not appear
as though White has enough ko threats left, so he/she can not win
the ko. When White plays at 15, Black re-takes the ko with a6.
Then White plays 17 and captures four of Black‘s stones. Black
wins the ko by playing at 18 and capturing White at A16. The
result is not a resounding success for Black, though, because he/she
allowed White to capture too many of his/her stones in the ladder.
Black would have done better if he/she would have looked for
other ko threats rather than trying to escape from the ladder.
8 ―The monkey jump is generally a late-middle game maneuver that is often worth about 8-9 points and sometimes
has greater uses for uniting apparently separated stones. It usually occurs when one player has a stone on the second
line, and the opponents‘ stones are on the third line. The ―jump‖ occurs usually on the first line and three points to
the left or right under the opponents‘ stones. (see Shotwell, p. 50).

Go Lesson Plans
©Gordon E. Castanza, Ed. D.
10/19/11 DRAFT
56
Lesson Plan Seven
Territory
PREPARATION
OBJECTIVE 1. EALRs CO 1 1.1, 1.2; 2 2.1, 2.2, 2.4; 3 3.1, 3.2; 4 4.1, 4.2; R 1
1.3; 2 2.3, 2.4; 3 31., 3.2, 3.4; W 1 1.3; 2 2.1, 2.2, 2.3; 3; 4 4.1,
4.2; M 1 1.2, 1.3, 1.5; 2 2.1; 3 3.1; 5 5.2, 5.3; SSG 1 1.1; 2; 3 3.3;
SSIIS 1.1a; 1.1b; SSIGPS 2.1, 2.1a; 2.1b; SSCTS 3.1, 3.1.1a -
3.1.1d. AKCSs: ELA A 1 – 8; B 1 -3; C 1 – 3, 5; D 1, 2, 4; E 1-4.
R A 1-3; B 1-2; C 1, 4; WL A 1, 4; B 1, 4, 6; C 1, 2, 4; M A 1, 4,
5; B 1, 2, 4, 6, 7; C 1; D 1 – 5; E 1; T A 1 – 3; B 1-2; C 1-3; D 1-
3; E 7.
2. The student will be able to recognize (knowledge) and to discuss
(comprehension) the concept of territory so that when given three
examples of territory, he/she will identify them correctly 100% of
the time. The student will be able to apply (application) his/her
knowledge of territory to create secure territory so that when
asked to make a ―safe‖ extension he/she will be able to make a
―base‖ correctly 100% of the time.
STUDENTS 3. The students are Upper Elementary (gr. 4-6) students attending a
Montessori School that the American Montessori Association has
accredited.
4. This is the seventh lesson in the series, In the previous lessons the
students learned about eye-shapes. This concept is a good
introduction to the discussion of ―territory.‖
CLASSROOM
MANAGEMENT
5. 9 x 9 demo board, class Go sets: bring in 9 x 9 sets (do not leave
in the classroom), and lender sets (that the students can take
home).
6. The teacher will ask the students to use the procedure of obtaining
the Go sets from the storage box and setting up the boards, tables,
and chairs. Students will demonstrate to the teacher the proper
way to greet the instructor, fellow students, and opponents. The
teacher expects that the students will follow all the behavioral
expectations of the school as appropriate for this lesson.
7. The students will set up their lender set for their parent(s) and
demonstrate ―territory.‖ Then the student will play the capture Go
game of ―capture five with his/her parent(s).
INTRODUCTION
SET 8. Territory is a strange concept in go because it is based on an
understanding of the importance of land instead of prisoners (as in
chess). Sensei‘s library (http://senseis.xmp.net/?Territory) defines
―territory‖ as, ―A part of the board that is surrounded by stones
belonging to a living group, and in which the opponent cannot
make a living group.‖ Bradley (Bradley, 2001) defines ―territory‖
as, ―Open intersections entirely surrounded, singly or

Go Lesson Plans
©Gordon E. Castanza, Ed. D.
10/19/11 DRAFT
57
SET in groups, by safe (two-eyed) stones of a single
color. (See Diag. 1). A ―safe‖ extension along the
third line (the line of territory) skips exactly (n+1)
spaces from a wall of (n) stones to create a ―base‖
(potential for creating two eyes) (see Diag. 3).
COMMUNICATION
OF PURPOSE
9. Your main purpose in learning about territory is that the more of it
you have the better. Your objective in a game of Go is to obtain
more territory than your opponent. At the end of a game, each side
counts up the number of points of territory it has. However, the
end of the game is too late to calculate whether or not you are
winning or losing the game. You should practice estimating the
amount of territory you have throughout the game. You always
will need to make your territory secure. You use the extension to
attempt to make secure territory, or a base (see Diags. 4-) in which
you can make at least two eyes. If you have stones that have no
base, your opponent can kill them, so you should consider it very
important to make bases.
BODY OF THE LESSON
PRESENTATION 10. In Diagram 1, ask the students how many points White has? How
many does Black have? Using the demonstration board, set up an
example of ―territory‖ (see Diag. 2). Explain that the easiest way
to make territory is to start in the corners first, then move to the
sides. Move into the center last. Explain that the third line is the
line of territory (see Diag. 2). Explain that it would be a mistake to
try to place your stones in such a solid line to enclose territory
because you would end up with less territory than your opponent.
PROCESSING 11. The teacher will demonstrate that in order to have ―secure
territory,‖ you must: (1) have borders that are complete and
unbroken (no cutting points), (2) its surrounding stones have two
real eyes (or can make them in the event of an attack), (3) the
opponent can not play inside of it and live (see Diag. 3). Follow-
up with guided practice, and then one-on-one independent
practice.
12. Students will come to the demonstration board and recreate at
least two positions (see following pages for potential territory
positions for the students to solve) that show territory, and how to
extend your territory in order to create a base (see Diags. 4-10).
The students will pair up, hand out the Go sets, and construct their
own territory and extension positions for each other.
MONITORING 13. The teacher will set up a position demonstrating territory (see
Diag. 11). The teacher will observe if students can determine how
many points of territory each player would have. The teacher will
ask students to make an extension to create a base for making
eyes. The teacher will observe if students make the appropriate
number of skips between stones and walls on the third line to

Go Lesson Plans
©Gordon E. Castanza, Ed. D.
10/19/11 DRAFT
58
MONITORING make a base for eye-space.
14. The teacher will have students come to the demo board and show
their peers ―secure‖ territory, (see Diags. 12-13), and how to make
an extension to create eye-space.
15. The teacher will ask students to come to the demo board to set up
their own territories, and then have his/her partner identify the
number of points for each side. The teacher will ask students to
come to the board to set up an extension to create eye-space, and
then have his/her partner identify the possible ways to make eyes
in the space. If there are students with disabilities in the
classroom, the teacher will make the appropriate accommodations.
CLOSING
CLOSURE 16. Remind students of concepts exposed today, and guide the
students‘ attention to the vocabulary words that the teacher used in
today‘s class. Ask students to repeat the concepts and to define
them for their colleagues.
ASSESSMENT 17. The teacher will set up territory situation (see Diags. 11) and ask
the students to form two teams. Each team silently counts the
number of points for their team. When a team thinks they have the
correct number of points of territory for their side, raise your
hands. The teacher will come and give you a reward when you‘ve
made the most points in the territory. The teacher will ask students
to pair up, and one side sets up a territory situation. The other side
gets to count first. As soon as one of the students has counted the
correct number of points of territory, quit the game and start
another. The first team to count the territory correctly wins the
game.
FOLLOW-UP 18. Vocabulary to learn: territory, dame (unoccupied spaces with
black on one side, and white on the other; neutral, no points here
for either player), komi (points given to white to compensate for
not having the advantage of the first move), extension, and base.
The teacher will give worksheet problems that contain territory
situations to the students to solve. Students will come to the demo
board and show their peers how they counted the territory (see
following diagrams).
REFLECTION
(after the lesson)
19. What did you do that helped students learn and meet the
objective?
20. What would you do differently if you taught this lesson again to
make it more successful for students?
21. SAKT 1-8; SAKS 1 – 14; AKSCRS Cultural Standards for
Students: B – F; Cultural Standards for Educators: B – E; Cultural
Standards for Curriculum: A, B, D, E; Cultural Standards for
Schools: B, C.
22. PA 1. A – E; 2 A – F; 3 A – D; 4 A – E; 5 A – I; 6 A E; 7 A – F; 8
A – E; 9 A – E; 10 A - G

Go Lesson Plans
©Gordon E. Castanza, Ed. D.
10/19/11 DRAFT
59
Diag 1. In this diagram, the squared
points are White‘s points
Diag. 2. In this diagram,
all of Black‘s stones are
on the third line, and all of
White‘s stones are on the
fourth line. Is Black‘s or
White‘s territory larger?

Go Lesson Plans
©Gordon E. Castanza, Ed. D.
10/19/11 DRAFT
60
Diag. 3. In this position, Black‘s stone on D3 is all alone.
White decides to attack at 1. Now Black is ―pincered‖ on
two sides. In order to protect himself/herself, Black
should extend to 2 in order to create a ―base‖ for the
potential of making two eyes.
Diag. 4. Black plays 1 to approach White‘s stone at R9. If white does not
defend his/her stone, then Black can attack at 3, thus denying White a base.
A lone stone is a stone that invites an attack. So White should not ignore
Black‘s approach. White should play at 2 (following the rule of skipping
n+1 from ―n‖ stones, or ―If one, jump two; if two, jump three.‖. This is
called an ―extension.‖
Diag. 5. If White decides to extend to 2 as in this
diagram, he/she opens him/herself up to Black‘s
invasion at 3. There‘s too much space between
White‘s stones.
Diag. 6. On the other hand, if
White decides to extend only
one point to 2, then Black
responds at 3, thus robbing
white the chance to make a
base for making two eyes.
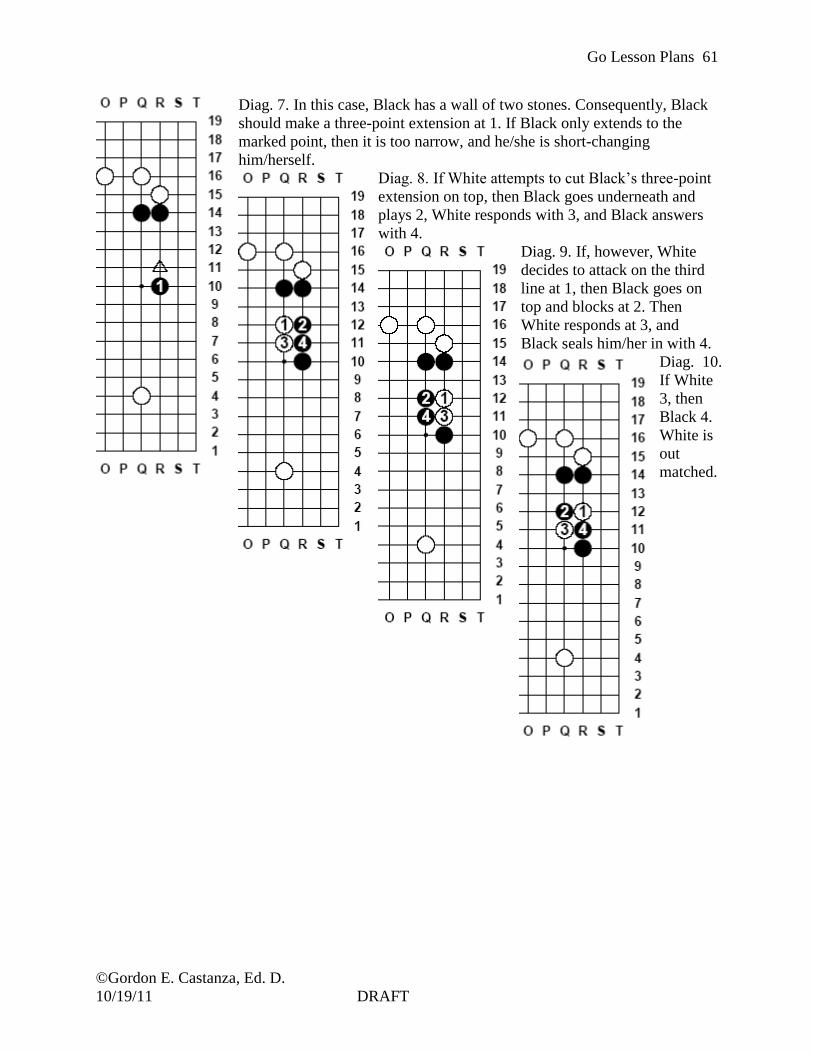
Go Lesson Plans
©Gordon E. Castanza, Ed. D.
10/19/11 DRAFT
61
Diag. 7. In this case, Black has a wall of two stones. Consequently, Black
should make a three-point extension at 1. If Black only extends to the
marked point, then it is too narrow, and he/she is short-changing
him/herself.
Diag. 8. If White attempts to cut Black‘s three-point
extension on top, then Black goes underneath and
plays 2, White responds with 3, and Black answers
with 4.
Diag. 9. If, however, White
decides to attack on the third
line at 1, then Black goes on
top and blocks at 2. Then
White responds at 3, and
Black seals him/her in with 4.
Diag. 10.
If White
3, then
Black 4.
White is
out
matched.

Go Lesson Plans
©Gordon E. Castanza, Ed. D.
10/19/11 DRAFT
62
Diag. 11.
Diag. 12. How should Black respond to White‘s move at 2? Black
should make the three-point extension to 3.
Diag. 13.
After
Black
plays 1,
white
answers
with 2.
What
should be Black‘s next move? Black can make a base with the two-
point extension at 3. Follow-up moves for Black are at A and B, which
is the standard way of making two-eyes in this kind of position.

Go Lesson Plans
©Gordon E. Castanza, Ed. D.
10/19/11 DRAFT
63
Lesson Plan Eight
Influence
PREPARATION
OBJECTIVE 1. EALRs: CO 1 1.1, 1.2; 2 2.1, 2.2, 2.4; 3 3.1, 3.2; 4 4.1, 4.2; R 1
1.3; 2 2.3, 2.4; 3 31., 3.2, 3.4; W 1 1.3; 2 2.1, 2.2, 2.3; 3; 4 4.1,
4.2; M 1 1.2, 1.3, 1.5; 2 2.1; 3 3.1; 5 5.2, 5.3; SSG 1 1.1; 2; 3 3.3;
SSIIS 1.1a; 1.1b; SSIGPS 2.1, 2.1a; 2.1b; SSCTS 3.1, 3.1.1a -
3.1.1d. AKCSs: ELA A 1 – 8; B 1 -3; C 1 – 3, 5; D 1, 2, 4; E 1-4.
R A 1-3; B 1-2; C 1, 4; WL A 1, 4; B 1, 4, 6; C 1, 2, 4; M A 1, 4,
5; B 1, 2, 4, 6, 7; C 1; D 1 – 5; E 1; T A 1 – 3; B 1-2; C 1-3; D 1-
3; E 7.
2. The student will be able to appraise (evaluation) a position so that
when given two positions he/she will be able to tell the area of
influence of a group of stones with 100% accuracy.
STUDENTS 3. The students are Upper Elementary (gr. 4-6) students attending a
Montessori School that the American Montessori Association has
accredited.
4. The previous lesson was on ―territory.‖ This lesson expands on
that lesson to illustrate a more subtle concept of ―influence,‖ ―the
power of a group of stones, usually a solid, center-facing wall to
affect whatever happens in its vicinity‖ (Bradley, 2001).
CLASSROOM
MANAGEMENT
5. 9 x 9 demo board, class Go sets: bring in 9 x 9 sets (do not leave
in the classroom), and lender sets (that the students can take
home).
6. The teacher will ask the students to use the procedure of obtaining
the Go sets from the storage box and setting up the boards, tables,
and chairs. Students will demonstrate to the teacher the proper
way to greet the instructor, fellow students, and opponents. The
teacher expects that the students will follow all the behavioral
expectations of the school as appropriate for this lesson
7. The students will set up their lender set for their parent(s) and
demonstrate ―influence.‖ Then the student will give his/her parent
a number of handicap stones depending on the student‘s
assessment of his/her parent‘s strength. He/she will play a game of
Go with his/her parent(s).
INTRODUCTION
SET 8. ―Influence‖ can also be called ―thickness.‖ Each stone has a
certain influence on the board. Captured stones have an influence
close to zero. Surrounded stones that make a live group, influence
only the surrounding group. Stones that are in open space have an
influence on that open space and the stones bordering that open
space. Influence is a long range effect. The stronger a group, the
greater its influence on a neighboring area. The more open the
neighboring area, the greater the group's influence. The weaker the

Go Lesson Plans
©Gordon E. Castanza, Ed. D.
10/19/11 DRAFT
64
SET other groups neighboring that area, the larger the group's influence.
COMMUNICATION
OF PURPOSE
9. As Shotwell (Shotwell, 2003) points out, ―Influence is only the
potential to affect the course of later play [and] if used properly
thickness can later result in a lot of territory. There is some risk
involved in choosing influence over territory, but in many
positions the only key to victory is via the use of thickness.‖ Only
experience can teach you how to decide which is worth more.
BODY OF THE LESSON
PRESENTATION 10. In Diagram 1, ask the students which side they think has the
territory and which side has the influence? Using the
demonstration board, set up an example of influence (see Diag. 2-
4).
PROCESSING 11. The teacher will demonstrate the Go axiom that you ―Don‘t play
near thickness. Either your own or the opponent‘s‖ (see Diag. 5).
The teacher will demonstrate the Go axiom ―Drive towards your
thickness‖ (see Diag. 6). Follow-up with guided practice, and then
one-on-one independent practice.
12. Students will come to the demonstration board and recreate at
least two positions (see following pages for potential ―influence‖
positions for the students to solve) that show influence, and how
to extend your influence in order to use its power (see Diag. 5).
The students will pair up, hand out the Go sets, and construct their
own influence positions for each other.
MONITORING 13. The teacher will set up a position demonstrating influence (see
Diags. 7). The teacher will observe if students can determine
which player has ―territory‖ and which has ―influence.‖ The
teacher will ask students to make an extension to create increase
one‘s influence on the board. The teacher will observe if students
make the appropriate number of skips between stones and walls to
increase/decrease the player‘s influence on the board.
14. The teacher will have students come to the demo board and show
their peers ―influence‖ (see Diags. 8-10), and how to make an
extension to increase his/her influence.
15. The teacher will ask students to come to the demo board to set up
their own ―influence‖ examples, and then have his/her partner
identify the number of points for each side. The teacher will ask
students to come to the board to set up an extension to increase
his/her influence, and then have his/her partner identify the area of
influence. If there are students with disabilities in the classroom,
the teacher will make the appropriate accommodations.
CLOSING
CLOSURE 16. Remind students of concepts exposed today, and guide the
students‘ attention to the vocabulary words that the teacher used in
today‘s class. Ask students to repeat the concepts and to define
CLOSURE them for their colleagues.

Go Lesson Plans
©Gordon E. Castanza, Ed. D.
10/19/11 DRAFT
65
ASSESSMENT 17. Play a demo game against the students. On a 9 x 9 board, give the
―students‘ team a four stone handicap. Ask the students to line up
to take turns making moves on the demo board. Remind them not
to comment on each other‘s moves except to say ―good move!‖
Some students may need your encouragement. Remind them that
they have plenty of time. Give suggestions for possible moves if a
student seems confused.
FOLLOW-UP 18. Vocabulary to learn: influence, thickness. The teacher will give
worksheet problems that contain territory situations to the students
to solve. Students will come to the demo board and show their
peers how they counted the territory (see following diagrams).
REFLECTION
(after the lesson)
19. What did you do that helped students learn and meet the
objective?
20. What would you do differently if you taught this lesson again to
make it more successful for students.
21. SAKT 1-8; SAKS 1 – 14; AKSCRS Cultural Standards for
Students: B – F; Cultural Standards for Educators: B – E; Cultural
Standards for Curriculum: A, B, D, E; Cultural Standards for
Schools: B, C.
22. PA 1. A – E; 2 A – F; 3 A – D; 4 A – E; 5 A – I; 6 A E; 7 A – F; 8
A – E; 9 A – E; 10 A - G
Diag. 1. This is a joseki sequence in which White1
invades on the 3-3 point under Black‘s (handicap) stone.
White has pretty secure territory in the lower right corner.
That is, if Black decided to invade the corner, in all
likelihood his/her stones would die. For the time being
Black has no secure territory in this area of the board. On
the other hand Black‘s wall (―thickness‖) exerts a lot of
―influence‖ over the rest of the board to the left. Even
though White has sente in this position, it is considered
an equal outcome because Black has ―outside influence‖
over the rest of the board.

Go Lesson Plans
©Gordon E. Castanza, Ed. D.
10/19/11 DRAFT
66
Diag. 2.
Diag. 3.
Diag. 4. Black has
the hoshi stone and
the marked stone in
place. White
approaches with 1.
Black answers with
the pincer at 2.
White jumps into
the corner with 3,
and up to 8 the
sequence is very
common. White has
thus taken territory
but Black has
created a group,
consisting of the
wall 4-6-hoshi, virtually connected to 2 and 8. The marked stone provides for sufficient space to
make eyes for the group. The Black configuration is strong and influences the center and the
right side.
Diag. 5. B1 in this position is in an ideal spot because it
allows for enough room between it and the Black wall to
make best use of its power. If it were closer, then its
power would be wasted. If it were further away, then it
would just be an invitation for White to invade. If White
invades too deeply, he/she should be in trouble (unless
there are other stones around which aren‘t shown). So
White should play cautiously with a ―light‖ reducing
move like W2 here (or at ―a‖).

Go Lesson Plans
©Gordon E. Castanza, Ed. D.
10/19/11 DRAFT
67
Diag. 6. White tried to invade
Black‘s area, then White jumped
out at 1. On the right, Black has a
lot of thickness, and the advantage.
Black caps at 2, which blacks
White‘s attempt to escape to the
center. If White plays the diagonal
at 3, then Black pushes White
towards his/her thickness with 4.
White 5 and Black makes a
knight‘s move to 6, and white
makes a one-point jump to 7, but
Black counters at 8, thus sealing in White‘s stones. Driving weak stones towards your thickness
is a good strategy.
Diag. 7. Black builds a wall. The marked Black stone is closer to
the wall, but because a White stone is already in the area, this
makes perfect sense. This configuration is regarded as strong, and
influences the center and lower side.
Diag. 8. This is what happens when White
immediately makes a 3-3 point invasion. White
7 creates a weakness.
Diag. 9. The white stone is captured in a type of net, but some aji remains.
White can not run out immediately, However. Black is thick.
Diag. 10. Black plays the marked stone
instead of at a. Black 1 is a tight move. If
White ignores it, Black 3 and 5 are then sente
against the corner.

Go Lesson Plans
©Gordon E. Castanza, Ed. D.
10/19/11 DRAFT
68
Lesson Plan Nine
Scoring
PREPARATION
OBJECTIVE 1. EALRs: CO 1 1.1, 1.2; 2 2.1, 2.2, 2.4; 3 3.1, 3.2; 4 4.1, 4.2; R 1
1.3; 2 2.3, 2.4; 3 31., 3.2, 3.4; W 1 1.3; 2 2.1, 2.2, 2.3; 3; 4 4.1,
4.2; M 1 1.2, 1.3, 1.5; 2 2.1; 3 3.1; 5 5.2, 5.3; SSG 1 1.1; 2; 3 3.3;
SSIIS 1.1a; 1.1b; SSIGPS 2.1, 2.1a; 2.1b; SSCTS 3.1, 3.1.1a -
3.1.1d. AKCSs: ELA A 1 – 8; B 1 -3; C 1 – 3, 5; D 1, 2, 4; E 1-4.
R A 1-3; B 1-2; C 1, 4; WL A 1, 4; B 1, 4, 6; C 1, 2, 4; M A 1, 4,
5; B 1, 2, 4, 6, 7; C 1; D 1 – 5; E 1; T A 1 – 3; B 1-2; C 1-3; D 1-
3; E 7.
2. The student will be able to assess (evaluation) the position on the
board so that when given a full-board position he/she will
determine if the game is over, fill in the neutral points (dame) and
then score it with 100% accuracy.
STUDENTS 3. The students are Upper Elementary (gr. 4-6) students attending a
Montessori School that the American Montessori Association has
accredited.
4. In the two previous lessons the teacher showed students how to
determine territory and influence. In this lesson the teacher
combines those lessons with lesson two on Units & Liberties, and
he/she will introduce the concept of ―scoring the finished game.‖
CLASSROOM
MANAGEMENT
5. 9 x 9 demo board, class Go sets: bring in 9 x 9 sets (do not leave
in the classroom), and lender sets (that the students can take
home). The teacher will ask students to use their ―game record
sheets‖ to keep a record of the games the teacher will show them
on the demo board.
6. The teacher will ask the students to use the procedure of obtaining
the Go sets from the storage box and setting up the boards, tables,
and chairs. Students will demonstrate to the teacher the proper
way to greet the instructor, fellow students, and opponents. The
teacher expects that the students will follow all the behavioral
expectations of the school as appropriate for this lesson.
7. The students will set up their lender set for their parent(s) and
show them one or more of the 9 x 9 professional games for which
he/she kept a game record. Then the student will go through one
or more of the games with his/her parent(s) and determine who the
winner was at the end of the game.
INTRODUCTION
SET 8. Black and white alternate turns until there do not appear to be any
more advantage to playing a stone. Since the aim of Go is to
encircle as much territory as possible, the game is over when
neither side can gain or lose any more territory. At that time, the

Go Lesson Plans
©Gordon E. Castanza, Ed. D.
10/19/11 DRAFT
69
SET players go through a process to verify that the game is over. The
players then proceed to fill in the neutral points.
COMMUNICATION
OF PURPOSE
9. The purpose of this lesson is to show how to finish a game and
then score it to see which side won the game. Shotwell (2003, p.
106) says, ―It‘s important to remember that completing the
borders is really just a continuation of the ‗endgame‘ that the
teacher will discuss in Lesson 12. So it often occurs on parts of the
board quite early in the game, and not only just before both sides a
ready to pass.‖
BODY OF THE LESSON
PRESENTATION 10. In Diag. 1, ask the students to predict if Black is ready to pass?
Use Diag. 2 to point out that there are more moves available for
both sides. After discussion, post Diag. 3 on the demo board, and
ask the students if White should pass? Place the moves from Diag.
4-5 on the board. Ask the students to predict again the next move,
and ask them to explain their reasons for making their suggested
move. If there are any liberties that remain between the safe stones
of both sides, they are not credited to either side. These are
―dame‖ points. Each player fills in the dame points alternatively in
they are all filled. Put Diag. 6 on the board and ask the students to
identify if there are any dame, which side should fill it and why?
Put Diag. 7 on the board.
PROCESSING 11. The teacher will explain that players can end a Go game in three
ways: (1) when both players say ―pass‖ in succession; (2) by
resignation; (3) if either player exceeds the time limits when
playing with a clock.
12. Saying ―pass‖ means that a single color of stones completely
encloses a complete and unbroken border of stones; there are two
eyes for each territory, or the opponent can not prevent the
formation of two eyes; the opponent cannot or will not invade; or
the only other possible moves are already in your territory. A
player may make a ―pass‖ move at any time, but when he/she does
so, he/she must give a stone to his/her opponent. If the game is an
―even‖ game (i.e. no handicap), then white must make the last
pass. The opponent is not required to ―pass‖ in kind. He/she may
continue to play. When this happens, the play continues until such
time as both players pass in succession. Resignation is a courtesy
to one‘s opponent if the situation is hopeless.
MONITORING 13. The teacher will set up a final position of a game (see Diag. 8).
The teacher will observe how students manipulate the stones into
groups of multiples of five or 10, fill in dame, and fill in empty
spaces with prisoners.
14. The teacher will place a final position in the demo board and ask
students to come to the demo board to show their peers how they
count the final score of the game (see Diag. 9).

Go Lesson Plans
©Gordon E. Castanza, Ed. D.
10/19/11 DRAFT
70
MONITORING 15. The teacher will ask students to come to the demo board to set up
their own final position examples, and then have his/her partner
identify the number of points for each side. If there are students
with disabilities in the classroom, the teacher will make the
appropriate accommodations.
CLOSING
CLOSURE 16. Remind students of concepts exposed today, and guide the
students‘ attention to the vocabulary words that the teacher used in
today‘s class. Ask students to repeat the concepts and to define
them for their colleagues.
ASSESSMENT 17. Play a demo game against the students. On a 9 x 9 board, give the
―students‘ team a four stone handicap. Ask the students to line up
to take turns making moves on the demo board. Remind them not
to comment on each other‘s moves except to say ―good move!‖
Some students may need your encouragement. Remind them that
they have plenty of time. Give suggestions for possible moves if a
student seems confused.
FOLLOW-UP 18. Vocabulary to learn: pass, dame, and komi. The teacher will give
worksheet problems that contain problems for the students to
solve (see diagrams 11-14). Students will come to the demo board
and show their peers how they counted the territory (see following
diagrams).
REFLECTION
(after the lesson)
19. What did you do that helped students learn and meet the
objective?
20. What would you do differently if you taught this lesson again to
make it more successful for students.
21. SAKT 1-8; SAKS 1 – 14; AKSCRS Cultural Standards for
Students: B – F; Cultural Standards for Educators: B – E; Cultural
Standards for Curriculum: A, B, D, E; Cultural Standards for
Schools: B, C.
22. PA 1. A – E; 2 A – F; 3 A – D; 4 A – E; 5 A – I; 6 A E; 7 A – F; 8
A – E; 9 A – E; 10 A – G
Diag. 1. Assume that you are playing on a 7 x 7 board.
Should Black ―pass‖ in this position?

Go Lesson Plans
©Gordon E. Castanza, Ed. D.
10/19/11 DRAFT
71
Diag 2. No Black should not pass: 1. White‘s wall is
incomplete, and B1 can reduce White‘s territory by one
point. Black then has sente, which forces White3 to move
to 2 to complete his/her border. The territorial boundary in
the upper right corner is also incomplete. B3 gains another
three points. Black prevents White from playing at 5, and
forces White to play at 4. The Black connects at 5, and the
game is at an end. The Black cut at ―a‖ doesn‘t accomplish
anything, because White can come back and atari at ―b.‖
Similarly, at the bottom, if White plays ―c‖, Black would
capture him/her in a ladder. So both players are ready to
pass.
Diag. 3. This is another 7 x 7 game. In this position, should
White pass?
Diag. 4. Since there are two places, ―a‖ and ―b‖ in
which the borders between Black and White are
incomplete, White should not pass.

Go Lesson Plans
©Gordon E. Castanza, Ed. D.
10/19/11 DRAFT
72
Diag. 5. White plays at 1 to protect the marked stone
from atari. This is two points better for White. After B2,
W3, B4, White passes and gives a stone to Black. Black
also passes and gives a stone to White. Since this is a
non-handicap game, White has to pass once more. So
the result is:
White has 12 spaces + one Black stone = 13
Black has 16 space + two White stones = 18.
Consequently, Black wins the game by 5 stones.
Diag. 6. How many dame are there in this position?
There is only one dame at ―a,‖ but only Black can
fill it. White can not fill it. If White filled it then
he/she would place him/herself in atari and Black
would play at E1, White at D2, Black at F3 put
white into atari.
Diag. 7. Is this game over? How would you score
it? Black has six prisoners, white has three
prisoners. The komi is 6.5 points.
1. The players alternately fill in all dame using
extra stones, not prisoners.
2. Both sides pass in succession and exchange
―pass stones.‖
3. Each side removes from its territory as
prisoners all abandoned opposing stones.
4. Each side fills its prisoners into territories of
the same color, thereby subtracting them from
the opponent‘s score.
5. Each side‘s remaining territory is rearranged
by the opponent into easily countable
groupings (usually multiples of 5 or 10 points)
6. Each remaining vacant intersection counts as

Go Lesson Plans
©Gordon E. Castanza, Ed. D.
10/19/11 DRAFT
73
one point of score for the side that has surrounded it, except Seki.
7. Komi (compensation for playing second) is added to White‘s score.
8. The side with the higher total score wins the game.
In this diagram Black has 23 points on the board, plus six prisoners = 29. White has 25 points on
the board plus 3 prisoners, plus 6.5 komi, for a total of 34.5. Consequently, White wins by 5.5
points.
Diag. 8. Black has no White prisoners.
White has three Black prisoners.
Black has 15 points on the board and no
prisoners for a total of 15.
White has 12 points on the board, plus
three prisoners, for a total of 15. However,
there is 6.5 points of komi. Consequently,
White wins by 6.5 points.
Diag. 9. Before 1 and 5 are played, this was
the final position of the board, but the wall of
territory are not complete at those points.
Consequently, if it is White‘s turn, he/she
plays at 1. Black connects at 2, and that
connects the borders in this area. Next White
plays 3, to which Black respond with 4, and
White connects with 5. Now the borders of
this area are finished. Now to take care of the
dame points (marked with an X). These
points are neutral points. If one side fills them
in it does not effect the outcome of the game.
Ordinarily, each side takes turns filling in the
dame points. Sometimes, though, it makes a
difference how the dame points are filled in.
The following diagrams show a couple of
situations.

Go Lesson Plans
©Gordon E. Castanza, Ed. D.
10/19/11 DRAFT
74
Diag. 10. There are two dame points, A and B, in this
final position. If Black plays at A, then he/she takes
away one of White‘s liberties. If White fills B, then
Black can come back and play at C2, thus putting
White‘s three stones in atari. Consequently, White
should not play B, but play at C2 him/herself.
Diag. 11. Problem: Black to play. What move does Black
make to live?
Diag. 12. Problem: Black to play.
What moves does Black make to
kill the white group at the top
and the white group at the bottom?

Go Lesson Plans
©Gordon E. Castanza, Ed. D.
10/19/11 DRAFT
75
Diag. 13. Problem. Black to play. How does Black make
a living group?
Diag. 14. Alive or Dead? Is Black alive or dead? Is
another move necessary?

Go Lesson Plans
©Gordon E. Castanza, Ed. D.
10/19/11 DRAFT
76
Lesson Plan 10
Extensions, Connections, Cuts—Part One
PREPARATION
OBJECTIVE 1. EALRs: CO 1 1.1, 1.2; 2 2.1, 2.2, 2.4; 3 3.1, 3.2; 4 4.1, 4.2; R 1
1.3; 2 2.3, 2.4; 3 31., 3.2, 3.4; W 1 1.3; 2 2.1, 2.2, 2.3; 3; 4 4.1,
4.2; M 1 1.2, 1.3, 1.5; 2 2.1; 3 3.1; 5 5.2, 5.3; SSG 1 1.1; 2; 3 3.3;
SSIIS 1.1a; 1.1b; SSIGPS 2.1, 2.1a; 2.1b; SSCTS 3.1, 3.1.1a -
3.1.1d. AKCSs: ELA A 1 – 8; B 1 -3; C 1 – 3, 5; D 1, 2, 4; E 1-4.
R A 1-3; B 1-2; C 1, 4; WL A 1, 4; B 1, 4, 6; C 1, 2, 4; M A 1, 4,
5; B 1, 2, 4, 6, 7; C 1; D 1 – 5; E 1; T A 1 – 3; B 1-2; C 1-3; D 1-
3; E 7.
2. The student will be able to describe and discuss (comprehension)
extensions, connections, and cuts, so that when given three
positions he/she will correctly show each 100% of the time.
STUDENTS 3. The students are Upper Elementary (gr. 4-6) students attending a
Montessori School that the American Montessori Association has
accredited.
4. In Lesson Seven, the teacher introduced the students to the
concept of territory. During that lesson, the teacher introduced
some of the basics of extension. See Lesson Seven for more
details. In the previous lessons the focus was mechanical and
positional. In this lesson the teacher moves the emphasis to
technical skill building.
CLASSROOM
MANAGEMENT
5. 9 x 9 demo board, class Go sets: bring in 9 x 9 sets (do not leave
in the classroom), and lender sets (that the students can take
home). The teacher will ask students to use their ―game record
sheets‖ to keep a record of the games the teacher will show them
on the demo board.
6. The teacher will ask the students to use the procedure of obtaining
the Go sets from the storage box and setting up the boards, tables,
and chairs. Students will demonstrate to the teacher the proper
way to greet the instructor, fellow students, and opponents. The
teacher expects that the students will follow all the behavioral
expectations of the school as appropriate for this lesson.
7. The students will set up their lender set for their parent(s) and
show them the six forms of the extension, how to make
connections, and the results of a cut.
INTRODUCTION
SET 8. There are some key techniques, such as extensions, connections,
and cuts, to the game of Go. Players who wish to do well at
playing Go should know these techniques..
COMMUNICATION
OF PURPOSE
9. You will need to know these techniques because as in volleyball,
for example, you have to learn how to pass, spike, serve the ball,
and to practice those things over and over so that they become

Go Lesson Plans
©Gordon E. Castanza, Ed. D.
10/19/11 DRAFT
77
COMMUNICATION
OF PURPOSE
automatic if you want to be a good player. The same is true of playing
Go, because if you have to think about which technique to use, you
probably will not react correctly and you will lose the game.
BODY OF THE LESSON
PRESENTATION 10. ―Extending‖ is one of the most common techniques in Go. From
Diag. 1, show the students the six basic ways Black can play to
extend his/her stones. Eventually, the player wants to solidly
connect all of his/her extensions. There are two types of
connections: ―solid,‖ and ―potential/virtual.‖ From Diag. 2, show
the students how White can play to connect his/her stones in a
―solid‖ connection. Next, show students the various forms of
―potential/virtual‖ connections. In Diag. 3-6, show the students
how White can cut the Black stones with the ―Alien
Symbol‖(Kim, 1997).
PROCESSING 11. The teacher will demonstrate the six extension patterns, how to
make connections, and how to cut. You use extensions to: (1)
Enclose or attack an opposing group; (2) run away from an attack;
(3) move into an adjacent area on the board; (4) build territory (or
―thickness‖); (5) Sketch out or enclose potential territory; (6)
make eye-space; (7) prevent your opponent from doing the same
thing.
12. The students will pair up, and they will hand out the Go sets. Have
students solve three puzzle problems (see Diags. 7-9).
MONITORING 13. The teacher will ask students to demonstrate to their partner three
of the six forms of extensions. Then his/her partner will
demonstrate to him/her the remaining three extension patterns.
14. The teacher will place a demonstration game on the demo board
and ask students to come to the demo board to show their peers
how he/she responds to the request to show an extension,
connection, or cut (see Diag. 10).
15. The teacher will ask students to come to the demo board to set up
their own extension, connection, and cut position examples, and
then have his/her partner identify the best extension, how he/she
would connect, and identify if a cut would be successful. If there
are students with disabilities in the classroom, the teacher will
make the appropriate accommodations.
CLOSING
CLOSURE 16. Remind students of concepts exposed today, and guide the
students‘ attention to the vocabulary words that the teacher used in
today‘s class. Ask students to repeat the concepts and to define
them for their colleagues.
ASSESSMENT 17. Play a demo game against the students. On a 9 x 9 board, give the
―students‘ team a four stone handicap. Ask the students to line up
to take turns making moves on the demo board. Remind them not
to comment on each others‘ moves except to say, ―good move!‖

Go Lesson Plans
©Gordon E. Castanza, Ed. D.
10/19/11 DRAFT
78
ASSESSMENT Some students may need your encouragement. Remind them that they
have plenty of time. Give suggestions for possible moves if a student
seems confused.
FOLLOW-UP 18. Vocabulary to learn: haengma, small knight‘s move, large
knight‘s move, one-point extension, two-point extension, diagonal
extension, tiger‘s mouth, bamboo joint, and ―Alien symbol‖ (Kim,
2003) How will students apply and extend the learning, and deal
with real world problems?
REFLECTION
(after the lesson)
19. What did you do that helped students learn and meet the
objective?
20. What would you do differently if you taught this lesson again to
make it more successful for students.
21. SAKT 1-8; SAKS 1 – 14; AKSCRS Cultural Standards for
Students: B – F; Cultural Standards for Educators: B – E; Cultural
Standards for Curriculum: A, B, D, E; Cultural Standards for
Schools: B, C.
22. PA 1. A – E; 2 A – F; 3 A – D; 4 A – E; 5 A – I; 6 A E; 7 A – F; 8
A – E; 9 A – E; 10 A - G
Diag. 1. This diagram illustrates the six basic extensions,
or haengma, in Korean. Illustration one shows the
attachment extension. Illustration two, indicates the one-
point extension. Illustration three shows the two point
extension. Illustration four shows the diagonal extension.
Illustration five, shows the ―small knight‘s move.
Illustration six shows the large knight‘s move.
Diag. 2. A ―solid‖ connection is a position in which two
stones are right next to each other. White can connect
his/her stones by playing at 1. When Black plays 2, he/she
make a ―potential/virtual‖ connection, that is called the
―tiger‘s mouth.‖ If Black plays at 3, then he/she creates the
―Bamboo Joint.‖ However, all other things being equal, it is
considered stronger for Black to play at 4. If white tries to
penetrate at the marked space, then Black at 4 makes a
tiger‘s mouth. It is important to realize that each move you
make, especially defensive moves should have a dual
purpose. Unfortunately, your opponent can cut ―potential/virtual‖ connections. See the following
diagram.

Go Lesson Plans
©Gordon E. Castanza, Ed. D.
10/19/11 DRAFT
79
Diag. 3. The position labeled ―A‖ is
the basic form of the ―Alien
Symbol.‖ In the position labeled
―B‖, the three marked Black stones
are threatening to form the
―Bamboo Joint.‖ After White has
―hit the head of two stones‖ with
the forth marked (White) stone we
see the beginnings of the ―Alien
Symbol.‖ There is a saying in go
that you should try to prevent the
formation of the ―Bamboo Joint.‖
Consequently, should White block
at 1, or 2?
Diag. 4. If White plays 1, then
Black tries to escape with 2. White
makes a ―double atari‖ with 3.
Black prefers to save three stones,
and plays 4. White can capture one
stone, but could he/she have
captured more? Let‘s see.
Diag. 5. If White elects to play at 1 (which is 2 in
Diag. 3), then Black has to play at 2. White
responds by playing at 3, and he/she has trapped
the four Black stones. If Black chooses to sacrifice
the two Black stones by playing at 3, then White
still interjects at 2, and traps the two Black stones.

Go Lesson Plans
©Gordon E. Castanza, Ed. D.
10/19/11 DRAFT
80
Diag. 6. Here‘s another look at the ―Alien symbol.‖ Black
prevents the ―Bamboo Joint‖ at 1. White connects at 2, and
Black catches the stones in the sequence up to 7. The ―Alien
Symbol‖ basically comes about because Black has hit the head
of two stones on two sides, then prevented the formation of the
―Bamboo Joint‖ by placing a stone where White should place a
stone to complete the ―Bamboo Joint.‖
Diag 7. Black to Play. White has played at 1. How does Black
answer? (A ko fight).
Diag. 8. Black to play. How
does Black play in this
position? (Take the ko).
Diag. 9. Black to play. White has
played at 1. How does Black
answer? (Take the ko at H1).

Go Lesson Plans
©Gordon E. Castanza, Ed. D.
10/19/11 DRAFT
81
Diag 10. This is an even game, so
Black proceeds to fill in the two star
point corners, and White fill in one
star point and one 3-4 point (If Black
does not play the approach move,
White would respond with a knight‘s
enclosure at 6 or a one-point enclosure
at 5.). After taking the corners, the
proverb tells us to concentrate on the
sides. However, Black has decided to
approach his/her opponent‘s
―unsettled corner‖ with 5, a one-point
approach. White attaches with 6, and
Black makes a diagonal connection
(actually a ―hane‖) with 7. White
―pulls back‖ with 8. Black decides to
attack the lower left corner with 9.
White doesn‘t want his 4-4 stone to
get caught in an ―eagle formation‖ (so
he/she plays at 10. Black then extends
to the right at 11. Now it is White who
wants to attack Black‘s lower right corner with 12. Black also does not want to get caught in a
―double eagle,‖ so he plays 13. Black responds with 15. Now White has the opportunity to
extend up the right side with 16. This creates the ―kite‖ formation in the lower right corner.
Now it‘s Black‘s turn to play and he/she decides to connect at 17. White extends with a
one-point jump at 18, and Black responds with 19 according to the Go proverb about extensions:
―If one, jump two; if two, jump three. White decides to protect his lower left corner territory with
20 (which serves two purposes: it solidifies the corner and it aims at invading Blacks lower-side
framework. However, Black plays ―gote‖ at 21 (if Black wanted, he/she could have played move
21 at H4, instead of R14 to strengthen his/her framework along the bottom side. White responds
by jumping in with an invasion at 22. Black decides he/she is going to answer the White invasion
by playing 23, thus pushing White along the third line and creating a monster wall for
him/herself along the fourth line. White has to decide how he/she is going to live under this wall.
So White slides under Black‘s stone at O4 with 30. Black prevents a tiger’s mouth with 31, and
White protects his/her flank with 32 (if White does not play 32, then Black plays at N2, and sets
the trap for the Loose Ladder, explained in the next lesson). White can make two eyes now, so
his bottom group is alive. Black‘s territory on the bottom side is non-existent, so White‘s
invasion succeeded. However, Black cause is not at all lost. While White was trying to make
eye-space, Black was making thickness with his/her wall facing the center. This result should be
good for Black. He/she follows up with 33, 35, and 37 both to put pressure on the White stones
on the right side, and to increase his influence over the center of the board. Black reveals his/her
strategy is to make territory in the center. To do so, Black must protect his/her potential territory
on all four sides. This task is not easy for Black, but if White tries to destroy Black‘s aji
(potential) in the center, Black can retaliate strongly because of his/her thickness in the center to
attack White. White tries to break through Black‘s formation with 38. Black responds with 39,
because if he/she does not play here, then White will break out into the center. White 40 is a

Go Lesson Plans
©Gordon E. Castanza, Ed. D.
10/19/11 DRAFT
82
peep at the tiger’s mouth. Black connects with 41 (if Black does not connect at 41, then White
will cut there, and Black two corner stones are history., and White plays at 42. When White
plays the atari, Black blocks with 43 instead. White captures at 44, and Black blocks again at 45,
thus sacrificing one stone. This is a situation in which Black must sacrifice one stone to
accomplish his/her goal of solidifying his/her center influence. White responds with another atari
at 46, Black connects at 47. White could capture Black‘s stone in atari, buy he/she decides he/she
wants to grab the star region at the top center with 48. To see the value of White playing at 48,
try seeing what the situation would look like if Black played there instead.
Black makes the upper right corner enclosure with 49 (instead of 49, Black could play
N17 (where White plays 52). However, White may mount an attack later by invading at the 3-3
point, which is almost impossible to kill). White decides to invade at 50, but Black blocks it with
51, and White can not live in the corner. White makes this exchange by planting a sleeper to see
if he/she can use it later. White 52 has dual purpose: (1) it extends his/her territory on the upper
side, and (2) it makes the sleeper stone more useful for later play. At this point the opening is
finished.

Go Lesson Plans
©Gordon E. Castanza, Ed. D.
10/19/11 DRAFT
83
Lesson Plan 11
Extensions, Connections, Cuts—Part Two
PREPARATION
OBJECTIVE 1. EALRs: CO 1 1.1, 1.2; 2 2.1, 2.2, 2.4; 3 3.1, 3.2; 4 4.1, 4.2; R 1
1.3; 2 2.3, 2.4; 3 31., 3.2, 3.4; W 1 1.3; 2 2.1, 2.2, 2.3; 3; 4 4.1,
4.2; M 1 1.2, 1.3, 1.5; 2 2.1; 3 3.1; 5 5.2, 5.3; SSG 1 1.1; 2; 3 3.3;
SSIIS 1.1a; 1.1b; SSIGPS 2.1, 2.1a; 2.1b; SSCTS 3.1, 3.1.1a -
3.1.1d. AKCSs: ELA A 1 – 8; B 1 -3; C 1 – 3, 5; D 1, 2, 4; E 1-4.
R A 1-3; B 1-2; C 1, 4; WL A 1, 4; B 1, 4, 6; C 1, 2, 4; M A 1, 4,
5; B 1, 2, 4, 6, 7; C 1; D 1 – 5; E 1; T A 1 – 3; B 1-2; C 1-3; D 1-
3; E 7.
2. The student will be able to describe, to discuss (comprehension),
and to demonstrate (application) the elements of a ladder, a ladder
breaker, Geta (trap/snare), the ―crane‘s nest,‖ the loose ladder, the
―knight‘s move,‖ the ―dog‘s neck‖ extension, the ―horse‘s neck‖
extension, the snapback, and the ―robber‘s attack,‖ so that when
given one position of each he/she will correctly show each 100%
of the time.
STUDENTS 3. The students are Upper Elementary (gr. 4-6) students attending a
Montessori School that the American Montessori Association has
accredited.
4. In the previous lesson the students learned the fundamental
technical skills of making extensions, connects, and cuts. In this
lesson the teacher builds on those concepts and introduces the
student to ―Ladders,‖ ―Ladder Breakers,‖ Net/Traps/Snares
(―Geta‖), the ―Crane‘s Nest,‖ ―Loose Ladder,‖ the ―Knight‘s
Move,‖ ―Dog‘s Neck Extension, ―Horse‘s Neck Extension, ―the
―Snapback,‖ and the ―Robber‘s Attack.‖
CLASSROOM
MANAGEMENT
5. 9 x 9 demo board, class Go sets: bring in 9 x 9 sets (do not leave
in the classroom), and lender sets (that the students can take
home). The teacher will ask students to use their ―game record
sheets‖ to keep a record of the games the teacher will show them
on the demo board.
6. The teacher will ask the students to use the procedure of obtaining
the Go sets from the storage box and setting up the boards, tables,
and chairs. Students will demonstrate to the teacher the proper
way to greet the instructor, fellow students, and opponents. The
teacher expects that the students will follow all the behavioral
expectations of the school as appropriate for this lesson.
7. The students will set up their lender set for their parent(s) and
show them the ―Ladder,‖ how to block a ladder, the use of the
―Net,‖ the ―Crane‘s Nest‖ formation, how to use the ―Loose
Ladder,‖ the ―Knight‘s Move,‖ the ―Dog‘s Neck and Horse‘s
Neck‖ extensions, how the ―Snapback‖ works and the use of the
―Robber‘s Attack.‖

Go Lesson Plans
©Gordon E. Castanza, Ed. D.
10/19/11 DRAFT
84
INTRODUCTION
SET 8. In this lesson we explore the more difficult, but also essential,
fundamental, and most interesting tactics of Go. Players who wish
to do well at playing Go should know these techniques..
COMMUNICATION
OF PURPOSE
9. You will need to know these techniques because these tactics
allow you to capture your opponent‘s stones that try to cut your
stones. You will also need to know these techniques because,
while connecting your stones is a good idea, it is not always the
most efficient use of your stones. If you always want to make
solid connections, you will lose because your opponent will get
more territory than you will.
BODY OF THE LESSON
PRESENTATION 10. The ―ladder,‖ which is a virtual connection, is one of the most
interesting capturing techniques. Players threaten to use them in
almost every game of Go, and they can have a strong influence on
the course of the game (see Diag. 1-2). The most experienced
players, however, rarely play them out to the end. Instead, they try
to find a way to break the ladder, and use one of several ―ladder
breaking‖ (see Diag. 3) techniques. The ―geta,‖ also known as a
trap/snare, is one technique (see Diags. 4-6). The ―crane‘s nest‖ is
a form of ―geta‖ that occurs when there is a string of three stones
in a row (see Diag. 7). The ―loose ladder‖ is a special form of
―geta‖ in which one player drives the other player‘s stones around
as in a ladder even though the attacked stones are not in atari, yet
(see Diag. 8-9). There are three techniques that are very useful for
attacking and defending: the ―knight‘s move‖ (Diag. 10-11), the
―dogs‘ neck‖ (which is a sort of double small knight‘s move) (see
Diag. 12 and the ―horse‘s neck‖ (which is a sort of double large
knight‘s move) (see Diag. 13). The ―snapback‖ (see Diag. 14-16)
is basically a ―throw-in‖ capturing technique in which you put one
of your own stones in atari. You basically ―bait a trap‖ for your
opponent to take, and then you come back to capture more of
his/her stones (see Diag. 17 for an example of a ―pin,‖ which is a
form of snapback.. The ―Robber‘s attack‖ (see Diag. 18-19) is
another form of ―snapback‖ or ―throw-in‖ sacrifice to rescue
threatened stones.
PROCESSING 11. The teacher will demonstrate the ladder, how to place a stone for a
―ladder breaker,‖ how to set up a ―geta,‖ how to set up a ―crane‘s
nest,‖ and the advantage(s) of the ―loose ladder.‖ The teacher will
explain, and demonstrate the functions of the ―knight‘s move‖: (1)
to run, (2) to attack, (3) to enclose territory, and (4) to establish a
form of virtual connection. The teacher will explain the two forms
of the double knight‘s move: (1) the ―dog‘s neck‖ (a ―small
knight‘s move,‖ and (2) the ― horse‘s neck‖ (a ―large knight‘s
move‖). The teacher will demonstrate two ―throw-in‖ techniques

Go Lesson Plans
©Gordon E. Castanza, Ed. D.
10/19/11 DRAFT
85
PROCESSING (1) the ―snapback,‖ and the ―robber‘s attack.‖
12. The students will pair up, and they will hand out the Go sets. Have
students solve three puzzle problems (see Diags. 20-24).
MONITORING 13. The teacher will ask students to demonstrate to their partner the
basic formation for the ladder, how to prepare themselves to use a
ladder breaker, a ―geta‖ formation, and the small and large
knight‘s move. Then his/her partner will demonstrate the ―crane‘s
nest,‖ the ―dog‘s neck‖ extension, the ―horse‘s neck‖ extension,
and the snapback.
14. The teacher will place a demonstration game on the demo board
and ask students to come to the demo board to show their peers
how to set up a ladder breaker, when it is preferable to
immediately capture the ladder, or to use a ―geta,‖ and to capture
stones using a ―snapback.‖
15. The teacher will ask students to come to the demo board to set up
their own ladders, ladder breakers, ―geta,‖ ―crane‘s nest,‖ and
snapback. If there are students with disabilities in the classroom,
the teacher will make the appropriate accommodations.
CLOSING
CLOSURE 16. Remind students of concepts exposed today, and guide the
students‘ attention to the vocabulary words that the teacher used in
today‘s class. Ask students to repeat the concepts and to define
them for their colleagues.
ASSESSMENT 17. Play a demo game against the students. On a 13 x 13 board, give
the ―students‘ team a three stone handicap. Ask the students to
line up to take turns making moves on the demo board. Remind
them not to comment on each others‘ moves except to say, ―good
move!‖
FOLLOW-UP 18. Vocabulary to learn: ladder, ladder breaker, ―geta,‖ knight‘s
move, crane‘s nest, dog‘s neck extension, horse‘s neck extension,
loose ladder, and snapback. At home, the student will observe two
games on the KGS or IGS servers between strong players. The
student will report to the following class the observations they
made of these players using a ladder, ladder breaker, ―geta,‖ and
snapback.
REFLECTION
(after the lesson)
19. What did you do that helped students learn and meet the
objective?
20. What would you do differently if you taught this lesson again to
make it more successful for students.
21. SAKT 1-8; SAKS 1 – 14; AKSCRS Cultural Standards for
Students: B – F; Cultural Standards for Educators: B – E; Cultural
Standards for Curriculum: A, B, D, E; Cultural Standards for
Schools: B, C.
22. PA 1. A – E; 2 A – F; 3 A – D; 4 A – E; 5 A – I; 6 A E; 7 A – F; 8
A – E; 9 A – E; 10 A - G

Go Lesson Plans
©Gordon E. Castanza, Ed. D.
10/19/11 DRAFT
86
Diag. 1. This is the classic position for the ―ladder,‖ wherein
Black has two stones aligned and one diagonally connected.
White tries to cut. If it is Black‘s turn, he/she can capture the
White stone. He/she must not start with 1, though. White would
escape and have two liberties. The most effective approach is
for Black to play at 2. The following diagram shows what
happens if White tries to escape.
Diag. 2. This diagram illustrates the
classic ―ladder‖ ―shape.‖ Black
drives White to the edge, and
eventually kills him/her with 20.
There are two ways to prevent the
ladder. One is for White to cut
his/her losses and allow Black to
capture the one stone. White would
benefit from this tactic if he/she
played his/her ―escape‖ stone
elsewhere on the board to gain an
advantage. The other way is called
the ―ladder breaker,‖ and is
illustrated in the next diagram.

Go Lesson Plans
©Gordon E. Castanza, Ed. D.
10/19/11 DRAFT
87
Diag. 3. This diagram shows the
―ladder breaker zone.‖ If it is
White‘s move and he/she places a
stone on any of the points marked
with an ―A,‖ or one of the ―x‖s
within the ―zone,‖ he/she can
prevent Black from succeeding with
the ladder. The reason for this is
that after White plays his/her stone
on one of the points, he/she drives
Black into a self-atari, making it
possible for White to escape, to put
Black into a double atari, or to
capture a stone. Thus, Black‘s plan
is thwarted. White has to be careful,
though, not to station the ladder
breaker stone too far out. If too far
out, Black can station a stone in
between it, and then White is in
trouble again. Does Black have a
recourse? Yes, he/she can place a
stone on one of the points in the
―zone‖ in between the White ―ladder breaker‖ stone and the beginning of the Ladder to make it
work again.
Diag. 4. In the initial stages of this position, White‘s circled
stone has cut the Black stones. It is impossible for Black to
capture White‘s stones in a ladder because of White‘s marked
stone, which is a ladder breaker. However, as suggested in the
previous diagram, when Black plays at 1, and White tries to
run with 2, Black blocks with 3. White cannot even escape if
he/she tries to play at ―A,‖ because Black will capture with
―B.‖
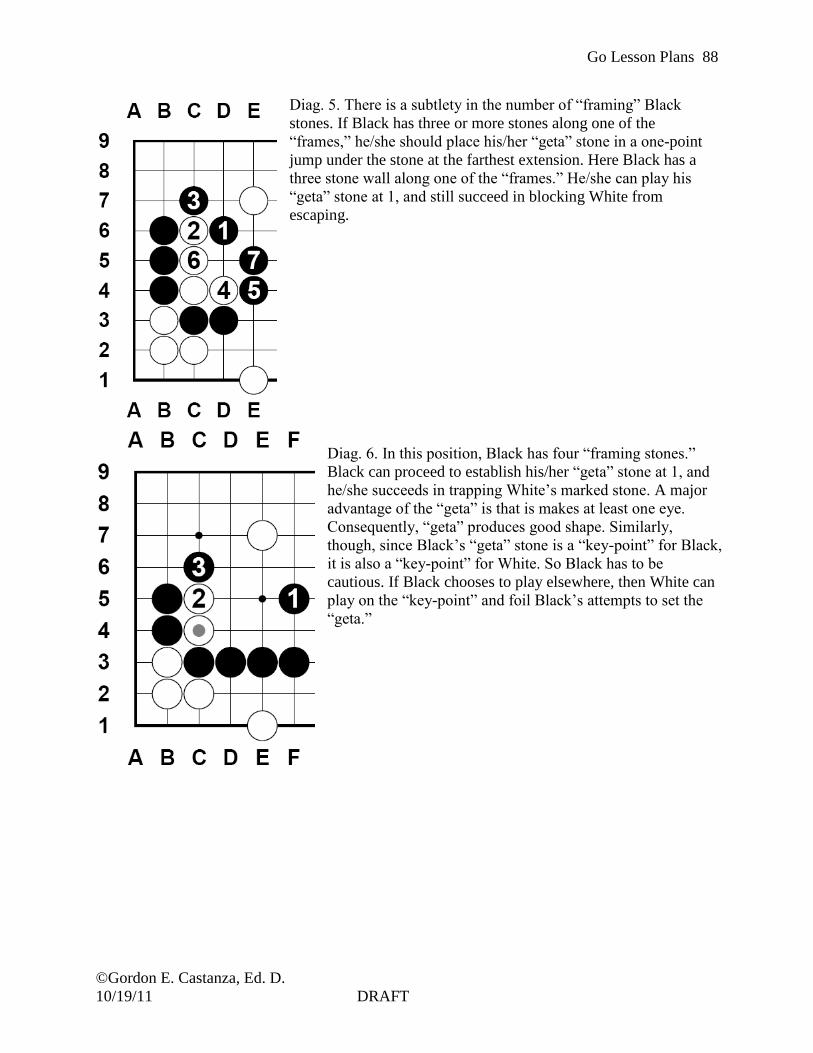
Go Lesson Plans
©Gordon E. Castanza, Ed. D.
10/19/11 DRAFT
88
Diag. 5. There is a subtlety in the number of ―framing‖ Black
stones. If Black has three or more stones along one of the
―frames,‖ he/she should place his/her ―geta‖ stone in a one-point
jump under the stone at the farthest extension. Here Black has a
three stone wall along one of the ―frames.‖ He/she can play his
―geta‖ stone at 1, and still succeed in blocking White from
escaping.
Diag. 6. In this position, Black has four ―framing stones.‖
Black can proceed to establish his/her ―geta‖ stone at 1, and
he/she succeeds in trapping White‘s marked stone. A major
advantage of the ―geta‖ is that is makes at least one eye.
Consequently, ―geta‖ produces good shape. Similarly,
though, since Black‘s ―geta‖ stone is a ―key-point‖ for Black,
it is also a ―key-point‖ for White. So Black has to be
cautious. If Black chooses to play elsewhere, then White can
play on the ―key-point‖ and foil Black‘s attempts to set the
―geta.‖

Go Lesson Plans
©Gordon E. Castanza, Ed. D.
10/19/11 DRAFT
89
Diag. 7. The ―crane‘s
nest‖ is a form of ―geta,‖
and ―snapback.‖ The basic
formation of the ―crane‘s
nest‖ occurs here when
White‘s three marked
stones get hemmed in. If it
is Black‘s turn, he/she
plays at 1. White tries to
escape by playing at 2.
Black plays a ―throw-in‖
with 3. White puts Black
into atari with 4. Black
responds by playing at 5.
If White thinks he/she is
going to save his/her
stones by playing at 6 and
capturing Black‘s stone at
3 then Black comes back and plays at 7, putting five of White‘s stones in atari
Diag. 8. This diagram shows
what happens if Black gets a
little greedy, He/she has just
put the White stone at D7 in
atari. White tries to escape
with 1. Black blocks with 2,
White continues his/her
escape with 3, thus putting
the Black stone in atari.
Black responds by placing
White‘s group of stones in
atari with 4. White captures
with 5. While it looks like
Black has gained in outside
influence, White has secured the corner and created two eyes. Black, on the other hand, has
maintained sente.
Diag. 9. However, Black can
play more efficiently by pushing
White‘s stones with 2-8. Black
reduces White‘s liberties to two.
Black‘s three stones have three
liberties, thus Black is ahead on
the liberty count. Black not only
gains the corner, but also five
stones. However, the capture is
in ―gote,‖ which poses no
immediate threat to White.

Go Lesson Plans
©Gordon E. Castanza, Ed. D.
10/19/11 DRAFT
90
Diag. 10. The ―knight‘s move‖ is one of the six haengma (tactics for
moving or running with your stones, cf. Diag. 1, Lesson Plan Ten).
The ―knight‘s move‖ is often used for attacking, driving opponent‘s
stones in a particular direction, running away and to surround
territory. In this diagram, 1 is an example of the ―small knight‘s
move‖ with relation to the marked Black stone. It also succeeds in
encircling White‘s group.
Diag. 11. This ―knight‘s move‖ scenarios shows how Black
makes a virtual connection instead of making a solid connection
at ―a,‖ or a ―Tiger‘s Mouth‖ at ―b,‖ or ―c.‖ If White makes the
error of playing a cut at ―a‖, then Black would connect at G6
catching White in a ladder. Black‘s move at 1 also accomplishes
a second goal of making an extension as far out as possible.
Diag. 12. Black is threatening to enclose White‘s two marked
stones, especially if Black plays at 1. However, if it is White‘s
move, White can prevent Black‘s threat by playing at 1. This
formation is known as the ―dog‘s neck,‖ and forms a small
knight‘s move from both of the marked stones.

Go Lesson Plans
©Gordon E. Castanza, Ed. D.
10/19/11 DRAFT
91
Diag. 13. The ―horse‘s neck‖ extension is the ―large
knight‘s move‖ from two stones. In the diagram,
White plays 1, to which Black counters with 2,
which blocks White from the corner, and forces
White to play 3. Black 4 continues Black‘s efforts to
sketch out Black‘s position in the corner. White
needs to make eye-space shape, so he/she plays at 5.
Black wants to keep White out of the corner, so he
blocks White with 6. Now it looks like Black is
hemming White in, so White plays 7, the ―horse‘s
neck‖ extension, and Black completes the
encirclement with 8.
Diag. 14. This is a ―snapback‖ position in which
Black will put one of his/her stones in atari. If Black
want to capture two White stones, he/she plays at 1,
by which Black puts his/her stone in a tiger‘s mouth.
White responds by capturing the Black stone with 2.
However, White now has three stones in atari, and
Black comes back to play at 1, thus capturing the
three White stones.
Diag. 15. Here is another example of a snapback.
This time White must capture the five marked Black
stones or he/she will lose his/her four stones on the
right. Note that Black‘s marked stones have two
liberties. Can White capture them? If White puts
him/herself in atari by playing at 1, then Black
captures at 2, and puts White‘s stone at C4 in atari.
However, now Black has only one liberty. White
recaptures by playing at 1 again, and captures six
Black stones.

Go Lesson Plans
©Gordon E. Castanza, Ed. D.
10/19/11 DRAFT
92
Diag. 16. Assuming it is Black‘s move, he/she can capture White‘s
four stones on the right. Black put him/herself into atari with 1.
White captures with 2, and then Black comes back to play a stone
at 1 and captures the five White stones.
Diag. 17. This diagram illustrates
the ―pin,‖ in which Black takes
advantage of White two weak
points at ―A,‖ and ―B.‖ Black
plays at 1. If White tries to
connect by playing at ―A,‖ then
Black plays at ―B‖ thus capturing
four of White‘s stones. On the
other hand, if White ignores
Black‘s move at 1, and plays at
―B,‖ then Black plays his/her
stone at ―A,‖ and kills two of
White‘s stones.
Diag. 18. It looks like White‘s three stones in the bottom corner are
going to die. However, White knows the ―robber‘s attack‖ which
takes advantage of his/her ability to set up two cutting points that
threaten to cut Black‘s groups apart. White proceeds to play at 1.
Black doesn‘t want his/her stones separated, so he/she responds
with 2. However, in doing so, Black has created the two cutting
points at ―a,‖ and ―b.‖ White responds by playing at 3.
Diag. 19. Black connects with 4.
However, White plays the self-
atari at 5. If Black thinks he/she
can save the three marked stones
by capturing 5 at J4, then White
plays 7, and puts the three marked
stones in atari. Now Black is faced
with having to choose to either
lose the three marked stones or
losing seven stones. On the other
hand, if Black connects at 6, then
White still plays at 7 to threaten Black three marked
stones, and freeing his/her stones in the corner.

Go Lesson Plans
©Gordon E. Castanza, Ed. D.
10/19/11 DRAFT
93
Diag. 20. Black to play. How should Black respond to 1?
Black should play at E2 to link his stones on the left and
right.
Diag. 21. Black to play. White plays double atari with
1. How should Black reply? Taking the ko at D5 is the
only move for Black.
Diag. 22. Black to play. White 1 captures the Black
stone at C4 in ko. How should Black reply? (Black
should connect at E5)

Go Lesson Plans
©Gordon E. Castanza, Ed. D.
10/19/11 DRAFT
94
Diag. 23. White to play and live. (1 move). What move does
White make to give his/her stones life? White must set up a
snapback by playing at T18. If Black captures, then White takes
three of Black‘s stones and lives with two eyes.
Diag. 24. Black to play and live. (1 move).
What move does Black make to give his/her
stones life? (Black plays at H8. If White
captures F9 by playing G9, then Black plays a
snapback at F9 to capture three White stones.
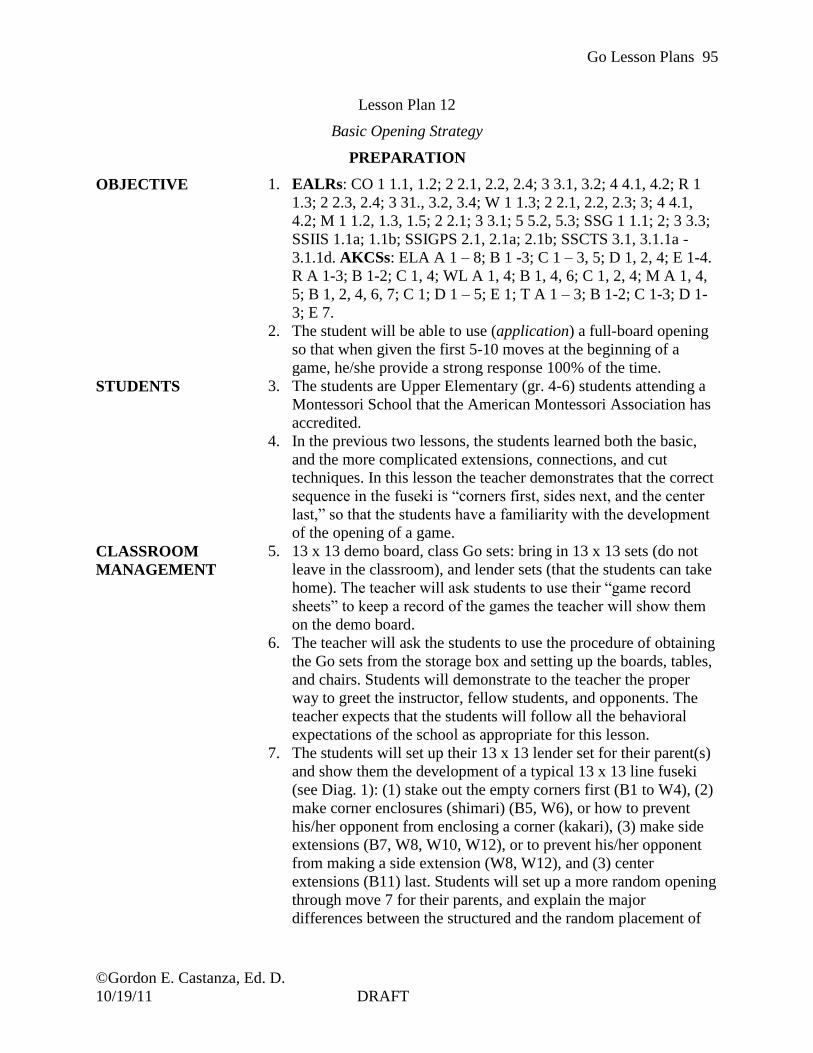
Go Lesson Plans
©Gordon E. Castanza, Ed. D.
10/19/11 DRAFT
95
Lesson Plan 12
Basic Opening Strategy
PREPARATION
OBJECTIVE 1. EALRs: CO 1 1.1, 1.2; 2 2.1, 2.2, 2.4; 3 3.1, 3.2; 4 4.1, 4.2; R 1
1.3; 2 2.3, 2.4; 3 31., 3.2, 3.4; W 1 1.3; 2 2.1, 2.2, 2.3; 3; 4 4.1,
4.2; M 1 1.2, 1.3, 1.5; 2 2.1; 3 3.1; 5 5.2, 5.3; SSG 1 1.1; 2; 3 3.3;
SSIIS 1.1a; 1.1b; SSIGPS 2.1, 2.1a; 2.1b; SSCTS 3.1, 3.1.1a -
3.1.1d. AKCSs: ELA A 1 – 8; B 1 -3; C 1 – 3, 5; D 1, 2, 4; E 1-4.
R A 1-3; B 1-2; C 1, 4; WL A 1, 4; B 1, 4, 6; C 1, 2, 4; M A 1, 4,
5; B 1, 2, 4, 6, 7; C 1; D 1 – 5; E 1; T A 1 – 3; B 1-2; C 1-3; D 1-
3; E 7.
2. The student will be able to use (application) a full-board opening
so that when given the first 5-10 moves at the beginning of a
game, he/she provide a strong response 100% of the time.
STUDENTS 3. The students are Upper Elementary (gr. 4-6) students attending a
Montessori School that the American Montessori Association has
accredited.
4. In the previous two lessons, the students learned both the basic,
and the more complicated extensions, connections, and cut
techniques. In this lesson the teacher demonstrates that the correct
sequence in the fuseki is ―corners first, sides next, and the center
last,‖ so that the students have a familiarity with the development
of the opening of a game.
CLASSROOM
MANAGEMENT
5. 13 x 13 demo board, class Go sets: bring in 13 x 13 sets (do not
leave in the classroom), and lender sets (that the students can take
home). The teacher will ask students to use their ―game record
sheets‖ to keep a record of the games the teacher will show them
on the demo board.
6. The teacher will ask the students to use the procedure of obtaining
the Go sets from the storage box and setting up the boards, tables,
and chairs. Students will demonstrate to the teacher the proper
way to greet the instructor, fellow students, and opponents. The
teacher expects that the students will follow all the behavioral
expectations of the school as appropriate for this lesson.
7. The students will set up their 13 x 13 lender set for their parent(s)
and show them the development of a typical 13 x 13 line fuseki
(see Diag. 1): (1) stake out the empty corners first (B1 to W4), (2)
make corner enclosures (shimari) (B5, W6), or how to prevent
his/her opponent from enclosing a corner (kakari), (3) make side
extensions (B7, W8, W10, W12), or to prevent his/her opponent
from making a side extension (W8, W12), and (3) center
extensions (B11) last. Students will set up a more random opening
through move 7 for their parents, and explain the major
differences between the structured and the random placement of

Go Lesson Plans
©Gordon E. Castanza, Ed. D.
10/19/11 DRAFT
96
CLASSROOM
MANAGEMENT
stones and the affect their placement will have on the development of
the rest of the game.
INTRODUCTION
SET 8. In this lesson the teacher will demonstrate two or three effective
opening sequences (fuseki) that illustrate the principle of
distribution (one or two of one‘s stones per area at first) and then
to consolidate later as required. The student should place his/her
opening stones so that they are not too close to either one of
this/her own stones or to those of his/her opponent. Compare
Diag. 2 with Diag. 3.
COMMUNICATION
OF PURPOSE
9. Although tactical fighting is important to local fighting, as an
overall strategy the fuseki actually determines the way that a game
will unfold. There are many different ways to play a fuseki, and
mastering the strategic opening requires a lot of skill that you gain
through playing many games. Perhaps then the student can go on
to advanced books on the subject of fuseki.
BODY OF THE LESSON
PRESENTATION 10. The opening is the time when the player sketches out his/her
territorial bases. A solid opening strategy, like building the
foundation to a house or a building, enable the player to build
small or large structures. The classical opening strategy is to
follow certain basic principles: (1) start from the corners, (2) after
the corners, go to the sides, (3) use the third and fourth lines. The
teacher demonstrates the best starting points in the corner, and
explains that each offers advantages and disadvantages (see Diag.
4).
PROCESSING 11. The teacher will give instructions, and then follow-up with guided
practice, and then one-on-one independent practice. If you start on
the 3-3 point (―a‖ in Diag. 4), then you are guaranteed a small (10
points) amount of territory (see Diag. 5). Playing a stone on the 4-
4 point (―b‖ in diag.4) is good for gaining influence, because your
opponent can always play at the 3-3 point and then if he/she
follows the joseki in Diag. 6, he/she can gain the corner, or, by
changing one move (see Diag. 7), he/she can keep the corner and
gain influence, but at the expense of giving white eye-space on the
side. One example of a shimari occurs when you take the corner at
the 3-4 point. There are basically three ways to enclose the corner
(see Diag. 8). Another example of a corner enclosure (shimari)
occurs when you take the corner at the 4-4 (star) point. Unlike the
3-4 point that only required one stone to secure the corner, the 4-4
point requires two stones to enclose the corner (see Diag 9). When
contemplating enclosing a corner, you should consider what
influence the shamari will project (see Diag. 10).
12. The students will pair up, and they will hand out the Go sets. Have
students solve two puzzle problems (Diags. 11-12).

Go Lesson Plans
©Gordon E. Castanza, Ed. D.
10/19/11 DRAFT
97
MONITORING 13. The teacher will ask students to demonstrate to their partner the
basic formation for the order in which he/she will place stones for
a balanced opening fuseki. Then his/her partner will demonstrate
the corner enclosures (shimari) for the 3-4 point and the 4-4 point.
14. The teacher will place a demonstration game (see Diag. 13) on the
demo board and ask students to come to the demo board to show
their peers how to set up a fuseki and the corner enclosures for the
3-4 point and the 4-4 point. Teacher will continue with the demo
game (Diag. 14-21), playing to the end, and asking students along
the way about positions such as attachments, ―geta,‖ etc.
15. The teacher will ask students to come to the demo board to set up
their own fuseki and corner enclosures. If there are students with
disabilities in the classroom, the teacher will make the appropriate
accommodations.
CLOSING
CLOSURE 16. Remind students of concepts exposed today, and guide the
students‘ attention to the vocabulary words that the teacher used in
today‘s class. Ask students to repeat the concepts and to define
them for their colleagues.
ASSESSMENT 17. Play a demo game against the students. On a 13 x 13 board, give
the ―students‘ team a three stone handicap. Ask the students to
line up to take turns making moves on the demo board. Remind
them not to comment on each others‘ moves except to say, ―good
move!‖
FOLLOW-UP 18. Vocabulary to learn: fuseki, joseki, shimari, and kakari. At home,
the student will observe two games on the KGS or IGS servers
between strong players. The student will report to the following
class the observations they made of these players using fuseki,
joseki, shimari, and kakari..
REFLECTION
(after the lesson)
19. What did you do that helped students learn and meet the
objective?
20. What would you do differently if you taught this lesson again to
make it more successful for students.
21. SAKT 1-8; SAKS 1 – 14; AKSCRS Cultural Standards for
Students: B – F; Cultural Standards for Educators: B – E; Cultural
Standards for Curriculum: A, B, D, E; Cultural Standards for
Schools: B, C.
22. PA 1. A – E; 2 A – F; 3 A – D; 4 A – E; 5 A – I; 6 A E; 7 A – F; 8
A – E; 9 A – E; 10 A - G

Go Lesson Plans
©Gordon E. Castanza, Ed. D.
10/19/11 DRAFT
98
Diag. 1. This opening follows the
patterns (1) fill the empty corners first
(B1-W4), (2) make corner enclosures
(B5, W6), or prevent your opponent
from making corner enclosures, (3)
make side extensions (B7, W8, W10,
W12), or prevent your opponent from
making side extensions (W8, W12), and
(4) make center extensions last (B11).
B11 prevents White from playing the
same move which would completely
hem in Black. W12 is performing
double duty. Not only does White make
an extension along the side, but White
also prevents Black from doing so as
well. The last point to make here is that
none of the stones are too close to the
edge (third line) and none make direct
contact with another stone.
Diag. 2. In this diagram the stones are
randomly placed across the board.
They are neither connected, nor posing
any immediate danger to the other
stones on the board. There does not
seem to be much coordination.

Go Lesson Plans
©Gordon E. Castanza, Ed. D.
10/19/11 DRAFT
99
Diag. 3. This is a fairly ―normal‖ opening sequence.
What are the differences between this and Diag. 2?
The stone sin this diagram basically follow a more
orderly development: (1) start in the corners (B1—
W4), (2) make corner enclosures (B5, W6, W8,
B11), (3) make side extensions (B7, W10, B13,
W14), (4) use the third and the fourth lines (B11,
B13, W10, W14).
Diag. 4. Points ―a‖ through ―h‖ are the ―best‖ places to start in the
corner. Sometimes, ―i,‖ and ―j‖ are chosen.
Diag. 5. With the Black stone already at the 3-3 point, this joseki
sequence shows why starting at the 3-3 point has very little
influence on the rest of the board.
Diag. 6. This diagram illustrates the joseki that should unfold when
Black plays on the 4-4 points and White decides to invade on the 3-3
point.

Go Lesson Plans
©Gordon E. Castanza, Ed. D.
10/19/11 DRAFT
100
Diag. 7. On the other hand, if Black plays 6 at S6 instead of R6,
Black can capture the two White stones (1, 3). Then if White plays
―a,‖ Black plays ―b,‖ White plays ―c,‖ then Black plays ―d‖ to take
the corner. However, white captures the Black stone at S6 thus
making eye-shape along the side.
Diag. 8. Shimari (corner enclosure). When
you take a corner by playing at the 3-4
point, then you need to follow-up with
another stone in order to enclose the
corner. The first is basically a ―small
knight‘s‖ move from the 3-4 point as with
the Black stones marked with triangles.
The second technique is the ―one-point‖
jump as with the Black stones marked with
squares. The third enclosure is to use the
―large knight‘s‖ move as with the Black
stones marked with the diamonds.
Diag. 9. From the 4-4 point, you can also make a knight‘s move to
enclose the corner. However, you will also need another stone at A in
order to make secure territory in the corner. It is usually considered
more efficient to shimari a 3-4 point corner, because it takes one less
move. So, the advice is to enclose a 3-4 corner as soon as possible, but
you can take a little more time about enclosing the star point corner. So,
if you create a 3-4 corner, then you should think about enclosing it first.
With a 4-4 corner you can think about approaching your opponent‘s
corners, or playing one of the big points on the side before finishing the
shimari.

Go Lesson Plans
©Gordon E. Castanza, Ed. D.
10/19/11 DRAFT
101
Diag. 10. The influence that a shimari launches is at
right angles to the base that its two stones form, and in
direct proportion to the spacing between the stones.
This diagram illustrates the area of influence for each
type of corner enclosure. When you are trying to decide
which would be the best direction to extend, consider
which direction has the strongest influence. Also, you
want to consider how far you want to extend. The
optimal distance is to the middle of the side and usually
on the third line, although the fourth line may be better
sometimes. These extensions are not safely connected
to the corner enclosure, nor do they secure any territory
(compare this situation with the ―safe‖ third line
extensions discussed in Lesson 7. However, the value
of these extensions lies in their potential for a ―moyo‖
(a large potential territory/sphere of influence) between themselves and the shimari. Such a large
distance, though, is an invitation for your opponent to invade, because he/she does not want you
to secure a large territory. Consequently, a fight will probably ensue.
Diag. 11. Who has the advantage? After the sequence to
White 8, who has the better game?
Diag. 12. Black to play. How does Black respond to
White 1? (There are two correct answers). Black plays
either L4, or K3.
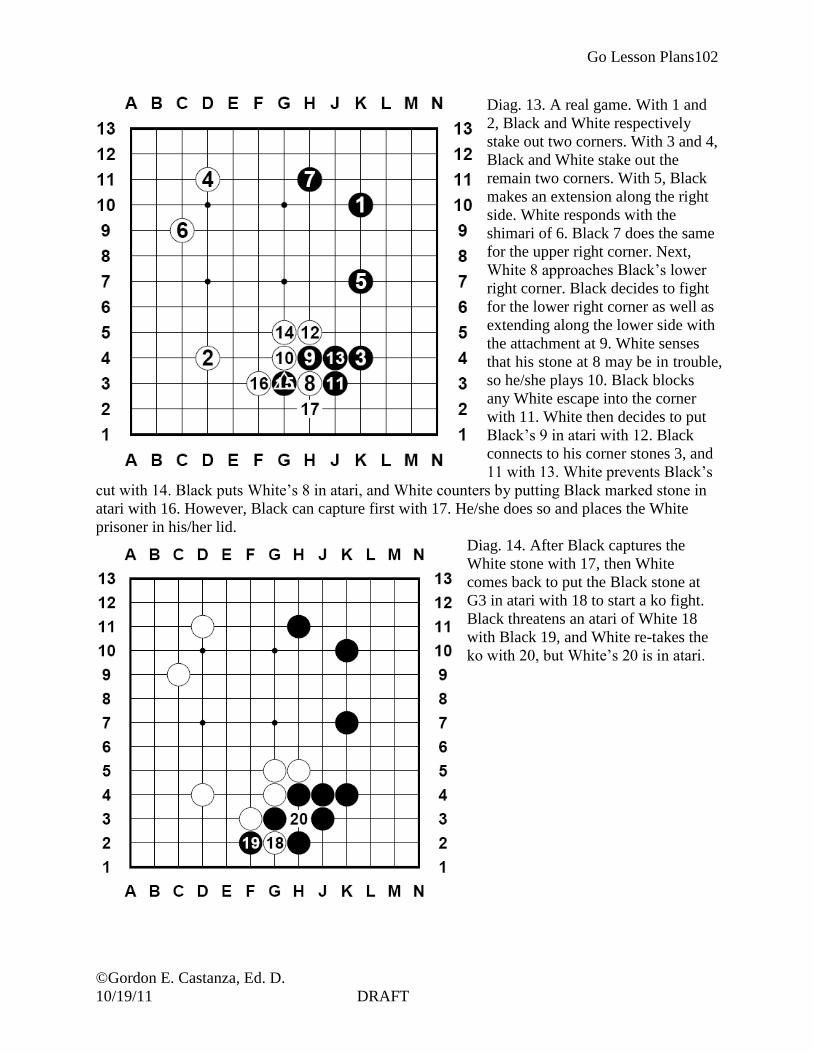
Go Lesson Plans
©Gordon E. Castanza, Ed. D.
10/19/11 DRAFT
102
Diag. 13. A real game. With 1 and
2, Black and White respectively
stake out two corners. With 3 and 4,
Black and White stake out the
remain two corners. With 5, Black
makes an extension along the right
side. White responds with the
shimari of 6. Black 7 does the same
for the upper right corner. Next,
White 8 approaches Black‘s lower
right corner. Black decides to fight
for the lower right corner as well as
extending along the lower side with
the attachment at 9. White senses
that his stone at 8 may be in trouble,
so he/she plays 10. Black blocks
any White escape into the corner
with 11. White then decides to put
Black‘s 9 in atari with 12. Black
connects to his corner stones 3, and
11 with 13. White prevents Black‘s
cut with 14. Black puts White‘s 8 in atari, and White counters by putting Black marked stone in
atari with 16. However, Black can capture first with 17. He/she does so and places the White
prisoner in his/her lid.
Diag. 14. After Black captures the
White stone with 17, then White
comes back to put the Black stone at
G3 in atari with 18 to start a ko fight.
Black threatens an atari of White 18
with Black 19, and White re-takes the
ko with 20, but White‘s 20 is in atari.

Go Lesson Plans
©Gordon E. Castanza, Ed. D.
10/19/11 DRAFT
103
Diag. 15. The White stone marked
with a circle is in atari. However,
since it just captured in ko, Black
may not return to G3 to recapture.
Consequently, Black must play
somewhere else on the board. He/she
chooses to peek at 21, but this brings
on White‘s block at 22.
Diag. 16. Black re-takes the ko with
23. Since white can not recapture
immediately, he/she plays the corner
invasion (kakari) as 24. Black‘s
reply is at 25.

Go Lesson Plans
©Gordon E. Castanza, Ed. D.
10/19/11 DRAFT
104
Diag. 17. Now White can re-take
the ko with 26. Black must play
elsewhere, so he/she plays at 27 in
an attempt to make a base for his
H11 stone as well as threatening an
attack on White‘s upper left corner.
Diag. 18. White decides that he/she
has no more ko threats, so he/she
connects the ko with 28. The ko
fight is over. Even though White
won the ko, with 29 Black puts
D11 in atari. White elects to
connect with 30. Black connects
with 31, and makes a strong
position. White now turns his/her
attention to the fight for the upper
right corner and connects with 32.
Black ―hits the head‖ of White‘s
two stone extension with 33. White
plays the hane of 34 trying to
secure more eye-space. Black
connects with 35, and White also
connects with 36. Now Black leads
with 37, threatening to move into
the corner. White blocks with 38.
Black plays the hane 39 to intrude
into the corner. White ataris 39
with 40, and Black connects with 41. White protects 40 with 42 and he/she has effectively made
eye-space in the corner, but at the expense of Black‘s making a lot of influence on the outside.
Virtually the whole right side is Black‘s territory.

Go Lesson Plans
©Gordon E. Castanza, Ed. D.
10/19/11 DRAFT
105
Diag. 19. Black decides to
stake out a position on the
left side and threatens to
make a base. White protects
his/her corner with 44, and
Black makes a diagonal
extension at 45. White
attaches at 46 attempting to
enclose these two stones.
However, Black moves out
ahead with 47. White wants
to keep pace, so he/she plays
48. Black continues to keep
ahead by playing 49. White
keeps up. Black keeps
heading with 51, and White
responds with 52. Finally
Black plays 53, and he/she
has effectively separated
White into three groups,
while it looks like Black
with be able to connect
his/her three groups. White
wants to secure his/her upper left corner and plays 54. Black connects with 55. Then White turns
his/her attention to an attempt to destroy Black‘s territory on the right side with 56. Black blocks
with 57, and White extends to 58. Black blocks with 59. Next White wants to try to expand
his/her eye-space territory, and plays 60. Black goes ahead with 61. White tries to intrude into
the corner while also trying to carve out eye-space with 62. Black blocks with 63. White keeps
Black from making a foray into N4, by playing 64. Now Black makes a one-point jump with 65.
White continues making his/her border with 66. Black goes back to make a solid wall with 67.
White extends to 68 in order to make two eyes to live on the inside. If it were White‘s turn,
he/she could play at 69 and then have his/her two eyes to live. However, it is Black‘s turn and
he/she plays at 69 to prevent White from making two eyes. Consequently, White‘s invasion that
started with 56 is a failure. Seeing no profit here, White turns to threatening Black‘s lower right
corner with 70 and puts the stone at H2 in atari. Black puts White 70 into atari with 71. White
captures Black‘s H2 with 72. Black wants to make sure he/she has eye-space in the corner, so
he/she strengthens his/her corner territory with 73. Since white suffered a loss on the right side,
he/she turns his/her attention to threaten Black virtual connection on the left side by playing 74.
Black makes a strong come-back with 75. White pulls back with 76, and Black makes a solid
connection with 77. With 78, White threatens to cut the Black stones by playing at B6. However,
it is Black‘s turn and he/she sees the wisdom of connecting with 79. White protects his/her
corner territory with 80. Similarly, Black protects his/her territory on the top with 81. White
extends with 82, and Black blocks with 83. Next White 84 threatens to cut Black‘s two groups in
half. Instead. Black plays 85 to make a solid connection between his lower corner group, and his
center group. Black 85 also prevents White from rescuing his/her right side stones that where in
danger of capture. White 86 peeks at separating Black‘s groups. Black blocks with 87. White

Go Lesson Plans
©Gordon E. Castanza, Ed. D.
10/19/11 DRAFT
106
then looks to reduce Black‘s area with 88. Black now has a chance to reduce White‘s territory in
the corner with 89. White blocks with 90 and Black connects with 91. White does not want
Black coming into the corner to upset his/her eye-space, so he/she connects with 92. Next Black
turn to the other side of the board and seeks to reduce White‘s territory in the upper corner with
93. White blocks with 94, which also connects his/her stones, and makes a ―carpenter‘s square‖
formation in the corner, thus securing the two eyes. Black connects with 95.White 96 tries to
reduce Black‘s territory as well as expand his/her own. Black extends with 97, making sure that
White can make no new inroads into his/her territory. Similarly, White extends his/her wall on
the left side with 98 in order to make his/her eye-space secure. Black plays 99 to relieve White of
some territory. White Black with 100, and Black connects with 101.
Next White tries to penetrate into Black‘s territory with 102, and Black makes the
connection with 103. Next White peeks with 104 and Black connects with 105. White now turns
to the lower right corner to take a little territory away from Black with 106. Black block with 107,
and White connects with 108.
Black puts White‘s B5 stone in atari, and White connects with 110. Next Black peeks
with 111, and White connects with 112. This is the end of the game. Neither Black nor White
can reduce or enlarge any more territory.
Diag. 20. Now it‘s time
to count up the points to
see which side won.
First the neutral points
(dame) are filled in (see
the marked areas with
the ―X‖). Each side
takes turns filling in the
neutral points (moves 1-
8). Then each side
proceeds to remove the
―dead stones‖ (the Black
stone is marked with a
triangle, the White
stones are marked with
a circle in the center.
White has a total of four
prisoners, and Black has
a total of 9.

Go Lesson Plans
©Gordon E. Castanza, Ed. D.
10/19/11 DRAFT
107
Diag. 21. Black fills in White
territory with his/her captured
White stones. White fills in Black
territory with his/her captured
Black stones. Then the stones are
moved around to ―square-off‖ the
territory. The result is that White
has 20 + 4 = 24 points. Black has
25 points. Consequently, Black
has one by one point.

Go Lesson Plans
©Gordon E. Castanza, Ed. D.
10/19/11 DRAFT
108
Lesson Plan 13
Endgame
PREPARATION
OBJECTIVE 1. EALRs: CO 1 1.1, 1.2; 2 2.1, 2.2, 2.4; 3 3.1, 3.2; 4 4.1, 4.2; R 1
1.3; 2 2.3, 2.4; 3 31., 3.2, 3.4; W 1 1.3; 2 2.1, 2.2, 2.3; 3; 4 4.1,
4.2; M 1 1.2, 1.3, 1.5; 2 2.1; 3 3.1; 5 5.2, 5.3; SSG 1 1.1; 2; 3 3.3;
SSIIS 1.1a; 1.1b; SSIGPS 2.1, 2.1a; 2.1b; SSCTS 3.1, 3.1.1a -
3.1.1d. AKCSs: ELA A 1 – 8; B 1 -3; C 1 – 3, 5; D 1, 2, 4; E 1-4.
R A 1-3; B 1-2; C 1, 4; WL A 1, 4; B 1, 4, 6; C 1, 2, 4; M A 1, 4,
5; B 1, 2, 4, 6, 7; C 1; D 1 – 5; E 1; T A 1 – 3; B 1-2; C 1-3; D 1-
3; E 7.
2. The student will be able to use (application) his/her stones to
finish off territorial boundaries at the edge of the board, so that
when given an endgame sequence he/she will complete the
boundaries 100% of the time.
STUDENTS 3. The students are Upper Elementary (gr. 4-6) students attending a
Montessori School that the American Montessori Association has
accredited.
4. In the previous lesson, the teacher exposed the students to the
concepts of the opening (fuseki, joseki, shimari, and kakari). The
teacher also demonstrated a ―real‖ game and demonstrated the
end-game activity of filling in the dame (neutral points), removing
dead stones, filling in respective territory with prisoners, and then
counting up the score. In this lesson, the teacher builds on the
previous lesson‘s end-game demonstration.
CLASSROOM
MANAGEMENT
5. 13 x 13 demo board, class Go sets: bring in 13 x 13 sets (do not
leave in the classroom), and lender sets (that the students can take
home). The teacher will ask students to use their ―game record
sheets‖ to keep a record of the games the teacher will show them
on the demo board.
6. The teacher will introduce the students to the procedure of
obtaining the Go sets from the storage box and setting up the
boards, tables, and chairs. The teacher will demonstrate to the
students the proper way to greet the instructor and fellow students,
and opponents. The teacher expects that the students will follow
all the behavioral expectations of the school as appropriate for this
lesson.
7. The student will set up his/her 13 x 13 lender set for his/her
parent(s) and show them the development of a the end-game on a
13 x 13 board. He/she will explain to his/her parents that the end-
game is the stage of finishing off the territorial boundaries. Even
though the middle game is the time that each side stakes out
his/her territories, they are not yet solidified.
Go Lesson Plans
©Gordon E. Castanza, Ed. D.
10/19/11 DRAFT
109
INTRODUCTION
SET 8. In this lesson the teacher will demonstrate how the student(s)
calculate the value of an end-game sequence: (1) what is the
resulting territory if Black has sente, (2) what is the resulting
territory if White has sente, (3) calculate the value of the sequence
(1. the same set of boundaries must be used for Black and White,
(2) there is no need to enclose areas of equal or about equal size,
although that usually makes it easier to count, (3) include all of the
area affected (see Diag. 1-4). The teacher will also introduce the
concept of the ―monkey jump,‖ the large knight‘s extension‖
along the edge of the board.
COMMUNICATION
OF PURPOSE
9. If any of the sealing-off of territorial boundaries is left out, the
opponent would have an entré into that position, and all of your
efforts to secure the territories would be wasted. If these moves
are played too early you might make a mistake, but at the end
these moves are the best that can be made with the remaining
points on the board.
BODY OF THE LESSON
PRESENTATION 10. The end of a game of Go occurs when neither side makes/loses no
more territory. At that time, each player agrees that the game is
over, and they begin to fill in the dame (neutral points) (see Diag.
5). The teacher will demonstrate the ―monkey jump,‖ which is an
end-game sequence that occurs on the first line. It amounts to a
―large knight‘s extension‖ to the edge of the board (see Diag. 9).
PROCESSING 11. The teacher will give instructions, and then follow-up with guided
practice, and then one-on-one independent practice. During the
teacher‘s demonstration of the end game in Diag. 5, he/she will
ask the students to identify the incomplete walls of territory and
ask a student to volunteer to come to the demo board and fill-in
one of the boundary points.
12. The students will pair up, and they will hand out the Go sets. Have
students solve two puzzle problems (see Diag. 6-8)
MONITORING 13. The teacher will ask students to demonstrate to their partner the
counting of the final score of a game, including filling-in the dame
(neutral points) (see Diag. 9). Then his/her partner will
demonstrate the counting of the end of a game, including dame
(neutral points) (see Diag. 10).
14. The teacher will place a demonstration game (see Diag. 11) on the
demo board and ask students to come to the demo board to show
their peers how to count the score at the end of the game.. Teacher
will place the stones of a demonstration game (Diag. 12), playing
to the end, and asking students along the way about positions such
as attachments, ―geta,‖ etc.
15. The teacher will ask students to come to the demo board to set up

Go Lesson Plans
©Gordon E. Castanza, Ed. D.
10/19/11 DRAFT
110
MONITORING his/her own end-game scenarios and to count the score at the end of
the game. If there are students with disabilities in the classroom, the
teacher will make the appropriate accommodations.
CLOSING
CLOSURE 16. Remind students of concepts exposed today, and guide the
students‘ attention to the vocabulary words that the teacher used in
today‘s class. Ask students to repeat the concepts and to define
them for their colleagues.
ASSESSMENT 17. Play a demo game against the students. On a 13 x 13 board, give
the ―students‘ team a three stone handicap. Ask the students to
line up to take turns making moves on the demo board. Remind
them not to comment on each others‘ moves except to say, ―good
move!‖
FOLLOW-UP 18. Vocabulary to learn: endgame (yose), life-and-death, sente,
monkey jump, and gote. At home, the student will observe two
games on the KGS or IGS servers between strong players. The
student will report to the following class the observations they
made of these players using sente, and gote.
REFLECTION
(after the lesson)
19. What did you do that helped students learn and meet the
objective?
20. What would you do differently if you taught this lesson again to
make it more successful for students.
21. SAKT 1-8; SAKS 1 – 14; AKSCRS Cultural Standards for
Students: B – F; Cultural Standards for Educators: B – E; Cultural
Standards for Curriculum: A, B, D, E; Cultural Standards for
Schools: B, C.
22. PA 1. A – E; 2 A – F; 3 A – D; 4 A – E; 5 A – I; 6 A E; 7 A – F; 8
A – E; 9 A – E; 10 A - G
Diag. 1. There are eight points (marked with an ―x‖) in
the imaginary boundaries for Black. There are six points
(marked with a ―y‖) in the imaginary boundaries for
White. However, if it is white‘s turn, he she can play at
―a,‖ forcing Black to respond.

Go Lesson Plans
©Gordon E. Castanza, Ed. D.
10/19/11 DRAFT
111
Diag. 2. When White plays 1, Black must respond with
2. White connects with 3 to prevent Black from
capturing 1. The Black must respond with 4 to prevent
White from putting 2 in atari and destroying even more
Black territory. Now Black‘s territory is reduced by
two points (to six), and White‘s territory remains the
same (six). White having sente here has helped him/her
reduce Black‘s territory by two points. Similarly, If
Black had sente, then he/she would be able to reduce
White‘s territory by two points.
Diag. 3. When white plays 1, he/she has sente because Black
is forced to play 2. Then White plays 3, Black responds with
4, and White connects with 5. Black is forced to play 6 in
order to prevent White from getting more territory in the
corner if he/she were to play at M11.
Diag. 4. Because the result of Diag. 3 is ―gote‖
(meaning 6 makes no significant threat to White), Black
may prefer to play 2 elsewhere on the board. The
following sequence develops. However, Black has lost
about eight points in the corner, and White has secured
the corner for him/herself and also has sente.

Go Lesson Plans
©Gordon E. Castanza, Ed. D.
10/19/11 DRAFT
112
Diag. 5. This position is
getting toward the end of a
13 x 13 game. If it is White‘s
turn, where would he/she
play to complete his/her
wall(s) of territory? There
are two spots where the
walls are incomplete (―A,‖
and ―B‖). If White blocks at
A (1) then Black connects
with 2. Now that boundary is
taken care of. Next White
plays at 3, Black blocks at 4,
and White connects at B (5).
Now this border is complete.
Only the dame (marked with
the ―X‖) need to be filled in.
Each side takes a turn filling
them in.
Diag. 6. Determining the
score. The game is over.
Both sides have taken three
prisoners and both have three
dead stones on the board.
Determine the score. (You
should arrange the territories
so that the stones are
disturbed as little as possible.
Both Black and White have
28 points, so the result is a
draw).

Go Lesson Plans
©Gordon E. Castanza, Ed. D.
10/19/11 DRAFT
113
Diag. 7. Black to play. There are
two profitable points left. Where
are they?
Diag. 8. Black 1 to 3, and White
4 are the last points of profit left.
The marked points are dame
(neutral) and have no value.

Go Lesson Plans
©Gordon E. Castanza, Ed. D.
10/19/11 DRAFT
114
Diag. 9. The neutral points 1-5
are filled in alternating between
both sides. Then the territories
are ―squared up,‖ and the
empty points are counted.
Diag 10. This is the final
position of the 8/1/04 Ing
Amateur Round 1 game
between Lui, I-han (B) and Li,
Jie (W). Jie Li won the game
after White resigned on the
168th
move.

Go Lesson Plans
©Gordon E. Castanza, Ed. D.
10/19/11 DRAFT
115
Diag. 11. This is the final position of the
8/2/04 Ing Amateur round 2 game
between Yuan Zhou (W), and Jie Li (B).
Jie Li won the game after White resigned
on Black‘s 165th
move.
Diag. 12. North American
Amateur Ing
Cup, Round 3, August 3,
2004, Rochester, NY
W: Jie Li 7d B: Joey Hung
7d
Commentary by Jie Li 7d.
1. W6 is usually at
C10; but I
played here to destroy B's
fuseki plan. 2. W12 is
important
because it makes W
stronger and reduces B's
moyo in the upper left.
Without this,
B can play at A (D9), W
must block at

Go Lesson Plans
©Gordon E. Castanza, Ed. D.
10/19/11 DRAFT
116
C9, then B can play at D11, making his moyo significantly bigger. 3. W20 The game feels favorable for W
because White has more territory and B's moyo on the left is incomplete and has some weak points. 4. The exchange from B21 to W26 is even. Black destroyed White's moyo in sente, but this group is weak
and could cost him later. 5. White 32 could also be at E17. I think it would be better for white. 6. W42 White could connect at F13 but I want to probe his response. 7. I think Black 43 is an overplay, because
he should just respond at D16. 8. W50 is an escaping tesuji. 9. B59 is a solid move but he's behind
already. 10. B61 is painful, if at F18 then J18 will be sente for White and later White can connect at L18. 11. W74 could be at F8, to make a better connection and avoid a troublesome fight later. 12. I didn't
expect Black to cut at 75 and 77 because the exchange of W78 and B79 is very painful for Black. 13. Black plays B85 to make the game more complicated because White is ahead, so Black needs to find an
attack. 14. W88 is a bad move; it should be at J9 first. 15. B89 is a vital shape point. After this, H10 would be sente because of the cut at H8. 16. W90 and 92 are probing moves. If Black responds with 93
at C5 for more territory, then white will gain sente at G7. And later White can play at J10 because of the
cutting point. 17. W94 is an overplay. It's big (30+ points) and hard to resist, but it really should be at H10. 18. B97 Although W took a stone in sente and gained a lot of territory, there's a cutting point at H8
and the whole White group is now weak, with no eyes. 19. W100 White is trying to live on the bottom. 20. W102 White is now alive, but Black gained a lot of potential in the center in sente. The game is now
very close. 21. B103 could be called the losing move, because it misses the key point at N14 for sealing
off the territory in the middle. 22. W104 This is the key point. 23. W110 is a good move. After this W has the option of either connecting back to 104 and 106 or cutting at Q14 and capturing the four stones
on the side. W110 is asking Black to capture 104 and 106 (which are small). 24. B125 is trying to cut White's connection, and if he can seal in the lower bottom group, then there is bad aji for White on the
bottom. A ko can result. 25. W126 is a connecting tesuji. 26. B131 Black is not giving up. 27. W138 is another tesuji. 28. After W140 White is connected. 29. B155 is an overplay, he's behind and trying to get
as much as he can. Black does not realize that the marked stones on the lower side are in trouble. Black
expects to only lose Q2 but White will take much more then that. The turn at R7 is very big, but not as big as the marked group, and he'll end with gote, so White will be able to block. 29. W156 Black can live
with the sequence beginning with b (O2), but... 30. W158 is a key point. Black was expecting White to just take a Q2. 31. B163 Black does not have enough space to make two eyes, and this is the last
attempt to save the game. 32. W172 White plays simply to reduce the eye space and Black just doesn't
have enough room. 33. W176 Black dies; White wins by resignation. NOTES: 96 x 9; 118 x 21; 124 x 103; 143 x 134; 152 x 149; 163 x 17

Go Lesson Plans
©Gordon E. Castanza, Ed. D.
10/19/11 DRAFT
117
Lesson Plan 14
Planning
PREPARATION
OBJECTIVE 1. EALRs: CO 1 1.1, 1.2; 2 2.1, 2.2, 2.4; 3 3.1, 3.2; 4 4.1, 4.2; R 1
1.3; 2 2.3, 2.4; 3 31., 3.2, 3.4; W 1 1.3; 2 2.1, 2.2, 2.3; 3; 4 4.1,
4.2; M 1 1.2, 1.3, 1.5; 2 2.1; 3 3.1; 5 5.2, 5.3; SSG 1 1.1; 2; 3 3.3;
SSIIS 1.1a; 1.1b; SSIGPS 2.1, 2.1a; 2.1b; SSCTS 3.1, 3.1.1a -
3.1.1d. AKCSs: ELA A 1 – 8; B 1 -3; C 1 – 3, 5; D 1, 2, 4; E 1-4.
R A 1-3; B 1-2; C 1, 4; WL A 1, 4; B 1, 4, 6; C 1, 2, 4; M A 1, 4,
5; B 1, 2, 4, 6, 7; C 1; D 1 – 5; E 1; T A 1 – 3; B 1-2; C 1-3; D 1-
3; E 7.
2. The student will be able to assess (evaluation) his/her plan using
the criteria for a good plan, and a decision tree for determining
his/her next move so that when given three positions on the board,
he/she will correctly make the most efficient move 80% of the
time.
STUDENTS 3. The students are Upper Elementary (gr. 4-6) students attending a
Montessori School that the American Montessori Association has
accredited.
4. In Lesson 12, the teacher presented the fundamentals of the
opening. In this lesson, the teacher gives the students two
processes to determine the elements of a good plan, and how to
decide on his/her next move given the moves of his/her opponent.
CLASSROOM
MANAGEMENT
5. 19 x 19 demo board, class Go sets: bring in 19 x 19 sets (do not
leave in the classroom), and lender sets (that the students can take
home). The teacher will ask students to use their ―game record
sheets‖ to keep a record of the games the teacher will show them
on the demo board.
6. The teacher will ask the students to use the procedure of obtaining
the Go sets from the storage box and setting up the boards, tables,
and chairs. Students will demonstrate to the teacher the proper
way to greet the instructor, fellow students, and opponents. The
teacher expects that the students will follow all the behavioral
expectations of the school as appropriate for this lesson.
7. The student will set up his/her 19 x 19 lender set for his/her
parent(s) and show them the elements of a good game plan.
He/she will explain to his/her parents that the plan of a game
needs to be flexible depending on the moves that his/her opponent
makes, and that there is a decision tree for determining what
his/her next move should be.
INTRODUCTION
SET 8. In this lesson the teacher will explain the aims of a good game
plan: (1) Sketch out/expand/consolidate territories; (2) build

Go Lesson Plans
©Gordon E. Castanza, Ed. D.
10/19/11 DRAFT
118
SET influence; (3) create good shape; (4) establish or maintain solid
connections; (5) defend his/her weak stones by (a) running to the
center, and/or making eye-space; (5) attack his/her opponent‘s weak
stones; (6) frustrate his/her opponent‘s similar plans. The teacher will
also introduce the decision tree that the student should use to decide
what his/her next move should be: (1) Evaluate the opponent‘s last
move: (a) what threat does it make? (b) how effectively is the threat
made? (c) what does he/she think the opponent‘s overall plan is? (d)
does the opponent‘s move gain or retain sente?; (2) Decide what
he/she wants to do; (3) Compare his/her plan with what he/she thinks
the opponent‘s plan is: (a) if his/her opponent‘s plan is greater than
his/her own, then he/she must revise his/her plan to counteract his/her
opponent‘s; (b) if his/her plan is greater than that of his/her
opponent‘s, then proceed with your plan; (4) make the move that best
fulfills his/her plan: (a) do not play the first move that comes to mind
that seems to accomplish his/her goal; (b) search for a move that does
double duty.
COMMUNICATION
OF PURPOSE
9. A game plan helps give one‘s moves direction and coordination.
Without one, a player will surely lose. In addition to having a
plan, you also need to be able to maintain flexibility in light of
what your opponent does. His/her move will likely have an effect
on how important his/her move is and also what is practical.
Flexibility is paramount because if a player is determined to carry
out his/her plan regardless of the changing dynamics of the game,
he/she is doomed to lose. A player should also be aware that in the
beginning of the game, there is more that he/she can gain when
he/she focus on increasing the number of liberties for his/her
stones, than on capturing his/her opponent‘s stones. However, just
because a player has a plan does not mean that it is a sure-fire way
to win. Each move changes the dynamics of the game. A good
plan requires that the player exercise good judgment and timing,
two attributes that can only come from playing a lot of games,
learning from experience, and studying the game.
BODY OF THE LESSON
PRESENTATION 10. The teacher plays the first 12 moves of a game on a 19 x 19 board,
and points out the elements of planning and decision making (see
Diag. 1). Teacher continues to play the next 11 moves pointing out
the back and forth change in plan as each side makes a move that
affects the over-all board position.
PROCESSING 11. The teacher will give instructions, and then follow-up with guided
practice, and then one-on-one independent practice. During the
teacher‘s demonstration of another fuseki in Diag. 3, he/she will
ask the students to identify the times when one side or the other
needs to adjust his/her game plan, and ask a student to volunteer to

Go Lesson Plans
©Gordon E. Castanza, Ed. D.
10/19/11 DRAFT
119
PROCESSING come to the demo board and show how he/she will make a change in
his/her plan
12. The students will pair up, and they will hand out the Go sets. Have
students solve two puzzle problems (see Diags. 4-5).
MONITORING 13. The teacher will ask students to demonstrate to his/her partner the
different changes to his/her game plan that would take place in the
first 10 moves in Diag. 6. Then his/her partner will demonstrate to
his/her partner the different changes to his/her game plan that
would take place in the second 10 moves in Diag. 7.
14. The teacher will place a demonstration game (see Diag. 8) on the
demo board and ask students to come to the demo board to show
their peers when it would be necessary to change the game plan.
Teacher will place the stones of a demonstration game (Diag. 8),
playing to the end, and asking students along the way what
decisions he/she makes to alter his/her game plan.
15. The teacher will ask students to come to the demo board to set up
his/her own game scenarios and explain the changes in game plan
he/she made during the game. If there are students with disabilities
in the classroom, the teacher will make the appropriate
accommodations as the situation warrants.
CLOSING
CLOSURE 16. Remind students of concepts exposed today, and guide the
students‘ attention to the vocabulary words that the teacher used in
today‘s class. Ask students to repeat the concepts and to define
them for their colleagues.
ASSESSMENT 17. Play a demo game against the students. On a 19 x 19 board, give
the ―students‘ team a nine stone handicap. Ask the students to line
up to take turns making moves on the demo board. Remind them
not to comment on each others‘ moves except to say, ―good
move!‖
FOLLOW-UP 18. Vocabulary to learn: planning, shimari, kakari. How will students
apply and extend the learning, and deal with real world problems?
REFLECTION
(after the lesson)
19. What did you do that helped students learn and meet the
objective?
20. What would you do differently if you taught this lesson again to
make it more successful for students.
21. SAKT 1-8; SAKS 1 – 14; AKSCRS Cultural Standards for
Students: B – F; Cultural Standards for Educators: B – E; Cultural
Standards for Curriculum: A, B, D, E; Cultural Standards for
Schools: B, C.
22. PA 1. A – E; 2 A – F; 3 A – D; 4 A – E; 5 A – I; 6 A E; 7 A – F; 8
A – E; 9 A – E; 10 A - G

Go Lesson Plans
©Gordon E. Castanza, Ed. D.
10/19/11 DRAFT
120
Diag. 1. It appears as though each side is
planning to sketch out potential territories
according to the ―Corners, Sides, Center‖
principle (B1-B7). Note that B1 and W4,
and W2 and B3 are each on the fourth
line in one direction, and in an empty
corner. Each player has also played the
―san ren sei,‖ a fuseki opening in which
each player plays on the three handicap
points on each side. W8-B9, W10, B11,
W12 is a standard joseki around Black‘s
lower left corner.
Diag. 2. White answers B13 (a kakari),
with W14. Now Black‘s plan is to
secure as much territory on the left
side as possible, and he/she tries to
discourage White from invading and
making his/her own territory and eye-
space there. So W16 intends to invade
the upper side. B17 blacks, so W18
connects, and B19 extends into the
center. White‘s new plan is to make
eye-shape and live locally with at least
a piece of the available corner territory
with W20, which is a kakari for the
corner, but Black‘s plan is to keep as
much corner territory as he/she can
with B21, W22, B23, W24, and B25.
White‘s plan is now to secure as much
territory and eye-space that he/she can
on the upper left, so he/she makes a
one-point extension to 26, and both
sides have eye-space and ―shape‖ in
this corner. Consequently, they are stable, so it isn‘t necessary for either side to make any further
moves here at this time. It would be inefficient. White now has sente, but the lower right corner
is unstable. Black‘s plan is now to make a kakari in the lower right corner with 27. W must
devise a new plan to solve this problem. White‘s new plan is to enclose the lower right corner
with W28 to provide territory and eye-space there, while blocking Black‘s expansion in that
direction. Since W28 does not threaten B27, Black regains sente with 29. Black‘s new plan is to

Go Lesson Plans
©Gordon E. Castanza, Ed. D.
10/19/11 DRAFT
121
enclose territory along the lower side while restricting White‘s ability to do so by playing the
two-point extension to B31, and Black has made a base on the lower side. White‘s new plan is
W32 because if Black played there it would give Black too much corner territory and too good a
position to allow.. White wants to secure his/her upper right corner with 32, and Black decides to
run for the center with B33.
Diag. 3.
Diag. 4. Black to play and kill white. (1
move) How does Black play to kill the
white stones? (B @ D6 puts W in atari and
gives White a false eye.)

Go Lesson Plans
©Gordon E. Castanza, Ed. D.
10/19/11 DRAFT
122
Diag. 5. Black to play and kill White (1
move). How does Black play to kill the white
stones? (Black plays at D2).
Diag. 6. Each side‘s initial plan: Begin to
sketch out potential territories, according to
the principle of ―Corners first, Sides second,
and then the Center.‖ B1, W2, B3, and W4
are on the third line and they are in a corner.
After W4 Black still has sente. Black decides
to invade the lower right corner with B5.
Black’s new plan: Get a foothold in the
lower right corner, and try to make it
hard for White to make his/her own
territory and eye-space there.
In this fuseki it is considered to be of equal
value for Black to make a shimari in one of
the corners on the left or to foil White from
making a shimari in the upper right corner.
B5 seems to make for a more interesting
game.
If White ignores B5, he/she is going to lose
the corner. Consequently, White plays W6, and Black retains sente. White’s new plan: “Make
shape” to live locally, with at least a piece of the lower right corner territory. W6 on the key
3-3 corner point is not designed to engage Black in a fight. Rather it is a well-known tesuji by
which White is ―making shape.‖
Each side‘s game plan seems to be holding up. What will change the dynamics is when
one side‘s stones become (at least temporarily) stable. B7 and W8 are good moves, even though
both are on the second line. Black‘s next move accomplished two tasks: (1) B9 is on White‘s
―shape‖ point (to make it harder for White to make eyes), and (2) it moves out toward the center.
W10 blocks Black‘s expansion in that direction.

Go Lesson Plans
©Gordon E. Castanza, Ed. D.
10/19/11 DRAFT
123
Diag. 7. B11 is a two point jump extension
which creates a base for two eyes. Ordinarily
B11 would be played one point further up, but
that would be going a little too far, and would
invite White to invade. The closer space of B11
also has the advantage that after the expected
answer of W12, Black doesn‘t have to defend
here, so he/she can retain sente to play
elsewhere. With B11 both sides have eye-space
and ―shape‖ in this corner (i.e. are stable), so
any more moves there would be inefficient at
this time. White has sente, but he/she must do
something about B11 that has weakened his/her
upper right corner stone, so he/she must devise
a new plan to solve this problem. White’s new
plan: Enclose the upper right corner with
W12 to provide both territory and eye-space
potential, and also blocking Black’s expansion in that direction. This also looks toward
expanding along the lower left side later. Since Black (B11) did not push too far up the right side
W12 does not pose a strong threat to Black‘s strong position below, so Black regains sente.
Black’s new plan: Begin to enclose territory on the upper side while curbing White’s ability
to do the same. Playing B13 at 14 to enclose (shimari) the upper left corner would produce a bit
more territory, but it would make it easy for White to play there instead with a two-point
extension along the upper side. So B13 was preferred. But this doesn‘t threaten White‘s upper
right shimari very seriously, so White takes sente. White’s new plan: Play W14 because a
Black stone at 14 gives Black too much corner territory and too good a left side position to
allow. But in so doing W14 is a weak stone which Black can safely attack, so Black retakes sente.
Black’s new plan is dual-purpose: (1) Take advantage of the isolated W14 by using B15 to
block it from obtaining eye-space in the corner, and (2) secure that corner territory for
him/herself. (Note that B15 attaches to W14, but not with the intention of trying to capture it).
Because W14 is weak White must respond to the Black attack, so Black retains sente. White’s
new plan: Run out into the open center via W16 to assure that W14 isn’t captured or
confined to a small space on the edge. Black’s new plan is dual-purpose: (1) Use B17 to
squeeze W14, 16 from below, and (2) sketch out some territory on the lower left side. B17
occupies one of the White stone‘s key ―shape‖ points while threatening to connect to B15
underneath by playing next at 18, so Black retains sente. White’s new plan: Although W18 is
forced (to prevent Black’s connection underneath), it threatens to steal some of the Black
corner territory. Black’s new plan: Use B19 to block off the lower right corner to preserve
his/her territory there. But White need not answer B19 immediately. So White gets sente.
White’s new plan has three purposes: (1) W20 expands his/her small lower right corner
position, (2) it creates White territory along the bottom side, and (3) it prevents Black from
enclosing the lower left corner by a play at this same point. W20 also threatens next to move
into and ―steal‖ much of the lower left corner at ―a,‖ or ―b,‖ so it‘s another ideal multui-purpose
move which Black must answer. Thus White to retains sente.

Go Lesson Plans
©Gordon E. Castanza, Ed. D.
10/19/11 DRAFT
124
Diag. 8. The key thing to remember is that
it is not advisable to impose your plan on an
unwilling opponent of equal strength.
Before making a decision what to play next,
you must assess the threats that your
opponent makes. If you ignore this step you
will almost always lose against a skilled
opponent.
At each turn, your desire to attack must
be balanced against the need to defend.

Go Lesson Plans
©Gordon E. Castanza, Ed. D.
10/19/11 DRAFT
125
Lesson Plan 15
Fighting
PREPARATION
OBJECTIVE 1. EALRs: CO 1 1.1, 1.2; 2 2.1, 2.2, 2.4; 3 3.1, 3.2; 4 4.1, 4.2; R 1
1.3; 2 2.3, 2.4; 3 31., 3.2, 3.4; W 1 1.3; 2 2.1, 2.2, 2.3; 3; 4 4.1,
4.2; M 1 1.2, 1.3, 1.5; 2 2.1; 3 3.1; 5 5.2, 5.3; SSG 1 1.1; 2; 3 3.3;
SSIIS 1.1a; 1.1b; SSIGPS 2.1, 2.1a; 2.1b; SSCTS 3.1, 3.1.1a -
3.1.1d. AKCSs: ELA A 1 – 8; B 1 -3; C 1 – 3, 5; D 1, 2, 4; E 1-4.
R A 1-3; B 1-2; C 1, 4; WL A 1, 4; B 1, 4, 6; C 1, 2, 4; M A 1, 4,
5; B 1, 2, 4, 6, 7; C 1; D 1 – 5; E 1; T A 1 – 3; B 1-2; C 1-3; D 1-
3; E 7.
2. The student will be able to assess (evaluation) whether or not
he/she should engage his/her opponent in a fight so that when
given a local position, he/she will determine the appropriateness
for fighting 100% of the time.
STUDENTS 3. The students are Upper Elementary (gr. 4-6) students attending a
Montessori School that the American Montessori Association has
accredited.
4. In the previous lesson, the teacher introduced the fundamentals of
good planning as they relate to decision making. In this lesson, the
teacher reveals more decision-making techniques that relate to the
principles of fighting.
CLASSROOM
MANAGEMENT
5. 19 x 19 demo board, class Go sets: bring in 19 x 19 sets (do not
leave in the classroom), and lender sets (that the students can take
home). The teacher will ask students to use their ―game record
sheets‖ to keep a record of the games the teacher will show them
on the demo board.
6. The teacher will introduce the students to the procedure of
obtaining the Go sets from the storage box and setting up the
boards, tables, and chairs. The teacher will demonstrate to the
students the proper way to greet the instructor and fellow students,
and opponents. The teacher expects that the students will follow
all the behavioral expectations of the school as appropriate for this
lesson.
7. The student will set up his/her 19 x 19 lender set for his/her
parent(s) and show them the elements of a decision to engage
his/her opponent in a fight. He/she will explain to his/her parents
when a player must engage in a fight.
INTRODUCTION
SET 8. The teacher will explain the decision tree to use when one is faced
with the prospect of a fight: (1) one gains more in the local
situation than he/she could by playing some where else on the
board; (2) he/she cannot achieve his/her goals any other way, (3)
he/she is already losing, but he/she may win if his/her opponent

Go Lesson Plans
©Gordon E. Castanza, Ed. D.
10/19/11 DRAFT
126
SET makes a mistake in engaging in the fight, (4) his/her opponent gives
him/her no choice.
COMMUNICATION
OF PURPOSE
9. Learning when and how to engage in fights is necessary because
the final result of most games is the result of fights, but the trick is
to learn to fight only when and as much as necessary.
BODY OF THE LESSON
PRESENTATION 10. The teacher discusses with the students that in conducting a fight
each one should: (1) identify his/her own and his/her opponent‘s
groups that lack two secure eyes, or he/she is not certain he/she
can make then, and that he/she cannot run away to safety; (2) for
each separate unit, he/she must determine (a) the number of the
unit‘s unshared liberties, (b) the number of liberties that both sides
share, and (c) which side will win the fight if each side has sente;
(3) begin/continue the fight only if he/she can win, unless it is
advantageous for him/her to use them for advantage elsewhere on
the board.
PROCESSING 11. The teacher sets up positions on the demo board (see Diags. 1-4)
and asks the student to follow the fight decision process above to
determine: (1) which units are at risk of capture, (2) what are the
units‘ liberty counts, (3) what should each side do if he/she has
sente?
12. The students will pair up, and they will hand out the Go sets. Have
students solve three puzzle problems (see Diags. 5-7).
MONITORING 13. The teacher will ask students to demonstrate to his/her partner the
use of the fighting decision tree as it applies to Diag. 8.
14. Ask the students to predict what would happen if Black ―hits the
head‖ of the two White stones (see Diags. 9-10)?
15. The teacher will ask students to come to the demo board to solve a
problem (see Diag. 11) using the fighting decision tree. If there are
students with disabilities in the classroom, the teacher will make
the appropriate accommodations as the situation warrants.
CLOSING
CLOSURE 16. Remind students of concepts exposed today, and guide the
students‘ attention to the vocabulary words that the teacher used in
today‘s class. Ask students to repeat the concepts and to define
them for their colleagues.
ASSESSMENT 17. Play a demo game against the students. On a 19 x 19 board, give
the ―students‘ team a nine stone handicap. Ask the students to line
up to take turns making moves on the demo board. Remind them
not to comment on each others‘ moves except to say, ―good
move!‖
FOLLOW-UP 18. Vocabulary to learn: Liberties (Mei); fighting decision tree, and
virtual liberty. How will students apply and extend the learning,
and deal with real world problems?

Go Lesson Plans
©Gordon E. Castanza, Ed. D.
10/19/11 DRAFT
127
REFLECTION
(after the lesson)
19. What did you do that helped students learn and meet the
objective?
20. What would you do differently if you taught this lesson again to
make it more successful for students.
21. SAKT 1-8; SAKS 1 – 14; AKSCRS Cultural Standards for
Students: B – F; Cultural Standards for Educators: B – E; Cultural
Standards for Curriculum: A, B, D, E; Cultural Standards for
Schools: B, C.
22. PA 1. A – E; 2 A – F; 3 A – D; 4 A – E; 5 A – I; 6 A E; 7 A – F; 8
A – E; 9 A – E; 10 A - G
Diag. 1. (1) Identify which units are at risk of
being captured, (2) What are the respective liberty
counts? (3) How should Black continue if he/she
had sente? how should White proceed if he/she
had sente?
The marked White and Black two-stone
units are the ones that are at risk of capture. Each
unit has two liberties on the outside. There are no
shared liberties. Which ever side has the first
move can capture his/her opponent‘s stones.
He/she will connect his/her own stones, and make
a two-point eye.
Diag 2. This is a similar situation. One should ask
the same questions as above. The marked White
and Black units are the ones that are at risk.
Liberty count: White has three outside liberties
(―a,‖ ―b,‖ and ―c‖); Black has two outside liberties
(―d,‖ and ―e‖). There is one shared liberty at ―x.‖
Since White is ahead on the liberty count (4 to 3),
that gives White sente, and he/she can make one
move elsewhere on the board, before coming back
to this position.

Go Lesson Plans
©Gordon E. Castanza, Ed. D.
10/19/11 DRAFT
128
Diag. 3. This position is slightly different from the one
above. (1) Which units are at risk of capture? The White
and Black marked units. (2) What are the respective
liberty counts? Black has three outside liberties, and
White has four. They share two liberties. (3) If White
has sente, what should he/she do? Although White has
more liberties (6-5), he/she does not have the luxury of
playing elsewhere on the board. He/she must place a
stone along B3-B5. As things unfold, ―a‖ would remain
as a liberty to both sides. However, White still has the
extra liberty at ―x.‖ If Black has the first move, the best
he/she can get is seki.
Diag. 4. (1) Which units are at risk in this situation?
The marked White and Black units are at risk. (2)
What are the respective liberty counts? White has
six outside liberties, while Black has only three.
There are three shared liberties (―a,‖ ―b,‖ and ―c‖).
Black has an eye at ―x.‖ (3) What should each side
do if he/she has sente? In this situation Black will
win. Even though each side proceeds correctly to fill
in his/her opponent‘s outside liberties, White‘s three
liberty advantage is not enough to save his/her
stones.
Diag. 5. Black to play and kill White (1 move). What
move does Black make to kill White? If Black makes a
mistake and plays F4, then White makes two eyes easily.
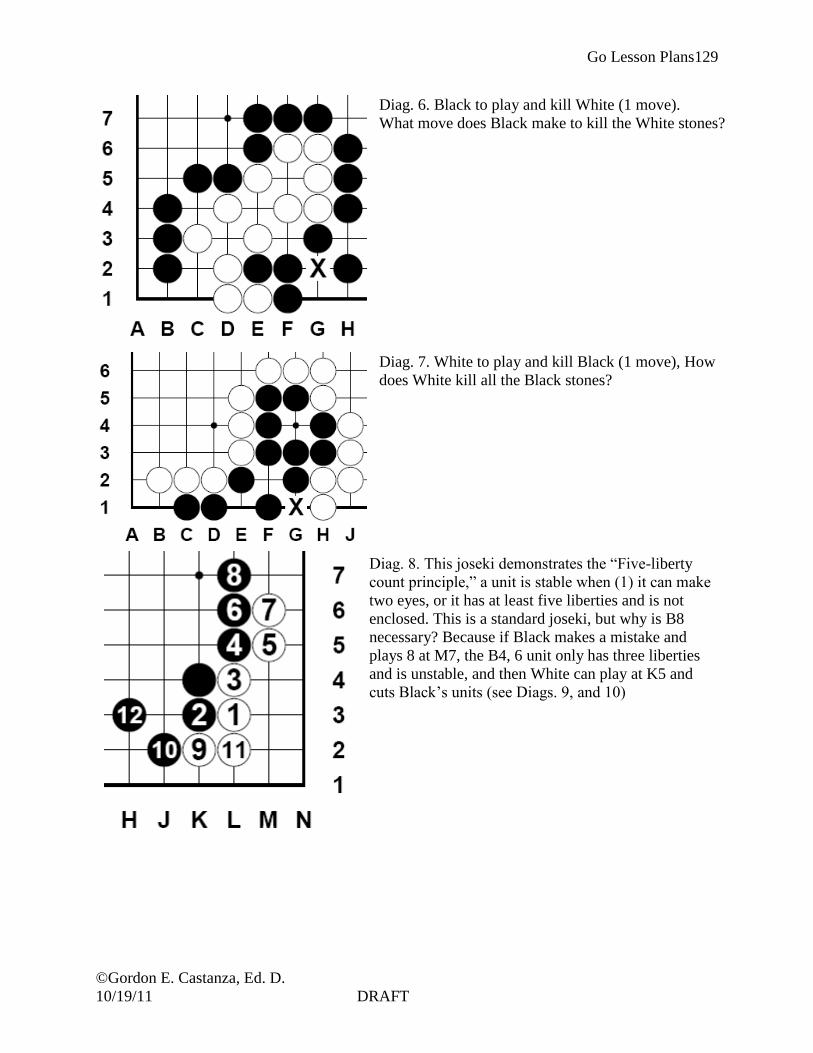
Go Lesson Plans
©Gordon E. Castanza, Ed. D.
10/19/11 DRAFT
129
Diag. 6. Black to play and kill White (1 move).
What move does Black make to kill the White stones?
Diag. 7. White to play and kill Black (1 move), How
does White kill all the Black stones?
Diag. 8. This joseki demonstrates the ―Five-liberty
count principle,‖ a unit is stable when (1) it can make
two eyes, or it has at least five liberties and is not
enclosed. This is a standard joseki, but why is B8
necessary? Because if Black makes a mistake and
plays 8 at M7, the B4, 6 unit only has three liberties
and is unstable, and then White can play at K5 and
cuts Black‘s units (see Diags. 9, and 10)

Go Lesson Plans
©Gordon E. Castanza, Ed. D.
10/19/11 DRAFT
130
Diag. 9. Black plays 8 at the marked stone. Then W1, B2, W3
puts Black in atari. B4 connects. W5 connects and White‘s
stones escape as well as cut Black‘s units in two.
Diag. 10. Here is a variation on the above Black mistake of
playing the marked stone. White opts to both attach the marked
stone as well as put Black in atari. Black captures with 4, but
White puts the marked stone in atari. The result is that while
Black‘s stones have good eye-space and are solidly connected,
White has succeeded in breaking out of the corner and is well
on his/her way to securing the right side.
Diag. 11. This is a fight to capture between the marked
units. White has only one outside liberty at ―a.‖ Black
has only one outside liberty at ―b.‖ The shared liberty is
at ―x.‖ Does winning the capturing race depend on who
moves first? No it doesn‘t because Black can atari
White, but White cannot atari Black. White would have
to make a move at N12 in preparation for playing at ―b.‖
Consequently, since white has to make an extra move,
Black‘s liberty count is virtually three instead of two.
Never the less, Black would win in any case, even if
White moved first.

Go Lesson Plans
©Gordon E. Castanza, Ed. D.
10/19/11 DRAFT
131
Lesson Plan 16
Connecting to the Go World
PREPARATION
OBJECTIVE 1. EALRs: CO 1 1.1, 1.2; 2 2.1, 2.2, 2.4; 3 3.1, 3.2; 4 4.1, 4.2; R 1
1.3; 2 2.3, 2.4; 3 31., 3.2, 3.4; W 1 1.3; 2 2.1, 2.2, 2.3; 3; 4 4.1,
4.2; M 1 1.2, 1.3, 1.5; 2 2.1; 3 3.1; 5 5.2, 5.3; SSG 1 1.1; 2; 3 3.3;
SSIIS 1.1a; 1.1b; SSIGPS 2.1, 2.1a; 2.1b; SSCTS 3.1, 3.1.1a -
3.1.1d. AKCSs: ELA A 1 – 8; B 1 -3; C 1 – 3, 5; D 1, 2, 4; E 1-4.
R A 1-3; B 1-2; C 1, 4; WL A 1, 4; B 1, 4, 6; C 1, 2, 4; M A 1, 4,
5; B 1, 2, 4, 6, 7; C 1; D 1 – 5; E 1; T A 1 – 3; B 1-2; C 1-3; D 1-
3; E 7.
2. The student will be able to practice (application) his/her go skills
so that when he/she is ready to play he/she can use the Internet to
find games/‖cyber‖ opponents/computer programs 100% of the
time.
STUDENTS 3. The students are Upper Elementary (gr. 4-6) students attending a
Montessori School that the American Montessori Association has
accredited.
4. By this time, the students have gone through the previous 15
lessons, and they are ready to expand their go playing to others in
the community, region, state, country, and world.
CLASSROOM
MANAGEMENT
5. AGA yearbooks, AGA E-Journals, 9 x 9 demo board, class Go
sets. If the school/organization has computers with Internet access,
the teacher should make arrangements with the school officials to
get permission to use the computers for showing the students the
various Go web servers. It would be a good idea if the teacher
could invite another Go player, preferably a student who is
familiar with playing games over the Internet, to assist him/her
during this lesson.
6. The teacher will ask the students to use the procedure of obtaining
the Go sets from the storage box and setting up the boards, tables,
and chairs. Students will demonstrate to the teacher the proper
way to greet the instructor, fellow students, and opponents. The
teacher expects that the students will follow all the behavioral
expectations of the school as appropriate for this lesson.
7. The student will demonstrate to his/her parents how to set up a
game on the Internet using the International Go Server (IGS), the
Kiseido Go Server (KGS), or on Yahoo.com‘s game page. He/she
will explain to his/her parents the value of having a virus detection
software (e.g Norton‘s Internet Security), Black Ice Firewall
software, and STOPzilla, to intercept and isolate his/her home
computer from computer virus attacks that, if left un-detected, and
un-deleted, could seriously damage his/her computer.

Go Lesson Plans
©Gordon E. Castanza, Ed. D.
10/19/11 DRAFT
132
INTRODUCTION
SET 8. Go has profited immensely due to the computer, and the Internet.
Through CD-ROM based teaching programs, Internet downloads
of teaching software, and Internet-based Go servers, not only has
SET the popularity of the game increased, but also the enjoyment of the
game with others has improved. The Internet has brought the
techniques and strategies of Go to hundreds of thousand of players
who would heretofore have had to spend countless hours trying to
track down even the most elementary of Go texts.
COMMUNICATION
OF PURPOSE
9. When the student uses the resources of the Internet, and Go
software, he she has access to resources such as games at all levels
of skill to match that of the student, computer teaching games,
high –level dan players who give lessons over the Internet, go
lectures, and Go tournaments. These features are especially
important for shut-ins and those who find that they have a few
spare moments to invite someone to play over the Internet without
having to wait for someone to show up at his/her doorstep.
BODY OF THE LESSON
PRESENTATION 10. The Internet Go Server (IGS), IGS Pandanet
(http://www.pandanet.co.jp/English/) links together people who
want to play Go from all over the world. You can play 24 hours a
day. Except for those times when the IGS Pandanet is down for
maintenance, it never goes to sleep. You can play or view games
throughout the whole year, whenever you feel like it. The IGS has
over 40,000 members who live in about 100 countries. The skill
levels range from the beginner to the expert. Consequently, you
can easily choose opponents whose skill-level is close to your
own.
The Kiseido Go Server (KGS) is also a popular web site
(http://kgs.kiseido.com/). At this site, one can play against the
computer, or play anyone who wants to play you in a number of
different ―rooms‖ (―Beginners,‖ ―English Game room,‖ etc.
Occasionally the KGS hosts a guest lecturer who gives lectures
over the Internet for free. One must be able to receive audio on
his/her computer in order to listen to these lectures.
Yahoo hosts an active Go server (http://games.yahoo.com/) which
has about six ―Beginners‖ rooms, and several rooms for advanced
players. It is basically for playing others. It does not have a
computer program to practice with, but it does have some
beginning instructions on how to play Go.
The American Go Association‘s web page
(http://www.usgo.org/index.asp) has a lot of information about Go
for the novice as well as the advanced player. One can even
subscribe to the on-line AGA E-Journal. It comes out once a
week. In addition to national and international Go news, it also

Go Lesson Plans
©Gordon E. Castanza, Ed. D.
10/19/11 DRAFT
133
PRESENTATION contains information about tournaments, and presents problems and
lessons from top players and teachers. It has a ―problems archive‖
(http://www.usgo.org/problems/index.asp) for those who want to
study Go problems to improve their game.
The teacher must explain to his/her students the conventions of
playing over the Internet. The teacher must remind students that
playing on the Internet has a lot of the features of being on the
telephone: (1) unless he/she is playing a computer (―robot‖),
remember that there is a real human being on the other computer; (2)
it is standard courtesy to tell is/her opponent if he/she needs to leave
the game for any reason. Do not leave the person wondering what
happened. (3) Quite often he/she will play a person from another
country/culture. In many cultures, it is not considered polite to ask a
person‘s age, political beliefs, religion, etc. (4) He/she may chat with
his/her opponent a little, and ask him/her where he/she is from, and
answer such questions from his/her opponent. (5) He/she must always
thank his/her opponent for the game. (6) Ask his/her opponent‘s
permission, or resign if he/she needs to leave the game for any reason.
An excellent resource for beginner and advanced player alike is the
―Sensei Library‖ (http://senseis.xmp.net/). It is a web site that
accumulates information from many other go players. It has an
excellent beginner‘s section in which you can discuss a particular
problem. The ―Beginner Study Section‖ is an excellent resource for
students to use in between weekly lessons. The ―Reference‖ section
contains a lot of useful information for every level of player. Sensei‘s
library is a must for those who need to understand, or review, the
basics.
PROCESSING 11. Along with his/her assistant, the teacher will demonstrate to the
students how to log on to two or three of the Go servers, how to
set up an account (including keeping a password). The teacher will
guide students to either the Go server‘s game program, or how to
engage another player in a game of Go for a limited time.
12. The students will pair up, and they will play a game on-line with
each other with an appropriate time-limit depending on the
amount of time available..
MONITORING 13. The teacher will move around the class and check students‘
understanding, and to offer assistance to students who are
encountering some difficulty getting their game set up on the Go
server.
14. Ask students to explain to another student how to log on to a Go
server and to set up an account, including entering a password.
15. The teacher will ask students to come to the demo board to show
the other students one of is/her games from a Go server, for which
he/she kept a game record. If there are students with disabilities in

Go Lesson Plans
©Gordon E. Castanza, Ed. D.
10/19/11 DRAFT
134
MONITORING the classroom, the teacher will make the appropriate accommodations
as the situation warrants
CLOSING
CLOSURE 16. Remind students of concepts exposed today, and guide the
students‘ attention to the vocabulary words that the teacher used in
today‘s class. Ask students to repeat the concepts and to define
them for their colleagues.
ASSESSMENT 17. Teacher will set up six Go problems (see Diags. 1-6) on the demo
board, and he/she will ask students to form teams. The teams will
select a ―captain.‖ The ―captains‖ will select which team goes first
in trying to solve the problem within a specific time limit. If the
team exceeds the time limit, the other team will have a similar
amount of time to work out the solution.
FOLLOW-UP 18. The teacher may consider assembling a ―How To Sign-Up For
Internet Go‖ handbook for students to use in between class
sessions. It is suggested that the teacher confine students to one
Go server in the beginning.
REFLECTION
(after the lesson)
19. What did you do that helped students learn and meet the
objective?
20. What would you do differently if you taught this lesson again to
make it more successful for students.
21. SAKT 1-8; SAKS 1 – 14; AKSCRS Cultural Standards for
Students: B – F; Cultural Standards for Educators: B – E; Cultural
Standards for Curriculum: A, B, D, E; Cultural Standards for
Schools: B, C.
22. PA 1. A – E; 2 A – F; 3 A – D; 4 A – E; 5 A – I; 6 A E; 7 A – F; 8
A – E; 9 A – E; 10 A - G
Diag. 1. White to play and kill Black (1 move). What
move does White make to kill the Black stones? If
White plays at 1, then he/she has two units of Black‘s
stones in atari. If Black captures by playing at C5, then
White answers with C2, putting Black (C3) in atari.
This is a classic ―snap back‖ tactic.
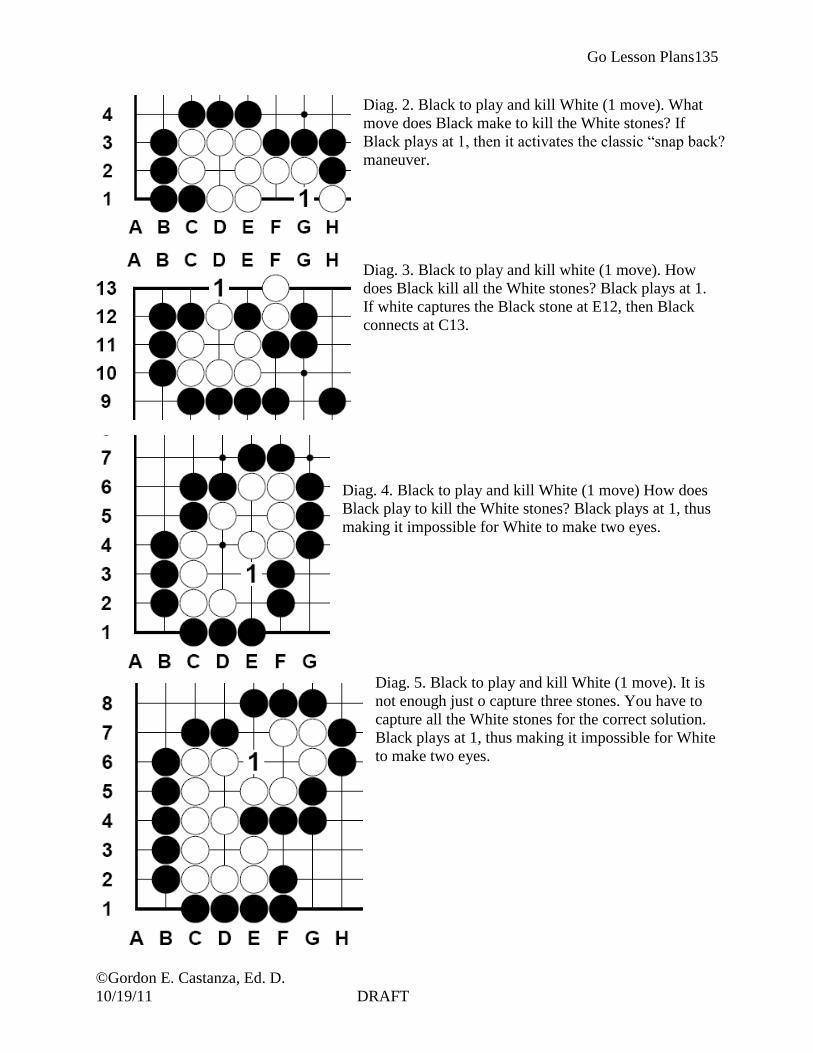
Go Lesson Plans
©Gordon E. Castanza, Ed. D.
10/19/11 DRAFT
135
Diag. 2. Black to play and kill White (1 move). What
move does Black make to kill the White stones? If
Black plays at 1, then it activates the classic ―snap back?
maneuver.
Diag. 3. Black to play and kill white (1 move). How
does Black kill all the White stones? Black plays at 1.
If white captures the Black stone at E12, then Black
connects at C13.
Diag. 4. Black to play and kill White (1 move) How does
Black play to kill the White stones? Black plays at 1, thus
making it impossible for White to make two eyes.
Diag. 5. Black to play and kill White (1 move). It is
not enough just o capture three stones. You have to
capture all the White stones for the correct solution.
Black plays at 1, thus making it impossible for White
to make two eyes.
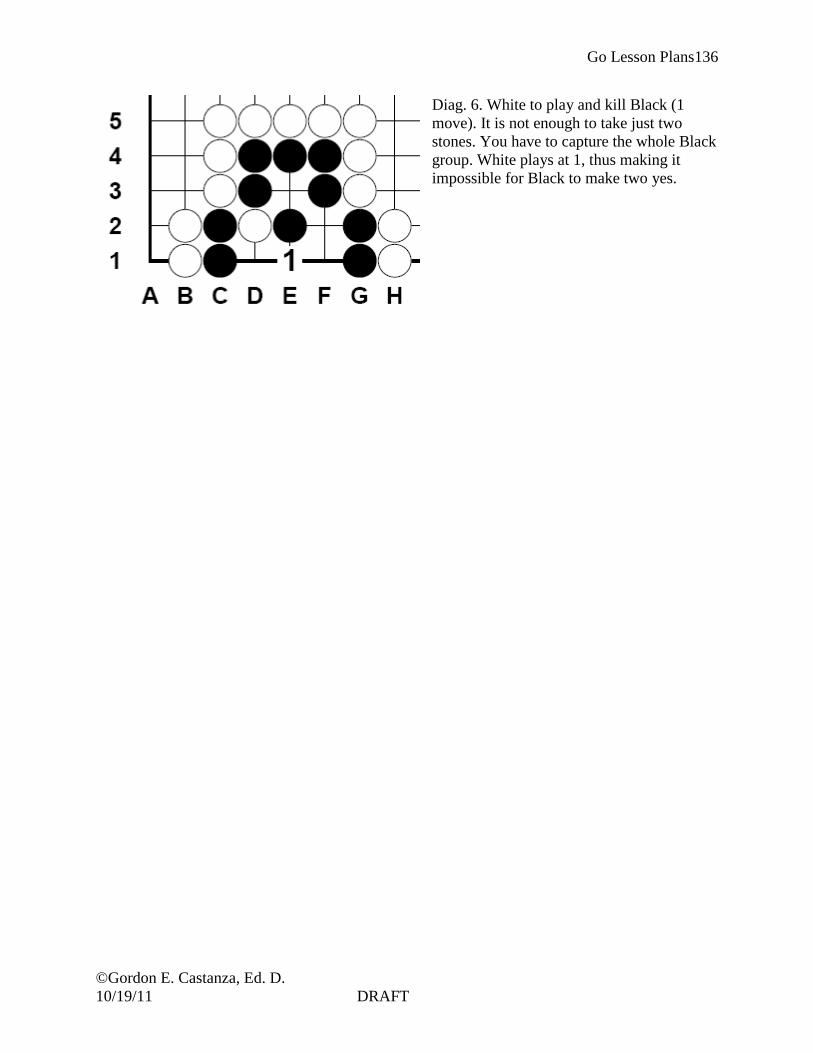
Go Lesson Plans
©Gordon E. Castanza, Ed. D.
10/19/11 DRAFT
136
Diag. 6. White to play and kill Black (1
move). It is not enough to take just two
stones. You have to capture the whole Black
group. White plays at 1, thus making it
impossible for Black to make two yes.

Go Lesson Plans
©Gordon E. Castanza, Ed. D.
10/19/11 DRAFT
137
References
Bradley, M. N. (2001). Go for kids. Santa Monica: CA: Yutopian Enterprises.
Cotton, K. (2000). Research you can use to improve results. Alexandria, VA: Association for
Supervision and Curriculum Development.
Kim, J., & Jeong, S. (1997). Learn to play go: Battle strategies (Vol. IV). New York, NY: Good
Move Press.
Kim, J., & Jeong, S. (2003). Learn to play go: The palace of memory (Vol. V). New York, NY:
Good Move Press.
Kridel, C. (May 2000). Books of the century. Educational Leadership, 80.
Mager, R. F. (1997). Preparing instructional objectives (3rd ed.). Atlanta, GA: The Center for
Effective Performance, Inc.
Ornstein, A. C., & Hunkins, F. (1993). Curriculum: Foundations, principles and issues (2nd ed.).
Boston, MA: Allyn and Bacon.
Shotwell, P. (2003). Go! More than a game (1st ed.). Boston, MA: Tuttle Publishing.
Tyler, R. (1949). Basic principles of curriculum and instruction. Chicago, IL: University of
Chicago Press.
Weir, S. (2004). School go teaching program lessons. Retrieved August 15, 2004, from
http://www.weirdolls.com/go/indgo.html
Yasuda, Y. (2002). Go as communication (Y. Nakao, Trans.). Richmond, VA: Slate & Shell.
Yasuda, Y. (2004). Let's play go. Richmond, VA: Slate & Shell.