
GM 1982-2005 KIT FEATURES 99-4544, IBR-444GMINST-4544 Applications 2 * Note: The factory mounting...
64
METRA - The World’s best kits ® metraonline.com REV. 10/18/2016 INST-4544 Installation instructions for part INST-4544 ® CAUTION! All accessories, switches, climate controls panels, and especially air bag indicator lights must be connected before cycling the ignition. Also, do not remove the factory radio with the key in the on position, or while the vehicle is running. © COPYRIGHT 2016 METRA ELECTRONICS CORPORATION • DIN radio provision • Also, for vehicles equipped with J-2000 panel-style • A) Radio housing • B) Flat faceplate • C) 1/2” Faceplate • D) 1” Faceplate • E) Equalizer faceplate • F) Equalizer brackets • G) Bracket set #1 • H) Bracket set #2 • I) Bracket set #3 • J) Bracket set #4 • K) Bracket set #5 • L) Bracket set #6 • M) Bracket set #7 • N) Bracket set #8 • O) Bracket set #9 • P) Bracket set #10 • Q) Bracket #(L) S-10 • R) (4) Carriage bolts/studs • S) (4) Nuts KIT FEATURES KIT COMPONENTS • Panel removal tool/flat head screwdriver • Torx-head screwdriver • Socket wrench TOOLS REQUIRED GM 1982-2005 99-4544, IBR-444GM B C A D E G H F I J L M K N O Q R P S APPLICATIONS See application list inside cover
Transcript of GM 1982-2005 KIT FEATURES 99-4544, IBR-444GMINST-4544 Applications 2 * Note: The factory mounting...

METRA - The World’s best kits ® metraonline.com
REV.
10/
18/2
016
INS
T-45
44
Installation instructions for part INST-4544
®
CAUTION! All accessories, switches, climate controls panels, and especially air bag indicator lights must be connected before cycling the ignition. Also, do not remove the factory radio with the key in the on position, or while the vehicle is running.
© COPYRIGHT 2016 METRA ELECTRONICS CORPORATION
• DIN radio provision• Also, for vehicles equipped with J-2000 panel-style• A) Radio housing • B) Flat faceplate • C) 1/2” Faceplate • D) 1” Faceplate • E) Equalizer faceplate
• F) Equalizer brackets • G) Bracket set #1 • H) Bracket set #2 • I) Bracket set #3 • J) Bracket set #4 • K) Bracket set #5 • L) Bracket set #6 • M) Bracket set #7 • N) Bracket set #8 • O) Bracket set #9 • P) Bracket set #10 • Q) Bracket #(L) S-10 • R) (4) Carriage bolts/studs • S) (4) Nuts
KIT FEATURES
KIT COMPONENTS
• Panel removal tool/flat head screwdriver • Torx-head screwdriver • Socket wrench
TOOLS REQUIRED
GM 1982-200599-4544, IBR-444GM
B CA D E
G HF I J
L MK N O
Q RP S
APPLICATIONSSee application list inside cover

INST-4544
Applications
2
* Note: The factory mounting bracket(s) must be retained and used with this vehicle.
Buick Century* ...................... 1982-1996
Electra*........................ 1984-1990
Estate Wagon* ............. 1984-1994
LeSabre* ..................... 1984-1994
Park Avenue* ............... 1984-1994
Reatta* ........................ 1990-1991
Regal* ......................... 1984-1987
Riviera* ........................ 1983-1985
Riviera* ........................ 1990-1995
Roadmaster ................ 1991-1994
Skyhawk* .................... 1982-1989
Skylark* ....................... 1983-1995
Cadillac
Cimarron .................... 1982-1988
DeVille* ........................ 1985-1995
Eldorado* ..................... 1984-1991
Escalade ..................... 1999-2002
Fleetwood* .................. 1985-1992
Seville* ........................ 1984-1991
Chevrolet Astro ........................... 1985-2005Avalanche .................... 2002 Beretta ....................... 1991-1996
Blazer (full)* ................. 1989-1991C/K Pickup .................. 1995-2000Camaro ....................... 1982-1992Camaro ....................... 1997-2002Caprice ....................... 1991-1996Cavalier ...................... 1982-1999
Celebrity* ..................... 1982-1990
Citation II* .................... 1985Corsica ....................... 1991-1996
Corvette* ..................... 1984-1989Corvette ...................... 1997-2004EI Camino ................... 1986-1987Express ....................... 1996-2000
G-Series Van ................ 1988-1996Impala ........................ 1994-1996Lumina ....................... 1990-2001Lumina APV ................ 1990-1996
Chevrolet (continued)
Malibu ........................ 1997-2000
Monte Carlo ................ 1986-1988
Monte Carlo ................ 1995-1999
Nova ........................... 1985-1988
S-10 Blazer ................ 1982-1994
S-10 Blazer ................ 1998-2001
S-10 Pickup ................ 1982-1993
S-10 Pickup ................ 1998-2001
Silverado .................... 1999-2002
Suburban* ................... 1989-1991
Suburban .................... 1995-2002
Tahoe ......................... 1995-2002
Venture ....................... 1997-1999
GMCC/K Pickup ................... 1995-2000G-Series Van ................ 1988-1995
Jimmy (full)* ................ 1989-1991
S-15 Jimmy ................ 1998-2001
S-15 Jimmy ................ 1982-1994
GMC (continued)
S-15 Pickup ................ 1982-1990Safari .......................... 1985-2004Savana ....................... 1996-2000Sierra ......................... 1999-2002Sonoma ....................... 1991-1993Sonoma ...................... 1998-2001
Suburban* ................... 1989-1991Suburban .................... 1995-1999Yukon ......................... 1995-2002
IsuzuHombre ....................... 1998-2001
OldsmobileAchieva* ...................... 1992-1995Bravada ...................... 1991-1994
Cutlass Calais* ............. 1984-1991
Cutlass Ciera* .............. 1982-1996
Cutlass Supreme* ........ 1984-1988
Delta 88* ..................... 1986-1988
Firenza* ....................... 1982-1988
Oldsmobile (continued)
Ninety-Eight* ............... 1984-1990Omega ........................ 1983-1984Silhouette ................... 1990-1999Toronado .................... 1982-1985
Pontiac6000 ........................... 1982-1991
Bonneville* .................. 1982-1999
Fiero* .......................... 1984-1988Firebird ....................... 1982-2002
Grand Am* ................... 1985-1995Grand Am ................... 1996-2000
Grand Prix* .................. 1985-1987Grand Prix ................... 1990-2003Montana ..................... 1999Sunbird** .................... 1982-1988Sunfire ........................ 1995-1999TransSport .................. 1990-1998
Saturn(all models) ................. 1991-1994
** Note: Vehicles are equipped with J-2000 panel style factory radios.

INST-4544
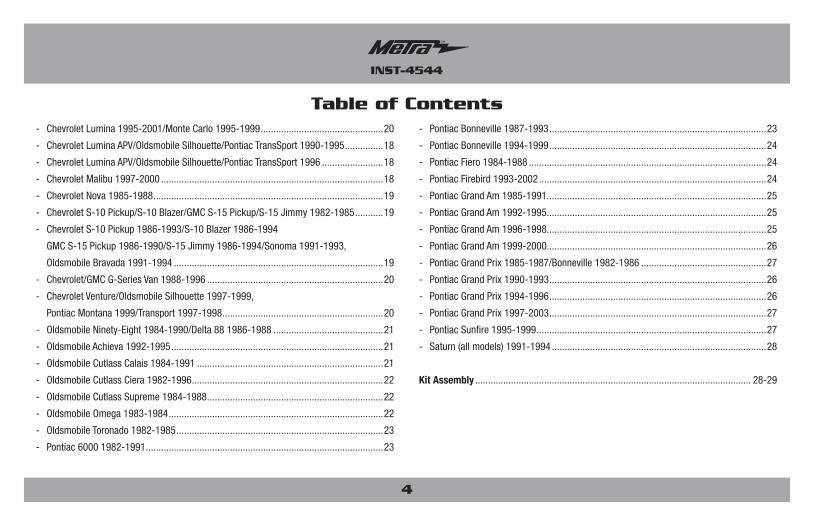
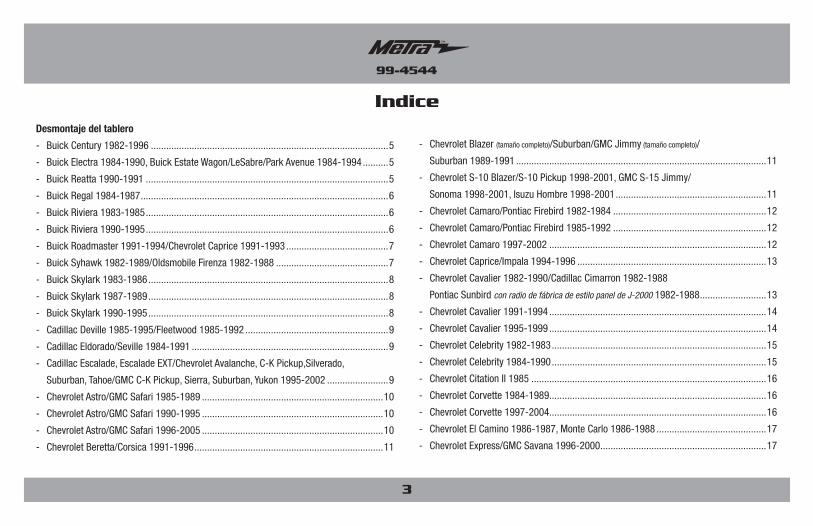
Table of Contents
3
Dash Disassembly
- Buick Century 1982-1996 .............................................................................................5
- Buick Electra 1984-1990, Buick Estate Wagon/LeSabre/Park Avenue 1984-1994 ..........5
- Buick Reatta 1990-1991 ...............................................................................................5
- Buick Regal 1984-1987 .................................................................................................6
- Buick Riviera 1983-1985 ...............................................................................................6
- Buick Riviera 1990-1995 ...............................................................................................6
- Buick Roadmaster 1991-1994/Chevrolet Caprice 1991-1993 ........................................7
- Buick Syhawk 1982-1989/Oldsmobile Firenza 1982-1988 ............................................7
- Buick Skylark 1983-1986 ..............................................................................................8
- Buick Skylark 1987-1989 ..............................................................................................8
- Buick Skylark 1990-1995 ..............................................................................................8
- Cadillac Deville 1985-1995/Fleetwood 1985-1992 ........................................................9
- Cadillac Eldorado/Seville 1984-1991 .............................................................................9
- Cadillac Escalade, Escalade EXT/Chevrolet Avalanche, C-K Pickup,Silverado,
Suburban, Tahoe/GMC C-K Pickup, Sierra, Suburban, Yukon 1995-2002 ........................9
- Chevrolet Astro/GMC Safari 1985-1989 .......................................................................10
- Chevrolet Astro/GMC Safari 1990-1995 .......................................................................10
- Chevrolet Astro/GMC Safari 1996-2005 .......................................................................10
- Chevrolet Beretta/Corsica 1991-1996 ..........................................................................11
- Chevrolet Blazer (full size)/Suburban/GMC Jimmy (full size)/Suburban 1989-1991 ..........11
- Chevrolet S-10 Blazer/S-10 Pickup 1998-2001, GMC S-15 Jimmy/
Sonoma 1998-2001, Isuzu Hombre 1998-2001 ...........................................................11
- Chevrolet Camaro/Pontiac Firebird 1982-1984 ............................................................12
- Chevrolet Camaro/Pontiac Firebird 1985-1992 ............................................................12
- Chevrolet Camaro 1997-2002 .....................................................................................12
- Chevrolet Caprice/Impala 1994-1996 ..........................................................................13
- Chevrolet Cavalier 1982-1990/Cadillac Cimarron 1982-1988
Pontiac Sunbird with J-2000 panel style factory radio 1982-1988 ......................................13
- Chevrolet Cavalier 1991-1994 .....................................................................................14
- Chevrolet Cavalier 1995-1999 .....................................................................................14
- Chevrolet Celebrity 1982-1983 ....................................................................................15
- Chevrolet Celebrity 1984-1990 ....................................................................................15
- Chevrolet Citation II 1985 ............................................................................................16
- Chevrolet Corvette 1984-1989.....................................................................................16
- Chevrolet Corvette 1997-2004.....................................................................................16
- Chevrolet El Camino 1986-1987, Monte Carlo 1986-1988 ...........................................17
- Chevrolet Express/GMC Savana 1996-2000 .................................................................17
- Chevrolet Lumina 1990-1994 ......................................................................................17
INST-4544
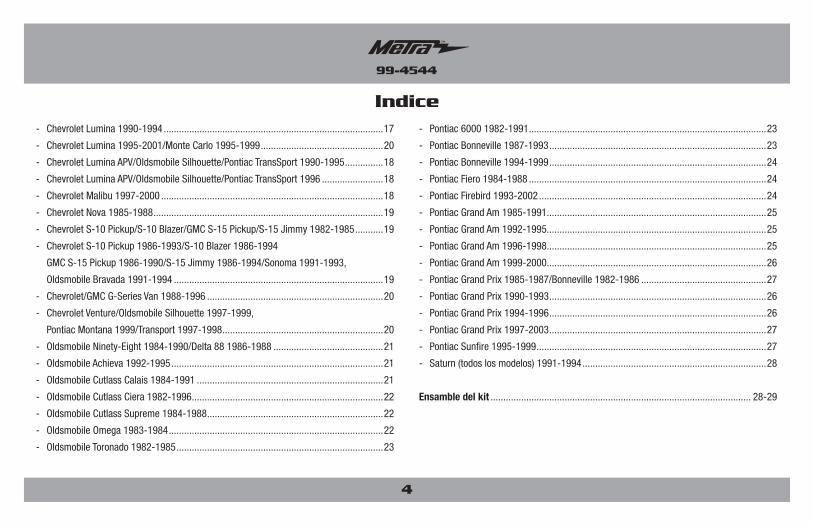
Table of Contents
4
- Chevrolet Lumina 1995-2001/Monte Carlo 1995-1999 ................................................20
- Chevrolet Lumina APV/Oldsmobile Silhouette/Pontiac TransSport 1990-1995 ...............18
- Chevrolet Lumina APV/Oldsmobile Silhouette/Pontiac TransSport 1996 ........................18
- Chevrolet Malibu 1997-2000 .......................................................................................18
- Chevrolet Nova 1985-1988 ..........................................................................................19
- Chevrolet S-10 Pickup/S-10 Blazer/GMC S-15 Pickup/S-15 Jimmy 1982-1985 ...........19
- Chevrolet S-10 Pickup 1986-1993/S-10 Blazer 1986-1994
GMC S-15 Pickup 1986-1990/S-15 Jimmy 1986-1994/Sonoma 1991-1993,
Oldsmobile Bravada 1991-1994 ..................................................................................19
- Chevrolet/GMC G-Series Van 1988-1996 .....................................................................20
- Chevrolet Venture/Oldsmobile Silhouette 1997-1999,
Pontiac Montana 1999/Transport 1997-1998 ...............................................................20
- Oldsmobile Ninety-Eight 1984-1990/Delta 88 1986-1988 ...........................................21
- Oldsmobile Achieva 1992-1995 ...................................................................................21
- Oldsmobile Cutlass Calais 1984-1991 .........................................................................21
- Oldsmobile Cutlass Ciera 1982-1996 ...........................................................................22
- Oldsmobile Cutlass Supreme 1984-1988 .....................................................................22
- Oldsmobile Omega 1983-1984 ....................................................................................22
- Oldsmobile Toronado 1982-1985 .................................................................................23
- Pontiac 6000 1982-1991 .............................................................................................23
- Pontiac Bonneville 1987-1993 .....................................................................................23
- Pontiac Bonneville 1994-1999 .....................................................................................24
- Pontiac Fiero 1984-1988 .............................................................................................24
- Pontiac Firebird 1993-2002 .........................................................................................24
- Pontiac Grand Am 1985-1991......................................................................................25
- Pontiac Grand Am 1992-1995......................................................................................25
- Pontiac Grand Am 1996-1998......................................................................................25
- Pontiac Grand Am 1999-2000......................................................................................26
- Pontiac Grand Prix 1985-1987/Bonneville 1982-1986 .................................................27
- Pontiac Grand Prix 1990-1993 .....................................................................................26
- Pontiac Grand Prix 1994-1996 .....................................................................................26
- Pontiac Grand Prix 1997-2003 .....................................................................................27
- Pontiac Sunfire 1995-1999 ..........................................................................................27
- Saturn (all models) 1991-1994 ....................................................................................28
Kit Assembly ............................................................................................................ 28-29

5
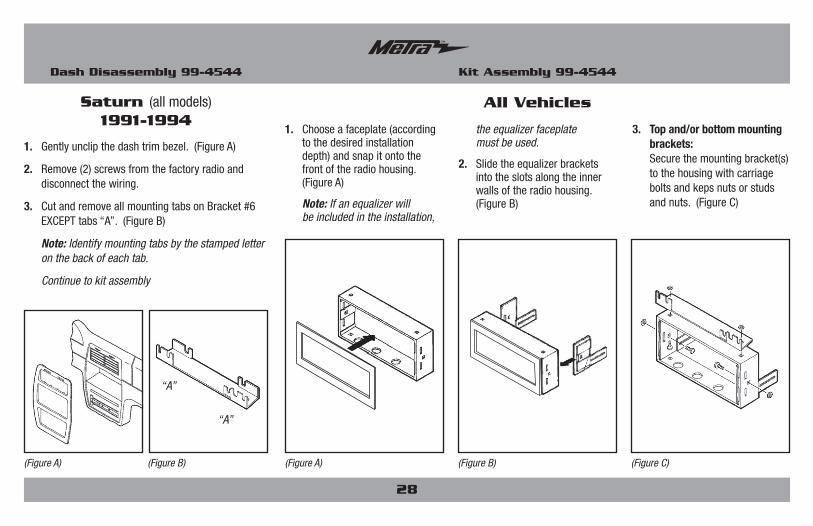
1. Remove (4) screws from the top-inside edge of the dash trim bezel. (Figure A)
2. Remove (5) screws from both sides of the steering column.
3. Remove (3) Phillips screws securing the rocker switch housing and lift the housing out.
4. Remove the hardware securing the factory mounting brackets to the factory radio. (Figure B)
5. Remove and retain the brackets.
Continue to kit assembly
Buick Century1982-1996
Buick Reatta1990-1991
Buick Electra 1984-1990Buick Estate Wagon/LeSabre/Park Avenue
1984-1994
(Figure A) (Figure B)
(S-10 applicationshown as example)
1. Unsnap the climate control trim bezel and remove (4) star-drive screws exposed. (Figure A)
2. Pull the steering collar back and carefully unsnap the dash trim bezel.
3. Remove the hardware securing the factory mounting brackets to the factory radio. (Figure B)
4. Remove and retain the brackets.
Continue to kit assembly
(Figure A) (Figure B)
(S-10 applicationshown as example)
1. Remove (2) torx-head screws above the instrument panel. (Figure A)
2. Remove (1) torx-head screw from each A/C vent. (Figure A)
3. Unclip the dash trim bezel and remove.
4. Remove the hardware securing the factory mounting brackets to the factory radio. (Figure B)
5. Remove and retain the brackets.
Continue to kit assembly
(Figure A) (Figure B)
(S-10 applicationshown as example)
Dash Disassembly 99-4544

6
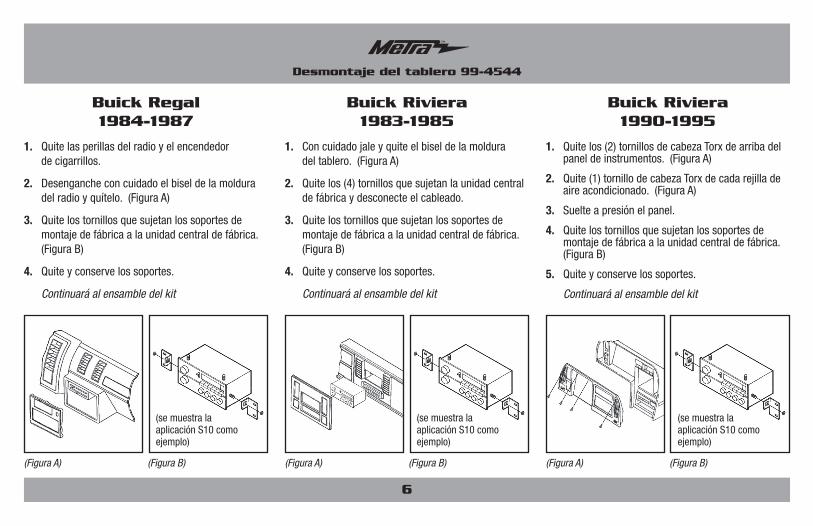
1. Remove the radio knobs and cigarette lighter.
2. Gently unclip the radio trim bezel and remove. (Figure A)
3. Remove the hardware securing the factory mounting brackets to the factory radio. (Figure B)
4. Remove and retain the brackets.
Continue to kit assembly
Buick Regal1984-1987
Buick Riviera1990-1995
Buick Riviera1983-1985
1. Carefully pull and remove the dash trim bezel. (Figure A)
2. Remove (4) screws securing the factory radio and disconnect the wiring.
3. Remove the hardware securing the factory mounting brackets to the factory radio. (Figure B)
4. Remove and retain the brackets.
Continue to kit assembly
1. Remove (2) torx-head screws above the instrument panel. (Figure A)
2. Remove (1) torx-head screw from each A/C vent. (Figure A)
3. Unsnap the panel.
4. Remove the hardware securing the factory mounting brackets to the factory radio. (Figure B)
5. Remove and retain the brackets.
Continue to kit assembly
(Figure A) (Figure B)
(S-10 applicationshown as example)
(Figure A) (Figure B)
(S-10 applicationshown as example)
(Figure A) (Figure B)
(S-10 applicationshown as example)
Dash Disassembly 99-4544
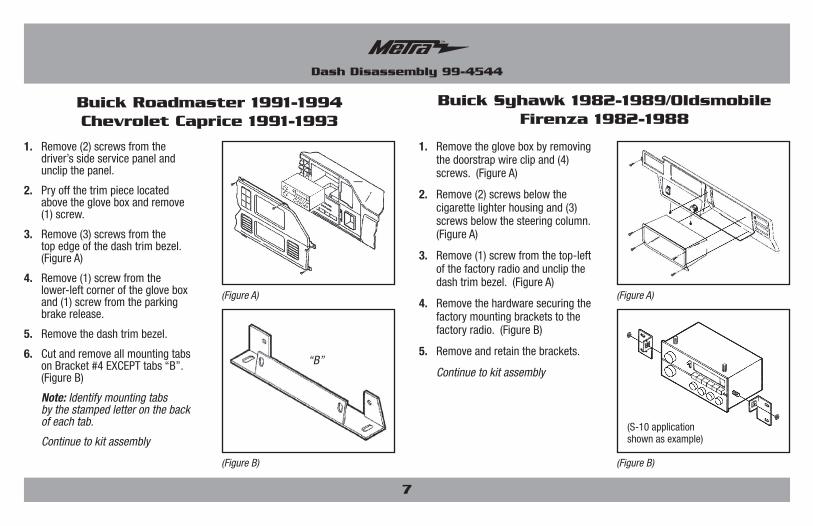
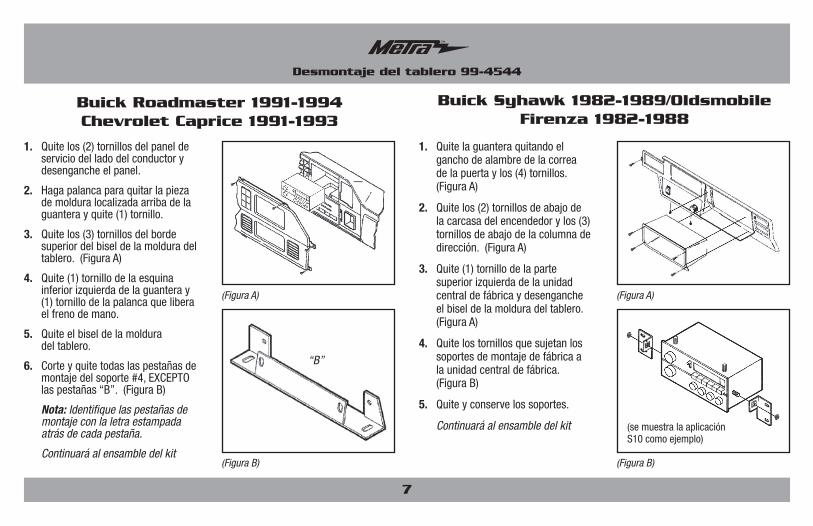
1. Remove (2) screws from the driver’s side service panel and unclip the panel.
2. Pry off the trim piece located above the glove box and remove (1) screw.
3. Remove (3) screws from the top edge of the dash trim bezel. (Figure A)
4. Remove (1) screw from the lower-left corner of the glove box and (1) screw from the parking brake release.
5. Remove the dash trim bezel.
6. Cut and remove all mounting tabs on Bracket #4 EXCEPT tabs “B”. (Figure B)
Note: Identify mounting tabs by the stamped letter on the back of each tab.
Continue to kit assembly
Buick Roadmaster 1991-1994Chevrolet Caprice 1991-1993
7
(Figure A)
(Figure B)
“B”
1. Remove the glove box by removing the doorstrap wire clip and (4) screws. (Figure A)
2. Remove (2) screws below the cigarette lighter housing and (3) screws below the steering column. (Figure A)
3. Remove (1) screw from the top-left of the factory radio and unclip the dash trim bezel. (Figure A)
4. Remove the hardware securing the factory mounting brackets to the factory radio. (Figure B)
5. Remove and retain the brackets.
Continue to kit assembly
Buick Syhawk 1982-1989/OldsmobileFirenza 1982-1988
(Figure A)
(Figure B)
(S-10 applicationshown as example)
Dash Disassembly 99-4544
8
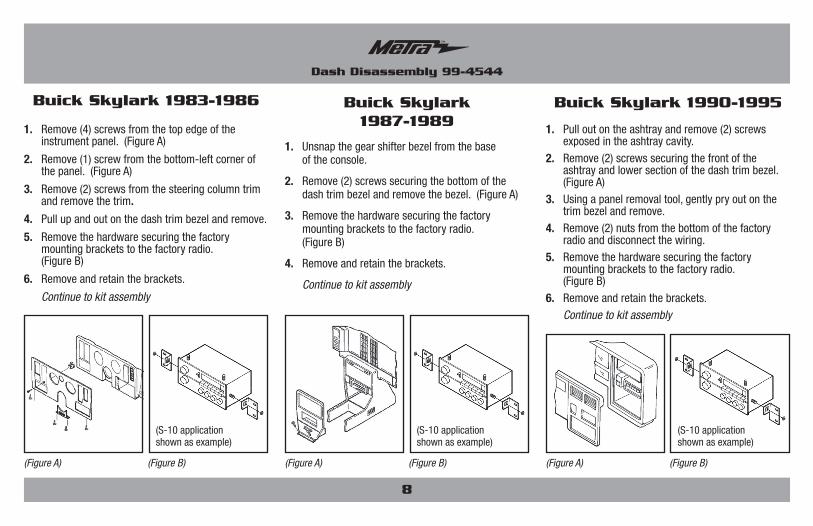
1. Remove (4) screws from the top edge of the instrument panel. (Figure A)
2. Remove (1) screw from the bottom-left corner of the panel. (Figure A)
3. Remove (2) screws from the steering column trim and remove the trim.
4. Pull up and out on the dash trim bezel and remove.
5. Remove the hardware securing the factory mounting brackets to the factory radio. (Figure B)
6. Remove and retain the brackets.
Continue to kit assembly
Buick Skylark 1983-1986 Buick Skylark 1990-1995Buick Skylark1987-1989
1. Unsnap the gear shifter bezel from the base of the console.
2. Remove (2) screws securing the bottom of the dash trim bezel and remove the bezel. (Figure A)
3. Remove the hardware securing the factory mounting brackets to the factory radio. (Figure B)
4. Remove and retain the brackets.
Continue to kit assembly
1. Pull out on the ashtray and remove (2) screws exposed in the ashtray cavity.
2. Remove (2) screws securing the front of the ashtray and lower section of the dash trim bezel. (Figure A)
3. Using a panel removal tool, gently pry out on the trim bezel and remove.
4. Remove (2) nuts from the bottom of the factory radio and disconnect the wiring.
5. Remove the hardware securing the factory mounting brackets to the factory radio. (Figure B)
6. Remove and retain the brackets. Continue to kit assembly
(Figure A) (Figure B)
(S-10 applicationshown as example)
(Figure A) (Figure B)
(S-10 applicationshown as example)
(Figure A) (Figure B)
(S-10 applicationshown as example)
Dash Disassembly 99-4544

9
1. Remove (2) screws from the top of the radio trim bezel.
2. Pull out on the top edge of the bezel and lift up to remove. (Figure A)
3. Remove the hardware securing the factory mounting brackets to the factory radio. (Figure B)
4. Remove and retain the brackets.
Continue to kit assembly
Cadillac Deville 1985-1995Fleetwood 1985-1992
Cadillac Escalade, Escalade EXT/Chevrolet Avalanche,
C-K Pickup, Silverado, Suburban, Tahoe/GMC C-K Pickup, Sierra, Suburban,
Yukon 1995-2002
Cadillac Eldorado/Seville 1984-1991
1. Remove (2) Phillips screws above the A/C vents. (Figure A)
2. Pull out on the top edge of the dash trim bezel unhook the bottom edge and remove.
3. Remove the hardware securing the factory mounting brackets to the factory radio. (Figure B)
4. Remove and retain the brackets.
Continue to kit assembly
1. Remove the steering column filler panel and the ashtray. (Figure A)
2. Unclip the dash trim bezel and remove. 3. Using a small flat-blade screwdriver, press
down on the outer clips of the factory radio (or pocket).
4. Disconnect the wiring and remove the radio. Locate Bracket Set #8. (Figure B)
Continue to kit assembly
(Figure A) (Figure B)
(S-10 applicationshown as example)
(Figure A) (Figure B)
(S-10 applicationshown as example)
(Figure A) (Figure B)
Dash Disassembly 99-4544

10
1. Remove (3) Phillips screws from the top portion of the dash trim bezel. (Figure A)
2. Open the glove box and remove (2) 10mm bolts from the lower edge of the trim bezel. (Figure A)
3. Pull the console trim forward and remove (2) 7mm bolts exposed.
4. Gently unclip and remove the trim bezel. Remove (2) 7mm screws from the factory radio and disconnect the wiring.
5. Cut and remove all mounting tabs on Bracket #3 EXCEPT tabs “A”. (Figure A)
Note: Identify mounting tabs by the stamped letter on the back of each tab.
Continue to kit assembly
Chevrolet Astro/GMCSafari 1985-1989
Chevrolet Astro/GMCSafari 1996-2004
Chevrolet Astro/GMCSafari 1990-1995
1. Remove (2) screws from the bottom of the dash trim bezel. (Figure A)
2. Gently unclip and remove the bezel.
3. Remove (4) screws from the factory radio and disconnect the wiring.
4. Cut and remove all mounting tabs on Bracket #1 EXCEPT tabs “A”. (Figure B)
Note: Identify mounting tabs by the stamped letter on the back of each tab.
Continue to kit assembly
1. Place the gear selector in its lowest position.
2. Unclip the perimeter of the dash trim bezel. (Figure A)
3. Disconnect the rear A/C control harness and the headlight switch from the back of the dash trim bezel and remove the bezel.
4. Using a flat-blade screwdriver, press down on the outside clips of the factory radio and remove.
5. Locate Bracket Set #8. (Figure B)
Continue to kit assembly
(Figure A) (Figure B) (Figure A) (Figure B) (Figure A) (Figure B)
“A”
“A”
“A”
Dash Disassembly 99-4544

11
1. Using a panel removal tool, pry outward on the dash trim bezel and remove. (Figure A)
2. Remove (2) screws securing the factory radio and disconnect the wiring.
3. Locate Bracket #7. (Figure B)
Continue to kit assembly
Chevrolet Beretta/Corsica 1991-1996
Chevrolet S-10 Blazer/S-10 Pickup 1998-2001, GMC S-15 Jimmy/Sonoma 1998-2001, Isuzu Hombre
1998-2001
Chevrolet Blazer (full size)Suburban/GMC Jimmy (full size) Suburban 1989-1991
1. Remove (2) screws from the radio trim bezel and remove the bezel. (Figure A)
2. Remove (2) screws securing the factory radio and disconnect the wiring.
3. Remove the hardware securing the factory mounting brackets to the factory radio. (Figure B)
4. Remove and retain the brackets.
Continue to kit assembly
1. Remove (2) 9/32” hex-head screws from the knee bolster. (Figure A)
2. Pull down on the bolster and remove 9/32” screws exposed on the base of the dash trim bezel.
3. Remove (1) Phillips screw above the instrument cluster.
4. Unclip the dash trim bezel and remove. 5. Remove (2) 9/32” hex-head screws securing the
factory radio and disconnect the wiring.6. Locate Bracket Set #10. (Figure B) Continue to kit assembly
(Figure A) (Figure B) (Figure A) (Figure B)
(S-10 applicationshown as example)
(Figure A) (Figure B)
Dash Disassembly 99-4544

12
1. Remove (4) star-drive screws from the dash trim bezel and remove the bezel. (Figure A)
2. Remove (4) screws securing the factory radio and disconnect the wiring.
3. Cut and remove all mounting tabs on Bracket #2 EXCEPT those tabs with holes “A”. (Figure B)
Note: Identify mounting tabs by the stamped letter on the back of each tab.
Continue to kit assembly
Chevrolet Camaro/PontiacFirebird 1982-1984
Chevrolet Camaro1997-2002
Chevrolet Camaro/PontiacFirebird 1985-1992
1. Remove (4) star-drive screws from the dash trim bezel and remove the bezel. (Figure A)
2. Remove (4) screws securing the factory radio and disconnect the wiring.
3. Cut and remove all mounting tabs on Bracket #2 EXCEPT those tabs with holes “B”. (Figure B)
Note: Identify mounting tabs by the stamped letter on the back of each tab.
Continue to kit assembly
1. Unclip the radio trim bezel and remove. (Figure A)
2. Remove (2) 7mm hex-head screws securing the factory radio and disconnect the wiring.
3. Locate Bracket Set #10. (Figure B)
Note: Identify mounting tabs by the stamped letter on the back of each tab.
Continue to kit assembly
(Figure A) (Figure B) (Figure A) (Figure B) (Figure A) (Figure B)
“A”
“B”
Dash Disassembly 99-4544
13
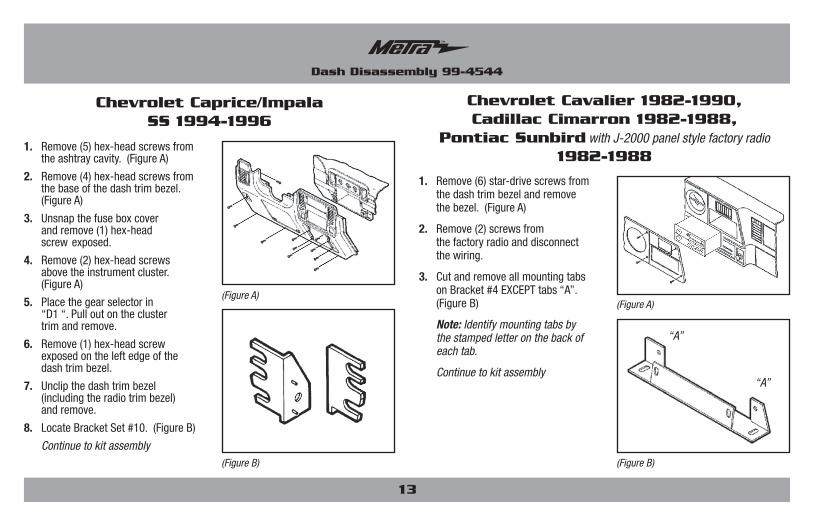
1. Remove (5) hex-head screws from the ashtray cavity. (Figure A)
2. Remove (4) hex-head screws from the base of the dash trim bezel. (Figure A)
3. Unsnap the fuse box cover and remove (1) hex-head screw exposed.
4. Remove (2) hex-head screws above the instrument cluster. (Figure A)
5. Place the gear selector in “D1 “. Pull out on the cluster trim and remove.
6. Remove (1) hex-head screw exposed on the left edge of the dash trim bezel.
7. Unclip the dash trim bezel (including the radio trim bezel) and remove.
8. Locate Bracket Set #10. (Figure B)
Continue to kit assembly
Chevrolet Caprice/ImpalaSS 1994-1996
(Figure A)
(Figure B)
1. Remove (6) star-drive screws from the dash trim bezel and remove the bezel. (Figure A)
2. Remove (2) screws from the factory radio and disconnect the wiring.
3. Cut and remove all mounting tabs on Bracket #4 EXCEPT tabs “A”. (Figure B)
Note: Identify mounting tabs by the stamped letter on the back of each tab.
Continue to kit assembly
Chevrolet Cavalier 1982-1990,Cadillac Cimarron 1982-1988,
Pontiac Sunbird with J-2000 panel style factory radio 1982-1988
(Figure A)
(Figure B)
“A”
“A”
Dash Disassembly 99-4544

14
1. Using a panel removal tool, carefully pry out on the dash trim bezel and remove. (Figure A)
2. Remove (2) screws securing the factory radio and disconnect the wiring.
3. Cut and remove all mounting tabs on Bracket #3 EXCEPT tabs “B”. (Figure B)
Note: Identify mounting tabs by the stamped letter on the back of each tab.
Continue to kit assembly
Chevrolet Cavalier1991-1994
Chevrolet Cavalier 1995-1999
1. Open drivers door and remove fuse panel on end of dash then open passenger door and remove panel on end of dash.
2. Remove (1) Phillips screw from each side, now exposed.
3. Remove (3) 7mm hex-head screws from the top of the glove box liner.
4. Remove (2) 7mm hex-head screws from the top-left corner of the glove box cavity.
5. Remove (1) Phillips screw from the defroster duct.
6. Remove the duct work and (1) Phillips screw exposed.
7. Remove the dash pad and (3) Phillips screws exposed at the top of the radio trim bezel. (Figure A)
8. Locate Bracket Set #10. (Figure B)
Continue to kit assembly
(Figure A) (Figure B) (Figure A) (Figure B)
“B”
“B”
Dash Disassembly 99-4544
15
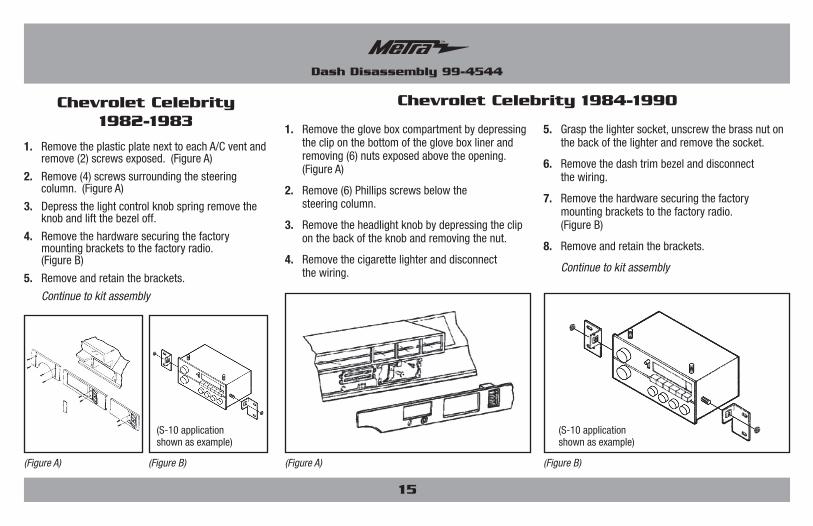
1. Remove the plastic plate next to each A/C vent and remove (2) screws exposed. (Figure A)
2. Remove (4) screws surrounding the steering column. (Figure A)
3. Depress the light control knob spring remove the knob and lift the bezel off.
4. Remove the hardware securing the factory mounting brackets to the factory radio. (Figure B)
5. Remove and retain the brackets.
Continue to kit assembly
Chevrolet Celebrity1982-1983
Chevrolet Celebrity 1984-1990
1. Remove the glove box compartment by depressing the clip on the bottom of the glove box liner and removing (6) nuts exposed above the opening. (Figure A)
2. Remove (6) Phillips screws below the steering column.
3. Remove the headlight knob by depressing the clip on the back of the knob and removing the nut.
4. Remove the cigarette lighter and disconnect the wiring.
5. Grasp the lighter socket, unscrew the brass nut on the back of the lighter and remove the socket.
6. Remove the dash trim bezel and disconnect the wiring.
7. Remove the hardware securing the factory mounting brackets to the factory radio. (Figure B)
8. Remove and retain the brackets.
Continue to kit assembly
(Figure A) (Figure A) (Figure B)(Figure B)
(S-10 applicationshown as example)
(S-10 applicationshown as example)
Dash Disassembly 99-4544

16
1. Remove (2) screws from the bottom steering column trim panel and remove. (Figure A)
2. Remove (6) screws from the dash trim bezel, disconnect the wiring and remove. (Figure A)
3. Remove the hardware securing the factory mounting brackets to the factory radio. (Figure B)
4. Remove and retain the brackets.
Continue to kit assembly
Chevrolet Citation II1985
Chevrolet Corvette1997-2004
Chevrolet Corvette1984-1989
1. Remove (7) screws from the dash trim bezel. (Figure A)
2. Move the gear shifter to the lowest position.
3. Pull the right edge of the bezel forward, unhook the left side and remove.
4. Remove the hardware securing the factory mounting brackets to the factory radio. (Figure B)
5. Remove and retain the brackets.
Continue to kit assembly
1. Pry out on the ride control switch and disconnect the wiring.
2. Unsnap the switch trim and remove (2) 10mm hex-head bolts exposed.
3. Open the center console door, remove (4) screws from the inner hinge and remove the door.
4. Open the ashtray and remove (1) screw exposed. Remove the ashtray and (1) screw exposed.
5. Unclip the small grille to the left of the ignition switch and remove (1) screw exposed.
6. Unclip the base of the radio trim bezel and remove. (Figure A)
7. Locate Bracket Set #10. (Figure B) Continue to kit assembly
(Figure A) (Figure B)
(S-10 applicationshown as example)
(Figure A) (Figure B)
(S-10 applicationshown as example)
(Figure A) (Figure B)
Dash Disassembly 99-4544

17
1. Remove (4) screws from the dash trim bezel. (Figure A)
2. Remove the bezel and disconnect the cigarette lighter wiring.
3. Cut and remove all mounting tabs on Bracket #2 EXCEPT tabs “C”. (Figure B)
Note: Identify mounting tabs by the stamped letter on the back of each tab.
Continue to kit assembly
Chevrolet El Camino1986-1987, Monte Carlo
1986-1988
Chevrolet Lumina1990-1994
Chevrolet Express/GMC Savana 1996-2000
1. Unclip the plastic trim piece located below the steering column.
2. Unclip the dash trim bezel. Pull the bezel over the steering column and disconnect the wiring. (Figure A)
3. Using a flat-blade screwdriver, press down on the outside clips of the factory radio and remove.
4. Locate Bracket Set #8. (Figure B)
Continue to kit assembly
1. Remove (2) screws from the lower steering column panel.
2. Pull the panel down to access the bottom portion of the radio trim bezel. (Figure A)
3. Pull the top and bottom edges of the bezel. (Figure A)
4. Cut and remove all mounting tabs on Bracket #5 EXCEPT tabs “A”. (Figure B)
Note: Identify mounting tabs by the stamped letter on the back of each tab.
Continue to kit assembly
(Figure A) (Figure B) (Figure A) (Figure B) (Figure A) (Figure B)
“C”
“C”
“A”
“A”
“A”“A”
Dash Disassembly 99-4544

18
1. Remove (2) screws securing the lower steering column panel and remove.
2. Remove (2) screws exposed on the left tab of the radio trim bezel. (Figure A)
3. Open the glove box and remove (2) screws exposed on the right tabs of the radio trim bezel.
4. Cut and remove all mounting tabs on Bracket #6 EXCEPT tabs “B”. (Figure B)
Note: Identify mounting tabs by the stamped letter on the back of each tab.
Continue to kit assembly
Chevrolet Lumina APV/Oldsmobile Silhouette/
Pontiac TransSport1990-1995
Chevrolet Malibu1997-2000
Chevrolet Lumina APV/Oldsmobile Silhouette/Pontiac
TransSport 19961. Unclip the radio trim bezel
and remove.
2. Remove (2) 9/32” hex-head screws securing the factory radio and disconnect the wiring. (Figure A)
3. Locate Bracket Set #10. (Figure B)
Continue to kit assembly
(Figure A) (Figure B) (Figure B)
“B”
“B”
1. Remove (1) Phillips screw from each side of the center console.
2. Open the glove box and remove (2) Phillips screws exposed. (Figure A)
3. Remove (2) 7mm hex-head screws and (1) pop-clip from the lower steering column panel, and (2) Phillips screws exposed near the climate controls.
4. Remove (1) 7mm hex-head screw under the glove box.
5. Pull out on the center console and remove.
6. Cut and remove all mounting tabs on Bracket #6 EXCEPT tabs “B”. (Figure B)
Note: Identify mounting tabs by the stamped letter on the back of each tab.
Continue to kit assembly
(Figure A) (Figure B)
“B”
“B”
(Figure A)
Dash Disassembly 99-4544

19
1. Remove the ashtray and (2) screws from the ashtray bracket. (Figure A)
2. Remove (2) screws above the radio opening and remove the radio trim bezel. (Figure A)
3. Cut and remove all mounting tabs on Bracket #1 EXCEPT tabs “B”. (Figure B)
Note: Identify mounting tabs by the stamped letter on the back of each tab.
Continue to kit assembly
Chevrolet Nova1985-1988
Chevrolet S-10 Pickup 1986-1993/S-10 Blazer 1986-1994, GMC S-15
Pickup 1986-1990/S-15 Jimmy 1986-1994/Sonoma
1991-1993, Oldsmobile Bravada 1991-1994
Chevrolet S-10 Pickup/S-10 Blazer 1982-1985
GMC S-15 Pickup/S-15 Jimmy 1982-1985
1. Remove (4) star-drive screws from the corners of the dash trim bezel. (Figure A)
2. Remove (1) star-drive screw from the lower-right corner of the instrument cluster panel and remove the dash trim bezel.
3. Cut and remove all mounting tabs on Bracket #5 EXCEPT tabs “B”. (Figure B)
Note: Identify mounting tabs by the stamped letter on the back of each tab.
Continue to kit assembly
1. Remove the ashtray and (1) screw inside the ashtray cavity.
2. Open the glove box and remove (2) screws exposed on the edge of the dash trim bezel. (Figure A)
3. Locate Bracket #(L) S-10 and the right Bracket from Bracket Set #5.
4. Cut and remove all mounting tabs on the right Bracket EXCEPT top tab “B”. (Figure B)
Note: Identify mounting tabs by the stamped letter on the back of each tab.
Continue to kit assembly
(Figure A) (Figure B) (Figure A) (Figure B) (Figure A) (Figure B)
“B”
“B”
“B”
“B”
Dash Disassembly 99-4544

20
1. Carefully unsnap the radio trim bezel and remove. (Figure A)
2. Remove (2) screws securing the factory radio and disconnect the wiring.
3. Disconnect the negative battery terminal to prevent an accidental short circuit.
4. Remove the ashtray and (1) Phillips screw exposed in the ashtray cavity.
5. Remove (1) Phillips screw
from the cigarette lighter compartment.
6. Remove (2) Phillips screws securing the factory radio and disconnect the wiring.
7. Cut and remove all mounting tabs on Bracket #1 EXCEPT tabs “C”. (Figure B)
Note: Identify mounting tabs by the stamped letter on the back of each tab.
Continue to kit assembly
Chevrolet/GMC G-Series Van1988-1996
Chevrolet Venture/Oldsmobile Silhouette
1997-1999, Pontiac Montana 1999/Transport
1997-1998
1. Remove the ashtray and (1) Phillips screw exposed in the ashtray cavity.
2. Remove (1) Phillips screw from the cigarette lighter compartment.
3. Remove (2) Phillips screws securing the factory radio and disconnect the wiring.
4. Locate Bracket Set #10. (Figure B)
Continue to kit assembly
(Figure A) (Figure B)
“C”
“C”
(Figure A) (Figure B)
1. Unclip the dash trim bezel and remove (it may be necessary to loosen the knee bolster). (Figure A)
2. Remove (2) 7mm hex-head screws securing the factory radio and disconnect the wiring.
3. Locate Bracket Set #10. (Figure B) Continue to kit assembly
Chevrolet Lumina 1995-2001/Monte Carlo 1995-1999
(Figure B)
(Figure A)
Dash Disassembly 99-4544
21
1. Place the gear shifter in low and remove the rubber trim boot from the steering column.
2. Remove (2) Phillips screws from the radio trim bezel.
3. Unhook the ashtray/light wiring terminal and remove the trim bezel. (Figure A)
4. Remove the hardware securing the factory mounting brackets to the factory radio. (Figure B)
5. Remove and retain the brackets.
Continue to kit assembly
Oldsmobile Ninety-Eight 1984-1990/Delta 88
1986-1988
Oldsmobile Cutlass Calais 1984-1991
Oldsmobile Achieva1992-1995
1. Remove (4) screws from the top edge of the dash trim bezel. (Figure A)
2. Remove (2) screws from the bottom edge of the bezel. (Figure A)
3. Unsnap the A/C ducts, disconnect the light switch and remove the bezel.
4. Remove the hardware securing the factory mounting brackets to the factory radio. (Figure B)
5. Remove and retain the brackets.
Continue to kit assembly
1. Remove the console/glove box assembly and (3) screws below the box.
2. Lift up the parking brake trim and remove (2) screws from the gear shifter trim. (Figure A)
3. Remove the ashtray from the gear shifter area and (2) 7mm screws exposed.
4. Using a screwdriver, depress the retainer tabs on the dash ashtray, pull the ashtray out and remove (2) 7mm hex-head screws from the ashtray bracket.
5. Remove the hardware securing the factory mounting brackets to the factory radio. (Figure B)
6. Remove and retain the brackets. Continue to kit assembly
(Figure A) (Figure B)
(S-10 applicationshown as example)
(Figure A) (Figure B)
(S-10 applicationshown as example)
(Figure A) (Figure B)
(S-10 applicationshown as example)
Dash Disassembly 99-4544

22
1. Remove the ashtray and (2) screws from the ashtray location. (Figure A)
2. Remove (1) screw below and (2) screws above the steering column. (Figure A)
3. Pry the A/C vents out and remove the screws exposed in the vent cavities.
4. Remove (6) screws from the edge of the dash trim bezel and remove the bezel. (Figure A)
5. Remove the hardware securing the factory mounting brackets to the factory radio. (Figure B)
6. Remove and retain the brackets.
Continue to kit assembly
Oldsmobile Cutlass Ciera 1982-1996
Oldsmobile Omega1983-1984
Oldsmobile Cutlass Supreme 1984-1988
1. Remove the radio trim bezel, and then disconnect the cigarette lighter connector. (Figure A)
2. Remove the hardware securing the factory mounting brackets to the factory radio. (Figure B)
3. Remove and retain the brackets.
Continue to kit assembly
1. Remove (4) hex-head washer screws from the steering column trim panel, pull down on the rear edge of the panel and remove.
2. Remove (4) Phillips screws from the top edge of the dash trim bezel. (Figure A)
3. Remove (2) hex-head washer screws from the bottom of the dash trim bezel and remove the bezel. (Figure A)
4. Cut and remove all mounting tabs on Bracket #2 EXCEPT tabs “C”.
Note: Identify mounting tabs by the stamped letter on the back of each tab.
Continue to kit assembly
(Figure A) (Figure B)
(S-10 applicationshown as example)
(Figure A) (Figure B)
(S-10 applicationshown as example)
(Figure A) (Figure B)
“C”
“C”
“C”
“C”
Dash Disassembly 99-4544

23
1. Depress the clip located behind the headlight knob and remove the knob.
2. Remove (3) screws securing the steering column trim and remove.
3. Remove (4) screws from the bottom edge of the dash trim bezel and remove. (Figure A)
4. Remove the hardware securing the factory mounting brackets to the factory radio. (Figure B)
5. Remove and retain the brackets.
Continue to kit assembly
Oldsmobile Toronado 1982-1985
Pontiac Bonneville1987-1993
Pontiac 60001982-1991
1. Open the glove box and remove (1) screw from the side of the radio trim bezel. (Figure A)
2. Gently remove the bezel from the dash and the dummy plate from the bezel.
3. Cut and remove all mounting tabs on Bracket #5 EXCEPT tabs “A”. (Figure A)
Note: Identify mounting tabs by the stamped letter on the back of each tab.
Continue to kit assembly
1. Gently unsnap and remove the dash trim bezel. (Figure A)
2. Remove the screws securing the factory radio and disconnect the wiring.
3. Remove the hardware securing the factory mounting brackets to the factory radio. (Figure B)
4. Remove and retain the brackets.
Continue to kit assembly
(Figure A) (Figure B)
(S-10 applicationshown as example)
(Figure A) (Figure B) (Figure A) (Figure B)
(S-10 applicationshown as example)
“A”
“A”
Dash Disassembly 99-4544

24
1. Unclip the right side of the dash trim bezel. (Figure A)
2. Unclip the left side of the bezel and remove. (Figure A)
3. Remove (3) 7mm hex-head screws securing the factory radio and disconnect the wiring.
4. Locate Bracket Set #9. (Figure B)
Continue to kit assembly
Pontiac Bonneville1994-1999
Pontiac Firebird1993-2002
Pontiac Fiero 1984-1988
1. Remove (4) star-drive screws from the dash trim bezel. (Figure A)
2. Gently pull out on the trim bezel and remove.
3. Remove (4) hex-head screws from the factory radio and disconnect the wiring.
4. Remove the hardware securing the factory mounting brackets to the factory radio. (Figure B)
5. Remove and retain the brackets.
Continue to kit assembly
1. Unclip the radio trim bezel. (Figure A)
2. Remove (4) 7mm hex-head screws securing the factory radio and disconnect the wiring.
3. Locate Bracket Set #9. (Figure B)
Continue to kit assembly
(Figure A) (Figure B) (Figure A) (Figure B)
(S-10 applicationshown as example)
(Figure A)
(Figure B)
Dash Disassembly 99-4544

25
1. Carefully unsnap the front edge of the gear shifter console panel.
2. Unsnap and remove the dash trim bezel. (Figure A)
3. Remove the hardware securing the factory mounting brackets to the factory radio. (Figure B)
4. Remove and retain the brackets.
Continue to kit assembly
Pontiac Grand Am1985-1991
Pontiac Grand Am1996-1998
Pontiac Grand Am1992-1995
1. Remove (6) 7mm hex-head screws from the driver’s side knee bolster panel and lower the panel.
2. Remove (4) Phillips screws from the glove box/cupholder assembly.
3. Remove (1) 7mm hex-head screw from the left corner of the dash trim bezel. (Figure A)
4. Loosen (2) 10mm nuts from the top of the factory radio, slide the radio out and disconnect the wiring. (Figure A)
5. Remove the hardware securing the factory mounting brackets to the factory radio. (Figure B)
6. Remove and retain the brackets.
Continue to kit assembly
1. Remove (2) Phillips screws from the pocket.
2. Remove (2) Phillips screws above the instrument cluster. (Figure A)
3. Unclip the dash trim bezel and remove.
4. Remove (3) 7mm hex-head screws securing the factory radio and disconnect the wiring.
5. Locate Bracket Set #9. (Figure B)
Continue to kit assembly
(Figure A) (Figure B)
(S-10 applicationshown as example)
(Figure A) (Figure B)
(S-10 applicationshown as example)
(Figure A) (Figure B)
Dash Disassembly 99-4544
26
1. Unclip the radio trim bezel. (Figure A)
2. Remove (3) 9/32” screws securing the factory radio and disconnect the wiring.
3. Locate Bracket Set #9. (Figure B)
Continue to kit assembly
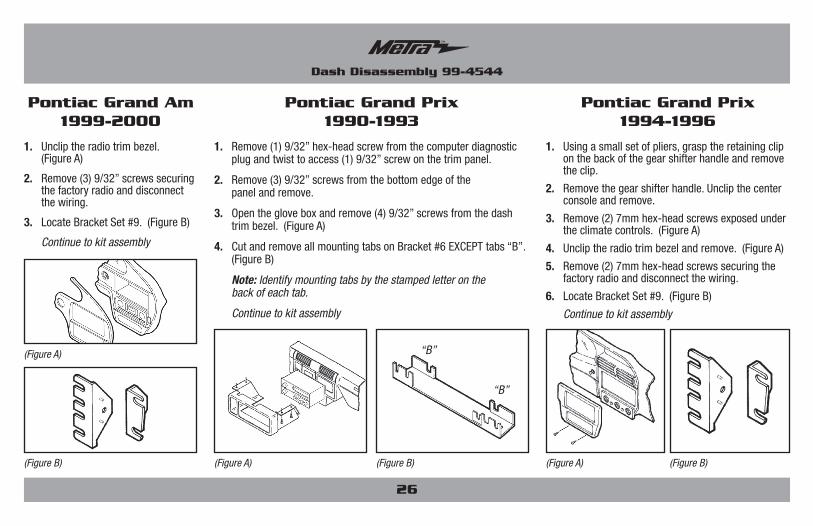
Pontiac Grand Am1999-2000
Pontiac Grand Prix1994-1996
Pontiac Grand Prix1990-1993
1. Remove (1) 9/32” hex-head screw from the computer diagnostic plug and twist to access (1) 9/32” screw on the trim panel.
2. Remove (3) 9/32” screws from the bottom edge of the panel and remove.
3. Open the glove box and remove (4) 9/32” screws from the dash trim bezel. (Figure A)
4. Cut and remove all mounting tabs on Bracket #6 EXCEPT tabs “B”. (Figure B)
Note: Identify mounting tabs by the stamped letter on the back of each tab.
Continue to kit assembly
1. Using a small set of pliers, grasp the retaining clip on the back of the gear shifter handle and remove the clip.
2. Remove the gear shifter handle. Unclip the center console and remove.
3. Remove (2) 7mm hex-head screws exposed under the climate controls. (Figure A)
4. Unclip the radio trim bezel and remove. (Figure A)
5. Remove (2) 7mm hex-head screws securing the factory radio and disconnect the wiring.
6. Locate Bracket Set #9. (Figure B)
Continue to kit assembly
(Figure B) (Figure A) (Figure B) (Figure A) (Figure B)
“B”
“B”
(Figure A)
Dash Disassembly 99-4544
27
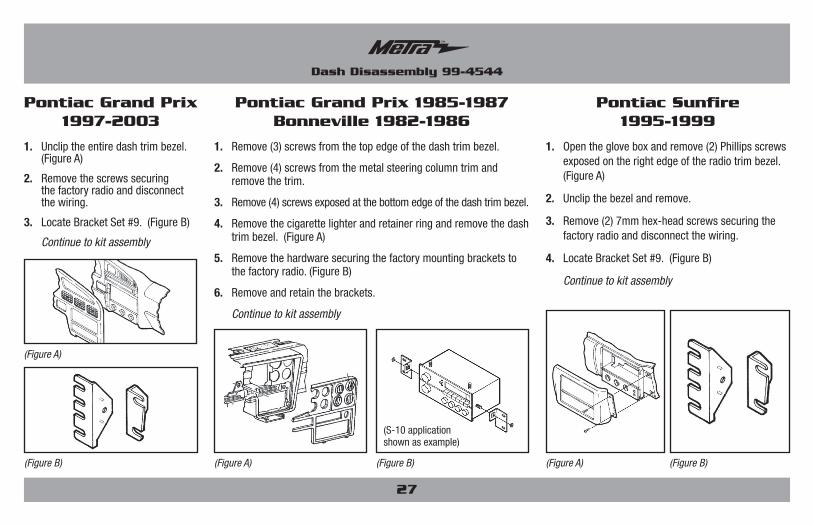
1. Unclip the entire dash trim bezel. (Figure A)
2. Remove the screws securing the factory radio and disconnect the wiring.
3. Locate Bracket Set #9. (Figure B)
Continue to kit assembly
Pontiac Grand Prix1997-2003
Pontiac Sunfire1995-1999
1. Open the glove box and remove (2) Phillips screws exposed on the right edge of the radio trim bezel. (Figure A)
2. Unclip the bezel and remove.
3. Remove (2) 7mm hex-head screws securing the factory radio and disconnect the wiring.
4. Locate Bracket Set #9. (Figure B)
Continue to kit assembly
(Figure A)
(Figure A) (Figure B)
Pontiac Grand Prix 1985-1987Bonneville 1982-1986
1. Remove (3) screws from the top edge of the dash trim bezel.
2. Remove (4) screws from the metal steering column trim and remove the trim.
3. Remove (4) screws exposed at the bottom edge of the dash trim bezel.
4. Remove the cigarette lighter and retainer ring and remove the dash trim bezel. (Figure A)
5. Remove the hardware securing the factory mounting brackets to the factory radio. (Figure B)
6. Remove and retain the brackets.
Continue to kit assembly
(Figure A) (Figure B)
(S-10 applicationshown as example)
(Figure B)
Dash Disassembly 99-4544
1. Choose a faceplate (according to the desired installation depth) and snap it onto the front of the radio housing. (Figure A)
Note: If an equalizer will be included in the installation,
the equalizer faceplate must be used.
2. Slide the equalizer brackets into the slots along the inner walls of the radio housing. (Figure B)
3. Top and/or bottom mounting brackets:
Secure the mounting bracket(s) to the housing with carriage bolts and keps nuts or studs and nuts. (Figure C)
28
All Vehicles
Kit Assembly 99-4544
(Figure B) (Figure C)(Figure A)
Saturn (all models)1991-1994
1. Gently unclip the dash trim bezel. (Figure A)
2. Remove (2) screws from the factory radio and disconnect the wiring.
3. Cut and remove all mounting tabs on Bracket #6 EXCEPT tabs “A”. (Figure B)
Note: Identify mounting tabs by the stamped letter on the back of each tab.
Continue to kit assembly
(Figure A) (Figure B)
“A”
“A”
Dash Disassembly 99-4544
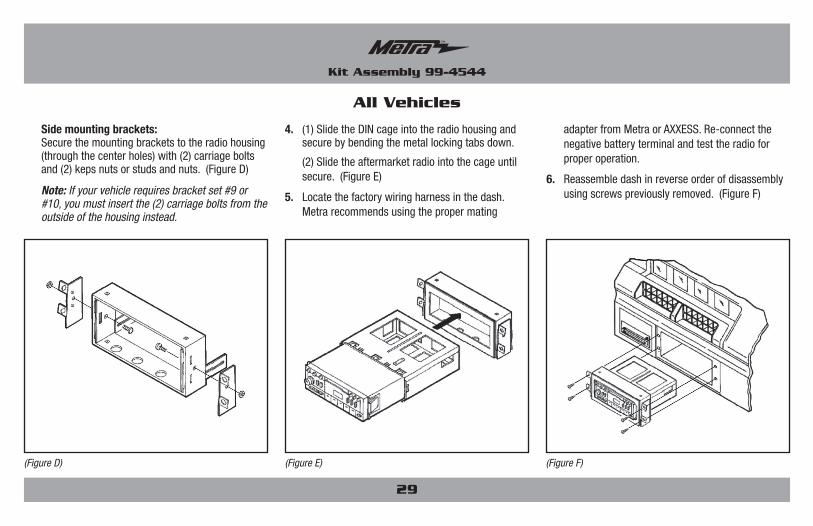
4. (1) Slide the DIN cage into the radio housing and secure by bending the metal locking tabs down.
(2) Slide the aftermarket radio into the cage until secure. (Figure E)
5. Locate the factory wiring harness in the dash. Metra recommends using the proper mating
adapter from Metra or AXXESS. Re-connect the negative battery terminal and test the radio for proper operation.
6. Reassemble dash in reverse order of disassembly using screws previously removed. (Figure F)
29
All Vehicles
Kit Assembly 99-4544
(Figure D) (Figure F)(Figure E)
Side mounting brackets: Secure the mounting brackets to the radio housing
(through the center holes) with (2) carriage bolts and (2) keps nuts or studs and nuts. (Figure D)
Note: If your vehicle requires bracket set #9 or #10, you must insert the (2) carriage bolts from the outside of the housing instead.
Notes
31

Notes
32

METRA - The World’s best kits ® metraonline.com © COPYRIGHT 2016 METRA ELECTRONICS CORPORATION
REV.
10/
18/2
016
INS
T-45
44
KNOWLEDGE IS POWEREnhance your installation and fabrication skills by enrolling in the most recognized and respected mobile electronics school in our industry.Log onto www.installerinstitute.com or call 800-354-6782 for more information and take steps toward a better tomorrow.
Metra recommends MECP certified technicians
Installation instructions for part INST-4544
®
IMPORTANTIf you are having difficulties with the installation of this product, please call our Tech Support line at 1-800-253-TECH. Before doing so, look over the instructions a second time, and make sure the installation was performed exactly as the instructions are stated. Please have the vehicle apart and ready to perform troubleshooting steps before calling.

METRA - The World’s best kits ® metraonline.com
REV.
10/
18/2
016
INS
T-45
44
Instrucciones de instalación para la pieza INST-4544
®
¡PRECAUCIÓN! Todos los accesorios, interruptores, paneles de con-troles de clima y especialmente las luces del indicador de las bolsas de aire deben estar conectados antes ciclar la ignición. Además, no quite el radio de fábrica con la llave en la posición o de encendido ni con el vehículo funcionando.
© COPYRIGHT 2016 METRA ELECTRONICS CORPORATION
• Provisión de radio DIN• También para vehículos equipados con J-2000 estilo panel
• A) Carcasa del radio • B) Placa frontal plana • C) Placa frontal de 1/2” • D) Placa frontal de 1” • E) Placa frontal del ecualizador • F) Soportes del ecualizador • G) Juego de soportes #1 • H) Juego de soportes #2 • I) Juego de soportes #3 • J) Juego de soportes #4 • K) Juego de soportes #5 • L) Juego de soportes #6 • M) Juego de soportes #7 • N) Juego de soportes #8 • O) Juego de soportes #9 • P) Juego de soportes #10 • Q) Soporte #(L) S-10 • R) (4) pernos cabeza de hongo/montantes • S) (4) tuercas
CARACTERÍSTICAS DEL KIT
COMPONENTES DEL KIT
• Herramienta de remoción de panel/destornillador de paleta • Destornillador de cabeza Torx • Llave de tubo
HERRAMIENTAS REQUERIDAS
GM 1982-200599-4544, IBR-444GM
B CA D E
G HF I J
L MK N O
Q RP S
APLICACIONESVer interior de la portada
99-4544
Aplicaciones
2
* Nota: Los soportes de montaje de fábrica deben retenerse y usarse con este vehículo.
Buick Century* ...................... 1982-1996
Electra*........................ 1984-1990
Estate Wagon* ............. 1984-1994
LeSabre* ..................... 1984-1994
Park Avenue* ............... 1984-1994
Reatta* ........................ 1990-1991
Regal* ......................... 1984-1987
Riviera* ........................ 1983-1985
Riviera* ........................ 1990-1995
Roadmaster ................ 1991-1994
Skyhawk* .................... 1982-1989
Skylark* ....................... 1983-1995
Cadillac
Cimarron .................... 1982-1988
DeVille* ........................ 1985-1995
Eldorado* ..................... 1984-1991
Escalade ..................... 1999-2002
Fleetwood* .................. 1985-1992
Seville* ........................ 1984-1991
Chevrolet Astro ........................... 1985-2005Avalanche .................... 2002 Beretta ....................... 1991-1996
Blazer (tamaño completo) *... 1989-1991C/K Pickup .................. 1995-2000Camaro ....................... 1982-1992Camaro ....................... 1997-2002Caprice ....................... 1991-1996Cavalier ...................... 1982-1999
Celebrity* ..................... 1982-1990
Citation II* .................... 1985Corsica ....................... 1991-1996
Corvette* ..................... 1984-1989Corvette ...................... 1997-2004EI Camino ................... 1986-1987Express ....................... 1996-2000
G-Series Van ................ 1988-1996Impala ........................ 1994-1996Lumina ....................... 1990-2001Lumina APV ................ 1990-1996
Chevrolet (seguido)
Malibu ........................ 1997-2000
Monte Carlo ................ 1986-1988
Monte Carlo ................ 1995-1999
Nova ........................... 1985-1988
S-10 Blazer ................ 1982-1994
S-10 Blazer ................ 1998-2001
S-10 Pickup ................ 1982-1993
S-10 Pickup ................ 1998-2001
Silverado .................... 1999-2002
Suburban* ................... 1989-1991
Suburban .................... 1995-2002
Tahoe ......................... 1995-2002
Venture ....................... 1997-1999
GMCC/K Pickup ................... 1995-2000G-Series Van ................ 1988-1995
Jimmy (full)* ................ 1989-1991
S-15 Jimmy ................ 1998-2001
S-15 Jimmy ................ 1982-1994
GMC (seguido)
S-15 Pickup ................ 1982-1990Safari .......................... 1985-2004Savana ....................... 1996-2000Sierra ......................... 1999-2002Sonoma ....................... 1991-1993Sonoma ...................... 1998-2001
Suburban* ................... 1989-1991Suburban .................... 1995-1999Yukon ......................... 1995-2002
IsuzuHombre ....................... 1998-2001
OldsmobileAchieva* ...................... 1992-1995Bravada ...................... 1991-1994
Cutlass Calais* ............. 1984-1991
Cutlass Ciera* .............. 1982-1996
Cutlass Supreme* ........ 1984-1988
Delta 88* ..................... 1986-1988
Firenza* ....................... 1982-1988
Oldsmobile (seguido)
Ninety-Eight* ............... 1984-1990Omega ........................ 1983-1984Silhouette ................... 1990-1999Toronado .................... 1982-1985
Pontiac6000 ........................... 1982-1991
Bonneville* .................. 1982-1999
Fiero* .......................... 1984-1988Firebird ....................... 1982-2002
Grand Am* ................... 1985-1995Grand Am ................... 1996-2000
Grand Prix* .................. 1985-1987Grand Prix ................... 1990-2003Montana ..................... 1999Sunbird** .................... 1982-1988Sunfire ........................ 1995-1999TransSport .................. 1990-1998
Saturn(todos los modelos) ..... 1991-1994
** Nota: Los vehículos están equipados con J-2000 radios de fábrica estilo de panel.
99-4544
Indice
3
Desmontaje del tablero
- Buick Century 1982-1996 .............................................................................................5
- Buick Electra 1984-1990, Buick Estate Wagon/LeSabre/Park Avenue 1984-1994 ..........5
- Buick Reatta 1990-1991 ...............................................................................................5
- Buick Regal 1984-1987 .................................................................................................6
- Buick Riviera 1983-1985 ...............................................................................................6
- Buick Riviera 1990-1995 ...............................................................................................6
- Buick Roadmaster 1991-1994/Chevrolet Caprice 1991-1993 ........................................7
- Buick Syhawk 1982-1989/Oldsmobile Firenza 1982-1988 ............................................7
- Buick Skylark 1983-1986 ..............................................................................................8
- Buick Skylark 1987-1989 ..............................................................................................8
- Buick Skylark 1990-1995 ..............................................................................................8
- Cadillac Deville 1985-1995/Fleetwood 1985-1992 ........................................................9
- Cadillac Eldorado/Seville 1984-1991 .............................................................................9
- Cadillac Escalade, Escalade EXT/Chevrolet Avalanche, C-K Pickup,Silverado,
Suburban, Tahoe/GMC C-K Pickup, Sierra, Suburban, Yukon 1995-2002 ........................9
- Chevrolet Astro/GMC Safari 1985-1989 .......................................................................10
- Chevrolet Astro/GMC Safari 1990-1995 .......................................................................10
- Chevrolet Astro/GMC Safari 1996-2005 .......................................................................10
- Chevrolet Beretta/Corsica 1991-1996 ..........................................................................11
- Chevrolet Blazer (tamaño completo)/Suburban/GMC Jimmy (tamaño completo)/
Suburban 1989-1991 ..................................................................................................11
- Chevrolet S-10 Blazer/S-10 Pickup 1998-2001, GMC S-15 Jimmy/
Sonoma 1998-2001, Isuzu Hombre 1998-2001 ...........................................................11
- Chevrolet Camaro/Pontiac Firebird 1982-1984 ............................................................12
- Chevrolet Camaro/Pontiac Firebird 1985-1992 ............................................................12
- Chevrolet Camaro 1997-2002 .....................................................................................12
- Chevrolet Caprice/Impala 1994-1996 ..........................................................................13
- Chevrolet Cavalier 1982-1990/Cadillac Cimarron 1982-1988
Pontiac Sunbird con radio de fábrica de estilo panel de J-2000 1982-1988 ..........................13
- Chevrolet Cavalier 1991-1994 .....................................................................................14
- Chevrolet Cavalier 1995-1999 .....................................................................................14
- Chevrolet Celebrity 1982-1983 ....................................................................................15
- Chevrolet Celebrity 1984-1990 ....................................................................................15
- Chevrolet Citation II 1985 ............................................................................................16
- Chevrolet Corvette 1984-1989.....................................................................................16
- Chevrolet Corvette 1997-2004.....................................................................................16
- Chevrolet El Camino 1986-1987, Monte Carlo 1986-1988 ...........................................17
- Chevrolet Express/GMC Savana 1996-2000 .................................................................17
99-4544
Indice
4
- Chevrolet Lumina 1990-1994 ......................................................................................17
- Chevrolet Lumina 1995-2001/Monte Carlo 1995-1999 ................................................20
- Chevrolet Lumina APV/Oldsmobile Silhouette/Pontiac TransSport 1990-1995 ...............18
- Chevrolet Lumina APV/Oldsmobile Silhouette/Pontiac TransSport 1996 ........................18
- Chevrolet Malibu 1997-2000 .......................................................................................18
- Chevrolet Nova 1985-1988 ..........................................................................................19
- Chevrolet S-10 Pickup/S-10 Blazer/GMC S-15 Pickup/S-15 Jimmy 1982-1985 ...........19
- Chevrolet S-10 Pickup 1986-1993/S-10 Blazer 1986-1994
GMC S-15 Pickup 1986-1990/S-15 Jimmy 1986-1994/Sonoma 1991-1993,
Oldsmobile Bravada 1991-1994 ..................................................................................19
- Chevrolet/GMC G-Series Van 1988-1996 .....................................................................20
- Chevrolet Venture/Oldsmobile Silhouette 1997-1999,
Pontiac Montana 1999/Transport 1997-1998 ...............................................................20
- Oldsmobile Ninety-Eight 1984-1990/Delta 88 1986-1988 ...........................................21
- Oldsmobile Achieva 1992-1995 ...................................................................................21
- Oldsmobile Cutlass Calais 1984-1991 .........................................................................21
- Oldsmobile Cutlass Ciera 1982-1996 ...........................................................................22
- Oldsmobile Cutlass Supreme 1984-1988 .....................................................................22
- Oldsmobile Omega 1983-1984 ....................................................................................22
- Oldsmobile Toronado 1982-1985 .................................................................................23
- Pontiac 6000 1982-1991 .............................................................................................23
- Pontiac Bonneville 1987-1993 .....................................................................................23
- Pontiac Bonneville 1994-1999 .....................................................................................24
- Pontiac Fiero 1984-1988 .............................................................................................24
- Pontiac Firebird 1993-2002 .........................................................................................24
- Pontiac Grand Am 1985-1991......................................................................................25
- Pontiac Grand Am 1992-1995......................................................................................25
- Pontiac Grand Am 1996-1998......................................................................................25
- Pontiac Grand Am 1999-2000......................................................................................26
- Pontiac Grand Prix 1985-1987/Bonneville 1982-1986 .................................................27
- Pontiac Grand Prix 1990-1993 .....................................................................................26
- Pontiac Grand Prix 1994-1996 .....................................................................................26
- Pontiac Grand Prix 1997-2003 .....................................................................................27
- Pontiac Sunfire 1995-1999 ..........................................................................................27
- Saturn (todos los modelos) 1991-1994 ........................................................................28
Ensamble del kit ...................................................................................................... 28-29

5
1. Quite los (4) tornillos del borde interior superior del bisel de la moldura del tablero. (Figura A)
2. Quite los (5) tornillos de ambos lados de la columna de dirección.
3. Quite los (3) tornillos Phillips que sujetan la carcasa del interruptor y saque la carcasa.
4. Quite los tornillos que sujetan los soportes de montaje de fábrica a la unidad central de fábrica. (Figura B)
5. Quite y conserve los soportes.
Continuará al ensamble del kit
Buick Century1982-1996
Buick Reatta1990-1991
Buick Electra 1984-1990Buick Estate Wagon/LeSabre/Park Avenue
1984-1994
(Figura A) (Figura B)
(se muestra la aplicación S10 como ejemplo)
1. Suelte a presión el bisel de la moldura del control de clima y quite los (4) tornillos de estrella expuestos. (Figura A)
2. Jale el collar de la dirección hacia atrás y con cuidado suelte a presión el bisel de la moldura del tablero.
3. Quite los tornillos que sujetan los soportes de montaje de fábrica a la unidad central de fábrica. (Figura B)
4. Quite y conserve los soportes. Continuará al ensamble del kit
(Figura A) (Figura B)
(se muestra la aplicación S10 como ejemplo)
1. Quite los (2) tornillos de cabeza Torx de arriba del panel de instrumentos. (Figura A)
2. Quite (1) tornillo de cabeza Torx de cada rejilla de aire acondicionado. (Figura A)
3. Desenganche el bisel de la moldura del tablero y quite.
4. Quite los tornillos que sujetan los soportes de montaje de fábrica a la unidad central de fábrica. (Figura B)
5. Quite y conserve los soportes.
Continuará al ensamble del kit
(Figura A) (Figura B)
(se muestra la aplicación S10 como ejemplo)
Desmontaje del tablero 99-4544
6
1. Quite las perillas del radio y el encendedor de cigarrillos.
2. Desenganche con cuidado el bisel de la moldura del radio y quítelo. (Figura A)
3. Quite los tornillos que sujetan los soportes de montaje de fábrica a la unidad central de fábrica. (Figura B)
4. Quite y conserve los soportes.
Continuará al ensamble del kit
Buick Regal1984-1987
Buick Riviera1990-1995
Buick Riviera1983-1985
1. Con cuidado jale y quite el bisel de la moldura del tablero. (Figura A)
2. Quite los (4) tornillos que sujetan la unidad central de fábrica y desconecte el cableado.
3. Quite los tornillos que sujetan los soportes de montaje de fábrica a la unidad central de fábrica. (Figura B)
4. Quite y conserve los soportes.
Continuará al ensamble del kit
1. Quite los (2) tornillos de cabeza Torx de arriba del panel de instrumentos. (Figura A)
2. Quite (1) tornillo de cabeza Torx de cada rejilla de aire acondicionado. (Figura A)
3. Suelte a presión el panel.
4. Quite los tornillos que sujetan los soportes de montaje de fábrica a la unidad central de fábrica. (Figura B)
5. Quite y conserve los soportes.
Continuará al ensamble del kit
(Figura A) (Figura B)
(se muestra la aplicación S10 como ejemplo)
(Figura A) (Figura B)
(se muestra la aplicación S10 como ejemplo)
(Figura A) (Figura B)
(se muestra la aplicación S10 como ejemplo)
Desmontaje del tablero 99-4544
1. Quite los (2) tornillos del panel de servicio del lado del conductor y desenganche el panel.
2. Haga palanca para quitar la pieza de moldura localizada arriba de la guantera y quite (1) tornillo.
3. Quite los (3) tornillos del borde superior del bisel de la moldura del tablero. (Figura A)
4. Quite (1) tornillo de la esquina inferior izquierda de la guantera y (1) tornillo de la palanca que libera el freno de mano.
5. Quite el bisel de la moldura del tablero.
6. Corte y quite todas las pestañas de montaje del soporte #4, EXCEPTO las pestañas “B”. (Figura B)
Nota: Identifique las pestañas de montaje con la letra estampada atrás de cada pestaña.
Continuará al ensamble del kit
Buick Roadmaster 1991-1994Chevrolet Caprice 1991-1993
7
(Figura A)
(Figura B)
“B”
1. Quite la guantera quitando el gancho de alambre de la correa de la puerta y los (4) tornillos. (Figura A)
2. Quite los (2) tornillos de abajo de la carcasa del encendedor y los (3) tornillos de abajo de la columna de dirección. (Figura A)
3. Quite (1) tornillo de la parte superior izquierda de la unidad central de fábrica y desenganche el bisel de la moldura del tablero. (Figura A)
4. Quite los tornillos que sujetan los soportes de montaje de fábrica a la unidad central de fábrica. (Figura B)
5. Quite y conserve los soportes.
Continuará al ensamble del kit
Buick Syhawk 1982-1989/OldsmobileFirenza 1982-1988
(Figura A)
(Figura B)
(se muestra la aplicación S10 como ejemplo)
Desmontaje del tablero 99-4544

8
1. Quite los (4) tornillos del borde superior del panel de instrumentos. (Figura A)
2. Quite (1) tornillo de la esquina inferior izquierda del panel. (Figura A)
3. Quite los (2) tornillos de la moldura de la columna de dirección y quite la moldura.
4. Jale hacia arriba y saque el bisel de la moldura del tablero y retire.
5. Quite los tornillos que sujetan los soportes de montaje de fábrica a la unidad central de fábrica. (Figura B)
6. Quite y conserve los soportes.
Continuará al ensamble del kit
Buick Skylark 1983-1986 Buick Skylark 1990-1995Buick Skylark1987-1989
1. Suelte a presión el bisel de la palanca de velocidades de la base de la consola.
2. Quite los (2) tornillos que sujetan la parte inferior del bisel de la moldura del tablero y quite el bisel. (Figura A)
3. Quite los tornillos que sujetan los soportes de montaje de fábrica a la unidad central de fábrica. (Figura B)
4. Quite y conserve los soportes.
Continuará al ensamble del kit
1. Jale el cenicero y quite los (2) tornillos expuestos en la cavidad del cenicero.
2. Quite los (2) tornillos que sujetan el frente del cenicero y la sección inferior del bisel de la moldura del tablero. (Figura A)
3. Usando una herramienta de remoción de panel, haga palanca suavemente para sacar el bisel de la moldura y retire.
4. Quite las (2) tuercas de la parte inferior de la unidad central de fábrica y desconecte el cableado.
5. Quite los tornillos que sujetan los soportes de montaje de fábrica a la unidad central de fábrica. (Figura B)
6. Quite y conserve los soportes. Continuará al ensamble del kit
(Figura A) (Figura B)
(se muestra la aplicación S10 como ejemplo)
(Figura A) (Figura B)
(se muestra la aplicación S10 como ejemplo)
(Figura A) (Figura B)
(se muestra la aplicación S10 como ejemplo)
Desmontaje del tablero 99-4544
9
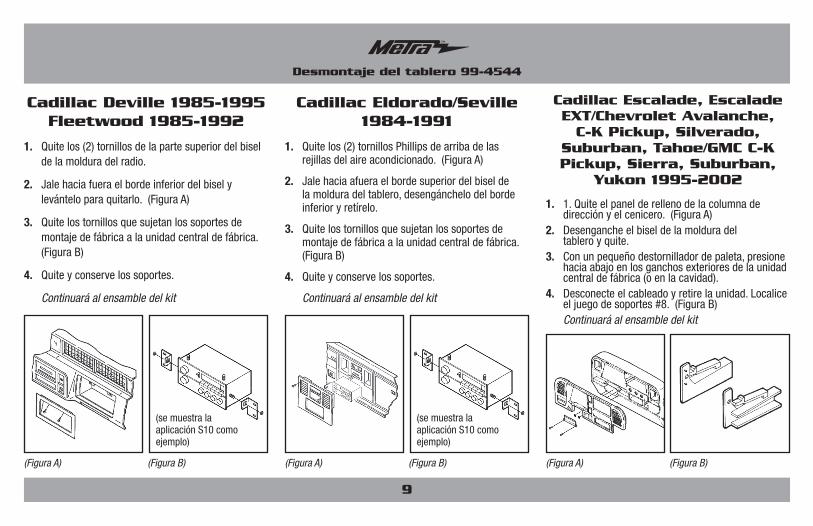
1. Quite los (2) tornillos de la parte superior del bisel de la moldura del radio.
2. Jale hacia fuera el borde inferior del bisel y levántelo para quitarlo. (Figura A)
3. Quite los tornillos que sujetan los soportes de montaje de fábrica a la unidad central de fábrica. (Figura B)
4. Quite y conserve los soportes.
Continuará al ensamble del kit
Cadillac Deville 1985-1995Fleetwood 1985-1992
Cadillac Escalade, Escalade EXT/Chevrolet Avalanche,
C-K Pickup, Silverado, Suburban, Tahoe/GMC C-K Pickup, Sierra, Suburban,
Yukon 1995-2002
Cadillac Eldorado/Seville 1984-1991
1. Quite los (2) tornillos Phillips de arriba de las rejillas del aire acondicionado. (Figura A)
2. Jale hacia afuera el borde superior del bisel de la moldura del tablero, desengánchelo del borde inferior y retírelo.
3. Quite los tornillos que sujetan los soportes de montaje de fábrica a la unidad central de fábrica. (Figura B)
4. Quite y conserve los soportes.
Continuará al ensamble del kit
1. 1. Quite el panel de relleno de la columna de dirección y el cenicero. (Figura A)
2. Desenganche el bisel de la moldura del tablero y quite.
3. Con un pequeño destornillador de paleta, presione hacia abajo en los ganchos exteriores de la unidad central de fábrica (o en la cavidad).
4. Desconecte el cableado y retire la unidad. Localice el juego de soportes #8. (Figura B)
Continuará al ensamble del kit
(Figura A) (Figura B)
(se muestra la aplicación S10 como ejemplo)
(Figura A) (Figura B)
(se muestra la aplicación S10 como ejemplo)
(Figura A) (Figura B)
Desmontaje del tablero 99-4544

10
1. Quite los (3) tornillos Phillips de la porción superior del bisel de la moldura del tablero. (Figura A)
2. Abra la guantera y quite los (2) pernos de 10mm del borde inferior del bisel de la moldura. (Figura A)
3. Jale la moldura de la consola hacia adelante y quite los (2) pernos de 7mm expuestos.
4. Desenganche y quite con cuidado el bisel de la moldura. Quite los (2) tornillos de 7mm de la unidad central de fábrica y desconecte el cableado.
5. Corte y quite todas las pestañas de montaje del soporte #3, EXCEPTO las pestañas “A”. (Figura A)
Nota: Identifique las pestañas de montaje con la letra estampada atrás de cada pestaña.
Continuará al ensamble del kit
Chevrolet Astro/GMCSafari 1985-1989
Chevrolet Astro/GMCSafari 1996-2004
Chevrolet Astro/GMCSafari 1990-1995
1. Quite los (2) tornillos de la parte inferior del bisel de la moldura del tablero. (Figura A)
2. Desenganche y quite con cuidado el bisel.
3. Quite los (4) tornillos de la unidad central de fábrica y desconecte el cableado.
4. Corte y quite todas las pestañas de montaje del soporte #1, EXCEPTO las pestañas “A”. (Figura B)
Nota: Identifique las pestañas de montaje con la letra estampada atrás de cada pestaña.
Continuará al ensamble del kit
1. Coloque el selector de velocidades en su posición más baja.
2. Desenganche el perímetro del bisel de la moldura del tablero. (Figura A)
3. Desconecte el arnés del control del aire acondicionado trasero y el interruptor de los faros de la parte posterior del bisel de la moldura del tablero y quite el bisel.
4. Con un destornillador de paleta, presione hacia abajo en los ganchos exteriores de la unidad central de fábrica y quítela.
5. Localice el juego de soportes #8. (Figura B) Continuará al ensamble del kit
(Figura A) (Figura B) (Figura A) (Figura B) (Figura A) (Figura B)
“A”
“A”
“A”
Desmontaje del tablero 99-4544
11
1. Usando una herramienta de remoción de panel, haga palanca hacia afuera para sacar el bisel de la moldura del tablero y retire. (Figura A)
2. Quite los (2) tornillos que sujetan la unidad central de fábrica y desconecte el cableado.
3. Localice el soporte #7. (Figura B)
Continuará al ensamble del kit
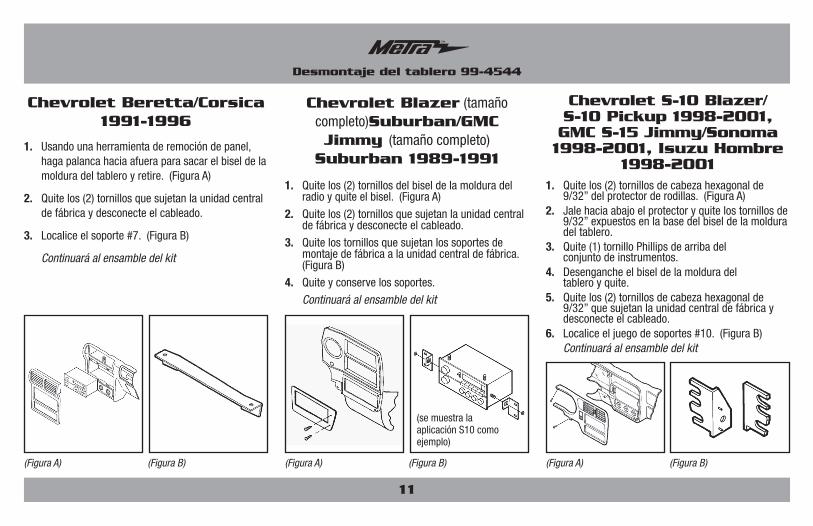
Chevrolet Beretta/Corsica 1991-1996
Chevrolet S-10 Blazer/S-10 Pickup 1998-2001, GMC S-15 Jimmy/Sonoma 1998-2001, Isuzu Hombre
1998-2001
Chevrolet Blazer (tamaño completo)Suburban/GMC Jimmy (tamaño completo)
Suburban 1989-1991
1. Quite los (2) tornillos del bisel de la moldura del radio y quite el bisel. (Figura A)
2. Quite los (2) tornillos que sujetan la unidad central de fábrica y desconecte el cableado.
3. Quite los tornillos que sujetan los soportes de montaje de fábrica a la unidad central de fábrica. (Figura B)
4. Quite y conserve los soportes.
Continuará al ensamble del kit
1. Quite los (2) tornillos de cabeza hexagonal de 9/32” del protector de rodillas. (Figura A)
2. Jale hacia abajo el protector y quite los tornillos de 9/32” expuestos en la base del bisel de la moldura del tablero.
3. Quite (1) tornillo Phillips de arriba del conjunto de instrumentos.
4. Desenganche el bisel de la moldura del tablero y quite.
5. Quite los (2) tornillos de cabeza hexagonal de 9/32” que sujetan la unidad central de fábrica y desconecte el cableado.
6. Localice el juego de soportes #10. (Figura B) Continuará al ensamble del kit
(Figura A) (Figura B) (Figura A) (Figura B)
(se muestra la aplicación S10 como ejemplo)
(Figura A) (Figura B)
Desmontaje del tablero 99-4544
12
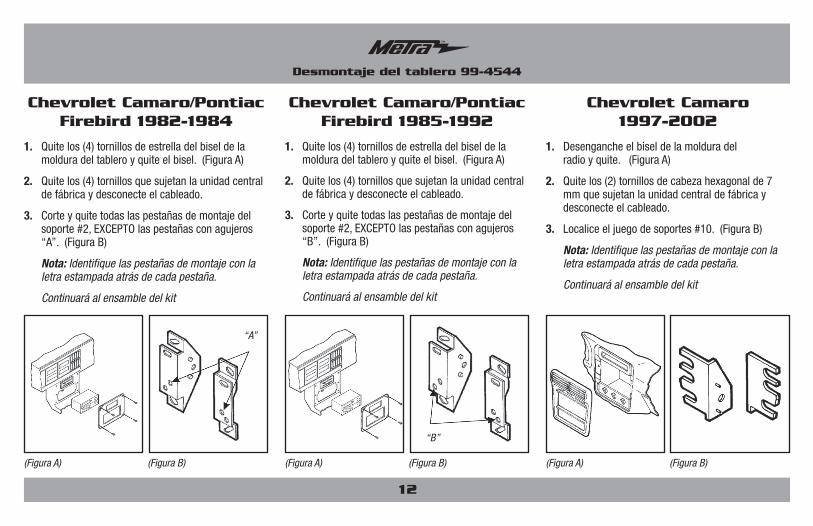
1. Quite los (4) tornillos de estrella del bisel de la moldura del tablero y quite el bisel. (Figura A)
2. Quite los (4) tornillos que sujetan la unidad central de fábrica y desconecte el cableado.
3. Corte y quite todas las pestañas de montaje del soporte #2, EXCEPTO las pestañas con agujeros “A”. (Figura B)
Nota: Identifique las pestañas de montaje con la letra estampada atrás de cada pestaña.
Continuará al ensamble del kit
Chevrolet Camaro/PontiacFirebird 1982-1984
Chevrolet Camaro1997-2002
Chevrolet Camaro/PontiacFirebird 1985-1992
1. Quite los (4) tornillos de estrella del bisel de la moldura del tablero y quite el bisel. (Figura A)
2. Quite los (4) tornillos que sujetan la unidad central de fábrica y desconecte el cableado.
3. Corte y quite todas las pestañas de montaje del soporte #2, EXCEPTO las pestañas con agujeros “B”. (Figura B)
Nota: Identifique las pestañas de montaje con la letra estampada atrás de cada pestaña.
Continuará al ensamble del kit
1. Desenganche el bisel de la moldura del radio y quite. (Figura A)
2. Quite los (2) tornillos de cabeza hexagonal de 7 mm que sujetan la unidad central de fábrica y desconecte el cableado.
3. Localice el juego de soportes #10. (Figura B)
Nota: Identifique las pestañas de montaje con la letra estampada atrás de cada pestaña.
Continuará al ensamble del kit
(Figura A) (Figura B) (Figura A) (Figura B) (Figura A) (Figura B)
“A”
“B”
Desmontaje del tablero 99-4544

13
1. Quite los (5) tornillos de cabeza hexagonal de la cavidad del cenicero. (Figura A)
2. Quite los (4) tornillos de cabeza hexagonal de la base del bisel de la moldura del tablero. (Figura A)
3. Suelte a presión la tapa de la caja de fusibles y quite (1) tornillo de cabeza hexagonal expuesto.
4. Quite los (2) tornillos de cabeza hexagonal de arriba del conjunto de instrumentos. (Figura A)
5. Coloque el selector de velocidades en “D1”. Jale hacia afuera el bisel de la moldura del conjunto y quítelo.
6. Quite (1) tornillo de cabeza hexagonal expuesto del borde izquierdo del bisel de la moldura del tablero.
7. Desenganche el bisel de la moldura del tablero (incluyendo el bisel de la moldura del tablero) y quítelo.
8. Localice el juego de soportes #10. (Figura B)
Continuará al ensamble del kit
Chevrolet Caprice/Impala SS 1994-1996
(Figura A)
(Figura B)
1. Quite los (6) tornillos de estrella del bisel de la moldura del tablero y quite el bisel. (Figura A)
2. Quite los (2) tornillos de la unidad central de fábrica y desconecte el cableado.
3. Corte y quite todas las pestañas de montaje del soporte #4, EXCEPTO las pestañas “A”. (Figura B)
Nota: Identifique las pestañas de montaje con la letra estampada atrás de cada pestaña.
Continuará al ensamble del kit
(Figura A)
(Figura B)
“A”
“A”
Desmontaje del tablero 99-4544
Chevrolet Cavalier 1982-1990,Cadillac Cimarron 1982-1988,
Pontiac Sunbird con radio de fábrica de estilopanel de J-2000 1982-1988

14
1. Usando una herramienta de remoción de panel, haga palanca cuidadosamente para sacar el bisel de la moldura del tablero y retire. (Figura A)
2. Quite los (2) tornillos que sujetan la unidad central de fábrica y desconecte el cableado.
3. Corte y quite todas las pestañas de montaje del soporte #3, EXCEPTO las pestañas “B”. (Figura B)
Nota: Identifique las pestañas de montaje con la letra estampada atrás de cada pestaña.
Continuará al ensamble del kit
Chevrolet Cavalier1991-1994
Chevrolet Cavalier 1995-1999
1. Abra la puerta del conductor y quite el panel de fusibles en el extremo del tablero, luego abra la puerta del pasajero y quite el panel del extremo del tablero.
2. Quite (1) tornillo Phillips expuesto de cada lado.
3. Quite los (3) tornillos de 7mm de cabeza hexagonal de la parte superior del revestimiento de la guantera.
4. Quite los (2) tornillos de 7mm de cabeza hexagonal de la esquina superior izquierda de la cavidad de la guantera.
5. Quite (1) tornillo Phillips del conducto del desempañador.
6. Quite el ducto y (1) tornillo Phillips expuesto.
7. Quite la almohadilla del tablero y (3) tornillos Phillips expuestos en la parte superior del bisel de la moldura del radio. (Figura A)
8. Localice el juego de soportes #10. (Figura B)
Continuará al ensamble del kit
(Figura A) (Figura B) (Figura A) (Figura B)
“B”
“B”
Desmontaje del tablero 99-4544

15
1. Quite la placa plástica de enseguida de cada rejilla de aire acondicionado y quite los (2) tornillos expuestos. (Figura A)
2. Quite los (4) tornillos que rodean la columna de dirección. (Figura A)
3. Presione el resorte de la perilla de control de la luz, quite la perilla y levante y saque el bisel.
4. Quite los tornillos que sujetan los soportes de montaje de fábrica a la unidad central de fábrica. (Figura B)
5. Quite y conserve los soportes. Continuará al ensamble del kit
Chevrolet Celebrity1982-1983
Chevrolet Celebrity 1984-1990
1. Quite el compartimiento de la guantera presionando el gancho de la parte inferior del revestimiento de la guantera y quite las (6) tuercas expuestas arriba de la apertura. (Figura A)
2. Quite los (6) tornillos Phillips debajo de la columna de dirección.
3. Quite la perilla de los faros, presionando el gancho de la parte posterior de la perilla y quitando la tuerca.
4. Quite el encendedor y desconecte el cableado.
5. Sujete el enchufe del encendedor, desatornille la tuerca de bronce de la parte posterior del encendedor y quite el enchufe.
6. Quite el bisel de la moldura del tablero y desconecte el cableado.
7. Quite los tornillos que sujetan los soportes de montaje de fábrica a la unidad central de fábrica. (Figura B)
8. Quite y conserve los soportes.
Continuará al ensamble del kit
(Figura A) (Figura A) (Figura B)(Figura B)
(se muestra la aplicación S10 como ejemplo)
(se muestra la aplicación S10 como ejemplo)
Desmontaje del tablero 99-4544
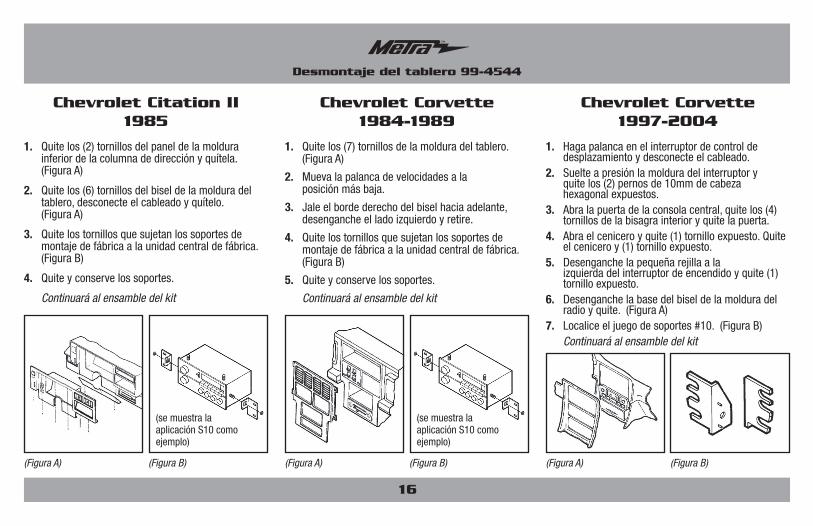
16
1. Quite los (2) tornillos del panel de la moldura inferior de la columna de dirección y quítela. (Figura A)
2. Quite los (6) tornillos del bisel de la moldura del tablero, desconecte el cableado y quítelo. (Figura A)
3. Quite los tornillos que sujetan los soportes de montaje de fábrica a la unidad central de fábrica. (Figura B)
4. Quite y conserve los soportes.
Continuará al ensamble del kit
Chevrolet Citation II1985
Chevrolet Corvette1997-2004
Chevrolet Corvette1984-1989
1. Quite los (7) tornillos de la moldura del tablero. (Figura A)
2. Mueva la palanca de velocidades a la posición más baja.
3. Jale el borde derecho del bisel hacia adelante, desenganche el lado izquierdo y retire.
4. Quite los tornillos que sujetan los soportes de montaje de fábrica a la unidad central de fábrica. (Figura B)
5. Quite y conserve los soportes.
Continuará al ensamble del kit
1. Haga palanca en el interruptor de control de desplazamiento y desconecte el cableado.
2. Suelte a presión la moldura del interruptor y quite los (2) pernos de 10mm de cabeza hexagonal expuestos.
3. Abra la puerta de la consola central, quite los (4) tornillos de la bisagra interior y quite la puerta.
4. Abra el cenicero y quite (1) tornillo expuesto. Quite el cenicero y (1) tornillo expuesto.
5. Desenganche la pequeña rejilla a la izquierda del interruptor de encendido y quite (1) tornillo expuesto.
6. Desenganche la base del bisel de la moldura del radio y quite. (Figura A)
7. Localice el juego de soportes #10. (Figura B) Continuará al ensamble del kit
(Figura A) (Figura B)
(se muestra la aplicación S10 como ejemplo)
(Figura A) (Figura B)
(se muestra la aplicación S10 como ejemplo)
(Figura A) (Figura B)
Desmontaje del tablero 99-4544

17
1. Quite los (4) tornillos del bisel de la moldura del tablero. (Figura A)
2. Quite el bisel y desconecte el cableado del encendedor.
3. Corte y quite todas las pestañas de montaje del soporte #2, EXCEPTO las pestañas “C”. (Figura B)
Nota: Identifique las pestañas de montaje con la letra estampada atrás de cada pestaña.
Continuará al ensamble del kit
Chevrolet El Camino1986-1987, Monte Carlo
1986-1988
Chevrolet Lumina1990-1994
Chevrolet Express/GMC Savana 1996-2000
1. Desenganche la pieza de moldura de plástico localizada debajo de la columna de dirección.
2. Desenganche el bisel de la moldura del tablero. Jale el bisel por encima de la columna de dirección y desconecte el cableado. (Figura A)
3. Con un destornillador de paleta, presione hacia abajo en los ganchos exteriores de la unidad central de fábrica y quítela.
4. Localice el juego de soportes #8. (Figura B)
Continuará al ensamble del kit
1. Quite los (2) tornillos del panel inferior de la columna de dirección.
2. Jale el panel hacia abajo para obtener acceso a la porción inferior del bisel de la moldura del radio. (Figura A)
3. Jale los bordes superior e inferior del bisel. (Figura A)
4. Corte y quite todas las pestañas de montaje del soporte #5, EXCEPTO las pestañas “A”. (Figura B)
Nota: Identifique las pestañas de montaje con la letra estampada atrás de cada pestaña.
Continuará al ensamble del kit
(Figura A) (Figura B) (Figura A) (Figura B) (Figura A) (Figura B)
“C”
“C”
“A”
“A”
“A”“A”
Desmontaje del tablero 99-4544
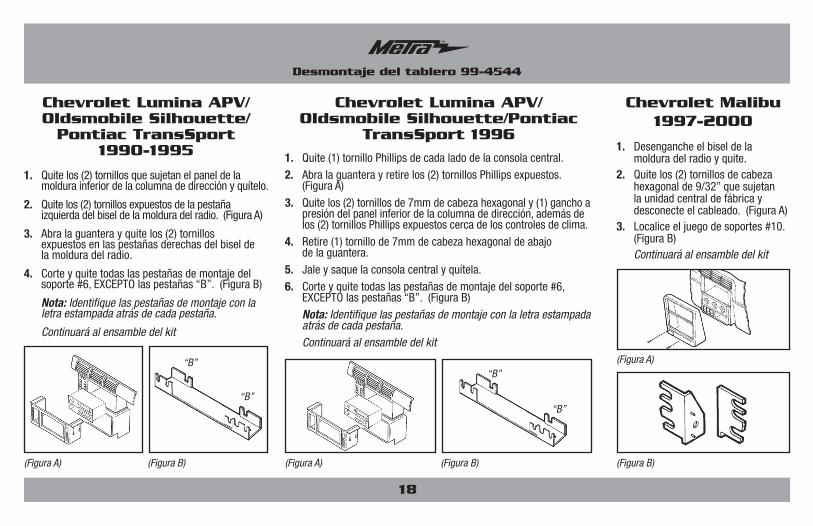
18
1. Quite los (2) tornillos que sujetan el panel de la moldura inferior de la columna de dirección y quítelo.
2. Quite los (2) tornillos expuestos de la pestaña izquierda del bisel de la moldura del radio. (Figura A)
3. Abra la guantera y quite los (2) tornillos expuestos en las pestañas derechas del bisel de la moldura del radio.
4. Corte y quite todas las pestañas de montaje del soporte #6, EXCEPTO las pestañas “B”. (Figura B)
Nota: Identifique las pestañas de montaje con la letra estampada atrás de cada pestaña.
Continuará al ensamble del kit
Chevrolet Lumina APV/Oldsmobile Silhouette/
Pontiac TransSport1990-1995
Chevrolet Malibu1997-2000
Chevrolet Lumina APV/Oldsmobile Silhouette/Pontiac
TransSport 19961. Desenganche el bisel de la
moldura del radio y quite. 2. Quite los (2) tornillos de cabeza
hexagonal de 9/32” que sujetan la unidad central de fábrica y desconecte el cableado. (Figura A)
3. Localice el juego de soportes #10. (Figura B)
Continuará al ensamble del kit
(Figura A) (Figura B) (Figura B)
“B”
“B”
1. Quite (1) tornillo Phillips de cada lado de la consola central. 2. Abra la guantera y retire los (2) tornillos Phillips expuestos.
(Figura A)3. Quite los (2) tornillos de 7mm de cabeza hexagonal y (1) gancho a
presión del panel inferior de la columna de dirección, además de los (2) tornillos Phillips expuestos cerca de los controles de clima.
4. Retire (1) tornillo de 7mm de cabeza hexagonal de abajo de la guantera.
5. Jale y saque la consola central y quítela.6. Corte y quite todas las pestañas de montaje del soporte #6,
EXCEPTO las pestañas “B”. (Figura B) Nota: Identifique las pestañas de montaje con la letra estampada
atrás de cada pestaña. Continuará al ensamble del kit
(Figura A) (Figura B)
“B”
“B”
(Figura A)
Desmontaje del tablero 99-4544

19
1. Quite el cenicero y los (2) tornillos del soporte del cenicero. (Figura A)
2. Quite los (2) tornillos de arriba de la apertura del radio y quite el bisel de la moldura del radio. (Figura A)
3. Corte y quite todas las pestañas de montaje del soporte #1, EXCEPTO las pestañas “B”. (Figura B)
Nota: Identifique las pestañas de montaje con la letra estampada atrás de cada pestaña.
Continuará al ensamble del kit
Chevrolet Nova1985-1988
Chevrolet S-10 Pickup 1986-1993/S-10 Blazer 1986-1994, GMC S-15
Pickup 1986-1990/S-15 Jimmy 1986-1994/Sonoma
1991-1993, Oldsmobile Bravada 1991-1994
Chevrolet S-10 Pickup/S-10 Blazer 1982-1985
GMC S-15 Pickup/S-15 Jimmy 1982-1985
1. Quite los (4) tornillos de estrella de las esquinas del bisel de la moldura del tablero. (Figura A)
2. Quite (1) tornillo de estrella de la esquina inferior derecha del panel del conjunto de instrumentos y quite el bisel de la moldura del tablero.
3. Corte y quite todas las pestañas de montaje del soporte #5, EXCEPTO las pestañas “B”. (Figura B)
Nota: Identifique las pestañas de montaje con la letra estampada atrás de cada pestaña.
Continuará al ensamble del kit
1. Quite el cenicero y (1) tornillo del interior de la cavidad del cenicero.
2. Abra la guantera y quite los (2) tornillos expuestos en el borde del bisel de la moldura del tablero. (Figura A)
3. Localice el soporte #(L) S-10 y el soporte derecho del juego de soportes #5.
4. Corte y quite todas las pestañas de montaje del soporte derecho EXCEPTO la pestaña superior “B”. (Figura B)
Nota: Identifique las pestañas de montaje con la letra estampada atrás de cada pestaña.
Continuará al ensamble del kit
(Figura A) (Figura B) (Figura A) (Figura B) (Figura A) (Figura B)
“B”
“B”
“B”
“B”
Desmontaje del tablero 99-4544

20
1. Desenganche el bisel de la moldura del radio con cuidado y quítela. (Figura A)
2. Quite los (2) tornillos que sujetan la unidad central de fábrica y desconecte el cableado.
3. Desconecte la terminal negativa de la batería para evitar un cortocircuito accidental.
4. Quite el cenicero y (1) tornillo Phillips expuesto en la cavidad del cenicero.
5. Quite (1) tornillo Phillips del compartimiento
del encendedor.6. Quite los (2) tornillos
Phillips que sujetan la unidad central de fábrica y desconecte el cableado.
7. Corte y quite todas las pestañas de montaje del soporte #1, EXCEPTO las pestañas “C”. (Figura B)
Nota: Identifique las pestañas de montaje con la letra estampada atrás de cada pestaña.
Continuará al ensamble del kit
Chevrolet/GMC G-Series Van1988-1996
Chevrolet Venture/Oldsmobile Silhouette
1997-1999, Pontiac Montana 1999/Transport
1997-1998
1. Quite el cenicero y (1) tornillo Phillips expuesto en la cavidad del cenicero.
2. Quite (1) tornillo Phillips del compartimiento del encendedor.
3. Quite los (2) tornillos Phillips que sujetan la unidad central de fábrica y desconecte el cableado.
4. Localice el juego de soportes #10. (Figura B)
Continuará al ensamble del kit
(Figura A) (Figura B)
“C”
“C”
(Figura A) (Figura B)
1. Desenganche el bisel de la moldura del tablero y quítela (puede ser necesario aflojar el protector de rodillas). (Figura A)
2. Quite los (2) tornillos de cabeza hexagonal de 7 mm que sujetan la unidad central de fábrica y desconecte el cableado.
3. Localice el juego de soportes #10. (Figura B)
Continuará al ensamble del kit
Chevrolet Lumina 1995-2001/Monte Carlo 1995-1999
(Figura B)
(Figura A)
Desmontaje del tablero 99-4544

21
1. Coloque la palanca de velocidades en baja y quite el recubrimiento de caucho de la columna de dirección.
2. Quite los (2) tornillos Phillips del bisel de la moldura del radio.
3. Desenganche la terminal de cableado del cenicero/la luz y quite el bisel de la moldura. (Figura A)
4. Quite los tornillos que sujetan los soportes de montaje de fábrica a la unidad central de fábrica. (Figura B)
Continuará al ensamble del kit
Oldsmobile Cutlass Calais 1984-1991
Oldsmobile Achieva1992-1995
1. Quite los (4) tornillos del borde superior del bisel de la moldura del tablero. (Figura A)
2. Quite los (2) tornillos del borde inferior del bisel. (Figura A)
3. Suelte a presión los ductos del aire acondicionado, desconecte el interruptor de la luz y quite el bisel.
4. Quite los tornillos que sujetan los soportes de montaje de fábrica a la unidad central de fábrica. (Figura B)
5. Quite y conserve los soportes.
Continuará al ensamble del kit
1. Quite el conjunto de consola/guantera y los (3) tornillos debajo de la guantera.
2. Levante la moldura del freno de mano y quite los (2) tornillos de la moldura de la palanca de velocidades. (Figura A)
3. Quite el cenicero del área de la palanca de velocidades y los (2) tornillos de 7mm expuestos.
4. Con un destornillador, presione las pestañas de retención del cenicero del tablero, jale el cenicero hacia afuera y quite los (2) tornillos de 7mm de cabeza hexagonal del soporte del cenicero.
5. Quite los tornillos que sujetan los soportes de montaje de fábrica a la unidad central de fábrica. (Figura B)
Continuará al ensamble del kit
(Figura A) (Figura B)
(se muestra la aplicación S10 como ejemplo)
(Figura A) (Figura B)
(se muestra la aplicación S10 como ejemplo)
(Figura A) (Figura B)
(se muestra la aplicación S10 como ejemplo)
Desmontaje del tablero 99-4544
Oldsmobile Ninety-Eight 1984-1990/Delta 88
1986-1988
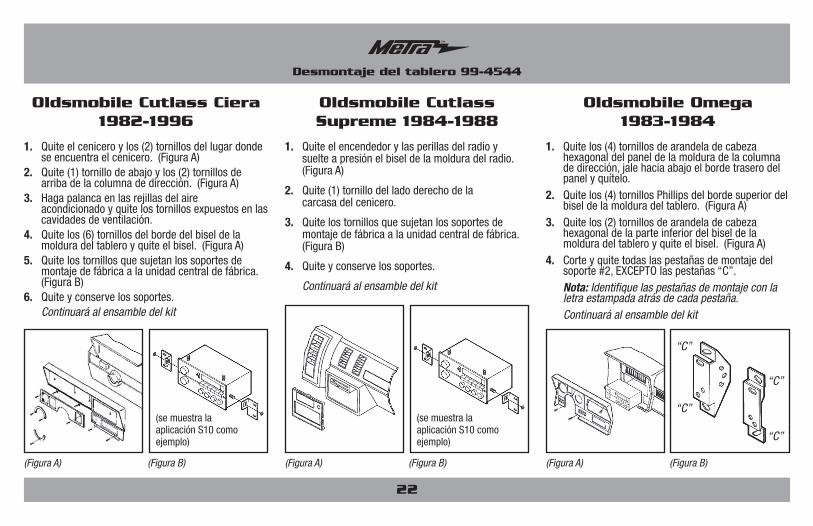
22
1. Quite el cenicero y los (2) tornillos del lugar donde se encuentra el cenicero. (Figura A)
2. Quite (1) tornillo de abajo y los (2) tornillos de arriba de la columna de dirección. (Figura A)
3. Haga palanca en las rejillas del aire acondicionado y quite los tornillos expuestos en las cavidades de ventilación.
4. Quite los (6) tornillos del borde del bisel de la moldura del tablero y quite el bisel. (Figura A)
5. Quite los tornillos que sujetan los soportes de montaje de fábrica a la unidad central de fábrica. (Figura B)
6. Quite y conserve los soportes. Continuará al ensamble del kit
Oldsmobile Cutlass Ciera 1982-1996
Oldsmobile Omega1983-1984
Oldsmobile Cutlass Supreme 1984-1988
1. Quite el encendedor y las perillas del radio y suelte a presión el bisel de la moldura del radio. (Figura A)
2. Quite (1) tornillo del lado derecho de la carcasa del cenicero.
3. Quite los tornillos que sujetan los soportes de montaje de fábrica a la unidad central de fábrica. (Figura B)
4. Quite y conserve los soportes.
Continuará al ensamble del kit
1. Quite los (4) tornillos de arandela de cabeza hexagonal del panel de la moldura de la columna de dirección, jale hacia abajo el borde trasero del panel y quítelo.
2. Quite los (4) tornillos Phillips del borde superior del bisel de la moldura del tablero. (Figura A)
3. Quite los (2) tornillos de arandela de cabeza hexagonal de la parte inferior del bisel de la moldura del tablero y quite el bisel. (Figura A)
4. Corte y quite todas las pestañas de montaje del soporte #2, EXCEPTO las pestañas “C”.
Nota: Identifique las pestañas de montaje con la letra estampada atrás de cada pestaña.
Continuará al ensamble del kit
(Figura A) (Figura B)
(se muestra la aplicación S10 como ejemplo)
(Figura A) (Figura B)
(se muestra la aplicación S10 como ejemplo)
(Figura A) (Figura B)
“C”
“C”
“C”
“C”
Desmontaje del tablero 99-4544

23
1. Presione el gancho localizado detrás de la perilla de los faros y quite la perilla.
2. Quite los (3) tornillos que sujetan la moldura de la columna de dirección y quítela.
3. Quite los (4) tornillos del borde inferior del bisel de la moldura del tablero y quítelo. (Figura A)
4. Quite los tornillos que sujetan los soportes de montaje de fábrica a la unidad central de fábrica. (Figura B)
5. Quite y conserve los soportes.
Continuará al ensamble del kit
Oldsmobile Toronado 1982-1985
Pontiac Bonneville1987-1993
Pontiac 60001982-1991
1. Abra la guantera y quite (1) tornillo del costado del bisel de la moldura del tablero. (Figura A)
2. Con cuidado, quite el bisel del tablero y la placa simuladora del bisel.
3. Corte y quite todas las pestañas de montaje del soporte #5, EXCEPTO las pestañas “A”. (Figura A)
Nota: Identifique las pestañas de montaje con la letra estampada atrás de cada pestaña.
Continuará al ensamble del kit
1. Con cuidado suelte a presión y quite el bisel de la moldura del tablero. (Figura A)
2. Quite los tornillos que sujetan la unidad central de fábrica y desconecte el cableado.
3. Quite los tornillos que sujetan los soportes de montaje de fábrica a la unidad central de fábrica. (Figura B)
4. Quite y conserve los soportes.
Continuará al ensamble del kit
(Figura A) (Figura B)
(se muestra la aplicación S10 como ejemplo)
(Figura A) (Figura B) (Figura A) (Figura B)
(se muestra la aplicación S10 como ejemplo)
“A”
“A”
Desmontaje del tablero 99-4544

24
1. Desenganche el lado derecho del bisel de la moldura del tablero. (Figura A)
2. Desenganche el lado izquierdo del bisel y quítelo. (Figura A)
3. Quite los (3) tornillos de cabeza hexagonal de 7 mm que sujetan la unidad central de fábrica y desconecte el cableado.
4. Localice el juego de soportes #9. (Figura B)
Continuará al ensamble del kit
Pontiac Bonneville1994-1999
Pontiac Firebird1993-2002
Pontiac Fiero 1984-1988
1. Quite los (4) tornillos de estrella del bisel de la moldura del tablero. (Figura A)
2. Con cuidado jale hacia afuera el bisel de la moldura y quítelo.
3. Quite los (4) tornillos de cabeza hexagonal de la unidad central de fábrica y desconecte el cableado.
4. Quite los tornillos que sujetan los soportes de montaje de fábrica a la unidad central de fábrica. (Figura B)
Continuará al ensamble del kit
1. Desenganche el bisel de la moldura del radio. (Figura A)
2. Quite los (4) tornillos de cabeza hexagonal de 7 mm que sujetan la unidad central de fábrica y desconecte el cableado.
3. Localice el juego de soportes #9. (Figura B)
Continuará al ensamble del kit
(Figura A) (Figura B) (Figura A) (Figura B)
(se muestra la aplicación S10 como ejemplo)
(Figura A)
(Figura B)
Desmontaje del tablero 99-4544

25
1. Con cuidado suelte a presión el borde delantero del panel de la consola de la palanca de velocidades.
2. Suelte a presión y quite con cuidado el bisel de la moldura del tablero. (Figura A)
3. Quite los tornillos que sujetan los soportes de montaje de fábrica a la unidad central de fábrica. (Figura B)
4. Quite y conserve los soportes.
Continuará al ensamble del kit
Pontiac Grand Am1985-1991
Pontiac Grand Am1996-1998
Pontiac Grand Am1992-1995
1. Quite los (6) tornillos de cabeza hexagonal del panel del protector de rodillas del lado del conductor y baje el panel.
2. Quite los (4) tornillos Phillips del conjunto de la guantera/portavasos.
3. Quite (1) tornillo de 7mm de cabeza hexagonal de la esquina izquierda del bisel de la moldura del tablero. (Figura A)
4. Afloje las (2) tuercas de 10mm de la parte superior de la unidad central de fábrica, deslice la unidad hacia fuera y desconecte el cableado. (Figura A)
5. Quite los tornillos que sujetan los soportes de montaje de fábrica a la unidad central de fábrica. (Figura B)
6. Quite y conserve los soportes. Continuará al ensamble del kit
1. Quite los (2) tornillos Phillips de la cavidad.
2. Quite los (2) tornillos Phillips de arriba del conjunto de instrumentos. (Figura A)
3. Desenganche el bisel de la moldura del tablero y quite.
4. Quite los (3) tornillos de cabeza hexagonal de 7 mm que sujetan la unidad central de fábrica y desconecte el cableado.
5. Localice el juego de soportes #9. (Figura B)
Continuará al ensamble del kit
(Figura A) (Figura B)
(se muestra la aplicación S10 como ejemplo)
(Figura A) (Figura B)
(se muestra la aplicación S10 como ejemplo)
(Figura A) (Figura B)
Desmontaje del tablero 99-4544
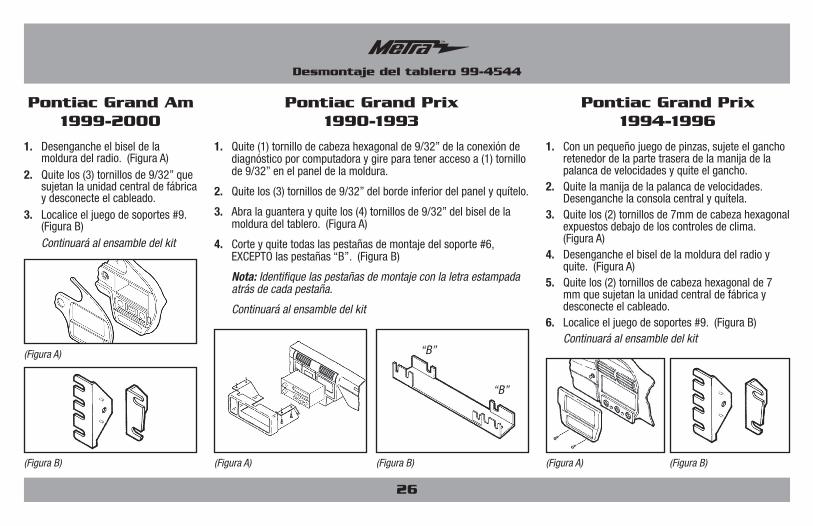
26
1. Desenganche el bisel de la moldura del radio. (Figura A)
2. Quite los (3) tornillos de 9/32” que sujetan la unidad central de fábrica y desconecte el cableado.
3. Localice el juego de soportes #9. (Figura B)
Continuará al ensamble del kit
Pontiac Grand Am1999-2000
Pontiac Grand Prix1994-1996
Pontiac Grand Prix1990-1993
1. Quite (1) tornillo de cabeza hexagonal de 9/32” de la conexión de diagnóstico por computadora y gire para tener acceso a (1) tornillo de 9/32” en el panel de la moldura.
2. Quite los (3) tornillos de 9/32” del borde inferior del panel y quítelo.
3. Abra la guantera y quite los (4) tornillos de 9/32” del bisel de la moldura del tablero. (Figura A)
4. Corte y quite todas las pestañas de montaje del soporte #6, EXCEPTO las pestañas “B”. (Figura B)
Nota: Identifique las pestañas de montaje con la letra estampada atrás de cada pestaña.
Continuará al ensamble del kit
1. Con un pequeño juego de pinzas, sujete el gancho retenedor de la parte trasera de la manija de la palanca de velocidades y quite el gancho.
2. Quite la manija de la palanca de velocidades. Desenganche la consola central y quítela.
3. Quite los (2) tornillos de 7mm de cabeza hexagonal expuestos debajo de los controles de clima. (Figura A)
4. Desenganche el bisel de la moldura del radio y quite. (Figura A)
5. Quite los (2) tornillos de cabeza hexagonal de 7 mm que sujetan la unidad central de fábrica y desconecte el cableado.
6. Localice el juego de soportes #9. (Figura B) Continuará al ensamble del kit
(Figura B) (Figura A) (Figura B) (Figura A) (Figura B)
“B”
“B”
(Figura A)
Desmontaje del tablero 99-4544

27
1. Desenganche todo el bisel de la moldura del tablero. (Figura A)
2. Quite los tornillos que sujetan la unidad central de fábrica y desconecte el cableado.
3. Localice el juego de soportes #9. (Figura B)
Continuará al ensamble del kit
Pontiac Grand Prix1997-2003
Pontiac Sunfire1995-1999
1. Abra la guantera y quite (2) tornillos Phillips expuestos en el borde superior derecho del bisel de la moldura del radio. (Figura A)
2. Desenganche el bisel y quite.
3. Quite los (2) tornillos de cabeza hexagonal de 7 mm que sujetan la unidad central de fábrica y desconecte el cableado.
4. Localice el juego de soportes #9. (Figura B)
Continuará al ensamble del kit
(Figura A)
(Figura A) (Figura B)
Pontiac Grand Prix 1985-1987Bonneville 1982-1986
1. Quite los (3) tornillos del borde superior del bisel de la moldura del tablero.
2. Quite los (4) tornillos de la moldura de la columna de dirección y quite la moldura.
3. Quite los (4) tornillos expuestos del borde inferior del bisel de la moldura del radio.
4. Quite el encendedor y las el anillo retenedor y quite el bisel de la moldura del radio. (Figura A)
5. Quite los tornillos que sujetan los soportes de montaje de fábrica a la unidad central de fábrica. (Figura B)
6. Quite y conserve los soportes.
Continuará al ensamble del kit
(Figura A) (Figura B)
(se muestra la aplicación S10 como ejemplo)
(Figura B)
Desmontaje del tablero 99-4544
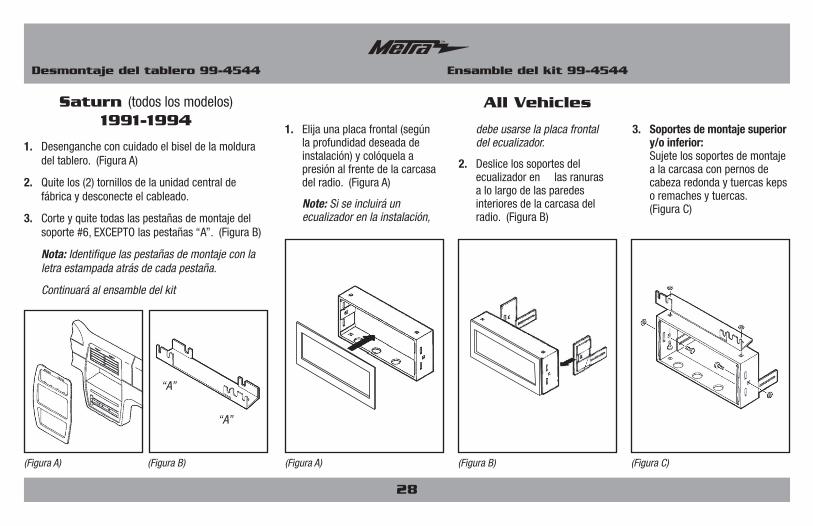
1. Elija una placa frontal (según la profundidad deseada de instalación) y colóquela a presión al frente de la carcasa del radio. (Figura A)
Note: Si se incluirá un ecualizador en la instalación,
debe usarse la placa frontal del ecualizador.
2. Deslice los soportes del ecualizador en las ranuras a lo largo de las paredes interiores de la carcasa del radio. (Figura B)
3. Soportes de montaje superior y/o inferior:
Sujete los soportes de montaje a la carcasa con pernos de cabeza redonda y tuercas keps o remaches y tuercas. (Figura C)
28
All Vehicles
Ensamble del kit 99-4544
(Figura B) (Figura C)(Figura A)
Saturn (todos los modelos)1991-1994
1. Desenganche con cuidado el bisel de la moldura del tablero. (Figura A)
2. Quite los (2) tornillos de la unidad central de fábrica y desconecte el cableado.
3. Corte y quite todas las pestañas de montaje del soporte #6, EXCEPTO las pestañas “A”. (Figura B)
Nota: Identifique las pestañas de montaje con la letra estampada atrás de cada pestaña.
Continuará al ensamble del kit
(Figura A) (Figura B)
“A”
“A”
Desmontaje del tablero 99-4544
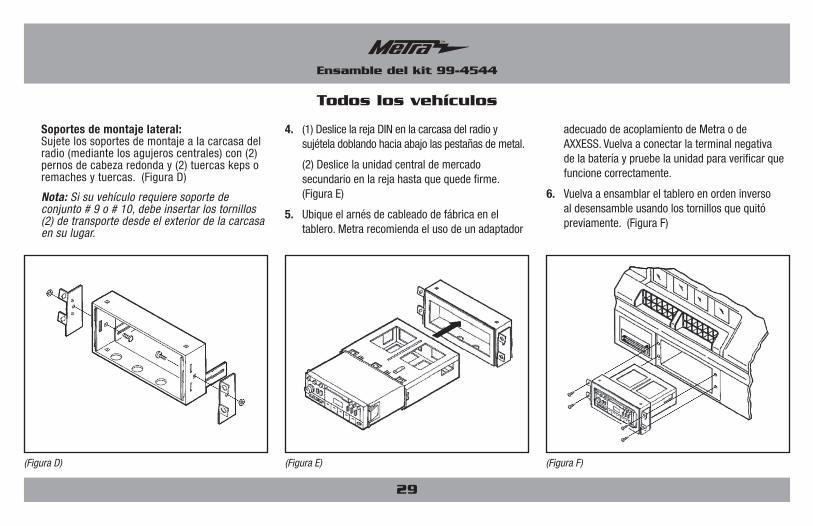
4. (1) Deslice la reja DIN en la carcasa del radio y sujétela doblando hacia abajo las pestañas de metal.
(2) Deslice la unidad central de mercado secundario en la reja hasta que quede firme. (Figura E)
5. Ubique el arnés de cableado de fábrica en el tablero. Metra recomienda el uso de un adaptador
adecuado de acoplamiento de Metra o de AXXESS. Vuelva a conectar la terminal negativa de la batería y pruebe la unidad para verificar que funcione correctamente.
6. Vuelva a ensamblar el tablero en orden inverso al desensamble usando los tornillos que quitó previamente. (Figura F)
29
Todos los vehículos
Ensamble del kit 99-4544
(Figura D) (Figura F)(Figura E)
Soportes de montaje lateral: Sujete los soportes de montaje a la carcasa del
radio (mediante los agujeros centrales) con (2) pernos de cabeza redonda y (2) tuercas keps o remaches y tuercas. (Figura D)
Nota: Si su vehículo requiere soporte de conjunto # 9 o # 10, debe insertar los tornillos (2) de transporte desde el exterior de la carcasa en su lugar.

Notas
30

Notas
31

METRA - The World’s best kits ® metraonline.com © COPYRIGHT 2016 METRA ELECTRONICS CORPORATION
REV.
10/
18/2
016
INS
T-45
44
KNOWLEDGE IS POWEREnhance your installation and fabrication skills by enrolling in the most recognized and respected mobile electronics school in our industry.Log onto www.installerinstitute.com or call 800-354-6782 for more information and take steps toward a better tomorrow.
Metra recomienda técnicos con certificación del Programa de Certificación en Electrónica Móvil (Mobile Electronics Certification Program, MECP).
EL CONOCIMIENTO ES PODERMejore sus habilidades de instalación y fabricación inscribiéndose en la escuela de dispositivos electrónicos móviles más reconocida y respetada de nuestra industria. Regístrese en www.installerinstitute.com o llame al 800-354-6782 para obtener más información y avance hacia un futuro mejor.
Instrucciones de instalación para la pieza INST-4544
®
IMPORTANTESi tiene dificultades con la instalación de este producto, llame a nuestra línea de soporte técnico al 1-800-253-TECH. Antes de hacerlo, revise las instrucciones por segunda vez y asegúrese de que la instalación se haya realizado exactamente como se indica en las instrucciones. Por favor tenga el vehículo desarmado y listo para ejecutar los pasos de resolución de problemas antes de llamar.