Ginger Beer
13
http://www.instructables.com/id/The-REAL-ginger-beer-recipe/ Home Sign Up! Explore Community Submit All Art Craft Food Games Green Home Kids Life Music Offbeat Outdoors Pets Ride Science Sports Tech The REAL ginger beer recipe! by fallscrape on April 30, 2009 Table of Contents intro: The REAL ginger beer recipe! . . . . . . . . . . . . . . . . . . . . . . . . . . . . . . . . . . . . . . . . . . . . . . . . . . . . . . . . . . . . . . . . . . . . . . . . . . . . . . . . . . . . . . . . . . . . . . . 2 step 1: Equipment List . . . . . . . . . . . . . . . . . . . . . . . . . . . . . . . . . . . . . . . . . . . . . . . . . . . . . . . . . . . . . . . . . . . . . . . . . . . . . . . . . . . . . . . . . . . . . . . . . . . . . . . . . 3 step 2: Clean! . . . . . . . . . . . . . . . . . . . . . . . . . . . . . . . . . . . . . . . . . . . . . . . . . . . . . . . . . . . . . . . . . . . . . . . . . . . . . . . . . . . . . . . . . . . . . . . . . . . . . . . . . . . . . . . 4 step 3: Scalding the ginger & grating . . . . . . . . . . . . . . . . . . . . . . . . . . . . . . . . . . . . . . . . . . . . . . . . . . . . . . . . . . . . . . . . . . . . . . . . . . . . . . . . . . . . . . . . . . . . . . 4 step 4: Getting everything together . . . . . . . . . . . . . . . . . . . . . . . . . . . . . . . . . . . . . . . . . . . . . . . . . . . . . . . . . . . . . . . . . . . . . . . . . . . . . . . . . . . . . . . . . . . . . . . . 5 step 5: Measuring the gravity of the situation . . . . . . . . . . . . . . . . . . . . . . . . . . . . . . . . . . . . . . . . . . . . . . . . . . . . . . . . . . . . . . . . . . . . . . . . . . . . . . . . . . . . . . . . 6 step 6: Adding the ginger beer plant . . . . . . . . . . . . . . . . . . . . . . . . . . . . . . . . . . . . . . . . . . . . . . . . . . . . . . . . . . . . . . . . . . . . . . . . . . . . . . . . . . . . . . . . . . . . . . . 7 step 7: Wait... 2 days! . . . . . . . . . . . . . . . . . . . . . . . . . . . . . . . . . . . . . . . . . . . . . . . . . . . . . . . . . . . . . . . . . . . . . . . . . . . . . . . . . . . . . . . . . . . . . . . . . . . . . . . . . 9 step 8: First bottle . . . . . . . . . . . . . . . . . . . . . . . . . . . . . . . . . . . . . . . . . . . . . . . . . . . . . . . . . . . . . . . . . . . . . . . . . . . . . . . . . . . . . . . . . . . . . . . . . . . . . . . . . . . . 10 step 9: Final results . . . . . . . . . . . . . . . . . . . . . . . . . . . . . . . . . . . . . . . . . . . . . . . . . . . . . . . . . . . . . . . . . . . . . . . . . . . . . . . . . . . . . . . . . . . . . . . . . . . . . . . . . . . 11 Related Instructables . . . . . . . . . . . . . . . . . . . . . . . . . . . . . . . . . . . . . . . . . . . . . . . . . . . . . . . . . . . . . . . . . . . . . . . . . . . . . . . . . . . . . . . . . . . . . . . . . . . . . . . . . . . 11 Advertisements . . . . . . . . . . . . . . . . . . . . . . . . . . . . . . . . . . . . . . . . . . . . . . . . . . . . . . . . . . . . . . . . . . . . . . . . . . . . . . . . . . . . . . . . . . . . . . . . . . . . . . . . . . . . . . . 12 Comments . . . . . . . . . . . . . . . . . . . . . . . . . . . . . . . . . . . . . . . . . . . . . . . . . . . . . . . . . . . . . . . . . . . . . . . . . . . . . . . . . . . . . . . . . . . . . . . . . . . . . . . . . . . . . . . . . . . 12
-
Upload
crusaders-media -
Category
Documents
-
view
250 -
download
1
Transcript of Ginger Beer

http://www.instructables.com/id/The-REAL-ginger-beer-recipe/
Home Sign Up! Explore Community Submit
All Art Craft Food Games Green Home Kids Life Music Offbeat Outdoors Pets Ride Science Sports Tech
The REAL ginger beer recipe!by fallscrape on April 30, 2009
Table of Contents
intro: The REAL ginger beer recipe! . . . . . . . . . . . . . . . . . . . . . . . . . . . . . . . . . . . . . . . . . . . . . . . . . . . . . . . . . . . . . . . . . . . . . . . . . . . . . . . . . . . . . . . . . . . . . . . 2
step 1: Equipment List . . . . . . . . . . . . . . . . . . . . . . . . . . . . . . . . . . . . . . . . . . . . . . . . . . . . . . . . . . . . . . . . . . . . . . . . . . . . . . . . . . . . . . . . . . . . . . . . . . . . . . . . . 3
step 2: Clean! . . . . . . . . . . . . . . . . . . . . . . . . . . . . . . . . . . . . . . . . . . . . . . . . . . . . . . . . . . . . . . . . . . . . . . . . . . . . . . . . . . . . . . . . . . . . . . . . . . . . . . . . . . . . . . . 4
step 3: Scalding the ginger & grating . . . . . . . . . . . . . . . . . . . . . . . . . . . . . . . . . . . . . . . . . . . . . . . . . . . . . . . . . . . . . . . . . . . . . . . . . . . . . . . . . . . . . . . . . . . . . . 4
step 4: Getting everything together . . . . . . . . . . . . . . . . . . . . . . . . . . . . . . . . . . . . . . . . . . . . . . . . . . . . . . . . . . . . . . . . . . . . . . . . . . . . . . . . . . . . . . . . . . . . . . . . 5
step 5: Measuring the gravity of the situation . . . . . . . . . . . . . . . . . . . . . . . . . . . . . . . . . . . . . . . . . . . . . . . . . . . . . . . . . . . . . . . . . . . . . . . . . . . . . . . . . . . . . . . . 6
step 6: Adding the ginger beer plant . . . . . . . . . . . . . . . . . . . . . . . . . . . . . . . . . . . . . . . . . . . . . . . . . . . . . . . . . . . . . . . . . . . . . . . . . . . . . . . . . . . . . . . . . . . . . . . 7
step 7: Wait... 2 days! . . . . . . . . . . . . . . . . . . . . . . . . . . . . . . . . . . . . . . . . . . . . . . . . . . . . . . . . . . . . . . . . . . . . . . . . . . . . . . . . . . . . . . . . . . . . . . . . . . . . . . . . . 9
step 8: First bottle . . . . . . . . . . . . . . . . . . . . . . . . . . . . . . . . . . . . . . . . . . . . . . . . . . . . . . . . . . . . . . . . . . . . . . . . . . . . . . . . . . . . . . . . . . . . . . . . . . . . . . . . . . . . 10
step 9: Final results . . . . . . . . . . . . . . . . . . . . . . . . . . . . . . . . . . . . . . . . . . . . . . . . . . . . . . . . . . . . . . . . . . . . . . . . . . . . . . . . . . . . . . . . . . . . . . . . . . . . . . . . . . . 11
Related Instructables . . . . . . . . . . . . . . . . . . . . . . . . . . . . . . . . . . . . . . . . . . . . . . . . . . . . . . . . . . . . . . . . . . . . . . . . . . . . . . . . . . . . . . . . . . . . . . . . . . . . . . . . . . . 11
Advertisements . . . . . . . . . . . . . . . . . . . . . . . . . . . . . . . . . . . . . . . . . . . . . . . . . . . . . . . . . . . . . . . . . . . . . . . . . . . . . . . . . . . . . . . . . . . . . . . . . . . . . . . . . . . . . . . 12
Comments . . . . . . . . . . . . . . . . . . . . . . . . . . . . . . . . . . . . . . . . . . . . . . . . . . . . . . . . . . . . . . . . . . . . . . . . . . . . . . . . . . . . . . . . . . . . . . . . . . . . . . . . . . . . . . . . . . . 12

http://www.instructables.com/id/The-REAL-ginger-beer-recipe/
intro: The REAL ginger beer recipe!Oh how so many people have been fooled into making authentic, real gingerbeer!
Tsk tsk!
Traditional ginger beer was made using a ginger beer plant. This is NOTsomething that you can easily make yourself - it must be possible to makeit yourself because someone hundreds of years ago by chance seems to havecreated it. If a recipe calls for yeast it is not REAL ginger beer!
I have heard dark rumours that you can make one by blanching ginger andleaving it with wild yeasts to ferment (just like a sourdough starter).Why is this do you say? It's because a real ginger beer plant is asymbotic relationship between yeast and bacteria creating a unique flavouryou cannot achieve with just brewers or baking yeast.
It is only in recent generations (read: 1887) that a gentleman calledHarry Marshall Ward looked into the sybiotic relationship and had he haveknown it was going to pretty much consume the rest of his life, he'dprobably not have bothered. He named the process 'symbotic fermentation'.I call it good beer!
It is however extremely difficult to get ginger beer plant as its use hasalmost entirely died out. I assume from some of my research that it isdue to the WW2 where rationing made it almost impossible to maintain theplant. Some did survive however as there are small countries that stillbrew it traditionally and small internet shoppes which if you're lookingfor it will sell it to you - but be warned, there are those who arecashing in on your ignorance who sell you '100 generations old ginger beeryeast' which is for all intensive purposes, just yeast. Just old yeast...
When a plant has made a batch, traditionally you could split it and giveit to friends, family or strange people on the internet.
So the first thing you need to do is go forth, find a supplier. There area few links on Wikipedia (thanks to a bit of fervent editing I updated the page anonymously a few days ago). Go forth, make purchases or put begging commentsin the bottom of this instructable and when I've got enough, I'll do mybest to send some out.
Image Notes1. Ginger Beer Plant. No, it wasn't supposed to be like a fish, it just came out of a square packet like that. Odd isn't it.
http://www.instructables.com/id/The-REAL-ginger-beer-recipe/
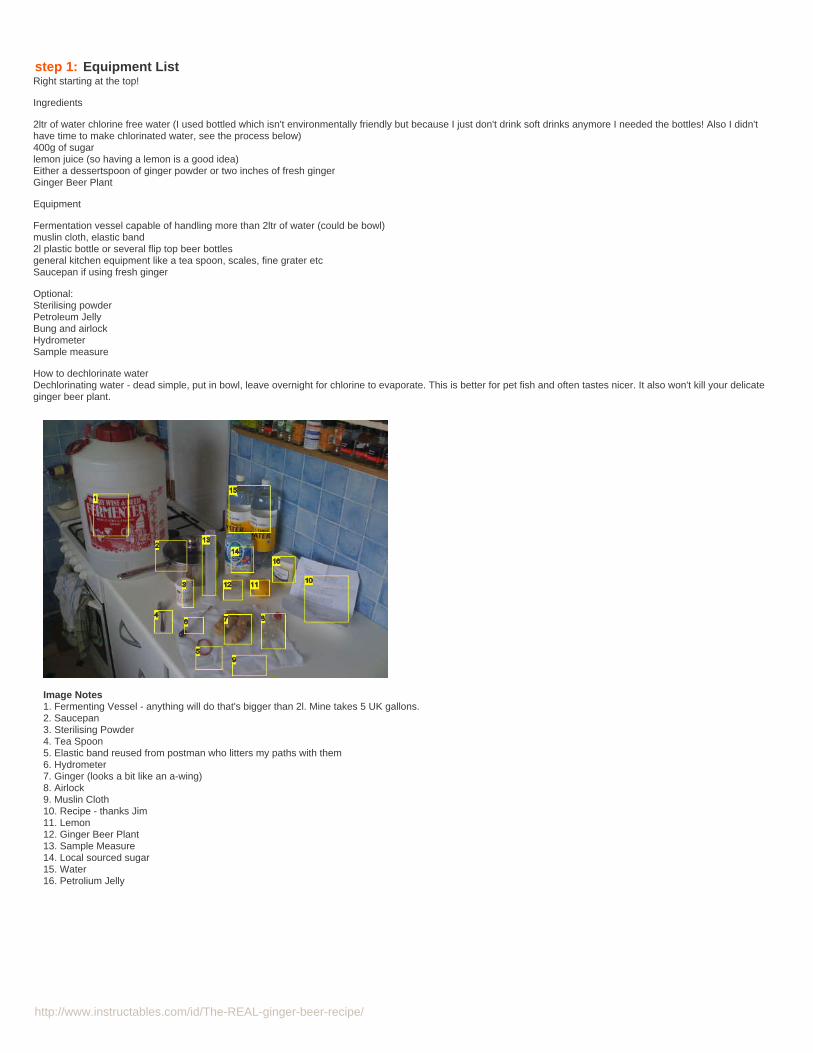
step 1: Equipment ListRight starting at the top!
Ingredients
2ltr of water chlorine free water (I used bottled which isn't environmentally friendly but because I just don't drink soft drinks anymore I needed the bottles! Also I didn'thave time to make chlorinated water, see the process below)400g of sugarlemon juice (so having a lemon is a good idea)Either a dessertspoon of ginger powder or two inches of fresh gingerGinger Beer Plant
Equipment
Fermentation vessel capable of handling more than 2ltr of water (could be bowl)muslin cloth, elastic band2l plastic bottle or several flip top beer bottlesgeneral kitchen equipment like a tea spoon, scales, fine grater etcSaucepan if using fresh ginger
Optional:Sterilising powderPetroleum JellyBung and airlockHydrometerSample measure
How to dechlorinate waterDechlorinating water - dead simple, put in bowl, leave overnight for chlorine to evaporate. This is better for pet fish and often tastes nicer. It also won't kill your delicateginger beer plant.
Image Notes1. Fermenting Vessel - anything will do that's bigger than 2l. Mine takes 5 UK gallons.2. Saucepan3. Sterilising Powder4. Tea Spoon5. Elastic band reused from postman who litters my paths with them6. Hydrometer7. Ginger (looks a bit like an a-wing)8. Airlock9. Muslin Cloth10. Recipe - thanks Jim11. Lemon12. Ginger Beer Plant13. Sample Measure14. Local sourced sugar15. Water16. Petrolium Jelly

http://www.instructables.com/id/The-REAL-ginger-beer-recipe/
step 2: Clean!First of all have a clean kitchen!
So clean it monkey!
Next make sure all your gear - whatever you're using is very clean. This is where the optional sterlising powder comes in useful. I'm used to making beer which takes aloooong time so requires everything to be exceedingly clean or you can end up with an iambic brew which can be good, can be awful.
Follow the instructions on the side of the sterilising powder. Mine said '10ltr of warm water with three to four teaspoons of sterlising powder shaken about for 10 minutesso that it coats everything with sterilising death'. Note sterilising doesn't clean, it just kills. If you've got a dirty lump inside your fermentation vessel it'll still leak bacteriaeverywhere.
Washing up liquid and hot water does a good enough job - this stuff only takes about four days to make and you'll be transferring it after two.
Image Notes1. Left over dishes from pasta bake2. Dirty fermentation vessel3. Manky dishes4. More rubbish5. Tea stains. You can't see them but I can
step 3: Scalding the ginger & gratingThis step is only for those using fresh ginger root. The reason for scalding is to kill any bugs. Give it a quick wash then drop it in a saucepan of boiling water for a minuteor less. Watch your fingers after you drain the water away - it's still damn hot.
My pictures show 2x2" of ginger. I'm doubling the quantities in my recipe as I'm making twice the amount so I get twice the ginger beer plant so I can send it to twice thepeople. My next batch will be 5 gallons!!!
Grate the ginger finely
Image Notes1. Big bubbles mean rolling boil. If you don't make the water as hot as this, it'snot as likely to kill stuff2. 4" of ginger - you actually only need 2" of ginger if you're only making 2ltr

http://www.instructables.com/id/The-REAL-ginger-beer-recipe/
Image Notes1. Grating. Hopefully someone of your obvious high calibre can do this without toomuch instruction. Note the small holes in the grater - this is what I mean by 'fine'.Incidentally I got my grater from a large Swedish furniture store because it has areservoir to catch grated stuff
step 4: Getting everything togetherAdd water to the fermenting vessel.
To juice the lemon, I use the following method. Bung in microwave for about 10 seconds. It probably won't even be warm to the touch. Slice it in half and stick a fork in it.Twist fork and you'll get much more juice out (because the microwave gets the internal structure of the lemon breaking down I guess). I also grated a bit of zest (the skin -just the yellow bit) into the pile of ginger. Put a measure of lemon into your water. I'd use a teaspoon or two.
Add the ginger (and if you've been daring a bit of the lemon zest) into your square of muslin cloth. pull the sides together and secure the corners into a package with theelastic band.
Add the sugar to the water and stir. I used 400g (Well, actually I used 800g because I'm using twice the ingredients all round)

http://www.instructables.com/id/The-REAL-ginger-beer-recipe/
Image Notes1. Look at me! I'm spinnin' God bless Joe cartoon and his love of nukin' stuff
Image Notes1. Twist!
Image Notes1. Try to get it central, you might want to give it a bit of a squeeze before securingwith the elastic band over the fermenting vessel so the ginger juice doesn't goeverywhere.
Image Notes1. Packaged. Looks like a badly made won ton to me.
step 5: Measuring the gravity of the situationHa ha ha. I find myself so funny.
Right, back to the serious business of beer making.
By adding all this sugar we've increased the gravity of the water. In this case I've increased it to just over 1.062. If you need to learn to read a hydrometer, read the sideof the packet. It's a complicated business which involves looking at the big scale at the side and noting down the number. (actually there is more to do that if you want itreally accurate).
The easiest way is to use a sample measure which you fill up with liquid from the fermentation vessel and stick your hydrometer in it. Then read the number off the sideas I've previously mentioned.
Why do we want to do this? Well as the ginger beer plant starts breaking down the sugar it'll break it down to alcohol which reduces the gravity.
If I measure the gravity at the end of the fermentation I'll know how alcoholic it is by going into my favorite search engine and typing 'homebrew gravity alcohol calculator'and picking the snazziest applet I can find and filling it in.
This is optional and has nothing to do with the final result and you can skip it if you don't care what you're drinking.

http://www.instructables.com/id/The-REAL-ginger-beer-recipe/
Image Notes1. that's roughly where the water level is. Sorry it's side on, I didn't realise instructables applet couldn't rotate images because I'm stupid and lazy. I could have doneit in photoshop, and maybe one day I will.
step 6: Adding the ginger beer plantThe first image shows real ginger beer plant. You'll notice the grains are much bigger than usual yeast. This stuff has been in my fridge about a week or so in a plasticbag. It smells yeasty and slightly alcoholic.
Just drop it into the mix with your won ton style grated ginger (See 2nd pic)
Now I like my fermentation vessel airtight. I do this because it stops anything getting into the barrel to cause infection. Like animals, insects, small children etc.
The best way is to have a proper beer fermentation device. These have lids and to get a good seal you need to lubricate the rubber ring with petroleum jelly. (pic threeand four) so go lubricate that ring if you can!
The airlock is the final bit of the airtight mechanism. If I just stuck a solid lid on it, the CO2 which is a by product of alcohol production will quite literally blow the lid off.You just put a bit of water in it and it lets pressure out without letting wild yeast or insects in.
Final pic shows it all barreled up.

http://www.instructables.com/id/The-REAL-ginger-beer-recipe/
Image Notes1. Big bits of ginger beer plant2. My sterilised hand
Image Notes1. airlock on barrel
Image Notes1. Won ton2. ginger beer plant starting to do its thing!3. Yes I know it kinda looks like the toilet after a night out, but I promise it'll tastebetter than it looks in a few days...
Image Notes1. Petroleum Jelly2. Ring3. airlock

http://www.instructables.com/id/The-REAL-ginger-beer-recipe/
Image Notes1. A well lubricated ring!
Image Notes1. Water in airlock
step 7: Wait... 2 days!Find something to do. Write an instructable.
Unfortunately you'll have to wait two days for the next bit because it's still brewing... Meantime why not use the remaining lemon to make traditional non-sparklinglemonade!
Add the remaining lemon juice, some sugar, cold water. Stir. If it needs more sugar, add more. It's not very scientific and tastes good.
Now wash up again!
See you Saturday evening...
Coming soon:Bottling - what to do and what not to do (including exploding bottles warning)Final alcohol readingDrinking

http://www.instructables.com/id/The-REAL-ginger-beer-recipe/
Image Notes1. Sugar2. glass3. Lemon juice
step 8: First bottleUpdate 3rd May 2009 - 2.5 days after primary fermentation started
As I mentioned before I wanted to make two bottles on this brew - I needed to really double the size of the Ginger Beer Plant (GBP) because I've got quite a few peoplewho want some.
So this morning (about half an hour ago) I bottled up my first bottle and tested the gravity.
The starting gravity was 1.62 and the current gravity is 1.50 which gives me a 1.51% vol brew.
Not bad for something that's only two/three days old.
And I tell you now, it's tasty. Oh yes is it tasty...
The current batch isn't horrendously gingery, it's actually very palatable and still very sweet as the GBP still hasn't taken hold. But during my filtering of the batch I noticedthe very first few bits of GBP, translucent white in colour (nothing like the brown stuff I held in my hand at the start of the experiment) sticking to the filter.
The size of the grains was about 1mm - quite small but much bigger than normal yeast. I expect the stuff at the bottom of the barrel to be much bigger.
I will be adding more images and following the final bottle of the brew (the stuff I'm trying to make quite, quite alcoholic) in this instructable, but watch for the next onewhich will explain the cultivation of ginger beer plant so you can grow lots of the stuff and give it to all your friends.
The important part is not to fill the bottle completely, leave a couple of inches at the top empty. Squeeze the bottle so the ginger beer comes right up to the rim of thebottle then put on the lid. As the mixture continues to ferment on your worktop it will gradually fill with CO2 and pop the bottle out. When the bottle is hard open the bottleand let the pressure out (carefully...) then either stick it in the fridge or alternatively repeat the squeezing and leaving if you want a drier ginger beer. Best way is to keeptesting it to make sure it's drinkable.
More pictures to follow.

http://www.instructables.com/id/The-REAL-ginger-beer-recipe/
Image Notes1. First attempt using a bit of muslin cloth to filter through the innards of cafetiere.Didn't work. But you get the idea...
Image Notes1. Well, it did work but it took a long time to filter through so instead see picthree.
Image Notes1. half a soft drink bottle lined with muslin works really well. But you'll need a 2ndpair of hands. So I woke my fiancée and used her.
step 9: Final resultsI made the original brew on Thursday 30th.
Today I bottled up the 2nd bottle and took the gravity. It was 1.034 which makes it 4.2%
Quite alcoholic.
Tomorrow I will add a few 'bottling' pics. All I've done now is add a bit of sugar (About a teaspoon) to a plastic bottle and squeezed out the air. Tomorrow I'll see if thebottle is hard, and if it is put it in the fridge.
Related Instructables
Ginger Beer -AlcoholicVersion byChrisVincent
British -Stinging NettleBeer bybrucedenney Beer (guide) by
scoochmaroo
How to makenettle beer bylemonie
Understanding:DrinkingAlcohol by )-(angman
Beer BottleTrick !! (video)by easybartricks
Beer Brats bydork5200
CarbonatedHomemadeSassafras LovePotion bytrebuchet03

http://www.instructables.com/id/The-REAL-ginger-beer-recipe/
Advertisements
Comments17 comments Add Comment
capricorn says: Jul 18, 2009. 5:46 AM REPLYSomething new to brew, thanks for sharing my friend :)
lemonie says: Apr 30, 2009. 1:01 PM REPLYI've been planning to make some ginger beer myselaf, now I've got a recipe!
L
Read the Mothers DayContest again, it's about sewing (and please rotate the sideways images)
fallscrape says: Apr 30, 2009. 2:01 PM REPLYThanks Lemonie - I'll do my best to rotate them later
lemonie says: Apr 30, 2009. 2:20 PM REPLYHow long has it been on now? I should be checking the nettle beer as it's probably due for a bottling at the weekend...
L
fallscrape says: May 1, 2009. 12:47 AM REPLYLast night when I posted this I was typing it as I made it. In total it only took about an hour from start to finish. The brew has been on the go forabout 13hrs now and could take upto 5 days. I have to keep tasting it to see when it tastes about right.
svfox69 says: Jul 16, 2009. 11:17 AM REPLYThis is like M*A*S*H where the two doctors, hawkeye and bj had their own still brewing their hooch. Alchemy.
Steven
http://scrabblecheat.com never lose a game again
lemonie says: May 1, 2009. 12:06 PM REPLYMmmm - use your eyes - it will tend to look brewed-out when it is (and get a hydrometer?) Or are you trying to catch it with the right sugarbalance then sterilise it?
L
(I don't have problems using tap-water)
fallscrape says: May 2, 2009. 12:27 AM REPLYthere is no need to sterilise it, you wait until it tastes like you would drink, then bottle it. leave it until the bottle goes hard (it'll becarbonated) then put it in the fridge which retards the GBP so it doesn't go pop! I'll be putting these stages on when my beer is ready!
ploop171 says: Jul 14, 2009. 8:56 PM REPLYi chugged a cup of ginger beer in spanish class and it burned my throat and then i barfed it up...i couldnt stop laughing.
SinAmos says: Jul 13, 2009. 9:23 PM REPLYI just started my first mead a few days ago. So, what's the difference between the ginger plant and ginger root again?
korgoth25 says: Jul 14, 2009. 4:03 AM REPLYginger root is the plants root while ginger plant is the stem and such
nachobobs says: Jul 14, 2009. 7:39 AM REPLYThe Ginger "Plant" is the actual yeast kick starter for the fermentation to begin. This can be made with dry ginger, sugar and water. The Ginger root isthe actual tuber from a Ginger Shrub

http://www.instructables.com/id/The-REAL-ginger-beer-recipe/
wenpherd says: Jun 2, 2009. 11:27 AM REPLYis it fizzy?
drhemmings says: Jun 1, 2009. 2:27 PM REPLYhmm... I've just started making ginger beer with yeast and now I've discovered your recipe. Sounds like you've done your research. Well done. This gingerbeer plant sounds interesting. Where did you get yours from? Do you have any to spare yet? Thanks!
Tool Using Animal says: May 1, 2009. 12:55 AM REPLYThanks, I now feel much better about how my kitchen looks. ;-)
fallscrape says: May 2, 2009. 12:28 AM REPLYtell me about it! :(
omnibot says: May 23, 2009. 1:21 PM REPLYMy sweetheart finally ordered me to clean it all out, paint everything and start over.