GidasViewer - LSI Lastem · Microsoft SQL Server is Microsoft product for databases management and...
56
Cod. SWUM_00405_en GidasViewer User Manual Update 24/05/2018
Transcript of GidasViewer - LSI Lastem · Microsoft SQL Server is Microsoft product for databases management and...

Cod. SWUM_00405_en
GidasViewer
User Manual Update 24/05/2018

LSI LASTEM GidasViewer – User Manual
2
Index
1. Introduction .................................................................................................................................. 4 2. System requirements .................................................................................................................... 4 3. Gidas database creation ................................................................................................................ 5
3.1. SQL Server ........................................................................................................................... 5
3.2. Creation of Gidas database through guided procedure ........................................................ 5 3.2.1. Creating the database in a network service .................................................................. 5
3.2.2. Creating the database on the local computer ............................................................... 6 3.2.3. Selection of the initial size of the database .................................................................. 8
3.3. Gidas database management ................................................................................................ 9 3.4. Connection to Gidas database .............................................................................................. 9
3.4.1. Add a new Data Source Connection .......................................................................... 10
3.4.2. Update of Gidas database ........................................................................................... 11 3.5. How to get information on the database Gidas .................................................................. 12
4. Using the program ...................................................................................................................... 14 4.1. User interface presentation ................................................................................................. 14
4.1.1. Menu .......................................................................................................................... 16
4.2. General settings .................................................................................................................. 17 4.3. Custom views ..................................................................................................................... 17 4.4. Browser .............................................................................................................................. 18
4.4.1. Instruments ................................................................................................................. 19 4.4.2. Display and grouping options .................................................................................... 20
4.4.2.1. Change of the instrument description .................................................................... 21 4.4.3. Custom views ............................................................................................................. 21
4.5. User licenses ...................................................................................................................... 23
4.5.1. The Licenses Manager program ................................................................................. 23 4.5.1.1. Installation of the program from the site FTP ........................................................ 23
4.5.1.2. Program use............................................................................................................ 24 4.6. Data extraction ................................................................................................................... 26
4.6.1. User defined surveys .................................................................................................. 27
4.6.2. Data re-processing...................................................................................................... 28 4.6.2.1. List of elaborations................................................................................................. 29
4.7. Wind rose data extraction .................................................................................................. 30 4.7.1. Identification of the measures of direction and intensity of the wind ........................ 32 4.7.2. Options for the calculation of the wind roses ............................................................ 32
4.8. Weibull distribution calculation ......................................................................................... 33 4.8.1. Options for the calculation of the Weibull distribution ............................................. 34
4.9. Filters ................................................................................................................................. 35 4.10. Window of data display ..................................................................................................... 36
4.10.1. Automatic positioning of data display windows ........................................................ 37 4.10.2. Data formatting .......................................................................................................... 38 4.10.3. Data export ................................................................................................................. 39 4.10.4. Display of data using charts ....................................................................................... 40
4.10.4.1. Zoom Function ................................................................................................... 41 4.10.4.2. Highlight the data series ..................................................................................... 42 4.10.4.3. Set horizontal reference values .......................................................................... 42

LSI LASTEM GidasViewer – User Manual
3
4.10.4.4. Chart Settings ..................................................................................................... 44
4.10.4.5. Management of error and missing data .............................................................. 44 4.10.5. Display of wind rose data using charts ...................................................................... 46 4.10.6. Display of Statistics ................................................................................................... 47
4.10.6.1. Chart Statistics ................................................................................................... 48 4.11. Display Profiles .................................................................................................................. 49
4.11.1. Load automatically a display profile .......................................................................... 50 4.12. Backup and Restore of instrument data ............................................................................. 51
4.12.1. Instrument Backup ..................................................................................................... 51
4.12.2. Instrument restore ...................................................................................................... 52 4.13. Import data from an InfoGAP archive ............................................................................... 53 4.14. Monitor of instantaneous data ............................................................................................ 53
4.15. Program’s configuration file .............................................................................................. 54 4.16. The Update Manager program ........................................................................................... 55
4.16.1. Installation of the program from the site FTP ............................................................ 55 4.16.2. Program use................................................................................................................ 55
LSI LASTEM GidasViewer – User Manual
4
1. Introduction
GidasViewer program allows the display and re-processing of data stored in database SQL Server
(©
Microsoft) Gidas.
2. System requirements The program needs following hardware and software:
Personal computer
Processor at 600 MHz operating frequency or higher. 1 GHz recommended;
Display: SVGA res. 1024x768 or higher;
Operating system (*):
o Microsoft Windows 7/2003/2008/8/10
Microsoft .NET Framework V.3.5 (**);
LSI LASTEM 3DOM program (updated to the last available version) previously installed to
communicate with the instrument;
Instance of SQL Server 2005 or superior(***).
(*) Operating systems must be updated with the latest update released by Microsoft and
available through Windows Update; for operating systems not listed is not guaranteed correct
and complete operation of programs.
(**)The Microsoft. NET Framework 3.5 setup is included in the LSI Lastem product USB storage
and, if necessary, is automatically installed during the installation. Otherwise you can
download the installer for the Microsoft. NET Framework 3.5 directly from the Microsoft
Download Center at http://www.microsoft.com/downloads/en/default.aspx inserting in the search
field. the term ".NET".
On Windows 8 and 10 you can enable. NET Framework 3.5 manually from the Control Panel . In
the Control Panel you can use Add Programs and Features, then Enable or disable Windows
features and then select the check box Microsoft. NET Framework 3.5.1. . This option requires an
Internet connection.
(***)Gidas database can also be installed on free versions SQL Server Express. For the system
requirements of SQL Server Express, see the Gidas Database Management documentation released
with this program or visit the official Microsoft site http://technet.microsoft.com/en-
us/library/ms143506(SQL.120).aspx
The procedure to install Gidas database installs the 2014 versione of SQL Server Express if
required.
Program GidasViewer can also connects to remote instances of SQL Server 2005 or superior.
LSI LASTEM GidasViewer – User Manual
5
3. Gidas database creation
GidasViewer program has got a guided procedure for the creation of Gidas database; this procedure
is also automatically started at the end of GidasViewer installation.
3.1. SQL Server
Gidas database uses Microsoft SQL Server 2005 or superior.
Microsoft SQL Server is Microsoft product for databases management and there are different
versions available, depending on the complexity of data bases and corporate processes which have
to be managed. Particularly Express version is the free version of SQL Server (for more information
see Microsoft official site).
SQL Server is installed as service and it runs as a bridge between the application and the database.
Every SQL Server service can manage many databases and in every computer many SQL Server
services can be installed. Any service can be distinguished with its name: a service of SQL Server is
also called Instance of SQL Server.
Gidas database can be created on any version of SQL Server 2005 or superior installed on the local
computer or in a network connected host.
For more information about the management of the database Gidas you can look inside the
document Management of the Gidas database available from the Windows menu Start All
programs LSI_Lastem Gidas.
3.2. Creation of Gidas database through guided
procedure
The guided procedure starts automatically after the installation of GidasViewer program, or you can
alternatively start the guided procedure from the menu Tools Create Gidas database.
The first screen of the procedure allows user to create a new database Gidas or to connect to an
existent one.
If the user decides to create a new database Gidas the second screen of the procedure determines
whether the database will be created locally or in a networked environment. In this case it is
assumed that in the corporate network is already configured a SQL Server 2005 service or superior.
The next screen will depend on the choices made by the user and the guided procedure ends with
the creation of the database file in the selected instance of SQL Server.
3.2.1. Creating the database in a network service
To create the database in a SQL Server service network it is necessary to specify the connection
parameters to that service. The connection parameters should be required to the database
administrator and are set in the following screen:

LSI LASTEM GidasViewer – User Manual
6
To create the database file is necessary that the user connecting to the SQL Server service has
administrator rights on that service.
The <Network Search> button performs a search of the instances of SQL Server within the
corporate network; depending on the firewall settings and services, not all instances in the network,
might be included in the response.
3.2.2. Creating the database on the local computer
The creation of the database Gidas on the local computer varies depending on whether your
computer has already installed a SQL Server service or not.
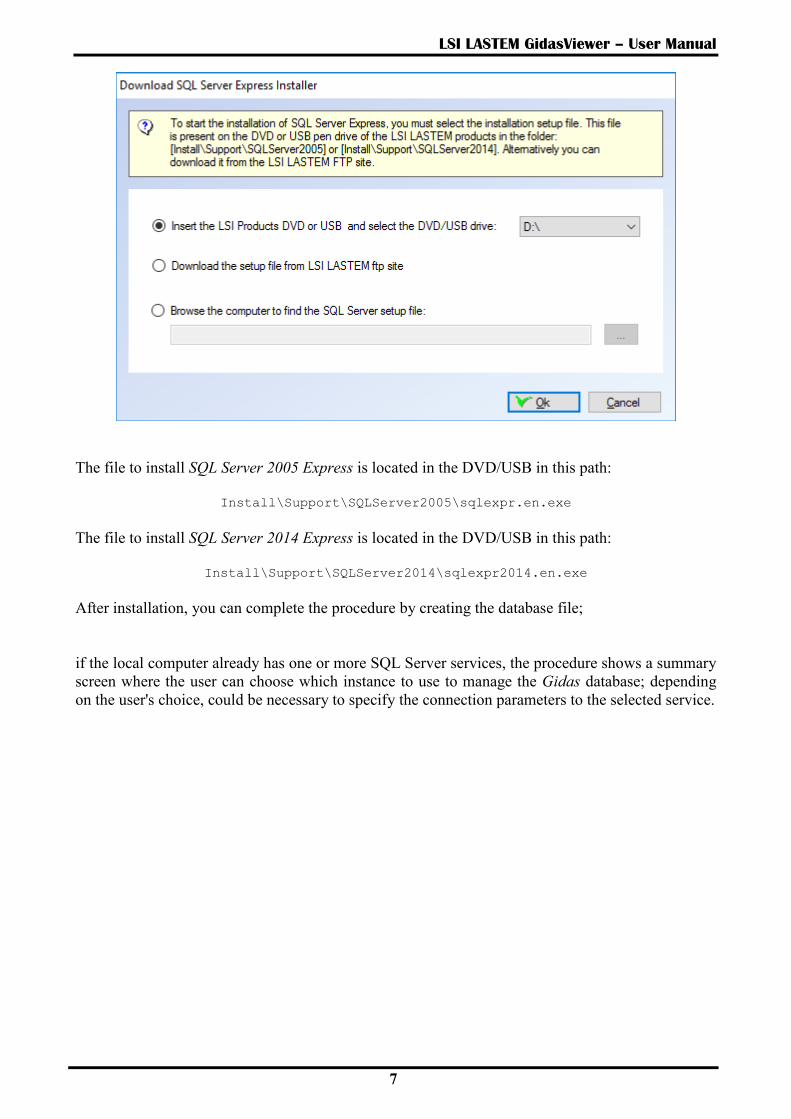
If the local computer has no SQL Server service installed, the wizard will install the free version of
SQL Server Express. The SQL Server version is determined by the characteristics of the operating
system: SQL Server Epress 2005 for systems prior to Windows 7, SQL Server 2014 for system
from Windows 7. The SQL Server is installed as an instance named LSIDB.
The setup files are located on the DVD/USB installation support of LSI LASTEM products or can
be downloaded from our FTP site:
LSI LASTEM GidasViewer – User Manual
7
The file to install SQL Server 2005 Express is located in the DVD/USB in this path:
Install\Support\SQLServer2005\sqlexpr.en.exe
The file to install SQL Server 2014 Express is located in the DVD/USB in this path:
Install\Support\SQLServer2014\sqlexpr2014.en.exe
After installation, you can complete the procedure by creating the database file;
if the local computer already has one or more SQL Server services, the procedure shows a summary
screen where the user can choose which instance to use to manage the Gidas database; depending
on the user's choice, could be necessary to specify the connection parameters to the selected service.

LSI LASTEM GidasViewer – User Manual
8
WARNING
The setup of SQL Server Express versions has disabled remote connections by default: it means
that database isn’t visible from a networked host. In order to enable the remote connections for
SQL Server 2005 Express follow the instructions in this document:
http://support.microsoft.com/kb/914277/en-us .; for superior versions follow
(http://msdn.microsoft.com/en-us/library/ms179383(v=sql.120).aspx)
3.2.3. Selection of the initial size of the database
When you create a new database Gidas is possible to determine the initial size of the data file.
The size of the database Gidas automatically grows by 10% to fit the size of the data content. The
choice of an initial size too small will not cause data loss but in the long term can degrade the
performance of the database.

LSI LASTEM GidasViewer – User Manual
9
Remember that if you are installing Gidas on a Express version of SQL Server there is a limit on the
size of the data file:
4 GB is the maximum for SQL Server 2005 Express
10 GB is the maximum for SQL Server major version
3.3. Gidas database management
The document Gidas database management describes the main tasks to manage Gidas database and
SQL Server. To read this document select Windows Start All Programs LSI -Lastem
Gidas.
We recommend to effect periodic backup operations to avoid data loss.
3.4. Connection to Gidas database
When you start program first time, you need to specify Gidas database to which it has to connect.
If the program is started on the same computer where the guided procedure has been used for the
creation of the database Gidas (3.2) the program is already configured and no additional operation
is required. Otherwise the program automatically shows the Select Gidas Data Source window that
can also be started in a second time using the menu File Change Data Source.

LSI LASTEM GidasViewer – User Manual
10
This window shows the Gidas data source in use and allows the change of it. To change it check an
item of the data source connection list or press the <Add> button to add a new one; use the <Test>
button to test selected connection availability. You can also change the query time out of the data
source in use (this number can be increased if a poor performance database server is used).
The list of the available data sources contains the list of all the data sources inserted by the user,
therefore initially it is empty. This list also shows the data source used by the various LSI-Lastem
programs.
The <Remove> button removes a data source from the list: this does not change the configuration
of programs that use the deleted data source, which will continue anyway to use it.
3.4.1. Add a new Data Source Connection
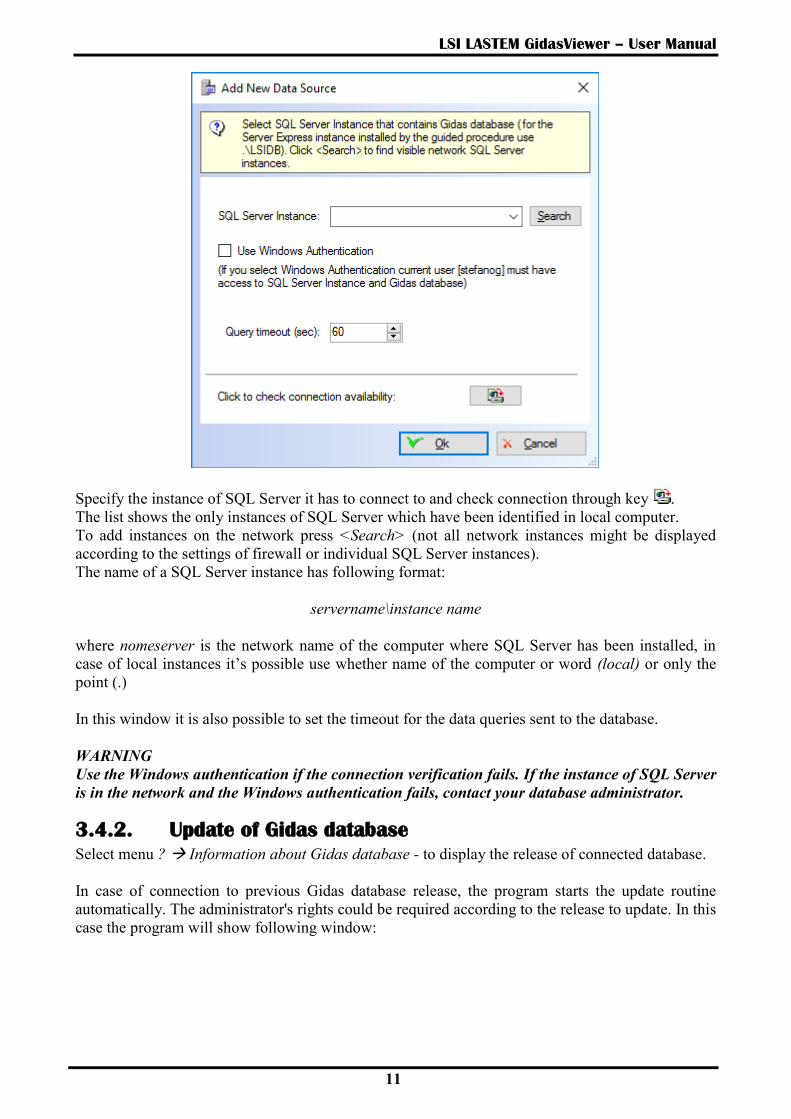
To add a new data source connection press the <Add> button of the previous windows to show the
Add New Data Source window.
LSI LASTEM GidasViewer – User Manual
11
Specify the instance of SQL Server it has to connect to and check connection through key .
The list shows the only instances of SQL Server which have been identified in local computer.
To add instances on the network press <Search> (not all network instances might be displayed
according to the settings of firewall or individual SQL Server instances).
The name of a SQL Server instance has following format:
servername\instance name
where nomeserver is the network name of the computer where SQL Server has been installed, in
case of local instances it’s possible use whether name of the computer or word (local) or only the
point (.)
In this window it is also possible to set the timeout for the data queries sent to the database.
WARNING
Use the Windows authentication if the connection verification fails. If the instance of SQL Server
is in the network and the Windows authentication fails, contact your database administrator.
3.4.2. Update of Gidas database
Select menu ? Information about Gidas database - to display the release of connected database.
In case of connection to previous Gidas database release, the program starts the update routine
automatically. The administrator's rights could be required according to the release to update. In this
case the program will show following window:

LSI LASTEM GidasViewer – User Manual
12
WARNING
To update the database you must connect to the SQL Server with administrative rights.
Use the Windows authentication if the connection verification fails. If the instance of SQL Server
is in the network and the Windows authentication fails contact your database administrator.
3.5. How to get information on the database Gidas
To get information on the database Gidas select the menu ? About Gidas Database:

LSI LASTEM GidasViewer – User Manual
13
This window displays extensive information on the database Gidas in use.
Especially useful are Database Server Edition, Database allocated file size, Database estimated
size. If you are using a version of Microsoft SQL Server Express (as in the figure above) the
maximum data size cannot exceed 4GB for SQL Server 2005 Express and 10 GB for major version.
When the estimated size of the database exceeds the 90% of this limit the window displays a
warning.
The button <Performance> opens a window that allows you to check the status of fragmentation of
the indexes of the main data table of the database by pressing the button <Test Fragmentation>:
If the indexes of the table are very fragmented you can be reorganize them using the button
<Resolve>.
ATTENTION:
on a very large database operation testing and reorganizing the indexes can take several minutes
during which the database may no longer be accessible.

LSI LASTEM GidasViewer – User Manual
14
4. Using the program 4.1. User interface presentation
If at start the program is connected to valid Gidas database, the program looks like following mask
and displays the window of Browser and the window of Proprieties.
It’s possible that program looks different because the position of these windows can be modified:
If window shows the icon in the title bar, the window is always visible; if it shows the
icon it means that the window hides itself automatically when it isn’t selected, and
shows only a label anchored to the border of main window. In order to restore the window
click mouse on this label.
In order to modify the look of display icon click on it.
It’s possible move the windows and anchor them in other positions of the display dragging
them by title bar: during dragging the possible new anchorage positions are displayed.

LSI LASTEM GidasViewer – User Manual
15
When the data are displayed, the windows that include the data are displayed in the centre of main
window:

LSI LASTEM GidasViewer – User Manual
16
4.1.1. Menu
The program has following menus:
File
Change Data Source: it displays the modification window of Gidas database’s instance used
by the program. The program can use both local and remote databases.
Page Setup: it displays the system window for setup of page orientation for printing of
charts
Default Printer: it selects the default printer for printing of charts
Save Profile: save a layout profile (§4.11);
Save Profile As: save a layout profile with a different name;
Open profile: open a profile from the list of the available profiles;
Close Profile: close the active profile;
Exit: it closes the program;
Edit
Add Custom View: it adds a personalized view to Browser’s window (§4.4);
Management Groups: it displays the management group windows (§4.4.2);
View
Instruments Browser: it displays the window of Browser.
Properties Windows: it displays the properties window.
Close All Data Viewers: it closes all data display windows.
Arrange All Data Viewers: it arranges all data viewers automatically.
Browser Refresh: it updates the data of Browser requesting them the database again.
Scroll Forward All Data Viewers: it scrolls forward all visible data viewers.
Scroll Backward All Data Viewers: it scrolls backward all visible data viewers.
Reset Default Layout: it resets the default application layout.
Options
Program Settings: it shows the window with general program settings.
Text File Export Properties: it shows the setups window in order to format date and numeric
values when you are exporting data on text file.
Tools
Create Gidas Database: it starts procedure for Gidas database installation.
Instrument Backup: it stores data of one instrument in a compressed binary file.
Instrument Restore: it restores data of one instrument from a compressed binary file.
Import Data from InfoGap Database: it imports data from a valid InfoGAP database.
Import Data from Mobile Device: it imports data from a valid Gidas mobile database.
License Manager: it starts the License Center program
?
Contents: it shows program’s user manual.
Gidas Database Management: it shows Gidas database management user manual.
Check for updates: it starts the request of program’s updates.
About: it shows the window with information about program.

LSI LASTEM GidasViewer – User Manual
17
About Gidas Database: it shows the window that displays the information about connected
Gidas database.
You can find some of these menu’s entries in the key bar below main window’s menu.
4.2. General settings
To view or edit general program settings select menu Option Program Settings:
The General tab allows the program to automatically load the profile in use when the program when
closed (§4.11), set the preferred visualization mode for the instrument browser (§4.4), the default
time range selection (§4.6), decide whether to add the index measure to the name of the columns of
data and allows the program to automatically show the Gidas About form when the program starts
(§ 3.5) . The Data Format tab set the format for the displayed data (§4.10); the Chart tab set the
chart settings (§4.10.4); the Wind Rose tab set the wind rose settings (§4.7); the Weibull
Distribution tab set the Weibull calculation settings (§4.8).
4.3. Custom views
Through this program you can fix some personalized views in order to aggregate data coming from
different instruments and/or surveys.
Use menu Edit Add custom view… to add a personalized view or click mouse right key on
Custom views of Browser selecting menu Add new view.
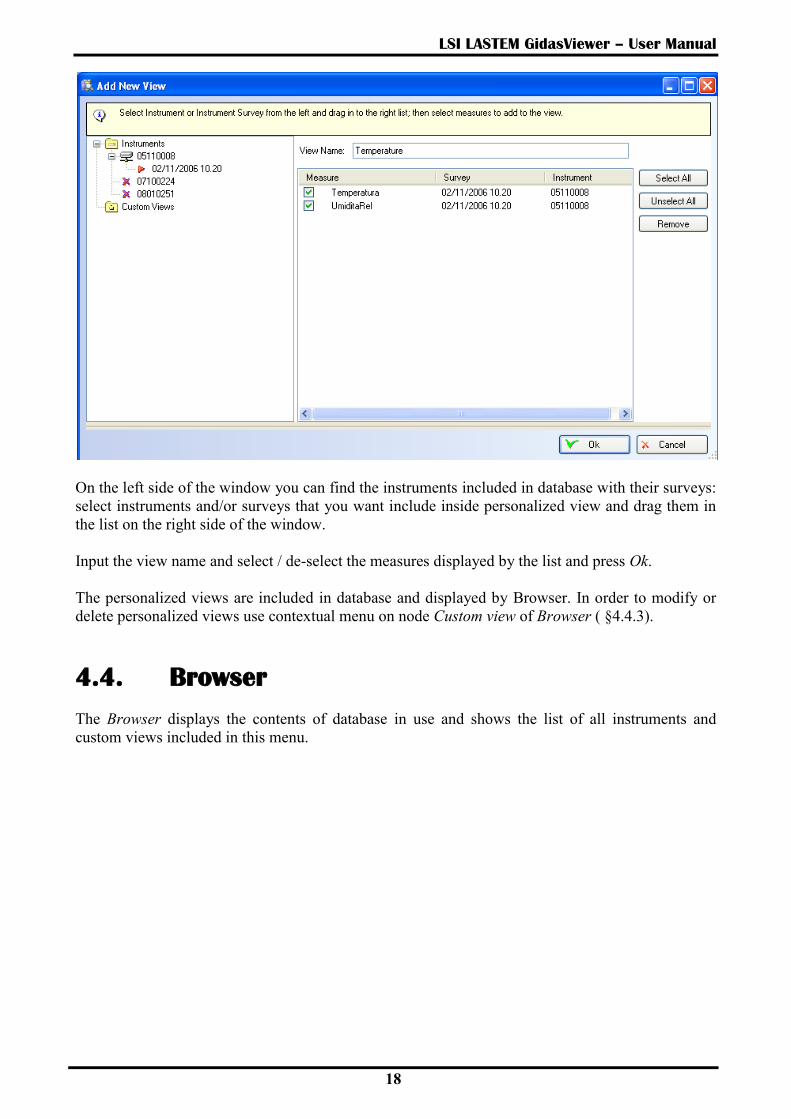
These operations show setup/change window of personalized views:
LSI LASTEM GidasViewer – User Manual
18
On the left side of the window you can find the instruments included in database with their surveys:
select instruments and/or surveys that you want include inside personalized view and drag them in
the list on the right side of the window.
Input the view name and select / de-select the measures displayed by the list and press Ok.
The personalized views are included in database and displayed by Browser. In order to modify or
delete personalized views use contextual menu on node Custom view of Browser ( §4.4.3).
4.4. Browser
The Browser displays the contents of database in use and shows the list of all instruments and
custom views included in this menu.
LSI LASTEM GidasViewer – User Manual
19
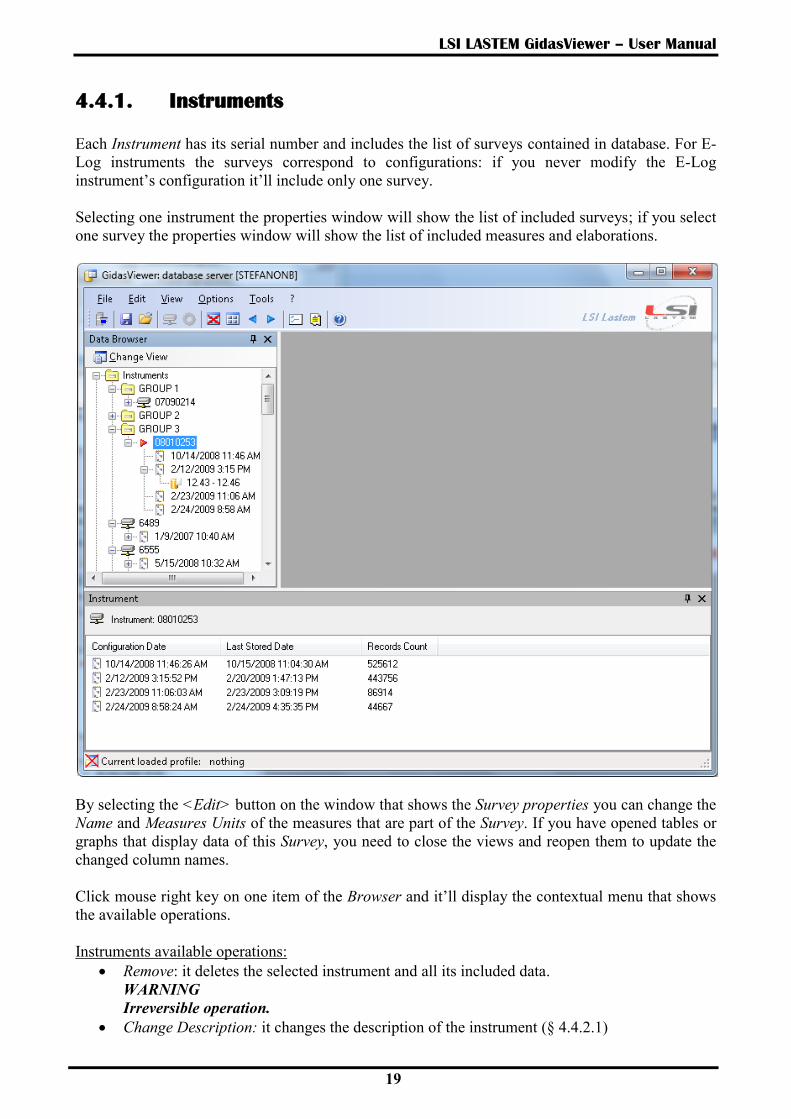
4.4.1. Instruments
Each Instrument has its serial number and includes the list of surveys contained in database. For E-
Log instruments the surveys correspond to configurations: if you never modify the E-Log
instrument’s configuration it’ll include only one survey.
Selecting one instrument the properties window will show the list of included surveys; if you select
one survey the properties window will show the list of included measures and elaborations.
By selecting the <Edit> button on the window that shows the Survey properties you can change the
Name and Measures Units of the measures that are part of the Survey. If you have opened tables or
graphs that display data of this Survey, you need to close the views and reopen them to update the
changed column names.
Click mouse right key on one item of the Browser and it’ll display the contextual menu that shows
the available operations.
Instruments available operations:
Remove: it deletes the selected instrument and all its included data.
WARNING
Irreversible operation.
Change Description: it changes the description of the instrument (§ 4.4.2.1)
LSI LASTEM GidasViewer – User Manual
20
Surveys available operations:
Show data: it displays processed data included in the survey (§4.6)
Show Wind Rose Data: shows wind rose data included in the survey (§4.7)
Show Weibull Wind Rose Distribution: shows Weibull distribution (§4.8)
View instantaneous data: it starts monitor for display of instantaneous data (§4.14).
Remove: it deletes selected survey and all its included data.
WARNING
Irreversible operation.
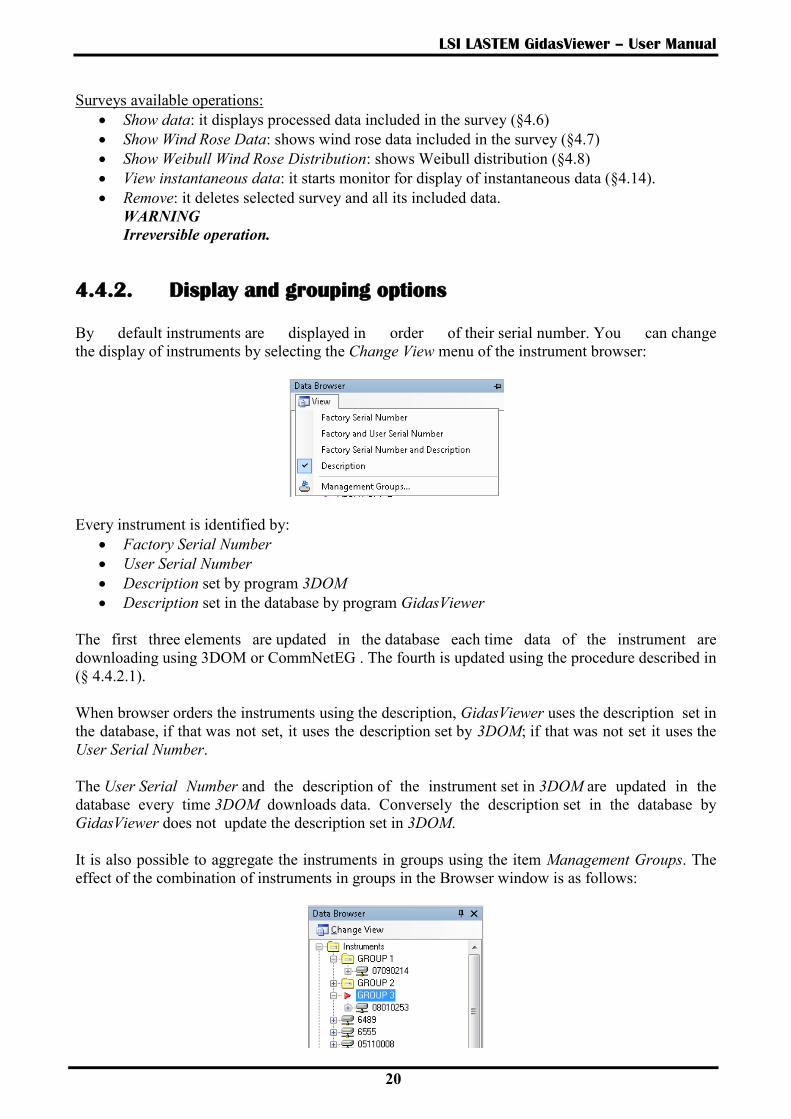
4.4.2. Display and grouping options
By default instruments are displayed in order of their serial number. You can change
the display of instruments by selecting the Change View menu of the instrument browser:
Every instrument is identified by:
Factory Serial Number
User Serial Number
Description set by program 3DOM
Description set in the database by program GidasViewer
The first three elements are updated in the database each time data of the instrument are
downloading using 3DOM or CommNetEG . The fourth is updated using the procedure described in
(§ 4.4.2.1).
When browser orders the instruments using the description, GidasViewer uses the description set in
the database, if that was not set, it uses the description set by 3DOM; if that was not set it uses the
User Serial Number.
The User Serial Number and the description of the instrument set in 3DOM are updated in the
database every time 3DOM downloads data. Conversely the description set in the database by
GidasViewer does not update the description set in 3DOM.
It is also possible to aggregate the instruments in groups using the item Management Groups. The
effect of the combination of instruments in groups in the Browser window is as follows:

LSI LASTEM GidasViewer – User Manual
21
The window Management Groups allows creating new groups, rename groups, add or remove
instruments from each group:
To add an instrument in a group drag it from the list on left to a group node in the list on the right;
to remove an instrument from a group drag it from the list on the right to the list on the left
4.4.2.1. Change of the instrument description
In order to change the description of one instrument select the item in Browser and select contextual
menu Change Description. This menu shows the following window:
4.4.3. Custom views
The custom views section includes all personalized views inputted into Gidas database by users.
Click mouse right key on one item and it’ll display the contextual menu that shows the available
operations.
Personalized views available operations:

LSI LASTEM GidasViewer – User Manual
22
Show data: it displays processed data included in survey (§4.6)
Show Wind Rose Data: shows wind rose data included in the survey (§4.7)
Show Weibull Wind Rose Distribution: shows Weibull distribution (§4.8)
View instantaneous data: it starts monitor for display of instantaneous data (§4.14).
Remove: it deletes selected view but doesn’t delete connected data
Edit: it starts window for view change.

LSI LASTEM GidasViewer – User Manual
23
4.5. User licenses
The program allows the display of instruments’ data included in Gidas database for which there’s
valid license file; you can ask LSI LASTEM for license files.
In case the license file isn’t available, the instrument is displayed in the Data Browser with icon
and you cannot access to its data.
Similarly if one custom view includes data that depend on one measure of not licensed instrument,
you cannot access to data of view.
4.5.1. The Licenses Manager program
Use menu Tool Licenses Manager to run the program LSI License Center which manages the
LSI programs licenses installed on the local computer.
The LSI License Center program is one of the components of the LSI Support Center program
which can directly be installed by the CD of the products LSI LASTEM or from the CD of the
licenses files or downloading the installer file from the site FTP of the LSI LASTEM. the LSI
Support Center also contains the component that verifies the availability of the new versions of the
LSI LASTEM programs installed in the computer (§4.16).
4.5.1.1. Installation of the program from the site FTP
If the program of the management of the licenses is not installed in the local computer you can
download the installation file from the LSI LASTEM FTP site. At the end of the downloading the
installation will automatically starts; at the end of the installation the program will be started.

LSI LASTEM GidasViewer – User Manual
24
4.5.1.2. Program use
The program visualizes all the installed licenses in the computer divided for single programs or
single tools. Through this program it is possible:
to export the selected licenses in an archive file;
to import an archive licenses file in the local computer;
to produce a simple text file report with the list of the installed licenses in the computer;
to directly download the licenses archives from the LSI LASTEM site;
The licenses archive is constituted by an only file zip of extension .lsilic: this is the format with
which the licenses are distributed by LSI LASTEM.
Every licenses archive can be downloaded from the LSI LASTEM site inserting the License Code
supplied by LSI LASTEM with the purchase of the programs.

LSI LASTEM GidasViewer – User Manual
25
Through the Settings button it is possible to set the parameters of the Internet communication in the
case it is present a server proxy.

LSI LASTEM GidasViewer – User Manual
26
4.6. Data extraction
In order to display the data of one survey or one custom view select the item in Browser and select
contextual menu Show data. This menu shows the window for setup of data extraction options:
Options for data require:
From … to : select this option in order to set up a slot for data selection; use keys to
scroll selected time period one quantity backward and forward respectively, that is the
difference among two dates; the button serves to automatically set the time limit on a
user-defined survey (function supported by R- Log instrument)
Last period from now: select this option to extract defined period of data starting from the
most recent value;
Data from the last n minutes: select this option to extract last n minutes of data;

LSI LASTEM GidasViewer – User Manual
27
Use only data with validation percentage greater than: select required validity percentage of
processed datum; if you set up 0 all date are extracted, if you set up 100 only date with
validity percentage 100% are extracted;
Enable columns filter: selecting this option it’s displayed the window that allows the
selection of measures to display: at the opposite it’s displayed all measures and their
processings included in the survey or in the custom view.
Elaboration rate options (§4.6.2)
If the selected period are outside the limits of the data in the database the window displays a
warning but you can always continue with the extraction of data:
If you select the option Last period the data check covers only the lower time limit.
WARNING:
the period of availability of data is indicated by using the configuration date as lower limit and
the date of the last elaborated data downloaded into the database. In some special cases, this
information may not be updated.
4.6.1. User defined surveys
With the R-Log instrument was introduced the possibility to add a user defined survey. These
surveys are stored in the database GIDAS (version 2.4.0) and are associated with the instrument
configuration current when the user survey was created.
The user surveys are shown in the data extraction windows. By clicking the button the
program shows the windows with the list of the user surveys available for the selected instrument:

LSI LASTEM GidasViewer – User Manual
28
From this window you can open or remove a user survey: to open a user survey means to assign the
temporal limits of the user survey to the temporal limits of the extraction window.
4.6.2. Data re-processing
Using window for setup of data request options you can fix some re-processings about data
extracted from database.
Through re-processing options you can specify one or more elaboration rates about available data.
Elaboration rate options:
Hide original data: in case of re-processings, when you select this option you don’t display
the original data (included in database) stored by instruments and used to obtain
elaborations;
Elaboration rate (minutes): this list includes the elaboration rates (minutes) that will be used
for elaborated data; use keys <Add> and/or <Remove> to run the list; keys sort
increasing-wise or decreasing-wise the elaboration rates included in the list;
Elaborated record date setting: this option is displayed when the data extracted from
database are elaborated; selecting option Upper limit the datum processed during a fixed slot
is assigned to date related to upper bound of elaboration slot; selecting option Lower limit
the datum processed during a fixed slot is assigned to date related to lower bound of
elaborated slot.
The <Add> button opens the window that allows you to add new elaboration rates:

LSI LASTEM GidasViewer – User Manual
29
4.6.2.1. List of elaborations
Table Core.ElabTypeList of database Gidas includes the list of base processings made during
measure’s elaboration.
Original datum Elaboration
Inst (n.e.) Ave
Inst Ave
Min Min
Ave Ave
Max Max
StDev Nothing
Tot Sum
Duration Sum
PrevDir AvgDirection
RisDir VectDirection
RisVel VectVel
StdDevDir Nothing
CalmPerc Ave
ValidDataPerc Ave
PSBisect AvgDirection
PSPrevDir AvgDirection
PSPrevVel Ave
PSStdDevDir Nothing
DirFreq1 Ave
DirFreq2 Ave
DirFreq3 Ave
DirFreq4 Ave
DirFreq5 Ave
DirFreq6 Ave
DirFreq7 Ave
DirFreq8 Ave
DirFreq9 Ave
DirFreq10 Ave

LSI LASTEM GidasViewer – User Manual
30
DirFreq11 Ave
DirFreq12 Ave
DirFreq13 Ave
DirFreq14 Ave
DirFreq15 Ave
DirFreq16 Ave
TimeMin Nothing
TimeMax Nothing
In this table the column Original datum represents the processing made by instrument which
generated the datum; column Elaboration represents the processing made when datum is
elaborated. In particular:
datum Inst (n.e.) represents the instantaneous datum not elaborated by instrument;
elaboration Nothing means that datum isn’t elaborated (for example datum StDev standard
deviation);
elaboration AvgDirection is applied to wind direction data that are elaborated by geometric
mean of directions without taking wind intensity into consideration.
elaborations VectDirection and VectVel (supported by version 2.11 of Gidas database)
perform a vector processing of the combined data of wind speed and wind direction.
types PSBisect, PSPrevDir, PSPrevVel, PSStdDevDir, DirFreqn are supported only by
Babuc ABC instruments
types TimeMin and TimeMax are supported by Pluvi-ONE instruments and are displayed
using hh:mm:ss format.
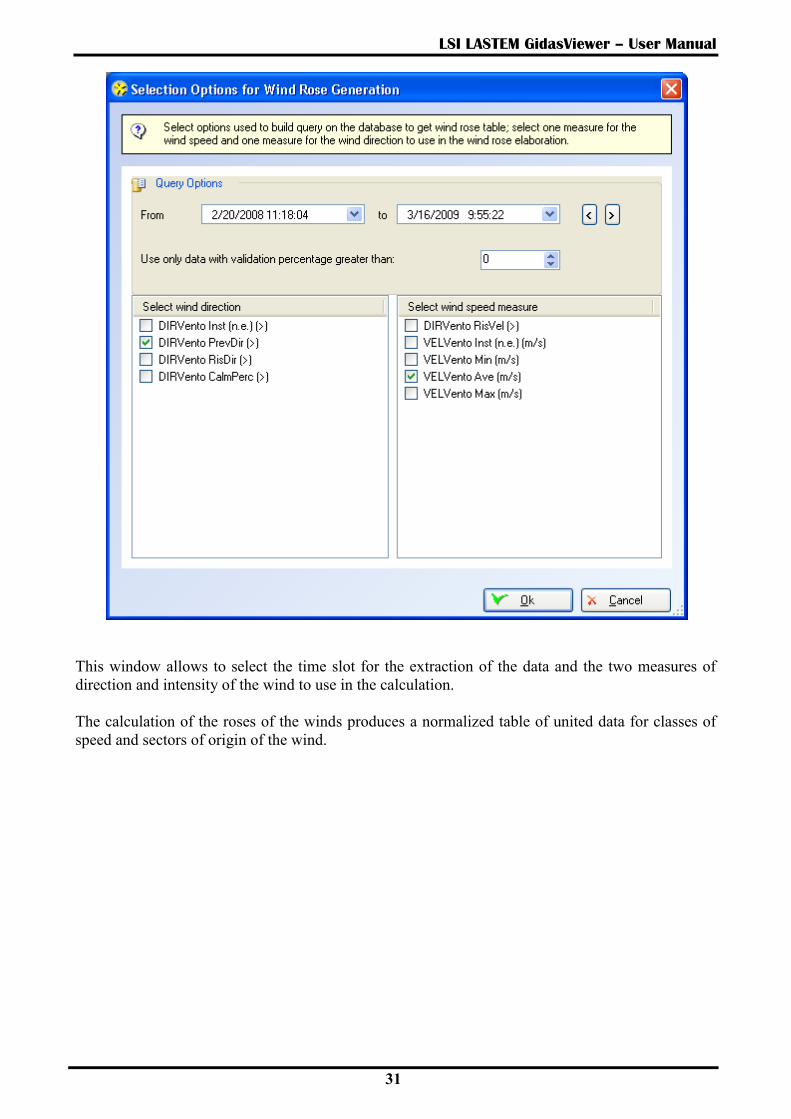
4.7. Wind rose data extraction
In order to display the wind rose data of one survey or one custom view select the item in Browser
and select contextual menu Show Wind Rose Data. This menu shows the window for setup of wind
rose data extraction options:
LSI LASTEM GidasViewer – User Manual
31
This window allows to select the time slot for the extraction of the data and the two measures of
direction and intensity of the wind to use in the calculation.
The calculation of the roses of the winds produces a normalized table of united data for classes of
speed and sectors of origin of the wind.

LSI LASTEM GidasViewer – User Manual
32
4.7.1. Identification of the measures of direction and intensity
of the wind
Measures of wind direction are identified by:
Measure type: Direction
Measures of wind speed are identified by:
measure type: Speed
measure type: Direction + elaboration type: RisVel o PsPrevVel
4.7.2. Options for the calculation of the wind roses
Through menu Options Program Settings you can set up the default options which determine the
settings used to calculation wind roses:

LSI LASTEM GidasViewer – User Manual
33
The Wind Rose Settings tab contains the options used for the calculation of the roses of the winds
Number of wind sectors: number of the sectors in which the angle of 360° degrees is divided;
they are available different values (1,4,8,12,16,24,36 sectors)
Sectors starting point: they are available two choices Start from 0 degree and Center on 0
degree. If for instance the number of wind sectors selected is 36 sectors of 10 degrees,
choosing Start from 0 degree the sectors will be: (1, 10), (10, 20) …; choosing Center on 0
degree the sectors will be (-5, 5), (5, 15) …..
Normalization factor: factor used for normalizing the data of the resultant wind rose table
Wind speed class list: it allows to select the classes of speed to use in the calculation; the
button Add it add a new class of speed with the superior value equal to that contained in the
field of insertion; the button Remove it removes the element selected by the list; the button
Default reset the default values.
4.8. Weibull distribution calculation
Weibull distribution is used to simulate the statistical distribution of probability of the wind,
especially in wind energy applications:
𝑓𝑖 =𝑘
𝑐(
𝑣𝑖
𝑐)
𝑘−1
𝑒−(𝑣𝑖𝑐
)𝑘

LSI LASTEM GidasViewer – User Manual
34
where 𝑓𝑖 is the probability of observing wind velocity 𝑣𝑖, k is the shape parameter and c is the scale
parameter; k and c are the two characteristic parameters of the distribution (more information on the
meaning and use of the Weibull distribution can be found in specialized books on the subject).
In order to display the Weibull distribution of wind data of one survey or one custom view select the
item in Browser and select contextual menu Show Weibull Wind Rose Distribution. This menu
shows the window for setup of Weibull distribution data extraction options similar to that for the
calculation of the wind roses (§4.7) to select the time frame for the extraction of data and two
channels of direction and wind speed to be used in the calculation (§ 4.7.1).
The calculation of the Weibull distribution shows the distribution of wind data, aggregated to class
velocity normalized to 1, and the Weibull curve with the estimated values of two parameters k and
c:
The calculation of the parameter k is performed iteratively using the method of minimizing the
standard deviation between the calculated and measured values, the shape parameter c is calculated
from the value of k and the value of the average velocity of the wind distribution using the formula:
𝑐 =𝑣𝑎𝑣𝑔
Γ (1 +1𝑘
)
4.8.1. Options for the calculation of the Weibull distribution
Through menu Options Program Settings you can set up the default options which determine the
settings used to calculation Weibull distribution:

LSI LASTEM GidasViewer – User Manual
35
The Weibull Distribution tab contains the options used for the calculation. of the roses of the winds
contiene le impostazioni utilizzate per il calcolo della distribuzione del vento utilizzata nel calcolo
della distribuzione di Weibull. The calculation is done user determined number of speed classes
with fixed size expressed in meters per second.
4.9. Filters
Through data display window (§4.10) you can save the data extraction options by means of button
Save Filter. The button Save Filter has two options:
Save
Save as
The saved filters are displayed in Data Browser under data source item survey or custom view.
Selecting one Filter in Browser, the data will be displayed directly, without using the window for
setting data extraction options.
Through data display window you can modify the settings for data extraction using key Requery;
you can also save the filter’s modifications or save then as a new filter.
Filters available operations:
Show data: it displays the elaborated data included in the survey;
Remove: it deletes the selected view without deleting connected data.

LSI LASTEM GidasViewer – User Manual
36
During first download of survey’s data from Babuc ABC instrument, the program sets up
automatically one set of filters for each processing base included in several survey’s channels, in
order to group the quantities which have same processing rate.
4.10. Window of data display
In order to display the data of one survey or one personalized view select the item in the Browser
and select contextual menu Show Data or Show Wind Rose Data.
After setting up the options for data extraction (§4.6 or 4.7 or 4.8) the data are loaded by database
and displayed in data display window.
This window shows all tables of database required data: original data and re-processed data. You
can reach available options by means of keys under window headline; they’re the following:
: it shows information about the data source;
: it scrolls data forward or backward in time provided the data selection is based on a
time period;
Refresh: it updates the data re-loading them from database;
Requery: it modifies the options for data extraction and re-loads them from database;
Add/Remove: it allows to add or remove data tables modifying the list of elaborating bases;
this option is not available if data are of wind roses types;
Change View: it changes view of the data switching between Data Table, Chart and
Statistics.
Save Filter: it saves the options for data extraction (§4.9);
Export to: it exports the data from current selected table (the above example shows the table
Original Data);
Each table has got also its contextual menu as follow:

LSI LASTEM GidasViewer – User Manual
37
Show chart: it passes to graphic display of data
Copy: it copies selected data of current table in clipboard of Windows;
Export to: it exports the table’s data;
Remove: it deletes the table. Select key Add/Remove to restore it.
Use key to close current window; it’s on the left side of headline bar or menu. Use menu View
Close all data viewers to close all used data windows.
You can drag data windows and anchor them in different positions.
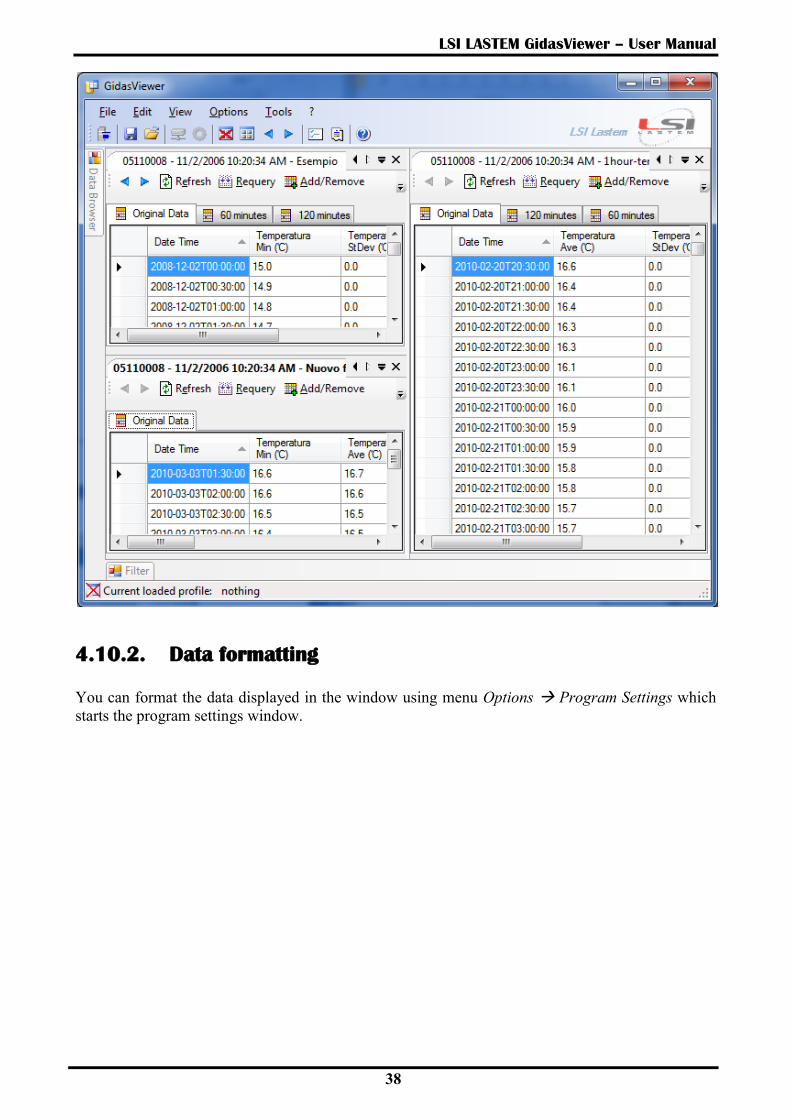
4.10.1. Automatic positioning of data display windows
Choose View Tile all windows data (or the button on the toolbar button) the program
automatically arranges windows allowing the simultaneous display of all data display windows.
LSI LASTEM GidasViewer – User Manual
38
4.10.2. Data formatting
You can format the data displayed in the window using menu Options Program Settings which
starts the program settings window.

LSI LASTEM GidasViewer – User Manual
39
Through the Data Format tab you can specify the decimal digits of floating point data and the date
format. These are default formats:
Local: it uses local setups;
ISO 8601: it uses ISO 8601 format (yyyy-mm-ddT hh:mm:ss);
Year/Month/Day;
Month/Day/Year;
Day/Month/Year;
Custom: personalized format allows to personalize the format of date and time using
following symbols:
y: year (use yyyy to represent the year, four numbers);
M: month (use MM to represent the month, two numbers);
d: day (use dd to represent the day, two numbers);
H: hour (use HH to represent the hour, two numbers);
m: minute (use mm to represent the minutes, two numbers);
s: second (use ss to represent the seconds, two numbers).
To represent time (hour, minutes, seconds) it always uses standard separating symbol of computer,
except for ISO 8601 format that uses symbol ‘:’.
4.10.3. Data export
You can export the data of current table on text file using key Export to.
It’s possible to use two different formats:
Text File: it exports only data of current table on text file; Select menu Options Export on
text file to set up the data formatting options
Excel spreadsheet xml: it exports the data of all tables into file compatible with XML
Worksheet format of Excel. This file format is supported by releases of Excel XP, 2003 and
higher and by OpenOffice from release 2.4

LSI LASTEM GidasViewer – User Manual
40
4.10.4. Display of data using charts
Select contextual menu Show chart or key Change View Mode to pass from data display through
tables to graphic display:
Contextual menu about chart includes following options:
Show Table: it returns to display of data through table;
Show Legend: it shows/hides the chart key;
Show Cursor Values: it shows/hides the display of mouse’s slider coordinates;
Show Statistics: it shows/hides the statistics form (§ 4.10.6)
Filter: it selects the series of data to display;
Limits: it sets a series of values used to display horizontal lines on the chart;
Reset: it resets all settings to its default values;
All values: it shows all selected values;
One hour: it shows the values grouped in one hour periods;
One day: it shows the values grouped in one day periods;
One week: it shows the values grouped in one week periods;
One month: it shows the values grouped in one month periods;
Save as: it allows to save the chart as image selecting format from Windows Bitmap, JPEG,
PNG, GIF
Copy: it copies the chart in the clipboard (inner format is JPEG);
Print: it starts the system window for choice of printer and printing of the chart;
Print Preview: it starts the chart printing preview window
LSI LASTEM GidasViewer – User Manual
41
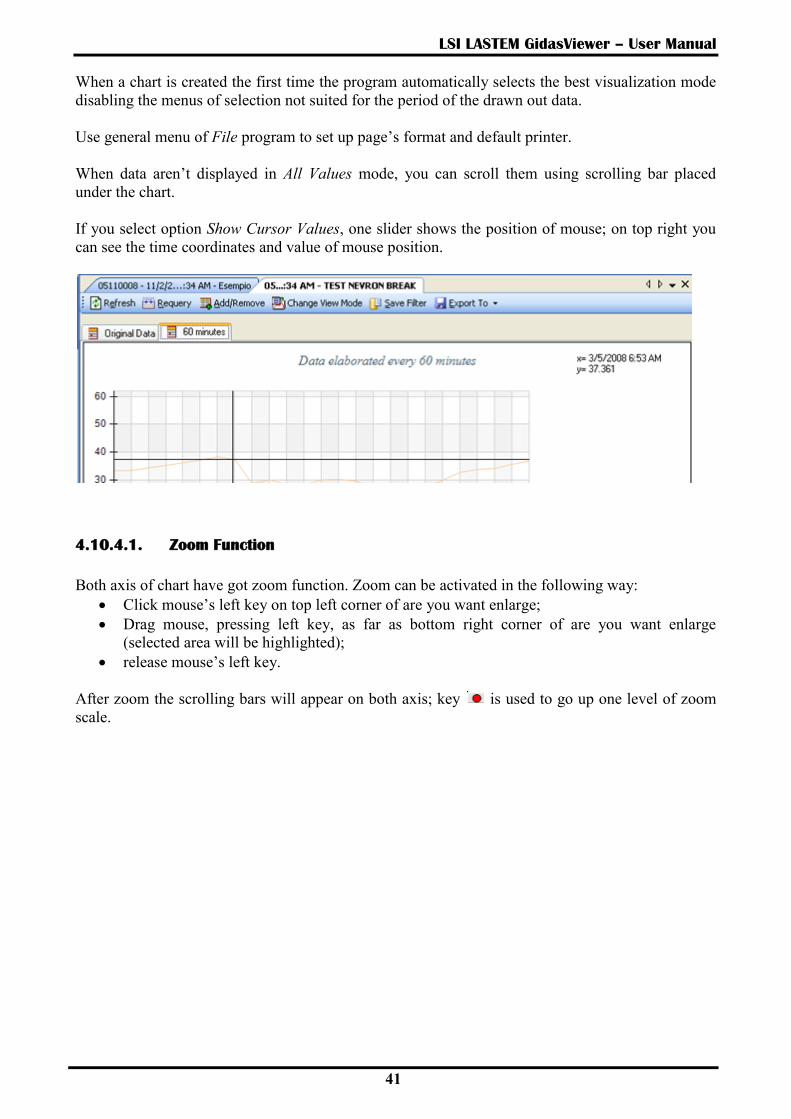
When a chart is created the first time the program automatically selects the best visualization mode
disabling the menus of selection not suited for the period of the drawn out data.
Use general menu of File program to set up page’s format and default printer.
When data aren’t displayed in All Values mode, you can scroll them using scrolling bar placed
under the chart.
If you select option Show Cursor Values, one slider shows the position of mouse; on top right you
can see the time coordinates and value of mouse position.
4.10.4.1. Zoom Function
Both axis of chart have got zoom function. Zoom can be activated in the following way:
Click mouse’s left key on top left corner of are you want enlarge;
Drag mouse, pressing left key, as far as bottom right corner of are you want enlarge
(selected area will be highlighted);
release mouse’s left key.
After zoom the scrolling bars will appear on both axis; key is used to go up one level of zoom
scale.
LSI LASTEM GidasViewer – User Manual
42
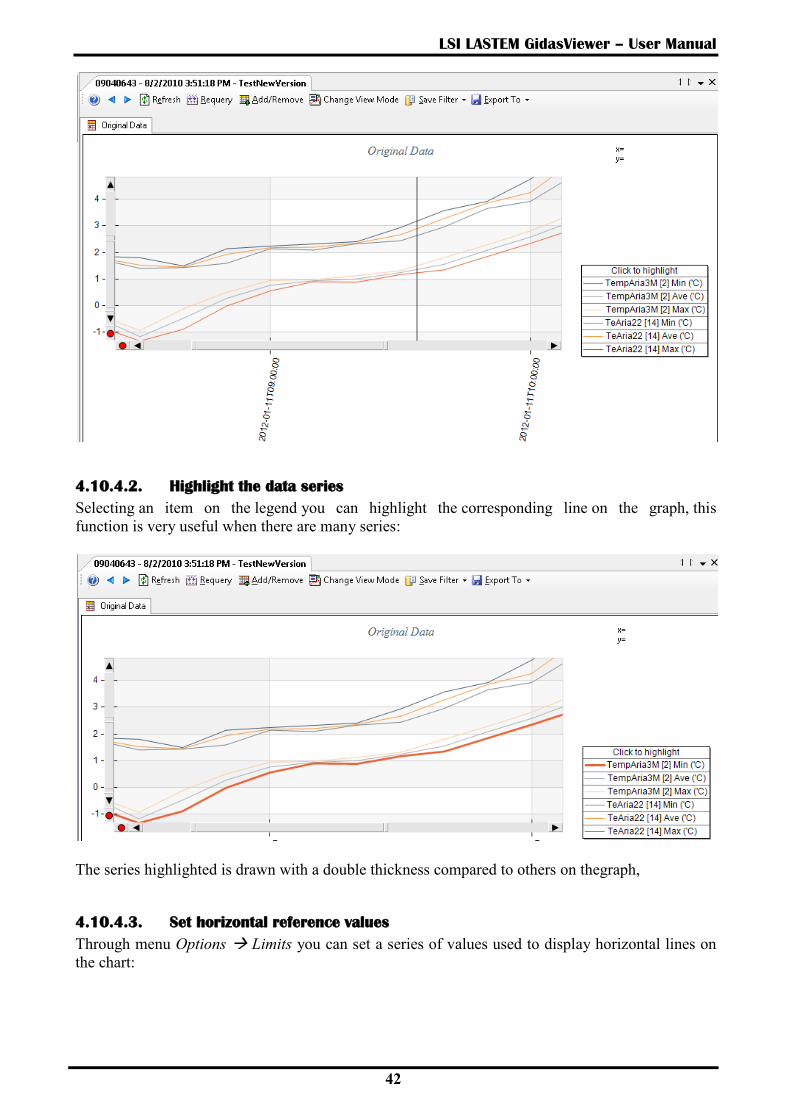
4.10.4.2. Highlight the data series
Selecting an item on the legend you can highlight the corresponding line on the graph, this
function is very useful when there are many series:
The series highlighted is drawn with a double thickness compared to others on thegraph,
4.10.4.3. Set horizontal reference values
Through menu Options Limits you can set a series of values used to display horizontal lines on
the chart:

LSI LASTEM GidasViewer – User Manual
43
In this form you can set:
the visibility of the limit;
the value for the limit
the color of the line used to display the limit
the style of the line
All the visible limits will be displayed on the chart:
LSI LASTEM GidasViewer – User Manual
44
You can save the limits selected along with options to extract data using the save function of the
filter data extraction (§ 4.9)
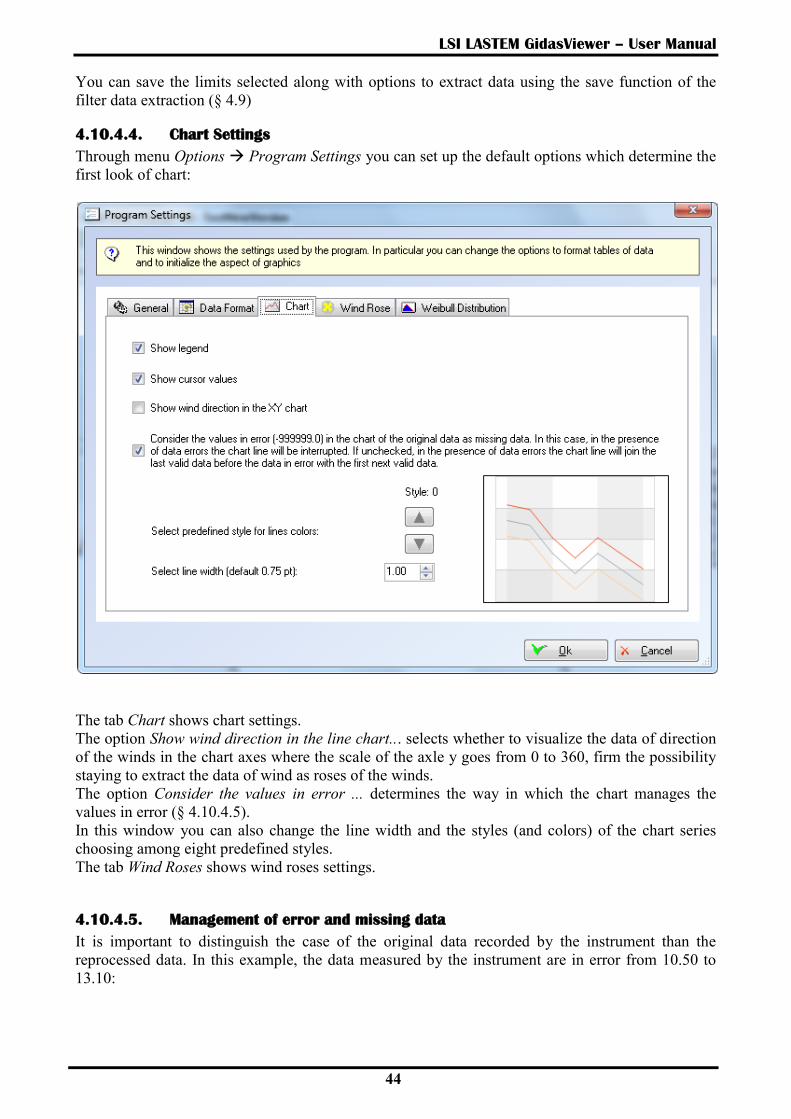
4.10.4.4. Chart Settings
Through menu Options Program Settings you can set up the default options which determine the
first look of chart:
The tab Chart shows chart settings.
The option Show wind direction in the line chart... selects whether to visualize the data of direction
of the winds in the chart axes where the scale of the axle y goes from 0 to 360, firm the possibility
staying to extract the data of wind as roses of the winds.
The option Consider the values in error ... determines the way in which the chart manages the
values in error (§ 4.10.4.5).
In this window you can also change the line width and the styles (and colors) of the chart series
choosing among eight predefined styles.
The tab Wind Roses shows wind roses settings.
4.10.4.5. Management of error and missing data
It is important to distinguish the case of the original data recorded by the instrument than the
reprocessed data. In this example, the data measured by the instrument are in error from 10.50 to
13.10:

LSI LASTEM GidasViewer – User Manual
45
Reprocessing the data on an hourly basis we obtain the following table:
Note that where the original data are on error the elaborated data are empty (there are no data to
perform the processing).
The chart of the hourly data stops the lines where the original data are missing:
The chart of the original data can behave differently depending on the parameter Consider the
values in error … configurable in the Chart tab of the Program Settings form (menu Options
Program Settings).

LSI LASTEM GidasViewer – User Manual
46
With this option selected, the chart also shows the original data line breaks at the data in error; if the
option is not selected the chart joins the last valid data before the data into error with the first
following valid data:
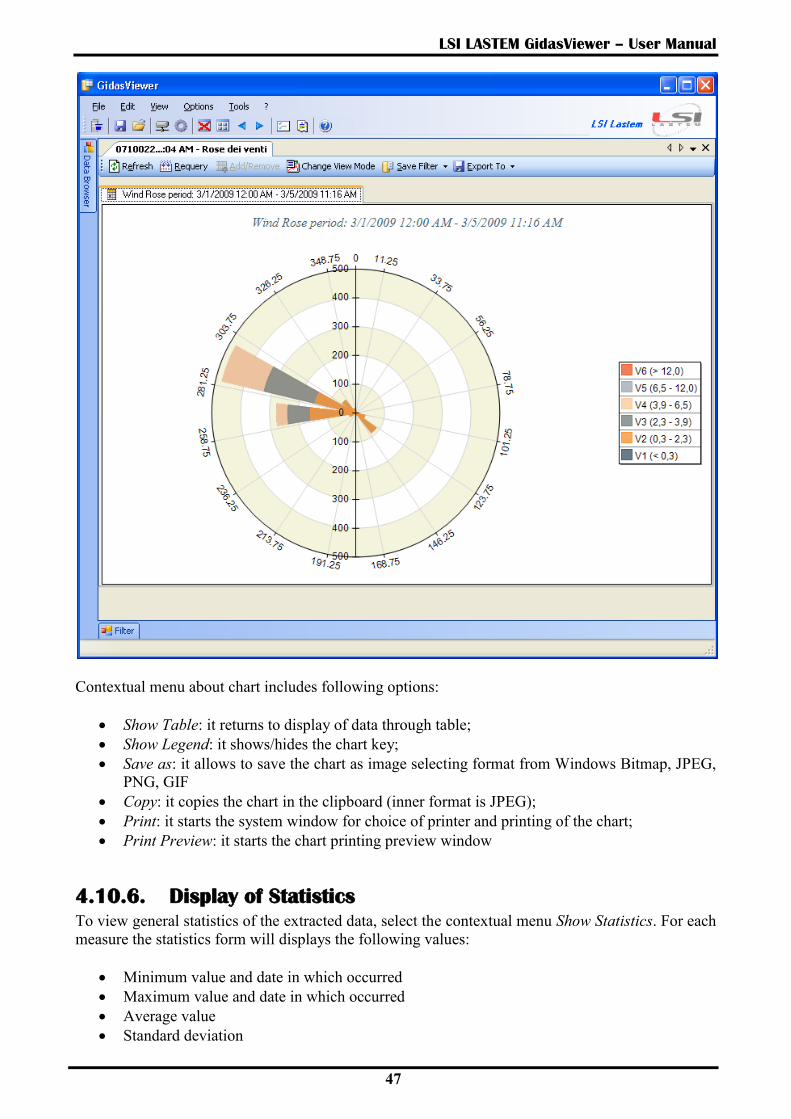
4.10.5. Display of wind rose data using charts
Select contextual menu Show chart or key Change View Mode when data are extracted as wind
roses pass from data display through tables to graphic display:
LSI LASTEM GidasViewer – User Manual
47
Contextual menu about chart includes following options:
Show Table: it returns to display of data through table;
Show Legend: it shows/hides the chart key;
Save as: it allows to save the chart as image selecting format from Windows Bitmap, JPEG,
PNG, GIF
Copy: it copies the chart in the clipboard (inner format is JPEG);
Print: it starts the system window for choice of printer and printing of the chart;
Print Preview: it starts the chart printing preview window
4.10.6. Display of Statistics
To view general statistics of the extracted data, select the contextual menu Show Statistics. For each
measure the statistics form will displays the following values:
Minimum value and date in which occurred
Maximum value and date in which occurred
Average value
Standard deviation

LSI LASTEM GidasViewer – User Manual
48
Please note that:
The statistics are calculated over the period of data extraction.
The statistics are calculated based on the elaborated rate of extracted data.
The statistics are not calculated for measures that do not require elaboration (for example the
standard deviation) and for the variables related to the direction.
For measures that are processed as Total (for example the precipitation) it is also displayed
the value Total while the Average value and the Standard deviation are not evaluated.
4.10.6.1. Chart Statistics
The chart statistics show statistical values only on the portion of the chart displayed along the x-
axis. To view statistics on the chart select the context menu Shows Statistics. The chart statistics are
displayed in a new window and are updated in real time by changing the visible portion along the x
axe of the chart:

LSI LASTEM GidasViewer – User Manual
49
Please note that:
The statistics window is always on top
To close the window using the close button of the window
If you filter the series displayed on the chart, even the statistics window updates accordingly
Each chart displays its own statistics window.
Statistics are relative to the portion of the graph displayed along the x axis. Any zoom along
the y axis are not reflected in the calculation of statistics.
4.11. Display Profiles
It is possible to save the current view (i.e. all data visible display windows) in a display profile that
can be recharged at any time. In this way all the data visible display windows are reloaded with the
same settings used when you saved the display profile.
The profile contains a description of the options for data extraction and location of each active data
display window; to save a profile you must associate a filter to every data display windows (§4.9);
if you save a profile when one or more data windows are not associated with an extraction filter the
program will require to save each of these filter.
To save current profile select menu File Save Profile or the button ; to save current profile
with another name select menu File Save Profile As; to close the current profile select menu File
Close Profile. When you close current profile the program does not close the display data
windows.

LSI LASTEM GidasViewer – User Manual
50
To load a profile select menu File OpenProfile or the button ; the window shows the list of
the available profiles and you can remove, edit or load the selected profile:
The current profile is displayed in the application status bar.
4.11.1. Load automatically a display profile
It is possible to load a display profile automatically when the program starts. To enable this feature
select menu Options Program Settings, the tab General and select the control box Automatically
load the current profile when the program starts.
When this setting is selected, the program load automatically the display profile that was current
when the program was close last time.
To disable the automatic loading of a profile unselect the control box Automatically load the
current profile when the program starts or close the current profile before closing the program.

LSI LASTEM GidasViewer – User Manual
51
4.12. Backup and Restore of instrument data
Using the menu Tools Instrument Backup you can start the wizard to export data from one
instrument into an archive file, using the menu Tools Instrument Restore you can launch the
wizard to restore a previously back upped data file.
These procedures are only available for instruments with a regular license file.
WARNING:
This procedure should not be used as replacing the usual practice of backing up the Gidas
database files but only as a way to export large amounts of data which are thus available for
subsequent re-importation or to move data from one database to another.
4.12.1. Instrument Backup
The procedure for instrument backup requires the user to specify:
the instrument to be exported;
the choice of data to be exported;
the folder where to save the backup file.
It is possible to backup a single complete survey or select a time period which may also include
more surveys:
The backup file is a regular zip file that contains several files; the name of the backup file is
assigned by default:

LSI LASTEM GidasViewer – User Manual
52
single survey: [folder]\[serialnumber]_Survey_[yyyy-mm-dd].gidas.bck
time range period: [folder]\[serialnumber]_Time_[yyyy-mm-dd]_[yyyy-mm-dd]-gidas.bck
where:
[folder]: it is the folder where to save the backup file;
[serialnumber]: it is the instrument serial number;
[yyy-mm-dd]: it represents the survey configuration date or the time period of temporal
data mining.
If the backup relates to an entire survey, after completing the backup the user can decide whether to
permanently delete the survey from the database.
The process of storing data can be time consuming and create large files based on the amount of
data to be exported. It is possible anyway to stop the procedure before its conclusion.
4.12.2. Instrument restore
The procedure for restoring data requires the user to specify the name of the archive file and dumps
the contents before proceeding with the data extraction.
The process of data restore can take much time based on the amount of data to be restored.
You can stop the procedure before its conclusion: in this case the data will remain partially restored
in the database.
Note that the recovery process does not replace data already stored in the database, but it just adds
the missing ones.
LSI LASTEM GidasViewer – User Manual
53
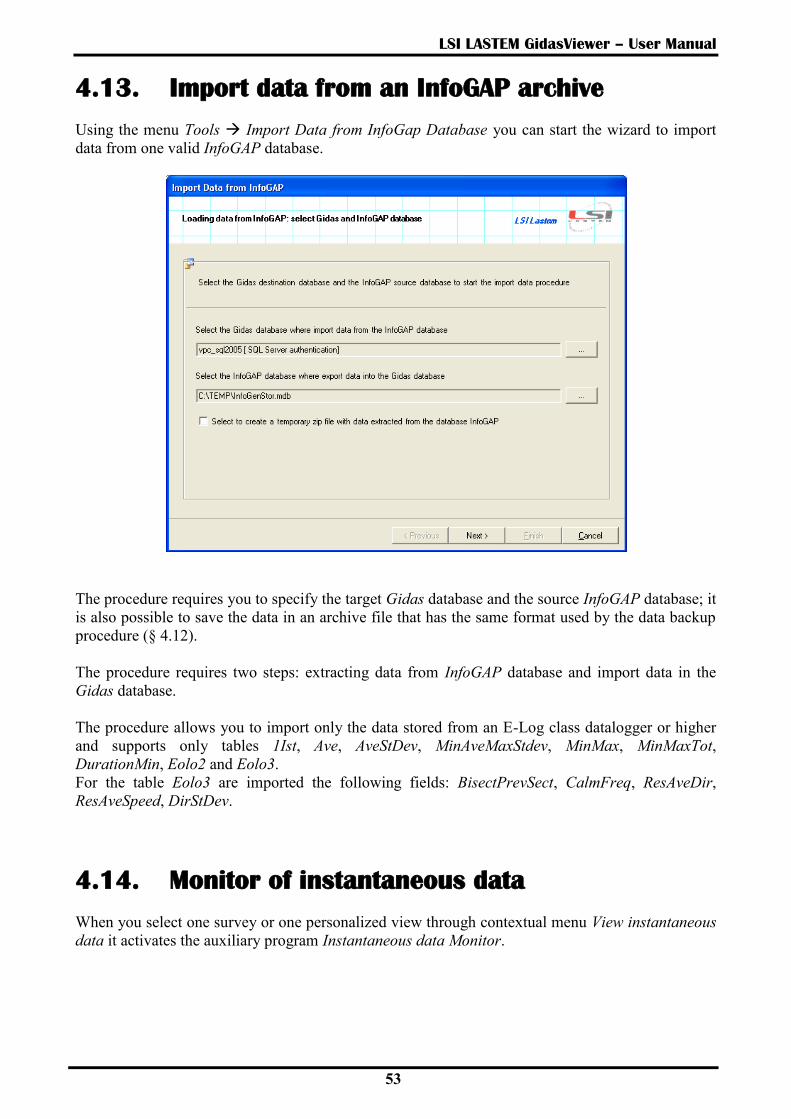
4.13. Import data from an InfoGAP archive
Using the menu Tools Import Data from InfoGap Database you can start the wizard to import
data from one valid InfoGAP database.
The procedure requires you to specify the target Gidas database and the source InfoGAP database; it
is also possible to save the data in an archive file that has the same format used by the data backup
procedure (§ 4.12).
The procedure requires two steps: extracting data from InfoGAP database and import data in the
Gidas database.
The procedure allows you to import only the data stored from an E-Log class datalogger or higher
and supports only tables 1Ist, Ave, AveStDev, MinAveMaxStdev, MinMax, MinMaxTot,
DurationMin, Eolo2 and Eolo3.
For the table Eolo3 are imported the following fields: BisectPrevSect, CalmFreq, ResAveDir,
ResAveSpeed, DirStDev.
4.14. Monitor of instantaneous data
When you select one survey or one personalized view through contextual menu View instantaneous
data it activates the auxiliary program Instantaneous data Monitor.

LSI LASTEM GidasViewer – User Manual
54
This program displays last instantaneous data stored in the database for survey or selected custom
view.
Menus structure:
Run Start, Stop: it starts or stops the update of the window. You can also use keys under
menus bar.
Options Data tables format: this is the same option as GidasViewer program and it checks
the format of data displayed by table.
Textbox Refresh timer (sec) allows to set up the updating slot (seconds) of the data table. In
addition to default values you can also input one custom value.
WARNING
The program doesn’t communicate with the instruments, but it uses the data included in the
database (updated by the programs) which communicate with the instruments (for ex.
CommNetEG).
4.15. Program’s configuration file
The name of program’s configuration file is GidasViewer.exe.config and it’s in the folder for
program installation. File’s format is xml and it includes some default setups:
<LSI_Lastem.Lib2.Gidas.UI.Properties.Settings>
<setting name="UserDefinedCulture" serializeAs="String">
<value />
</setting>
<setting name="ExeMonitorFile" serializeAs="String">
<value>GidasInstMonitor.exe</value>
</setting>
<setting name="ExeInstallFile" serializeAs="String">
<value>GidasDatabaseInstaller.exe</value>
</setting>
</LSI_Lastem.Lib2.Gidas.UI.Properties.Settings>

LSI LASTEM GidasViewer – User Manual
55
Where:
UserDefinedCulture: used language. Program starts use of Italian language (default setup
with not assigned value) if computer has been set with Italian language, otherwise it starts
use of English language. To force use of English in Italian computer input value <value>en-
us</value>; to force use of Italian in other language computer input value <value>it-
it</value>;
ExeMonitorFile, ExeInstallFile: they show the name of programs used for display of
instantaneous data and for installation of Gidas database.
4.16. The Update Manager program
Use menu ? Check for updates to run the program LSI Update Center which verifies the
availability of the new versions of the LSI LASTEM programs installed in the computer.
The LSI Update Center program is one of the components of the LSI Support Center program
which can directly be installed by the CD of the products LSI LASTEM or from the CD of the
licenses files or downloading the installer file from the site FTP of the LSI LASTEM. The LSI
Support Center also contains the component which manages the licenses of the programs installed
on the local computer (§4.5.1).
4.16.1. Installation of the program from the site FTP
If the program LSI Update Center is not installed in the local computer you can download the
installation file from the LSI LASTEM FTP site. At the end of the downloading the installation will
automatically starts; at the end of the installation the program will be started.
4.16.2. Program use
The LSI Update Center program is composed from two modules:
the program LSI Update Center Monitor that is started in automatic with the operating
system and that verify periodically the availability of updatings for all the LSI LASTEM
programs installed in the computer.
The program LSI Update Center that it shows the state of the available updatings and, if the
case, discharge from the LSI LASTEM web site the files of installation and starts the
installation of the upgrade.
The program LSI Update Center shows the state of the LSI LASTEM programs installed in the
local computer:

LSI LASTEM GidasViewer – User Manual
56
For every program the installed current version and the last available version is visualized. A
program can be in one of these states:
up to date;
not updatable: a new version exists but the product is not updatable;
updatable: double click the product to update on the list to start download the installer
file.
Selecting Information it is possible to visualize a web page that contains the list of the changes of
all the versions of the selected program.
Through the button Search is adjourned the search of the updates and through the button Settings
are modified the connection properties, if a proxy is used, and the temporal interval used by the
monitor for the automatic search of the updates.
You keeps in mind that when this program is started by the menu Start Programs of Windows or
from the contextual menu of the monitor the program visualizes the results of the last automatic
search effected by the automatic monitor visualizing the date of the search. To adjourn the data
press the button Search.