Getting Started with VCarve Prokcwoodworkersguild.org/wp-content/uploads/2019/03/... · Tutorials...
12
Getting Started with VCarve Pro Before you even turn on the CNC to begin your first project you must first create instructions to tell the CNC machine what to do as it relates to your project. To create these instructions, you must generate something called G-Code (we will discuss this later). There are several different software tools that can be used to layout and design your project, and then create this G-Code. Some of these tools are free, and some can cost upwards of $1000 for each individual licensed user. As you can guess, this wide difference in price (zero $ to $1,000) results in a wide variance in terms of functionality. If you go out to the Internet, you will find evangelicals for each software package touting how it’s the best to be used with the CNC machine. For most of the guild members who wish to use the CNC machine at the shop, there is no good reason to go out and spend their personal money and purchase their own software. Why? Because several years ago key guild members purchased CAD (Computer-Aided Design) – CAM (Computer-Aided Machining) software that guild members can legally use for no cost to you. There are four different software products that they purchased, which will be used in the design and production of your CNC project. For the purposes of this initial document we are only going to discuss the first two software products They are: VCarve Pro Makerspace Both of these products are provided and supported by a company named Vectric. Vectric is a software company based out of the UK. They are highly regarded in the CNC community and because of that fact many CNC hardware manufacturers partner with them to provide software. Later in this guide we will install the VCarve Pro and Makerspace software. Makerspace is a complementary product used with VCarve Pro which allows guild members to download the VCarve Pro software at home, where they can create and refine their project. Then, when they are finished, they can save their project to a flash drive, and bring the flash drive down to the shop, so they can put finishing touches on the model (adding the G-Code). Then final VCarve Pro files can be saved back out to your flash drive, taken into the CNC room, and be loaded into the CNC machine for cutting operations. Now let’s get down to the nitty-gritty the first thing we need to do is download your own copy of VCarve Pro on your home computer go to www.Vectric.com and you will see a screen with the top that says, “Free Trial”. Vectric is most accommodating in allowing users to test drive their software. When you clicked on “Free Trial”, a list of software products should appear. Now click on VCarve Pro and follow the prompts to download that product. Before you start your download, you will see a pop-up, that allows you to sign up for the Vectric Newsletter. When you are ready, click on the Download button, to start the download. The files you are downloading and installing is between 150 and 450 megabytes, so it might take a few minutes. Depending upon your browser, you might get some other minor prompts, but your download should complete normally. Congratulations! You have downloaded and installed the VCarve Pro software on your home computer. Now is a good time to tell your trial version, and the folks it back at Vectric, that you that you will be using your trial version in conjunction with a licensed copy of the VCarve Pro located in the Library of the shop. This section will provide information on entering the serial number into your home version of VCarve Pro that corresponds with the serial number already loaded on the machines in the shop library. First, double click on the VCarve Pro icon, located on your desktop, which was created when you installed VCarve Pro. In the upper left corner of the screen, you will see the screen below;
Transcript of Getting Started with VCarve Prokcwoodworkersguild.org/wp-content/uploads/2019/03/... · Tutorials...

Getting Started with VCarve Pro
Before you even turn on the CNC to begin your first project you must first create instructions to tell the CNC
machine what to do as it relates to your project. To create these instructions, you must generate something
called G-Code (we will discuss this later). There are several different software tools that can be used to layout
and design your project, and then create this G-Code. Some of these tools are free, and some can cost
upwards of $1000 for each individual licensed user. As you can guess, this wide difference in price (zero $ to
$1,000) results in a wide variance in terms of functionality. If you go out to the Internet, you will find
evangelicals for each software package touting how it’s the best to be used with the CNC machine. For most
of the guild members who wish to use the CNC machine at the shop, there is no good reason to go out and
spend their personal money and purchase their own software. Why? Because several years ago key guild
members purchased CAD (Computer-Aided Design) – CAM (Computer-Aided Machining) software that guild
members can legally use for no cost to you. There are four different software products that they purchased,
which will be used in the design and production of your CNC project. For the purposes of this initial document
we are only going to discuss the first two software products
They are:
VCarve Pro
Makerspace
Both of these products are provided and supported by a company named Vectric. Vectric is a software
company based out of the UK. They are highly regarded in the CNC community and because of that fact many
CNC hardware manufacturers partner with them to provide software. Later in this guide we will install the
VCarve Pro and Makerspace software. Makerspace is a complementary product used with VCarve Pro which
allows guild members to download the VCarve Pro software at home, where they can create and refine their
project. Then, when they are finished, they can save their project to a flash drive, and bring the flash drive
down to the shop, so they can put finishing touches on the model (adding the G-Code). Then final VCarve Pro
files can be saved back out to your flash drive, taken into the CNC room, and be loaded into the CNC machine
for cutting operations.
Now let’s get down to the nitty-gritty
the first thing we need to do is download your own copy of VCarve Pro on your home computer
go to www.Vectric.com and you will see a screen with the top that says, “Free Trial”. Vectric is most
accommodating in allowing users to test drive their software. When you clicked on “Free Trial”, a list of
software products should appear. Now click on VCarve Pro and follow the prompts to download that product.
Before you start your download, you will see a pop-up, that allows you to sign up for the Vectric Newsletter.
When you are ready, click on the Download button, to start the download. The files you are downloading and
installing is between 150 and 450 megabytes, so it might take a few minutes. Depending upon your browser,
you might get some other minor prompts, but your download should complete normally.
Congratulations! You have downloaded and installed the VCarve Pro software on your home computer. Now
is a good time to tell your trial version, and the folks it back at Vectric, that you that you will be using your trial
version in conjunction with a licensed copy of the VCarve Pro located in the Library of the shop.
This section will provide information on entering the serial number into your home version of VCarve Pro that
corresponds with the serial number already loaded on the machines in the shop library.
First, double click on the VCarve Pro icon, located on your desktop, which was created when you installed
VCarve Pro.
In the upper left corner of the screen, you will see the screen below;

Click on “Help”, as seen in the ellipse above.
In the upper left corner, you will see as per below;
Click on “About VCarve Pro…” as seen in the above ellipse.
The screen will clear, and you will see the pop-up as shown below;

Click on the button, shown in the ellipse, as per above
To make it clear… the code you enter in must be EXACTLY as shown in the above ellipse and that is shown
below in a larger (and more readable) font
When entered EXACTLY as shown above, click “OK”.
That’s it! When you restart your trial version of VCarve Pro, it will identify itself as the Makerspace Client
edition and files you create in your Makerspace Client edition can now be opened the Guild and the toolpaths
(G-Code) saved for the CNC machine. You can work with your files on your desktop, laptop etc. as long as you
enter the same Makerspace ID into the trial version on each of your computers. You can also share files you
create or edit with other members of the Guild. If you are sharing files, you must not share any patented or
copyrighted files from a third party.

You’re are now almost ready to start on your first project.
So now you must answer the question? What do I want to make?
Unless you already have a project in mind, we would suggest that you start simple
Maybe a sign
Perhaps a simple box
Maybe a carved, detailed rendition of the Mona Lisa (probably not)
You could jump directly into VCarve Pro and start the design aspects your project (which we do not
recommend). Unless you are already familiar with VCarve Pro, we maintain that a better use of your time
would be to first learn the functionality of VCarve Pro
Below is a list of tutorials. The good thing about tutorials is twofold. First, you get acquainted with the software
and learn functionality / workflow. Secondly, tutorials are an excellent idea incubator for coming up with new
ideas, where you can use the tutorial project as a jumping off point, and then modify the project to your
personal needs.
Tutorials from Vectric
The first set of tutorials, as seen below, are a subset of instructional tutorials that can be found on the Vectric
web site. We show some of them below. If you are reading a paper copy, you can key in the web address into
your browser, or find that item on the Vectric web site.

There are many other tutorials on the Vectric web site that can give you ideas and build your skills in using
VCarve Pro.
Another source of information and inspiration is YouTube. Below is a set of basic tutorials that give you a good
understanding of using VCarve Pro.
Video 1- A 3 minute overview of making a sign with a CNC
https://www.youtube.com/watch?v=Qm0kBXESY3o&list=PLnB6ixM3mohU3yOco1eIDz5ol10gpvYh9
____________________________________________________________
Video 2- Getting started making a sign with VCarve Pro- Basic Vectors
https://www.youtube.com/watch?v=cquux2Xysww&index=2&list=PLnB6ixM3mohU3yOco1eIDz5ol10gpvYh9
____________________________________________________________
Video 3- Basic shapes and text with VCarve Pro
https://www.youtube.com/watch?v=gJCg5-xq3d4&index=3&list=PLnB6ixM3mohU3yOco1eIDz5ol10gpvYh9
____________________________________________________________
Video 4 - Font Selection, Text Editing and Text on a Curve
https://www.youtube.com/watch?v=XV23QqvSy6A&index=4&list=PLnB6ixM3mohU3yOco1eIDz5ol10gpvYh9
____________________________________________________________
Video 5 - Working with Graphics

https://www.youtube.com/watch?v=kQse2p_XVeI&index=5&list=PLnB6ixM3mohU3yOco1eIDz5ol10gpvYh9
____________________________________________________________
Video 6 - Using the Tool Path Function to Cut a Curve
https://www.youtube.com/watch?v=4C6rmc3FtHE&index=6&list=PLnB6ixM3mohU3yOco1eIDz5ol10gpvYh9
____________________________________________________________
Video 7 - Cutting Flutes and Pockets
https://www.youtube.com/watch?v=maaaNdBP19E&list=PLnB6ixM3mohU3yOco1eIDz5ol10gpvYh9&index=7
____________________________________________________________
Video 8 Pattern Cutting
https://www.youtube.com/watch?v=KctIKWjRsvA&index=8&list=PLnB6ixM3mohU3yOco1eIDz5ol10gpvYh9
____________________________________________________________
Video 9 Using More than One Cutting Tool
https://www.youtube.com/watch?v=6dAtpuynt7A&index=9&list=PLnB6ixM3mohU3yOco1eIDz5ol10gpvYh9
____________________________________________________________
Please go through some of these videos. Design a project that somewhat mimics what is being done in the
video, but use your ideas and the new knowledge you are gaining to make that project “your own’. In the case
of a sign… put your own wording on it instead of using that in the tutorial. Go out to Vectric.com and look for
other tutorials, or even go to another section of their web site that showcases new projects. The web site for
the CNC machine also has part of their web site dedicated to providing users information for new ideas.
Simply go to
www.lwmcnc.com/training/cnc-project-categories/
and Explore!!!
What can be made with a CNC machine is almost unlimited and having the knowledge and skills to use this
important tool add to your repertoire as a woodworker.
Now let’s fast forward… and assume that you have thought things through, spent some time learning VCarve
Pro by viewing a number of tutorials, and created your own project. Once you get through all the design steps

you must prepare your project for final machining. With the upgraded CNC, we are doing thigs a bit differently
than before. The CNC room now contains the actual machine, and a PC that has the CNC instructs
processing software (Mach3) located on it. You cannot use that PC to modify your project design as before.
The expectation is that you will have a ‘ready to cut’ project on a flash drive when you go into the CNC room.
Then it is a matter of taking your wood, cutters, and flash drive into the CNC room… and making magic
happen.
While you are learning VCarve Pro, it is a good idea to invest in some CNC cutters. The Guild does not
provide cutters, so this is an investment that you will need to make. Ask any Guild member knowledgeable
with CNC as to what they recommend that you purchase to get started.
As a part of the VCarve Pro design process, there is a ‘Preview Toolpath’ feature. The advantage of this
feature is that it gives the user an accurate and realistic 3-D representation of what your workpiece will look like
after it has gone through the CNC cutting stage. You can actually watch the ‘virtual bit’ spin around and move
through your virtual board. It shows the cutter path, the passes that will be taken, and the sequence of parts
and toolpaths. Please use this preview function to simulate your CNC cutting. It saves time, prevents waste
and mistakes, and makes for an overall better project. As you are finishing your design, there are a couple of
other tools that you can use to review your project. The first is “Create Job Sheet”, as shown below.

The second tool is the “Toolpath Summary / Time” function.
This is a good tool to use as a check to confirm that what you are planning to cut, is reasonable. Why? When
cutting small or simple parts, the time to cut them is quick. But as your skills progress, and you move into
more complicated projects, cutting times can be an issue. We have seen complicated projects take up to 12
hours of cutting to finish. This extreme length of time can create many issues. If nothing else, you can use this
function as a planning tool so you can reserve an appropriate amount of CNC Room time, without infringing
upon other peoples’ scheduled time.
If you use the ‘Preview Toolpaths’ function correctly, you will not run into any surprises once the spindle is
turned on and has started cutting. It is an anxious feeling to start

cutting with the CNC, knowing it
has its’ own “mind”, and that mind is totally out of synch with what you had in your “mind”.
The last section will show, step-by-step the process of saving a project to a flash drive, down in the library with
Makerspace, as G-Code for the CNC machine. This will then serve as the beginning for the instructional
aspects of actually setting up and using the CNC machine once it is back at the Guild.
If you have made it this far, we assume that you learned VCarve Pro, created a project (along with toolpaths),
and saved your project out to a flash drive from your home computer. When you come into the library, there
are 2 PC’s that can be used to read in your files and write the toolpaths out so the CNC machine can read
them. Simply insert your flash drive and open your project in a normal fashion, as seen below.
Select your file location, and then select your
project. When you select your project, VCarve
Pro reads it as a Makerspace file, and goes out
to the Vectric web site to confirm that the Guild
as a current Makerspace license. When that is
confirmed, VCarve Pro checks that the
Makerspace ID# on your project, matches
exactly, to the Makerspace ID# in the PC you
are working on. Assuming that everything is
correct, the file opens. Once opened, your
project should look identical to how it looked at
home. Take a few minutes and confirm that
everything is as you expect.
You are now ready to write out your toolpaths.

In the lower right corner is a list of toolpaths that
you created as a part of designing your project.
It is these toolpaths, which were written out as a
part of your project, that will now be discreetly
written out as the individual G code toolpaths for
the CNC machine to use.
Highlighting the toolpath list, or highlighting an
individual toolpath, will make that toolpath(s) available
to be written out as G code. When you click the save
toolpath button you will then get a prompt with the
parameters for which this toolpath will be saved. Most
importantly on the prompt shown below is that of the
Post-Processor. The purpose of the postprocessor is
to customize the G code so it is directly usable in the
software and hardware which will which is used at the
Guild. For the purposes of VCarve Pro, you should
always select the Legacy 3 Axis CV Arcs (inch) (*.txt) postprocessor.

Clicking on the save toolpaths to file will present you with the prompt shown below that allows you to select the
device and subdirectory for which you wish to write the G code.
Below is shown in example of G code that was produced for the CNC machine at the Guild.
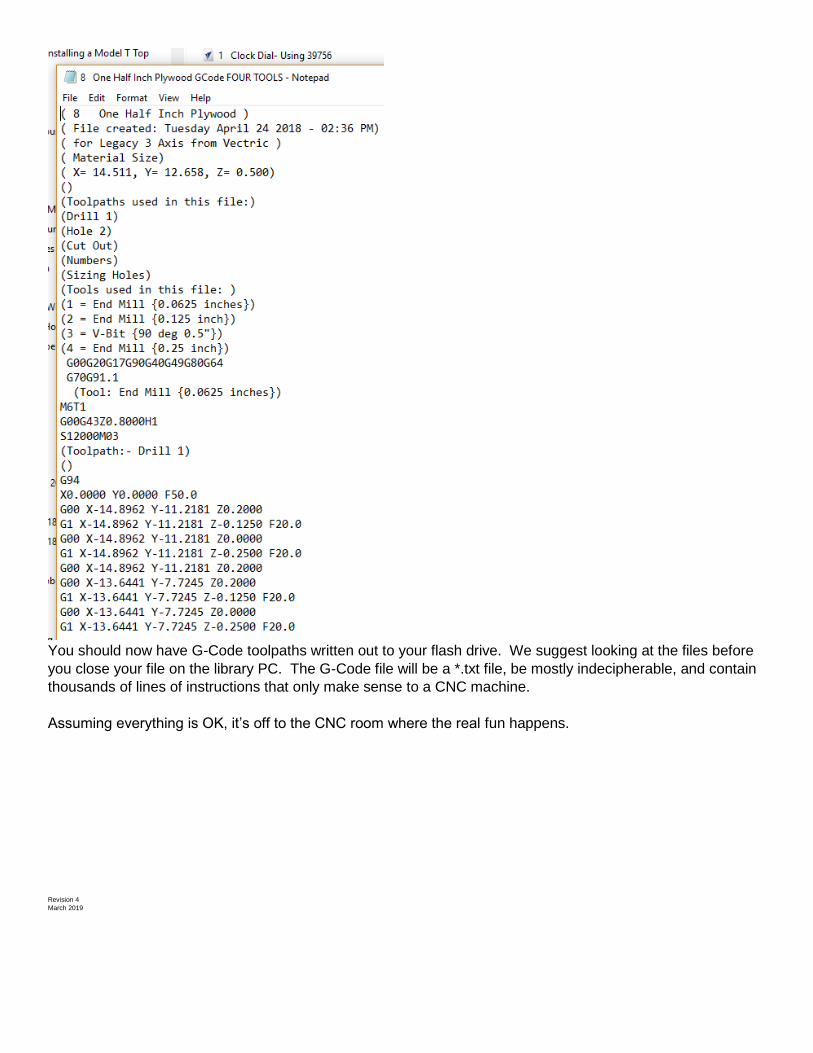
You should now have G-Code toolpaths written out to your flash drive. We suggest looking at the files before
you close your file on the library PC. The G-Code file will be a *.txt file, be mostly indecipherable, and contain
thousands of lines of instructions that only make sense to a CNC machine.
Assuming everything is OK, it’s off to the CNC room where the real fun happens.
Revision 4
March 2019