Getting Started with SAS® Cost and Profitability Management 8
198
Getting Started with SAS ® Cost and Profitability Management 8.3 SAS ® Documentation October 1, 2018
Transcript of Getting Started with SAS® Cost and Profitability Management 8

Getting Started with SAS®
Cost and Profitability Management 8.3
SAS® DocumentationOctober 1, 2018

The correct bibliographic citation for this manual is as follows: SAS Institute Inc. 2018. Getting Started with SAS® Cost and Profitability Management 8.3. Cary, NC: SAS Institute Inc.
Getting Started with SAS® Cost and Profitability Management 8.3
Copyright © 2018, SAS Institute Inc., Cary, NC, USA
All Rights Reserved. Produced in the United States of America.
For a hard copy book: No part of this publication may be reproduced, stored in a retrieval system, or transmitted, in any form or by any means, electronic, mechanical, photocopying, or otherwise, without the prior written permission of the publisher, SAS Institute Inc.
For a web download or e-book: Your use of this publication shall be governed by the terms established by the vendor at the time you acquire this publication.
The scanning, uploading, and distribution of this book via the Internet or any other means without the permission of the publisher is illegal and punishable by law. Please purchase only authorized electronic editions and do not participate in or encourage electronic piracy of copyrighted materials. Your support of others' rights is appreciated.
U.S. Government License Rights; Restricted Rights: The Software and its documentation is commercial computer software developed at private expense and is provided with RESTRICTED RIGHTS to the United States Government. Use, duplication, or disclosure of the Software by the United States Government is subject to the license terms of this Agreement pursuant to, as applicable, FAR 12.212, DFAR 227.7202-1(a), DFAR 227.7202-3(a), and DFAR 227.7202-4, and, to the extent required under U.S. federal law, the minimum restricted rights as set out in FAR 52.227-19 (DEC 2007). If FAR 52.227-19 is applicable, this provision serves as notice under clause (c) thereof and no other notice is required to be affixed to the Software or documentation. The Government’s rights in Software and documentation shall be only those set forth in this Agreement.
SAS Institute Inc., SAS Campus Drive, Cary, NC 27513-2414
October 2018
SAS® and all other SAS Institute Inc. product or service names are registered trademarks or trademarks of SAS Institute Inc. in the USA and other countries. ® indicates USA registration.
Other brand and product names are trademarks of their respective companies.
8.3-P1:abmgs

ContentsChapter 1 • Getting Started . . . . . . . . . . . . . . . . . . . . . . . . . . . . . . . . . . . . . . . . . . . . . . . . . . . . . . . . 1
Import a Completed Model . . . . . . . . . . . . . . . . . . . . . . . . . . . . . . . . . . . . . . . . . . . . . . . . 1Terminology . . . . . . . . . . . . . . . . . . . . . . . . . . . . . . . . . . . . . . . . . . . . . . . . . . . . . . . . . . . 2Technical Support . . . . . . . . . . . . . . . . . . . . . . . . . . . . . . . . . . . . . . . . . . . . . . . . . . . . . . . 2
Chapter 2 • Introduction . . . . . . . . . . . . . . . . . . . . . . . . . . . . . . . . . . . . . . . . . . . . . . . . . . . . . . . . . . . 3Overview . . . . . . . . . . . . . . . . . . . . . . . . . . . . . . . . . . . . . . . . . . . . . . . . . . . . . . . . . . . . . . 3The ABC Model and CAM-I Methodology . . . . . . . . . . . . . . . . . . . . . . . . . . . . . . . . . . . 4SAS Cost and Profitability Management Models . . . . . . . . . . . . . . . . . . . . . . . . . . . . . . . 5Basic Steps to Building a Model . . . . . . . . . . . . . . . . . . . . . . . . . . . . . . . . . . . . . . . . . . . 9Parcel Express . . . . . . . . . . . . . . . . . . . . . . . . . . . . . . . . . . . . . . . . . . . . . . . . . . . . . . . . . 10
Chapter 3 • Create a Paper Plan . . . . . . . . . . . . . . . . . . . . . . . . . . . . . . . . . . . . . . . . . . . . . . . . . . . 11Overview . . . . . . . . . . . . . . . . . . . . . . . . . . . . . . . . . . . . . . . . . . . . . . . . . . . . . . . . . . . . . 11Building by Design . . . . . . . . . . . . . . . . . . . . . . . . . . . . . . . . . . . . . . . . . . . . . . . . . . . . . 11The Parcel Express Tutorial Model . . . . . . . . . . . . . . . . . . . . . . . . . . . . . . . . . . . . . . . . 12
Chapter 4 • User Interface . . . . . . . . . . . . . . . . . . . . . . . . . . . . . . . . . . . . . . . . . . . . . . . . . . . . . . . . 15Overview . . . . . . . . . . . . . . . . . . . . . . . . . . . . . . . . . . . . . . . . . . . . . . . . . . . . . . . . . . . . . 15Logging On . . . . . . . . . . . . . . . . . . . . . . . . . . . . . . . . . . . . . . . . . . . . . . . . . . . . . . . . . . . 15Navigation Pane . . . . . . . . . . . . . . . . . . . . . . . . . . . . . . . . . . . . . . . . . . . . . . . . . . . . . . . 16The Workspace Manager . . . . . . . . . . . . . . . . . . . . . . . . . . . . . . . . . . . . . . . . . . . . . . . . 19Models Workspace . . . . . . . . . . . . . . . . . . . . . . . . . . . . . . . . . . . . . . . . . . . . . . . . . . . . . 20Analysis Workspace for OLAP Cubes . . . . . . . . . . . . . . . . . . . . . . . . . . . . . . . . . . . . . . 23
Chapter 5 • Create Periods and Scenarios . . . . . . . . . . . . . . . . . . . . . . . . . . . . . . . . . . . . . . . . . . . 25Overview . . . . . . . . . . . . . . . . . . . . . . . . . . . . . . . . . . . . . . . . . . . . . . . . . . . . . . . . . . . . . 25Create a Period . . . . . . . . . . . . . . . . . . . . . . . . . . . . . . . . . . . . . . . . . . . . . . . . . . . . . . . . 25Create a Scenario . . . . . . . . . . . . . . . . . . . . . . . . . . . . . . . . . . . . . . . . . . . . . . . . . . . . . . 27Deleting Periods and Scenarios . . . . . . . . . . . . . . . . . . . . . . . . . . . . . . . . . . . . . . . . . . . 28
Chapter 6 • Create a New Model with Its Dimensions . . . . . . . . . . . . . . . . . . . . . . . . . . . . . . . . . . 29Overview . . . . . . . . . . . . . . . . . . . . . . . . . . . . . . . . . . . . . . . . . . . . . . . . . . . . . . . . . . . . . 29Use the New Model Wizard . . . . . . . . . . . . . . . . . . . . . . . . . . . . . . . . . . . . . . . . . . . . . . 30Create Dimension Members . . . . . . . . . . . . . . . . . . . . . . . . . . . . . . . . . . . . . . . . . . . . . . 39Appendix: Acquiring a Write Lock on a Model . . . . . . . . . . . . . . . . . . . . . . . . . . . . . . . 41
Chapter 7 • Create Modules and Accounts . . . . . . . . . . . . . . . . . . . . . . . . . . . . . . . . . . . . . . . . . . 43Overview . . . . . . . . . . . . . . . . . . . . . . . . . . . . . . . . . . . . . . . . . . . . . . . . . . . . . . . . . . . . . 43Build the Resource Module Structure . . . . . . . . . . . . . . . . . . . . . . . . . . . . . . . . . . . . . . . 45Build the Activity Module Structure . . . . . . . . . . . . . . . . . . . . . . . . . . . . . . . . . . . . . . . 49Build the Cost Object Module Structure . . . . . . . . . . . . . . . . . . . . . . . . . . . . . . . . . . . . 51
Chapter 8 • Create Attributes . . . . . . . . . . . . . . . . . . . . . . . . . . . . . . . . . . . . . . . . . . . . . . . . . . . . . 55Types of Attributes . . . . . . . . . . . . . . . . . . . . . . . . . . . . . . . . . . . . . . . . . . . . . . . . . . . . . 55Create Attributes . . . . . . . . . . . . . . . . . . . . . . . . . . . . . . . . . . . . . . . . . . . . . . . . . . . . . . . 57Create a Column Layout . . . . . . . . . . . . . . . . . . . . . . . . . . . . . . . . . . . . . . . . . . . . . . . . . 61Entering Attribute Values . . . . . . . . . . . . . . . . . . . . . . . . . . . . . . . . . . . . . . . . . . . . . . . . 63Applying Additional Attributes to Accounts . . . . . . . . . . . . . . . . . . . . . . . . . . . . . . . . . 64

Chapter 9 • Create Drivers . . . . . . . . . . . . . . . . . . . . . . . . . . . . . . . . . . . . . . . . . . . . . . . . . . . . . . . . 67Overview . . . . . . . . . . . . . . . . . . . . . . . . . . . . . . . . . . . . . . . . . . . . . . . . . . . . . . . . . . . . . 67Create a Standard Driver . . . . . . . . . . . . . . . . . . . . . . . . . . . . . . . . . . . . . . . . . . . . . . . . 69Create Additional Standard Drivers . . . . . . . . . . . . . . . . . . . . . . . . . . . . . . . . . . . . . . . . 70Create a Calculated Driver . . . . . . . . . . . . . . . . . . . . . . . . . . . . . . . . . . . . . . . . . . . . . . . 70Summary . . . . . . . . . . . . . . . . . . . . . . . . . . . . . . . . . . . . . . . . . . . . . . . . . . . . . . . . . . . . . 73
Chapter 10 • Make Assignments . . . . . . . . . . . . . . . . . . . . . . . . . . . . . . . . . . . . . . . . . . . . . . . . . . . 75Overview . . . . . . . . . . . . . . . . . . . . . . . . . . . . . . . . . . . . . . . . . . . . . . . . . . . . . . . . . . . . . 75Modify the Column Layout . . . . . . . . . . . . . . . . . . . . . . . . . . . . . . . . . . . . . . . . . . . . . . 76Make Assignments from Resources to Activities . . . . . . . . . . . . . . . . . . . . . . . . . . . . . . 78Make Assignments from Activities to Other Activities . . . . . . . . . . . . . . . . . . . . . . . . . 85Make Assignments from Activities to Cost Objects . . . . . . . . . . . . . . . . . . . . . . . . . . . . 89Adding Attributes to Cost Accounts . . . . . . . . . . . . . . . . . . . . . . . . . . . . . . . . . . . . . . . . 94
Chapter 11 • Calculate Costs . . . . . . . . . . . . . . . . . . . . . . . . . . . . . . . . . . . . . . . . . . . . . . . . . . . . . . 97Overview . . . . . . . . . . . . . . . . . . . . . . . . . . . . . . . . . . . . . . . . . . . . . . . . . . . . . . . . . . . . . 97Calculate Costs . . . . . . . . . . . . . . . . . . . . . . . . . . . . . . . . . . . . . . . . . . . . . . . . . . . . . . . . 97Viewing and Verifying Calculation Results . . . . . . . . . . . . . . . . . . . . . . . . . . . . . . . . . . 98
Chapter 12 • Add Bills of Costs . . . . . . . . . . . . . . . . . . . . . . . . . . . . . . . . . . . . . . . . . . . . . . . . . . . 101Adding Bills of Costs . . . . . . . . . . . . . . . . . . . . . . . . . . . . . . . . . . . . . . . . . . . . . . . . . . 101Steps for Building Bills of Costs . . . . . . . . . . . . . . . . . . . . . . . . . . . . . . . . . . . . . . . . . 101Fixed and Variable Quantities . . . . . . . . . . . . . . . . . . . . . . . . . . . . . . . . . . . . . . . . . . . . 102Creating External Unit Accounts and Bills of Costs . . . . . . . . . . . . . . . . . . . . . . . . . . 103
Chapter 13 • Enter Sales and Revenue Data . . . . . . . . . . . . . . . . . . . . . . . . . . . . . . . . . . . . . . . . 109Working with Sold Quantity . . . . . . . . . . . . . . . . . . . . . . . . . . . . . . . . . . . . . . . . . . . . . 109Enter Revenue and Calculate Profit . . . . . . . . . . . . . . . . . . . . . . . . . . . . . . . . . . . . . . . 126Postscript on Generating Assignments According to a Rule . . . . . . . . . . . . . . . . . . . . 128
Chapter 14 • Generate Reports . . . . . . . . . . . . . . . . . . . . . . . . . . . . . . . . . . . . . . . . . . . . . . . . . . . 137Overview . . . . . . . . . . . . . . . . . . . . . . . . . . . . . . . . . . . . . . . . . . . . . . . . . . . . . . . . . . . . 137Report Templates . . . . . . . . . . . . . . . . . . . . . . . . . . . . . . . . . . . . . . . . . . . . . . . . . . . . . 137Create a Report to Export Model Data . . . . . . . . . . . . . . . . . . . . . . . . . . . . . . . . . . . . . 138Use a Report Configuration to Export Model Data . . . . . . . . . . . . . . . . . . . . . . . . . . . 140Delete a Report Configuration . . . . . . . . . . . . . . . . . . . . . . . . . . . . . . . . . . . . . . . . . . . 140
Chapter 15 • Generate Cubes . . . . . . . . . . . . . . . . . . . . . . . . . . . . . . . . . . . . . . . . . . . . . . . . . . . . 141Overview . . . . . . . . . . . . . . . . . . . . . . . . . . . . . . . . . . . . . . . . . . . . . . . . . . . . . . . . . . . . 141Types of Cubes . . . . . . . . . . . . . . . . . . . . . . . . . . . . . . . . . . . . . . . . . . . . . . . . . . . . . . . 142Overview of Cube Generation . . . . . . . . . . . . . . . . . . . . . . . . . . . . . . . . . . . . . . . . . . . 142Cube Configurations . . . . . . . . . . . . . . . . . . . . . . . . . . . . . . . . . . . . . . . . . . . . . . . . . . . 143Generate Cubes . . . . . . . . . . . . . . . . . . . . . . . . . . . . . . . . . . . . . . . . . . . . . . . . . . . . . . . 149Select Cost Flow: In or Out . . . . . . . . . . . . . . . . . . . . . . . . . . . . . . . . . . . . . . . . . . . . . 150Manage Cube Permissions . . . . . . . . . . . . . . . . . . . . . . . . . . . . . . . . . . . . . . . . . . . . . . 153
Chapter 16 • Use the SAS OLAP Analyzer . . . . . . . . . . . . . . . . . . . . . . . . . . . . . . . . . . . . . . . . . . 155Creating OLAP Views . . . . . . . . . . . . . . . . . . . . . . . . . . . . . . . . . . . . . . . . . . . . . . . . . 155Analyzing OLAP Cubes . . . . . . . . . . . . . . . . . . . . . . . . . . . . . . . . . . . . . . . . . . . . . . . . 156Using the Cube Explorer View . . . . . . . . . . . . . . . . . . . . . . . . . . . . . . . . . . . . . . . . . . . 173
Chapter 17 • Handling No-Dimension Accounts . . . . . . . . . . . . . . . . . . . . . . . . . . . . . . . . . . . . . 179Introduction . . . . . . . . . . . . . . . . . . . . . . . . . . . . . . . . . . . . . . . . . . . . . . . . . . . . . . . . . . 179Alternative Method . . . . . . . . . . . . . . . . . . . . . . . . . . . . . . . . . . . . . . . . . . . . . . . . . . . . 181Advantages of Using the Alternative . . . . . . . . . . . . . . . . . . . . . . . . . . . . . . . . . . . . . . 184
iv Contents

Chapter 18 • Finishing Up . . . . . . . . . . . . . . . . . . . . . . . . . . . . . . . . . . . . . . . . . . . . . . . . . . . . . . . 191Parcel Express Conclusions . . . . . . . . . . . . . . . . . . . . . . . . . . . . . . . . . . . . . . . . . . . . . 191Additional Features . . . . . . . . . . . . . . . . . . . . . . . . . . . . . . . . . . . . . . . . . . . . . . . . . . . . 191What to Do Next . . . . . . . . . . . . . . . . . . . . . . . . . . . . . . . . . . . . . . . . . . . . . . . . . . . . . . 192
Contents v

vi Contents

Chapter 1
Getting Started
Import a Completed Model . . . . . . . . . . . . . . . . . . . . . . . . . . . . . . . . . . . . . . . . . . . . . . 1
Terminology . . . . . . . . . . . . . . . . . . . . . . . . . . . . . . . . . . . . . . . . . . . . . . . . . . . . . . . . . . . 2
Technical Support . . . . . . . . . . . . . . . . . . . . . . . . . . . . . . . . . . . . . . . . . . . . . . . . . . . . . . 2
Import a Completed ModelThis tutorial is intended to familiarize you with the basic modeling concepts that are used in SAS Cost and Profitability Management software. To complete the model-building process, perform this tutorial from beginning to end exactly as it is presented.
Note: Depending on your display settings and the number of times that you perform a step or procedure, the information in the windows might differ slightly from the illustrations that are presented in this tutorial.
You can import an already completed model for the Parcel Express Tutorial by doing the following:
1. Select File ð Import ð Model Data.
2. Select XML or ZIP File as the type of data you want to import, and click Next.
3. Browse to the following file:
<install directory>\SASHome\x86\SASCostandProfitabilityManagementClient\8.3\Samples\Models\Native\ParcelExpressTutorial.xml, and click Next.
4. Name the tutorial. You can name it anything you want. Click Next, review your choices, and then click Finish.
The tutorial model is imported. You must calculate the model to view calculated data.
If you are new to the discipline of Activity-Based Costing, you might benefit more from this tutorial by first learning about the concept. A number of books and articles present excellent overviews. Even without this background, you will learn some basic ABM concepts by completing this tutorial.
Even though you might know ABM, work through this tutorial to become familiar with SAS Cost and Profitability Management terminology, commands, and dialog boxes.
1

TerminologyThis tutorial refers to both the discipline of activity-based management (ABM), and the SAS Cost and Profitability Management solution. References to the discipline appear in lowercase or by abbreviation. The SAS solution is always capitalized.
The discipline of ABM has a set of specialized terms. Some are used in this tutorial precisely because of their specialized meaning in the theory and practice of ABM. As these terms are introduced, this tutorial provides brief definitions. More complete definitions can be found in the CAMI Glossary of activity-based management.
Technical SupportIf you encounter problems that you cannot solve by reading the online Help or this tutorial, go to the SAS technical support site at http://support.sas.com.
2 Chapter 1 • Getting Started

Chapter 2
Introduction
Overview . . . . . . . . . . . . . . . . . . . . . . . . . . . . . . . . . . . . . . . . . . . . . . . . . . . . . . . . . . . . . 3
The ABC Model and CAM-I Methodology . . . . . . . . . . . . . . . . . . . . . . . . . . . . . . . . . 4Overview . . . . . . . . . . . . . . . . . . . . . . . . . . . . . . . . . . . . . . . . . . . . . . . . . . . . . . . . . . . 4The Cost Assignment View . . . . . . . . . . . . . . . . . . . . . . . . . . . . . . . . . . . . . . . . . . . . 5The Process View . . . . . . . . . . . . . . . . . . . . . . . . . . . . . . . . . . . . . . . . . . . . . . . . . . . . 5
SAS Cost and Profitability Management Models . . . . . . . . . . . . . . . . . . . . . . . . . . . . 5Periods and Scenarios . . . . . . . . . . . . . . . . . . . . . . . . . . . . . . . . . . . . . . . . . . . . . . . . . 5Period and Scenario Associations . . . . . . . . . . . . . . . . . . . . . . . . . . . . . . . . . . . . . . . . 5Modules . . . . . . . . . . . . . . . . . . . . . . . . . . . . . . . . . . . . . . . . . . . . . . . . . . . . . . . . . . . 6Dimensions . . . . . . . . . . . . . . . . . . . . . . . . . . . . . . . . . . . . . . . . . . . . . . . . . . . . . . . . . 6Dimension Members . . . . . . . . . . . . . . . . . . . . . . . . . . . . . . . . . . . . . . . . . . . . . . . . . . 7Accounts . . . . . . . . . . . . . . . . . . . . . . . . . . . . . . . . . . . . . . . . . . . . . . . . . . . . . . . . . . . 7Cost Elements . . . . . . . . . . . . . . . . . . . . . . . . . . . . . . . . . . . . . . . . . . . . . . . . . . . . . . . 7Attributes . . . . . . . . . . . . . . . . . . . . . . . . . . . . . . . . . . . . . . . . . . . . . . . . . . . . . . . . . . 8Properties . . . . . . . . . . . . . . . . . . . . . . . . . . . . . . . . . . . . . . . . . . . . . . . . . . . . . . . . . . 8Drivers . . . . . . . . . . . . . . . . . . . . . . . . . . . . . . . . . . . . . . . . . . . . . . . . . . . . . . . . . . . . 9Assignments . . . . . . . . . . . . . . . . . . . . . . . . . . . . . . . . . . . . . . . . . . . . . . . . . . . . . . . . 9Column Layouts . . . . . . . . . . . . . . . . . . . . . . . . . . . . . . . . . . . . . . . . . . . . . . . . . . . . . 9
Basic Steps to Building a Model . . . . . . . . . . . . . . . . . . . . . . . . . . . . . . . . . . . . . . . . . . 9
Parcel Express . . . . . . . . . . . . . . . . . . . . . . . . . . . . . . . . . . . . . . . . . . . . . . . . . . . . . . . . 10
OverviewCost and Profitability management is a discipline that enables companies to manage activities and processes as a means of improving organizational performance and the value that is received by the customer. By applying direct and indirect business costs to activities, the SAS Cost and Profitability Management solution enables managers to get a true understanding of the costs and profits that are associated with a product, customer, service, or business process. It supports ongoing profitability analysis, cost-management initiatives, shared-services management, planning and budgeting efforts, and capacity optimization.
Activity-based costing more accurately tracks costs than traditional methods. Two critical limitations of traditional cost accounting systems are as follows:
• the inability to provide individual product, service, customer, or process costs with a reasonable level of accuracy
3

• the inability to provide useful feedback to management for the purpose of operational control
Often, managers of complex organizations make important decisions about pricing, product and customer mix, resource allocations, and budgeting that are based on inaccurate and inappropriate cost and profitability information.
Using SAS Cost and Profitability Management, you build one or more models that apply direct and indirect organizational costs to specific activities and processes. As a result, managers are able to see actual cost assignments and their bottom-line impacts from an operational perspective. Managers get a true understanding of the cause-and-effect relationships that link resources and processes to outputs. Thus, business planners can easily forecast resource requirements, create budgets, and optimize capacity usage.
The ABC Model and CAM-I Methodology
OverviewABC assumes that activities cause expenditure of resources, and that cost objects—the results of activities or products and services that are produced—create the demand for activities.
The Consortium of Advanced Management, International (CAMI) develops methods to define critical business issues and to model effective strategies and solutions that resolve cost and resource management issues. SAS Cost and Profitability Management uses the CAMI methodology for Cost and Profitability model development.
RESOURCES
PROCESS VIEW
COST ASSIGNMENT VIEW*
Resource Cost Assignment
Resource Drivers
Activity Drivers
Performance Measures
ACTIVITIES
Activity Cost Assignment
COST OBJECTS
Cost Drivers
4 Chapter 2 • Introduction

The Cost Assignment ViewAn ABM system enables you to identify the activities that are performed, associate resources (expenditures) with those activities, and flow the cost of activities to cost objects. Resource drivers (typically, general ledger entries such as payroll, utilities, or materials) drive expenditures for activities. Activity drivers (such as the number of parts or setups) drive activity consumption for cost objects. Types of cost objects are: products, services, markets, distribution channels, engineering projects, or customers.
The Process ViewAn ABM system enables you to expose the relationship between why work is done, and the results of that work. In ABM terms, cost drivers drive the reason for activities and the effort that is needed to engage in the activities. Performance measures drive the achieved results of activities the efficiency, the required completion time, and the quality of the activities that were performed.
SAS Cost and Profitability Management ModelsThe basic container for information in SAS Cost and Profitability Management software is the model. A meaningful model reflects the organization that it is modeling, and uses terms that are familiar to the people who work there. The structural elements of a model should be named after elements that are present in the organizational environment. For example, a company's general ledger account names, such as Wages and Depreciation, can be used to name and reference the resource accounts in the model; the hierarchy of processes in a company can be applied to the activity accounts in the model.
Periods and ScenariosYou define periods and scenarios independently of any model. Any period and scenario can be shared by all the models on a server.
A period is any number of days such as a year, month, week, and quarter. You can define a hierarchy of periods such as months within quarters within years.
A scenario is a label that you associate with a period so that you can distinguish the data for that period with that label from data for the same period with a different label. Two common labels are “Actual” and “Budget”. Using those labels (scenarios) allows you to distinguish actual costs and budgeted costs in a period. You can also define a hierarchy of scenarios such as Budget→WhatIf1, Budget→WhatIf2.
Period and Scenario AssociationsA period and scenario association (also referred to as a period/scenario association, or just period/scenario) is an ordered pair consisting of one period and one scenario. You associate a period with a scenario when you specify the initial period and scenario for a model. Until you create additional period/scenario associations, all model data belongs to the initial period/scenario association.
SAS Cost and Profitability Management Models 5

ModulesA module contains a set of accounts. The set of modules forms an ordered set of sets of accounts. The set of modules is an ordered set because it determines the direction of cost flow in a model:
• An account in one module can flow costs to any other account (including itself) in the same module.
• An account in one module can flow costs to any other account in any module after its own module in the direction determined by the module order.
A traditional activity-based costing model consists of four basic modules, which reflect the CAM-I definitions:
Resourcecontains the expenses (or costs), such as salaries, materials, and depreciation, for the organization that is being modeled.
Activitycontains activities. Activities have accounts with cost elements. Costs might be assigned to activities from resource accounts or from other activity accounts.
Cost Objectcontains cost objects (products, services, channels, or customers). These cost objects are assigned costs from resources, activities, other cost objects, or any combination of the three.
External Unitcontains bill of costs that are external to the organization such as materials purchased from an external supplier. The External Unit module is optional but is useful for containing costs that originate outside the organization being modeled.
These modules constitute the main structure of a model. You will build each of these modules with the use of dimensions.
Dimensions
OverviewDimensions are the top-level categories that lay out the types of accounts that exist in your model. Examples of dimensions are: region, channel, product, customer, resource, general ledger, materials, department, activity, etc. Each of these categories represents a single dimension. Common dimensions are products, time, geography, customers, promotions, and sales channels.
Types of DimensionsThere are two types of dimensions in a model: structural and attribute.
Structural dimensions are the building blocks of modules. For example, the typical structural dimensions of the resource module are region, organization, or general ledger; the activity module might be structured according to the region or organization dimension, along with an activity dimension.
Dimension attributes provide information that is useful, but not required, to uniquely identify the model structure. Using dimension attributes, you can classify or organize information in ways that will help you analyze model results. The SAS Cost and
6 Chapter 2 • Introduction

Profitability Management OLAP tool makes no distinction between dimension attributes and structural dimensions.
Dimension MembersDimension members form a tree structure under their respective dimension and further refine the types of accounts that exist in your model. Dimension hierarchies are a powerful modeling tool because they allow you to ask questions at a high level, and then expand a dimension to reveal more detail. For example, the tree structure under the region dimension might look something like the following:
• Americas
• US
• New York
• Washington D.C.
• Cary
• Canada
• Brazil
• Europe
• Germany
• England
• France
• Asia
• China
• Korea
• Japan
AccountsAn account is an intersection of dimension members—one dimension member from each dimension in a module—and is the bearer of costs in a model. For example, if a model contains the dimensions Region, Activity, and Product, one account might be the following:
London x Shipping x Hat
Where London is a dimension member of Region, Shipping is a dimension member of Activity, and Hat is a dimension member of Product.
Cost ElementsThe cost in an account is the sum of its cost elements. There are two types of cost elements:
Entered Cost ElementAn entered cost element is one that you create and to which you assign costs directly by giving it one or both of the following:
SAS Cost and Profitability Management Models 7

EnteredCostA lump sum that you give to the cost element
EnteredUnitCostIf you specify EnteredUnitCost, then the cost for the cost element is determined by multiplying that unit cost times the number of units of the parent account that are assigned to destination accounts. In other words, the cost is determined by how many units are demanded by the destination accounts. For a fuller explanation, see“Fixed and Variable Quantities” on page 102.
Note: All of the cost in a model originates with entered cost elements.
Received Cost ElementA received cost element is one that you create indirectly by creating an assignment from one account to another. The cost that the destination account receives from that source account is a received cost element.
AttributesAttributes are things that you define to be true of accounts. Attributes are either of the following:
Value attributesA value attribute has a value that is true of an account. Value attributes can be of the following type:
• Numeric
• Text
• Stage
Tag attributesA tag attribute (also known as Boolean) does not have a value. You can apply a tag attribute to one or more accounts, and you can use a tag attribute in a formula to identify accounts that have that tag attribute.
Dimension attributesDimension attributes are like ordinary (structural) dimensions in that they contain members (dimension member attributes) that refine the types of accounts that exist in your model. And dimension attributes, like structural dimensions, appear in OLAP cubes.
For example, the dimension attribute, FixedVariable, can contain the dimension member attributes Fixed and Variable. By applying either the dimension member attribute Fixed or the dimension member attribute Variable to accounts you can distinguish fixed costs from variable costs in your model.
Note: Like numeric and stage attributes, dimension attributes can appear in the OLAP cubes that are generated from your model. Text and tag attributes do not appear in OLAP cubes.
PropertiesProperties have values that are true of the elements of a model. For some properties you enter the value yourself. For example, EnteredCost is a property whose value you enter, whereas Cost is a property whose value is calculated by the system.
8 Chapter 2 • Introduction

DriversA driver distributes cost in a source account to one or more destination accounts. There are four types of drivers:
Evenly assignedDistributes the cost evenly to each of the destination accounts.
PercentageDistributes the cost by percentages that you specify to each of the destination accounts.
StandardUses a system-defined formula for distributing the cost to each of the destination accounts. The formula is system-defined, but you determine the values of the items in the formula.
Calculated standardUses a user-defined formula for distributing the cost to each of the destination accounts. You define the formula, and you determine the values of the items in the formula.
AssignmentsAn assignment is a particular distribution of costs between accounts using a driver. The amount of cost that flows is controlled by the driver. A single source account can make assignments to any number of destination accounts, but each source account can have only one driver.
Column LayoutsA column layout is the set of properties and attributes that display when you view the modules in your model or when you view the dimension members in your model. You can customize column layouts so that the properties and attributes that are displayed are the ones that you want to see. You can create any number of column layouts.
Basic Steps to Building a ModelThe following list of steps summarizes the method that you will use in this tutorial for setting up and analyzing information in SAS Cost and Profitability Management models.
1. Create a paper plan.
Collect resource (expenditure), activity, and cost object (products and services) information to design your model. Determine the goal of the model (what kind of information you want to get from it), and determine the appropriate dimensions, periods, and scenarios to achieve that goal.
2. Create periods and scenarios.
Create the periods and scenarios to be used by your model. (Periods and scenarios are shared by all models on a server.)
3. Create dimensions, modules, and accounts.
Basic Steps to Building a Model 9

Create the dimensions and dimension members that you will use to build the modules. Build the resource, activity, and cost object modules by defining the accounts (dimension intersections) of each module.
4. Define attributes.
Define and add attributes to the appropriate accounts.
5. Define drivers.
Define drivers that measure the consumption of expenses and activities.
6. Make assignments.
Select the relevant driver for each source account. Make cost assignments from source accounts to destination accounts.
7. Calculate costs.
Calculate costs and display the results.
8. Add bills of costs.
Define and link external unit costs to accounts.
9. Enter sales and revenue data.
Enter sales volumes and calculate profit and unit cost.
Parcel ExpressParcel Express is a fictitious organization that is using activity-based costing to determine whether this method more clearly conveys costs and profitability information than traditional costing methods.
A later chapter outlines the main business activities of Parcel Express and the company's goals in using SAS Cost and Profitability Management.
10 Chapter 2 • Introduction

Chapter 3
Create a Paper Plan
Overview . . . . . . . . . . . . . . . . . . . . . . . . . . . . . . . . . . . . . . . . . . . . . . . . . . . . . . . . . . . . 11
Building by Design . . . . . . . . . . . . . . . . . . . . . . . . . . . . . . . . . . . . . . . . . . . . . . . . . . . . 11
The Parcel Express Tutorial Model . . . . . . . . . . . . . . . . . . . . . . . . . . . . . . . . . . . . . . . 12Company Background . . . . . . . . . . . . . . . . . . . . . . . . . . . . . . . . . . . . . . . . . . . . . . . 12Goals . . . . . . . . . . . . . . . . . . . . . . . . . . . . . . . . . . . . . . . . . . . . . . . . . . . . . . . . . . . . . 12Model Structure . . . . . . . . . . . . . . . . . . . . . . . . . . . . . . . . . . . . . . . . . . . . . . . . . . . . 12Data Collection . . . . . . . . . . . . . . . . . . . . . . . . . . . . . . . . . . . . . . . . . . . . . . . . . . . . . 13
OverviewCost and Profitability management projects begin with a plan. After you have determined the analysis goals of the model and defined the dimensions that will enable that analysis, you can begin data collection. Information about resources (expenditures), activities (tasks), and cost objects (products and services produced) provides the basis for building a model.
Building by DesignBefore beginning to build a model, evaluate and make preliminary decisions about the design of the model. Just as a building contractor needs a plan before beginning to build a house, a model builder needs a plan for the structure of a model before beginning to build the model. Factors that influence a model's design include the following:
• goal of the model—the operational or strategic questions the model is intended to answer
• data already collected and its format
• data needed that is not being collected
• types of OLAP cubes that will be needed
This tutorial uses a simple design and focuses on the steps for building a model. The design of the model and the effort that it takes can be simple or complex. The model builder will need to understand these factors, and other factors that are unique to each
11

modeling situation, to arrive at a design. The model used with this tutorial is named Parcel Express. The Parcel Express Tutorial case study provides fictitious company data.
The Parcel Express Tutorial Model
Company BackgroundParcel Express began operations in Beaverton, Oregon, in 1990 as a ground parcel delivery service. In 1995, with 125 employees and $1 million in sales, the company began expanding to overnight delivery and second-day delivery.
In the first quarter of 2004, total sales revenue was approximately $5.5 million. Costs for the same period were about $3.8 million, for a profit of about $1.7 million.
GoalsParcel Express aims to trace operating costs to individual products and services so that the overall costs and profit of each product and service can be determined and improved. Parcel Express is concerned that the current accounting system, which divides the business into about 10 product groupings, might not accurately reflect the different costs of doing business for the two express services: Overnight Express and 2nd Day Guaranteed.
Management wants to know how each product is performing. The company's competitors have dominated in the second-day delivery market, and management has recently slashed prices on that product. Sales volumes have increased as a result, but it is unclear how much profit Parcel Express is making, if any. The company would like to meet a target profit margin of at least 10% on the 2nd Day Guaranteed product, and at least 25% on all others. It is willing to adjust pricing or modify processes to reach that goal.
Model Structure
OverviewParcel Express has assembled a modeling team whose members have become familiar with the structure of models. Together, they have determined that the following module structure most accurately reflects how Parcel Express conducts its operations.
Resource ModuleResources will be structured by region and general ledger account. The two main processing plants are Beaverton and Eugene, Oregon. General ledger accounts include:
• wages (salary and overtime)
• operating expenses and office supplies
• equipment depreciation
Activity ModuleActivities will be structured by region and activity. The activities Parcel Express has chosen to model include the following:
• branch collection
12 Chapter 3 • Create a Paper Plan

• sorting and inspection
• air and land distribution
• resolution of customer complaints
The Eugene facility does not have an air distribution function, so it will have one less account than Beaverton.
Cost Object ModuleParcel Express needs to be able to track not only the costs of products and services, but the costs of its channels as well. Therefore, Parcel Express will organize the cost object module by channel and products and services.
The three channels are as follows:
• drop box
• walk in
• commercial pick up
The three products and services are as follows:
• Standard Ground
• 2nd Day Guaranteed
• Overnight Express
External Unit ModuleEach product has packaging costs that must be accounted for. Materials for packaging will be tracked as accounts in the External Unit module, including the following:
• envelopes
• flats
• boxes
Data CollectionThe following data will be collected for entry into the model:
WagesWage information, including salaries and overtime, will come from the general ledger system. Wages will be entered in dollar amounts, and assigned to activities according to the number of full-time employees, or FTEs (Full-Time Equivalents), who are associated with an activity.
Operating ExpensesOperating expenses and supply costs will come from the general ledger. These costs will be assigned to activities in dollar amounts.
Equipment ExpensesEquipment expenses, including depreciation, will come from the general ledger. These costs will be assigned by percentage.
Collection and DistributionBranch managers will collect data from their control systems regarding the number of packages that are collected, moved to warehouses, sorted, inspected, and distributed by land and air. Accurate numbers here are critical to the success of the modeling effort. Activity accounts will assign costs by number of packages.
The Parcel Express Tutorial Model 13

ComplaintsThe number of customer complaints will be collected by branch managers. Costs that are associated with complaint resolution will be assigned according to the number of complaints that are received.
RevenueRevenue will come from the sales accounting system. Revenue will be associated with cost objects according to the sales quantity for each product.
14 Chapter 3 • Create a Paper Plan

Chapter 4
User Interface
Overview . . . . . . . . . . . . . . . . . . . . . . . . . . . . . . . . . . . . . . . . . . . . . . . . . . . . . . . . . . . . 15
Logging On . . . . . . . . . . . . . . . . . . . . . . . . . . . . . . . . . . . . . . . . . . . . . . . . . . . . . . . . . . 15
Navigation Pane . . . . . . . . . . . . . . . . . . . . . . . . . . . . . . . . . . . . . . . . . . . . . . . . . . . . . . 16
The Workspace Manager . . . . . . . . . . . . . . . . . . . . . . . . . . . . . . . . . . . . . . . . . . . . . . . 19Overview . . . . . . . . . . . . . . . . . . . . . . . . . . . . . . . . . . . . . . . . . . . . . . . . . . . . . . . . . . 19Go to the Models Workspace . . . . . . . . . . . . . . . . . . . . . . . . . . . . . . . . . . . . . . . . . . 19
Models Workspace . . . . . . . . . . . . . . . . . . . . . . . . . . . . . . . . . . . . . . . . . . . . . . . . . . . . 20Overview . . . . . . . . . . . . . . . . . . . . . . . . . . . . . . . . . . . . . . . . . . . . . . . . . . . . . . . . . . 20Module Views . . . . . . . . . . . . . . . . . . . . . . . . . . . . . . . . . . . . . . . . . . . . . . . . . . . . . . 21Assignments Panes . . . . . . . . . . . . . . . . . . . . . . . . . . . . . . . . . . . . . . . . . . . . . . . . . . 22Column Layouts . . . . . . . . . . . . . . . . . . . . . . . . . . . . . . . . . . . . . . . . . . . . . . . . . . . . 22
Analysis Workspace for OLAP Cubes . . . . . . . . . . . . . . . . . . . . . . . . . . . . . . . . . . . . 23
OverviewThe SAS Cost and Profitability Management solution is web-enabled. Its server typically resides on your company's intranet, and the client software resides on your computer. This tutorial assumes that you have installed the software on your computer, and that you are familiar with basic software usage techniques, such as using menus, dialog boxes, and other windows and web controls.
Logging OnLog on to SAS Cost and Profitability Management from the Start menu.
1. Select Start ð Programs ð SAS ð Cost and Profitability Management 8.3 ð Cost and Profitability Management Solution.
You see the Log On dialog box.
15

2. Select an environment from the SAS environment drop-down list or specify default to choose the default environment.
An “environment” is a shortcut to the URL of a SAS server program that authenticates your logon information and provides a connection to a SAS Cost and Profitability Management Metadata Server. Because you log on first to the SAS server program rather than directly to a Metadata Server, the Metadata Server can change without your having to modify your logon procedure.
3. Enter your domain and User ID (for example, HQ\JohnD).
4. Enter your Password.
5. Click Log On.
SAS Cost and Profitability Management opens.
Note: If multiple languages are installed on your computer, the language that is used is determined by your location setting in Windows (select Settings ð Control Panel ð Regional and Language Options).
Navigation PaneThe Navigation pane enables you to navigate among the workspaces that constitute SAS Cost and Profitability Management:
• Workspace Manager
• Models
• Analysis
16 Chapter 4 • User Interface

If the Navigation pane is not visible, then select View ð Navigation pane.
Minimizing the Navigation Pane
1. Click the Auto hide icon to minimize the Navigation pane.
When you roll over the minimized tab with the cursor, the Navigation pane is restored, but only temporarily.
2. Click the Auto Hide icon again (the push-pin) to make the Navigation pane stay open (or select View ð Navigation Pane).
Navigation Pane 17

Partitioning the Navigation Pane
Move the gripper up or down to change the relative size of the task area and the button area in the Navigation pane.
Note: You cannot move the gripper up farther than is necessary to fully display all the buttons in the button area.
18 Chapter 4 • User Interface

The Workspace Manager
OverviewThe following display shows the SAS Cost and Profitability Management Workspace Manager. The Workspace Manager provides a treeview of all SAS Cost and Profitability Management elements—from models to cube configurations—and gives you access to them all.
Read the online Help (click ) for a description of the Workspace Manager. Any existing models to which you have access rights appear in the Models folder or its subfolders. You can create shortcuts to your models in the My Shortcuts folder.
Go to the Models WorkspaceFrom the Workspace Manager, go to the Models workspace:
The Workspace Manager 19
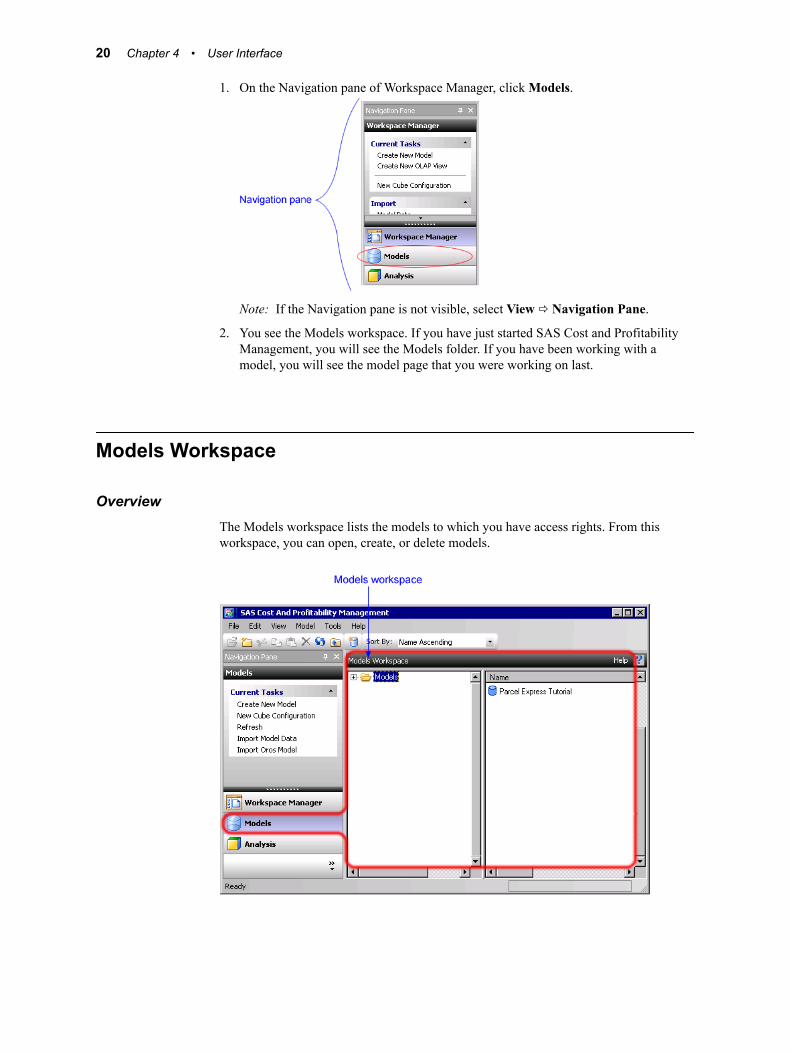
1. On the Navigation pane of Workspace Manager, click Models.
Note: If the Navigation pane is not visible, select View ð Navigation Pane.
2. You see the Models workspace. If you have just started SAS Cost and Profitability Management, you will see the Models folder. If you have been working with a model, you will see the model page that you were working on last.
Models Workspace
OverviewThe Models workspace lists the models to which you have access rights. From this workspace, you can open, create, or delete models.
20 Chapter 4 • User Interface

Module ViewsWhen you open a model, you typically go to the Resource module view. If you change to a different view such as an OLAP view and then return to the model, you go to the model page that you were working on most recently.
The following picture shows the Resource module of the model that you will be building in this tutorial.
When a model is open, if you want to open a different model from the currently open model, do one of the following:
• Click the Go to Models Workspace button on the Models Workspace Toolbar.
• Select Model ð Change Model or Context from the menu bar.
• Go to the Workspace Manager and navigate to the Models folder.
Models Workspace 21

In this tutorial, you will be directed to use the menus most of the time. Occasionally, you will be instructed to use a button or an icon. As you become more familiar with the software, you can choose the method that you prefer to initiate tasks.
Assignments PanesOne of the main objectives of Cost and Profitability management is to accurately assess how company costs are consumed—for example, you can see how costs flow from general ledger accounts to activities to products and services. SAS Cost and Profitability Management provides you with several graphical tools to help you see and manage this flow. Among these tools are the left and right assignments panes, which enable you to view and assign costs from one module to another and within a single module.
By default, each module opens in a single-pane view, the primary pane. The primary pane contains the structure of a module, which includes the dimension intersections (accounts) and each account's cost elements. You can open the left assignments pane to see the accounts from which costs flow (sometimes called source accounts). You can open the right assignments pane to see the accounts to which costs flow (sometimes called destination accounts).
The following display shows the Activity module of the model that you will be building in this tutorial. All three panes are open.
In this display, the arrows that point from the left assignments pane to the primary pane indicate costs that are flowing into the Beaverton Inspect account in the Activity module. The arrows that point from the primary pane to the right assignments pane indicate costs that then flow from the Beaverton Inspect account into other accounts.
In this tutorial, you will use the right assignments pane to assign costs from one account to another.
Column Layouts
OverviewA column layout is a set of column headings for module views and for the Dimensions view along with the specification for how information in those columns should appear.
22 Chapter 4 • User Interface

You can customize a column layout to display various information, such as properties, attributes, and dimensions. When you have customized it, you can save a column layout by name so that you can retrieve it later. You see saved column layouts in the Workspace Manager and in the Column Layout list when you view a module or when you open the Dimensions view.
When you save a column layout, the following information is saved:
• description
• column headings
• information that is displayed in each column and the period/scenario association to which it applies
• format for each column and order of the columns from left to right
• model
• column widths
T I P All column layouts that are saved by all users on the same server are listed in the Workspace Manager. Therefore, your organization might want to set guidelines for saving and naming column layouts.
Properties, Attributes, and Dimensions in Column LayoutsThe columns of a column layout are derived from the following model elements:
PropertiesA property is a model item that holds values that are entered by a user or calculated by the software. Examples of properties include Cost, Unit Cost, Output Quantity, Sold Quantity, and Profit. The more familiar you become with SAS Cost and Profitability Management modeling, the more you will be able to use properties creatively to achieve your analysis goals.
AttributesAn attribute is a user-defined label or numeric value that is attached to an account. Each attribute is a particular characteristic that is used for analysis. An attribute conveys information about the item to which it is attached.
DimensionsA dimension is a category by which data will be or is analyzed. You define the dimensions of your model when you use the New Model Wizard.
Analysis Workspace for OLAP CubesA cube is the main object in OLAP, which is a technology that provides fast access to data in a model. A cube contains a set of data that is constructed from a subset of model data and that is organized and summarized into a multidimensional structure. SAS Cost and Profitability Management cubes are standard OLAP cubes.
Analysis Workspace for OLAP Cubes 23

You use SAS Cost and Profitability Management software to connect to and interact with the cubes on a SAS Cost and Profitability Management server. For each model, you can generate cubes that you can manipulate with the SAS OLAP Analyzer to interactively analyze business data.
• Change to the Analysis workspace to access OLAP cubes.
From the Navigation pane, click Analysis.
You see the Analysis workspace.
When you have opened an OLAP view, if you want to open a different OLAP view from the currently open one, do one of the following:
• Click the Go to Analysis Workspace button on the Analysis Workspace Toolbar.
• Go to the Workspace Manager and navigate to the OLAP Views folder.
24 Chapter 4 • User Interface

Chapter 5
Create Periods and Scenarios
Overview . . . . . . . . . . . . . . . . . . . . . . . . . . . . . . . . . . . . . . . . . . . . . . . . . . . . . . . . . . . . 25
Create a Period . . . . . . . . . . . . . . . . . . . . . . . . . . . . . . . . . . . . . . . . . . . . . . . . . . . . . . . 25
Create a Scenario . . . . . . . . . . . . . . . . . . . . . . . . . . . . . . . . . . . . . . . . . . . . . . . . . . . . . 27
Deleting Periods and Scenarios . . . . . . . . . . . . . . . . . . . . . . . . . . . . . . . . . . . . . . . . . . 28
OverviewA period is an interval of time in which Cost and Profitability management data is maintained. A period can represent any unit of time: a month, a quarter, a year, and so on. A model can hold data for different periods, but only one period at a time is active. You can create a hierarchy of periods, such as FY2014 > Q1 > January. By default, each level is given a name, such as Period L1.
You can compare model data that you have entered for different periods. For example, you can examine the costs for March versus the costs for February.
Scenarios are generally used to manage different variations of data within a period. A scenario can be any set of data: actual, budget, aggressive plan, conservative plan, and so on. The default scenarios are Actual and Budget. You can create a hierarchy of scenarios, such as Budget > Aggressive. By default, each level is given a name, such as Scenario L1. However, these names are not descriptive when you generate cubes. So, you can rename a default scenario level.
Create a PeriodParcel Express analyzes costs by quarters. Because this tutorial was originally created in 2008, the period that you will create is 2008 Q1.
1. Select Tools ð Manage Periods.
You see the Manage Periods dialog box.
25

2. Select the 2008 period and click New.
Note: These periods might already exist on your server.
You see the New Period dialog box.
3. For Name, replace New Period with 2008 Q1.
4. For Reference, type 08Q1.
5. Select a Start date of January 1, 2008.
Note: In addition to using the graphical calendar, you can simply overwrite the start or end date:
6. Select an End date of March 31, 2008.
Note: SAS Cost and Profitability Management enables you to enter descriptions for the items that you create. In this tutorial, you do not enter descriptions.
7. Click OK.
You see the new period added to the list below the 2008 period.
8. Create three more periods that are named 2008 Q2, 2008 Q3, and 2008 Q4. Specify appropriate date ranges and references for each period. All period references must be unique.
When you are finished, you should see the following periods in the Manage Periods dialog box:
26 Chapter 5 • Create Periods and Scenarios

9. Click OK.
Create a ScenarioParcel Express wants to compare actual costs that it incurred on a quarterly basis. It will analyze the profit and loss trends in these costs to make decisions about resource allocation, process control, and pricing. For these purposes, the Actual default scenario is adequate.
However, so that you gain experience, assume that the company had specific profit targets that it wanted to model in SAS Cost and Profitability Management. You could create a scenario named Target.
1. Select Tools ð Manage Scenarios
You see the Manage Scenarios dialog box.
2. Select All Scenarios and click New.
You see the New Scenario dialog box.
Create a Scenario 27

3. For Name, replace New Scenario with Target.
4. For Reference, type Target.
5. Click OK.
You see the new scenario added to the list below the Actual scenario.
6. Click OK.
Deleting Periods and ScenariosYou can delete a period or scenario from the Manage Periods or Manage Scenarios dialog boxes, respectively:
1. Select Tools ð Manage Periods or Tools ð Manage Scenarios.
2. Select a period or scenario.
3. Click Delete.
Note: This procedure makes the period or scenario unavailable for any model. If a period/scenario association is already assigned to a model, then you first need to delete the association from every such model as follows:
1. Open the model and select Model ð Period and Scenario Associations Page.
2. Right-click a period/scenario association.
3. Select Delete.
28 Chapter 5 • Create Periods and Scenarios

Chapter 6
Create a New Model with Its Dimensions
Overview . . . . . . . . . . . . . . . . . . . . . . . . . . . . . . . . . . . . . . . . . . . . . . . . . . . . . . . . . . . . 29
Use the New Model Wizard . . . . . . . . . . . . . . . . . . . . . . . . . . . . . . . . . . . . . . . . . . . . . 30Overview . . . . . . . . . . . . . . . . . . . . . . . . . . . . . . . . . . . . . . . . . . . . . . . . . . . . . . . . . . 30Step 1: Start the New Model Wizard . . . . . . . . . . . . . . . . . . . . . . . . . . . . . . . . . . . . 30Step 2: Select a Starting Period and Scenario . . . . . . . . . . . . . . . . . . . . . . . . . . . . . . 31Step 3: Select the Type of Model . . . . . . . . . . . . . . . . . . . . . . . . . . . . . . . . . . . . . . . 32Step 4: Select the Method for Defining Dimensions . . . . . . . . . . . . . . . . . . . . . . . . 32Step 5: Change the Number of Modules . . . . . . . . . . . . . . . . . . . . . . . . . . . . . . . . . . 33Step 6: Define the Dimensions for Each Module . . . . . . . . . . . . . . . . . . . . . . . . . . . 34Step 7: Define Dimension Attributes . . . . . . . . . . . . . . . . . . . . . . . . . . . . . . . . . . . . 37Step 8: Finish the New Model Wizard . . . . . . . . . . . . . . . . . . . . . . . . . . . . . . . . . . . 38
Create Dimension Members . . . . . . . . . . . . . . . . . . . . . . . . . . . . . . . . . . . . . . . . . . . . 39
Appendix: Acquiring a Write Lock on a Model . . . . . . . . . . . . . . . . . . . . . . . . . . . . 41
OverviewA model is an ordered set of modules; and a module is an ordered set of accounts; and an account is an intersection of dimension members. So, before creating and defining the modules and accounts in your model, you must first define the dimensions as specified in the paper plan.
The following table shows the dimensions that you will create for the tutorial along with the default dimensions that are created automatically if you do not specify them yourself.
Module Tutorial Dimensions Default Dimensions
External Unit Materials Materials
Resource Region
General Ledger
Organization
General Ledger
Activity Region
Activities
Organization
Activities
29

Module Tutorial Dimensions Default Dimensions
Cost Object Region
Channel
Products and Services
Customer
Products and Services
Use the New Model Wizard
OverviewA main purpose of the New Model Wizard is to establish the dimensions of your model. These are the dimensions that you will use to create accounts and the structure of the modules. Most important, these are the dimensions that will eventually enable you to generate meaningful cubes and to analyze the profits and losses that result from your business activities.
Now, you will create the model named Parcel Express Tutorial. The model's monetary data will be in U.S. dollars.
Step 1: Start the New Model Wizard1. Select File ð New ð Model.
You see Step 1 of the New Model Wizard.
The New Model Wizard contains eight steps. If you accept the default dimensions for your model, you will not perform every step. For this tutorial, you will define your own dimensions and perform every step in the New Model Wizard.
2. For the name, type Parcel Express Tutorial.
30 Chapter 6 • Create a New Model with Its Dimensions

Note: Each model name must be unique on a SAS Cost and Profitability Management server.
3. For the reference, type PExpress. This short reference is used in public views.
4. Verify that the base currency is US Dollar($).
5. Click Next.
You see Step 2 of the New Model Wizard.
Step 2: Select a Starting Period and Scenario1. Select a period and a scenario as your initial period/scenario association.
A period/scenario association is a pair consisting of one period and one scenario. All model data resides in a period/scenario association. Until you add other period/scenario associations to your model, all your data will reside in this initial period/scenario association.
You can select any period and scenario, but this tutorial model was first created in 2008 so that is the year that we will choose.
a. Expand 2008 and select the 2008 Q1 period.
b. Select the Actual scenario.
2. Click Next.
You see Step 3 of the New Model Wizard.
Use the New Model Wizard 31

Step 3: Select the Type of Model1. Select Activity-based costing model as the type of model to be created.
Possible model types are the following:
Activity-based costing modelBy default, with this type of model there are four modules: External Unit, Resource, Activity, and Cost Object. However, you can change the number of modules and rename them.
User-defined costing modelA user-defined costing model can have any number of modules with any name you choose.
Create a model from templateWhen you create a model from a template, you provide information contained in the template to the new model. A template includes the following information:
• the model’s modules, including their order, name, and reference
• the dimensions included in each module
You can override the template information when you create a new model.
2. Click Next.
You see Step 4 of the New Model Wizard.
Step 4: Select the Method for Defining Dimensions1. Verify that the Select or define the dimensions for each module option is selected.
32 Chapter 6 • Create a New Model with Its Dimensions

This option enables you to create new dimensions, rearrange dimensions, or use the default dimensions for some modules but not others. The dimensions that you will create for the tutorial include the following:
Module Dimensions
External Unit Materials
Resource Region
General Ledger
Activity Region
Activities
Cost Object Region
Channel
Products and Services
2. Click Next.
You see Step 5 of the New Model Wizard.
Step 5: Change the Number of Modules1. Verify that your model has the following four modules: External Unit, Resource,
Activity, and Cost Object.
You can add, remove, and rename modules. For this tutorial you use the default modules.
Use the New Model Wizard 33

2. Click Next.
You see Step 6 of the New Model Wizard.
Step 6: Define the Dimensions for Each Module
OverviewIn this step of creating a model, you specify the dimensions for each module.
Click each module in turn and specify its dimensions.
Note: You must define the dimensions for every module before the Next button is enabled in order to proceed to the next step.
Define Dimensions for the External Unit Module1. Select External Unit.
34 Chapter 6 • Create a New Model with Its Dimensions

2. Verify that Materials is the only dimension in the Selected dimensions list.
Module Dimensions
External Unit Materials
Define Dimensions for the Resource Module1. Select Resource.
2. Create the following dimensions in the Resource module:
Module Dimensions
Resource Region
General Ledger
The order of dimensions in the list determines the hierarchy of dimensions in the module. In this case, Parcel Express wants to organize its resources by Region, and then by General Ledger.
In order to create those two dimensions, perform the following steps:
a. Remove the Organization dimension from the Selected dimensions list.
b. Click New.
You see the New Dimension dialog box.
Use the New Model Wizard 35

c. For Name, type Region.
d. For Reference, use Region.
e. Click OK.
The New Dimension dialog box closes and you see that the Region dimension has been added to the Available dimensions list.
f. Select the Region dimension and click Add >.
g. Move Region to the top of the list.
Define Dimensions for the Activity ModuleNow, you will define the dimensions for the activity module by using these same techniques.
1. Select Activity.
2. Create the following dimensions in the Activity module:
Module Dimensions
Activity Region
Activities
In order to create those two dimensions, perform the following steps:
a. Remove the Organization dimension from the Selected dimensions list.
b. Select the Region dimension and click Add >.
c. Move Region to the top of the list.
Define Dimensions for the Cost Object Module1. Select Cost Object.
36 Chapter 6 • Create a New Model with Its Dimensions

2. Create the following dimensions in the Cost Object module:
Module Dimensions
Cost Object Region
Channel
Products and Services
In order to create those dimensions, perform the following steps:
a. Remove the Customer dimension from the Selected dimensions list.
b. Create a new dimension named Channel that has a reference of Channel.
c. Move the Channel dimension to the Selected dimensions list.
3. Click Next.
You see Step 7 of the New Model Wizard.
Step 7: Define Dimension AttributesIn this step, you have the option of creating dimension attributes. A dimension attribute is like an ordinary attribute in that it can be applied to accounts. But, unlike an ordinary attribute, a dimension attribute is displayed in cubes. We will not create any dimension attributes with this step of creating the tutorial model, but we will create one later. See “Create a Dimension Attribute” on page 60.
Use the New Model Wizard 37

Click Next.
Step 8: Finish the New Model Wizard1. Review the Summary of Information and dimensions in each module, as shown:
If any of the information in the summary is incorrect, click Back to move to the page that requires changes. After making the corrections, click Next to return to the summary.
2. Click Finish.
You see the Dimensions page that now has the following dimensions:
38 Chapter 6 • Create a New Model with Its Dimensions

Note: If you select Model ð Properties and click the Model Dimensions tab, you can see the dimensions as shown in the following picture:
These dimensions are the basic building blocks that you will use to construct the modules of your model. First, however, you must create the members of each dimension.
Create Dimension MembersDimension members are the unique elements of a dimension level. For example, the Region dimension of the Parcel Express Tutorial model will have levels that include countries, states, and cities. Beaverton and Eugene are dimension members at the same level of the Region dimension.
1. On the Dimensions page, select Region.
2. Select Edit ð New Dimension Member (or right-click Region).
You see the New Dimension Member dialog box.
Create Dimension Members 39

3. Click Add.
4. For Name, type USA.
T I P After clicking Add, you can simply begin typing. The focus is automatically given to the Name field, and you do not have to move the cursor there.
5. Click OK.
You see that the USA dimension member has been added below Region.
T I P When you click OK, you see that the Reference field is the same as the Name field. In this tutorial, you will not change the references of dimensions. However, for the models that you create for your company, you might want to devise a standard referencing methodology.
6. Select the USA dimension member.
7. Create a new dimension member under USA named Oregon.
Note that the level is Level2. The reason for this is that you are adding a dimension member below a Level1 dimension member.
8. Using the techniques that you have learned, create the following dimension members:
40 Chapter 6 • Create a New Model with Its Dimensions

Note: You will not create dimension members for the Materials dimension yet. You will add those dimension members when you create bills of cost.
Appendix: Acquiring a Write Lock on a ModelTo edit a model you must first acquire a Write lock on it. A Write lock prevents other uses from modifying the same model that you are editing or even looking at it while you are editing it. When you use the New Model wizard to create a model, you automatically acquire a Write lock on it. However, if for some reason you lose the Write lock (for example, if an Administrator releases the lock), then you will have to acquire the lock again before you can continue editing.
To open a model with a Write lock for editing, perform the following steps:
1. Click the Models tab in the Navigation Pane.
Appendix: Acquiring a Write Lock on a Model 41

Note:
• If a model is already open, then you can click the Go to Models Workspace icon on the toolbar.
• You can also click the Workspace Manager tab and then select the Models folder.
2. Right-click the model and select Acquire Write Lock.
When you have a Write lock, no one else can acquire a Write lock or even open the model for viewing while you are in the process of changing it.
A dialog box appears asking if you want to open the model.
3. Click Yes to open the model.
Note: Once you have acquired the Write lock, you can reopen the model subsequently (even after closing and reopening the client application) by double-clicking the model.
42 Chapter 6 • Create a New Model with Its Dimensions

Chapter 7
Create Modules and Accounts
Overview . . . . . . . . . . . . . . . . . . . . . . . . . . . . . . . . . . . . . . . . . . . . . . . . . . . . . . . . . . . . 43
Build the Resource Module Structure . . . . . . . . . . . . . . . . . . . . . . . . . . . . . . . . . . . . 45Create Resource Accounts . . . . . . . . . . . . . . . . . . . . . . . . . . . . . . . . . . . . . . . . . . . . 45Add Cost Elements with Entered Costs . . . . . . . . . . . . . . . . . . . . . . . . . . . . . . . . . . 46
Build the Activity Module Structure . . . . . . . . . . . . . . . . . . . . . . . . . . . . . . . . . . . . . . 49Creating Activity Accounts . . . . . . . . . . . . . . . . . . . . . . . . . . . . . . . . . . . . . . . . . . . 49
Build the Cost Object Module Structure . . . . . . . . . . . . . . . . . . . . . . . . . . . . . . . . . . 51Omitting a Dimension From an Account . . . . . . . . . . . . . . . . . . . . . . . . . . . . . . . . . 51Creating Cost Object Accounts . . . . . . . . . . . . . . . . . . . . . . . . . . . . . . . . . . . . . . . . 52
OverviewAn account is the basic repository of costs in a model. You create an account in SAS Cost and Profitability Management by defining an intersection between dimension members. For example, in the Parcel Express Tutorial model, you will create an account for tracking the costs of inspecting packages in Beaverton. You create this account by defining an intersection between Region and Activity dimension members, as shown here:
Region > USA > Oregon > Beaverton xActivity > Regional Sorting > Inspect
Shorthand for the resulting account, or dimension intersection, is Beaverton x Inspect.
The costs of an account are derived from cost elements, which can either be added directly to the account or assigned from other accounts.
The following picture shows the accounts and cost elements that you will create in this chapter for each module:
43

In the following picture, you can see that the account 2nd Day Guaranteed is the intersection of the dimension members Beaverton x Drop Box x 2nd Day Guaranteed. Those dimension members are, in turn, members of the dimensions Region x Channel x Products and Services respectively. You can notice that the display name of the account, 2nd Day Guaranteed, is the name of the last member in the intersection of the dimension members when the order of dimension members is the order of their containing dimensions—Region, Channel, Products. The order of dimensions is the order in which you define them when you create a model
44 Chapter 7 • Create Modules and Accounts

Build the Resource Module Structure
Create Resource AccountsStart by creating a structure to hold the resource costs in the model.
1. To open the resource module, select Model ð Module ð Resource (or click the Select Module icon on the toolbar, and then select Resource from the drop-down list).
2. Select Edit ð New Account (or right-click RESOURCE (PRIMARY PANE) and select New Account).
You see Step 1 of the New Account Wizard.
The Dimensions area contains the dimensions of the resource module. The Accounts area will contain the accounts that you create.
3. Expand Region to display all of its dimension members.
4. In the Dimensions list, select the following dimension members:
Beaverton
Eugene
Wages
Operating Expenses
Equipment Expenses
Build the Resource Module Structure 45

5. Verify that leaf dimension members only is selected in the Create accounts using field.
6. Click Add.
You see that the following accounts have been added to the Accounts list:
7. Click Next.
You see Step 2 of the New Account Wizard. Here, you will add the cost elements and costs of each account.
T I P The system has automatically generated a unique name and reference for each account. The names and references that you see will be different from those shown in the window. These names and references are used in operational summaries, but they do not appear elsewhere on a page, unless you add columns to display them. Your company can decide whether to use the system-generated names or to use a naming and referencing methodology. If your models are extremely large, it will probably be more convenient to use system-generated account names and references.
Add Cost Elements with Entered Costs1. Select the Beaverton x Wages account and click Add Cost Element twice.
You see that two cost elements have been added to the account table. The names and references of these cost elements are system-generated. In the account table, you can add costs and change the names and references of cost elements.
2. Change the names and references of the two cost elements that you added and enter their costs, as follows:
46 Chapter 7 • Create Modules and Accounts

Cost Element NameCost Element Reference Entered Cost
Salaries BS 1,563,000.00
Overtime BOT 75,600.00
The New Account window should look like the following:
Note: In large models, entered costs might be imported from other sources, such as a database. In that case, you could create the cost elements, but leave the entered costs empty.
3. Using the techniques that you have learned, create cost elements and entered costs as follows:
Account Cost Element Name
Cost Element Reference Entered Cost
Beaverton x
Operating Expenses
Operating Expenses
Office Supplies
BOE
BOS
228,000.00
10,000.00
Beaverton x
Equipment Expenses
Equipment Depreciation BED 54,300.00
Eugene x Wages Salaries
Overtime
ES
EOT
1,298,000.00
110,000.00
Eugene x
Operating Expenses
Operating Expenses
Office Supplies
EOE
EOS
263,000.00
8,000.00
Eugene x
Equipment Expenses
Equipment Depreciation EED 38,000.00
Build the Resource Module Structure 47
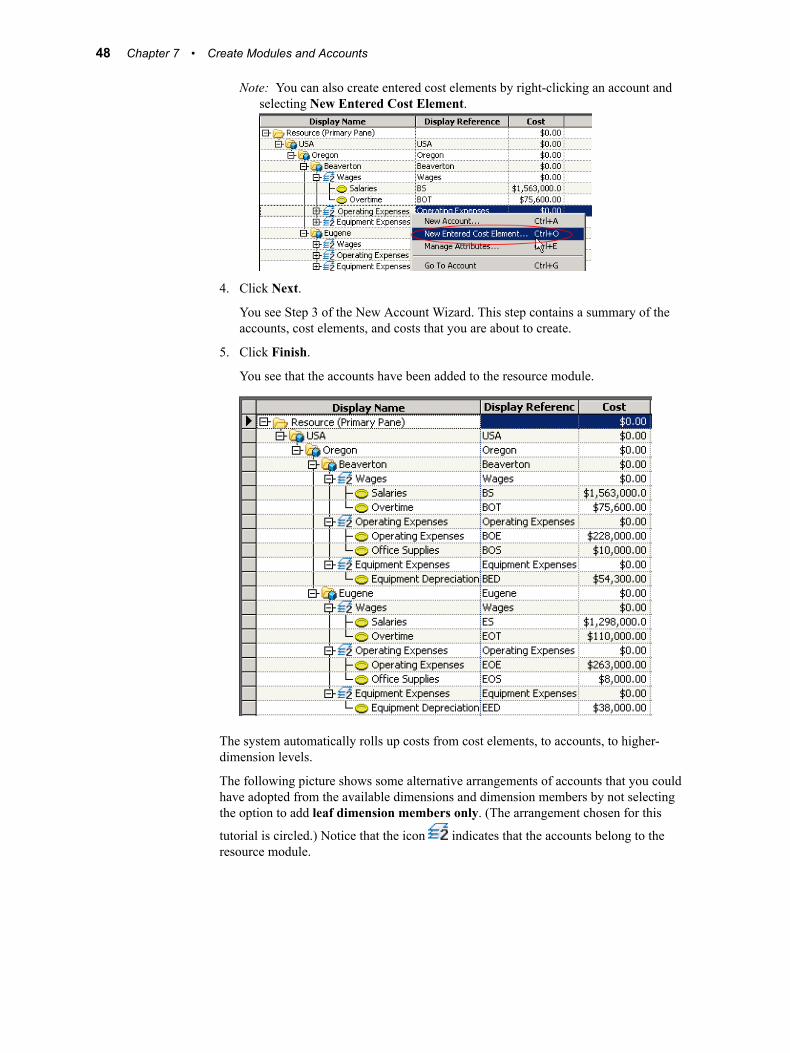
Note: You can also create entered cost elements by right-clicking an account and selecting New Entered Cost Element.
4. Click Next.
You see Step 3 of the New Account Wizard. This step contains a summary of the accounts, cost elements, and costs that you are about to create.
5. Click Finish.
You see that the accounts have been added to the resource module.
The system automatically rolls up costs from cost elements, to accounts, to higher-dimension levels.
The following picture shows some alternative arrangements of accounts that you could have adopted from the available dimensions and dimension members by not selecting the option to add leaf dimension members only. (The arrangement chosen for this
tutorial is circled.) Notice that the icon indicates that the accounts belong to the resource module.
48 Chapter 7 • Create Modules and Accounts

Build the Activity Module StructureAn activity is a task that consumes resources. Examples of activities include setting up a machine to produce a particular part, scheduling production of a certain number of products, and inspecting a batch of parts. In a model, you identify activities and calculate their costs.
Creating Activity AccountsIn the activity module, you will create activity accounts.
1. To open the activity module, select Model ð Modules ð Activity (or click the Select Module icon on the toolbar, and then select Activity from the drop-
down list).
2. Select Edit ð New Account.
You see the New Account Wizard.
3. Using the New Account Wizard, create the following accounts:
Note: Do not create cost elements. Costs will be assigned to these accounts from other accounts.
Build the Activity Module Structure 49

Dimension Intersection
Personnel Intensive Activities Beaverton x Resolve Customer Complaints
Beaverton x Expedite Package Shipments
Local Collection Beaverton x Move to Warehouse
Local Processing Beaverton x Sort
Beaverton x Inspect
Regional Distribution Beaverton x Air Distribution
Beaverton x Land Distribution
Personnel Intensive Activities Eugene x Resolve Customer Complaints
Eugene x Expedite Package Shipments
Local Collection Eugene x Move to Warehouse
Local Processing Eugene x Sort
Eugene x Inspect
Regional Distribution Eugene x Land Distribution
Note: There is no Air Distribution from Eugene.
Note: A quick way to create the Activity module accounts is to add the dimensions shown in the following picture and then remove the one Eugene x Air Distribution account.
After completing the steps of the New Account Wizard, you see the following activity
module structure (notice that the icon indicates that the accounts belong to the activity module):
50 Chapter 7 • Create Modules and Accounts

Note: You have not entered cost elements for these accounts, and no costs have been assigned yet, so cost is $0.00.
Build the Cost Object Module StructureThe cost object module will hold information about Parcel Express Tutorial's products and services. Its dimensions are Channel and Products and Services.
Omitting a Dimension From an AccountYou can create accounts that omit one or more dimensions of a module. In the cost object module of the Parcel Express Tutorial model, you will create accounts that have a Channel dimension member but no Products and Services dimension member, and vice versa. The purpose of these omissions is to track the unique costs of a channel that are unassociated with any product, and to track the unique costs of a product that are unassociated with any channel. To omit a dimension from an account, you select the No option in the New Account Wizard.
Examples of accounts that omit a dimension are as follows:
• Drop Box x No <Products and Services>
(tracks unique costs that are associated with the Drop Box channel)
• No <Channel> x 2nd Day Guaranteed
(tracks unique costs that are associated with the 2nd Day Guaranteed product)
Build the Cost Object Module Structure 51

Creating Cost Object AccountsUsing the techniques that you have learned, create the following accounts in the cost object module for each regional office Beaverton and Eugene.
Note: Do not create cost elements. Costs will be assigned to these accounts from other accounts.
Dimension Intersection
Drop Box x 2nd Day Guaranteed
Drop Box x Overnight Express
Drop Box x Standard Ground
Drop Box x No <Products and Services>
Walk In x 2nd Day Guaranteed
Walk In x Overnight Express
Walk In x Standard Ground
Walk In x No <Products and Services>
Commercial Pick Up x 2nd Day Guaranteed
Commercial Pick Up x Overnight Express
Commercial Pick Up x Standard Ground
Commercial Pick Up x No <Products and Services>
No <Channel> x 2nd Day Guaranteed
No <Channel> x Overnight Express
No <Channel> x Standard Ground
Note: You can create these accounts all at once by checking the leaf dimension members that are shown in the following display. This quick method, however, results in creating two meaningless accounts that you can delete afterward:
Beavertonx No <Channel> x No <Products and Services>
Eugenex No <Channel> x No <Products and Services>
52 Chapter 7 • Create Modules and Accounts

After you have created these accounts, you see the following cost object module structure:
Build the Cost Object Module Structure 53

54 Chapter 7 • Create Modules and Accounts

Chapter 8
Create Attributes
Types of Attributes . . . . . . . . . . . . . . . . . . . . . . . . . . . . . . . . . . . . . . . . . . . . . . . . . . . . 55Overview . . . . . . . . . . . . . . . . . . . . . . . . . . . . . . . . . . . . . . . . . . . . . . . . . . . . . . . . . . 55Text . . . . . . . . . . . . . . . . . . . . . . . . . . . . . . . . . . . . . . . . . . . . . . . . . . . . . . . . . . . . . . 56Numeric . . . . . . . . . . . . . . . . . . . . . . . . . . . . . . . . . . . . . . . . . . . . . . . . . . . . . . . . . . 56Calculated . . . . . . . . . . . . . . . . . . . . . . . . . . . . . . . . . . . . . . . . . . . . . . . . . . . . . . . . . 57Dimension . . . . . . . . . . . . . . . . . . . . . . . . . . . . . . . . . . . . . . . . . . . . . . . . . . . . . . . . . 57Tag . . . . . . . . . . . . . . . . . . . . . . . . . . . . . . . . . . . . . . . . . . . . . . . . . . . . . . . . . . . . . . 57
Create Attributes . . . . . . . . . . . . . . . . . . . . . . . . . . . . . . . . . . . . . . . . . . . . . . . . . . . . . 57Create a Text Attribute . . . . . . . . . . . . . . . . . . . . . . . . . . . . . . . . . . . . . . . . . . . . . . . 57Create a Numeric Attribute . . . . . . . . . . . . . . . . . . . . . . . . . . . . . . . . . . . . . . . . . . . . 58Create a Calculated Numeric Attribute . . . . . . . . . . . . . . . . . . . . . . . . . . . . . . . . . . . 59Create a Dimension Attribute . . . . . . . . . . . . . . . . . . . . . . . . . . . . . . . . . . . . . . . . . . 60
Create a Column Layout . . . . . . . . . . . . . . . . . . . . . . . . . . . . . . . . . . . . . . . . . . . . . . . 61Open the Column Layout Dialog Box . . . . . . . . . . . . . . . . . . . . . . . . . . . . . . . . . . . 61Add Attributes to the Layout . . . . . . . . . . . . . . . . . . . . . . . . . . . . . . . . . . . . . . . . . . 62Save the Layout . . . . . . . . . . . . . . . . . . . . . . . . . . . . . . . . . . . . . . . . . . . . . . . . . . . . 62
Entering Attribute Values . . . . . . . . . . . . . . . . . . . . . . . . . . . . . . . . . . . . . . . . . . . . . . 63
Applying Additional Attributes to Accounts . . . . . . . . . . . . . . . . . . . . . . . . . . . . . . . 64Apply One Attribute . . . . . . . . . . . . . . . . . . . . . . . . . . . . . . . . . . . . . . . . . . . . . . . . . 64Add a Fixed_Variable Column to the Column Layout . . . . . . . . . . . . . . . . . . . . . . . 65Apply Additional Attributes to Accounts . . . . . . . . . . . . . . . . . . . . . . . . . . . . . . . . . 66
Types of Attributes
OverviewAn attribute is a label or identification tag that is attached to an account or roll-up account. The attribute conveys information about the object to which it is attached.
Attributes have many purposes. You can use them to do the following:
• group cost and profitability management data to simplify interpretation
• create different dimensions of data
• group similar cost categories across cost centers
• classify cost components as fixed or variable, value-added, or non-value-added
55

• use them in the definition of a calculated driver
There are five attribute types:
• Text
• Numeric
• Calculated
• Dimension
• Tag
TextA text attribute describes model information. You can use text attributes to annotate a model. You can use them to provide information about a model. You will see an example in this chapter.
Note: Text attributes cannot be viewed in OLAP.
NumericA numeric attribute enables you to enter data that is not entered or otherwise generated in a model.
Typically, numeric attributes are measures or quantities of units that contribute to the total cost of an activity, such as number of cases, number of pounds, number of orders, or number of times an activity is performed.
You can establish numeric attributes as performance measures for special purposes, such as tracking productivity (number of inputs or rejects, cycle time, and quality), or classifying information (level of complexity or number of subassemblies). Use the Default Value field under the Advanced tab to define data that is specific to that attribute.
Use the Default Value field under the Advanced tab to define data that is specific to that attribute.
56 Chapter 8 • Create Attributes

CalculatedNumeric attributes can be calculated. Calculated numeric attributes are also user-defined, but they rely on a formula to express their characteristics. This formula is developed by the user to capture unique business data. Calculated numeric attributes can be used in a driver definition.
DimensionA dimension attribute reflects a dimension, and a dimension member attribute reflects a dimension member. Dimension attributes enable you to categorize, select, and subtotal information. For example, activities can be grouped by summary-level processes, such as detailed manufacturing activities rolling up to manufacturing, and detailed distribution activities rolling up to distribution. The names of these higher-level processes are defined as dimension member attributes and are attached to their respective activities. Most importantly, you can query for dimension member attributes in OLAP.
Other examples of dimension attributes include the following:
• value-added categories (high, medium, low) that are attached to activities
• fixed cost/variable cost that is attached to resources enables you to group activity or cost object costs by fixed and variable cost components
• cost object groupings that are used to roll up products by product family, brand, market segment, or package type, or to group customers by region, channel, or salesperson
TagA tag attribute is one that is either attached (tagged) to an account or not. You can use the HasAttribute function to test whether an account has the attribute.
Note: Tag attributes used to be called Boolean attributes in previous releases of SAS Cost and Profitability Management. Tag attributes cannot be viewed in OLAP.
Create AttributesYou will create a text attribute, numeric attribute, calculated numeric attribute, and a dimension attribute.
Create a Text Attribute1. Select Model ð Attributes Page.
2. Select Edit ð New Attribute (or right-click ATTRIBUTES (PRIMARY PANE) and select New Attribute).
Create Attributes 57

3. For Name, type Manager.
4. For Reference, accept Manager.
5. Select an Attribute type of Text.
6. Click OK.
You see that the Manager attribute has been added to the list.
Create a Numeric Attribute1. Select Model ð Attributes Page.
2. Select Edit ð New Attribute.
You see the New Attribute dialog box.
3. For Name, type Number of Inspections.
4. For Reference, type Num of Ins.
5. Select an Attribute type of Numeric.
T I P You can type “n” to change the selection to Numeric in addition to using the drop-down list.
6. For Unit of Measure, type Inspections.
To summarize:
Name Reference Type Unit of Measure
Number of Inspections Num of Ins Numeric Inspections
7. Click OK.
You see that the Number of Inspections attribute has been added to the list.
8. Create three more numeric attributes.
58 Chapter 8 • Create Attributes

Name Reference Type Unit of Measure
Inspections Passed I_P Numeric Units Passed
Completed Expedite Requests
Completed Expedite Requests
Numeric Completed Requests
Average Time to Expedite
Average Time to Expedite
Numeric Hours
Create a Calculated Numeric Attribute
Name Reference Type Unit of Measure Formula
Cost per Inspection
Cost per Inspection
Numeric Calculated
Dollars Cost / “Num of Ins”
1. Select Edit ð New Attribute.
2. For Name, type Cost per Inspection.
3. For Reference, type Cost per Inspection.
4. Select an Attribute type of Numeric.
5. Select Dollars for Unit of measure.
6. Select the Advanced tab.
7. Verify that the period is 2008 Q1 / Actual.
8. Select the Calculated check box. This enables you to enter a formula.
9. Click Formula Builder.
You see the Formula Builder dialog box.
Create Attributes 59

10. The cost of inspection would be derived from a formula of Cost divided by the Number of Inspections. Create this formula by double-clicking each element. The formula will appear in the Formula area.
11. Click Validate Formula to verify the syntax of the formula.
12. Click OK to dismiss the message box.
13. Click OK to accept the formula.
14. Click OK to create the attribute.
15. Create a calculated numeric attribute for Percent of Inspections Passed.
Name Reference Type UoM Formula
Percent of Inspections Passed
Percent of Inspections
Numeric Calculated
Percentage “I_P”/”Num of Ins”
Create a Dimension Attribute
Name Reference Type
Fixed_Variable FV Dimension
1. Select Edit ð New Attribute.
2. For Name, type Fixed_Variable.
3. For Reference, type FV.
4. For Short Reference, type FV.
5. Select a Type of Dimension.
60 Chapter 8 • Create Attributes

6. For Short Reference, type FV.
7. Click OK.
Notice that the attribute is created as a folder to contain its dimension member attributes, which you create next.
8. Select the Fixed_Variable attribute folder.
9. Create the following two dimension member attributes:
Name Reference Type
Fixed F Dimension Member
Variable V Dimension Member
You see that the Fixed_Variable dimension and its two-dimension members have been added to the list of your model's dimensions.
Create a Column Layout
Open the Column Layout Dialog BoxTo view the attributes in the model, create a column layout named Cost Assignments to which are added columns for attributes.
1. Select Model ð Modules ð Activity.
2. Select Model ð Column Layout ð Edit Columns.
Note: You can also double-click the column heading to open the Column Layout dialog box.
You see the Column Layout dialog box.
Create a Column Layout 61

The columns that you see in the Displayed columns list are the columns for a specific pane. In the illustration, you see the column layout for the Primary pane.
Note: A column layout is a view of columns that already exist in tables in your model. Adding or removing a column from a column layout does not add or remove any property from the model.
Add Attributes to the Layout1. Verify that the Primary pane tab is selected.
2. Remove Display Reference from the Displayed columns list.
Removing this column from the layout will provide more screen space for columns that are relevant to making driver assignments.
3. From the Properties, Attributes, and Dimensions list, add the following two properties (both are under the Attributes folder):
• Inspections Passed
• Manager
Save the Layout1. Click Save As.
You see the Save Column Layout As dialog box.
62 Chapter 8 • Create Attributes

2. Verify that the New column layout option is selected, and then enter Cost Assignments.
3. Click OK to close the Save Column Layout As dialog box.
You see that the column layout Name has been changed to Cost Assignments.
4. Click OK to close the Column Layout dialog box.
You see the changes that you made to the column layout. Cost Assignments is the active column layout, and Inspections Passed and Manager appear in the column layout list.
Entering Attribute ValuesNow, you will enter attribute values.
1. Expand the Activity module by right-clicking the Activity row and selecting Expand ð All Levels.
2. In the Inspections Passed column for the Beaverton x Inspect account, type 43400.
3. In the Inspections Passed column for the Eugene x Inspect account, type 1100.
4. In the Manager column for the Beaverton x Sort account, type Smith.
5. In the Manager column for the Eugene x Sort account, type Jones.
Entering Attribute Values 63

Applying Additional Attributes to Accounts
Apply One AttributeHaving created the dimension attribute Fixed_Variable with its two dimension member attributes, Fixed and Variable, you can apply the dimension member attributes to accounts.
Note: You can attach attributes to accounts, but not to cost elements or to roll-up accounts.
1. Switch to the Resources page (remember that you can click the Select Module icon on the toolbar).
2. Expand the Resource module by right-clicking the Resource row and selecting Expand ð All Levels.
3. Right-click the Beaverton x Wages account, and then select Manage Attributes from the pop-up menu.
The Manage Accounts dialog box opens.
4. From the Manage Accounts dialog box, double-click Fixed_Variable to add it to the list of the account's attributes. (Or, select Fixed_Variable and click Add.)
5. Select Fixed from the drop-down list of dimension member attributes.
64 Chapter 8 • Create Attributes

6. Click OK to apply the attribute Fixed to the Wages account.
The attribute is added to the account.
Add a Fixed_Variable Column to the Column LayoutBefore adding the Fixed or Variable attribute to additional accounts, let's add the Fixed_Variable attribute column to the layout so that we can add the attributes more easily and better see the results.
1. If it is not already active, activate the saved column layout, Cost Assignments, by selecting it from the drop-down list of column layouts and clicking the arrow button.
2. Double-click the column heading (or, select Model ð Column Layout ð Edit Columns).
The Column Layout dialog box opens.
3. In the Column Layout dialog box, double-click Fixed_Variable (under the Attributes folder). (Or, select Fixed_Variable and click Add.)
Applying Additional Attributes to Accounts 65

4. Click Save to save the column layout.
5. Click OK to add the Fixed_Variable column to the column layout.
Apply Additional Attributes to AccountsNow we can more easily apply additional Fixed and Variable attributes to accounts.
1. Select the Beaverton x Operating Expenses account.
2. From the menu in the Fixed_Variable column, select Variable.
3. Repeat the process to apply the following dimension member attributes to the following accounts:
Attribute Account
Fixed Eugene x Wages
Variable Eugene x Operating Expenses
Note that it is not necessary to apply the attribute to all the resource accounts, as we are not applying it to the Equipment Expenses account.
Later, when we describe the SAS OLAP Analyzer, we will see that OLAP analysis allows, in this case, querying fixed-cost contributions versus variable-cost contributions. Dimension member attributes allow much of the functionality of real dimensions, without some of the overhead. In fact, they can provide a method of adding "dimensions" to a model, whereas the model itself cannot have dimensions added after the initial model definition.
66 Chapter 8 • Create Attributes

Chapter 9
Create Drivers
Overview . . . . . . . . . . . . . . . . . . . . . . . . . . . . . . . . . . . . . . . . . . . . . . . . . . . . . . . . . . . . 67
Create a Standard Driver . . . . . . . . . . . . . . . . . . . . . . . . . . . . . . . . . . . . . . . . . . . . . . 69
Create Additional Standard Drivers . . . . . . . . . . . . . . . . . . . . . . . . . . . . . . . . . . . . . . 70
Create a Calculated Driver . . . . . . . . . . . . . . . . . . . . . . . . . . . . . . . . . . . . . . . . . . . . . 70
Summary . . . . . . . . . . . . . . . . . . . . . . . . . . . . . . . . . . . . . . . . . . . . . . . . . . . . . . . . . . . . 73
OverviewAn important aspect of Cost and Profitability management is the understanding of how activities in an organization consume expenses and how products consume activities. These consumptions are governed by relevant drivers, which measure the frequency or intensity of the cost demands that are placed on resources and activities.
A driver distributes cost in an account to one or more destination accounts. The basic mechanism for distributing costs is by calculating three properties:
Driver Quantity Calculated (DrvQtyCalc)the number of units going to each destination account.
Driver Rate (DrvRate)the cost per unit for any destination account.
Driver Driven Cost (DrvDrvnCost)the cost going to each destination account.
It is calculated by multiplying DrvQtyCalc (number of units) times DrvRate (cost per unit).
There are four types of drivers:
Evenly Assigned distributes equal cost to each destination account.
The system assigns a value of 1 to DrvQtyCalc for each assignment so that DrvDrvnCost is the same for each destination account.
Percentage distributes a percentage of the total cost to each destination account.
You specify the percentage by specifying the DQF (Driver Quantity Fixed) for each assignment. During calculation, the system does the following:
67

1. Assigns to DrvQtyCalc for each assignment the DQF (percentage) that you specify for that assignment.
2. Calculates DrvRate as the cost that is to be distributed to each destination account per percentage point.
3. Calculates DrvDrvnCost as cost per percentage point times the number of percentage points going to each destination account.
Standard uses the following formula to calculate DrvQtyCalc:
DrvQtyCalc = (DQF x DWF) + (DQV x DWV x Dest.TDQ)
where:
DQF Driver Quantity Fixed represents the part of cost that is “pushed” by a source account to destination accounts, that is,, fixed costs.
DWF Driver Weight Fixed enables you to quantify the relative importance of a fixed cost by giving it a weight.
DQV Driver Quantity Variable represents the part of cost that is “pulled” by demand from destination accounts. When you use DQV, cost varies with demand.
DWV Driver Weight Variable enables you to quantify the relative importance of a variable cost by giving it a weight.
Dest.TDQ Total Driver Quantity on a destination account represents how much is going out of that destination account to other accounts. That amount is what is demanded of the source account by that destination account. The amount, Dest.TDQ, is calculated by the system based on values that you specify for the destination account.
The standard driver is very flexible because it enables you to consider numerous factors in driving costs through the model. In the Parcel Express tutorial, you will create drivers that use DQF and one driver that uses DQV. You will not use any weights, DWF or DWV, in this tutorial.
Calculated A calculated driver is a variety of standard driver. It is one that, instead of using the standard formula for calculating DrvQtyCalc, uses a formula—referred to as a Driver Formula— that you specify as a user. The formula can use any number of properties and attributes and can be as simple or as complicated as you want.
The first step in assigning resource costs to activities and activity costs to cost objects is building drivers. In this tutorial you will create the following drivers:
Driver Name Driver Type Purpose
FTEs Standard Tracks the cost of wages from the resource module to the activity module.
Dollars Standard Tracks the cost of operating expenses from the resource module to the activity module.
Number of Customer Complaints Standard Tracks the number of customer complaints per channel.
68 Chapter 9 • Create Drivers

Driver Name Driver Type Purpose
Number of Packages Standard Tracks the number of packages that were collected, sorted, and distributed.
Number of Expedite Requests Calculated Tracks the packages that are expedited regionally.
Create a Standard DriverTo create a Standard driver, perform the following steps:
1. Select Model ð Drivers Page.
You see the following list of system-defined drivers:
2. Select Edit ð New Driver. (Or, right-click Drivers and select New Driver.)
You see the New Driver dialog box.
3. For Name, type FTEs.
4. Verify that the Driver type is Standard.
Create a Standard Driver 69

5. Verify that the This driver's quantities are unique option is checked.
6. Verify that Allow fixed driver quantities for this driver is checked.
7. Click OK.
You see that FTEs has been added to the list of drivers.
Create Additional Standard DriversUse the procedure that you have learned for creating a driver to create the following additional Standard drivers:
Driver
Dollars
Number of Customer Complaints
Number of Packages
Select the following options for Dollars and Number of Customer Complaints:
Select the following options for the Number of Packages driver:
Create a Calculated DriverThe Number of Expedite Requests is a calculated driver. A calculated driver is a variety of Standard driver. It is one that, instead of using the standard formula for calculating DrvQtyCalc, uses a formula—referred to as a Driver Formula— that you specify as a user. Calculated drivers expand system capability, enabling you to define cost drivers that are unique to your business. You define these calculated drivers with formulas that you create using the properties and attributes that satisfy your needs. The calculated
70 Chapter 9 • Create Drivers

driver in this tutorial will use attributes that you have just created and numeric properties generated by the system.
Driver Formula
Number of Expedite Requests ( “Average Time to Expedite” * “Completed Expedite Requests” ) / DriverQuantityFixed
1. Add Number of Expedite Requests as a calculated driver. For Driver type, select Standard.
2. Verify that the This driver's quantities are unique option is checked.
3. Verify that Allow fixed driver quantities for this driver is checked.
4. Click Formula Builder.
You see the Formula Builder dialog box.
Note: In the following instructions, you can choose an element of the formula either by double-clicking the element, or by selecting it and clicking Insert.
Create a Calculated Driver 71

5. Choose ( from the Operators list.
6. Choose Average Time to Expedite from the Attributes list.
7. Choose * from the Operators list.
8. Choose Completed Expedite Requests as the multiplier from the Attributes list.
9. Choose ) to close the set.
10. Choose / from the Operators list.
11. Choose DriverQuantityFixed from the Numeric properties list.
DriverQuantityFixed is the user-entered fixed quantity that flows from one account to another. You can change this value only on assigned cost elements with a driver that allows fixed driver quantities.
12. Click Test to verify the syntax of the formula.
13. Click OK to accept the formula.
14. Click OK to create the driver.
72 Chapter 9 • Create Drivers

SummaryReview the list of drivers.
Summary 73

74 Chapter 9 • Create Drivers

Chapter 10
Make Assignments
Overview . . . . . . . . . . . . . . . . . . . . . . . . . . . . . . . . . . . . . . . . . . . . . . . . . . . . . . . . . . . . 75
Modify the Column Layout . . . . . . . . . . . . . . . . . . . . . . . . . . . . . . . . . . . . . . . . . . . . . 76Overview . . . . . . . . . . . . . . . . . . . . . . . . . . . . . . . . . . . . . . . . . . . . . . . . . . . . . . . . . . 76Open the Right Assignments Pane . . . . . . . . . . . . . . . . . . . . . . . . . . . . . . . . . . . . . . 76Specify Columns for the Right Pane . . . . . . . . . . . . . . . . . . . . . . . . . . . . . . . . . . . . 77Specify Columns for the Primary Pane . . . . . . . . . . . . . . . . . . . . . . . . . . . . . . . . . . 77Save the Column Layout . . . . . . . . . . . . . . . . . . . . . . . . . . . . . . . . . . . . . . . . . . . . . 78
Make Assignments from Resources to Activities . . . . . . . . . . . . . . . . . . . . . . . . . . . . 78Add Accounts for Assignments . . . . . . . . . . . . . . . . . . . . . . . . . . . . . . . . . . . . . . . . 78Make Assignments . . . . . . . . . . . . . . . . . . . . . . . . . . . . . . . . . . . . . . . . . . . . . . . . . . 79Make Other Assignments . . . . . . . . . . . . . . . . . . . . . . . . . . . . . . . . . . . . . . . . . . . . . 81
Make Assignments from Activities to Other Activities . . . . . . . . . . . . . . . . . . . . . . . 85Add Accounts for Assignments . . . . . . . . . . . . . . . . . . . . . . . . . . . . . . . . . . . . . . . . 85Make Assignments . . . . . . . . . . . . . . . . . . . . . . . . . . . . . . . . . . . . . . . . . . . . . . . . . . 86
Make Assignments from Activities to Cost Objects . . . . . . . . . . . . . . . . . . . . . . . . . 89Add Accounts for Assignments . . . . . . . . . . . . . . . . . . . . . . . . . . . . . . . . . . . . . . . . 89Make Assignments for Beaverton . . . . . . . . . . . . . . . . . . . . . . . . . . . . . . . . . . . . . . 89Make Assignments for Eugene . . . . . . . . . . . . . . . . . . . . . . . . . . . . . . . . . . . . . . . . . 92
Adding Attributes to Cost Accounts . . . . . . . . . . . . . . . . . . . . . . . . . . . . . . . . . . . . . . 94Overview . . . . . . . . . . . . . . . . . . . . . . . . . . . . . . . . . . . . . . . . . . . . . . . . . . . . . . . . . . 94Add Additional Attributes to the Column Layout . . . . . . . . . . . . . . . . . . . . . . . . . . 94Add Attribute Quantities . . . . . . . . . . . . . . . . . . . . . . . . . . . . . . . . . . . . . . . . . . . . . . 94Summary . . . . . . . . . . . . . . . . . . . . . . . . . . . . . . . . . . . . . . . . . . . . . . . . . . . . . . . . . . 95
OverviewAn assignment links source accounts to destination accounts. Costs flow along this path from resources to activities to cost objects—from expenses to activities to products, services, or customers. A source account is the source of a cost assignment. A destination account receives the results of a cost assignment.
75

As shown, the possible assignments between accounts, as indicated by letters, include the following:
A resource to resource
B resource to cost object
C resource to activity
D activity to activity
E activity to cost object
F cost object to cost object
Modify the Column Layout
OverviewIn a previous section, you created a column layout named Cost Assignments. In the following sections, you will add additional columns to the layout.
While building the model structure, you have been working in the single pane view. To make assignments, you need to open an assignments pane. When the primary pane and an assignments pane are open, you can see source accounts, destination accounts, assignments, driver names, and driver quantities. To assign resource costs to activity accounts, you will open the right assignments pane.
Open the Right Assignments Pane1. Select Model ð Modules ð Resource.
2. If it is not already active, activate the Cost Assignments saved column layout.
3. In the resource module, select Model ð Assignments ð Show right assignments pane.
You see the right assignments pane (to the right of the resource module primary pane).
76 Chapter 10 • Make Assignments

T I P You can split the assignments panes simply by clicking the Show Left and Right Assignments Panes button.
T I P You might want to hide the Navigation Pane on the left side of the window to display more data. To do this, click the x in the upper right corner of the pane. To re-open the Navigation Pane, select View ð Navigation Pane.
Specify Columns for the Right Pane1. Select Model ð Column Layout ð Edit Columns (or double-click the column
heading).
The columns that you see in the Displayed columns list are for a specific pane. Because you are currently viewing the right pane, you see the column layout for that pane. The default columns are Reference and Cost.
2. Remove the Reference column from the Displayed columns list.
3. Add the Driver Quantity Fixed (DQF) property to the Displayed columns list.
Specify Columns for the Primary Pane1. Select the Primary pane.
You can see the columns that you previously added to the primary pane of the Cost Assignments layout.
2. In Drivers, select Driver Name (DrvName).
T I P To find Driver Name (DrvName), scroll down to Driver and expand it.
Modify the Column Layout 77

3. Click Add.
You see that Driver Name (DrvName) has been added to the Displayed columns list.
4. Click Move to move the DrvName column to the top of the list.
Save the Column Layout1. Click Save.
2. Click OK to dismiss the Column Layout dialog box.
In the module view, you see the changes that you made to the Cost Assignments column layout.
Make Assignments from Resources to Activities
Add Accounts for AssignmentsThe first assignments that you make will be inter-modular, that, is, assignments from the resource module to the activity module.
1. Select Model ð Assignments ð Add Accounts in Right Pane (or click the Add accounts button ).
You see the Add Accounts for Assignments dialog box.
78 Chapter 10 • Make Assignments

2. Verify that the Activity module is selected.
3. Expand Activity so that you can see the Beaverton and Eugene roll-up accounts.
4. Select the Beaverton roll-up account, and then click Add Accounts.
You see that the Beaverton activity accounts have been added to the right pane.
5. Add the Eugene activity accounts to the right pane.
6. Click Close.
Note: To avoid mixing up assignments between Beaverton resources and Eugene accounts (and vice versa), consider adding only the Beaverton accounts first to the right pane. Next, make the assignments. Then, do the same for Eugene.
Note: Clearing accounts from the right pane does not delete assignments from your model. It removes the accounts from view.
Make AssignmentsNow that the intended destination accounts are displayed, you can make assignments from resource accounts to activity accounts.
1. In the primary pane, expand Resource to display all of its accounts.
T I P Select View ð Expand to display subfolders. In this tutorial, you do not need to expand the module hierarchies to display the cost elements of each account. If the cost elements are displayed, collapse the hierarchy to hide them.
2. Select the Wages account under Beaverton.
You see that arrows appear next to each account in the right pane. These arrows indicate that you can make assignments from Beaverton Wages to any of the listed accounts. Logically, the cost of wages in Beaverton would be assigned only to Beaverton activities, not Eugene activities.
3. In the Wages row under Beaverton, click on the cell in the DrvName column.
You see a list of available drivers, including system-defined and user-defined drivers.
4. Select FTEs.
Make Assignments from Resources to Activities 79

5. Make assignments to all of the Beaverton accounts in the right pane by clicking the arrow next to each account.
Note: You can use the hotkey F7 to create assignments between the selected account and all of the accounts in the other assignments pane.
You see that a line now connects Beaverton Wages to each of the arrows that you clicked.
6. Enter the following values in the DQF column in the right pane (the order of accounts might be different from the order that is shown; be careful to assign values to the correct accounts).
Note: The total cost of Beaverton Wages will be consumed by these seven activity accounts according to the number of FTEs that you have entered. SAS Cost and Profitability Management performs the math for you when you calculate costs in a later lesson.
After making the assignments, your model should look like this (the order of accounts might differ):
80 Chapter 10 • Make Assignments

Make Other AssignmentsNote: Remember that when making assignments, you must first select a driver before
you can select a destination account and assign a numeric value to the account.
1. In the primary pane, select Operating Expenses for Beaverton and make the following assignments:
Resource Account Driver Activity Account DQF
Beaverton x
Operating Expenses
Dollars Beaverton x
Resolve Customer Complaints
6,500.00
Beaverton x
Expedite Package Shipments
8,000.00
Beaverton x
Move to Warehouse
15,000.00
Beaverton x
Sort
23,000.00
Beaverton x
Inspect
54,000.00
Beaverton x
Air Distribution
83,000.00
Beaverton x
Land Distribution
56,500.00
After making the assignments, your model should look like the following (again the order of accounts might be different):
2. In the primary pane, select Equipment Expenses for Beaverton and make the following assignments:
Make Assignments from Resources to Activities 81

Resource Account Driver Activity Account DQF
Beaverton x
Equipment Expenses
Percentage Beaverton x
Resolve Customer Complaints
5
Beaverton x
Expedite Package Shipments
3
Beaverton x
Move to Warehouse
7
Beaverton x
Sort
20
Beaverton x
Inspect
25
Beaverton x
Air Distribution
25
Beaverton x
Land Distribution
15
Note: The total equals 100 because 100% of equipment expenses are used by Parcel Express.
After making the assignments, your model should look like the following (again the order of accounts might be different):
3. In the primary pane, select Wages for Eugene and make the following assignments:
82 Chapter 10 • Make Assignments
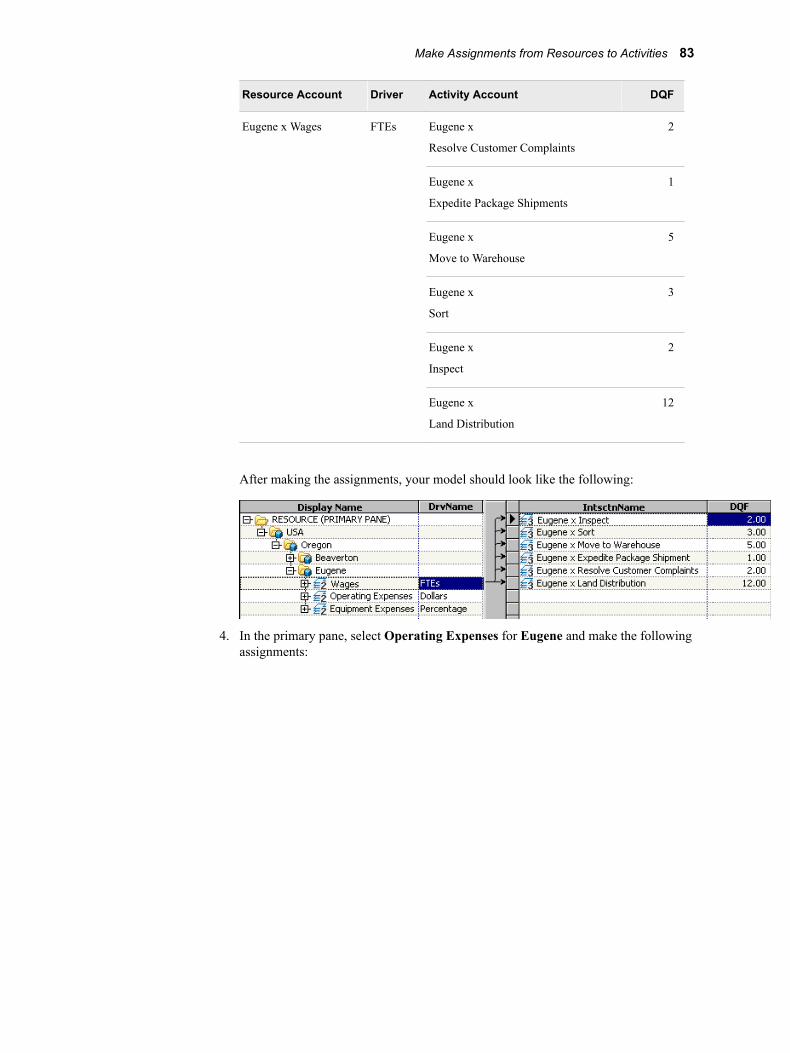
Resource Account Driver Activity Account DQF
Eugene x Wages FTEs Eugene x
Resolve Customer Complaints
2
Eugene x
Expedite Package Shipments
1
Eugene x
Move to Warehouse
5
Eugene x
Sort
3
Eugene x
Inspect
2
Eugene x
Land Distribution
12
After making the assignments, your model should look like the following:
4. In the primary pane, select Operating Expenses for Eugene and make the following assignments:
Make Assignments from Resources to Activities 83

Resource Account Driver Activity Account DQF
Eugene x
Operating Expenses
Dollars Eugene x
Resolve Customer Complaints
7,700.00
Eugene x
Expedite Package Shipments
9,000.00
Eugene x
Move to Warehouse
69,000.00
Eugene x
Sort
38,000.00
Eugene x
Inspect
58,300.00
Eugene x
Land Distribution
98,000.00
After making the assignments, your model should look like the following:
5. In the primary pane, select Equipment Expenses for Eugene and make the following assignments:
84 Chapter 10 • Make Assignments

Resource Account Driver Activity Account DQF
Eugene x
Equipment Expenses
Percentage Eugene x
Resolve Customer Complaints
5
Eugene x
Expedite Package Shipments
2
Eugene x
Move to Warehouse
8
Eugene x
Sort
20
Eugene x
Inspect
25
Eugene x
Land Distribution
40
After making the assignments, your model should look like the following:
Make Assignments from Activities to Other Activities
The costs of some activities flow to other activities. For example, at Parcel Express when packages are moved to a warehouse, they must then be sorted or inspected. Therefore, in the Parcel Express Tutorial model the costs of the Move to Warehouse activity flow to the Sort and Inspect activities. These are known as intra-modular assignments.
Add Accounts for Assignments1. Select Model ð Modules ð Activity (or click the Select Module button).
Make Assignments from Activities to Other Activities 85

2. If the Cost Assignments layout is not already active, select it from the Column Layout list, and then click the arrow .
3. If it is not already open, open the right assignments pane by selecting Model ð Assignments ð Show right assignments pane (or by clicking the Assignments pane button ).
4. Open the Add Accounts for Assignments dialog box by selecting Model ð Assignments ð Add Accounts in Right Pane (or by clicking the Add accounts button ).
5. Select the Activity module.
6. Add the following accounts to the right pane.
T I P To see these accounts, expand the hierarchy in the Add Accounts for Assignments dialog box. You can add the accounts individually or select them all at once by holding down the Ctrl key, and then clicking Add Accounts.
Activity Account
Beaverton x Inspect
Beaverton x Sort
Beaverton x Air Distribution
Beaverton x Land Distribution
Eugene x Inspect
Eugene x Sort
Eugene x Land Distribution
7. Click Close.
Make Assignments1. In the primary pane, select Move to Warehouse for Beaverton and make the
following assignments:
86 Chapter 10 • Make Assignments

Activity Account
(Primary Pane) Driver
Activity Account
(Right Pane) DQF
Beaverton x
Move to Warehouse
Number of Packages
Beaverton x Sort 203,000
Beaverton x Inspect 50,000
After making the assignments, your model should look like the following:
2. In the primary pane, select Inspect for Beaverton and make the following assignments:
Activity Account
(Primary Pane) Driver
Activity Account
(Right Pane) DQF
Beaverton x Inspect Number of Packages
Beaverton x Sort 44,000
After making the assignments, your model should look like the following:
3. In the primary pane, select Sort for Beaverton and make the following assignments:
Activity Account
(Primary Pane) Driver
Activity Account
(Right Pane) DQF
Beaverton x Sort Number of Packages
Beaverton x
Land Distribution
107,000
Beaverton x
Air Distribution
140,000
After making the assignments, your model should look like the following:
Make Assignments from Activities to Other Activities 87

4. In the primary pane, select Move to Warehouse for Eugene and make the following assignments:
Activity Account
(Primary Pane) Driver
Activity Account
(Right Pane) DQF
Eugene x
Move to Warehouse
Number of Packages
Eugene x Sort 117,000
Eugene x Inspect 18,000
After making the assignments, your model should look like the following:
5. In the primary pane, select Inspect for Eugene and make the following assignments:
Activity Account
(Primary Pane) Driver
Activity Account
(Right Pane) DQF
Eugene x Inspect Number of Packages
Eugene x Sort 16,000
After making the assignments, your model should look like the following:
6. In the primary pane, select Sort for Eugene and make the following assignments:
88 Chapter 10 • Make Assignments

Activity Account
(Primary Pane) Driver
Activity Account
(Right Pane) DQF
Eugene x Sort Number of Packages
Eugene x
Land Distribution
133,000
After making the assignments, your model should look like the following:
Make Assignments from Activities to Cost Objects
Add Accounts for Assignments1. If there are accounts in the right pane, clear the accounts as follows:
• Select the highest branch of the Activity hierarchy in the primary pane.
• Select Model ð Assignments ð Clear Right.
You see that the right pane has been cleared of accounts. This does not delete the assignments. It only removes them from view.
2. Open the Add Accounts for Assignments dialog box.
3. Verify that the Cost Object module is selected.
4. Add all of the Cost Object accounts to the right pane.
Note: To avoid mixing up activities and cost objects from Beaverton and Eugene, consider first adding only the Beaverton accounts and making assignments to those accounts. Then, clear the right pane. Next,, add all of the Eugene accounts and make assignments. Note that clearing accounts from a pane does not delete assignments from your model. It removes the accounts from view temporarily.
5. Click Close.
Make Assignments for Beaverton1. In the primary pane, select Resolve Customer Complaints for Beaverton and make
the following assignments:
Make Assignments from Activities to Cost Objects 89

Activity Account Driver Cost Object Account for Beaverton DQF
Beaverton x
Resolve Customer Complaints
Number of Customer Complaints
Commercial Pick Up x
No <Products and Services>
25
Walk In x
No <Products and Services>
85
Drop Box x
No <Products and Services>
15
After making the assignments, your model should look like the following:
2. In the primary pane, select Expedite Package Shipments for Beaverton and make the following assignments:
Activity Account Driver Cost Object Account for Beaverton DQF
Beaverton x
Expedite Package Shipments
Number of Expedite Requests
No <Channel> x Standard Ground 3,000
No <Channel> x Overnight Express 26,000
No <Channel> x
2nd Day Guaranteed
15,000
After making the assignments, your model should look like the following:
3. In the primary pane, select Inspect for Beaverton and create the following assignments:
Activity Account Driver Cost Object Account for Beaverton DQF
Beaverton x Inspect Number of Packages
No <Channel> x Standard Ground 500
No <Channel> x Overnight Express 4,500
No <Channel> x 2nd Day Guaranteed 1,000
90 Chapter 10 • Make Assignments

After making the assignments, your model should look like the following:
You can notice that in addition to the assignments to three Cost Activity accounts, there is an additional assignment to the Beaverton x Sort Activity account.
4. In the primary pane, select Air Distribution for Beaverton and make the following assignments:
Activity Account Driver Cost Object Account for Beaverton DQF
Beaverton x
Air Distribution
Number of Packages
No <Channel> x Standard Ground 50,000
No <Channel> x Overnight Express 65,000
No <Channel> x
2nd Day Guaranteed
25,000
After making the assignments, your model should look like the following:
5. In the primary pane, select Land Distribution for Beaverton and make the following assignments:
Activity Account Driver Cost Object Account for Beaverton DQF
Beaverton x
Land Distribution
Number of Packages
No <Channel> x Standard Ground 67,000
No <Channel> x Overnight Express 15,000
No <Channel> x 2nd Day Guaranteed 25,000
After making the assignments, your model should look like the following:
Make Assignments from Activities to Cost Objects 91

Make Assignments for Eugene1. In the primary pane, select Resolve Customer Complaints for Eugene and make
the following assignments:
Activity Account Driver Cost Object Account for Eugene DQF
Eugene x
Resolve Customer Complaints
Number of Customer Complaints
Commercial Pick Up x
No <Products and Services>
10
Walk In x
No <Products and Services>
32
Drop Box x
No <Products and Services>
25
After making the assignments, your model should look like the following:
2. In the primary pane, select Expedite Package Shipments for Eugene and make the following assignments:
Activity Account Driver Cost Object Account for Eugene DQF
Eugene x
Expedite Package Shipments
Number of Expedite Requests
No <Channel> x Standard Ground 25,000
No <Channel> x Overnight Express 1,000
No <Channel> x 2nd Day Guaranteed 10,000
After making the assignments, your model should look like the following:
92 Chapter 10 • Make Assignments

3. In the primary pane, select Inspect for Eugene and create the following assignments:
Activity Account Driver Cost Object Account for Eugene DQF
Eugene x Inspect Number of Packages
No <Channel> x Standard Ground 1,000
No <Channel> x Overnight Express 500
No <Channel> x 2nd Day Guaranteed 500
After making the assignments, your model should look like the following:
You can notice that in addition to the assignments to three Cost Activity accounts, there is an additional assignment to the Eugene x Sort Activity account.
4. In the primary pane, select Land Distribution for Eugene and make the following assignments:
Activity Account Driver Cost Object Account for Eugene DQF
Eugene x
Land Distribution
Number of Packages
No <Channel> x Standard Ground 75,000
No <Channel> x Overnight Express 16,000
No <Channel> x 2nd Day Guaranteed 42,000
After making the assignments, your model should look like the following:
Make Assignments from Activities to Cost Objects 93

Adding Attributes to Cost Accounts
OverviewWhen you created the cost drivers for the Parcel Express Tutorial model, you built one calculated driver, named Number of Expedite Requests, which was composed of two attributes, named Average Time to Expedite, and Completed Expedite Requests. (See Calculated Drivers.) The value of those attributes must be added to the cost accounts to which they apply.
Add Additional Attributes to the Column LayoutTo enter numeric values for attributes, the attributes must be added to the column layout for the cost object account:
1. Select Model ð Module ð Cost Object.
2. Make sure the current column layout is Cost Assignments.
3. Select Model ð Column Layout ð Edit Columns. The Column Layout window opens.
4. Make sure the Primary pane tab is selected.
5. Add the following two attributes to the column layout:
• Average Time to Expedite
• Completed Expedite Requests
6. Move the two attributes up after Cost.
The column layout should look like the following:
7. Click OK. The attributes are added to the primary pane. There is no need to save the column layout.
Add Attribute Quantities1. Now, add the following attribute quantities for Beaverton:
94 Chapter 10 • Make Assignments

Destination AccountAverage Time to Expedite
Completed Expedite Requests
No <Channel> x
Standard Ground
1.75 4,000
No <Channel> x
Overnight Express
1.75 15,000
No <Channel> x
2nd Day Guaranteed
1.75 25,000
2. Add the following attribute quantities for Eugene:
Destination AccountAverage Time to Expedite
Completed Expedite Requests
No <Channel> x
Standard Ground
3 6,000
No <Channel> x
Overnight Express
3 15,000
No <Channel> x
2nd Day Guaranteed
3 20,000
SummaryThe resulting attribute assignments should look like the following:
Adding Attributes to Cost Accounts 95

96 Chapter 10 • Make Assignments

Chapter 11
Calculate Costs
Overview . . . . . . . . . . . . . . . . . . . . . . . . . . . . . . . . . . . . . . . . . . . . . . . . . . . . . . . . . . . . 97
Calculate Costs . . . . . . . . . . . . . . . . . . . . . . . . . . . . . . . . . . . . . . . . . . . . . . . . . . . . . . . 97
Viewing and Verifying Calculation Results . . . . . . . . . . . . . . . . . . . . . . . . . . . . . . . . 98
OverviewTypically, costs are entered in a model at the end of a defined period. These costs come from an organization's general ledger accounts and from external bills of costs. Additional cost information can come from a Material Requirements Planning (MRP) system. Production data is also entered in a model at the end of a defined period.
At any time during the development of a model, you can calculate the cost of each account according to its driver and driver quantities.
Calculate CostsYou entered Parcel Express costs and quantities for the 2008 Q1 period, so calculations will be performed for this period.
1. Select Model ð Calculate Costs.
You see the Calculate Costs dialog box.
97

2. Select the period/scenario 2008 Q1/Actual.
Note: You can force calculations even if the flag is set that says that calculations are up-to-date. To speed processing, SAS Cost and Profitability Management skips calculating if it thinks that calculations are up-to-date. Use this option to force calculations anyway.
3. Click OK.
You see a message in the status bar, at the bottom of the window, indicating that the calculation is in progress.
The calculation takes more or less time depending on the speed of your SAS Cost and Profitability Management server and your connection to it. When the calculation is completed, you see the Operation Summary window. You should have 0 fatal errors and 0 errors.
Viewing and Verifying Calculation ResultsExperienced Cost and Profitability costing users calculate a model after they create accounts, assignments, and driver quantities, or after they enter cost data, as a validation and quality assurance technique.
The following displays show the total costs for the resource, activity, and cost object modules, along with the key roll-up accounts in each module. Verify that the modules and accounts in your model match the costs.
98 Chapter 11 • Calculate Costs

Viewing and Verifying Calculation Results 99

100 Chapter 11 • Calculate Costs

Chapter 12
Add Bills of Costs
Adding Bills of Costs . . . . . . . . . . . . . . . . . . . . . . . . . . . . . . . . . . . . . . . . . . . . . . . . . 101
Steps for Building Bills of Costs . . . . . . . . . . . . . . . . . . . . . . . . . . . . . . . . . . . . . . . . 101
Fixed and Variable Quantities . . . . . . . . . . . . . . . . . . . . . . . . . . . . . . . . . . . . . . . . . . 102Fixed Quantities . . . . . . . . . . . . . . . . . . . . . . . . . . . . . . . . . . . . . . . . . . . . . . . . . . . 102Variable Quantities . . . . . . . . . . . . . . . . . . . . . . . . . . . . . . . . . . . . . . . . . . . . . . . . . 102
Creating External Unit Accounts and Bills of Costs . . . . . . . . . . . . . . . . . . . . . . . . 103Introduction . . . . . . . . . . . . . . . . . . . . . . . . . . . . . . . . . . . . . . . . . . . . . . . . . . . . . . . 103Create the Dimension Members for Materials . . . . . . . . . . . . . . . . . . . . . . . . . . . . 103Create External Unit Accounts . . . . . . . . . . . . . . . . . . . . . . . . . . . . . . . . . . . . . . . . 104Modify the Cost Assignments Column Layout . . . . . . . . . . . . . . . . . . . . . . . . . . . 105Add Accounts for Assignments . . . . . . . . . . . . . . . . . . . . . . . . . . . . . . . . . . . . . . . 105Make Assignments and Calculate . . . . . . . . . . . . . . . . . . . . . . . . . . . . . . . . . . . . . . 105Summary . . . . . . . . . . . . . . . . . . . . . . . . . . . . . . . . . . . . . . . . . . . . . . . . . . . . . . . . . 106
Adding Bills of CostsA bill of costs provides a convenient mechanism for adding material and unit costs directly to accounts, for bidding on jobs, or for implementing activity accounting.
Use a bill of costs when either of the following is true:
• Costs outside of the general ledger need to be introduced into a model. Not all costs that are assigned through a model come from the general ledger. For example, material costs (the cost of purchased components) can be additional product cost information that often comes from a Material Requirements Planning (MRP) system.
• A model's unit cost elements that are associated with product families need to be tracked.
Steps for Building Bills of CostsTo build bills of costs, perform the following steps:
1. Define a dimension in the external unit module.
101

You did this step for the Parcel Express Tutorial model when you completed the New Model wizard. The dimension is Materials.
2. Create dimension members.
For the Parcel Express tutorial, the Materials dimension members represent packaging materials.
3. Create accounts in the external unit module.
You will use the New Account wizard to add external unit accounts to the model.
4. Create assignments from the external unit accounts to accounts in other modules, using a Standard driver.
Packaging materials in the Parcel Express Tutorial model contribute to the unique costs of a product. You will make assignments from accounts in the external unit module to accounts in the cost object module.
5. Enter a fixed or variable driver quantity.
You will enter both types of quantities.
6. If you enter a variable driver quantity, you must also enter a number to quantify demand so that cost can be calculated. You can specify this number with the SoldQty property for destination accounts.
You will enter sold quantities in a later chapter.
Fixed and Variable QuantitiesA Standard driver can include variable quantities, or fixed quantities, or both.
Fixed QuantitiesWith a fixed quantity driver, the cost that flows out of an account does not depend on demand. The cost is “pushed” by the quantity supplied. To calculate cost, the driver’s unit cost is multiplied by the fixed driver quantity (DQF).
For example, assume that a company manufactures bicycles. It buys 1,000 tires from another company at the beginning of each year. The tires might be used in any model of bicycle that the manufacturer produces, or they might not be used at all if some bicycles are not produced. In this case, the driver’s unit cost does not vary with the number of bicycles produced or sold; it is always $5,000 (1,000 x $5). The cost of tires is pushed by how many of them are already on hand—not by how many are ultimately needed.
Variable QuantitiesWith a variable quantity driver, the cost that flows out of an account depends on the quantity demanded. The cost is “pulled” by how many are needed at their final destination. To calculate cost, the bill of cost's unit cost is multiplied by the variable driver quantity (DQV) and the total driver quantity (TDQ) of the destination account. The total driver quantity can be either a system-calculated quantity (TDQ) or a user-entered quantity (TDQUE).
Note: TDQ, as a system-calculated quantity, ultimately depends on user-entered quantities such as SoldQty and DQF.
102 Chapter 12 • Add Bills of Costs

For example, assume that the bicycle manufacturer purchases tires from another company for $5 each for each bicycle that it sells. Because each bicycle requires two tires, the unit cost is $10. If the company sells 100 bicycles (SoldQty), the total cost is $1,000 (100 x $5 x 2). The cost of tires depends on the demand for them. In other words, the cost of tires is “pulled” by how many of them must be sent to their final destination.
Creating External Unit Accounts and Bills of Costs
IntroductionParcel Express buys the following components from outside vendors:
• standard envelopes
• 2nd day flats
• overnight flats
• large boxes
• small boxes
These costs must be accounted for in the model. To account for them, you will create external unit accounts and assign them to cost object accounts, thereby creating bills of costs.
Create the Dimension Members for Materials1. Select Model ð Dimensions Page.
2. Using the techniques that you have learned, create the following Materials dimension members:
T I P Select Edit ð New Dimension Member to open the New Dimension Member dialog box or right-click the dimension name.
Creating External Unit Accounts and Bills of Costs 103

Create External Unit Accounts1. To open the External Unit module, select Model ð Modules ð External Unit (or
click the Select Module icon on the toolbar, and then select External Unit
from the drop-down list).
You see the external unit module, which has no structure yet.
2. Select Edit ð New Account.
You see the New Account wizard.
3. Select the following dimension members:
• Standard Envelopes
• 2nd Day Flat
• Overnight Flat
• Large Box
• Small Box
4. Click Add and then click Next.
You see Step 2 of the New Account wizard.
5. Enter the following entered unit costs:
AccountEntered Unit Cost
Standard Envelopes .06
2nd Day Flat .14
Overnight Flat .14
Large Box .95
Small Box .75
6. Click Finish.
You see the following external unit structure:
104 Chapter 12 • Add Bills of Costs

Modify the Cost Assignments Column Layout1. In the external unit module, show the right assignments pane.
2. If the Cost Assignments layout is not already selected, select it from the Column Layout list, and then click the arrow.
3. Select Model ð Column Layout ð Edit Columns. The Column Layout dialog box opens.
4. Modify the right pane by adding Driver Quantity Variable (DQV).
5. Click Save and then click OK.
Add Accounts for Assignments1. Select Model ð Assignments ð Show Right Assignments Pane.
2. Open the Add Accounts for Assignments dialog box (select Model ð Assignments ð Add Accounts in Right Pane).
3. Add the following Cost Object accounts under Beaverton and Eugene to the right pane:
Cost Object Account
No <Channel> x 2nd Day Guaranteed
No <Channel> x Overnight Express
No <Channel> x Standard Ground
Make Assignments and Calculate1. Make assignments that have the following driver quantities:
External Unit Account Cost Object Account DQF DQV
Standard Envelopes Beaverton x No <Channel> x
Overnight Express
17,333
Standard Envelopes Eugene x No <Channel> x
Overnight Express
8,677
2nd Day Flat Beaverton x No <Channel> x
2nd Day Guaranteed
1.00
Creating External Unit Accounts and Bills of Costs 105

External Unit Account Cost Object Account DQF DQV
2nd Day Flat Eugene x No <Channel> x
2nd Day Guaranteed
1.00
Overnight Flat Beaverton x No <Channel> x
Overnight Express
123,500
Overnight Flat Eugene x No <Channel> x
Overnight Express
6,500
Large Box Beaverton x No <Channel> x
Standard Ground
120,833
Large Box Eugene x No <Channel> x
Standard Ground
4,167
Small Box Beaverton x No <Channel> x
Standard Ground
73,950
Small Box Eugene x No <Channel> x
Standard Ground
2,550
2. Select Model ð Assignments ð Show Single Pane.
3. Calculate the model, and then close the Operation Summary.
Note: Warnings occur because costs are still unassigned.
You see the following external unit costs:
The 2nd Day Flat external unit does not have a cost yet because you assigned a variable driver quantity of 1. Until you know how many are needed, the system cannot calculate the cost of 2nd Day Flat. The next chapter describes how the cost is calculated. See “Calculation of Variable Costs Based On Demand” on page 123.
SummaryThe following picture shows how the Cost is derived for each external unit account by multiplying its TDQ times its EnteredUnitCost. Because there is no variable cost in this case, we can simply add the two DQFs to derive the TDQ.
106 Chapter 12 • Add Bills of Costs

Creating External Unit Accounts and Bills of Costs 107

108 Chapter 12 • Add Bills of Costs

Chapter 13
Enter Sales and Revenue Data
Working with Sold Quantity . . . . . . . . . . . . . . . . . . . . . . . . . . . . . . . . . . . . . . . . . . . 109Modify the Cost Assignments Column Layout . . . . . . . . . . . . . . . . . . . . . . . . . . . 109Create a Rule-Based Driver . . . . . . . . . . . . . . . . . . . . . . . . . . . . . . . . . . . . . . . . . . 110Attach the Driver to Source Accounts . . . . . . . . . . . . . . . . . . . . . . . . . . . . . . . . . . 114Enter Sold Quantity for Destination Accounts . . . . . . . . . . . . . . . . . . . . . . . . . . . . 116Calculate the Model to Generate Assignments . . . . . . . . . . . . . . . . . . . . . . . . . . . . 118View Assignments Generated by the Rule-Based Driver . . . . . . . . . . . . . . . . . . . . 119Calculation of Variable Costs Based On Demand . . . . . . . . . . . . . . . . . . . . . . . . . 123
Enter Revenue and Calculate Profit . . . . . . . . . . . . . . . . . . . . . . . . . . . . . . . . . . . . . 126
Postscript on Generating Assignments According to a Rule . . . . . . . . . . . . . . . . . 128Overview . . . . . . . . . . . . . . . . . . . . . . . . . . . . . . . . . . . . . . . . . . . . . . . . . . . . . . . . . 128Attaching a Formula and Generating Assignments . . . . . . . . . . . . . . . . . . . . . . . . 129Selecting the Destination Accounts—First Pass . . . . . . . . . . . . . . . . . . . . . . . . . . . 131Selecting the Destination Accounts—Second Pass . . . . . . . . . . . . . . . . . . . . . . . . 132Selecting the Destination Accounts—Third Pass . . . . . . . . . . . . . . . . . . . . . . . . . . 133An Alternative Formula for Selecting the Destination Accounts . . . . . . . . . . . . . . 134
Working with Sold QuantitySome of the most critical calculations in a model rely on the number of products that are sold as well as on sales revenue. From these values, you can determine unit costs (calculated unit costs as opposed to entered unit costs) and profit. SAS Cost and Profitability Management provides properties for the input and calculation of these values.
Modify the Cost Assignments Column LayoutBefore doing the main work of this chapter, we first modify the column layout.
1. Select Model ð Module ð Cost Object .
2. Select Model ð Column Layout ð Edit Columns. The Column Layout dialog box opens.
3. Modify the primary pane by Add Sold Quantity (SoldQy) and moving it up after DrvName.
4. Click Save and then click OK.
109

Create a Rule-Based DriverUp to now in this tutorial you have made assignments manually by attaching a driver to a source account and connecting it to destination accounts to which to drive costs. Now we will create a driver that you attach to a source account and let the system generate assignments to destination accounts according to a rule that you define for selecting destination accounts. Such a driver is referred to as a “rule-based driver.” A rule-based driver is an ordinary driver with an associated rule formula. The formula determines for which destination accounts an assignment is automatically generated from every source account to which the driver is attached. For a discussion of rule-based drivers, see “Postscript on Generating Assignments According to a Rule” on page 128. In this chapter we use a rule-based driver to make assignments as shown in the following table:
Source Accounts Destination Accounts
From: products not associated with any particular channel
To: the following products associated with a particular channel (for example,, Drop Box)
110 Chapter 13 • Enter Sales and Revenue Data

Source Accounts Destination Accounts
From: channels (for example,, Drop Box) not associated with any particular product
To: the following products (same as above) associated with a particular channel
In addition to being a rule-based driver, the driver that we will create has a user-specified driver formula for calculating, DrvQtyCalc, the total number of units going to each destination account.
To create the driver, perform the following steps:
1. Select Model ð Drivers to open the Drivers view.
2. Right-click inside the Drivers view, and then select New Driver.
You can also select Create a Driver from the left-hand Navigation Pane.
The New Driver dialog box appears.
Working with Sold Quantity 111

3. For Name, type Sales volume.
4. For Driver Type, select Standard.
5. Select Formula Builder (the topmost Formula Builder button).
The Formula Builder dialog box opens.
6. In the Formula Builder dialog box:
a. Select Total Driver Quantity (under Properties).
112 Chapter 13 • Enter Sales and Revenue Data

That is, instead of using the general formula
DrvQtyCalc = (DQF x DWF) + (DQV x DWV x Dest.TDQ)
to calculate the total number of units going to each destination account, the calculated driver uses the formula DrvQtyCalc=TDQ.
Note: You might also use the formula
SoldQuantity (DrvQtyCalc=SoldQuantity)
because, in general, TDQ=SoldQuantity unless TDQ is overridden by TDQUE or the destination account has outgoing assignments in turn.
b. Click Insert (or, double-click Total Driver Quantity).
c. Click OK to close the Formula Builder.
7. In the New Driver dialog box, select Use Rule Formula, and then click Formula Builder (to the immediate right).
The Formula Builder dialog box opens.
8. Use the Formula Builder to build the following formula, and then click OK to close the Formula Builder.
IntersectionMatch(Region, Chnnl, Prod_Serv) AND SoldQuantity > 0
You can either enter the formula or use selections and the Insert button to build the formula.
Working with Sold Quantity 113

Note: This formula, which uses the IntersectionMatch() function, is equivalent to the following formula, which is much longer but possibly easier to understand:
(Source.Region.DimMemRef="None" OR Source.Region.DimMemRef=Destination.Region.DimMemRef)AND (Source.Chnnl.DimMemRef="None" OR Source.Chnnl.DimMemRef=Destination.Chnnl.DimMemRef)AND (Source.Prod_Serv.DimMemRef="None" OR Source.Prod_Serv.DimMemRef=Destination.Prod_Serv.DimMemRef)AND SoldQuantity > 0
It is also equivalent to the following somewhat simpler formula that uses the function isNone():
(Source.Region.isNone() OR Source.Region.DimMemRef=Destination.Region.DimMemRef)AND (Source.Chnnl.isNone() OR Source.Chnnl.DimMemRef=Destination.Chnnl.DimMemRef)AND (Source.Prod_Serv.isNone() OR Source.Prod_Serv.DimMemRef=Destination.Prod_Serv.DimMemRef)AND SoldQuantity > 0
9. Click OK to close the New Driver dialog box and create the new driver named Sales Volume.
Note: Rule-based drivers are discussed at greater length in “Postscript on Generating Assignments According to a Rule” on page 128.
Attach the Driver to Source Accounts1. Expand the Cost Object module by selecting COST OBJECT (PRIMARY PANE),
and right-click, and select Expand ð All Levels.
2. Delete the No <Channel> x No <Products and Services> accounts for both Eugene and Beaverton. (Right-click each account and select Delete.)
Note: You might have deleted them already when creating the cost object accounts.
3. Assign the Sales Volume driver to the following accounts for both Beaverton and Eugene:
114 Chapter 13 • Enter Sales and Revenue Data

Cost Object Account
Drop Box x No <Products and Services>
Walk In x No <Products and Services>
Commercial Pick Up x No <Products and Services>
4. Assign the Sales Volume driver to each of the No <Channel> accounts for both Beaverton and Eugene:
Cost Object Account
No <Channel> x 2nd Day Guaranteed
No <Channel> x Overnight Express
No <Channel> x Standard Ground
The Cost Object module should look like this:
Working with Sold Quantity 115

Enter Sold Quantity for Destination AccountsYou enter sales volumes using the SoldQuantity property. In the primary pane, enter the following values for SoldQuantity for the following accounts:
Account SoldQuantity
Beaverton x Drop Box x 2nd Day Guaranteed 9,000
Beaverton x Drop Box x Overnight Express 4,000
Beaverton x Drop Box x Standard Ground 21,666
116 Chapter 13 • Enter Sales and Revenue Data

Account SoldQuantity
Beaverton x Walk In x 2nd Day Guaranteed 29,840
Beaverton x Walk In x Overnight Express 37,330
Beaverton x Walk In x Standard Ground 73,300
Beaverton x Commercial Pick Up x 2nd Day Guaranteed 20,000
Beaverton x Commercial Pick Up x Overnight Express 26,000
Beaverton x Commercial Pick Up x Standard Ground 34,000
Eugene x Drop Box x 2nd Day Guaranteed 4,500
Eugene x Drop Box x Overnight Express 2,000
Eugene x Drop Box x Standard Ground 10,834
Eugene x Walk In x 2nd Day Guaranteed 16,000
Eugene x Walk In x Overnight Express 18,670
Eugene x Walk In x Standard Ground 36,700
Eugene x Commercial Pick Up x 2nd Day Guaranteed 10,000
Eugene x Commercial Pick Up x Overnight Express 13,000
Eugene x Commercial Pick Up x Standard Ground 17,000
After adding the sold quantities, the Cost Object module should look like the following:
Working with Sold Quantity 117

Calculate the Model to Generate AssignmentsSelect Model ð Calculate Costs to cause the system to use your rule-based driver to create assignments from source accounts to the appropriate destination accounts.
You see that costs are now assigned to the nine accounts (for each location) that previously did not have costs.
118 Chapter 13 • Enter Sales and Revenue Data

View Assignments Generated by the Rule-Based Driver
View Assignments from One Source AccountIt is helpful to understand that while you typically make assignments manually from source accounts to destination accounts, the Sales Volume driver automatically assigns costs to destination accounts that satisfy the rule formula criteria. You do not have to make explicit assignments. To see the assignments that are generated, follow these steps:
1. Display the right pane by selecting Model ð Assignments ð Show Right Assignments Pane.
Working with Sold Quantity 119

2. In the primary pane, select the Beaverton x Drop Box x No <Products and Services> account.
3. Select Model ð Assignments ð Show Right.
T I P You can display assignments simply by clicking the Show Assignments icon. It is not necessary to pull down the menu.
You see that assignments have automatically been made to three accounts in the right pane. You can see that the assignments have been generated by the fact that the arrows connecting the source and destination accounts are red.
Also, from the fact that the account icon is the same for both source and destination accounts, you can see that the three destination accounts are all in the Cost Object module. The Sales Volume driver has generated three Cost-Object to Cost-Object assignments.
To understand why the Sales volume driver generated these assignments, remember that its rule formula is equivalent to the following:
Destination.Region.DimMemRef=Source.Region.DimMemRef AND Destination.Channel.DimMemRef=Source.Channel.DimMemRef AND SoldQuantity > 0
The following table shows the source account in the picture to which the Sales volume driver is attached and the destination accounts to which the driver generated assignments.
Source account Destination accounts
Beaverton x Drop Box x No <Products and Services>
Beaverton x Drop Box x 2nd Day Guaranteed
Beaverton x Drop Box x Overnight Express
Beaverton x Drop Box x Standard Ground
And, the following table lists each condition of the driver’s rule formula and shows that it is satisfied by each of the destination accounts to which the driver generated an assignment.
120 Chapter 13 • Enter Sales and Revenue Data

Condition Satisfaction
Destination.Region.DimMemRef=Source.Region.DimMemRef
Beaverton (source) = Beaverton (destination: in all three destination accounts)
Destination.Channel.DimMemRef=Source.Channel.DimMemRef
Drop Box (source) = Drop Box (destination: in all three destination accounts)
SoldQuantity > 0 SoldQuantity=9,000 in 1st destination account
SoldQuantity=4,000 in 2nd destination account
SoldQuantity=21,666 in 3rd destination account
See “Enter Sold Quantity for Destination Accounts” on page 116.
View Assignments from Another Source AccountNow let’s view the assignments that are generated from another source account.
1. In the primary pane, select the Eugene x No <Channel> x 2nd Day Guaranteed account.
2. Select Model ð Assignments ð Show Right.
Again, you see in the following picture that assignments have automatically been made to three accounts in the right pane.
The following table shows the source account in the picture to which the Sales volume driver is attached and the destination accounts to which the driver generated assignments.
Working with Sold Quantity 121

Source account Destination accounts
Eugene x No <Channels> x 2nd Day Guaranteed
Eugene x Drop Box x 2nd Day Guaranteed
Beaverton x Drop Box x Overnight Express
Beaverton x Drop Box x Standard Ground
And, the following table lists each condition of the driver’s rule formula and shows that it is satisfied by each of the destination accounts to which the driver generated an assignment.
Condition Satisfaction
Destination.Region.DimMemRef=Source.Region.DimMemRef
Eugene in source = Beaverton in destination in all three destination accounts
Destination.Channel.DimMemRef=Source.Channel.DimMemRef
No <Channel> in source = Drop Box in destination in all three destination accounts.
Note: No <...> acts like a wildcard in rules-based drivers. It matches anything.
SoldQuantity > 0 SoldQuantity=4,500 in 1st destination account
SoldQuantity=16,000 in 2nd destination account
SoldQuantity=10,000 in 3rd destination account
See “Enter Sold Quantity for Destination Accounts” on page 116.
Of course, you can show the assignments that have been made for any account to which the Sales volume driver is assigned and verify that each destination account satisfies the rule formula. The following picture shows most of the assignments made by the Sales volume driver. Not all of the assignments are shown so as not to unduly clutter the picture, but you should be able to easily see which assignments are not shown.
122 Chapter 13 • Enter Sales and Revenue Data

Calculation of Variable Costs Based On DemandIf you return to the External Unit module, you see that a cost has now been generated for the 2nd Day Flat account.
Working with Sold Quantity 123

The reason that the cost has been calculated is that you assigned a Bill of Costs driver that uses the DQV property to the 2nd Day Flat account. To calculate the cost of an item that uses a DQV driver, you must know how many units of the item are required. Now that you have entered a Sold Quantity for the 2nd Day Guaranteed accounts (which are the final destination accounts for 2nd Day Flat), the cost of 2nd Day Flat can be calculated.
Let's look more closely at how the cost of $12,507.60 for 2nd Day Flat is calculated. Remember that you made assignments from the External Unit account, 2nd Day Flat, using a BOC driver with a Driver Quantity Variable. (See “Make Assignments and Calculate” on page 105.)
Unlike an account whose driver uses only DQF (whose cost is determined by an amount supplied), the cost of an account whose driver uses DQV is determined by an amount demanded. The cost on an assignment (DrvQtyCalc) is determined by the following formula:
DrvQtyCal = (DQF*DWF) + (DQV*DWV*Dest.TDQ)
Notice that when DQV is nonzero, then DrvQtyCalc depends on the TDQ of the destination account (Dest.TDQ). In the case of the 2nd Day Flat account, the destination accounts are the following accounts in the Cost Object module, as you can see in the following picture:
Eugene x Commercial Pick Up x 2nd Day GuaranteedEugene x Drop Box x 2nd Day GuaranteedEugene x Walk In x 2nd Day GuaranteedBeaverton x Commercial Pick Up x 2nd Day GuaranteedBeaverton x Drop Box x 2nd Day GuaranteedBeaverton x Walk In x 2nd Day Guaranteed
124 Chapter 13 • Enter Sales and Revenue Data

Note: You cannot re-create this picture in the UI. It is created by combining multiple images in an image editor.
Note: Remember that the assignments to the final destination accounts result from your having attached the Sales Volume driver to the following two intermediary accounts:
• Eugene x No <Channel> x 2nd Day Guaranteed
• Beaverton x No <Channel> x 2nd Day Guaranteed
(See “Attach the Driver to Source Accounts” on page 114.)
You can see from the picture that the TDQ of the final destination accounts results from your having assigned a Sold Quantity to those accounts, as shown in the following table. (See “Enter Sold Quantity for Destination Accounts” on page 116.)
Final Destination Account Sold Quantity Total Driver Quantity (TDQ)
Eugene x Commercial Pick Up x 2nd Day Guaranteed 10,000 10,000
Eugene x Drop Box x 2nd Day Guaranteed 4,500 4,500
Eugene x Walk In x 2nd Day Guaranteed 16,000 16,000
Beaverton x Commercial Pick Up x 2nd Day Guaranteed
20,000 20,000
Beaverton x Drop Box x 2nd Day Guaranteed 9,000 9,000
Beaverton x Walk In x 2nd Day Guaranteed 29,840 29,840
In the following table, you can see how the cost of $12,507.60 is calculated for the 2nd Day Flat account using the following formulas:
1. DrvQtyCalc=(DQF*DWF)+(DQV*DWV*Dest.TDQ)
2. TDQ=∑(DrvQtyCalc)
3. Cost=EntUnitCost x TDQ
Note: The abbreviations used in the formulas are the following:
DrvQtyCalc Driver Quantity Calculated
DQF Driver Quantity Fixed
DWF Driver Weight Fixed
DQV Driver Quantity Variable
DWV Driver Weight Variable
Dest Destination
TDQ Total Driver Quantity
Working with Sold Quantity 125

DrvQtyCalc=(DQF*DWF)+(DQV*DWV*Dest.TDQ)
Final Destination Account DQF DWF DQV DWV Dest.TDQ DrvQtyCalc
Eugene x Commercial Pick Up x 2nd Day Guaranteed 0 1 1 1 10,000 10,000
Eugene x Drop Box x 2nd Day Guaranteed 0 1 1 1 4,500 4,500
Eugene x Walk In x 2nd Day Guaranteed 0 1 1 1 16,000 16,000
Beaverton x Commercial Pick Up x 2nd Day Guaranteed 0 1 1 1 20,000 20,000
Beaverton x Drop Box x 2nd Day Guaranteed 0 1 1 1 9,000 9,000
Beaverton x Walk In x 2nd Day Guaranteed 0 1 1 1 29,840 29,840
TDQ of 2nd Day Flat = sum of DrvQtyCalc for individual assignments TDQ: 89,340
Cost of 2nd Day Flat = EntUnitCost x TDQ = .14 * 89,340 = 12,507.60 Cost: 12,507.60
Enter Revenue and Calculate ProfitProfit and loss can be calculated after you enter sales data in the Revenue property.
Create a new column layout.
1. Select Model ð Module ð Cost Object Module.
2. Activate the Default column layout .
3. Select Model ð Assignments ð Show Single Pane.
4. Open the Column Layout dialog box.
5. Modify the primary pane as follows:
• Remove the Display Reference column.
• Add the UnitCost, Sold Quantity, Revenue, and Profit columns.
6. Save the new column layout with the name Profit.
7. Close the Column Layout dialog box.
Note: Instead of creating your own column layout to show Profit, you might want to use the predefined system column layout named Performance.
Enter revenue and calculate profit.
126 Chapter 13 • Enter Sales and Revenue Data

1. In the Revenue column, enter the following values:
Cost Object Account Revenue
Beaverton x Drop Box x 2nd Day Guaranteed 72,550
Beaverton x Drop Box x Overnight Express 59,800
Beaverton x Drop Box x Standard Ground 379,166
Beaverton x Walk In x 2nd Day Guaranteed 321,667
Beaverton x Walk In x Overnight Express 558,133
Beaverton x Walk In x Standard Ground 123,333
Beaverton x Commercial Pick Up x 2nd Day Guaranteed 139,000
Beaverton x Commercial Pick Up x Overnight Express 388,700
Beaverton x Commercial Pick Up x Standard Ground 595,000
Eugene x Drop Box x 2nd Day Guaranteed 61,275
Eugene x Drop Box x Overnight Express 29,900
Eugene x Drop Box x Standard Ground 189,584
Eugene x Walk In x 2nd Day Guaranteed 215,834
Eugene x Walk In x Overnight Express 279,061
Eugene x Walk In x Standard Ground 641,667
Eugene x Commercial Pick Up x 2nd Day Guaranteed 69,500
Eugene x Commercial Pick Up x Overnight Express 194,350
Eugene x Commercial Pick Up x Standard Ground 297,500
2. Calculate the model, and then close the Operation Summary.
You see the following profit and loss information:
Enter Revenue and Calculate Profit 127

Postscript on Generating Assignments According to a Rule
OverviewYou have probably noticed a significant amount of repetition in the assignments that you made. With a rule-based driver, you can establish a general rule for making assignments for the driver and let the system generate the assignments for you in accordance with the rule instead of having to make the assignments yourself.
You use rule-based drivers to generate cost assignments automatically during calculation. The feature works by enabling you to attach a formula—referred to as a rule
128 Chapter 13 • Enter Sales and Revenue Data

formula—to an existing driver. When you attach the driver with its rule formula to a source account, the calculation evaluates for which potential destination accounts the rule formula tests true and creates an assignment from the source account to each such destination account.
The following picture shows some assignments in the Parcel Express Tutorial model that are candidates for generating according to a rule. Notice that the driver, Number of Expedite Requests, is attached to two different source accounts each of which assigns costs to three different destination accounts. If we can find a rule formula to choose just those destination accounts, then with one driver and a rule, we can generate six assignments.
Attaching a Formula and Generating AssignmentsBefore describing some rule formulas that will choose the desired destination accounts, let's first see how to attach a rule formula to a driver. Knowing how to attach a rule formula to a driver will help establish some context of what we are talking about when we refer to rule-based drivers.
To attach a rule formula to a driver, do the following:
1. Go to the Drivers page (select Model ð Drivers Page).
2. Select the driver to which you want to attach a rule formula and select Edit ð Item Properties.
The Driver Properties dialog box opens.
Postscript on Generating Assignments According to a Rule 129

3. Select Use Rule Formula and then click Formula Builder.
The Formula Builder dialog box opens.
4. Either use selections and the Insert key to build the formula, or enter the complete formula in the text field.
5. Click OK to close the Formula Builder, and then click OK to close the Driver Properties dialog box.
6. Repeat the preceding steps for each driver to which you want to attach a rule formula.
130 Chapter 13 • Enter Sales and Revenue Data

7. Attach each rule-based driver to the appropriate source accounts.
Of course, assuming that you have already attached these drivers to source accounts while doing this tutorial the calculation will simply re-create the assignments that you have already made (assuming that you define an appropriate rule formula). The point is that rule-based drivers give you an alternative to creating the assignments manually.
8. To generate assignments, calculate the model.
The assignments are generated—which you can verify by viewing the appropriate assignments panes. You can also verify that the cost flows, as shown below, are the same as when you attached the drivers manually.
Selecting the Destination Accounts—First PassNow let's talk about what rule formula to define. Probably the easiest way to select the desired destination accounts is to add a tag attribute to each. A tag attribute is one that either you add or you don't add to an account. (In previous releases of SAS Cost and Profitability Management, tag attributes were called Boolean attributes.) Then you can use the HasAttribute() function in a formula to test for the presence of the attribute. As shown below, the tag attribute, Expedite Requests, is attached to the six destination accounts.
Postscript on Generating Assignments According to a Rule 131

So, the following rule formula selects just these destination accounts:
"Module".DimMemRef="CostObject"AND Destination.HasAttribute("Expedite Requests")
The first condition, testing for the Cost Object module, is not necessary because the Expedite Requests attribute is attached to accounts only in the Cost Object module. However, adding the condition can speed up assignment generation because the system knows that it does not have to check other modules for potential destination accounts. The condition also helps ensure that you do not generate assignments to accounts other than those you intend. In particular, it can help prevent generating reciprocal costing where an account, directly or indirectly, assigns costs to itself.
Similarly, the “Destination” modifier is also not necessary because the system assumes by default that any unmodified account is a destination account. However, adding the modifier can make your rule formula easier to understand.
The rule formula, however, is not yet complete. Notice that if you were to apply this rule formula, it would generate assignments from a Beaverton source account not only to Beaverton destination accounts but also to the similar Eugene destination accounts. And, it would generate assignments from a Eugene source account to Beaverton destination accounts. Clearly you want Beaverton source accounts to assign costs only to Beaverton destination accounts, and Eugene source accounts only to Eugene destination accounts. The following sections sketch two solutions to this problem.
Selecting the Destination Accounts—Second PassThe first solution entails creating distinct attributes for the Beaverton and Eugene destination accounts:
• Expedite Requests Beaverton
• Expedite Requests Eugene
The following picture shows these attributes attached to the respective destination accounts:
132 Chapter 13 • Enter Sales and Revenue Data

In order to test for these attributes, you also need two distinct drivers each with its own rule formula—one for Beaverton and one for Eugene. The rule formula for the Beaverton driver is the following:
"Module".DimMemRef="CostObject"AND Destination.HasAttribute("Expedite Requests Beaverton")
And, the rule formula for the Eugene driver is the following:
"Module".DimMemRef="CostObject"AND Destination.HasAttribute("Expedite Requests Eugene")
The following pictures show the assignments that are generated by these rule formulas from the Beaverton and Eugene source accounts:
Selecting the Destination Accounts—Third PassThis section describes an alternative solution. Remember that you want Beaverton source accounts to assign costs only to Beaverton destination accounts, and Eugene
Postscript on Generating Assignments According to a Rule 133

source accounts only to Eugene destination accounts. In short, you want the source region to equal the destination region. You can accomplish this with the following condition:
Source.Region.DimMemRef=Destination.Region.DimMemRef
So, the complete rule formula to select the destination accounts is the following:
"Module".DimMemRef="CostObject"AND Destination.HasAttribute("Expedite Requests") AND Source.Region.DimMemRef=Destination.Region.DimMemRef
With this one rule formula, you can avoid creating distinct attributes for Beaverton and Eugene and also avoid duplicating the driver. This rule formula that is attached to a single driver generates exactly the assignments desired.
An Alternative Formula for Selecting the Destination AccountsLet's look more closely at the destination accounts to see whether it is possible to define a rule that selects just those destination accounts without even having to add an attribute. The display below shows the destination accounts with the CostObject module as the primary pane. Notice that all six destination accounts have the following property in common.
The DimMemRef of their dimension member in the Channel dimension is None.
Therefore, the following formula selects just these destination accounts:
"Module".DimMemRef="CostObject"AND Destination.Channel.DimMemRef="None"AND Source.Region.DimMemRef=Destination.Region.DimMemRef
Notes:
• Although the assignments pane shows “No <Channel>” as the DimMemRef of the dimension member in the Channel dimension, you must use the constant “None” in your formula. “None” is the internal name. “No <Channel>” is a translatable label that is just for display.
Note: You can also use the function isNone() as follows:
"Module".DimMemRef="CostObject"AND Destination.Channel.isNone()
134 Chapter 13 • Enter Sales and Revenue Data

AND Source.Region.DimMemRef=Destination.Region.DimMemRef
• Similarly, you can use either “DimMemRef” in your formula or “Reference”. In this context “Channel.DimMemRef” and “Channel.Reference” are synonymous. The dimension in this case is Channel, and the possible dimension members are Drop Box, Walk In, Commercial Pick-Up, and None. You refer to the dimension members using the compound notation: “Channel.Drop Box”, “Channel.Walk In”, “Channel.Commercial Pick-Up”, and “Channel.None”. Channel is the dimension, and the item that follows the period is a dimension member. More generally, you can write either “Channel.DimMemRef” or “Channel.Reference” because they are synonymous. The column heading in the assignments pane uses the label “DimMemRef” to distinguish it from the Reference of an account.
Postscript on Generating Assignments According to a Rule 135
136 Chapter 13 • Enter Sales and Revenue Data

Chapter 14
Generate Reports
Overview . . . . . . . . . . . . . . . . . . . . . . . . . . . . . . . . . . . . . . . . . . . . . . . . . . . . . . . . . . . 137
Report Templates . . . . . . . . . . . . . . . . . . . . . . . . . . . . . . . . . . . . . . . . . . . . . . . . . . . . 137
Create a Report to Export Model Data . . . . . . . . . . . . . . . . . . . . . . . . . . . . . . . . . . 138
Use a Report Configuration to Export Model Data . . . . . . . . . . . . . . . . . . . . . . . . 140
Delete a Report Configuration . . . . . . . . . . . . . . . . . . . . . . . . . . . . . . . . . . . . . . . . . 140
OverviewWhen the information has been entered into the model, the costs have been calculated, and the data has been reviewed, the next step in analyzing the data is generating reports.
The benefits of generating reports include the following:
• validating the model
• analyzing costs
• focusing on a specific area of interest
Report TemplatesA report template specifies the layout of a report and the fields of data in a report (but not the data itself). When you create a report, you first select a report template.
SAS Cost and Profitability Management contains the following predefined report templates that provide formats and that enable great flexibility in the amount and type of information to include in a report:
• Destination Furthest
• Dimensional Attribute Cost
• Driver Cost and Rate
• Multi-level Contributions
• Resource Contributions
137

• Unassigned Costs
• Unit Cost
Create a Report to Export Model DataCreating a report exports data from model data to a database. Modelers (with Read or Read/Write access to a model) and viewers (with Read access to a model) can create a report to export the data for the model. You must also need permission to the SAS Folders\Products\SAS Cost and Profitability Management\Registered Tables and Views directory in SAS Management Console to register the report tables.
To create resource contributions and destination furthest reports, you must have already generated the RC fact table for the model.
Perform the following steps to create a report:
1. Select File ð Export ð Report Data.
The Report Data Wizard appears.
2. On the Select Type step, select a report template and click Next.
For information about what data each report template contains, see “Working with Reports” in the SAS Cost and Profitability Management: Data Administration Guide, available from the Help menu or from http://support.sas.com/documentation/onlinedoc/abm/.
3. On the Select Model step, select a model to export its data and click Next.
Note: You must have required Read or Read/Write permission to the model.
4. On the Select Period/Scenario step, select the periods and scenarios for which you want to export the report data, and click Next.
5. On the Select Module step, select a module for which you want to export the data, and click Next.
To include data from all the modules, select the Use all modules option.
6. On the Select Dimensional Attributes step, select the dimensional attributes, and click Next.
Note: The check boxes of this step are available when you selected the Dimensional Attribute Cost report.
7. On the Database Location step, use the following options to export the report data to a database:
Table 14.1 Description of Fields of the Database Location Step
Field Description
Select Database Location
Use default database Select this option to export the report data to the default database that SAS Cost and Profitability Management uses.
138 Chapter 14 • Generate Reports

Field Description
Use alternate database Select this option to export the report data to a database other than the default database.
Browse to set up an alternate database connection
Click Browse to set up an alternate database connection to export the report data. After you click this button, the Connection Information dialog box appears.
This button is available only when you select the Use alternate database option.
Destination table name Enter a name for the database table. The table name must include alphanumeric characters. The only special character allowed is the underscore. The table name must not be more than 22 characters.
SAS Cost and Profitability Management displays the letter R followed by the model ID and underscore before the field. This displayed information is prefixed to the table name that you enter in this field. In other words, SAS Cost and Profitability Management creates a table with a name in the following format: R<model_ID>_<user—specified name>.
For example, suppose that the model ID is 1234 and the table name that you enter is FY2018. Then, the R1234_FY2018 table is created.
Load table into a library for SAS LASR Analytic Server
Click this check box to load the report data into a library for the SAS LASR Analytic Server.
This check box is available when the SAS LASR Analytic Server is configured and you are exporting the report data to the default database.
Replace the table if a table with the same name already exists in the database
Select this check box to replace the table with the same name that is specified in the Destination table name field if it already exists in the database.
8. Click Next.
9. Review the summary.
10. (Optional) If you need to change any information, click Back until you reach the page that you need to change in the wizard.
11. (Optional) To save the report configuration so that the report can be easily run again, do the following:
a. Select the Save configuration as option.
b. Enter the Name.
c. Enter the Description.
12. (Optional) To save the report configuration so that the report can be easily run without exporting the report data immediately, do the following:
a. Select the Save without running option.
b. Enter the new Name.
Create a Report to Export Model Data 139

c. Enter the Description.
13. Click Finish.
Use a Report Configuration to Export Model DataYou can use an already saved report configuration for easily exporting the model data. The configuration contains the following information:
• report template
• model
• periods and scenario associations
• module and dimension attributes
• the database connection information
To use the report configuration to export the model data:
1. In the Workspace Manager, open the Report Data Exports folder.
2. Right-click a report configuration and click Open. The Report Data wizard appears and contains all the report-related information already selected in it.
3. (Optional) Change the report configuration information to meet the business requirement.
4. Click Finish.
Delete a Report Configuration1. In the Workspace Manager, open the Report Data Exports folder.
2. Select a report configuration.
3. Click Delete.
Note: Depending on your permissions, you might not have the ability to delete a report configuration.
140 Chapter 14 • Generate Reports

Chapter 15
Generate Cubes
Overview . . . . . . . . . . . . . . . . . . . . . . . . . . . . . . . . . . . . . . . . . . . . . . . . . . . . . . . . . . . 141
Types of Cubes . . . . . . . . . . . . . . . . . . . . . . . . . . . . . . . . . . . . . . . . . . . . . . . . . . . . . . 142Multi-Stage Contribution Cube . . . . . . . . . . . . . . . . . . . . . . . . . . . . . . . . . . . . . . . 142Resource Contribution Cube . . . . . . . . . . . . . . . . . . . . . . . . . . . . . . . . . . . . . . . . . . 142Single-Stage Contribution Cube . . . . . . . . . . . . . . . . . . . . . . . . . . . . . . . . . . . . . . . 142
Overview of Cube Generation . . . . . . . . . . . . . . . . . . . . . . . . . . . . . . . . . . . . . . . . . . 142
Cube Configurations . . . . . . . . . . . . . . . . . . . . . . . . . . . . . . . . . . . . . . . . . . . . . . . . . 143Overview . . . . . . . . . . . . . . . . . . . . . . . . . . . . . . . . . . . . . . . . . . . . . . . . . . . . . . . . . 143Resource Contribution Cube . . . . . . . . . . . . . . . . . . . . . . . . . . . . . . . . . . . . . . . . . . 143Multi-Stage Contribution Cube . . . . . . . . . . . . . . . . . . . . . . . . . . . . . . . . . . . . . . . 146Minimal Multi-Stage Contribution Cube . . . . . . . . . . . . . . . . . . . . . . . . . . . . . . . . 148
Generate Cubes . . . . . . . . . . . . . . . . . . . . . . . . . . . . . . . . . . . . . . . . . . . . . . . . . . . . . . 149
Select Cost Flow: In or Out . . . . . . . . . . . . . . . . . . . . . . . . . . . . . . . . . . . . . . . . . . . . 150
Manage Cube Permissions . . . . . . . . . . . . . . . . . . . . . . . . . . . . . . . . . . . . . . . . . . . . . 153
OverviewA cube is the basic unit of analysis in OLAP, a technology that provides fast, interactive access to data in a model. A cube stores a model's dimensions and the measures that they contain into one unit. You use the SAS Cost and Profitability Management client to connect to and interact with the cubes on a SAS Cost and Profitability Management server. For each model, you can generate cubes and manipulate them on the OLAP page to interactively analyze business data.
An OLAP cube is called a cube even if it has more than the three dimensions of an ordinary geometric cube. An OLAP cube can represent any number of dimensions of data. SAS Cost and Profitability Management cubes are multidimensional OLAP (MOLAP) cubes.
141

Types of Cubes
Multi-Stage Contribution CubeUse this type of cube to perform tasks and to answer questions such as the following:
• Why is product A not profitable? You want to trace the costs back through activities and then to resources that contribute costs to this product.
• What are the costs for Product B that originate in salary resources and that are assigned through the Inspection activity to this product?
The multi-stage contribution cube enables you to analyze cost contributions into and out of stages that are defined in a model. The Cube Explorer view enables you to visually trace cost contributions through all the stages.
Resource Contribution CubeUse this type of cube to analyze resource accounts that contribute costs to other accounts. Or, use this type of cube to analyze the accounts that receive costs from resources.
The resource contribution cube enables you to analyze cost contributions from original accounts (where costs were entered) to final accounts that do not assign costs to other accounts. Generally, these contributions are from resource accounts to cost object accounts, but it does not matter where the original or final accounts reside.
Single-Stage Contribution CubeUse this type of cube to answer questions such as the following:
• Which activity costs contribute to product, customer, service costs, and so on?
• When costs are assigned within the cost object module, which subassembly costs contribute to product costs?
• What are the costs of resources that contribute to activities?
The single-stage contribution cube enables you to analyze cost contributions from one assignment level back. It does not matter where the costs originate or end. Typically, cost is contributed from the following:
• activities to cost objects
• resources to activities
Overview of Cube GenerationGenerating a cube is a two-step process.
Step 1: Create a cube configuration.
From a single model, you can generate multiple cubes: one each for resource contributions cube, single-stage contributions cube, and multiple different multi-stage
142 Chapter 15 • Generate Cubes

contributions cube. A cube configuration remembers your choices for a particular cube. If you update the model and need to regenerate the cube, you don’t have to specify the cube characteristics again. In short, one model can have multiple cube configurations, and each cube configuration contains the specifications for a single cube.
Step 2: Generate the cube.
After a model has been calculated, you generate cubes by specifying which of the cube configurations belonging to the model is to be used, and which periods and scenarios are to be included. For each cube configuration that you select, a cube is generated. If the model has not been calculated, you are asked if you want the calculation to be done so that cube generation can proceed.
Cube Configurations
OverviewFor this tutorial, you will create three cube configurations:
• “Resource Contribution Cube” on page 143
• “Multi-Stage Contribution Cube” on page 146
• “Minimal Multi-Stage Contribution Cube” on page 148
Resource Contribution Cube1. Go to the Workspace Manager.
2. Select File ð New ð Cube Configuration.
Step 1 of the New Cube Configuration wizard opens.
Cube Configurations 143

Specify the following for step 1:
• For Model name, select Parcel Express Tutorial.
• For Cube configuration name, type Parcel Express Resource.
• For Cube configuration reference, type PE_Resource.
• In the Generate section, select Cube and Fact table.
• For Type, select Resource Contribution.
3. Click Next. Step 2 opens.
This step enables you to specify options for cube generation. The options available depend on whether you are using SAS OLAP or Microsoft SQL Server Analysis Services to create and store cubes. The following picture shows the options for SAS OLAP cubes.
The following picture shows the options for Microsoft SQL Server Analysis Services cubes.
144 Chapter 15 • Generate Cubes

For this tutorial you can accept the default options.
4. Click Next. Step 3 opens.
5. Select all numeric attributes to be included in the resource contribution cube. Since the Parcel Express Tutorial model is relatively small, you can select all of the numeric attributes.
6. Click Next. Review your options, and then click Finish.
The cube configuration is added to the Cube Configurations folder.
Cube Configurations 145

The cube configuration is added to the Cube Configurations folder.
Multi-Stage Contribution CubeWith a multi-stage contribution cube, you can select what goes into the cube. This enables you to create smaller cubes for particular purposes.
1. Select File ð New ð Cube Configuration. Step 1 opens.
Specify the following for step 1:
• For Model name, select Parcel Express Tutorial.
• For Cube configuration name, enter Parcel Express Multi-Stage.
• For Cube configuration reference, enter PE_MultiStage.
• In the Generate section, select Cube and Fact table.
• For Type, select Multi-Stage Contribution.
2. Click Next. Step 2 opens.
This step enables you to specify options for cube generation. The options available depend on whether you are using SAS OLAP or Microsoft SQL Server Analysis Services to create and store cubes. Whichever you are using, for this step in the tutorial, you can accept the default options.
3. Click Next.
Step 3 opens. In this step, you can select not only which modules or stages to include in the cube, but also the dimension and the level at which to include them.
146 Chapter 15 • Generate Cubes

• Click the Modules option. This means that each module defines a separate stage in the order shown.
• Click the plus sign to expand the Resource module, and uncheck Fixed_Variable. The cube will be usually smaller if you exclude some dimension that are not needed.
• Click the plus sign to expand the Cost Object module, and under the Include to Level column, select Level 3 from the drop-down list for Region. Selecting Level3 for Region includes the details for Beaverton and Eugene in the cube.
• Leave the defaults under Cost Flow as shown. We ll look more closely at what this choice means later in the chapter.
4. Click Next. Step 4 opens.
5. Select all the numeric attributes to be included in the cube.
6. Click Next. Review your options, and then click Finish.
Cube Configurations 147

The cube configuration is added to the Cube Configurations folder.
Minimal Multi-Stage Contribution CubeThe next cube configuration that you create is an interesting one because it is very small. It provides an illustration of the utility of custom multi-stage contribution cubes. Even though this one is small, it is useful because it enables you to concentrate on total costs without worrying about where they come from.
1. Select File ð New ð Cube Configuration. Step 1 opens.
Specify the following for step 1:
• For Model name, select Parcel Express Tutorial.
• For Cube configuration name, enter Parcel Express Multi-Stage Mini.
• For Cube configuration reference, enter PE_MultiStageMini.
• In the Generate section, select Cube and Fact table.
• For Type, select Multi-Stage Contribution.
2. Click Next.
Step 2 opens. This step enables you to specify options for cube generation. The options available depend on whether you are using SAS OLAP or Microsoft Analysis Services to display cubes.
Once again, you can accept the default options.
3. Click Next.
Step 3 opens. In this step, you can select not only which modules or stages to include in the cube, but also the dimensions and level at which to include them.
148 Chapter 15 • Generate Cubes

• Click the Modules option.
• Uncheck the first three modules: ExternalUnit, Resource, and Activity. In this cube, you want to see only final costs.
• Click the plus sign to expand the Cost Object module, and under the Include to Level column, select Level 3 from the drop-down list for Region. Selecting Level3 for Region includes the details for Beaverton and Eugene in the cube. The default is to include up to and including Level 2.
• Leave the defaults under Cost Flow as shown.
4. Click Next. Step 4 opens.
5. Select all the numeric attributes to be included in the cube.
6. Click Next. Review your options, and then click Finish.
The cube configuration is added to the Cube Configurations folder.
Generate CubesHaving created four cube configurations, you can use them to generate cubes.
1. If the Parcel Express Tutorial is not already open, return to the model page and open the tutorial model.
2. Select Model ð Generate Cubes.
The Generate Cubes dialog box opens.
Generate Cubes 149

3. Select the cube configurations that you created.
4. Select the period/scenario 2008 Q1/Actual.
Note: In previous releases of SAS Activity-Based Management, you could not select a subset of periods/scenarios for inclusion.
5. Click Generate.
One cube is generated for each cube configuration that is selected.
Select Cost Flow: In or OutWith some models, it makes a difference in generating a cube whether you show costs flowing into a module/stage or out of a module/stage. It makes a difference in case the model has assignments from accounts within a module/stage to accounts within the same module/stage. For the Parcel Express Tutorial model in Chapter 3, Making Assignments, you made assignments from activities to activities. One such example is shown in the following picture.
150 Chapter 15 • Generate Cubes

Note: To display these assignments:
1. Select the Activity module.
2. Select Left and Right Assignments Panes from the View Assignments Panes icon.
T I P You can simply click the View Assignments Panes icon . It is not
necessary to pull down the menu.
3. Select the Move to Warehouse account.
4. Select Show Left and Right from the Show Assignments icon.
T I P You can simply click the Show Assignments icon . It is not necessary to pull down the menu.
When you generate a cube, you must specify what cost assignments you want to appear in the cube for each module/stage. Sticking with the current example, you must choose assignments into the Activity module (Move to Warehouse), or out of the Activity Module (Sort and Inspect). You can t choose both because that would result in double-counting final costs (part of Sort and Inspect costs are also Move to Warehouse costs).
The following picture shows the results of showing costs flowing into the Activity module. Notice that Move to Warehouse has nonzero cost because it receives
Select Cost Flow: In or Out 151

assignments from the Resource module. Inspect and Sort also have nonzero costs because they also receive assignments from the Resource module.
By contrast, the following picture shows the results of showing costs flowing out of the Activity module. Notice that Move to Warehouse now has zero cost because it has no assignments out of the Activity module into the Cost Object module; its assignments are entirely within the Activity module.
If a model has no cost assignments from accounts within a module/stage to other accounts within the same module/stage and if all accounts assign 100% of their cost, then the choice of showing cost flows into or out of a module/stage makes no difference. Every cost into a module/stage is also a cost out of the module/stage. By defining multiple stages such that there are no assignments within a single stage, you avoid having to consider the effect of showing cost flows in or out.
152 Chapter 15 • Generate Cubes

Manage Cube PermissionsAfter generating a cube, you can changes its owner and control who has permission to access it. Permission is granted by group. All users who are members of a group can receive permission (or be denied permission) to view a cube. Groups are created, and users are assigned to groups, in the SAS Management Console.
Manage cube permissions
1. Select Model ð Manage Cubes and Permissions.
The Manage Cubes and Permissions dialog box opens.
2. Select the cube whose permissions you want to manage.
Note: You can change only one cube at a time.
3. Click Permissions.
The Permissions dialog box opens.
4. You can add or remove Read access to groups. All members of the group inherit the permissions that you select for that group.
Manage Cube Permissions 153

154 Chapter 15 • Generate Cubes

Chapter 16
Use the SAS OLAP Analyzer
Creating OLAP Views . . . . . . . . . . . . . . . . . . . . . . . . . . . . . . . . . . . . . . . . . . . . . . . . 155
Analyzing OLAP Cubes . . . . . . . . . . . . . . . . . . . . . . . . . . . . . . . . . . . . . . . . . . . . . . . 156Overview . . . . . . . . . . . . . . . . . . . . . . . . . . . . . . . . . . . . . . . . . . . . . . . . . . . . . . . . . 156Selecting and Displaying Dimensions in Cubes . . . . . . . . . . . . . . . . . . . . . . . . . . . 157Displaying Dimension Attributes . . . . . . . . . . . . . . . . . . . . . . . . . . . . . . . . . . . . . . 163Summary: Rows and Columns . . . . . . . . . . . . . . . . . . . . . . . . . . . . . . . . . . . . . . . . 165Saving OLAP Views . . . . . . . . . . . . . . . . . . . . . . . . . . . . . . . . . . . . . . . . . . . . . . . . 165Using Measures in Cubes . . . . . . . . . . . . . . . . . . . . . . . . . . . . . . . . . . . . . . . . . . . . 166Exporting Cubes . . . . . . . . . . . . . . . . . . . . . . . . . . . . . . . . . . . . . . . . . . . . . . . . . . . 172
Using the Cube Explorer View . . . . . . . . . . . . . . . . . . . . . . . . . . . . . . . . . . . . . . . . . 173
Creating OLAP ViewsOnce you have generated cubes, you use the SAS OLAP Analyzer to view the cube.
Create an OLAP view
1. Select File ð New ð OLAP View.
You see Step 1 of the New OLAP View Wizard. The New OLAP View Wizard has only one step.
2. Select the Parcel Express Tutorial model.
3. Select the Resource Contributions cube.
155

4. Click Finish.
You see the resource contributions cube for the Parcel Express Tutorial model.
The cube view will be slightly different if you generated the cube using SAS OLAP than if you generated it using Microsoft SQL Server Analysis Services. For example, if the cube was generated using Microsoft SQL Server Analysis Services, then the Product and Services row is collapsed rather than expanded. This chapter shows a cube generated by using SAS OLAP.
Analyzing OLAP Cubes
OverviewSo far, the only information that the cube has provided is the costs for periods and scenarios. To perform an interactive analysis of the cube, you will select specific dimensions for analysis. You use the Data Dimensions window to select dimensions for display in OLAP cubes.
156 Chapter 16 • Use the SAS OLAP Analyzer
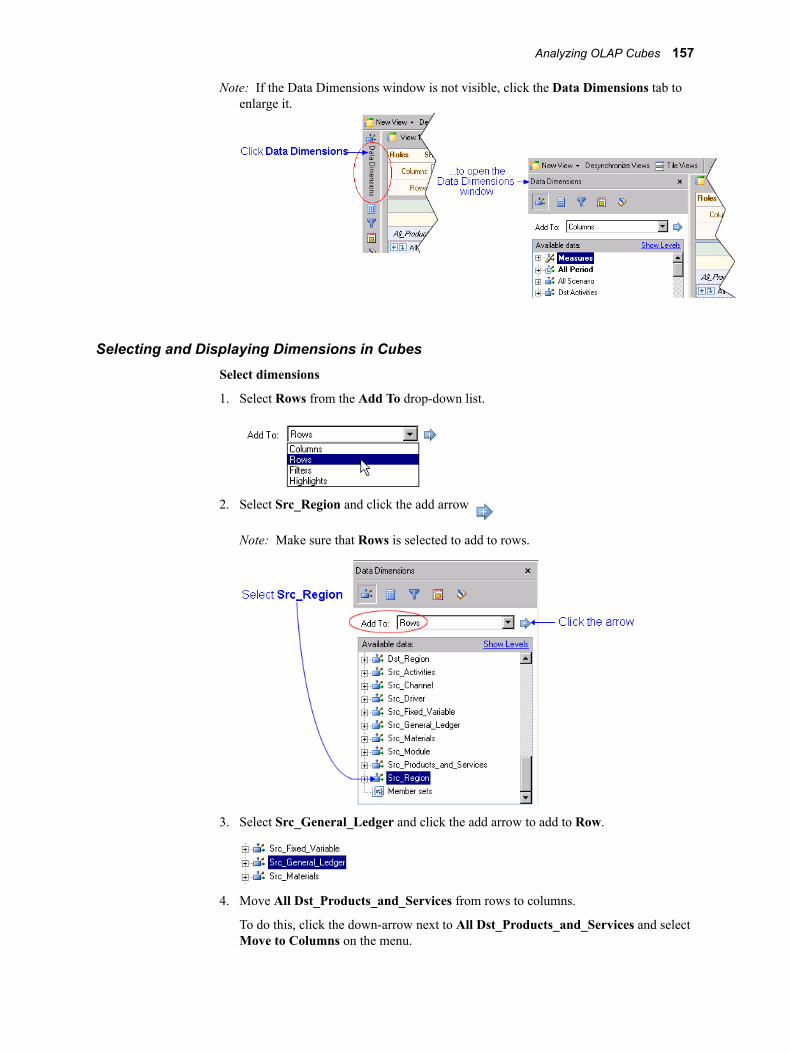
Note: If the Data Dimensions window is not visible, click the Data Dimensions tab to enlarge it.
Selecting and Displaying Dimensions in CubesSelect dimensions
1. Select Rows from the Add To drop-down list.
2. Select Src_Region and click the add arrow
Note: Make sure that Rows is selected to add to rows.
3. Select Src_General_Ledger and click the add arrow to add to Row.
4. Move All Dst_Products_and_Services from rows to columns.
To do this, click the down-arrow next to All Dst_Products_and_Services and select Move to Columns on the menu.
Analyzing OLAP Cubes 157

5. Remove AllPeriods from columns.
To do this, click the down-arrow next to AllPeriods and select Remove from View on the menu.
The table view should now look like the following:
The data in the table view has been updated according to the dimensions that you have selected. To see the details, you must drill through the dimensions.
Collapse the table
Click the links in the table header to collapse rows or columns to produce a more compact table.
1. Click Src_Region in the table header.
158 Chapter 16 • Use the SAS OLAP Analyzer

2. Click Src_General_Ledger in the table header.
Your table should now look like the following.
Note: If links are not active in the table header, you can make them active by clicking the down arrow next to any item in the header and selecting Show All Drill Paths and Descriptions.
Drill through dimensions
1. Click the down arrow next to the All Src_General_Ledger row in the grid.
Note: Use to drill down (the node that you click is replaced by its children). Use to expand (the node that you click is displayed along with its children).
You see the Src_General_Ledger dimension expand, showing the costs for each item.
Analyzing OLAP Cubes 159

2. Delete empty rows and columns by clicking the View Properties button on the toolbar. Then click Optimize Results and uncheck the following two boxes:
• Show empty rows in results
• Show empty columns in results
You see that the empty rows and columns have been removed from the grid and bar chart.
3. Drill down on the All Src_Region row multiple times until you see the general ledger expenses for Eugene and Beaverton.
160 Chapter 16 • Use the SAS OLAP Analyzer

Both the grid and bar chart show the contribution of resource accounts to each product.
4. In the Data Dimensions window, add Dst_Channel to Column.
Analyzing OLAP Cubes 161

You see that the All_Channel dimension has been added to the grid and bar chart.
The table view should look like the following, showing the cost per channel for each product and service:
A very useful navigational aid is the ability to isolate portions of a table.
5. Right-click the Commercial Pick-up column under 2nd Day Guaranteed, and then select Isolate Commercial Pick-up from the pop-up menu.
The resulting table enables you to focus your attention on the Commercial Pick-up channel.
162 Chapter 16 • Use the SAS OLAP Analyzer

Don't forget that you can click the Back button to return to a previous view.
6. Click the Back button to return to the previous view in which all channels are displayed (Commercial Pick-up, Drop Box, Walk In)
Displaying Dimension AttributesIn addition to displaying dimensions in the rows and columns of an OLAP view, you can display dimension attributes.
Select the Fixed_Variable dimension attribute
1. Select Src_Fixed_Variable from the Data Dimensions window and click the add arrow to add to Row.
Notice that the dimension attribute, Fixed_Variable, appears in the Data Dimension window along with other cube dimensions.
Analyzing OLAP Cubes 163

2. Right-click the row heading, Level1, and then select Remove Src_General_Ledger from the pop-up menu.
This step is not necessary, but we are doing it to isolate the Fixed_Variable attribute.
Your OLAP view should now look like the following. Notice that costs are broken down into fixed costs and variable costs (and those that are neither fixed nor variable). Dimension attributes can serve the same purpose as structural dimensions.
164 Chapter 16 • Use the SAS OLAP Analyzer

Summary: Rows and ColumnsThe following picture shows, for each type of cube, the elements that are available in the OLAP Analyzer for adding to rows or columns.
Note: The picture shows the elements available for a cube containing stages, which is a feature that is not exhibited by the Parcel Express Tutorial, so this option is not available for the tutorial.
Saving OLAP ViewsDuring the analysis, changes that you make to the Grid View, Chart View, and Cube Explorer View are retained during a session, even when you return to the OLAP page after viewing other tabs. However, when you close the session or when you close Grid View, Chart View, or Cube Explorer View, your changes are lost.
To save these changes so that they will be available later, you must save the OLAP view. When you save an OLAP view, you save the layout and contents of the view. However, the window positions and states are not saved.
Save an OLAP view
1. Select Analysis ð Save View As.
You see the Save OLAP View As dialog box.
Analyzing OLAP Cubes 165

2. For Name, type Parcel Express Tutorial – Resource Contributions. Click OK.
3. On the toolbar, click the Go to Analysis Workspace icon.
You see a link to Parcel Express Tutorial – Resource Contributions in the OLAP Views list.
Using Measures in CubesA measure is a property or an attribute that you can use to analyze OLAP information. The default measure is Cost. Now, you will create a new OLAP view using different measures. You will also create a custom measure.
Working with measures in OLAP
1. Select File ð New ð OLAP View (or click New OLAP View).
2. Select the Parcel Express Tutorial model.
3. Select the Resource Contributions cube.
4. Click Finish.
The resource contributions cube for the Parcel Express Tutorial model opens.
5. From the Data Dimensions window, add the following Measures to Columns:
• Cost
• Profit
• Revenue
• UnitCost
• UnitProfit
• UnitRevenue
166 Chapter 16 • Use the SAS OLAP Analyzer

Note: If there are too many periods displayed in columns of the cube, you can remove AllPeriods from columns and then add just the period 2008 as shown in the following picture.
6. You see that the 2nd Day Guaranteed product is losing money, whereas the other two products are profitable.
7. Let's highlight the unprofitable product.
a. Click the Conditional Highlights button.
Analyzing OLAP Cubes 167

b. Click Add.
The Add Conditional Highlight window opens.
c. Select Profit as the item to be highlighted.
d. Select By range.
e. Select Is less than.
f. Select 0.00.
g. Click the Highlight tab.
h. Select white as the text color.
i. Select red as the background color, and click OK.
168 Chapter 16 • Use the SAS OLAP Analyzer

The display now appears as follows. Notice that the negative profit is displayed with a red background.
8. Click the Data Dimensions button to return to the Data Dimensions tab.
9. Add Dst_Channel to Row.
This will enable you to see whether this trend is similar across all channels. One of management's goals was to make a profit of at least 10% on the 2nd Day Guaranteed product, and at least 25% on all other products. SAS Cost and Profitability Management has shown that the company's profit picture is not what management expected. Competitive pressures forced the company to lower the price of their 2nd Day Guaranteed product, but it did not know that it was losing money on all products but the Walk In product.
Analyzing OLAP Cubes 169

Now, you will create a custom measure to calculate gross margin.
Create a custom measure
1. Click the Customized Items and Sets button.
2. Click New ð Calculated Measure.
You see Step 1 of the Create New Calculated Member.
3. For Name, type GrossMargin, and then click Next.
Leave Basic Analysis selected.
170 Chapter 16 • Use the SAS OLAP Analyzer

4. Select Ratio and Profit / Revenue, and then click Next.
5. Select Percent for the Format, and then click Next.
Note: The option Publicly, to all users at all times is available only for cubes in SAS OLAP Server. The option is not available for cubes in Microsoft SQL Server Analysis Services.
6. Review the summary, and then click Finish.
You see the profit margin of each product. Based on the stated goals of the company, the 2nd Day Guaranteed is underperforming significantly.
Analyzing OLAP Cubes 171

If you look at the Data Dimensions window, you can see that GrossMargin has been added to the list of available measures.
Exporting CubesAt any point during OLAP analysis, you can export the displayed data to a Microsoft Excel spreadsheet. When you export to Microsoft Excel, you are exporting only the data that is currently displayed, not the entire cube.
Export an OLAP cube
1. Display the OLAP data that you want to export to a Microsoft Excel spreadsheet.
2. Select Analysis ð Export to Excel.
You see a Microsoft Excel spreadsheet that contains the data that is currently displayed in the cube.
172 Chapter 16 • Use the SAS OLAP Analyzer

Using the Cube Explorer ViewNow, you will analyze the model by using the Cube Explorer View to get more information about the costs that are associated with each product. The management of Parcel Express has learned that margins on the 2nd Day Guaranteed product fall well below expectations. The SAS Cost and Profitability Management OLAP tool will help management assess why costs for that product are higher than costs for other products.
You will create a multi-stage contributions cube view and use the Cube Explorer View to explore costs.
Create a multi-stage contributions cube view
1. Select File ð New ð OLAP View (or click New OLAP View).
2. Select the Parcel Express Tutorial model.
3. Select the Parcel Express Multi-Stage cube.
4. Click Finish.
The multi-stage contributions cube for the Parcel Express Tutorial model opens.
Create a new Cube Explorer View
1. Select New ð Explorer.
You see the first page of the Create New Cube Explorer View.
2. Click Cost_Object_Products_and_Services ð All ð 2nd Day Guaranteed, and then click Next. You will open the Cube Explorer View at the 2nd Day Guaranteed product because that is the product whose costs you want to explore.
Using the Cube Explorer View 173

3. Select Cost and UnitCost as the measures to analyze, and then click Finish (we will skip the third step of applying filters).
Note: The following image shows Cost and UnitCost together.
The Cube Explorer View opens at the 2nd Day Guaranteed product.
Analyze the model in Cube Explorer View
174 Chapter 16 • Use the SAS OLAP Analyzer

1. Right-click 2nd Day Guaranteed and select Change To ð Cost_Object_Region ð Level3.
You see the regional costs that contribute to the 2nd Day Guaranteed product.
2. Because Eugene accounts for the larger part of costs (54.82%) of the 2nd Day Guaranteed product costs, drill down into Eugene to discover where those costs come from. Right-click Eugene and select Change To ð Cost_Object_Channel ð Level1.
You see that the Walk In channel contributes 52% to the costs of the 2nd Day Guaranteed product. Drill down into this channel to explore what accounts for its costs.
Using the Cube Explorer View 175

3. Right-click Walk In and select Change To ð Activity_Activities ð Level2.
The Land Distribution set of activities stands out as constituting 47.90% of costs.
Note: If the Land Distribution node is covered, you can use the mouse to slide the covering nodes away.
4. Right-click LandDistribution and select Change To ð Resource_General_Ledger ð Level1.
176 Chapter 16 • Use the SAS OLAP Analyzer

Now you can see that the overwhelming part of this cost is for wages in Eugene, which is a full 86%.
5. To confirm the finding that it is wages in Eugene that account for the high cost of the 2nd Day Guaranteed product, drill down on Beaverton for a comparison.
a. Right-click Beaverton and select Change To ð Cost_Object_Channel ð Level1.
b. Right-click Walk In and select Change To ð Activity_Activities ð Level2.
c. Right-click Land Distribution and select Change To ð Resource_General_ Ledger ð Level1.
Even though Wages account for a similar percentage of costs for the 2nd Day Guaranteed product in Beaverton, UnitCost for Beaverton is a fraction of UnitCost for Eugene, and the total cost in Beaverton is half of the total cost in Eugene.
If you could put the two branches of the tree together, the picture would look like the following. The unit cost of wages in Eugene for land distribution ($7.00) is much higher than the unit cost of wages in Beaverton ($1.90). These costs play an important role in accounting for the total costs of the 2nd Day Guaranteed product.
Using the Cube Explorer View 177

178 Chapter 16 • Use the SAS OLAP Analyzer

Chapter 17
Handling No-Dimension Accounts
Introduction . . . . . . . . . . . . . . . . . . . . . . . . . . . . . . . . . . . . . . . . . . . . . . . . . . . . . . . . . 179
Alternative Method . . . . . . . . . . . . . . . . . . . . . . . . . . . . . . . . . . . . . . . . . . . . . . . . . . . 181
Advantages of Using the Alternative . . . . . . . . . . . . . . . . . . . . . . . . . . . . . . . . . . . . . 184
IntroductionTo create an account (an intersection of dimension members), you must specify a dimension member from each dimension in a module. The following error message appears if you omit selecting a dimension member from a particular dimension.
However, you can omit specifying a dimension member from a particular dimension by selecting instead the “No” dimension member that the system automatically generates for each dimension. The “No” dimension member signifies that there is no value for that dimension. For example, in the cost object module of the Parcel Express Tutorial, you created an account for each product for which the product is not associated with any particular channel. And, for each channel, you similarly created an account for which the channel is not associated with any particular product. The following picture shows these accounts. You can see, for example, that the Drop Box x No <Products and Services> account has associated costs of $15,468.14. These are costs that are associated with the Drop Box channel and not associated with any product.
179

You should also notice, as shown below, that the Drop Box x No <Products and Services> account is grouped with ordinary accounts in which the Drop Box channel is associated with a particular product.
This mixing of accounts has the somewhat unintuitive results that the total for the Drop Box roll-up account, $283,937.13, does not include the costs that are associated with the Drop Box x No <Products and Services> account.
The reason for not including the full cost is that doing so would result in double counting. As shown below, the cost of the No <Products and Services > account is distributed to the individual Region x Channel x Product accounts. Rolling up the full cost would result in double counting.
180 Chapter 17 • Handling No-Dimension Accounts

This chapter describes an alternative method for organizing No-dimension accounts that avoids this counterintuitive result and has even more significant advantages that are described later.
Alternative MethodThe alternative method entails the following steps for the module that contains No-dimension accounts. In the Parcel Express Tutorial, it is the cost object module that contains No-dimension accounts.
Create an additional dimension and its dimension members
1. Create an additional dimension. Name this dimension Cost Object Type.
2. Inside the Cost Object Type dimension, create a dimension member for each dimension for which you want a No-dimension account.
For the Parcel Express Tutorial, that means creating the following dimension members:
• A dimension member for channels that are not associated with any product
Name this dimension member Region_Channel because it is to contain accounts that are the intersection of Region x Channel x No <Products and Services>.
• A dimension member for products that are not associated with any channel
Name this dimension member Region_Product because it is to contain accounts that are the intersection of Region x Product x No <Channel>.
3. Inside the Cost Object Type dimension, create a dimension member to contain No-dimension accounts.
Name this dimension member Sales. It contains accounts that are the intersection of Region x Channel x Products and Services. These accounts represent the last stop in the model. When the final product is sold, you know the exact Product x Channel x Region intersection. All costs, even indirect product costs, are assigned to a final intersection of all dimensions.
The following picture contrasts the original dimensions in the Parcel Express Tutorial with the alternative method being described in this chapter that entails an additional dimension and its dimension members.
Alternative Method 181

Create accounts using the new dimension members
Create the following accounts for Beaverton and Eugene:
Dimension Member Accounts
Region_Channel Commercial Pick-up x No <Products and Services>
Drop Box x No <Products and Services>
Walk In x No <Products and Services>
Region_Product No <Channel> x 2nd Day Guaranteed
No <Channel> x Overnight Express
No <Channel> x Standard Ground
182 Chapter 17 • Handling No-Dimension Accounts

Dimension Member Accounts
Sales Commercial Pick-up x 2nd Day Guaranteed
Commercial Pick-up x Overnight Express
Commercial Pick-up x Standard Ground
Drop Box x 2nd Day Guaranteed
Drop Box x Overnight Express
Drop Box x Standard Ground
Walk In x 2nd Day Guaranteed
Walk In x Overnight Express
Walk In x Standard Ground
The following picture shows the accounts to be created in the cost object module under Beaverton compared to the original accounts in the Parcel Express Tutorial. The same accounts are created under Eugene.
Alternative Method 183

Advantages of Using the AlternativeRecall that mixing No-dimension accounts with ordinary accounts has the somewhat counter intuitive effect that the cost in a roll-up account does not include the cost of No-dimension accounts.
Another aspect of this same phenomenon is the fact that mixing accounts results in the non-display of totals for No-dimension accounts. For example, in the top part of the following picture, you can see that in both the original cost object hierarchy and in the alternative cost object hierarchy, the total is displayed for products that are not associated with any channel ($1,998,820.25). However, in the bottom part of the picture, you can see that in the original cost object hierarchy, there is no total that is displayed for the cost of channels that are not associated with any product. By contrast, in the alternative cost object hierarchy in which No-dimension accounts are grouped together, you can easily see that the total cost for channels not associated with any product is $128,901.18. Thus, it is easier to trace costs that are associated with a No-dimension account for a specific dimension.
184 Chapter 17 • Handling No-Dimension Accounts

An even more significant advantage is that the cost flow from No-dimension accounts to other accounts is more clearly visible. For example, in the following picture, you can see how the cost ($87,652.80) of the account Beaverton x Walk In x No<Products and Services> contributes to the total cost of the Walk In channel.
Advantages of Using the Alternative 185

In the following picture, you can also see that product costs that are not related to any channel are also passed on to the Walk In channel. However, as you might expect, not all these costs can be attributed to the Walk In channel.
186 Chapter 17 • Handling No-Dimension Accounts

For example, to see where the $401,573.75 for the No <Channel> x 2nd Day Guaranteed account goes, expand the roll-up accounts for Commercial Pick-up x 2nd Day Guaranteed and Drop Box x 2nd Day Guaranteed, as shown in the following picture. The following picture shows how cost flows to the different Beaverton 2nd Day Guaranteed accounts for each of the channels.
Advantages of Using the Alternative 187

The following table summarizes the cost flows shown in the preceding picture:
Source/Dest Account Cost
Source Region_Product x Beaverton x No <Channel> x 2nd Day Guaranteed $401,573.75
Destination Sales x Beaverton x Commercial Pick-up x 2nd Day Guaranteed $136,496.86
Destination Sales x Beaverton x Drop Box x 2nd Day Guaranteed $61,423.59
Destination Sales x Beaverton x Walk In x 2nd Day Guaranteed $203,653.31
To see in more detail where the product costs that are not associated with a particular channel flow, you can do the following:
1. Display the Right Assignments Pane.
2. Select the No-dimension account No <Channel> x 2nd Day Guaranteed for Beaverton.
3. Click Show Right.
4. In the right assignments pane, display the Driver Cost (DrvCost) column.
188 Chapter 17 • Handling No-Dimension Accounts

The resulting display is shown below. You can see that the total for Beaverton x Walk In x 2nd Day Guaranteed ($222,273.37) is the total of Walk In expenses not related to any product ($18,620.06) and 2nd Day Guaranteed expenses not related to any channel ($203,653.31). And, similarly, the total for Beaverton x Walk In ($1,191,263.92) is the total of the following roll-up accounts:
• Beaverton x Walk In x 2nd Day Guaranteed ($222,273.37)
• Beaverton x Walk In x Overnight Express ($336,220.46)
• Beaverton x Walk In x Standard Ground ($632,770.10).
Advantages of Using the Alternative 189

190 Chapter 17 • Handling No-Dimension Accounts

Chapter 18
Finishing Up
Parcel Express Conclusions . . . . . . . . . . . . . . . . . . . . . . . . . . . . . . . . . . . . . . . . . . . . 191
Additional Features . . . . . . . . . . . . . . . . . . . . . . . . . . . . . . . . . . . . . . . . . . . . . . . . . . 191
What to Do Next . . . . . . . . . . . . . . . . . . . . . . . . . . . . . . . . . . . . . . . . . . . . . . . . . . . . . 192
Parcel Express ConclusionsNow that you have created a SAS Cost and Profitability Management model and you have learned the basics of model analysis, you can begin designing and implementing your own models.
Using SAS Cost and Profitability Management, Parcel Express was able to see how costs flowed out of resource accounts to activities, and how costs flowed from activities to cost objects. In modeling the flow of costs through its business processes, the company learned that the 2nd Day Guaranteed product, which managers had assumed was not performing as well as the other products, was performing far worse than expected, and was actually losing money across all channels.
An OLAP analysis of the model showed that the percentages of costs that flowed from resource and activity accounts to cost object accounts was consistent across all product categories. Therefore, pricing seemed to be the primary reason for the underperformance. Another revelation was the amount of profit that was being made on the other two products.
Management must now decide how much of a loss, if any, is acceptable for the 2nd Day Guaranteed product. How will a price change affect volume? Is the higher profit on other products enough to offset the loss on the 2nd Day Guaranteed product?
To assess the impact of changes to the pricing structure, Parcel Express can use SAS Cost and Profitability Management to model possible future scenarios.
Additional FeaturesMany SAS Cost and Profitability Management features are not covered in this tutorial, or they are only briefly covered. These features include the following:
• importing data from other information systems
191

• importing models from databases, XML, or Oros
• exporting models to databases or XML
• sharing models
• managing the ownership and permissions for items
• publishing period/scenario associations
• managing item properties
• selecting currencies and exchange rates
• working with internal units
• creating stage attributes
• variable quantity drivers
• assigned idle cost
• allocated cost
• using the SAS Services API
To build effective and complete models for your organization, you will want to use some of these additional features. Because your models will be much larger than the Parcel Express Tutorial model, you might want to read about model size and performance in the online Help. You can also consult the SAS Cost and Profitability Management: User's Guide at http://support.sas.com/documentation/onlinedoc/abm/.
What to Do NextIf you felt comfortable using the basic tools and techniques in this tutorial to build the Parcel Express Tutorial model, then use them on a simple project of your own.
SAS has a variety of products, including videotapes and training classes, that can help you learn more about Cost and Profitability costing, management, and budgeting. In addition, SAS can help you build models for your organization. If you need additional information, contact your on-site SAS support personnel.
192 Chapter 18 • Finishing Up