
Getting Started with EPSS: A Guide for Evaluators Using ... Guide for Evaluators Using the Rhode...
26
i Getting Started with EPSS: A Guide for Evaluators Using the Rhode Island Model Rhode Island Department of Education: Office of Educator Quality
Transcript of Getting Started with EPSS: A Guide for Evaluators Using ... Guide for Evaluators Using the Rhode...

i
Getting Started with EPSS:
A Guide for Evaluators Using the Rhode Island Model
Rhode Island Department of Education: Office of Educator Quality

Table of Contents
What is EPSS? ................................................................................................................................... 3
EPSS Navigation ................................................................................................................................ 3
The Evaluator Dashboard (My Caseload) ........................................................................................... 4
Evaluator Caseload Management ...................................................................................................... 5
Beginning-of-Year Tasks .................................................................................................................... 7
Check Cycle Years .......................................................................................................................... 7
Schedule Beginning-of-the-Year (BOY) Conferences ....................................................................... 8
View Professional Growth Goals and Performance Improvement Plans .......................................... 8
Review and Approve Student Learning Objectives .......................................................................... 8
Throughout-the-Year Tasks ............................................................................................................... 9
Review/Upload Artifact Evidence .................................................................................................. 9
Schedule and Complete Classroom Observations or School Site Visits ............................................ 9
Add Data to the Professional Responsibilities Form ...................................................................... 10
Understand Optional Forms ......................................................................................................... 10
End-of-Year Tasks ........................................................................................................................... 10
Scoring Forms .............................................................................................................................. 10
Using the Student Learning Results and Scoring Form .................................................................. 11
Final Effectiveness Rating Report (FERR) ...................................................................................... 11
Running a Rubric Explorer Report ................................................................................................ 11
Looking Deeper into Component Scores Using Rubric Explorer ..................................................... 17
Ongoing Review of Component Scores to Highlight Strengths and Needs ......................................... 18
Using Caseload Detail View ............................................................................................................. 18
Using Caseload Detail View to Email ............................................................................................ 21
Using the Trend Explorer ................................................................................................................. 23
Online EPSS Help Resources ............................................................................................................ 26

3
What is EPSS? The Educator Performance and Support System (EPSS) is an online statewide data system created using
funds from Rhode Island’s Race to the Top Grant. The EPSS plays an important role in furthering RIDE’s
long-term commitment to support educator evaluation focused on professional growth and student
learning.
The EPSS captures all critical information associated with teacher, support professional, and
administrator evaluations and streamlines the process for both educators and evaluators. The EPSS
provides access to all forms, components, and scoring features required for implementation, as well as,
guidance to support the evaluation process.
RIDE currently collects final scores for Professional Practice: Classroom Environment, Professional
Practice: Instruction, Professional Responsibilities, Student Learning, and a Final Effectiveness Rating.
Individual forms contained in EPSS are confidential and only accessible by the educator, evaluator, and
district level administration.
EPSS Navigation There are several tasks that should be completed at the start of the school year. These include: signing
in to the RIDE portal and accessing EPSS, confirming that your user information is correct in EPSS, and
familiarizing yourself with the evaluator dashboard (i.e. “My Caseload”).
Log into EPSS via the RIDEmap Portal
1. https://ridemap.ride.ri.gov 2. Click on EPSS 3. Refer to the grey banner beneath the RIDE logo to confirm your name, district and
building.

4
The Evaluator Dashboard (My Caseload) The evaluator dashboard is where you can check the status of evaluations, view individual evaluations,
generate reports, and manage the system.
1. Use the Left Navigation Bar to access links to EPSS reports and to school-level and LEA-Level reference documents uploaded by your school and/or LEA.
2. Use the Process View to see a high level status of all educators within your purview with many filter and sort options to manage evaluations. Use the “Last name” box to quickly find a specific educator.
3. Select an educator from the list to see that user’s Evaluation profile and access designated components/forms in the user’s evaluation cycle below.
4. Use the Tools Section on the left navigation bar to add forms to a user’s profile or to assign rights to an evaluator for all educators in their building.
3 Evaluation
Profile
4 Tools Section
1
Reports
2 Process View
5
Evaluator Caseload Management Each evaluator’s caseload will be populated with the appropriate users to enable evaluators to participate in the evaluation process of assigned educators. Please note that you will not see the My Caseload tab until you have at least one person assigned to your caseload. Depending on your role, your caseload will either be automatically populated by RIDE Data Mart and then adjusted by your district’s designated EPSS District Configuration Administrator (DCA) or the DCA will assign your entire caseload.
Assigning Your Caseload (for Principals only) Building principals may also assign their own caseload as long as educators already have roles in their building.
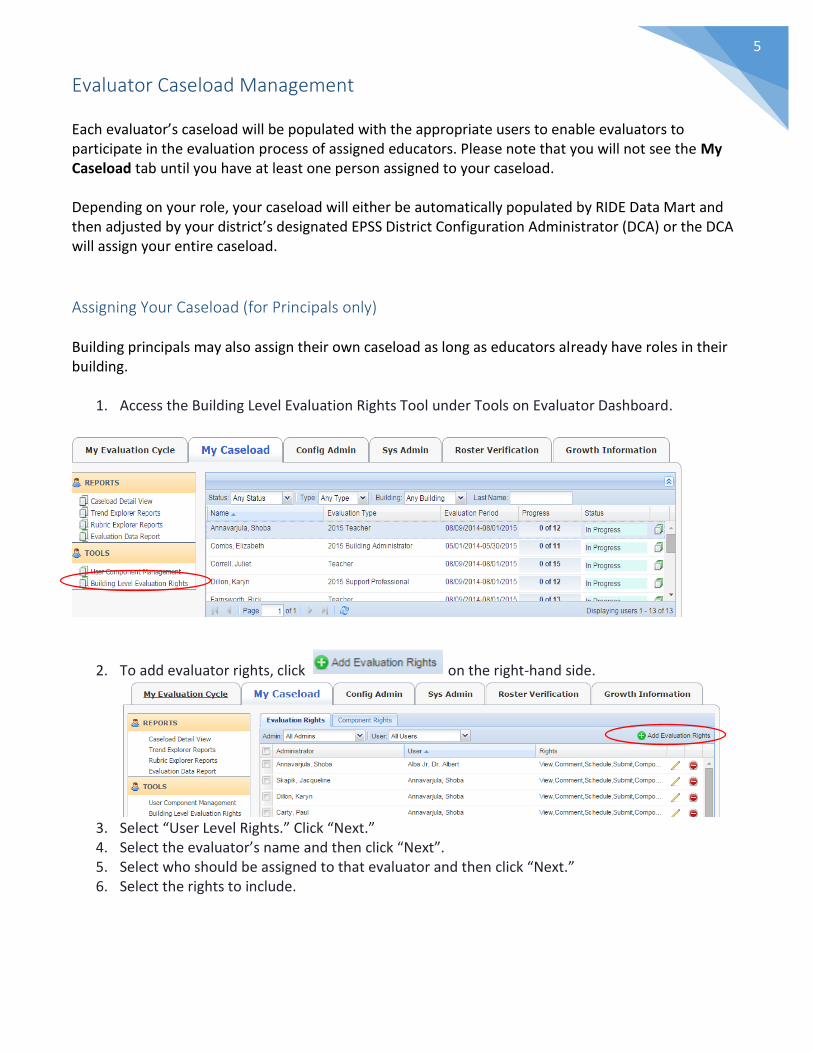
1. Access the Building Level Evaluation Rights Tool under Tools on Evaluator Dashboard.
2. To add evaluator rights, click on the right-hand side.
3. Select “User Level Rights.” Click “Next.” 4. Select the evaluator’s name and then click “Next”. 5. Select who should be assigned to that evaluator and then click “Next.” 6. Select the rights to include.

6
Accessing an Educator’s Evaluation Note that you may have varying degrees of access to participate in the evaluation process for the educators on your caseload. For example, a principal may have full access to View, Comment, Submit (edit) forms for all educators in the building while a complimentary evaluator may have rights to View and Comment on specific components of the process for specified users. 1. Use the Process View (located in the top half of the “My Caseload” tab) as a high level status
overview of the educators within your caseload.
2. Select a user in the Process View to reveal that user’s Evaluation Profile in the bottom half of the
My Caseload tab. The Evaluation Profile shows all components and forms in that user’s evaluation cycle.
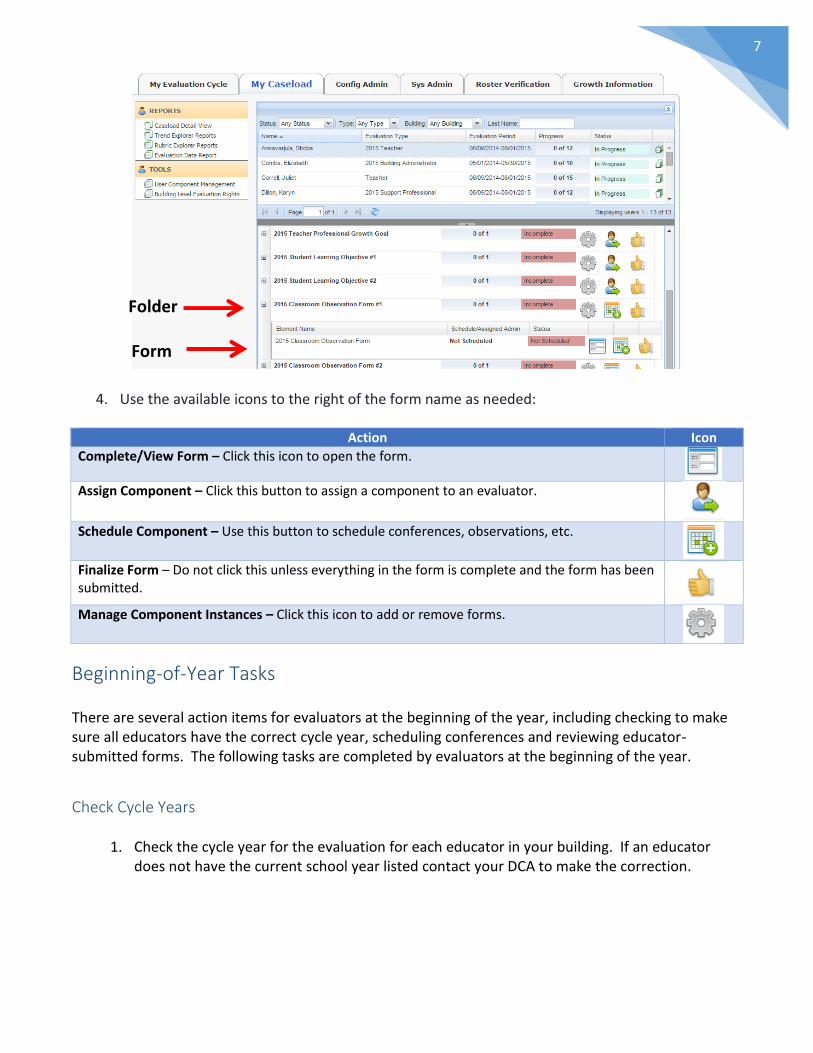
3. Expand a component using the + symbol to the left of the component name to view the form(s) within.
7
4. Use the available icons to the right of the form name as needed:
Action Icon
Complete/View Form – Click this icon to open the form.
Assign Component – Click this button to assign a component to an evaluator.
Schedule Component – Use this button to schedule conferences, observations, etc.
Finalize Form – Do not click this unless everything in the form is complete and the form has been submitted.
Manage Component Instances – Click this icon to add or remove forms.
Beginning-of-Year Tasks There are several action items for evaluators at the beginning of the year, including checking to make sure all educators have the correct cycle year, scheduling conferences and reviewing educator-submitted forms. The following tasks are completed by evaluators at the beginning of the year.
Check Cycle Years
1. Check the cycle year for the evaluation for each educator in your building. If an educator does not have the current school year listed contact your DCA to make the correction.
Folder
Form

8
Schedule Beginning-of-the-Year (BOY) Conferences From an educator’s Evaluation Profile, expand the Beginning-of-the –Year (BOY) component, in order to reveal the Schedule Icon adjacent to the BOY form to schedule the conference.
View Professional Growth Goals and Performance Improvement Plans Click on the Complete/View Form icon to review an educator’s submitted Professional Growth Goal (shown below) or Performance Improvement Plan.
Review and Approve Student Learning Objectives Expand the Student Learning Objective component to access the Student Learning Objectives form. Evaluators will need to indicate on the bottom of the form whether the Priority of Content, Rigor of Target and Quality of Evidence are Acceptable or Need Revisions. If they are acceptable the evaluator submits the form. If they need revision the evaluator should save the form and notify the educator that the SLO needs revision. Complete instructions can be found on the bottom of the form.

9
Throughout-the-Year Tasks Evaluators will need to complete tasks throughout the year, including reviewing and uploading
evidence for Professional Practice and Professional Responsibilities.
Review/Upload Artifact Evidence
1. Click on the Portfolio icon to the far right of a user’s entry in the Process View (on the My Caseload tab).
2. View a list of any artifacts that have been previously uploaded by clicking Artifact Files.
3. Click on the Download icon that shows the file format to open an artifact.
4. Click the Add Artifact button to upload an artifact.
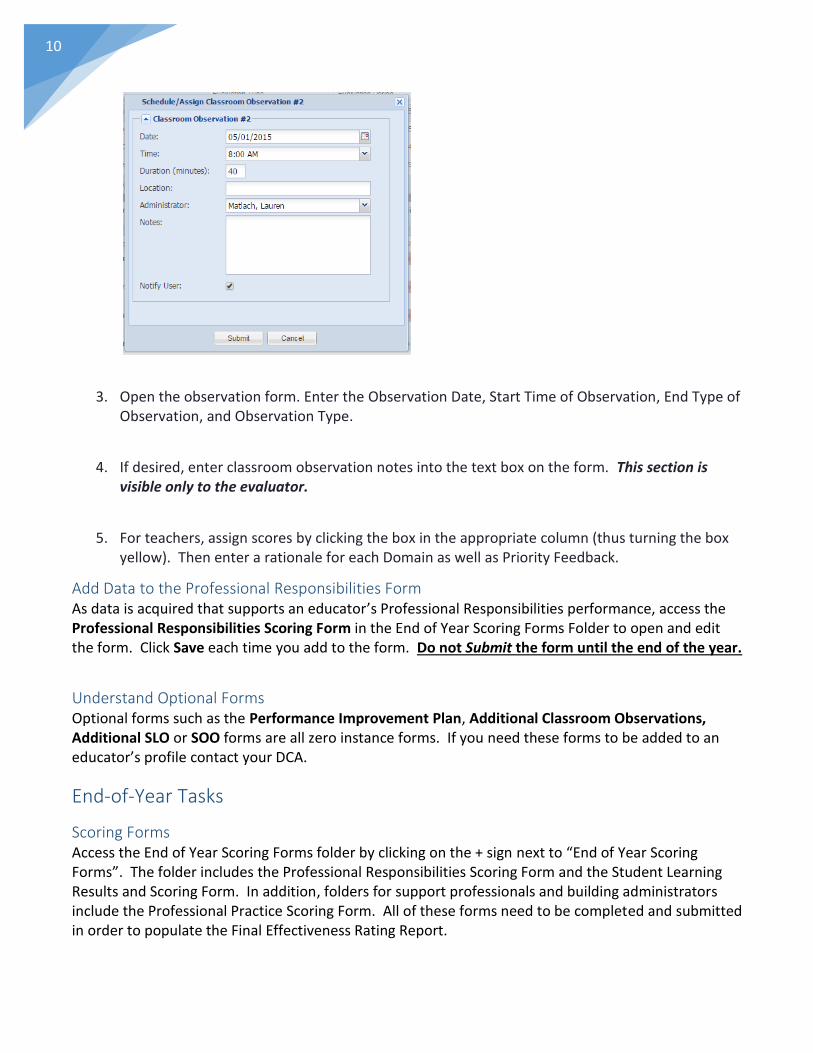
Schedule and Complete Classroom Observations or School Site Visits 1. As needed, go to an individual’s Evaluation Profile in order to expand components to access,
schedule, and complete Classroom Observations, School Site Visits or Observations of Practice.
2. Click the Schedule icon. This presents a pop-up window asking for date, time, and location. If delegating to another evaluator, select his/her name using the Administrator field. If this is an unannounced observation, deselect Notify User to prevent an e-mail notification about this upcoming event.
10
3. Open the observation form. Enter the Observation Date, Start Time of Observation, End Type of
Observation, and Observation Type.
4. If desired, enter classroom observation notes into the text box on the form. This section is visible only to the evaluator.
5. For teachers, assign scores by clicking the box in the appropriate column (thus turning the box yellow). Then enter a rationale for each Domain as well as Priority Feedback.
Add Data to the Professional Responsibilities Form As data is acquired that supports an educator’s Professional Responsibilities performance, access the Professional Responsibilities Scoring Form in the End of Year Scoring Forms Folder to open and edit the form. Click Save each time you add to the form. Do not Submit the form until the end of the year.
Understand Optional Forms Optional forms such as the Performance Improvement Plan, Additional Classroom Observations, Additional SLO or SOO forms are all zero instance forms. If you need these forms to be added to an educator’s profile contact your DCA.
End-of-Year Tasks
Scoring Forms Access the End of Year Scoring Forms folder by clicking on the + sign next to “End of Year Scoring Forms”. The folder includes the Professional Responsibilities Scoring Form and the Student Learning Results and Scoring Form. In addition, folders for support professionals and building administrators include the Professional Practice Scoring Form. All of these forms need to be completed and submitted in order to populate the Final Effectiveness Rating Report.

11
Using the Student Learning Results and Scoring Form Educators should enter their results in the Student Learning Results and Scoring Form and then click Save & Notify to alert the evaluator the data has been entered. The evaluator then scores the form using the rubric and clicks Submit. The Final Effectiveness Rating Report will not populate until this form has been submitted.
Final Effectiveness Rating Report (FERR) The FERR will populate once all of the scoring forms are completed. Evaluators should check to make sure all scores are appearing and the click Submit. If an evaluator finalizes the form without clicking Submit first, no score will appear.
Running a Rubric Explorer Report Professional Practice and Professional Responsibilities Rubric scores can be reviewed via the Rubric
Explorer Reports link for all evaluation types. The report can be produced to examine the rubric scores
of the district as a whole, by schools, by evaluators, by groups of educators or by individual educators.
1. Log into your EPSS Dashboard. On your My Caseload tab click on Rubric Explorer Reports.

12
2. Set the dates to reflect the school year you would like to view.
3. Set the report criteria.
In this example, the evaluation type selected is teacher, but a report could be run to examine the rubric scores of any evaluation type.
4. Select the Component(s) to be reviewed in the report. You may only run the rubric explorer for components that align to the Professional Practice or Professional Responsibilities rubrics. For the purpose of this example Observations 1, 2, 3 have been selected so a report can be produced that reflects the rubric scores for teacher evaluations on all three observations. Due to the changes in the aligned Professional Practice Rubric, there are multiple selections for each observation. Select all of the components you wish to view and the date will filter the correct information.

13
5. Choose the rubric that aligns to the components you wish to explore. Once the components (observation (s) or professional foundations) have been selected the screen will prompt you to choose a rubric. You may choose to select one or both of the domains of the rubric to be included in the report. For this example both Domain 2 and Domain 3 have been selected. The report will reflect rubric scores for both domains.
6. Select the group of educators to include in the report. All users in your caseload are automatically included by default. You can narrow the focus of the report by selecting/deselecting teachers, by content area or grade level for example, using the drop down menu. You can also narrow the focus by choosing an evaluator or group of evaluators using the Admin(s) drop down menu or by running the report for a specific school or set of schools using the Building(s) drop down menu. *Note: You may only view and filter report data based on your caseload.

14
7. With all the criteria for the report selected, click on the icon to run the report.

15
8. A heat map report will open.
9. Hover over any component and score to see the names of the teachers who earned that
score. Names will appear in a pop-up box.
10. Click on the component/score box for a printable list of teachers who earned that score.
11. Save and export the file in the desired format by clicking the buttons at the top of the report.

16
Action Icon
View PDF – Click this icon to save and/or print the report.
Export to Excel – You can export the text of the report into an Excel document. Once in Excel, the information can be further sorted using the data sort functionality within Microsoft Excel.
Save Configuration – Click this icon to save the report for future reference within EPSS. A pop-up menu will appear which will allow you to name and save your report. Once you have saved your report, you can access it using the drop-down menu under My Reports.
Finalize Form – Do not click this unless everything in the form is complete and the form has been submitted.
Manage Component Instances – Click this icon to add or remove forms.

17
12. Access saved files under My Reports in Rubric Explorer.
Analyzing Component Scores Using Rubric Explorer By selecting which educators, evaluators, or schools to include a report can be created that compares
the scores of one group of educators, evaluators, or schools to another like group.
The Append to existing report functionality within Rubric Explorer enables you to run a report to
compare rubric scores from School A to School B, teachers in one grade or subject area to another
grade or subject area or the scores given by one evaluator to another evaluator. Follow the directions
given in this packet to run one report; choose the first school, group of teachers, or evaluator and then
click the view icon to produce the first report. Afterwards scroll to the top of the page and click the box
for Append to existing report (see image below) , then select the criteria for the next report by
choosing the school, group of teachers, or evaluator you wish to compare to the first group. Once you
have selected your criteria, click the view icon to create the comparison report. The report will have
the information from the first set of criteria followed by the information from the second set of
criteria. Repeat this process to add another group of teachers, school or evaluators.

18
Ongoing Review of Component Scores to Highlight Strengths and Needs
The Rubric Explorer Report tool can be used throughout the year to highlight strengths and areas in
need of improvement to help in planning professional development opportunities focused on teaching
practices aligned to the components. Filtering tools on the Rubric Explorer allow for a specific focus of
the reports. Using the Append to existing report functionality will allow reports that compare first
observations to later observations. These reports can show growth in component scores and/or the
impact professional development may be having on component scores.
Using Caseload Detail View Once you are logged onto your caseload page click on Caseload Detail View.
When you first select Caseload Detail View your entire caseload and all of the individual components
will appear as the default view.
You may sort the Caseload Detail View by any/all of the criteria listed in the column headers in the
default view.

19
You may reduce the number of columns in your view by selecting the down arrow in any column, and
sliding over the Column menu. As shown in this image each column header can be
selected/deselected. Columns such as Eval Start Date and Eval End Date are the same for all
educators and can be deselected to make for a more manageable view
.
This image shows a more condensed view of the caseload and components. From this view an
evaluator may open forms, schedule observations and/or conferences and finalize components.

20
Evaluators may also create and save views for particular components of the evaluation. Each column’s
drop down menu contains a column specific filter menu. In this view the filter for the Element column
can be used to create a view for a particular element. As an example an evaluator could create a view
for Observation 1. In this view the evaluator would see only the components of Observation 1 for
his/her caseload. From this view the evaluator could schedule the observation, contact the educator,
open the observation form, or finalize the component.
Evaluators can filter by the Status column using the drop-down menu in order to keep track of the
status of the component.
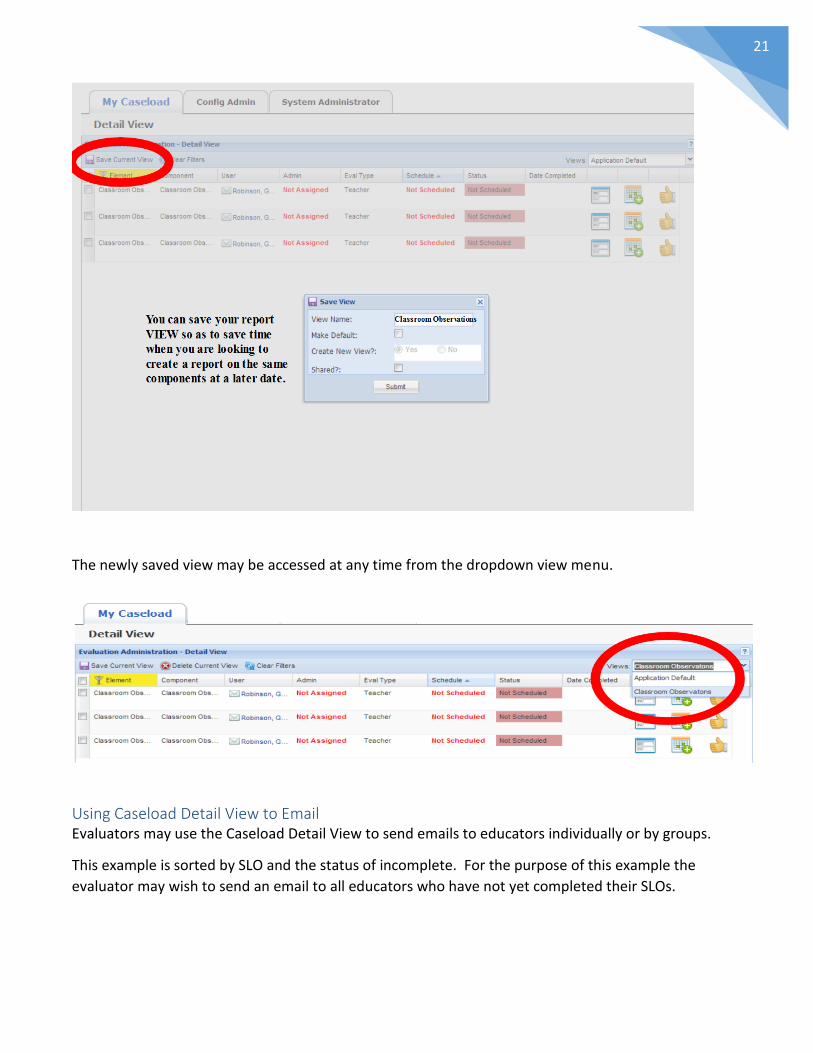
Each view created may be saved for ongoing access. Once the specific view has been created an
evaluator may click on the Save Current View Icon to open the save dialogue box.
21
The newly saved view may be accessed at any time from the dropdown view menu.
Using Caseload Detail View to Email Evaluators may use the Caseload Detail View to send emails to educators individually or by groups.
This example is sorted by SLO and the status of incomplete. For the purpose of this example the
evaluator may wish to send an email to all educators who have not yet completed their SLOs.

22
Use the check boxes to select the educators you wish to email in a group message or click on the
envelope next to the educators name to send a personal email. Select the check box to the left of the
Element column to send an email to all educators in that view.
Select the drop down menu on the Actions tab and then click on email selected users.
This action will open an email from your email provider with the addresses of the users in the BCC row
for privacy.
Simply type in your subject line and content and send to all selected educators at one time.

23
Using the Trend Explorer
The Trend Explorer displays data that is collected through single or multiple response items (e.g., drop-down lists, check boxes, etc.) by representing the information in a graphical format (a one-dimensional heat map), which portrays the frequency with which each response was selected across users, buildings, or the district as a whole. The user can specify a date to see a snapshot or indicate a time frame to see progress and growth over time for a particular item.
1. Click on the Trend Explorer Report under Reports on the My Caseload Tab:
2. Next, use the calendar fields to select the Start Date and End Date parameters for the report.
3. From the left side of the Filters section, use the drop down menus to select the desired Evaluation Types, Components, and Forms as well as the questions from which you would like the report to pull data.

24
4. Use the down arrows on the right to filter by User, Building, Department, Grade, Group and/or Position Type. The filter options available to you will depend on your role and the permissions assigned to you.
5. From the Options section, choose any or all of the following:
Show Counts: Displays, in "x out of y" format, the frequency with which a particular response was selected out of the total number of occurrences possible. Show Percentages: Displays, in percentage format, the frequency with which the response was selected out of the total number of occurrences possible. Show Values in Color: Offers a number of choices for depicting frequency using colors.
Include "In-Progress": Includes data from any forms that have been initiated, but not completed and Submitted. Group By: Indicates how the data will be displayed over time.

25
6. Click View to see the report on your screen.
Below the report, click View PDF to create a PDF version of the report or Export to Excel to create
a spreadsheet of the data. Click Save Configuration to save report for use at later date.

26
Troubleshooting with EPSS: Help Resources This section provides a list of common questions related to using EPSS and highlights resources where to get help if issues arise.
1. I’ve submitted the Final Effectiveness Rating Report, but one or more scores or ratings are missing from the Final Effectiveness Rating Report.
It is critical that you click Submit the End of Year Scoring Reports first because the Final
Effectiveness Rating Report relies on data from these forms. If scores appear to be missing,
click Edit Form at the bottom of the Professional Responsibilities Scoring Form,
Professional Practice Scoring Form, and Student Learning Results and Scoring Form, and
then submit them again. Then, open the Final Effectiveness Rating Report, click Edit Form
and submit. Many times this will correct any errors and pull in the correct data.
This error also sometimes occurs if a form is finalized before it is submitted. Please make
sure to click Submit at the bottom of the form before clicking the in the user’s
Evaluation Profile.
For more information and to access training guides, please visit RIDE’s official EPSS website: http://www.ride.ri.gov/TeachersAdministrators/EducatorEvaluation/EducatorPerformanceandSupportSystem(EPSS).aspx